


Contents
Examples of how Omada uses ports
Configuration of port forwarding
Change the ports used by Omada SDN Controller
Introduction
Programs use specific ports to send or receive data via a network. An Omada SDN Controller or Omada Discovery Utility uses the ports on the host, while an Omada hardware controller uses the ports on its hardware.
Ports fall into two groups: TCP (Transmission Control Protocol) ports and UDP (User Datagram Protocol) ports. Port numbers are limited, ranging from 1 to 65535 among each group. Such a fact gives rise to a port collision when a program tries to use a certain port on a host, only to find another program occupies the port.
This article explains the default ports used by Omada Controller v5.0.15 and later and Omada Discovery Utility v5.0.8 and later, as well as how to configure port forwarding and change supported Controller ports.
Requirements
- Omada Controller (software controller/ hardware controller)
- Omada Discovery Utility
Overview of default ports
The following table lists the default ports used by Omada Controller and Omada Discovery Utility and explains when each port is required.
|
Ports |
Omada Hardware |
Omada Software |
Omada Discovery |
When the port is required |
|
Web Management and Portal |
||||
|
TCP 80 |
✓ |
|
|
When accessing the management page of an Omada Hardware Controller over HTTP. |
|
TCP 443 |
✓ |
|
|
|
|
TCP 8088 |
✓ |
✓ |
|
|
|
TCP 8043 |
|
✓ |
|
|
|
TCP 8044 |
✓ |
✓ |
|
Before Controller v6.3: Devices use the Controller management port for firmware upgrades. (TCP 8043 by default for Omada Software Controller) |
|
TCP 8843 |
✓ |
✓ |
|
When clients access the Portal page over HTTPS. |
|
Device Discovery, Adoption, Management |
||||
|
UDP 29810 |
✓ |
✓ |
✓ |
Used by Omada Controller and Omada Discovery Utility to discover Omada devices. |
|
TCP 29814 |
✓ |
✓ |
✓ |
Used by Omada Controller and Omada Discovery Utility to manage Omada devices running firmware fully adapted to Omada Controller v5*. |
|
TCP 29815 |
✓ |
✓ |
|
Starting from Controller v5.9, used by Omada Controller to receive device information, packet capture files, and DPI application statistics from Omada devices. |
|
TCP 29816 |
✓ |
✓ |
|
Starting from Controller v5.9, used by Omada Controller to establish remote terminal sessions with Omada devices. |
|
TCP 29811/29812 |
✓ |
✓ |
✓ |
Used by Omada Controller and Omada Discovery Utility to manage Omada devices running firmware fully adapted to Omada Controller v4*. |
|
TCP 29813 |
✓ |
✓ |
|
Used when upgrading the firmware of Omada devices running firmware fully adapted to Omada Controller v4*. |
|
TCP 29817 |
✓ |
✓ |
✓ |
Starting from v6.0, Omada Controller uses TCP port 29817 to collect and receive device monitoring data. |
|
Initialization Check |
||||
|
UDP 27001 |
✓ |
✓ |
|
Used to allow the Omada app to discover an Omada Controller on the same network. |
|
Database Access |
||||
|
TCP 27217 |
|
✓ |
|
Used by Omada Software Controller to access the MongoDB database. |
|
Internal Communication |
||||
|
TCP 25 |
✓ |
|
|
Used for internal communication between backend processes and Nginx on hardware controllers. This port is not exposed externally. |
|
Cluster Mode |
||||
|
TCP 8090 |
✓ |
✓ |
|
Starting from Controller v5.15.20, used for HTTPS communication between Controller cluster nodes. This port is used only when cluster mode is enabled and cannot be changed. |
|
TCP 9098 |
✓ |
✓ |
|
Starting from Controller v5.15.20, used for gRPC communication between Controller cluster nodes. This port cannot be changed. |
|
RADIUS |
||||
|
UDP 1812 |
✓ |
✓ |
|
Default RADIUS authentication port. Used by the built-in RADIUS server and as the default authentication port for external RADIUS servers. The port can be changed on the RADIUS Server configuration page. |
|
UDP 1813 |
✓ |
✓ |
|
Default RADIUS accounting port. Used by the built-in RADIUS server and as the default accounting port for external RADIUS servers. The port can be changed on the RADIUS Server configuration page. |
Note:
New port in Controller v6.0: TCP 29817 for device monitoring data
Starting from Controller v6.0, TCP port 29817 is used for the new device data collection and reporting mechanism. This port must be open between Omada devices and the Controller.
New port in Controller v6.3: TCP 8044 for device firmware upgrades
Before Controller v6.3, devices use the Controller management port for firmware upgrades (TCP 8043 by default for Omada Software Controller). Starting from v6.3, ES devices use TCP port 8044 for firmware upgrades. Starting from v6.4, all devices use TCP port 8044. This port must be open between the devices and the Controller.
OLT discovery port
The factory-installed discovery port for the OLT is 29810. It can be directly adopted by the local controller.
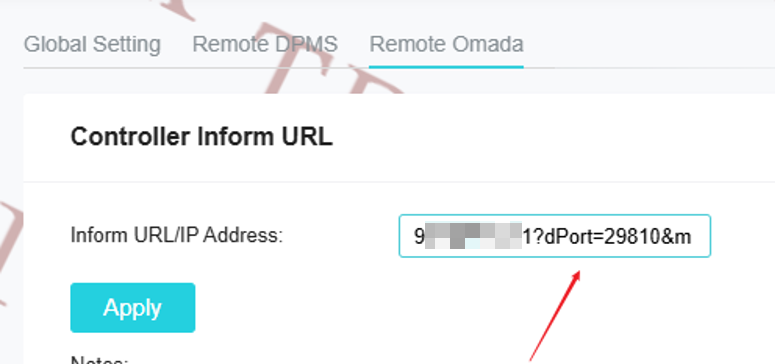
To adopt across a Layer 3 network, such as a CBC, you need to configure an inform URL. The OLT's discovery port can be changed by modifying the dPort in the inform URL. If the Omada inform URL does not specify a dPort, the default discovery port is 29810.
Examples of how Omada uses ports
The following example illustrates how Omada Controller and Omada Discovery Utility use UDP port 29810 to discover devices.
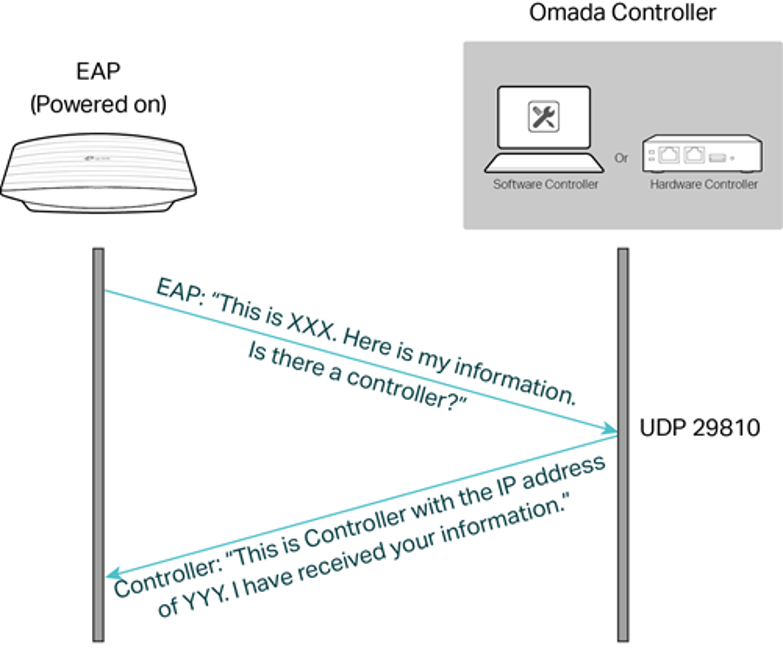
Step 1: The device sends a discovery message.
When an EAP does not know the IP address of the Controller, it broadcasts a discovery message through UDP port 29810 on the local network.
Step 2: The Controller responds to the device.
Omada SDN Controller or Omada Discovery Utility listens on UDP port 29810. After receiving the discovery message, the Controller or Discovery Utility responds to the EAP through the same port.
Configuration of port forwarding
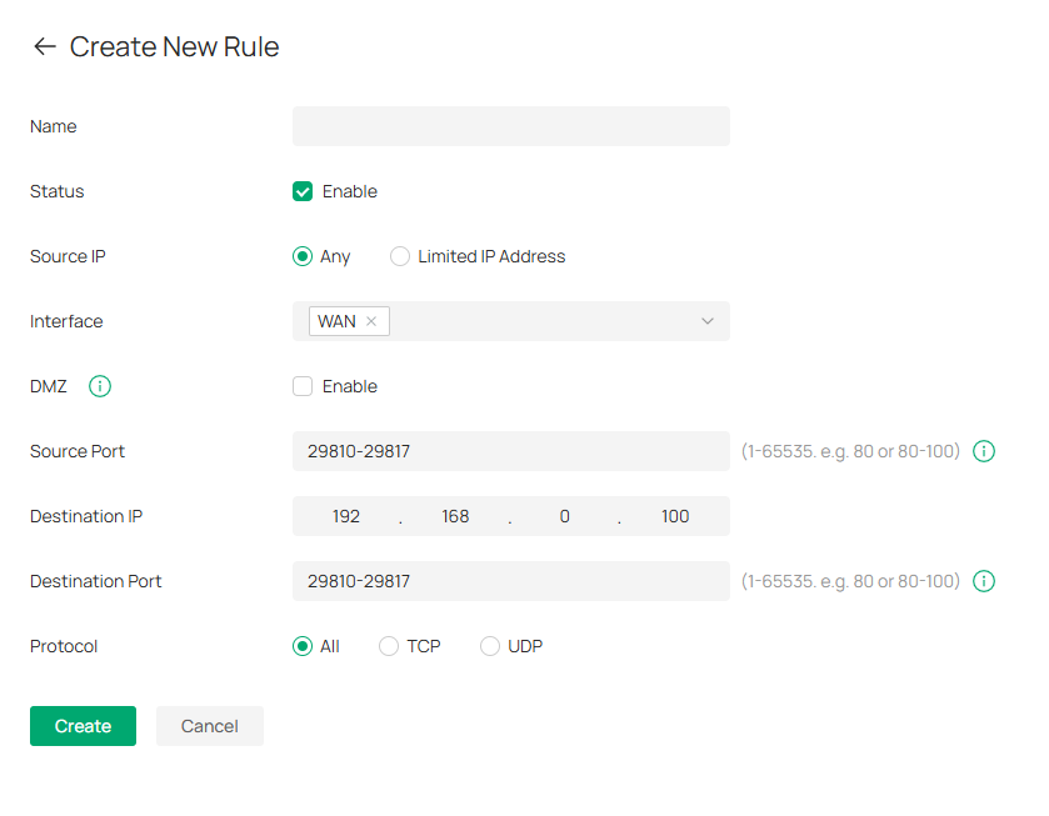
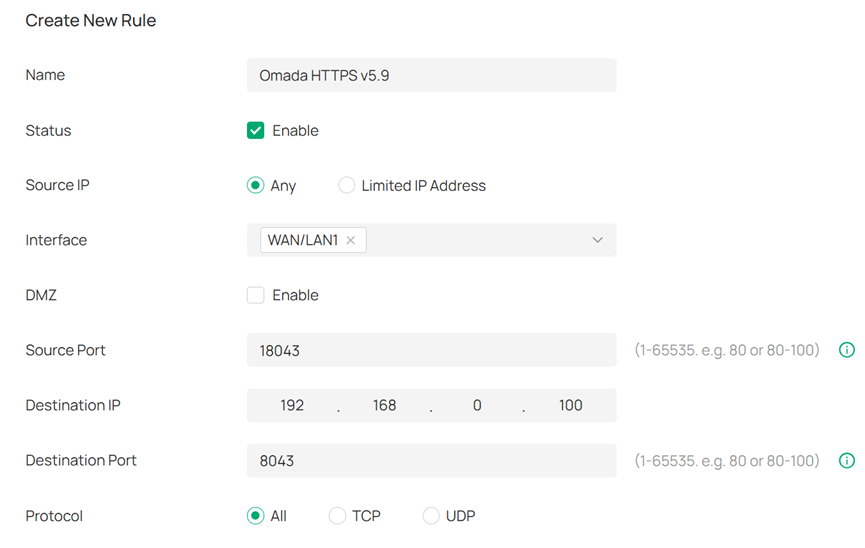
If there is a router performing NAT (Network Address Translation) between the controller and the devices, Port Forwarding rules should be created so that the controller and the devices can communicate with each other properly.
- For the ports used for device discovery, adoption, management, and upgrade, the source and destination ports of the Port Forwarding rules should be all the same as the above Omada ports, as shown below.
- Those ports used for web management and portal on Controller versions earlier than v5.9, set the source and destination ports of the Port Forwarding rules to the same corresponding Omada port numbers.
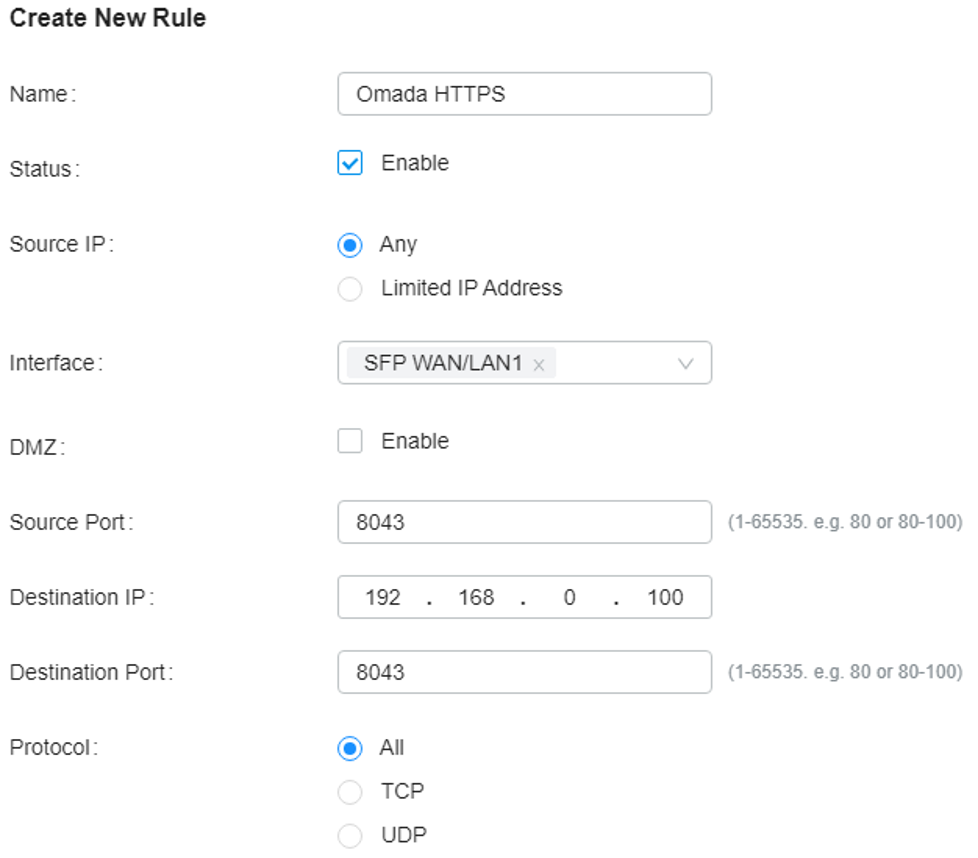
- Starting from Omada Controller v5.9, flexible Port Forwarding settings are supported. The source port can be customized while the destination port remains the corresponding port used by the Controller.
Change the ports used by Omada SDN Controller
Keeping the default ports is recommended unless changing a port is required because of a port conflict or deployment requirement.
4.1 Change web management, firmware upgrade, and Portal ports
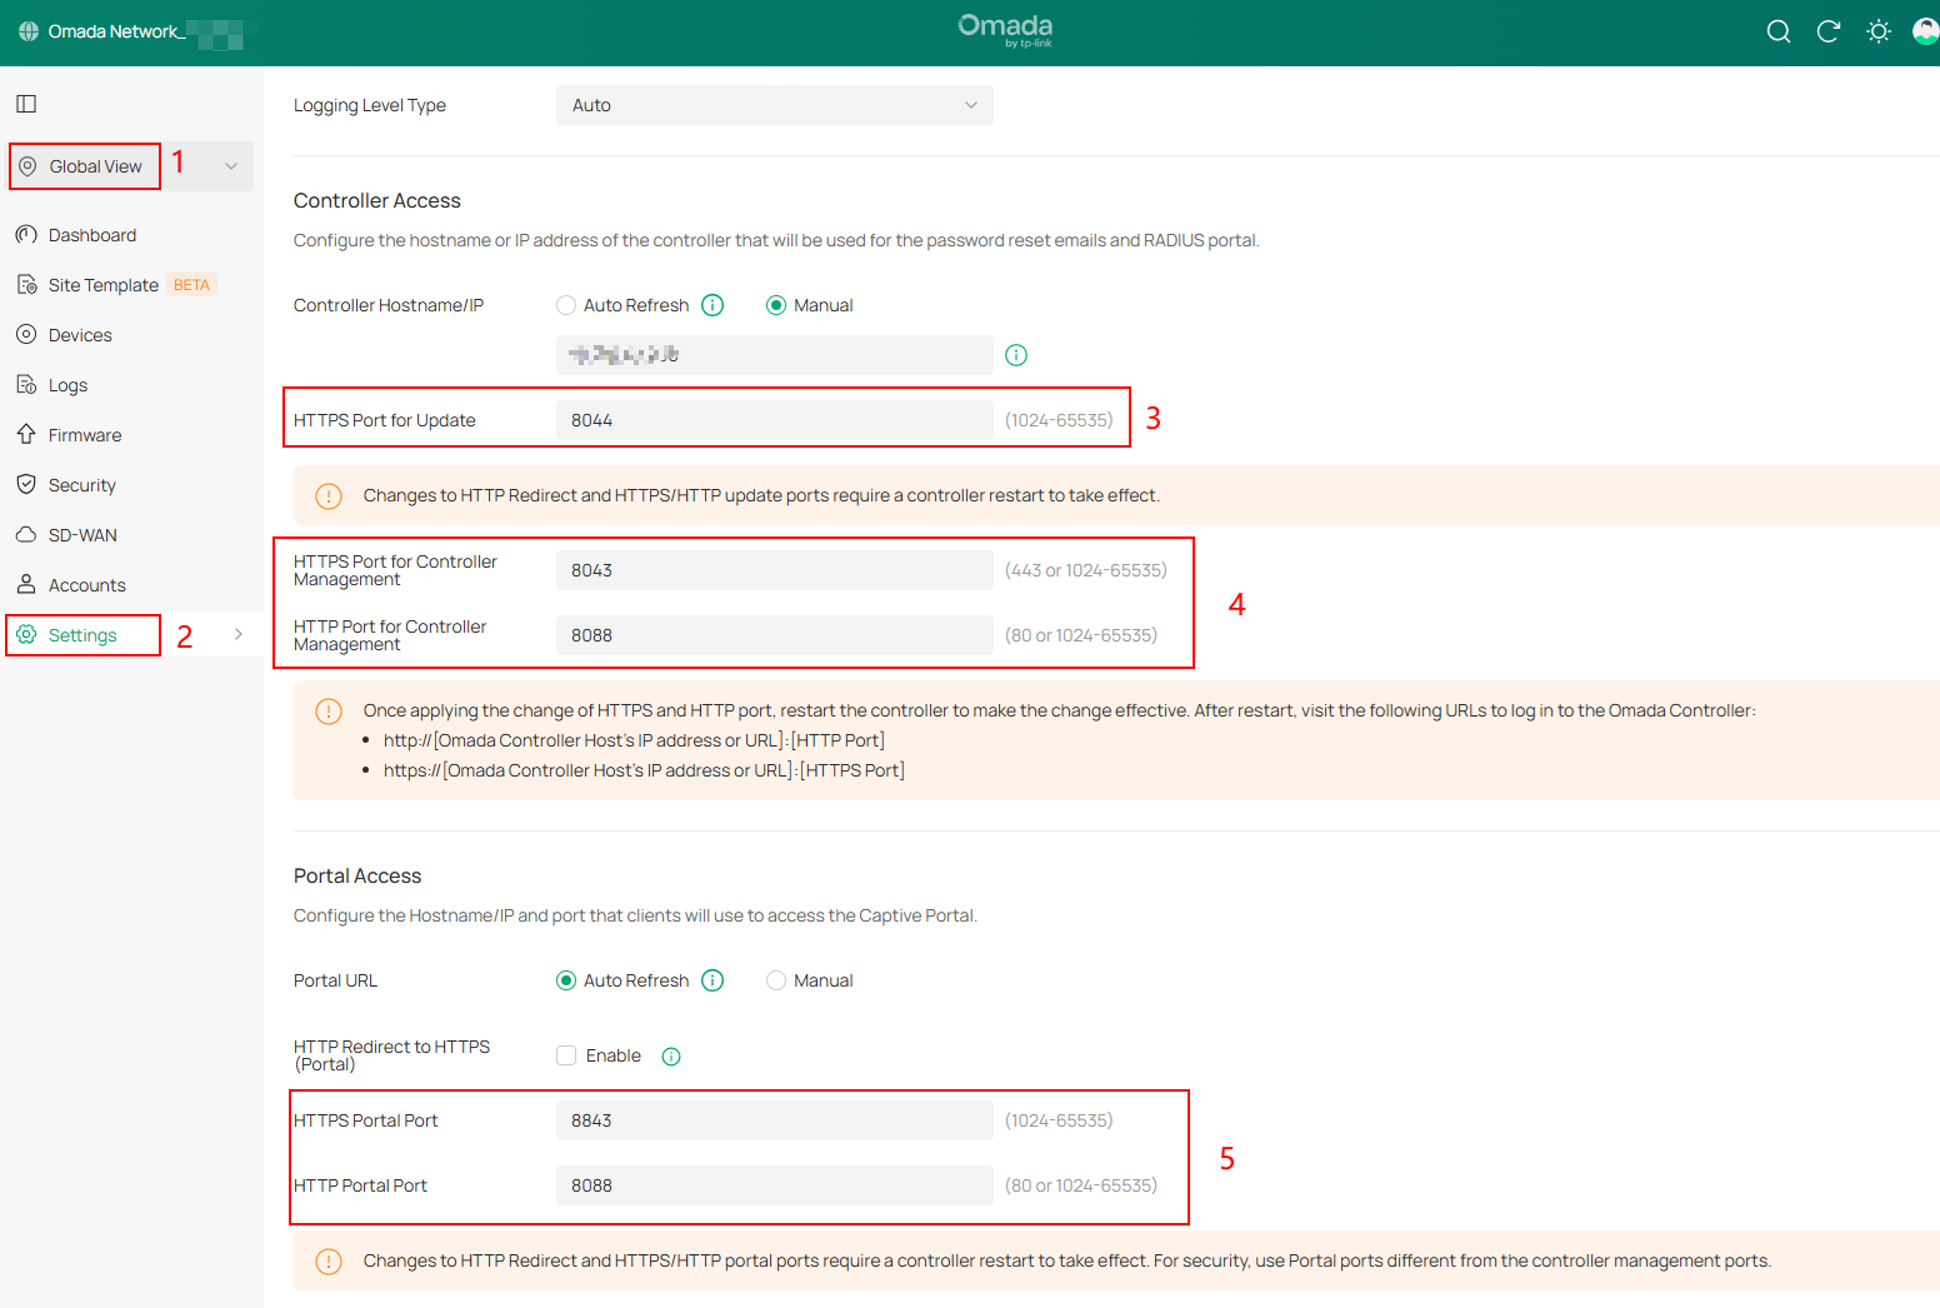
Omada SDN Controller supports changing the ports for Web management and Portal via its management page.
Step 1. Go to Global Settings > System Settings > Access Config.
Step 2. Change the required ports.
Change the applicable port settings:
- HTTPS Port for Update
- HTTPS Port for Controller Management,
- HTTP Port for Controller Management
- HTTPS Port for Portal,
- HTTP Port for Portal.
Step 3. Restart the controller.
Restart the Controller after changing the port numbers. The changes take effect after the Controller restarts.
Note: When using Omada Software Controller on Linux, avoid using port 443 because non-root users are not allowed to run services on this port, which may cause the Controller to fail to start. If this issue occurs, refer to What to Do If the Omada Software Controller Fails to Start on Linux After Modifying the Port ( Controller 5.5.6 or Above).
4.2 Change device management ports
Omada Software Controller allows the device management ports to be changed by editing the “omada.properties” file. It is recommended to keep the default ports unless changing them is necessary.
Step 1. Locate the omada.properties file.
Locate the omada.properties file according to the operating system.
- For Windows Controller, the default file path is “C:\Users\XXX\Omada Controller\properties” (XXX for your Windows account).
- For Linux Controller, the default file path is “/opt/tplink/EAPController/properties”.
Step 2. Change the required ports.
Open omada.properties and change the applicable port values:
port.app.discovery=27001
port.adopt.v1=29812
port.upgrade.v1=29813
port.manager.v1=29811
port.manager.v2=29814
port.discovery=29810
port.transfer.v2=29815
port.rtty=29816
port.olt.discovery=19810
port.device.monitor=29817
Step 3. Save the file and restart the Controller.
Save the changes to omada.properties, and then restart Omada Software Controller for the new port settings to take effect.
Note:
- Avoid using duplicate ports or well-known ports when changing these values.
- If you change the port for “port.discovery”, you need to use the Omada Discovery Utility to inform the devices of the new controller port.
4.3 Example: Configure different ports for two Controllers
If two Omada SDN Controllers are deployed in the same office to manage remote networks over the Internet, the ports used by one Controller can be changed to avoid port conflicts.
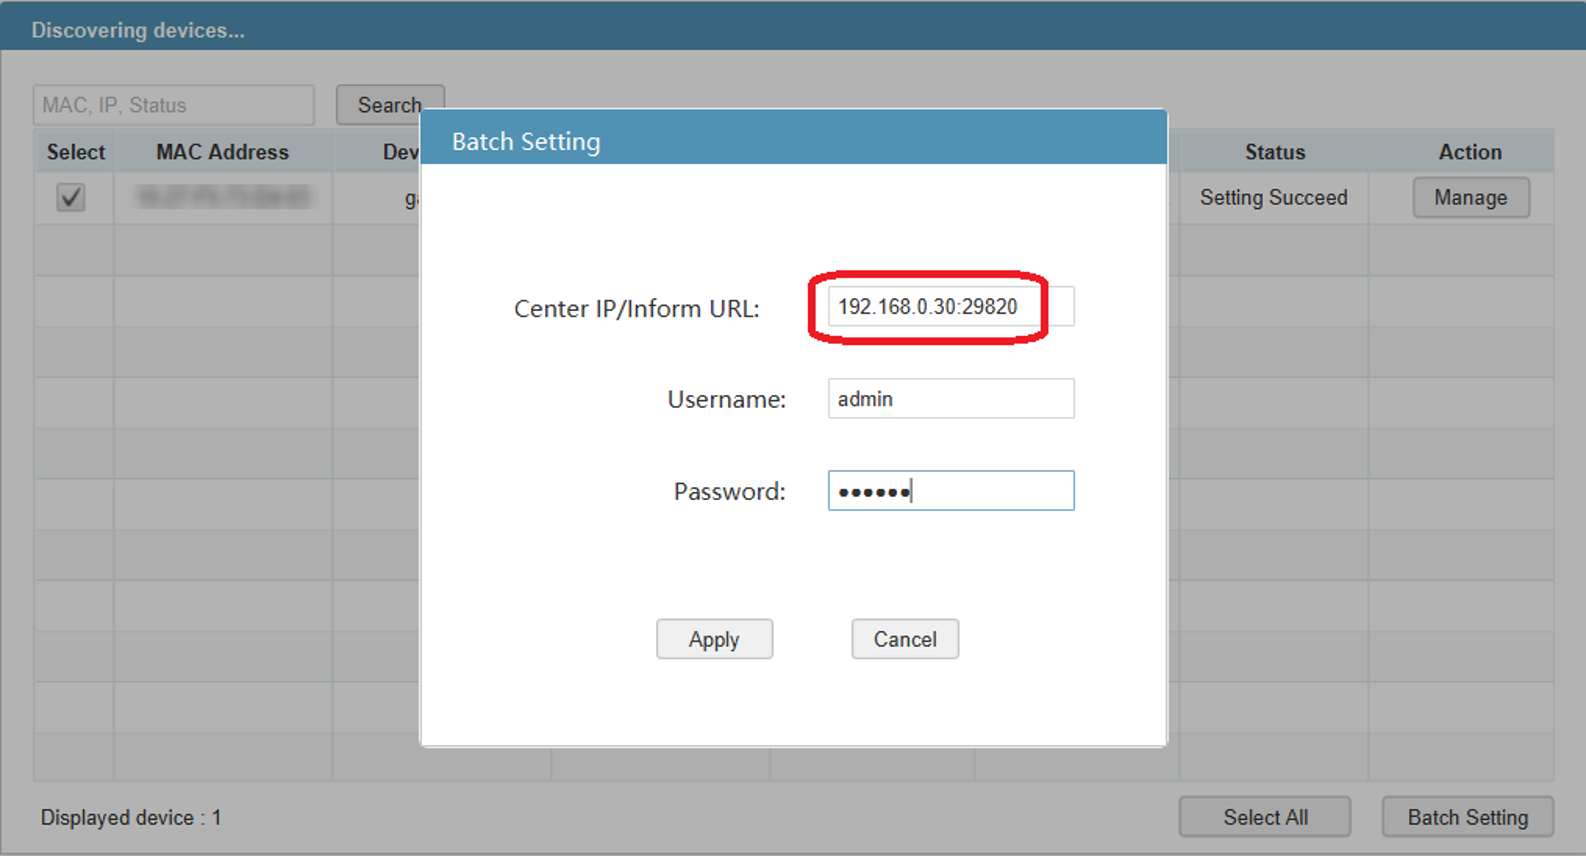
For example, change the HTTPS management port from 8043 to 18043 and modify the omada.properties file to change device management ports 29810–29817 to 29820–29827.
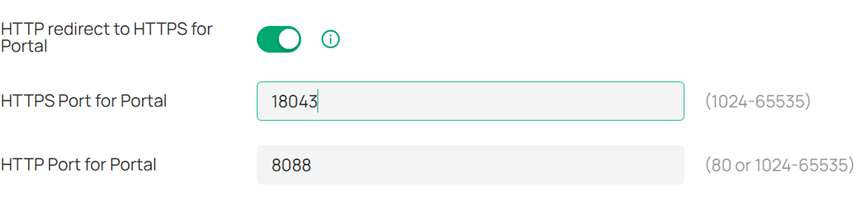
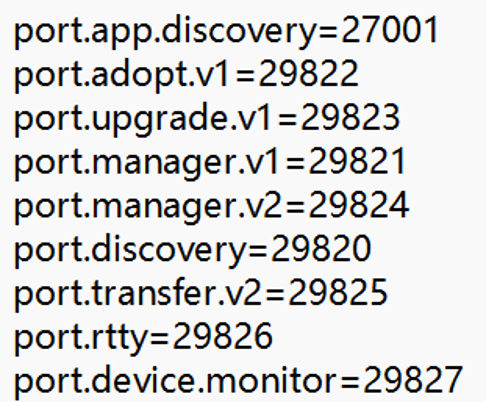
After changing the ports, update the corresponding Port Forwarding rules on the router according to Section 3. Configuration of port forwarding
Because port.discovery has been changed to 29820, run Omada Discovery Utility and specify port 29820 in the Inform URL.
Conclusion
Omada SDN Controller and Omada Discovery Utility use different TCP and UDP ports for web management, firmware upgrades, Portal access, device discovery and management, cluster communication, RADIUS, and other functions. Ensure that the ports required for the deployment are available and allowed through applicable firewalls.
When NAT is used between the Controller and managed devices, configure the corresponding port forwarding rules. If any default ports are changed, update the related firewall, port forwarding, and device discovery settings accordingly.
To learn more about each function and configuration, please visit Support Home to download or check the manual for your product.
