


Contents
Fusion Pro series and Bluetooth
Navigating between the Omada App and Omada Guard App
A short tour of the Omada Guard App
Account and organization permissions
Guard service activation status and app versions
Introduction
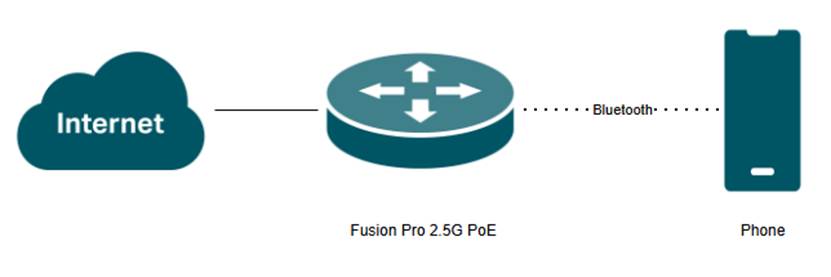
This article explains how to use a mobile device, such as a phone, to set up a Fusion Pro Gateway with the Omada App and then access and manage it with the Omada Guard App. First, you will use the Omada App to discover the Fusion Pro Gateway through Bluetooth, complete the initial setup, and bind it to your Omada UID. You will then switch to the Omada Guard App for a walkthrough of key management features, including account permissions, application and service status, device information, and connected device status.
For additional Fusion Pro Gateway setup methods and more detailed initial configuration instructions, refer to Getting Started with an Omada Fusion Gateway.
Requirements
- Fusion Pro Gateway
- Bluetooth-capable mobile device
- Omada App
- Omada Guard App
Omada UID
An Omada UID is the account used to access Omada cloud services and supported Omada platforms. It provides a single identity that can be used to sign in, access supported controllers remotely, and manage the Omada networks and organizations associated with your account.
Access through an Omada UID is based on the permissions assigned to the account, allowing multiple administrators to manage the same Omada environment without sharing login credentials. For more information about Omada accounts and cloud access, please refer to this article: TP-Link ID Explained: What It Is and How to Create One.
Note: Omada UID and TP-Link ID refer to the same account. Some interfaces may display TP-Link ID instead of Omada UID.
Fusion Pro series and Bluetooth
Bluetooth allows a nearby mobile device to establish a short-range wireless connection with the Omada Fusion Gateway during initial setup. This provides a simple way to discover and configure the gateway before normal network or cloud access has been established.
To use Bluetooth setup, you need a Bluetooth-capable mobile device, the Omada App, and a supported Fusion Pro Gateway. Bluetooth must be enabled on the mobile device, and the device should remain close to the gateway while completing the initial configuration.
Omada App and Omada Guard
The Omada App and Omada Guard App are designed for different parts of the Omada ecosystem.
The Omada App is primarily used for network management. It allows users to access an Omada Controller, adopt supported network devices, configure network settings, monitor network status, and manage connected clients from a mobile device. It can be used for both local and remote management, depending on the Controller configuration.
The Omada Guard App is focused on video surveillance and security devices. It is used to manage supported Omada cameras and related security devices, including viewing live video and recordings, receiving event notifications, using two-way audio, sharing devices with other users, and managing surveillance devices remotely.
In simple terms, use the Omada App for managing the network and use the Omada Guard App for managing cameras and video surveillance.
Initial configuration
Step 1. Connect the Fusion Pro Gateway to a power source and enable Bluetooth on the mobile device. Open the Omada App. A Set Up prompt will appear. Select Set Up.
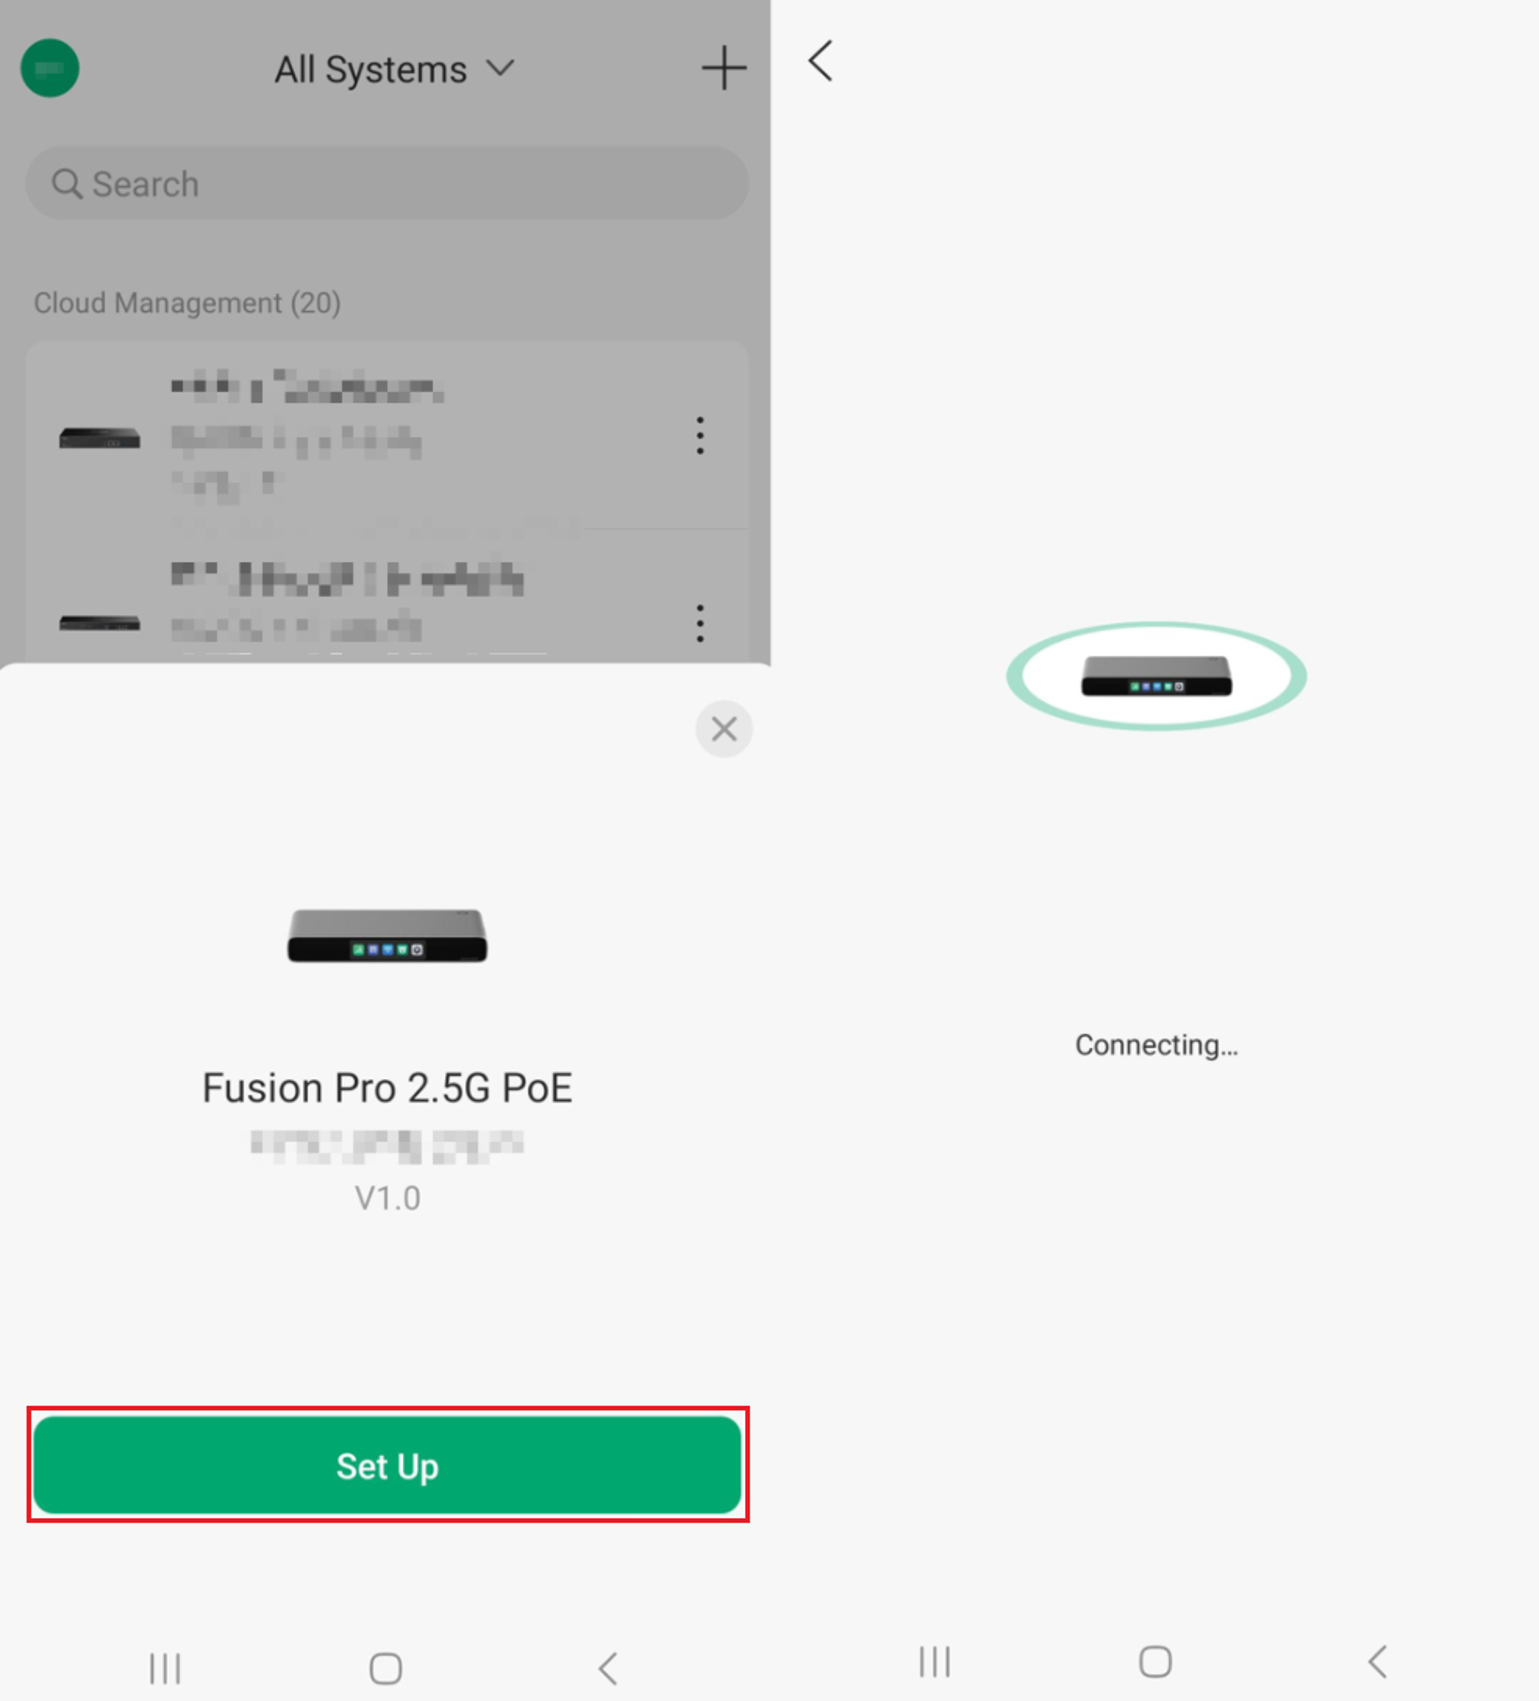
Note: If the Set Up prompt does not appear, you can start Bluetooth setup manually. Select the plus sign in the upper-right corner, then select the Fusion Pro Gateway. Continue with Step 2.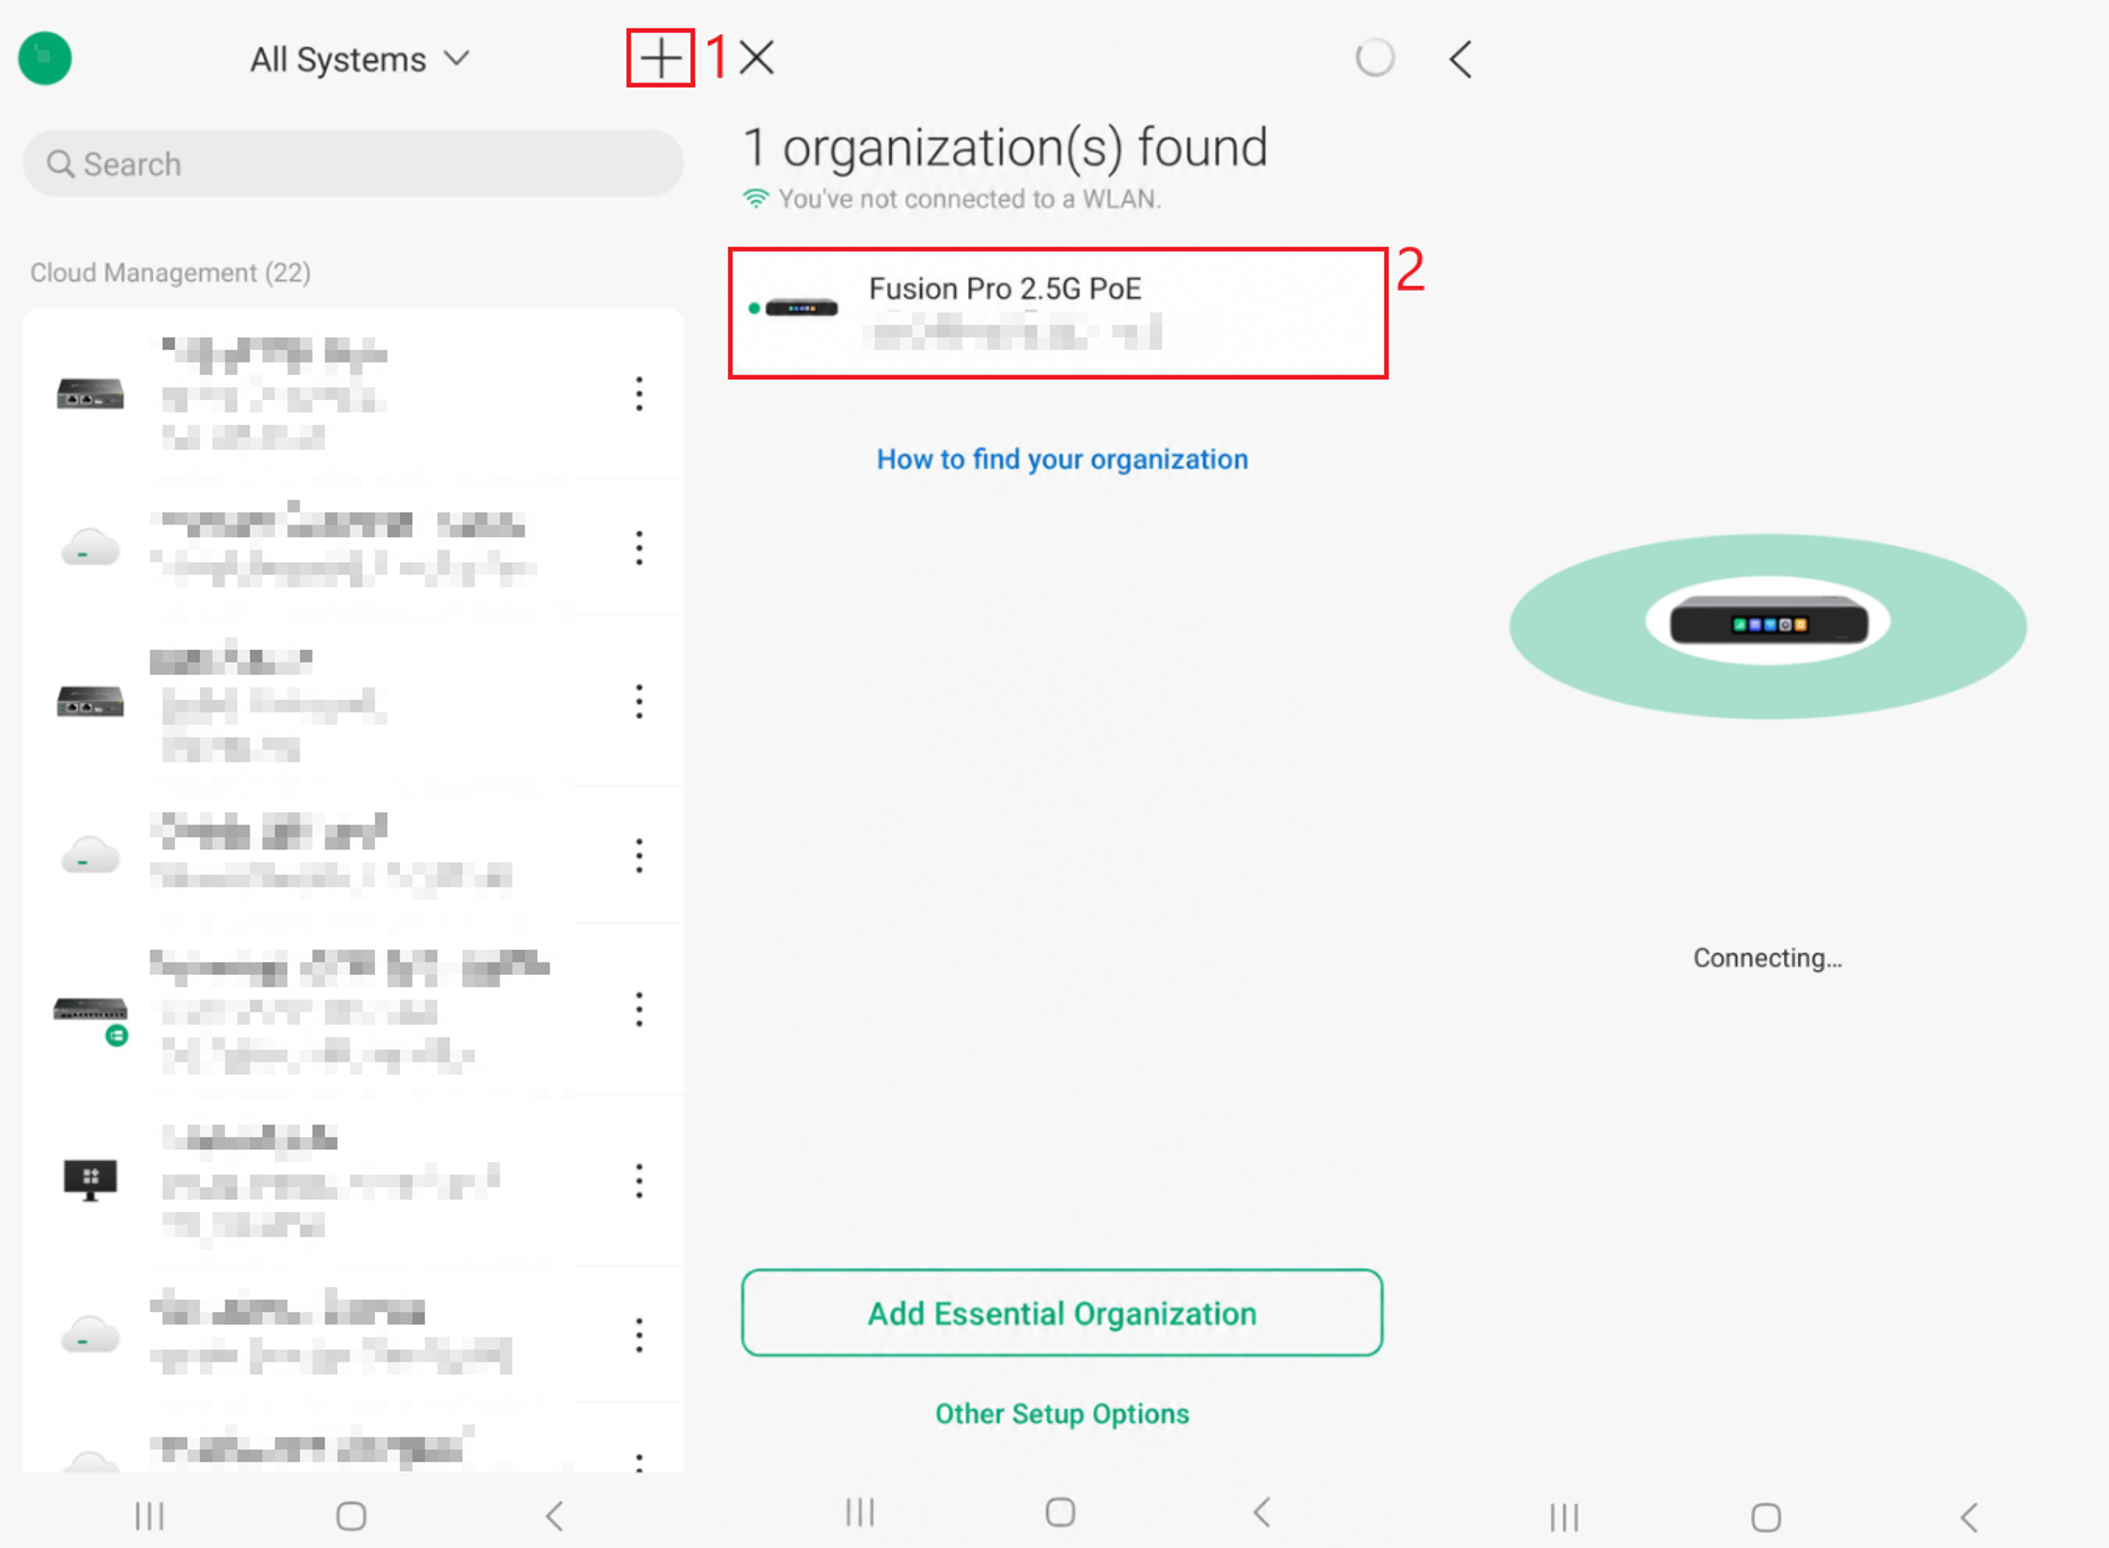
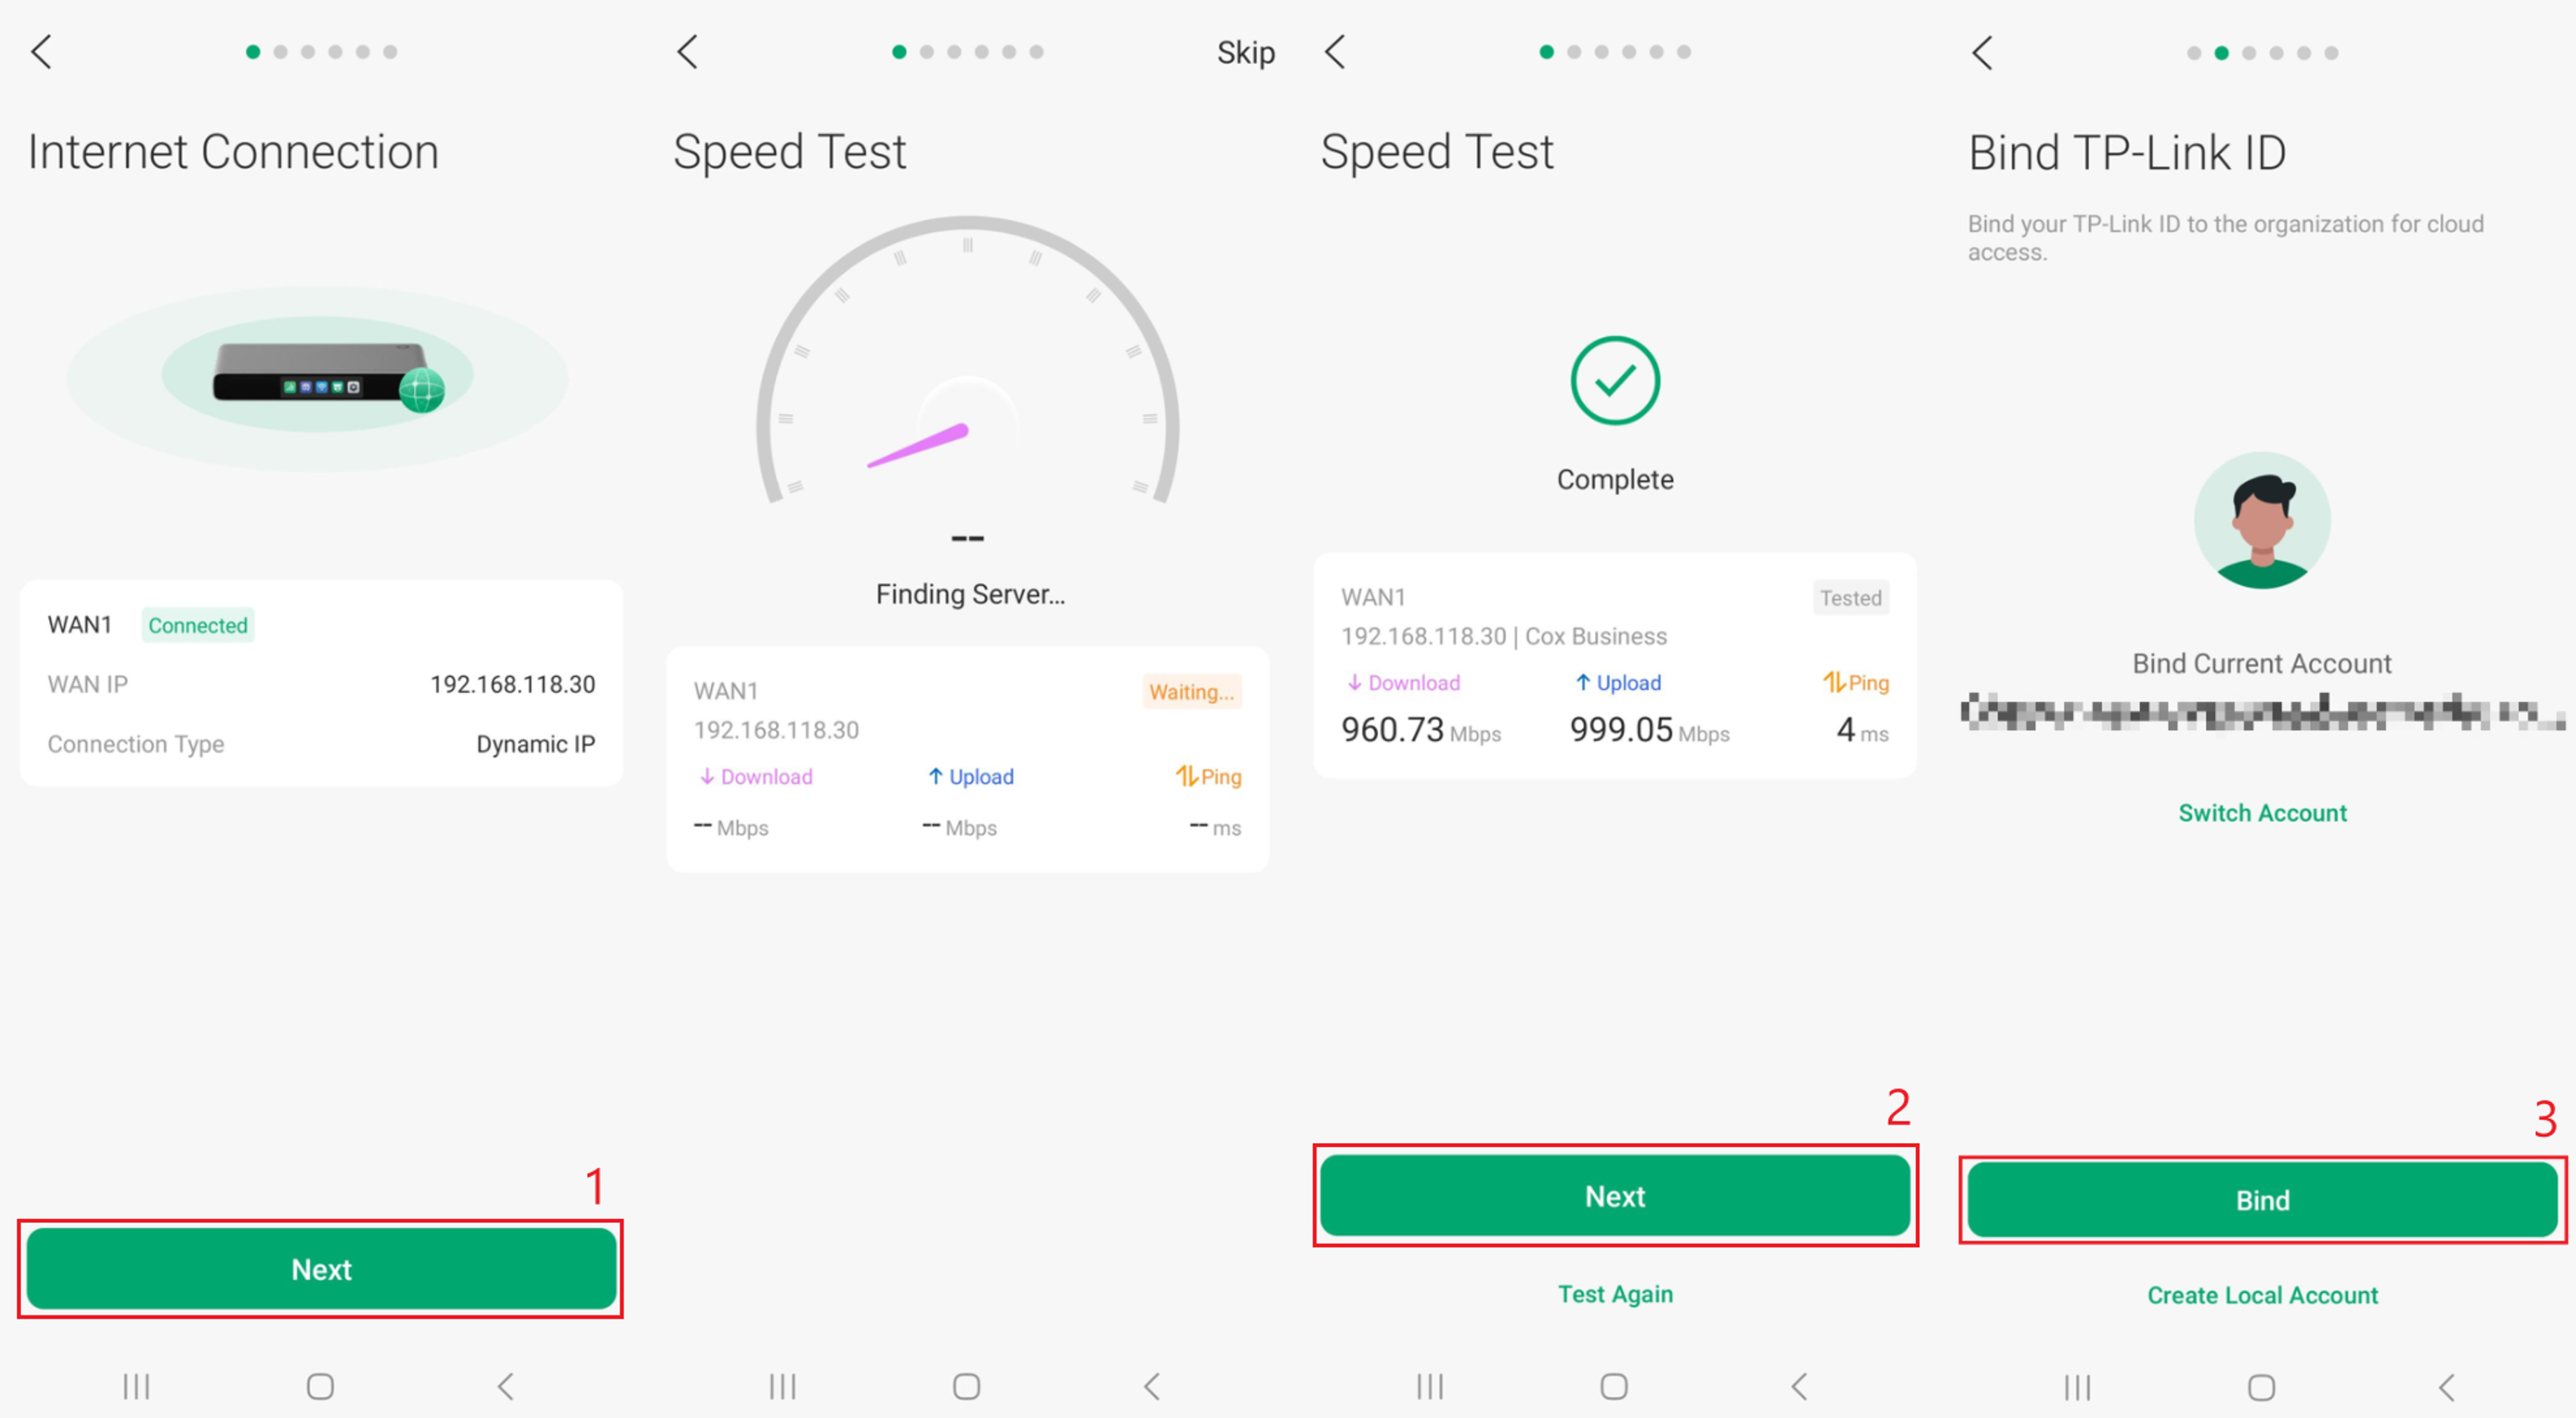
Step 2. Select Next on the Internet Connection screen. A Speed Test can be performed. This can be skipped using the Skip button in the top right of the screen. If the Speed Test is performed, select Next. Select Bind to bind the selected TP-Link ID to the Fusion device.
Note: If the Fusion Pro device is not connected to the internet, a Plug in the Internet Cable screen will appear rather than the Internet Connection screen. You may proceed to configure the device locally, or connect the device to the internet by connecting an RJ45 Ethernet cable into the WAN1 port.
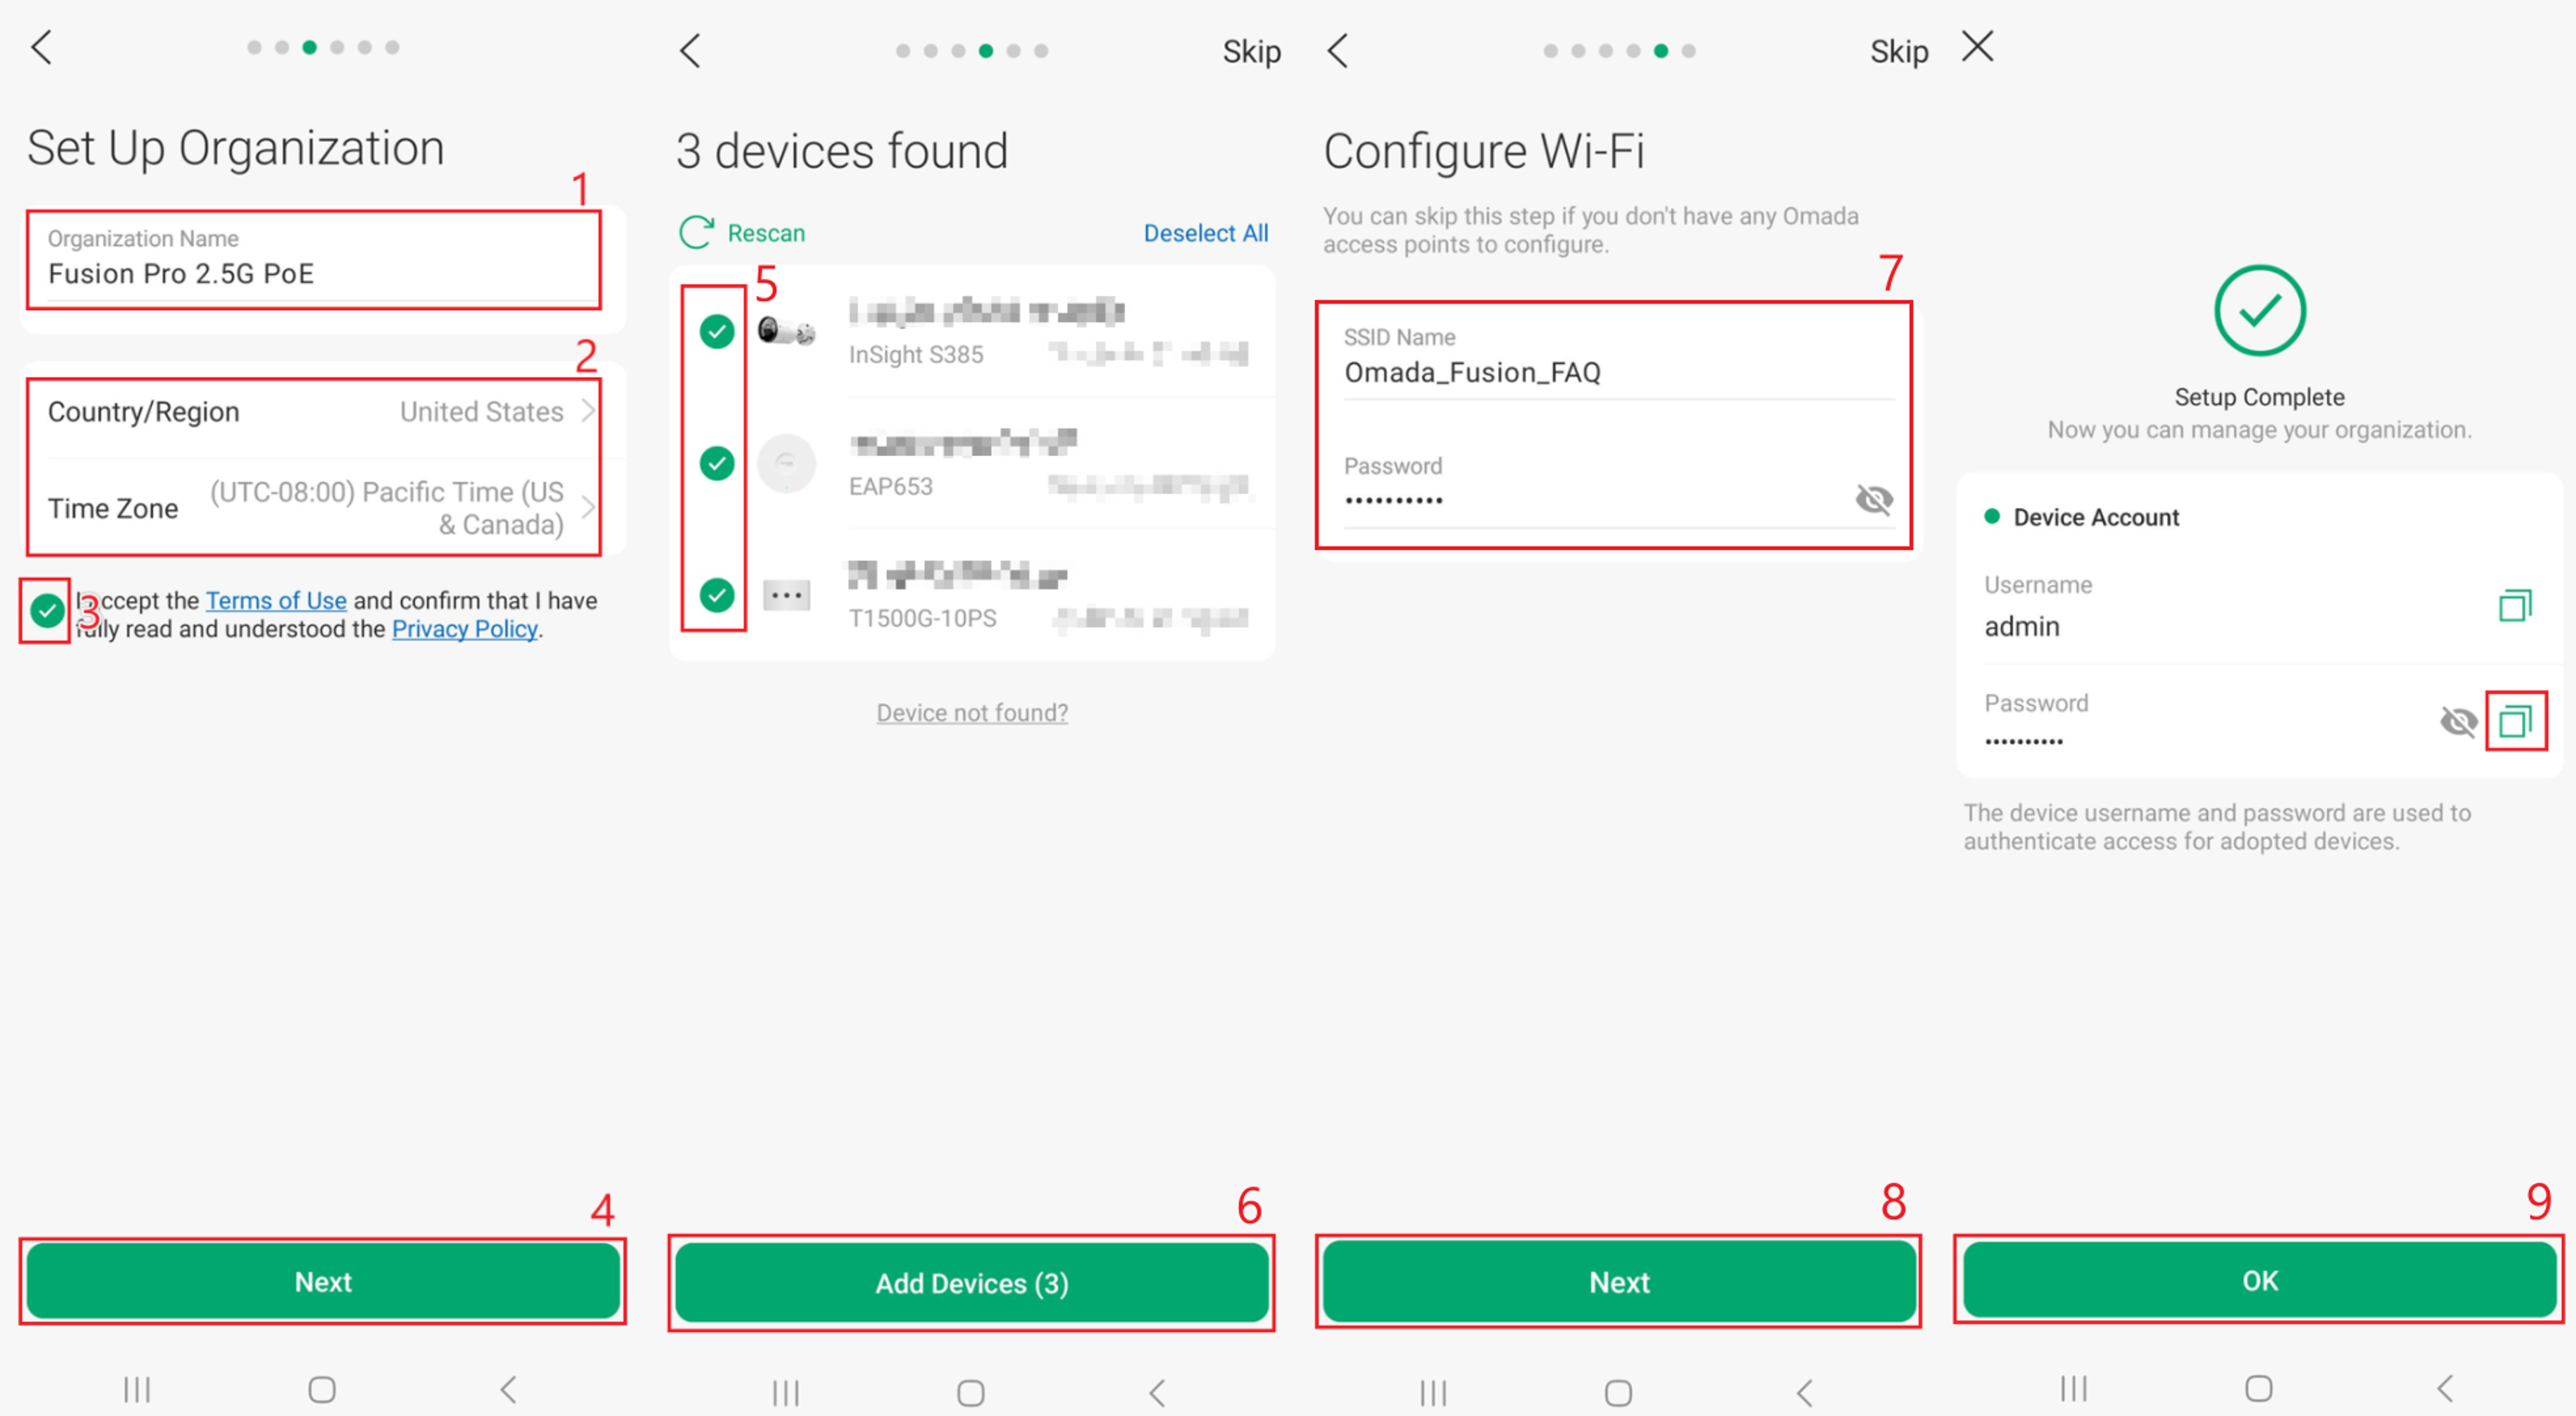
Step 3. Create an Organization Name, configure the Country/Region and Time Zone settings, accept the Terms of Use, and select Next. Add the connected devices to the controller, or skip this step and add them later. If adding devices now, select Add Devices. Configure the SSID Name and Password, then select Next. On the Setup Complete screen, note the randomly generated password. Select Copy to copy the password if needed. The password can be changed later. Select OK.
Navigating between the Omada App and Omada Guard App
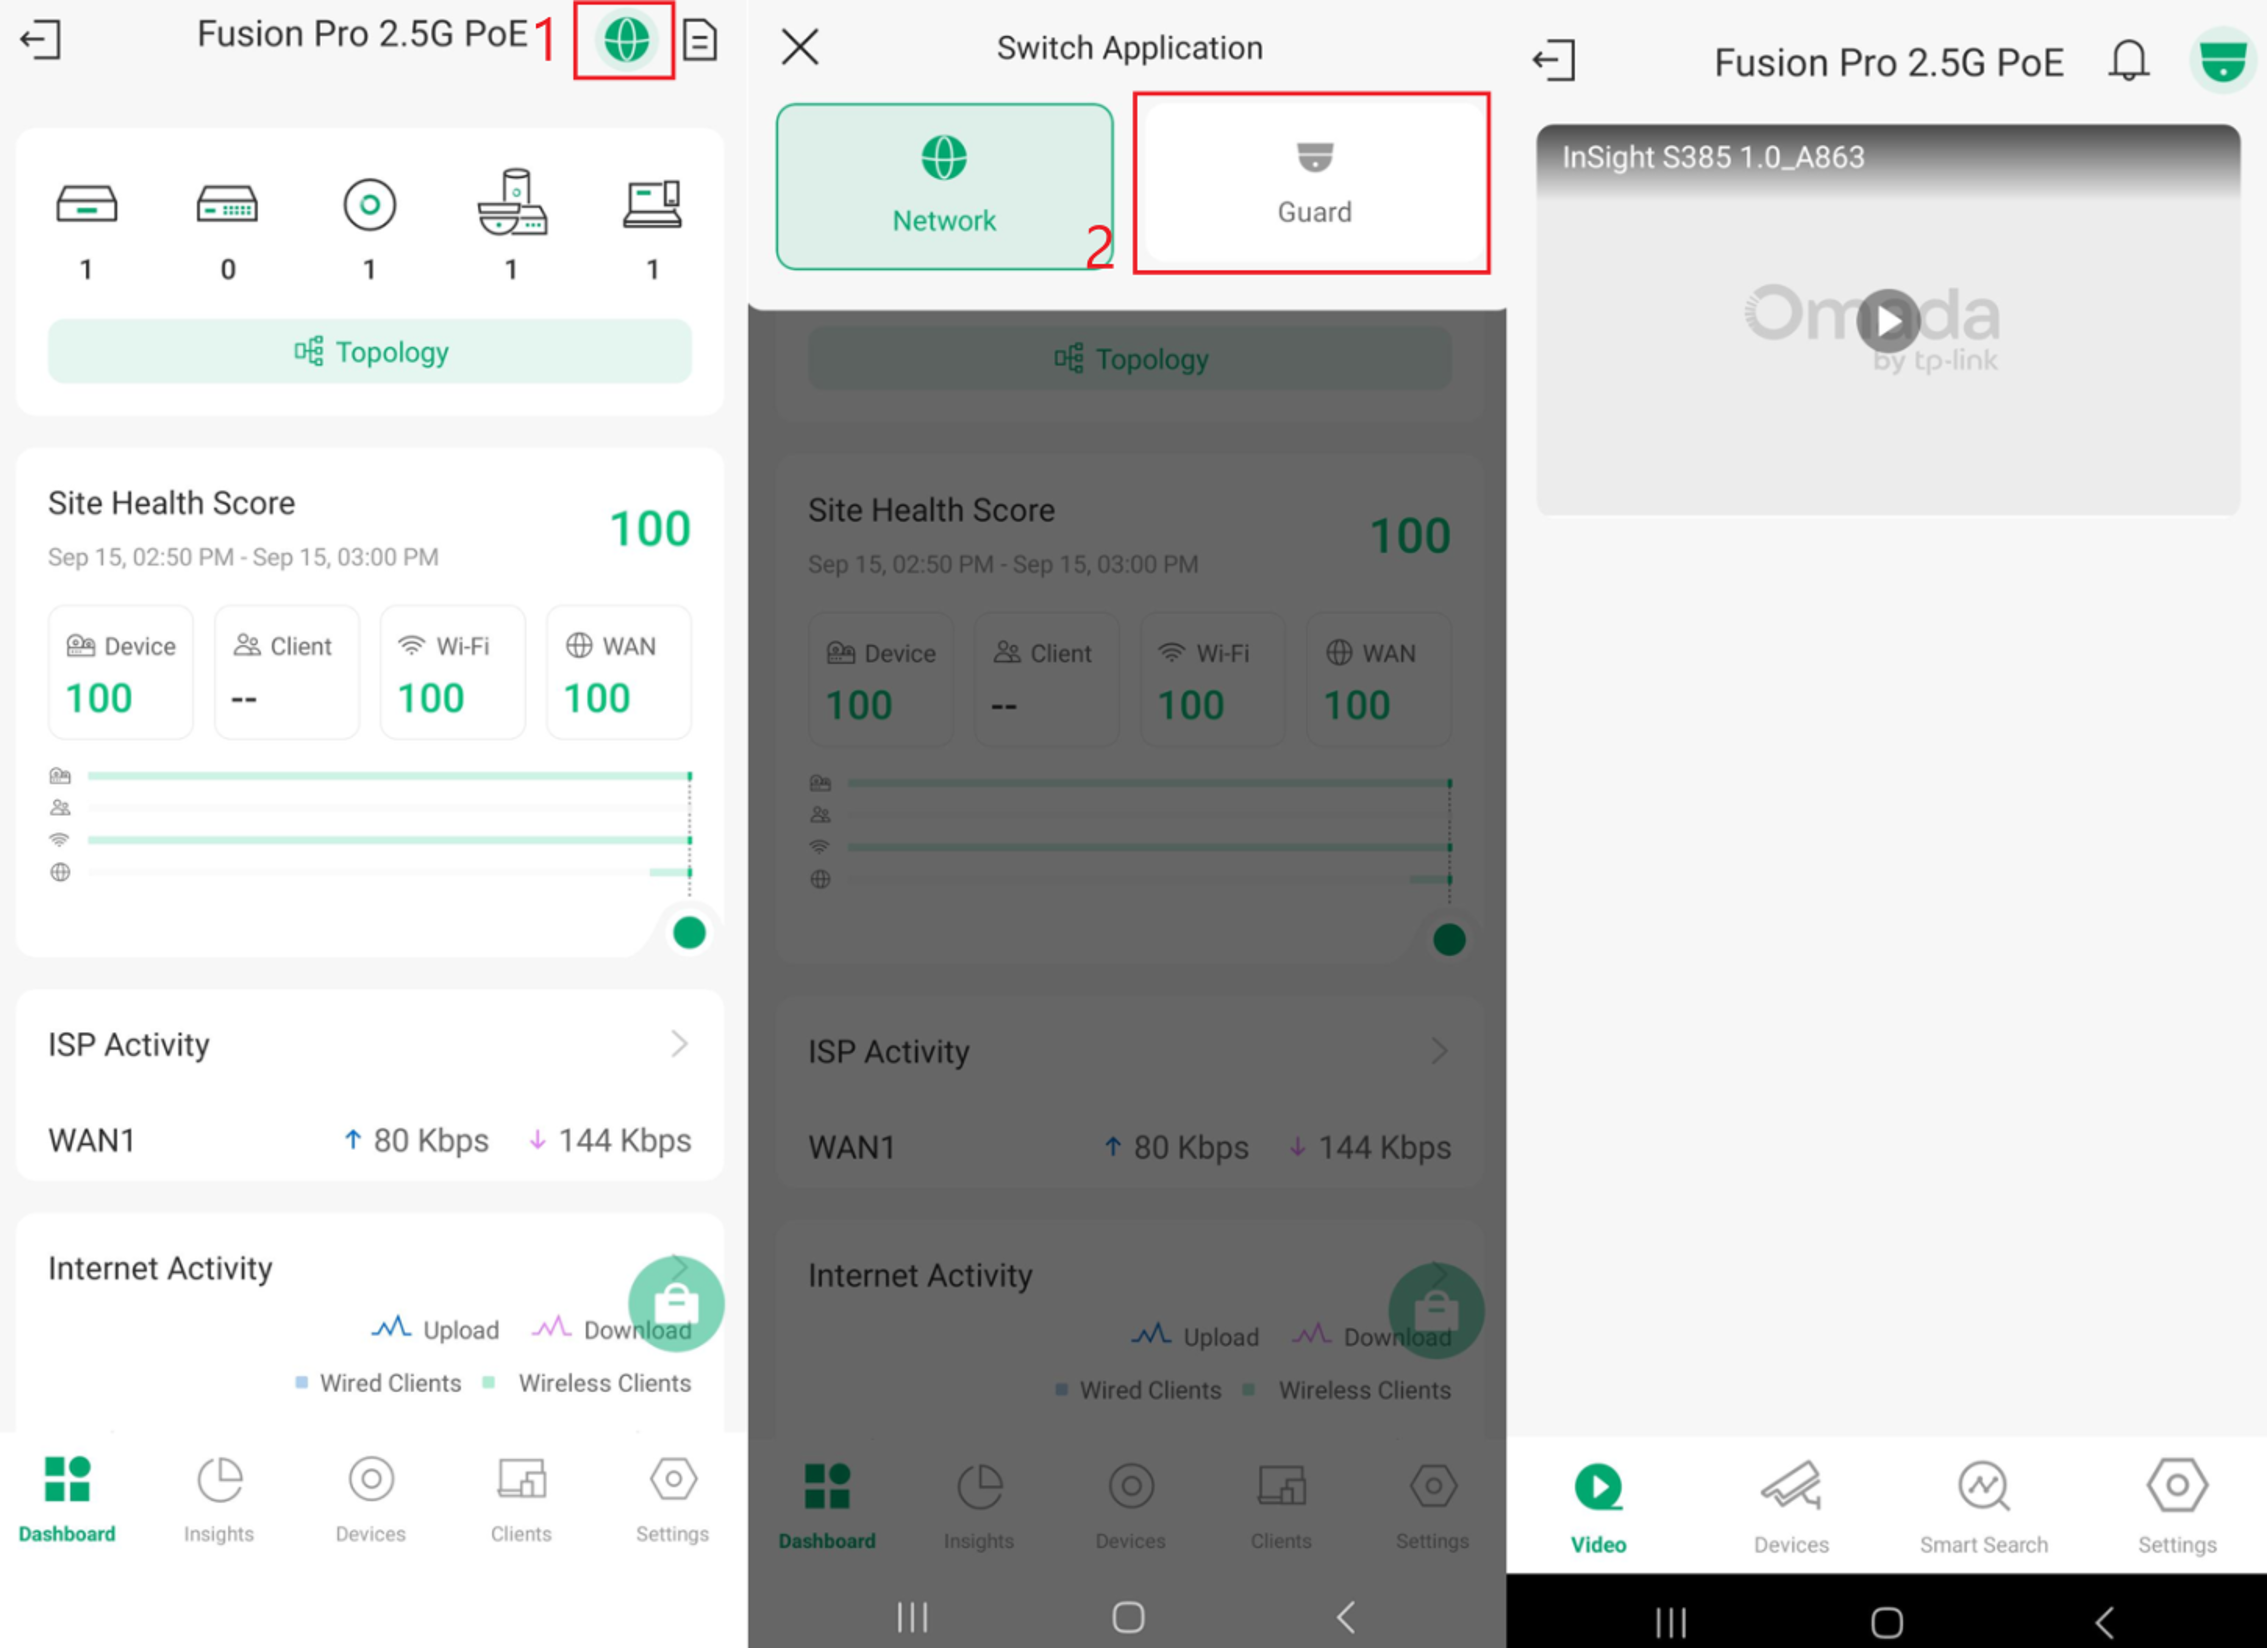
Within the Omada App, select the Omada Network Application icon, then select the Guard option. This will open the Omada Guard App.
Note: If you have not logged in to the Omada Guard App previously or the login has expired, you may be prompted to log in using your username and password.
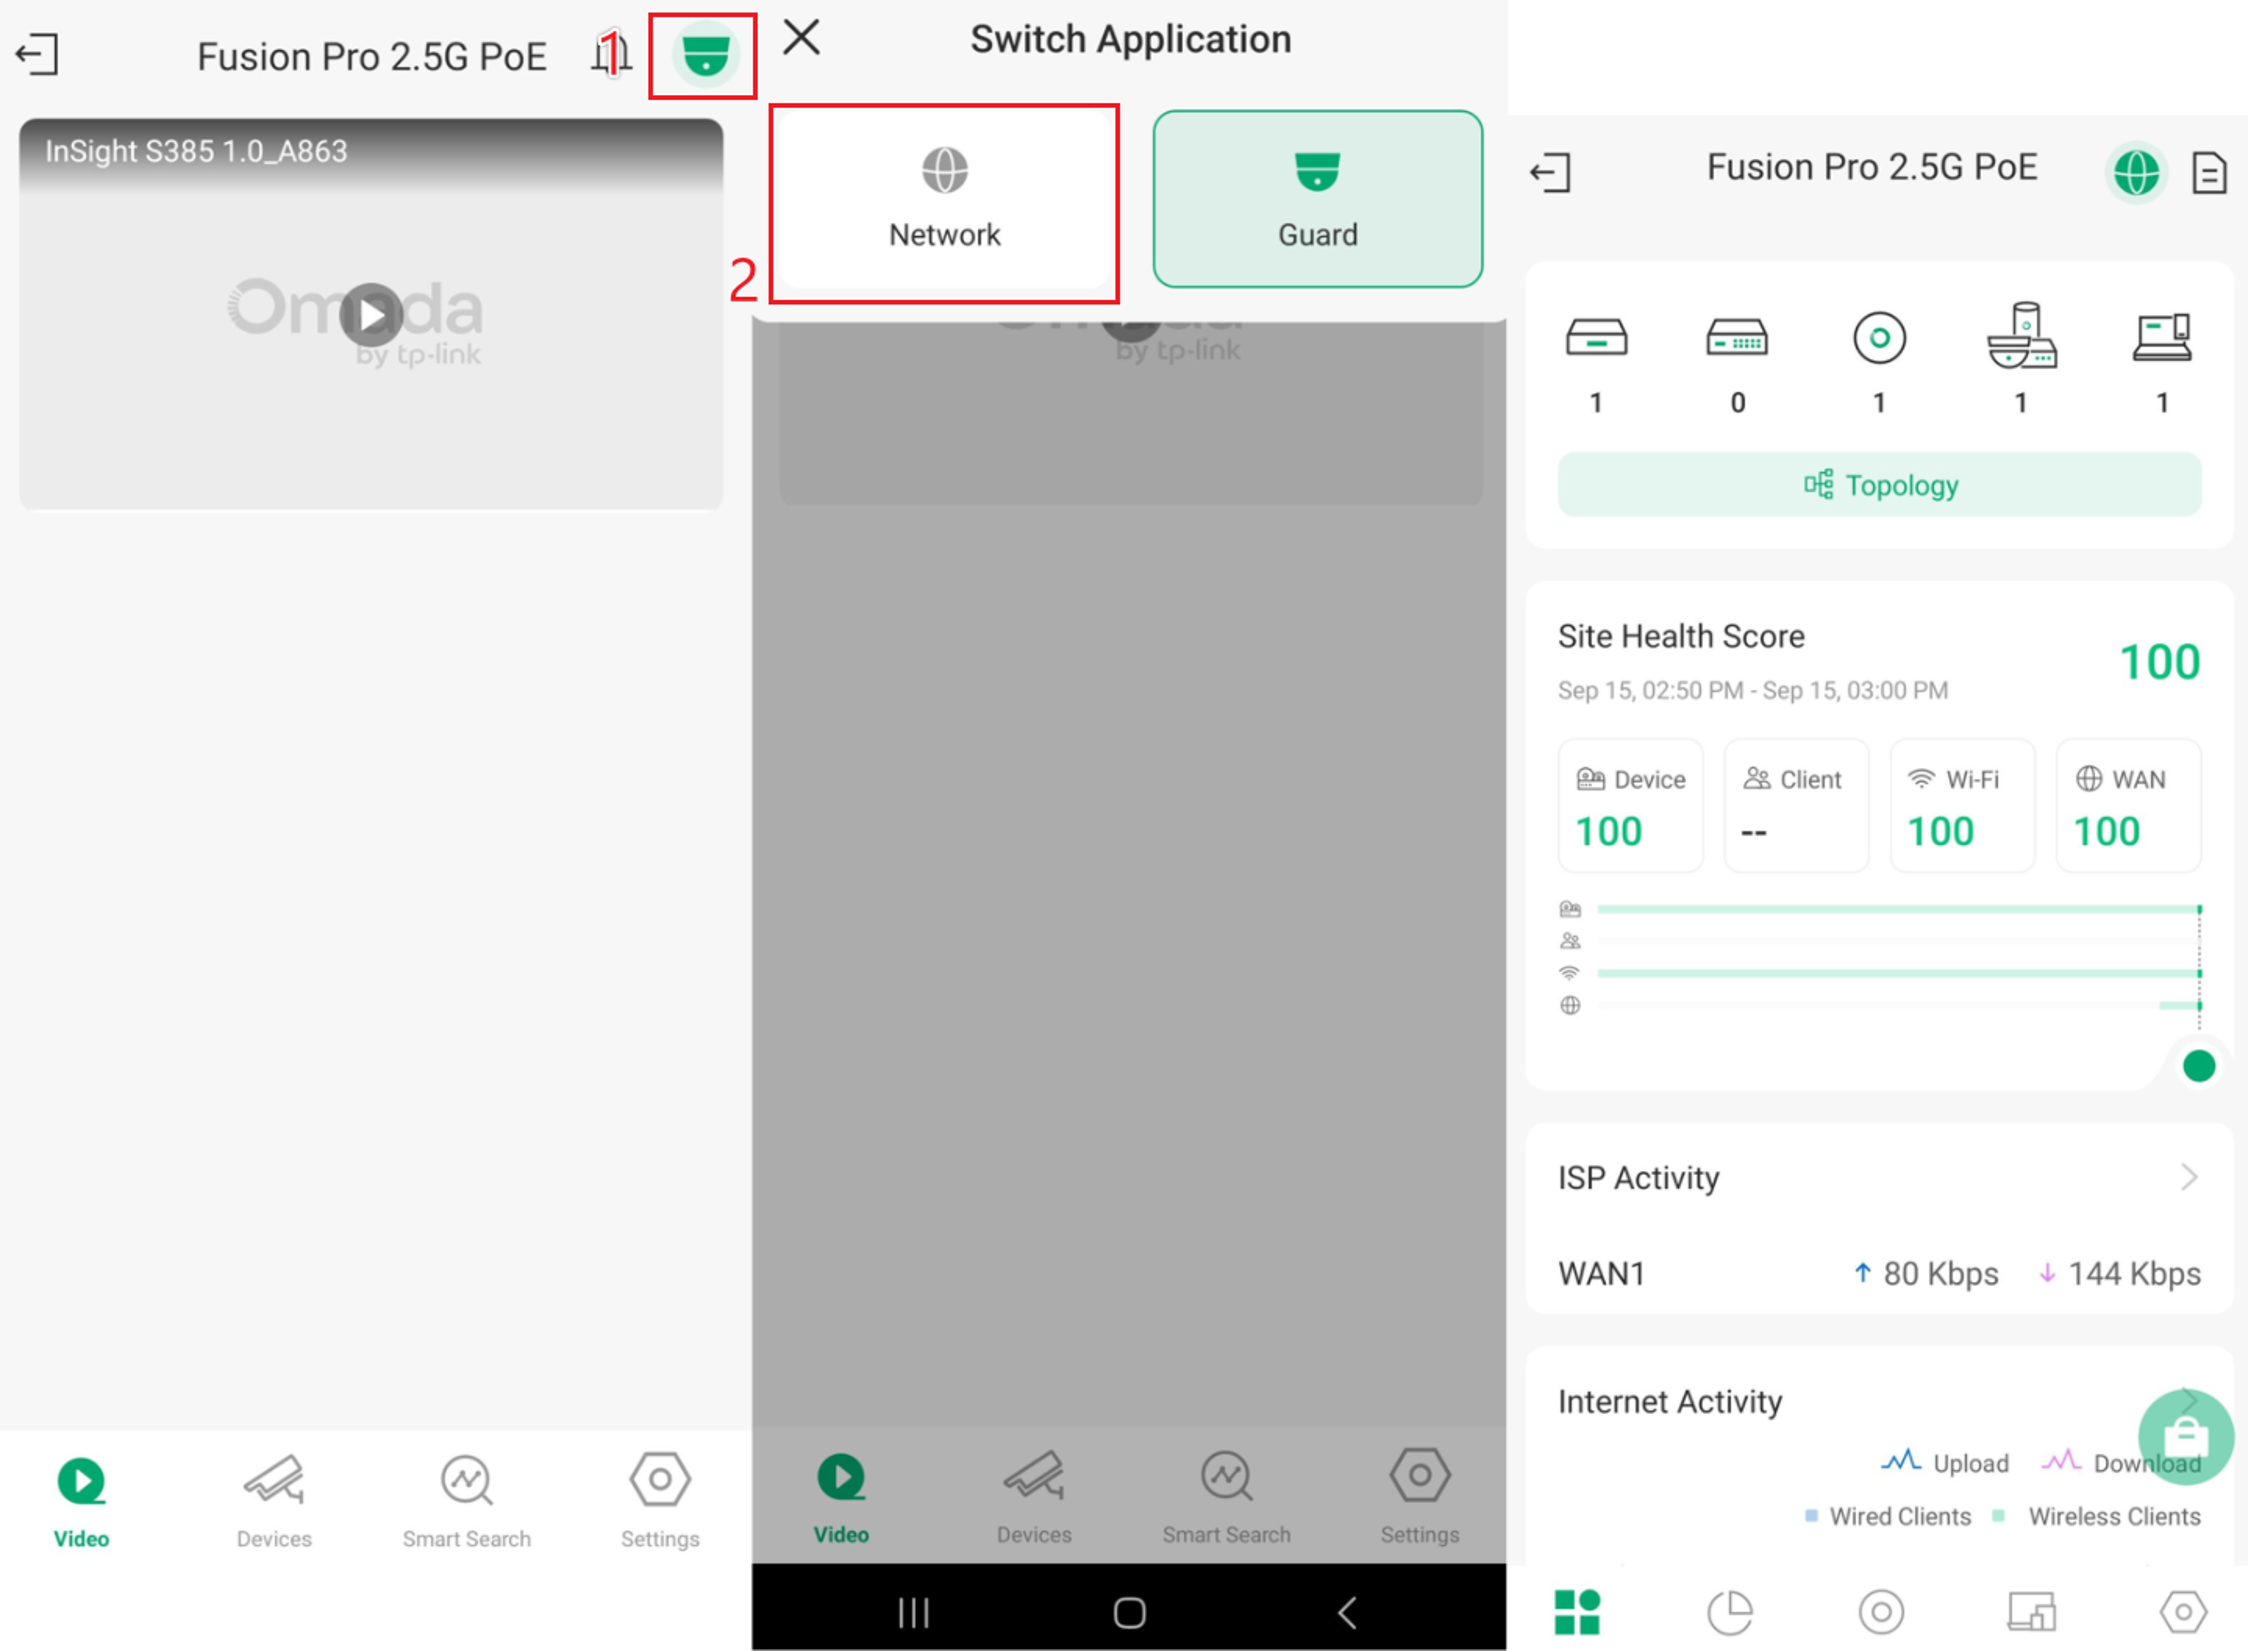
To navigate back to the Omada App from the Omada Guard App, while in the Omada Guard App, select the Omada Guard Application icon, then select the Network option. This will open the Omada App.
A short tour of the Omada Guard App
Here we will take a short tour of some of the key areas within the Omada Guard App. Key topics include System Settings, account and organization permissions, Guard service activation status, app version information, and device online status.
System Settings menu
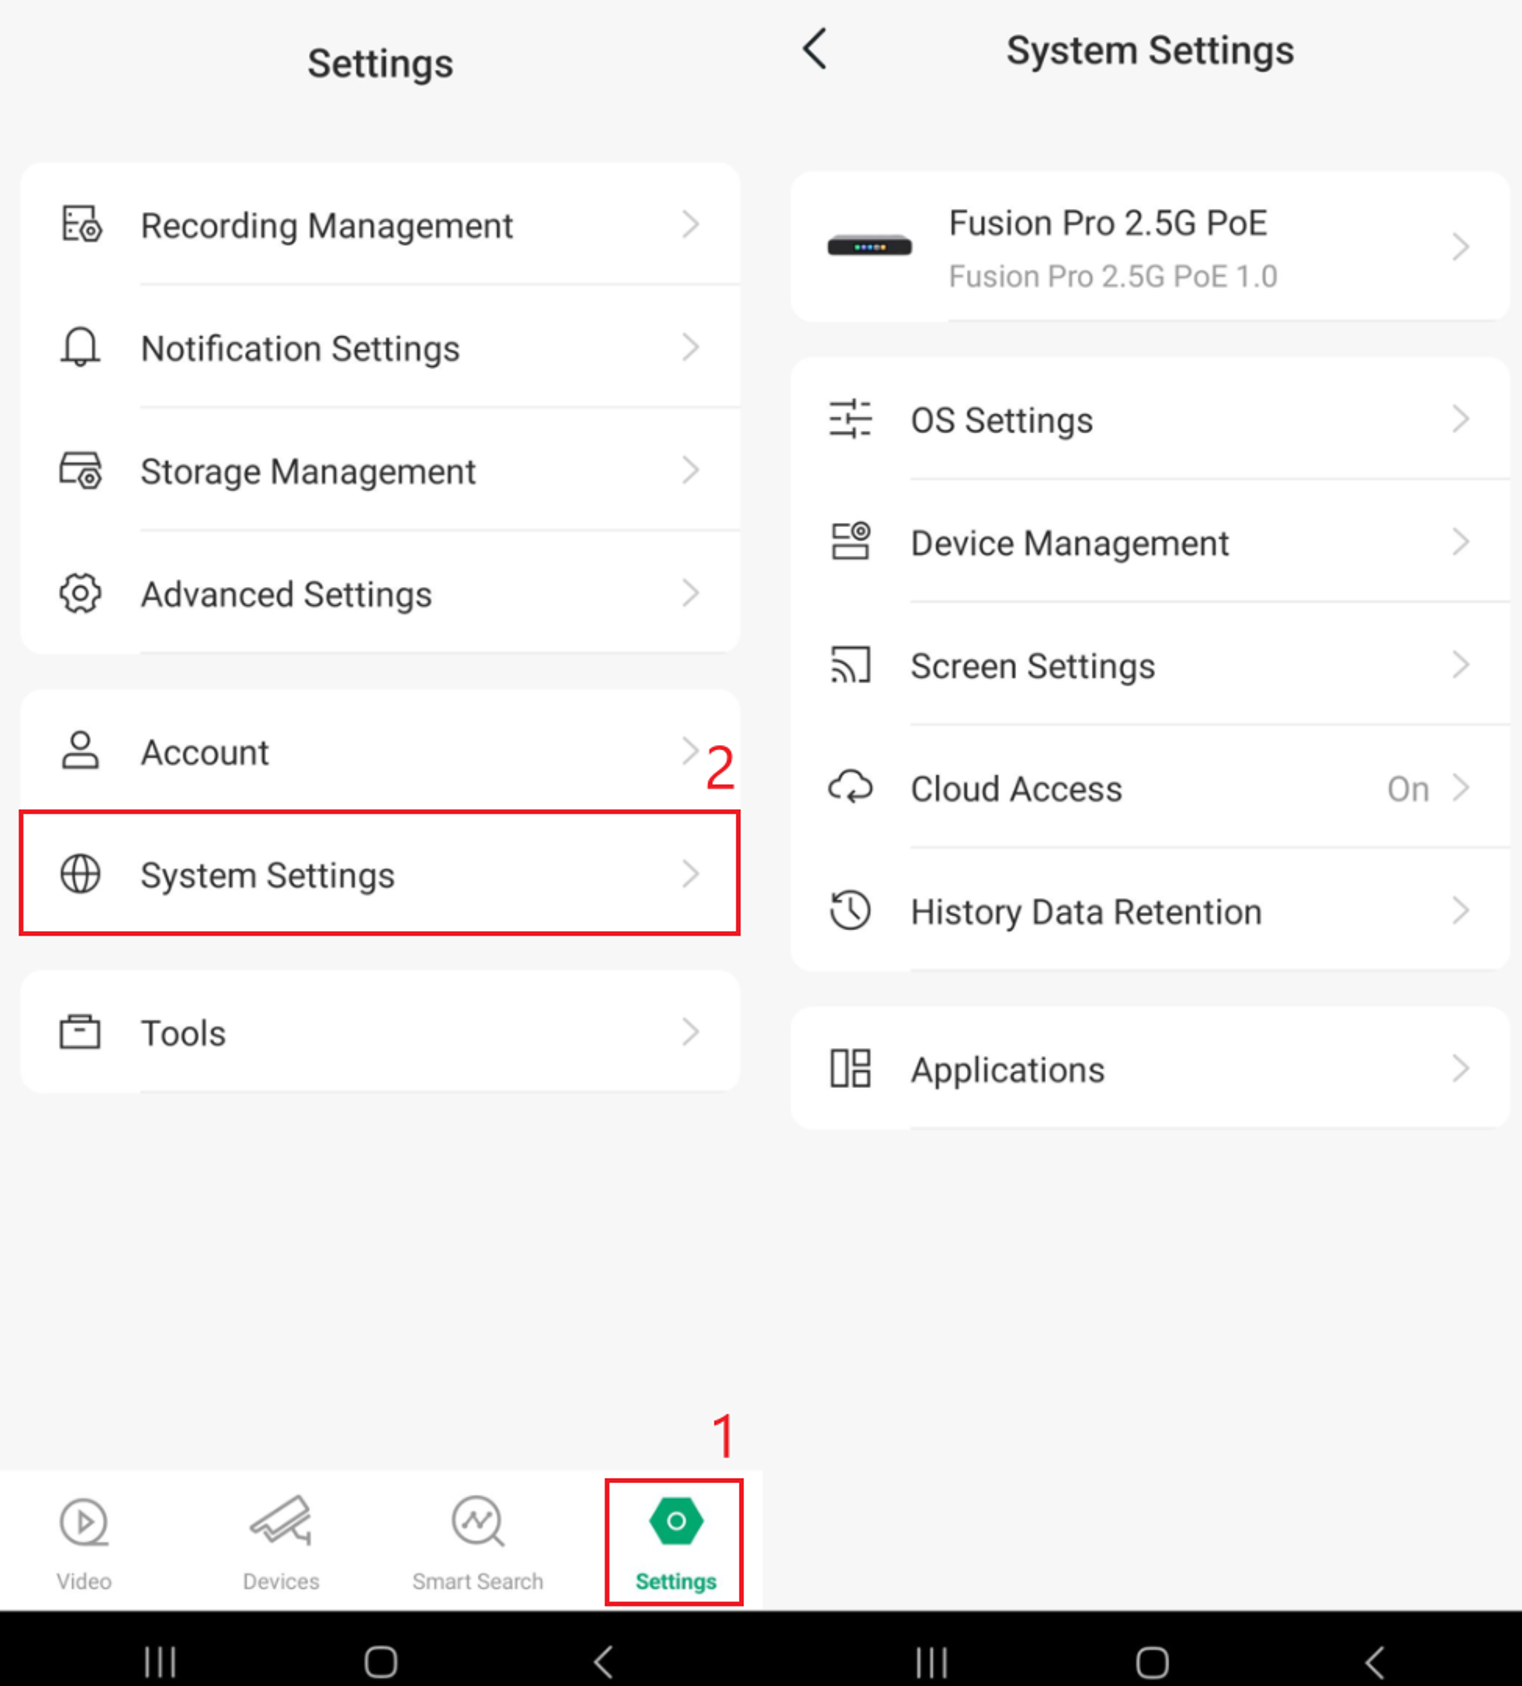
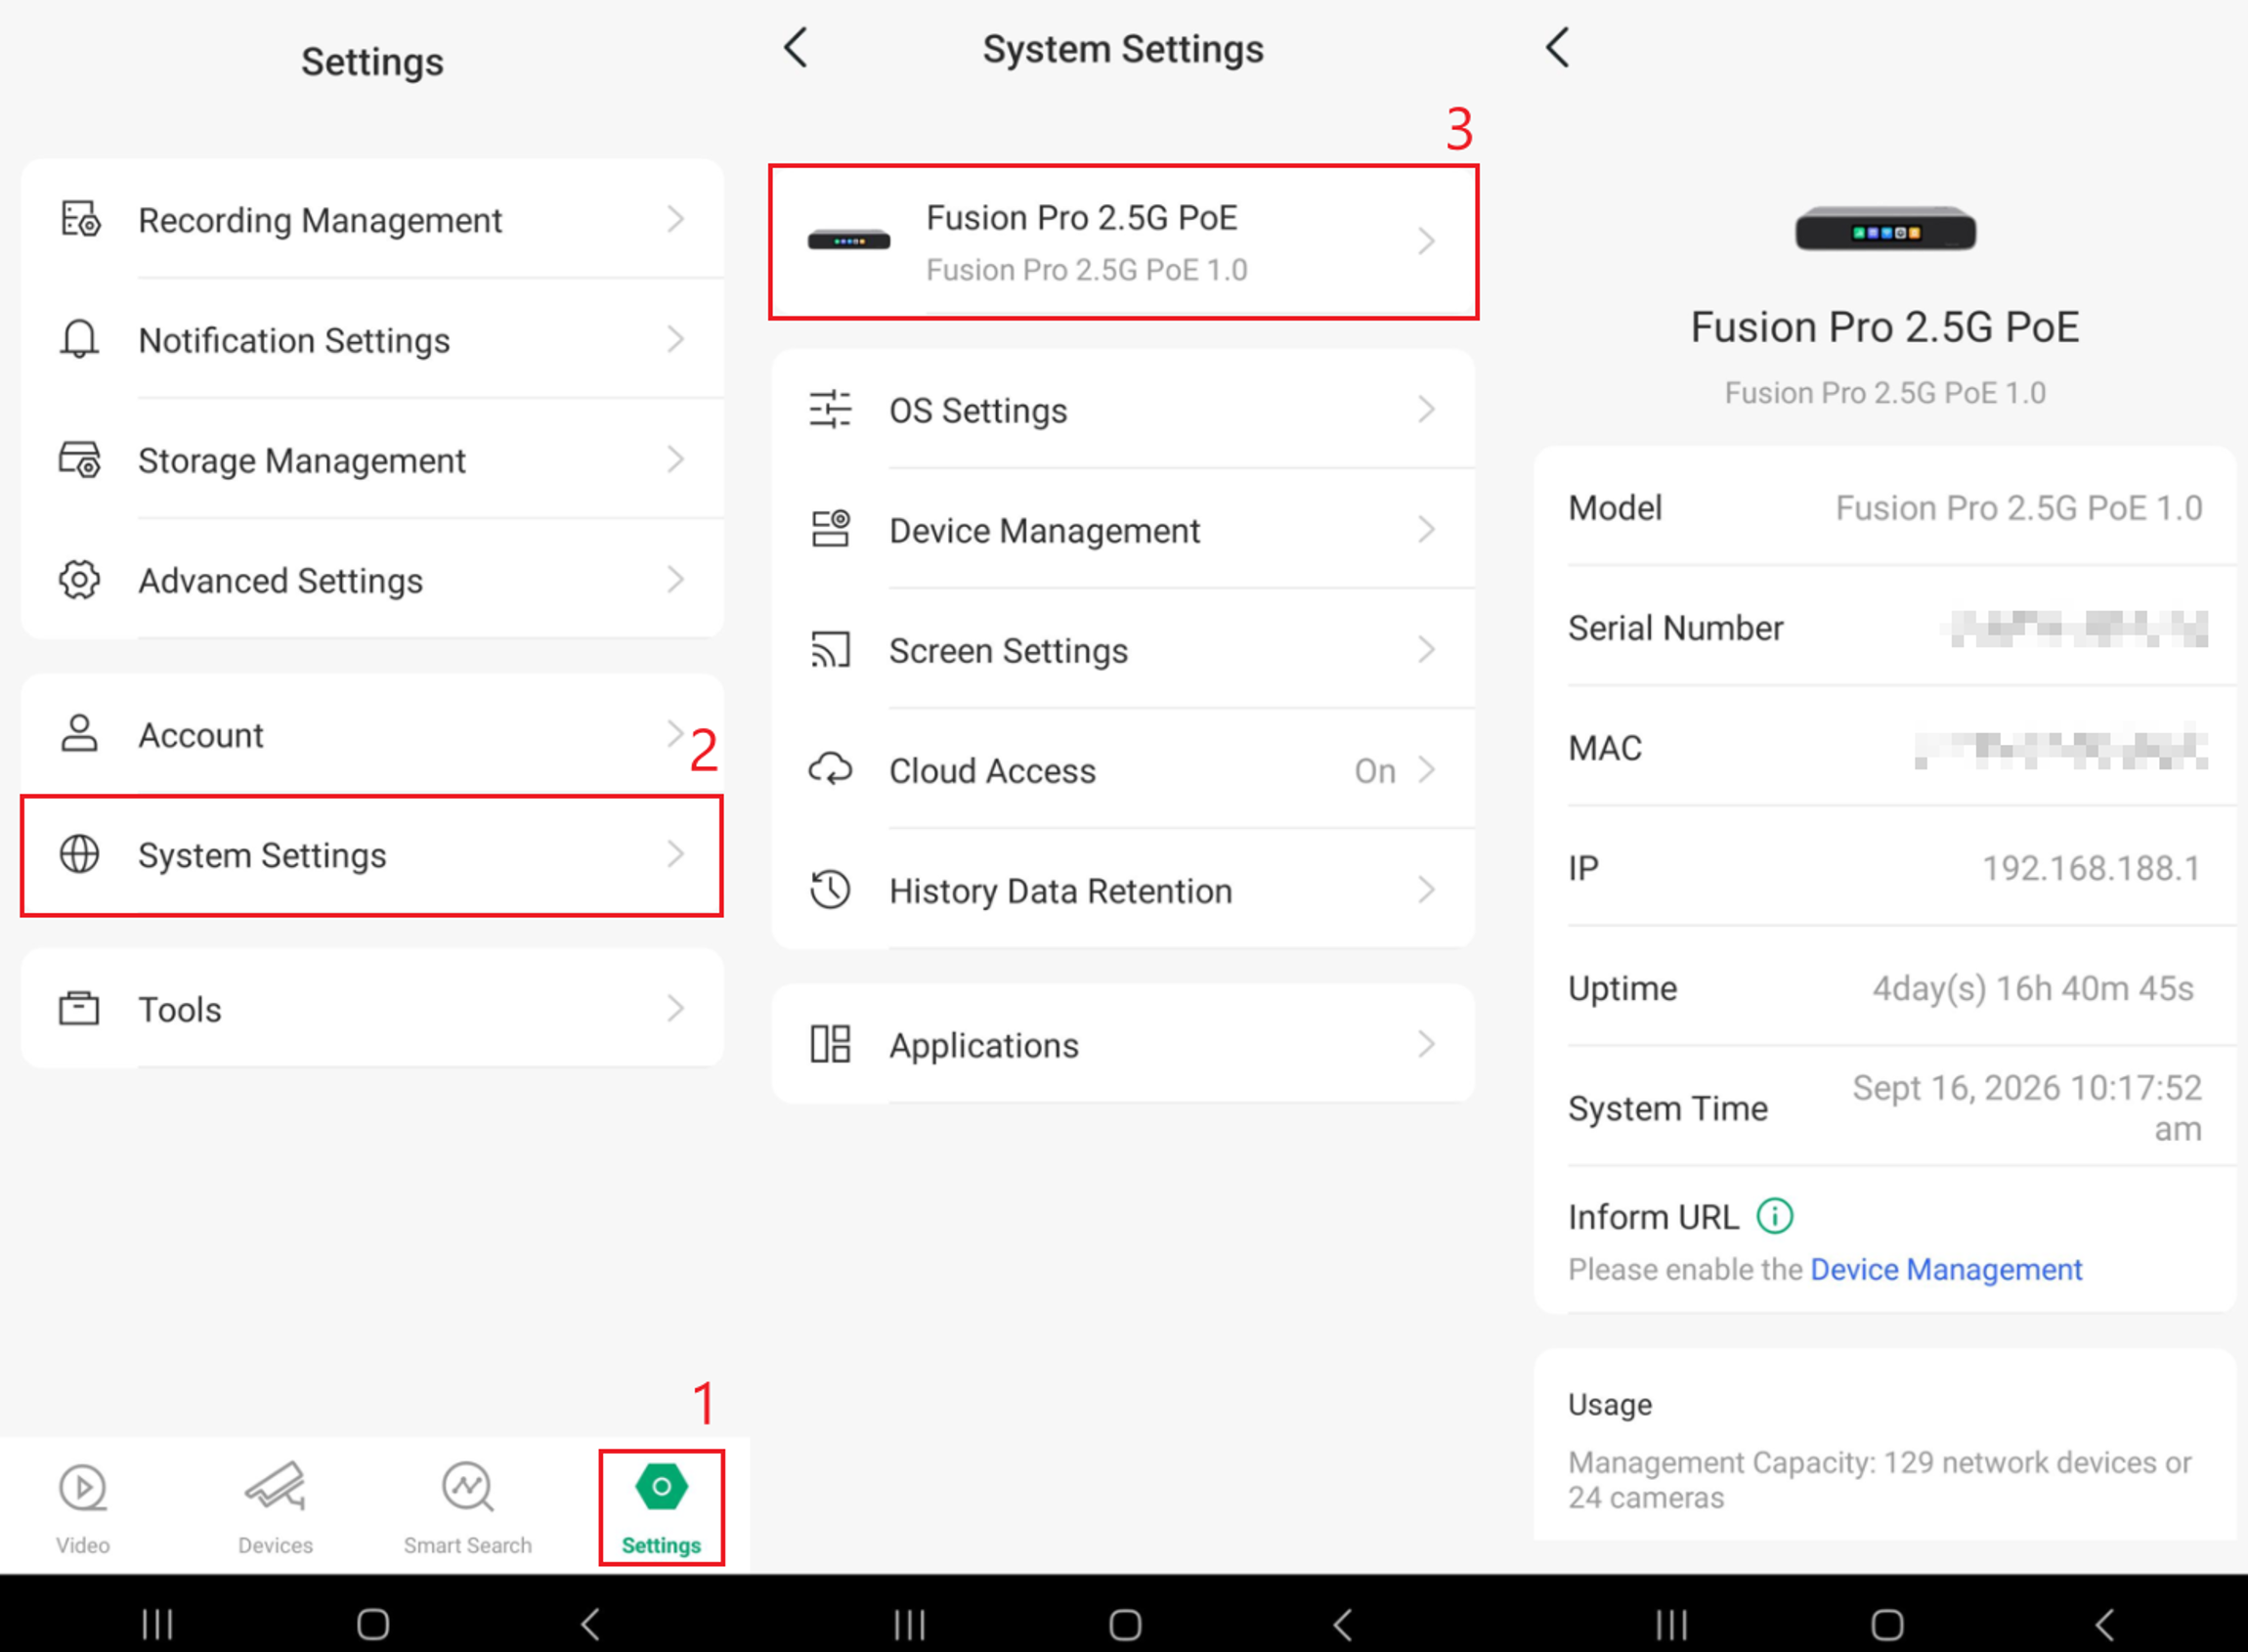
The System Settings menu provides access to the main system-level configuration options for the Fusion Pro device. From this page, you can manage device and operating system settings, configure display options, manage cloud access, set data retention preferences, and access installed applications.
The available options include:
- OS Settings: Configure operating-system-related settings.
- Device Management: View and manage device-level settings.
- Screen Settings: Configure display and screen-related options.
- Cloud Access: Manage the device's cloud access status and settings.
- History Data Retention: Configure how long historical data is retained.
- Applications: View and manage applications available on the device.
To find the System Settings menu, in the Omada Guard App, select Settings, then System Settings.
Device information
The Device Information page provides an overview of the Fusion Pro device and its current system status. It can be used to quickly identify the device and review important network, operational, and capacity information.
The page displays:
- Model: The model and hardware version of the Fusion Pro device.
- Serial Number: The unique serial number assigned to the device.
- MAC: The MAC address of the device.
- IP: The current IP address used by the device.
- Uptime: The amount of time the device has been operating since its last restart.
- System Time: The current date and time configured on the device.
- Inform URL: Displays the controller inform address when Device Management is enabled.
- Usage: Shows the management capacity of the device, including the maximum number of supported network devices and cameras.
To find the Device Information menu in the Omada Guard App, select Settings, then System Settings. Select the Fusion Pro device at the top of the System Settings menu.
Account and organization permissions
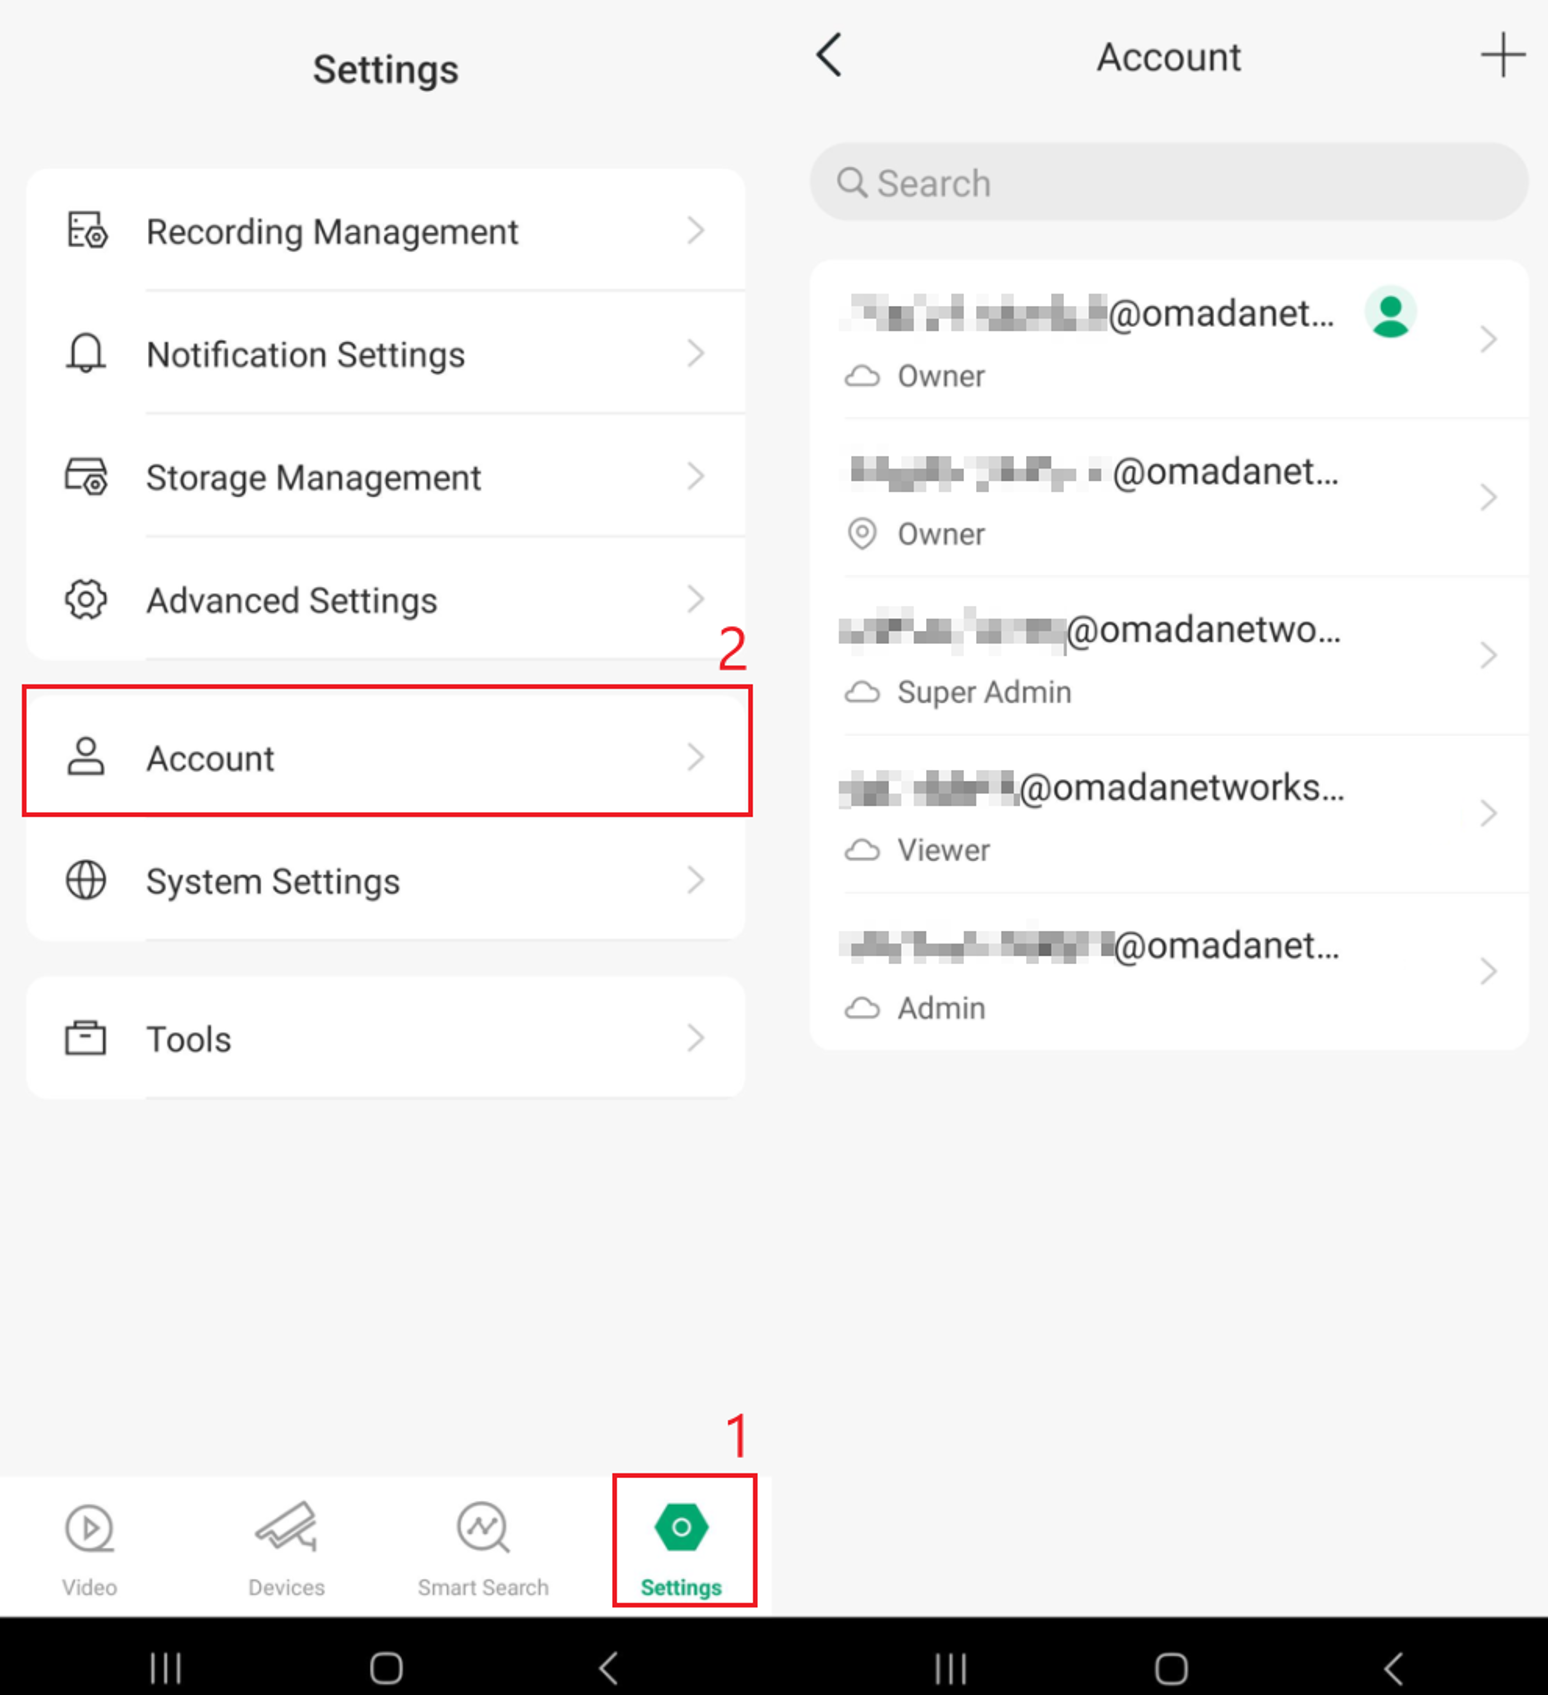
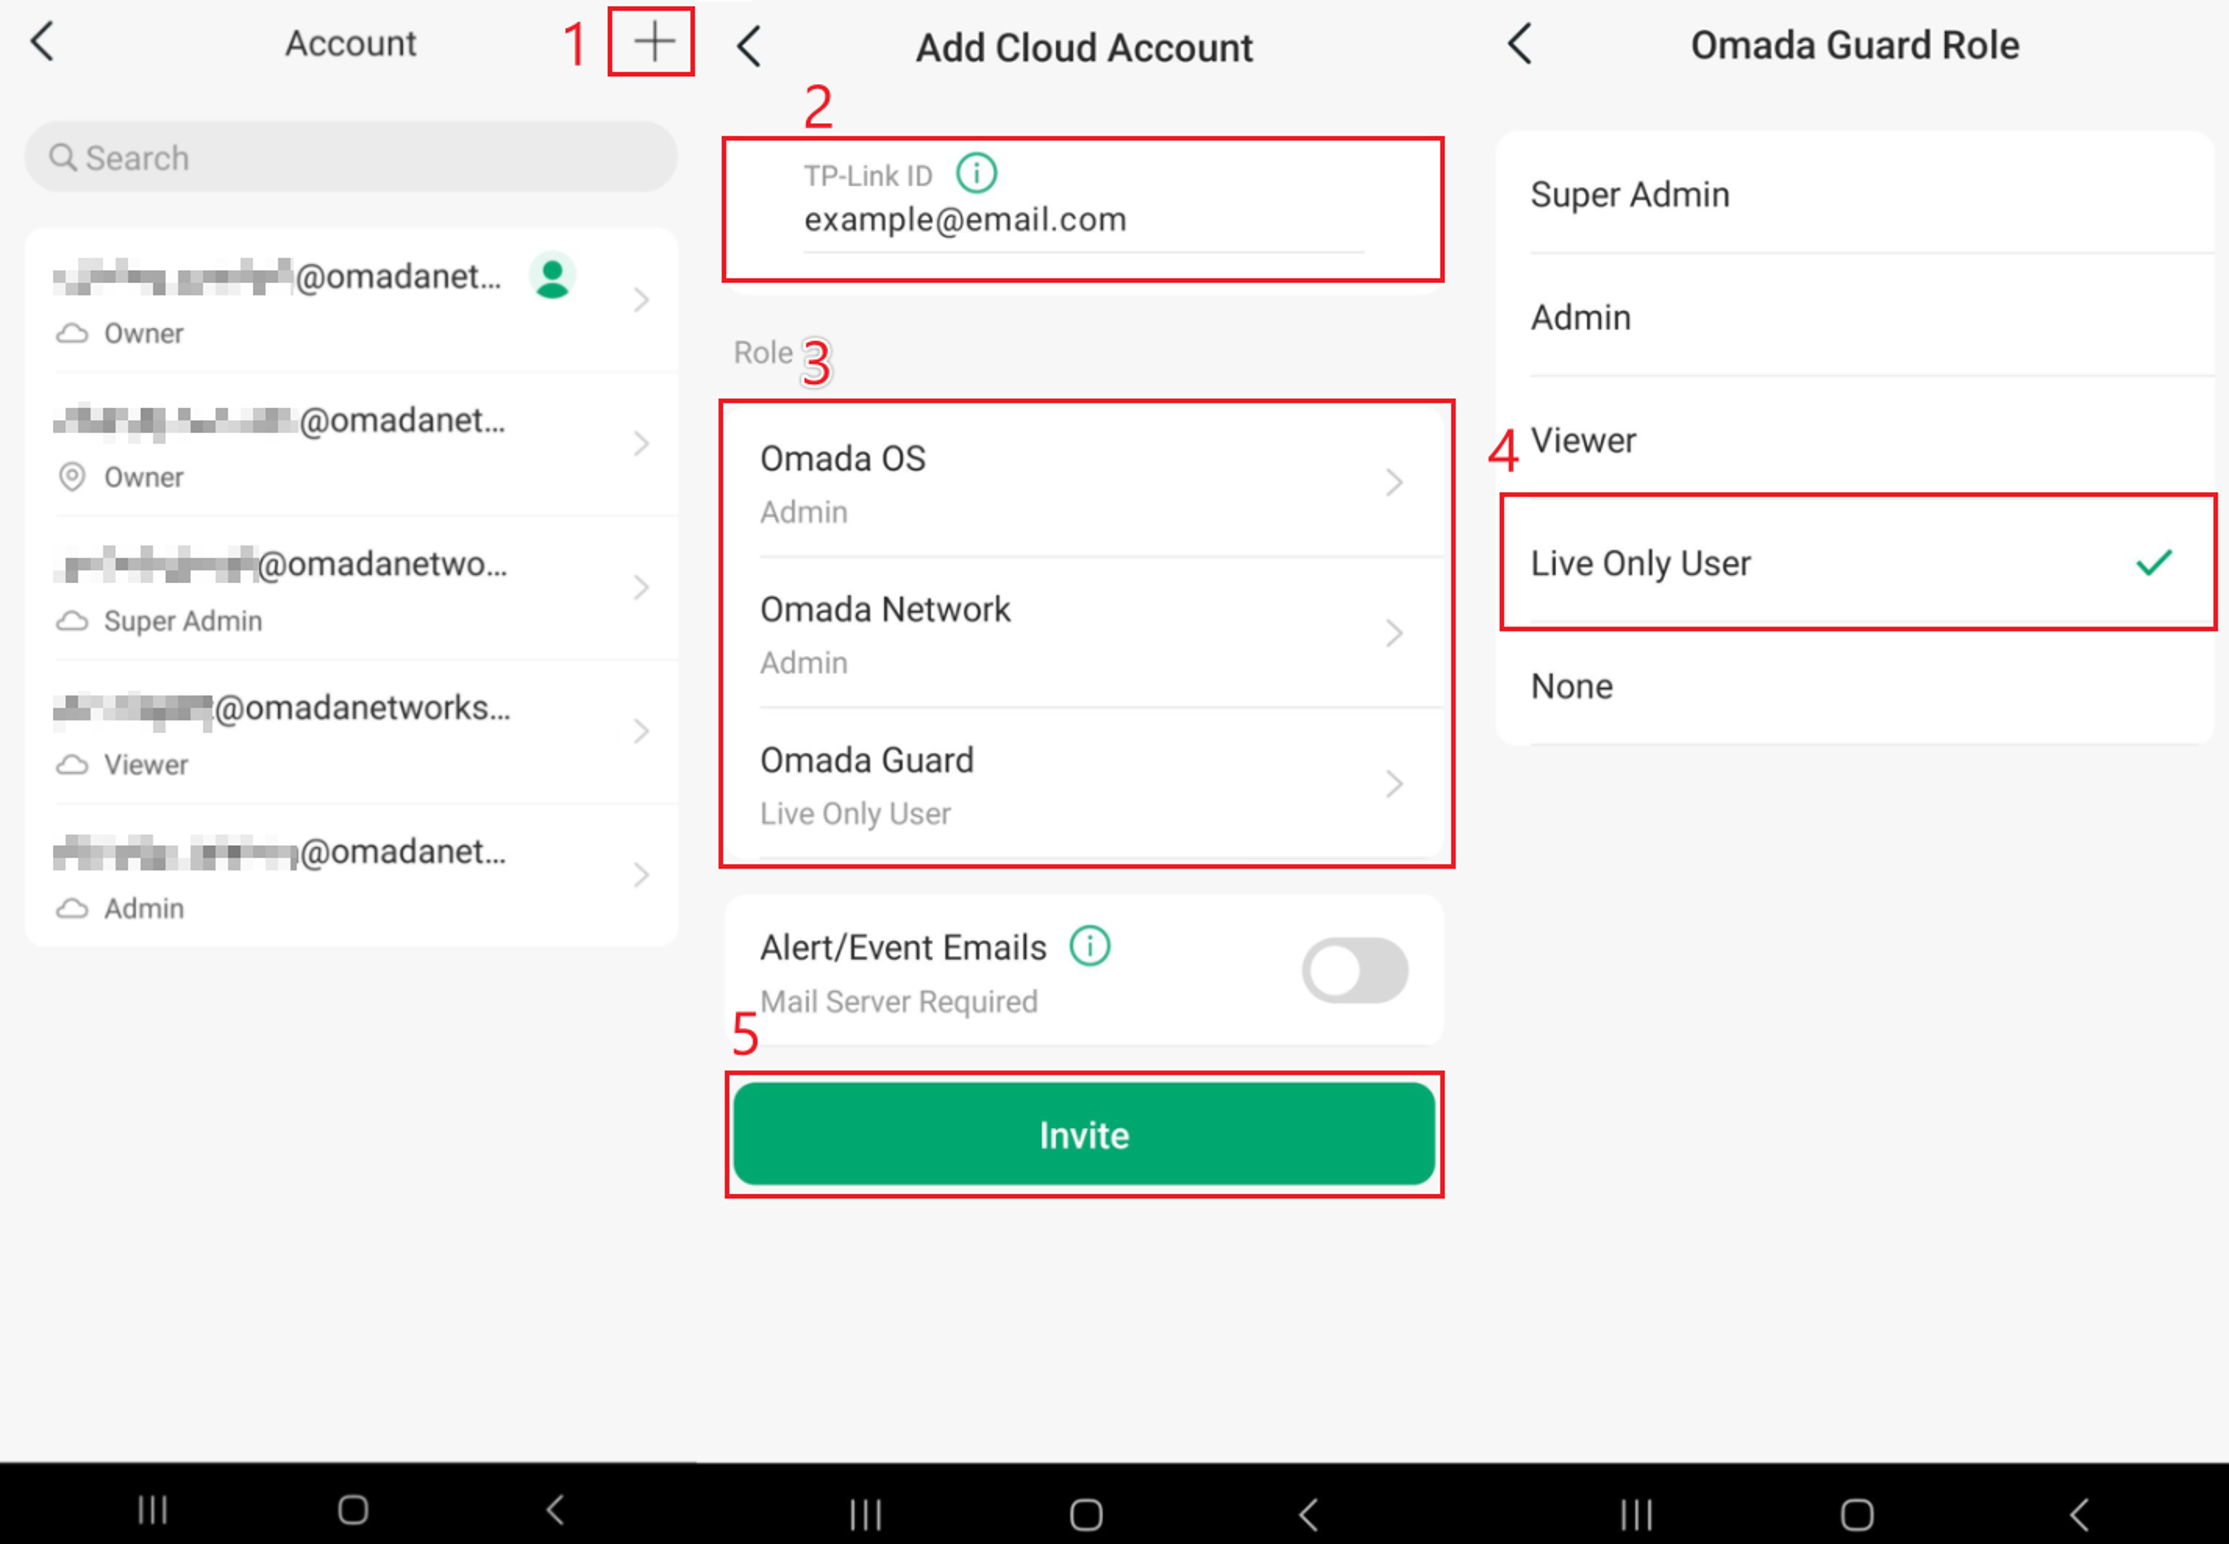
Accounts can be added to the site. The example below configures the Omada Guard role as Live Only User. Each role can be set individually or inherited from the Omada OS role.
In the Account menu, select the plus sign in the top right corner to add a user. Fill in the TP-Link ID field, then set the user's role for each application. Once set, select Invite.
Guard service activation status and app versions
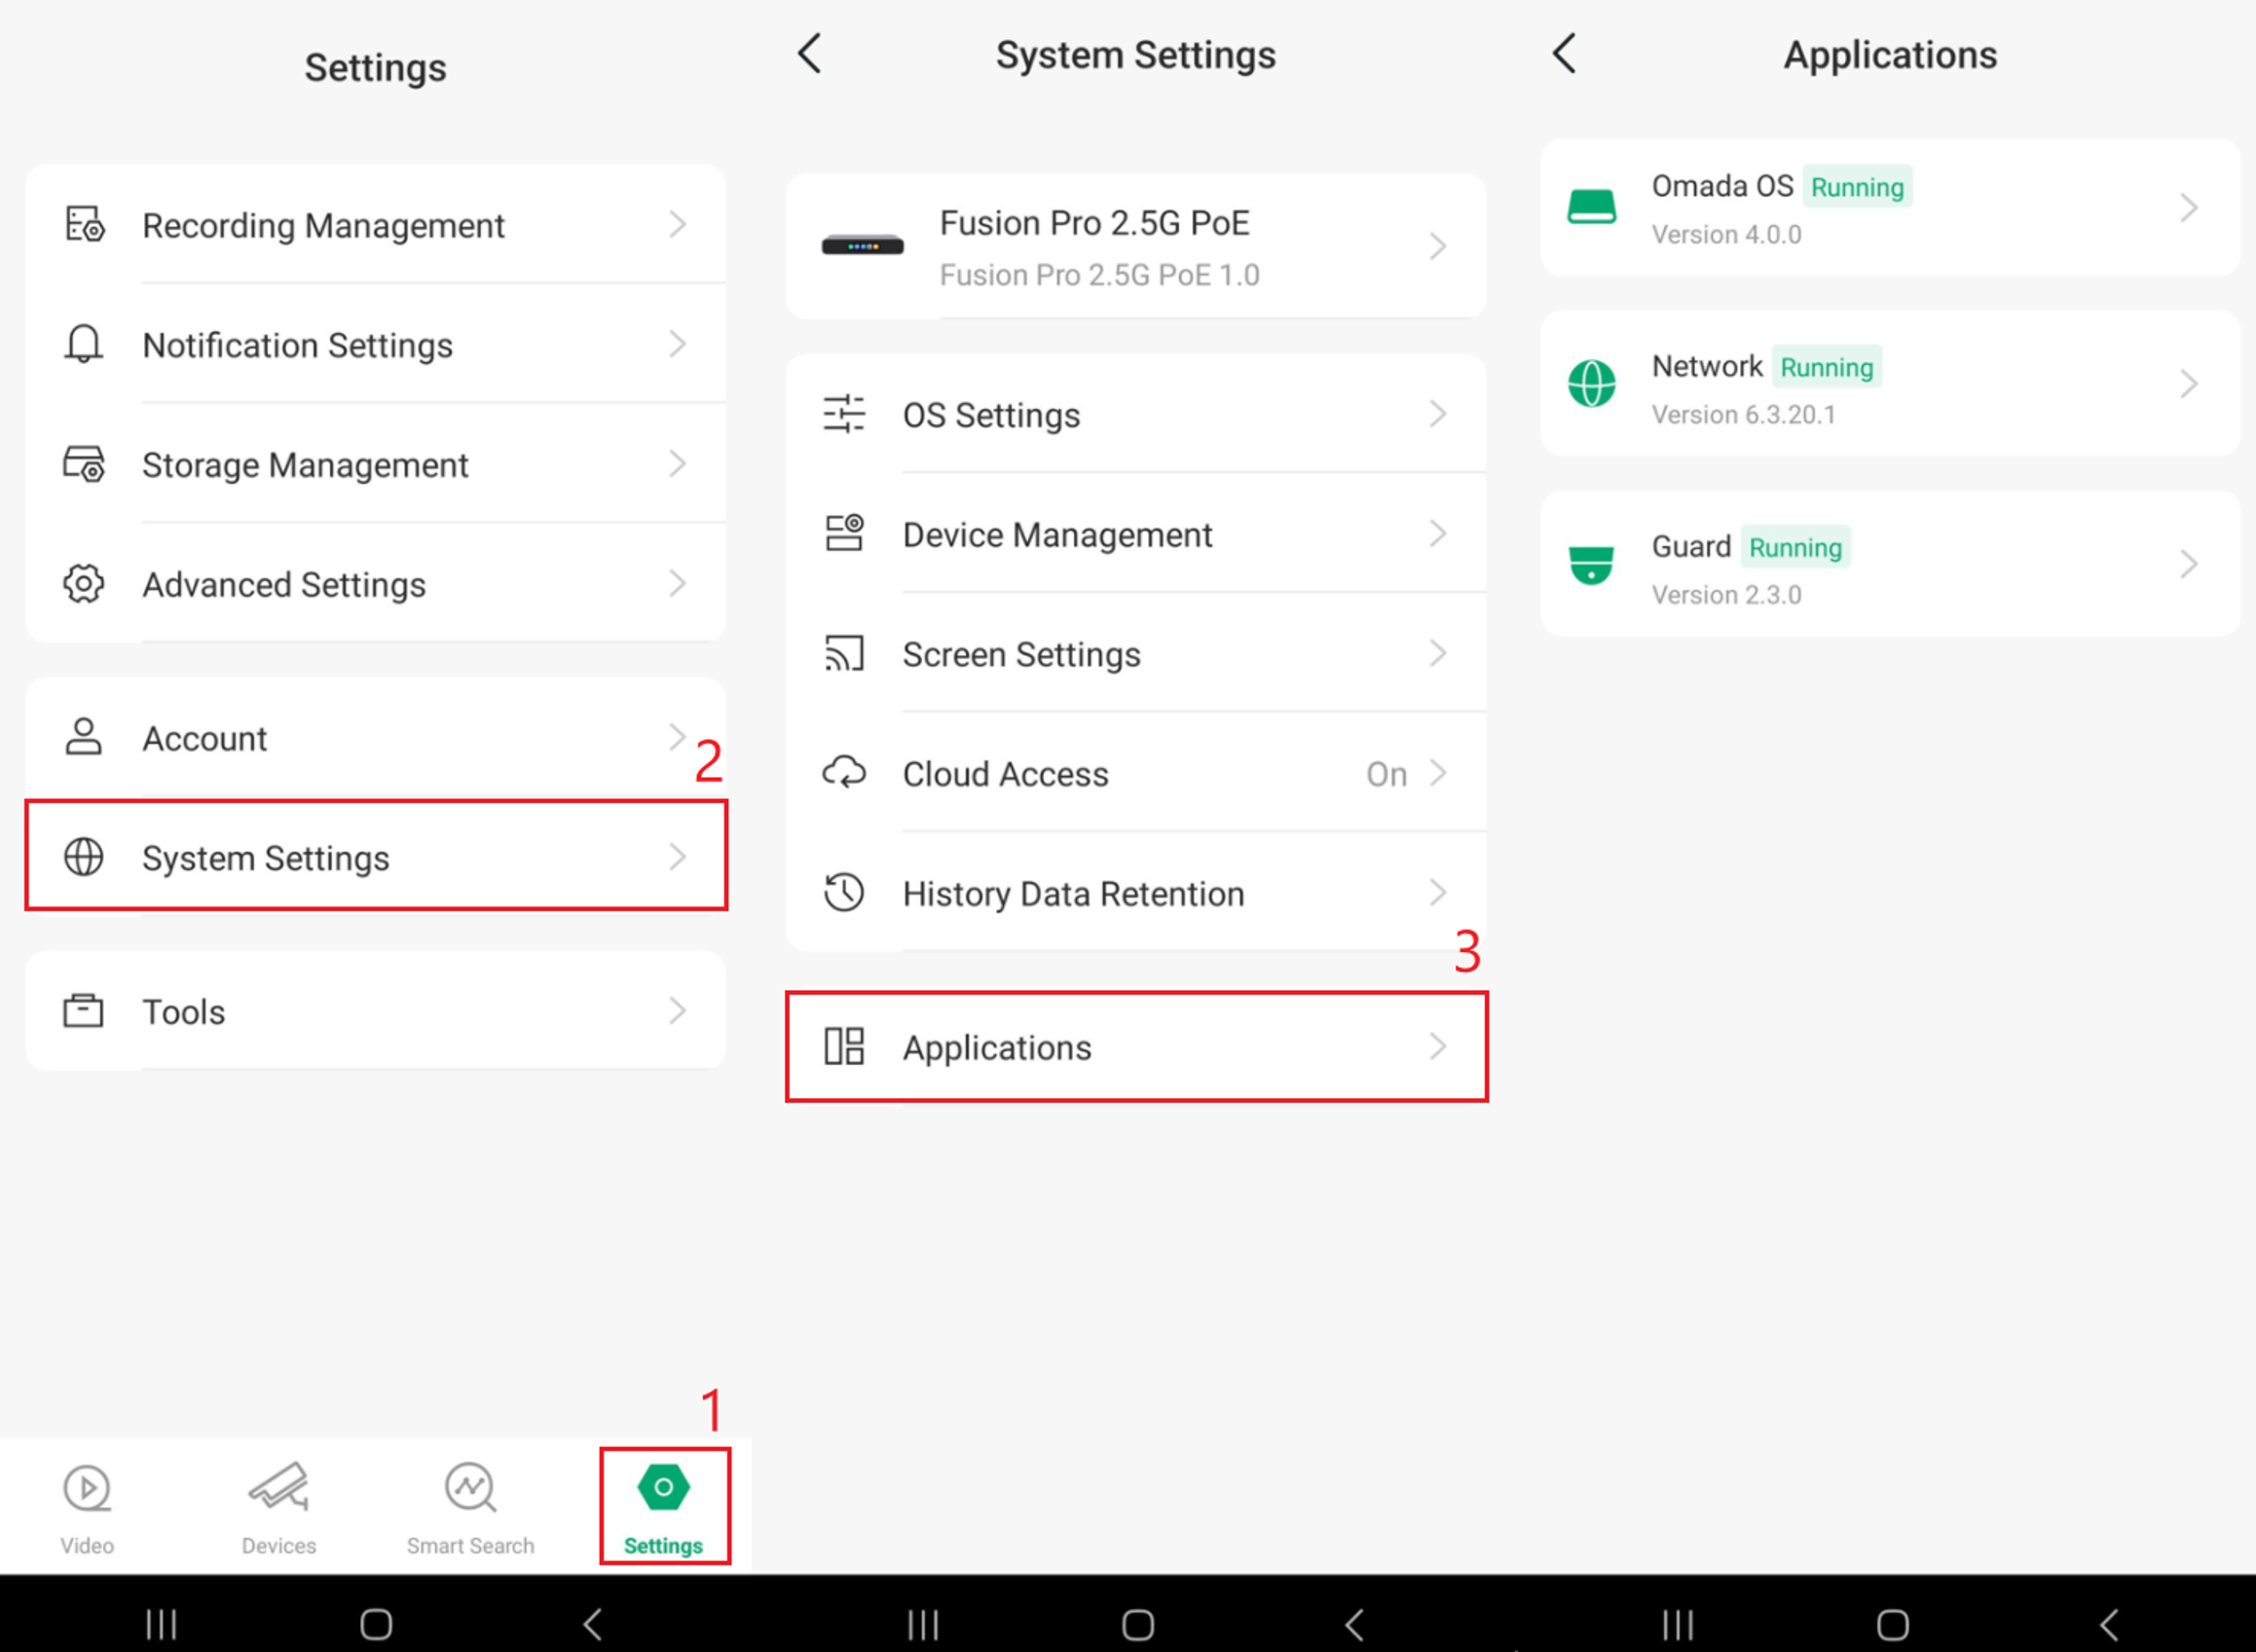
To check the Guard activation status and app versions, in the Omada Guard App, go to Settings > System Settings > Applications. Select an application for further information.
Device online status
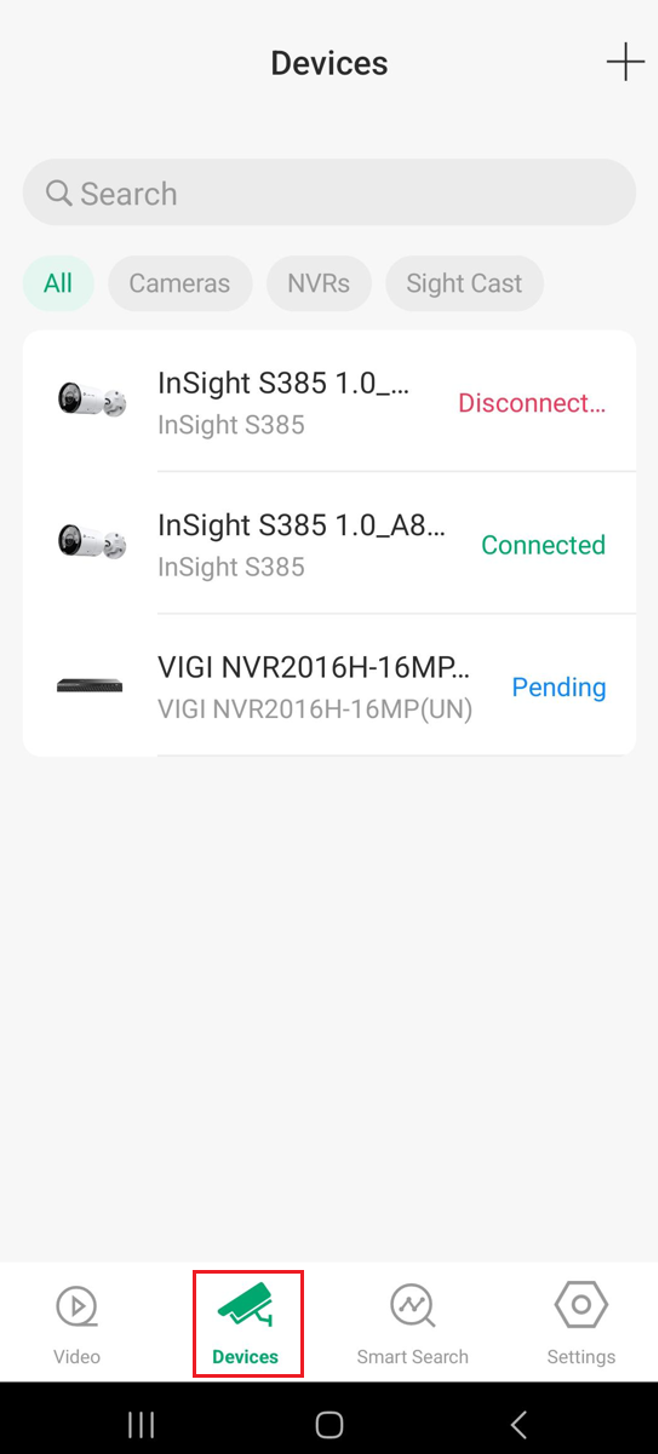
To check device status in the Omada Guard App, select the Devices tab at the bottom of the screen.
Devices may display one of the following statuses:
- Pending: The device has been discovered or added and is waiting for further action, such as adoption.
- Adopting: The device is currently being adopted and added to the system.
- Managed by Others: The device has been discovered, but it is currently adopted and managed by another controller.
- Configuring: The system is applying configuration settings to the device.
- Connected: The device is online and communicating normally with the system.
- Heartbeat Missed: The system has temporarily stopped receiving heartbeat messages from the device, which may indicate a communication issue.
- Disconnected: The device is no longer communicating with the system.
- Isolated: The device is connected to the network but cannot communicate normally with the rest of the managed network or controller.
Conclusion
You have now completed the initial setup of the Fusion Pro Gateway and bound it to your Omada UID. You can use the Omada App to manage your network and switch to the Omada Guard App to manage surveillance devices, users, applications, and device status.
To learn more about each function and configuration, please visit Support Home to download or check the manual for your product.
QA
Q1: Why does my Fusion Pro Gateway not appear in the Omada App?
A1: Ensure the Fusion Pro Gateway has finished starting up, Bluetooth is enabled on your mobile device, the Omada App has Bluetooth permission, and your mobile device is close to the gateway. TP-Link also recommends keeping the mobile device within approximately 5 meters during discovery.
Q2: Do I need both the Omada App and Omada Guard App?
A2: Yes, if you want to manage both networking and surveillance features. The Omada App is used for network setup and management, while the Omada Guard App is used for cameras, recordings, events, and other surveillance functions.
Q3: Why do I see the Plug in the Internet Cable screen during setup?
A3: This screen appears when the Fusion Pro Gateway does not have an internet connection. You can continue configuring the device locally or connect an Ethernet cable to the WAN1 port.
Q4: Can I skip the internet speed test during setup?
A4: Yes. Select Skip in the upper-right corner of the Speed Test screen to continue without performing the test.
Q5: What account is the Fusion Pro Gateway bound to during setup?
A5: The gateway is bound to the selected Omada UID during the setup process. The account provides access to supported Omada cloud services and associated networks and organizations.
Q6: How do I switch from the Omada App to Omada Guard?
A6: In the Omada App, select the Omada Network application icon, then select Guard. The Omada Guard App will open.
Q7: How do I return to the Omada App from Omada Guard?
A7: In the Omada Guard App, select the Omada Guard application icon, then select Network.
Q8: Where can I check the Fusion Pro device information?
A8: In the Omada Guard App, go to Settings > System Settings, then select the Fusion Pro Gateway. The page displays information such as the model, serial number, MAC address, IP address, uptime, and system time.
Q9: Can I give another user access to Omada Guard without giving them full administrator permissions?
A9: Yes. In Account, add the user's TP-Link ID and assign the appropriate role for each application. For example, the Omada Guard role can be set to Live Only User.
Q10: Where can I check whether a camera or NVR is online?
A10: Open the Devices tab in the Omada Guard App. Devices can display statuses such as Pending, Adopting, Configuring, Connected, Heartbeat Missed, Disconnected, or Isolated.
