


How to configure storm control in 2.5G Agile Switch


Contents
Configure Storm Control for Agile Switches on Standalone mode
Configure Storm Control for Agile Switches on Controller mode
Introduction
In a network, when client devices generate a large number of Broadcast, Multicast, or Unknown Unicast packets, a broadcast storm may occur, leading to network congestion, latency, or even device disconnection.
Storm Control limits the rate of specific packet types to effectively prevent such issues.
In common switches, Storm Control usually takes effect on the Ingress (incoming) direction, limiting the rate of broadcast, multicast, and unknown unicast packets entering a port.
However, unlike common switches, the Storm Control function of the 2.5G Agile Switch takes effect on the Egress (outgoing) direction.
This means:
- For common switches, to prevent storms generated by clients from affecting the uplink device, Storm Control should be configured on downlink ports (connected to clients).
- For 2.5G Agile switches, to achieve the same protection effect, Storm Control must be configured on uplink ports (connected to the gateway or upper-layer switch).
You can check all of 2.5G Agile Switches.
Requirements
- Omada 2.5G Easy Managed Switch (2.5G Agile Switch)
Configuration
In the following topology example, ES210X-M2 and ES210GP are used.
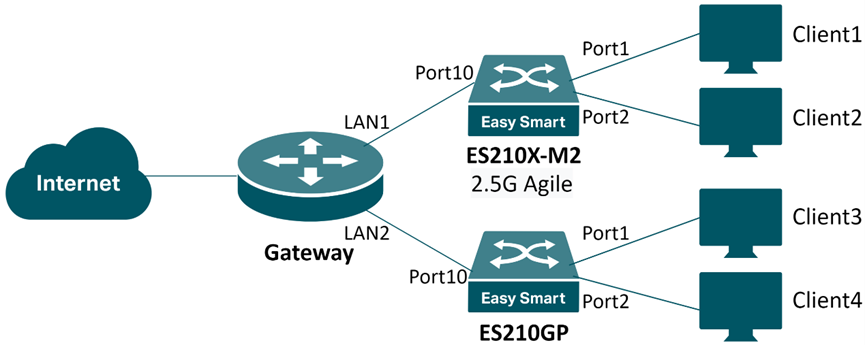
Port 1 and Port 2 are downlink ports, while Port 10 is an uplink port.
To prevent storms from the downlink clients affecting the uplink device, configure Storm Control on the uplink port (Port 10) for the 2.5G Agile Switch (ES210X-M2), and on the downlink ports (Port 1–2) for the common Switch (ES210GP).
Configure Storm Control for Agile Switches on Standalone mode
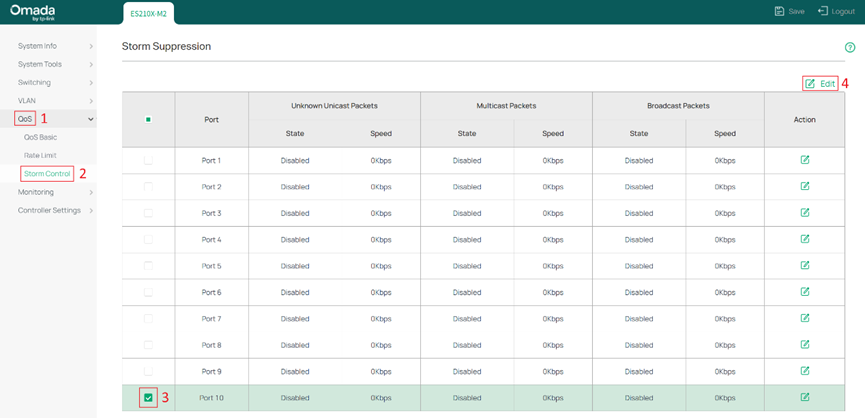
Step 1. Log in to the Web UI, go to QoS > Storm Control, select the ports to configure, and click Edit.
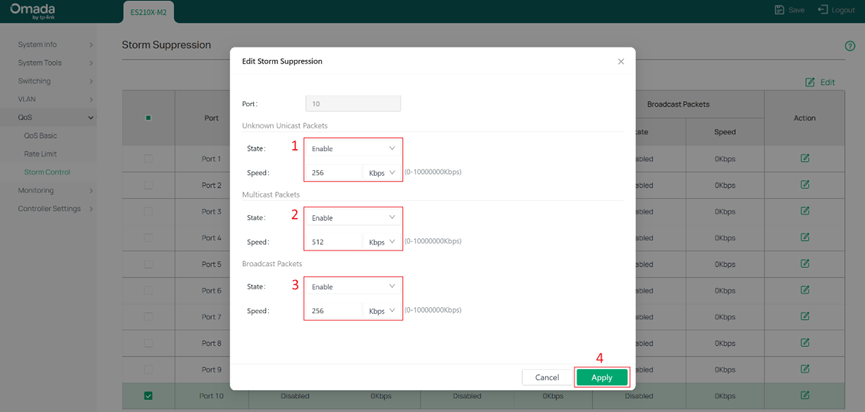
Step 2. Configure the Storm Control parameters as required and click Apply.
Configure Storm Control for Agile Switches on Controller mode
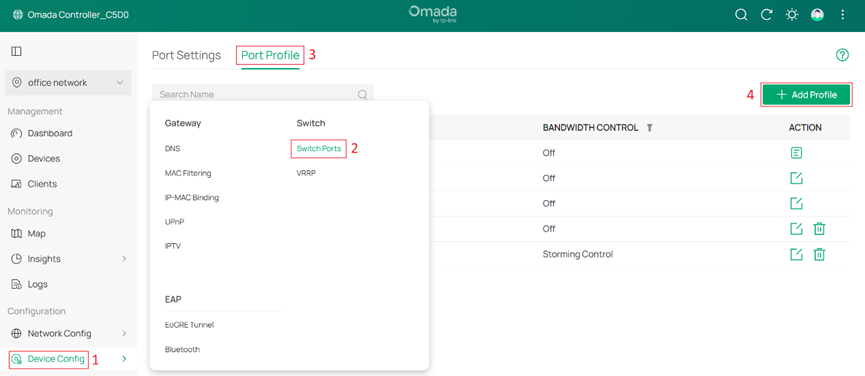
Step 1. Log in to the Controller Web UI, go to Device Config > Switch Ports > Port Profile, and click + Add Profile to create a Storm Control Port Profile.
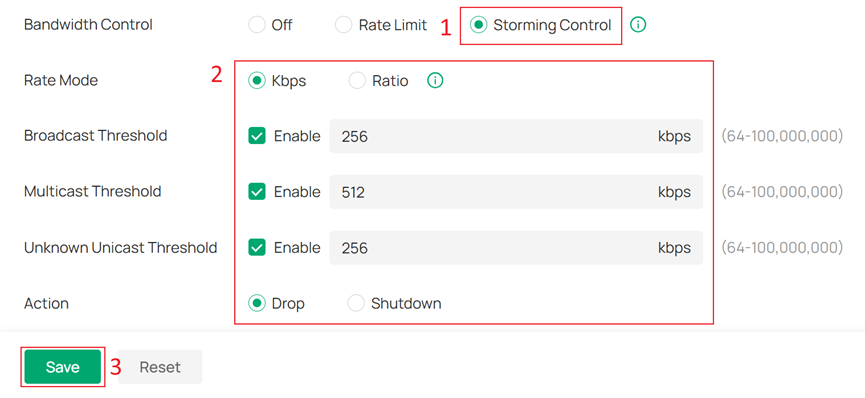
Step 2. Under Bandwidth Control, select Storm Control, configure the parameters as needed. Set other options according to your needs. Then, click Save.
Step 3. Go to Device Config > Switch Ports > Port Settings, edit the ports where Storm Control should be applied, click Edit Selected.

Step 4. Assign the Port Profile (with Storm Control enabled) as Profile for these ports.

Conclusion
With the above configuration, you can enable Storm Control on 2.5G Agile Switches to prevent broadcast storms from spreading.
Please note the directional difference: common switches act on Ingress, while 2.5G Agile switches act on Egress.
Get to know more details of each function and configuration please go to Download Center to download the manual of your product.
QA
Q1: Why does Storm Control have different directions on different switches?
A1: This is due to differences in hardware chip architecture. Currently, only the Omada 2.5G Easy Managed Switch (2.5G Agile Switch) series implements Storm Control on the Egress direction.
Q2: What happens if I configure Storm Control on a downlink port of a 2.5G Agile Switch?
A2: On 2.5G Agile switches, configuring Storm Control on a downlink port will not limit broadcast storms generated by clients, but it can restrict upstream storms from affecting downlink devices.
Q3: What happens if I configure Storm Control on both uplink and downlink ports?
A3: Enabling Storm Control on both uplink and downlink ports provides bidirectional protection:
- The uplink port limits abnormal traffic sent from clients.
- The downlink port limits broadcast storms coming from upstream devices.
It is suitable for large-scale networks requiring dual-direction protection.
