


How to configure IPSec LAN to LAN VPN for multiple subnets using the new GUI


This article mainly introduces how to configure IPSec LAN to LAN VPN for multiple subnets, if you have any other problems about how to configure VPN connections, please refer to Configuration Guide for VPN.
Topology and requirements
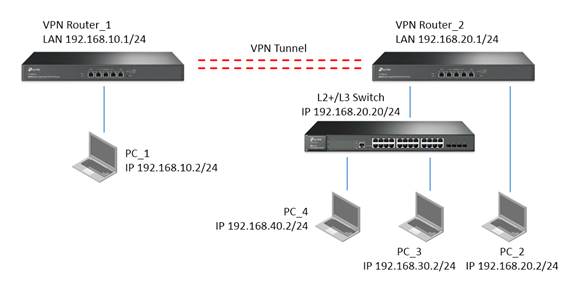
- VPN Router_1 and VPN Router_2 connect together via IPSec VPN.
- PC_1 in remote subnet 192.168.10.0/24 could access PC_2 in local subnet 192.168.20.0/24
- PC_1 in remote subnet 192.168.10.0/24 could access PC_3 in local subnet 192.168.30.0/24
- PC_1 in remote subnet 192.168.10.0/24 could access PC_4 in local subnet 192.168.40.0/24
Apart from configuring VPN connections on VPN Routers, we shall also configure Static Routing and Multi-Nets NAT on VPN Router which contains multiple subnets (In this example it is VPN Router_2).
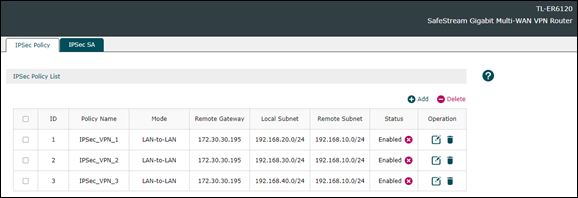
1. Configure IPSec VPN connection on two VPN Router
We shall configure IPsec VPN Tunnel for each subnets so that packets in those subnets could go through the VPN connection. In this example, we configure three IPsec VPN Tunnel on VPN > IPSec > IPSec Polocy as follows:
When the IPSec VPN Tunnel connected, you could see entries on VPN > IPSec > IPSec SA as follows:

2. Configure Static Route on VPN Router_2
Static Route is required to make sure that packets sent from the remote subnet 192.168.10.0/24 could be forwarded to different subnets. Here we shall configure the IP address of switch as the Next Hop for packets send to each subnets different from LAN of VPN Router_2 on Transmission > Routing > Static Route as follows:

3. Configure Multi-Nets NAT on VPN Router_2 (Optional)
Multi-Nets NAT is configured to enable the Internet access of different subnets. If you don’t configure it, your VPN connection for different subnets would not be affected, thus you could configured it according to your actual requirement. In this example we could configure it on Transmission > NAT > Multi-Nets NAT as follows:

On L2+/L3 Switch, we shall configure Static Routing and Interface so that packets in different subnets could be transmitted between this L2+/L3 Switch and VPN Router_2.
1. Configure Interface for different subnets on L2+/L3 Switch
We need to configure Interface for each subnets so that packets could be forwarded between this subnet and L2+/L3 Switch. Go to L3 FEATURES > Interface > Interface Config > Edit IPv4 to configure it as follows

2. Configure Static Routing on L2+/L3 Switch
Here the Static Routing entry performs as default gateway. It would send all packets to VPN Router_2 to forward to the remote site of VPN Tunnel or access Internet. Go to L3 FEATURES > Static Routing > IPv4 Static Routing to configure it as follows:

Finally, after configuring Interface and Static Routing, we could the routing table on L3 FEATURES > Routing Tables > IPv4 Routing Table as follows:

