


Content
Configuration – Fusion Gateway
Introduction
This FAQ provides guidance on configuring Dynamic DNS (DDNS) on Omada Gateways and Fusion Gateways using the Omada App. DDNS helps maintain reliable remote access to gateways, servers, NAS devices, VPNs, surveillance systems, and other network services when the public IP address changes dynamically.
DDNS automatically updates a domain name so that it points to the gateway’s current public IP address. This eliminates the need to manually track IP address changes and provides a consistent hostname for remote connectivity.
Both Omada Gateways and Fusion Gateways support multiple third-party DDNS providers. Fusion Gateways support the same DDNS configuration options as Omada Gateways, with the additional option of using TP-Link DDNS.
This article explains how to configure DDNS using the Omada App, including provider selection, domain configuration, verification, and relevant configuration options.
Requirements
Omada Gateway requirements
- Omada Gateway
- Omada App v5.2.1 or later
- Omada Controller v6.2 or later
Fusion Gateway requirements
- Fusion Gateway
- Omada App v5.2.1 or later
- Cloud Access enabled when using TP-Link DDNS
Configuration
DDNS configuration is similar for Omada and Fusion Gateways. However, Fusion Gateways also support TP-Link DDNS. Therefore, the configuration procedures are provided in separate sections.
Configuration – Omada Gateway
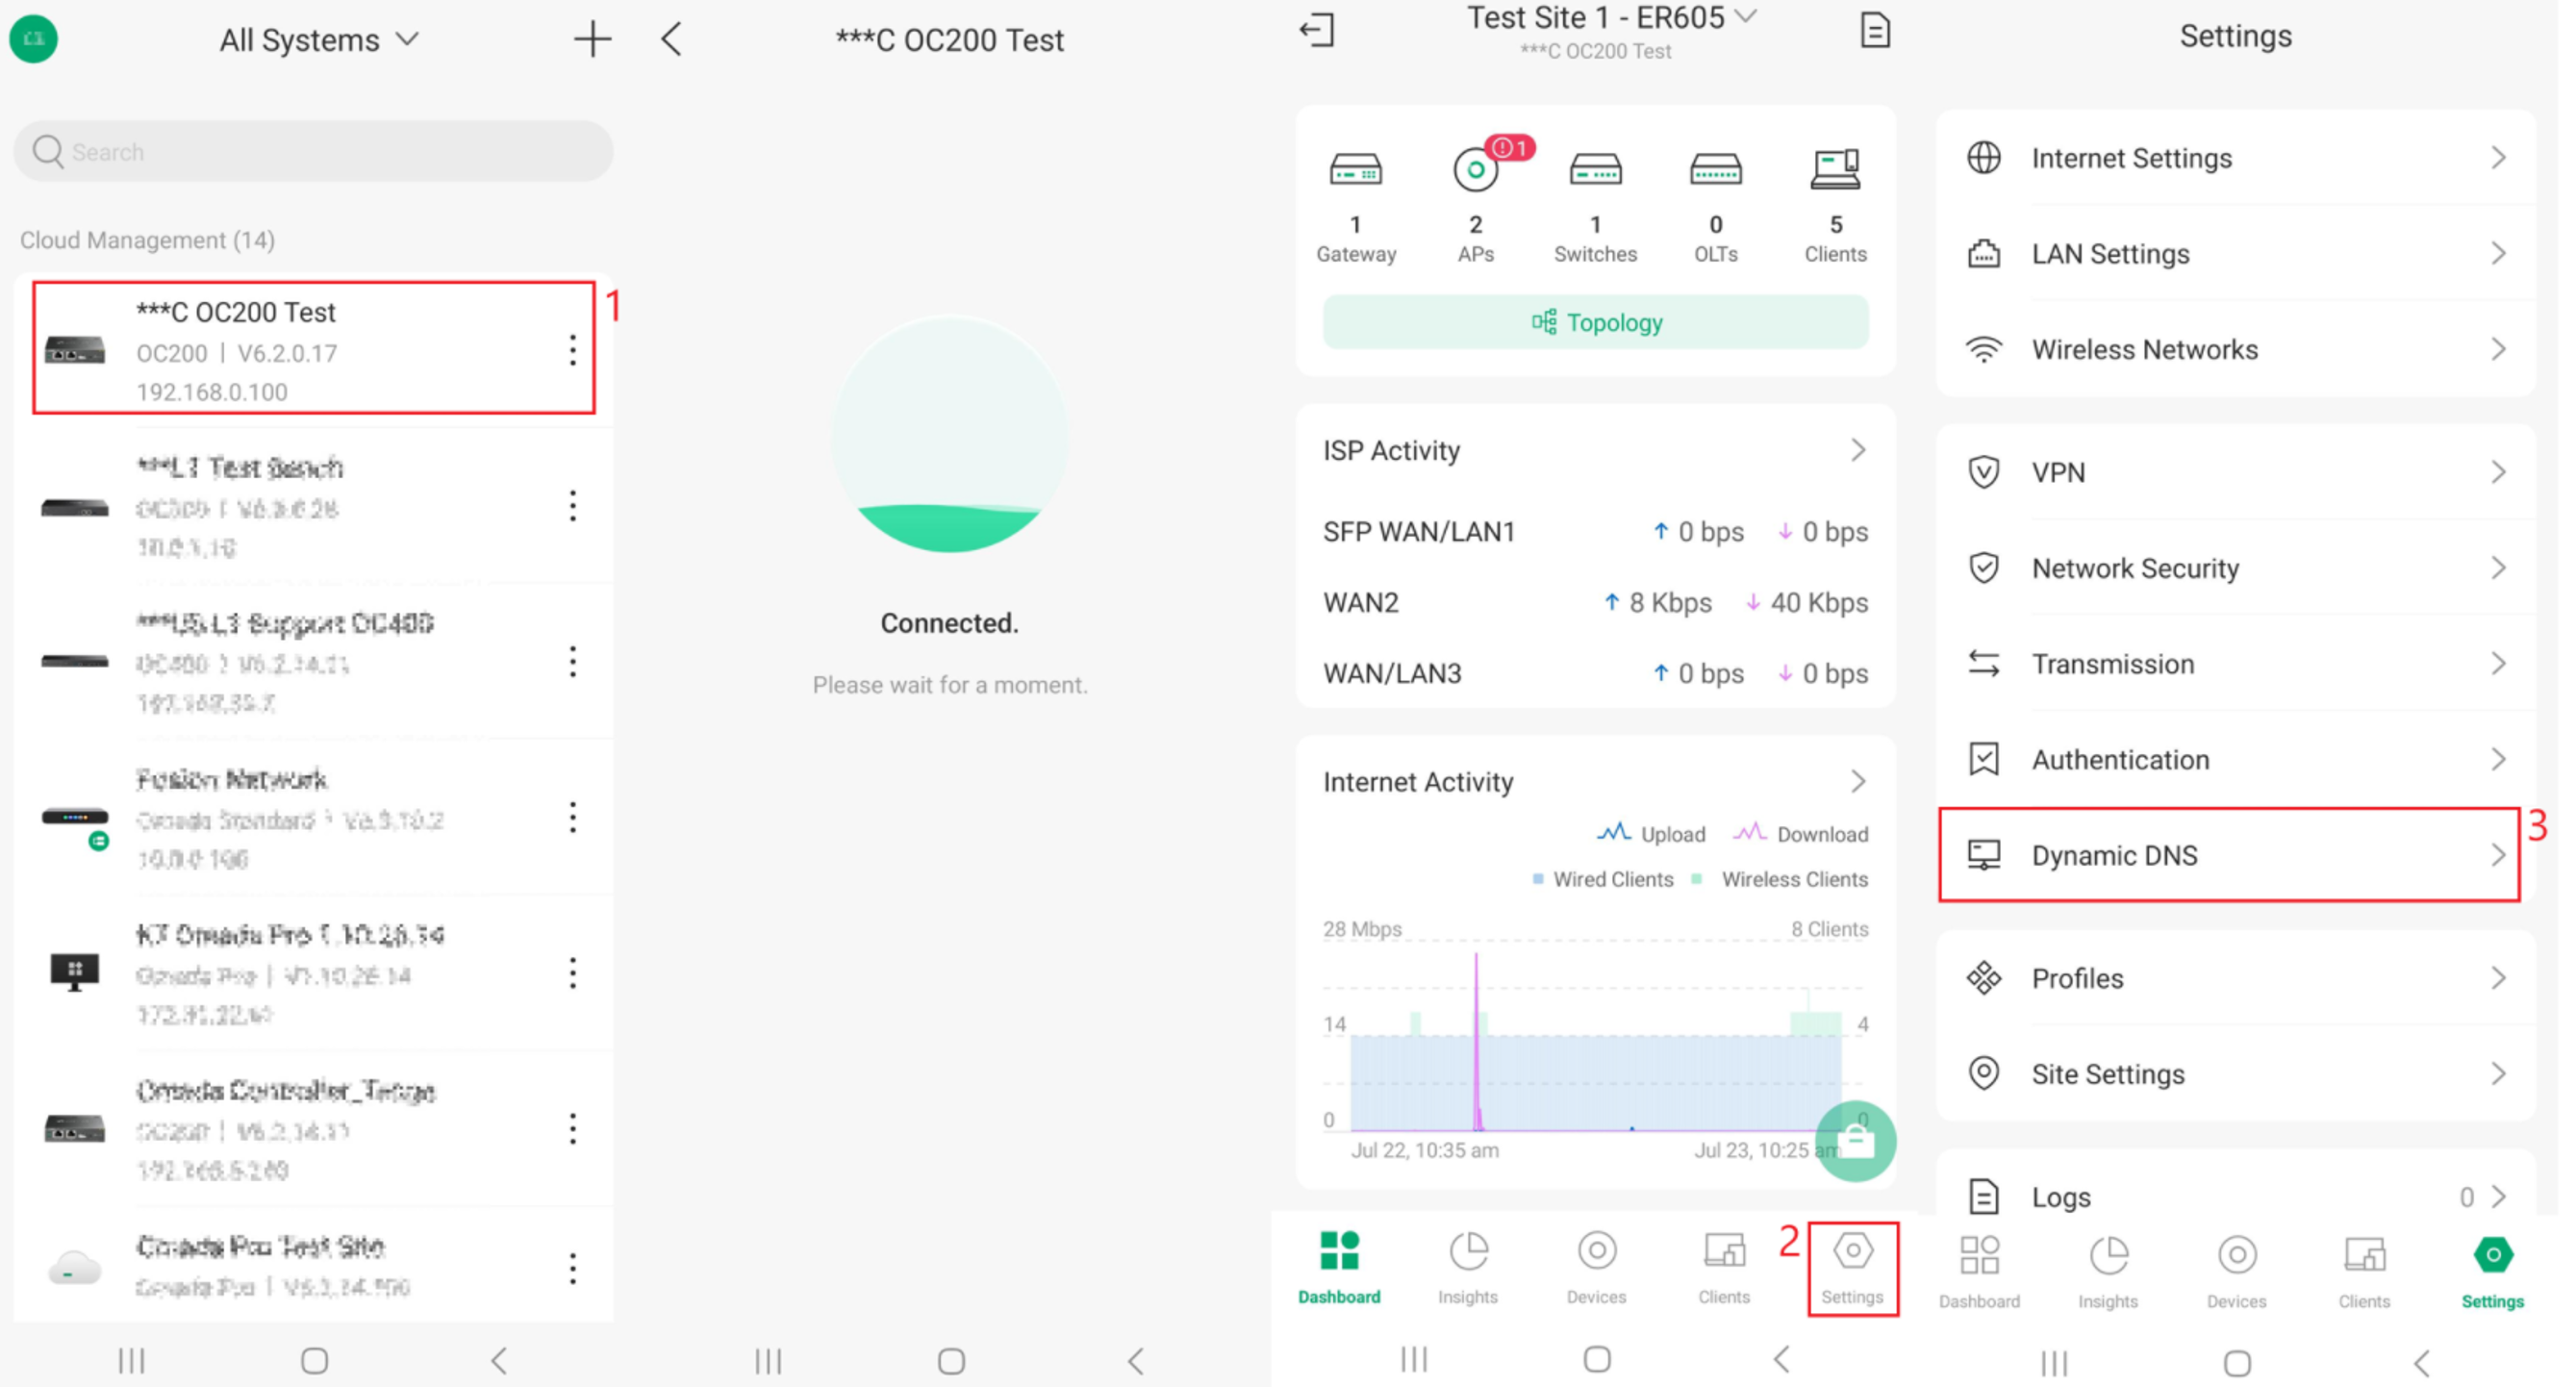
Step 1. Open the Omada App, select the desired Site, and navigate to Settings > Dynamic DNS.
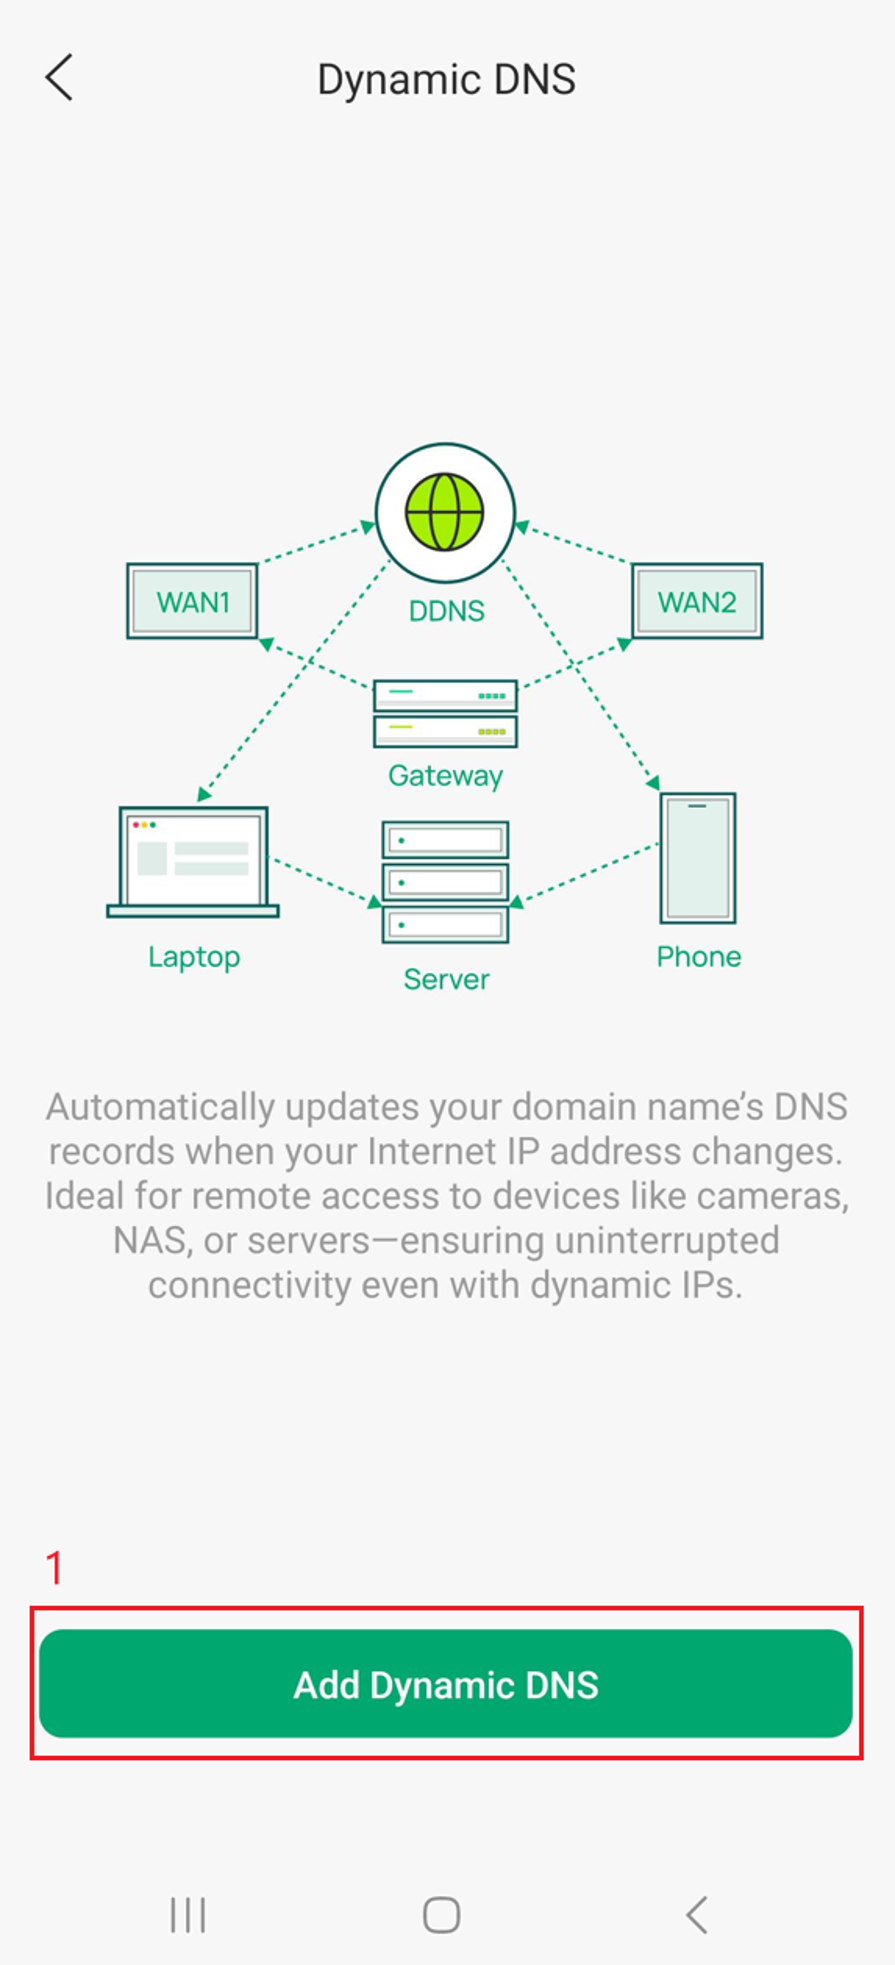
Step 2. Select Add Dynamic DNS.
Step 3. Select the Service Provider, then configure the Interface, Username, Password, Domain Name, Interval Mode, and Update Interval settings. The available settings may vary depending on the selected Service Provider. Select Done when complete. To add more Dynamic DNS entries, tap the + symbol.
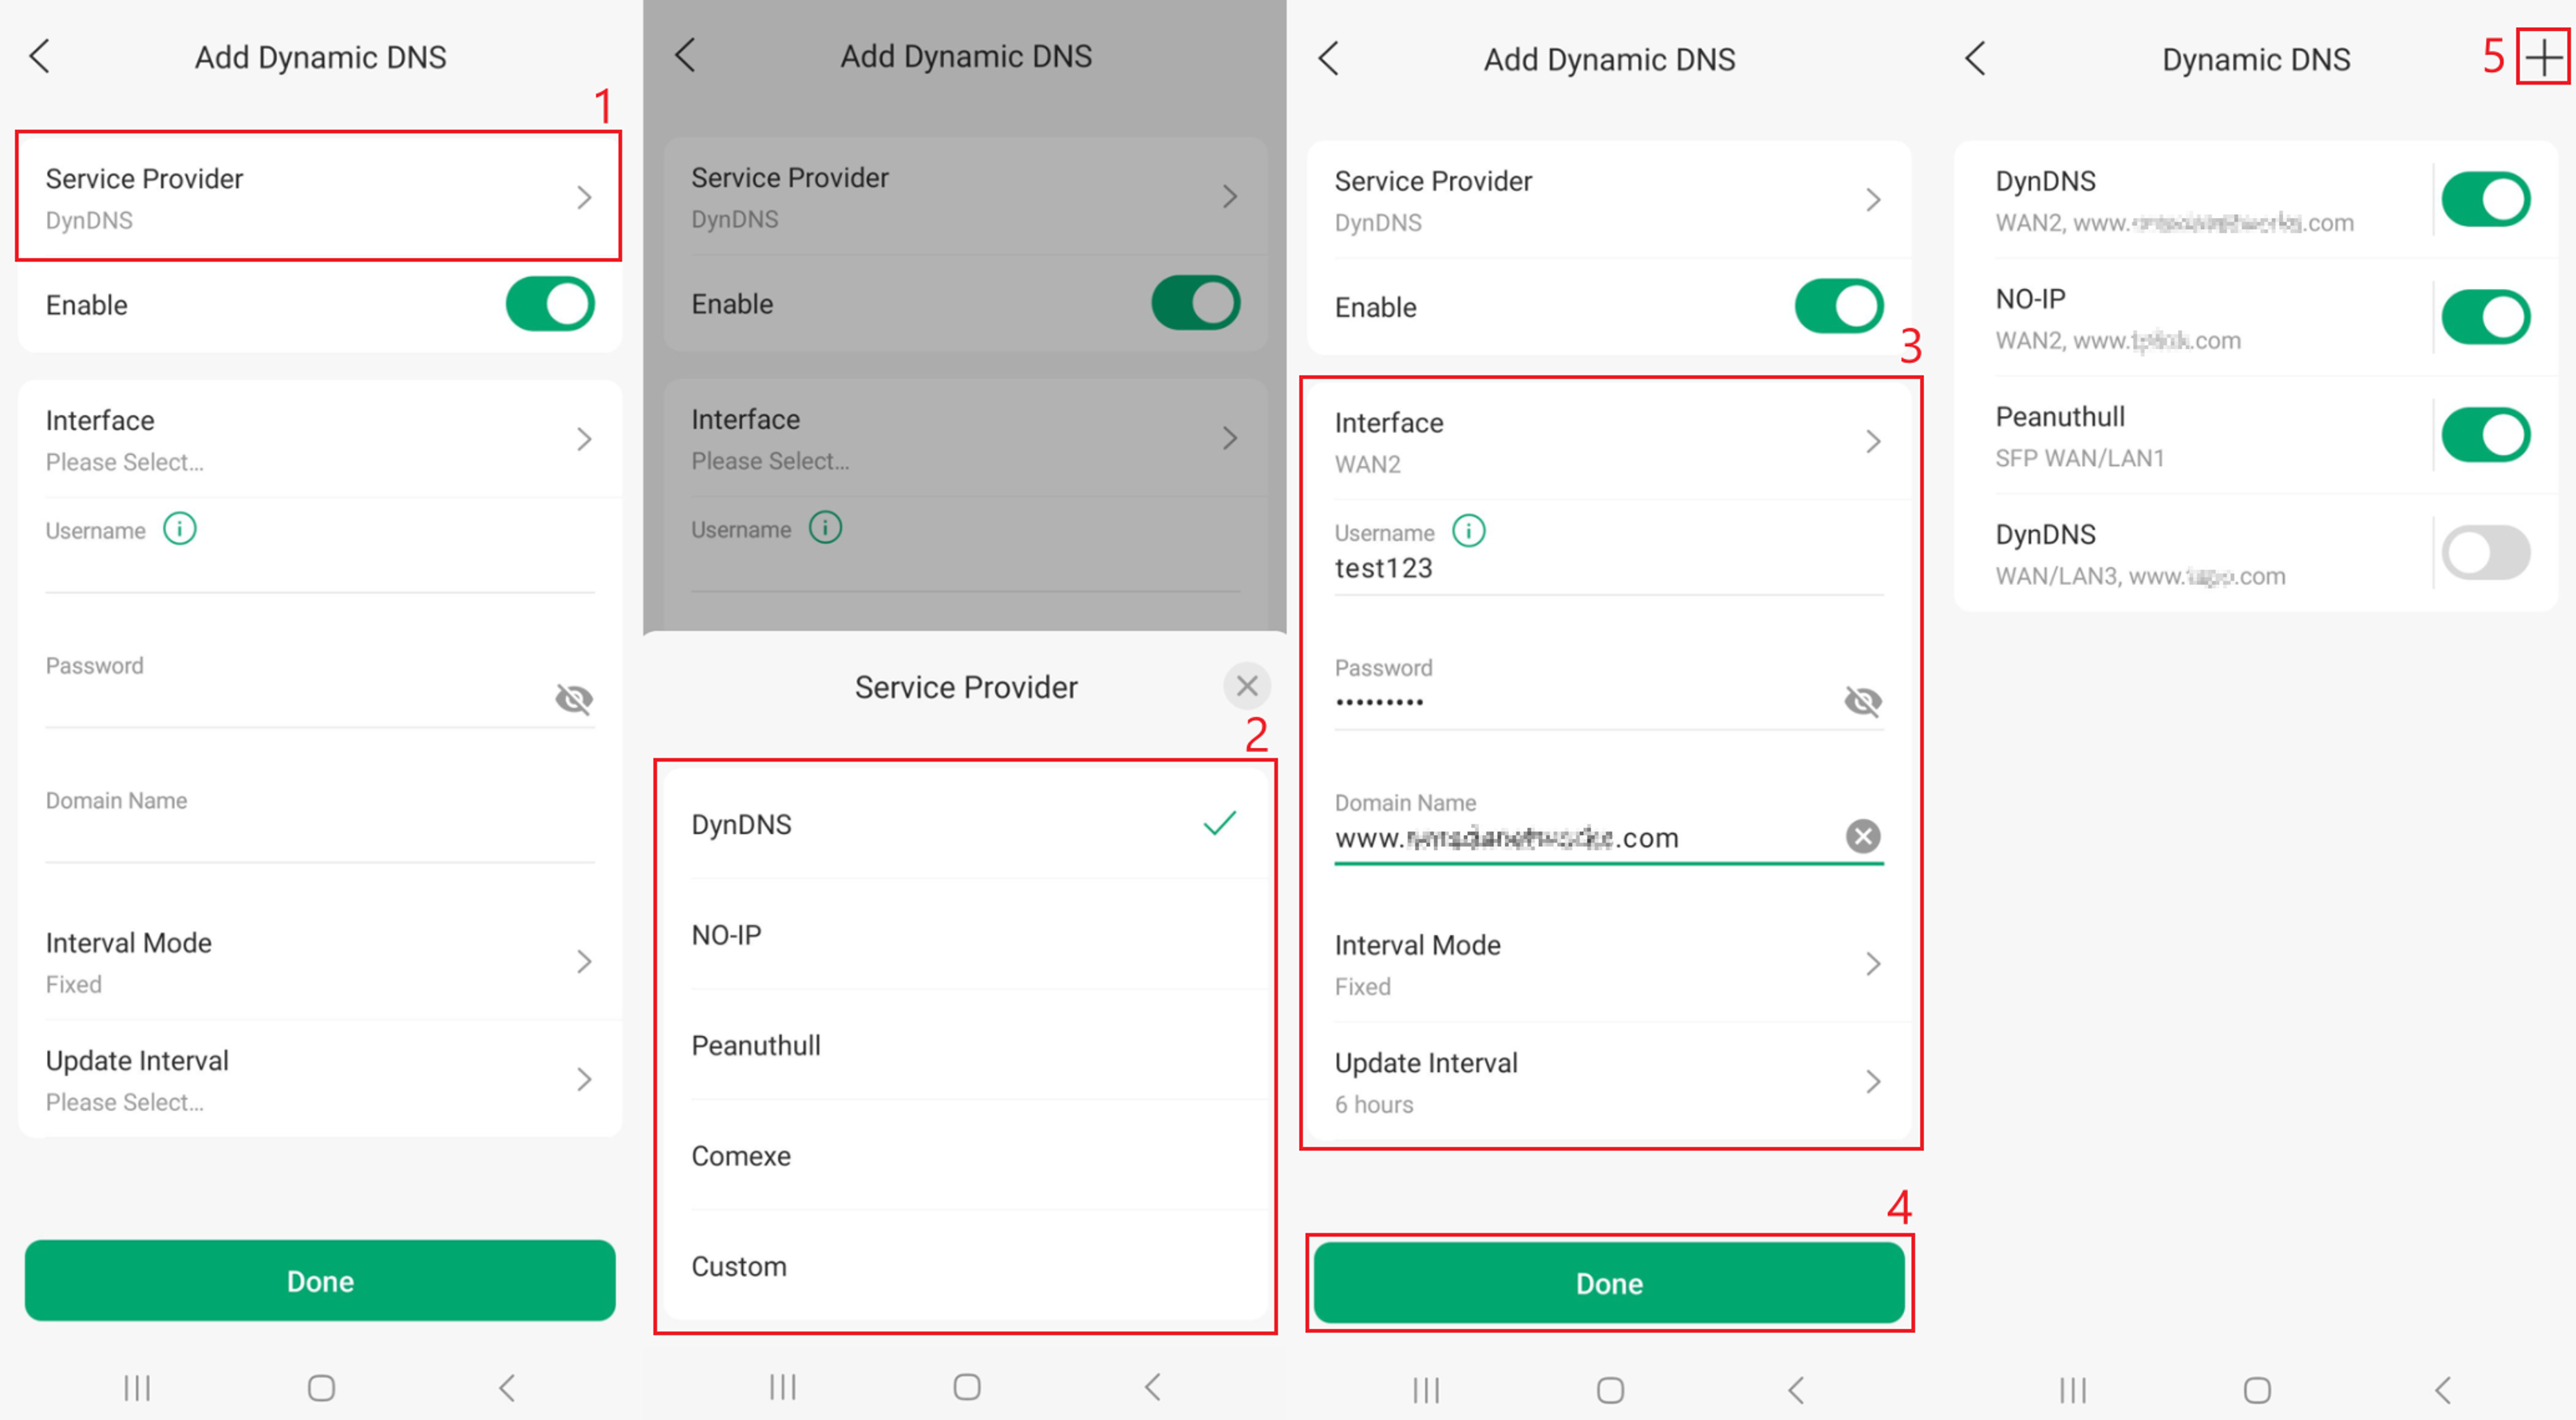
Note: The Service Provider setting includes several predefined third-party DDNS providers and a Custom option. DDNS configuration is similar between service providers; this example uses the DynDNS option.
Service Provider options:
- DynDNS: A commercial Dynamic DNS provider that allows remote access to your network using a hostname instead of an IP address.
- NO-IP: A popular Dynamic DNS service offering free and paid hostnames for accessing devices behind a changing IP address.
- Peanuthull: A third-party Dynamic DNS provider supported by some routers, primarily used by customers who already have a Peanuthull DDNS account.
- Comexe: A third-party Dynamic DNS service that provides hostname-to-IP updates for remote network access.
- Custom: Allows manual configuration of a Dynamic DNS provider that is not listed, using custom update URLs and authentication settings.
Add Dynamic DNS options
- Interface: Choose the WAN/Internet connection whose public IP address will be associated with the DDNS hostname.
- Domain Name: Enter the hostname registered with your DDNS provider.
- Username: Enter the username or account email associated with your DDNS provider.
- Password: Enter the password, API key, or update token required by your DDNS provider.
- Update URL: Specify the DDNS provider's update endpoint used to submit IP address updates (typically required for Custom DDNS providers).
- Update Interval: Defines how often the gateway checks for IP address changes and updates the DDNS service. A custom time interval can be selected here.
Configuration – Fusion Gateway
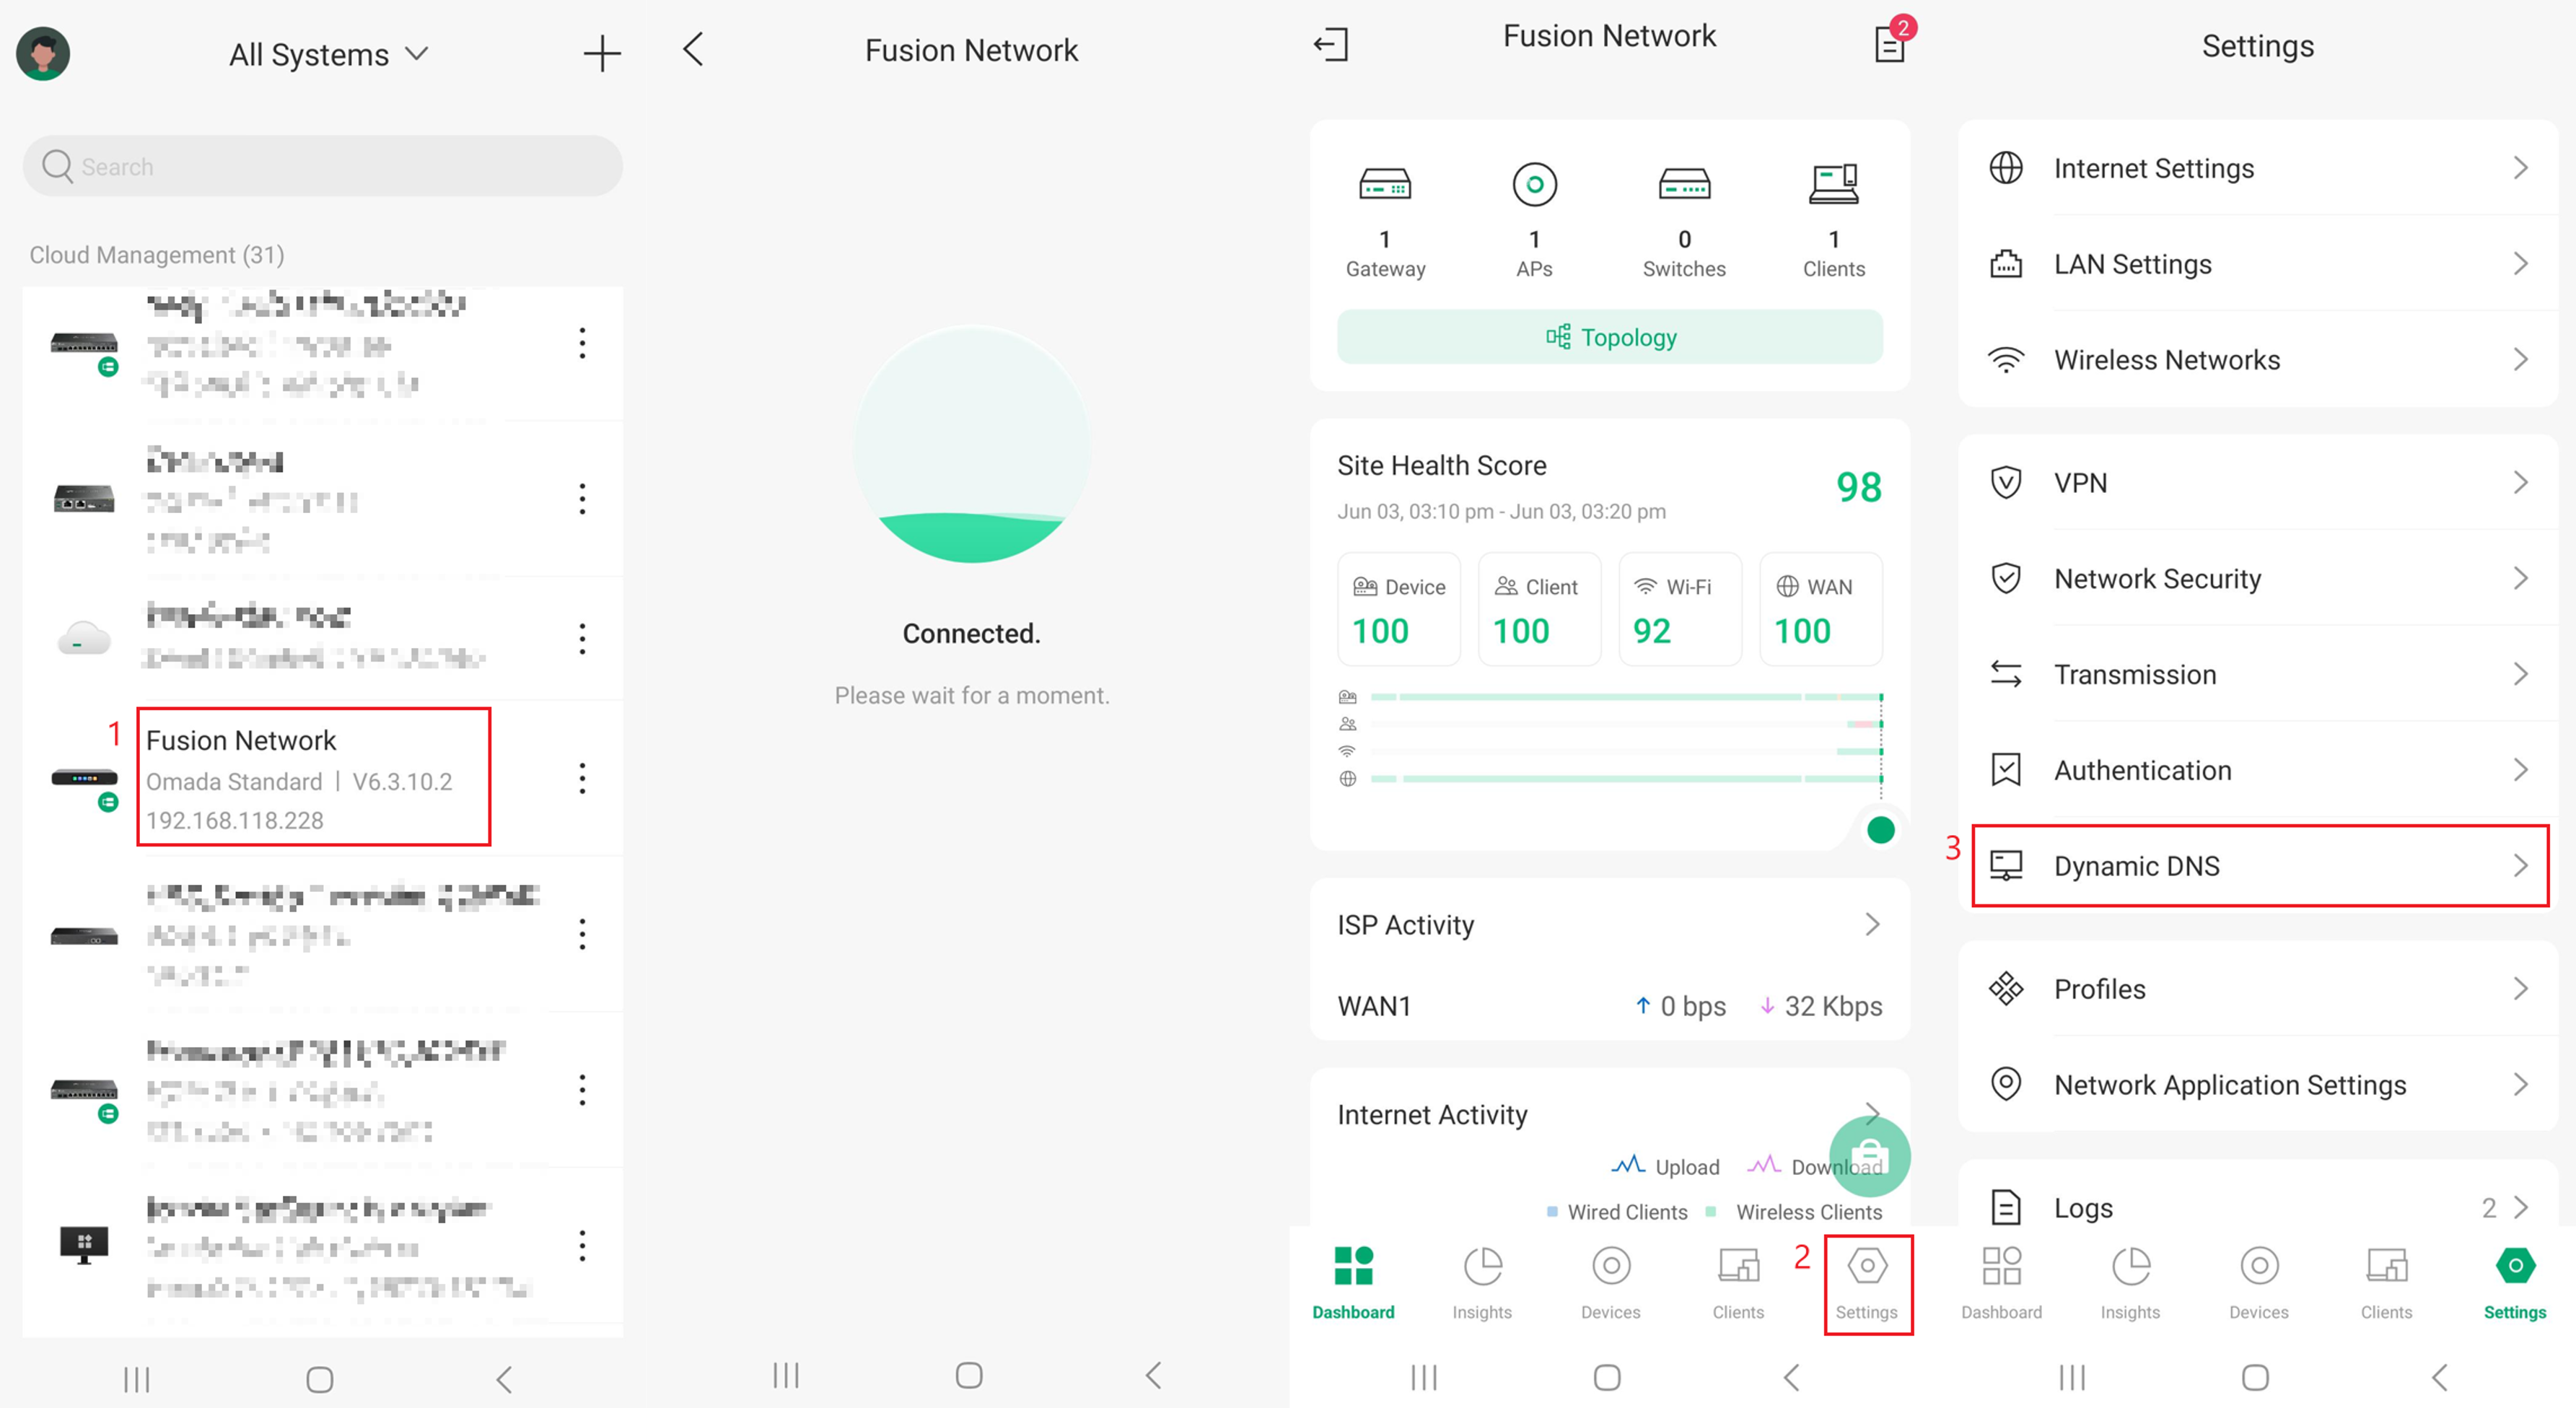
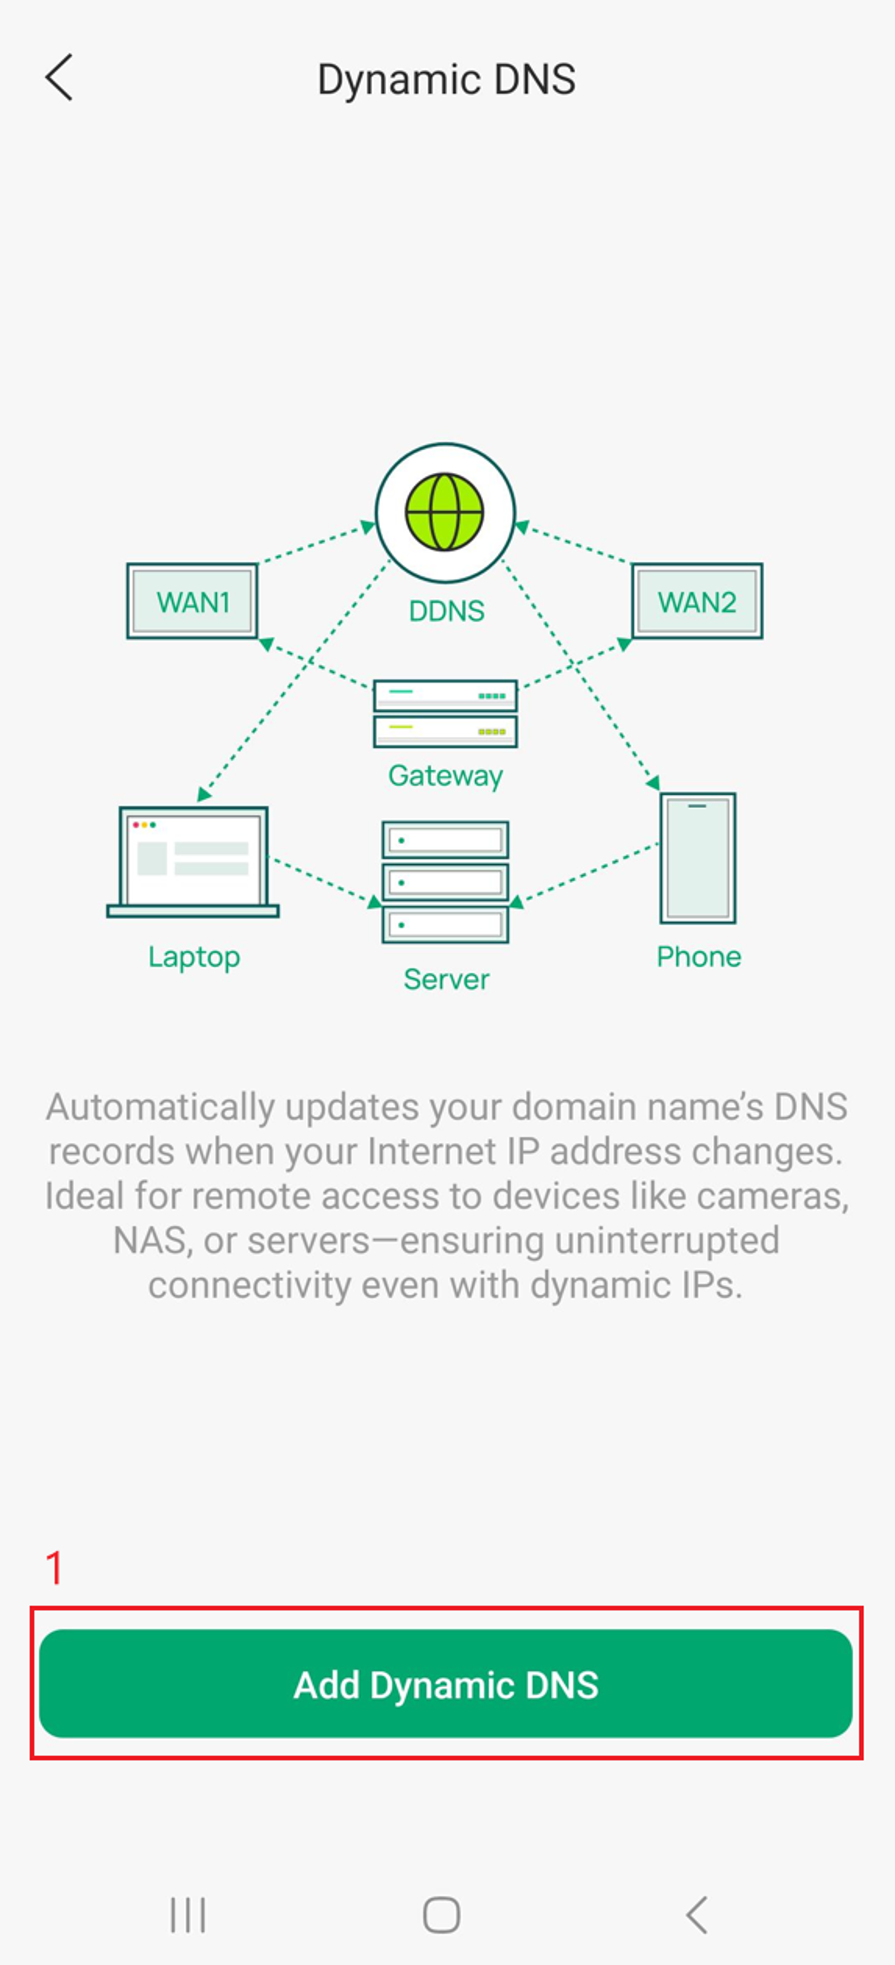
Step 1. Open the Omada App, select the Site containing the Fusion Gateway, and navigate to Settings > Dynamic DNS.
Step 2. Select Add Dynamic DNS.
Step 3. Select Service Provider, choose TP-Link DDNS or Third-Party DDNS, and then select Done.
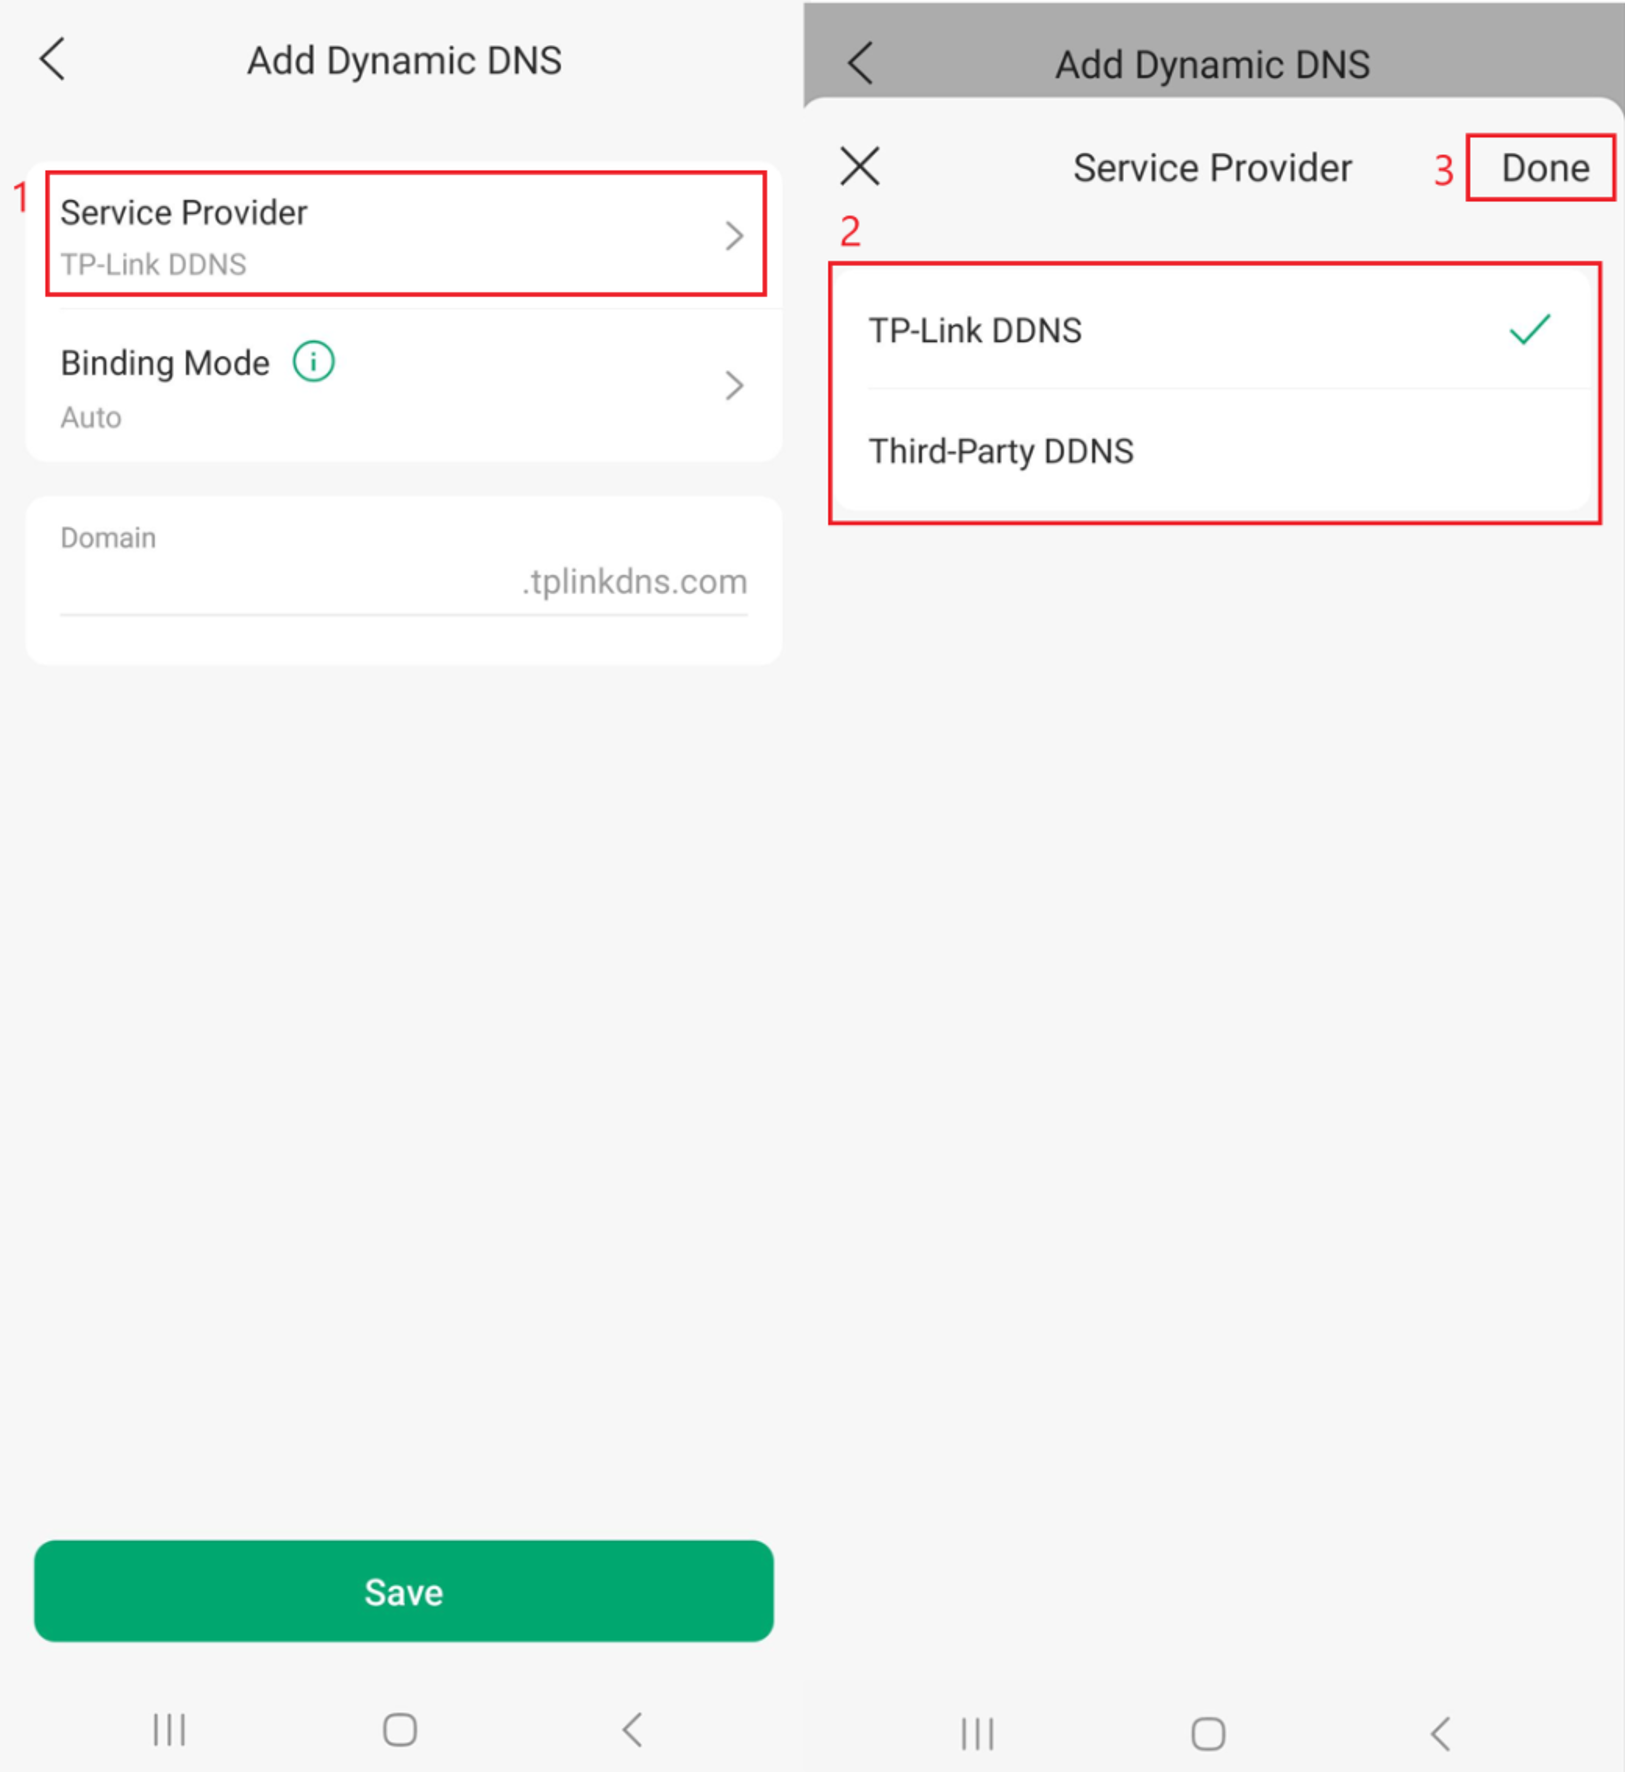
Note: The Service Provider setting supports the selection of either TP-Link DDNS or Third-Party DDNS. Third-Party DDNS includes both predefined third-party service providers and a Custom option. When TP-Link DDNS is selected, additional configuration items specific to the TP-Link DDNS service are displayed for setup and management.
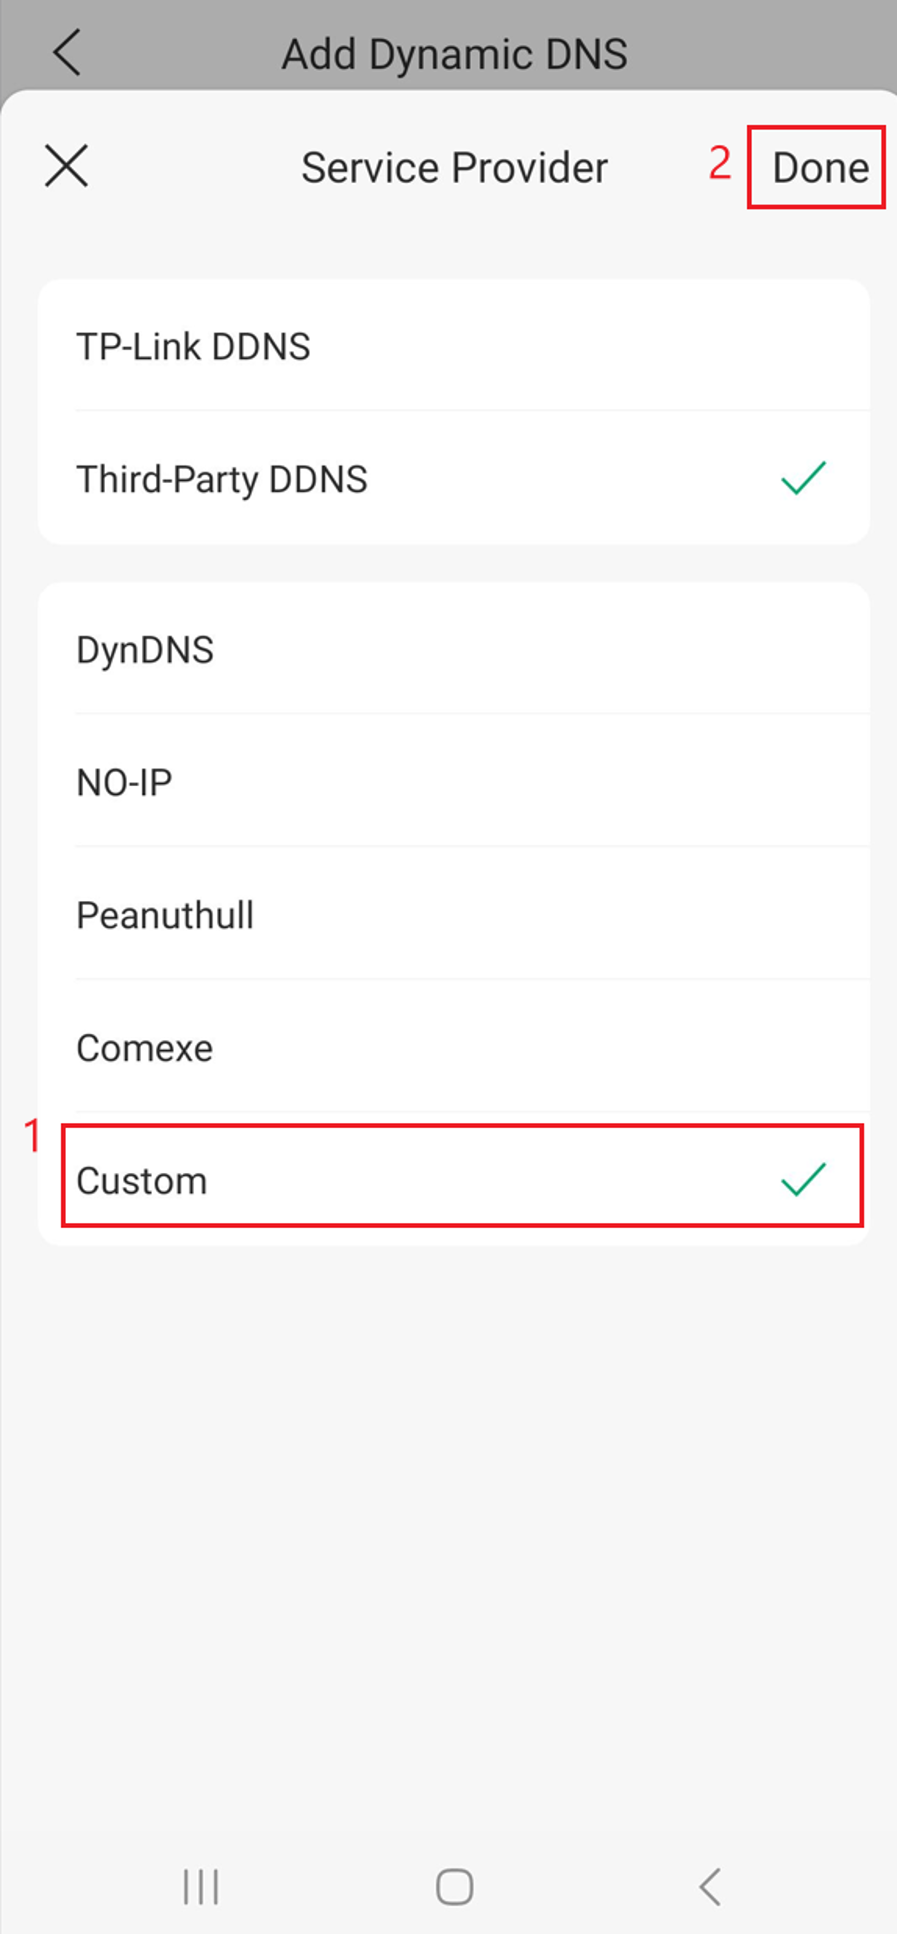
If Third-Party DDNS is selected, several new options will appear.
TP-Link DDNS
TP-Link DDNS is a built-in Dynamic DNS service that automatically associates your changing public IP address with a fixed hostname, allowing consistent remote access to your network. The service integrates with TP-Link's DDNS platform and requires Cloud Access to be enabled. TP-Link DDNS is unavailable when Cloud Access is disabled.
Other Service Provider options:
- DynDNS: A commercial Dynamic DNS provider that allows remote access to your network using a hostname instead of an IP address.
- NO-IP: A popular Dynamic DNS service offering free and paid hostnames for accessing devices behind a changing IP address.
- Peanuthull: A third-party Dynamic DNS provider supported by some routers, primarily used by customers who already have a Peanuthull DDNS account.
- Comexe: A third-party Dynamic DNS service that provides hostname-to-IP updates for remote network access.
- Custom: Allows manual configuration of a Dynamic DNS provider that is not listed, using custom update URLs and authentication settings.
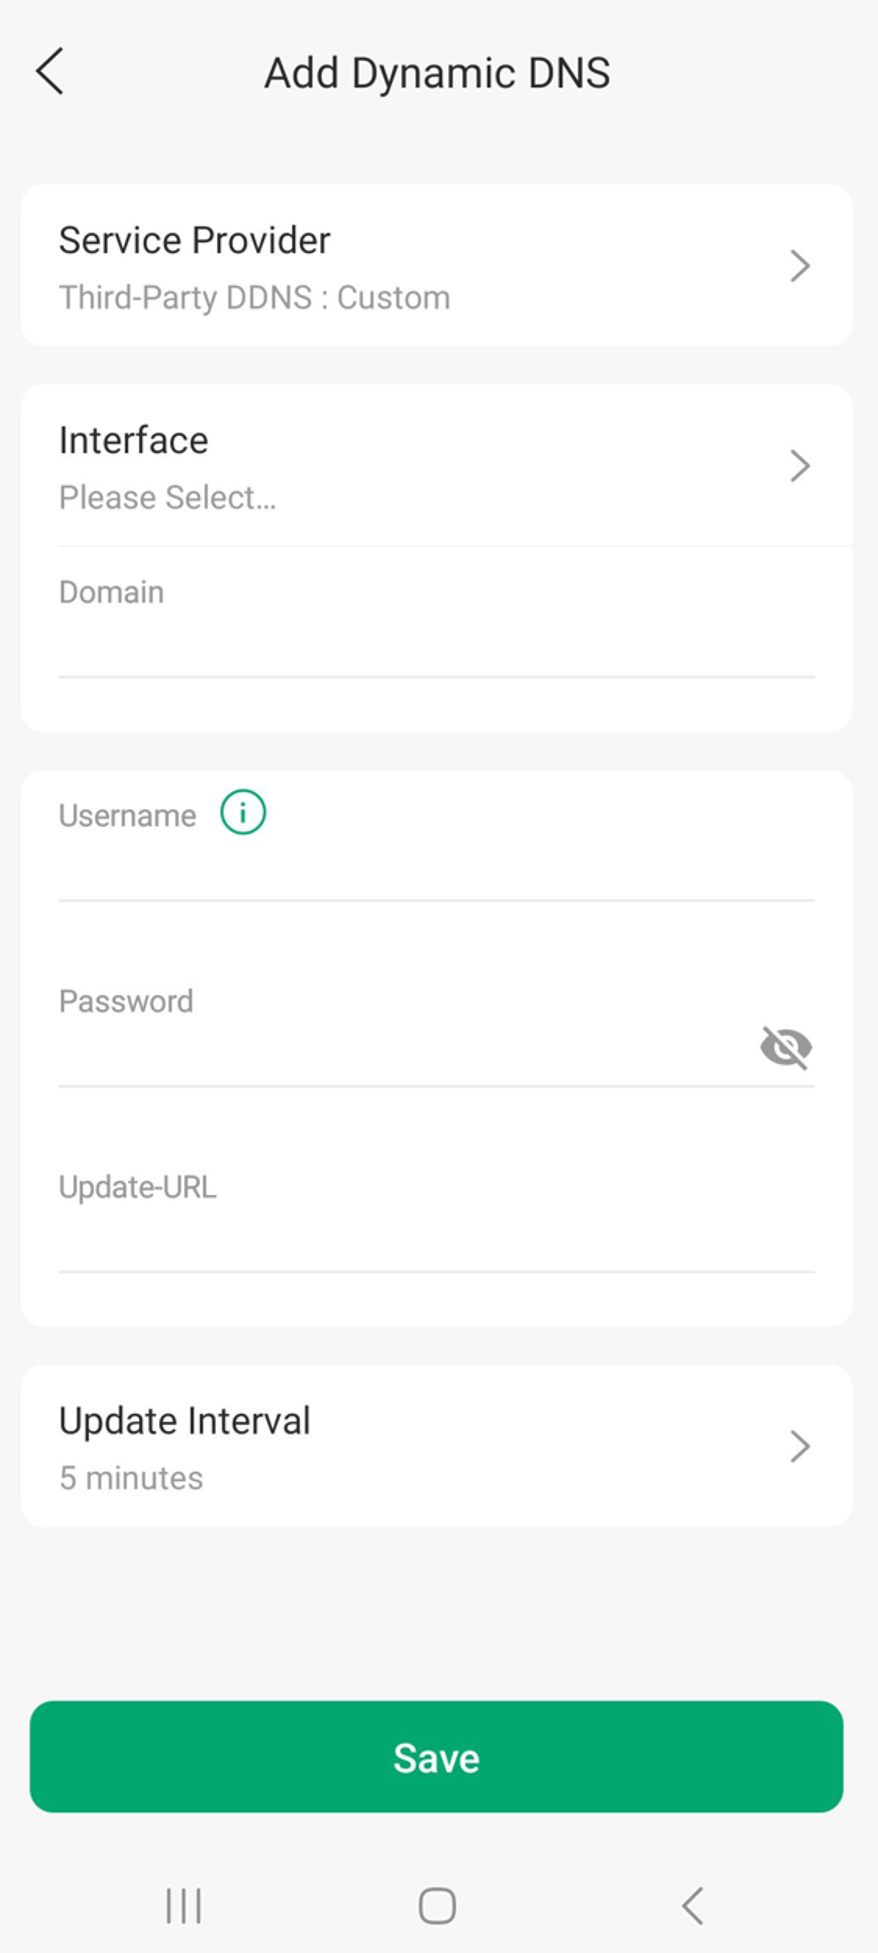
The following example shows the configuration options displayed after selecting Custom as the Service Provider. Other options differ slightly, depending on the Service Provider selected.
Add Dynamic DNS
- Interface: Choose the WAN/Internet connection whose public IP address will be associated with the DDNS hostname.
- Domain: Enter the hostname registered with your DDNS provider.
- Username: Enter the username or account email associated with your DDNS provider.
- Password: Enter the password, API key, or update token required by your DDNS provider.
- Update URL: Specify the DDNS provider's update endpoint used to submit IP address updates (typically required for Custom DDNS providers).
- Update Interval: Defines how often the router checks for IP address changes and updates the DDNS service. A custom time interval can be selected.
Step 4. If using TP-Link DDNS, select Binding Mode, and then select Auto or Manual. When selecting Manual, an Interface option will appear.
Note: Binding Mode is available only when TP-Link DDNS is selected as the service provider.
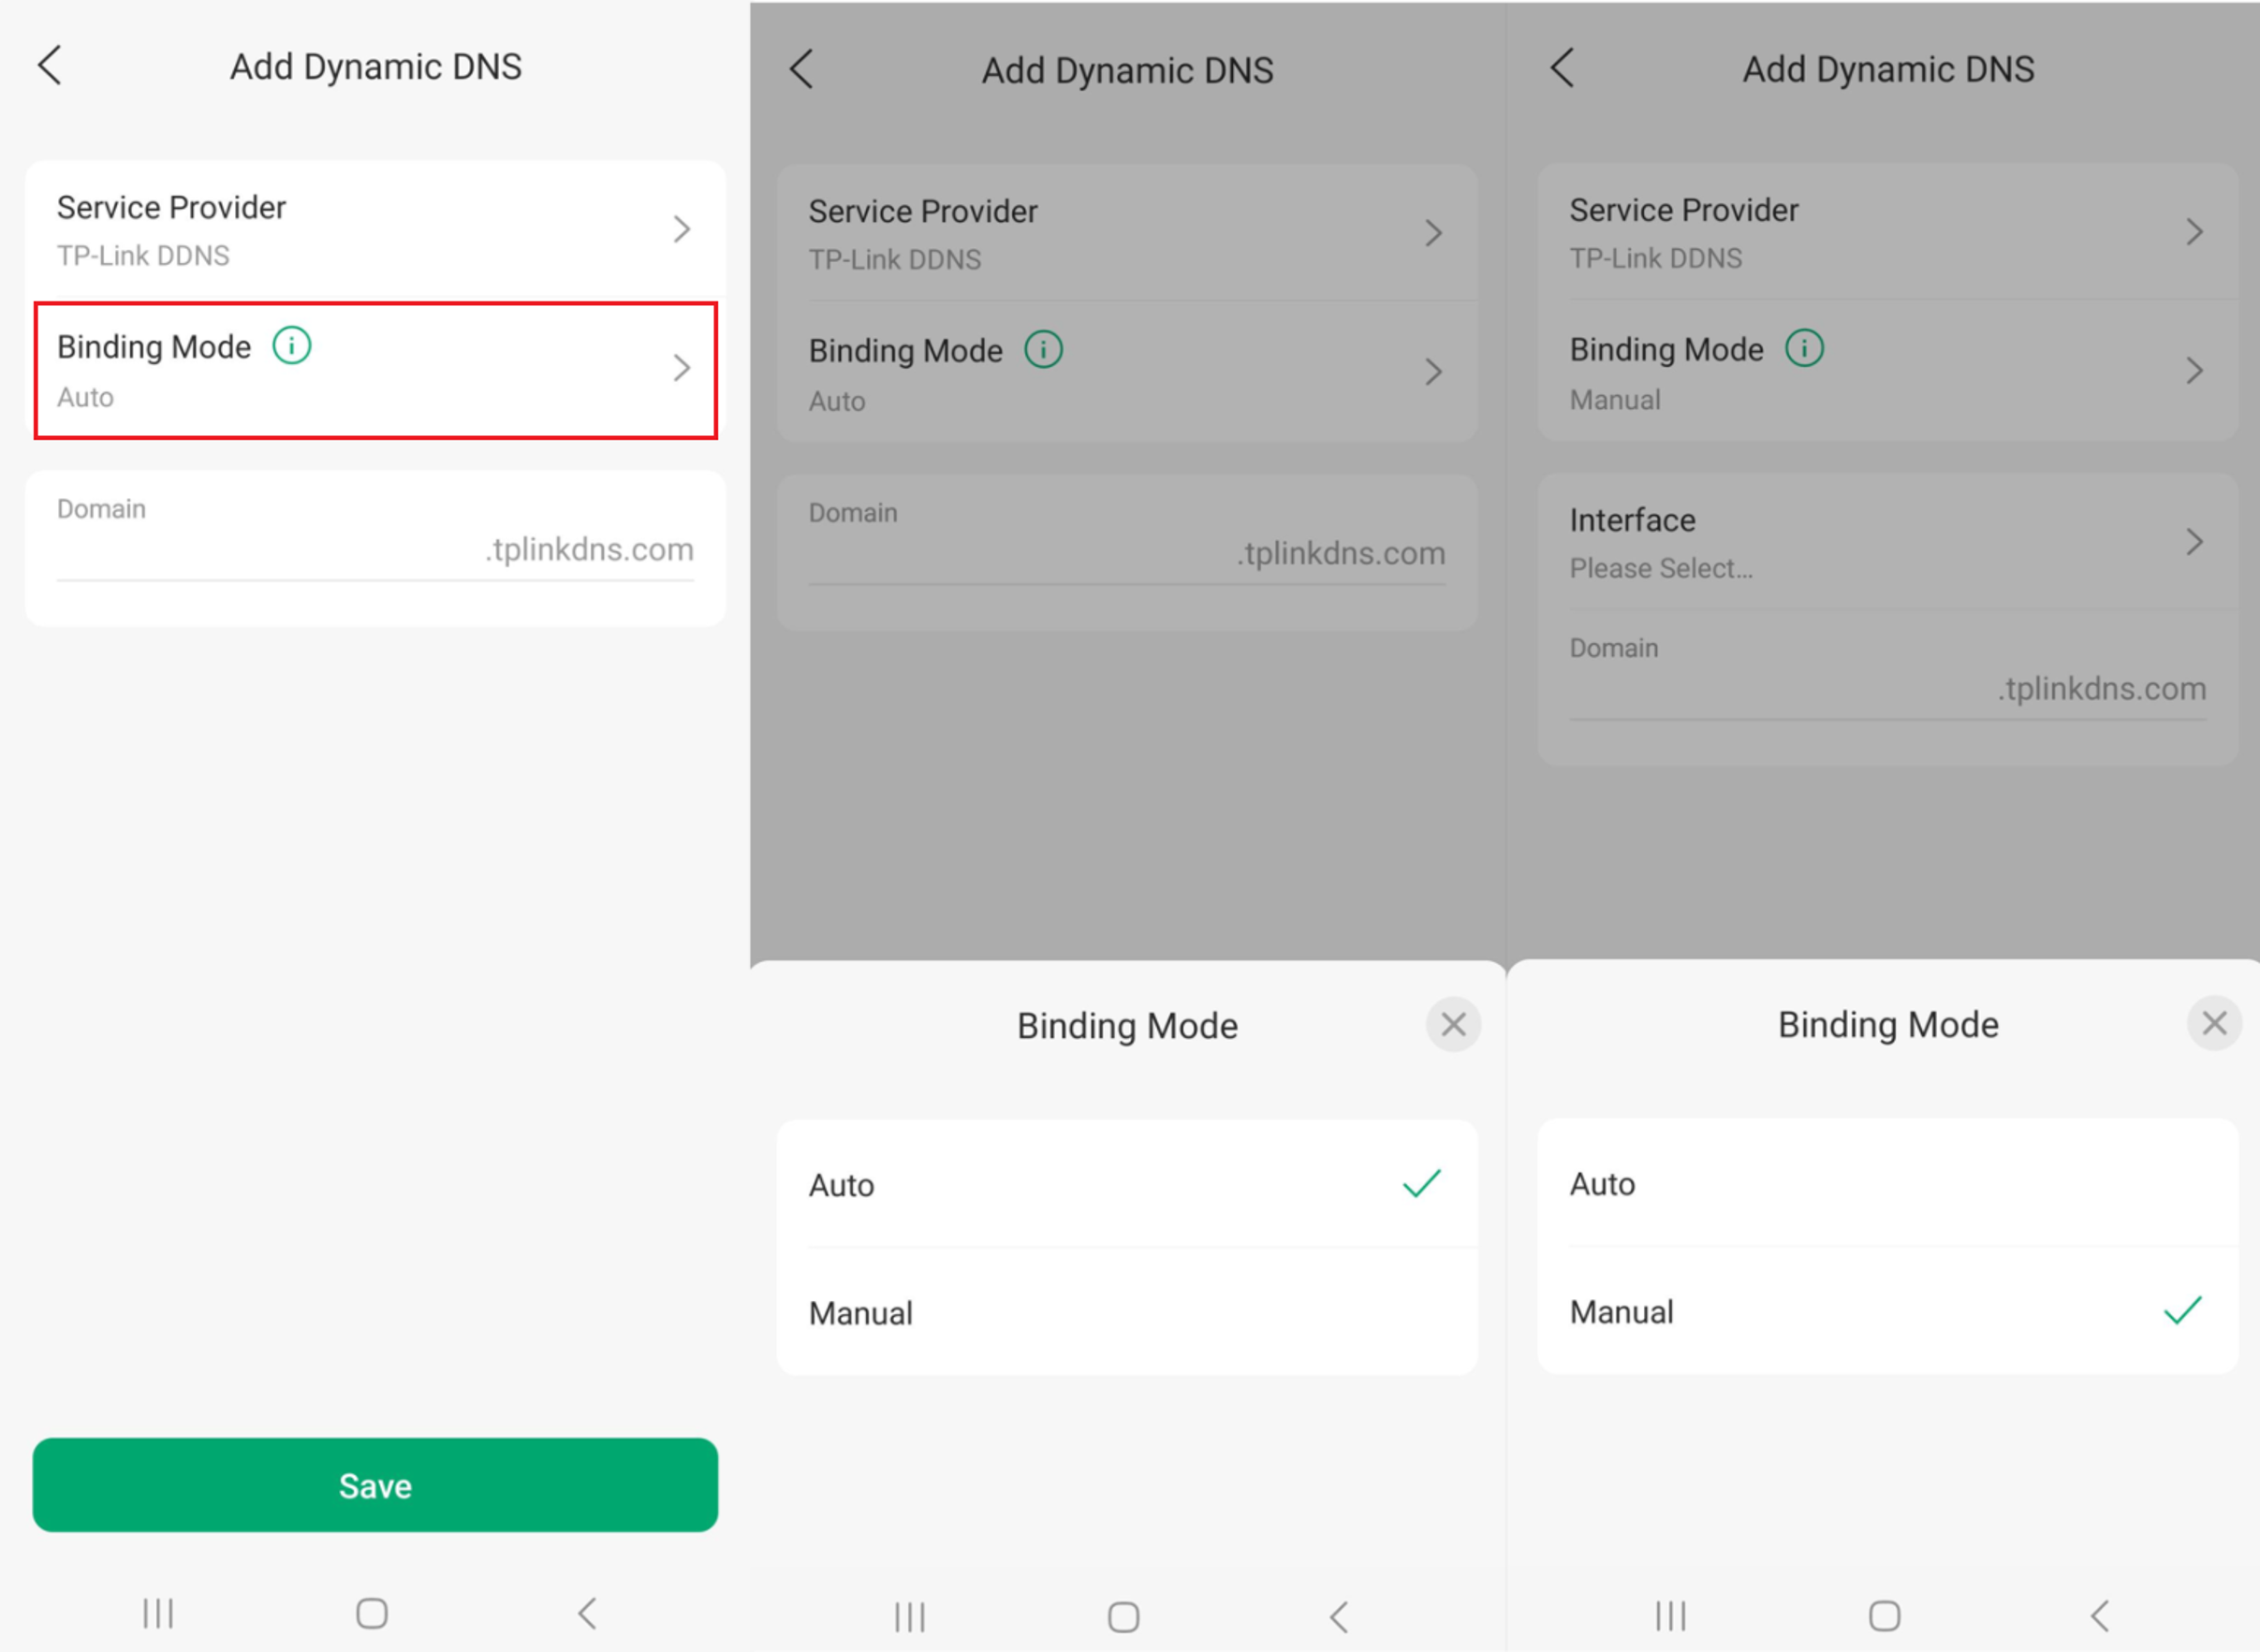
Binding Mode:
The Binding Mode setting supports two options, Auto and Manual, with Auto selected by default. When Auto mode is selected, the backend dynamically determines the appropriate WAN interface and automatically binds the DDNS service to a single domain.
- When selecting Manual:
- Users can manually bind a WAN interface to a Domain to create multiple entries, with a maximum of one per WAN, and domain names for different entries cannot be duplicated.
- By default, only one domain is displayed. Additional entries can be added and are displayed in a Domain List.
Step 5. Configure the Domain and any remaining fields (this depends on the selected Service Provider). The Domain is the hostname registered with your Dynamic DNS service. It is the address that will automatically update to point to your current public IP address. Select Save when complete.
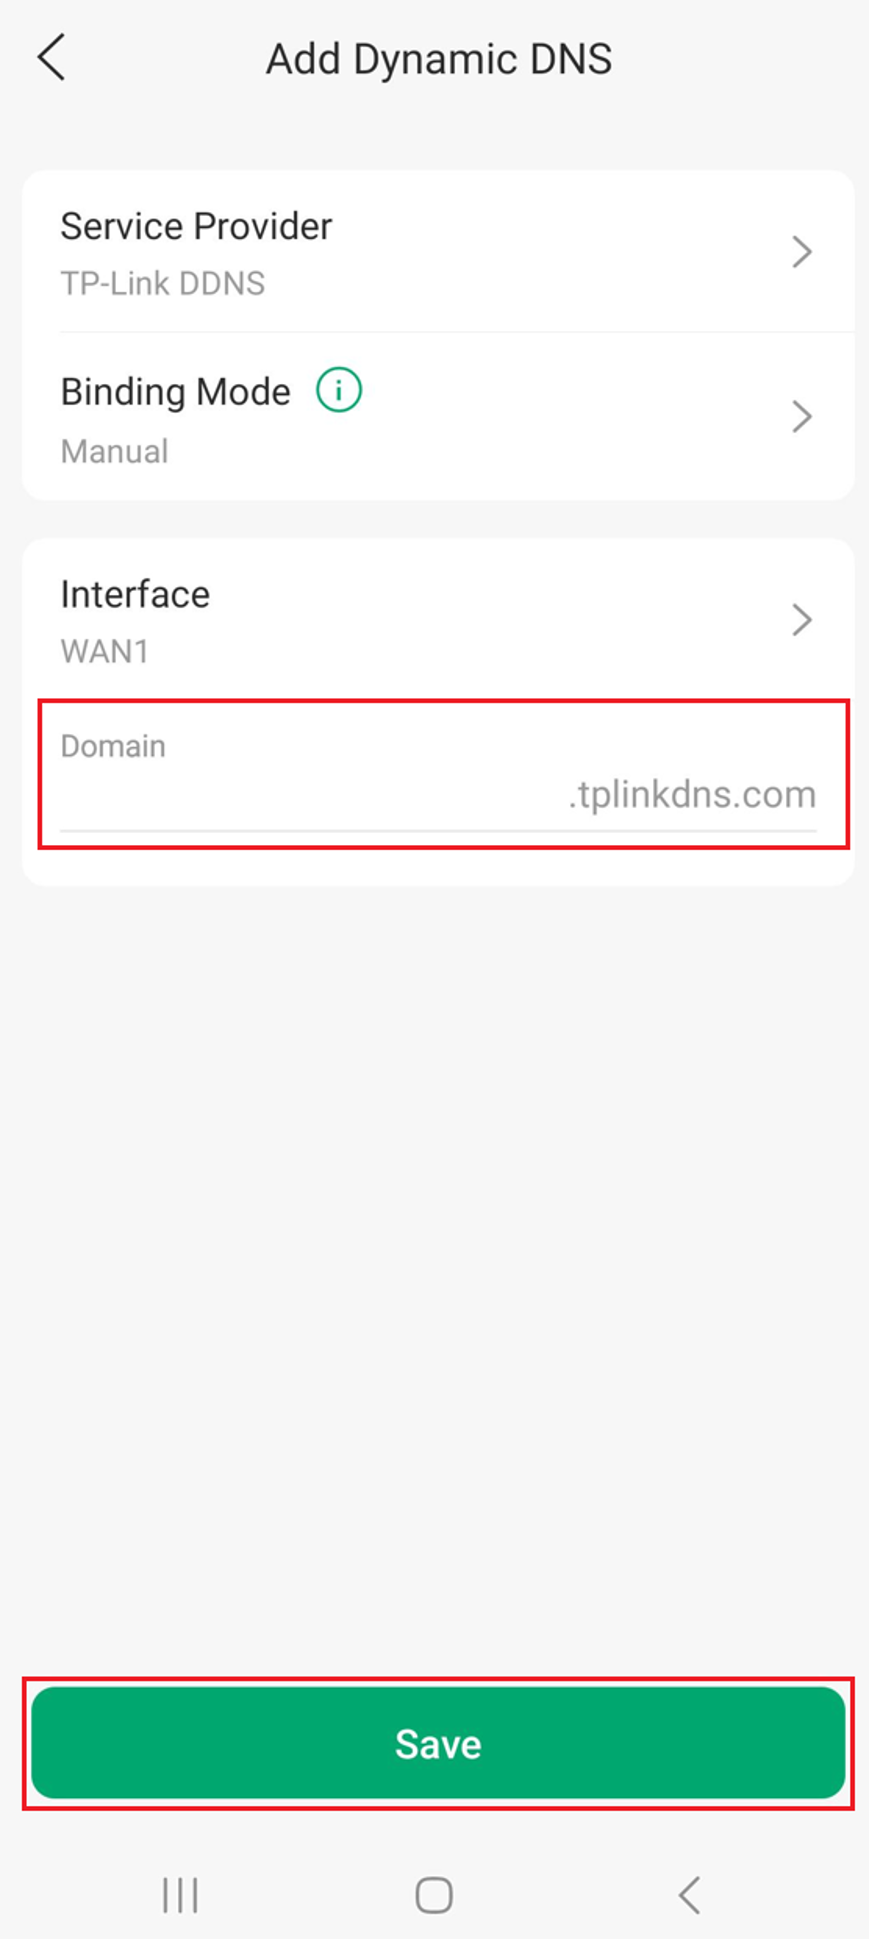
Domain:
The Domain field specifies the hostname that will be associated with your router's public IP address. DDNS automatically updates this hostname whenever your public IP changes, allowing you to access your network using a consistent address (for example, myvpn.tplinkdns.com) instead of having to remember or track a changing IP address.
Verification
Once configuration is complete, the new DDNS entry is added to the Dynamic DNS page. Multiple DDNS entries can be configured.
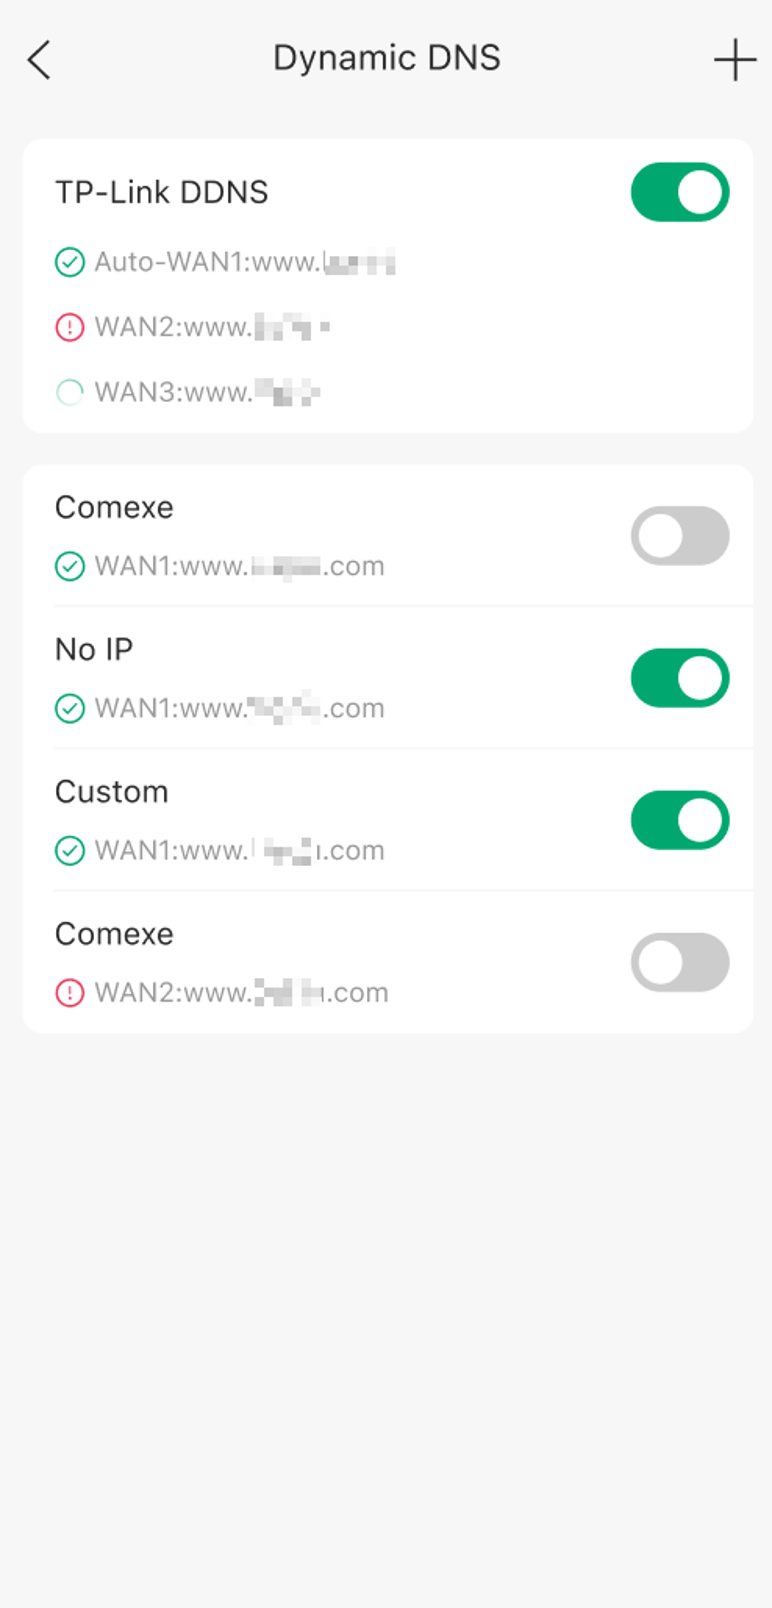
Dynamic DNS Configuration
Dynamic DNS is displayed in two sections: TP-Link DDNS and Third-Party.
- The number of WAN-to-domain mappings that DDNS can support is determined by the number of available WAN ports. WAN ports using DS-Lite or MAP-E dialing methods are not supported for creating WAN-to-domain mappings. Each DDNS entry must be associated with a dedicated WAN interface that has its own public IP address.
A Green Check Circle indicates a connected or normal connection.
A Green Loading Circle icon indicates a pending or configuring connection status.
A Red Exclamation Circle indicates a disconnected or abnormal connection.
- Clicking the Red Exclamation Circle will show a popup with an error message.
All status indicators are clickable to display the current status of the Dynamic DNS service.
Conclusion
You have now configured Dynamic DNS on an Omada or Fusion Gateway using the Omada App. The configured hostname will automatically update when the WAN public IP address changes, providing a consistent address for supported remote access services. Fusion Gateways can use TP-Link DDNS or supported third-party DDNS providers.
QA
Q1: What is Dynamic DNS (DDNS)?
A1: DDNS automatically updates a hostname to match your current public IP address, allowing reliable remote access to your network and devices even when your ISP changes your IP address.
Q2: Why are the DDNS options different between Omada and Fusion Gateways?
A2: Fusion Gateways support TP-Link DDNS in addition to the third-party DDNS providers supported by Omada Gateways.
Q3: Which DDNS providers are supported in the Omada App?
A3: Supported third-party providers include DynDNS, NO-IP, Peanuthull, Comexe, and Custom. Fusion Gateways also support TP-Link DDNS.
Q4: What is the DDNS Domain Name?
A4: The Domain Name is the hostname registered with your DDNS provider, such as myhome.ddns.net. The DDNS service updates this hostname to point to your current public IP address.
Q5: Why is TP-Link DDNS unavailable?
A5: TP-Link DDNS is available only on supported Fusion Gateways. Confirm that Cloud Access is enabled and that the gateway is connected to the cloud.
Q6: What do the DDNS status icons mean?
A6: A Green Check Circle indicates the DDNS service is connected and operating normally, a Red Exclamation Circle indicates a connection or configuration issue, and a Green Loading Circle indicates a pending or configuring connection status.
Q7: Can I configure multiple DDNS entries?
A7: Yes. The number of WAN-to-domain mappings that DDNS can support is determined by the number of available WAN ports. WAN ports using DS-Lite or MAP-E dialing methods are not supported for creating WAN-to-domain mappings. Each DDNS entry must be associated with a dedicated WAN interface that has its own public IP address.
To learn more about each function and configuration, please visit Support Home to download or check the manual for your product.
