


Contents
Create Site Templates and Device Templates
Bind devices to a Device Template
Unbind sites from a Site Template
Unbind devices from a Device Template
Introduction
The Site Template feature, available in the Controller’s Global View, is designed to simplify the configuration and management of multiple sites. It allows administrators to create reusable templates containing common site settings, such as Internet, LAN, WLAN, ACL, URL Filtering, Portal, and MAC Authentication configurations, and apply them to multiple sites in bulk.
By associating sites with Site Templates, administrators can quickly deploy standardized configurations and make large-scale changes more efficiently. For example, if multiple sites require configuration updates due to business or network changes, administrators can modify the relevant Site Template and apply it to the target sites instead of configuring each site individually. The more sites you manage, the greater the time savings and operational benefits provided by this feature.
In addition to site-level settings, Site Templates support Device Templates, which help streamline the management of devices with the same model. After devices are associated with a Site Template, they can be further assigned to Device Templates that contain model-specific configurations. For example, if multiple SG3452XP v2.20 switches are deployed at a site but require different configurations, you can create separate Device Templates with different port, VLAN interface, static route, and service settings, and then apply each template to the appropriate devices. This approach improves deployment efficiency while maintaining configuration flexibility.
This article explains how to configure and use the Site Template feature in Omada Cloud Standard v6.3.0.17.
Requirements
- Omada Controller (Softeware Controller / Cloud-Based Controller v6.0 and above)
- Omada Gateway
- Omada Switch
Configuration
Create Site Templates and Device Templates
Create a Site Template
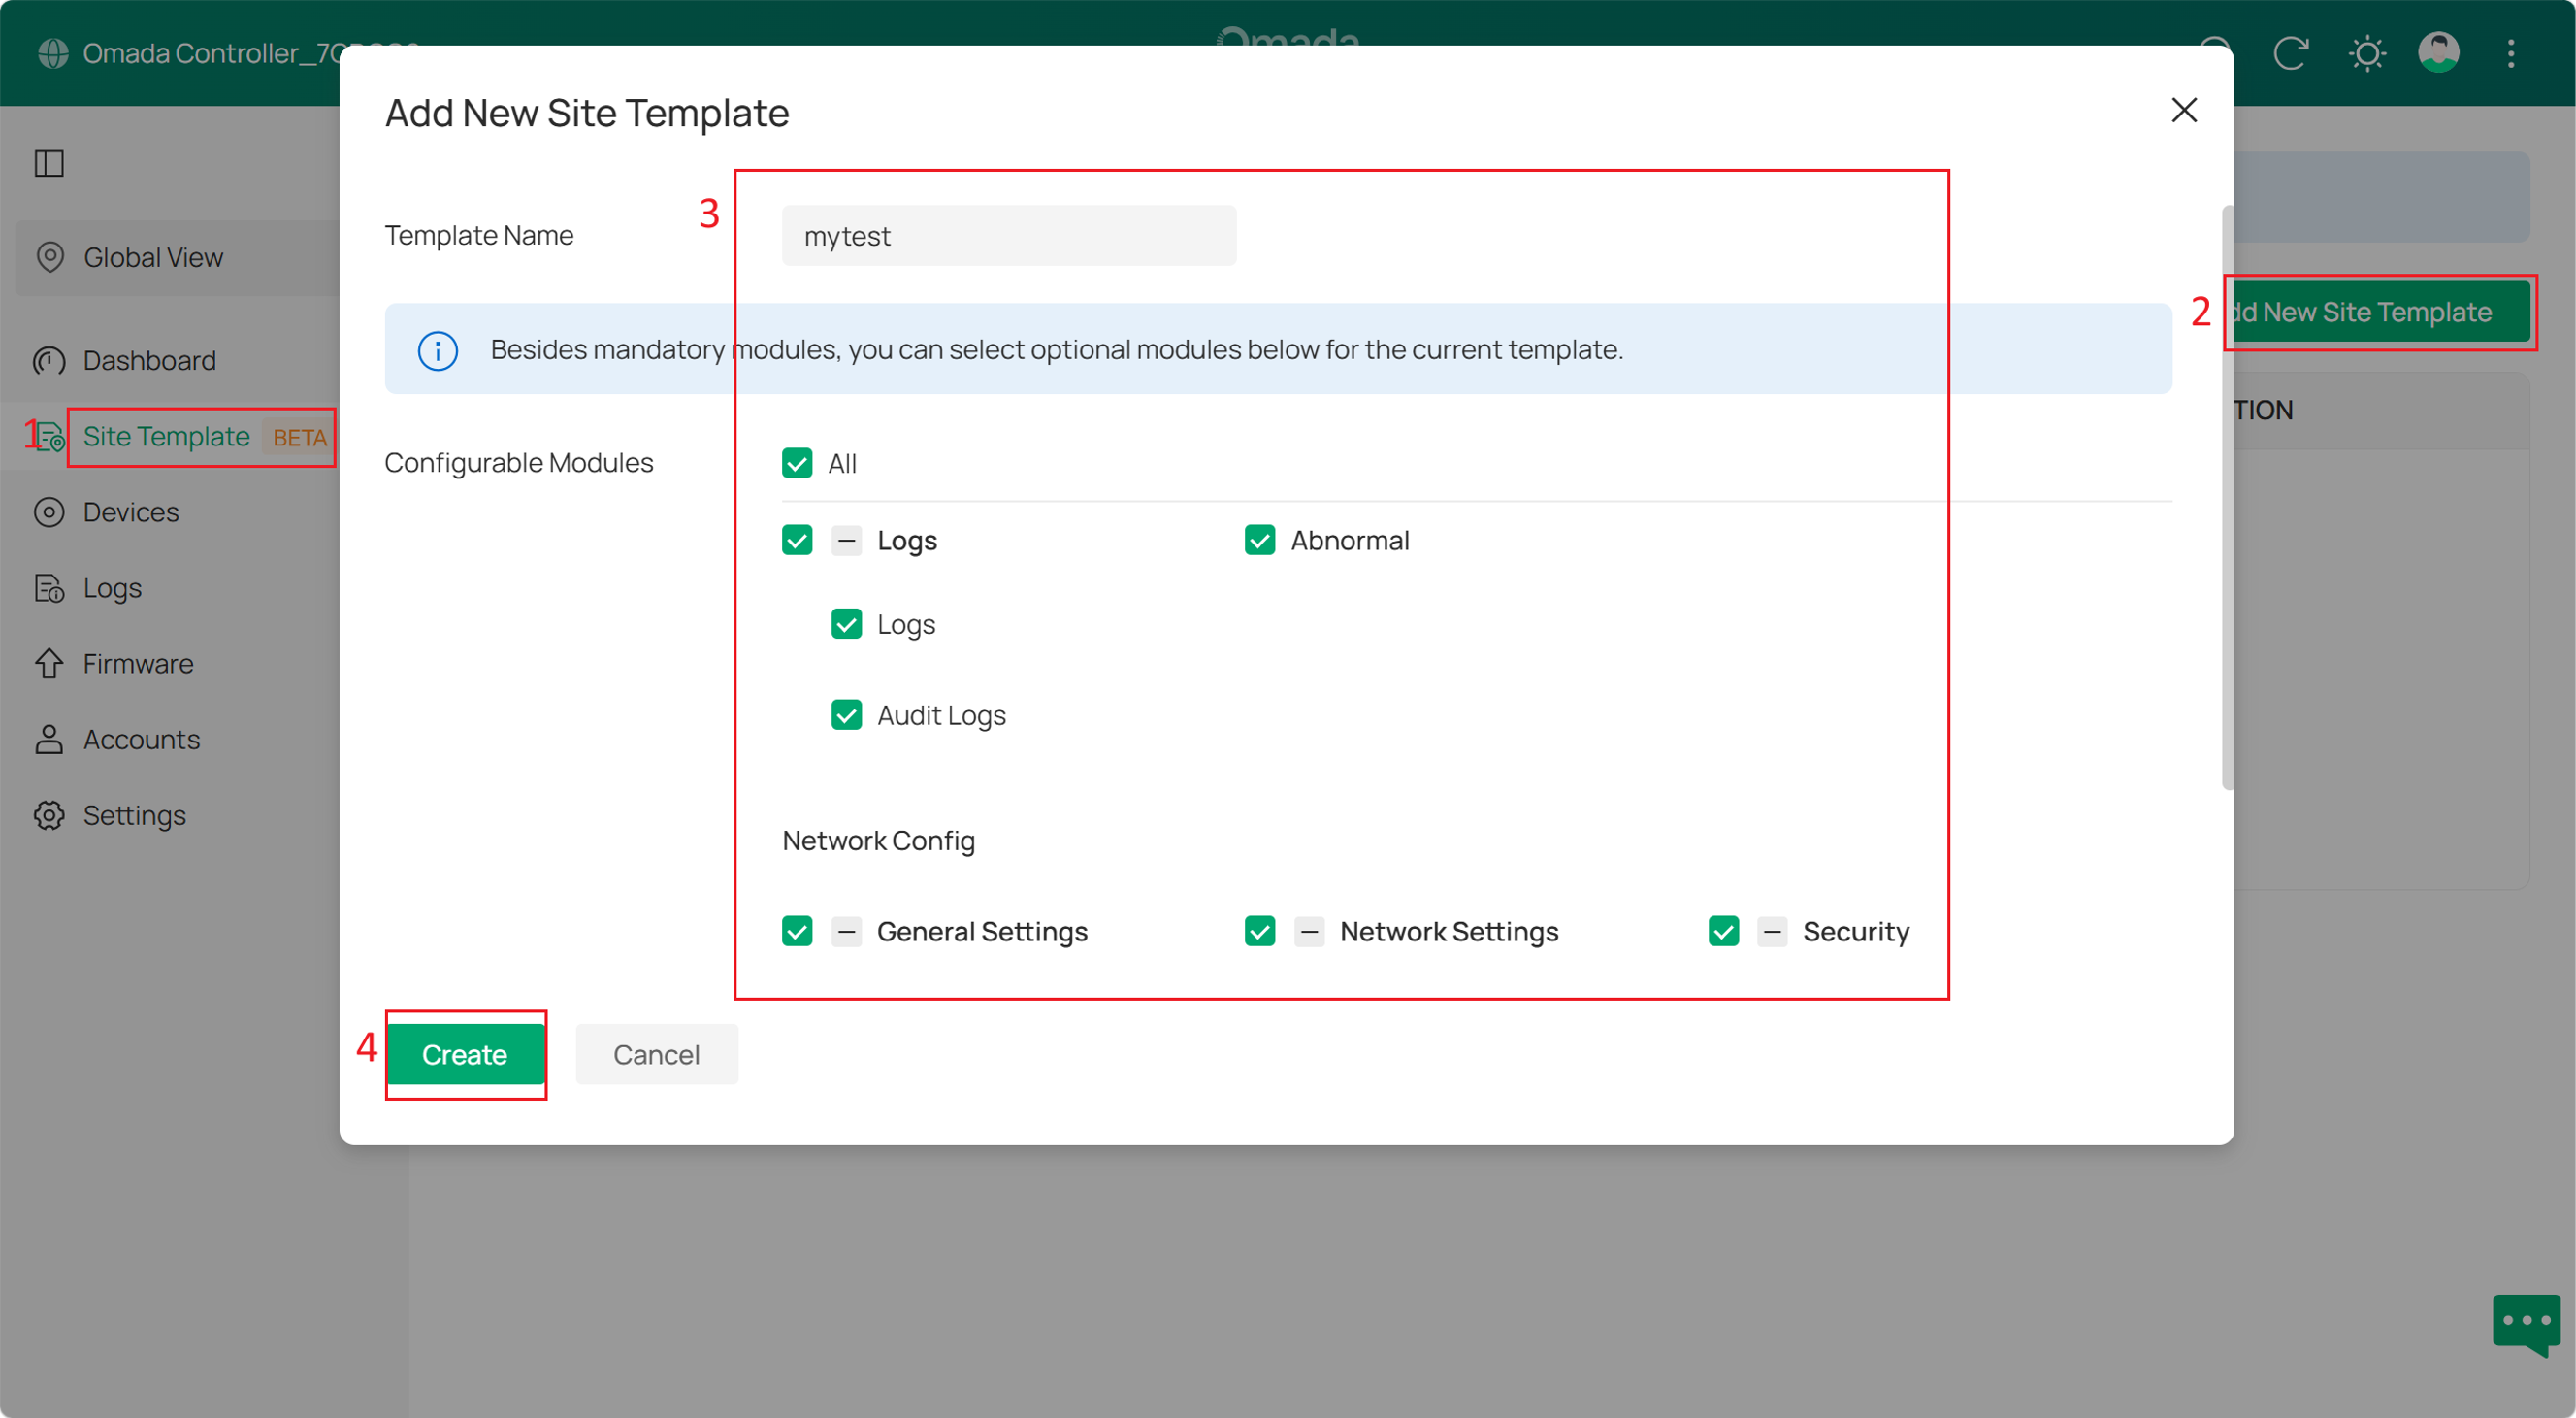
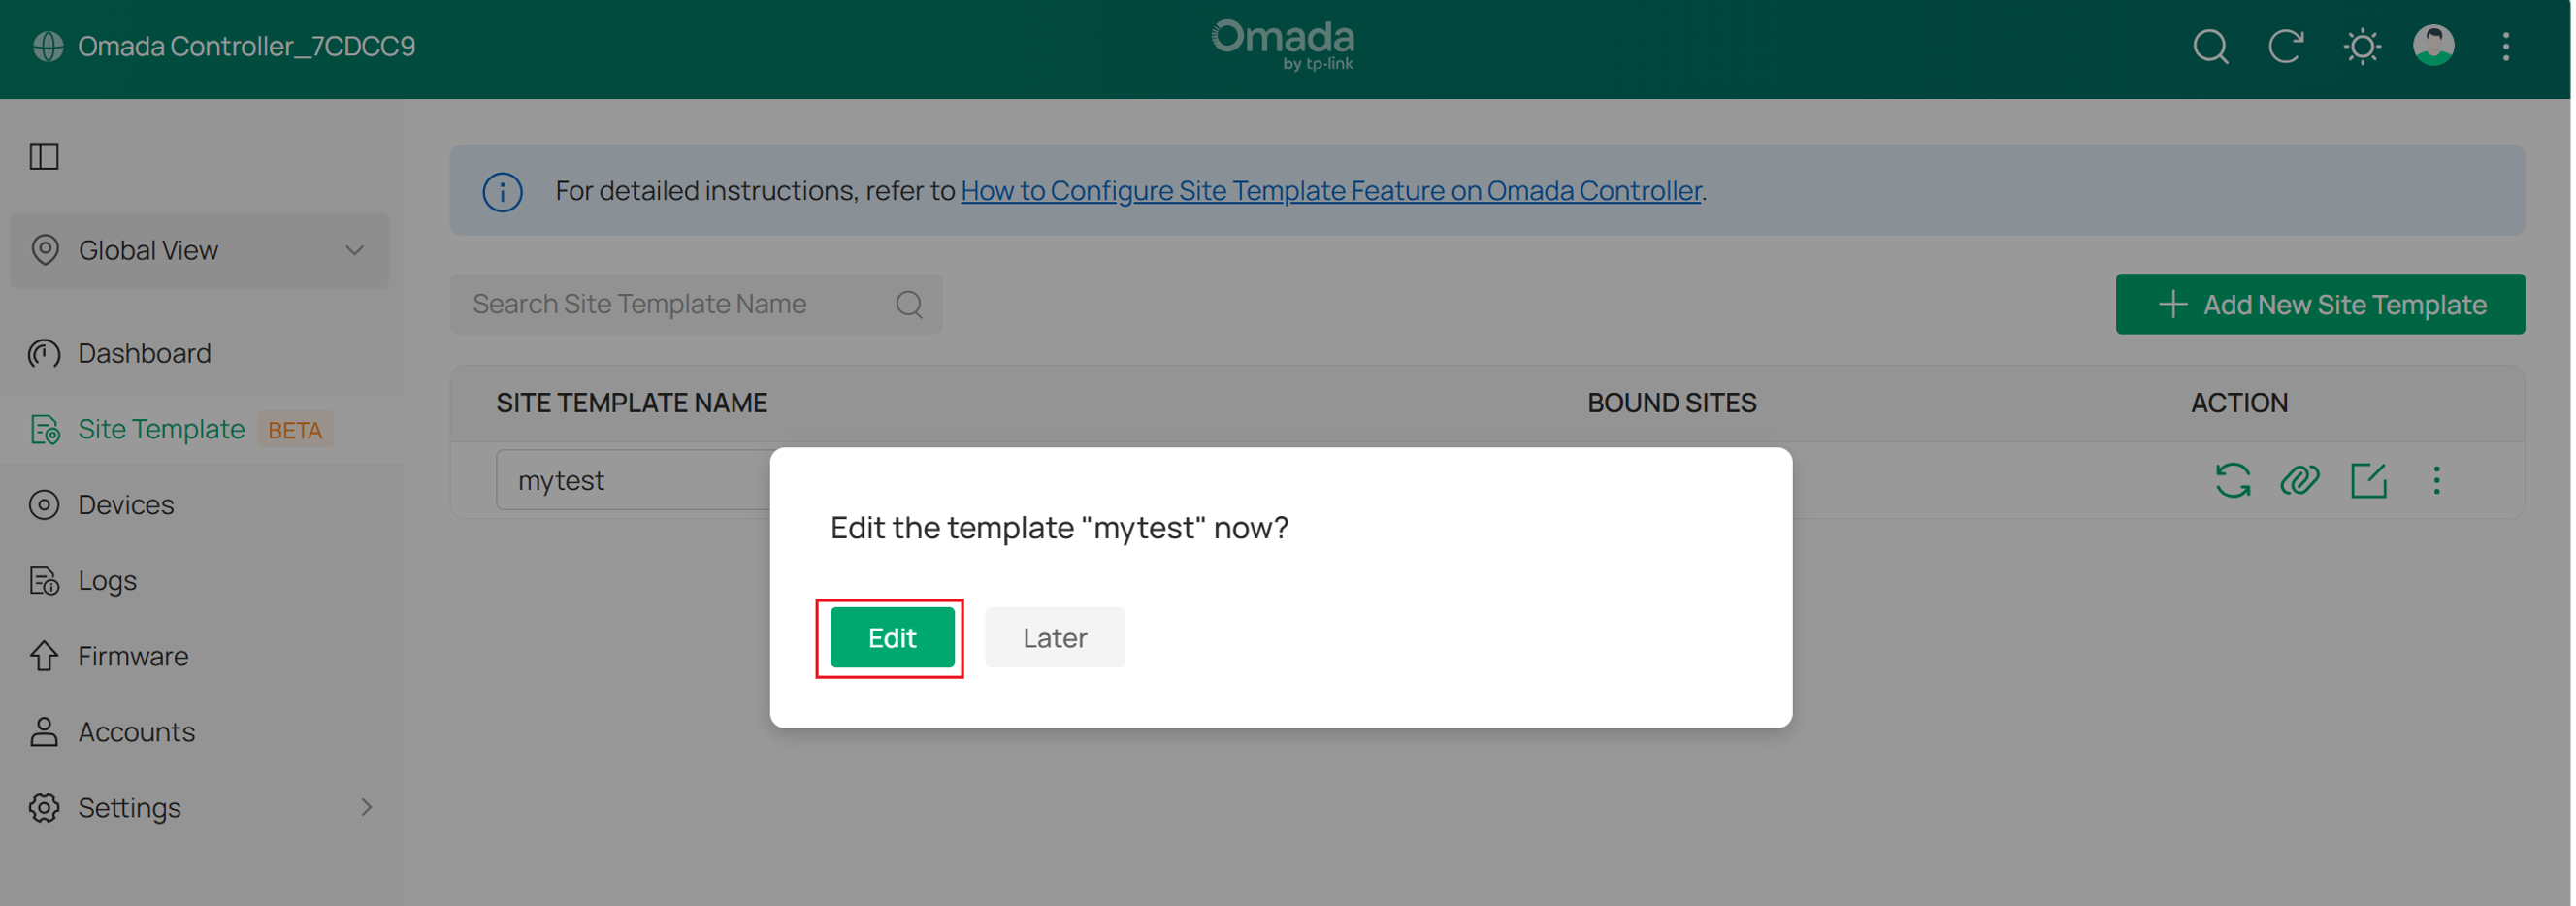
Step 1. Log in to the Omada Controller and navigate to Global View > Site Template. Click + Add New Site Template in the upper-right corner, enter a template name, select the configuration modules you want to include, and then click Create. The Edit window will open automatically, allowing you to continue configuring the template.
In this example, the template is named mytest, which is referenced throughout the rest of this article.
Note:
- Most site configuration modules are supported in a Site Template. Some modules are mandatory, while others are optional. Optional modules can be configured only if they are selected during template creation. For the complete list of supported modules, refer to the Site Template feature list at the end of this article.
- After a Site Template is created, its selected configuration modules cannot be modified.
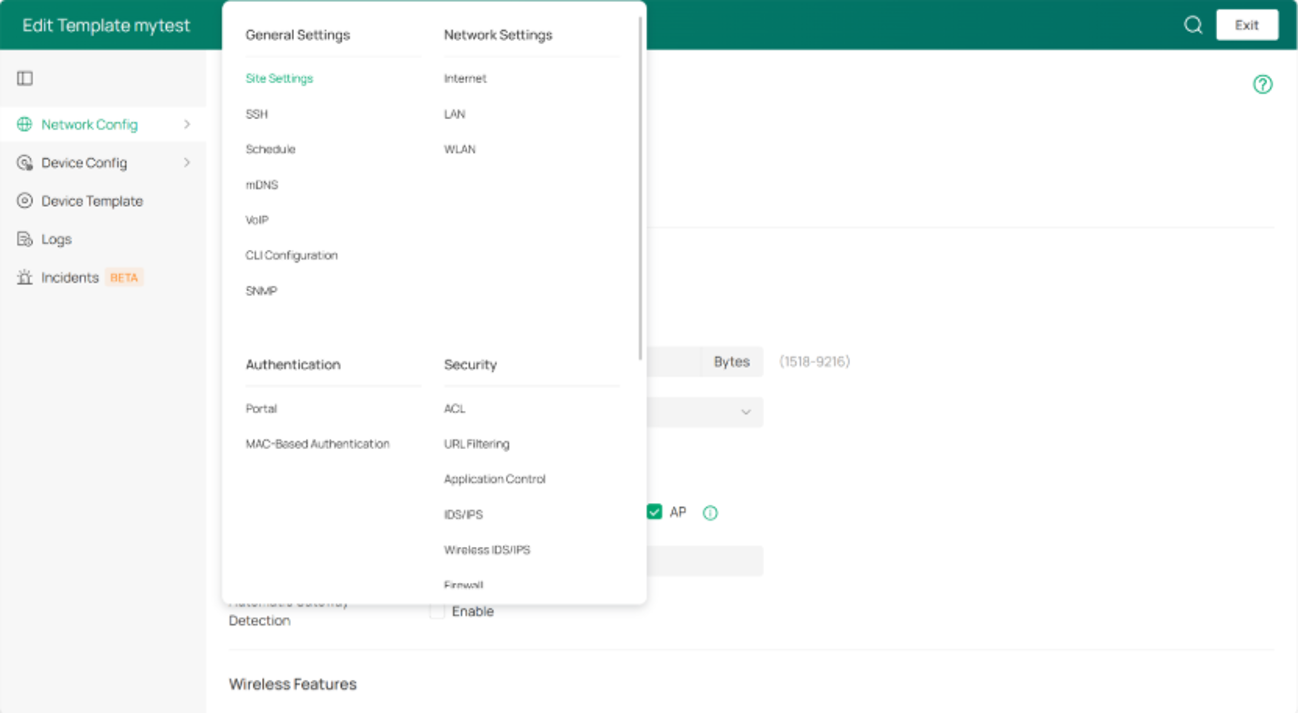
Step 2. On the mytest template page, configure the selected modules as required. The configuration procedures for Network Config/Device Config/Logs/Incidents are the same as those in a regular site, so they are not covered in this article. For more information, refer to the relevant feature guides on the Omada website.
Create a Device Template (Optional)
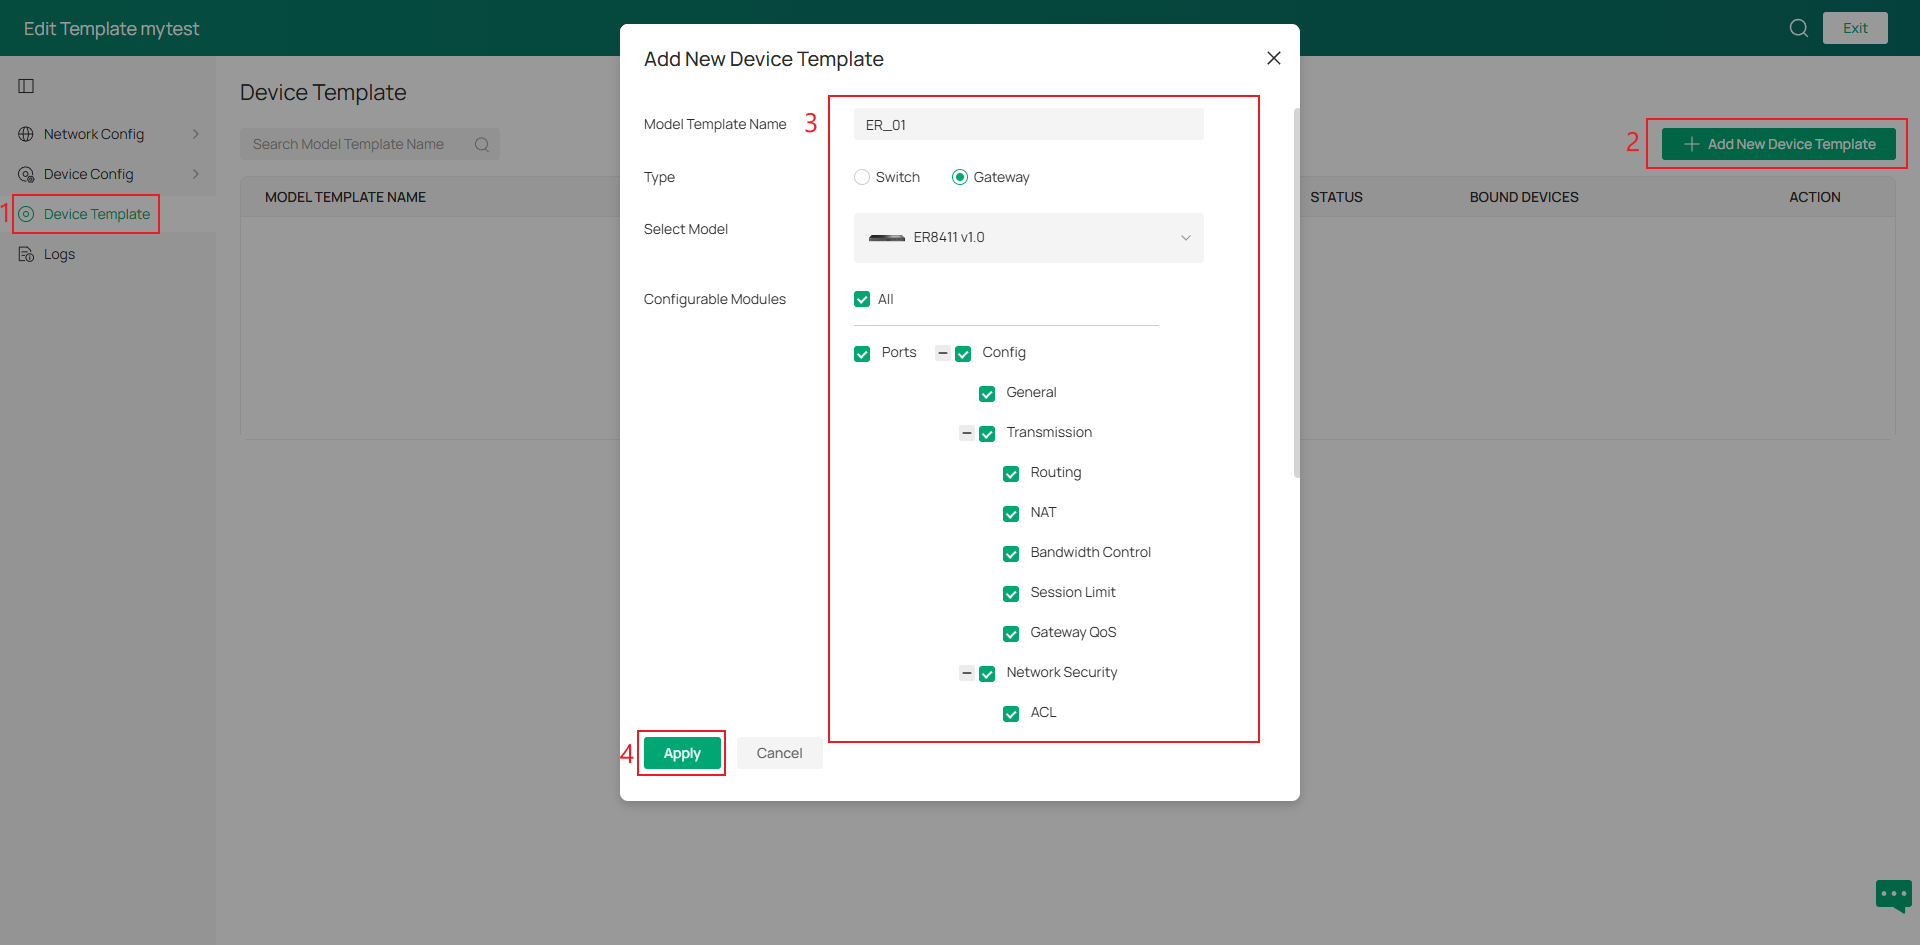
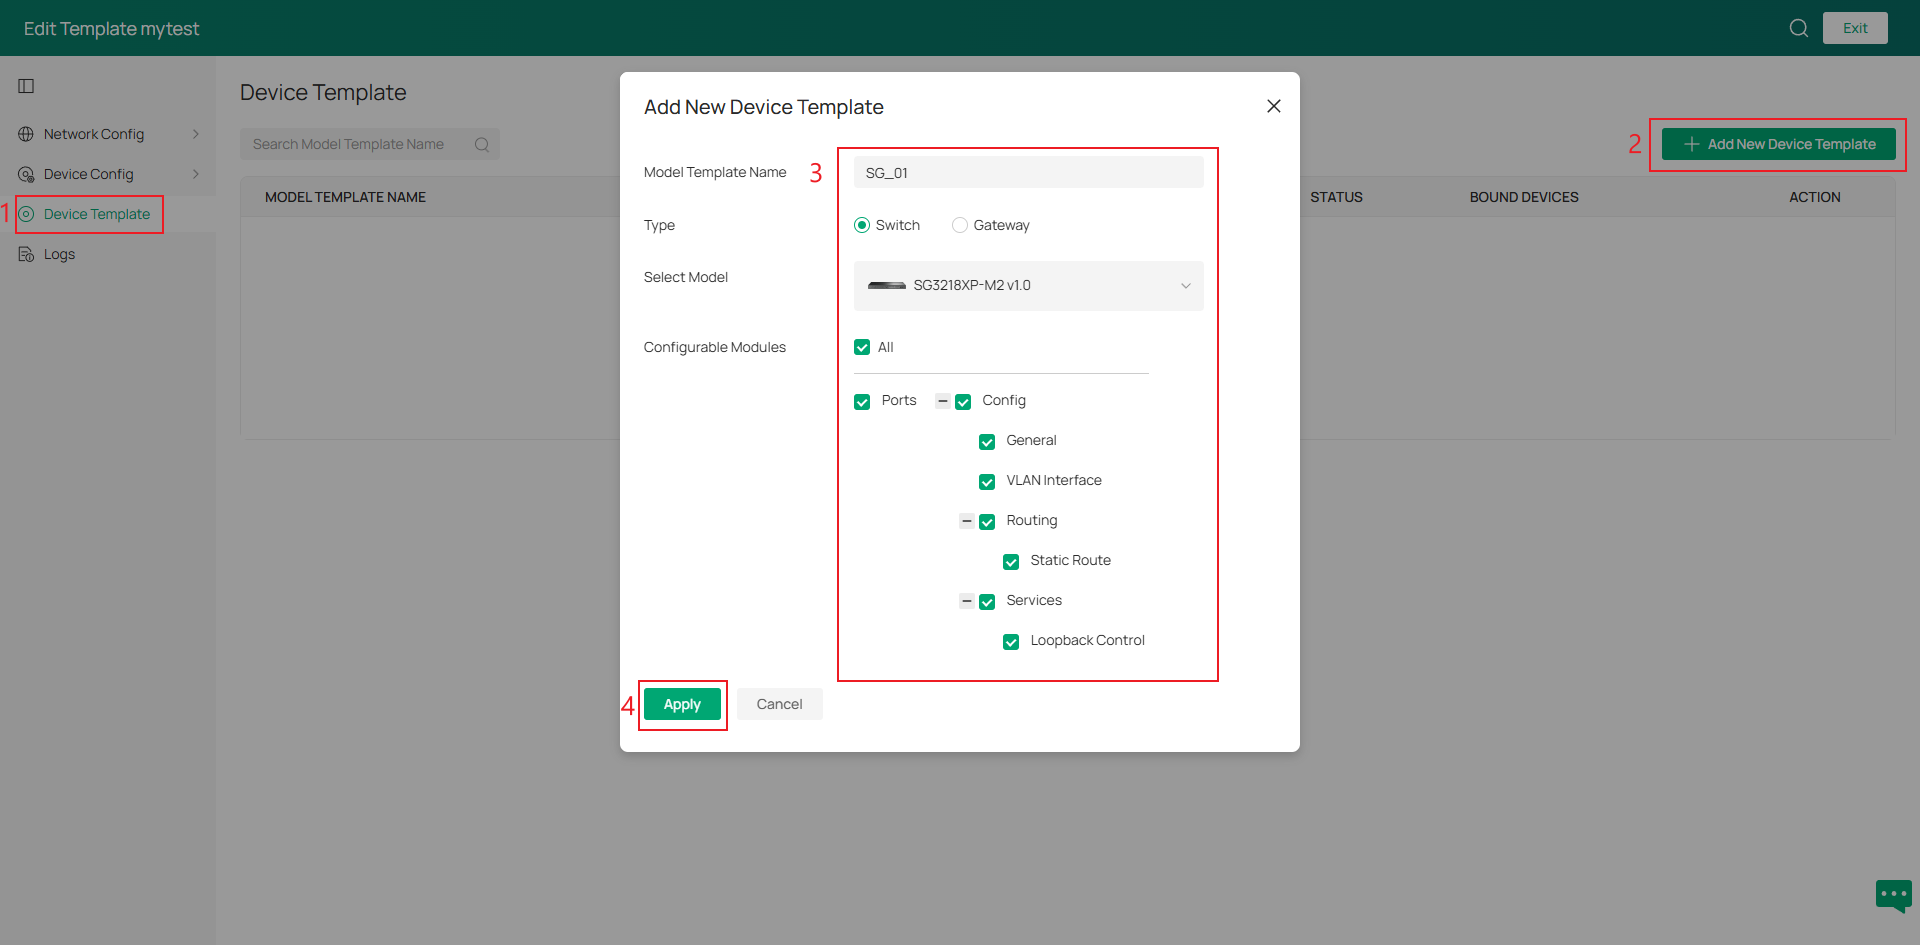
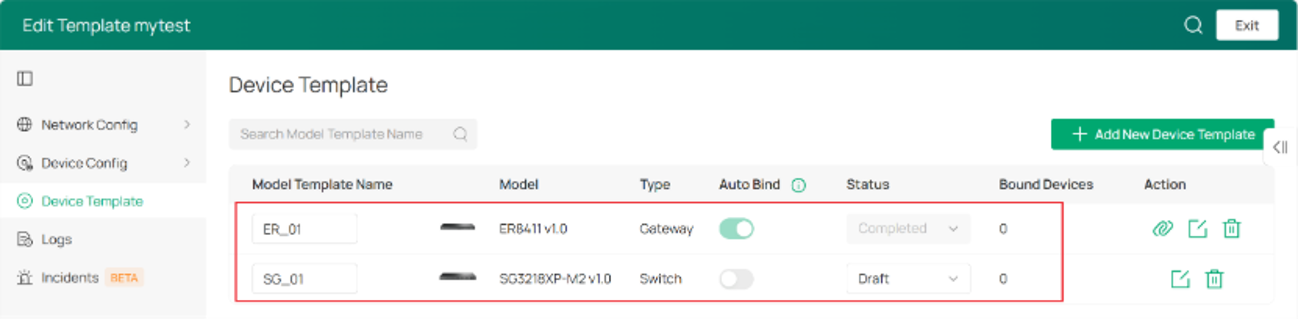
Step 1. Go to Global View > Device Template and click + Add New Device Template. Enter a template name, select the device type, device model, and the configuration modules you want to include.
In this example, two device templates are created:
ER_01 for ER8411 v1.0
SG_01 for SG3218XP-M2 v1.0
Note:
- Device Templates are supported only for Omada Gateways and Switches.
- Each Site Template can contain only one Gateway Device Template.
- When a Gateway Device Template is applied to a site, its WAN-related settings—including Online Detection, WAN Port Status, Load Balancing, and other WAN configurations—will overwrite the existing settings on the bound site.
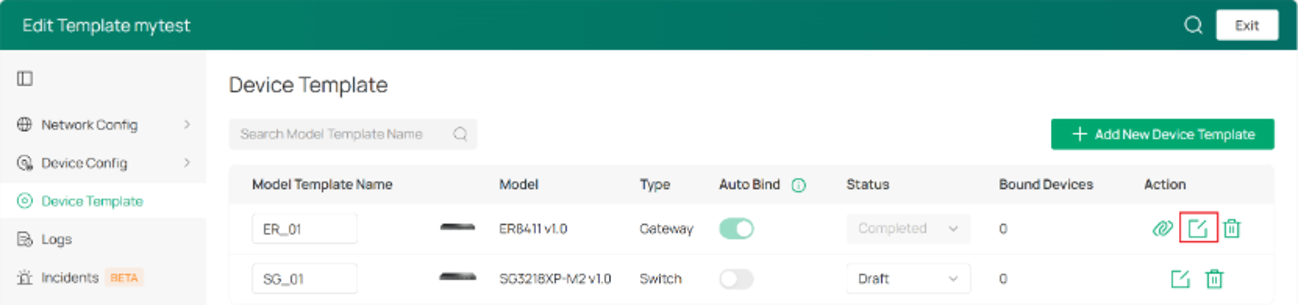
Step 2. Click the Edit icon in the Action column for the corresponding device template, and then configure the Ports and Config settings as required.
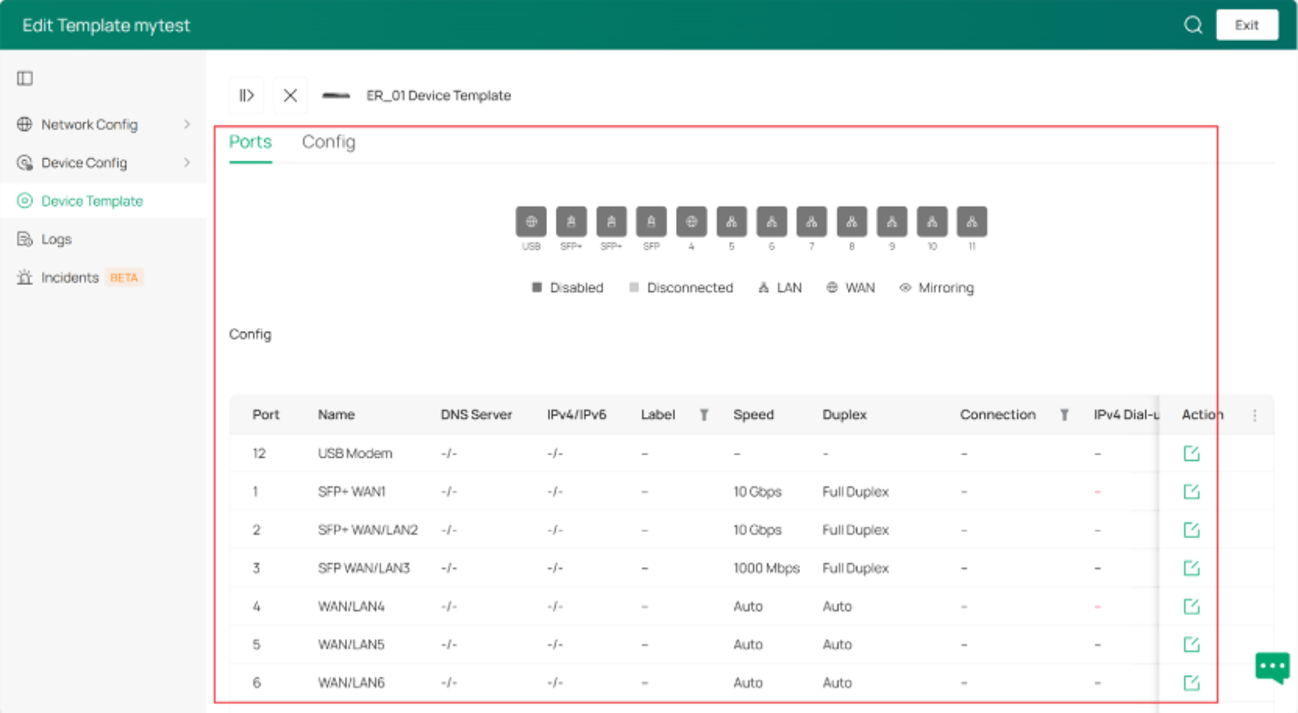
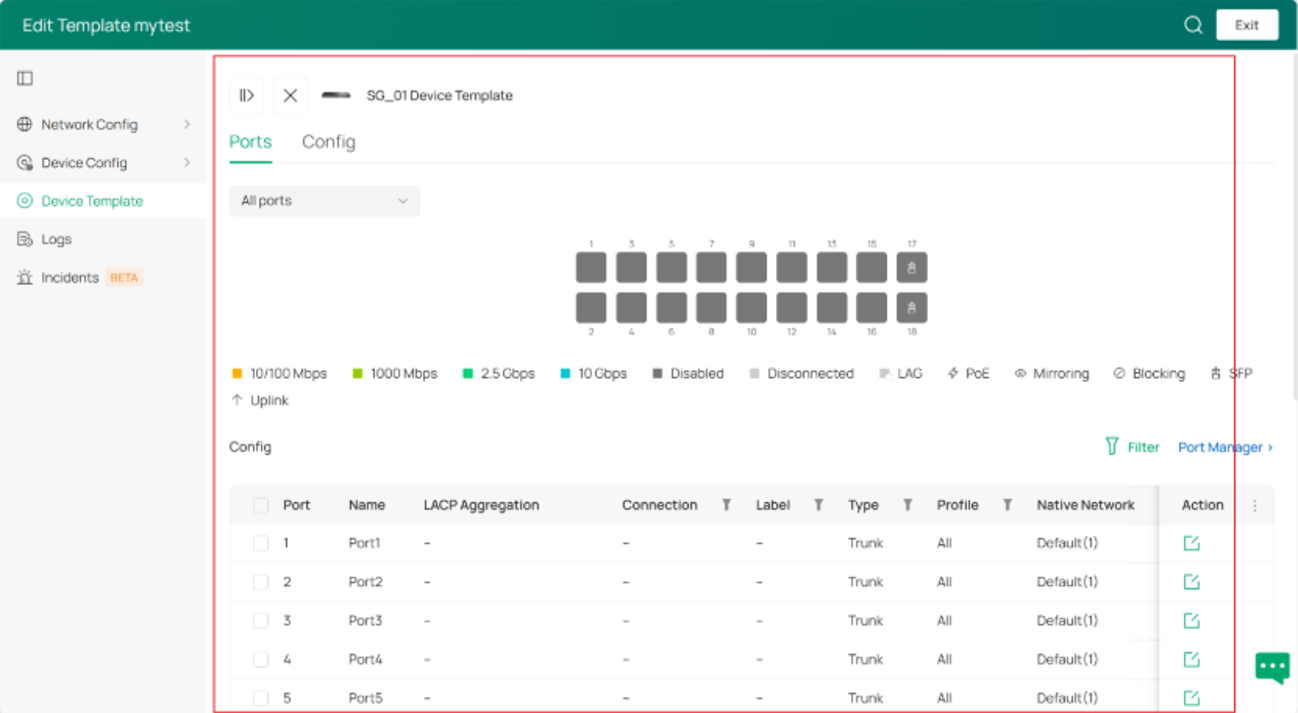
Step 3. The Site Template (mytest) has now been created successfully. To apply it to managed sites, continue to Bind sites to a Site Template.
Bind sites to a Site Template
Based on whether the site already exists, there are two ways to bind a site to a Site Template:
- Bind an existing site to a Site Template: Create a Site Template first, then apply it to existing sites.
- Apply a Site Template when creating a new site: Select a Site Template during the site creation process.
Bind an existing site to a Site Template
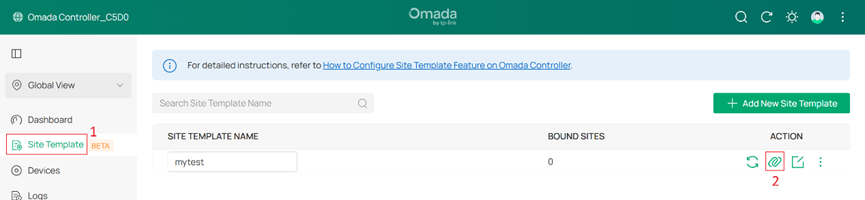
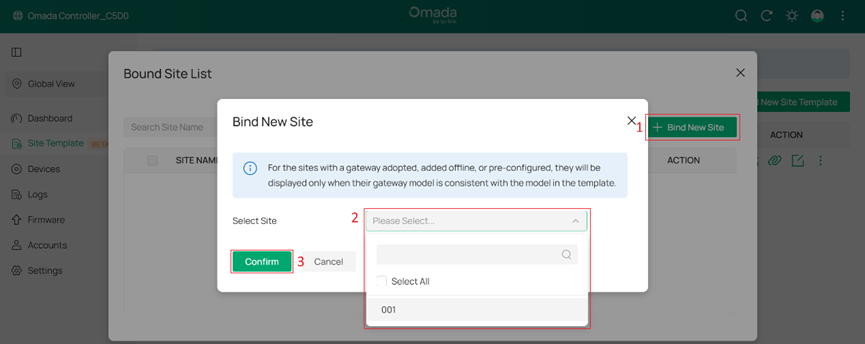
Go to Global View > Site Template, click Bound Site List for the target Site Template, and then click + Bind New Site. Select the sites you want to bind and click Confirm.
Note: After clicking Confirm, the Site Template configuration will be immediately synchronized to the bound sites.
Apply a Site Template when creating a new site.
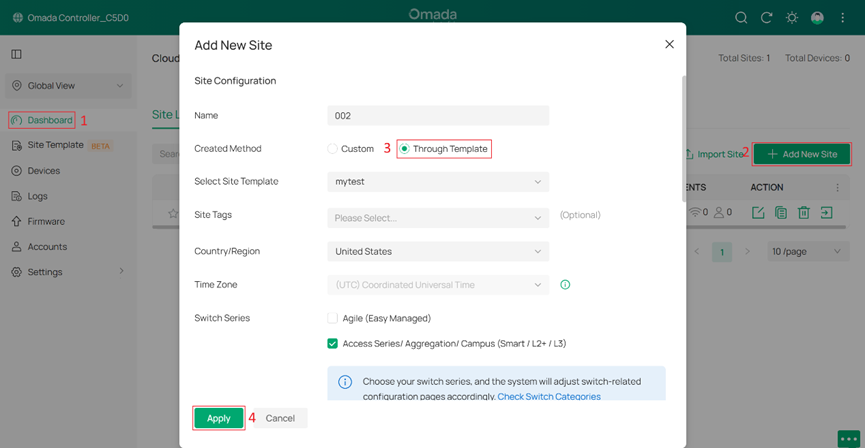
Go to Global View > Dashboard, click + Add New Site, and select Through Template as the creation method. Complete the required settings, select the desired Site Template, and then click Apply.
Bind devices to a Device Template
To apply the same configuration to multiple devices, you can bind devices to a Device Template. Go to the Device Template module of the corresponding Site Template and configure the device bindings as described below.
Bind an Omada Gateway to a Device Template
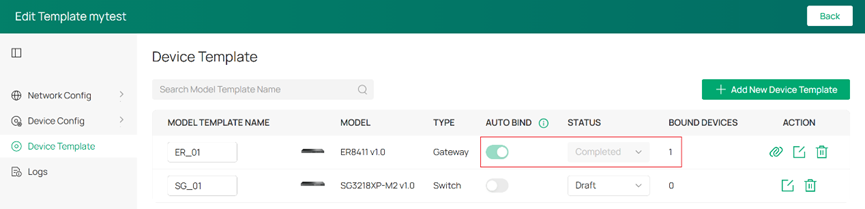
If an Omada Gateway is managed by a site, it will be automatically bound to the Gateway Device Template after the site is bound to a Site Template. In this case, AUTO BIND is enabled and the STATUS is set to Completed by default.
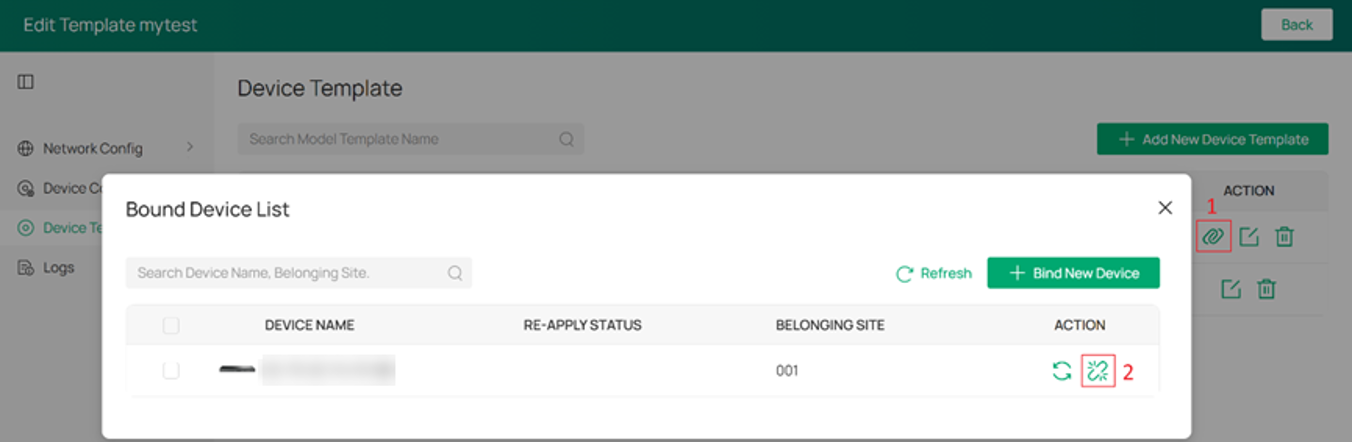
For example, in this article, the ER8411 v1.0 in Site 001 is automatically bound to the ER_01 Device Template. If you do not want the Gateway to use this Device Template, click Bound Device List, select the device entry, and click Unbind.
Note: Internet settings can be configured only after the Gateway Device Template is created.
Bind an Omada Switch to a Device Template
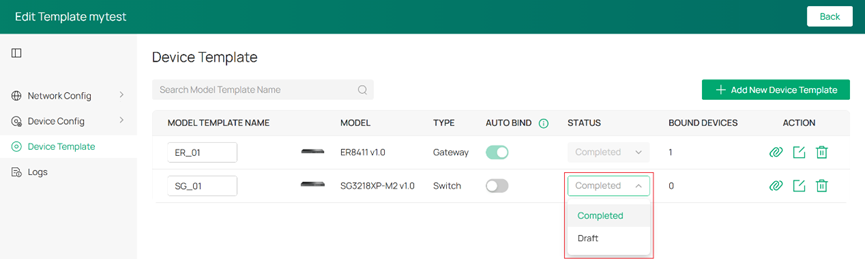
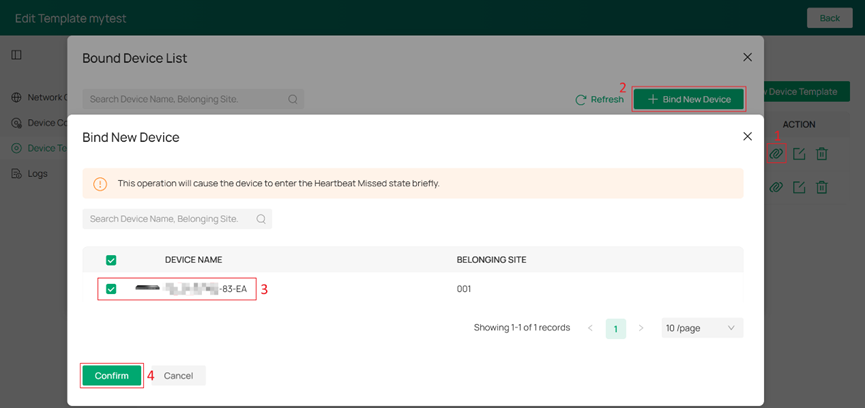
Before binding a Switch to a Device Template, change the template STATUS from Draft to Completed. A Device Template with Draft status cannot be used to bind devices. Then, click “Bound Device List” > + Bind New Device, select the target device model, and click Confirm.
Note:
1. After a Device Template is bound to a device of the corresponding model, its STATUS cannot be changed back to Draft.
2. When“AUTO BIND” is enabled, newly adopted devices with the same model will automatically bind to the Device Template and apply its configurations. Existing devices will not be automatically bound if the template contains DHCP Server or static IP configurations.
Verify Site and Device Template bindings (Optional)
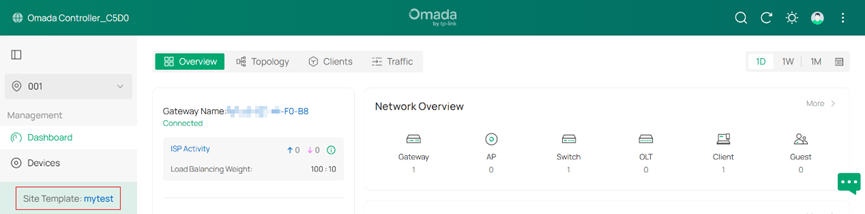
Go to Site 001, which is bound to the mytest Site Template. The Site Template: mytest label is displayed in the lower-left corner of the page.
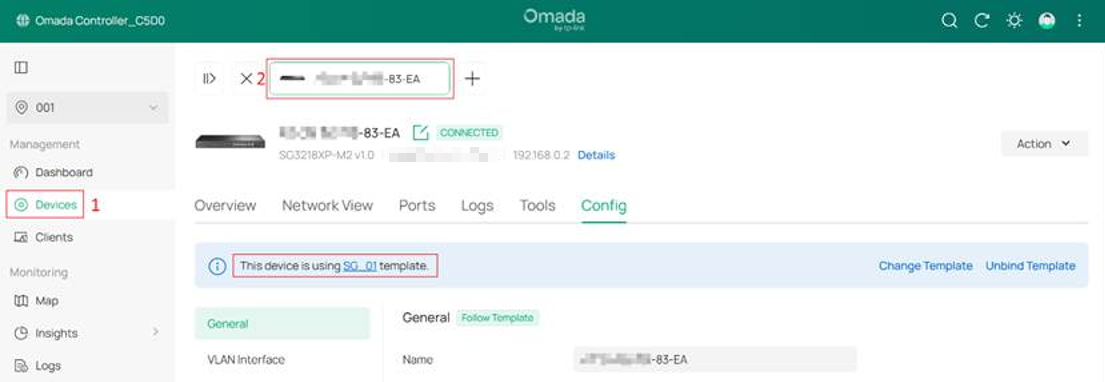
Click the SG2008P switch bound to the SG_01 Device Template. The page displays the message “This device is using template SG_01.”
Override Site or Device Template configurations (Optional)
If you do not want all sites using the same Site Template to maintain identical configurations, you can manually modify the configuration of individual sites or devices.
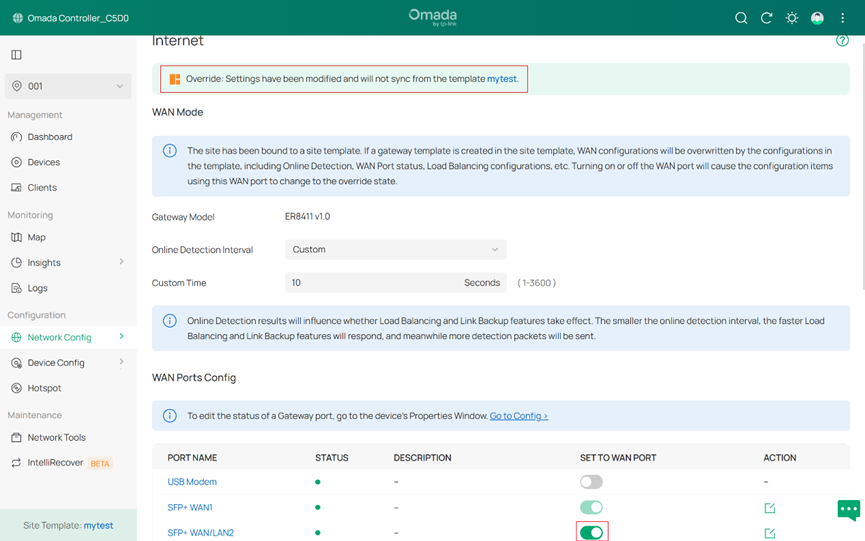
For example, if you configure the WAN/LAN1 port as the third WAN port, which differs from the mytest Site Template configuration, the site will be marked as overridden with the message:
"Override: Settings have been modified and will not sync from the template mytest.”
Unbind sites from a Site Template
After a site is unbound from a Site Template, it will no longer receive configuration updates from the template. However, the site will retain its current configurations, including any local overrides.
Depending on the number of sites you want to unbind, you can use one of the following methods:
Unbind a single site from a Site Template
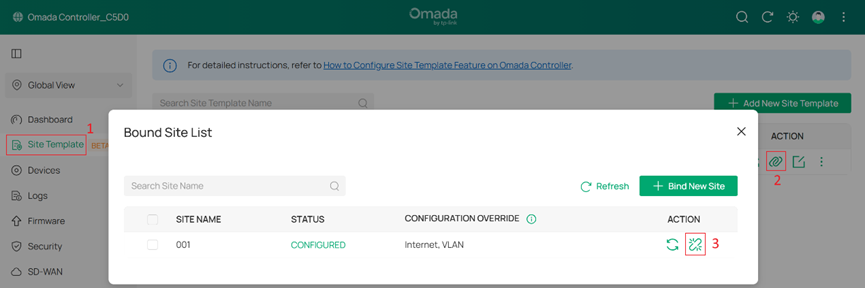
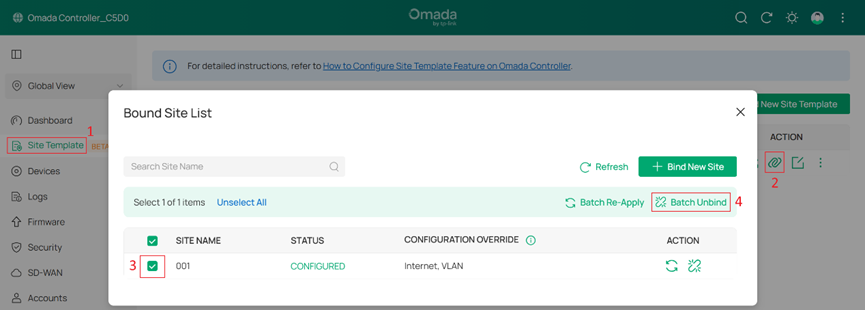
Go to Global View > Site Template, click Bound Site List for the target Site Template, select the site you want to unbind, and then click Unbind.
Batch unbind multiple sites from a Site Template
Go to Global View > Site Template, click Bound Site List for the target Site Template, select the sites you want to unbind, and then click Batch Unbind.
Unbind devices from a Device Template
After a device is unbound from a Device Template, it no longer synchronizes configurations from the template. However, the device retains its current configuration, including any local overrides.
Depending on the number of devices to be unbound, use one of the following methods.
Unbind a single device
A single device can be unbound from a Device Template either from the Site Template or directly from the site where the device is located
Method 1: From the Site Template
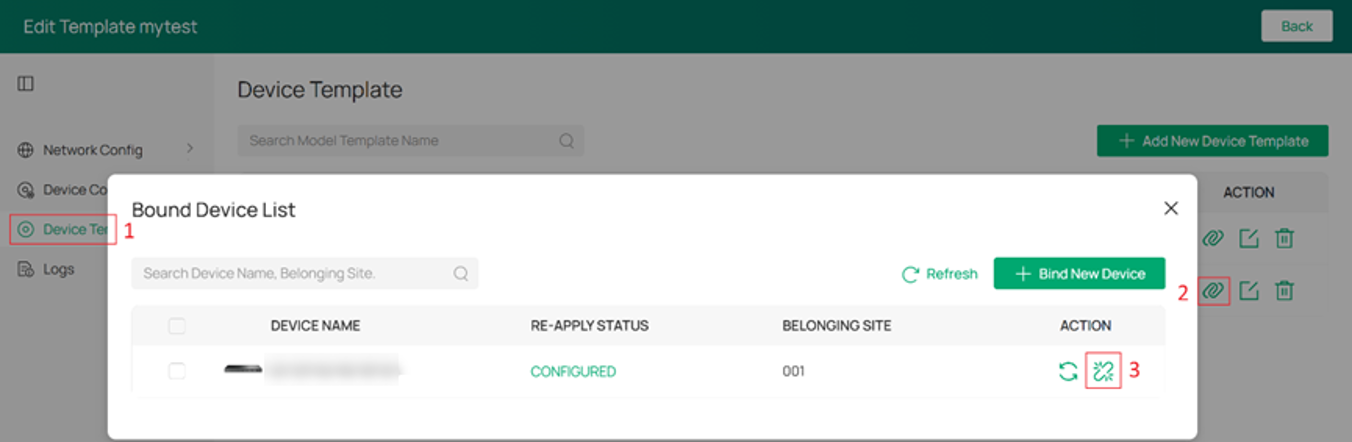
Go to the mytest template, click Bound Device List for the target Device Template, select the device to unbind, and click Unbind.
Method 2: From the Site
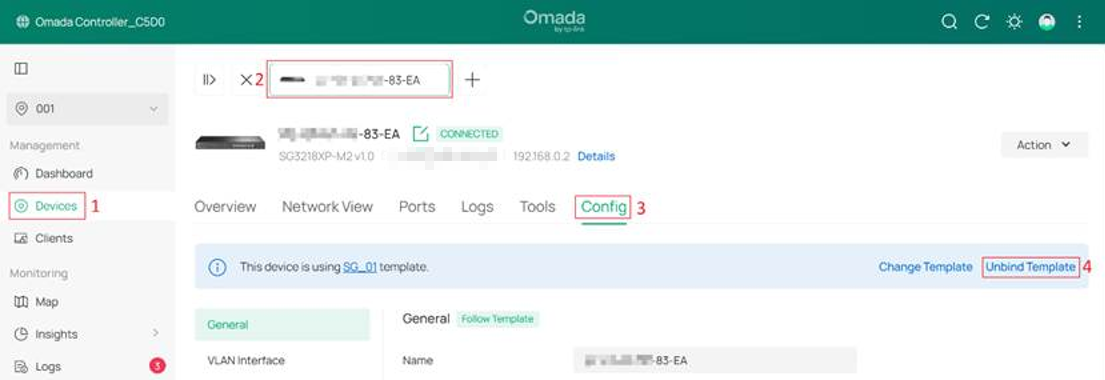
Go to Devices in the target site, select the device to open its properties, and click Unbind Template.
Unbind multiple devices
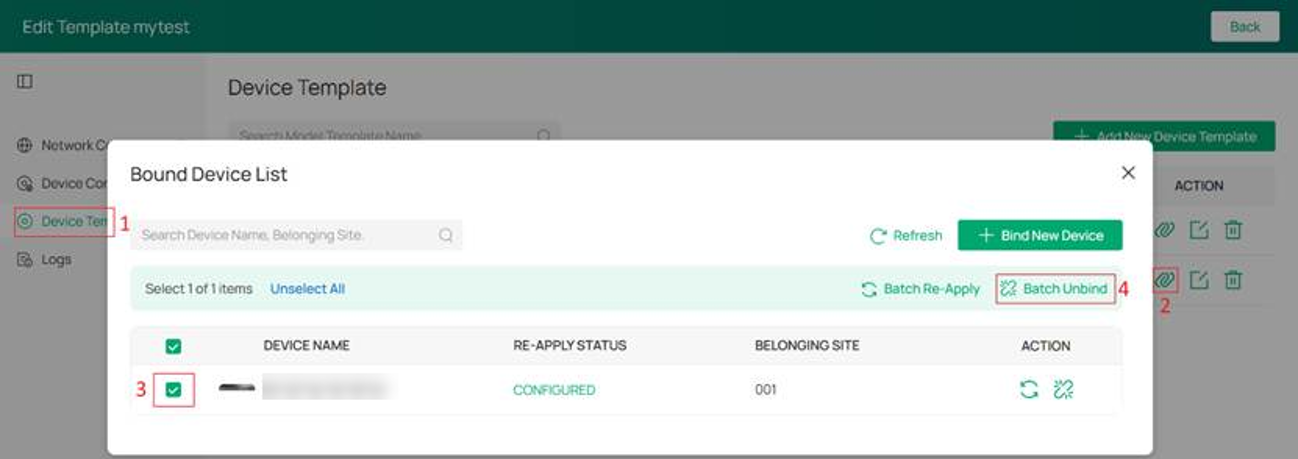
Go to the mytest template, click Bound Device List for the Device Template you want to manage, select the devices to unbind, and click Unbind.
Verification
This section provides examples of how the Site Template feature works after configuration. You can further explore other supported functions based on your requirements.
Step 1. Verify Site Template and Device Template configuration
Based on the configurations described in Create Site Templates and Device Templates, configure the Internet settings for the mytest template as shown below:
Add two LAN interfaces:
Default for VLAN 1 (192.168.0.1/24)
Site_Template_LAN for VLAN 10 (192.168.10.1/24)
Set the PVID of the LAN1 port in the ER_01 Device Template to VLAN 10.
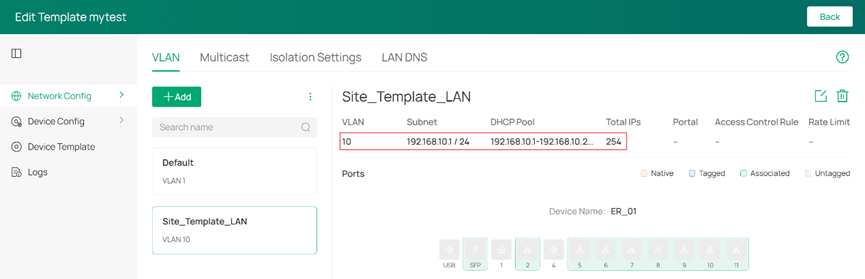
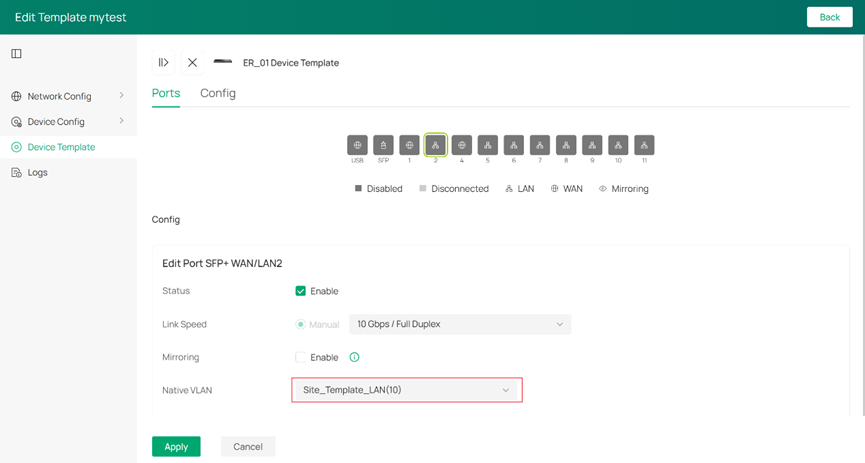
Step 2. Verify configuration synchronization
Go to Site 001. The Internet settings and Gateway settings should be synchronized with the mytest Site Template and ER_01 Device Template respectively.
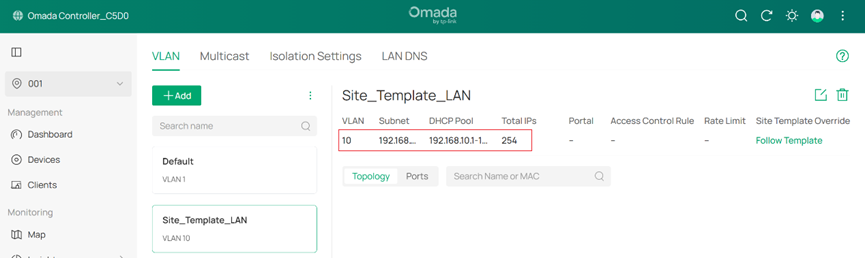
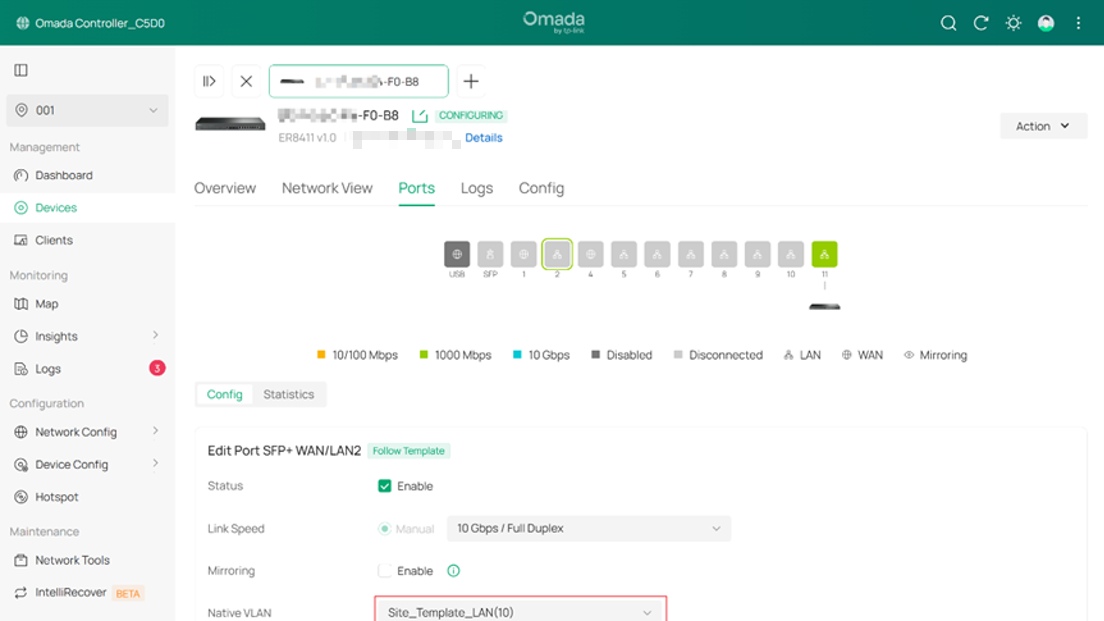
Step 3. Verify local overrides
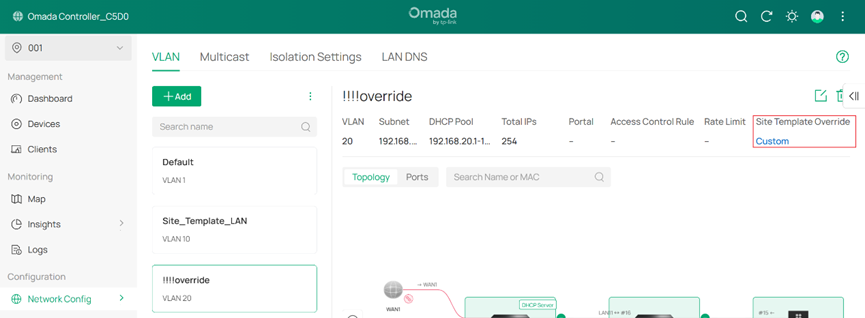
Modify the LAN settings in Site 001 by adding a new interface (!!!!override for VLAN 20-192.168.20.1/23). The newly added LAN profile is marked as Custom, indicating that it is a local override and is no longer synchronized from the Site Template.
Step 4. Restore Template Configuration
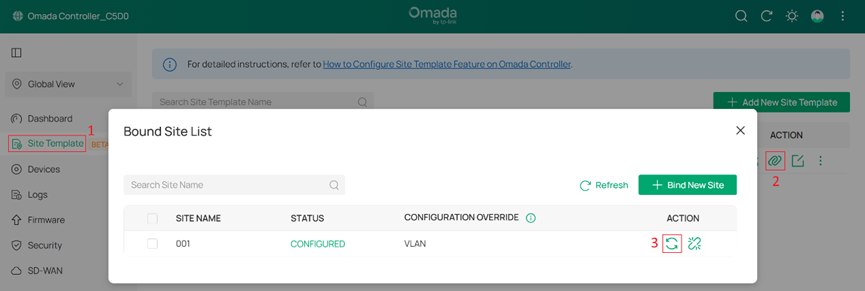
Click Re-Apply for Site 001. The site's configurations will be restored to match the settings defined in the mytest Site Template.
Conclusion
Site Templates and Device Templates enable you to configure multiple sites and devices in bulk, reducing repetitive configuration tasks and ensuring consistent settings across your network.
QA
Q1: Which configuration modules are supported by the Site Template feature?
A1: Please see the table below.
|
No |
Module |
Support |
Mandatory |
|
1 |
Dashboard |
× |
|
|
2 |
Statistics |
× |
|
|
3 |
Devices |
√ |
√ |
|
4 |
Clients |
× |
|
|
5 |
Insights |
× |
|
|
6 |
Logs |
√ |
× |
|
7 |
Audit Logs |
√ |
× |
|
8 |
Health |
× |
|
|
9 |
Incidents |
√ |
× |
|
10 |
Reports |
× |
|
|
11 |
Map |
× |
|
|
12 |
Network Tools |
× |
|
|
13 |
Site Settings |
√ |
√ |
|
14 |
Internet |
√ |
√ |
|
15 |
Virtual WAN |
× |
|
|
16 |
LAN |
√ |
√ |
|
17 |
WLAN |
√ |
√ |
|
18 |
WLAN Optimization |
√ |
× |
|
19 |
SIM |
√ |
× |
|
20 |
ACL |
√ |
√ |
|
21 |
URL Filtering |
√ |
√ |
|
22 |
MAC Filtering |
√ |
√ |
|
23 |
Attack Defense |
√ |
√ |
|
24 |
Firewall |
√ |
× |
|
25 |
IP-MAC Binding |
× |
|
|
26 |
Wireless IDS/IPS |
√ |
× |
|
27 |
IDS/IPS |
√ |
√ |
|
28 |
Application Control |
√ |
× |
|
29 |
Routing |
√ |
√ |
|
30 |
Switch OSPF |
× |
|
|
31 |
NAT |
√ |
√ |
|
32 |
Session Limit |
√ |
√ |
|
33 |
Bandwidth Control |
√ |
√ |
|
34 |
Gateway Qos |
√ |
√ |
|
35 |
Switch Qos |
× |
|
|
36 |
VRRP |
× |
|
|
37 |
OUI Based VLAN |
√ |
√ |
|
38 |
VPN |
× |
|
|
39 |
DHCP Reservation |
× |
|
|
40 |
Dynamic DNS |
√ |
√ |
|
41 |
mDNS |
√ |
√ |
|
42 |
SNMP |
√ |
√ |
|
43 |
UPnP |
√ |
√ |
|
44 |
SSH |
√ |
√ |
|
45 |
Reboot Schedule |
√ |
× |
|
46 |
Port Schedule |
√ |
× |
|
47 |
IPTV |
√ |
√ |
|
48 |
DNS Proxy |
√ |
√ |
|
49 |
DNS Cache |
√ |
√ |
|
50 |
Auto Send Data to Email |
× |
|
|
51 |
Portal |
√ |
√ |
|
52 |
802.1X |
× |
|
|
53 |
MAC-Based Authentication |
√ |
√ |
|
54 |
Groups |
√ |
√ |
|
55 |
Time Range |
√ |
√ |
|
56 |
Rate Limit |
√ |
√ |
|
57 |
PPSK |
√ |
√ |
|
58 |
RADIUS Profile |
√ |
√ |
|
59 |
LDAP Profile |
√ |
√ |
|
60 |
APN Profile |
√ |
√ |
|
61 |
Gateway Qos Service |
√ |
√ |
|
62 |
Bonjour Service |
√ |
√ |
|
63 |
OUI Profile |
√ |
√ |
|
64 |
Site CLI |
√ |
× |
|
65 |
Device CLI |
× |
Q2: How many site templates and device templates can be created on the same Omada Controller?
A2: For one Omada Controller, the maximum number of Site Template is 100 per customer (For MSP Mode)/Controller, the maximum number of Device Template is 257 (256 for Switch and 1 for Gateway) per Site Template.
Q2: How many Site Templates and Device Templates can be created on an Omada Controller?
A2: On a single Omada Controller, you can create up to 100 Site Templates per customer (in MSP mode) or per Controller (in Standalone mode).
Each Site Template supports up to 257 Device Templates, including:
- 256 Switch Device Templates
- 1 Gateway Device Template
Q3: How do I restore overridden configurations on sites bound to a Site Template?
A3:
- To restore all bound sites: Go to Global View > Site Template and click Re-apply for the desired template.
- To restore multiple bound sites: Go to Global View > Site Template, click Bound Site List, select the target sites, and click Batch Re-Apply.
- To restore a single bound site: Go to Global View > Site Template, click Bound Site List, select the target site, and click Re-Apply.
Note: Applying a Site Template will overwrite all site-level configurations on the selected sites and replace the private configurations of any devices whose models are included in the template. Configurations that are not supported by the template may also be removed.
For example, if a site contains custom LAN networks that are not defined in the template, those networks will be deleted. This may cause devices to go offline or result in temporary network interruptions. Before applying a Site Template, ensure that you understand its impact on the existing site configuration.
To learn more about each function and configuration, please visit Support Home to download or check the manual for your product.
