


How to Configure 802.11 Rate Control on Omada Controller


Contents
Objective
This article describes configuring the 802.11 Rate Control feature on the Omada Controller. This feature can improve the performance of high-density networks by disabling lower bit rates and allowing only higher bit rates on Omada APs and wireless clients.
Requirements
- Omada APs (The firmware must be compatible with Omada Network Application v6.1)
Introduction
In a traditional wireless network environment, some traditional clients, due to factors such as their hardware, software configurations, or the protocol characteristics they follow, tend to send many low-speed packets during the data transmission process. When transmitted in the air interface, these low-speed packets will occupy more time resources than high-speed packets. When too many traditional clients continuously send low-speed packets, especially in a high-density environment, the air interface resources are extensively consumed, resulting in a significant reduction in the available air interface time for clients with high-specification performance (such as employing more advanced modulation techniques and having more substantial signal processing capabilities). This situation directly negatively impacts the overall rate of the entire wireless network system during data transmission.
802.11 Wireless Frame
|
Frame Category |
Examples |
Purpose |
|
Management Frames |
Beacon, Probe Request/Response, Authentication, Association |
Establish and maintain wireless connections (network discovery, authentication, association, roaming) |
|
Control Frames |
RTS, CTS, ACK, Block ACK |
Assist in frame delivery and control medium access |
|
Data Frames |
Data, Null Data, QoS Null, QoS Data |
Carry user data or indicate device state (e.g., Power Save mode via PM bit) |
The 802.11 Rate Control (This controls both data and management frames) function of the Omada AP addresses this issue by optimizing and regulating the air interface traffic under the old protocols, thereby improving the overall network performance. Specifically, the feature only affects the relatively early Wi-Fi protocols (802.11a/b/g). The core functional mechanism lies in the effective management and control of low-speed packets in the air interface, aiming to improve the channel's overall utilization efficiency.
This article uses Omada Network Application v6.1 and EAP772v1 as examples to give details on how to configure this feature and how it takes effect.
Note:
- Omada Controller v5.15's UI design is completely different from the lower version, but the same functionality is in effect.
- Omada Network Application v6.1 add supported Management Rate Control.
Configuration
Step 1. Log in to the Controller, go to Site’s Settings > Wired&Wireless Networks > WLAN.
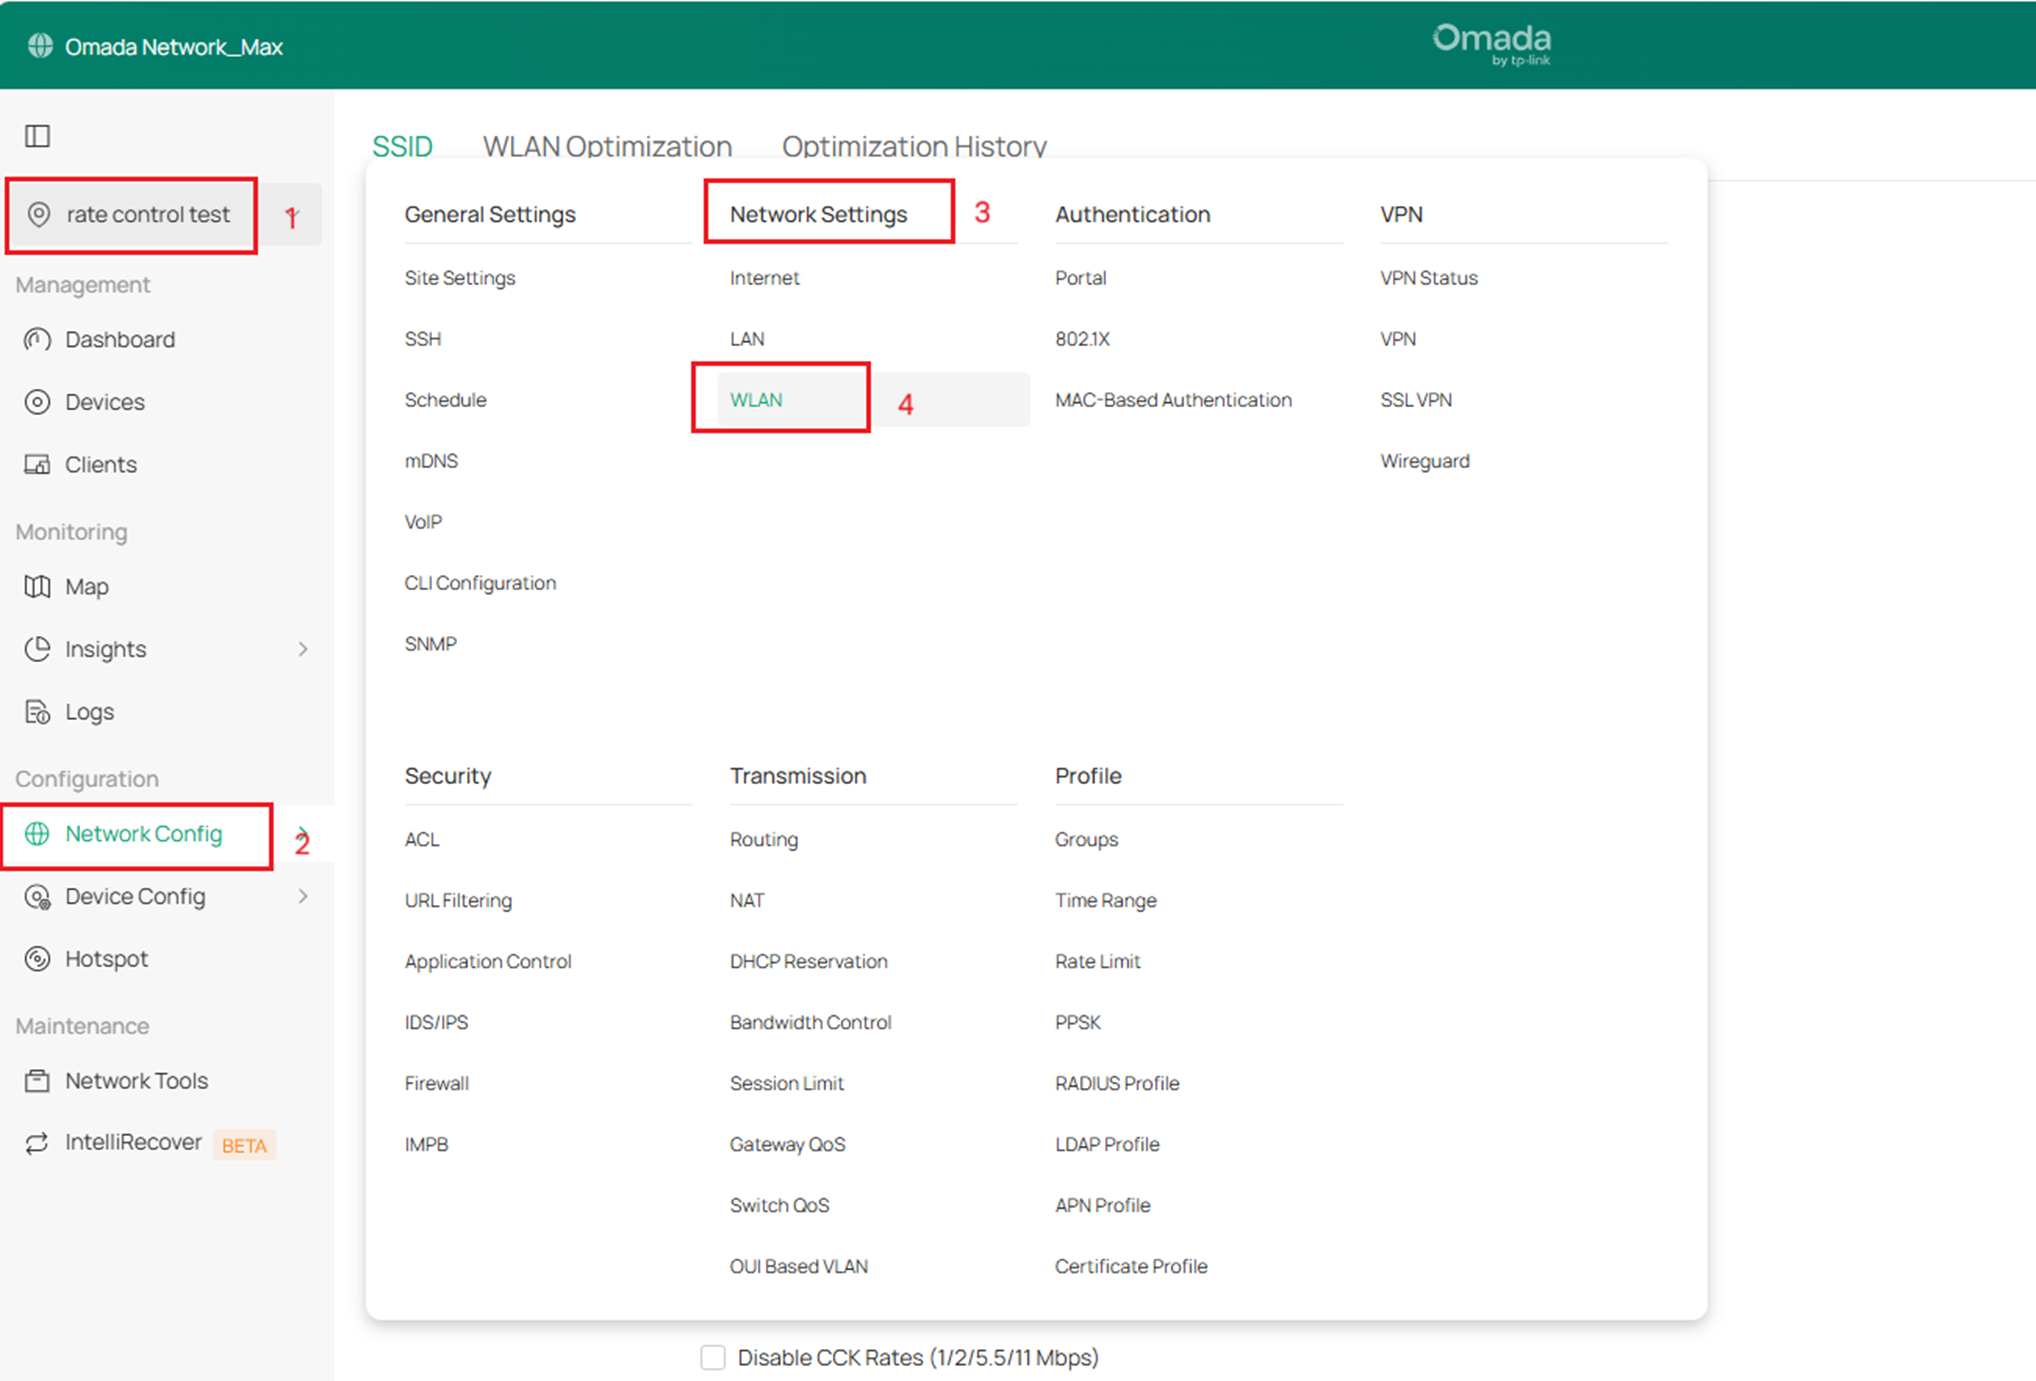
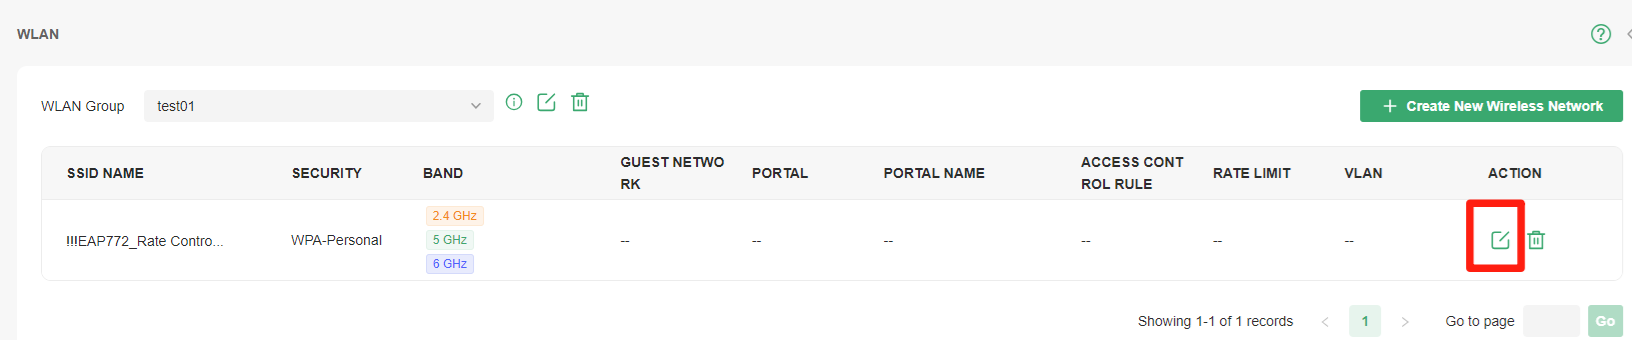
Step 2. Select the SSID to set up the 802.11 Rate Control feature and click the Edit Button.
Step 3. Expand the 802.11 Rate Control option, then adjust all sub-items according to your own needs.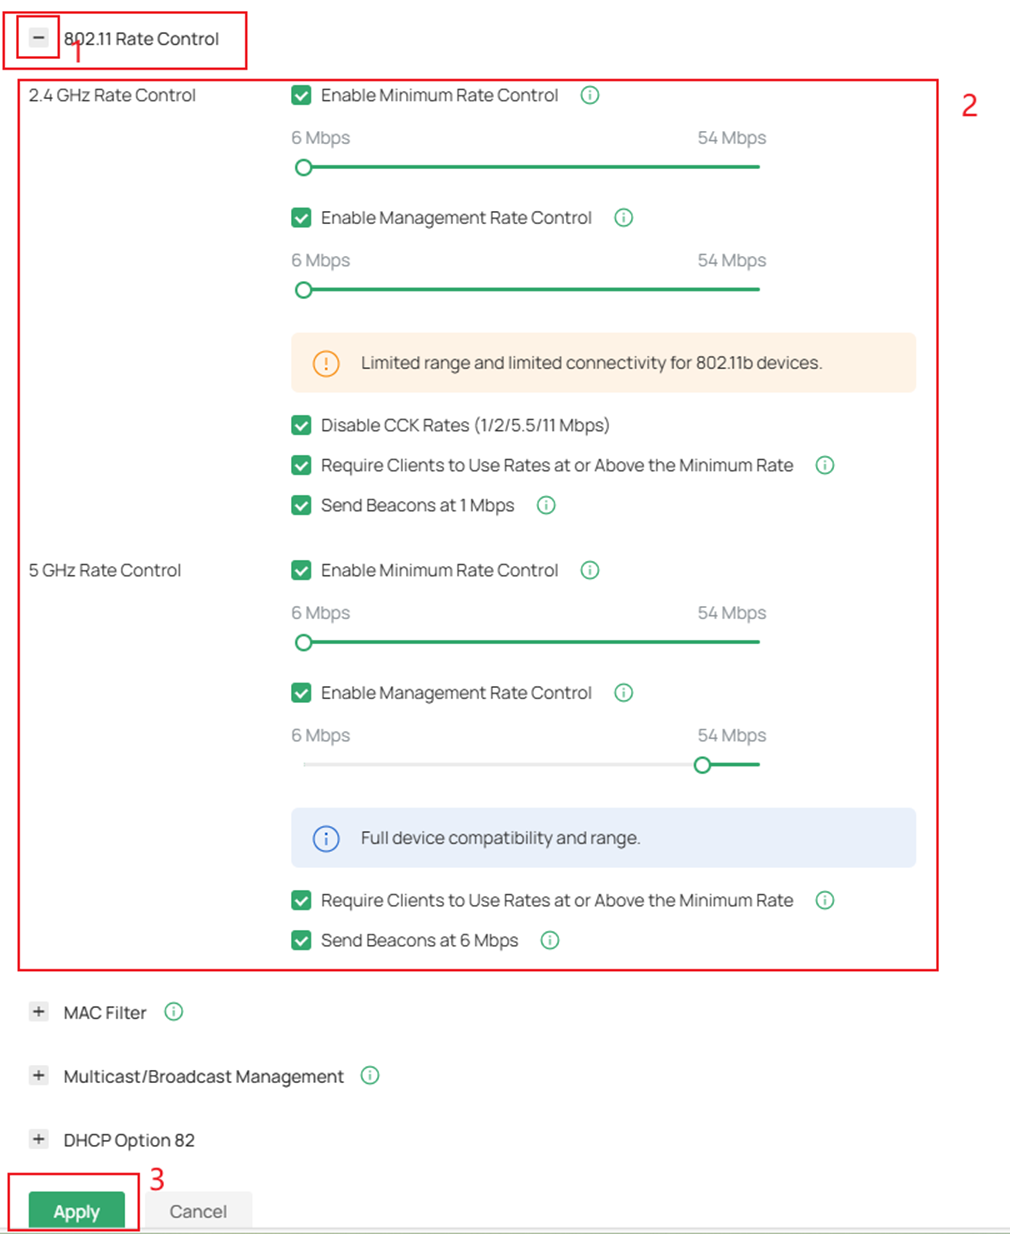
-
Enable Minimum Data Rate Control: When enabled, you can use the slider to set allowed bit rates on your 2.4 GHz/5GHz network. This controls both data and management frames. Disabling lower rates improves high-density network performance but may make older devices incompatible and reduce wireless range. To control management frames separately, enable Management Rate Control.
- Enable Management Rate Control:When enabled, you can independently set bit rates for management frames to optimize airtime usage. Higher minimum rates of management frames reduce overhead in dense environments but may affect network discovery range. Adjust based on your network requirements and client capabilities.
Note: This feature is not supported on devices running older firmware versions. The firmware must be compatible with Omada Network Application v6.1.
-
Disable CCK Rates (1/2/5.5/11 Mbps): Check the box to disable CCK rates (1/2/5.5/11 Mbps). CCK (Complementary Code Keying) is a modulation scheme for 802.11b devices that is applicable only in the 2.4 GHz band.
-
Require Clients to Use Rates at or Above the Specified Value: Check the box if you want to require clients to use rates equal to or above the specified value on the Minimum Data Rate Controller slider. Otherwise, the Minimum Data Rate Control will only affect the AP’s Tx direction.
-
Send Beacons at 1 Mbps/6 Mbps: Check the box to see if you want clients to send beacons at a minimum rate of 1Mbps on the 2.4GHz band (or 6Mbps on the 5GHz band). Otherwise, the AP will send the beacon frame based on the Minimum Data Rate Control value.
Verification
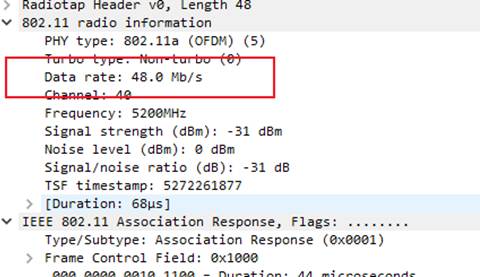
After completing the above configuration, use a Macbook with Wireshark installed to capture the 802.11 air packets about the relative AP and clients (you can refer How to Capture the Wireless Packets on MacBook to know the operation details); it’s found that:
(1) This AP sends the management frames (doesn’t include the beacon frame) and 802.11 g/n data frames with 48.0Mb/s or above data rates on this specific SSID, such as the probe response frame, the association response frame, and the authentication frame.


(2) This AP still sends a 5GHz beacon frame with a 6Mb/s data rate on the specific due to the enabled Send Beacons at 6 Mbps.

(3) The wireless client associated with this AP on the specific SSID sends data frames with a 48Mb/s data rate due to the Require Clients to Use Rates at or Above the Specified Value enabled.

Note: Only partial packets are shown here as examples for the introduction; you can also capture the rest of the packets to verify the effectiveness of this function.
Conclusion
Following the steps above, we have successfully configured the 802.11 Rate Control on Omada Controller and verified that this function works as configured. You can set up this feature according to your own needs.
Get to know more details of each function and configuration please go to Download Center to download the manual of your product.
QA
Q1. When should I configure this function for my wireless network?
Re. Generally speaking, it is recommended that this feature be left as the default status (disabled) for most customers unless there are a lot of 802.11 b/g/n wireless clients in your network, and your wireless experience is significantly impacted.
Q2. How is the Require Clients to Use Rates at or Above the Specified Value realized?
Re. With Require Clients to Use Rates at or Above the Specified Value configured, the AP will adjust the support rate carried in the beacon frame so the wireless clients can only associate and communicate with the AP at rates no lower than the configured value. For example, the beacon will be sent as follows after the Minimum Data Rate for the 5GHz band is set as 48Mbps:

Q3. Why did the 802.11 Rate Control I configured not take effect?
Re. Devices running older firmware do not support this feature. Please go to Download Center to check and upgrade the firmware to the latest version.
Q4: What is the difference in the 802.11 Rate Control feature between Omada Network v6.1 and earlier controller versions?
Re. Omada Network Application v6.1 add supported Management Rate Control. When enabled, you can independently set bit rates for management frames to optimize airtime usage. Higher minimum rates of management frames reduce overhead in dense environments but may affect network discovery range. Adjust based on your network requirements and client capabilities.
Q5: What are the implications of enabling the Management Rate Control feature?
Re. When the minimum transmission rate for management frames is set too high, it may impact the connectivity of legacy terminals. Users should adjust settings flexibly based on actual device conditions to balance performance optimization and network discovery range. Alternatively, enable “Send Beacons at 1 Mbps/6 Mbps” to broadcast the SSID and use low-rate beacon frames for connecting legacy/older IoT devices.
Get to know more details of each function and configuration please go to Download Center to download the manual of your product.
