


How to Configure IPv6 on Omada Gateway in Standalone Mode


Contents
IPv6 limitations and considerations
Introduction
IPv6 provides a significantly larger address space than IPv4 and supports the growing number of devices connected to modern networks. Omada Gateways support IPv6 in Standalone Mode, allowing IPv6 settings to be configured directly through the gateway's web management interface.
This guide explains how to configure IPv6 WAN and LAN settings and the DHCPv6 Prefix Delegation Server on an Omada Gateway in Standalone Mode, as well as how to verify IPv6 connectivity.
IPv6 limitations and considerations
For configurable IPv6 LAN prefixes, Omada currently supports Global Unicast Addresses and does not support Unique Local Addresses. Link-local addresses are generated automatically and may appear in status information.
The IPv6 addresses and prefixes under 2001:db8::/32 shown in this guide are reserved for documentation purposes and are not routable on the internet. For actual deployments, use an IPv6 address or prefix assigned by the ISP or network administrator. These example addresses cannot be used to verify internet connectivity.
Requirements
- Omada Gateway
Configuration
This section demonstrates how to configure IPv6 on an Omada Gateway in Standalone Mode, including WAN and LAN IPv6 settings and DHCPv6 Prefix Delegation Server configuration.
Note: The IPv6 addresses and prefixes used in this guide are within 2001:db8::/32, which is reserved for documentation purposes and is not routable on the internet. For an actual deployment, use the IPv6 addresses and prefixes provided by the ISP or network administrator.
IPv6 WAN configuration
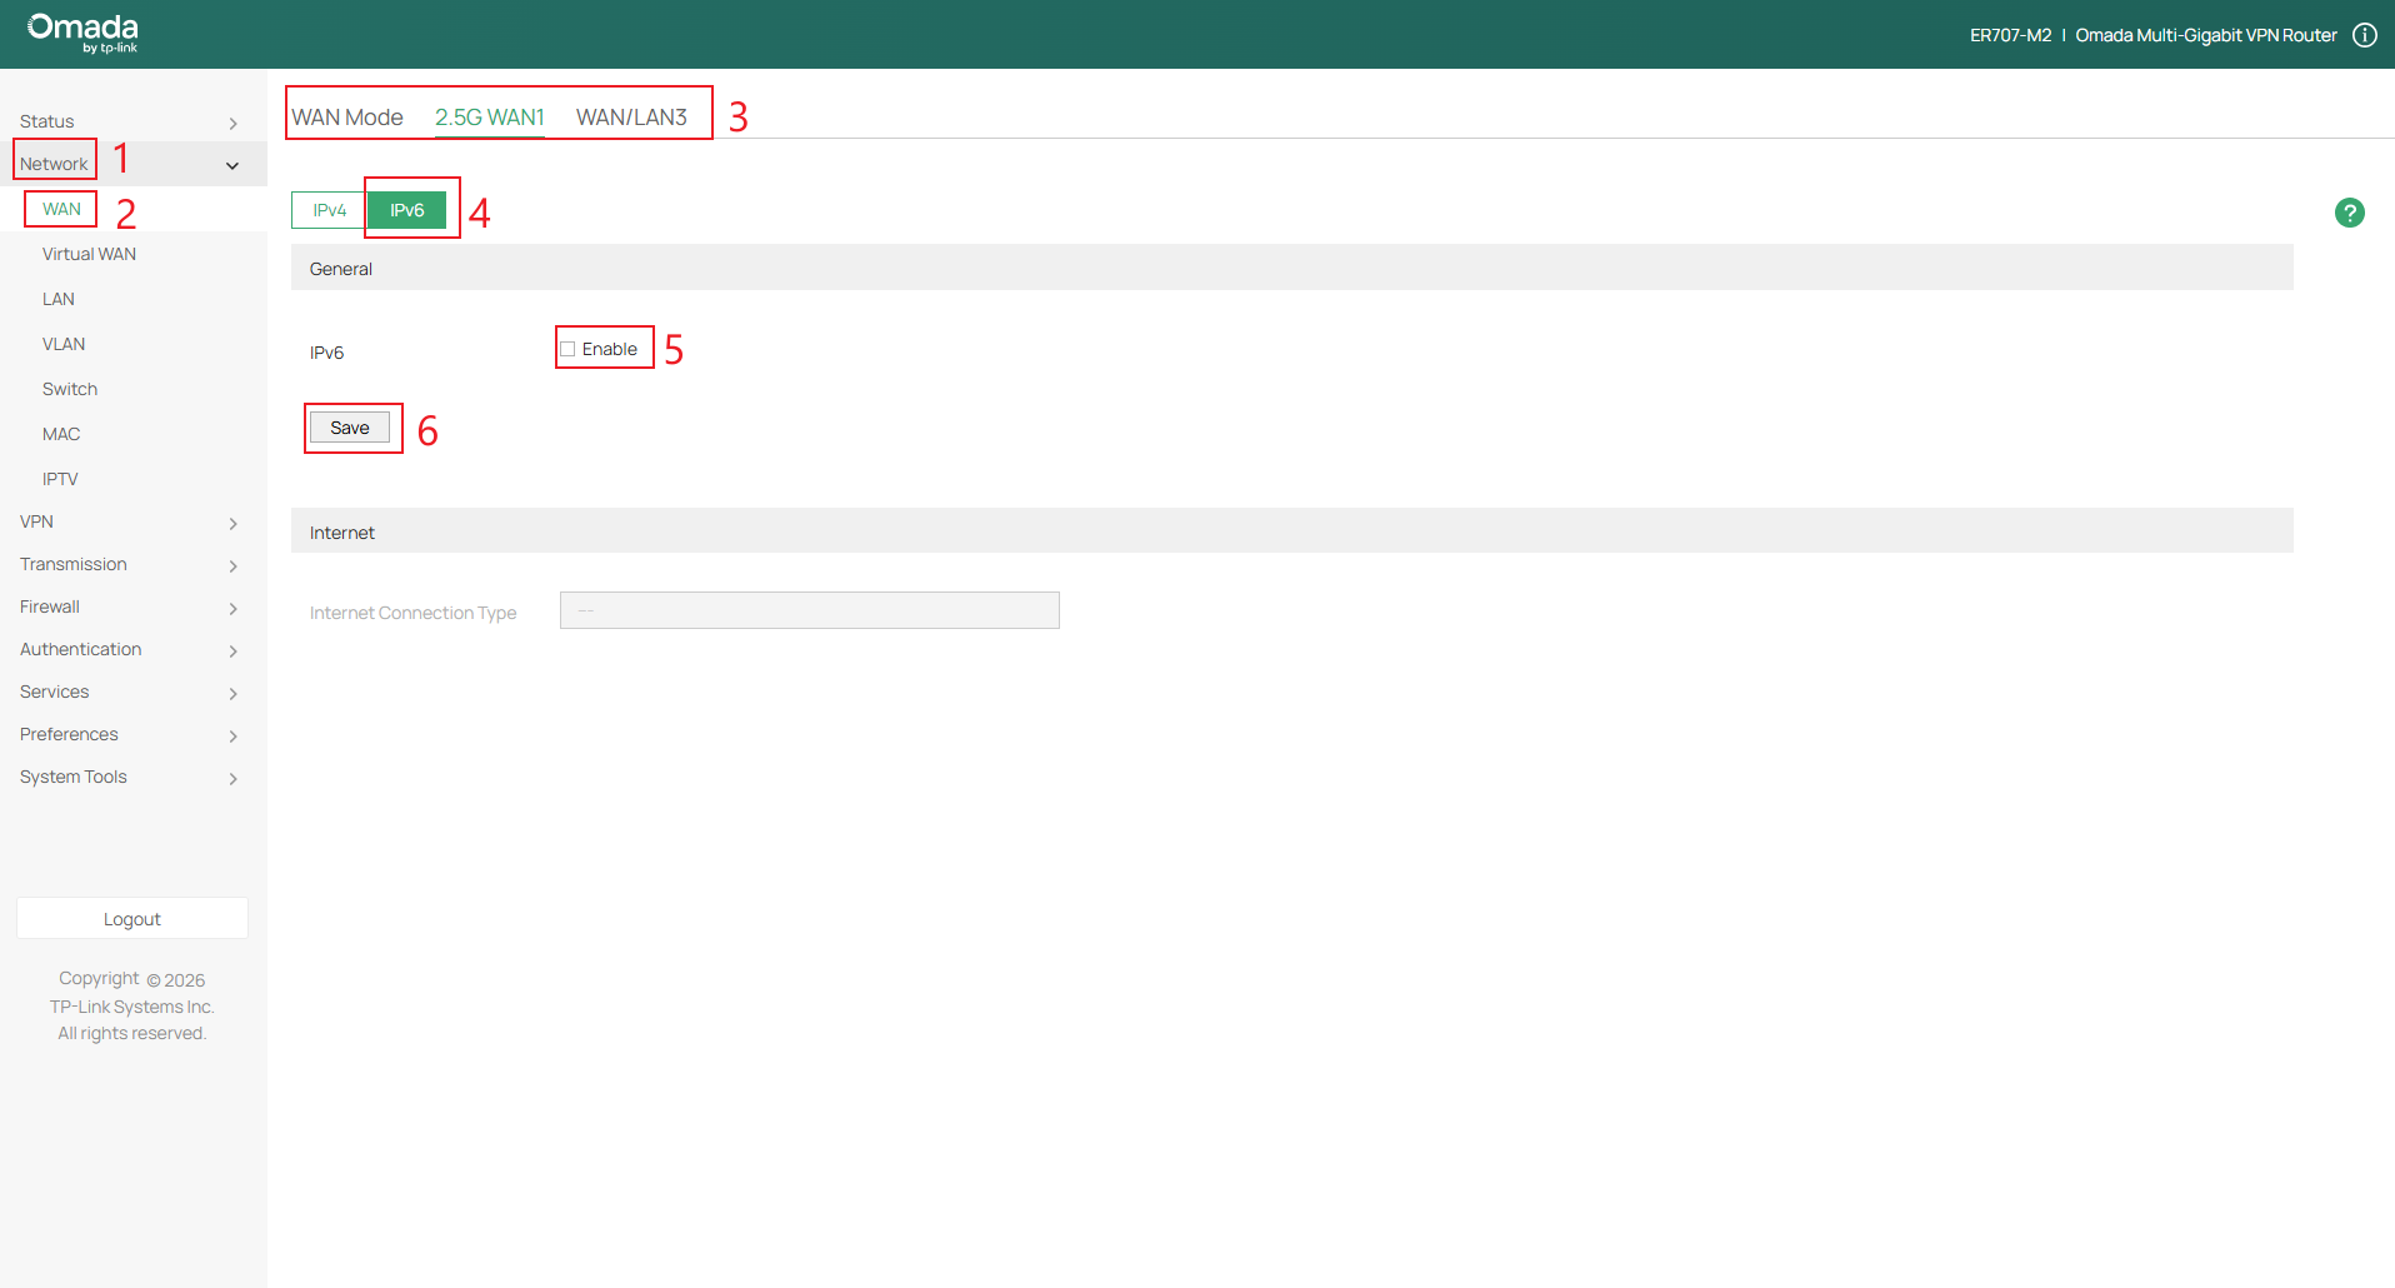
Step 1. Log in to the gateway's web management interface. Go to Network > WAN, select the WAN port, select IPv6, enable IPv6, and click Save.
Step 2. Select the appropriate Internet Connection Type based on the ISP requirements, and configure the corresponding parameters.
The following example uses Dynamic IP (SLAAC/DHCPv6).
Click Save once complete.
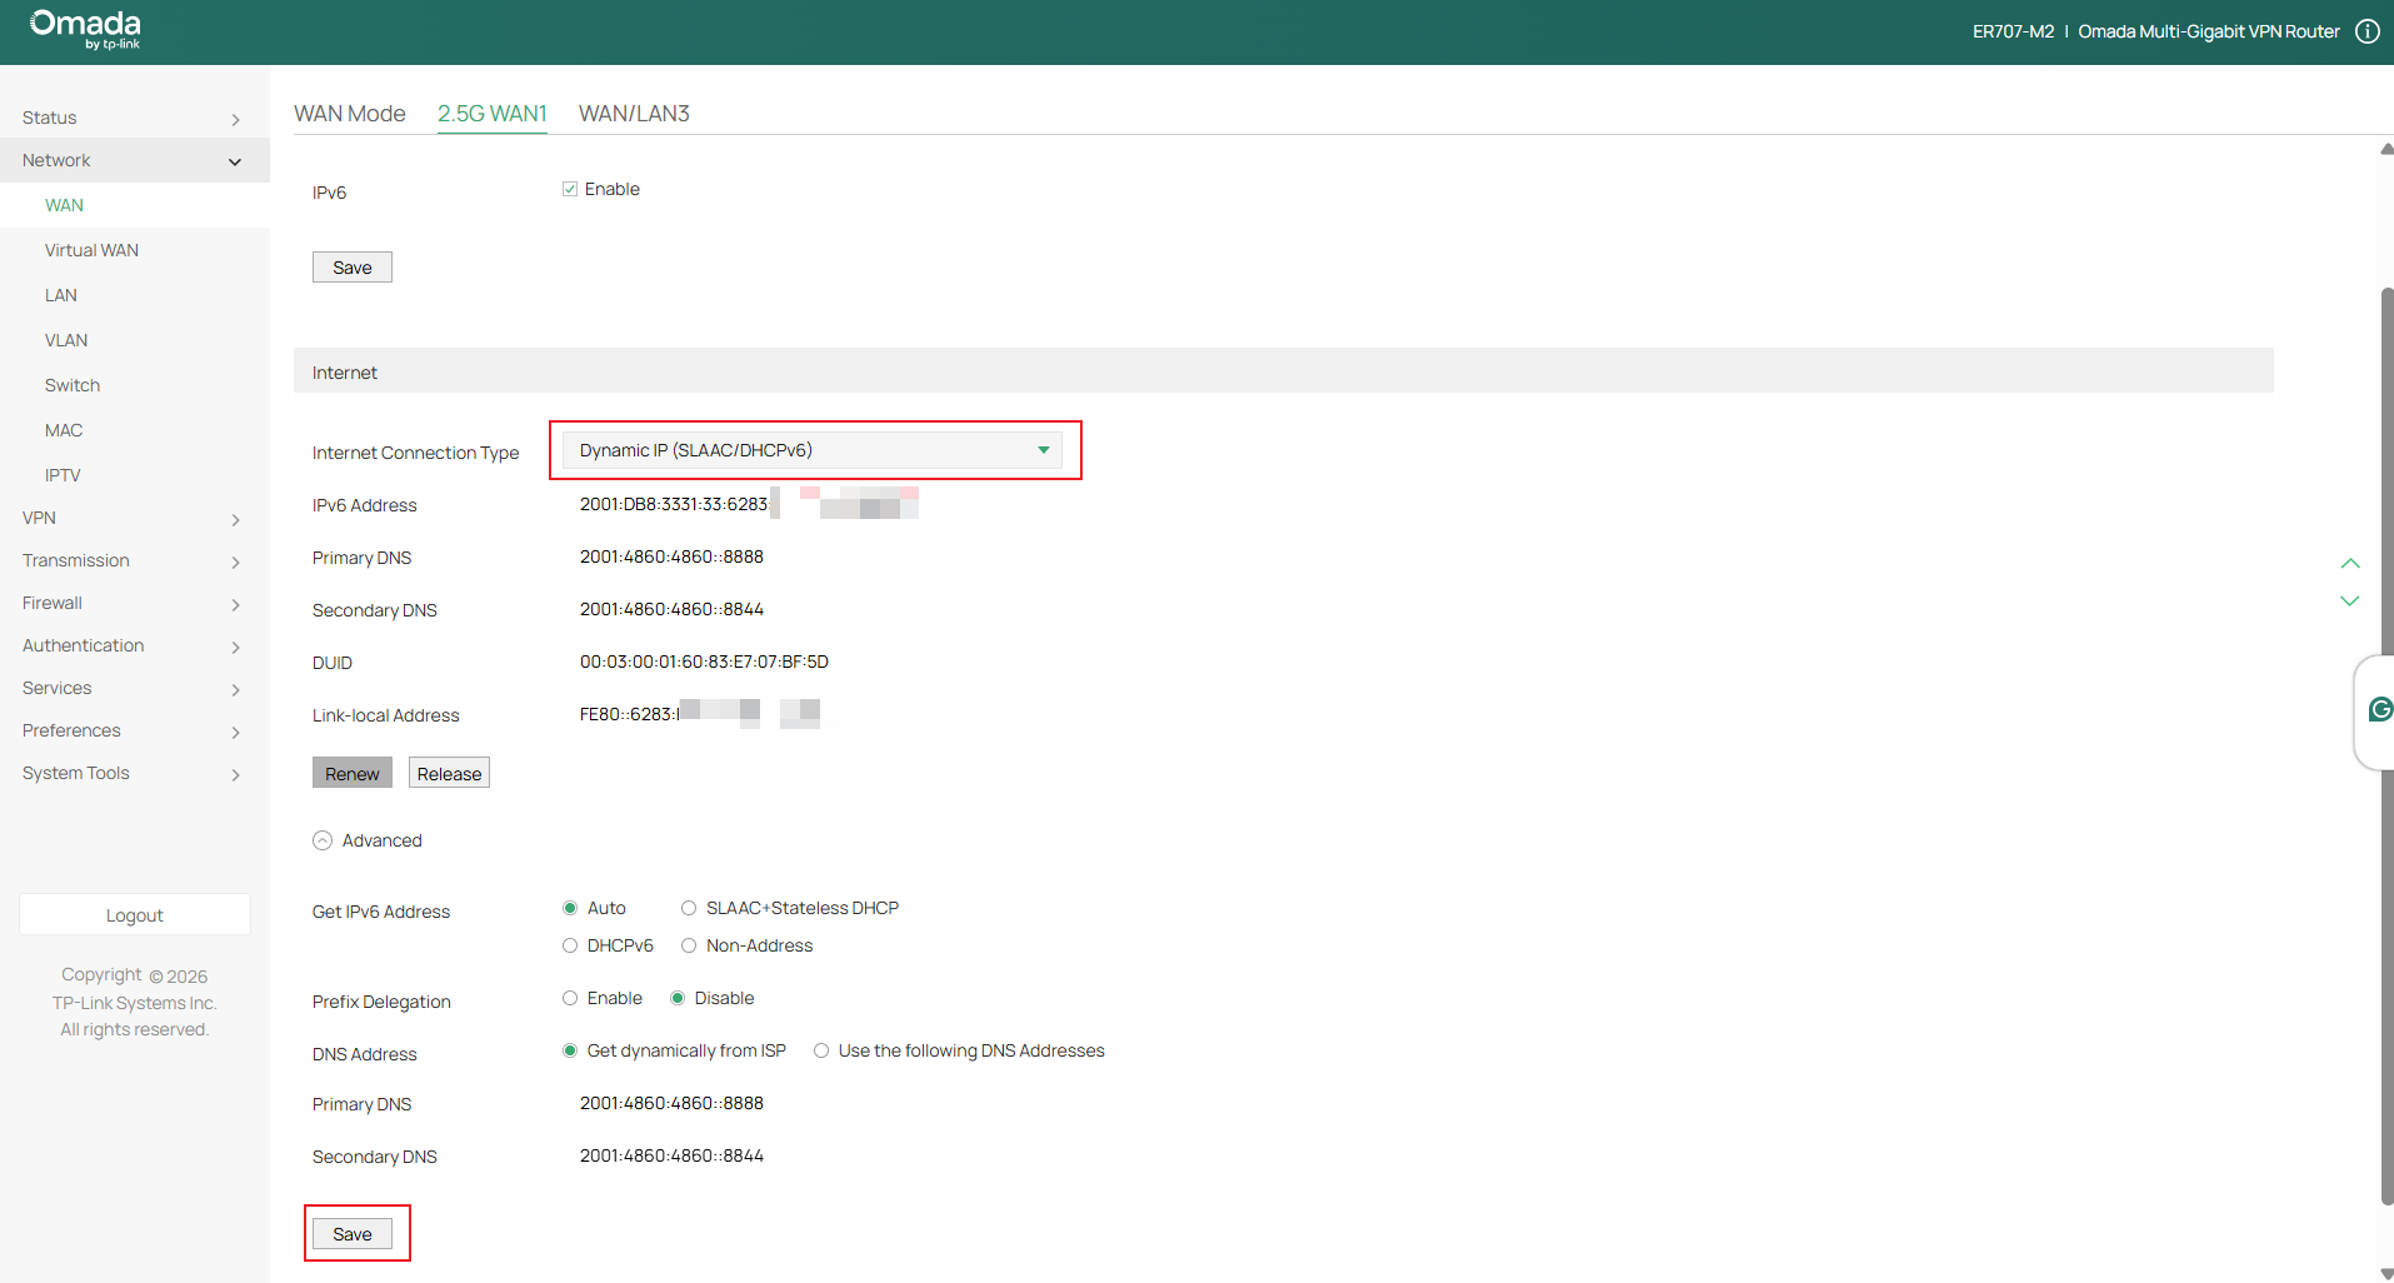
Internet Connection Type: Select the appropriate Internet Connection Type based on the IPv6 connection type provided by the ISP.
Static IP: Select this option if the ISP provides a static IPv6 address.
Dynamic IP (SLAAC/DHCPv6): Select this option if the ISP dynamically assigns IPv6 addresses. The exact IPv6 addressing method depends on the ISP deployment and may include SLAAC, DHCPv6, or DHCPv6 Prefix Delegation.
PPPoE: Select this option if the ISP uses PPPoEv6 and provides a username and password for authentication.
6to4 Tunnel: Select this option to establish IPv6 connectivity through a 6to4 tunnel.
Pass-Through (Bridge): Select this option if the ISP uses a Pass-Through (Bridge) network deployment. No additional parameters are required.
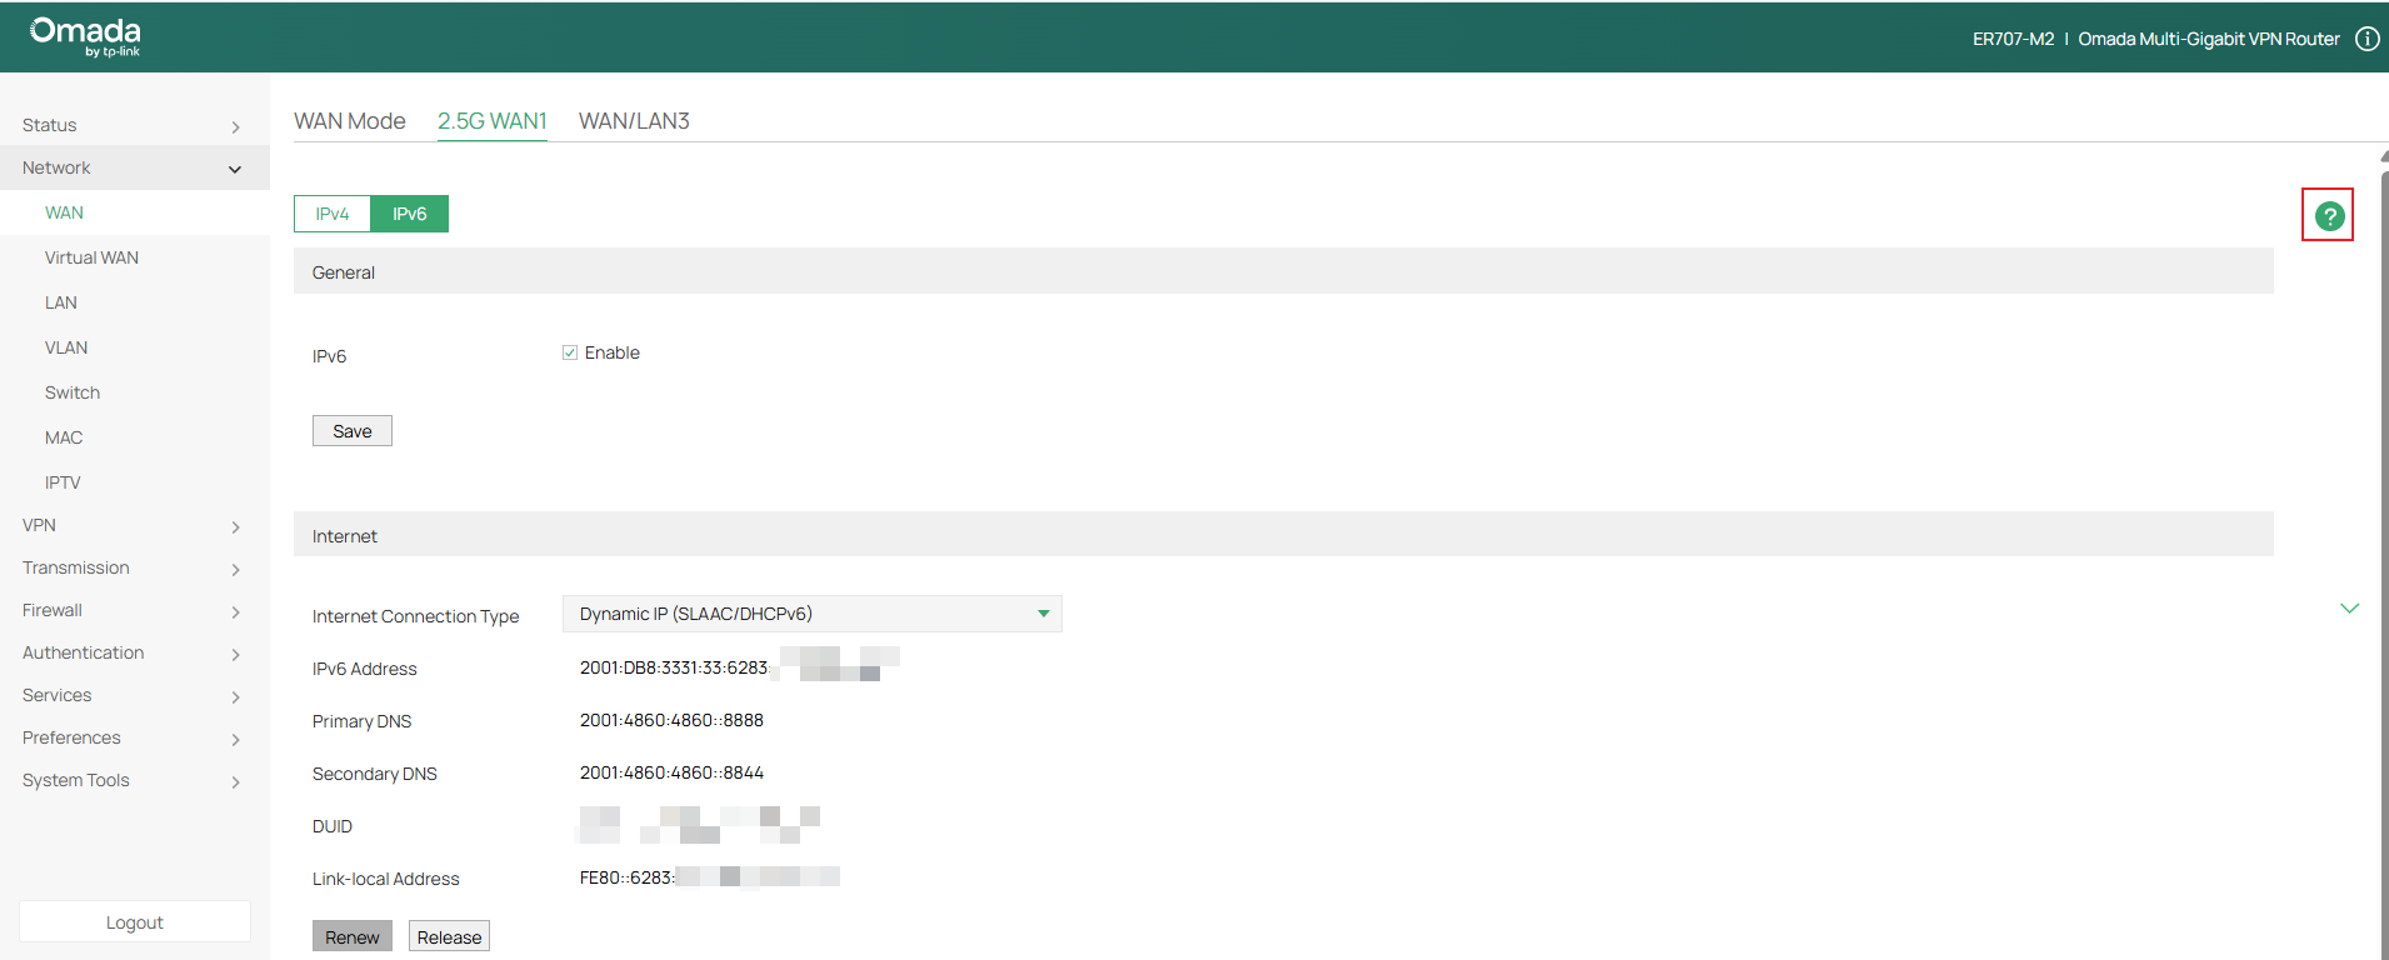
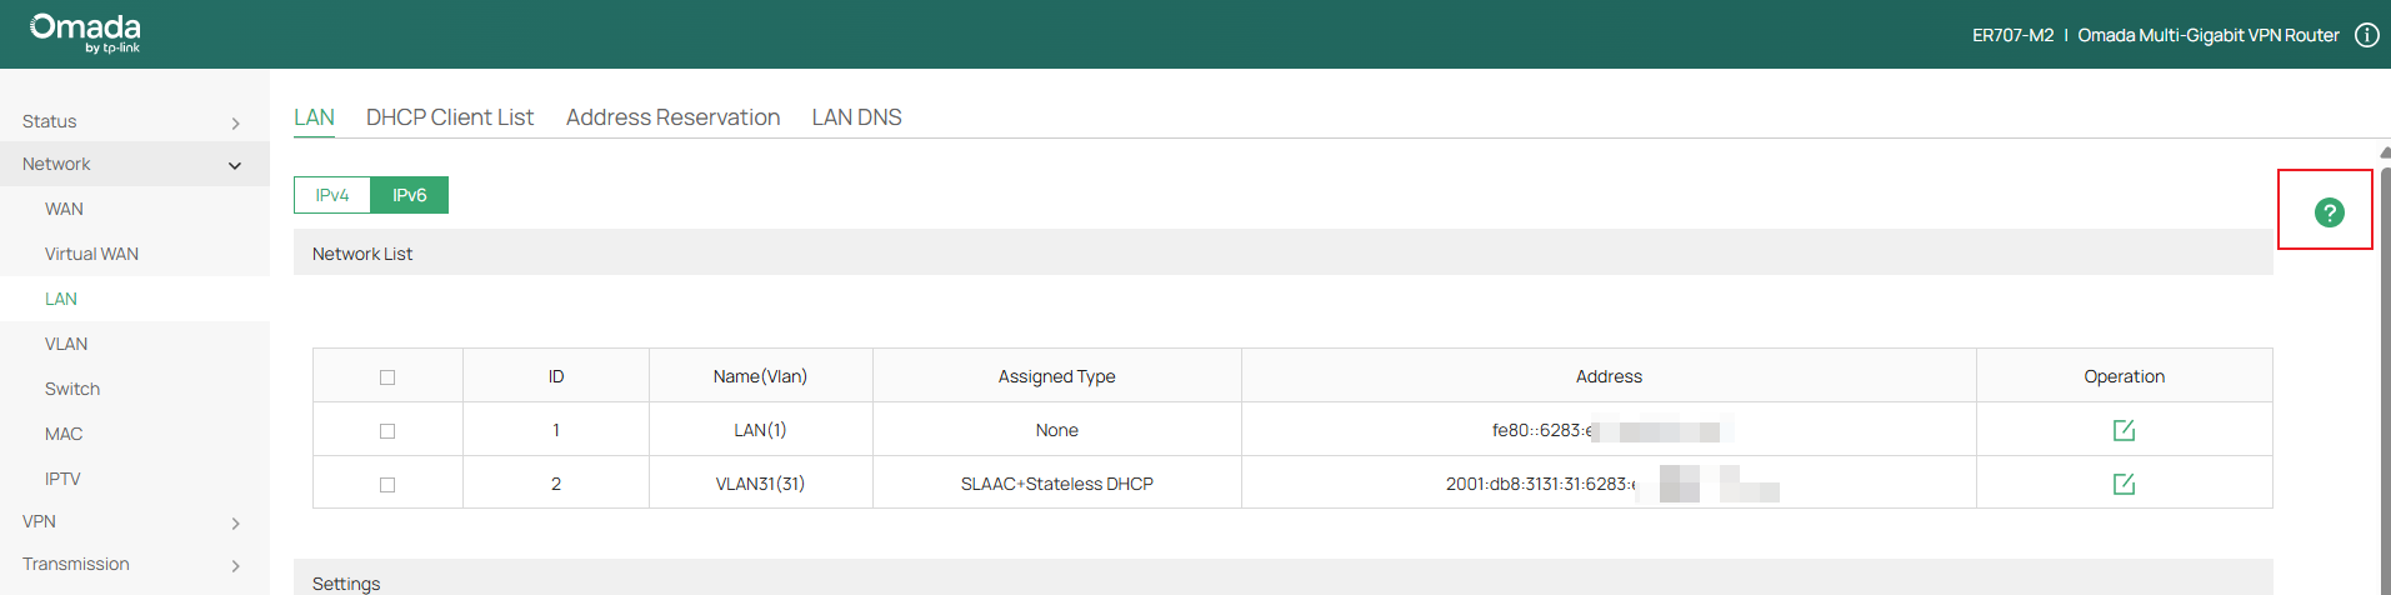
For more information about each parameter, click the Help icon in the upper-right corner.
IPv6 LAN configuration
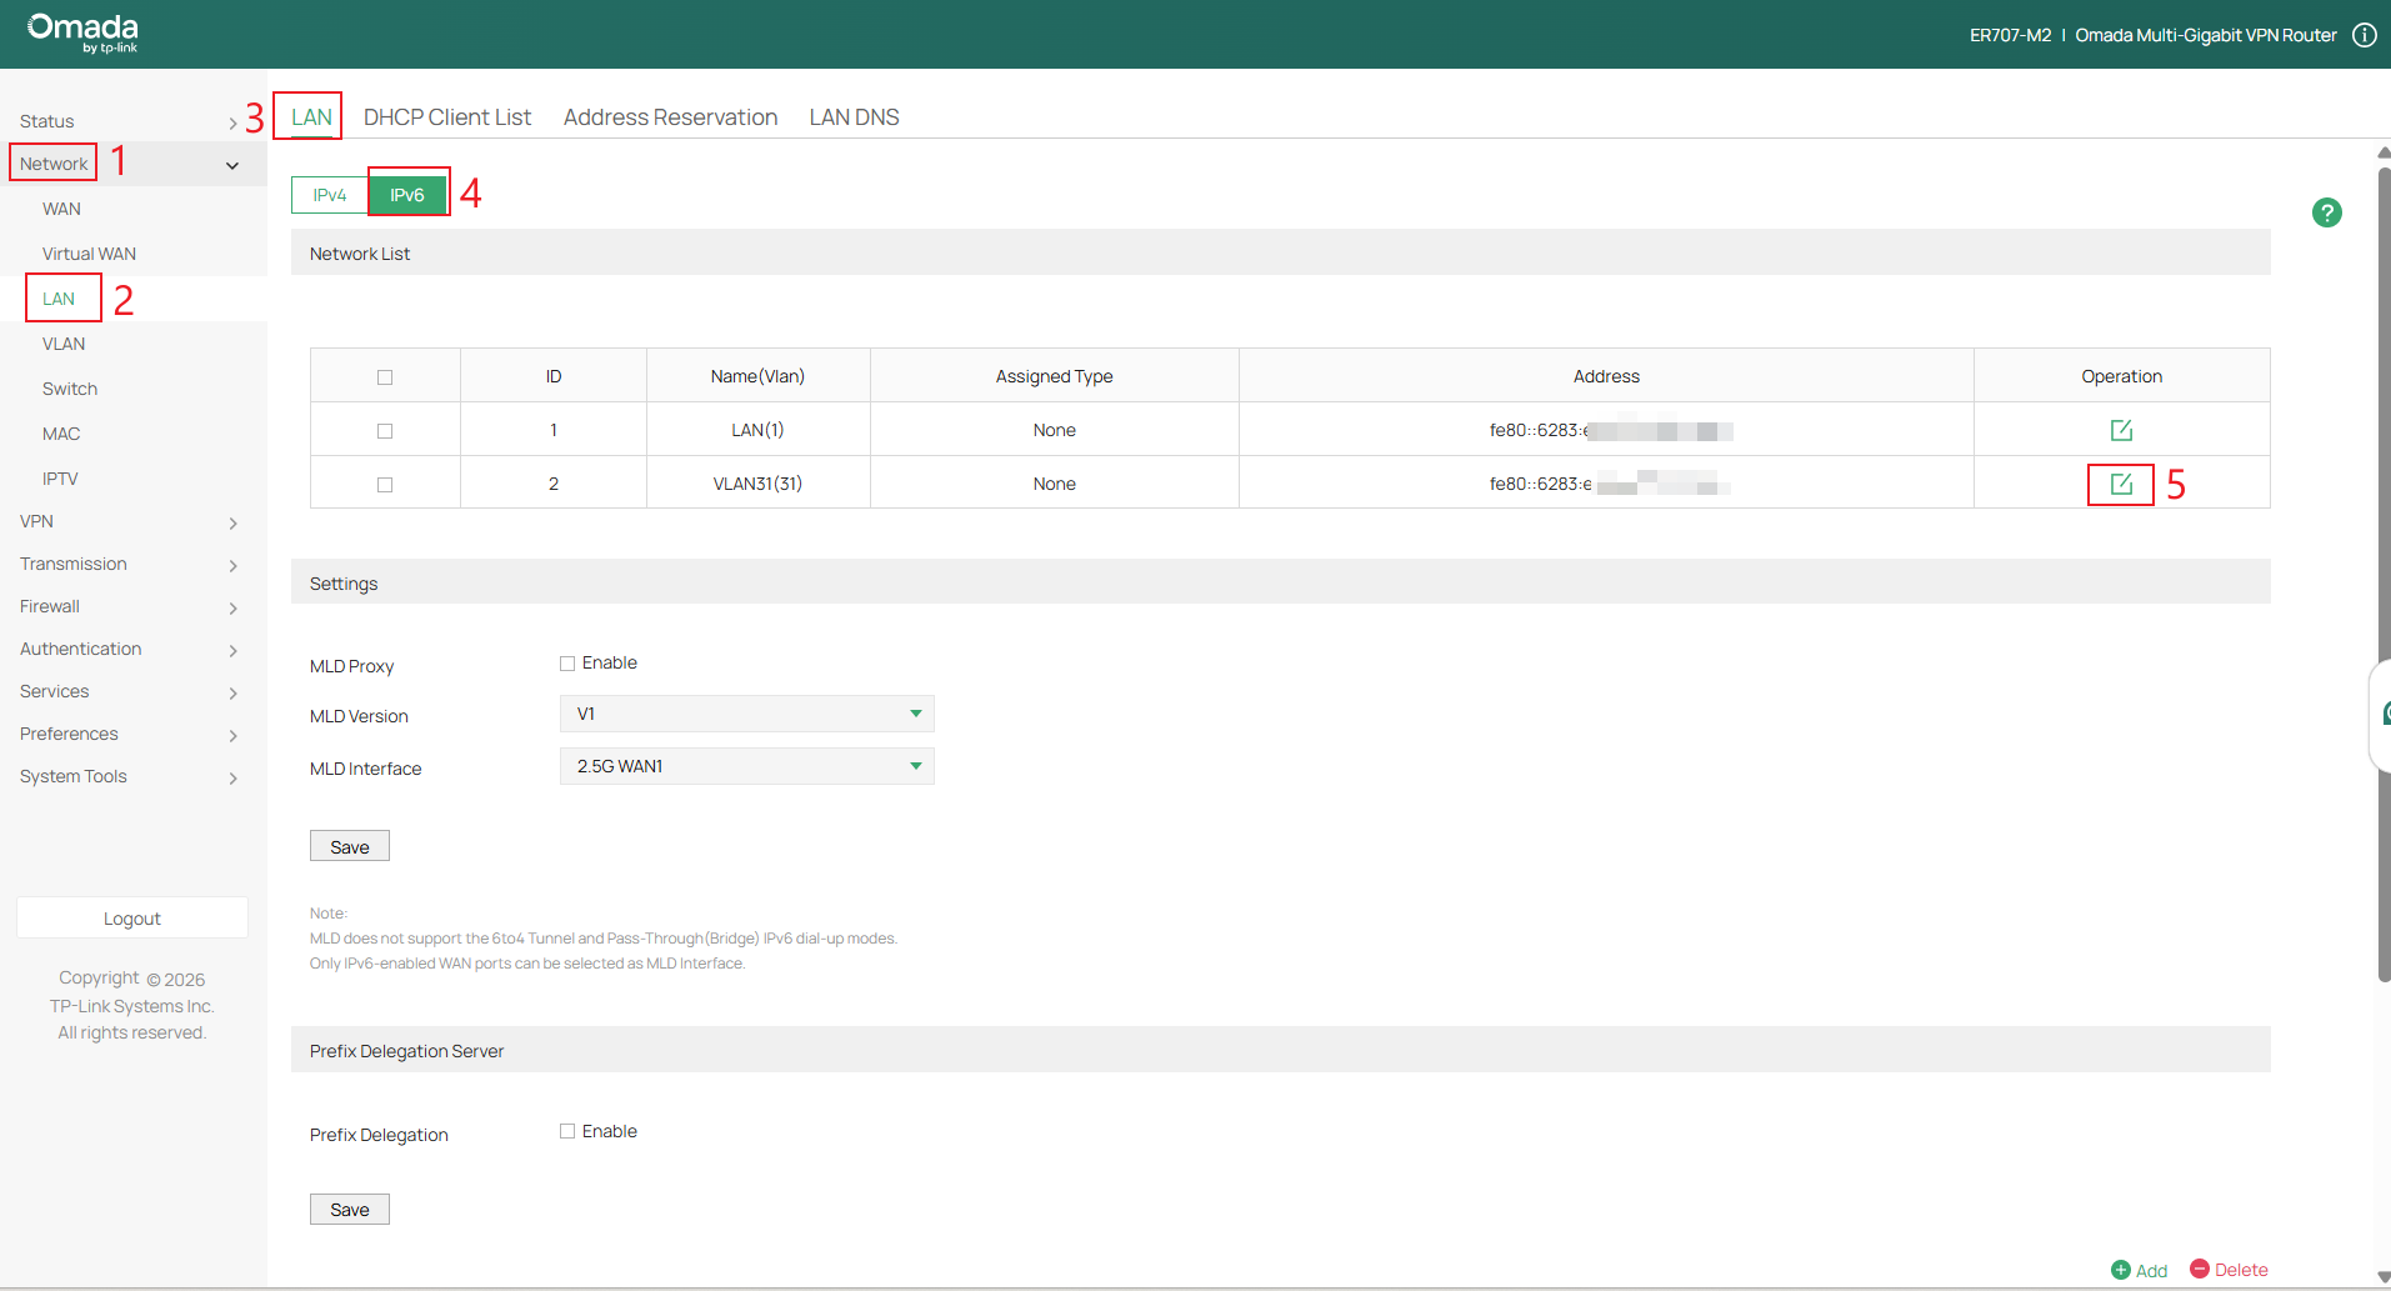
Step 1. Log in to the gateway's web management interface. Go to Network > LAN > LAN > IPv6, locate the target LAN network, and click Edit.
An IPv4 interface must already exist before IPv6 can be configured for the LAN. Edit an existing LAN or VLAN interface, or create one before configuring IPv6.
Step 2. Select the appropriate Assigned Type and configure the corresponding parameters. The following example uses SLAAC+Stateless DHCP.
Click OK once complete.
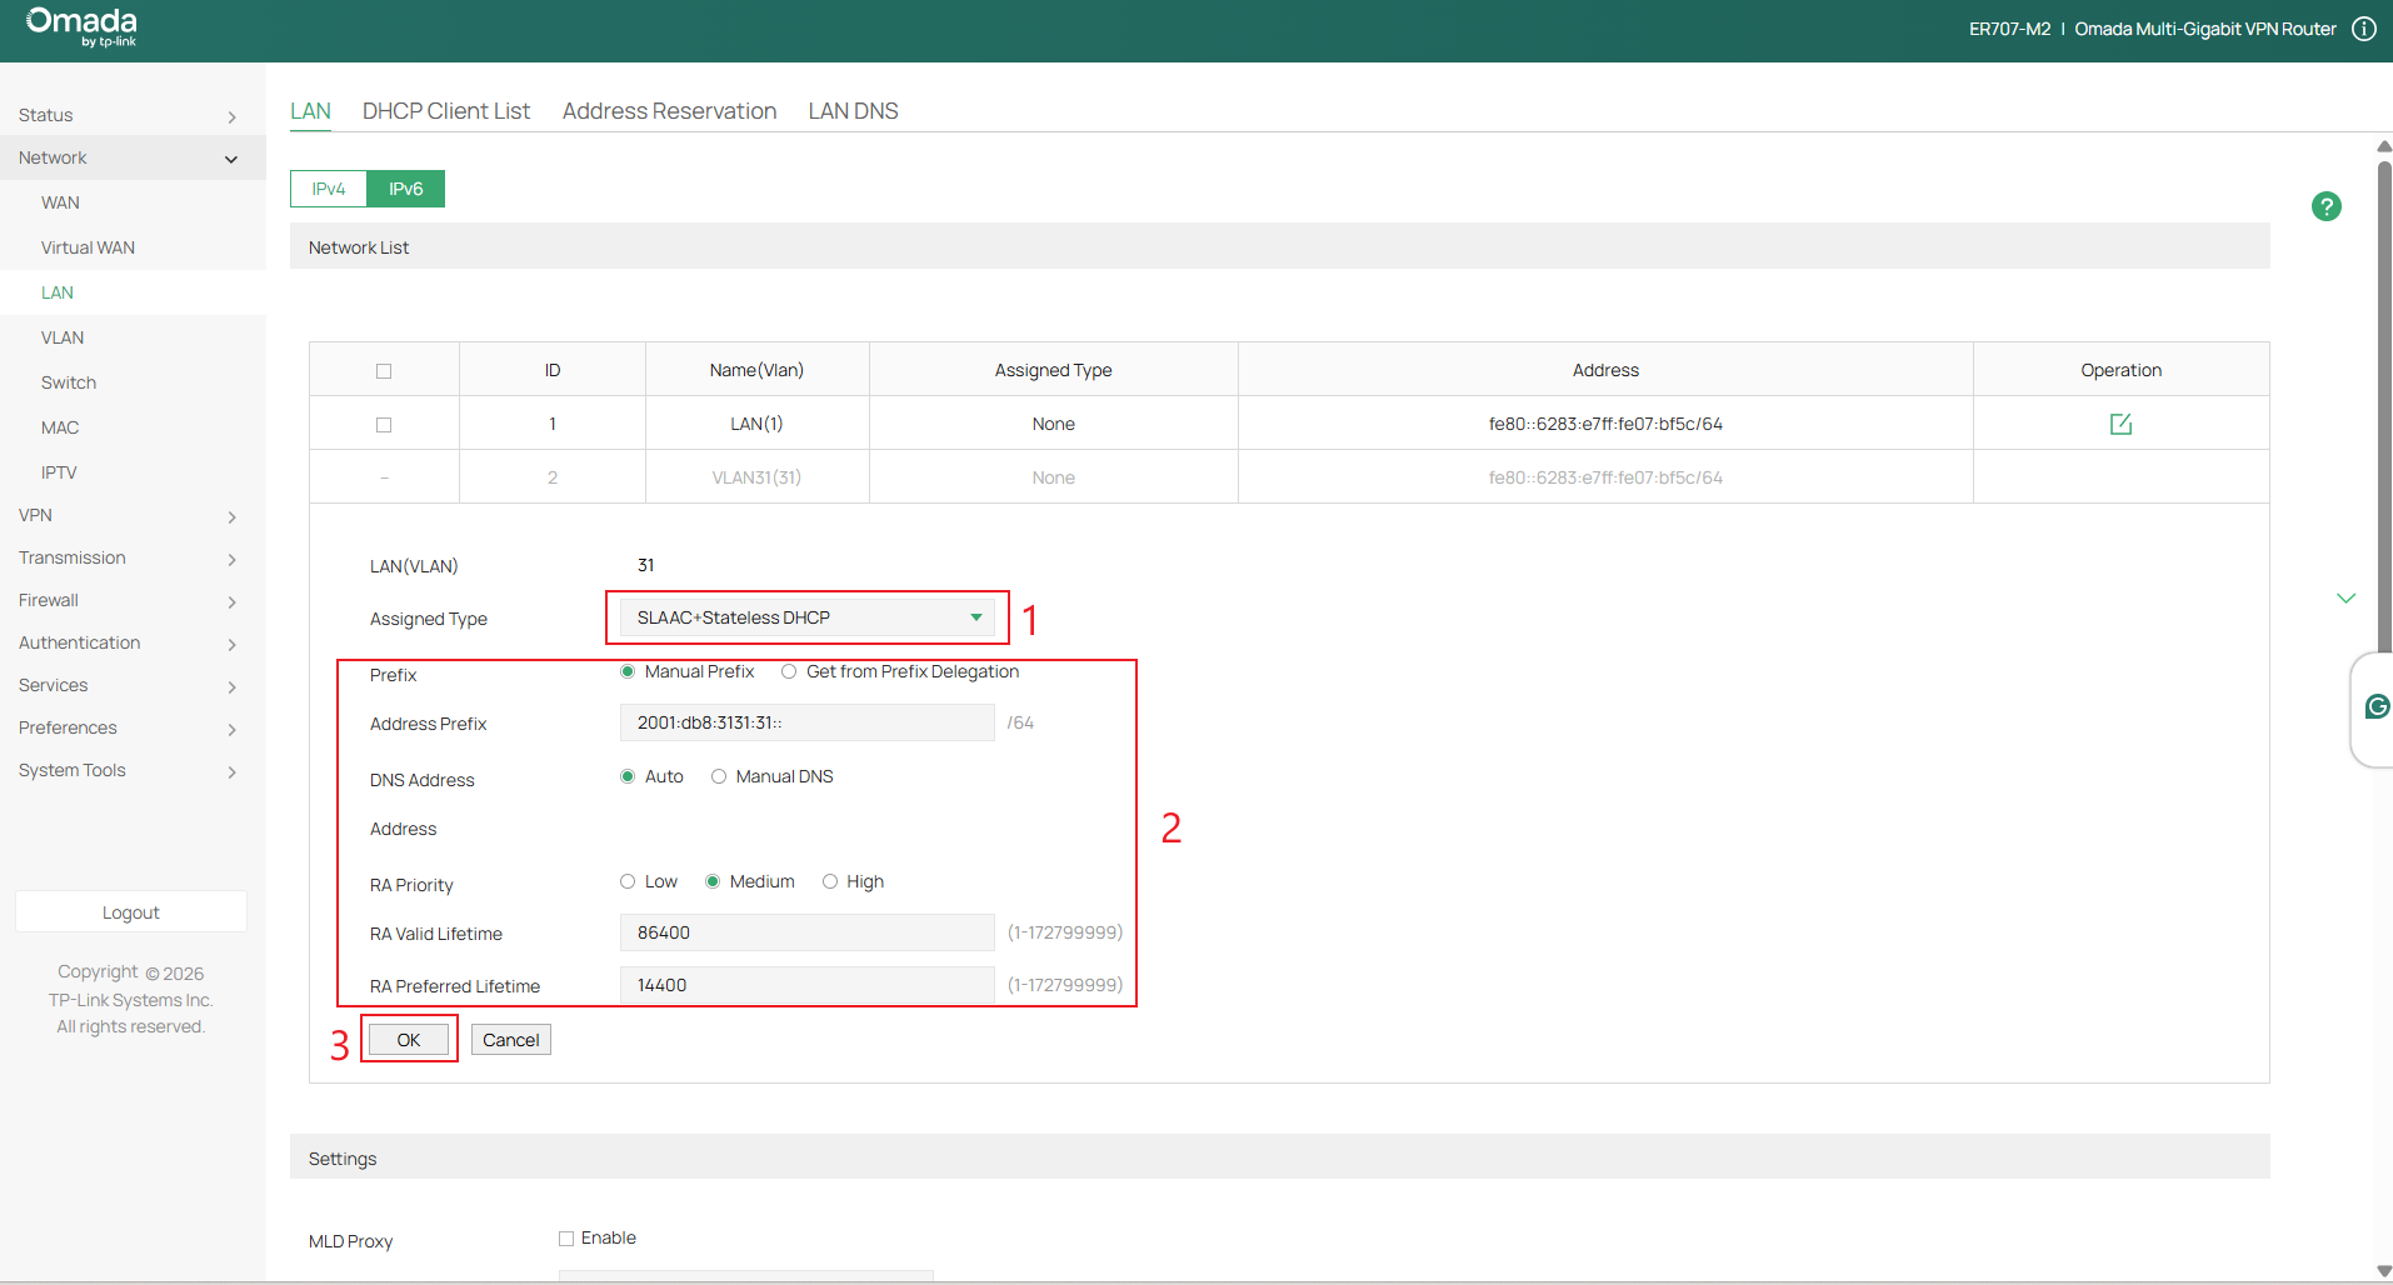
Assignment Types:
None: Disable IPv6 of the LAN port.
DHCPv6: The gateway assigns an IPv6 address and other parameters including the DNS server address to each client using DHCPv6.
SLAAC+Stateless DHCP: The gateway advertises the LAN IPv6 prefix through Router Advertisement (RA), and clients generate their own IPv6 addresses. Clients also obtain other parameters from the gateway through Stateless DHCPv6.
SLAAC+RDNSS: The gateway assigns the IPv6 address prefix to each client and the client automatically generates its own IPv6 address. Also, the gateway assigns other parameters including the DNS server address to each client using the RDNSS option in RA (Router Advertisement).
Pass-Through (Bridge): Select this type if the WAN ports of the gateway use the Pass-Through for IPv6 connections.
For more information regarding each Assignment Type and their parameters please click the help button at the top right.
Prefix Delegation Server
DHCPv6 Prefix Delegation, commonly called DHCPv6-PD, allows one router to assign a block of IPv6 addresses to another router. Instead of receiving only a single IPv6 address, the requesting router receives an entire prefix—such as a /56, /60, or /64—that it can use for the networks behind it.
In a typical configuration, the ISP delegates a large IPv6 prefix to the upstream router. The upstream router can then delegate a smaller portion of that prefix to a downstream router. The downstream router divides its assigned prefix into /64 networks and advertises them to devices on its LANs or VLANs.
This creates a hierarchy of routed IPv6 networks without using address translation. Each router receives globally routable address space, maintains the appropriate routes, and provides IPv6 connectivity to the devices behind it.
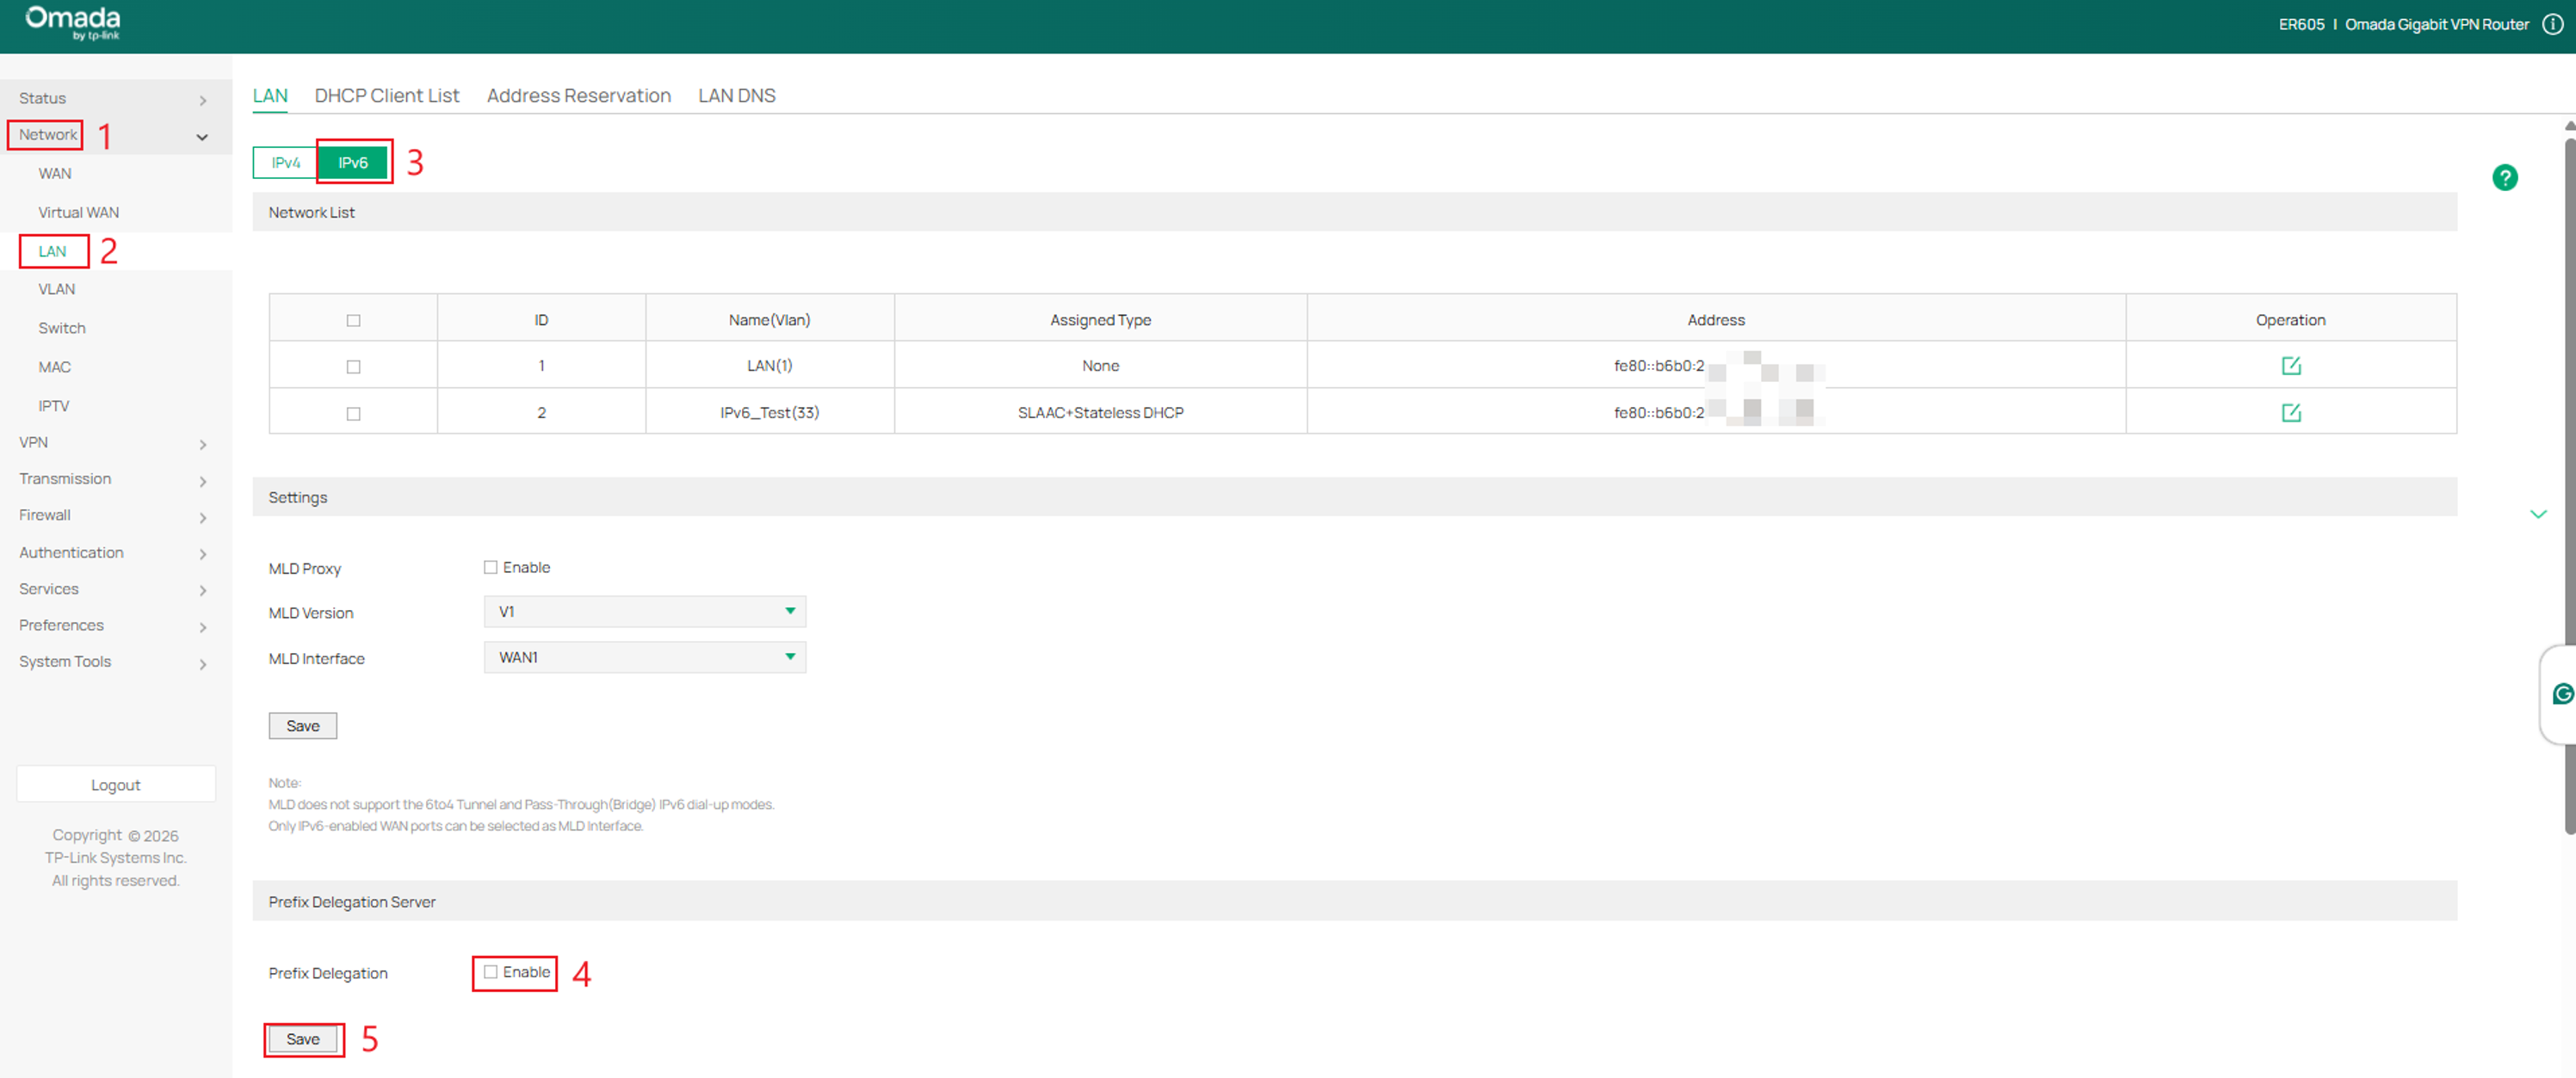
Step 1. Log in to the router and navigate to Network > LAN > IPv6. Under Prefix Delegation Server, enable Prefix Delegation, and click Save.
Step 2. Click Add, configure the Prefix Delegation parameters, and click OK.
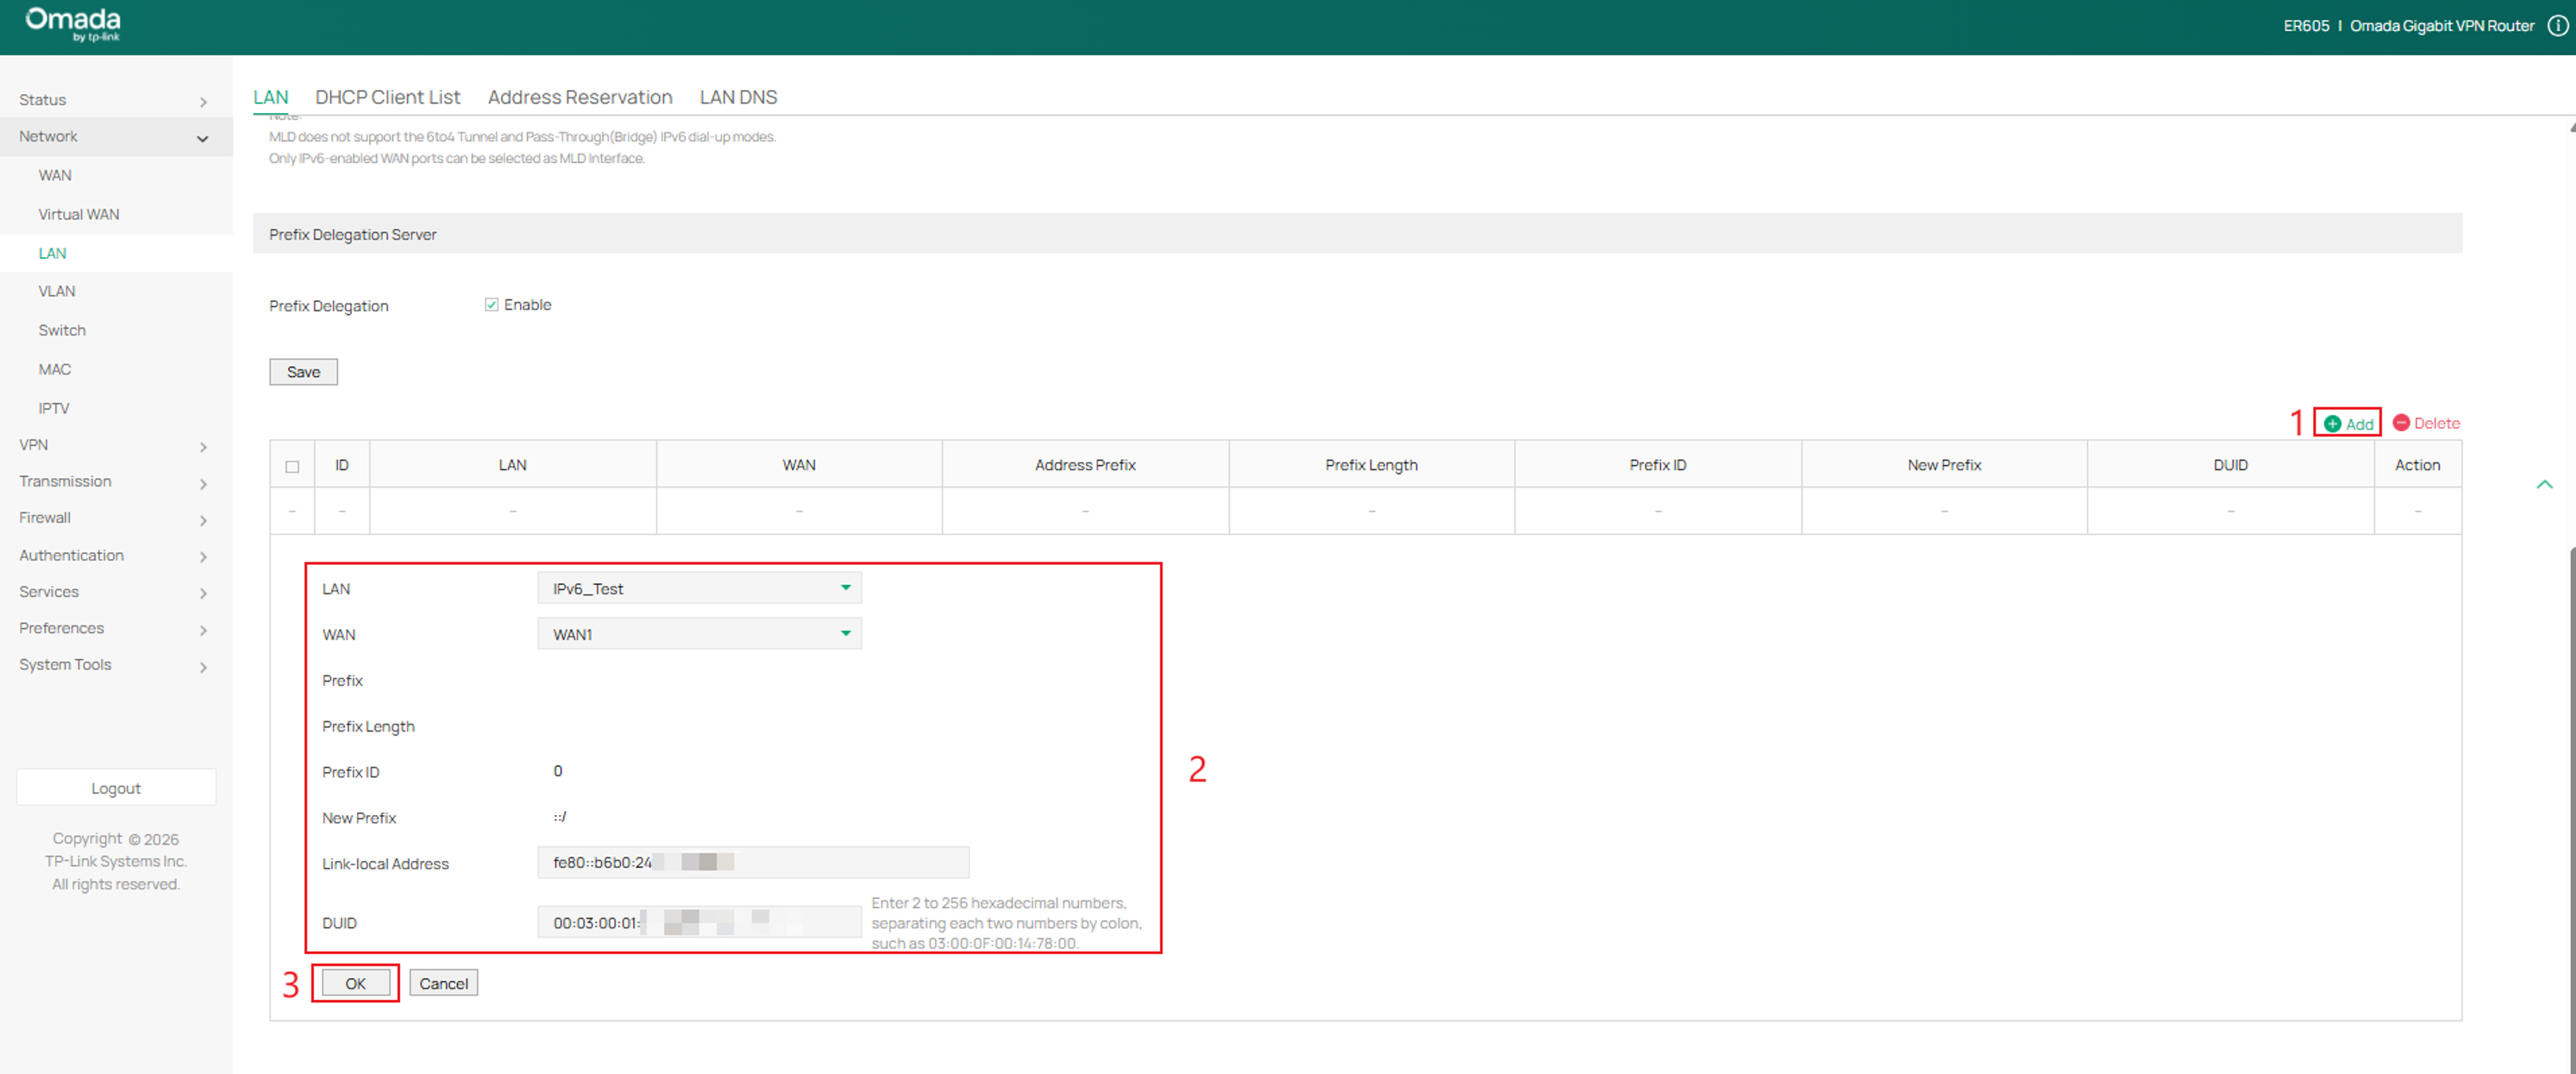
LAN: Specify the LAN port to which the requesting router will connect.
WAN: Select the WAN port to obtain the delegated prefix.
Prefix: Displays the IPv6 prefix delegated through the selected WAN interface. (Note: You need to enable Prefix Delegation for the corresponding WAN port. Follow the steps: Go to Network > IPV6 > WAN, set Internet Connection Type to Dynamic IP, and enable Prefix Delegation in Advanced.)
Prefix Length: Displays the length of the delegated IPv6 prefix.
Note: To configure the prefix length, go to Network > IPv6 > WAN, set Internet Connection Type to Dynamic IP, and configure Prefix Delegation Size under Advanced.
Prefix ID: Specify the value of the remaining bits if the configured Prefix Length is greater than the Prefix Length allocated by the original WAN port.
New Prefix: Displays the prefix to be applied.
Link-local Address: Specify the link-local IPv6 address of the device to apply the prefix.
DUID: Specifies the DUID of the device requesting the delegated prefix.
Verification
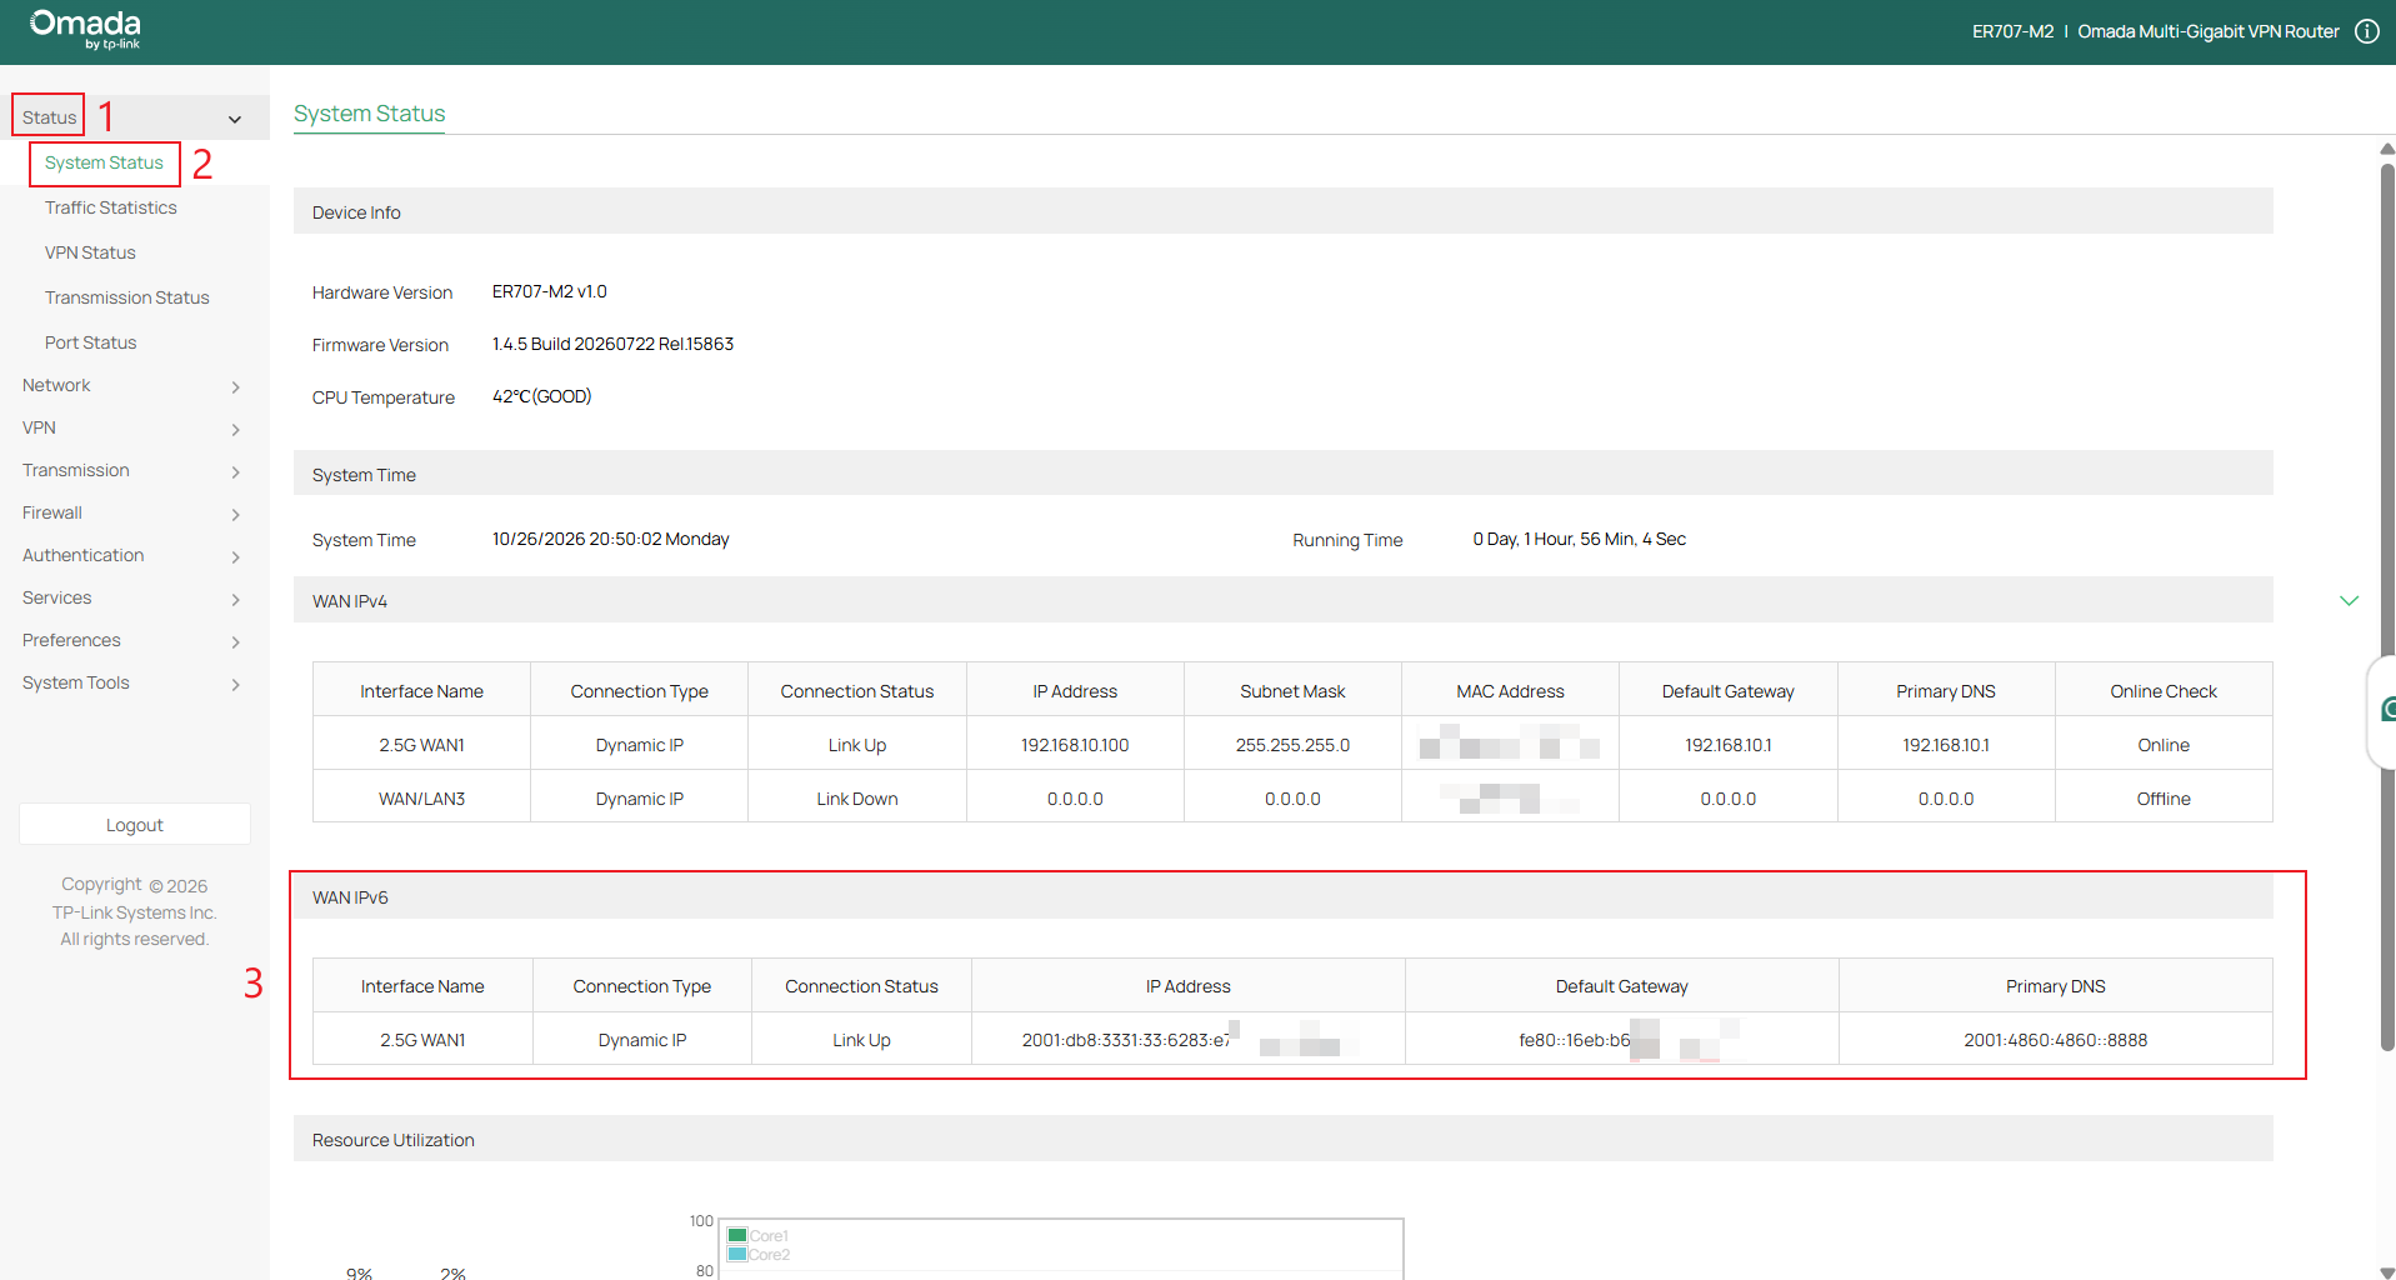
Go to Status > System Status. Under the WAN IPv6 information, verify that the WAN interface has obtained the expected IPv6 address and other network information.
LAN Verification: Run ipconfig in Command Prompt on a local device to ensure the device pulled the correct IP Address.
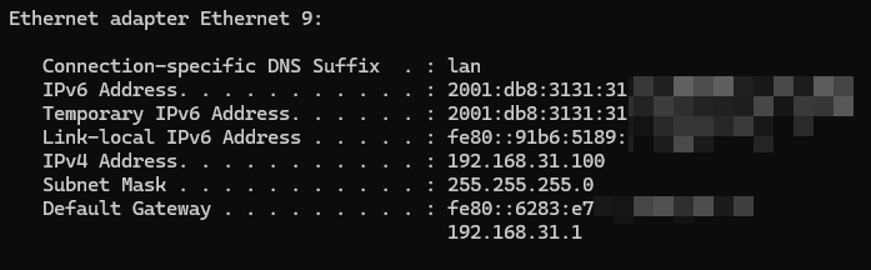
Note: For a more complete verification on Windows, you can also utilize ipconfig /all.
On Linux, use ip -6 addr to check the IPv6 address information.
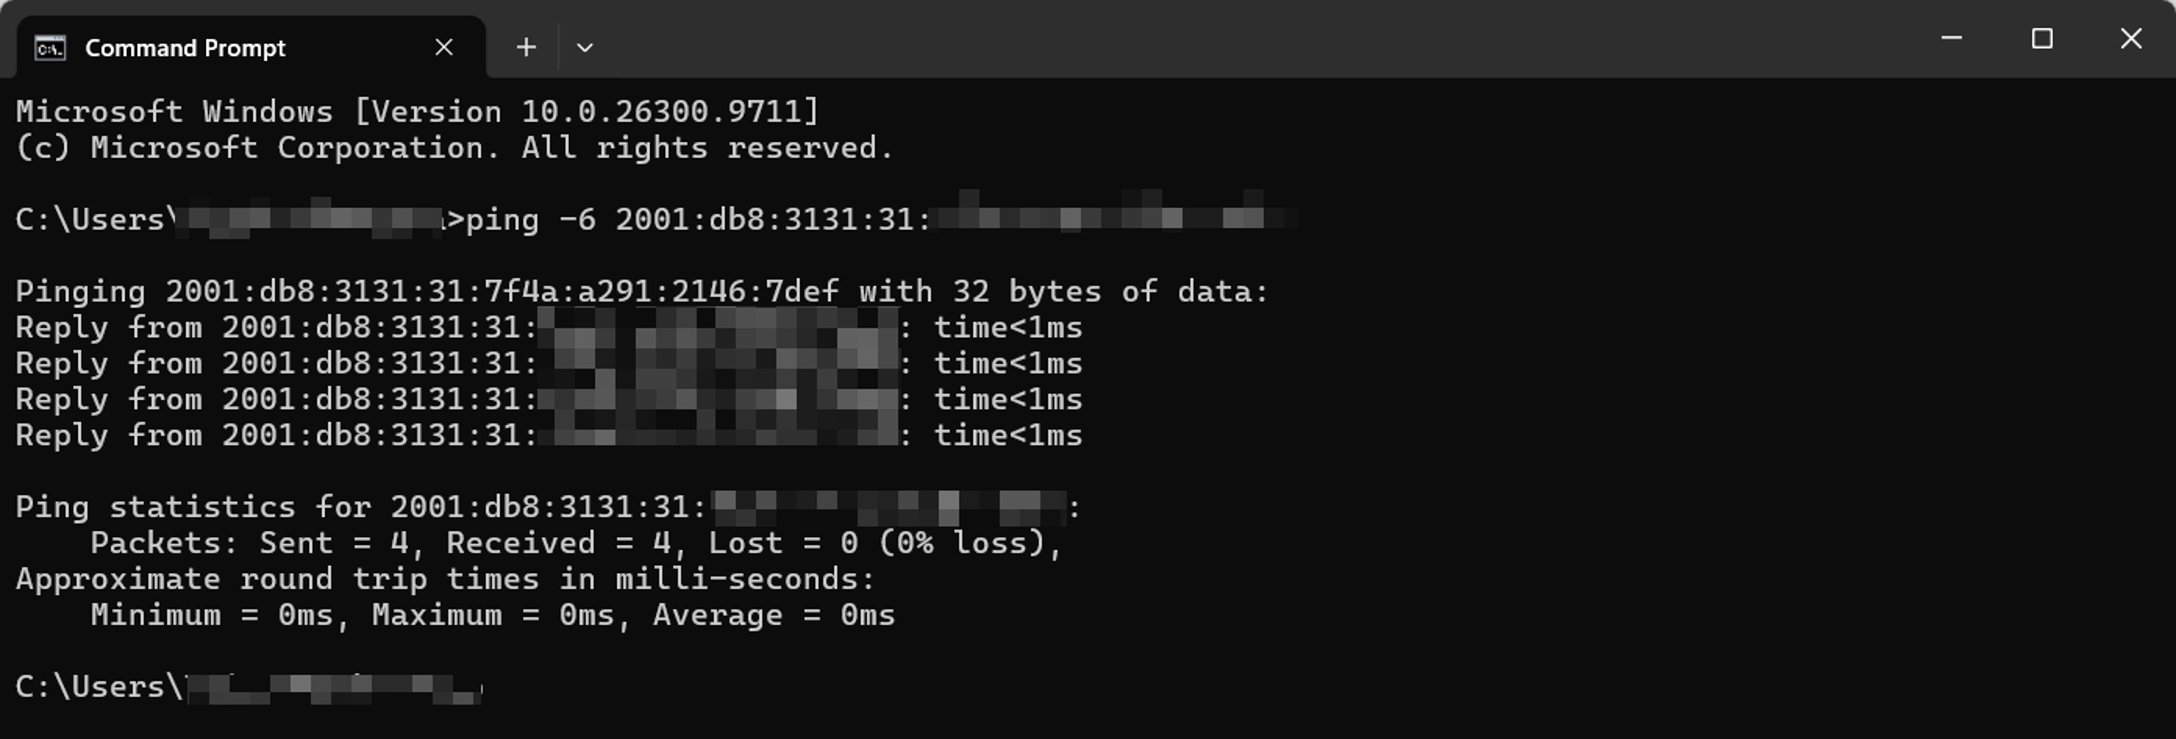
To verify IPv6 internet connectivity, open Command Prompt on a LAN device that has received a routable IPv6 address and run:
ping -6 <IPv6 address>
Example:
ping -6 one.one.one.one
Successful replies indicate that the device can resolve an IPv6 hostname and reach a public IPv6 destination. If necessary, run ping -6 2606:4700:4700::1111 to test IPv6 routing without relying on DNS.
Note: The 2001:db8::/32 example prefix cannot be used for this test because it is not routable on the internet.
Conclusion
IPv6 is now configured on the Omada Gateway in Standalone Mode, including the required WAN and LAN settings and, when applicable, DHCPv6 Prefix Delegation Server settings for downstream routers. Verify the configuration to ensure that the gateway and connected devices can obtain the appropriate IPv6 addressing and establish IPv6 connectivity.
To learn more about each function and configuration, please visit Support Home to download or check the manual for your product.
QA
Q1: Why is the Omada Gateway not receiving an IPv6 address on the WAN interface?
A1: Verify that IPv6 is enabled on the WAN interface and that the selected IPv6 connection type matches the upstream network or ISP requirements. Confirm that the correct IPv6 address assignment method, such as SLAAC or DHCPv6, is configured. If the issue persists, verify that the upstream network or ISP supports IPv6.
Q2: Why are LAN clients not receiving IPv6 addresses after enabling IPv6 on the Omada Gateway?
A2: Verify that IPv6 is properly configured on both the WAN and LAN interfaces. Check that the LAN IPv6 address assignment method is configured correctly and that a valid IPv6 prefix is available for the LAN network. If Prefix Delegation is enabled, confirm that the upstream network or ISP provides a delegated IPv6 prefix.
