This document is suitable for Omada Controller V4.1.5 or above. For other Omada Controller versions, please refer to FAQ 2581
After installation of the Omada Software Controller, sometimes it is found that the Omada controller cannot find the devices, which is quite annoying! Don’t worry, this article will help you solve the problem. The overview of steps is shown in the following picture, taking EAP as an example.
Note:
- In this document, Omada Controller Server indicates the server or computer running the Omada Software Controller program. DEVICE_IP_ADD indicates the IP addresses of the devices, including EAPs, routers, and switches.
- If you run the Omada Controller in a Virtual Machine (VM), please open ports 29810 to 29814 by setting Port Forwarding to a NAT type network adapter, or setting the adapter type to Bridged.
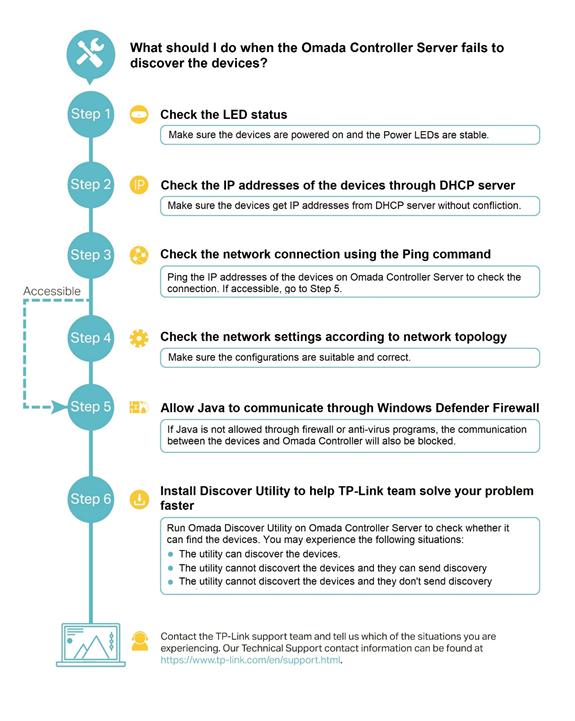
Step 1. Check the LED status
For EAPs, please make sure they are powered on and the Power LEDs are stable.
For switches and routers, please confirm that the LEDs of the Ethernet ports are powered on.
Step 2. Check the IP addresses of the devices through DHCP Server
Normally you can check the IP addresses of the devices through the DHCP server on the router. For TP-Link SafeStream routers, please log in to the management page, go to Network -> LAN -> DHCP Client List, then you will find some devices with the model number in the client name, as well as their IP addresses. Please make sure that the devices get IP addresses without conflict from the DHCP server.
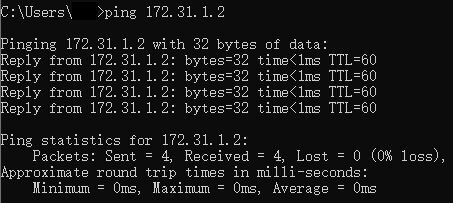
For example, the IP address for EAP225-Wall is 172.31.1.2 in the below image.

Step 3. Check the network connection using the Ping command
Now you have already known the IP addresses of the devices, please switch to the Omada Controller Server, click the Windows key on the keyboard, and input “cmd”, then you will get a black window. Please input “ping DEVICE_IP_ADD” to check the connection between the server and the device.
For example, “ping 172.31.1.2” to check the connection between the server and EAP225-Wall.
If the Omada Controller Server can access the devices, you will get a similar result as the below image, please refresh the Omada web management page and check whether the devices can be discovered.
If the Omada Controller Server cannot access the devices or the devices still cannot be discovered, please go to the next step.
Step 4. Check the network settings according to network topology
Different configurations are needed according to your network topology. Make sure the configurations are suitable and correct.
The following introduces needed network configurations for different topologies.
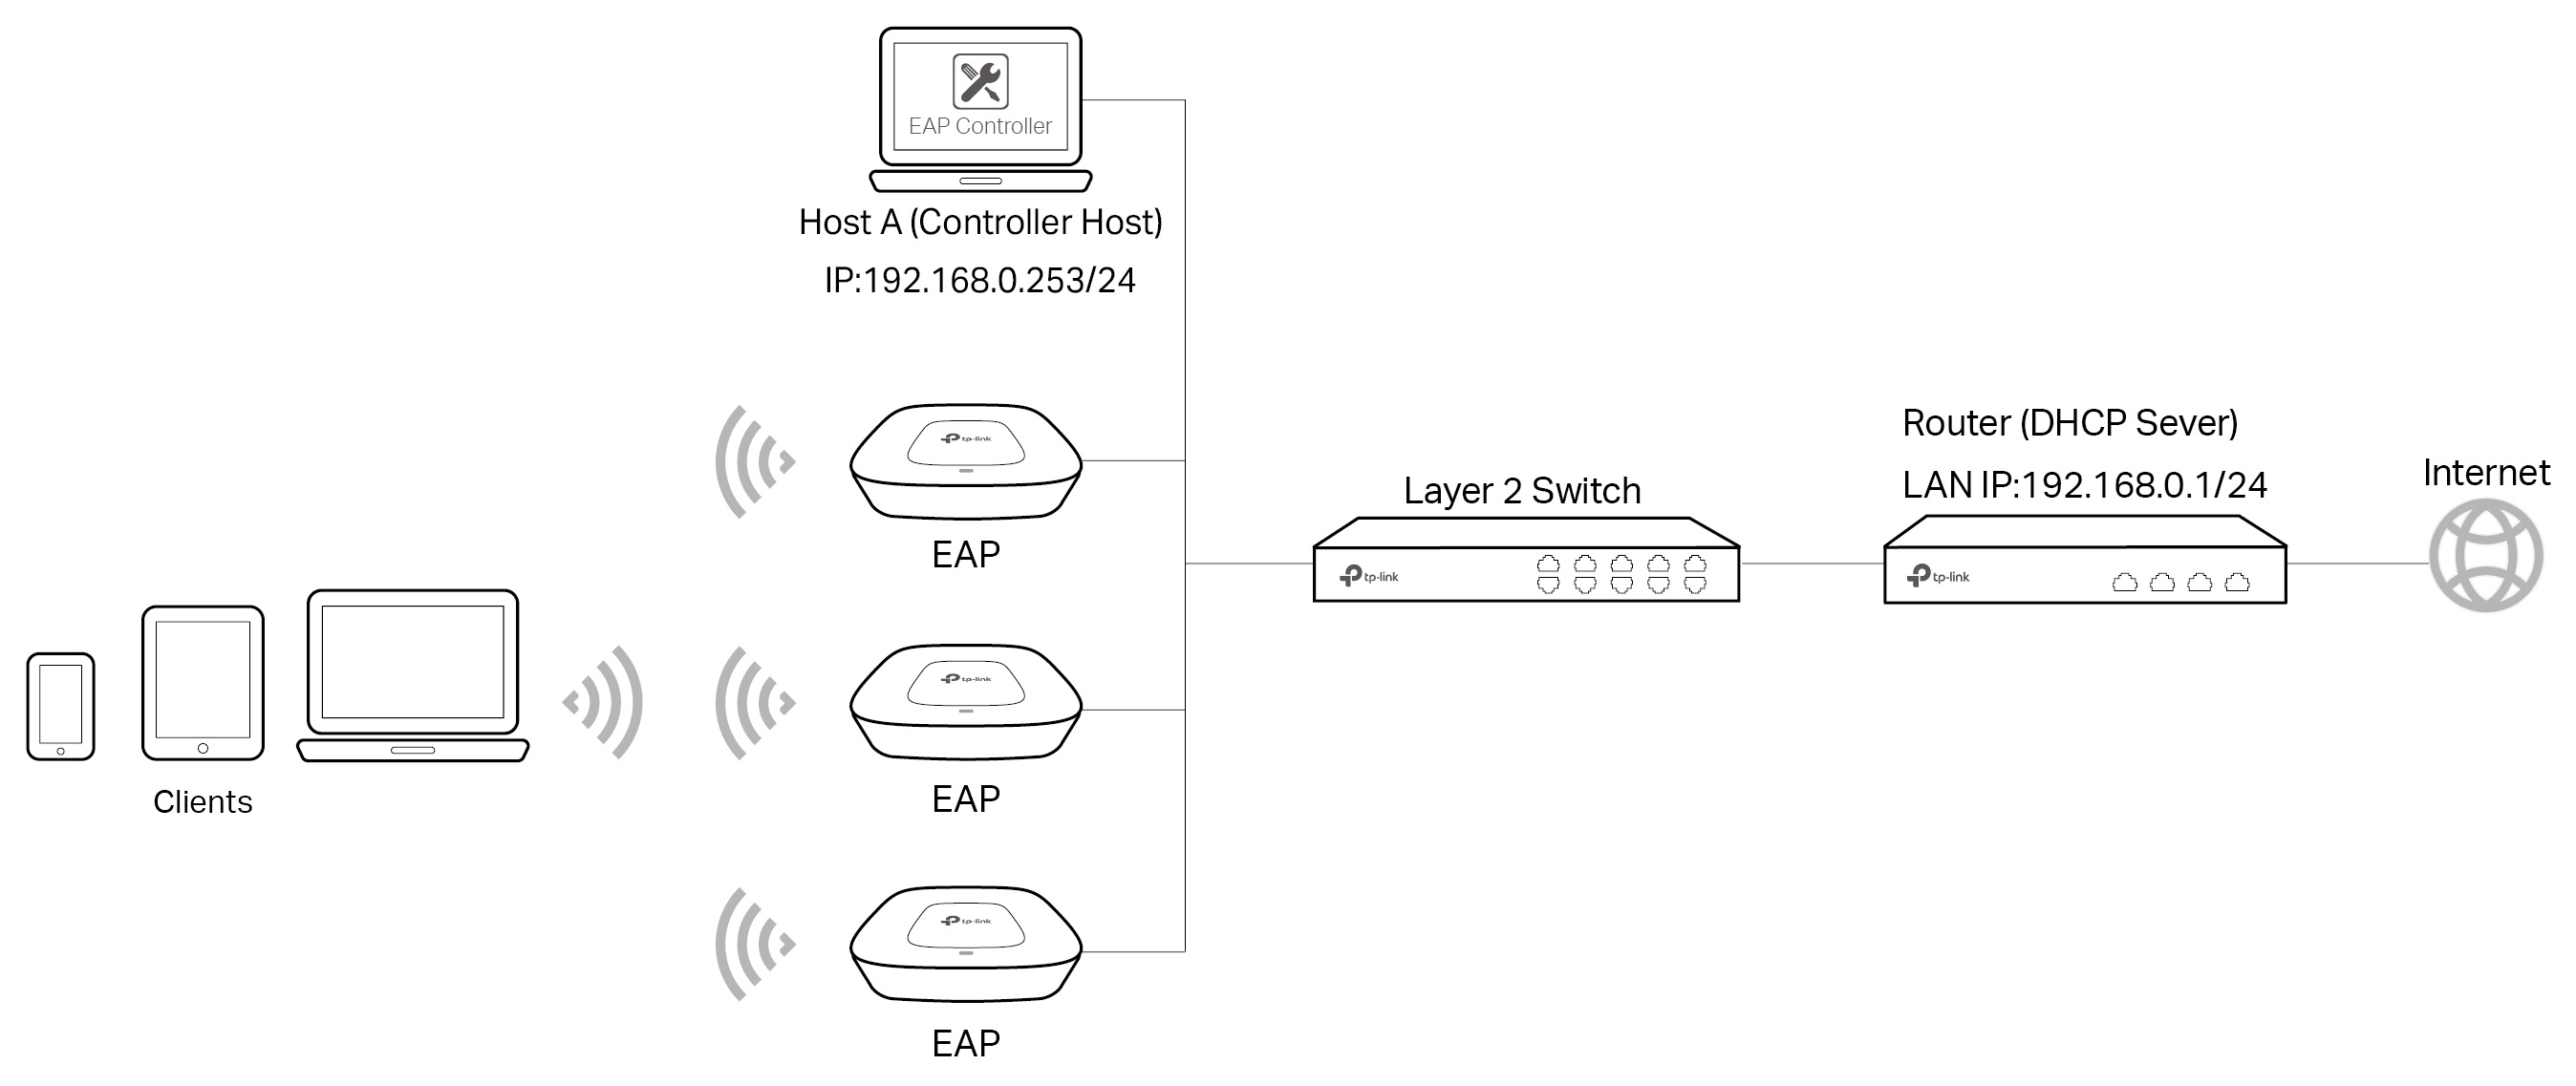
Ÿ If the Omada Controller Server and the devices are in the same VLAN and subnet (as shown below), there are no extra needs for the network configuration. Please go to Step 5. Allow Java to communicate through Windows Defender Firewall.
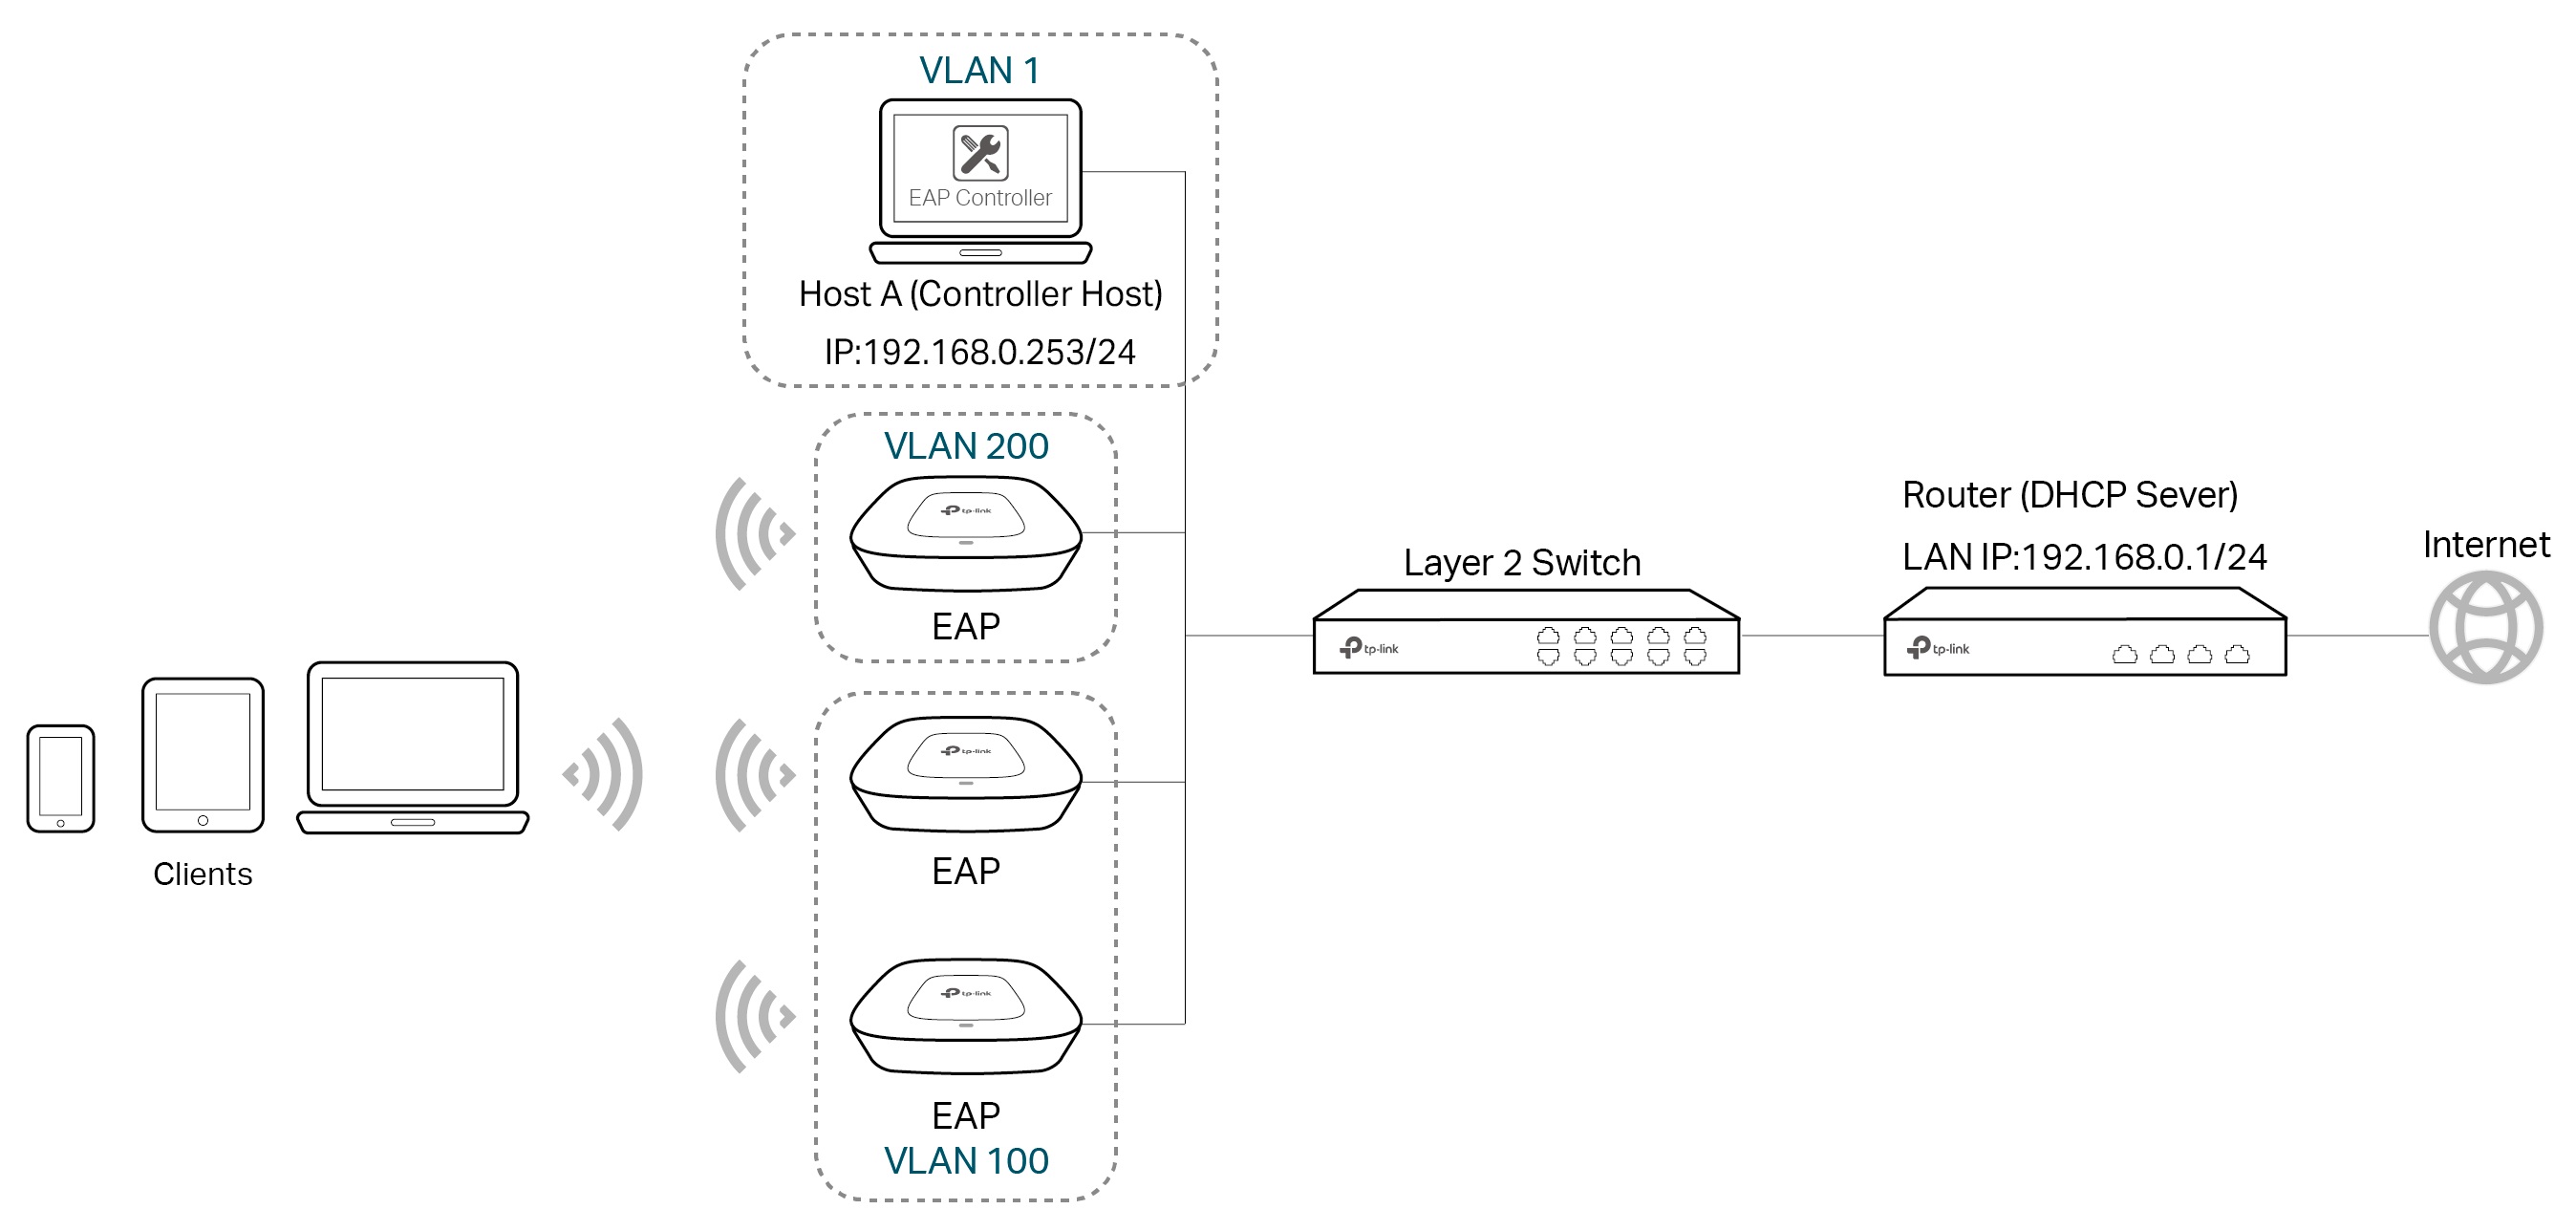
Ÿ If the devices are in different VLANs (as shown below), configure VLANs on the Layer 2 switch. For detailed steps, refer to FAQ-1365.
Ÿ If the Omada Controller Server is in a different subnet from the devices (as shown below), please run an Omada Discover Utility on a computer or configure DHCP option 138 on the Layer 3 switch so that they can communicate with each other. For detailed steps to discover the EAPs in different VLANs, refer to FAQ-1359 (using Discover Utility) or FAQ-1360 (configuring DHCP option 138).

Ÿ If the Omada Controller Server is in a different site from the devices (as shown below), configure VPN Tunnel or Port Forwarding on the router.
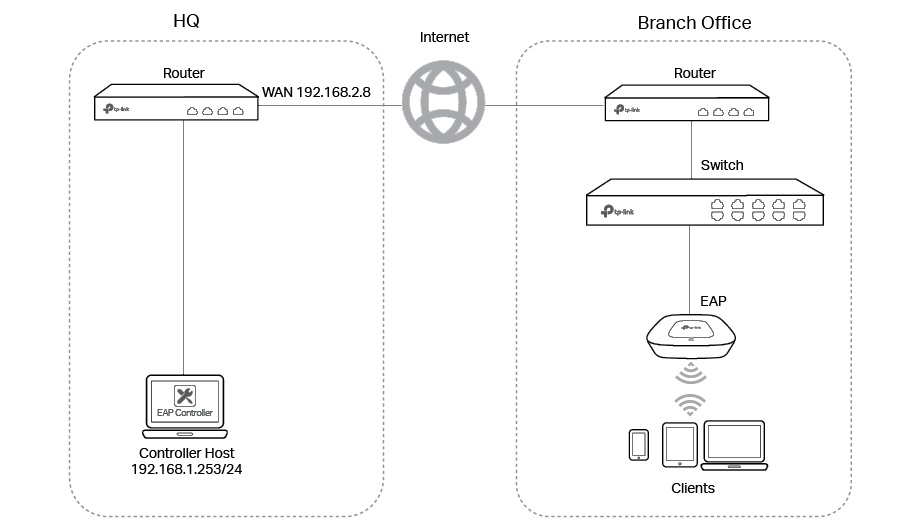
For detailed information about configuring these two features, refer to the following FAQs according to the method you use.
|
Feature Configuration |
Method |
Corresponding FAQ |
|
Configuring VPN Tunnel |
Discover Utility |
|
|
DHCP option 138 |
||
|
Configuring NAT Port Forwarding |
Discover Utility |
|
|
DHCP option 138 |
Step 5. Allow Java to communicate through Windows Defender Firewall
Omada Software Controller is working based on Java platform SE binary. If you are running on Windows OS, sometimes the Windows Firewall or some anti-virus program will block java to communicate.
Please go to Control Panel -> System and Security -> Windows Defender Firewall. On this page, please click “Allow an app or feature through Windows Defender Firewall (on the left side)” –> Allow another app -> Browse, then go to “C:\Program Files (x86)\Java\jre1.8.0_xxx\bin\ (for the 32-bit installer)” or ” C:\Program Files\Java\jre1.8.0_xxx\bin\ (for the 64-bit installer)” to add “javaw.exe” file. After that, please browse “C:\Program Files (x86)\Common Files\Oracle\Java\javapath_target_xxxxxxxx\ (For 32-bit installer)” or “C:\Program Files\Common Files\Oracle\Java\javapath_target_xxxxxxxx\ (For 64-bit installer)” to add “javaw.exe”.
After that please make sure that Private and Public are both checked for two “Java(TM) Platform SE binary” entries.
Please also note the VM network settings at the beginning of this article.
Step 6. Install Discover Utility to collect more information
Take EAP as an example, please follow the instructions below to get detailed information about your problem and help the TP-Link support team solve the problem faster.
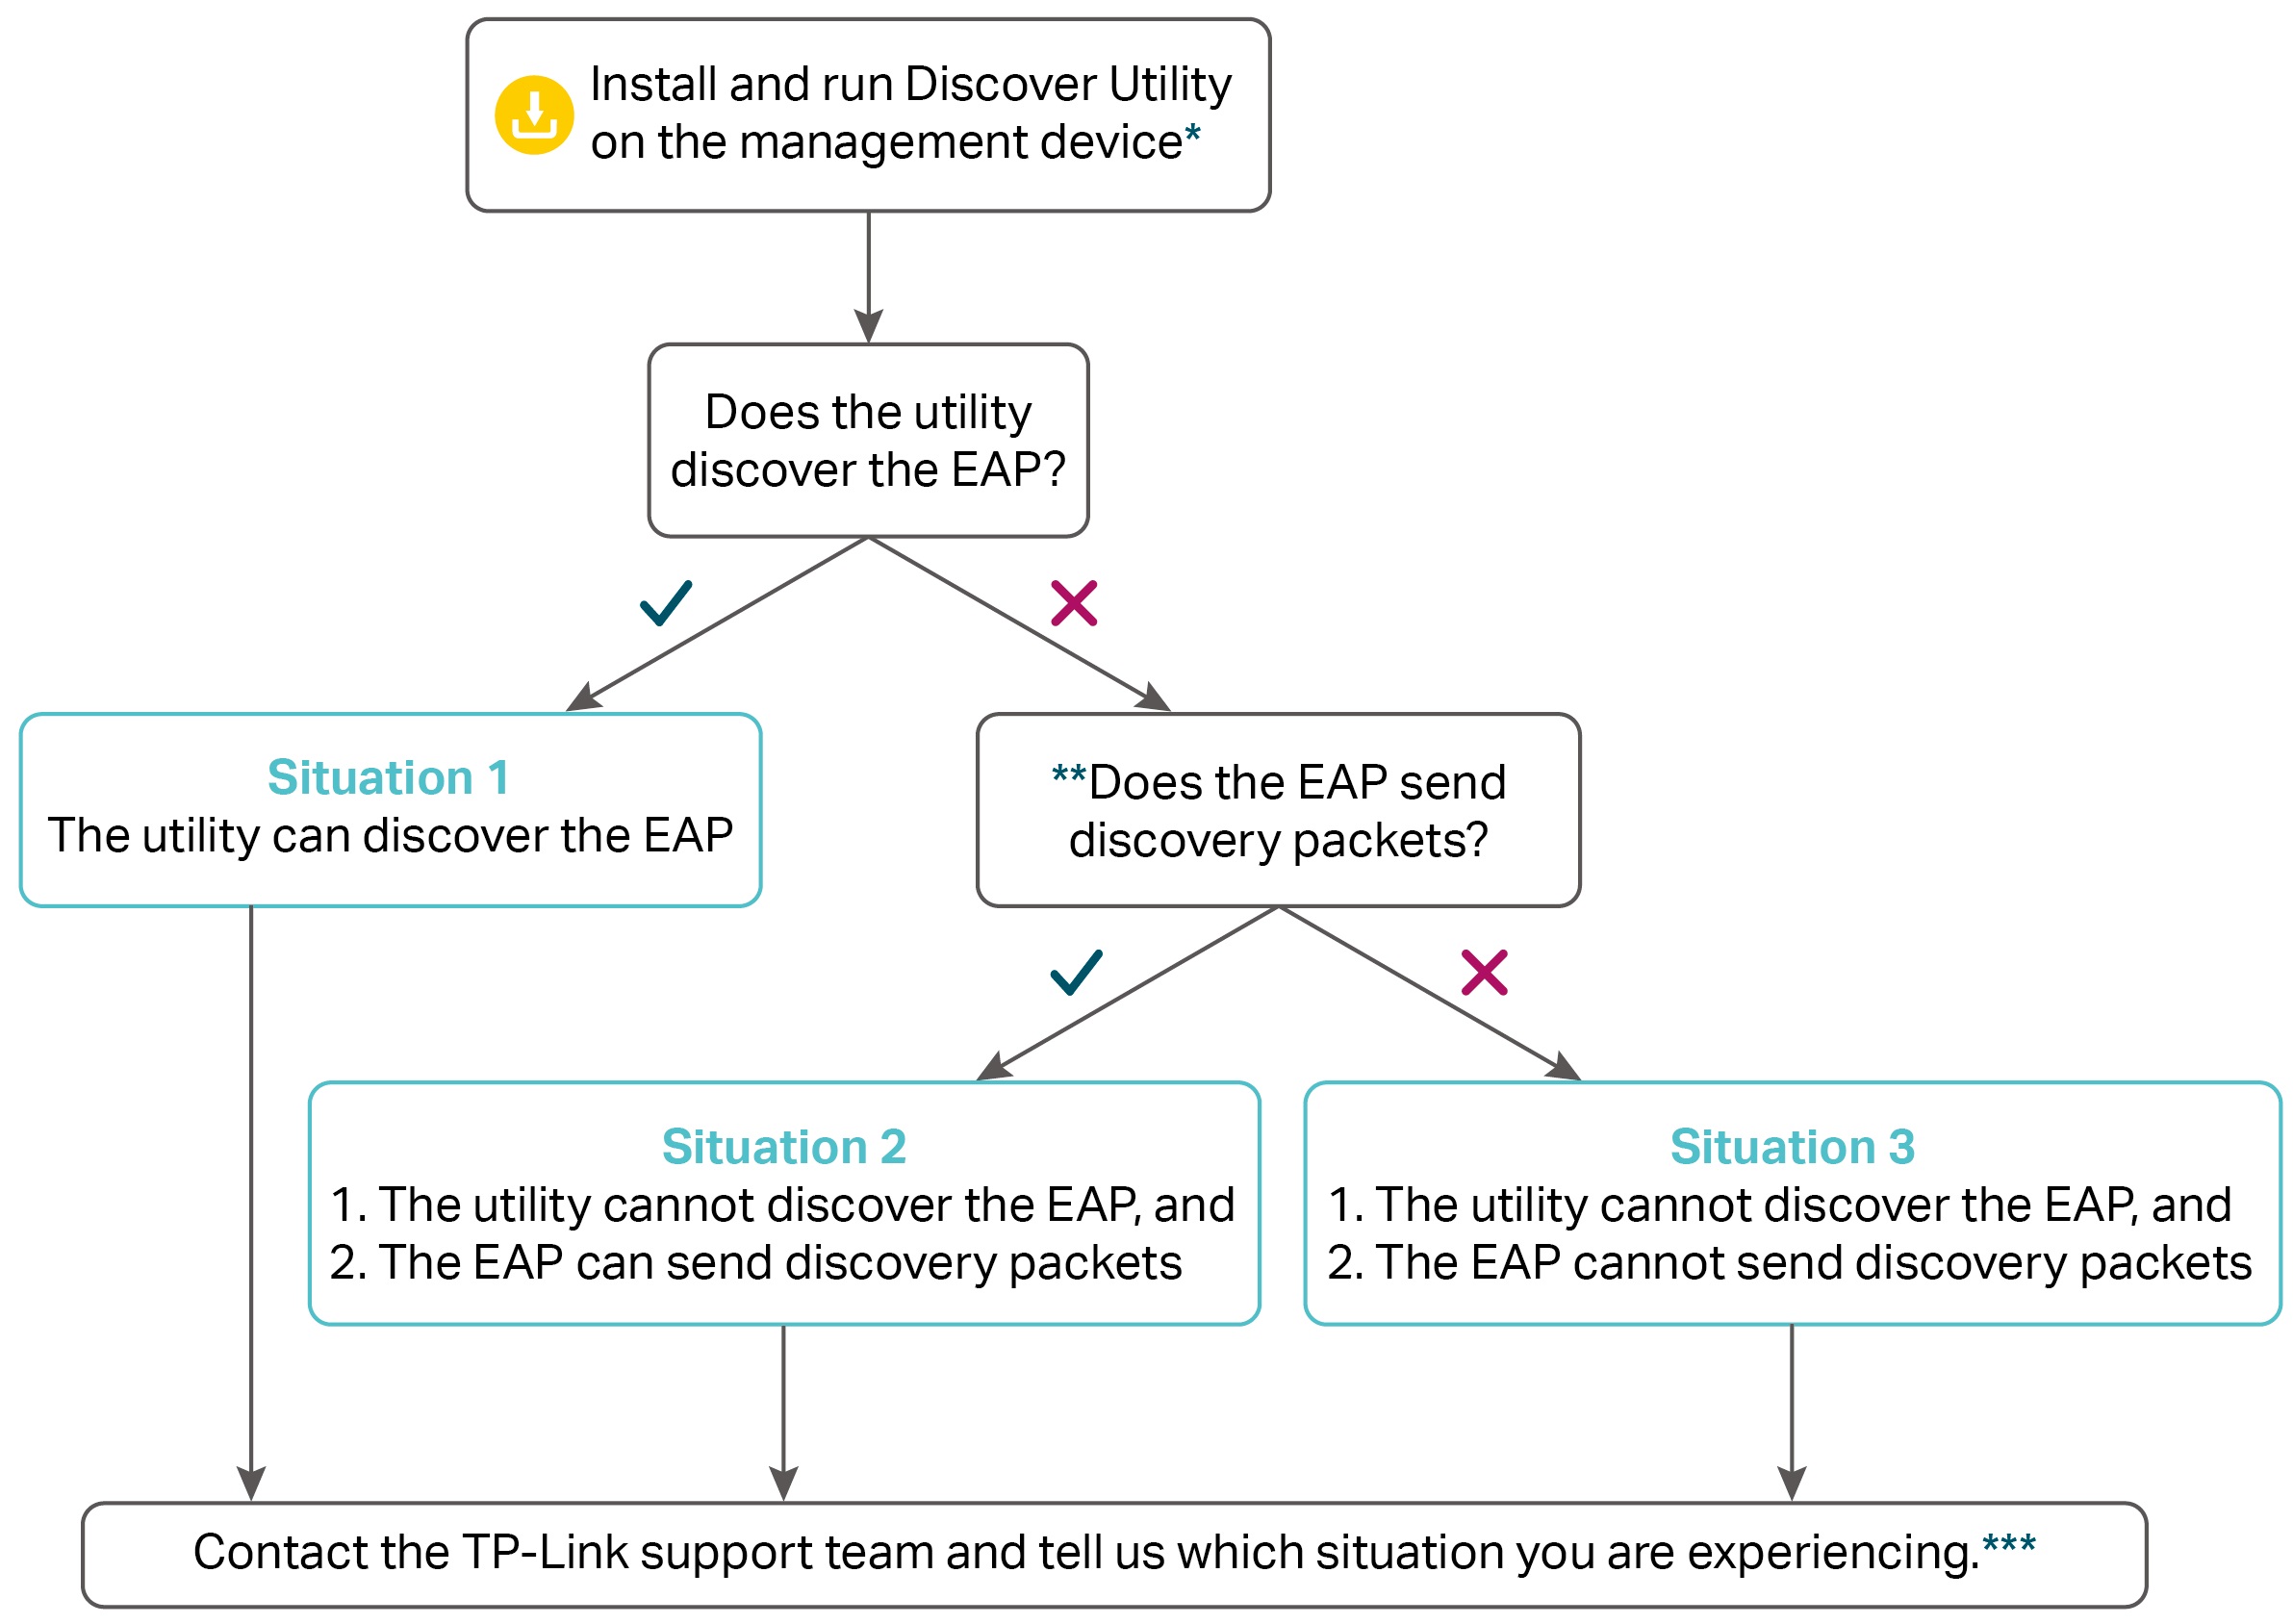
* To run the utility, close the controller first. The controller and utility cannot run together on one computer. Click to download the latest Discover Utility.
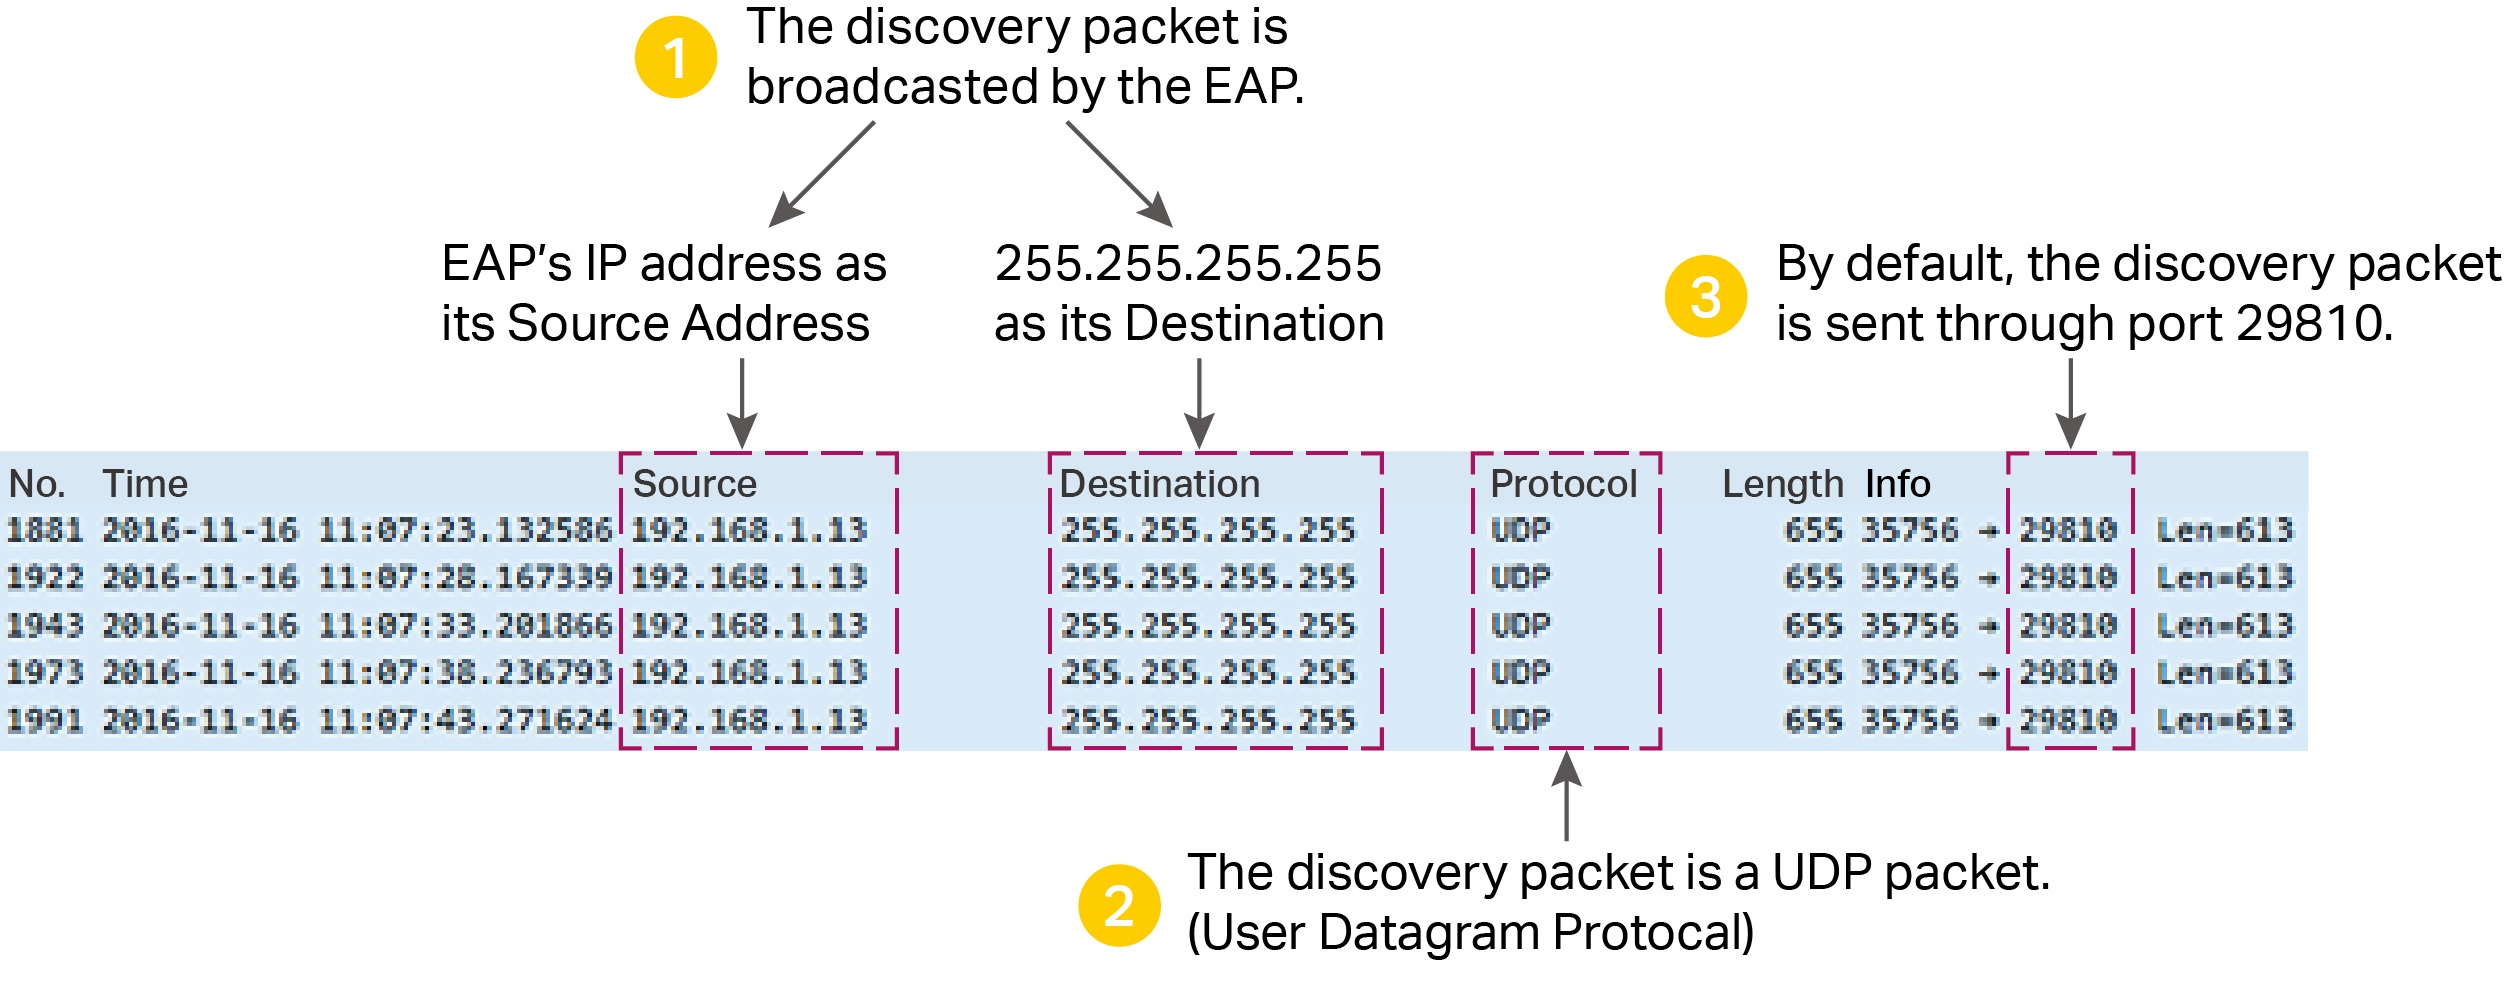
** If the utility cannot discover the devices, confirm if the devices send the discovery packet first. Keep the current network topology and capture packets of the LAN ports of the devices to analyze the situation. The packets with the following features are discovery packets:
*** Our Technical Support contact information can be found at https://www.tp-link.com/support/contact-technical-support/.


