


Omada Switch OUI-Based VLAN Configuration Guide


Content
Configuration for OUI-Based VLAN on Controller Mode
Configuration for OUI-Based VLAN in CLI
Introduction
OUI-Based VLAN allows Omada switches to automatically identify network devices based on the OUI portion of their MAC address and assign them to a designated VLAN. This feature can be used in a variety of deployment scenarios, such as automatically placing IP Phones into a Voice VLAN or separating an access point’s management traffic from its client traffic.
Once a matching device is identified, the switch automatically assigns it to the configured VLAN. When used for voice deployments, QoS prioritization can also be applied to help maintain stable and reliable voice communication during periods of network congestion.
This guide demonstrates how to configure OUI-Based VLAN through Controller Mode and the CLI on supported Omada switches. It also explains how the feature can simplify network segmentation and automate VLAN assignments based on a device's MAC OUI.
Requirements
- Omada L2+ switches, L3 switches and supported ES switches (Requires firmware compatible with Controller v6.3 and above)
- Omada Controller Version: 6.3 and above
Note: On supported ES switches, OUI-Based VLAN requires compatible firmware and Automatic VLAN ID Addition to be enabled. ES switches currently support the XX-XX-XX OUI Type format.
Configuration
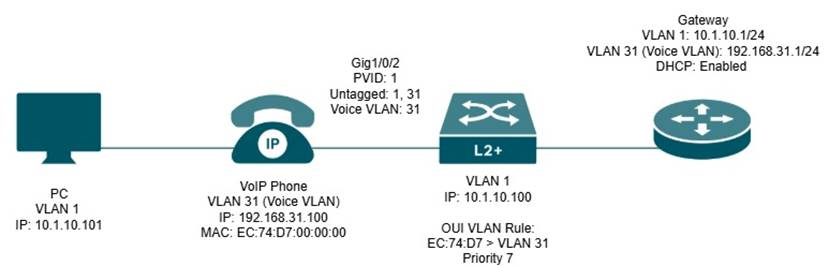
In a typical OUI-Based VLAN deployment, the IP Phone is connected directly to the switch, while a downstream device, such as a PC, is connected to the LAN/PC port on the back of the phone.
When the IP Phone connects to the switch, the switch identifies the device based on the OUI portion of its MAC address and dynamically assigns the phone traffic to the configured Voice VLAN. At the same time, the downstream PC connected through the IP Phone continues using the switch port's normal data VLAN configuration.
This allows both voice and data traffic to share the same physical switch port while remaining logically separated into different VLANs.
In this example, a Grandstream IP Phone with an OUI of EC:74:D7 is connected to the switch. A PC is connected to the LAN/PC port on the back of the phone. The switch automatically identifies the phone based on its OUI, places the phone traffic into the configured Voice VLAN, and allows the PC to remain on the data VLAN.
Configuration for OUI-Based VLAN on Controller Mode
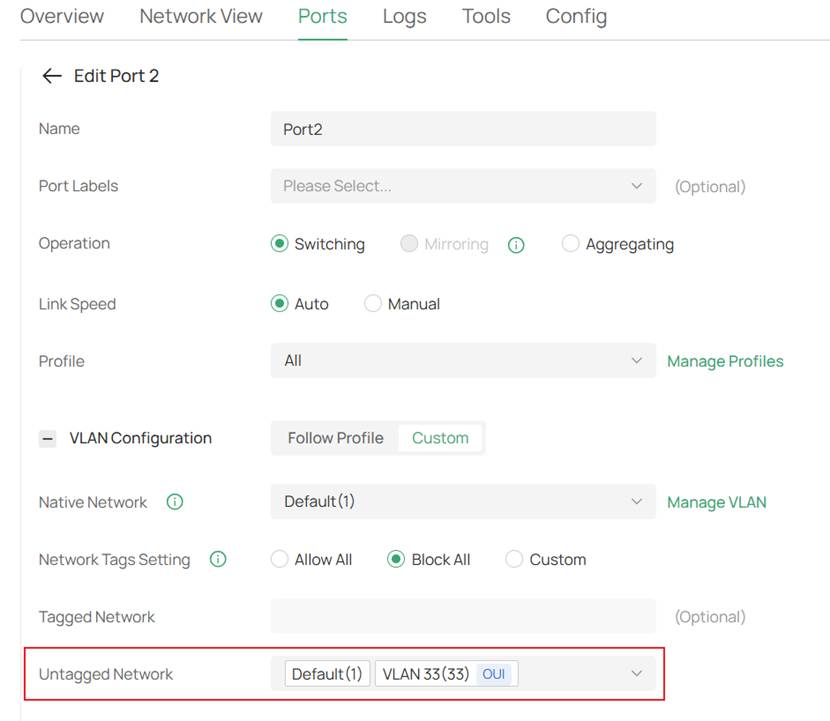
Note: Beginning with Controller v6.3, Automatic VLAN ID Addition is supported for OUI-Based VLAN. After an OUI-Based VLAN rule is bound to a port, the controller can automatically add the corresponding VLAN ID to the port's Untagged Network, eliminating the need to manually configure the port under the VLAN settings. This feature is only supported on Access ports and requires compatible switch firmware.
Note: If you are using firmware prior to the one adapted to controller v6.2, you will need to manually add the VLAN to that interface.
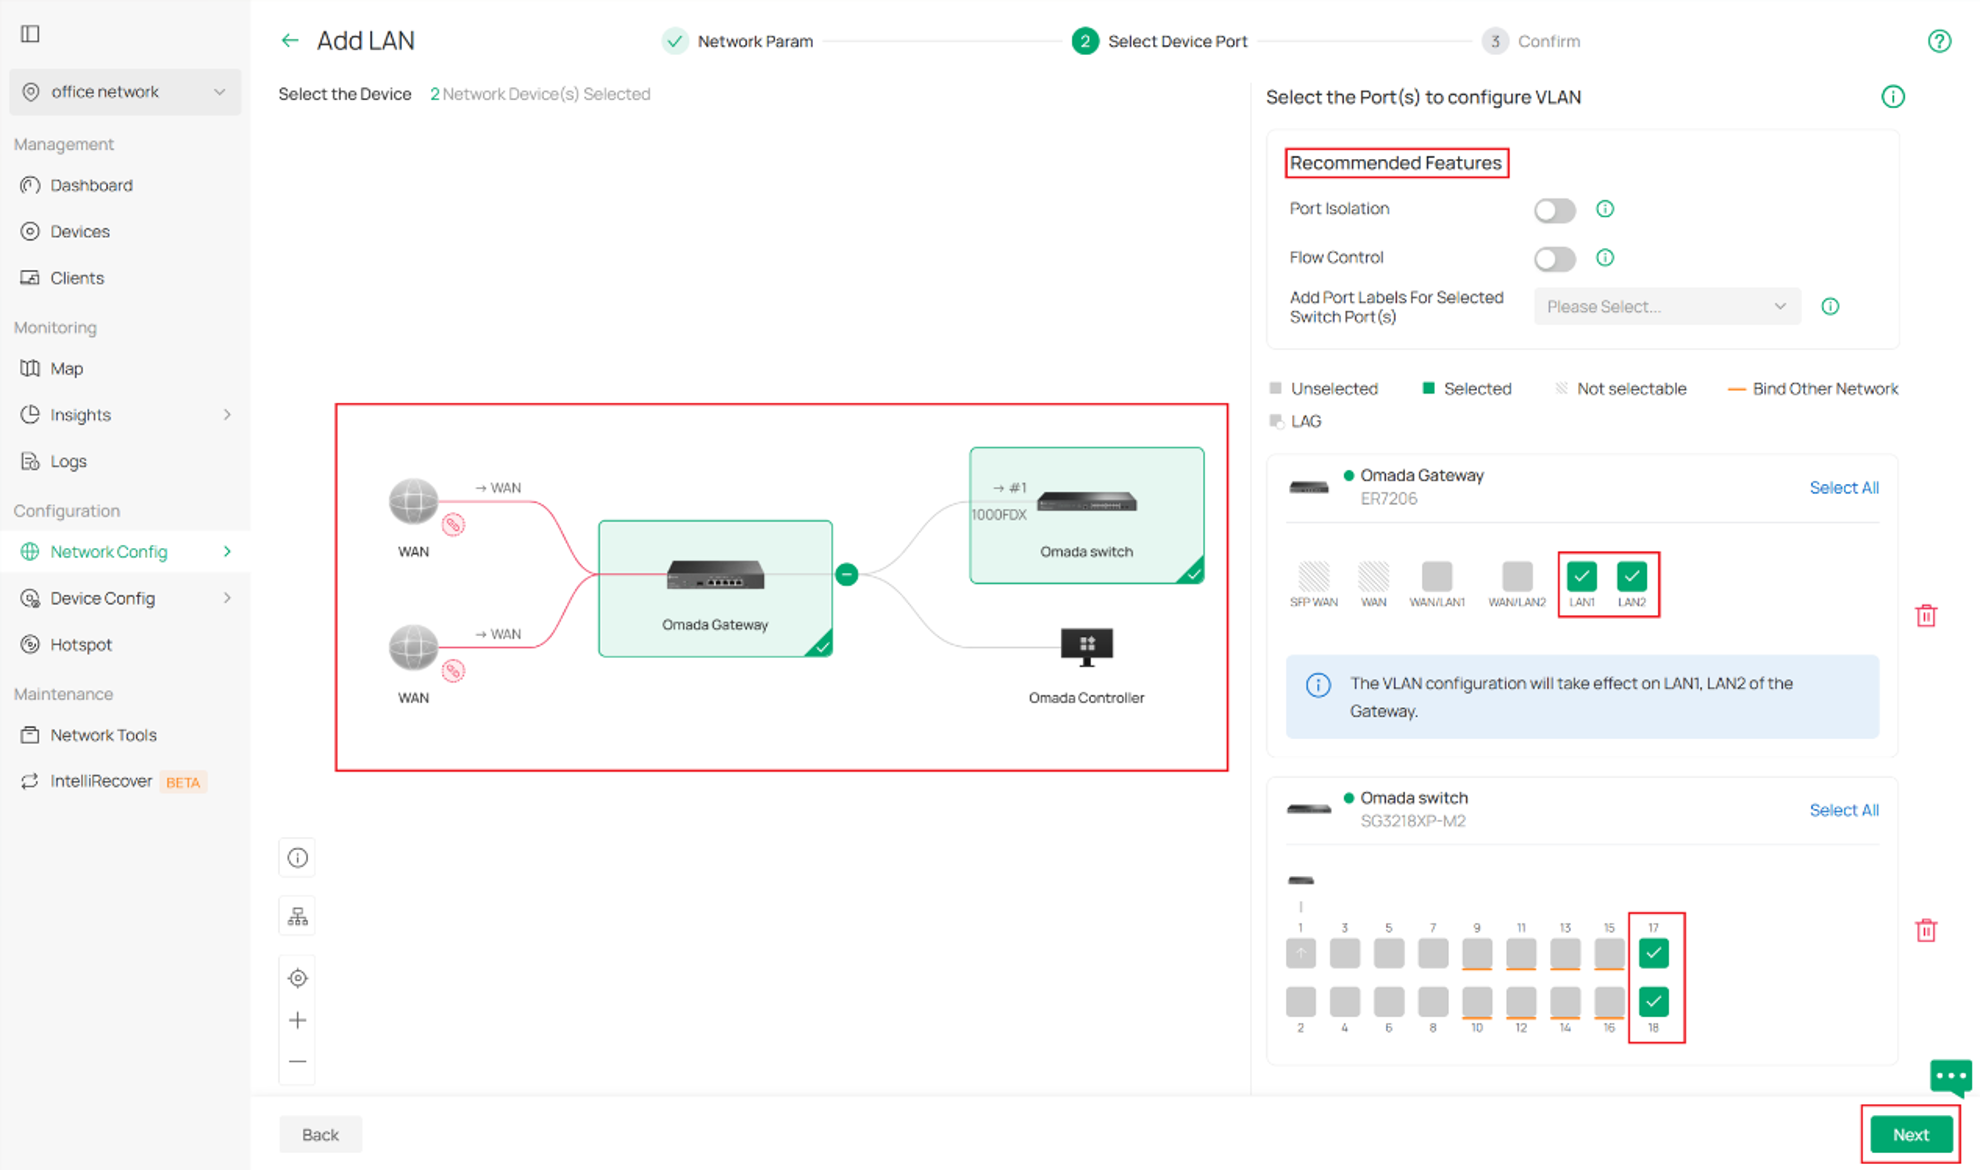
Step 1. Firstly, set up your VLAN and correct access ports.
Please refer to this FAQ: How to configure VLAN with Omada Network v6
Please pay attention to Step 2 on Configuration with an Omada device as DHCP server.
Step 2. Next, create an OUI group.
Log into your controller and go to your Site > Network Config > Profile > Groups > Create New Group
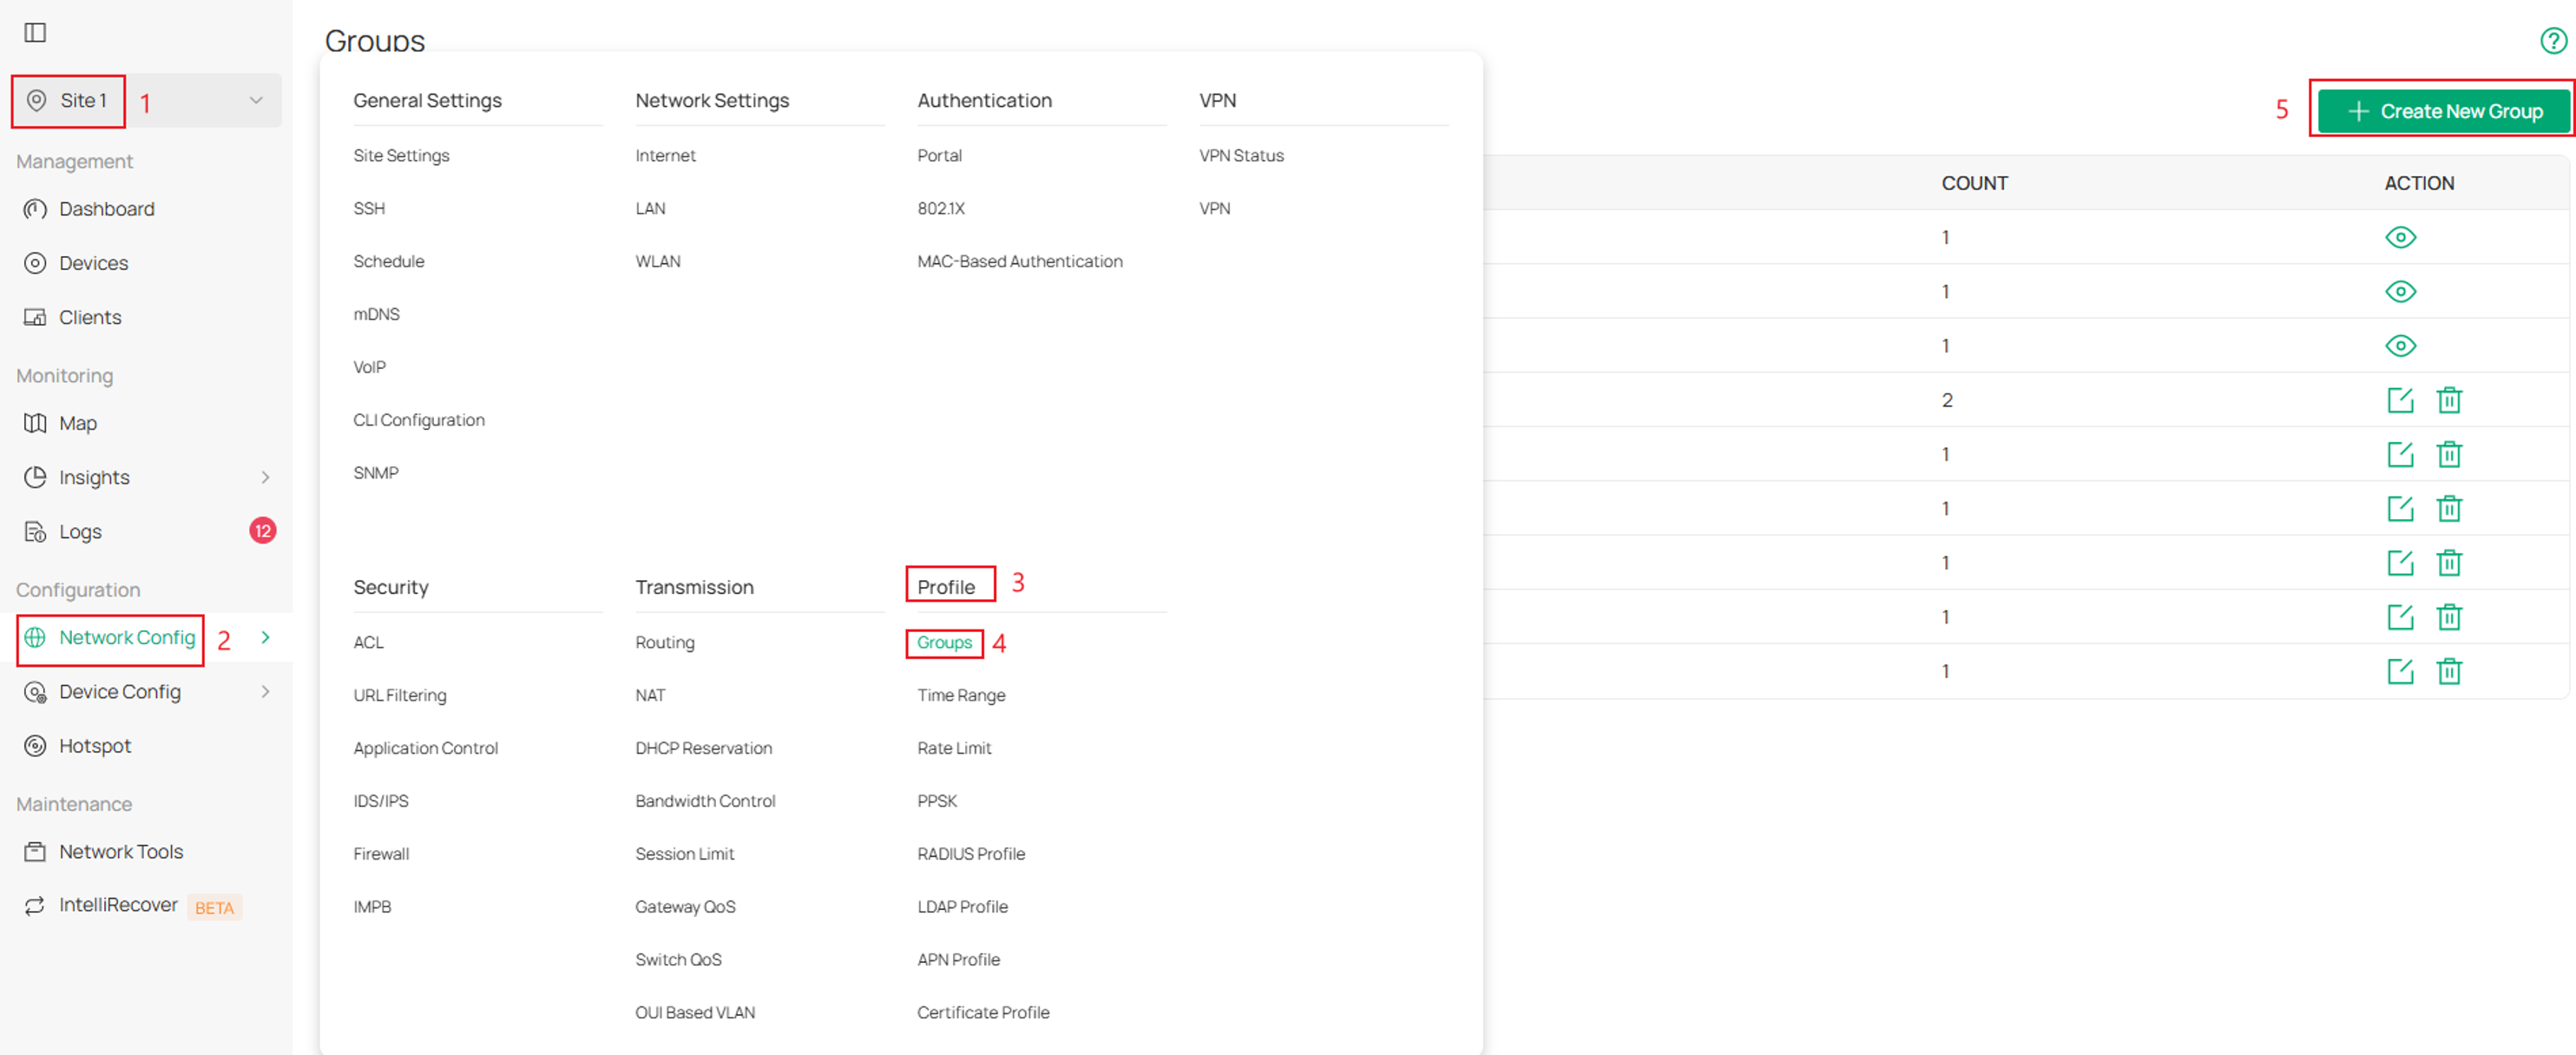
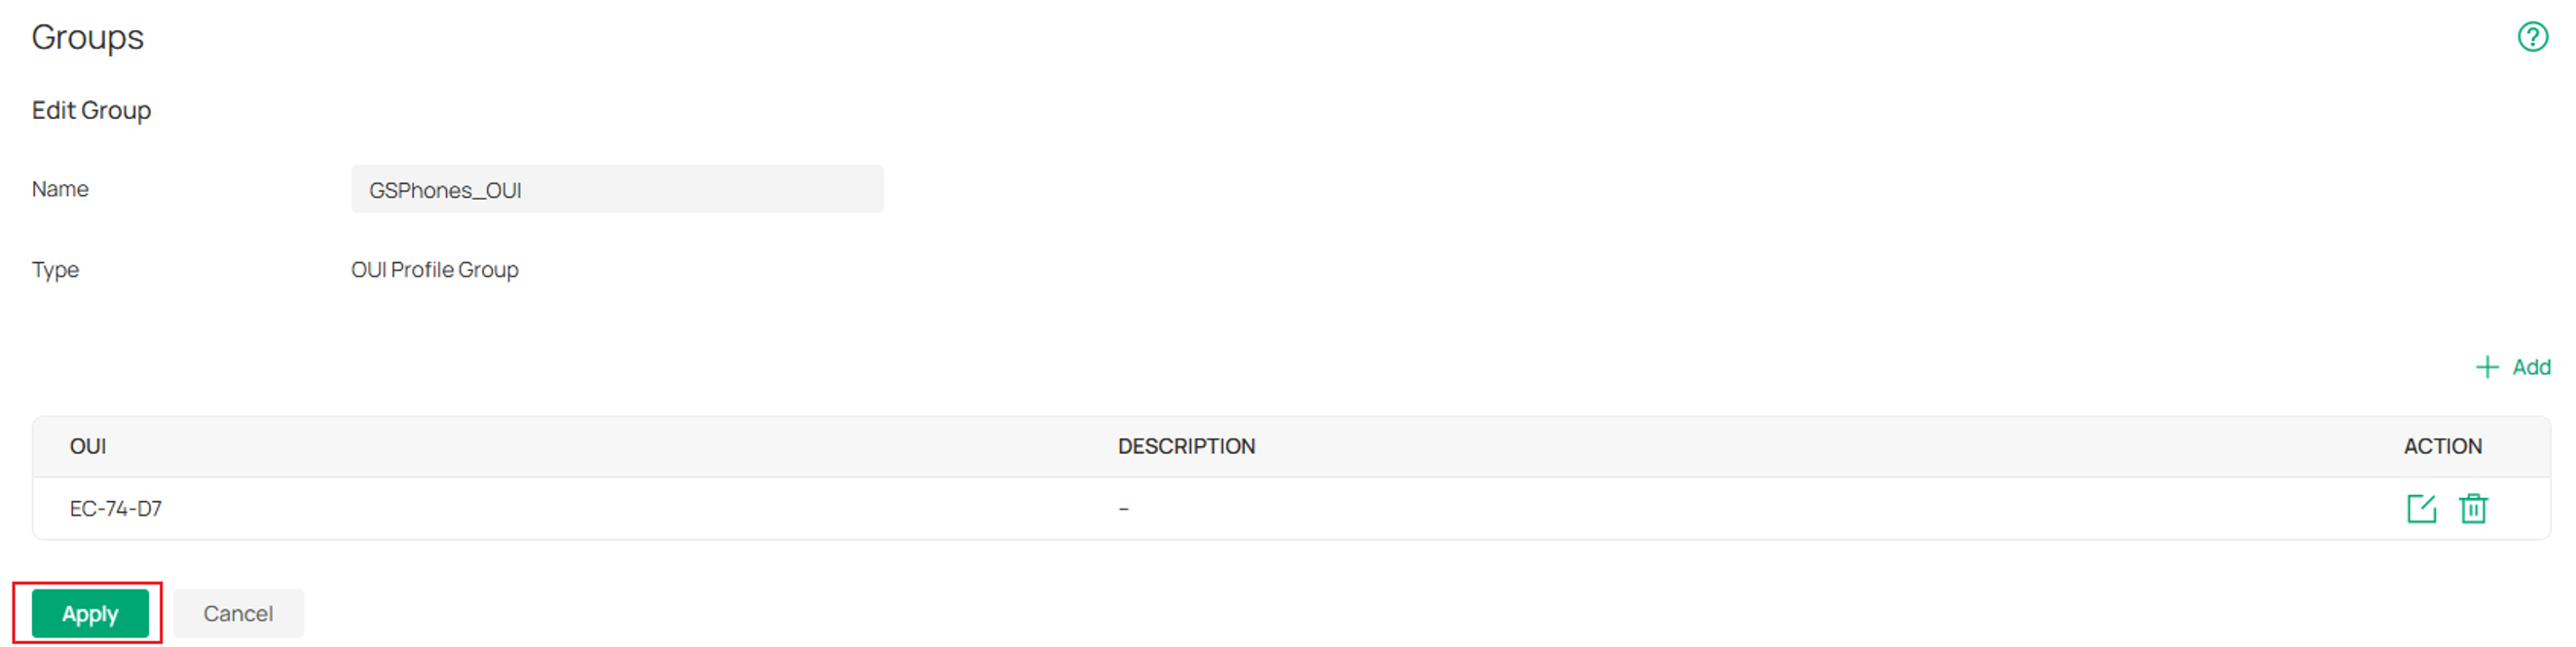
Step 3. Next name the new group > select OUI Profile Group as the Type > click Add

Step 4. Under OUI Type select the OUI mask and fill in the OUI.
If multiple OUI entries need to be added, click Add OUI to add additional entries.
Click Save once complete.
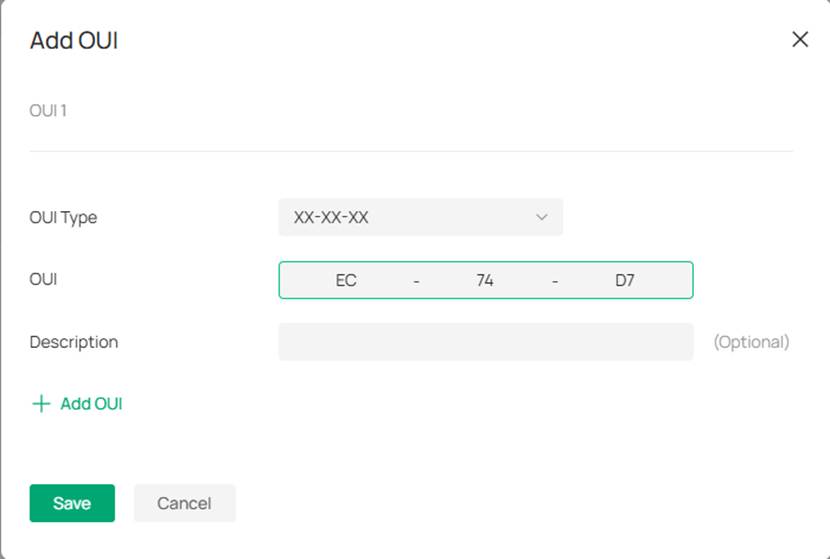
OUI Type: Specify the OUI length.
OUI: Enter one or multiple organizationally unique identifiers (OUIs).
Description: Enter the description for the profile.
Note: Supported OUI Type formats vary by switch series. Supported ES switches support only the XX-XX-XX format, while L2+ and L3 switches support all available OUI Type formats.
Step 5. Click Apply to create the group
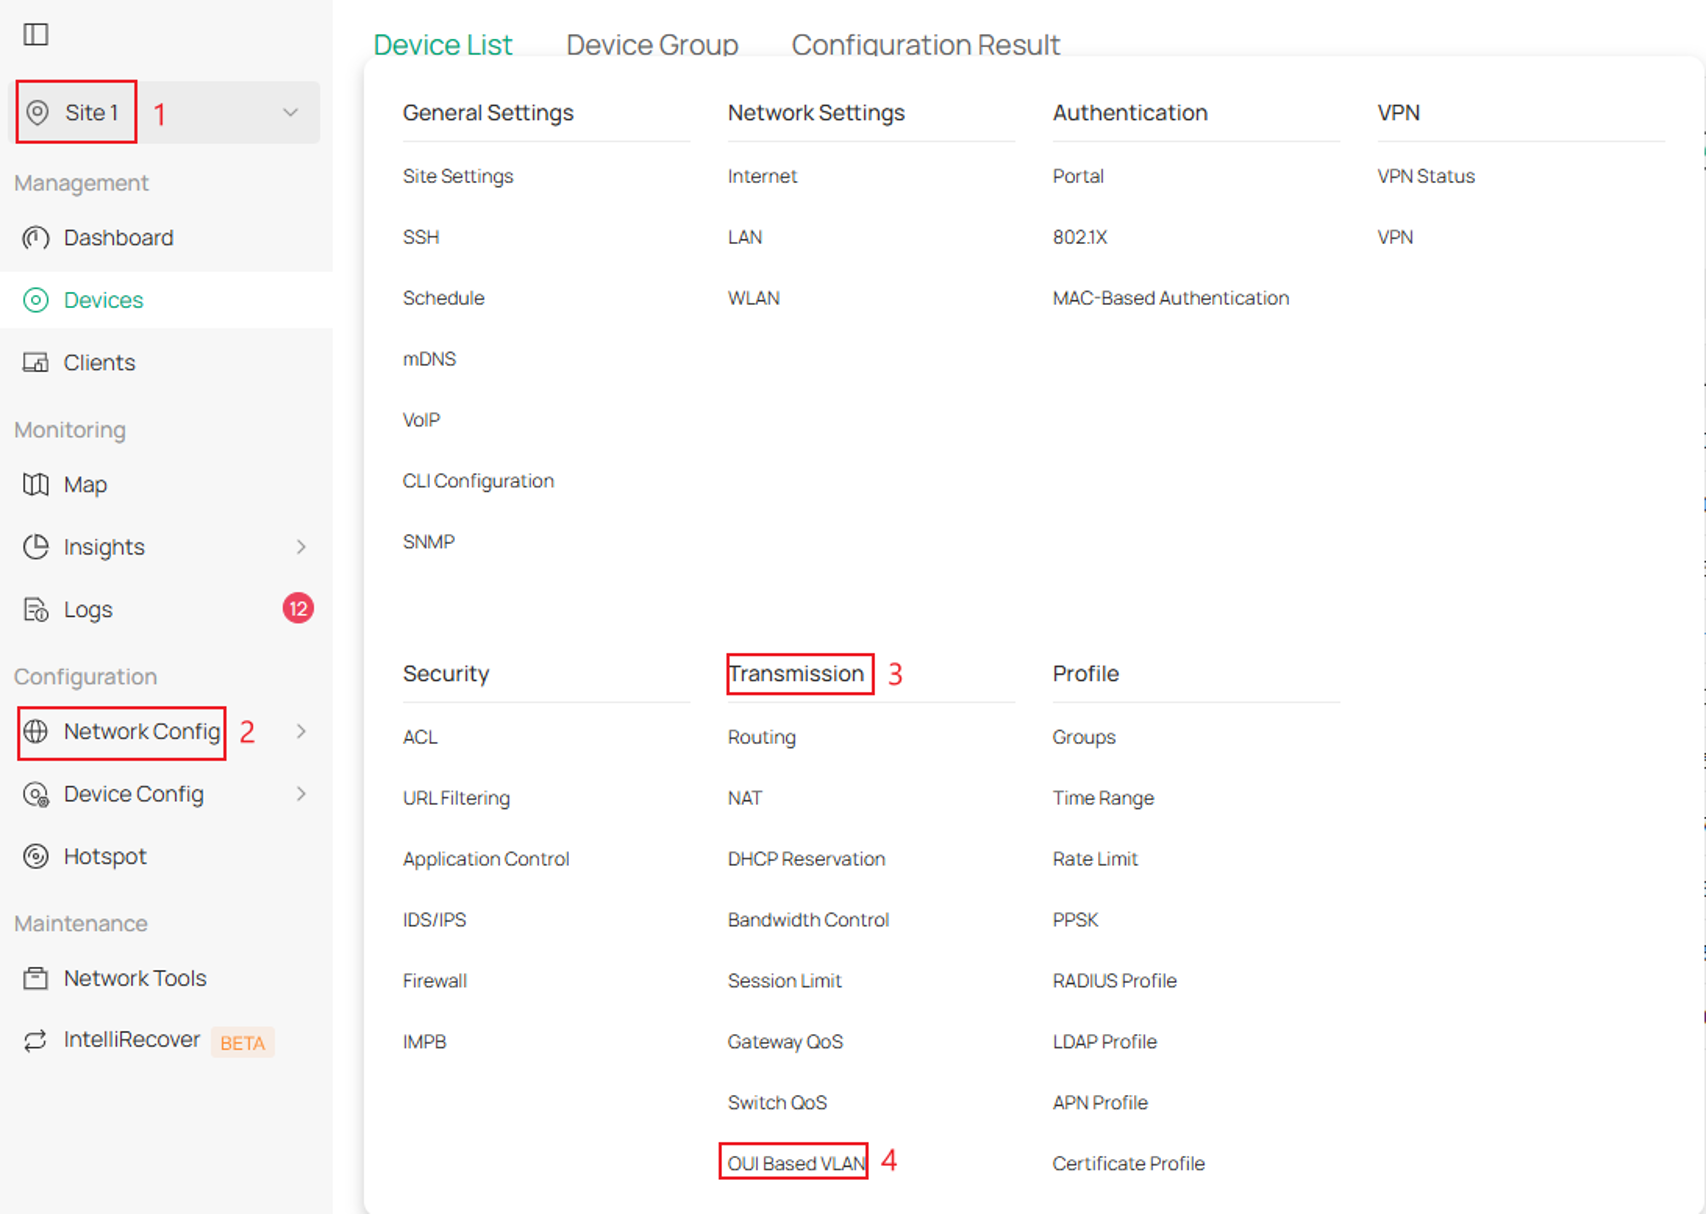
Step 6 . Next navigate to Network Config > Transmission > OUI Based VLAN
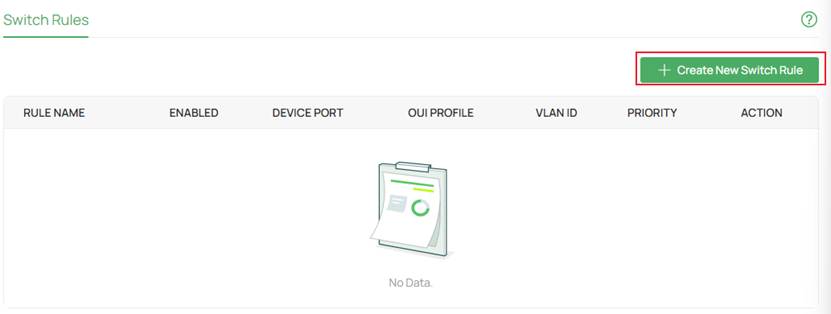
Step 7. Click Create New Switch Rule
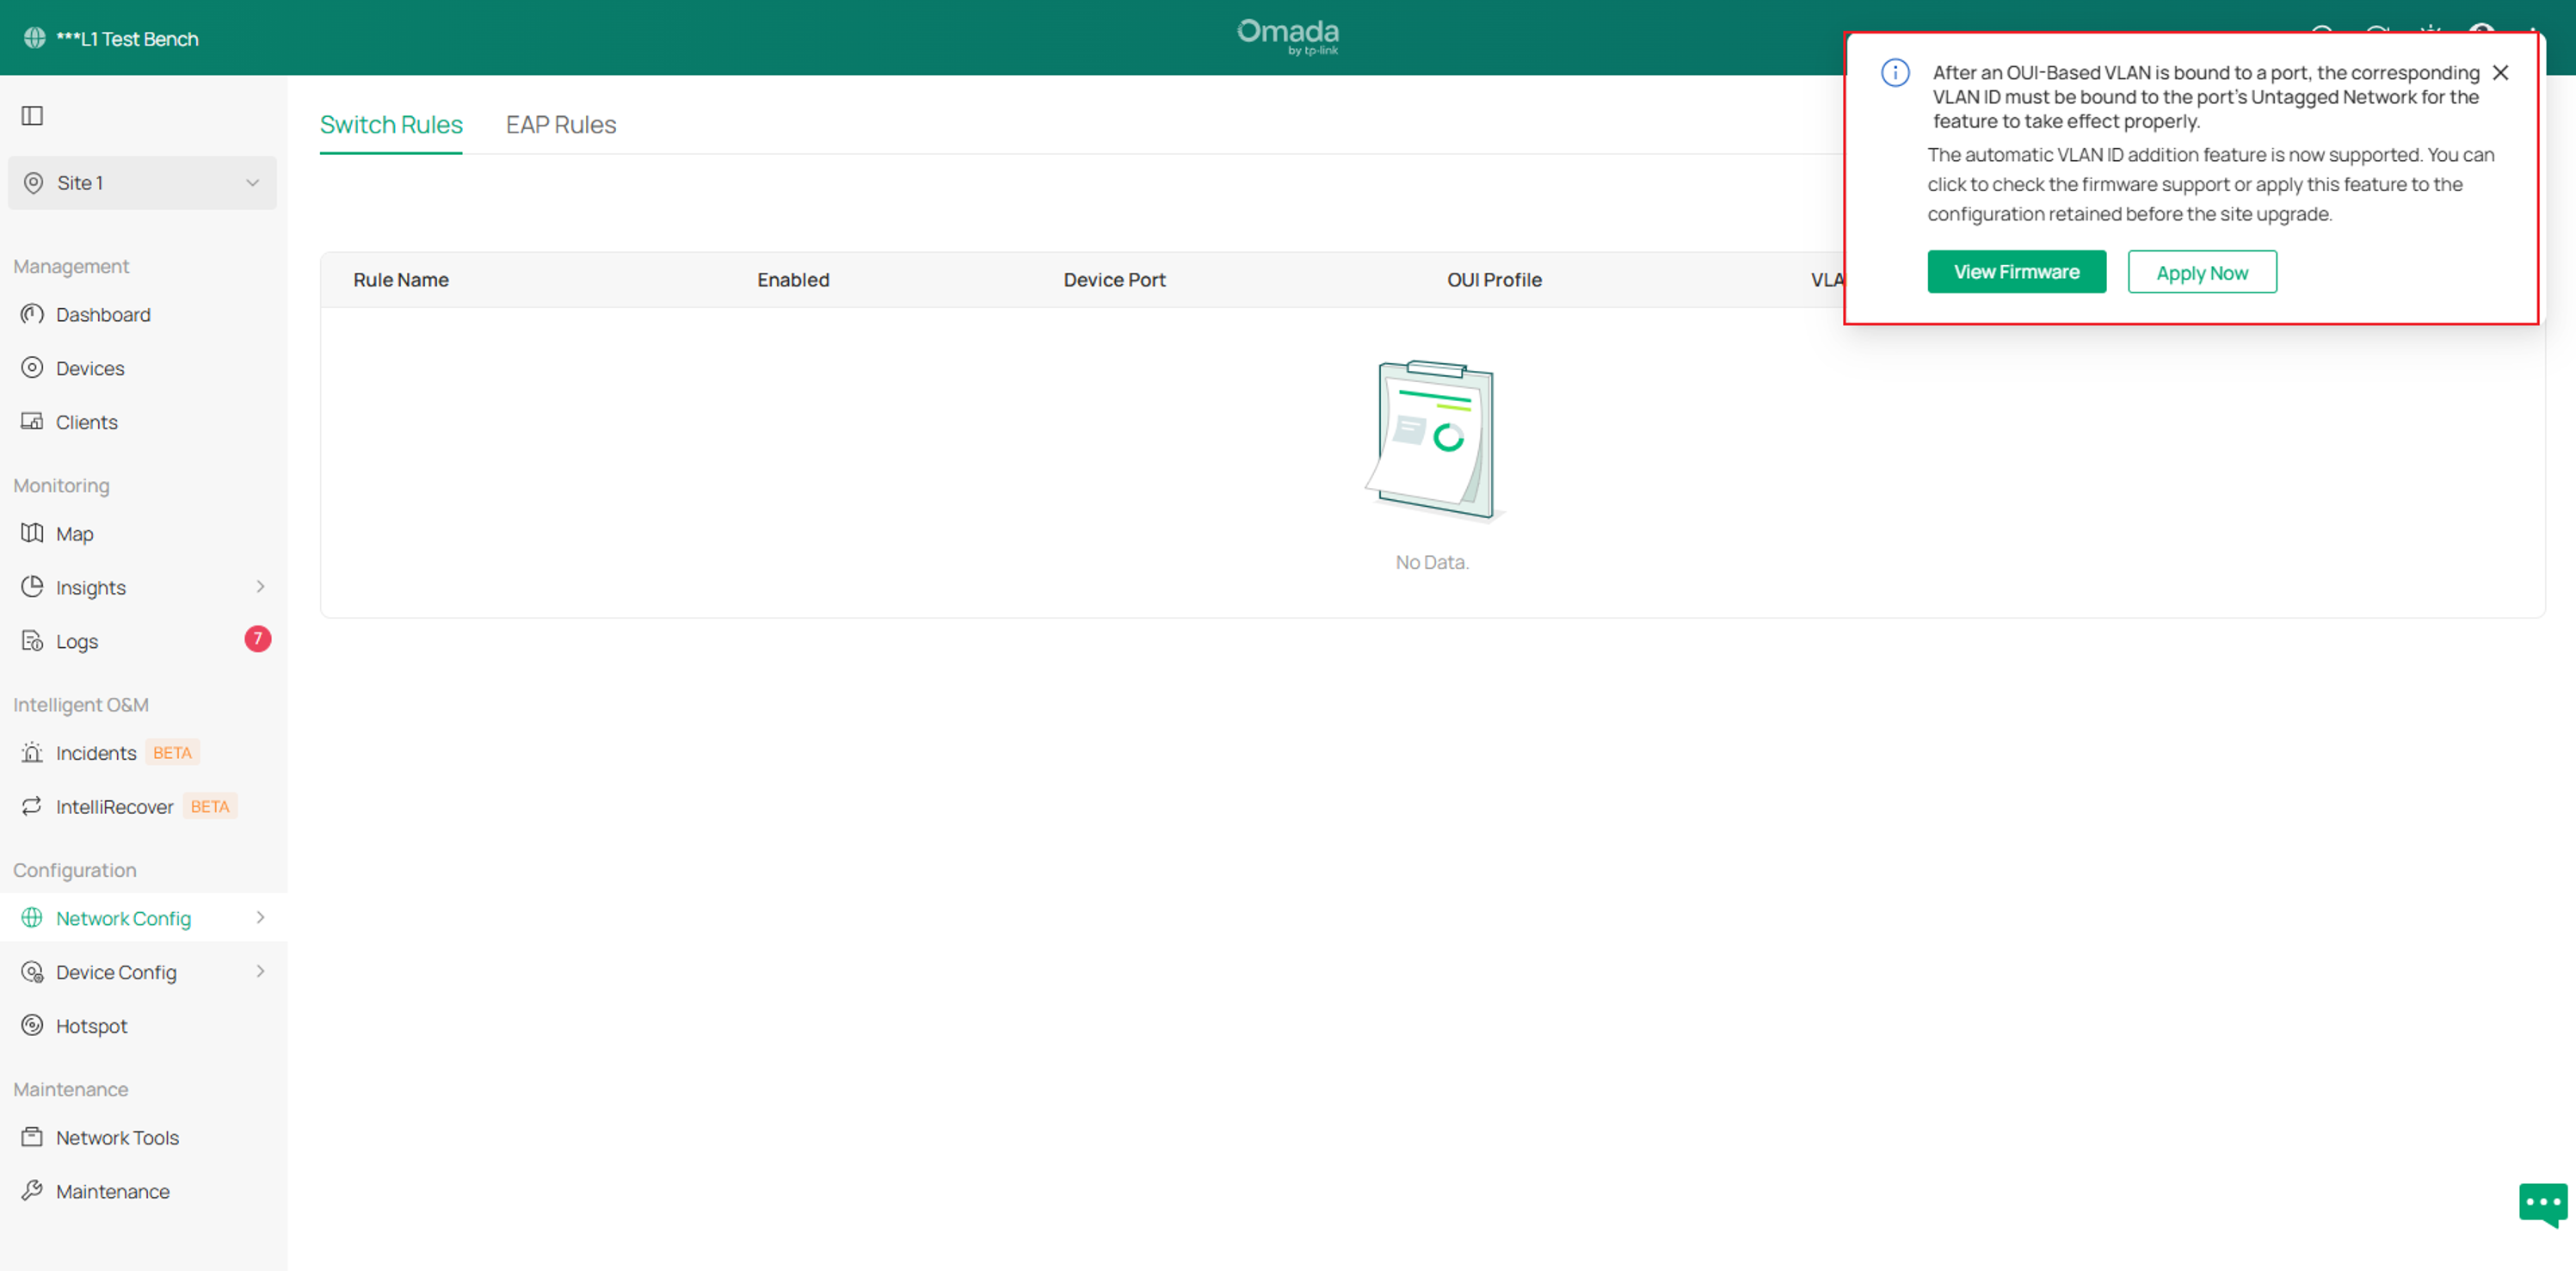
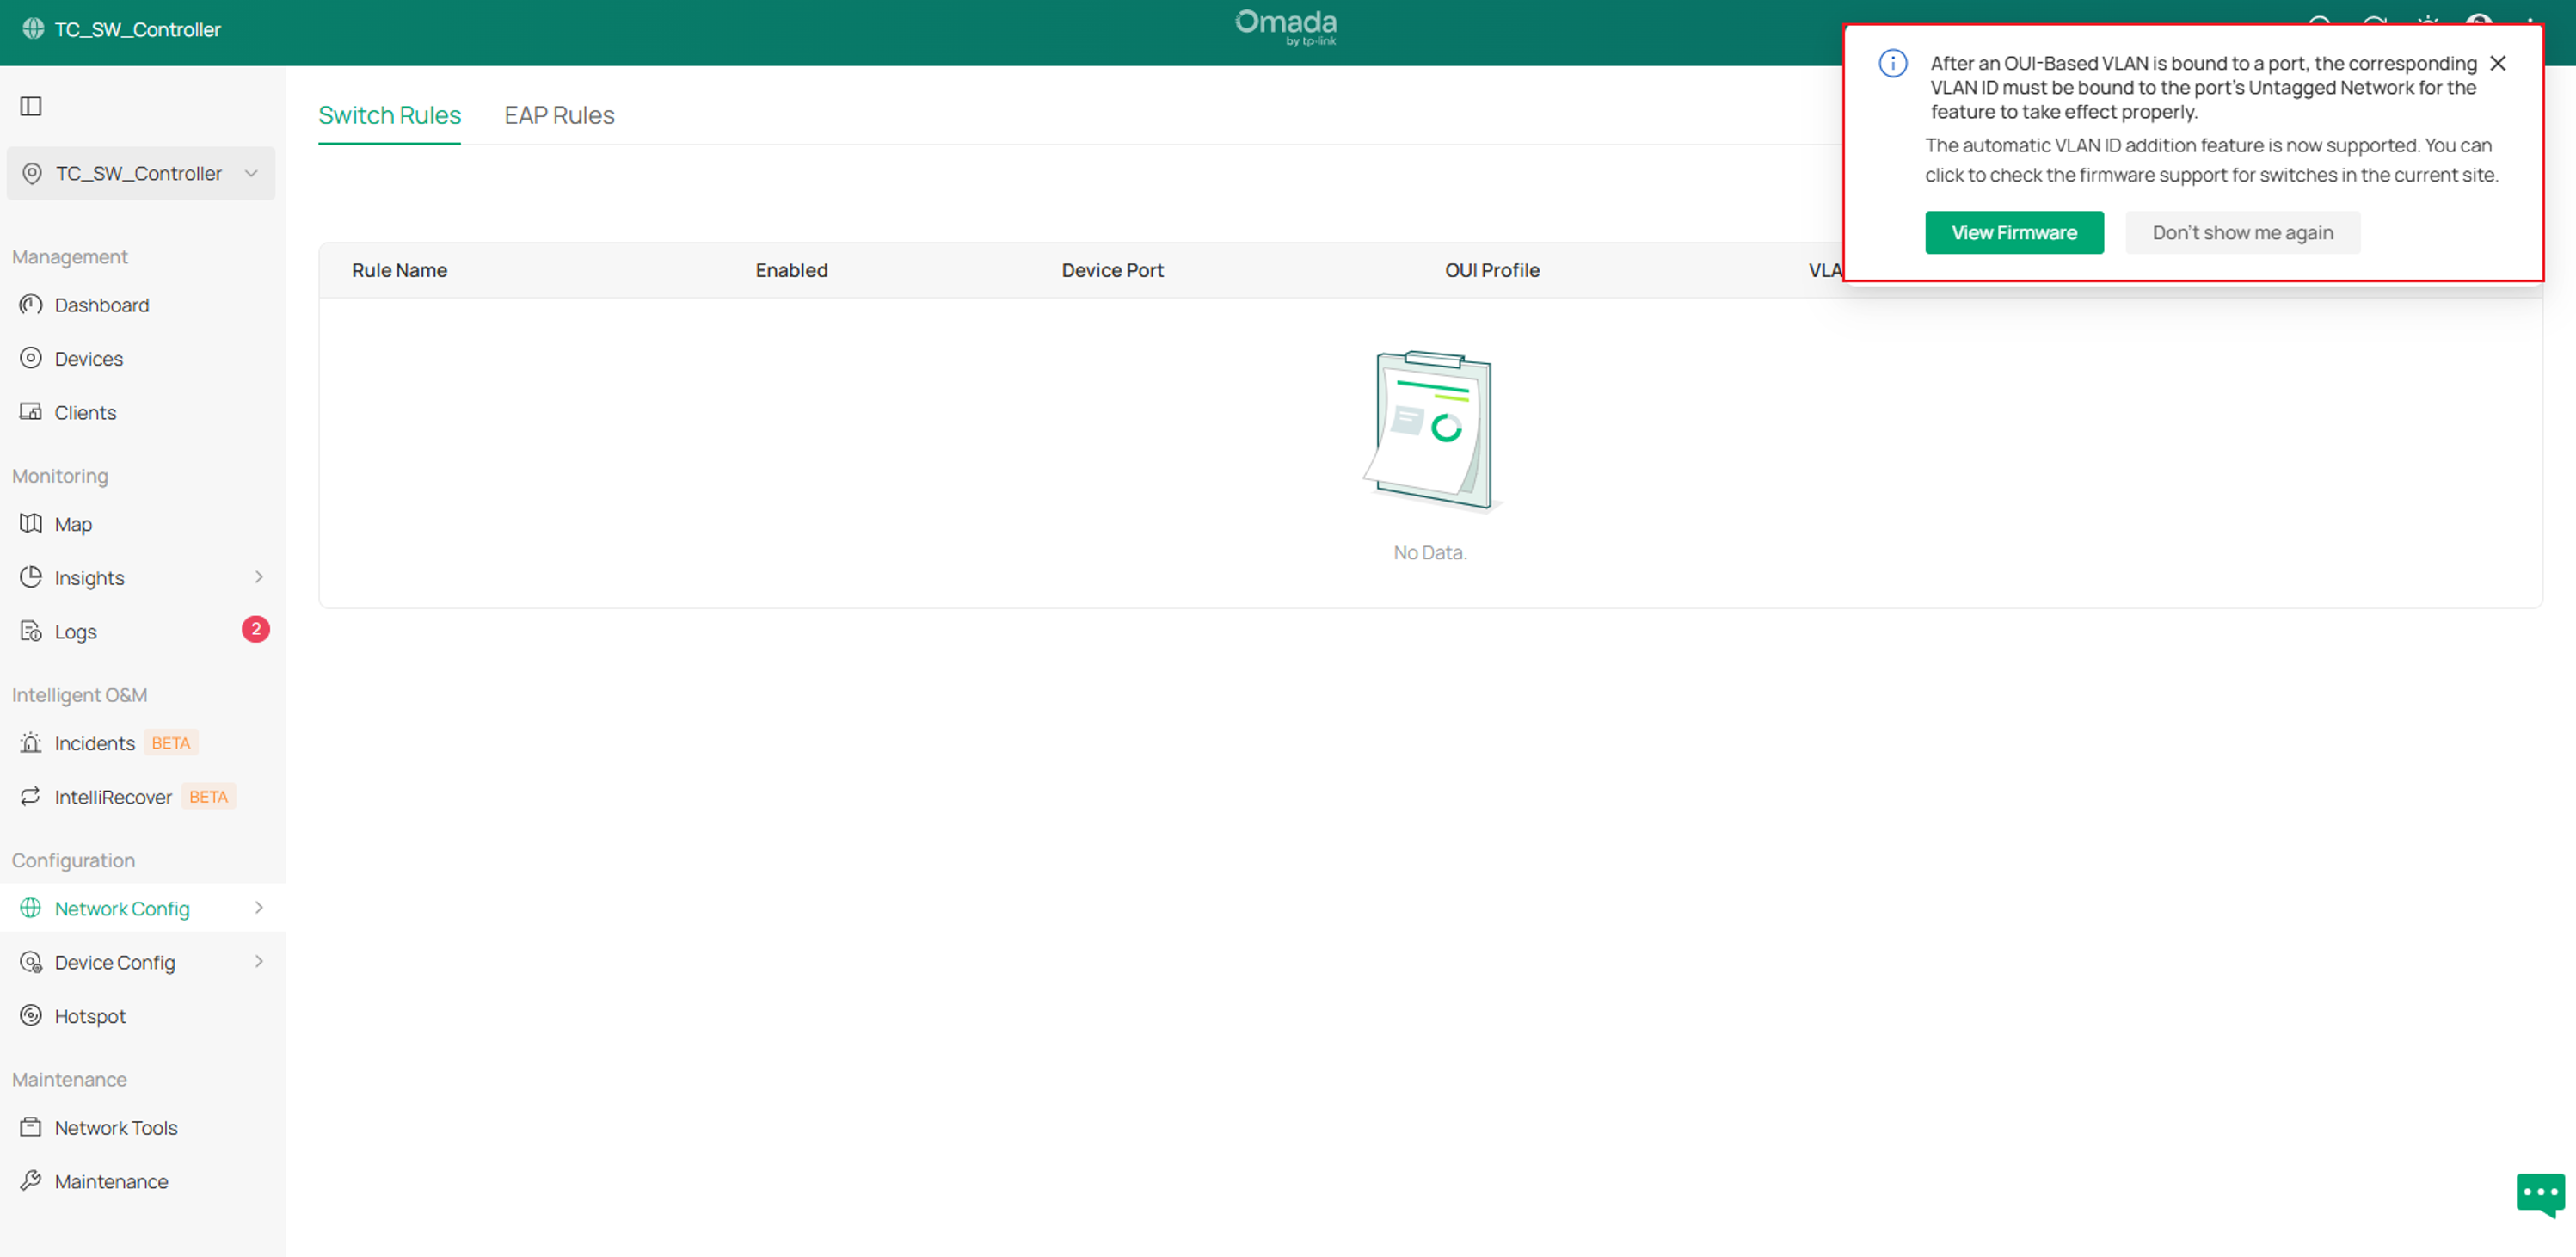
Note: Controller v6.3 introduces the Automatic VLAN ID Addition feature for OUI-Based VLAN.
1. If upgrading from an earlier Controller version to v6.3, you may see an Automatic VLAN ID Addition prompt, Click Apply Now to apply the feature to existing OUI-Based VLAN configurations.
2. If performing a new installation of Controller v6.3, no additional action is required, and the feature is applied automatically to newly created OUI-Based VLAN rules.
Existing Controller upgraded to v6.3:
New Controller v6.3 installation:
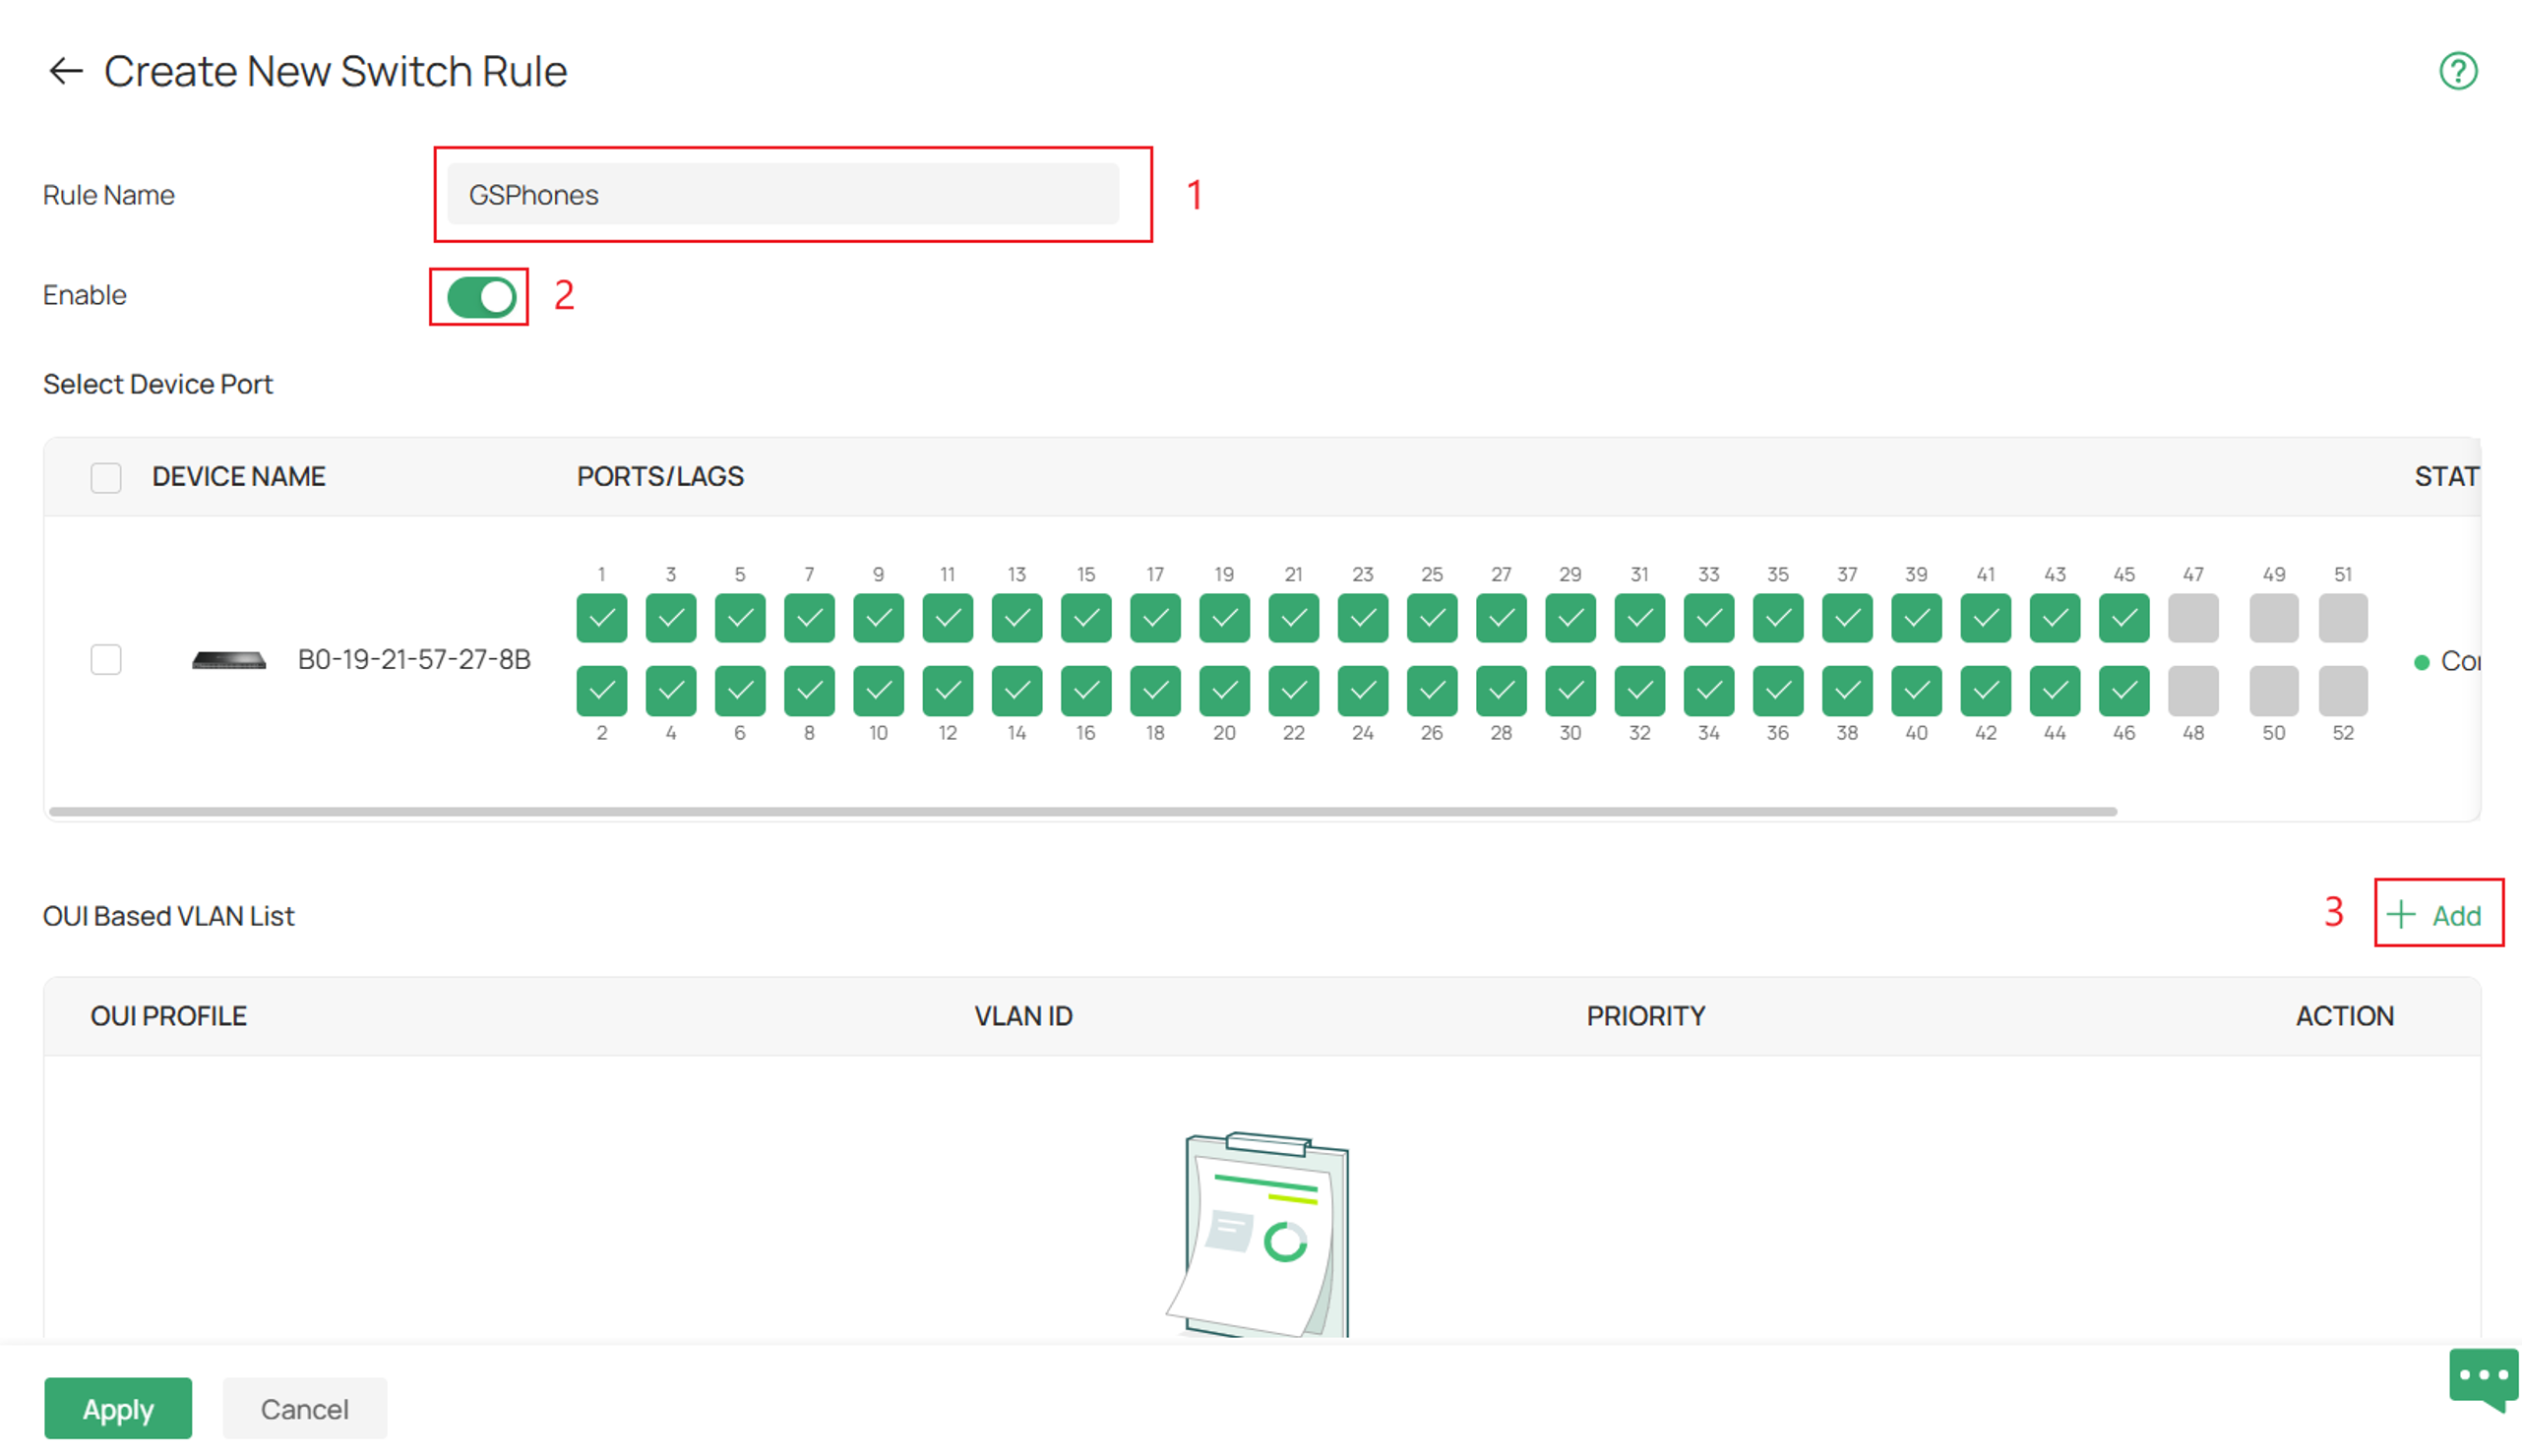
Step 8. Make a name for the rule in Rule Name.
Toggle the Enable switch to activate the rule.
Under Select Device Port, select the switch ports where the OUI-Based VLAN rule will be applied
Click Add.
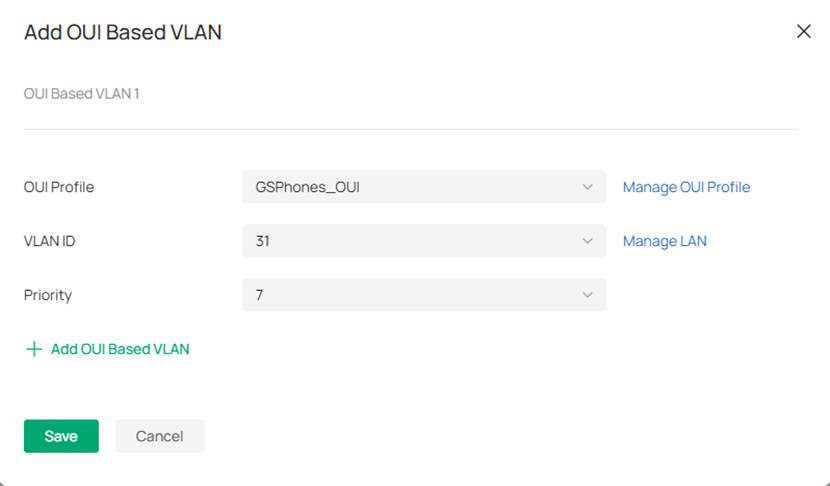
Step 9. Fill in the OUI entries
For OUI Profile select the group created. You can also click here to quickly navigate to the Manage OUI Profile page.
Under VLAN ID select the VLAN that they will be assigned to
Select the correct Priorty and the corresponding data packet will be marked with this priority for transmission
Click Save.
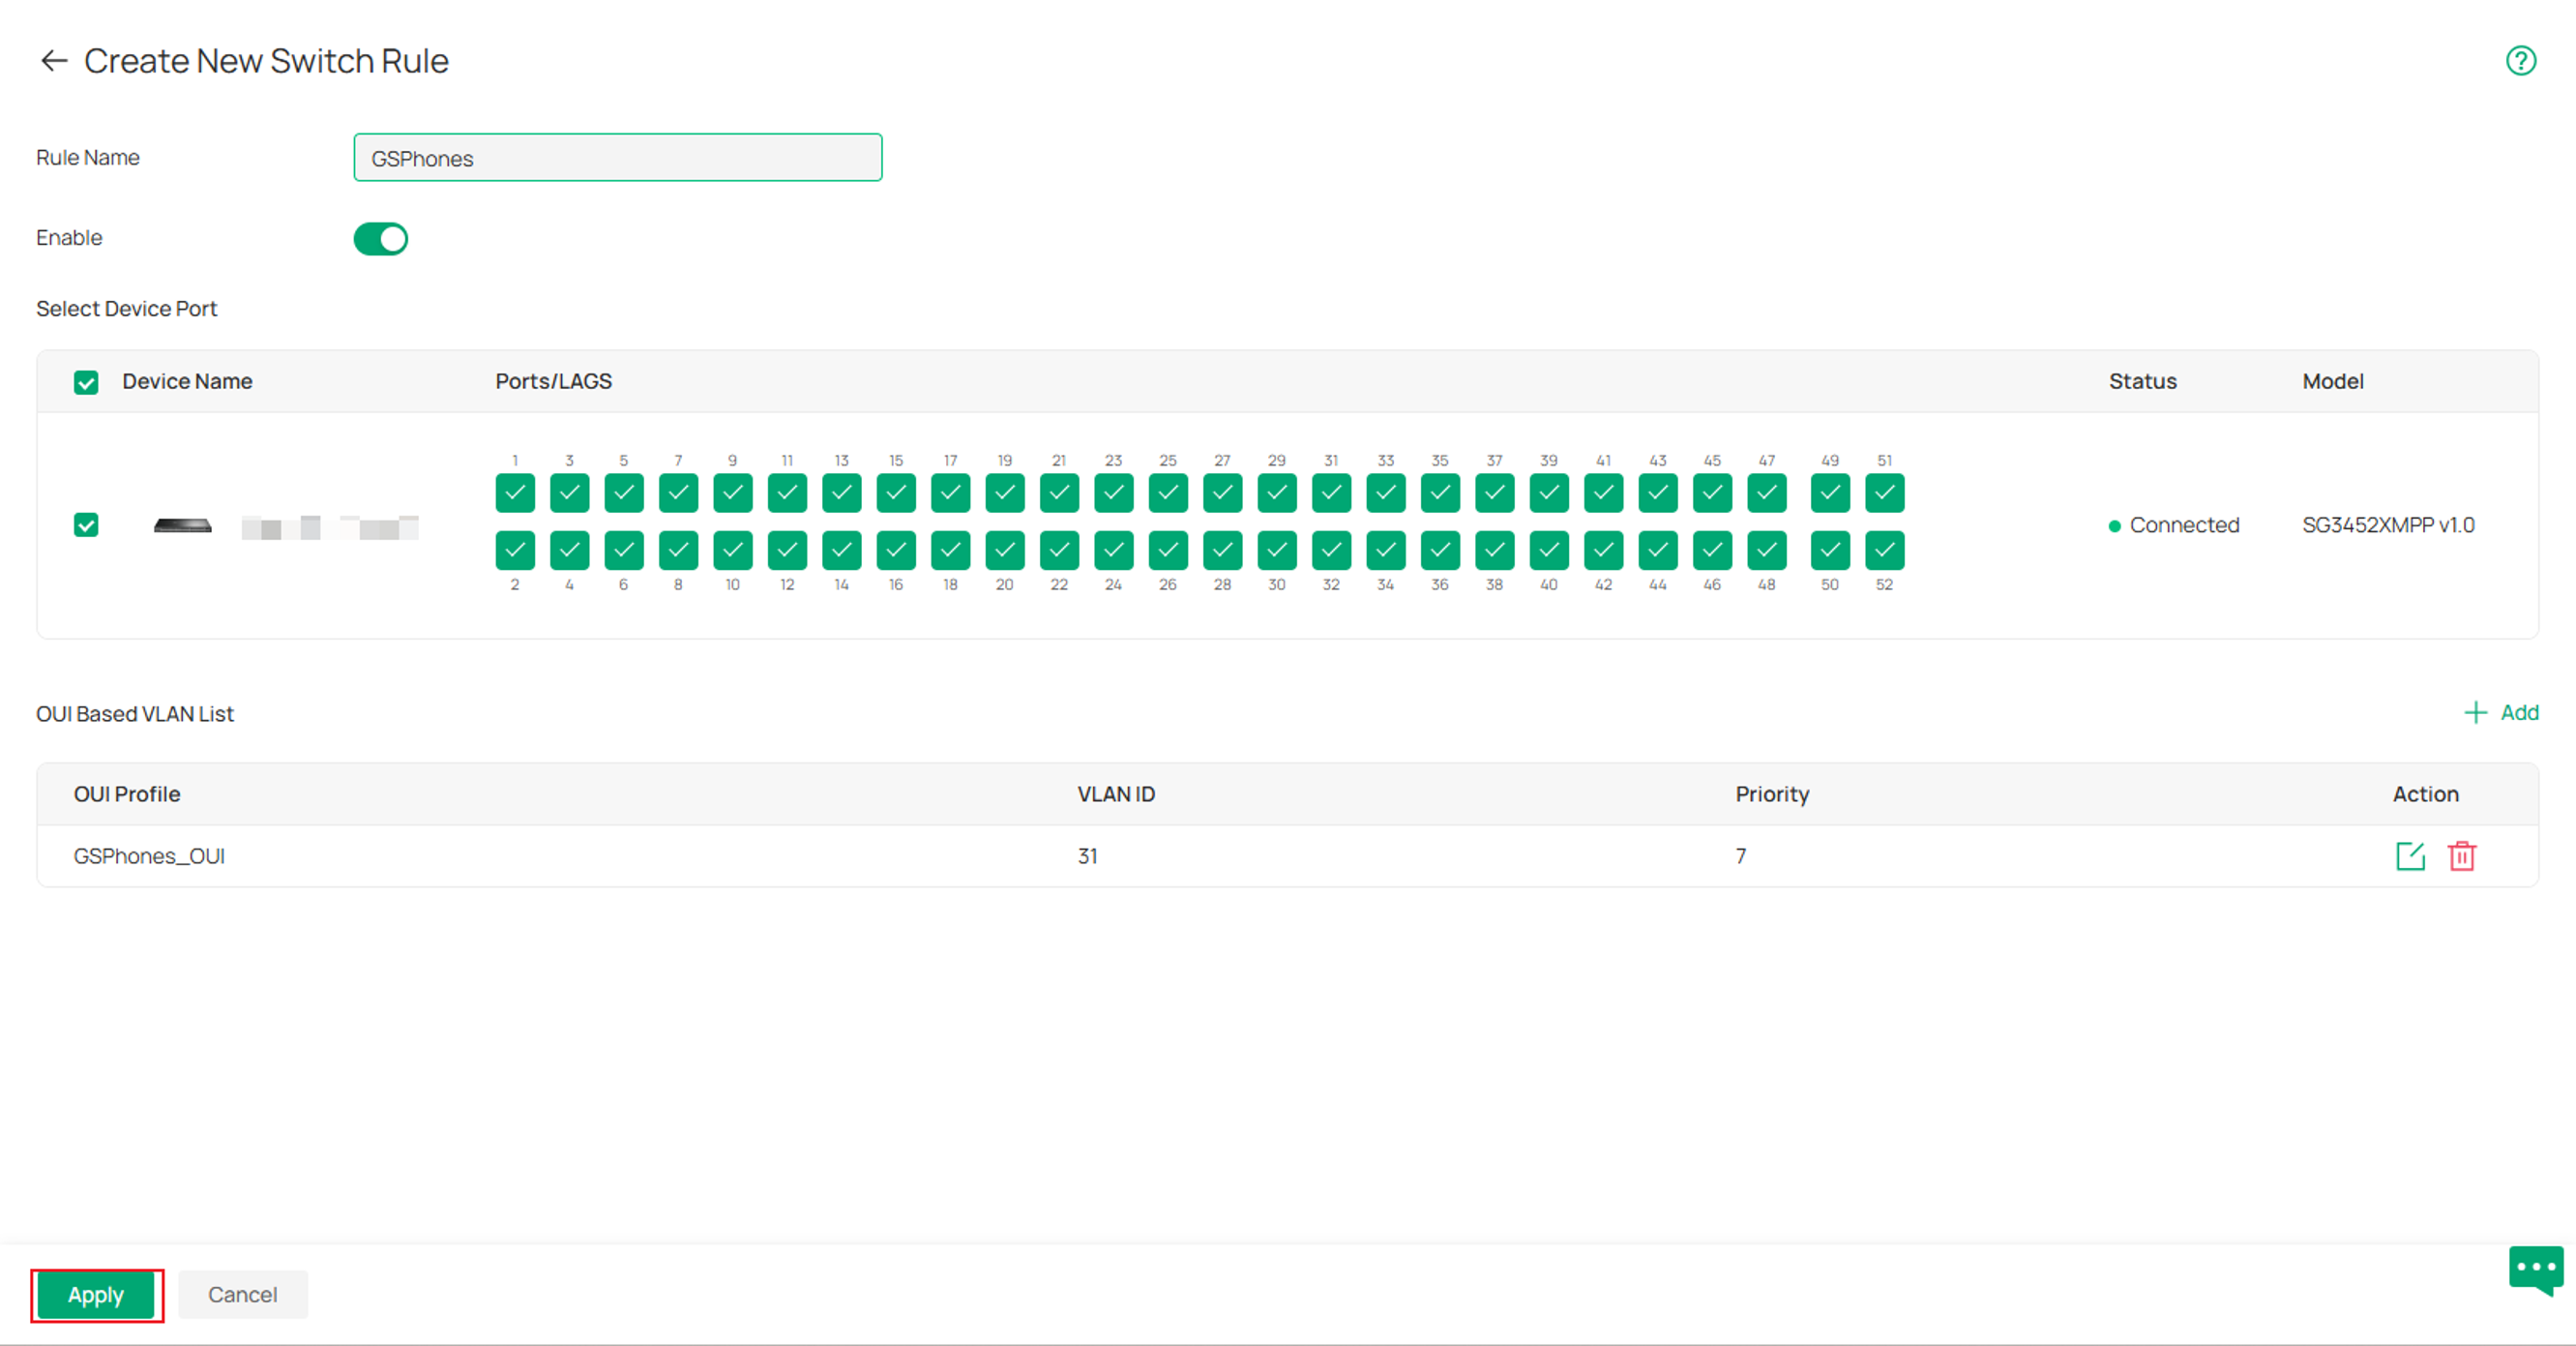
Step 10. Click Apply.
Step 11. To ensure the configured priority is applied to traffic on the OUI-Based VLAN, create a Switch QoS rule based on the configured VLAN ID.
For detailed instructions on configuring Switch QoS, refer to: How to Configure Switch QoS
Note: The Priority setting applies to the configured 802.1p priority to tagged traffic. On L2+ switches, configure a VLAN-based Switch QoS rule if the switch must perform local traffic scheduling based on that priority. Supported Gigabit ES switches do not require an additional Switch QoS rule.
Additional Notes
- If upgrading from an earlier Controller version to v6.3, Automatic VLAN ID Addition is disabled by default. Click Apply Now when prompted to enable Automatic VLAN ID Addition for existing OUI-Based VLAN configurations.
- For new Controller v6.3 installations, Automatic VLAN ID Addition is enabled by default.
- When Automatic VLAN ID Addition is enabled, binding an OUI-Based VLAN rule to an Access port automatically adds the corresponding VLAN to the port as an untagged network. If the VLAN is later removed from the port's Untagged Network, a confirmation dialog appears indicating that the associated OUI-Based VLAN rule will also be unbound from the port.
- When Automatic VLAN ID Addition is disabled, manually changing the OUI-Based VLAN from Untagged to Tagged behaves the same as in Controller versions prior to v6.3.
- If the target port is configured as a Trunk port when the OUI-Based VLAN rule is created, the corresponding VLAN is added to the port as a tagged network. OUI-Based VLAN does not automatically convert the VLAN to untagged. If an untagged VLAN is required, manually modify the port's VLAN settings.
Configuration for OUI-Based VLAN in CLI
Step 1. Create the VLAN on the global config
Vlan <ID>
Name <description>
See example below:
Vlan 31
Name GSPhones
Step 2 (optional). Specify the interface or interface range the VLAN will be added to as a tagged VLAN.
Note: This is primarily for switches that are running firmware that are not adapted to controller v6.2
Interface <interface-type> <port>
Switchport general allowed vlan <ID> tagged
See example below:
Interface range gigabitEthernet 1/0/1-8
Switchport general allowed vlan 31 tagged
Step 3. Configure OUI-Based VLAN on the global config.
oui-vlan <ID> mac-addr <MAC Address> mask <OUI Mask> vlan <VLAN ID> priority <Priority> desc <Description>
See example below:
oui-vlan 1 mac-addr EC:74:D7:00:00:00 mask FF:FF:FF:00:00:00 vlan 31 priority 7 desc GSPhones
Apply entry under the port configuration:
interface range gigabitEthernet 1/0/1-8
oui-vlan entry 1
Removal Command:
no oui-vlan entry 1
Verification
CLI Confirmation:
show voice-vlan

Conclusion
OUI-Based VLAN simplifies VoIP deployments by automatically identifying IP Phones based on their MAC address OUI and assigning them to a designated Voice VLAN. This helps reduce manual configuration while ensuring voice traffic receives proper prioritization across the network.
To learn more about each function and configuration, please visit Support Home to download or check the manual for your product.
QA
Q1: Can multiple OUI entries be assigned to the same Voice VLAN?
A1: Yes. Multiple OUI entries from different IP Phone manufacturers can be added to an OUI Profile Group and assigned to the same Voice VLAN.
Q2: What happens if it won't let me configure the voice VLAN ID?
A2: Check and see if that VLAN is created on that switch and tagged on the desired ports
