


How to Configure WireGuard VPN on Omada Gateway


Contents
Configuration for Site-to-Site WireGuard VPN via the web interface in standalone mode
Configuration for Client-to-Site WireGuard VPN via the web interface in standalone mode
Configuration of Site-to-Site WireGuard VPN via Omada Controller
Configuration of Client-to-Site WireGuard VPN via Omada Controller
Introduction
WireGuard VPN can establish a digital connection between a computer and a remote server owned by the VPN provider, creating a point-to-point tunnel that encrypts personal data, masks IP addresses, and allows you to circumvent website blocks and firewalls on the Internet. Using WireGuard VPN, you will have a private, protected, and secure network experience. As a new type of VPN protocol, WireGuard VPN runs at the kernel layer and provides an efficient, secure, simple, and modern VPN solution. WireGuard VPN uses strong encryption technology to ensure data security and provides fast transmission. With all these, WireGuard VPN offers many advantages compared to traditional VPN protocols, including efficient encryption and authentication mechanisms, lightweight protocol design, easy-to-use configuration and management, and fast transmission speeds.
Requirements
- Omada Gateway
- Omada VPN Client
Configuration
Configuration for Site-to-Site WireGuard VPN via the web interface in standalone mode
WireGuard VPN can be used in site-to-site scenarios between two routers and is suitable for scenarios such as mutual access between devices in the LAN at both ends of the router. Follow the steps below:
Step 1. Configure the WireGuard Server.
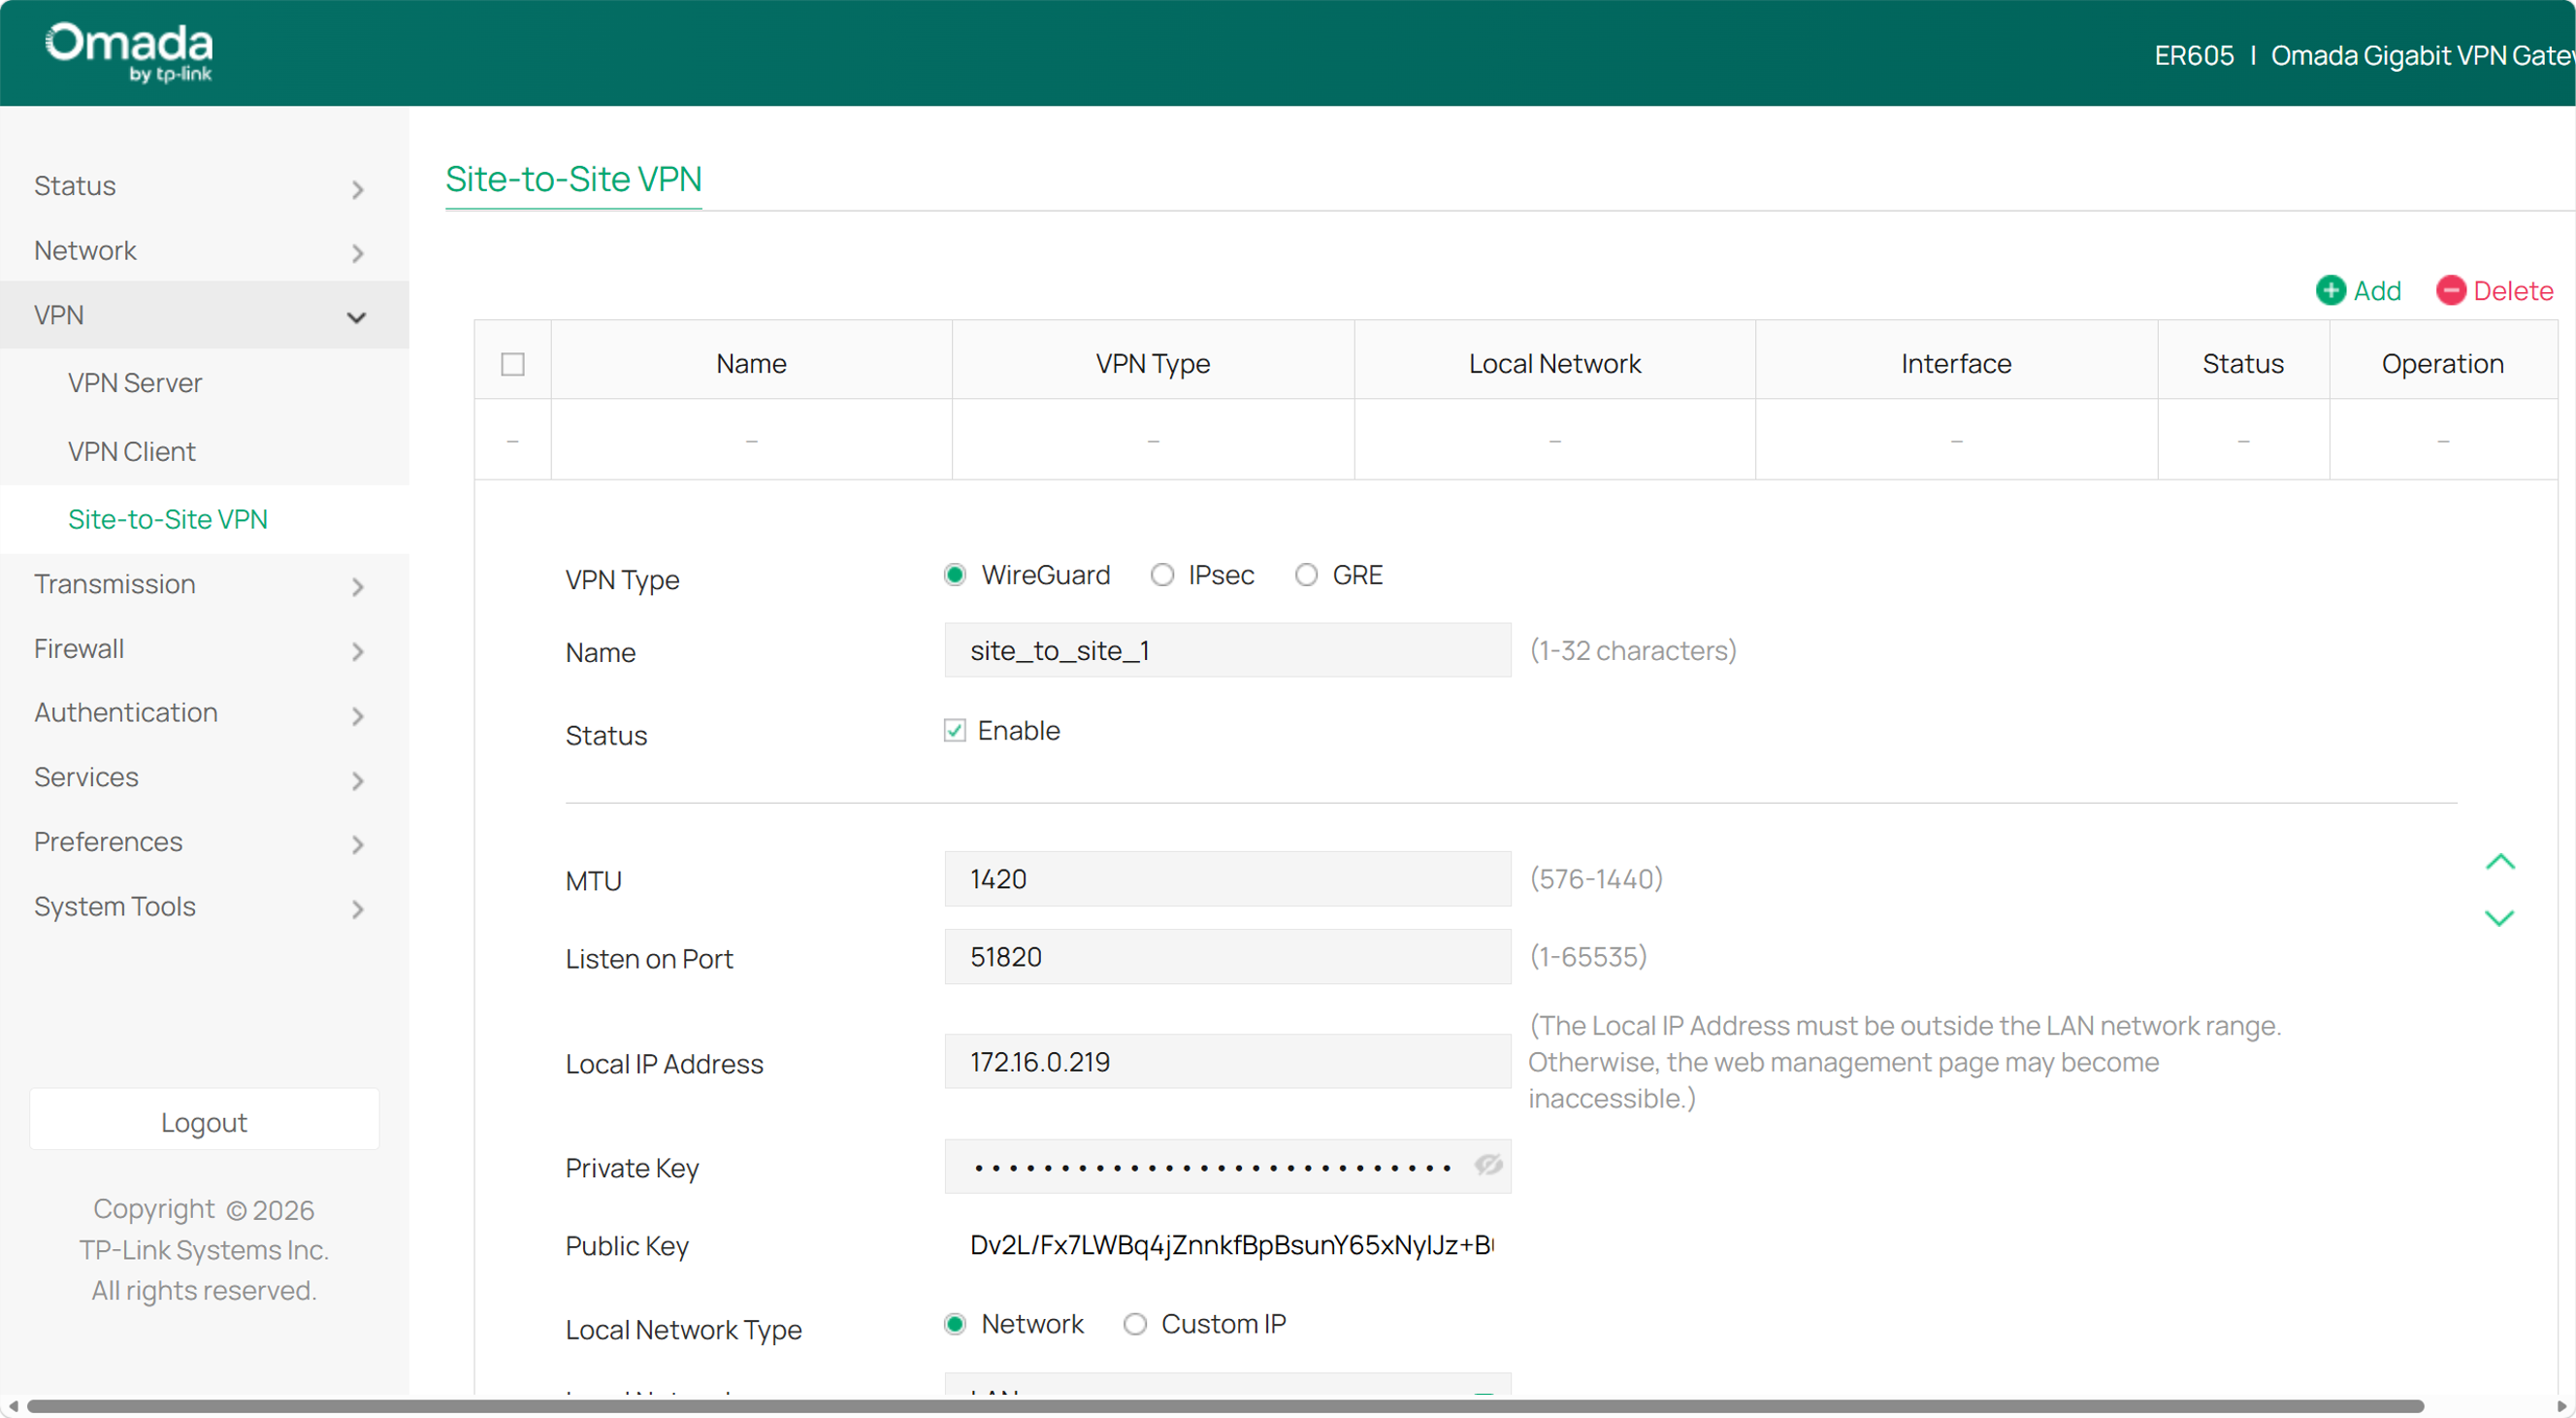
Go to VPN > Site-to-site VPN, and click Add on the right side to configure a WireGuard interface. Specify the Name, and leave MTU and Listen Port as default if there is no special requirement, so do Private Key and Public Key. Fill in the virtual IP of the WireGuard interface in the Local IP Address, which should be an unoccupied IP or an IP outside the LAN segment. Then click OK and copy the Public Key.
Step 2. Configure the WireGuard Client
The WireGuard interface configuration on the client is the same as on the server. Refer to Step 1.
Step 3. Configure the Server Peer
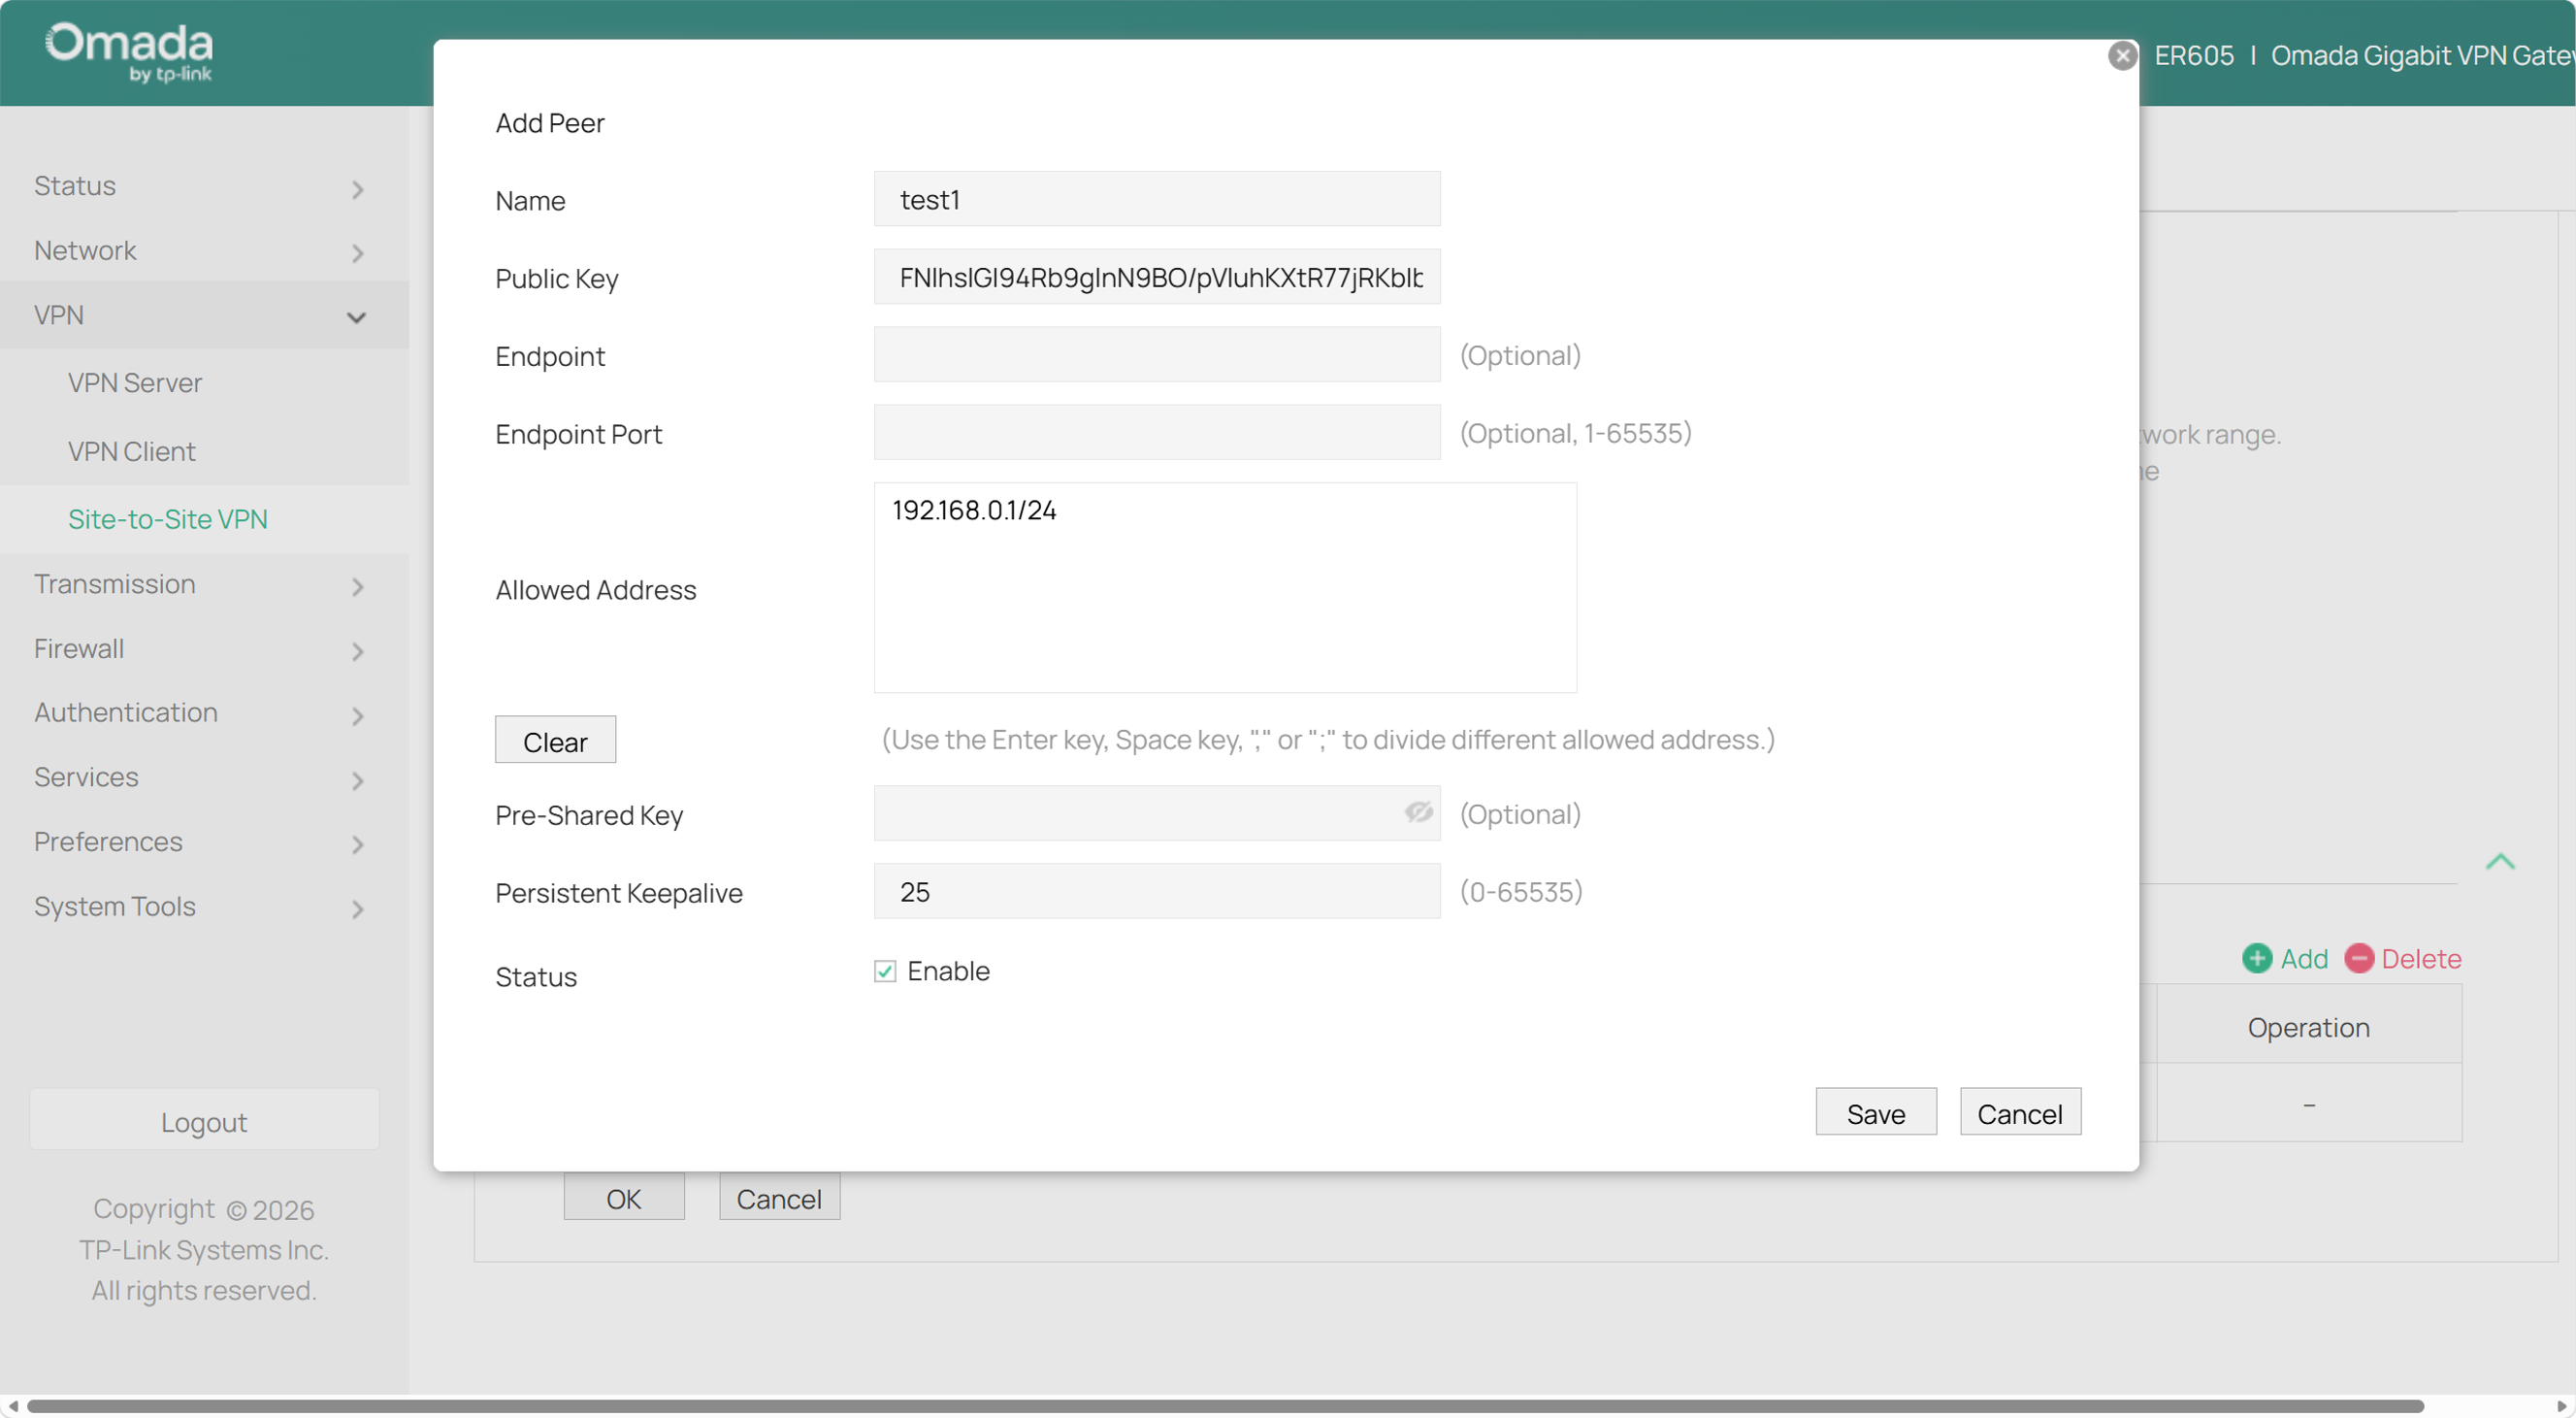
On VPN server side, go to VPN > Site-to-Site VPN, click Edit to modify the WireGuard interface created in Step 1, and then, in the Peers section of the edit page, click Add to create a new peer fill in the Public Key of the WireGuard interface on the client in Public Key; leave Endpoint and Endpoint Port as blank; fill in the network segment that needs VPN communication, that is, the LAN segment on the client in Allowed Address. Click Save. Then click OK to finish.
Step 4. Configure the Client Peer
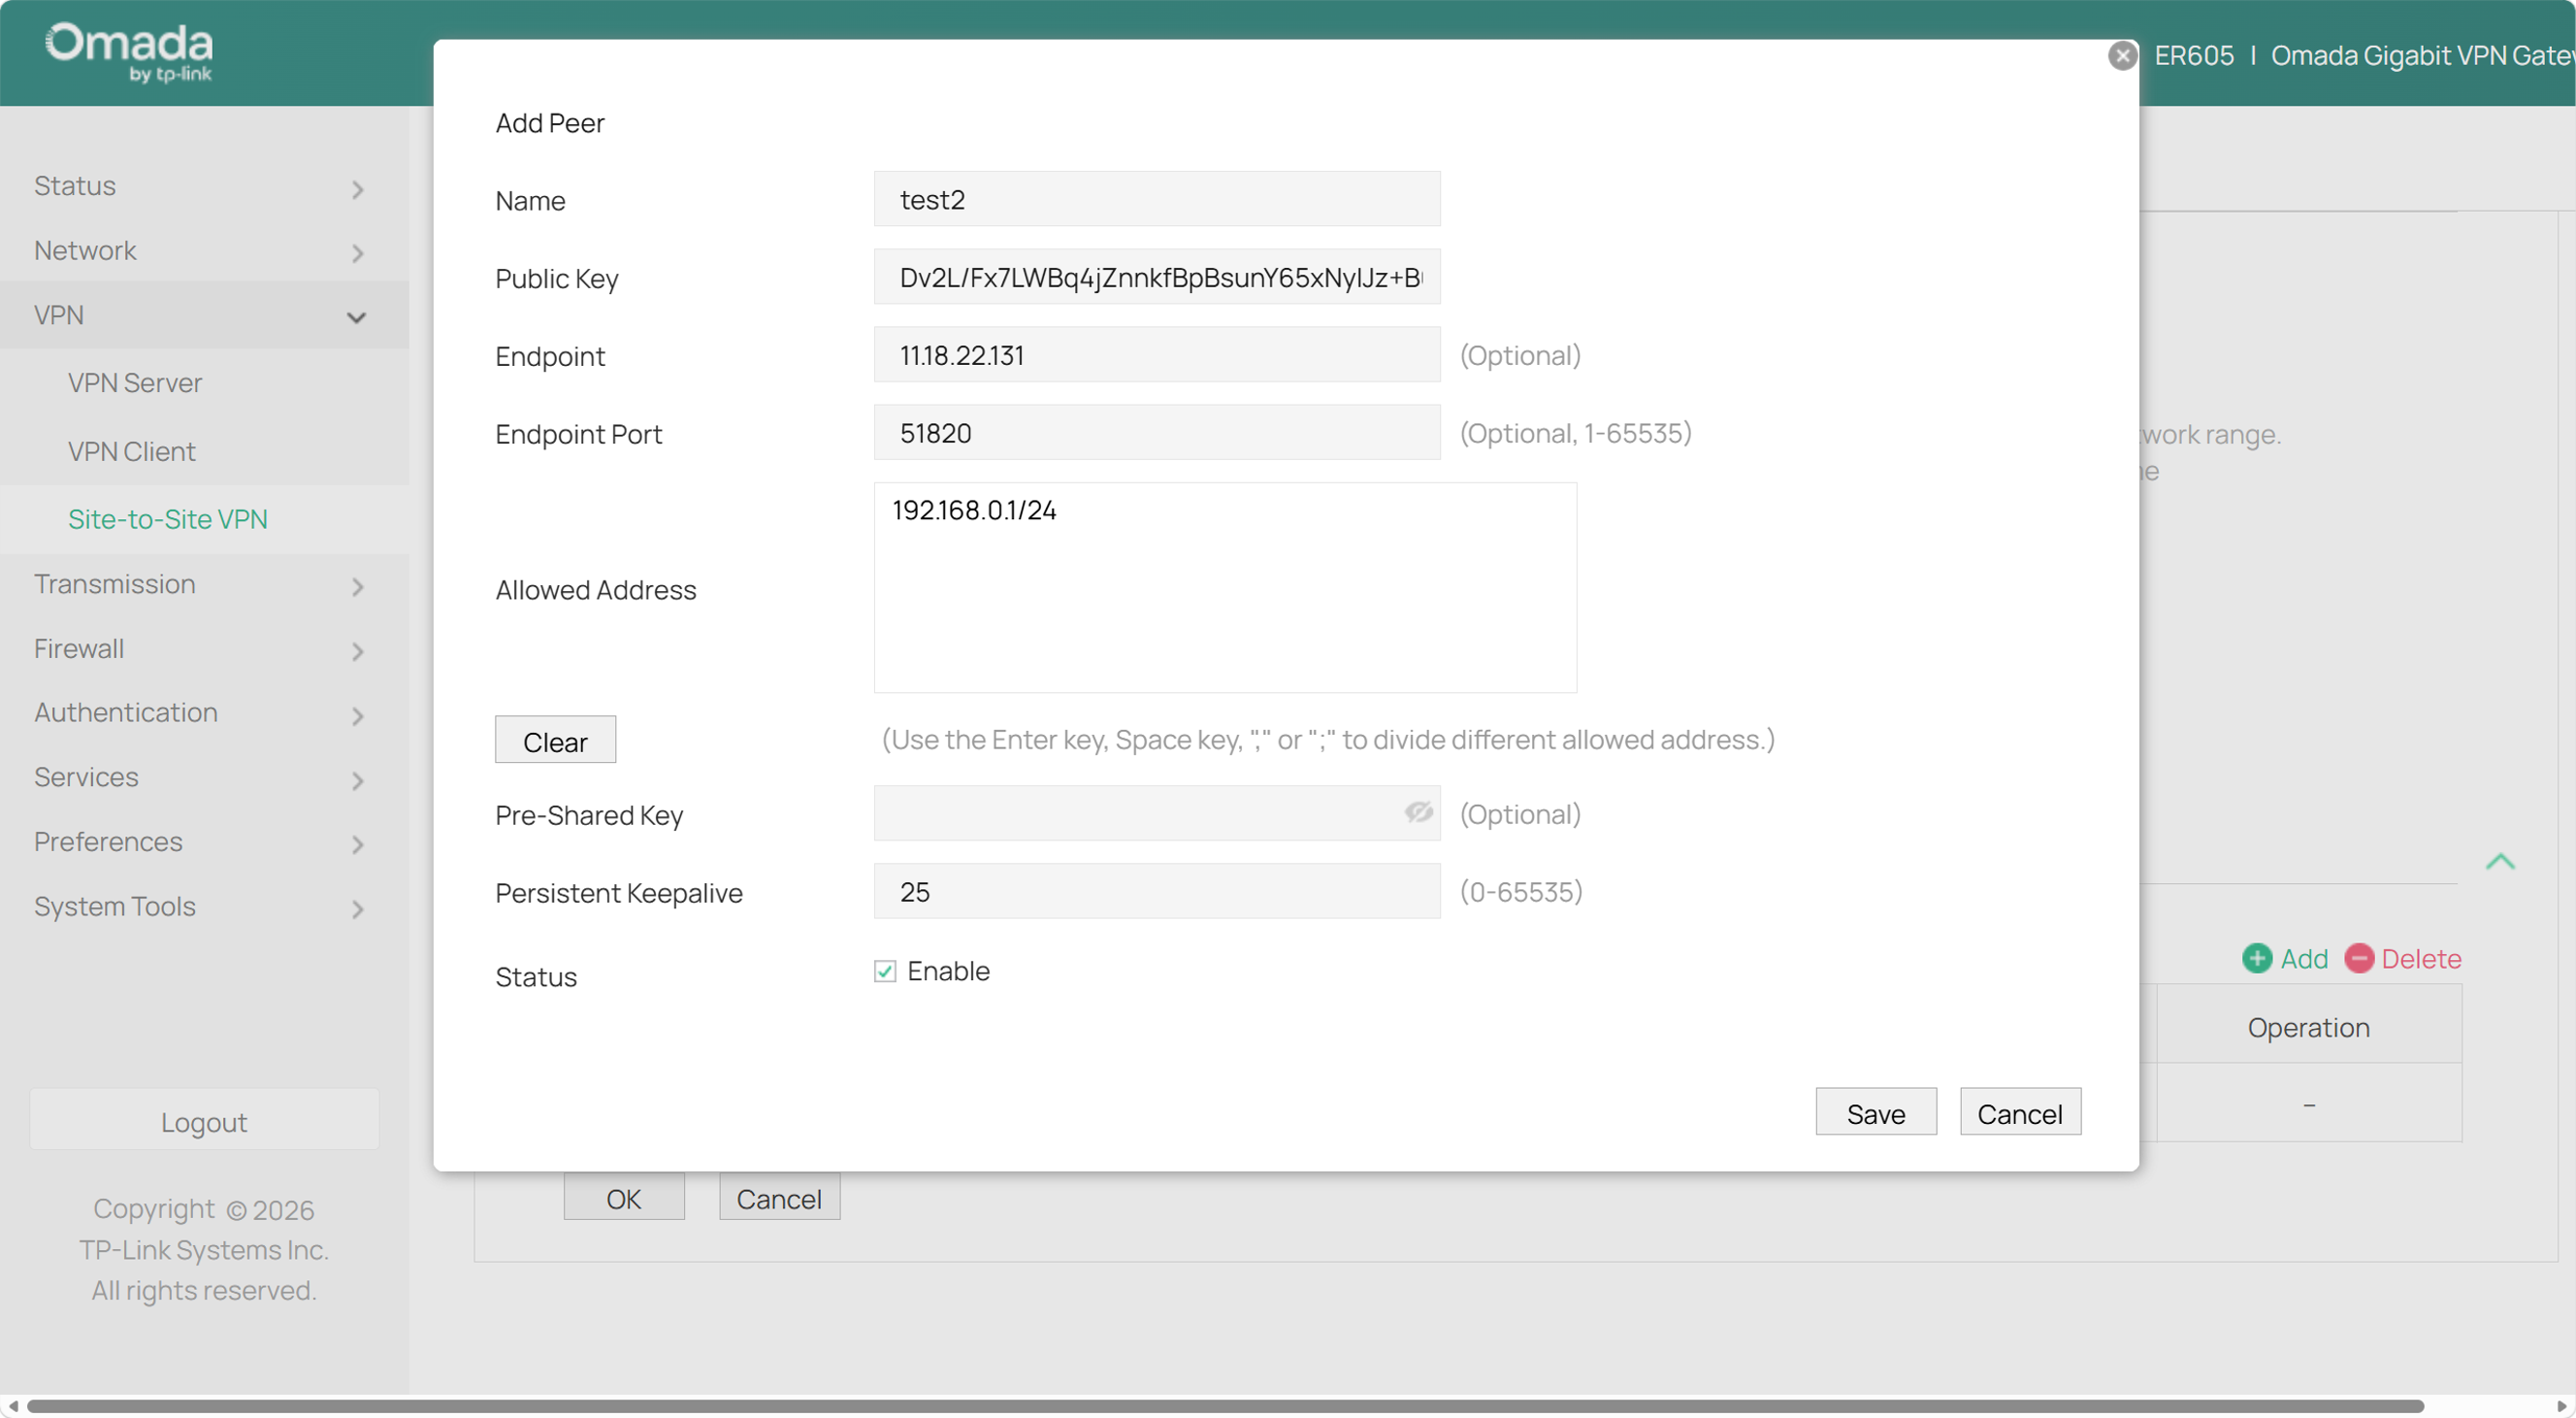
Compared with the server peer configuration in Step 3, the client peer configuration is slightly different: for Public Key, fill in the Public Key of the WireGuard interface on the server; for Endpoint and Endpoint Port, fill in the WAN IP of the peer router and the WireGuard interface port (the default is 51820). In the site-to-site scenario, if the WANs of both routers use public IP addresses, then the Endpoint and Endpoint Port are needed for only one end; that is, one end needs to initiate the connection actively. Please note that if one router is located behind NAT, that router shall serve as the Client.
Configuration for Client-to-Site WireGuard VPN via the web interface in standalone mode
WireGuard VPN can also be used in client-to-site scenarios between clients and routers. It is suitable for business travelers or temporary staff working remotely from the headquarters via mobile phones or computers. Taking the Omada VPN client as an example, you can follow the steps below to configure the Client-to-Site WireGuard VPN.
Step 1. Configure the WireGuard Server.
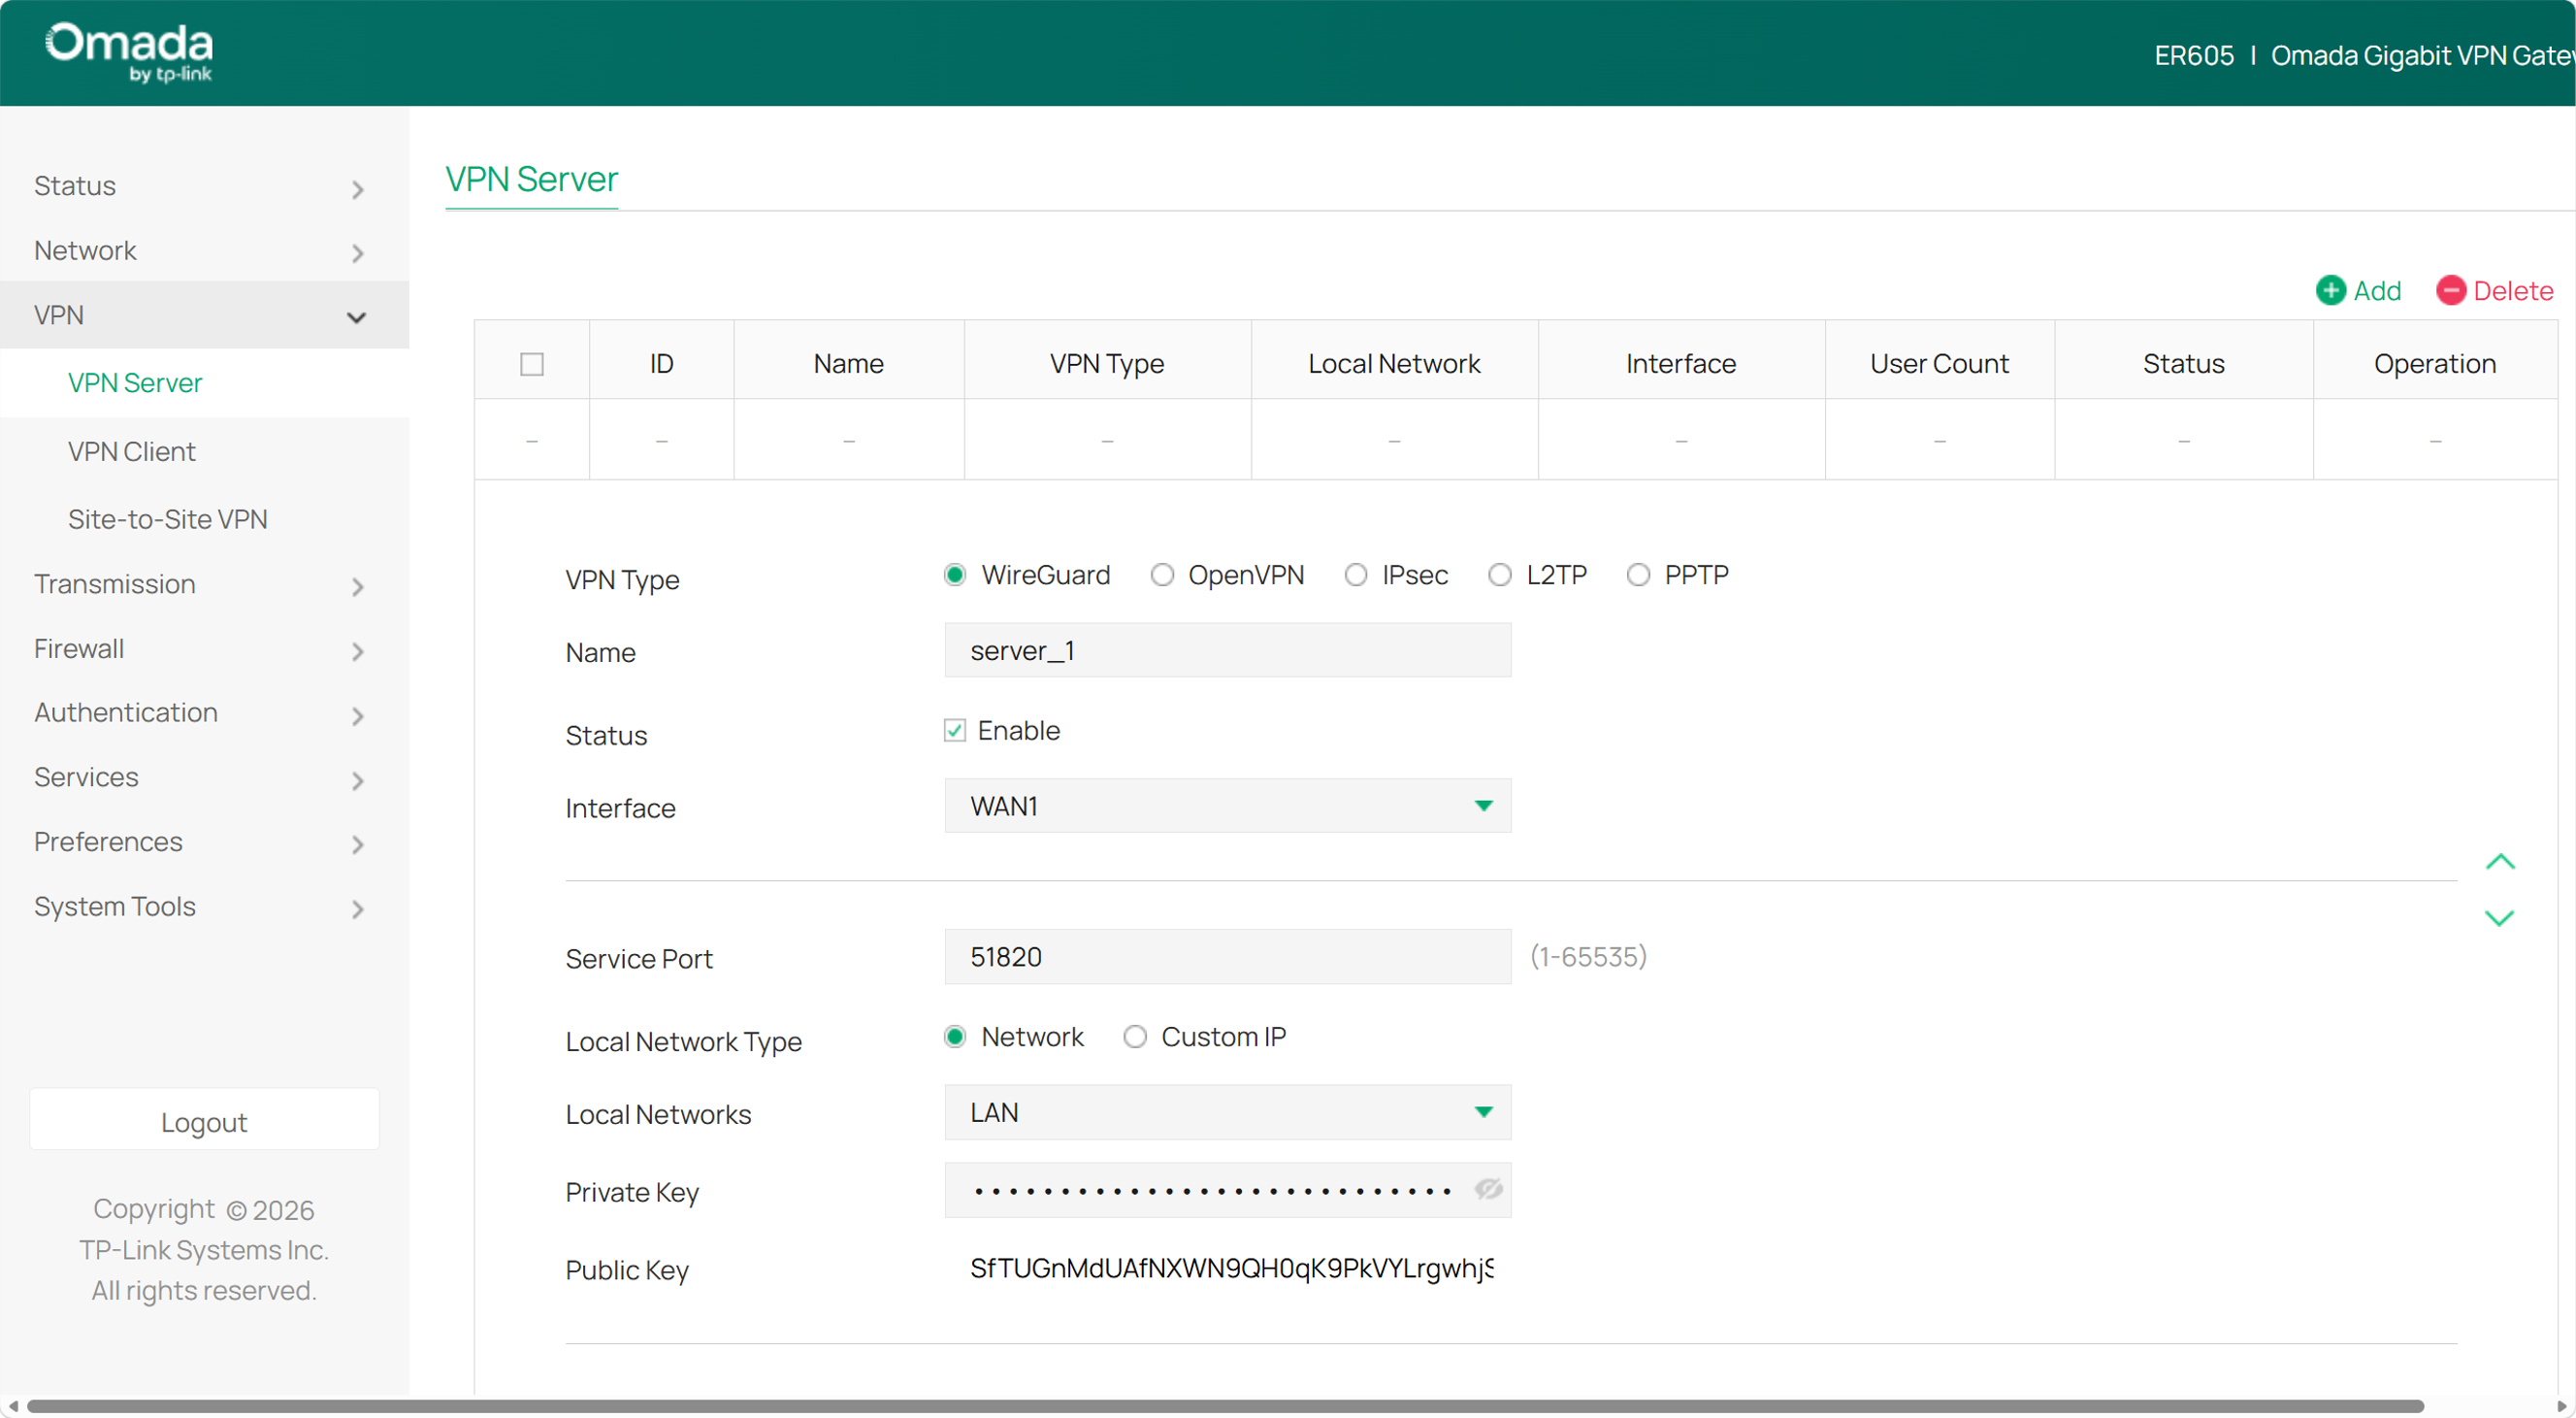
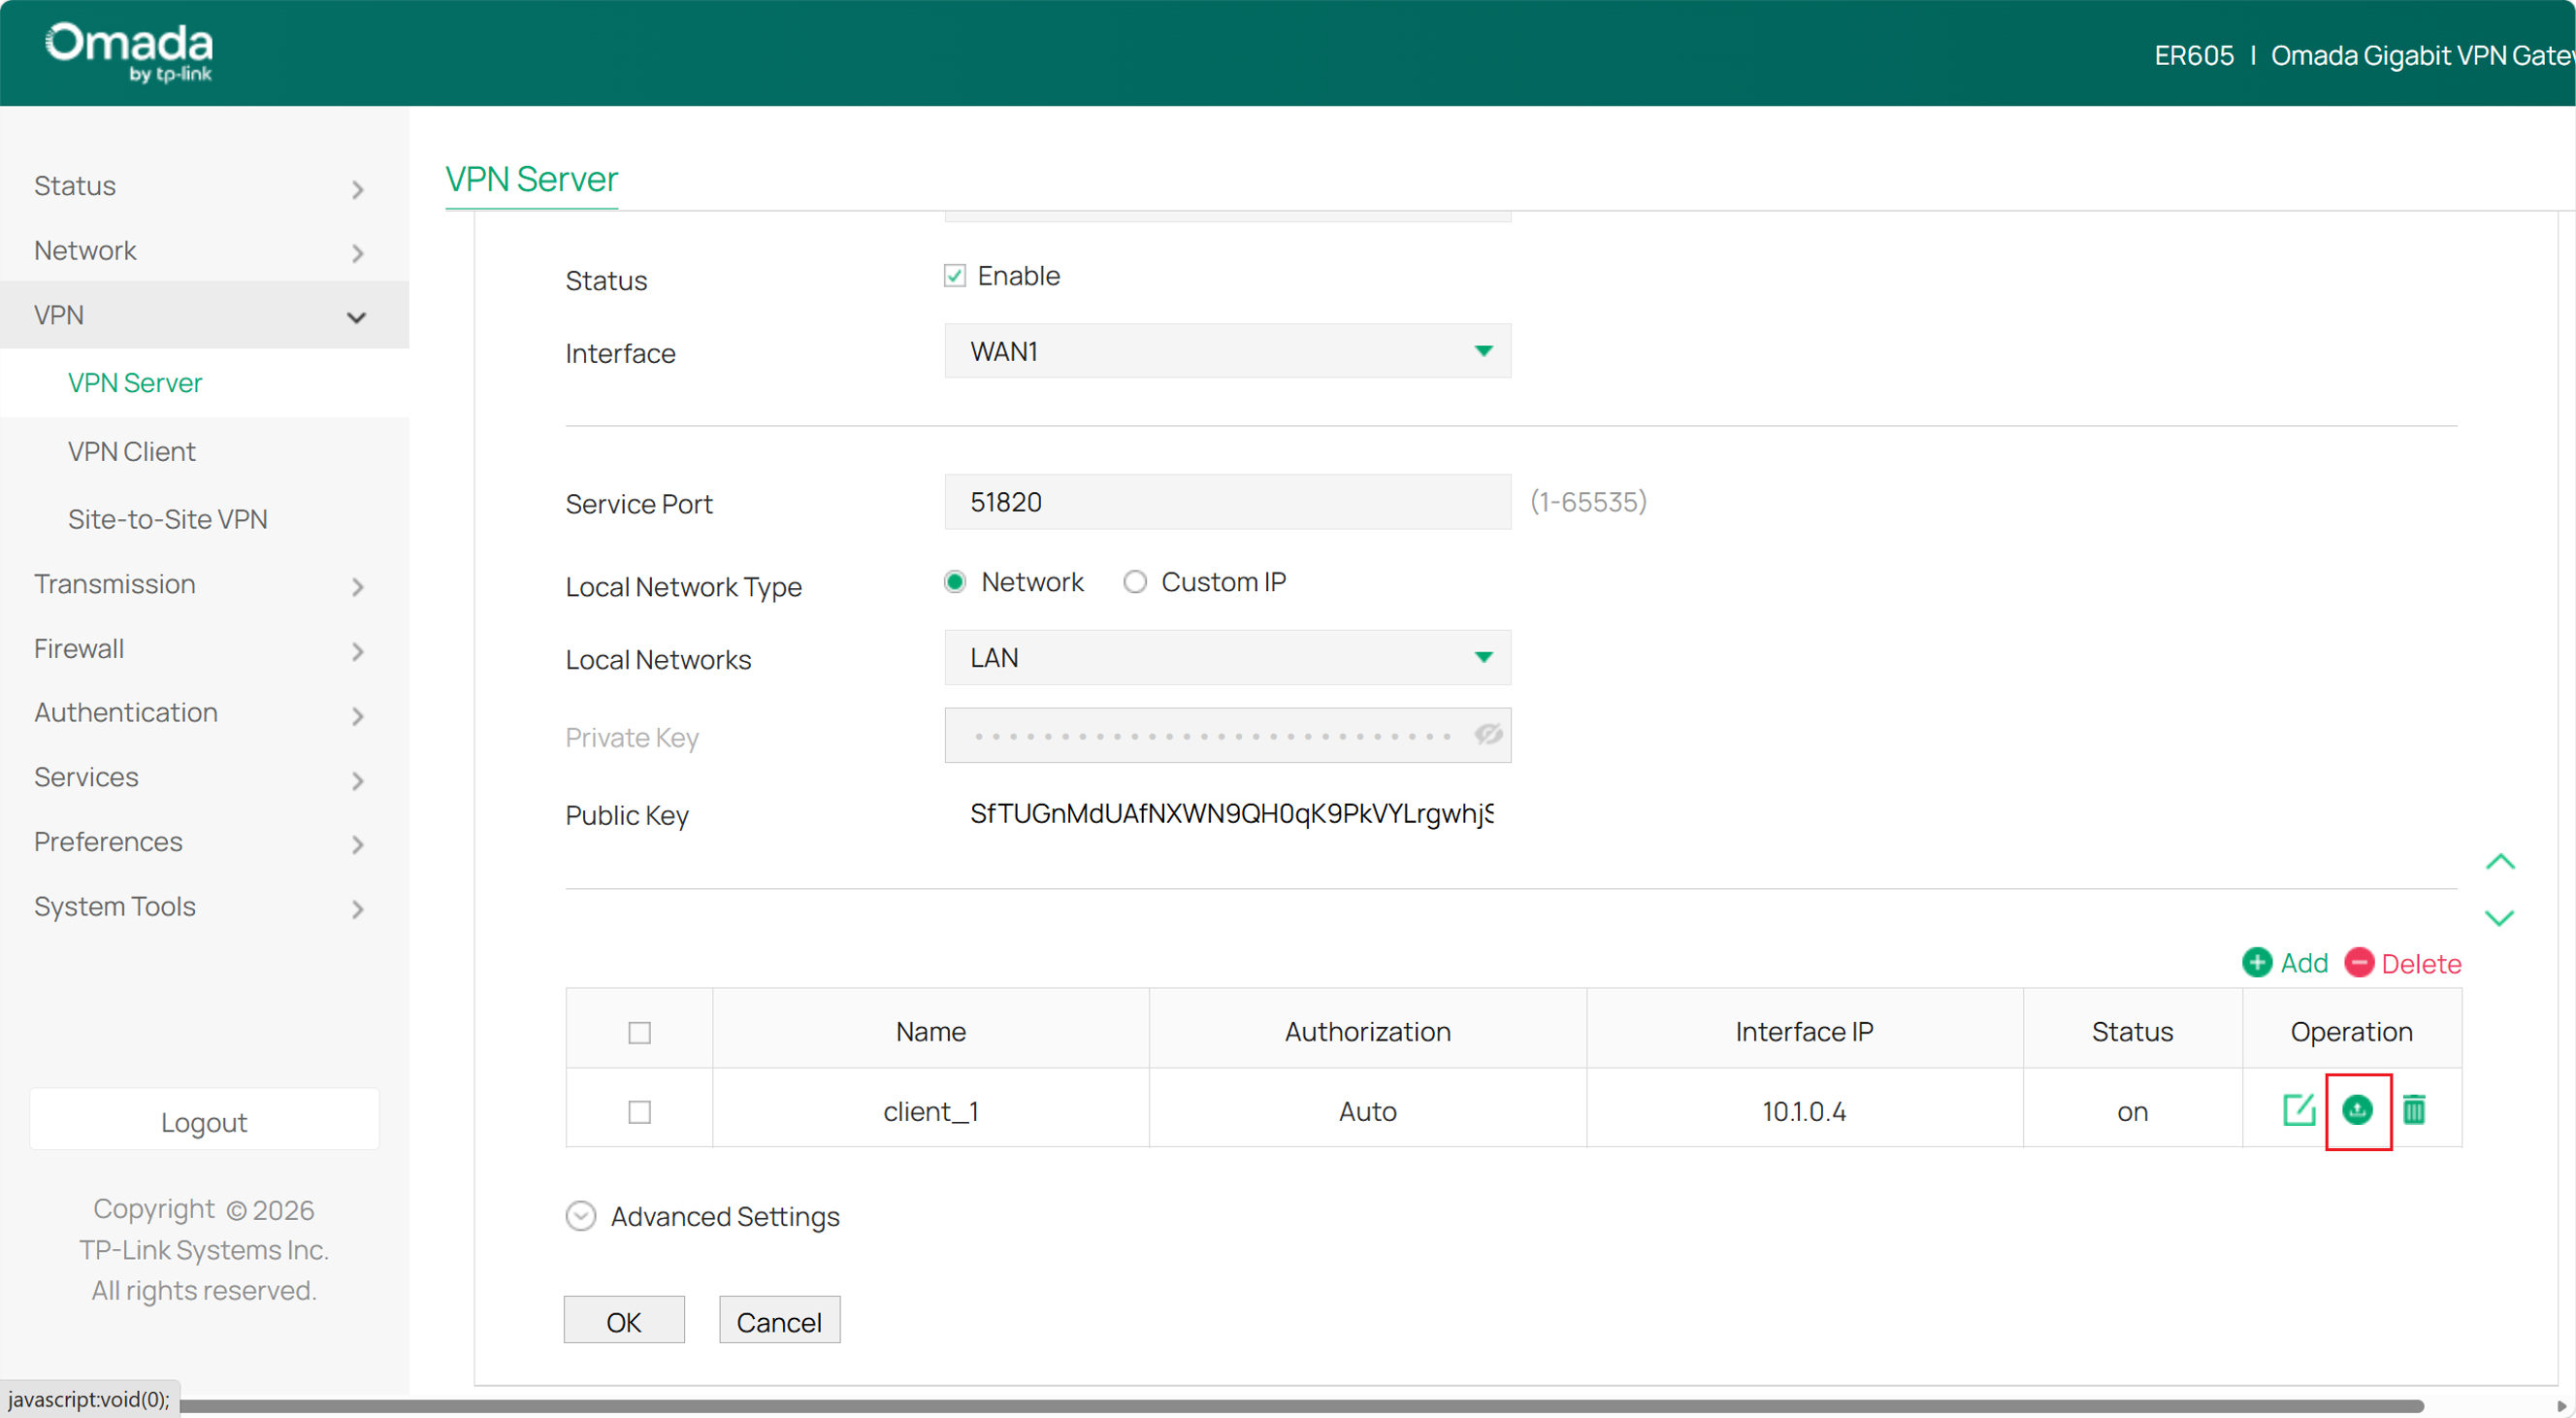
Go to VPN > VPN server, and click Add to configure a WireGuard interface. Specify the Name and interface. Leave Private Key and Public Key as default if there is no special requirement. Fill in the virtual IP of the WireGuard interface in IP Pool under Advanced settings, which should be an unoccupied IP or an IP outside the LAN segment. Then click OK to save.
Step 2. Obtain Client Configuration file.
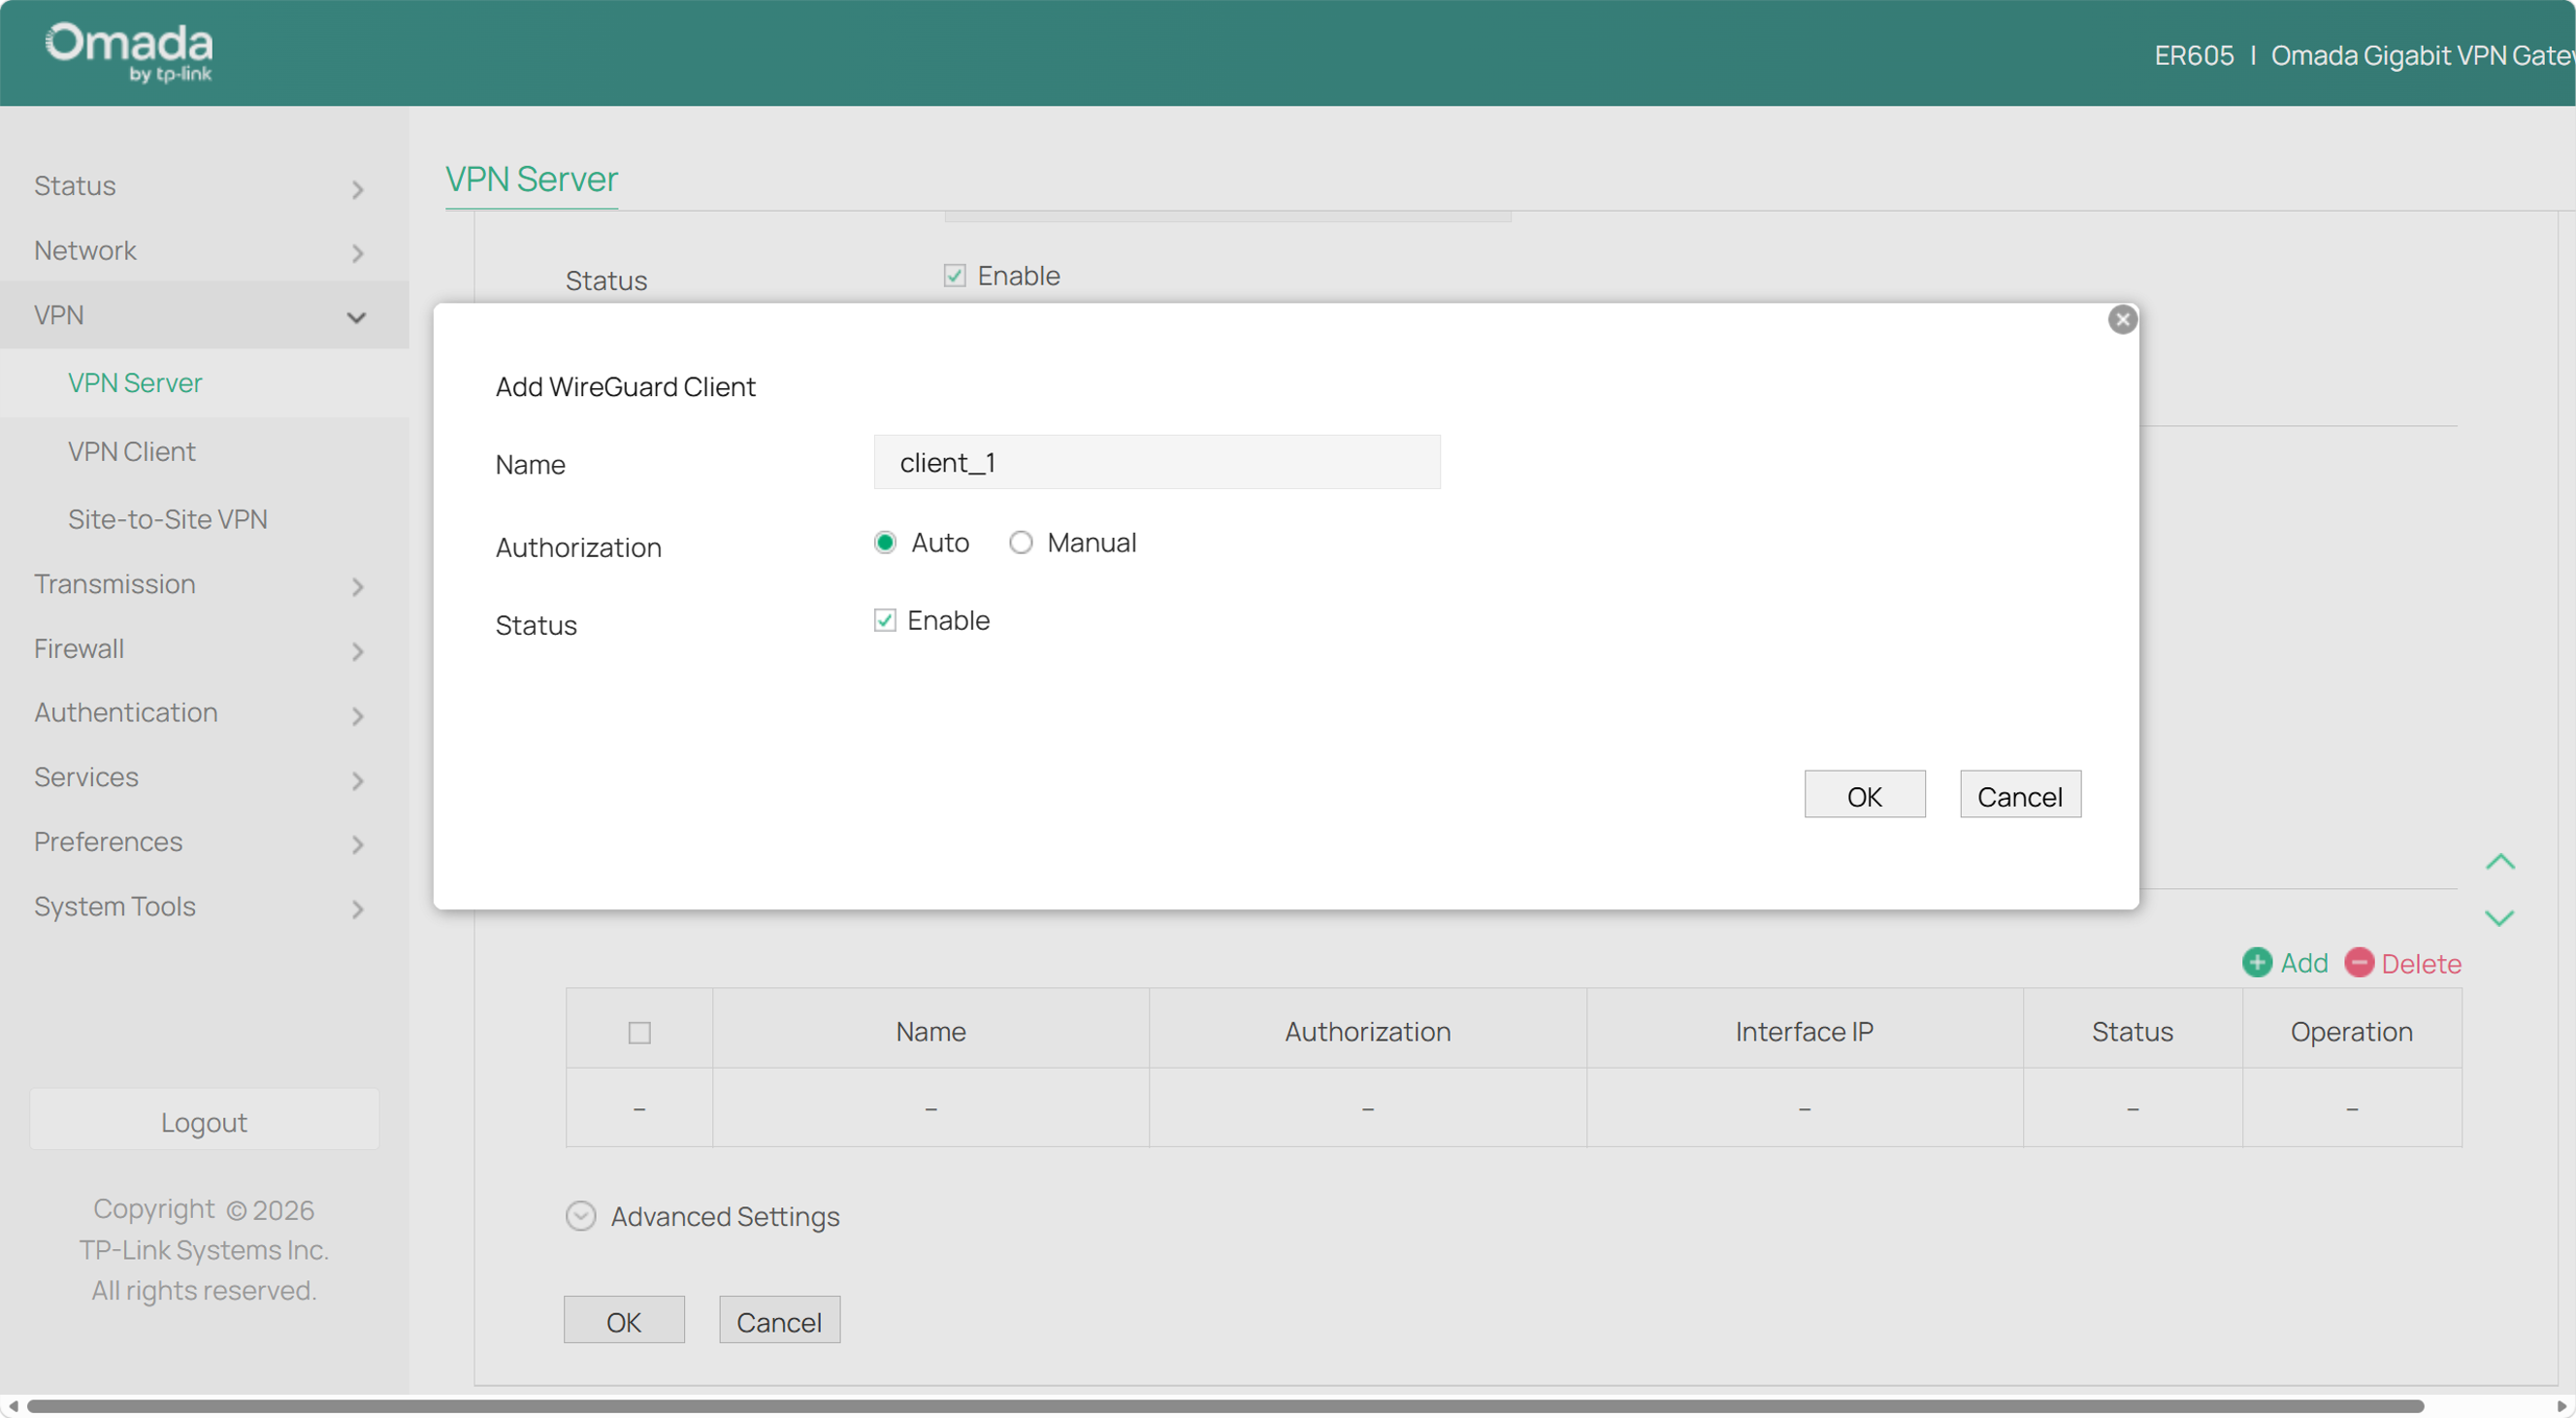
Go to VPN > VPN Server, edit the VPN server we just created, scroll down and click +Add Client to start peer configuration. Then you will be able to add a set of WireGuard client configuration file. Switch Authorization to Manual if you need to modify certain parameters. Click export button in operations when you have finished. Then you will get a file telling you what to configuration on your WireGuard client side.
Step 3. Configure the Omada VPN Client.
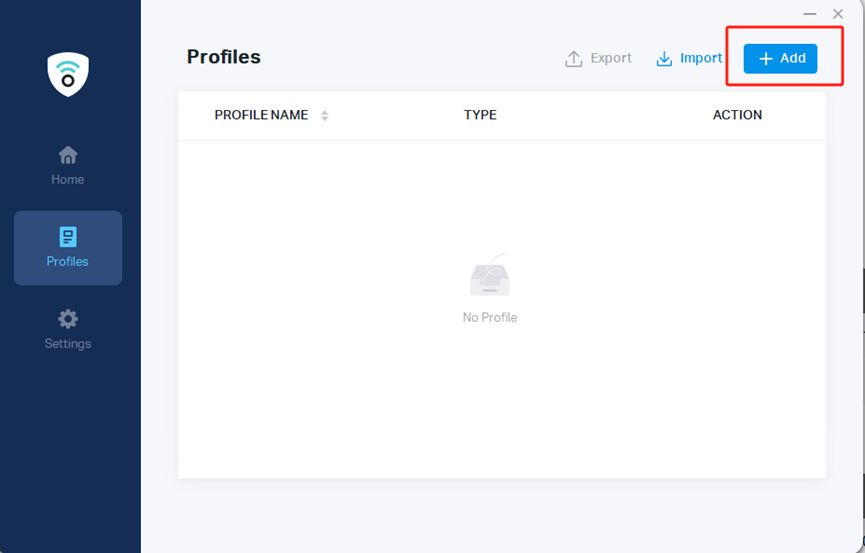
Download the Omada VPN client to your PC from TP-Link’s official website. Click the link Download Omada VPN Client | Omada Network Support, for example. Then, launch the client and click Add.

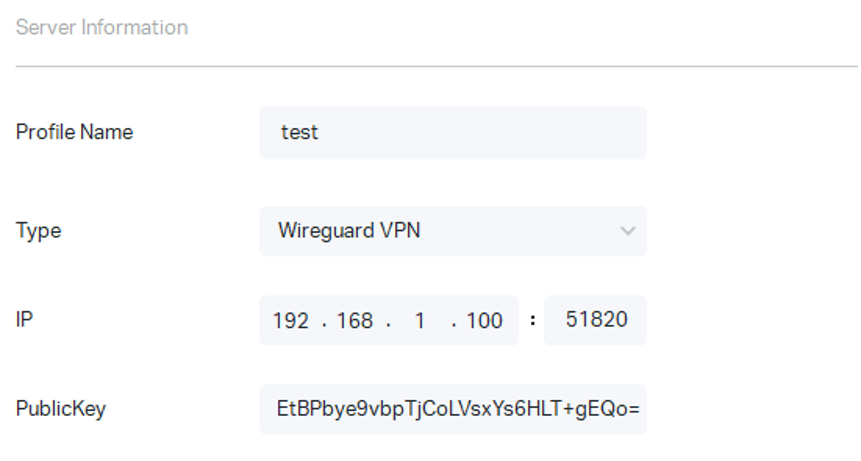
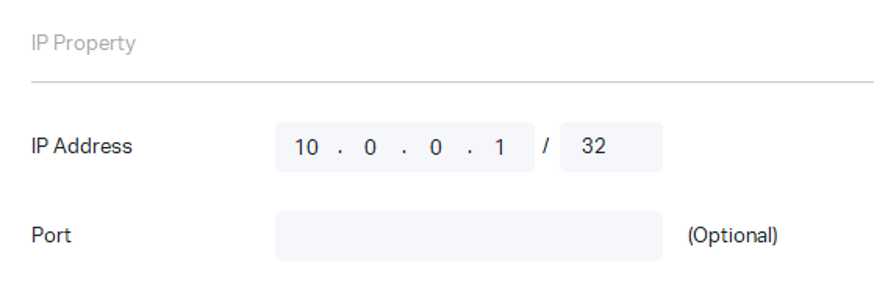
Select Type as WireGuard VPN. Then fill in the blank according to the client configuration file we just obtained.
In the Advanced Options section, Full VPN Traffic is enabled by default, indicating that all client traffic is forwarded through the VPN tunnel, which is the most common scenario. If needed, you can disable Full VPN Traffic and fill in the LAN IP resources that need to be accessed in Remote Subnets. Then click Confirm.
Configuration of Site-to-Site WireGuard VPN via Omada Controller
WireGuard VPN can be used in site-to-site scenarios between two routers. It is suitable for scenarios such as mutual access between devices in the LAN at both ends of the router. Follow the steps below:
Step 1. Configure the WireGuard Server.
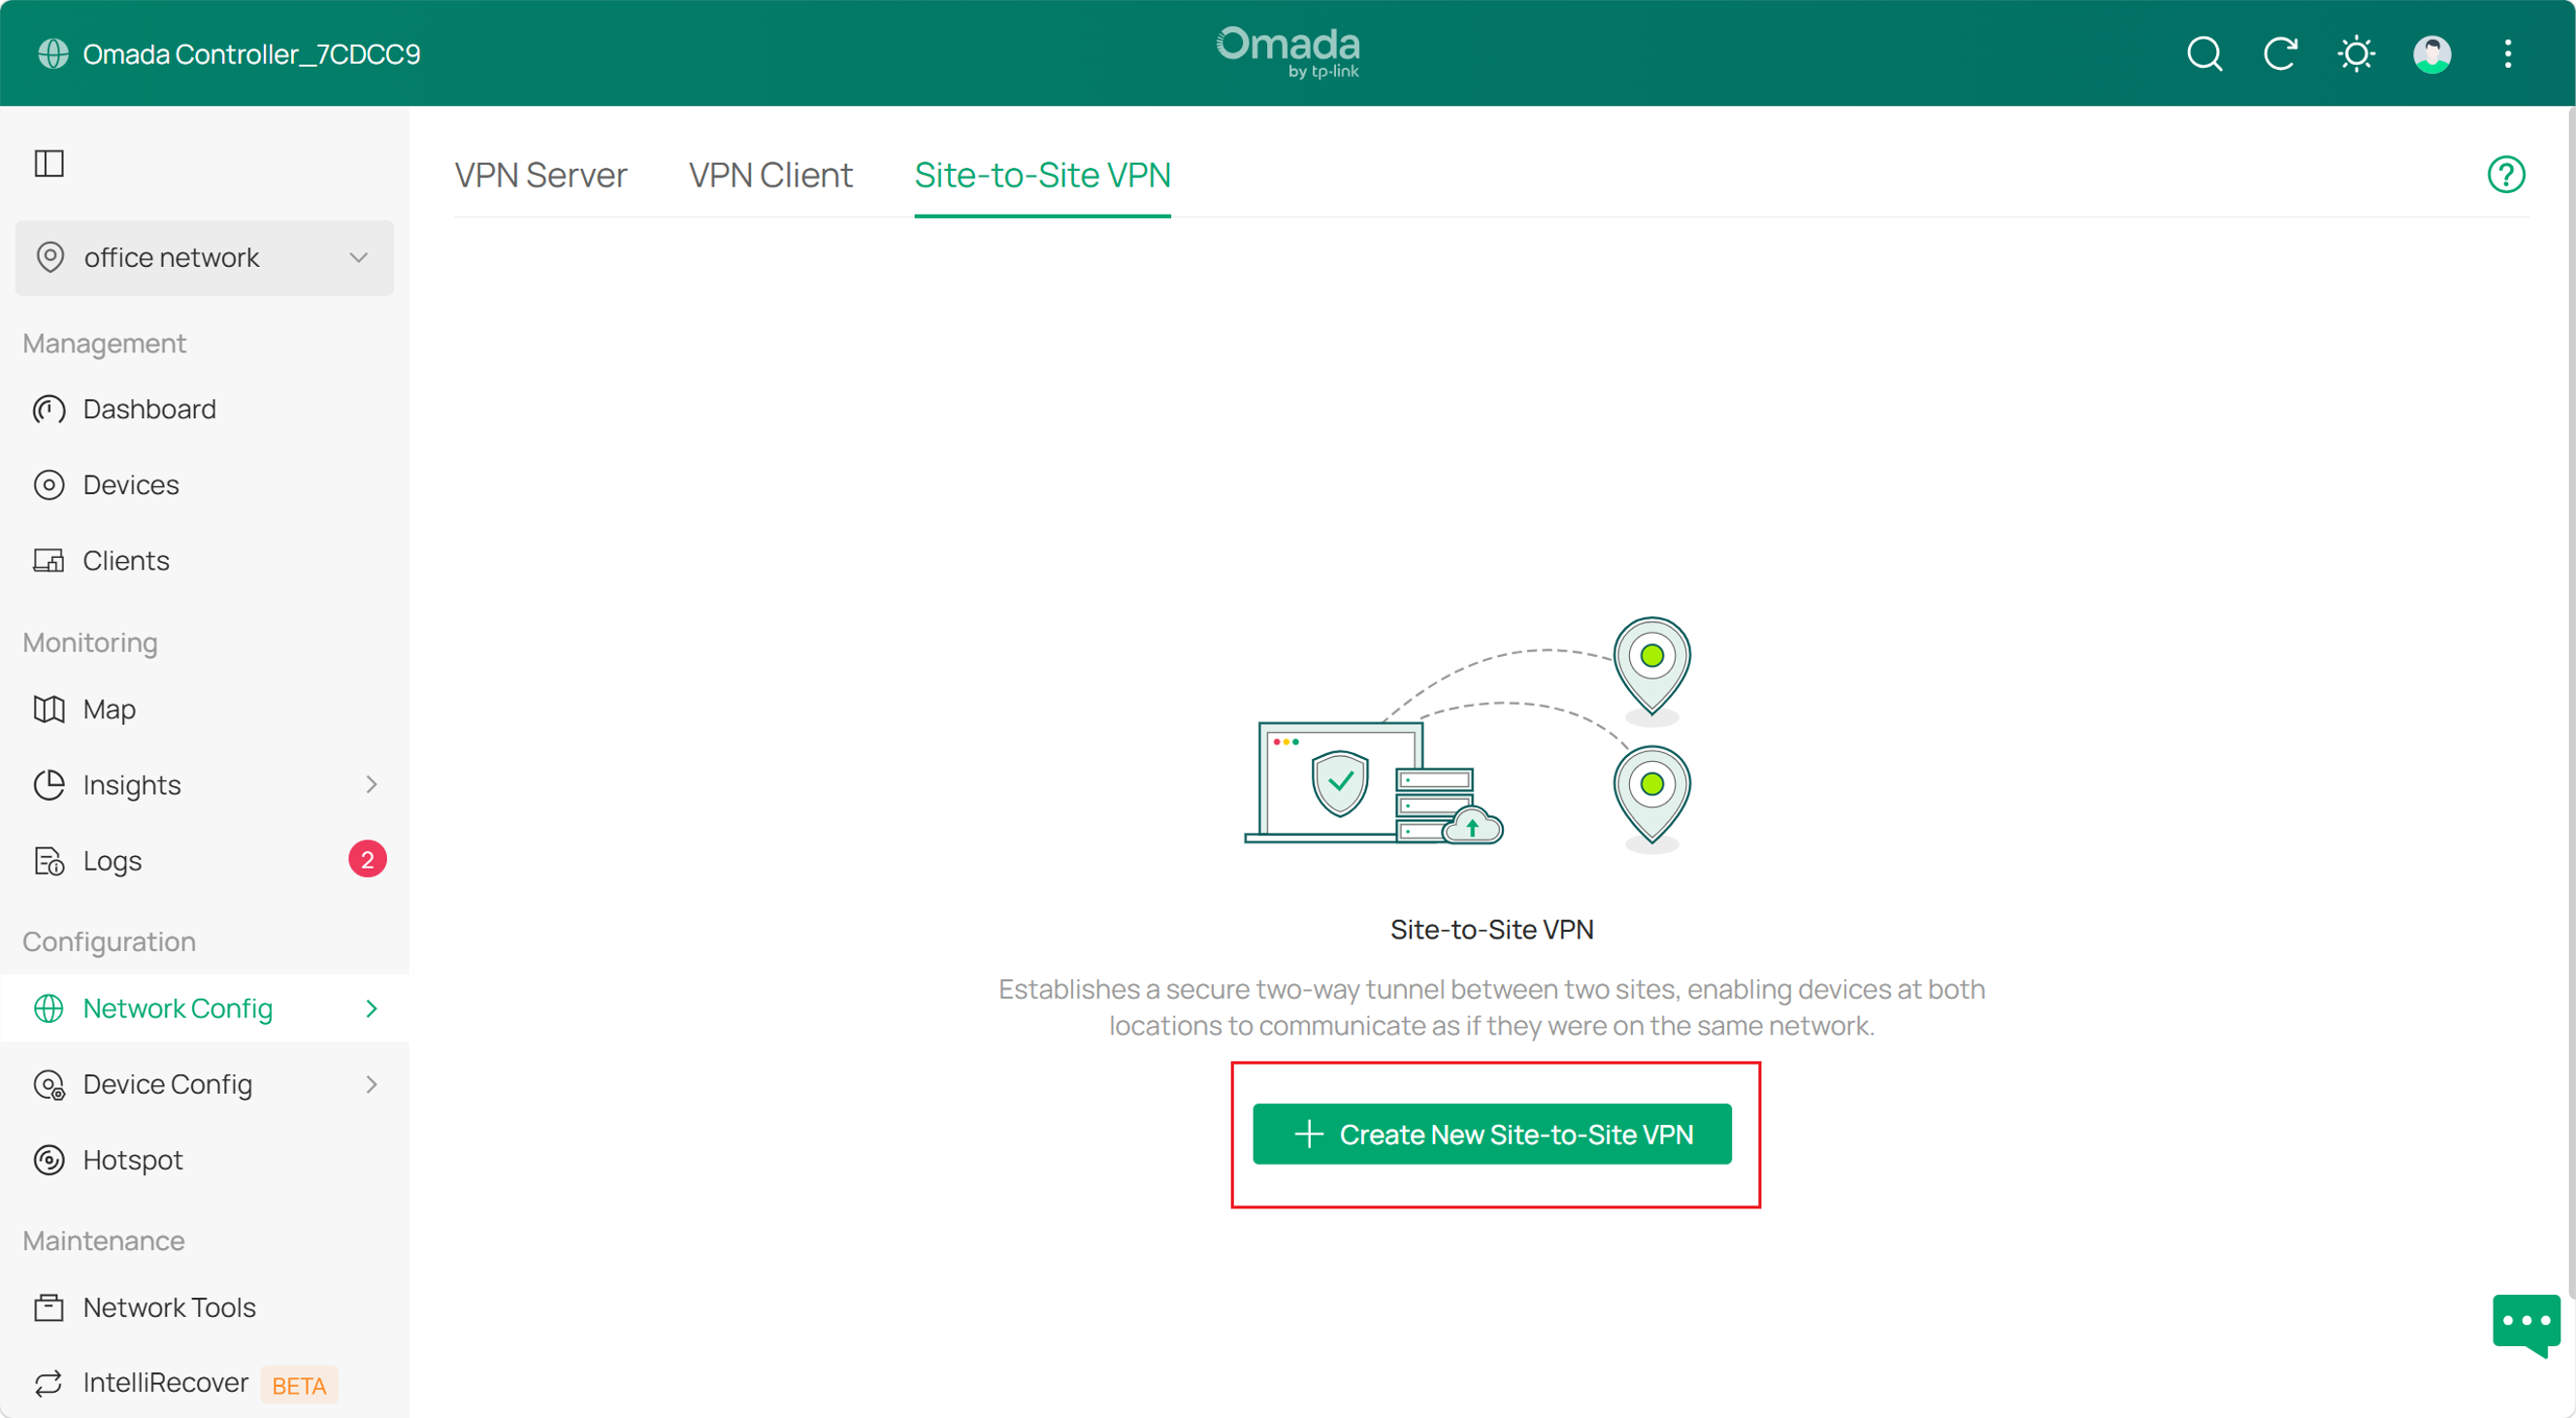
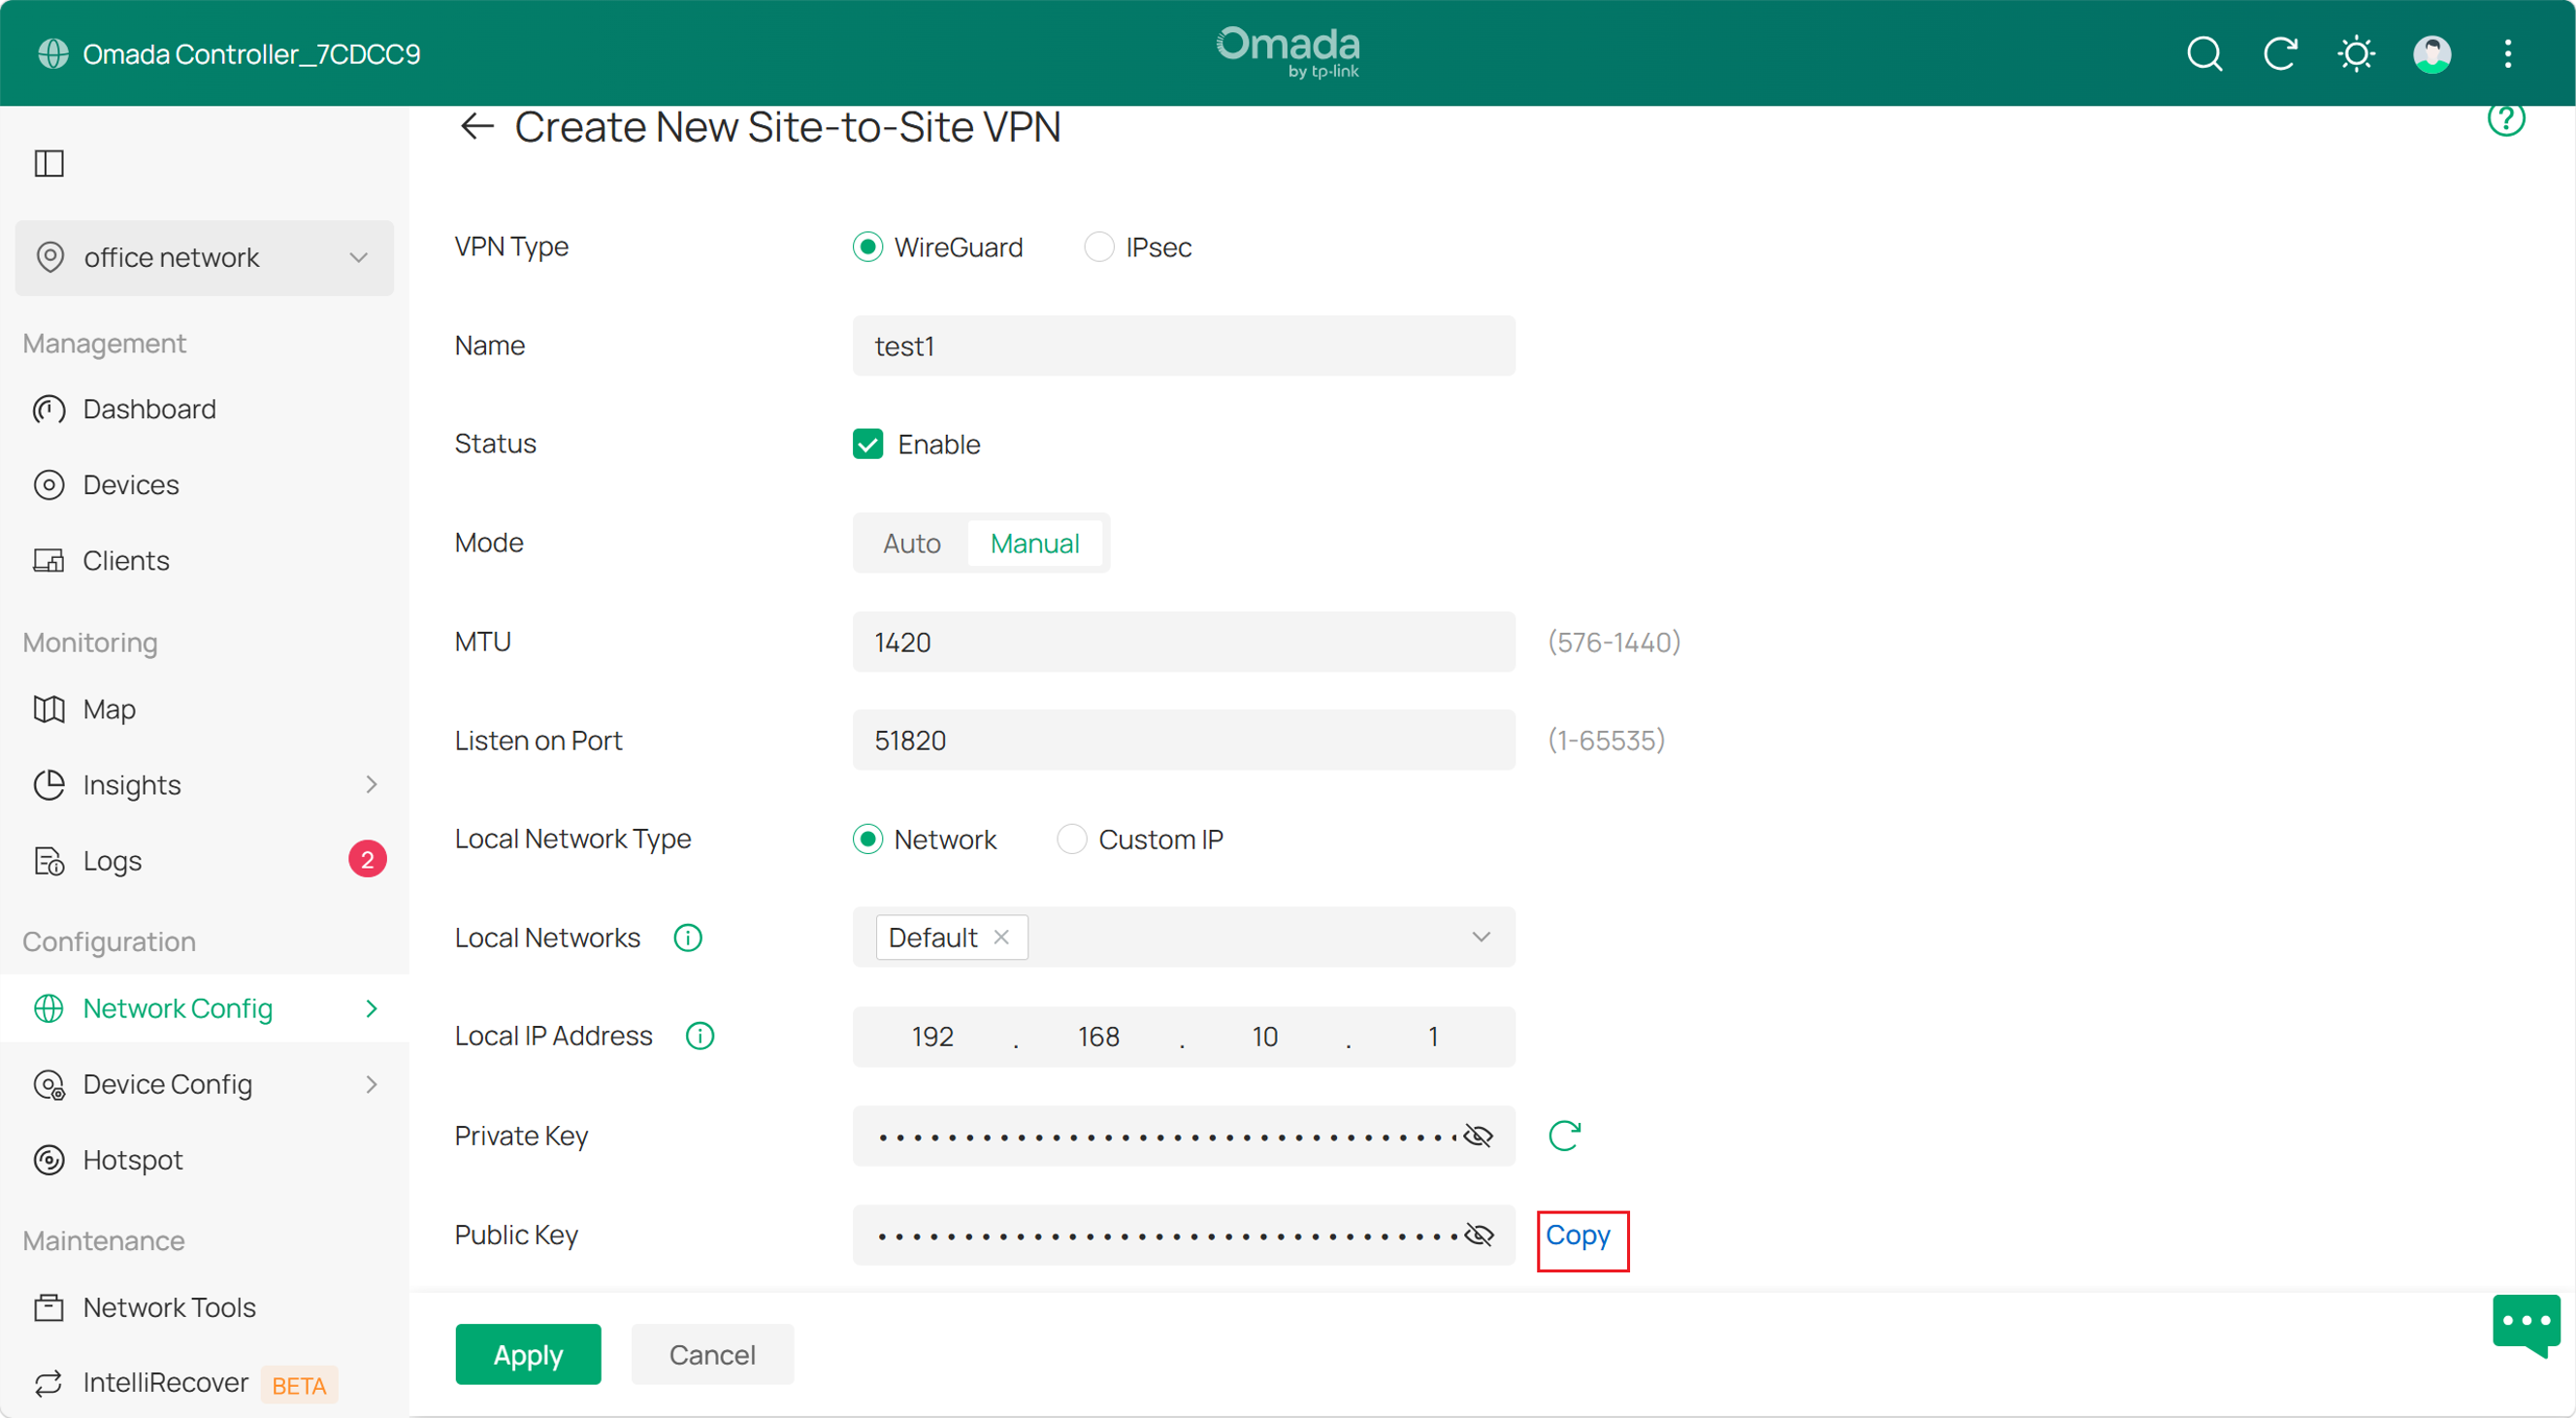
Go to Network Config > VPN > site-to-site VPN, and click Create New Site-to-Site VPN. Select WireGuard to configure the WireGuard interface. Switch to manual mode, specify the Name, and leave MTU and Listen on Port as default if there is no special requirement, so do Private Key and Public Key. Fill in the virtual IP of the WireGuard interface in the Local IP Address, which should be an unoccupied IP or an IP outside the LAN segment. Then click Apply and copy the Public Key.
Step 2. Configure the WireGuard Client.
The WireGuard interface configuration on the client is the same as on the server. Refer to Step 1.
Step 3. Configure WireGuard Peer.
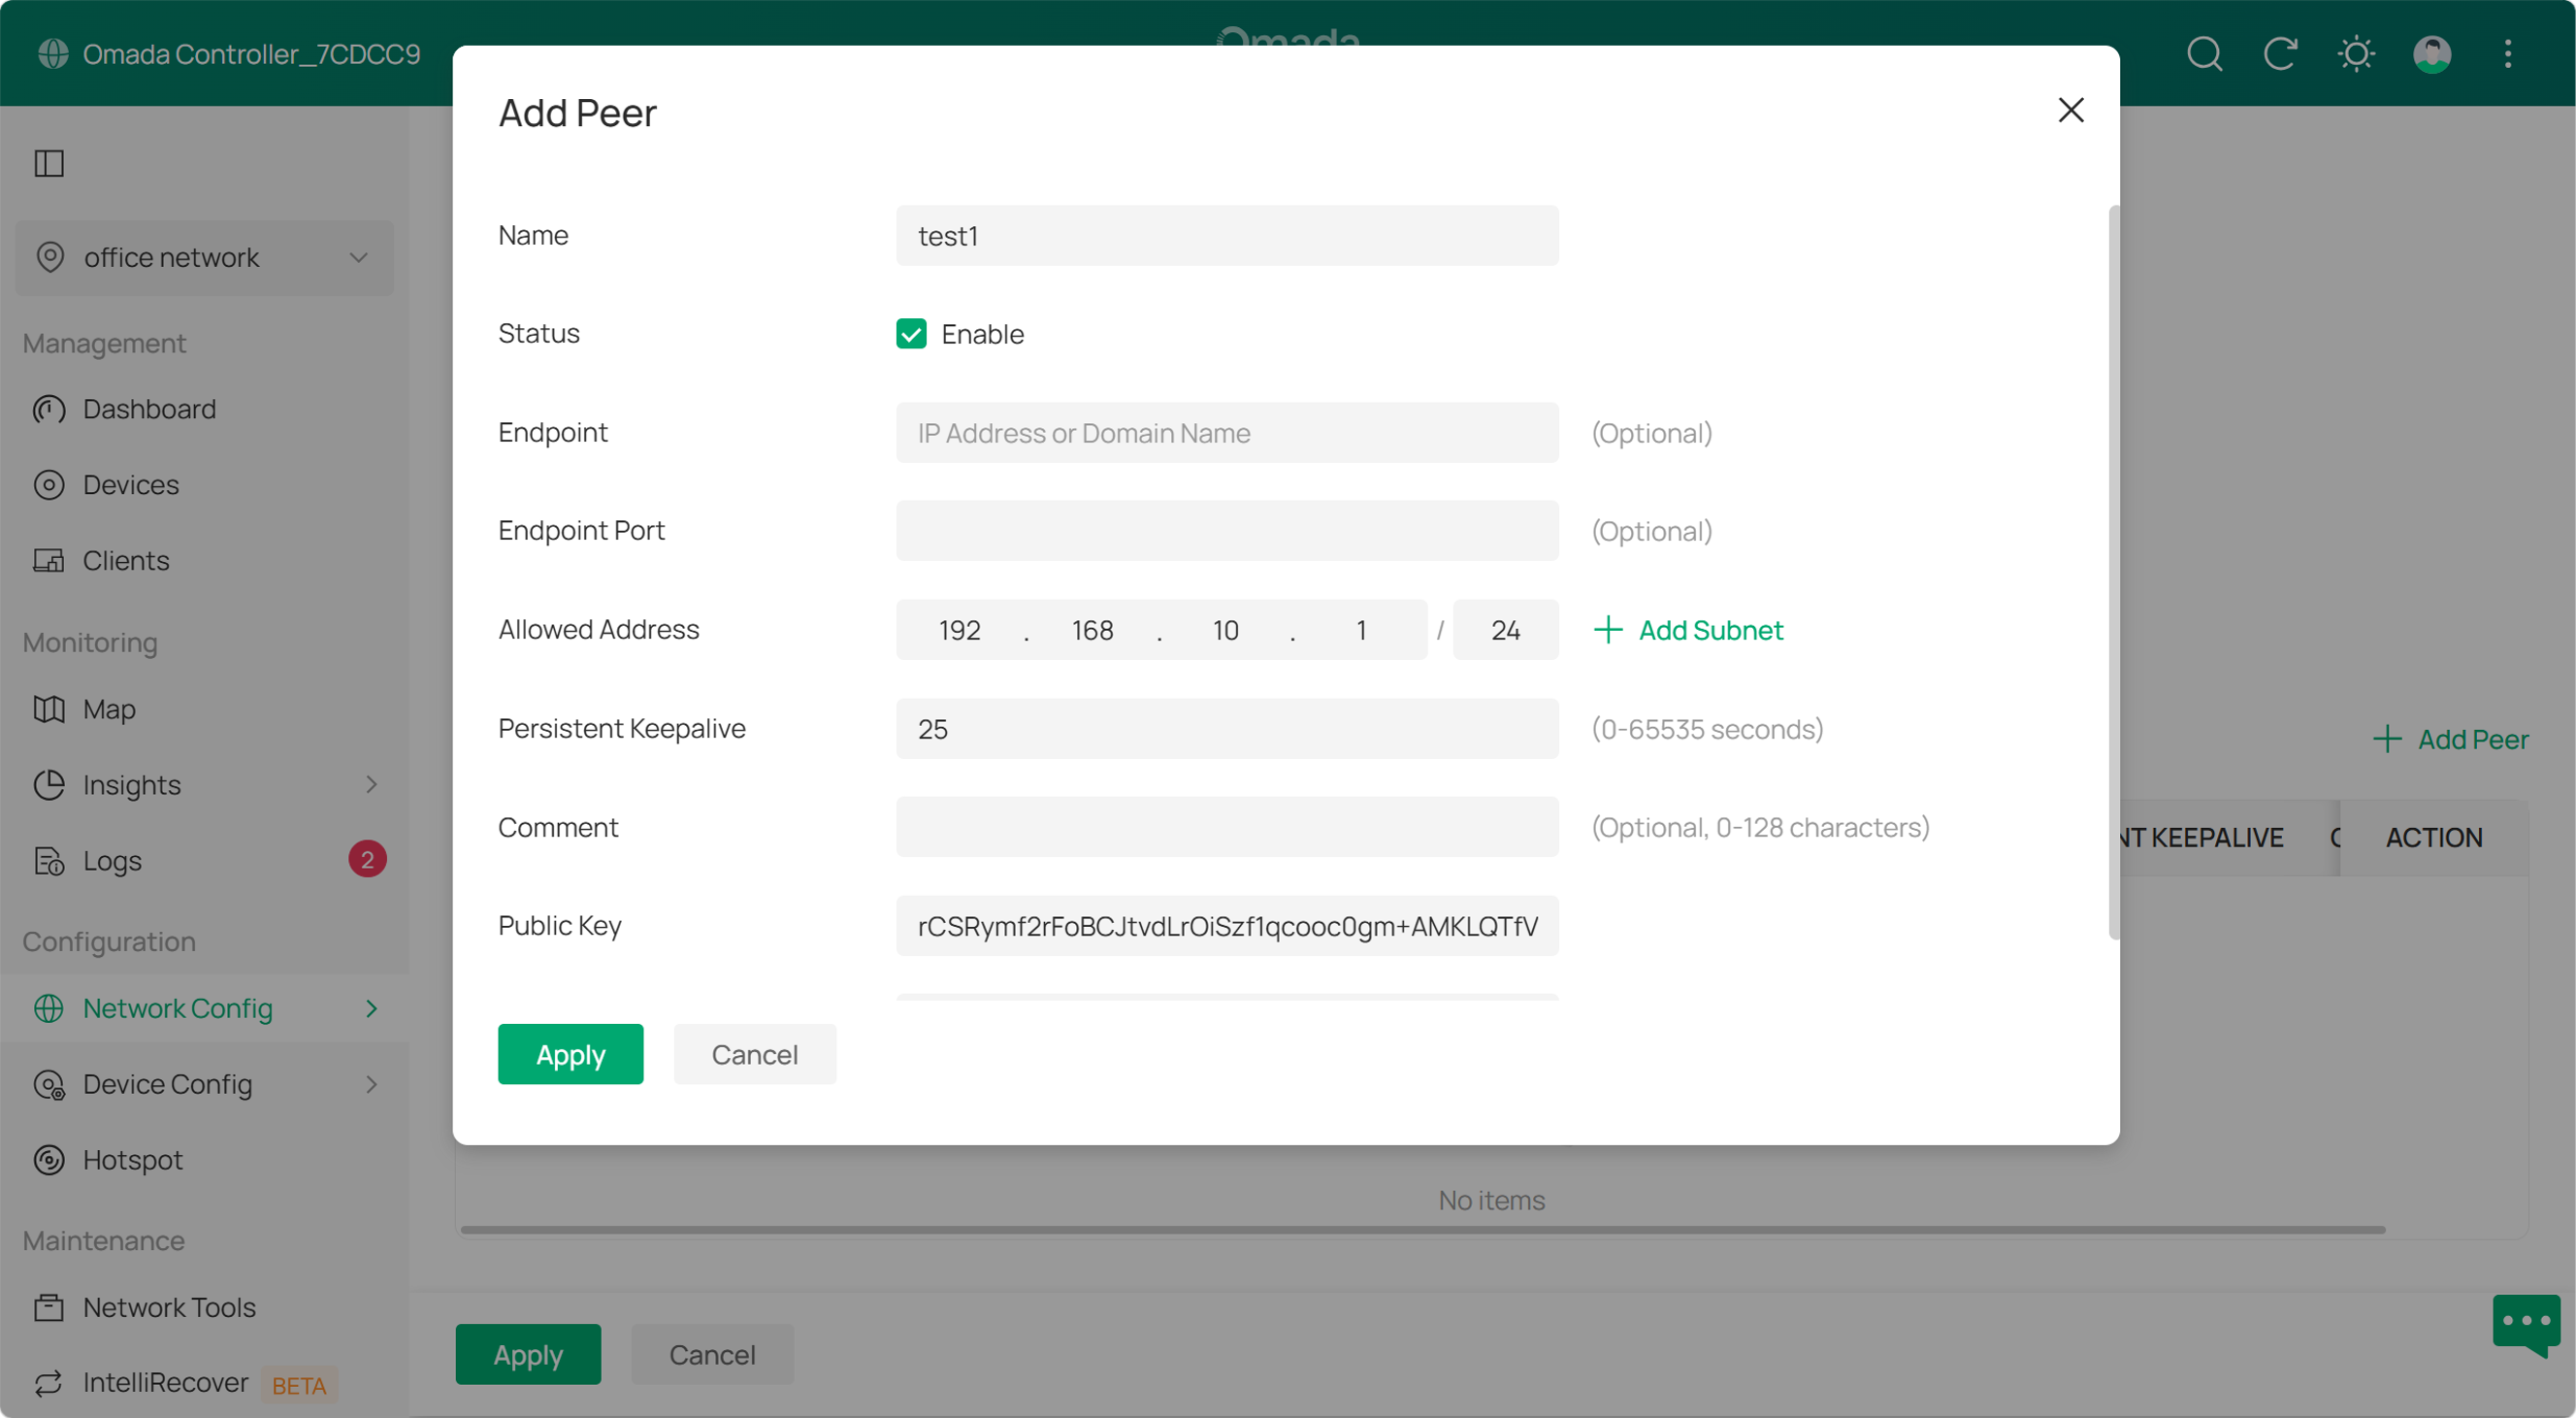
Go to Network Config > VPN > Site-to-Site VPN, enter the WireGuard VPN created, and click Add Peer to start configuration; fill in the Public Key of the WireGuard interface on the client in Public Key; leave Endpoint and Endpoint Port as blank; fill in the network segment that needs VPN communication, that is, the LAN segment on the client in Allowed Address. Then click Apply.
Step 4. Configure the Client Peer.
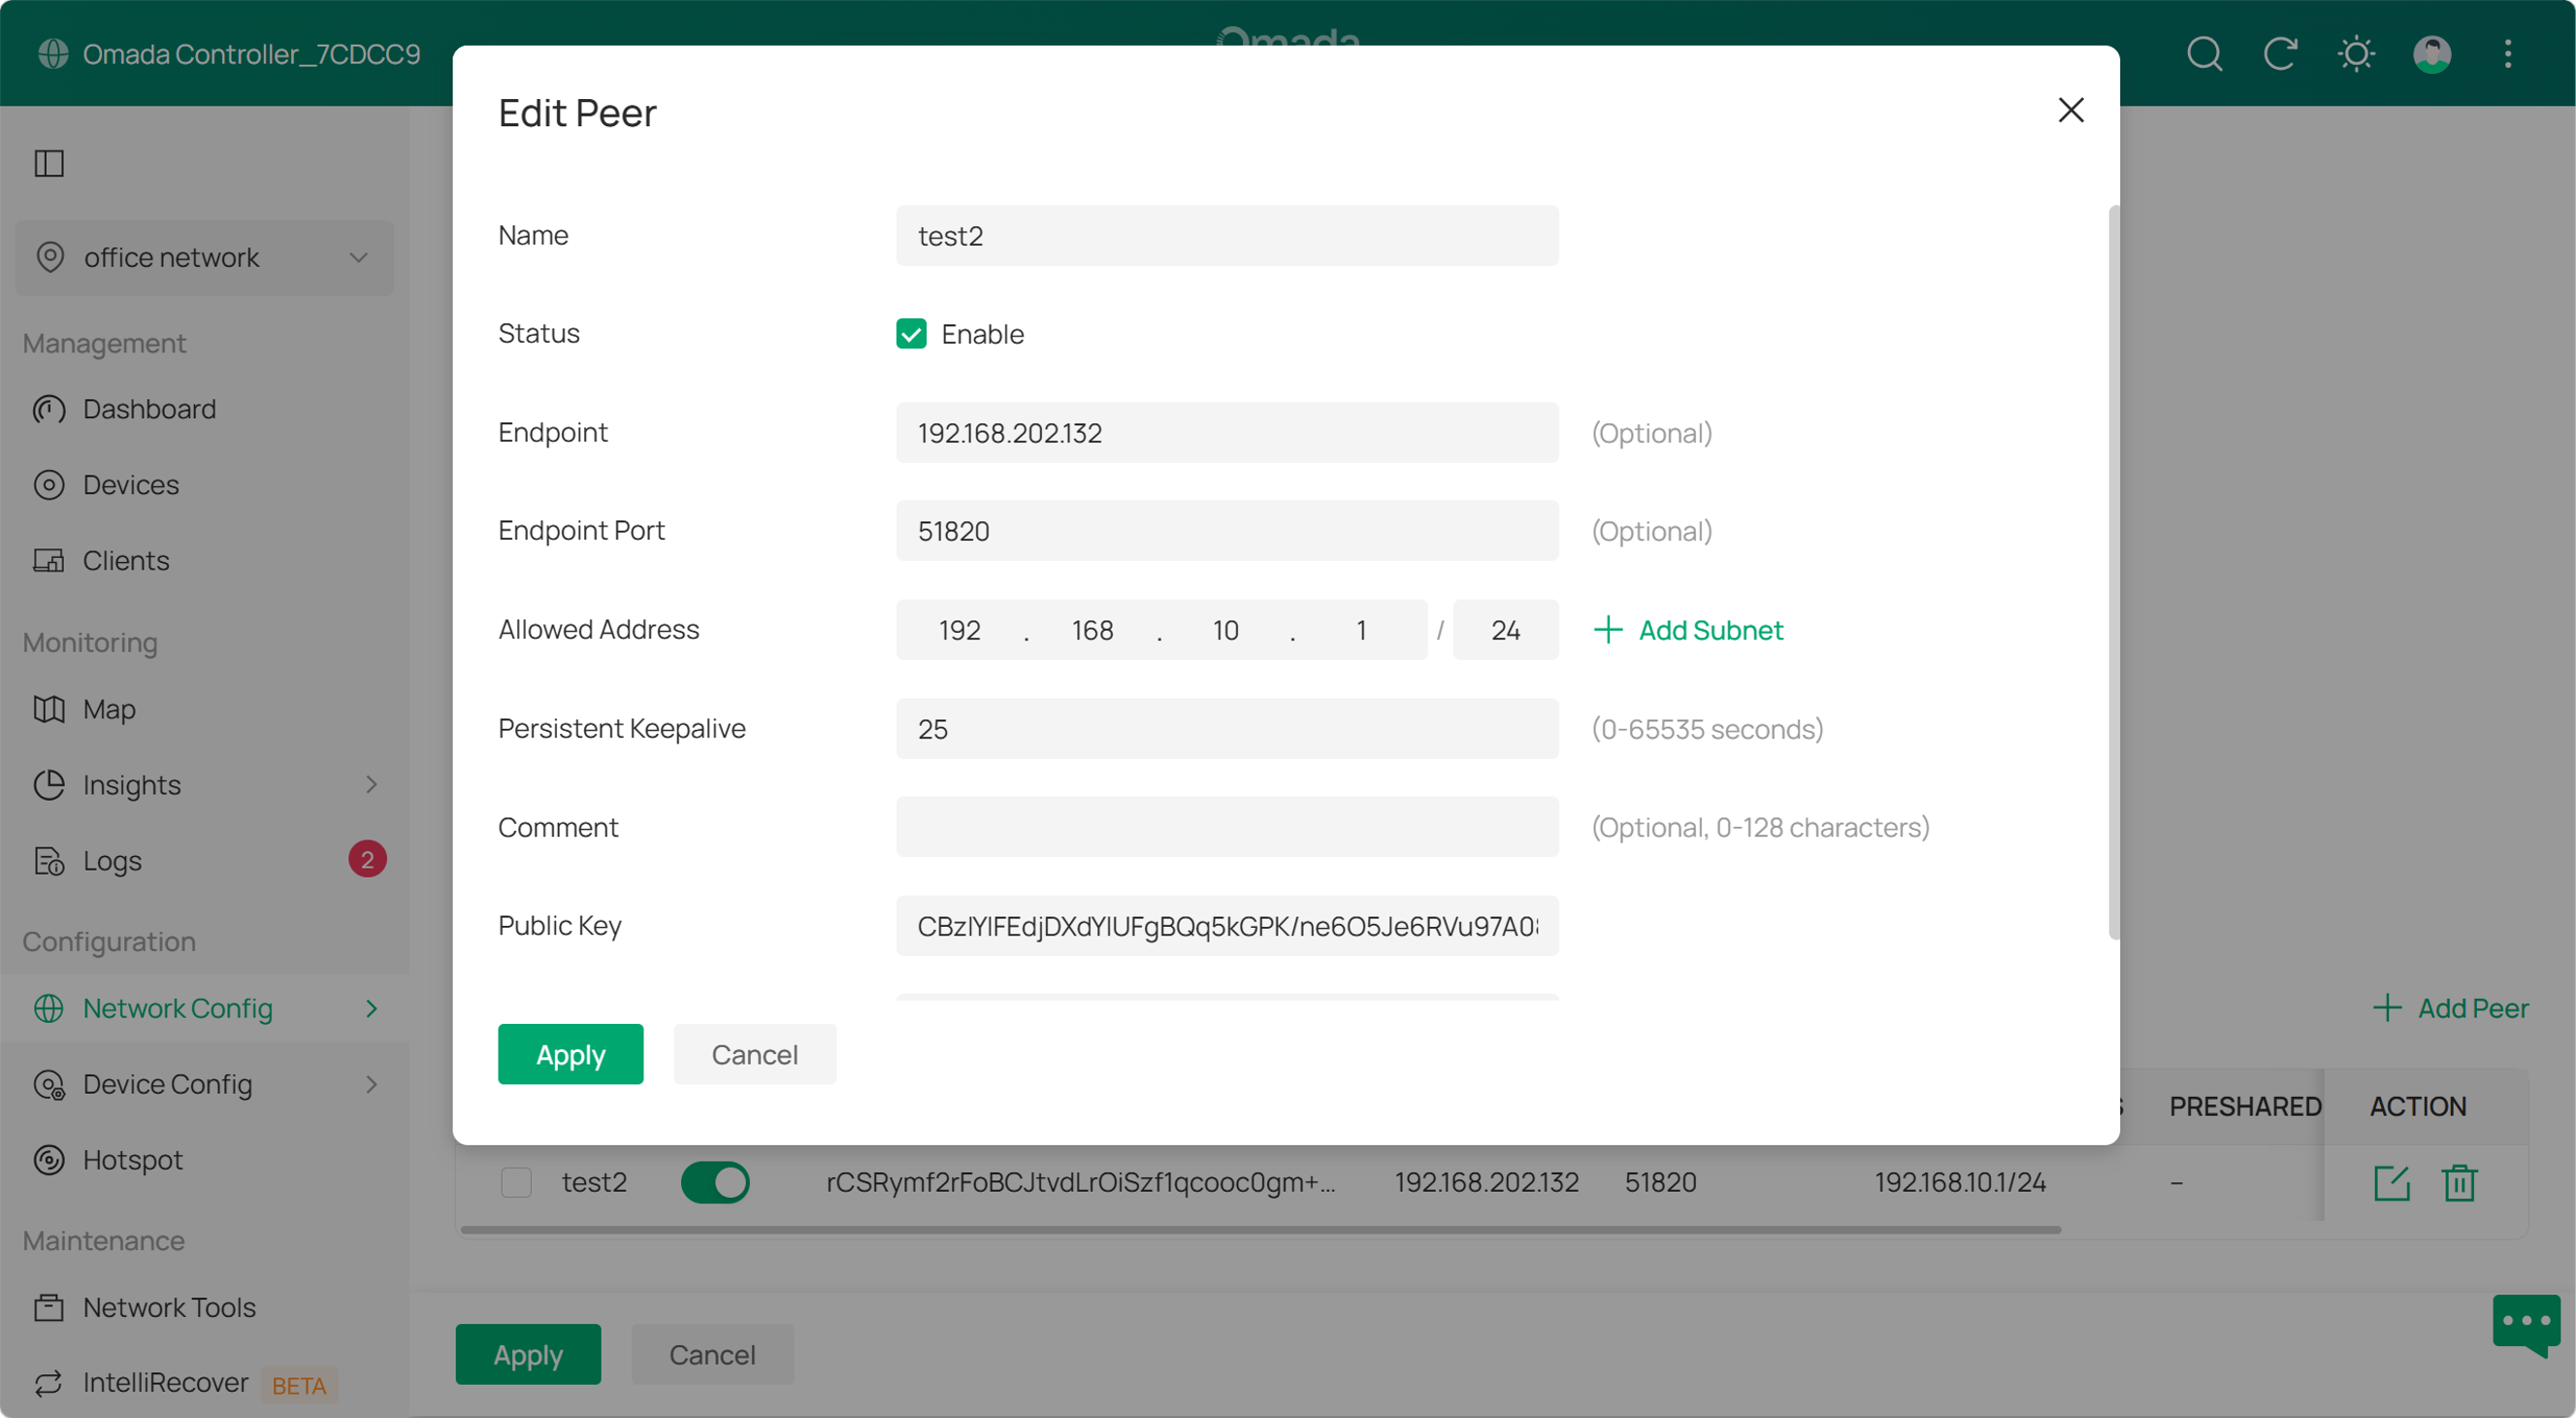
Compared with the server peer configuration in Step 3, the client peer configuration is slightly different: for Public Key, fill in the Public Key of the WireGuard interface on the server; for Endpoint and Endpoint Port, fill in the WAN IP of the peer router and the WireGuard interface port (the default is 51820). In the site-to-site scenario, if the WANs of both routers use public IP addresses, then the Endpoint and Endpoint Port are needed for only one end; that is, one end needs to initiate the connection actively. Please note that if one router is located behind NAT, that router shall serve as the Client.
Configuration of Client-to-Site WireGuard VPN via Omada Controller
WireGuard VPN can also be used in client-to-site scenarios between clients and routers. It is suitable for business travelers or temporary staff working remotely from the headquarters via mobile phones or computers. Taking the Omada VPN client as an example, you can follow the steps below to configure the Client-to-Site WireGuard VPN.
Step 1. Configure the WireGuard Server.
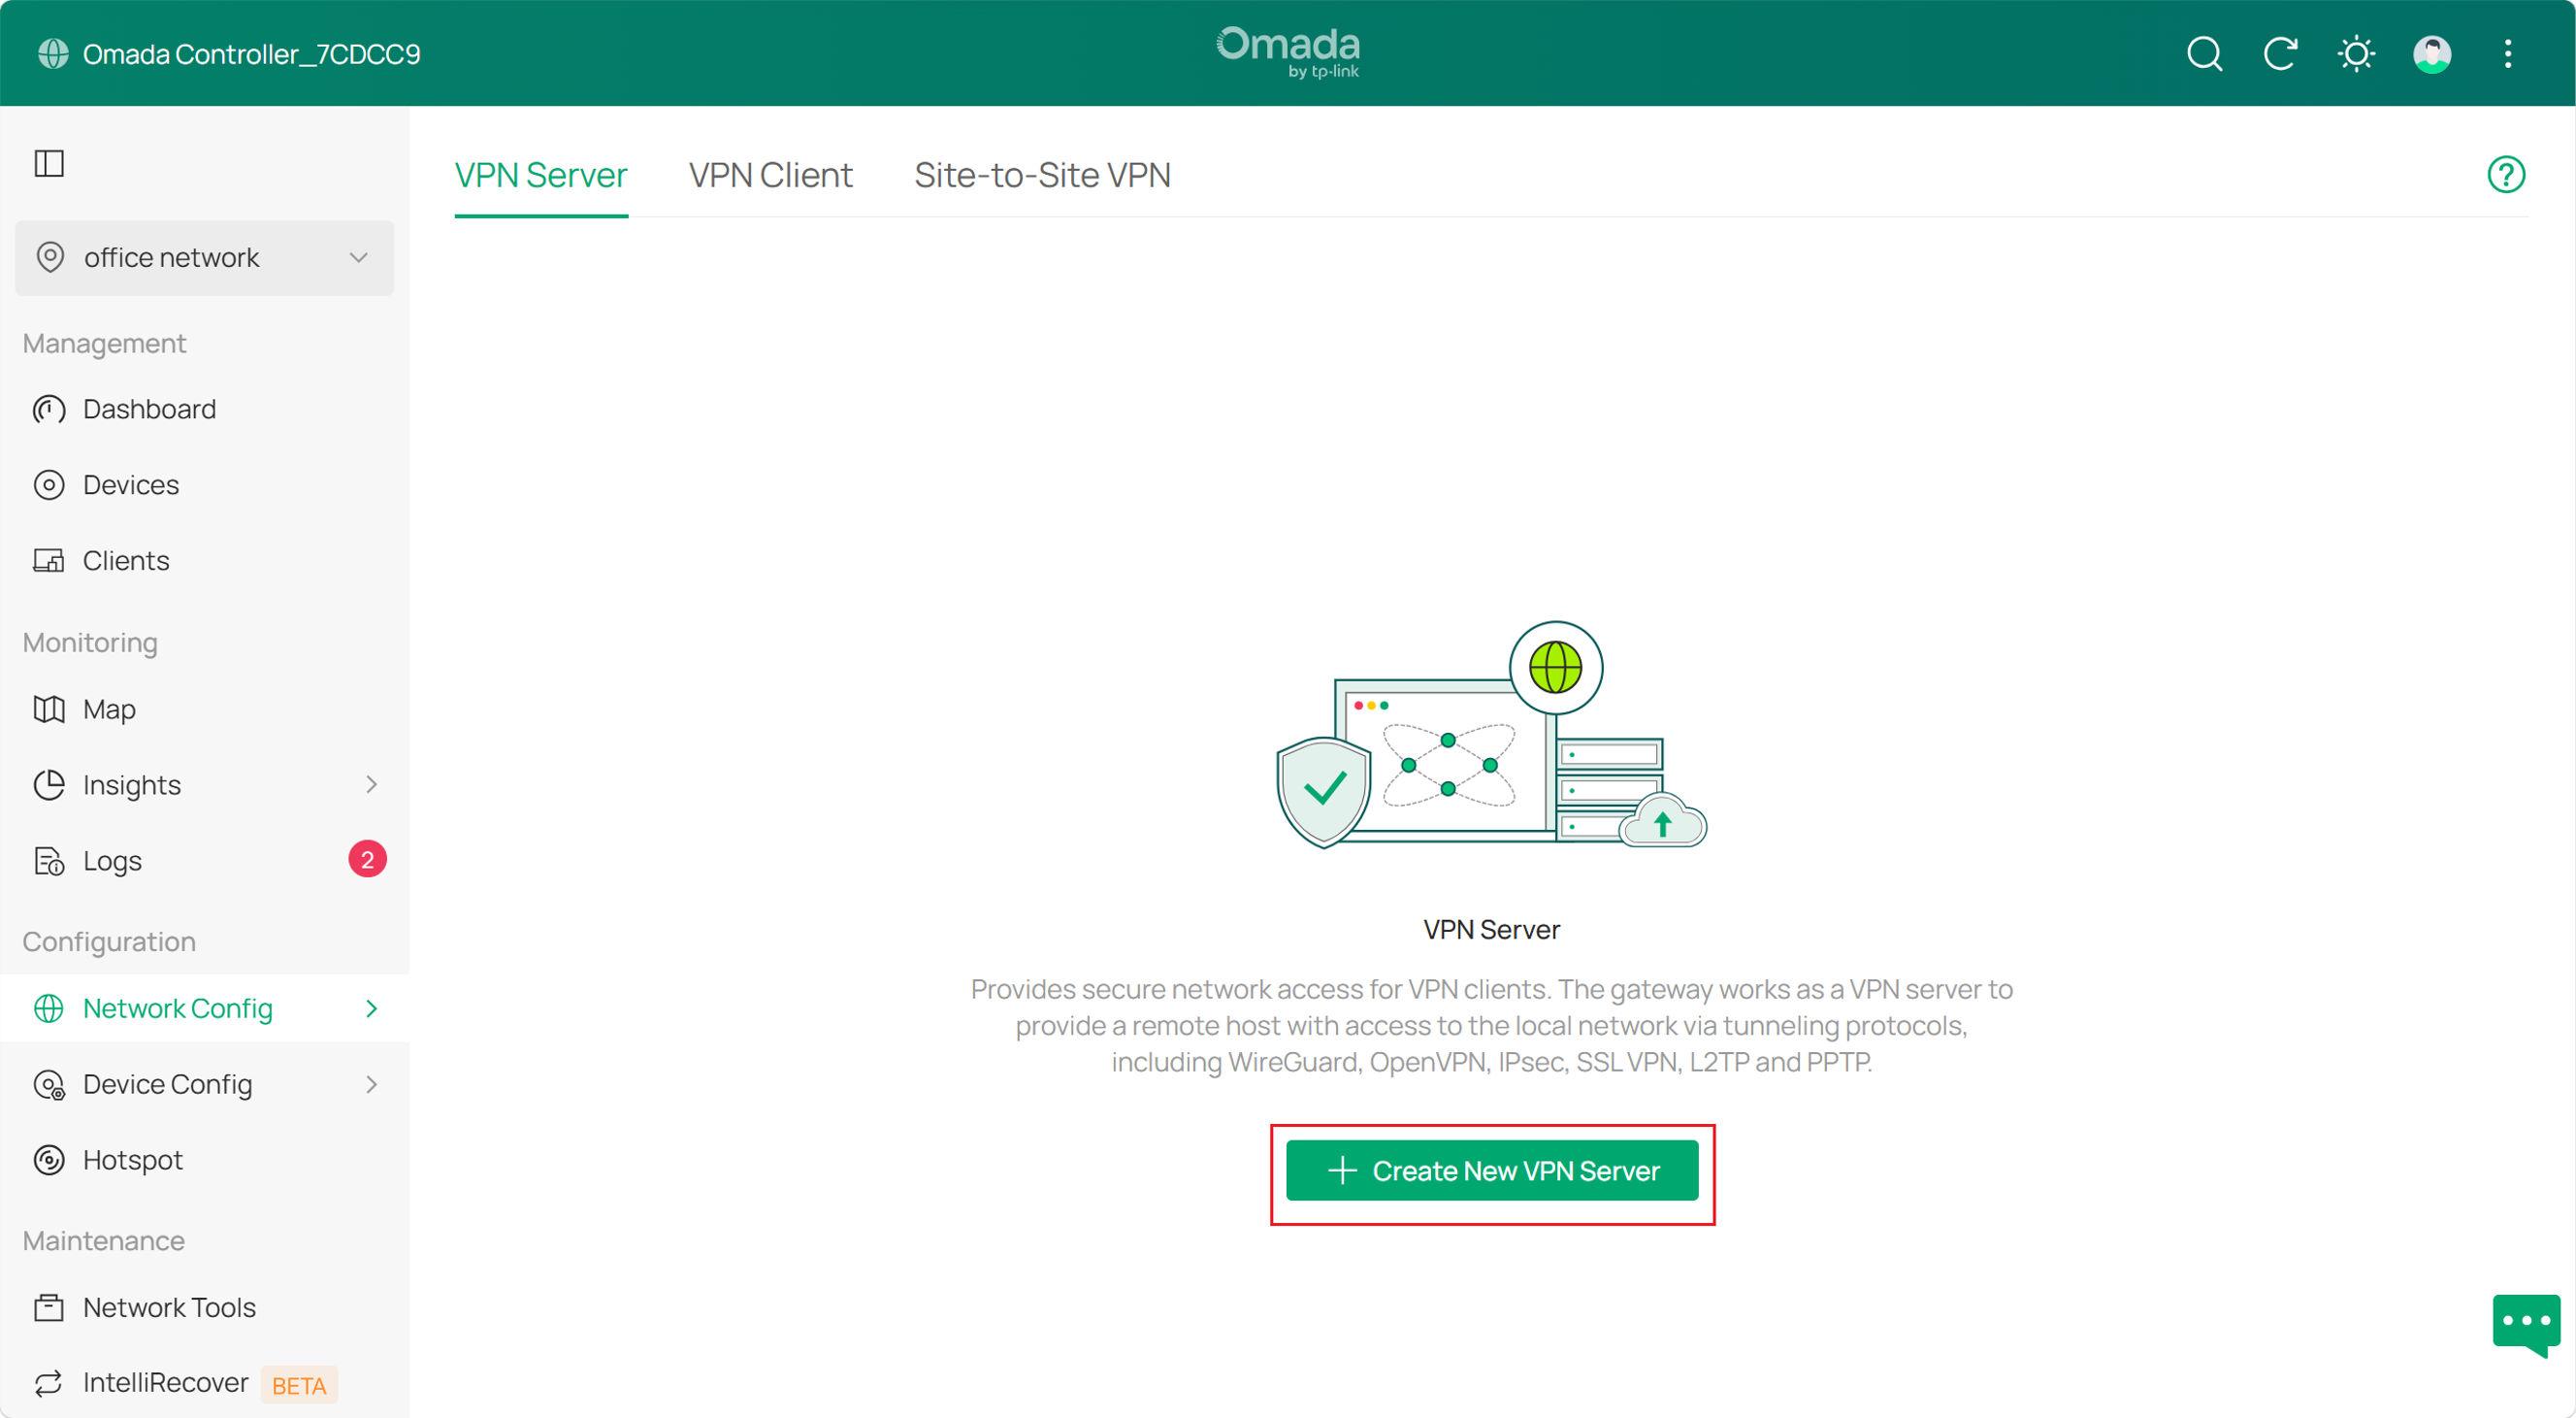
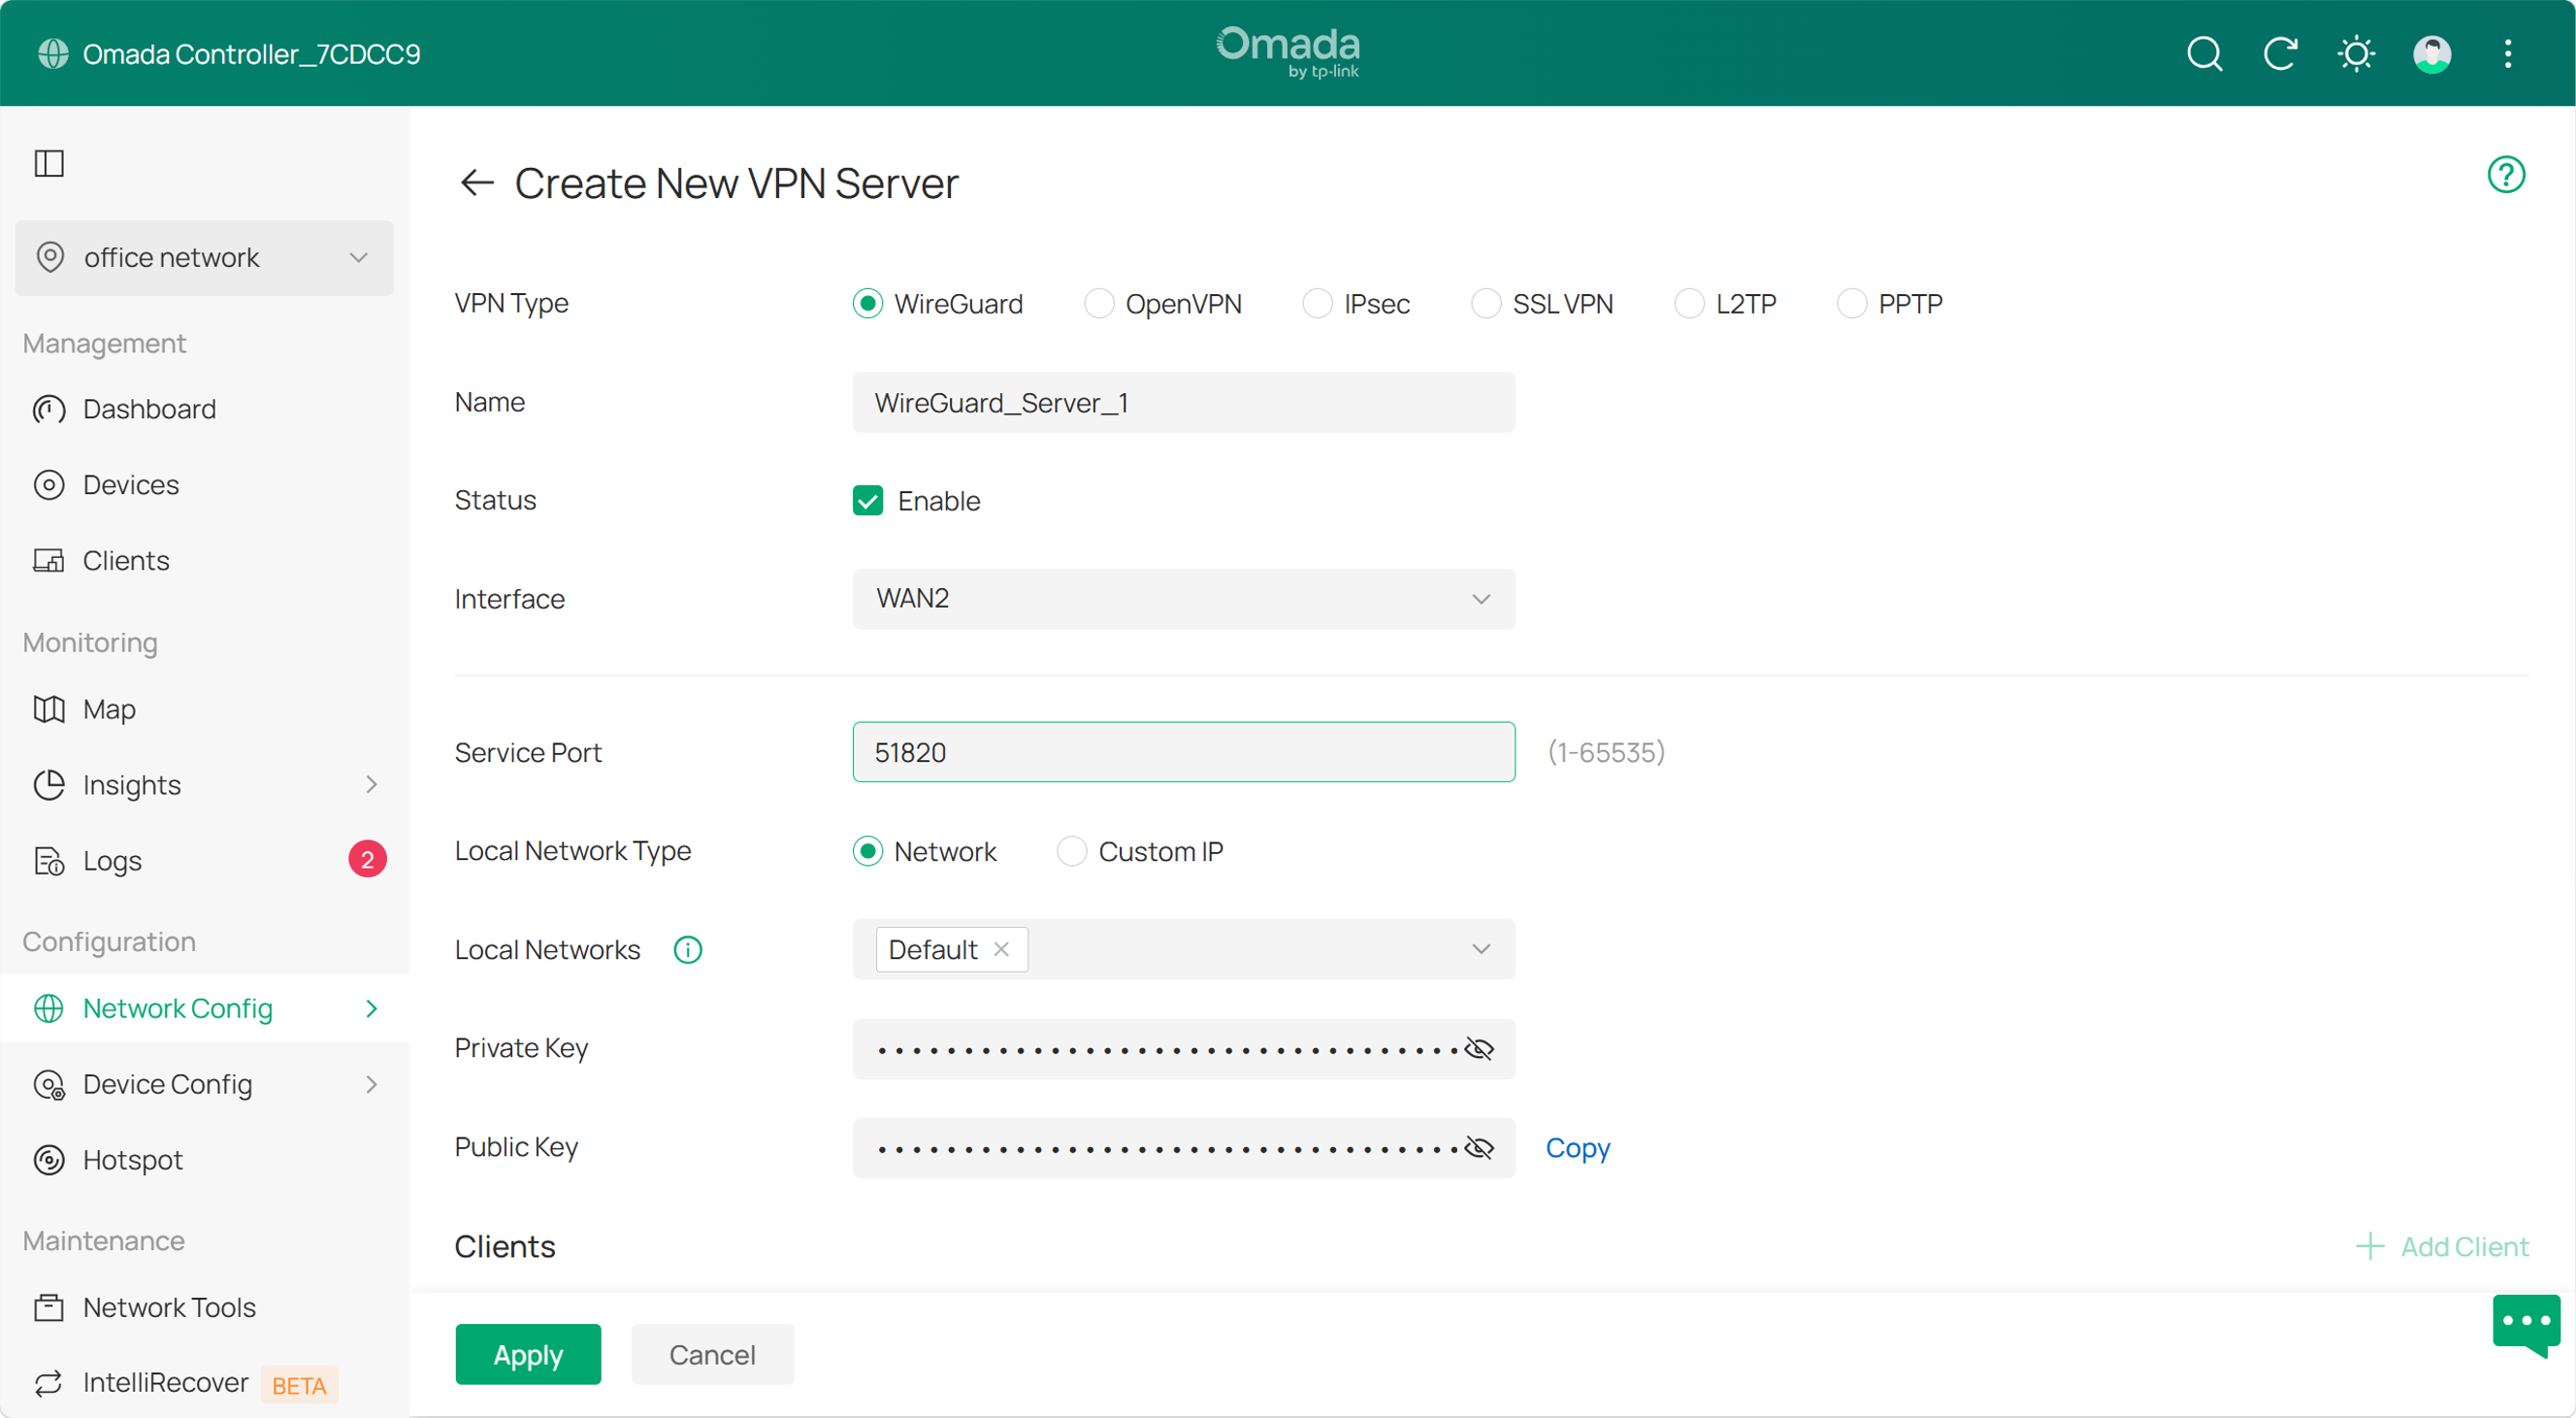
Go to Network Config > VPN > VPN server, and click Create New VPN Server. Select WireGuard to configure the WireGuard interface: specify the Name[licj9] and Interface, leave Service Port as default if there is no special requirement, so do Private Key and Public Key. Fill in the virtual IP of the WireGuard interface in IP Pool under Advanced, which should be an unoccupied IP or an IP outside the LAN segment. Then click Apply and copy the Public Key.
Step 2. Obtain Client Configuration file.
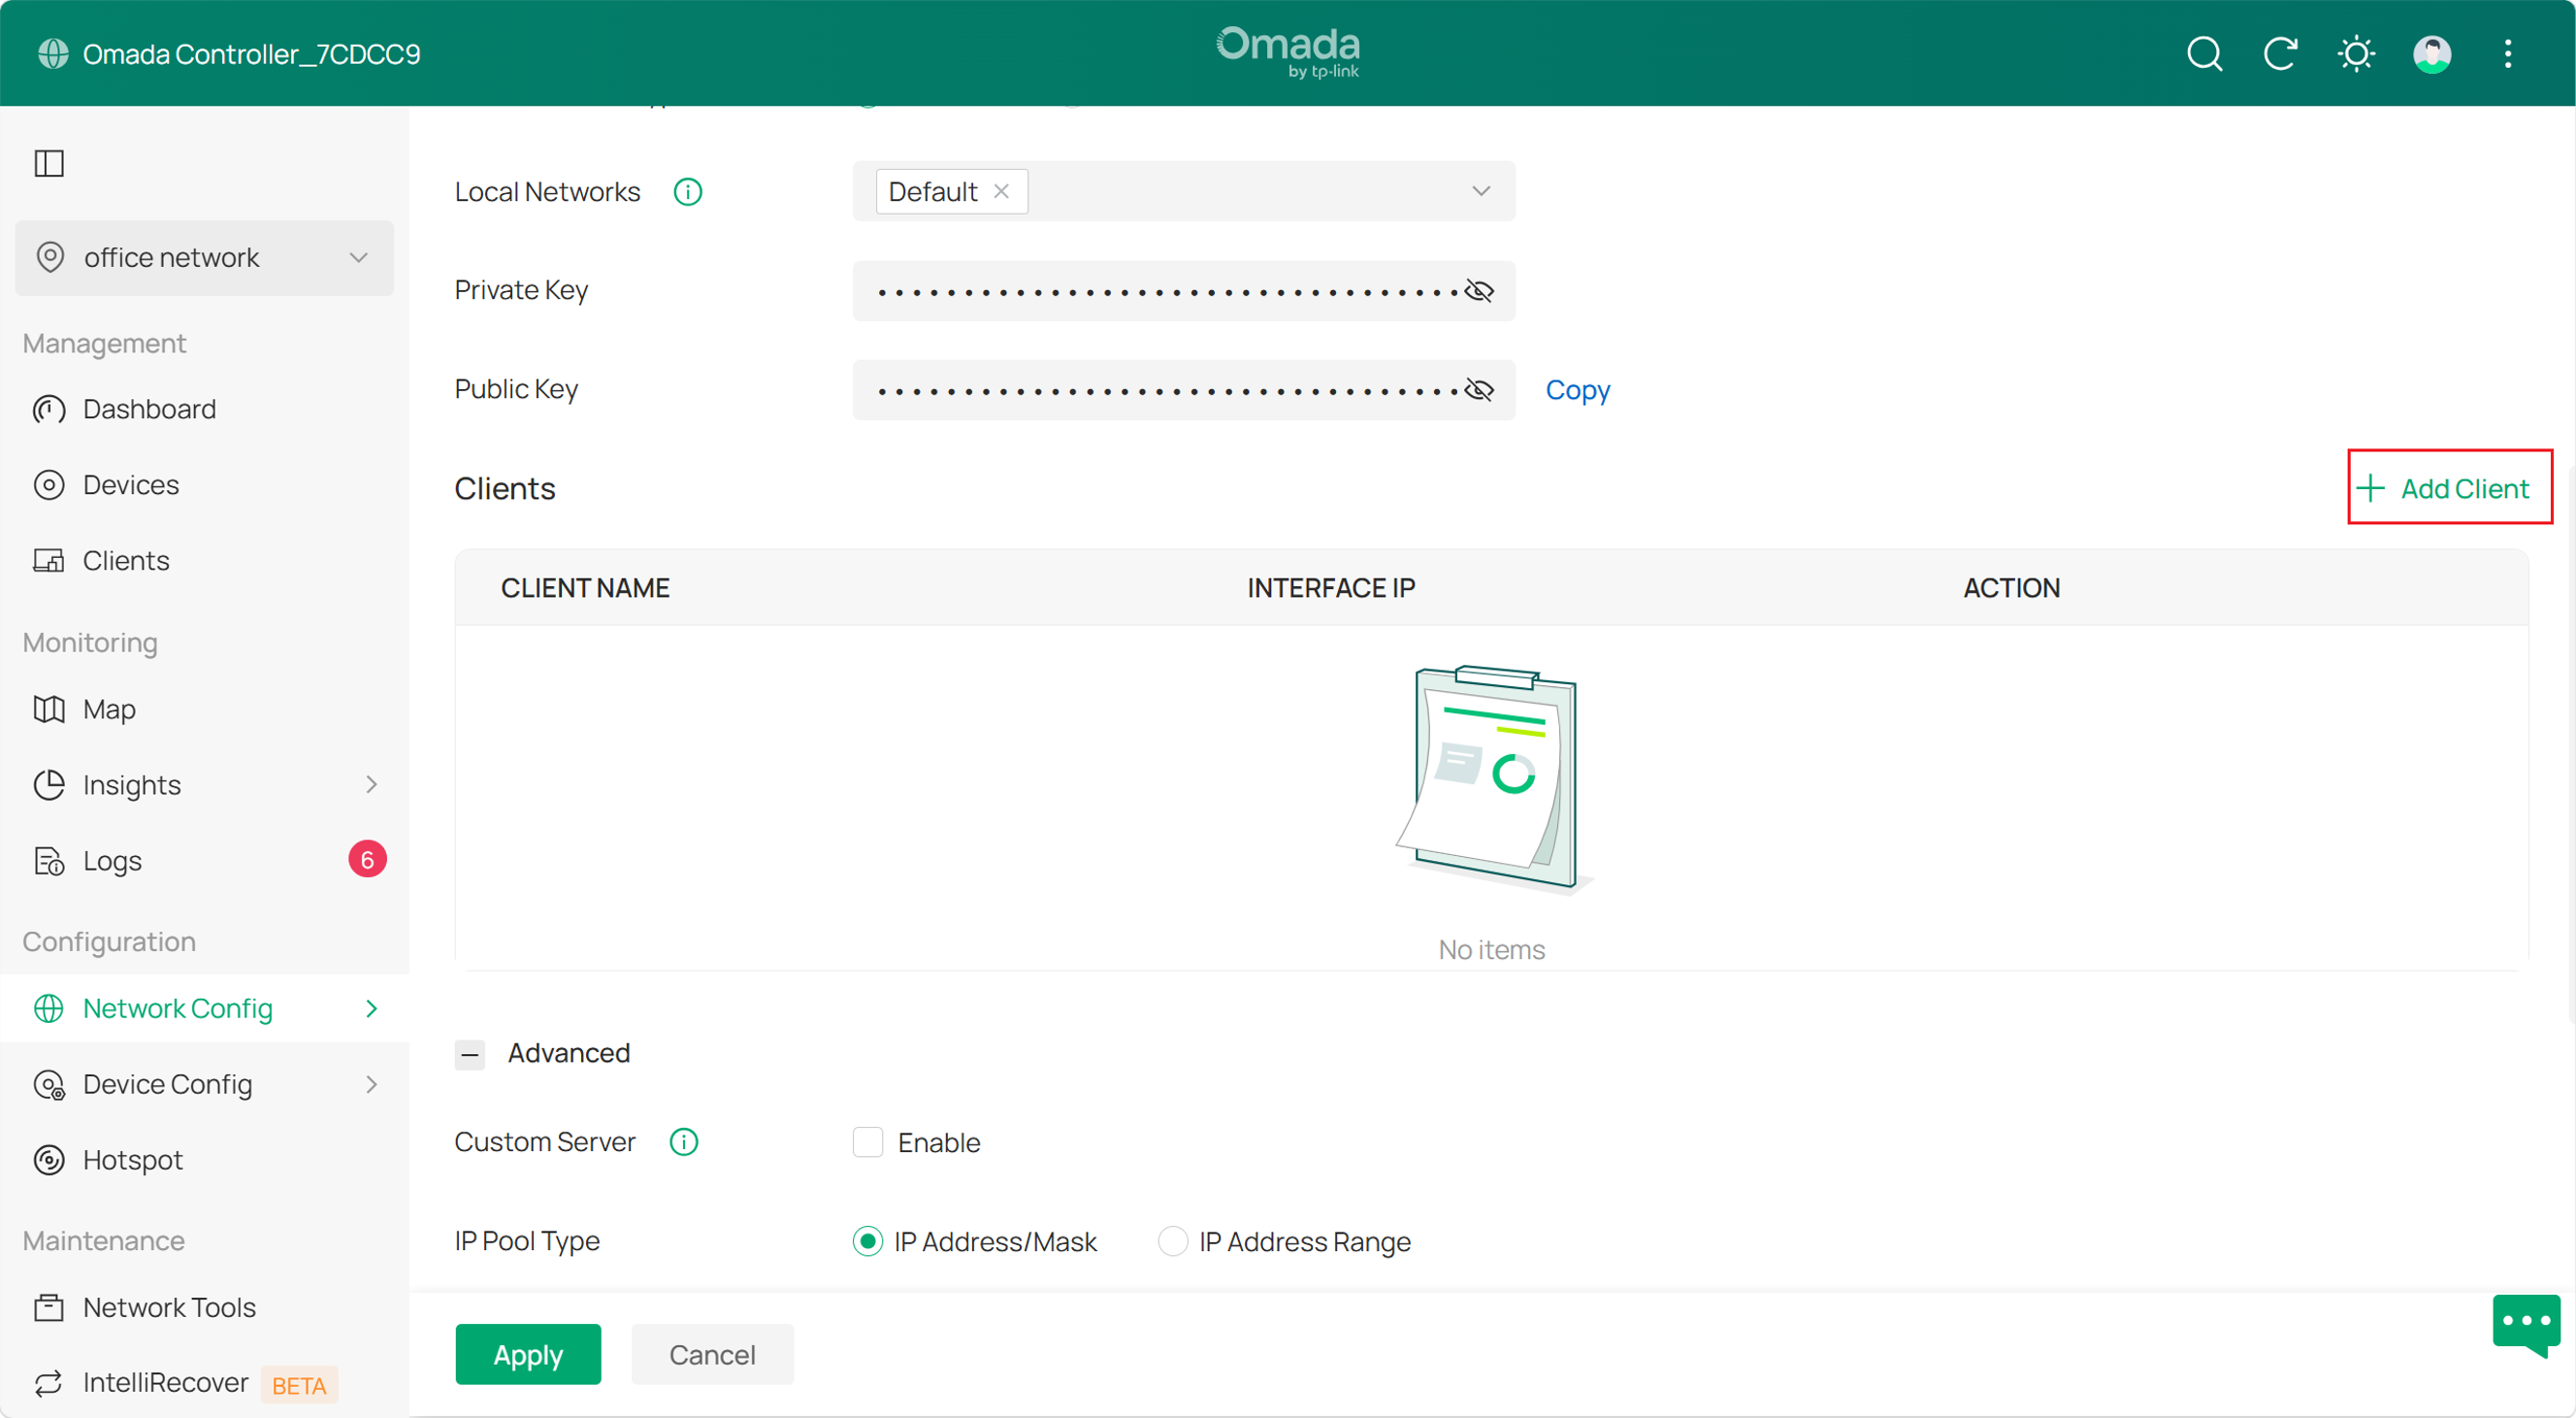
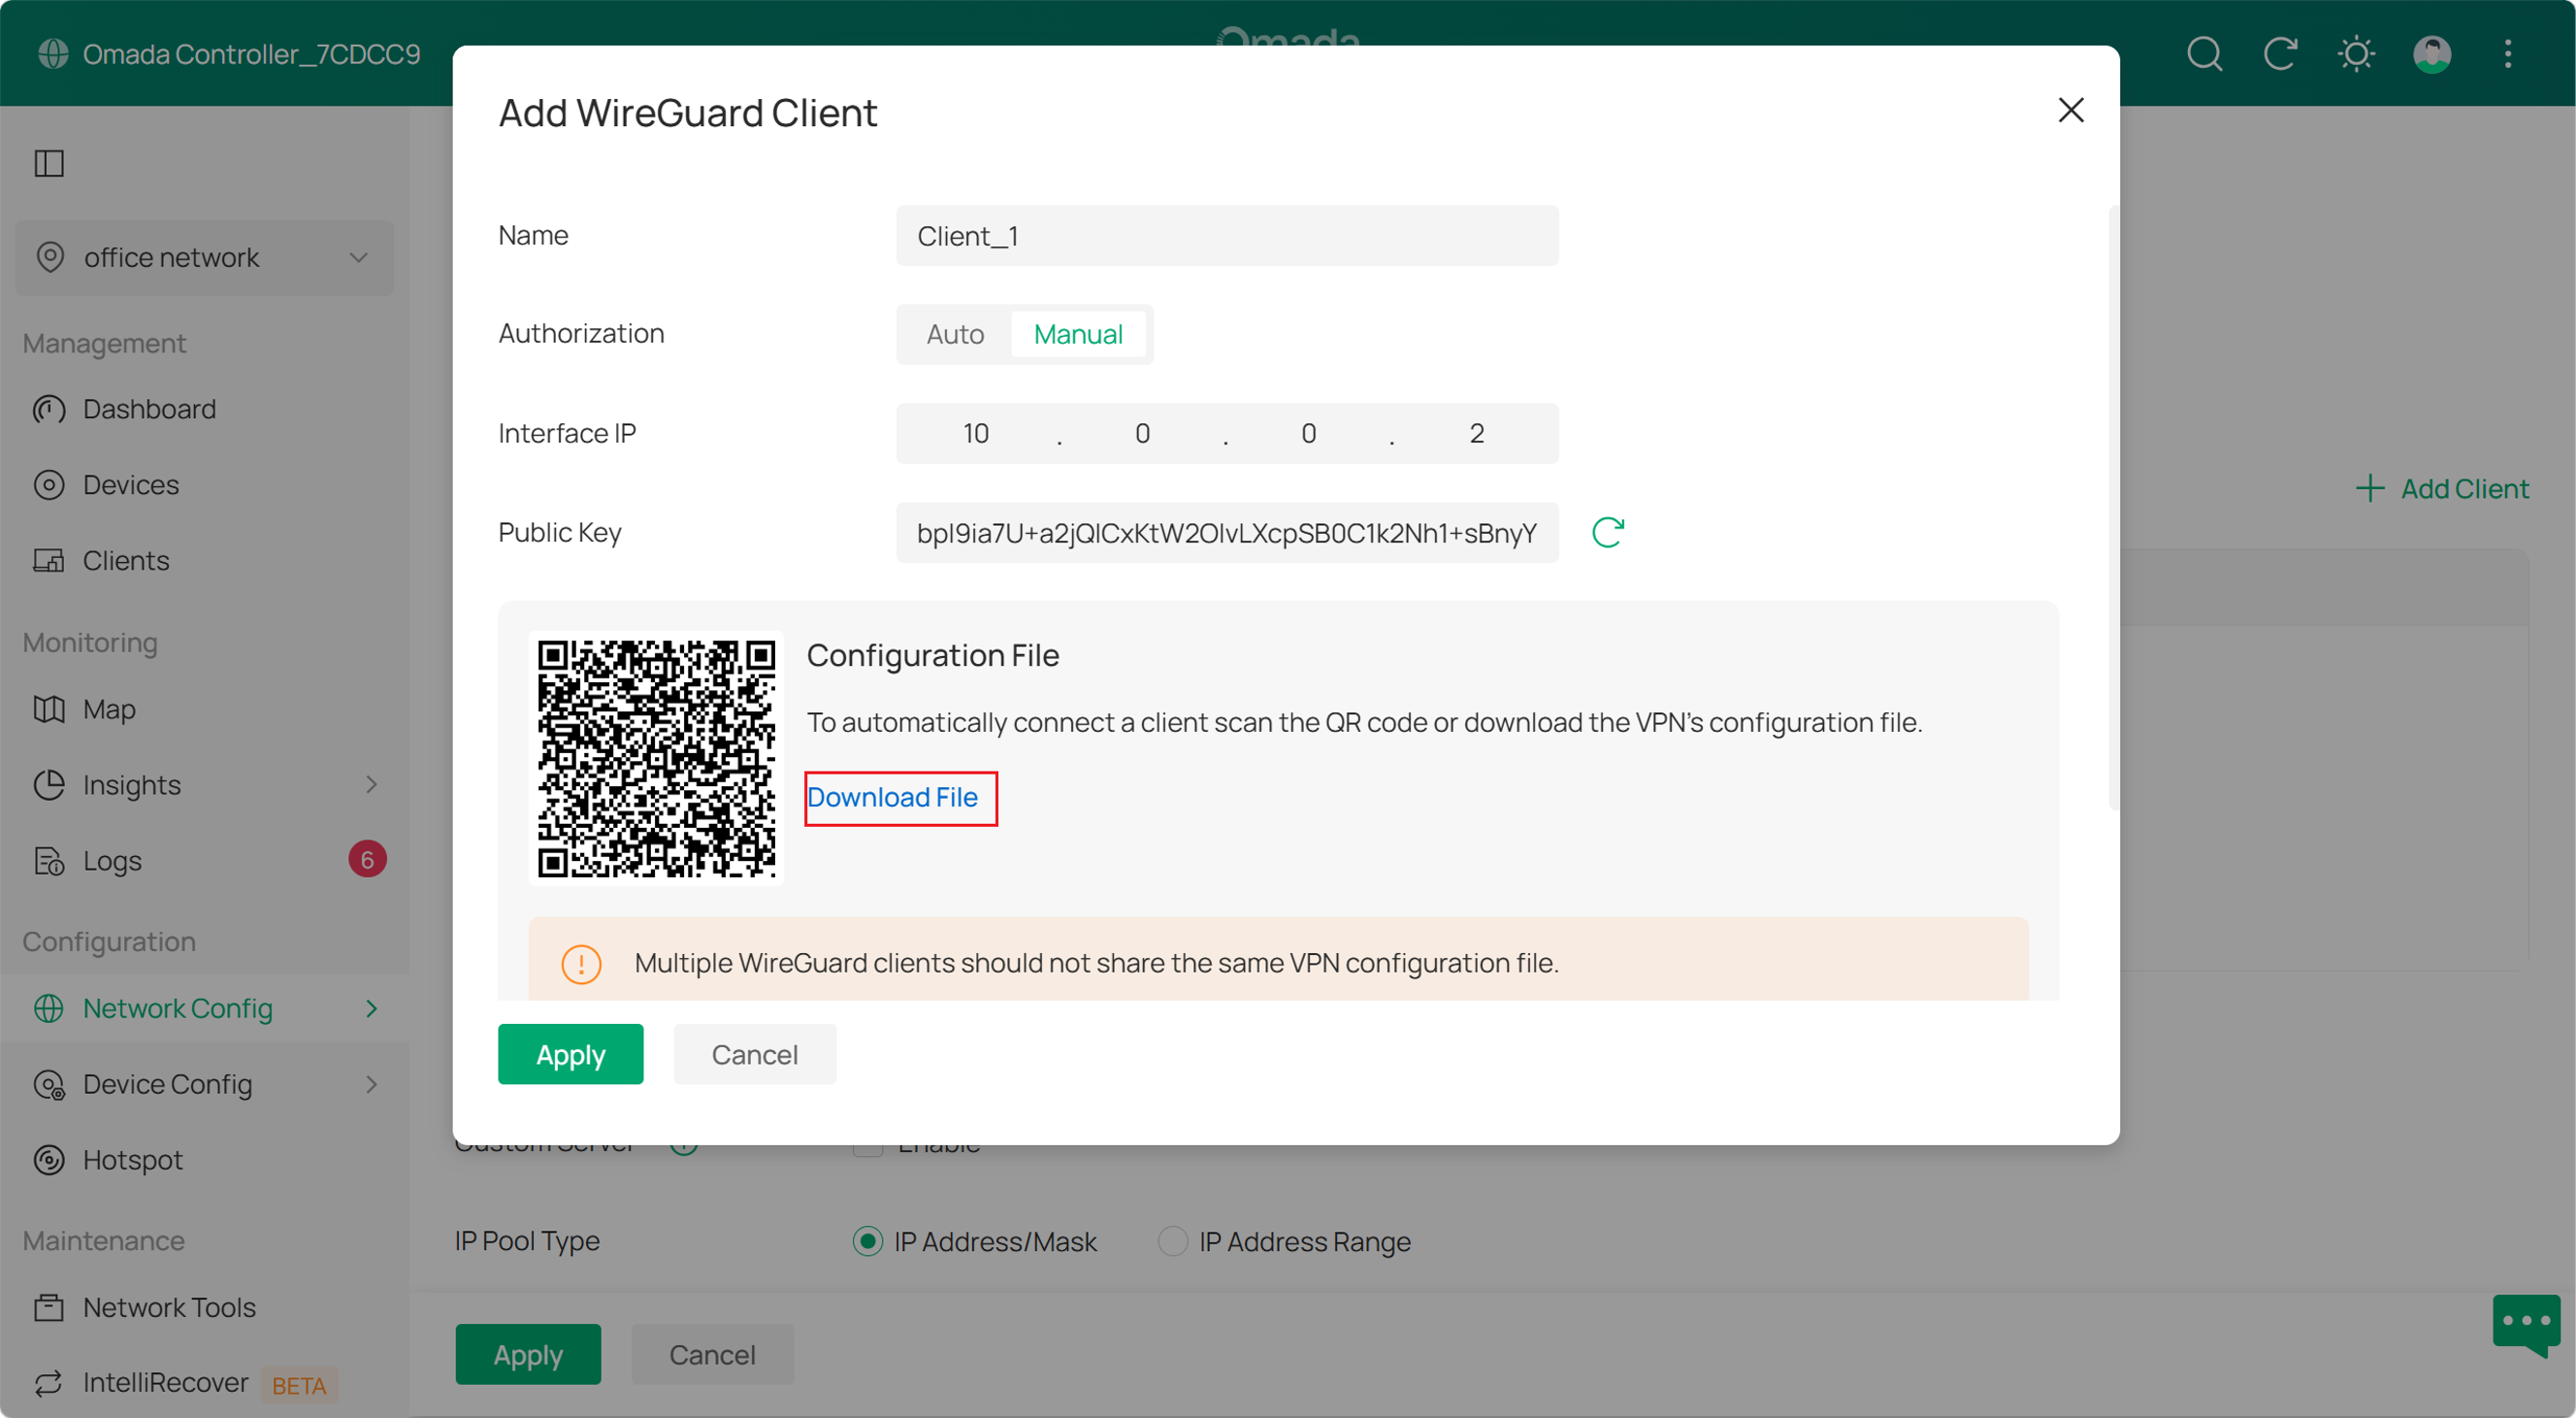
Go to Network Config > VPN > VPN Server, edit the VPN server we just created, scroll down and click +Add Client to start peer configuration. Then you will be able to add a set of WireGuard client configuration file. Switch Authorization to Manual if you need to modify certain parameters. Click download file or scan the QR code when you have finished. Then you will get a file telling you what to configuration on your WireGuard client side.
Step 3. Configure Omada VPN client.
Download the Omada VPN client to your PC from Download Omada VPN Client | Omada Network Support for example. Then, launch the client and click Add.
Select Type as WireGuard VPN. Then fill in the blank according to the client configuration file we just obtained.


In the Advanced Options section, Full VPN Traffic is enabled by default, indicating that all client traffic is forwarded through the VPN tunnel, which is the most common scenario. If needed, you can disable Full VPN Traffic and fill in the LAN IP resources that need to be accessed in Remote Subnets. Then click Confirm.
Conclusion
Now you have configured WireGuard VPN on Omada gateway. Enjoy your network!
To learn more about each function and configuration, please visit Support Home to download or check the manual for your product.
QA
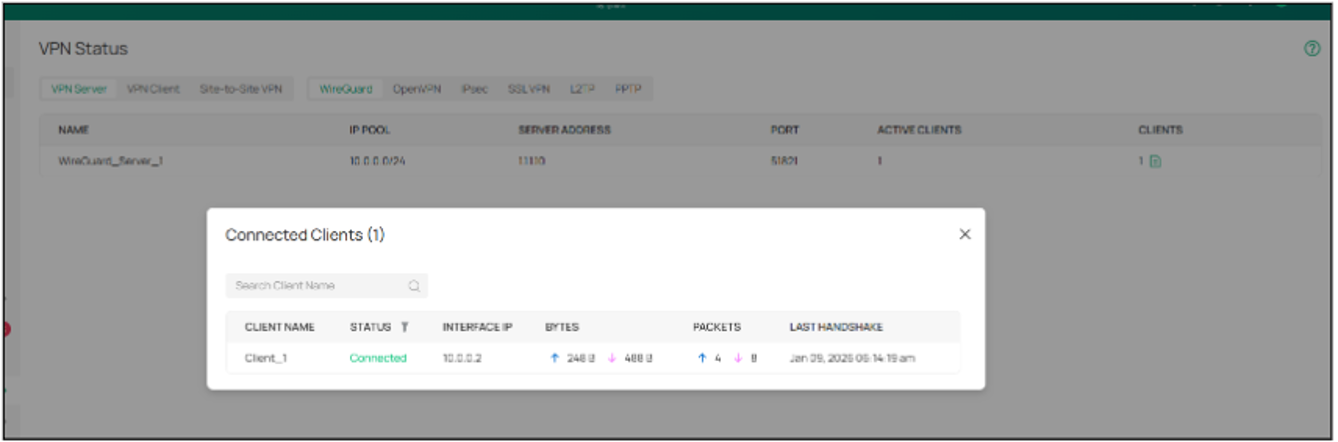
Q1: How do I check whether a tunnel is successfully established?
A1: On the web interface in standalone mode, In Status section the status bar will record the real-time uplink and downlink traffic and the last handshake; on the controller’s management interface, you can go to Network Config > VPN > VPN Status to view the real-time uplink and downlink traffic and the last handshake. Both the uplink and downlink traffic and timely updated handshake time indicate a success.
Q2: Why does communication fail even if the tunnel has been successfully established?
A2: This problem might be caused by improper Allowed Address configuration. Allowed Address indicates the address range that needs to pass the tunnel, so make sure that the destination address of the peer communication is included in the Allowed Address network segment. In addition, when the Allowed Address is configured as 0.0.0.0/0, that is, all traffic is allowed to enter the tunnel, the source IP during tunnel communication will be converted to the Local IP Address you configured, so ensure that the Local IP Address is within the Allowed Address of the peer WireGuard VPN.
Q3: Can VPNs of different types be created simultaneously?
A3: Yes. The premise is to ensure that all VPNs' routes (Allowed Address in WireGuard) are different so traffic with the corresponding destination address can enter the corresponding VPN tunnel.
