


Contents
Configuration – Controller mode
Block access to internal network from the internet
Allow access to internal network from the internet
Configuration – Standalone mode
Block access to internal network from the internet
Allow access to internal network from the internet
Block access to internal network from the internet
Allow access to internal network from the internet
Introduction
An access control list (ACL) allows a network administrator to create rules to restrict access to network resources. ACL rules filter traffic based on specified criteria such as source IP addresses, destination IP addresses, and port numbers, and determine whether to forward the matched packets.
Requirements
- Omada Gateway
- Controller mode: Omada Software Controller, Hardware Controller, Cloud-Based Controller, or Fusion Gateway.
- Standalone mode: No controller is required. Configure the gateway directly through its standalone web interface.
Configuration – Controller mode
Here we will introduce the configuration steps for Controller mode based on typical user scenarios.
Initial configuration
Before configuring IPv6 Access Control, IPv6 connectivity must be established on the Omada Gateway. The following steps demonstrate how to configure IPv6 on the WAN and LAN interfaces. This configuration is required for all three scenarios covered in this guide.
The IPv6 addresses and prefixes shown are examples and may differ between scenarios. The subsequent ACL configuration examples use the 3000:458:ff01::/64 prefix for the internal network.
This example uses an ER7206 Gateway.
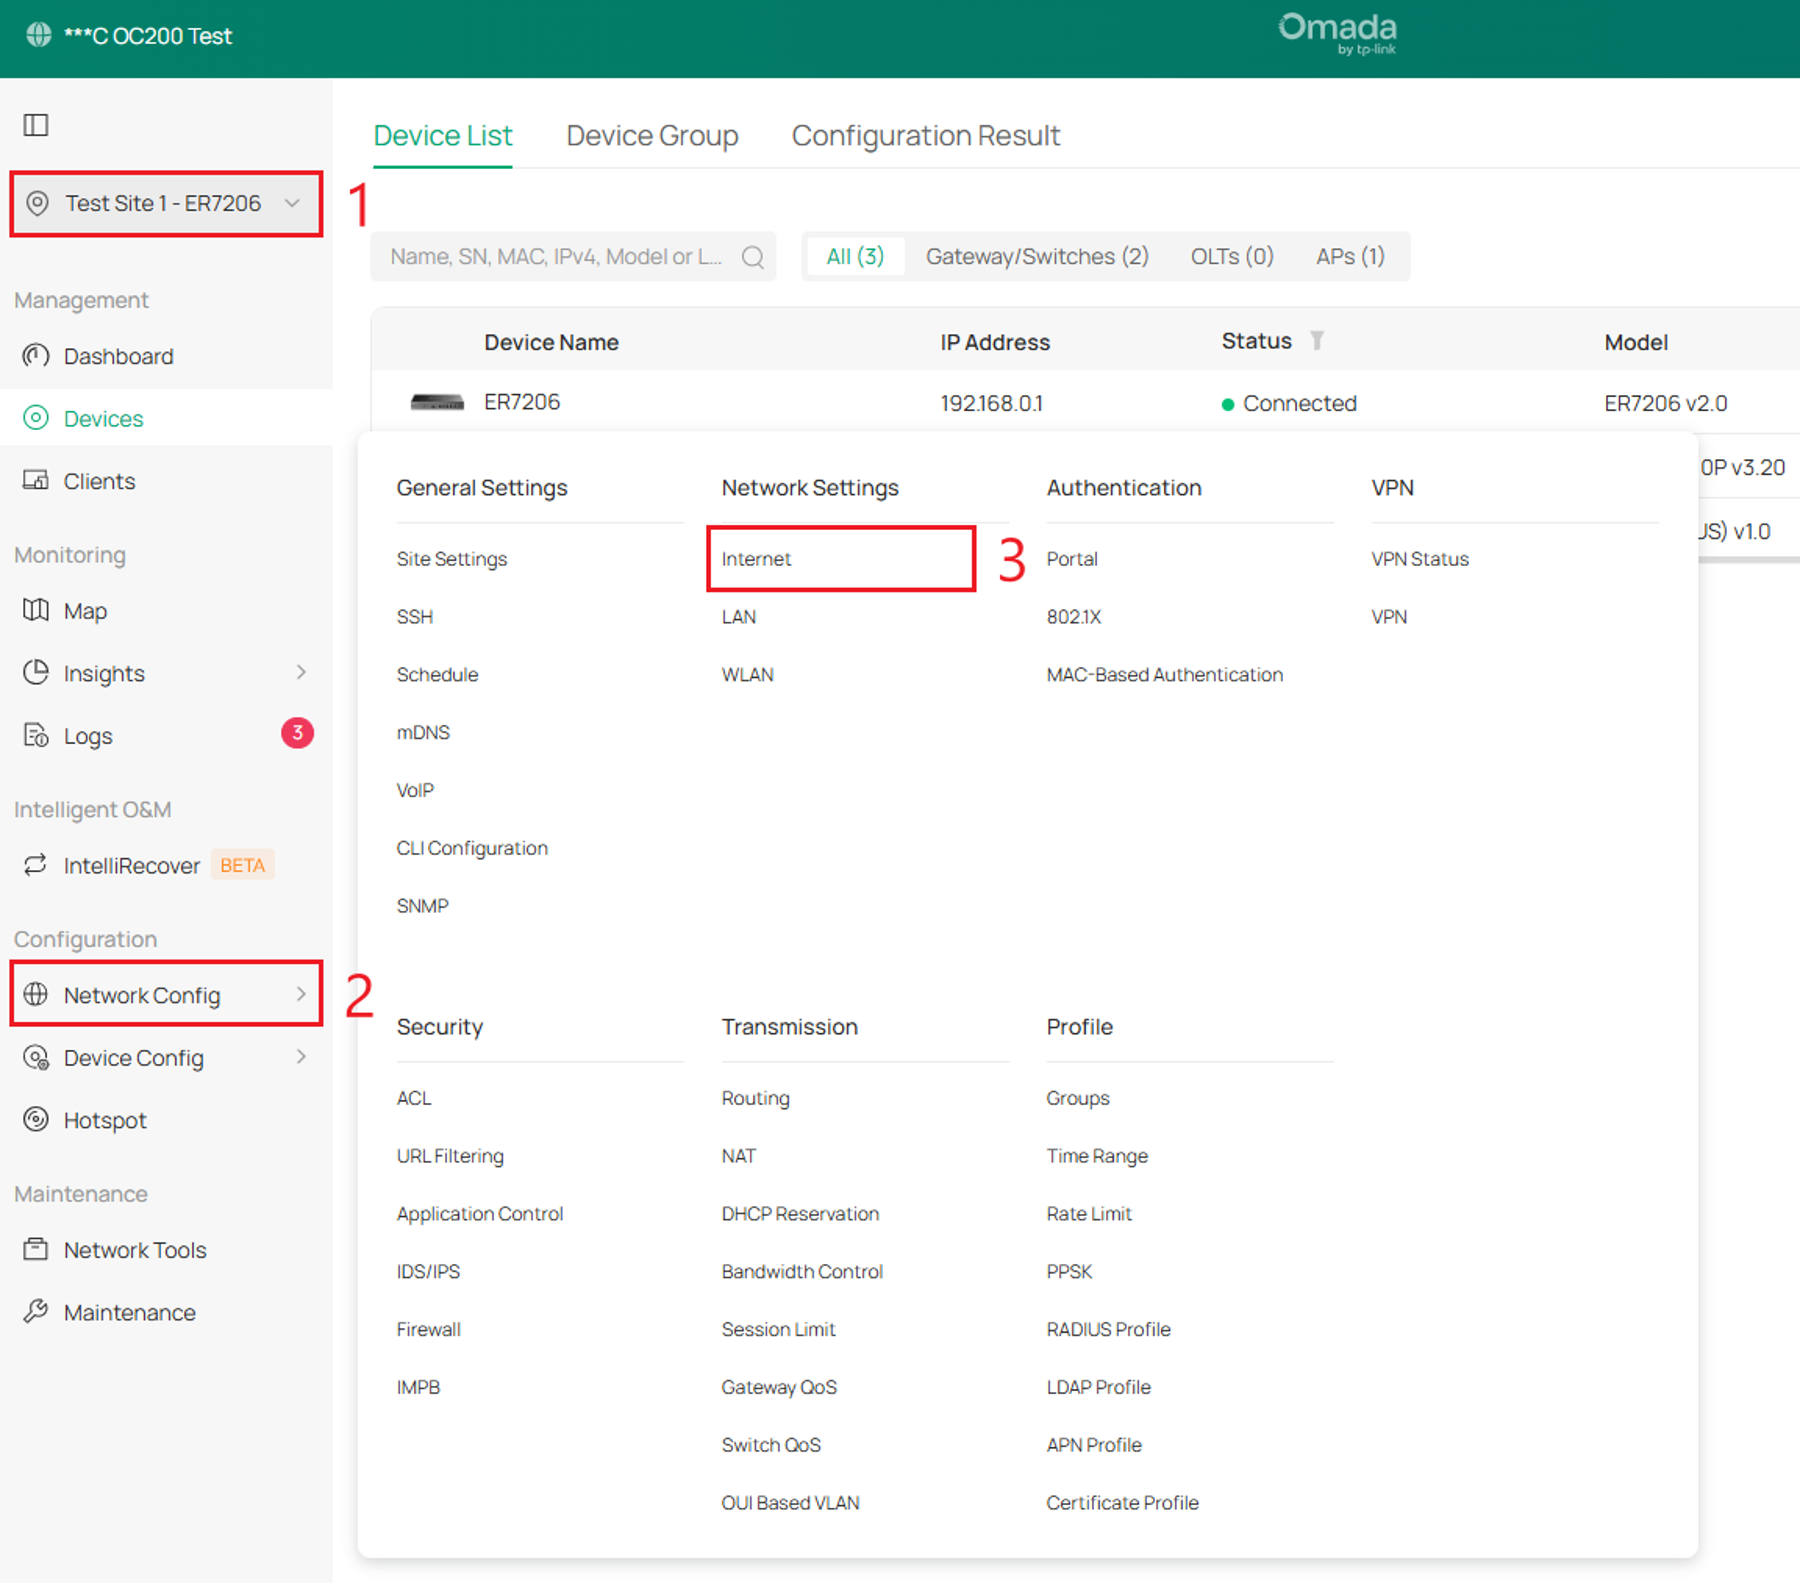
Step 1. Configure WAN IPv6 connection. In Site View, select Network Config > Internet.
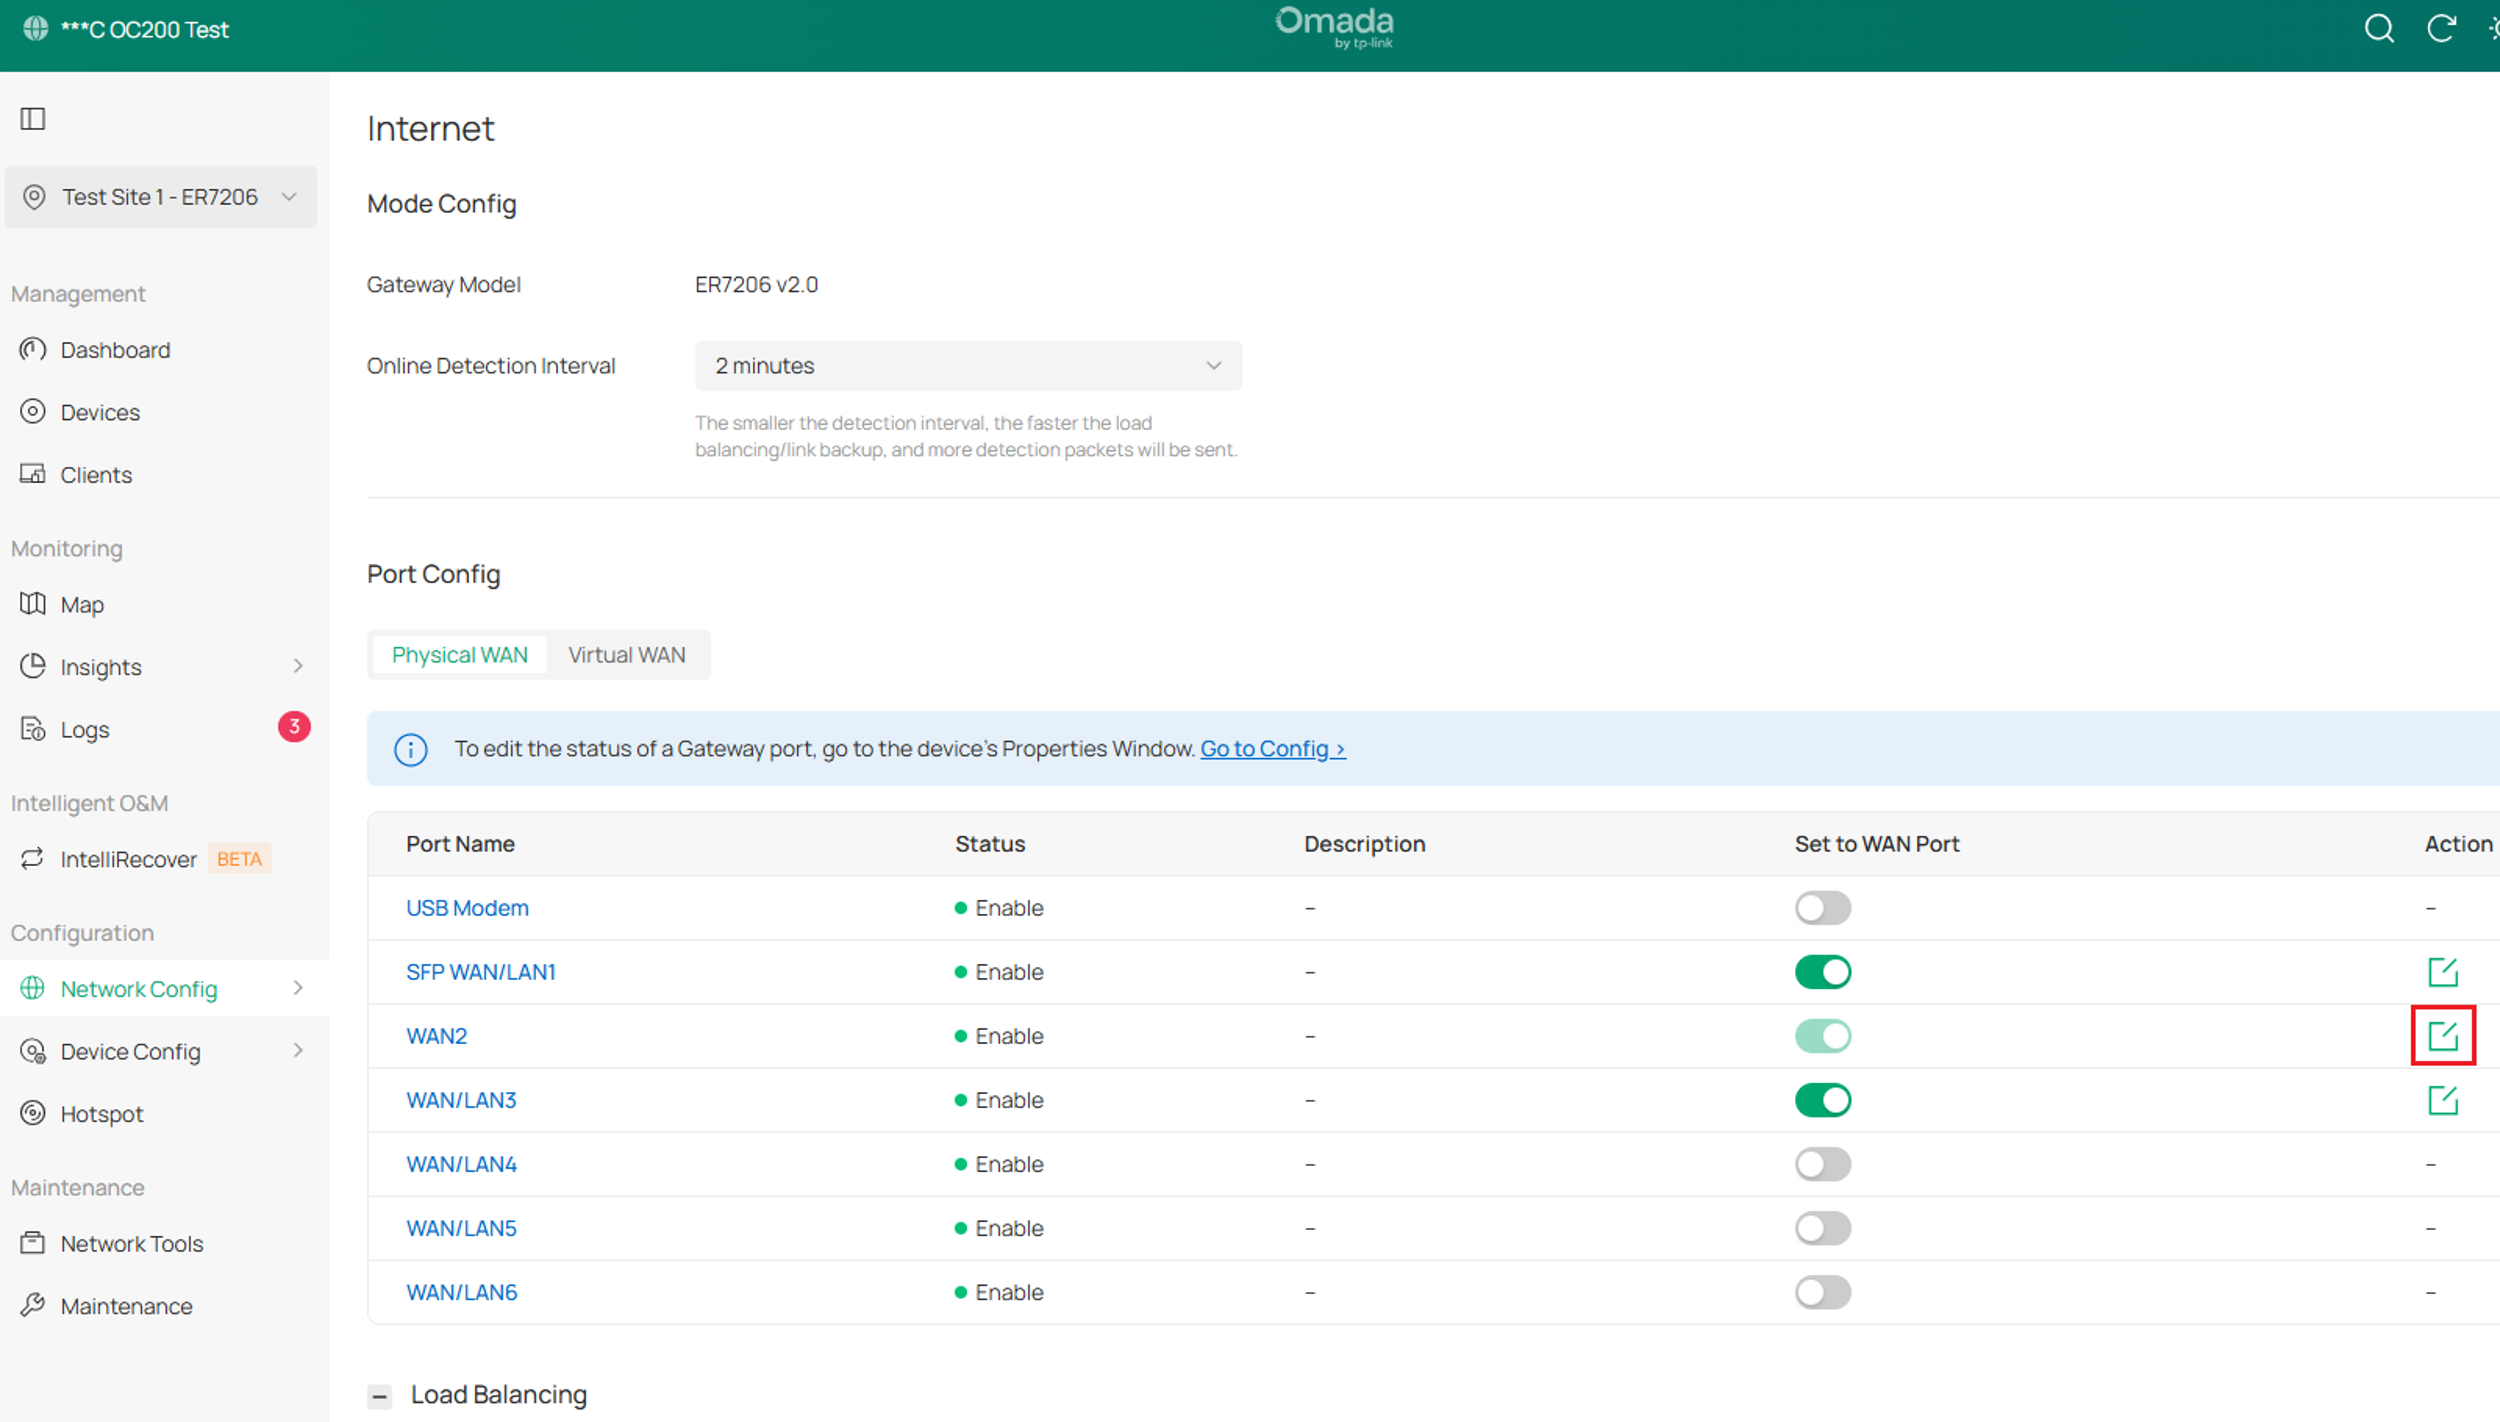
Step 2. Select the Edit icon next to the active WAN port. In this example, it is WAN2.
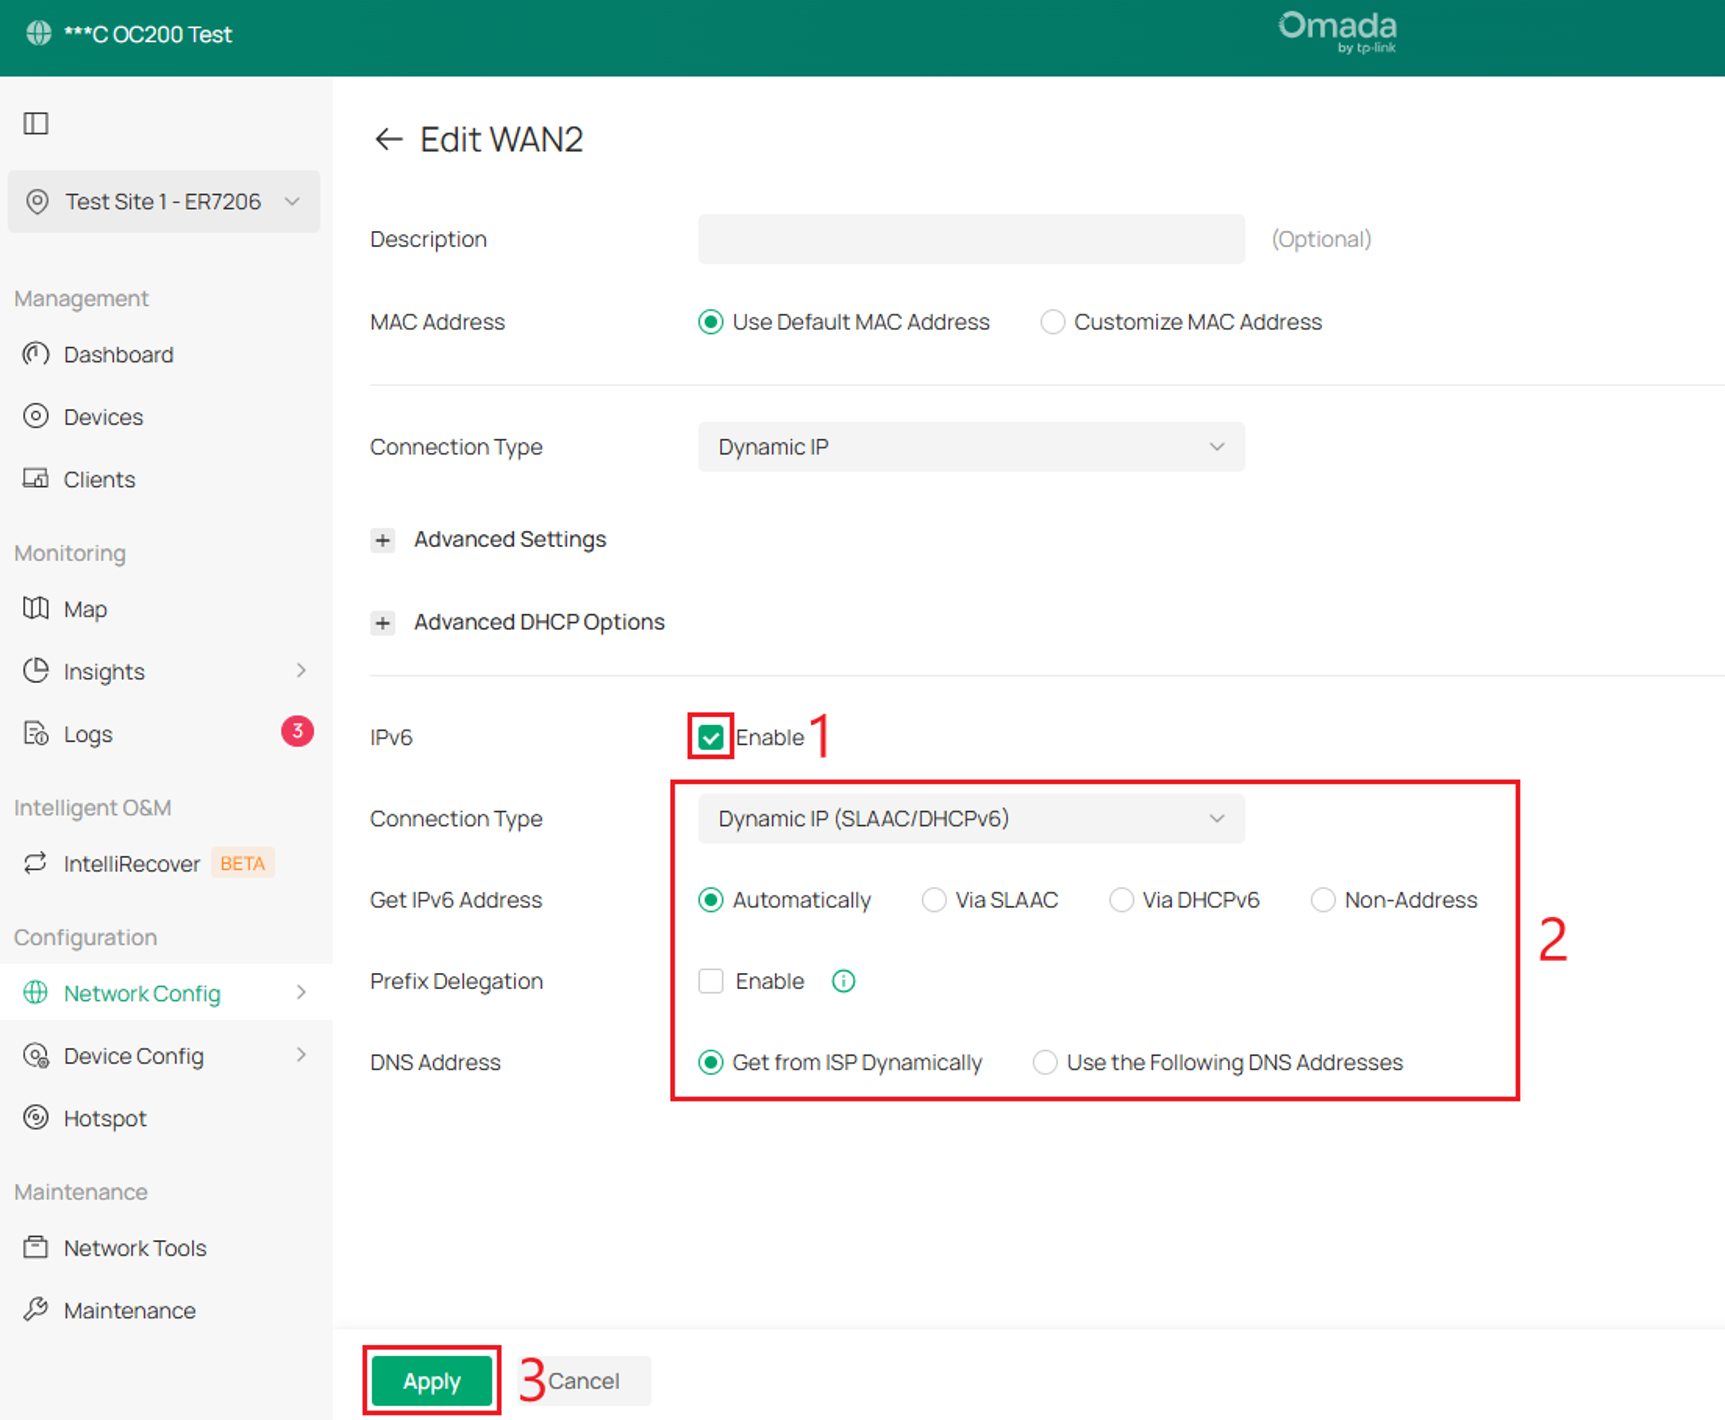
Step 3. In the IPv6 section, enable IPv6 and configure the Connection Type and other parameters according to your network requirements. Click Apply to save the settings.
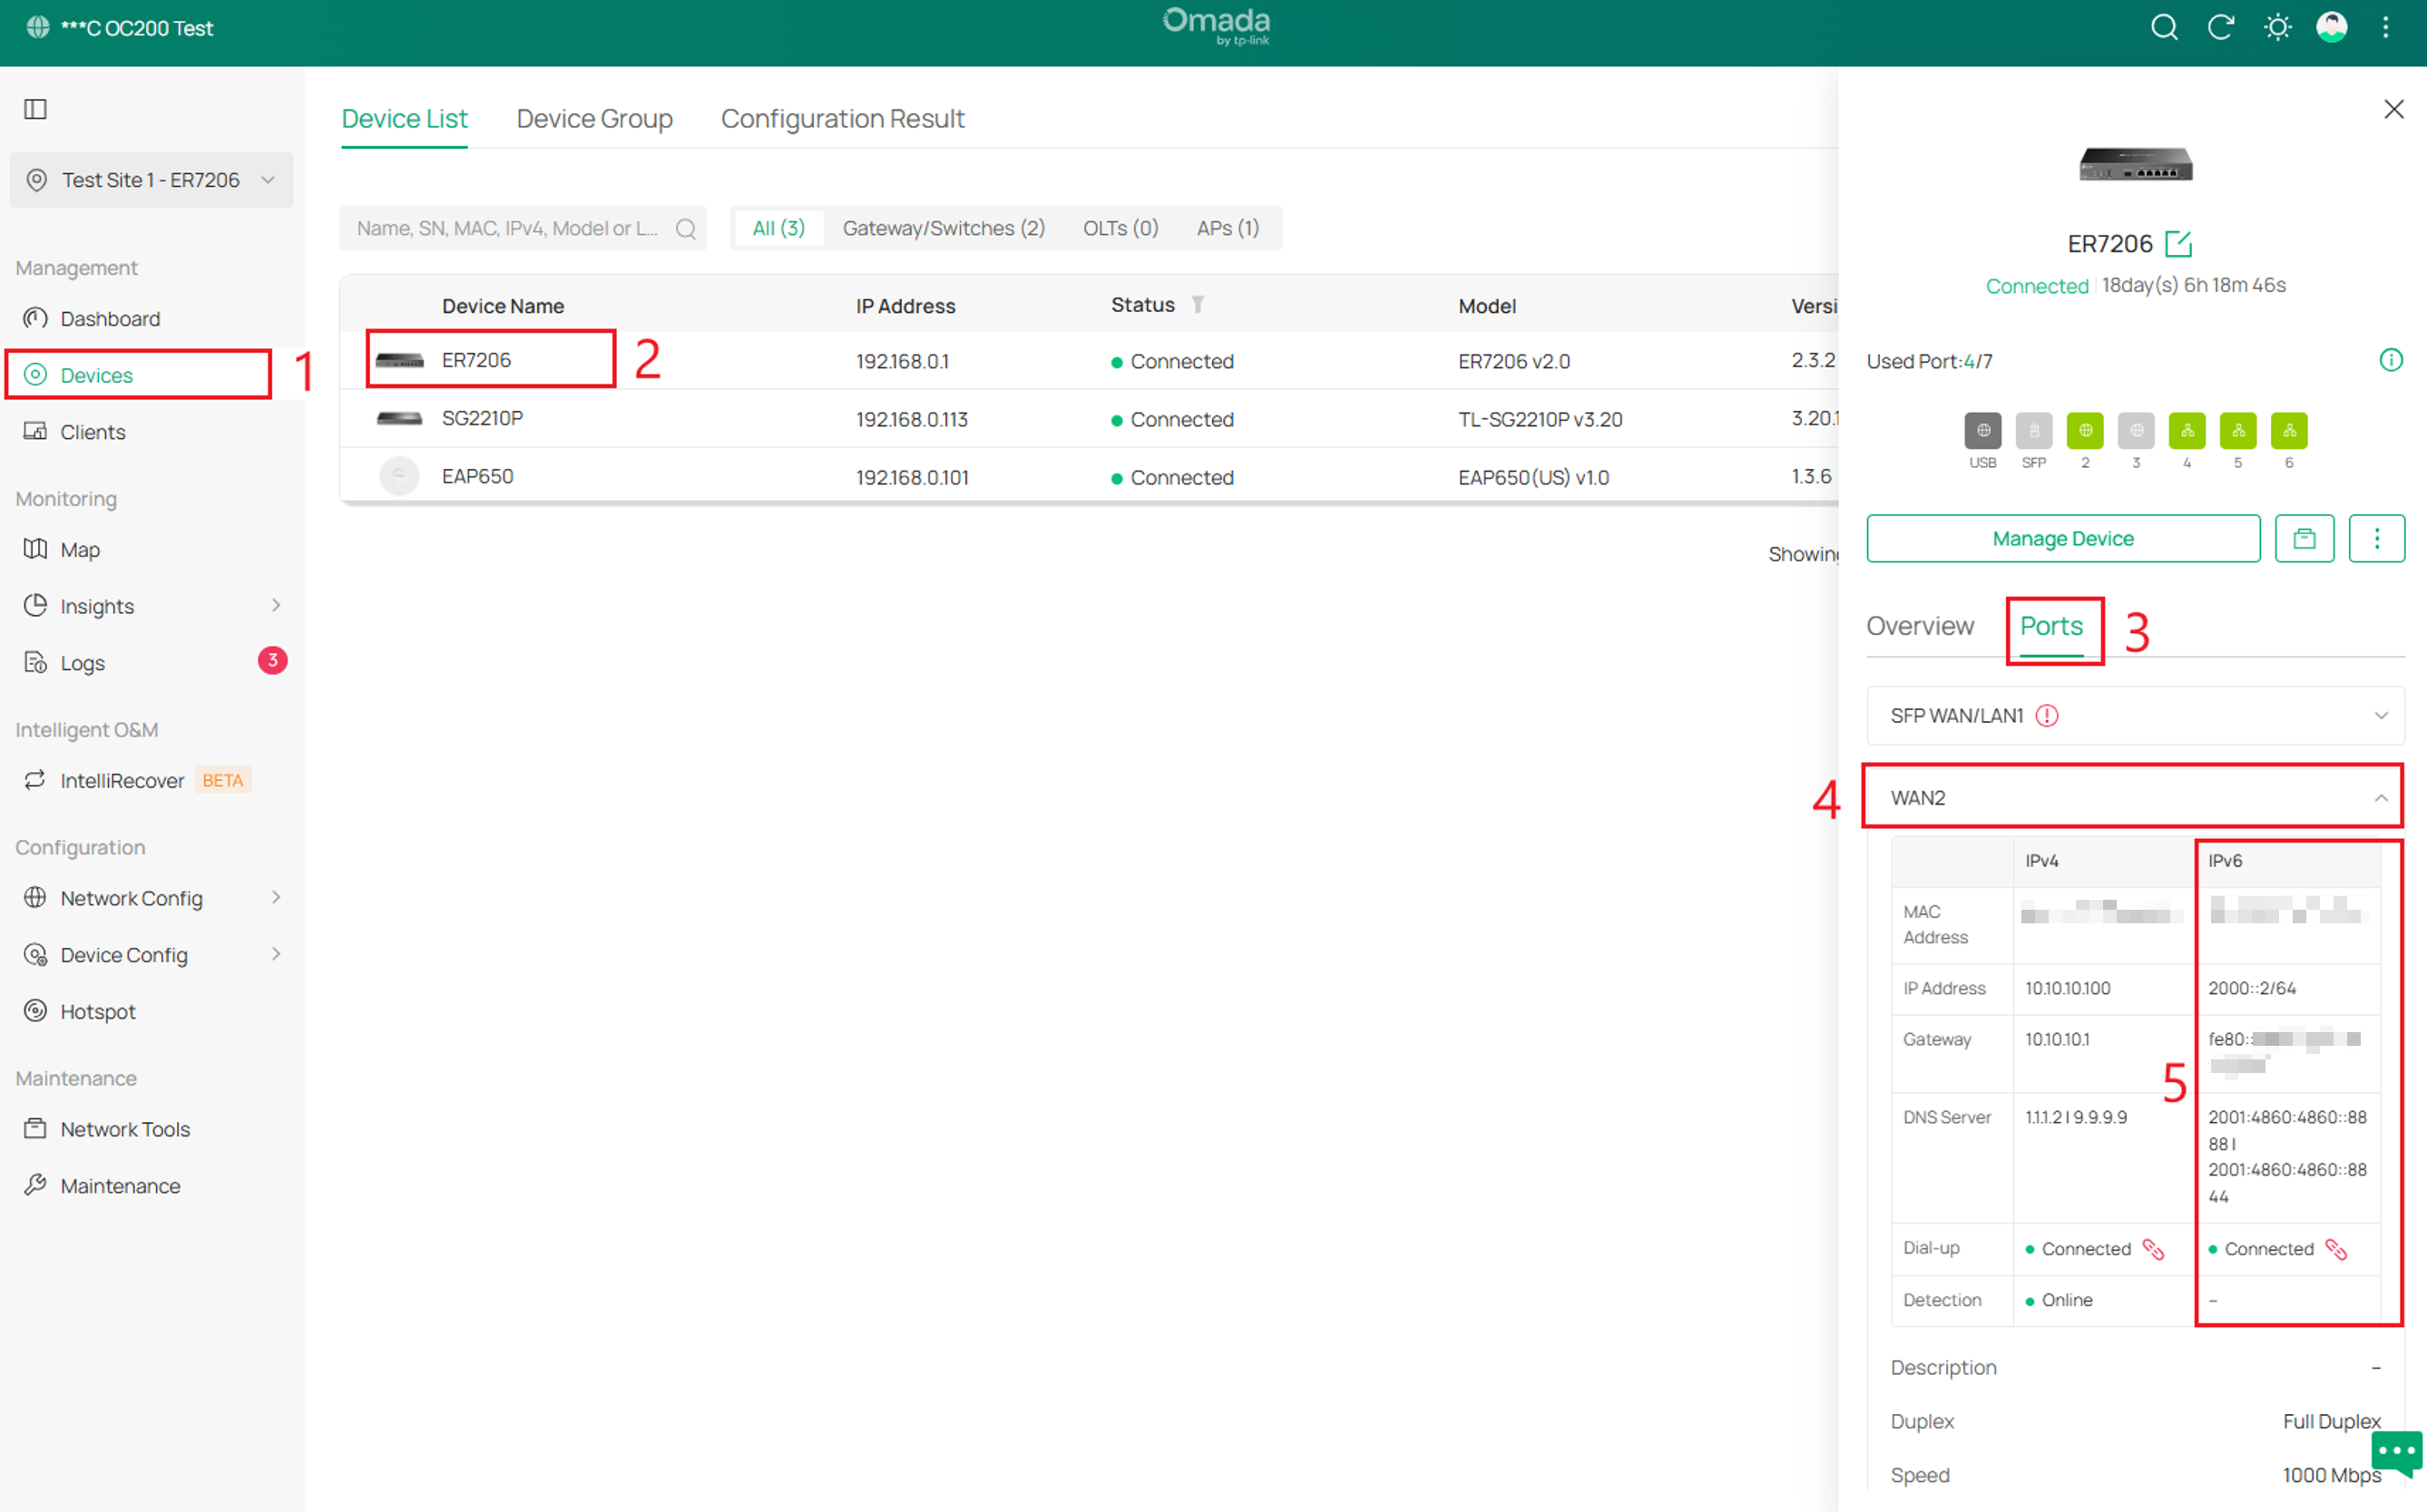
Step 4. To verify that the gateway is connected via IPv6, go to Devices, select the gateway, select Ports, and then select the WAN interface to check the IPv6 status.
Note: In the Dial-up row, click the red reconnect button next to Disconnected to refresh the connection if the status shows as Disconnected.
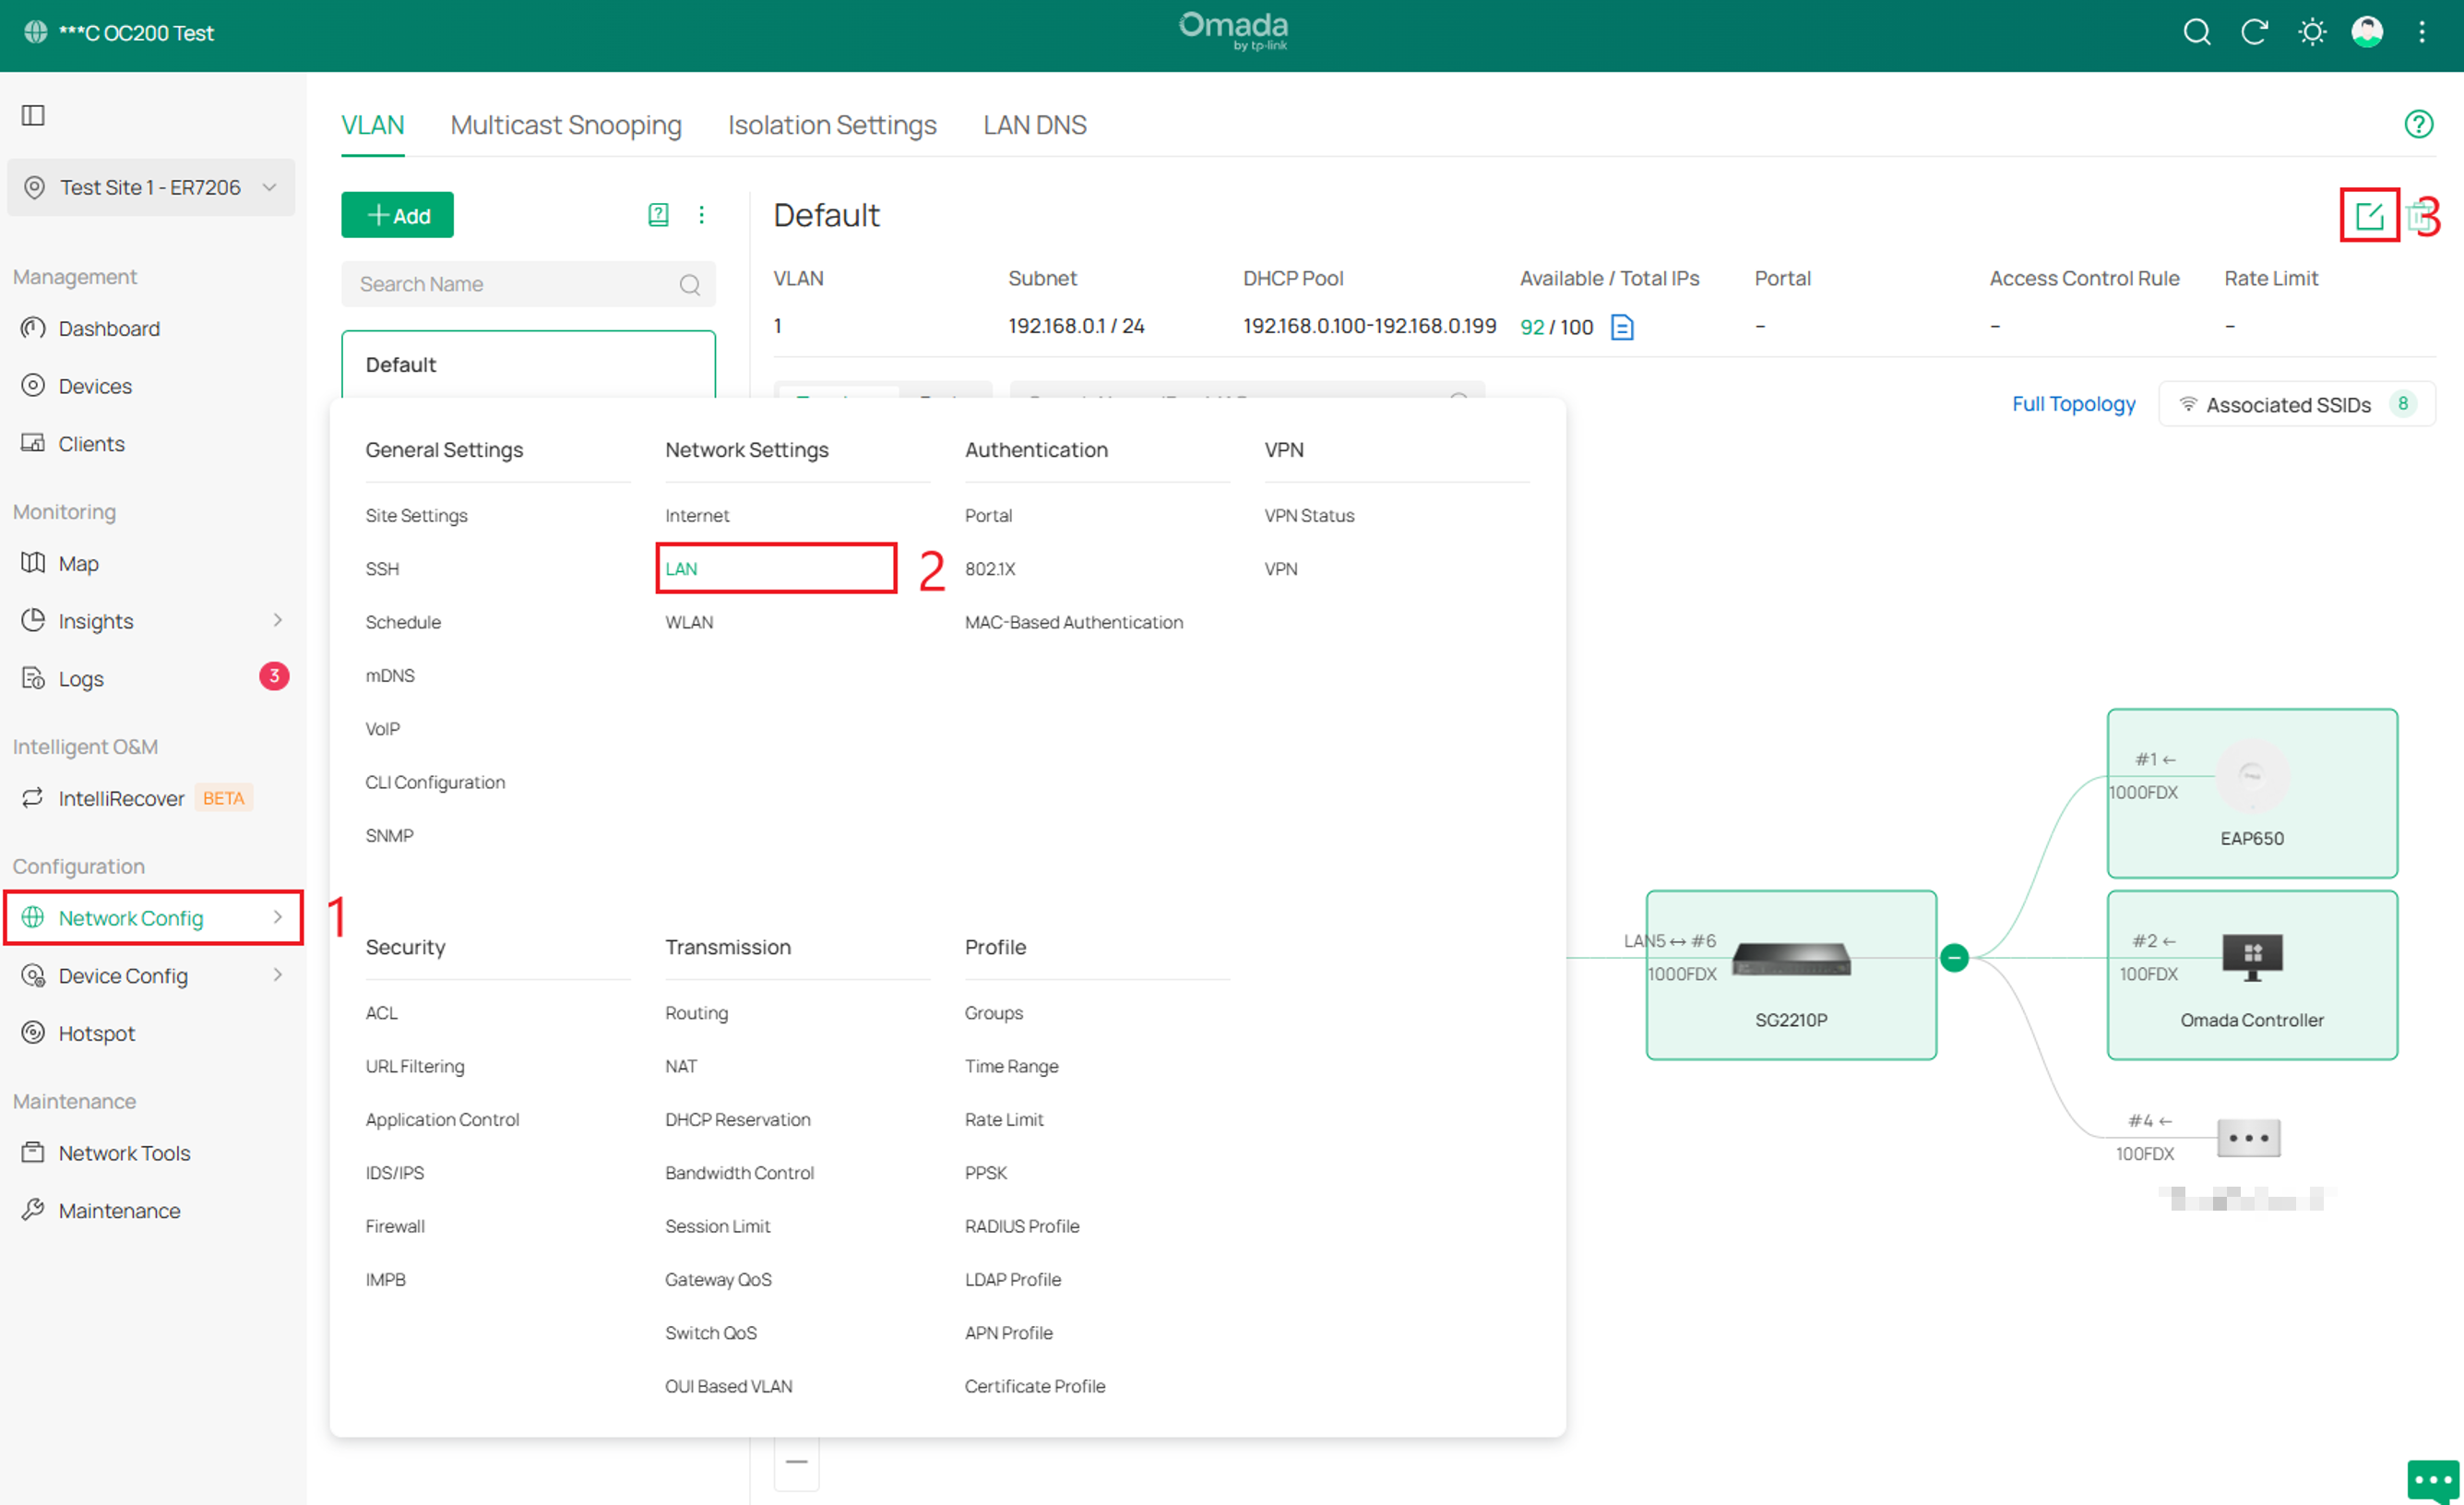
Step 5. Go to Network Config > LAN and click the Edit icon to open the LAN configuration page.
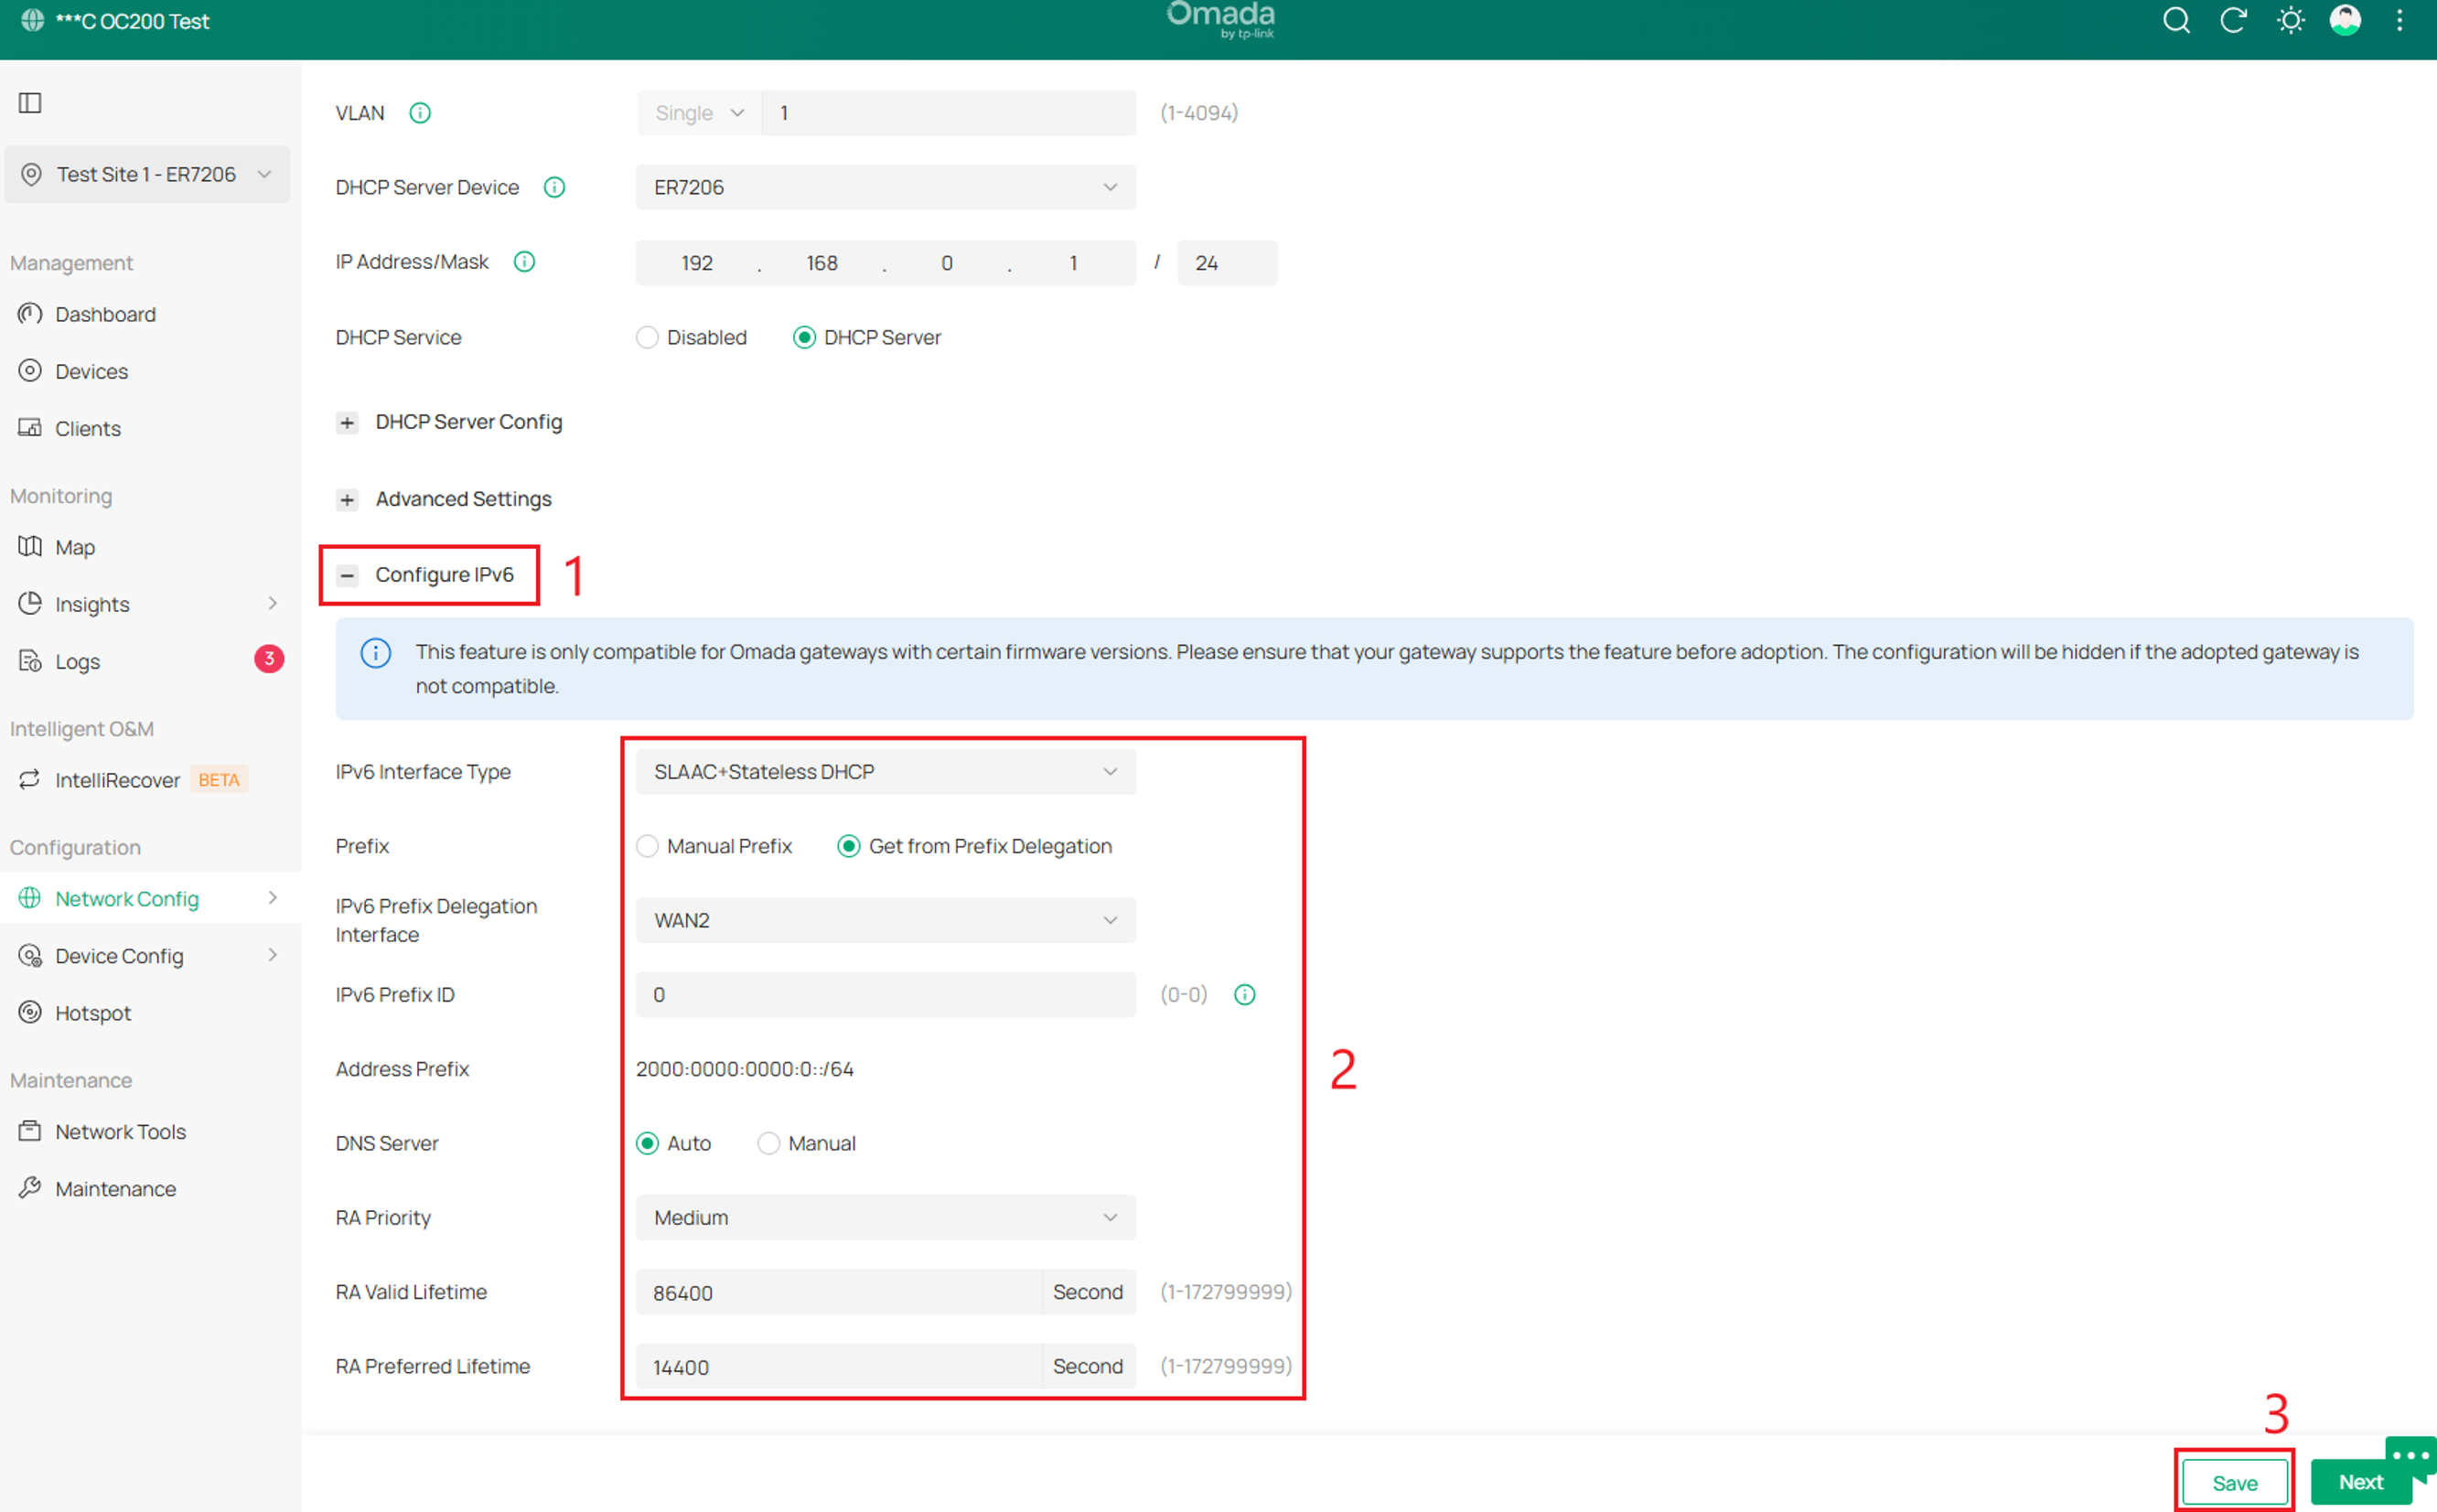
Step 6. Expand Configure IPv6, configure IPv6 Interface Type and the other parameters according to your network requirements, and then click Save. Select Apply to confirm the settings.
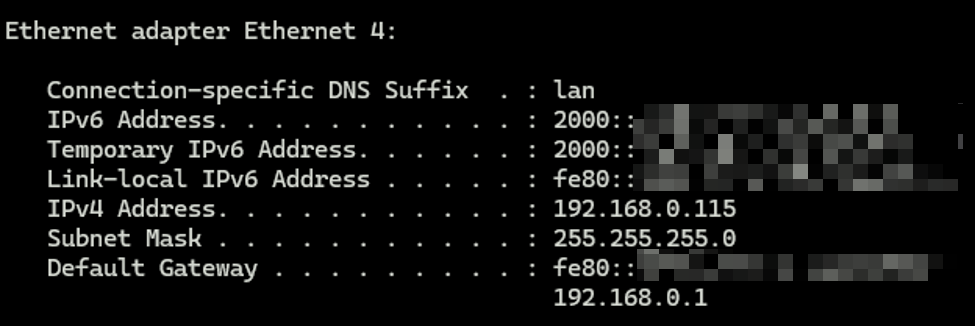
To verify the configuration, confirm that IPv6 is configured correctly on the WAN and LAN interfaces, including prefix delegation from the ISP if applicable. Connect a client to the LAN and verify that it obtains a global IPv6 address and an IPv6 default gateway.
Block access to internal network from the internet
By default, the gateway's WAN firewall blocks most new IPv6 connections initiated from the internet to devices on the LAN. Certain control traffic, such as DHCPv6 and required ICMPv6 messages, may still be permitted to maintain IPv6 connectivity. No additional ACL rules are required to block most unsolicited inbound connections to LAN devices.
Note: This behavior applies to traffic forwarded to LAN devices, not services hosted on the gateway itself, such as web management or SSH. Access to these services should be reviewed separately.
Allow access to internal network from the internet
Step 1. Under Site View, go to Network Config > Groups. Then select Create New Group.
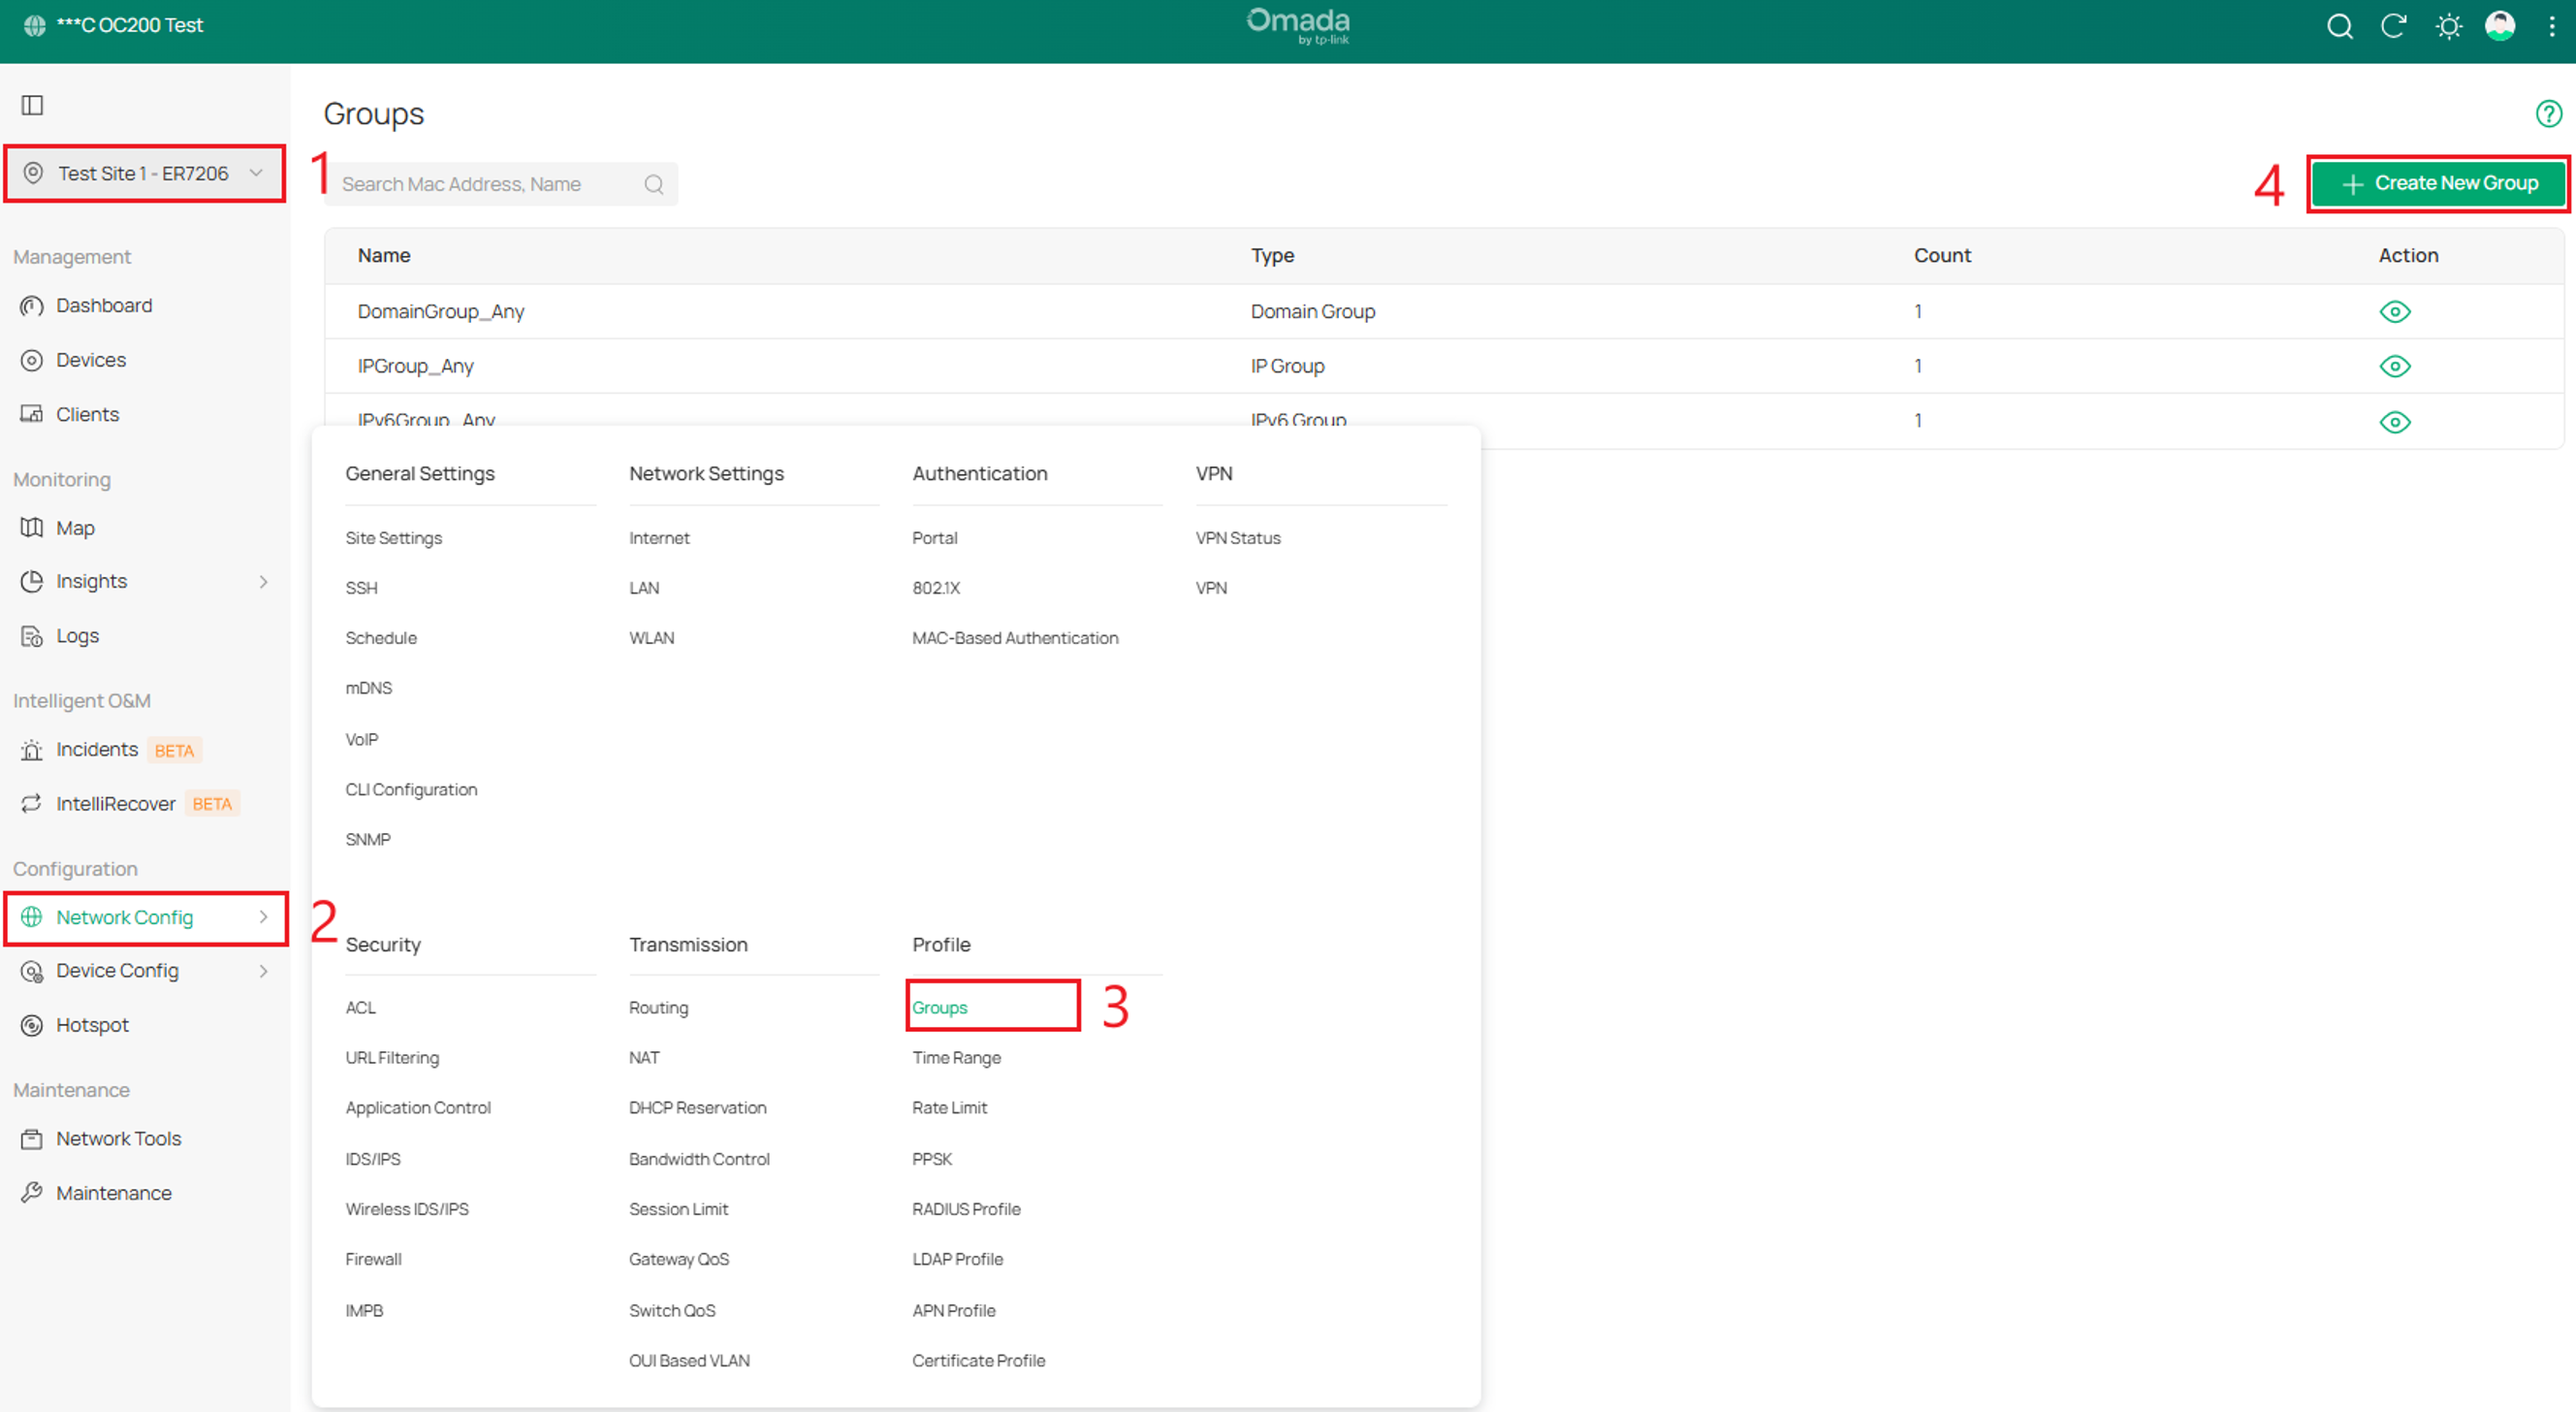
We will create an IPv6 Group called my_server and the external IPv6 Group my_client.
Step 2. Fill in the Name field and select IPv6 Group as the Type. Enter the IPv6 address and prefix for the group, then click Apply.
Note: Use a /128 prefix to match a single IPv6 address or a /64 prefix to match an entire IPv6 subnet. For example, use /128 for my_server unless access to the entire server subnet is required.
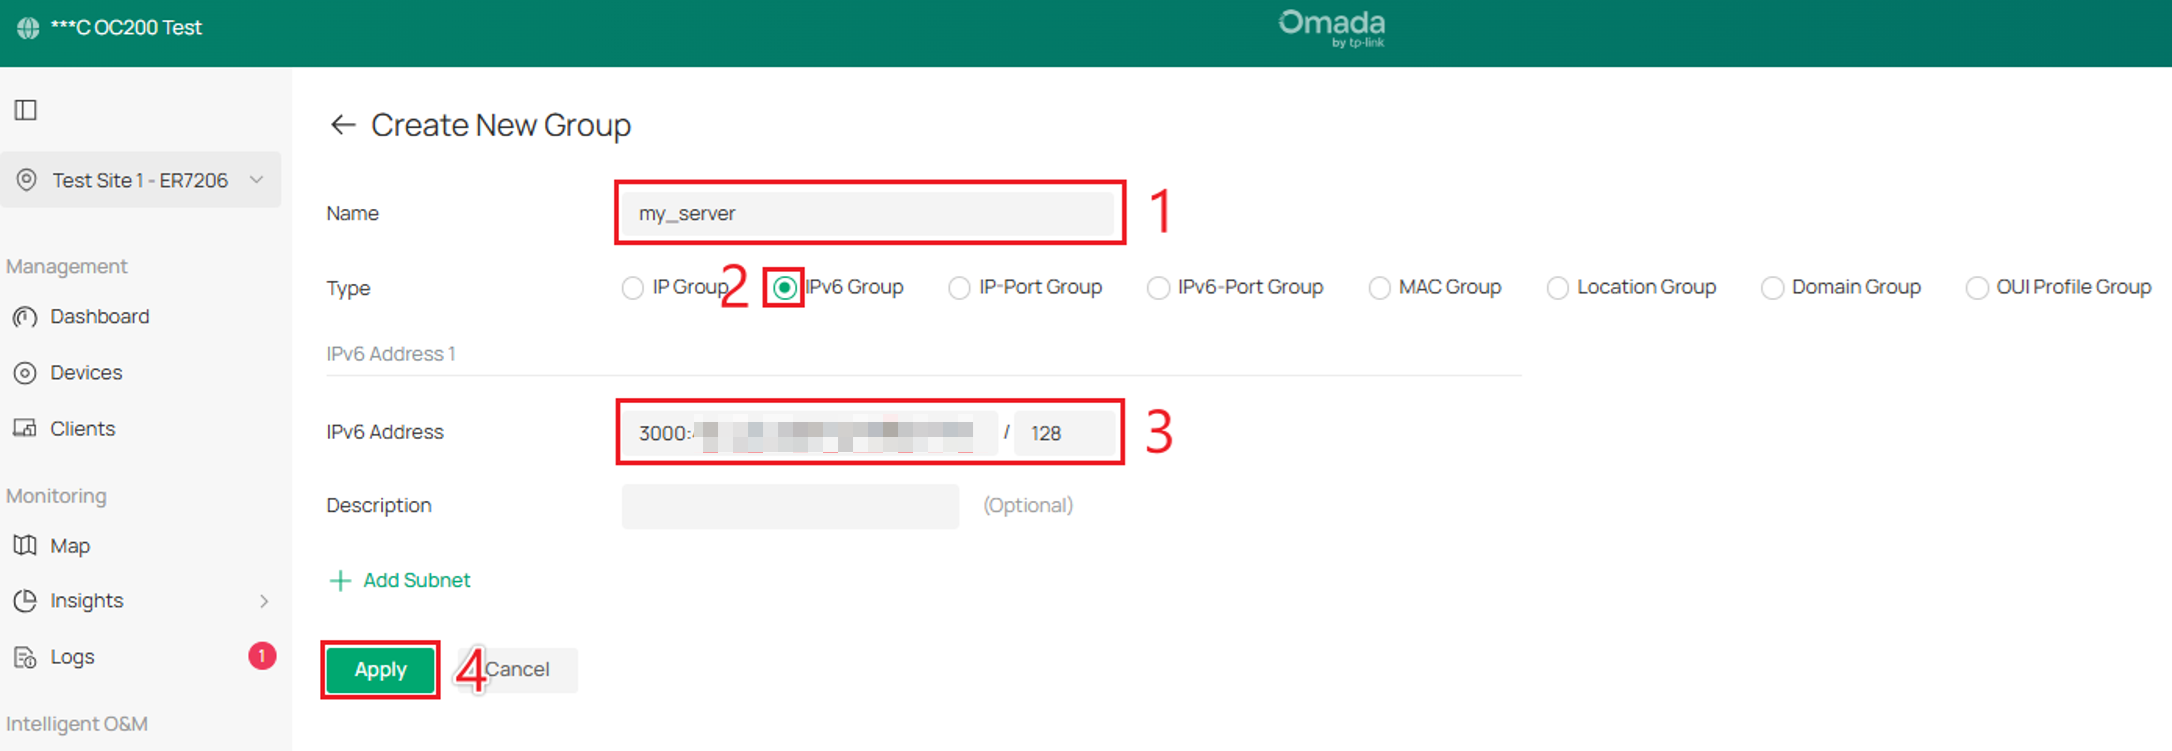
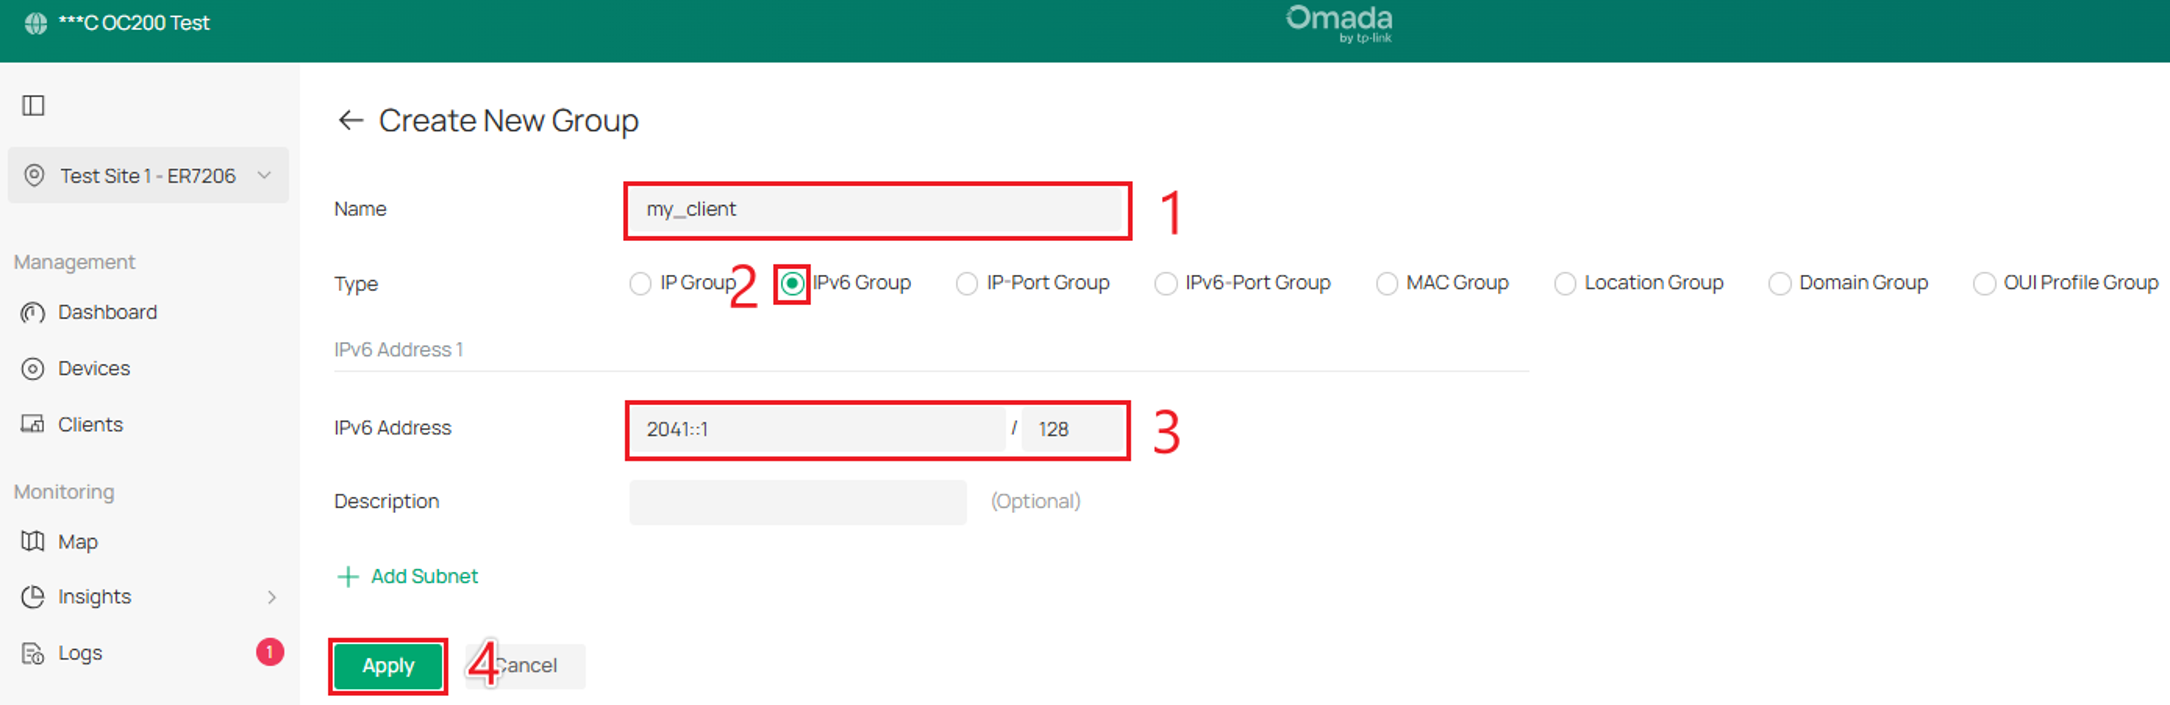
Step 3. Select Create New Group again, fill out the Name field and select Type as IPv6 Group. Enter an IPv6 address for the group and select Apply.
Note: A /128 prefix matches a single IPv6 address, restricting the rule to one external device. Use a /64 prefix if the rule needs to apply to an entire IPv6 subnet.
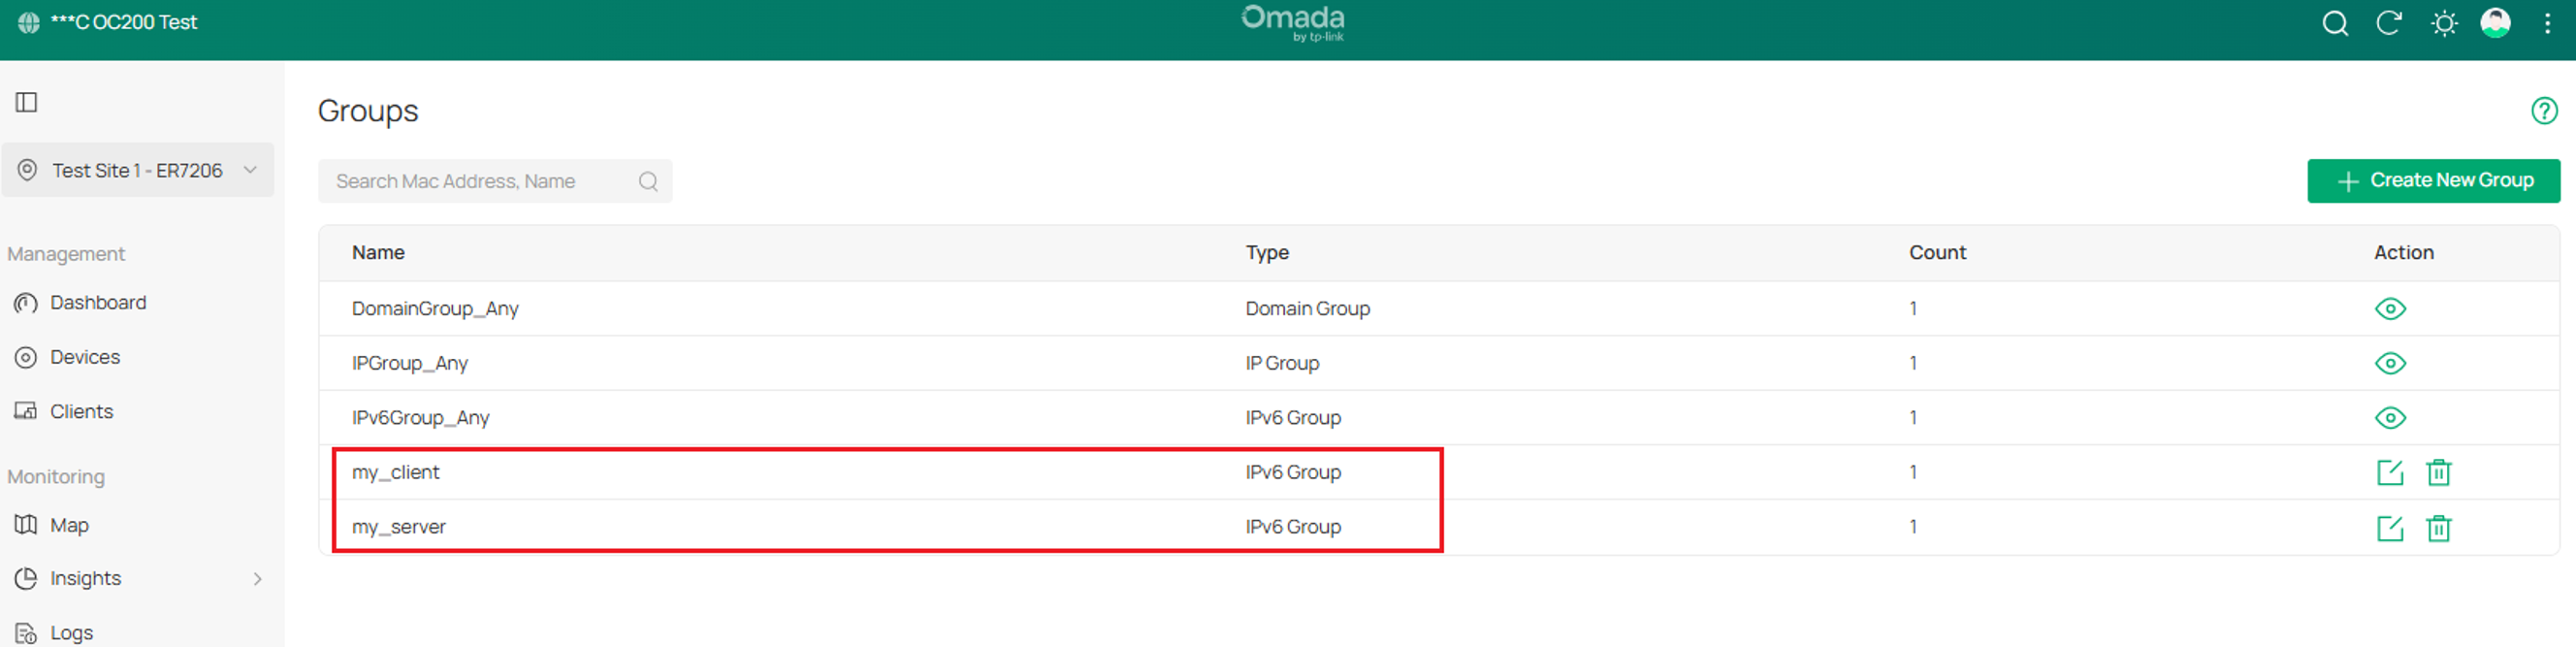
Step 4. Confirm that the IPv6 groups were created successfully. After selecting Apply, the Groups page displays the new IPv6 entries.
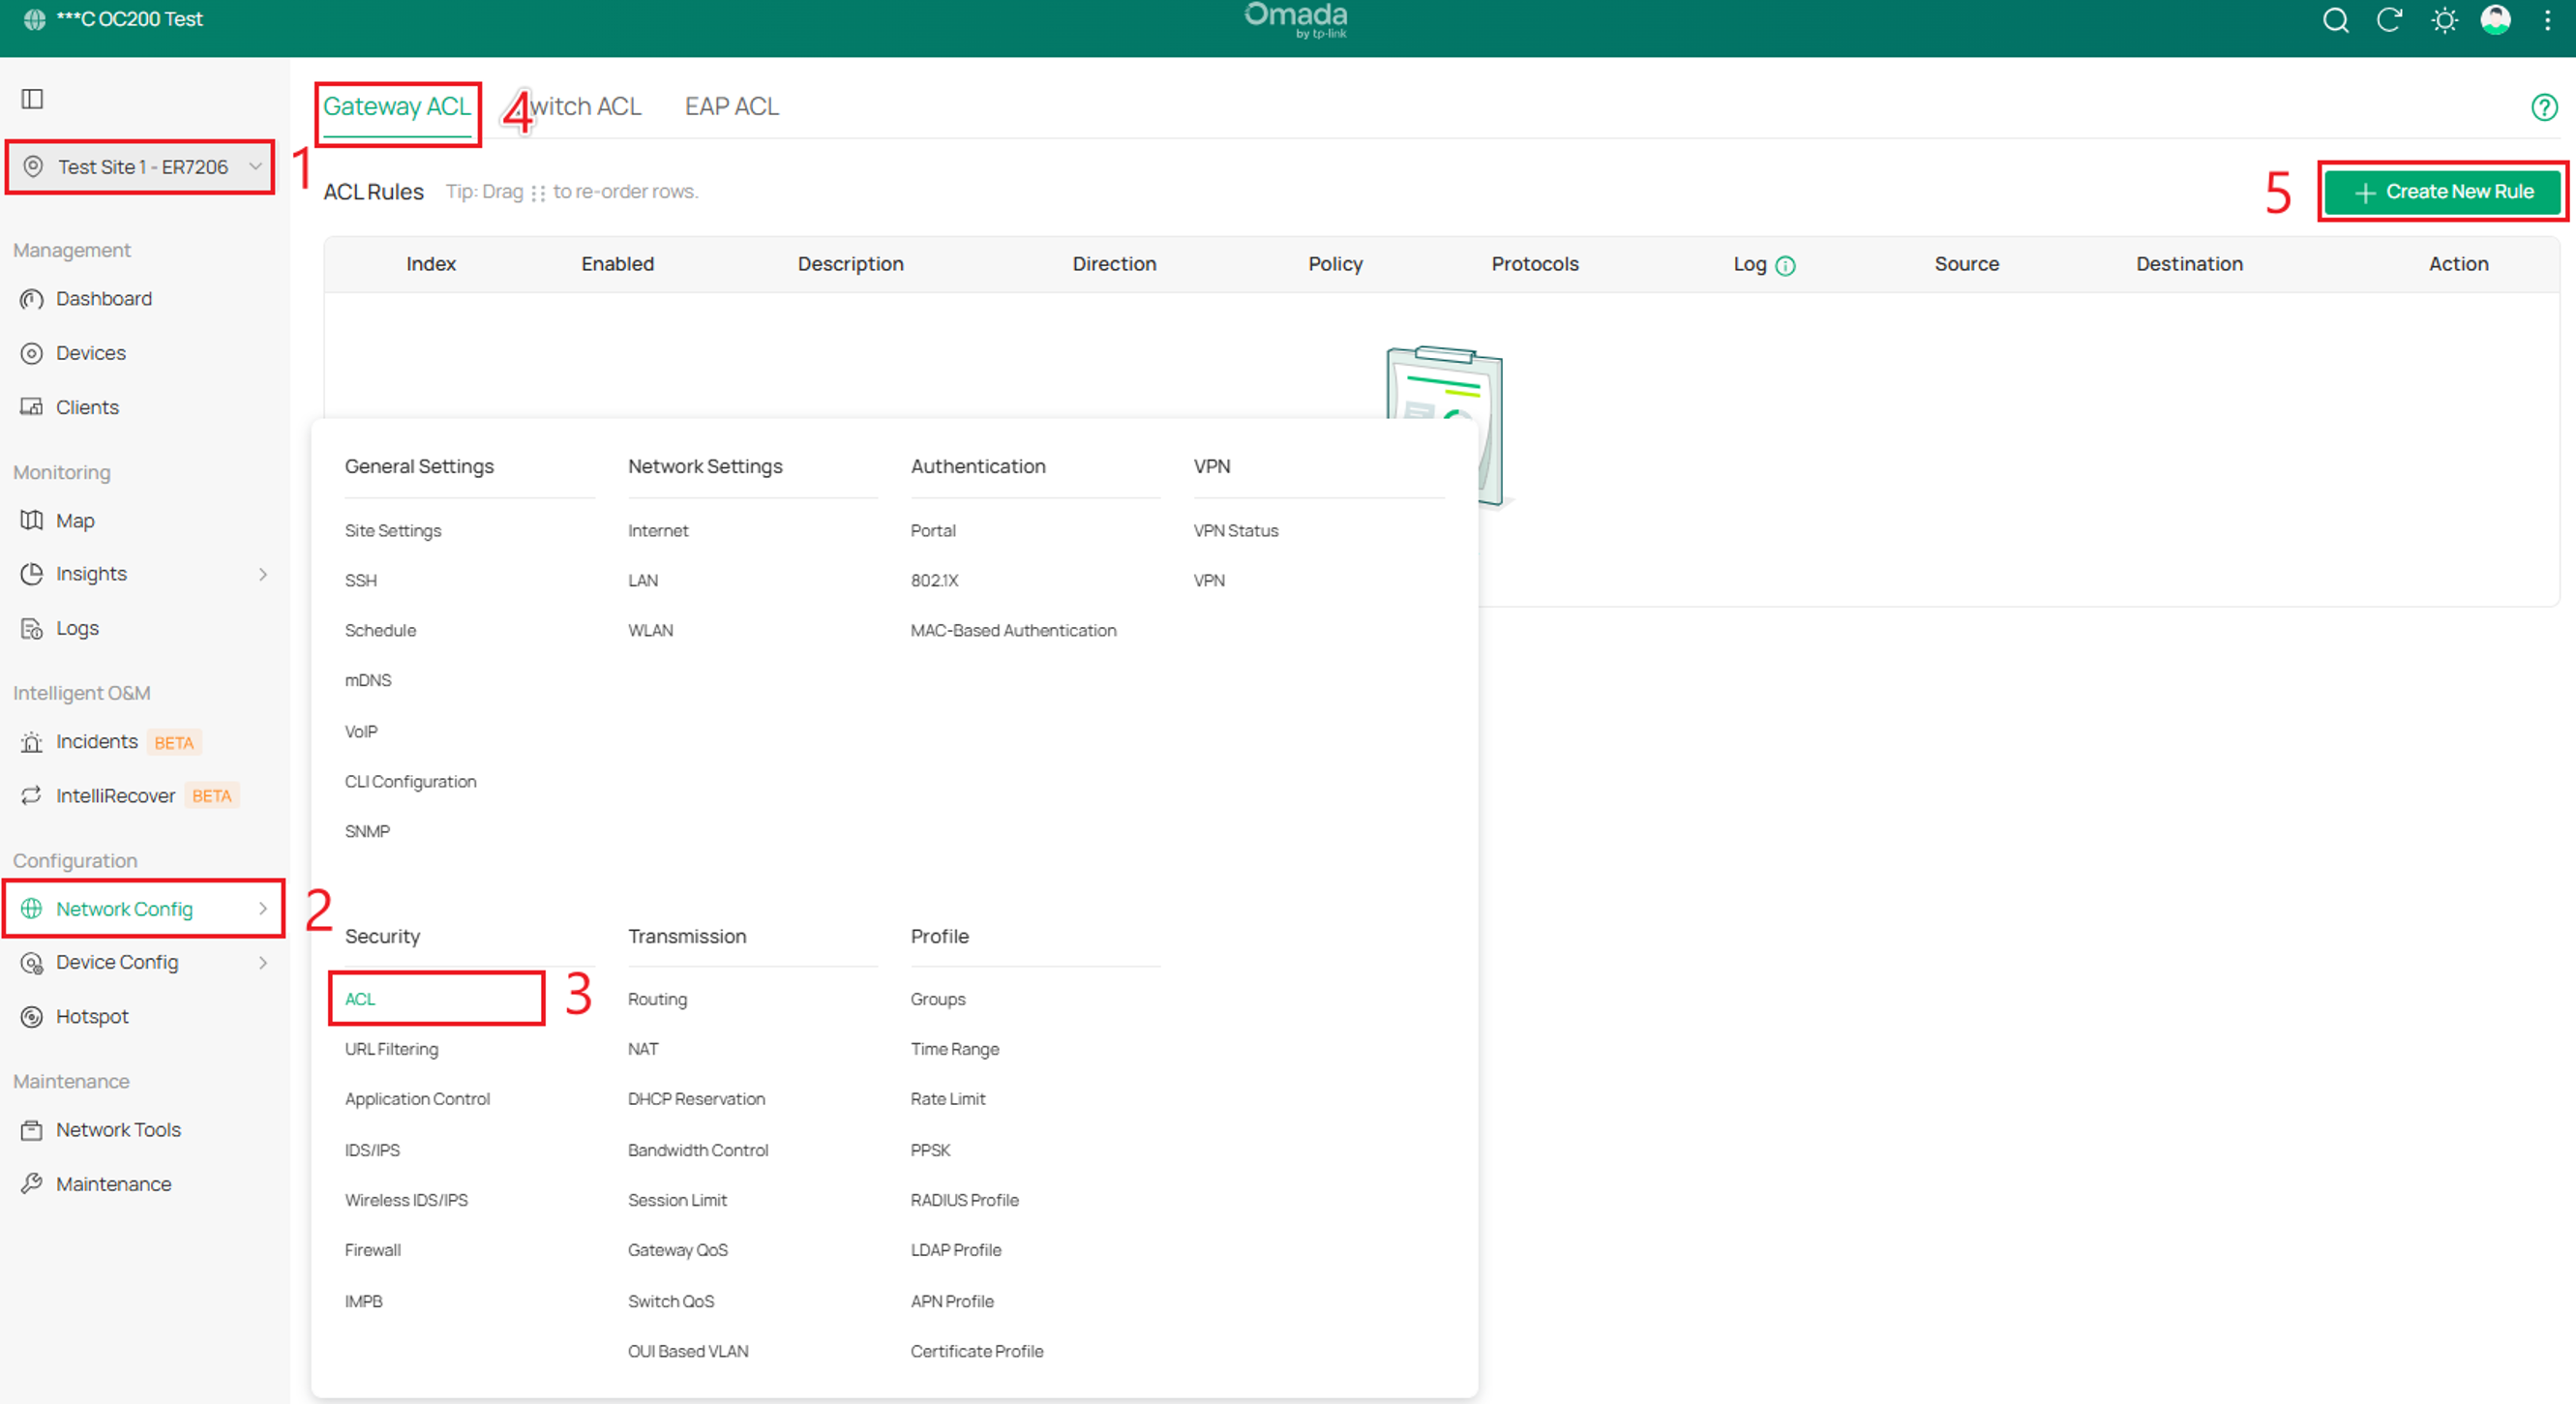
Step 5. Configure Access Control. Within Site View, go to Network Config > ACL > Gateway ACL, and click Create New Rule.
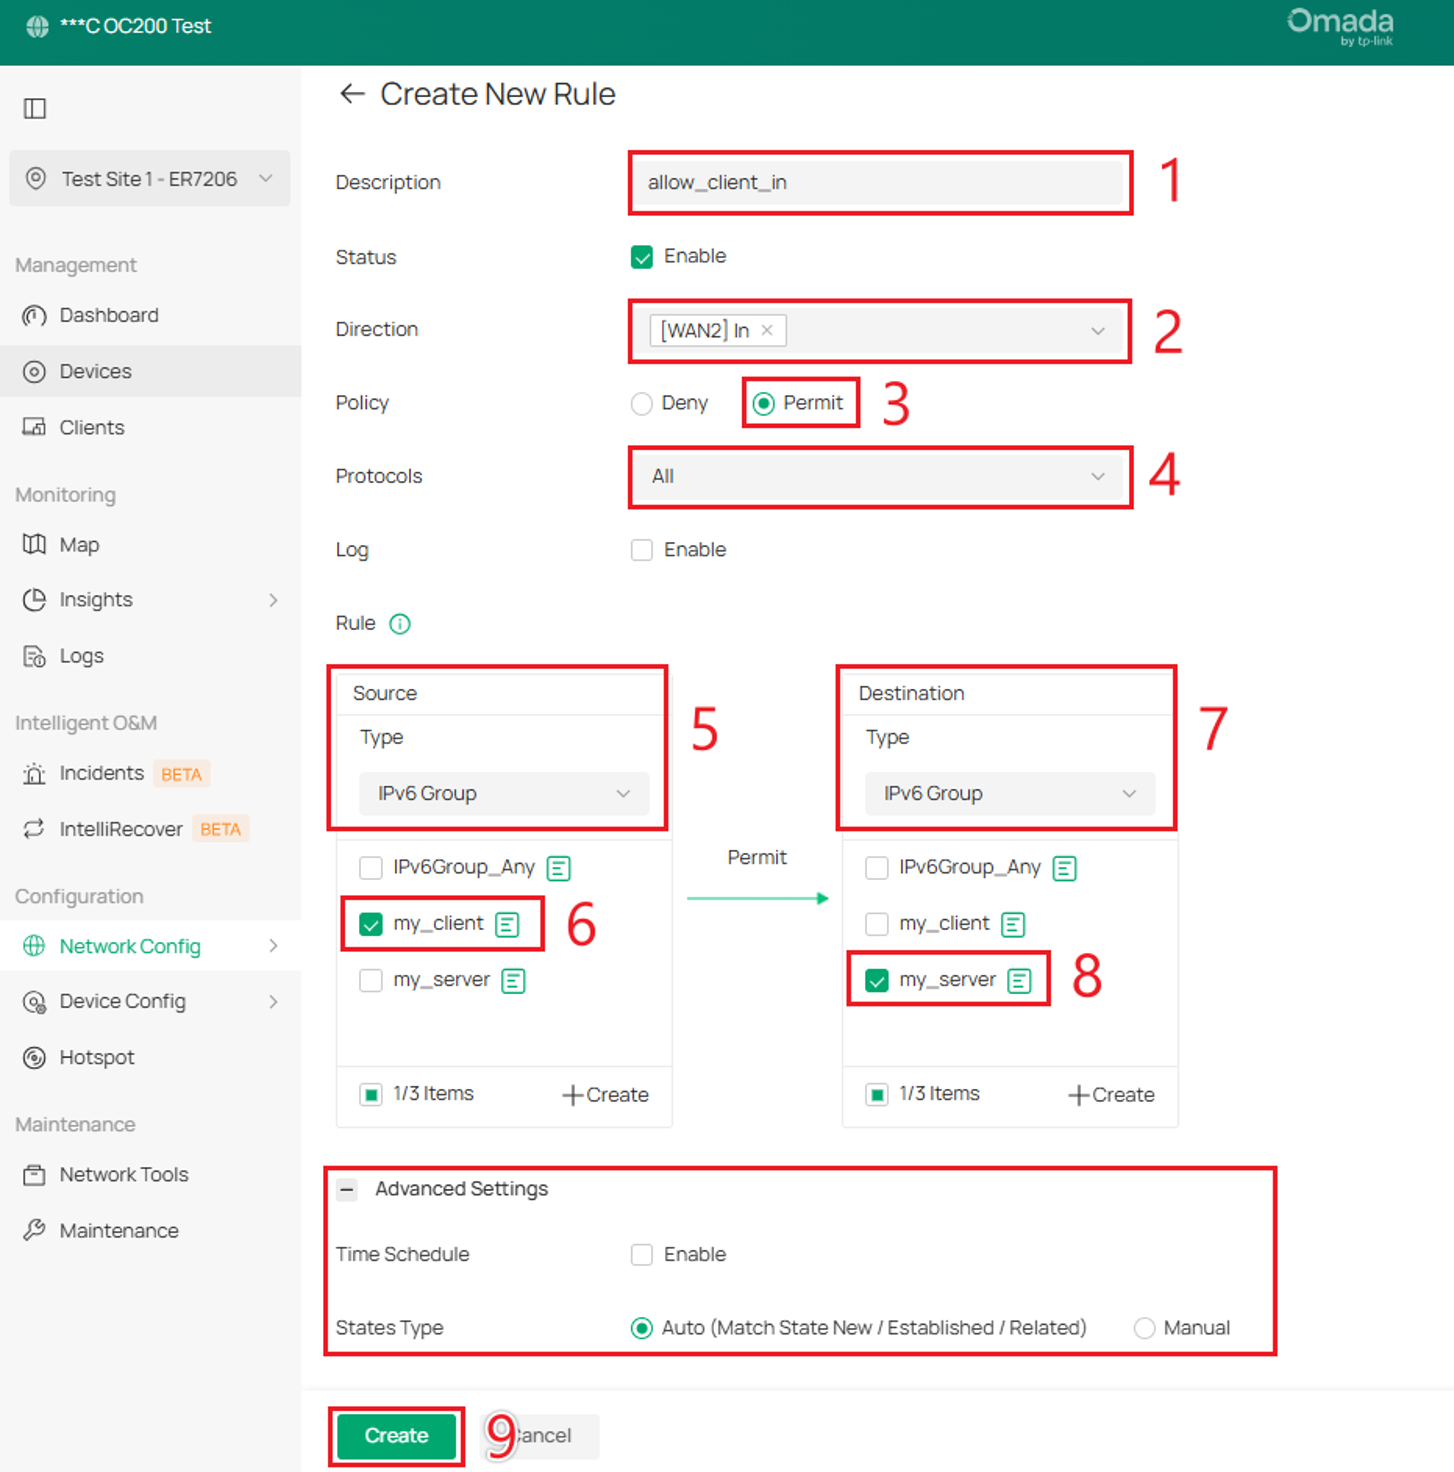
Step 6. In the Create New Rule section, configure the Description to allow_client_in, Status to Enable, Direction to [WAN2] In, Policy to Permit, Protocols to ALL, Source to my_client IPv6 group, and Destination to my_server IPv6 group.
In the Advanced Settings section, Time Range is not enabled by default. Keep the default settings unless necessary. Click Create.
Note: This is an example configuration. Settings may differ depending on the gateway. For example, select [SFP WAN/LAN1] In instead of [WAN2] In if applicable.
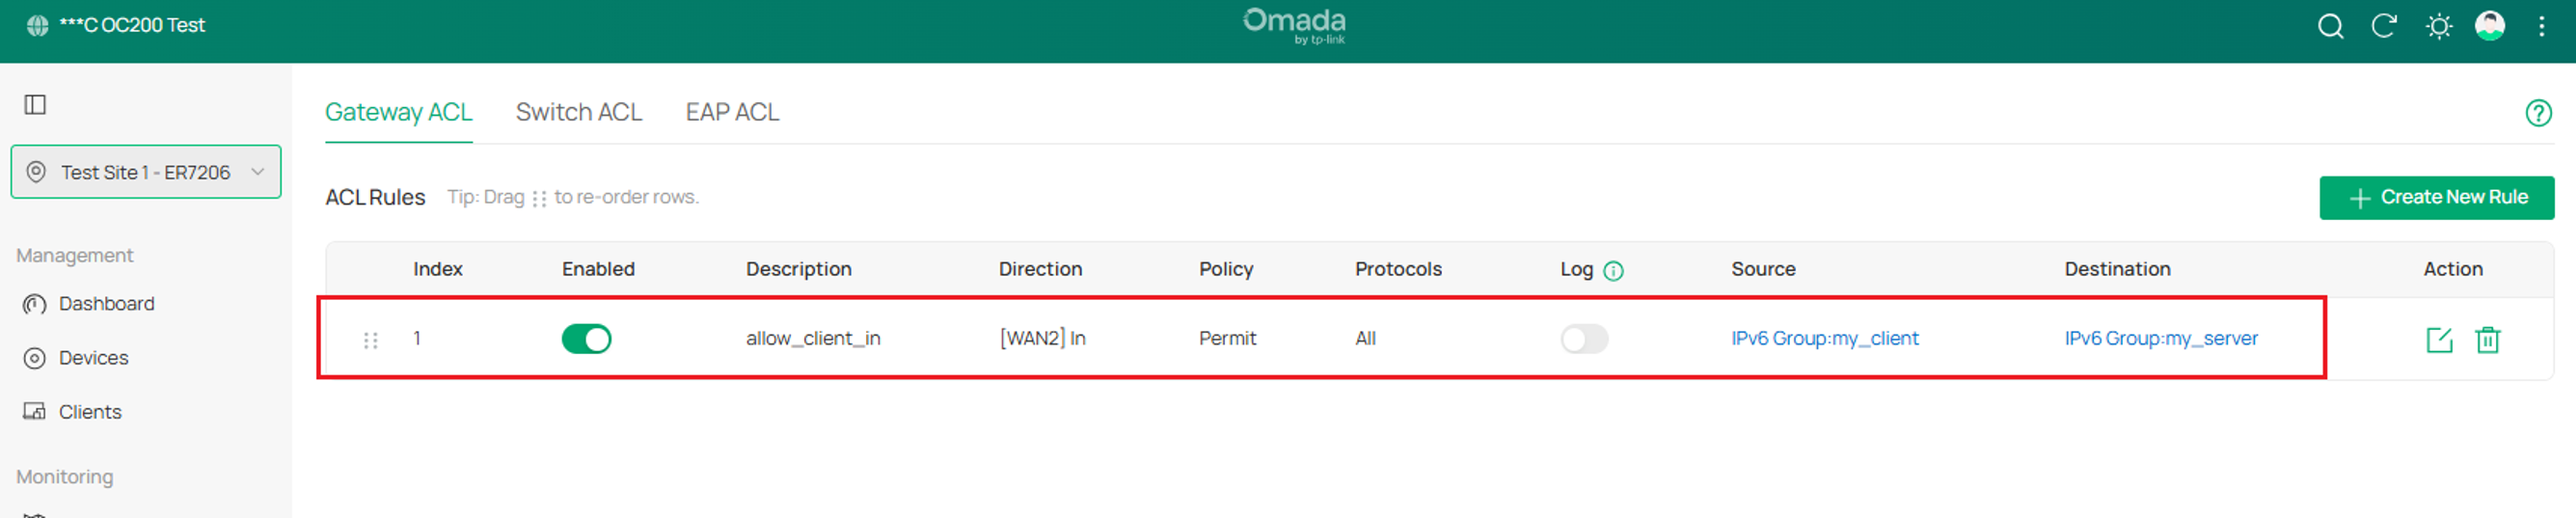
Step 7. After clicking Create, the new Gateway ACL appears in the ACL Rules list with a Permit policy. Configuration is complete.
Note: Gateway ACL rules are evaluated from top to bottom. Once traffic matches a rule, the corresponding Permit or Deny policy is applied, and subsequent rules are not evaluated for that traffic. Place more specific rules above broader rules.
Block access to the internet
By configuring Access Control, administrators can restrict IPv6 internet access for specific devices or networks. For example, a business may prevent security cameras from accessing the internet over IPv6 while allowing them to communicate with a local NVR. Similarly, parents can restrict IPv6 internet access for their children's devices during designated hours.
In this example, we will create a group called children_pc and restrict its IPv6 internet access using Time Schedule. The rule will be active from 12:00 a.m. to 8:00 a.m. on weekdays. This additional configuration is optional.
Step 1. Under Site View, go to Network Config > Groups. Then select Create New Group.
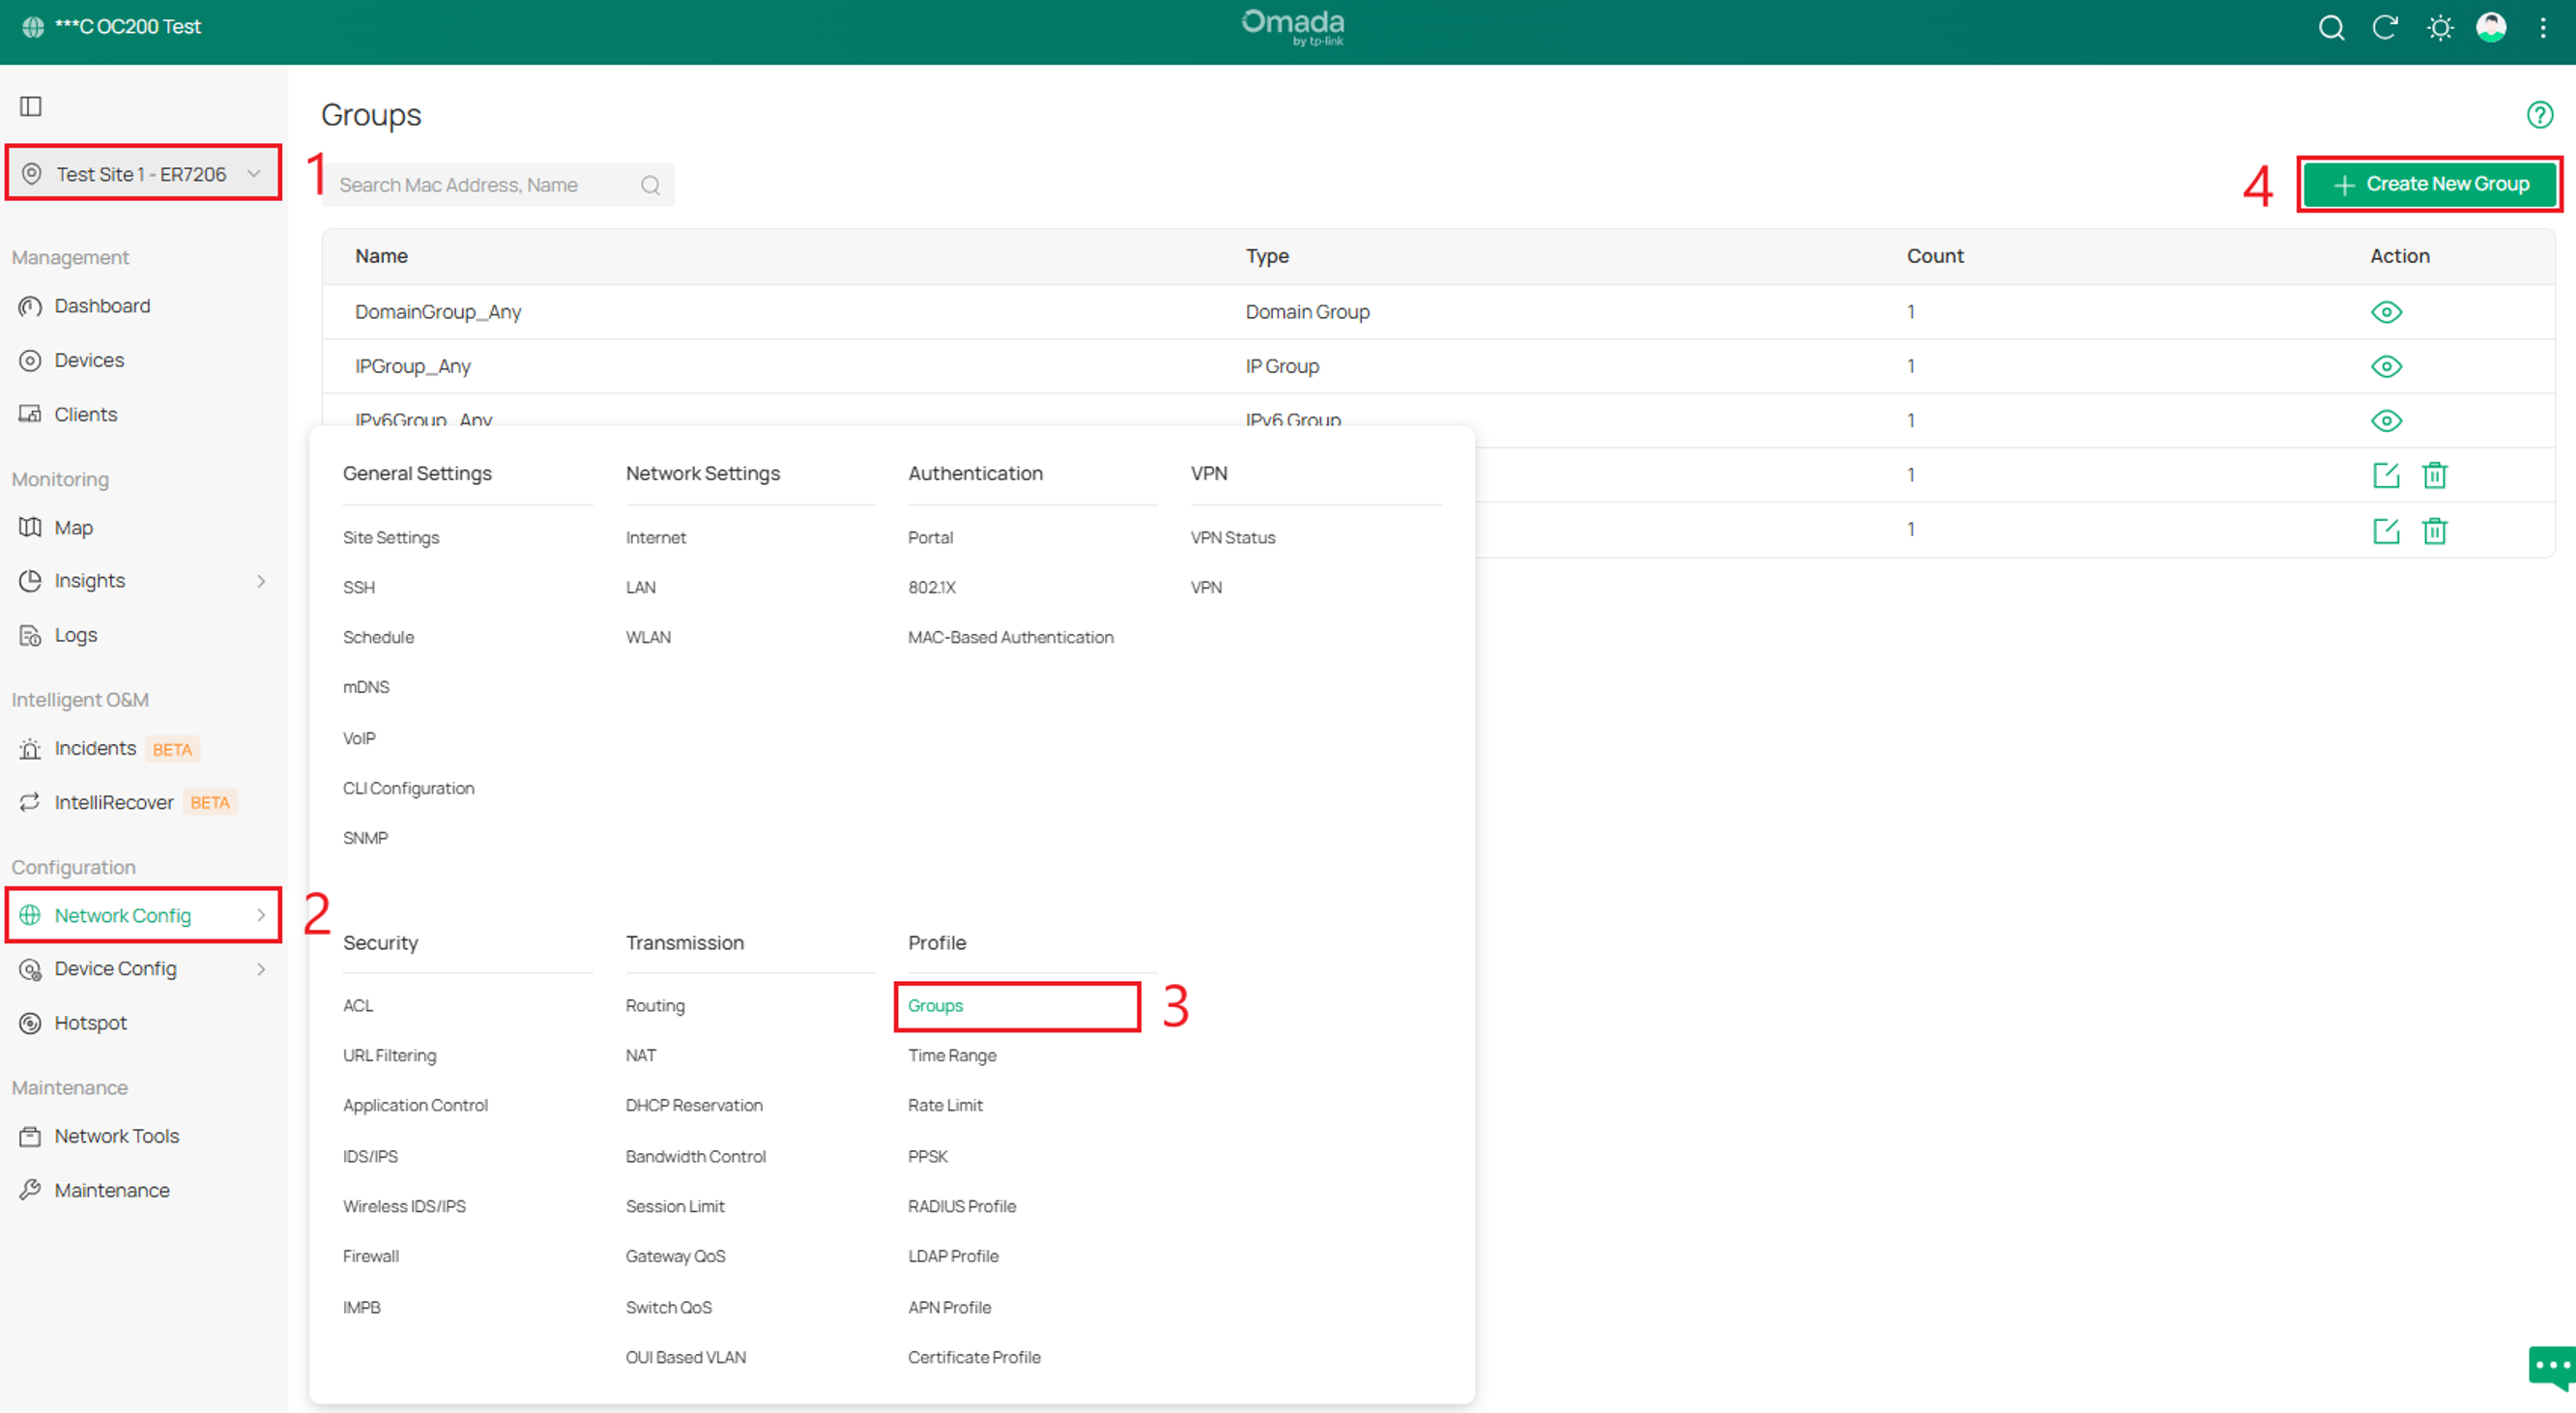
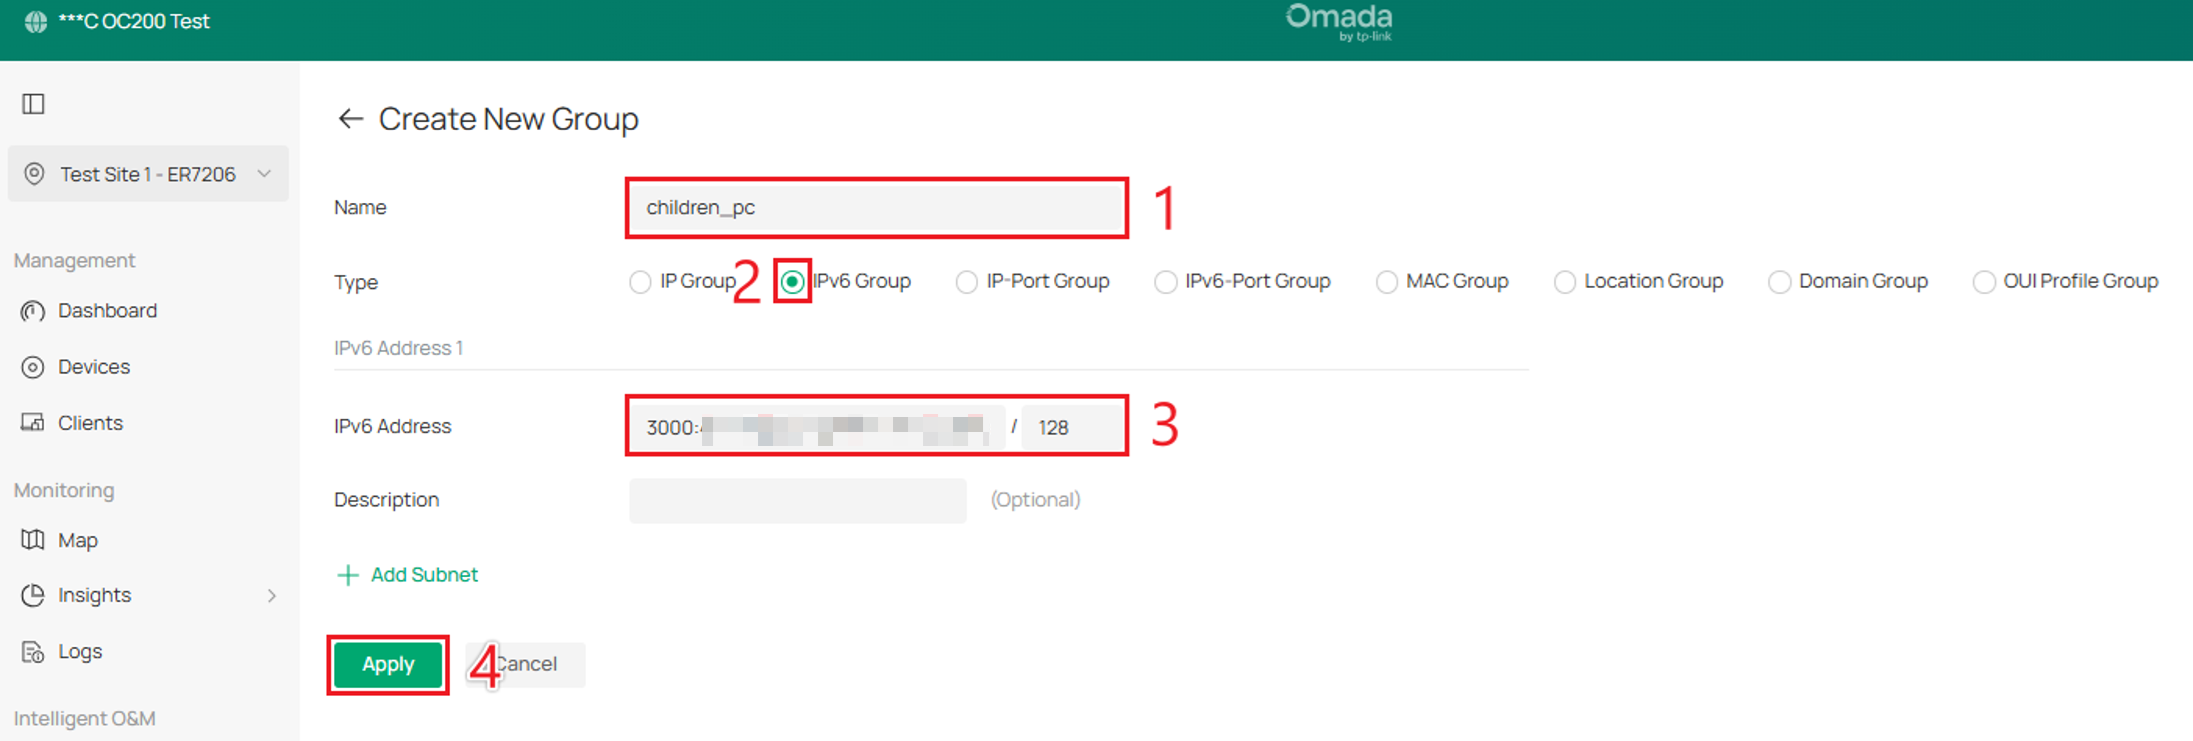
Step 2. Fill out the Name field and select Type as IPv6 Group. Enter an IPv6 address for the group and select Apply.
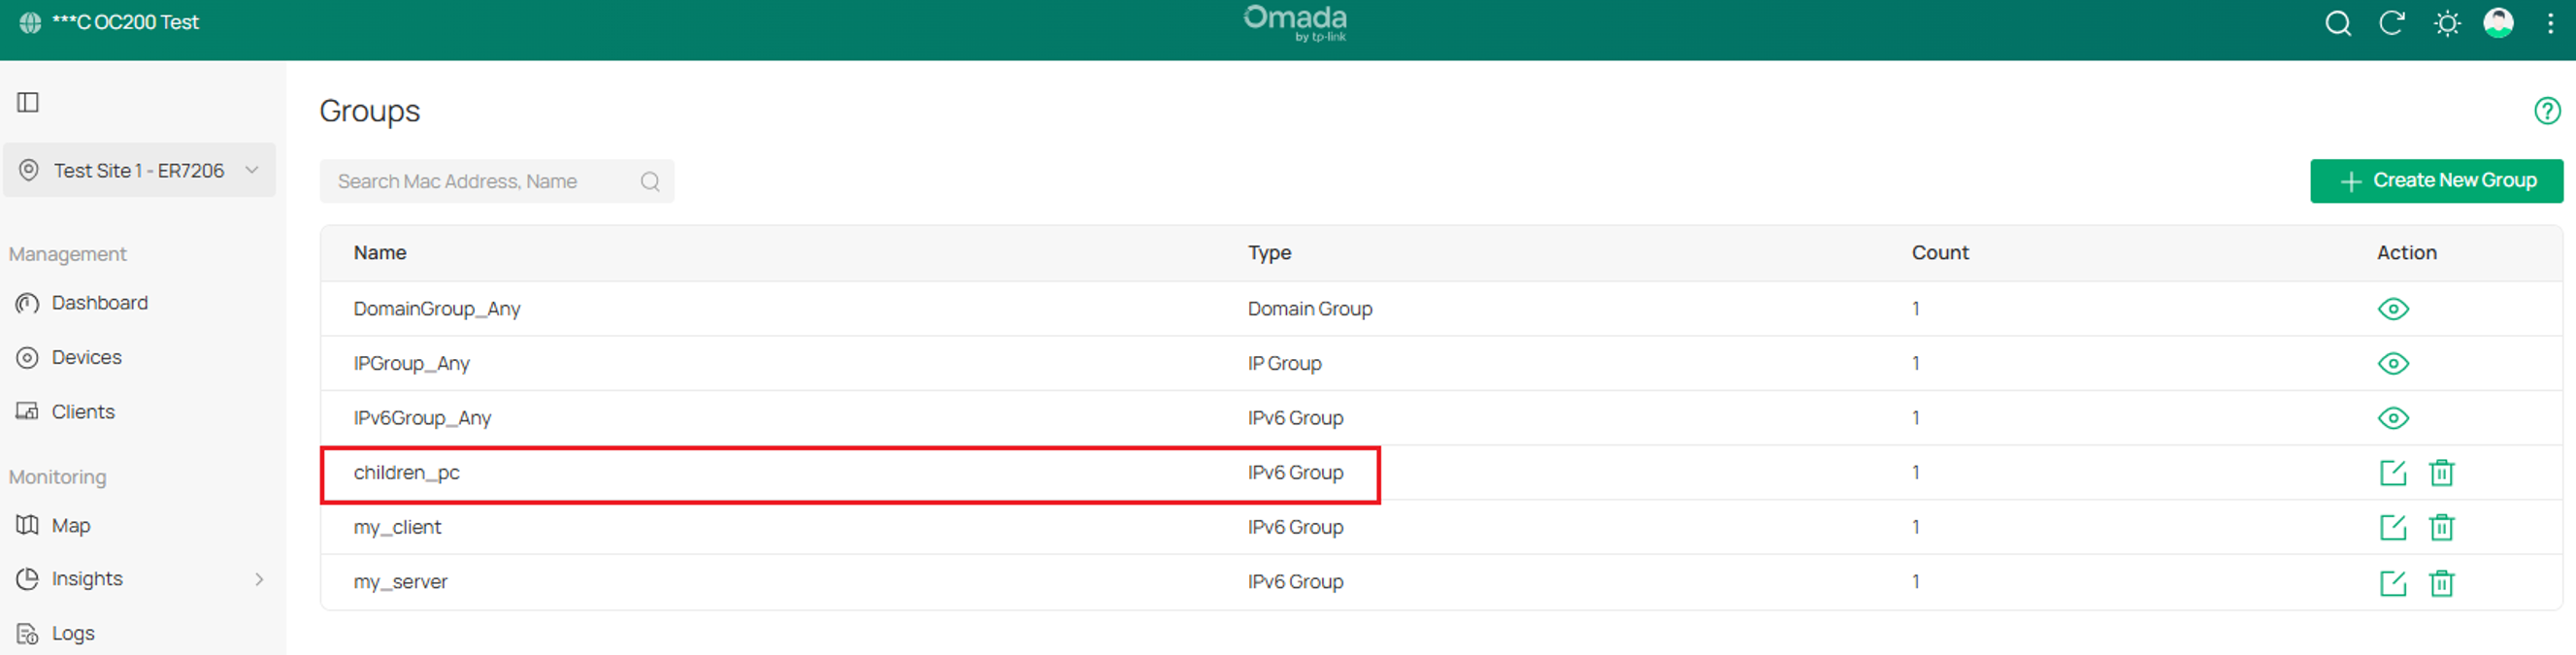
Step 3. Confirm that the IPv6 group was created successfully. After selecting Apply, the Groups page displays the new children_pc IPv6 group.
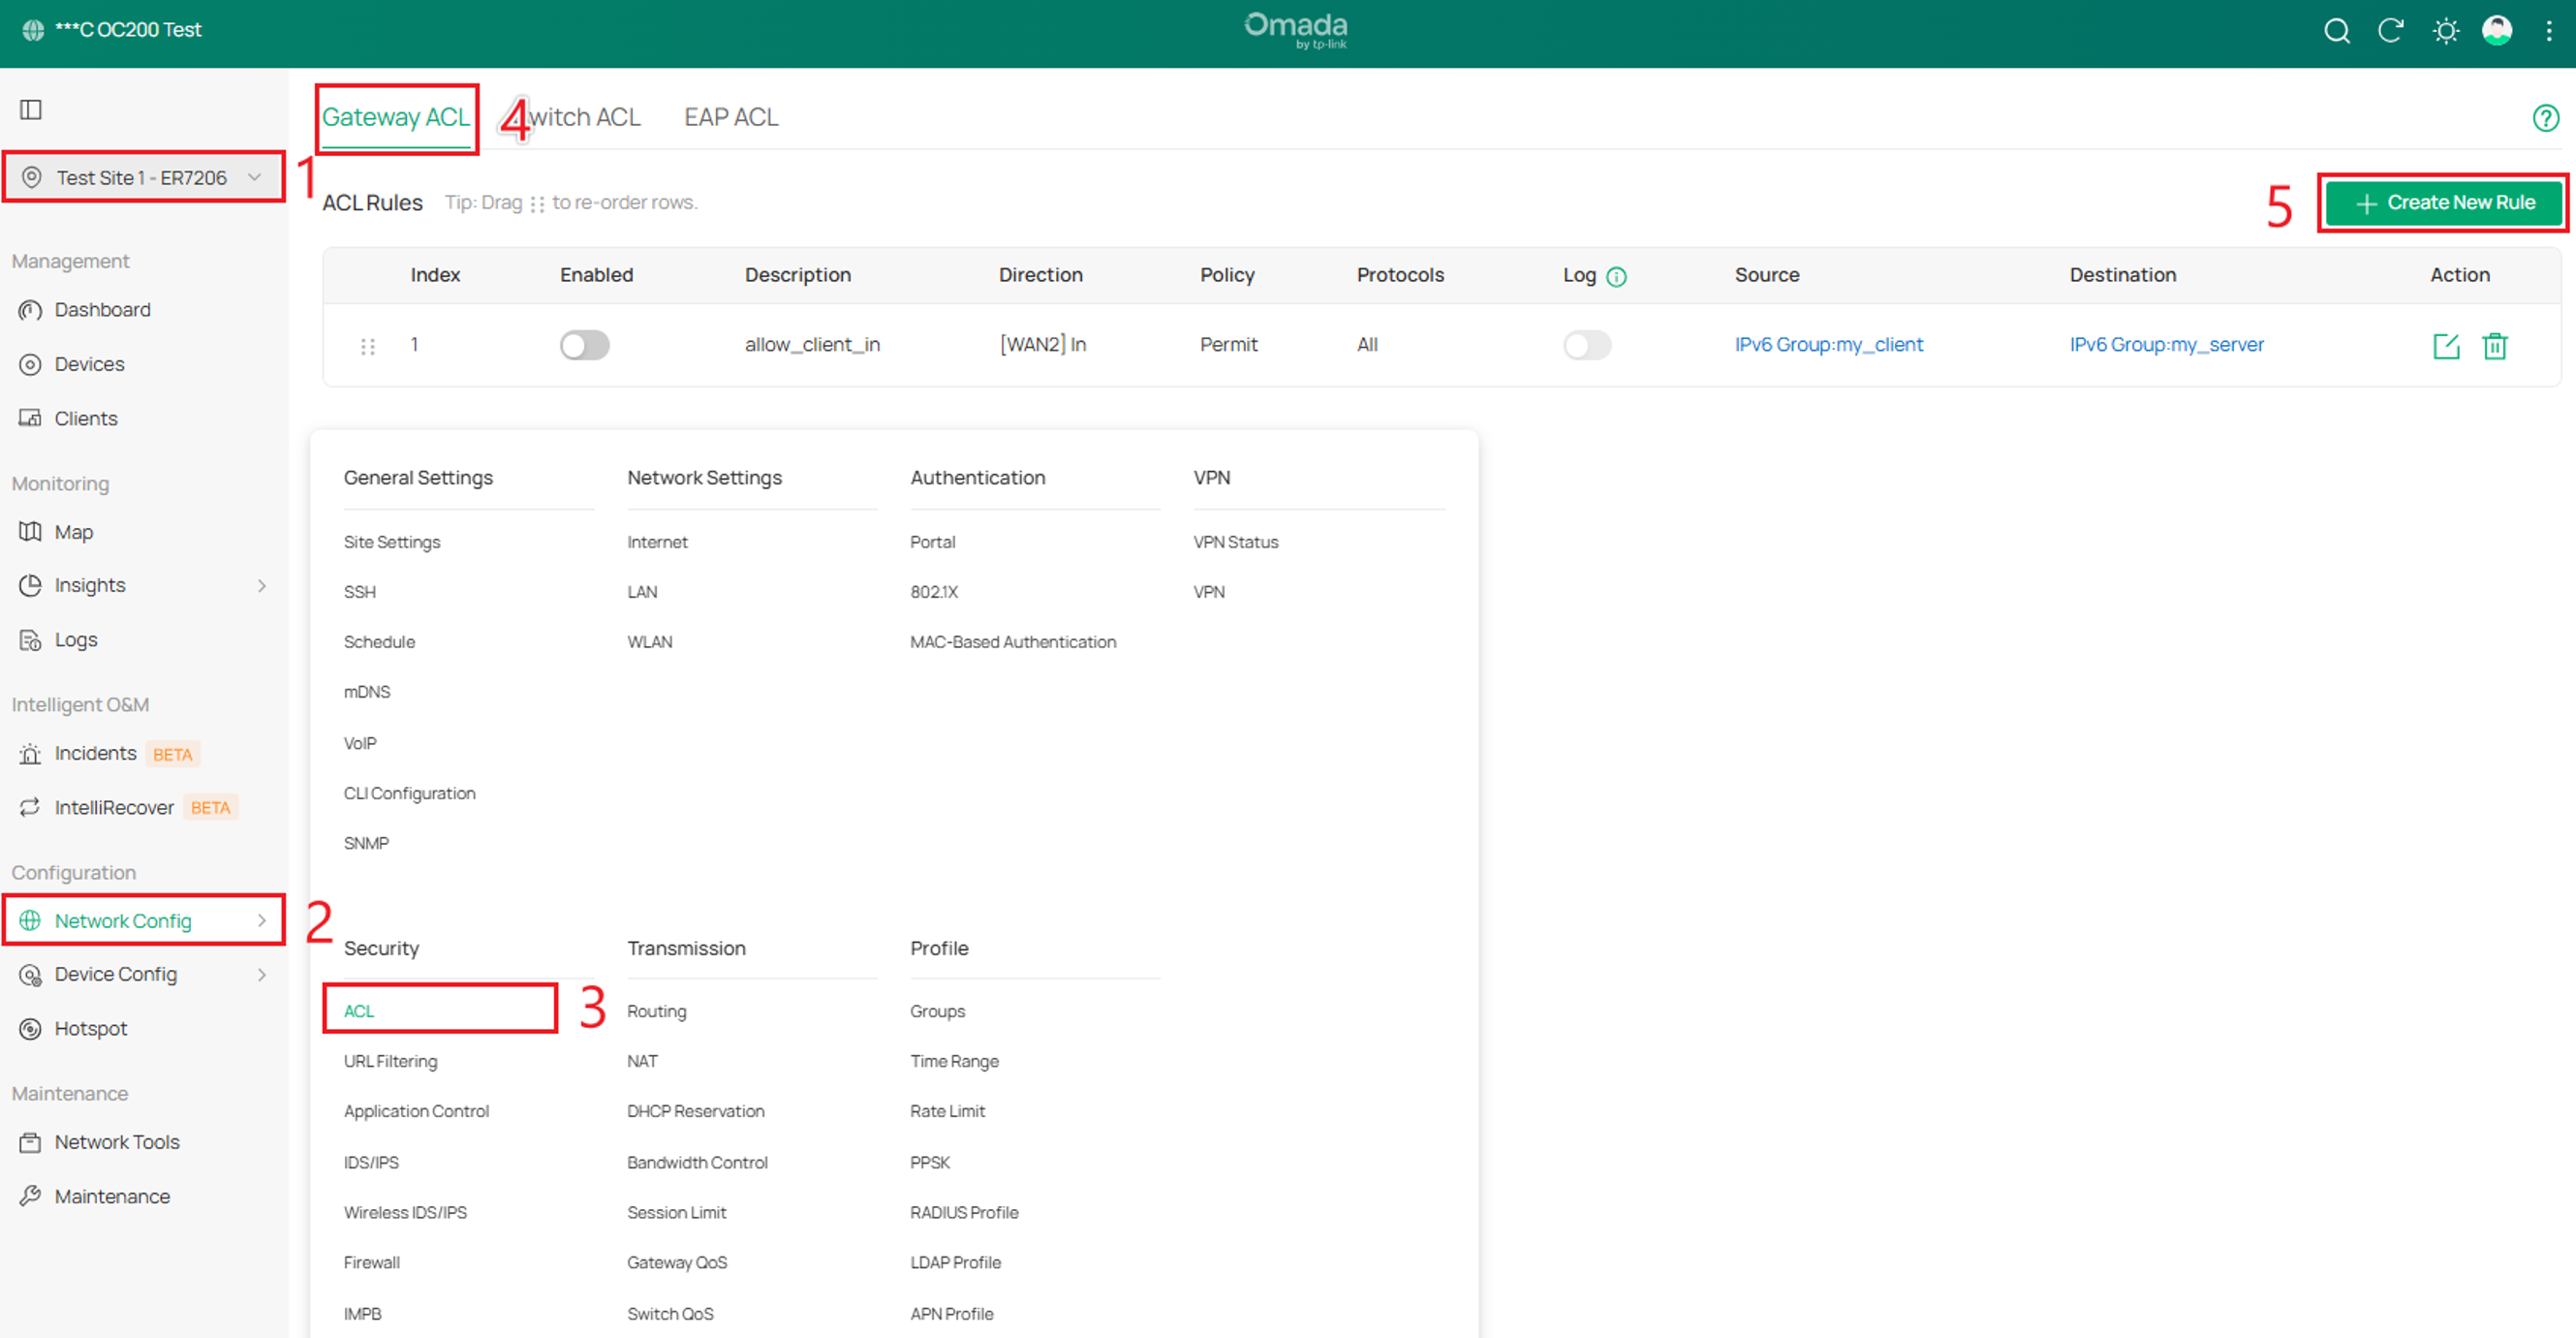
Step 4. Configure Access Control. Within Site View, go to Network Config > ACL > Gateway ACL, and click Create New Rule.
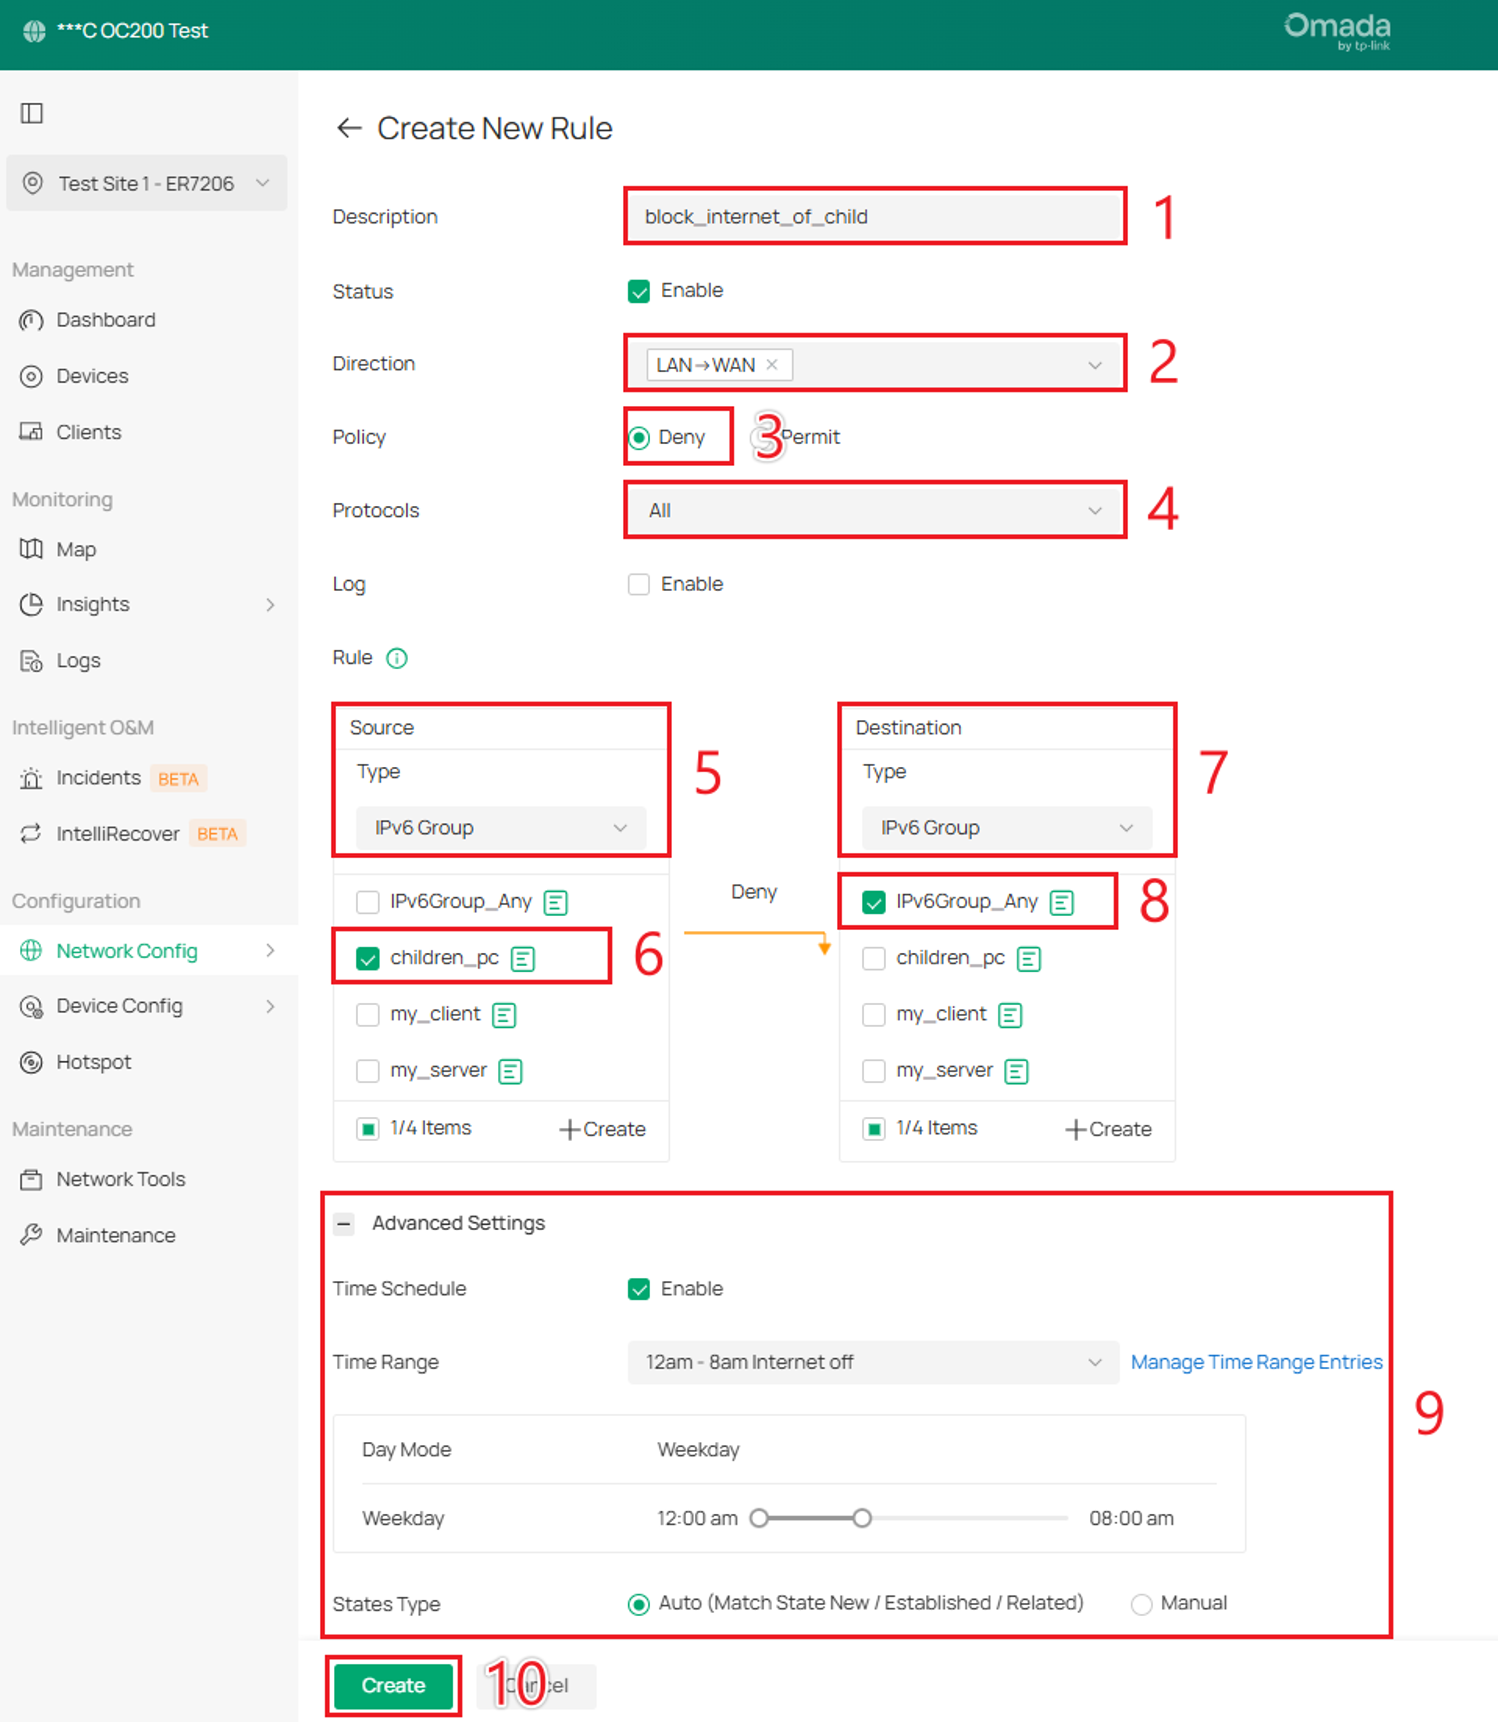
Step 5. In the Create New Rule section, configure Description as block_internet_of_child, Status as Enable, Direction as [LAN -> WAN], Policy as Deny, Protocols as ALL, Source as the children_pc IPv6 group, and Destination as the IPv6Group_Any.
In the Advanced Settings section, enable Time Schedule and select the required Time Range. In this example, the rule is active from 12:00 a.m. to 8:00 a.m. on weekdays. Click Create.
Note: This IPv6 ACL rule does not restrict IPv4 traffic. If clients also have IPv4 connectivity, they may still access the internet over IPv4. Configure an additional IPv4 ACL rule if both protocols need to be restricted.
Note: This example uses an IPv6 Group to restrict internet access based on the client's IPv6 address. If clients frequently change their IPv6 addresses, consider using a dedicated LAN network as the Source Type instead. This allows the ACL to match traffic from devices connected to that network, regardless of their individual IPv6 addresses.
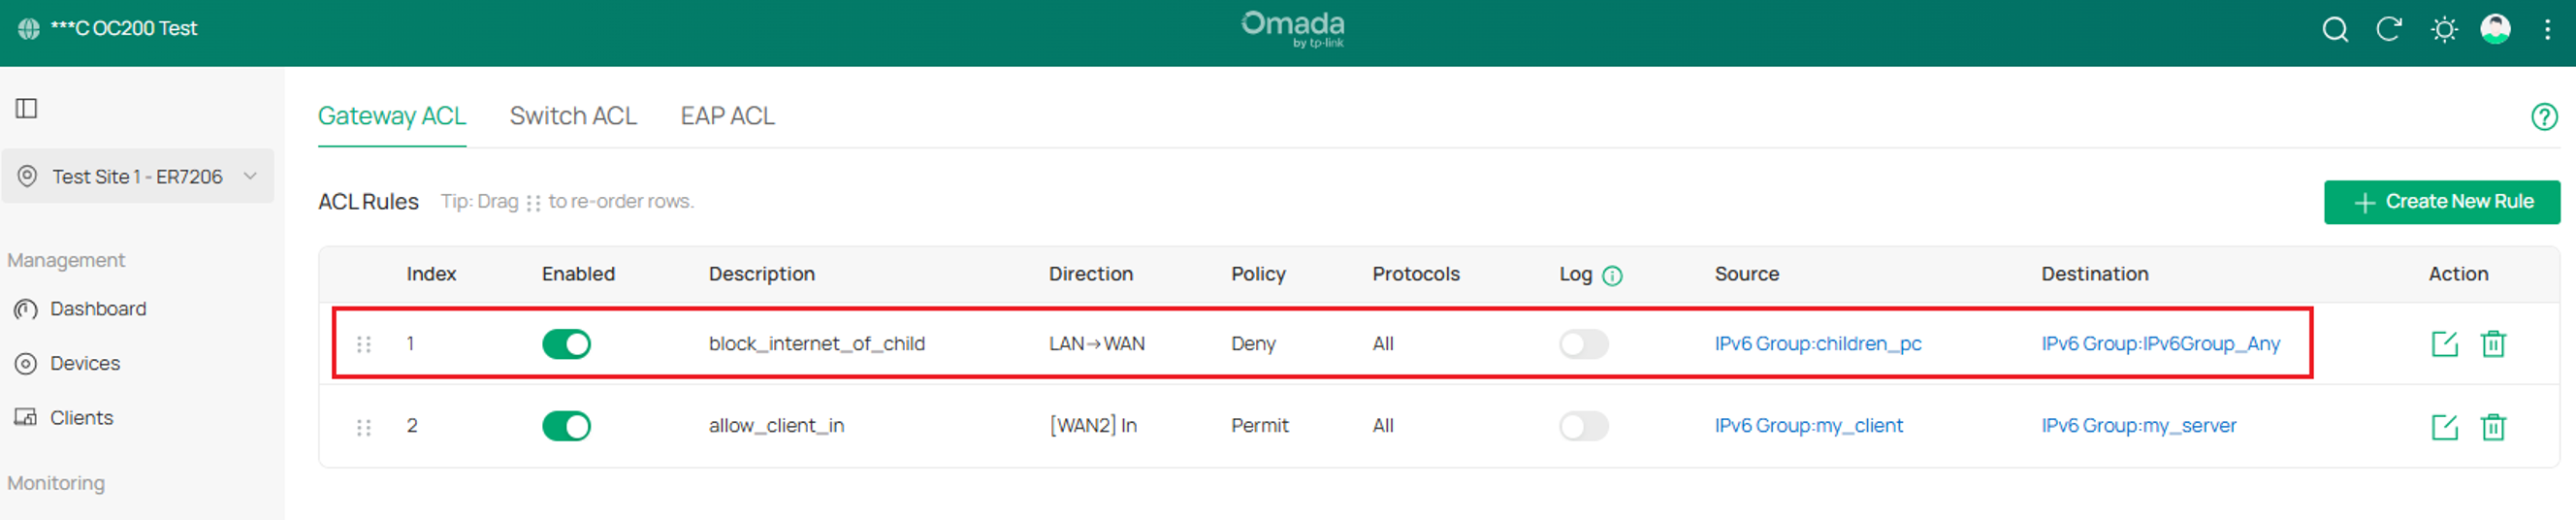
Step 6. After clicking Create, the new Gateway ACL appears in the ACL Rules list with a Deny policy. Configuration is complete.
Note: Gateway ACL rules are evaluated from top to bottom. Once traffic matches a rule, the corresponding Permit or Deny policy is applied, and subsequent rules are not evaluated for that traffic. Place more specific rules above broader rules.
Configuration – Standalone mode
Here we will introduce the configuration steps for Standalone mode based on typical user scenarios.
Initial configuration
Before configuring IPv6 Access Control, IPv6 connectivity must be established on the Omada Gateway. The following steps demonstrate how to configure IPv6 on the WAN and LAN interfaces. This configuration is required for all three scenarios covered in this guide.
The IPv6 addresses and prefixes shown are examples and may differ between scenarios. The subsequent ACL configuration examples use the 3000:458:ff01::/64 prefix for the internal network.
This example uses an ER706W-4G Gateway.
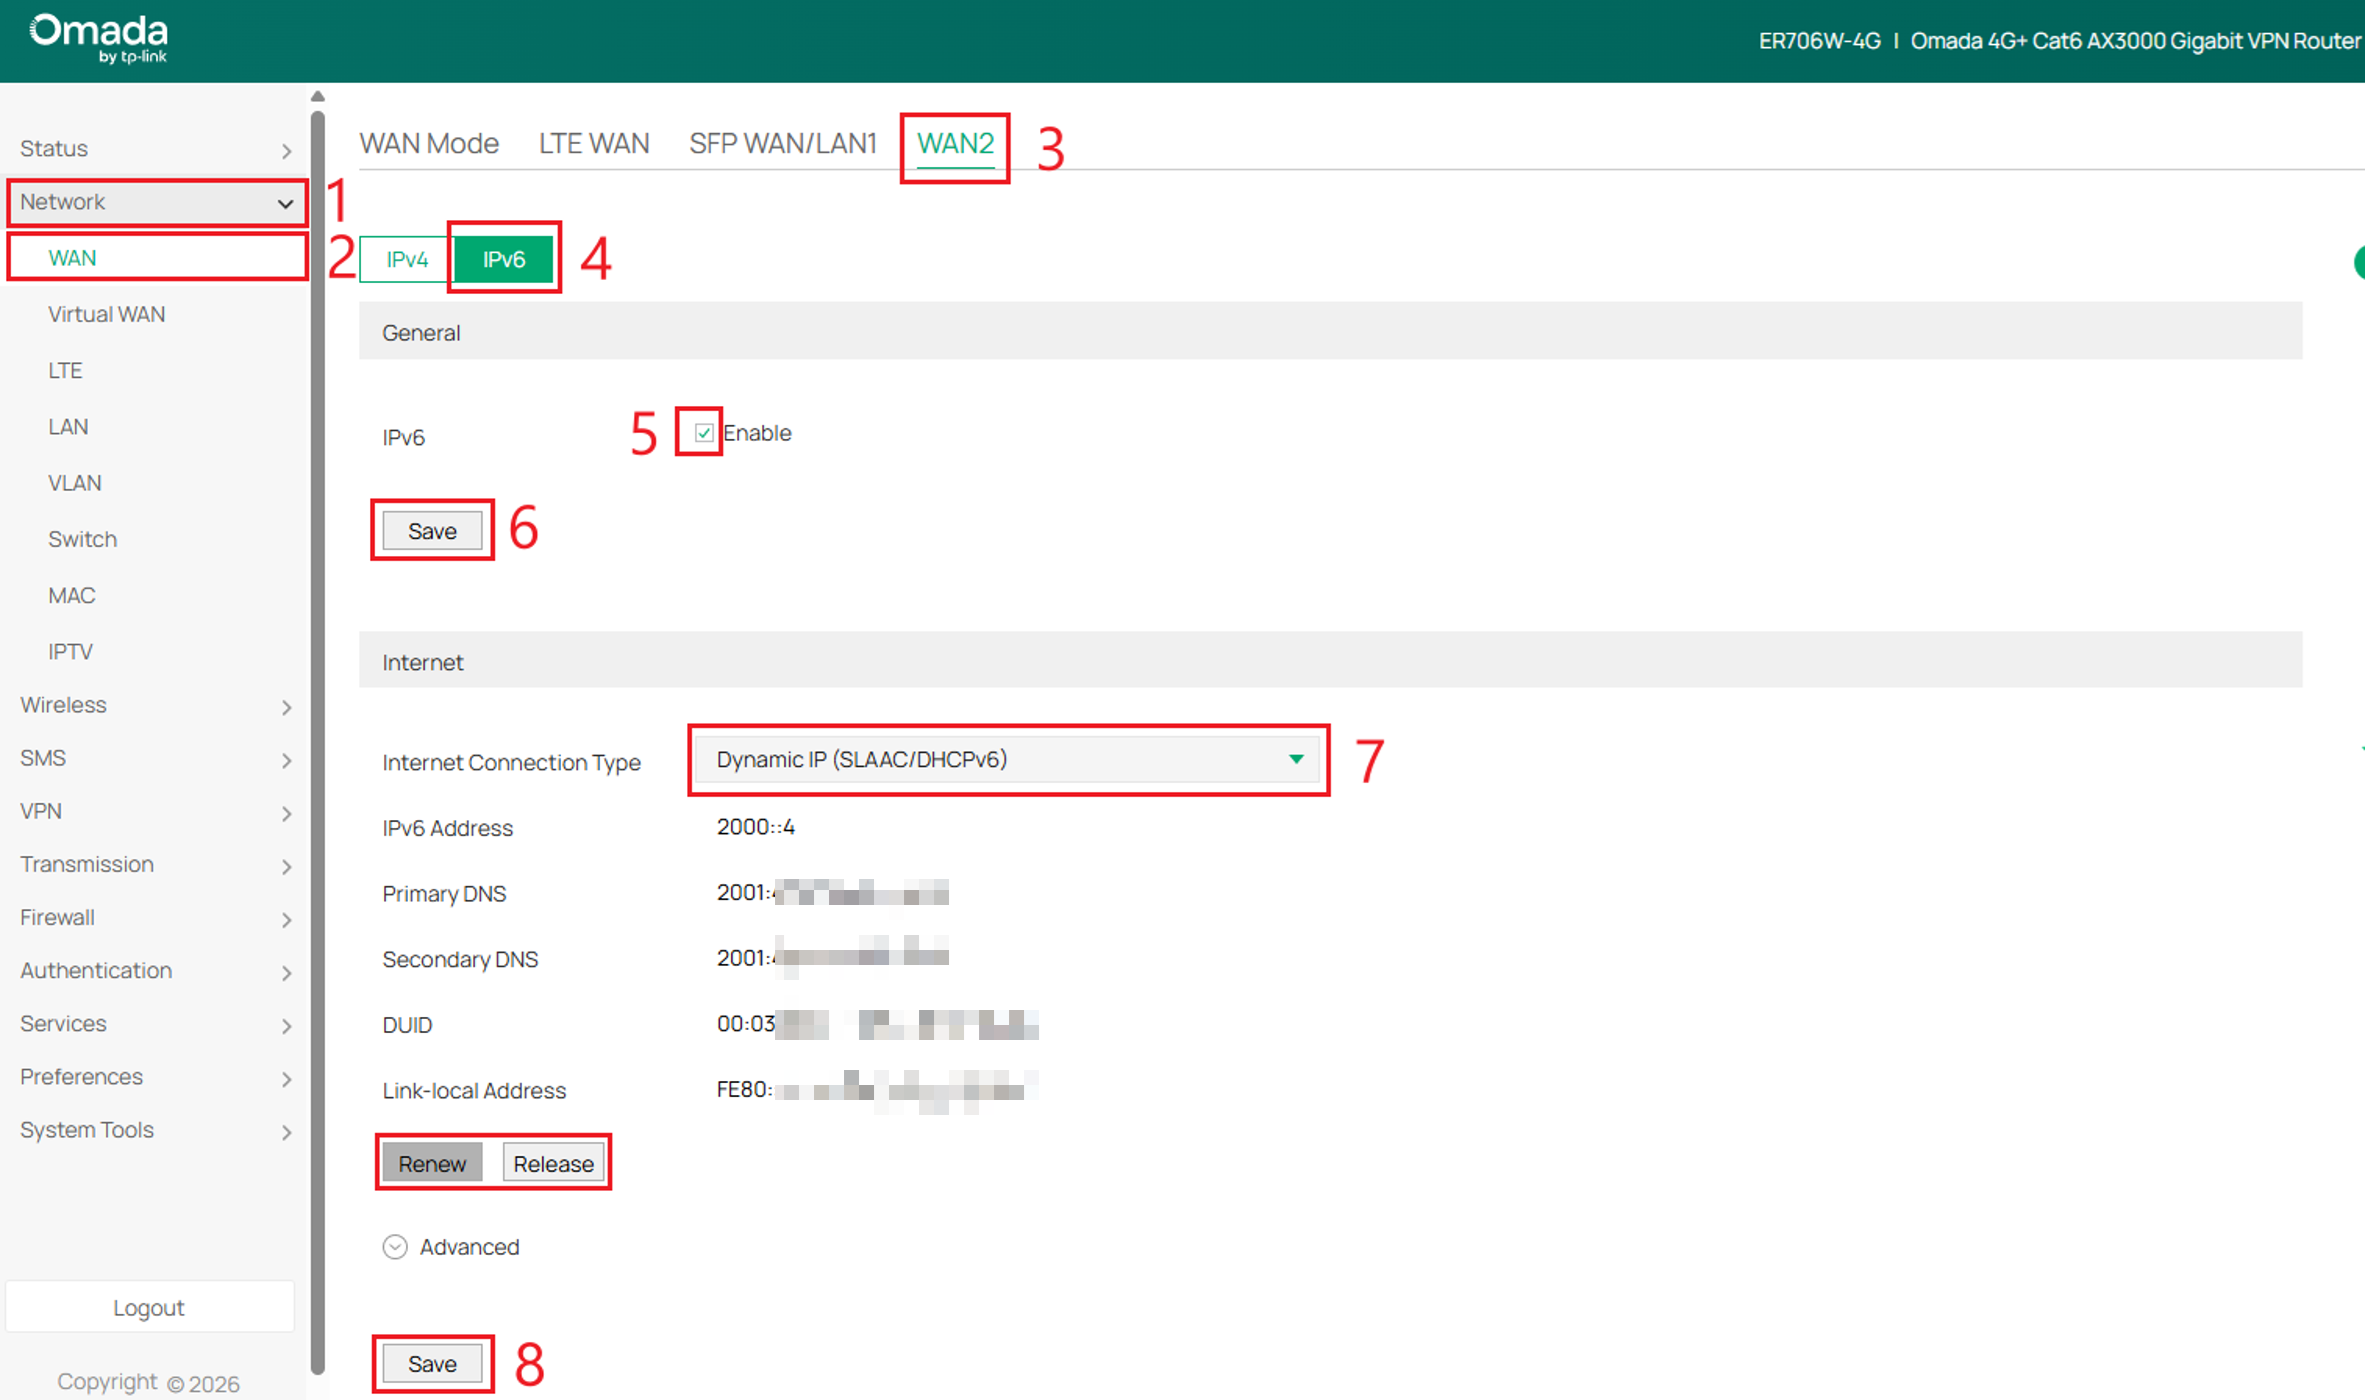
Step 1. Go to Network > WAN and select the active WAN port. In this example, we use WAN2. Select the IPv6 tab, enable IPv6, and click Save.
Under Internet Connection Type, select the appropriate connection type for your network. This example uses Dynamic IP (SLAAC/DHCPv6). Click Save to apply the settings.
Note: Use Renew to request updated IPv6 addressing information. Release relinquishes the current lease and may temporarily interrupt connectivity.
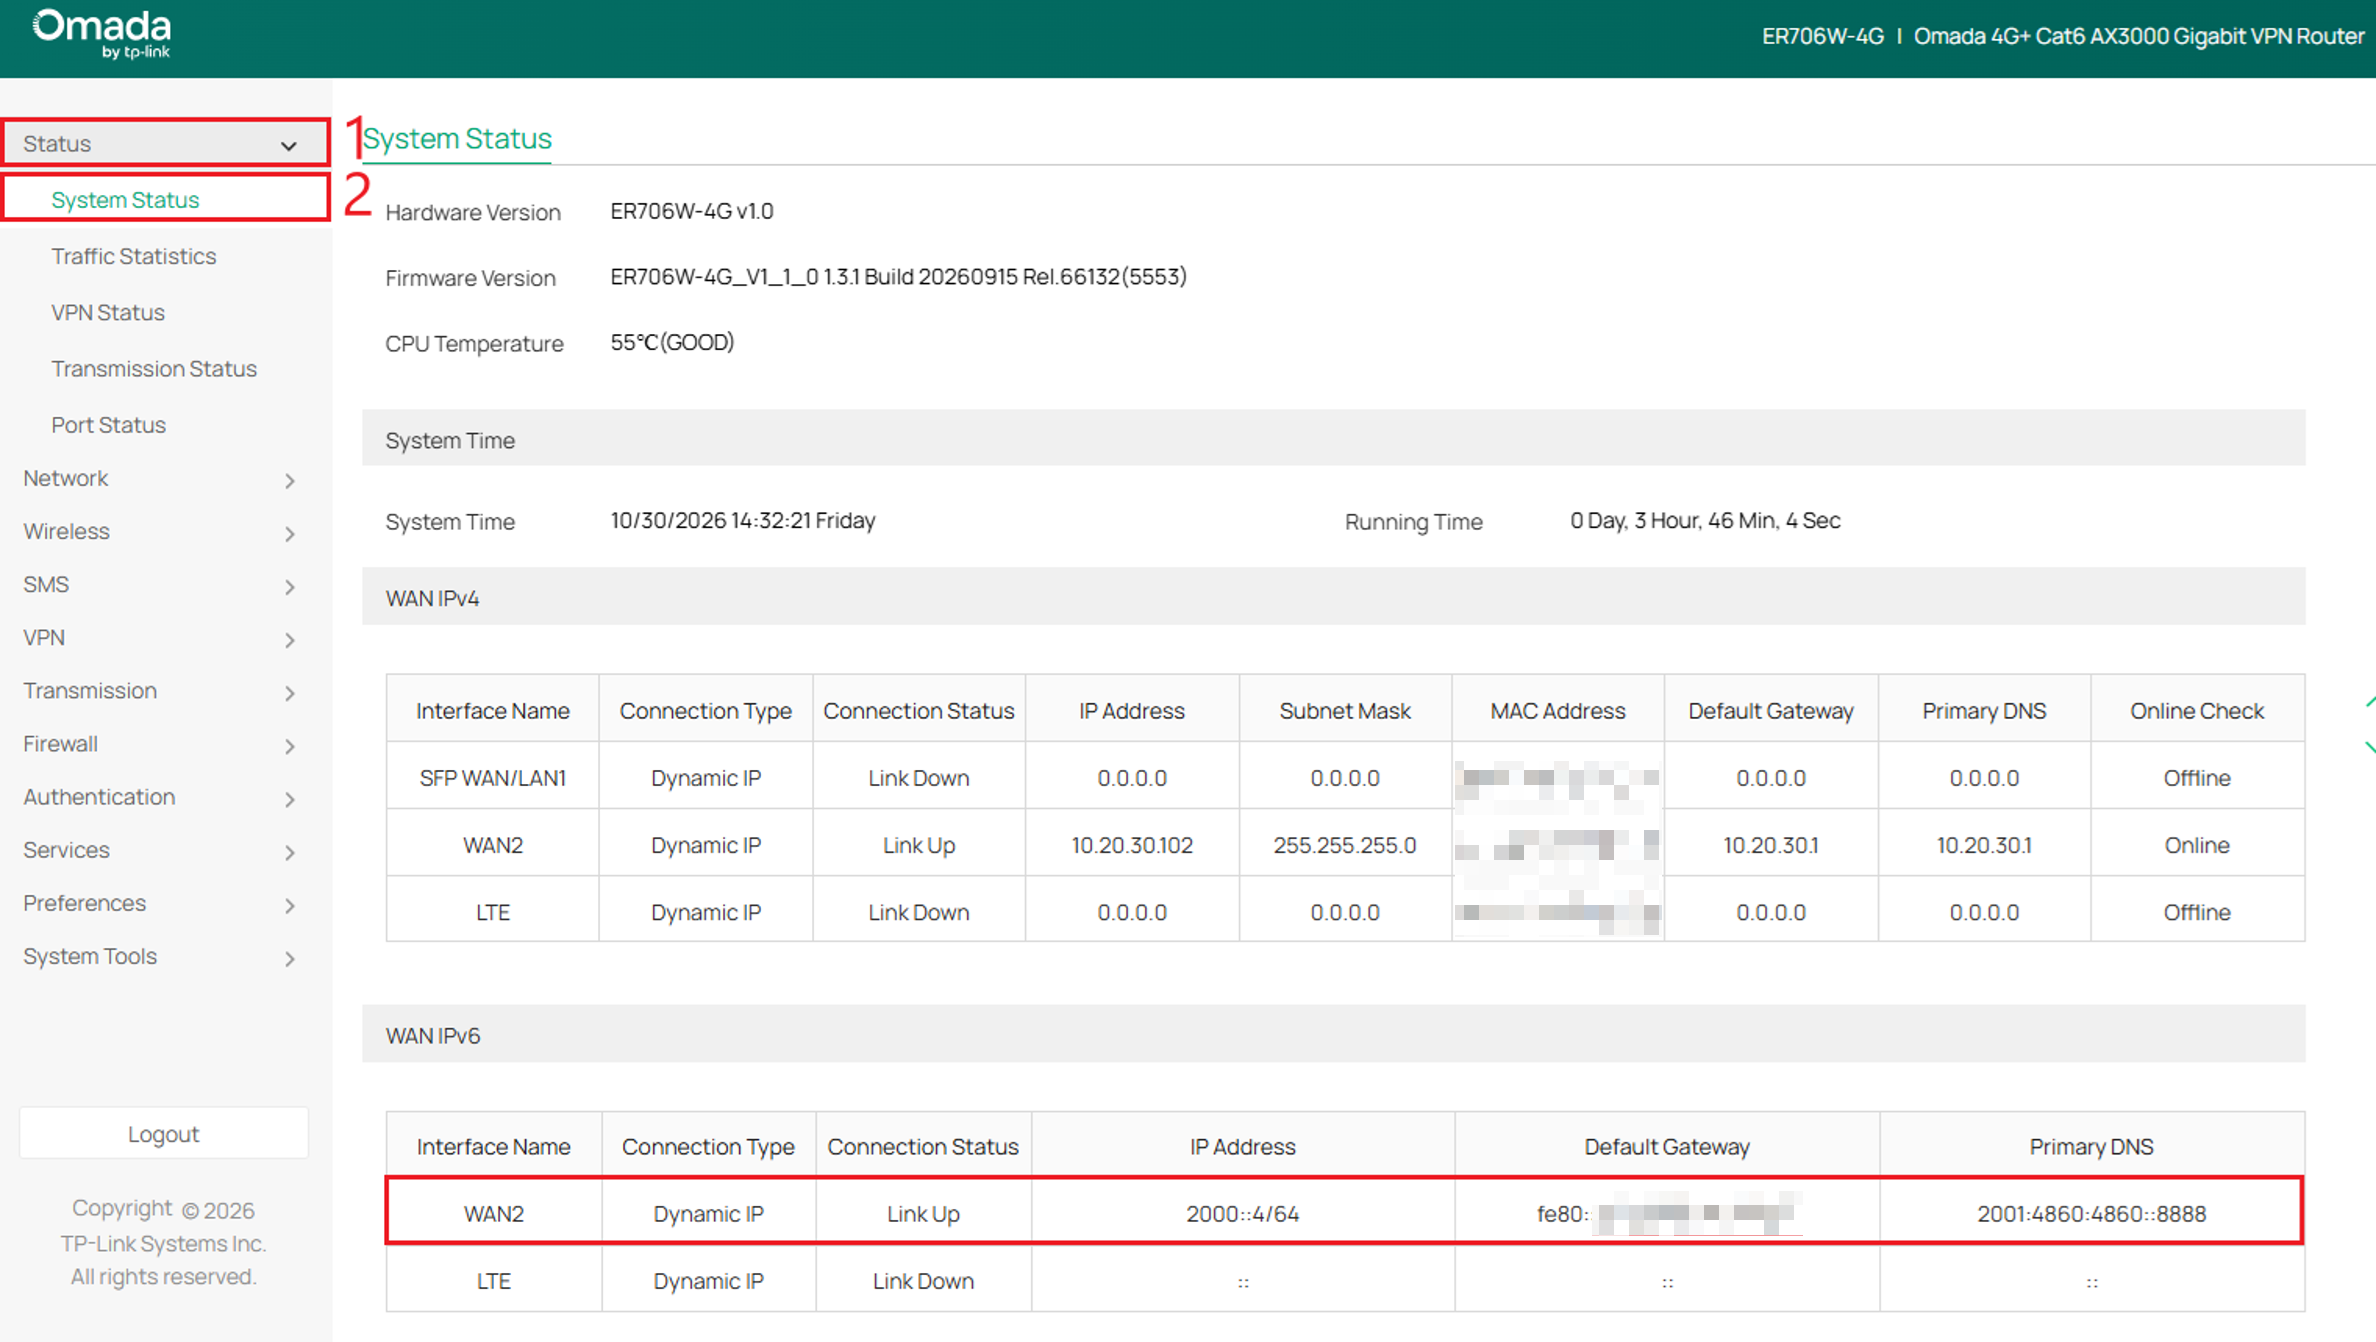
To verify the WAN IPv6 connection, go to Status > System Status. Under WAN IPv6, confirm that the configured interface shows Link Up and has an assigned IPv6 address.
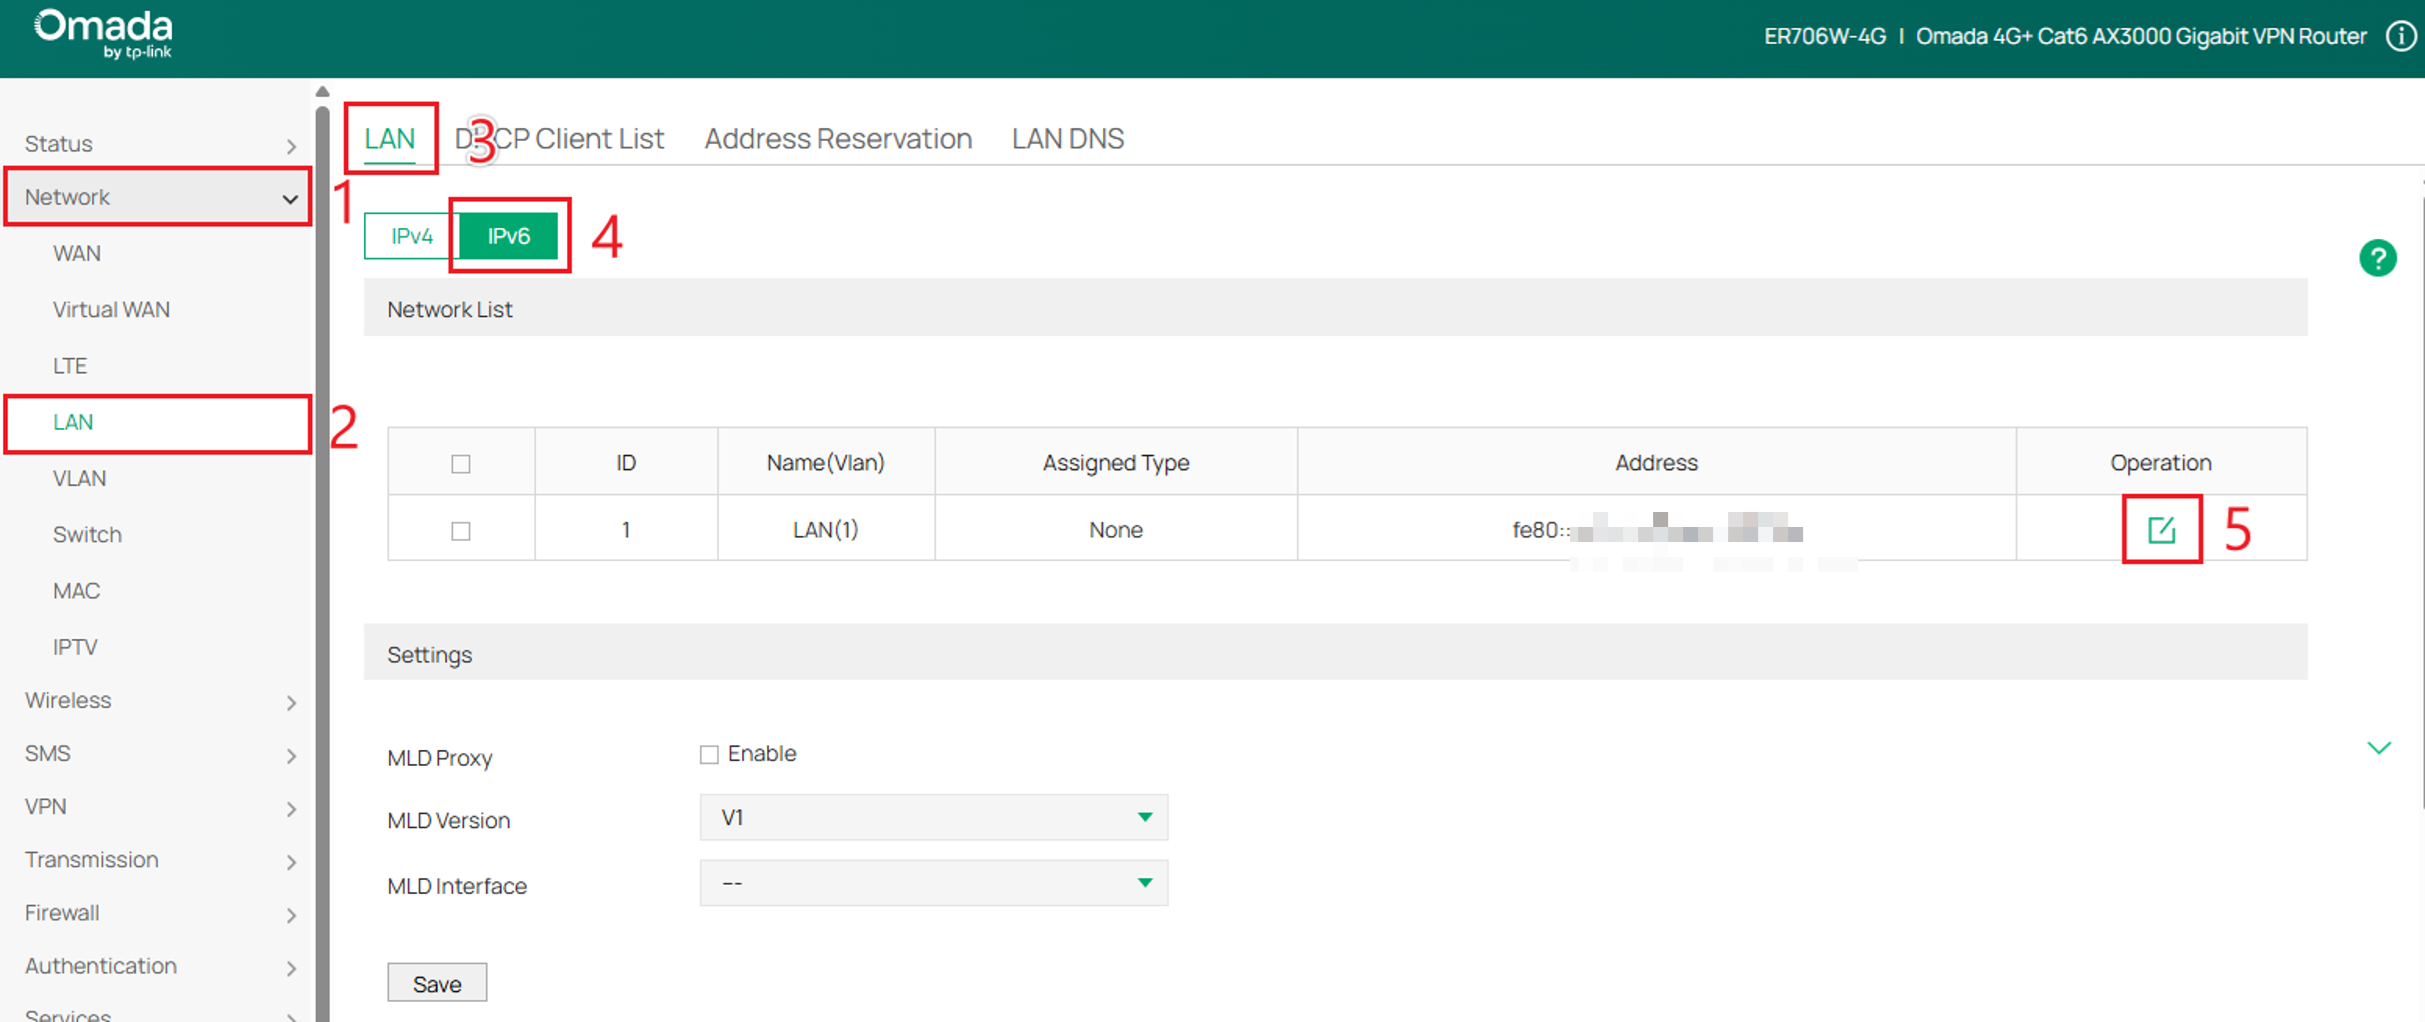
Step 2. Configure the LAN IPv6 connection. Go to Network > LAN. In the LAN tab, select IPv6, then click the Edit icon for the LAN interface.
Step 3. Select the Assigned Type. This example uses SLAAC+Stateless DHCP with prefix delegation from WAN2. Configure the remaining settings according to your network requirements, then click OK.
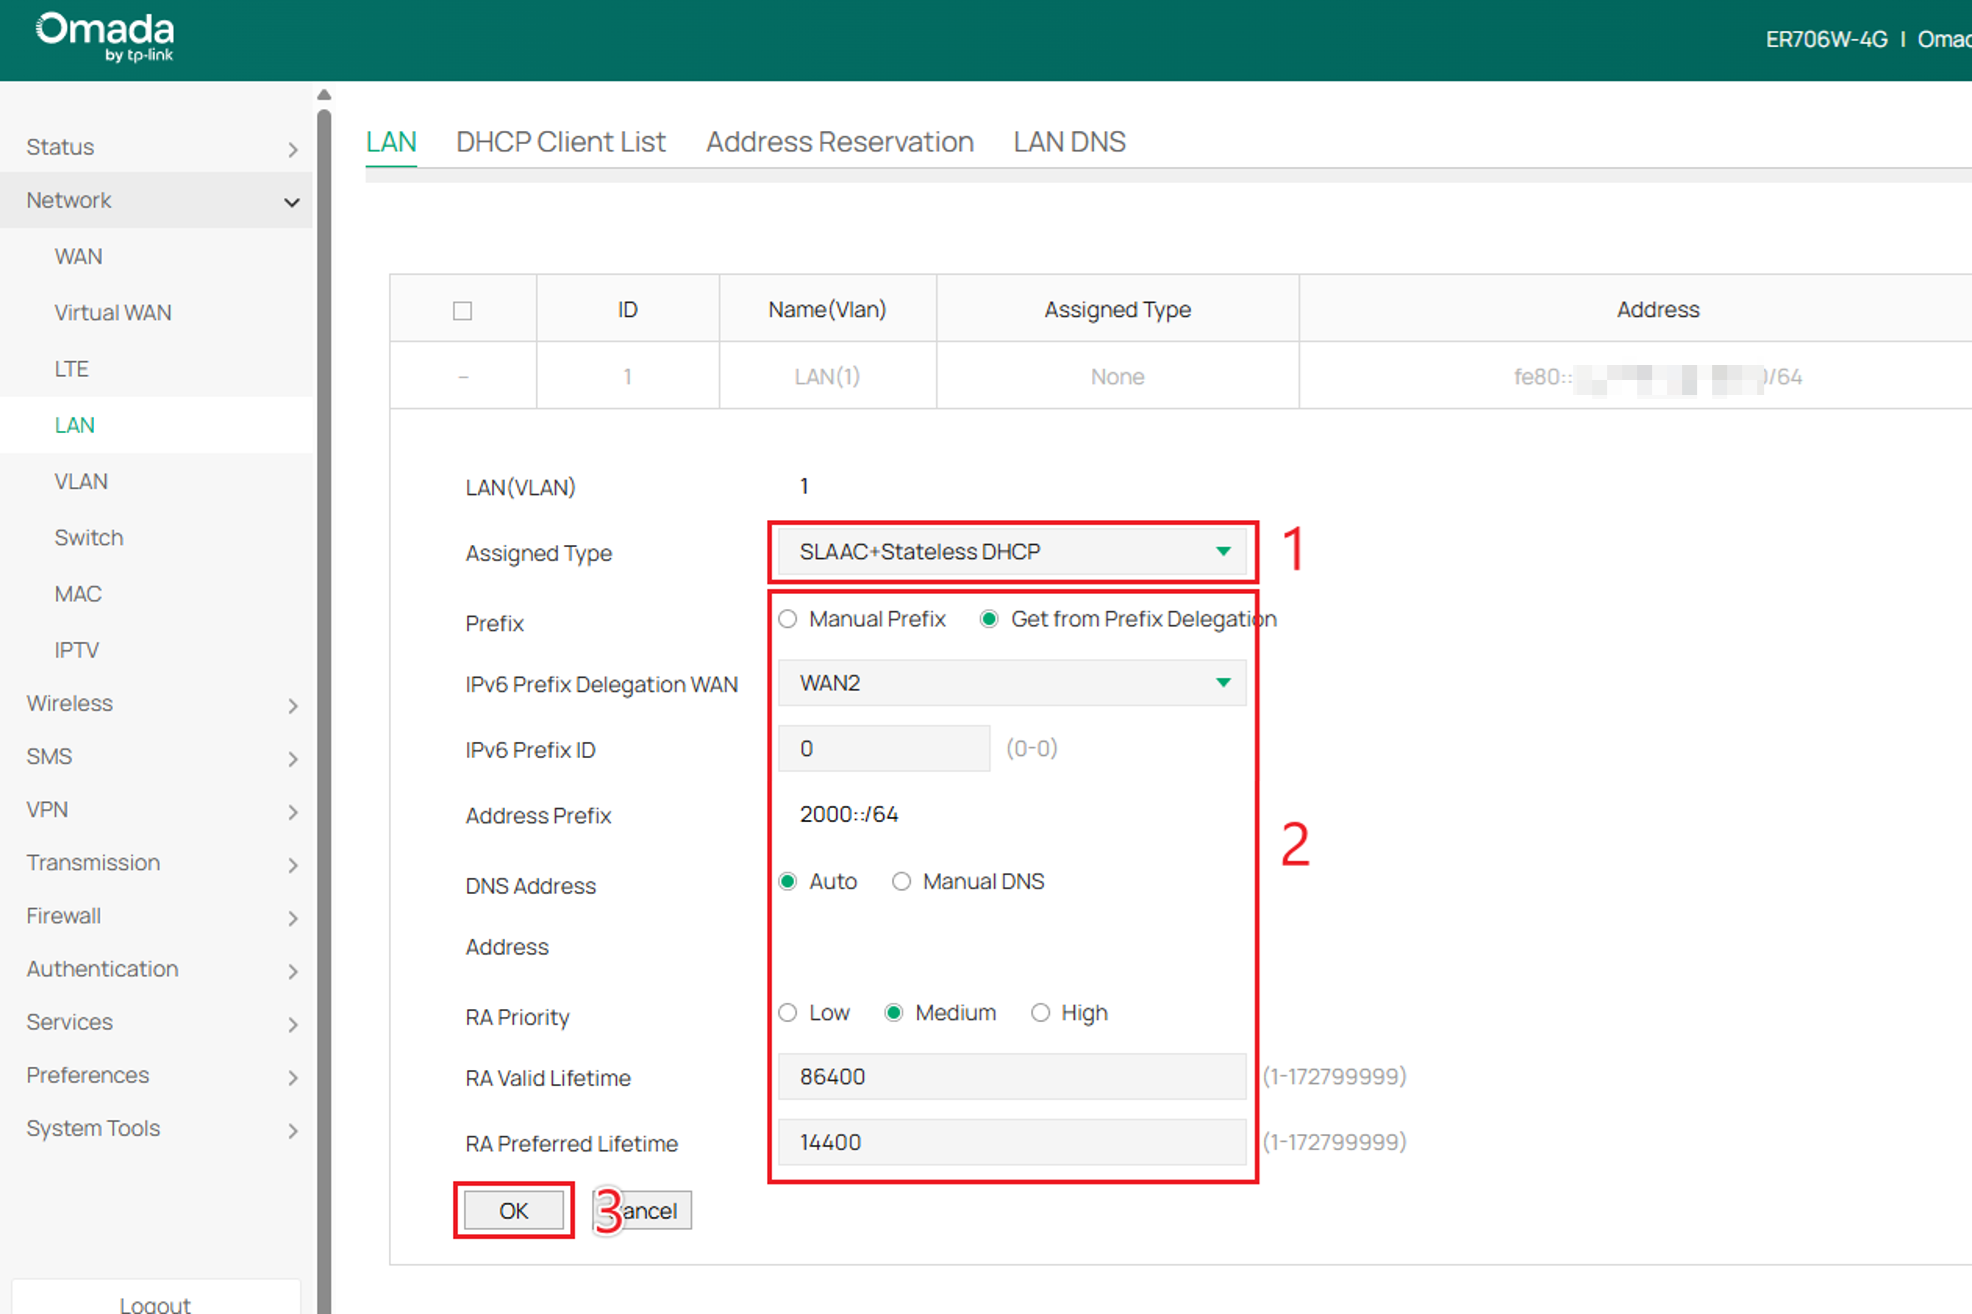
To verify the configuration, confirm that IPv6 is configured correctly on the WAN and LAN interfaces, including prefix delegation from the ISP if applicable. Connect a client to the LAN and verify that it obtains a global IPv6 address and an IPv6 default gateway.
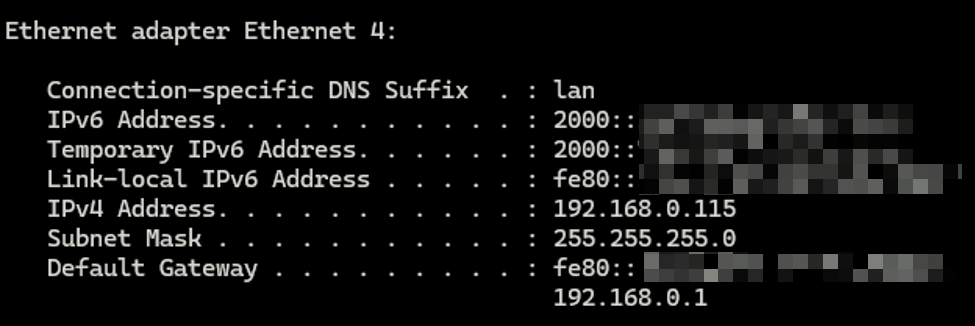
Block access to internal network from the internet
By default, the gateway's WAN firewall blocks most new IPv6 connections initiated from the internet to devices on the LAN. Certain control traffic, such as DHCPv6 and required ICMPv6 messages, may still be permitted to maintain IPv6 connectivity. No additional ACL rules are required to block most unsolicited inbound connections to LAN devices.
Note: This behavior applies to traffic forwarded to LAN devices, not services hosted on the gateway itself, such as web management or SSH. Access to these services should be reviewed separately.
Allow access to internal network from the internet
Step 1. Configure IPv6 groups and IP addresses. Go to Preferences > IP Group. In the IP Address tab, select IPv6 and select Add.
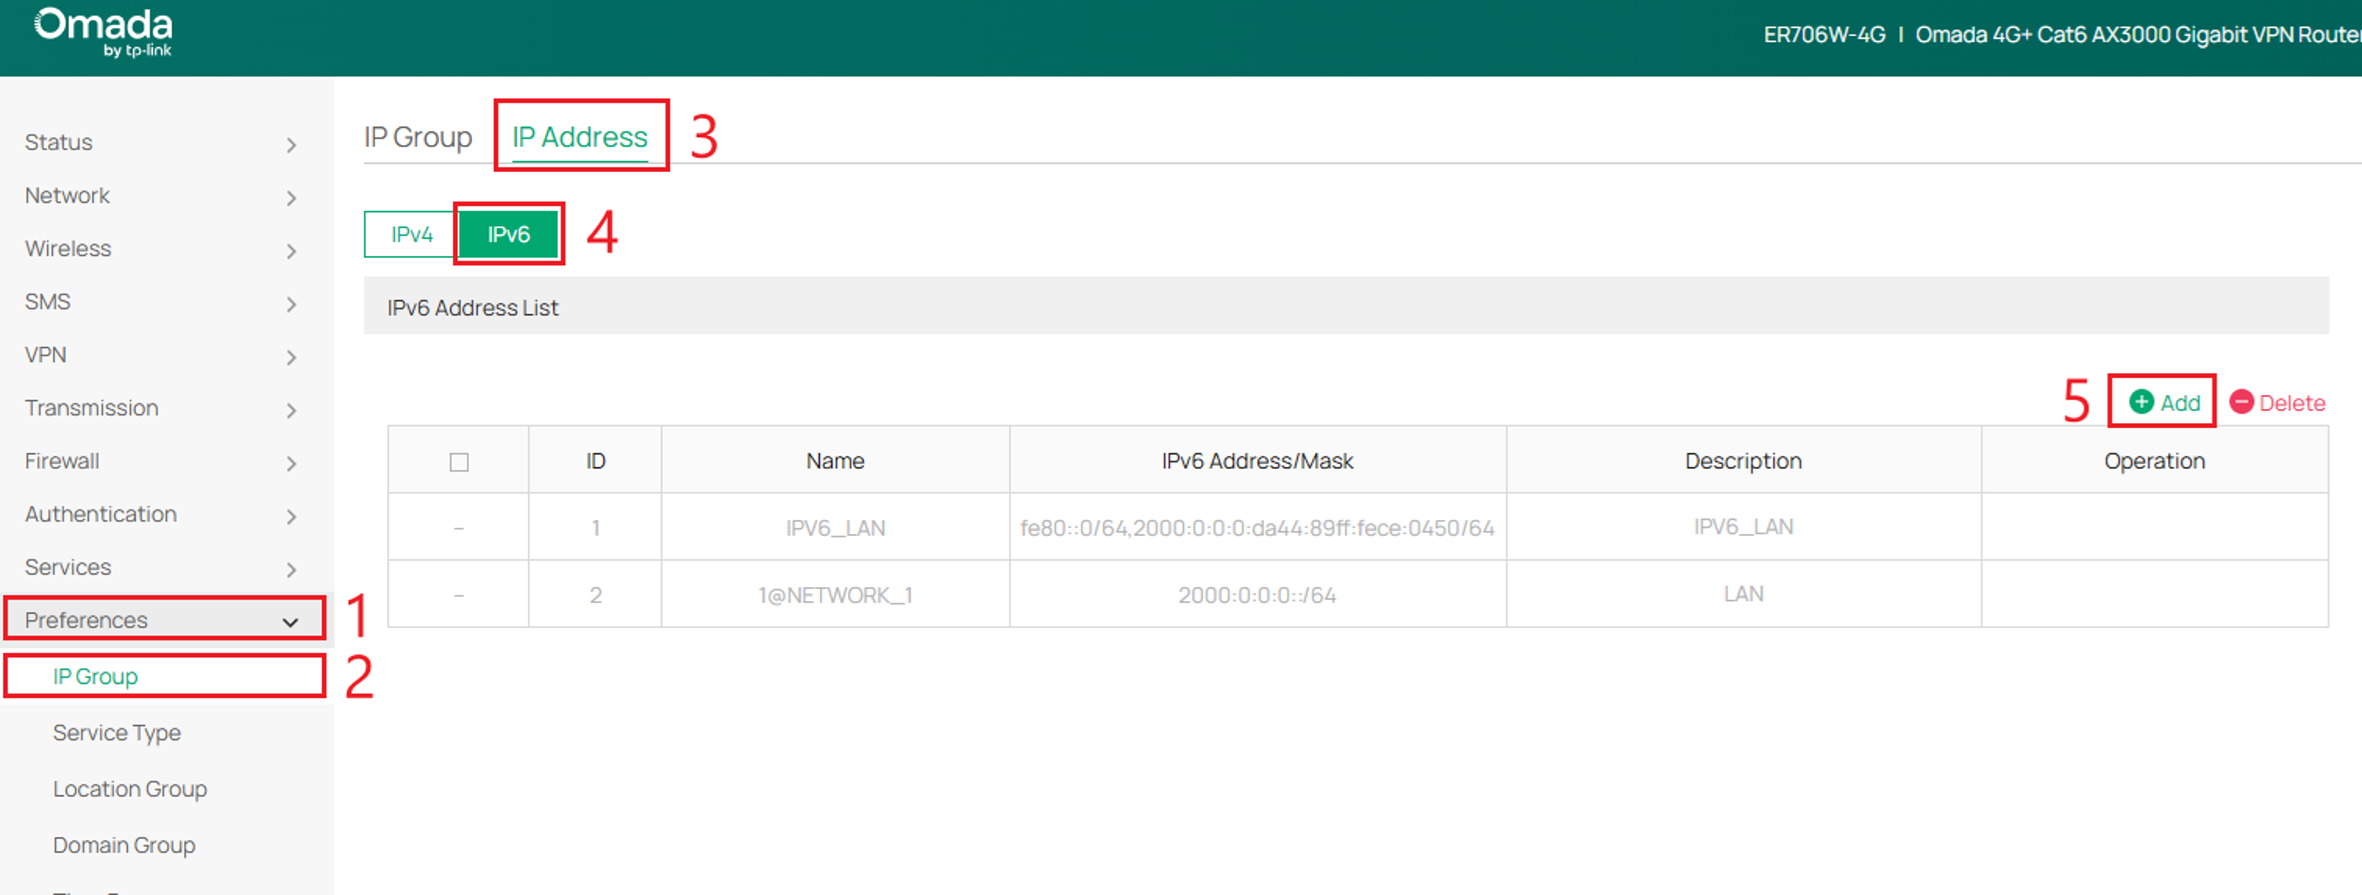
Step 2. Enter my_server_IP_Address in the Name field, specify the IPv6 address and prefix in IPv6 Address/Mask, and click OK.
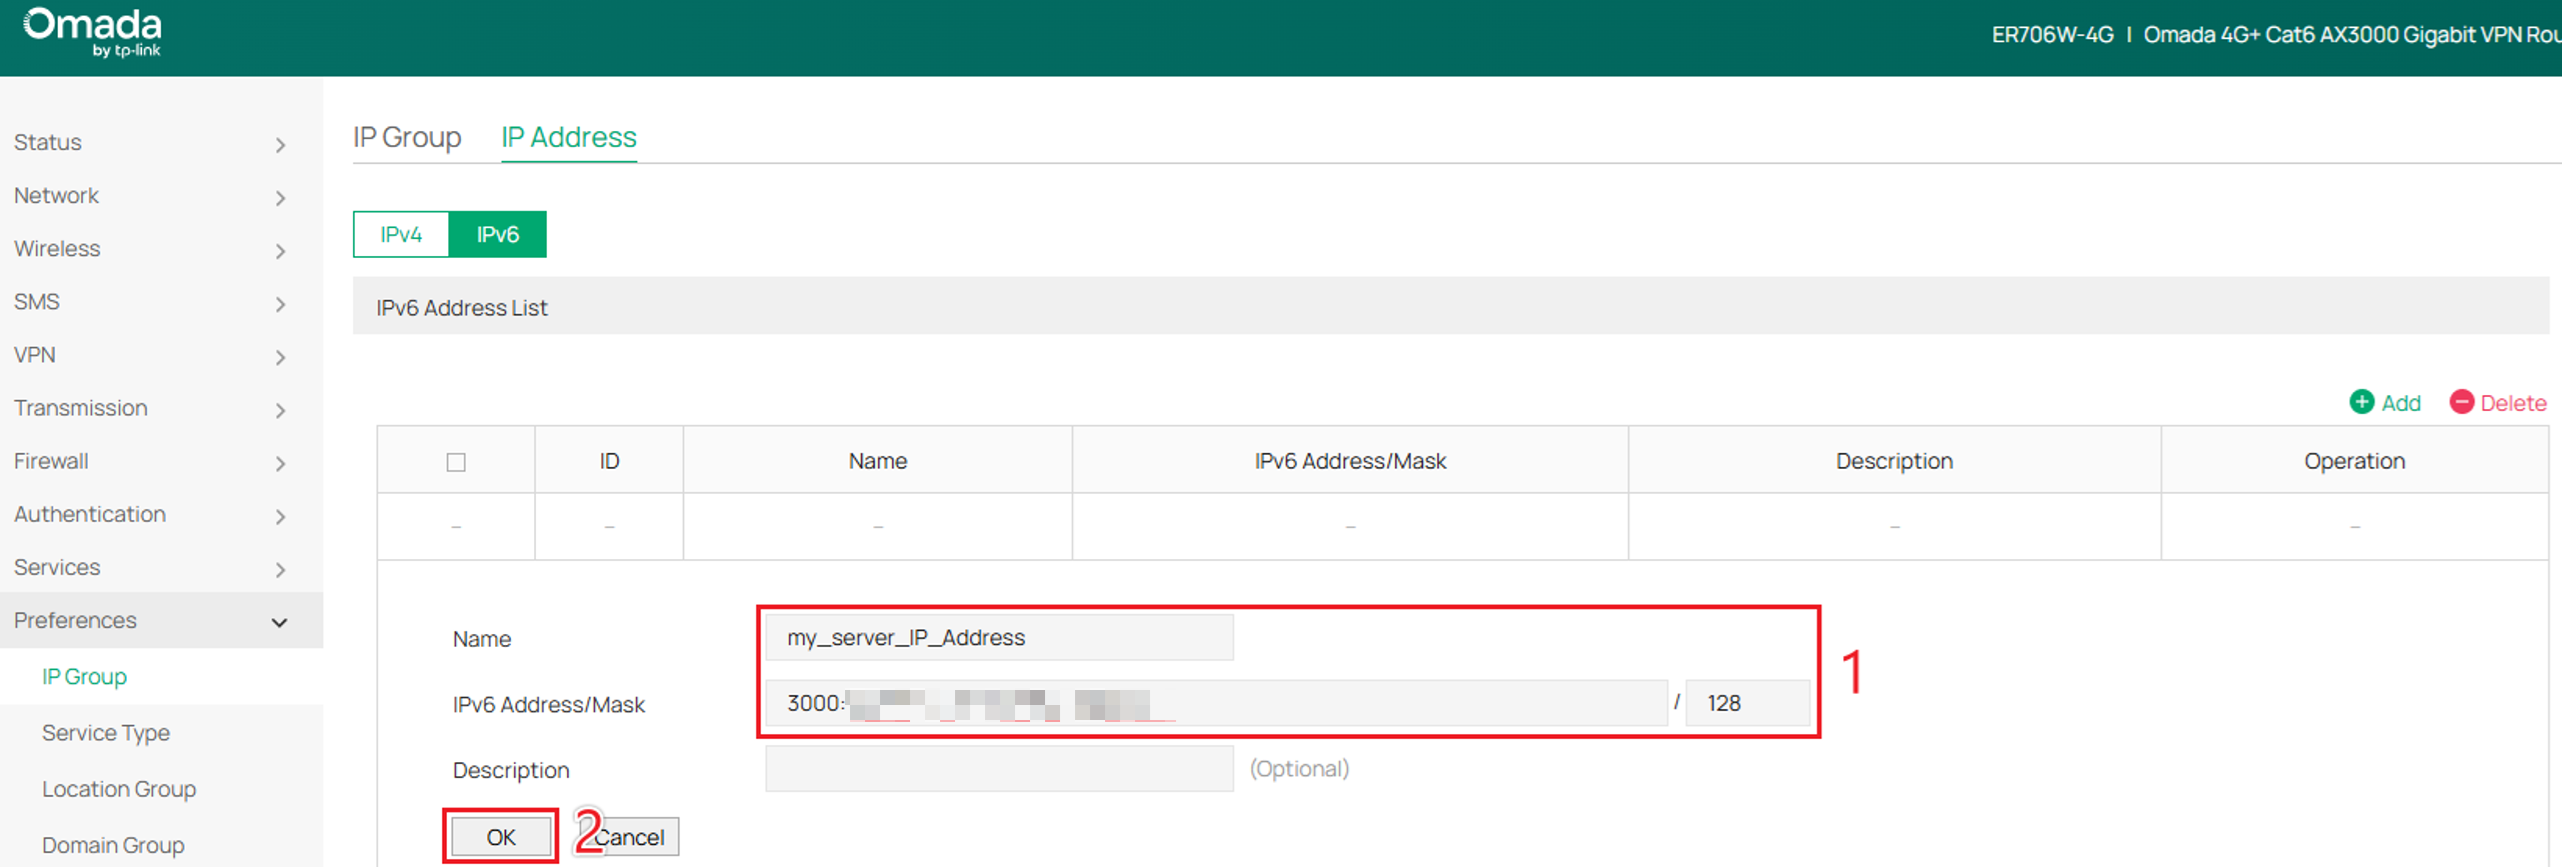
Step 3. Repeat the previous step to create my_client_IP_Address, then click OK.
Note: A /128 prefix matches a single IPv6 address. This example restricts access to one external device. Use a /64 prefix only if access from an entire IPv6 subnet is required.
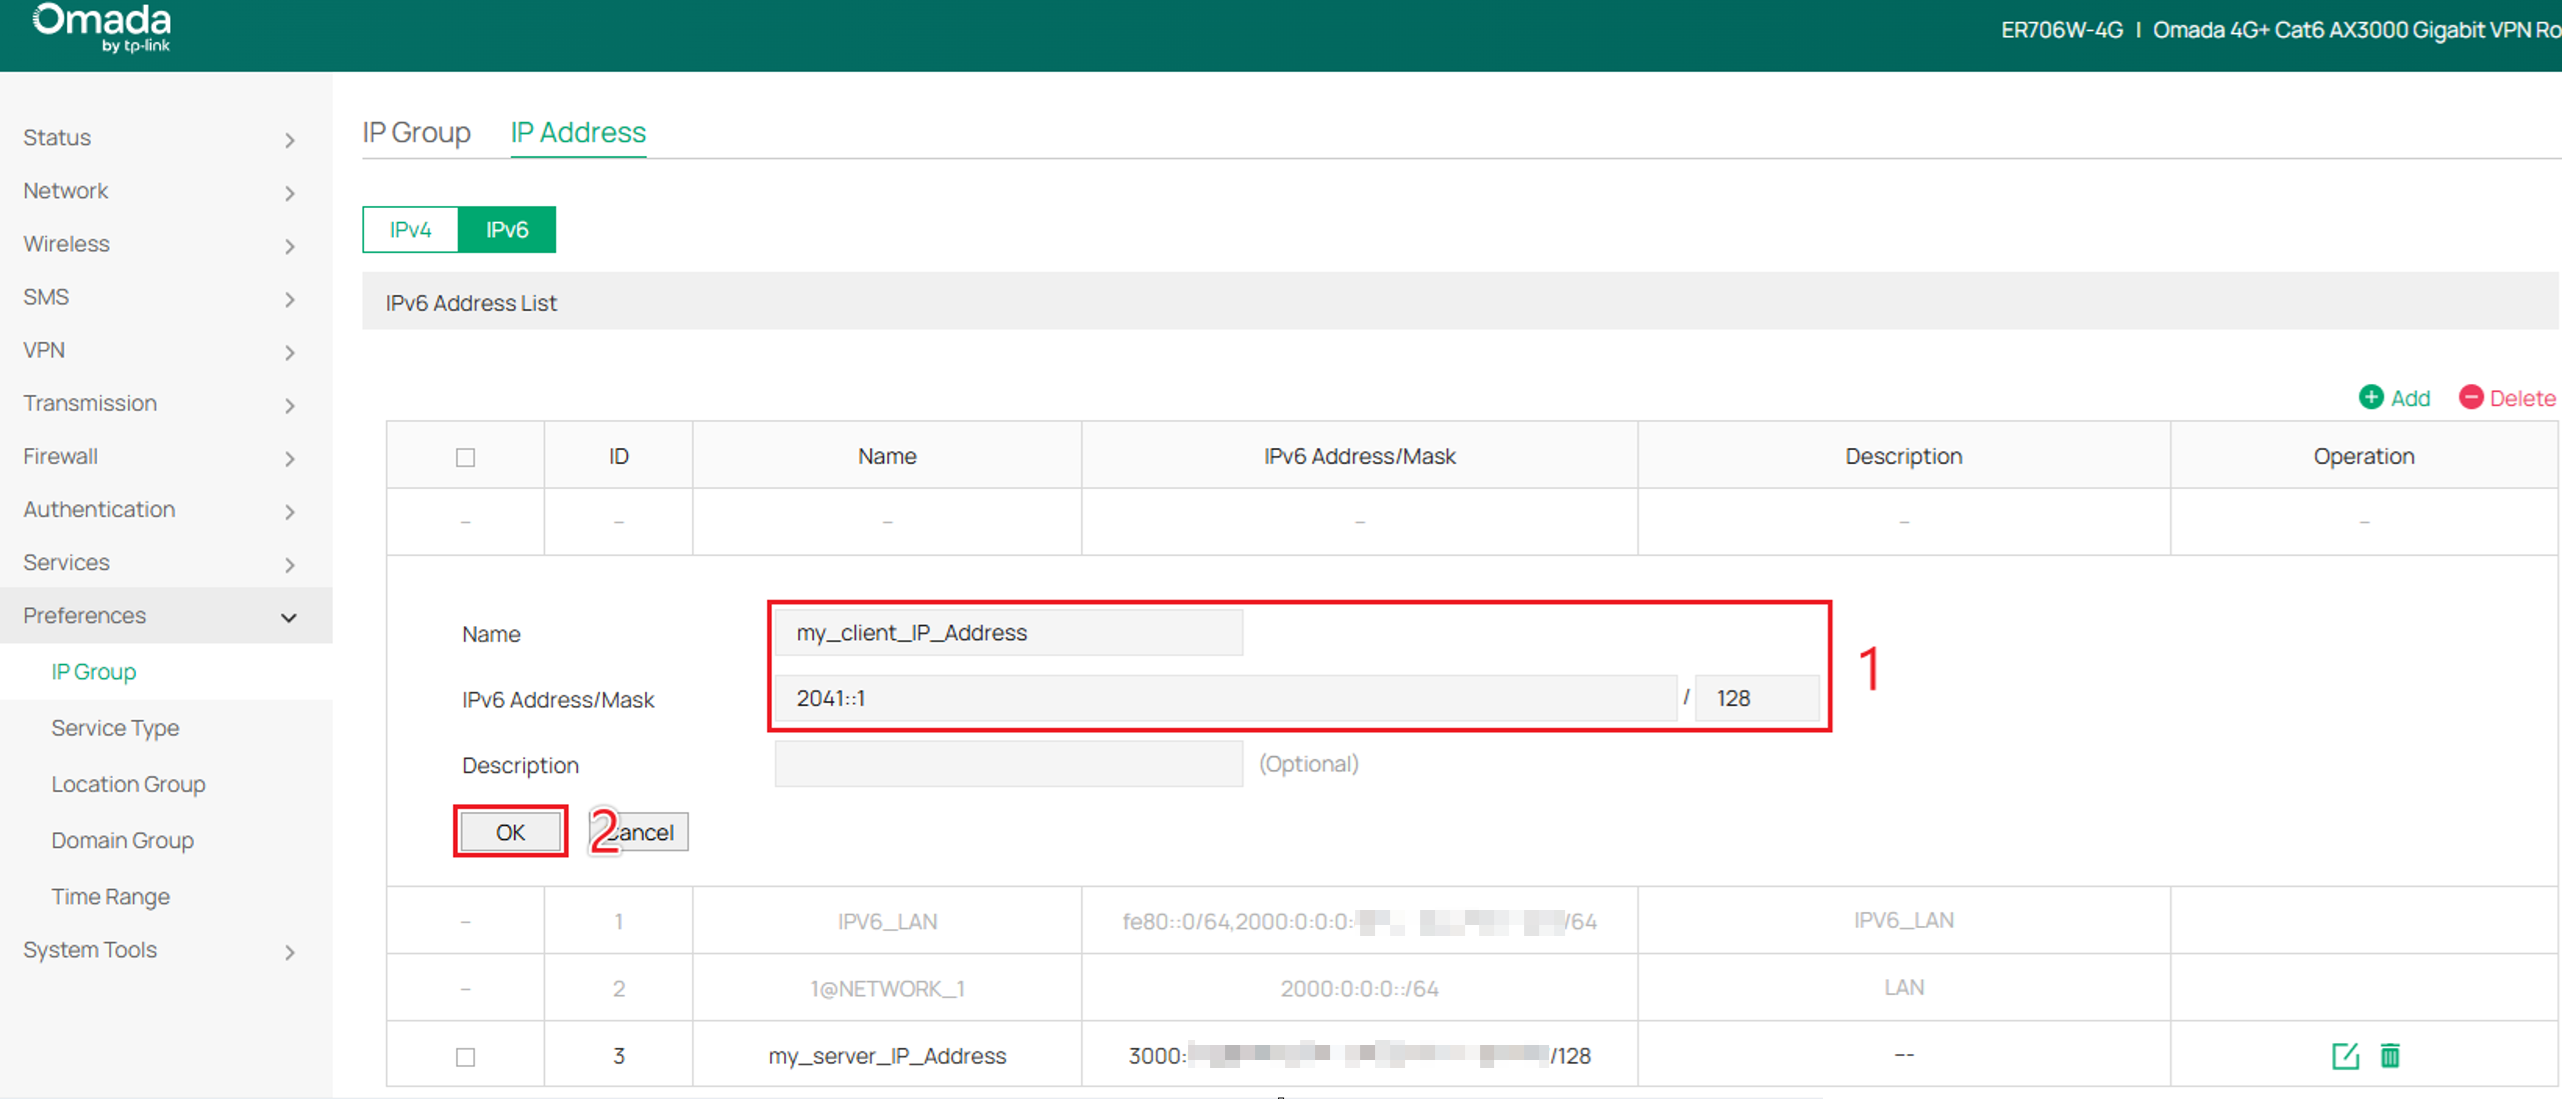
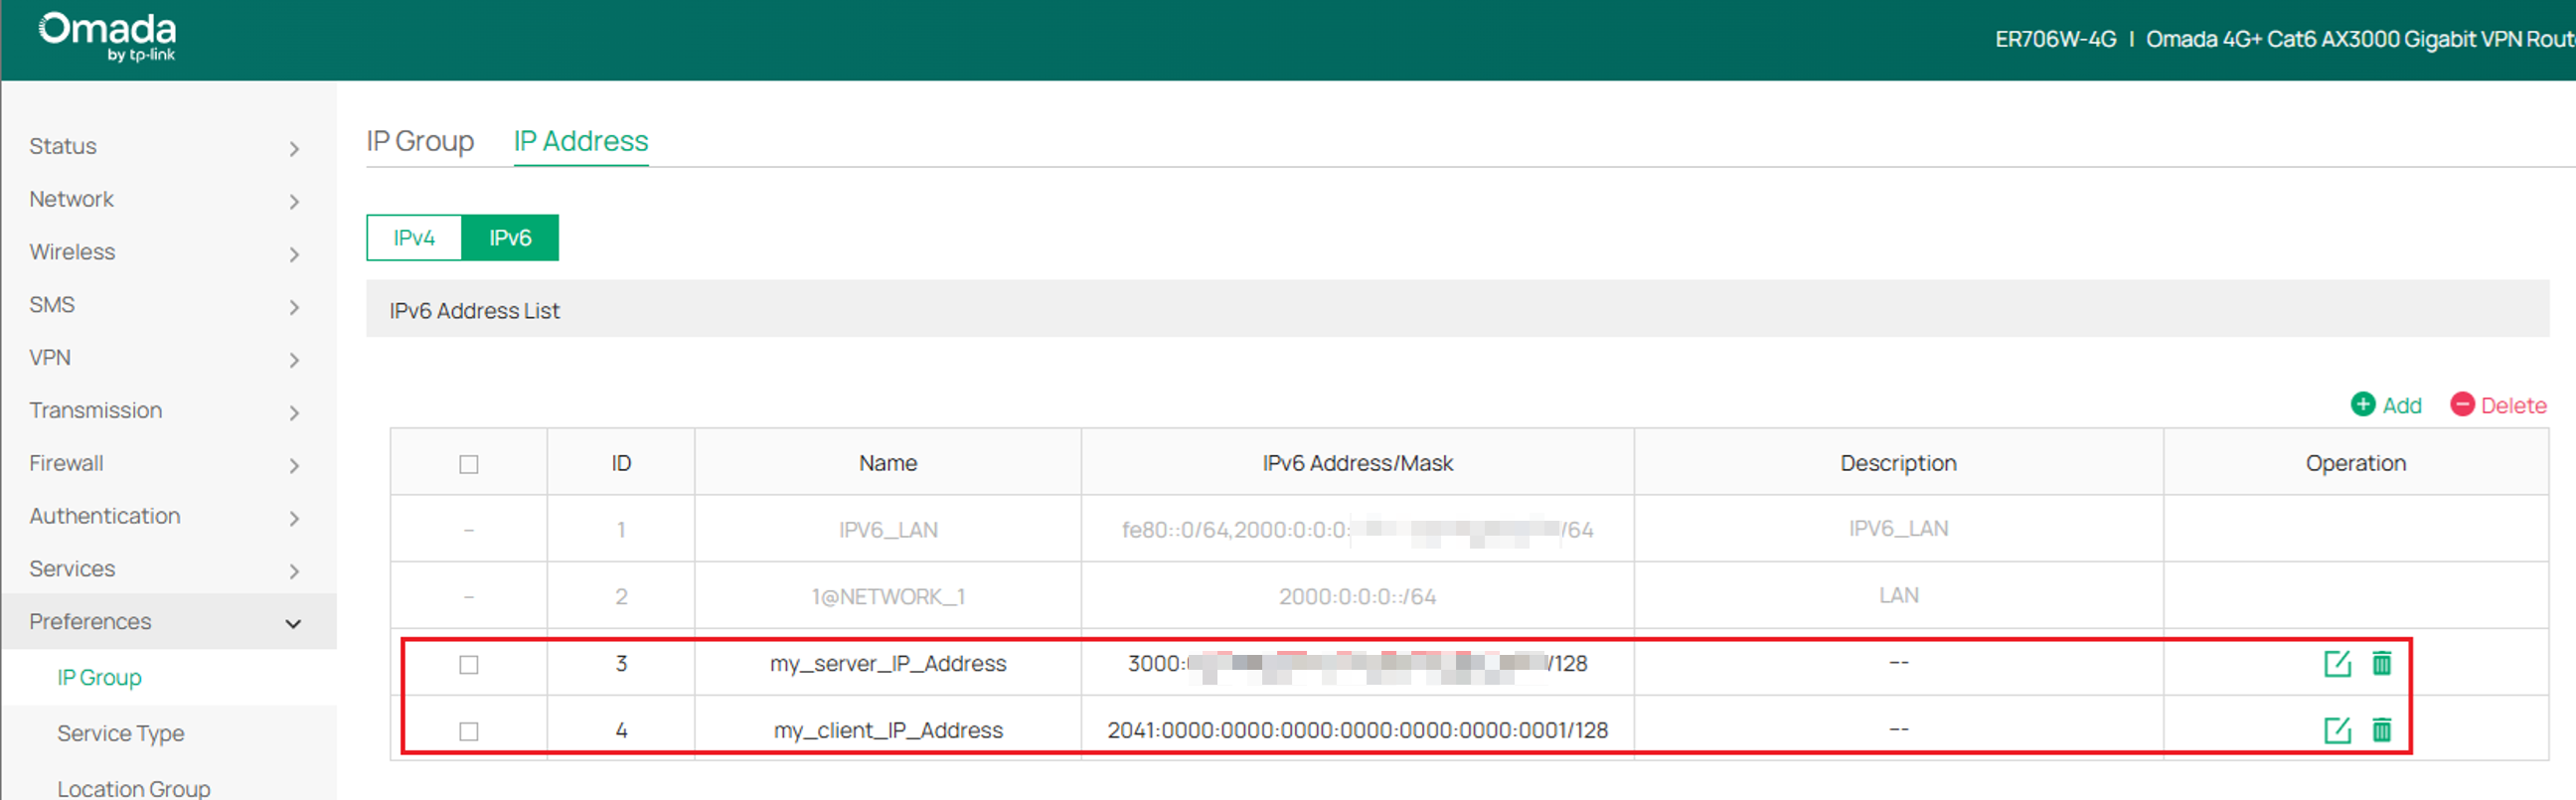
Step 4. Confirm that both entries appear in the IPv6 Address List.
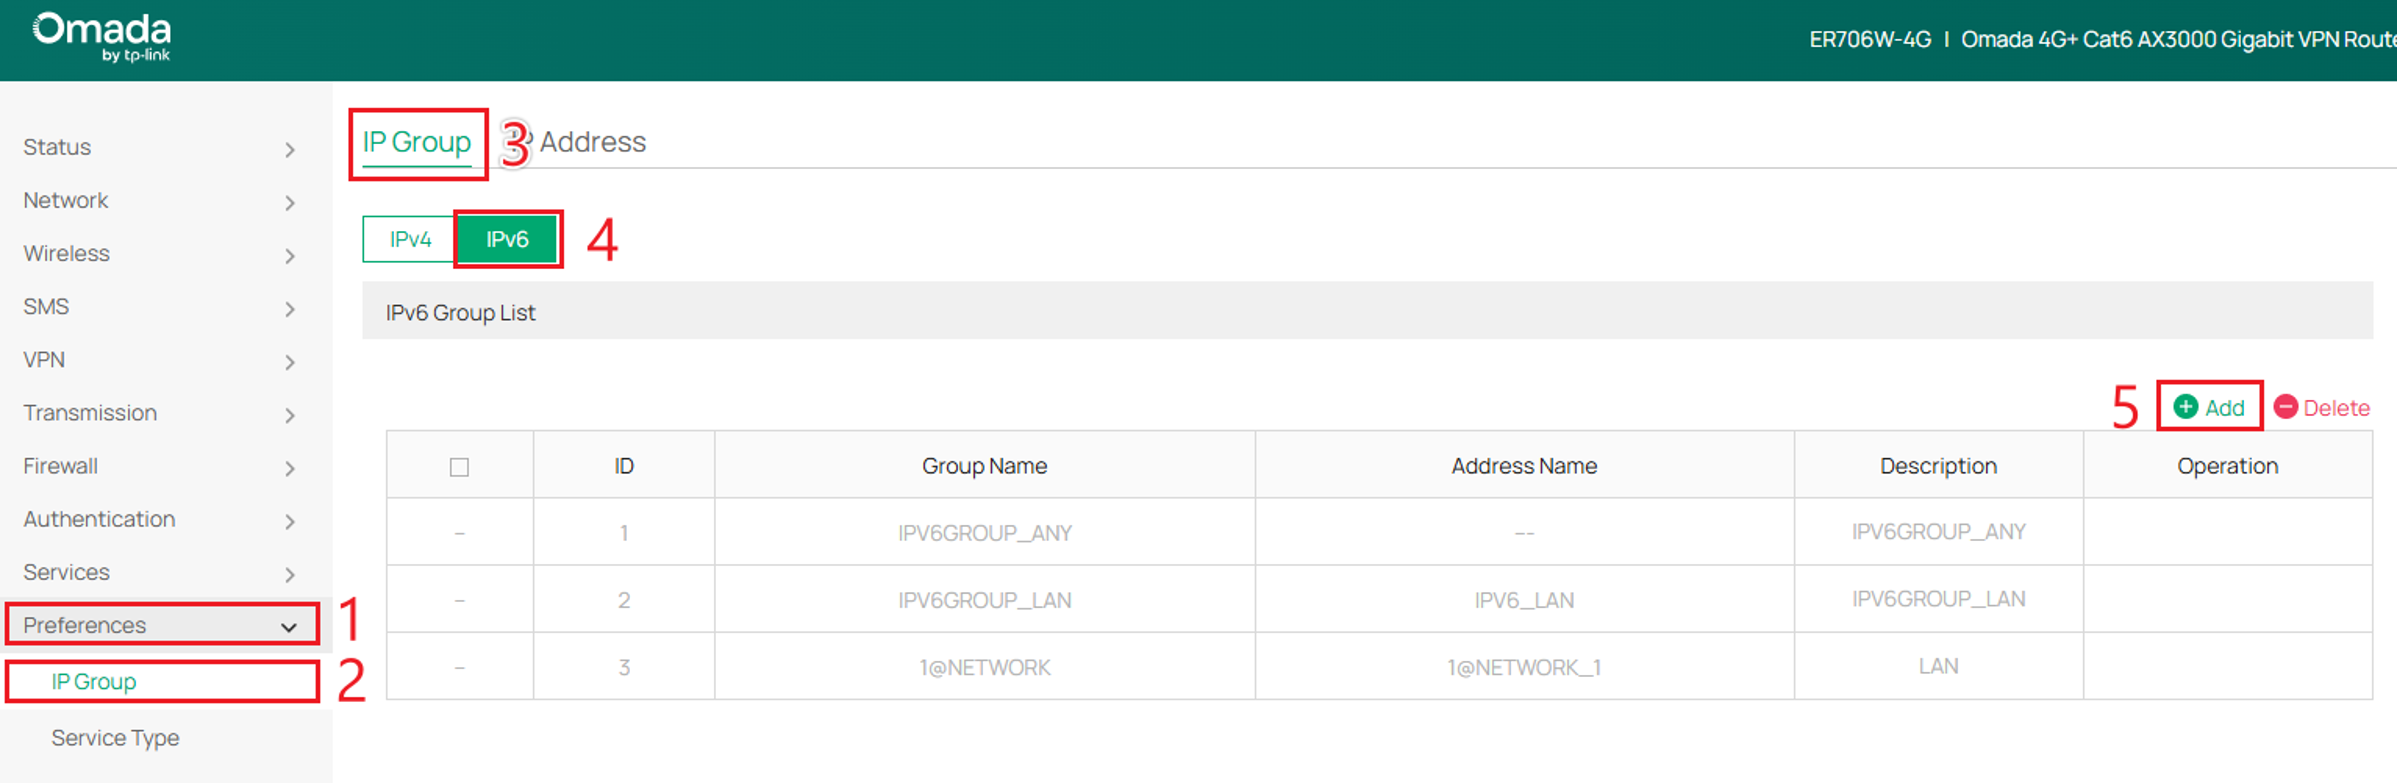
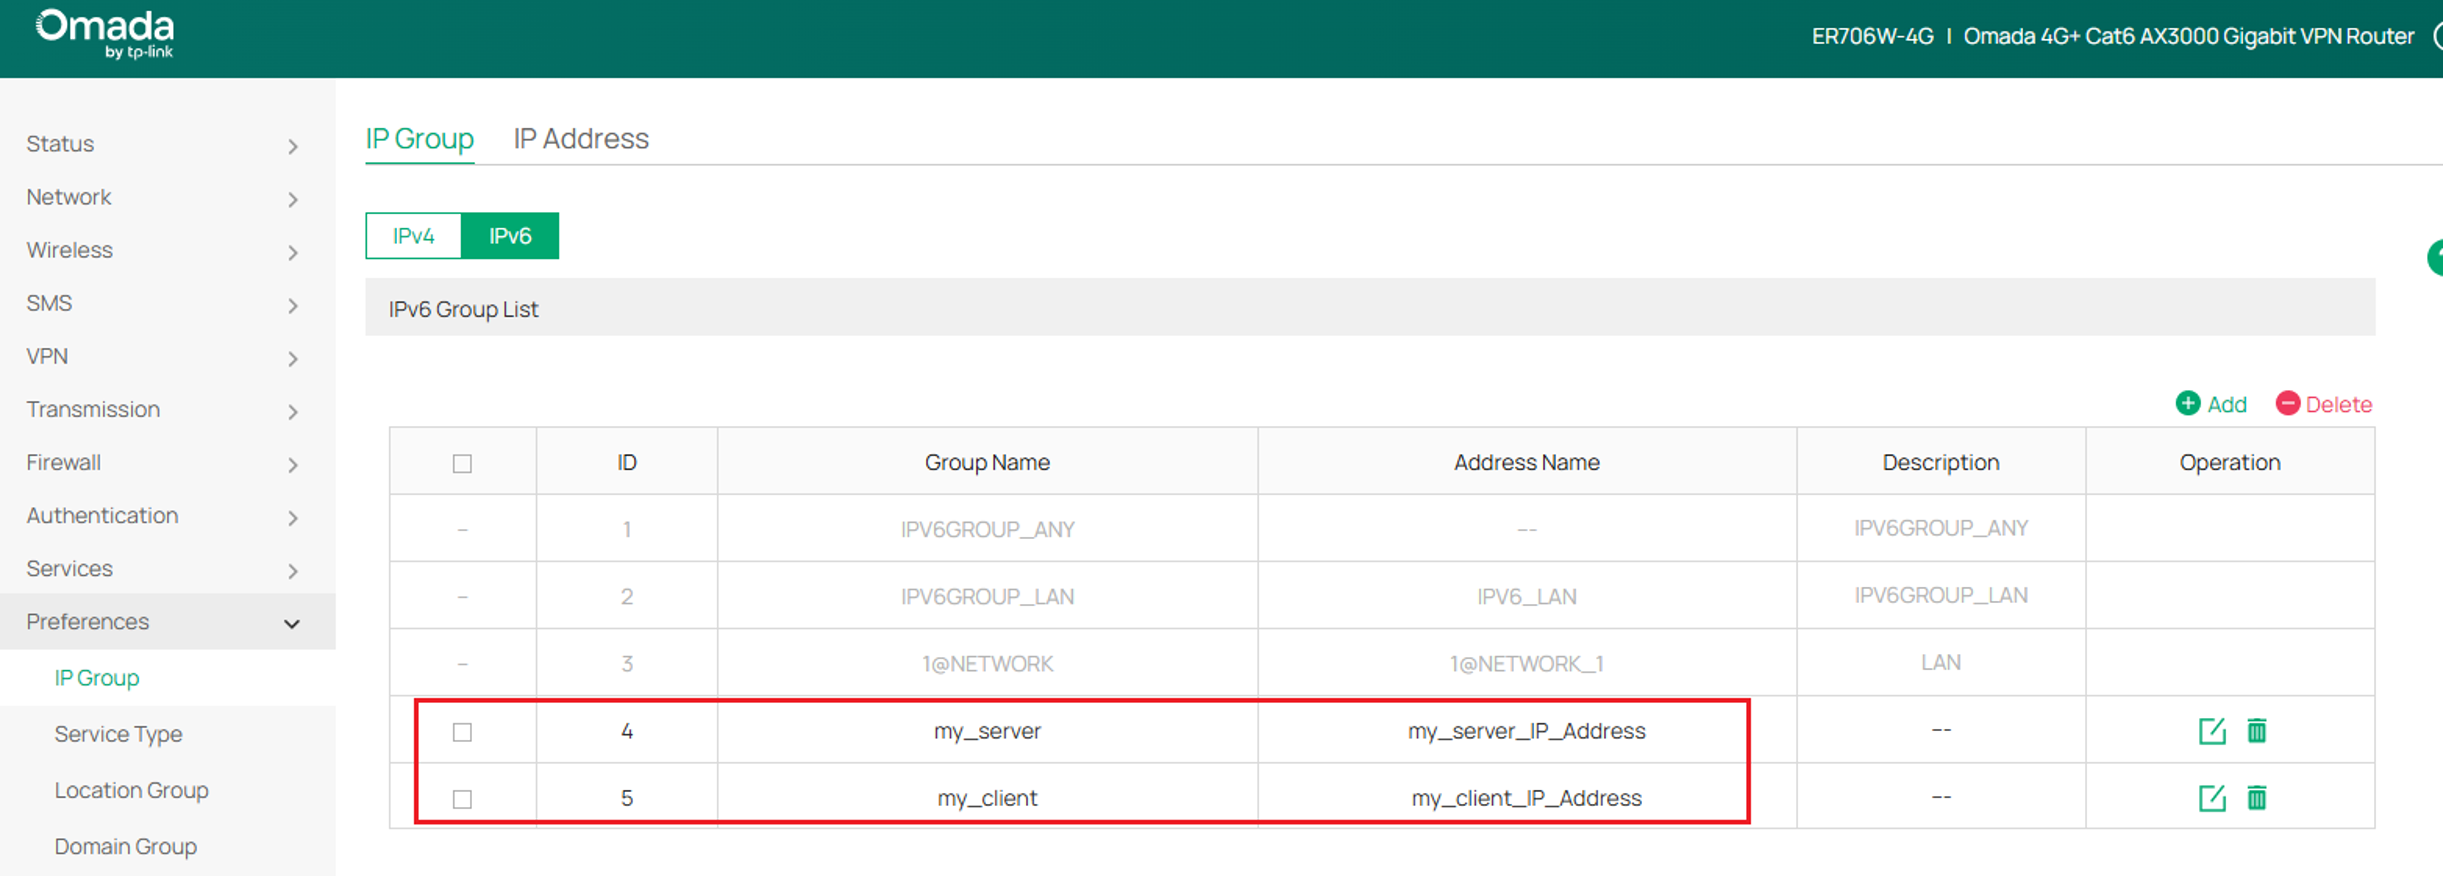
Step 5. Go to Preferences > IP Group, select the IP Group tab and IPv6, then click Add.
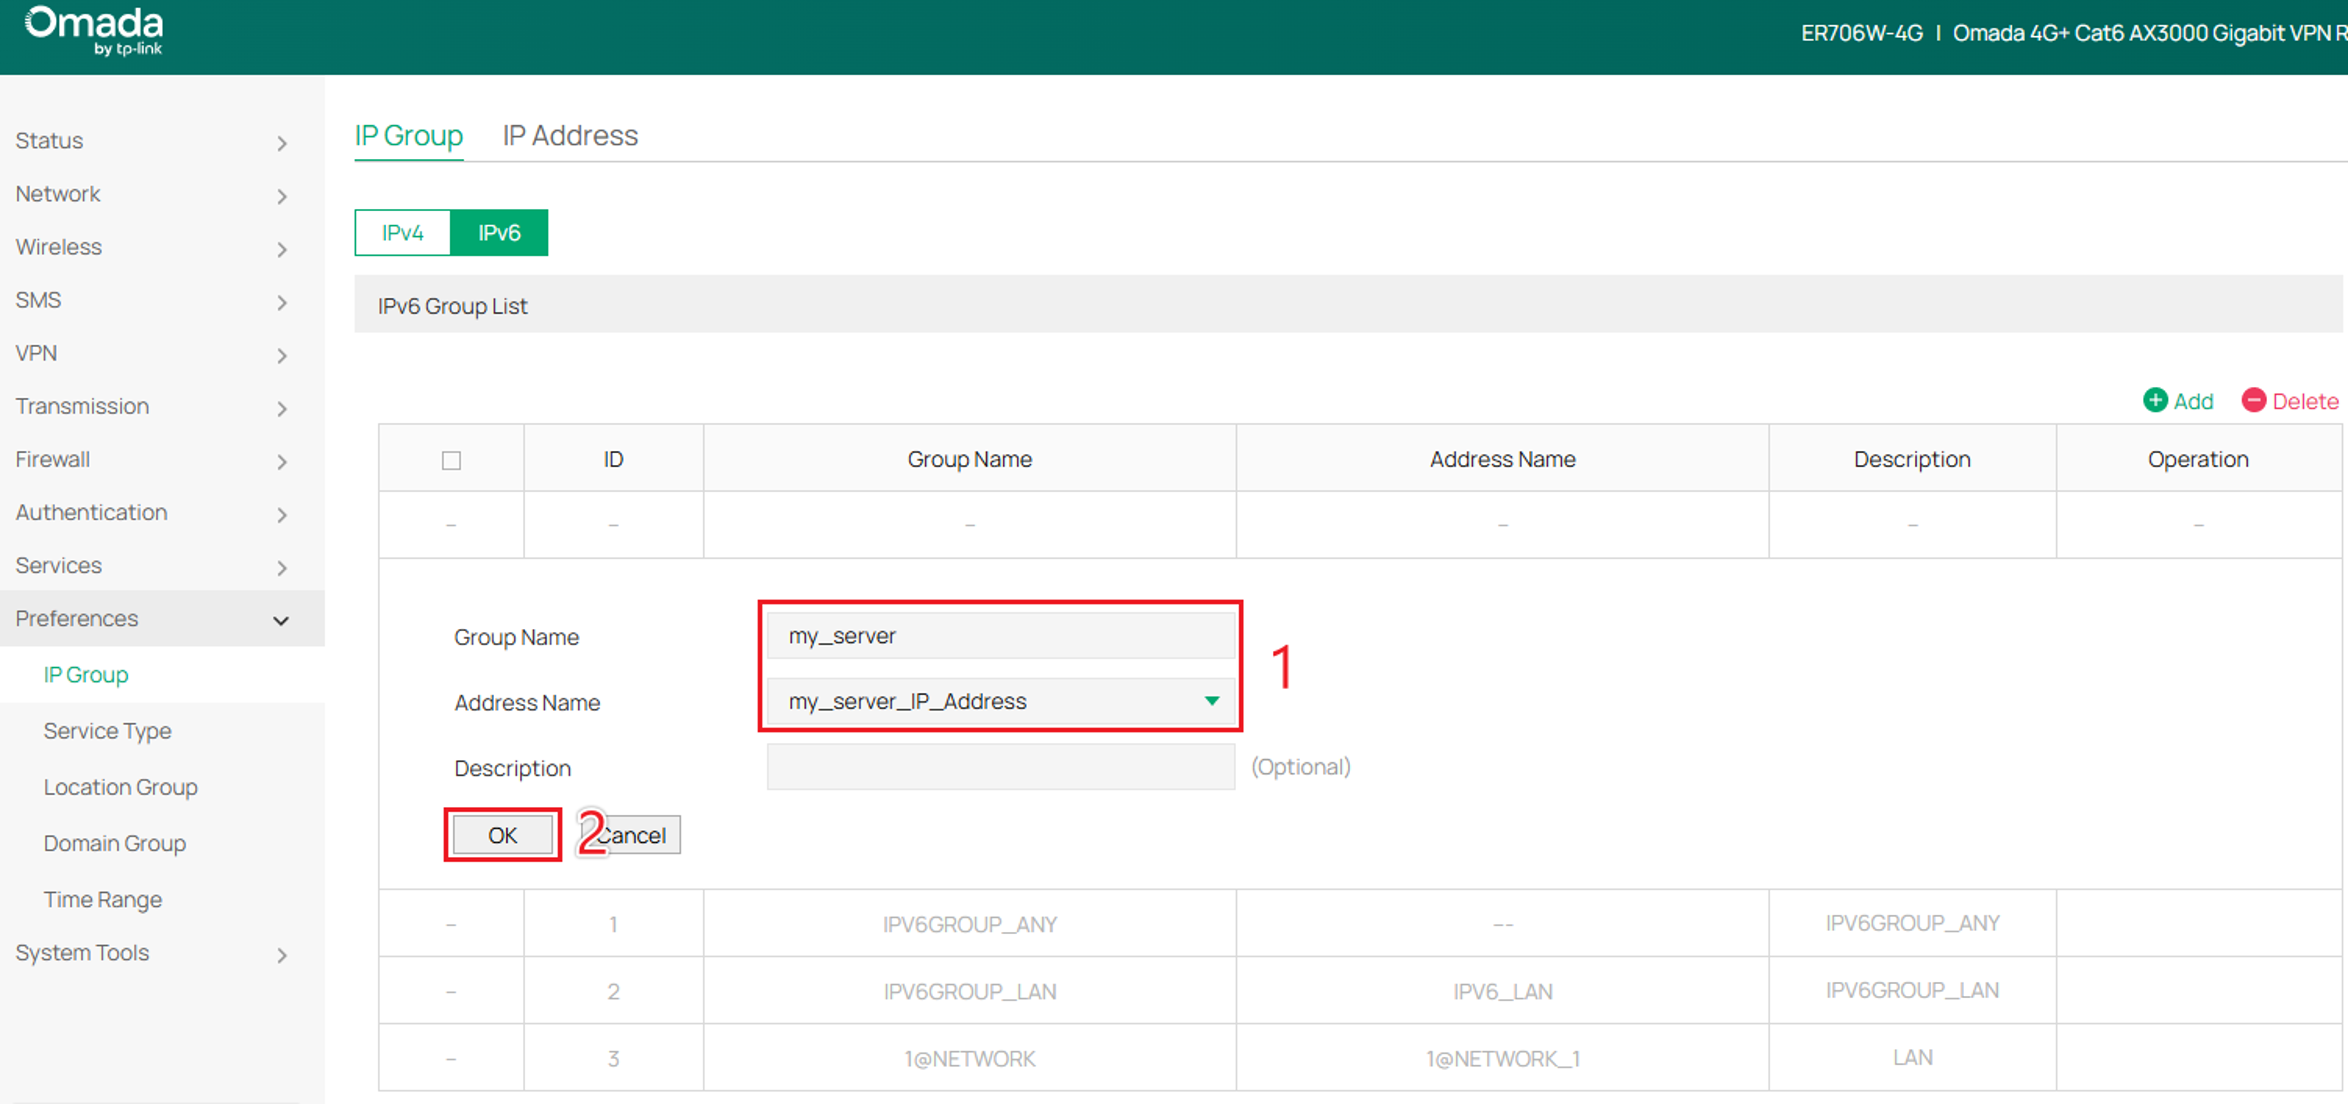
Step 6. Enter my_server as the Group Name, select my_server_IP_Address under Address Name, and click OK.
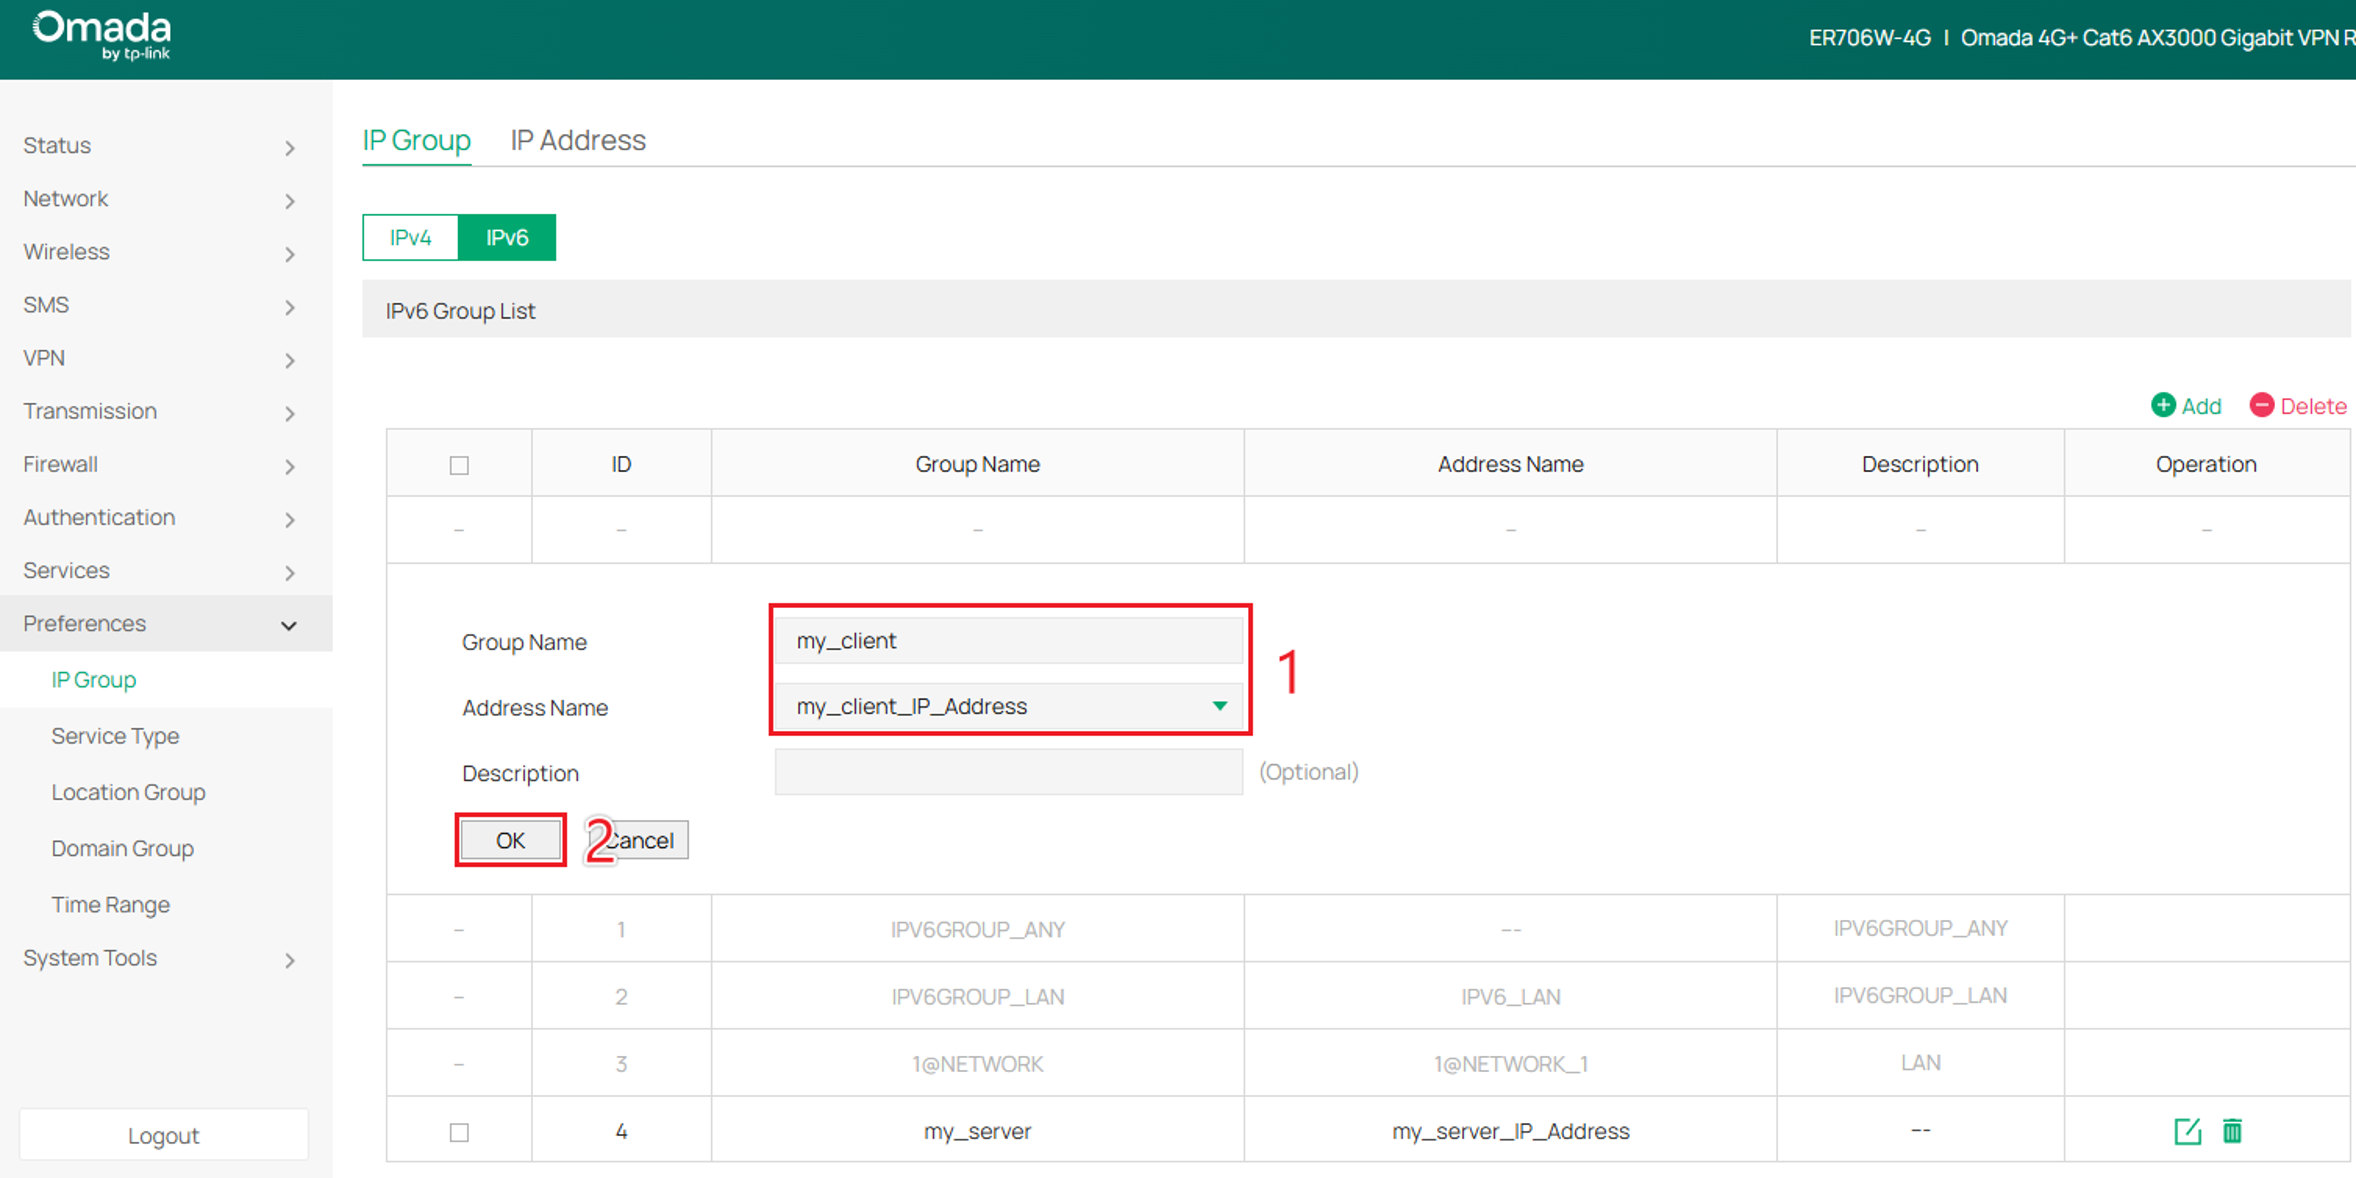
Step 7. Repeat the previous step to create my_client, using my_client_IP_Address as the Address Name. Click OK.
Step 8. Confirm that both groups appear in the IPv6 Group List.
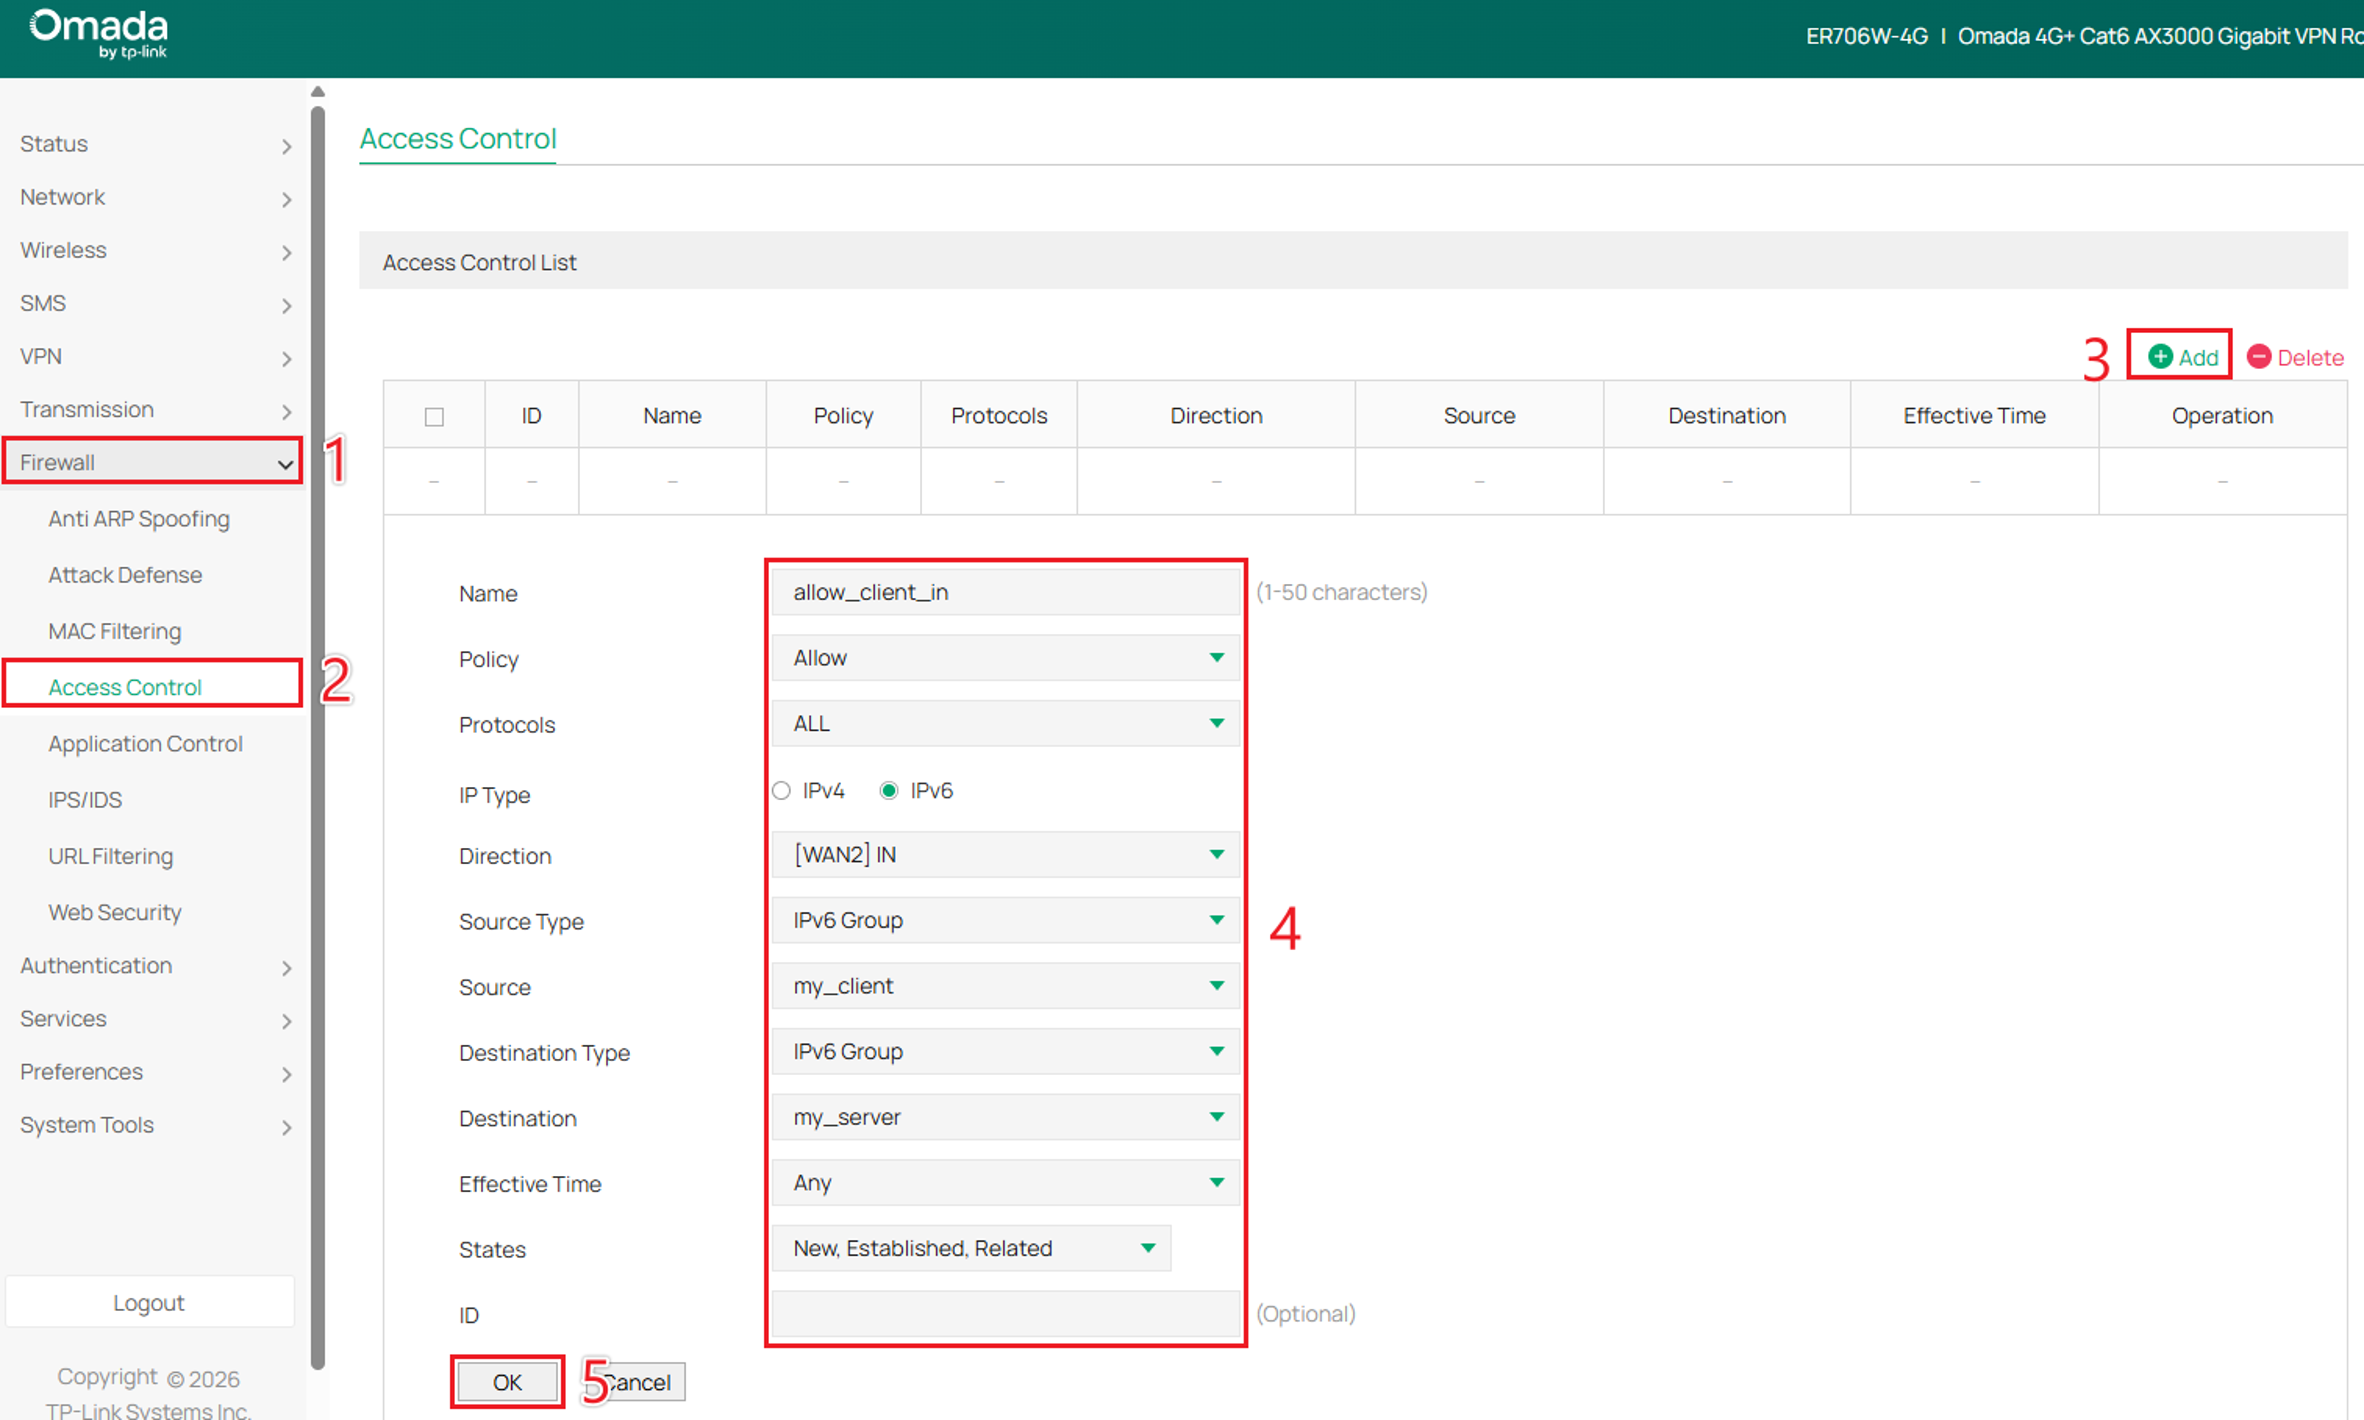
Step 9. Go to Firewall > Access Control, click Add, and configure the following ACL rule:
Name: allow_client_in
Policy: Allow
Protocols: ALL
IP Type: IPv6
Direction: [WAN2] IN
Source Type: IPv6 Group
Source: my_client
Destination Type: IPv6 Group
Destination: my_server
Effective Time: Any
States: New, Established, Related
Click OK to complete the configuration.
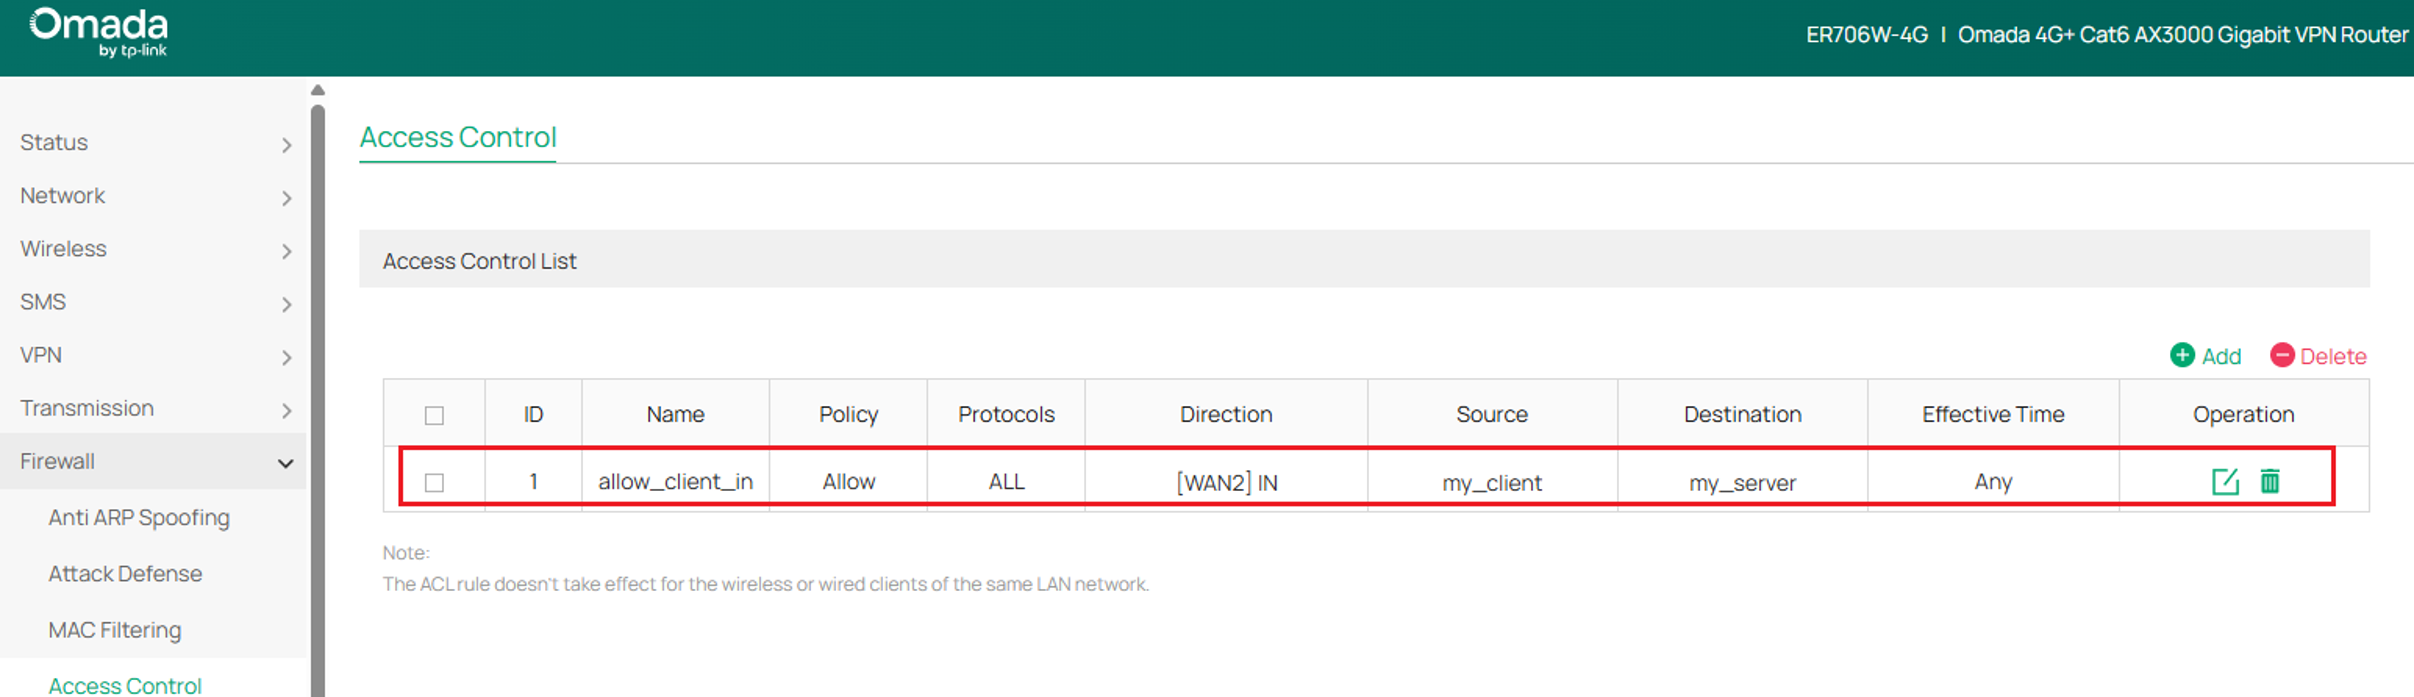
Step 10. Confirm that the new ACL rule appears in the Access Control List with the Allow policy.
Block access to the internet
By configuring Access Control, administrators can restrict IPv6 internet access for specific devices or networks. For example, a business may prevent security cameras from accessing the internet over IPv6 while allowing them to communicate with a local NVR. Similarly, parents can restrict IPv6 internet access for their children's devices during designated hours.
Standalone mode also supports time-based ACL rules. In this example, we will create an IPv6 group named children_pc and restrict its IPv6 internet access from 12:00 a.m. to 8:00 a.m., Monday through Friday. This schedule is optional.
Step 1. Configure IPv6 groups and IP addresses. Go to Preferences > IP Group. In the IP Address tab, select IPv6 and select Add.
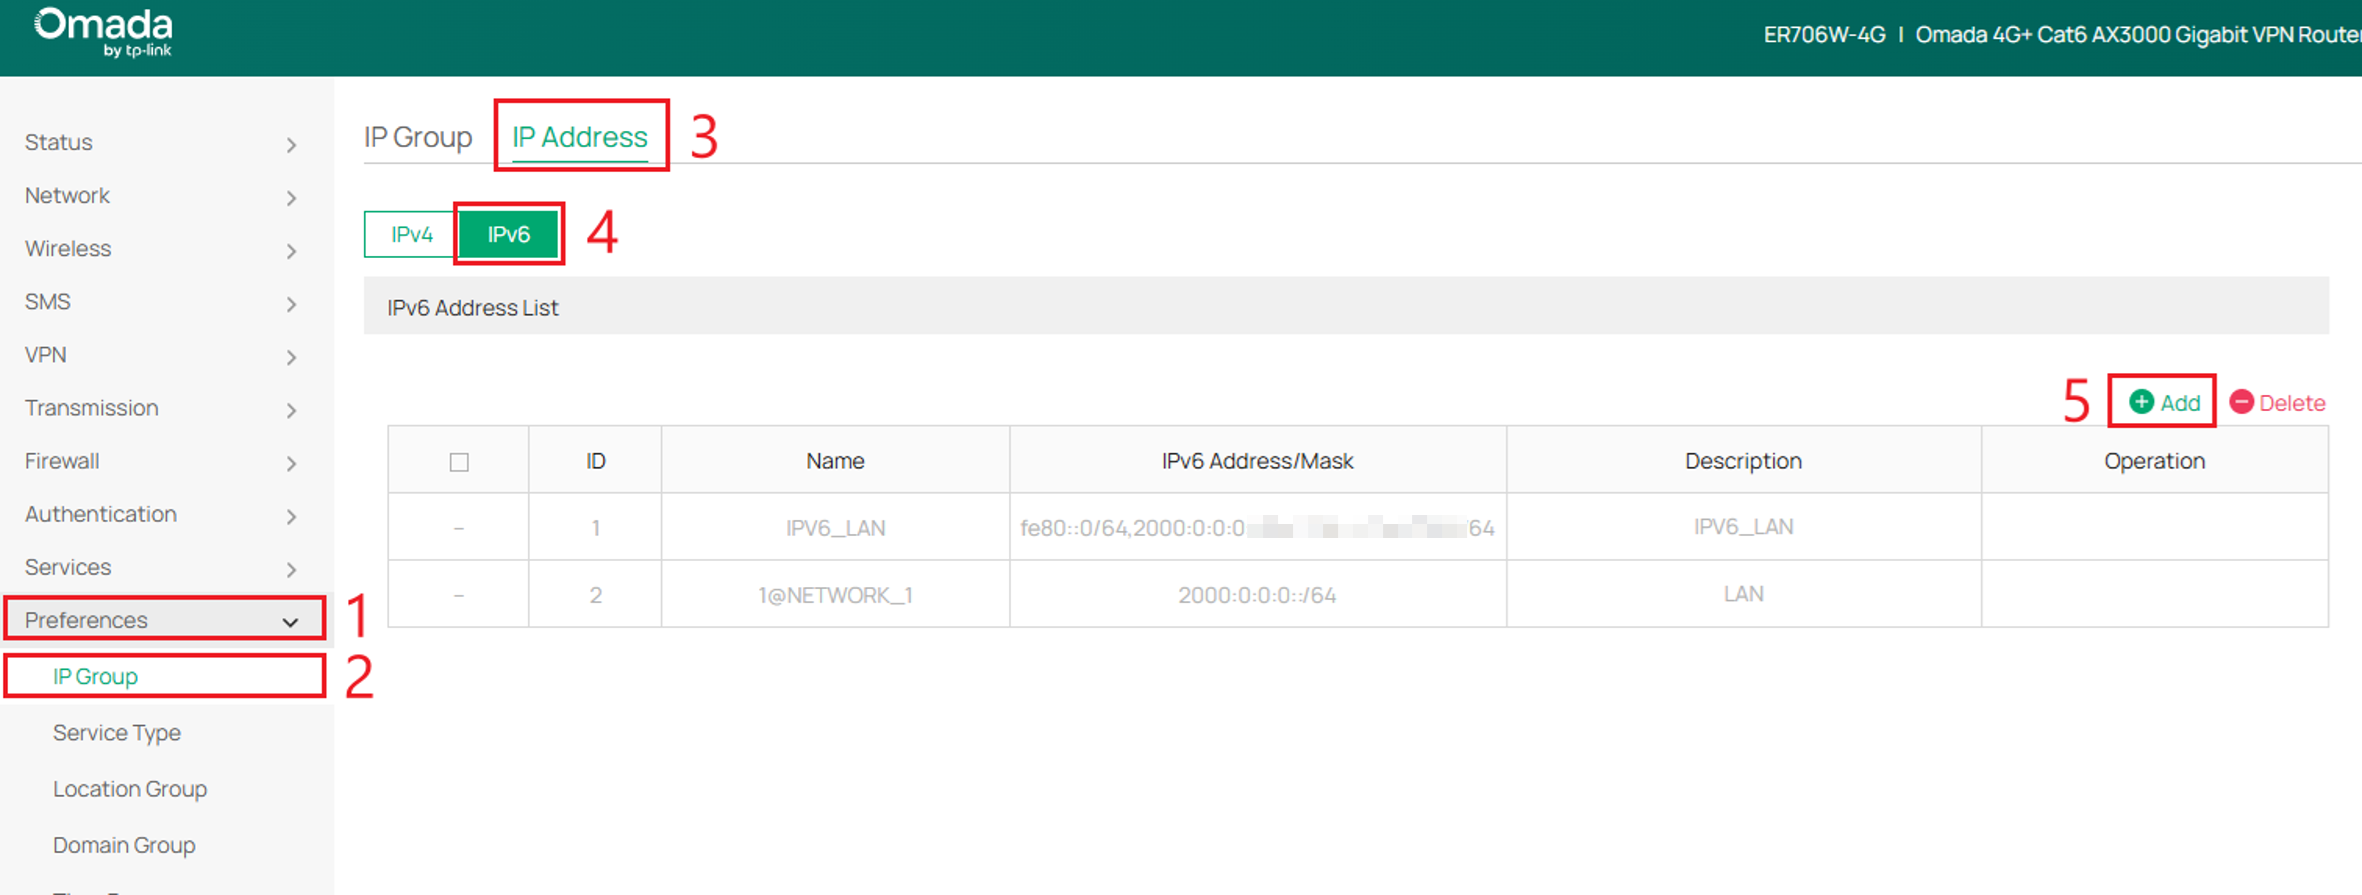
Step 2. Enter children_pc_IP_Address in the Name field and specify the client's IPv6 address and prefix in IPv6 Address/Mask. Click OK.
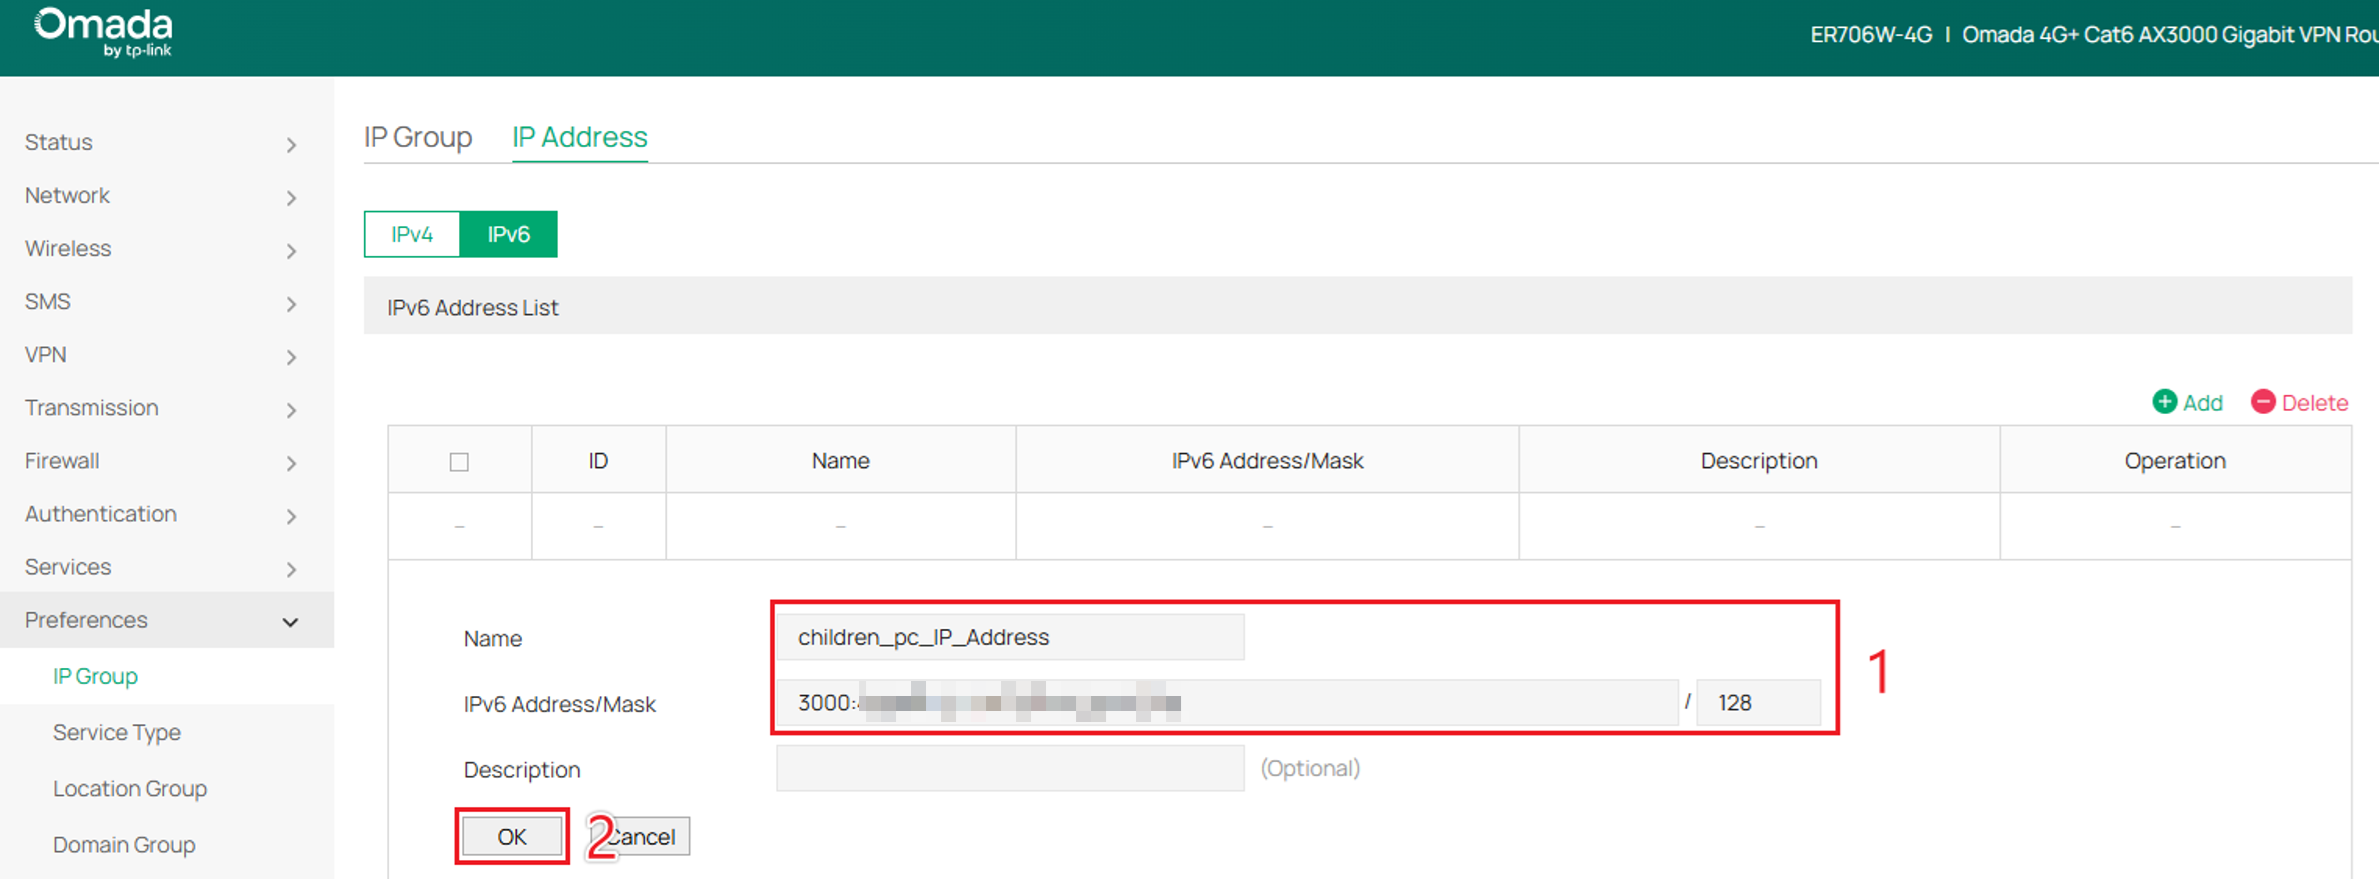
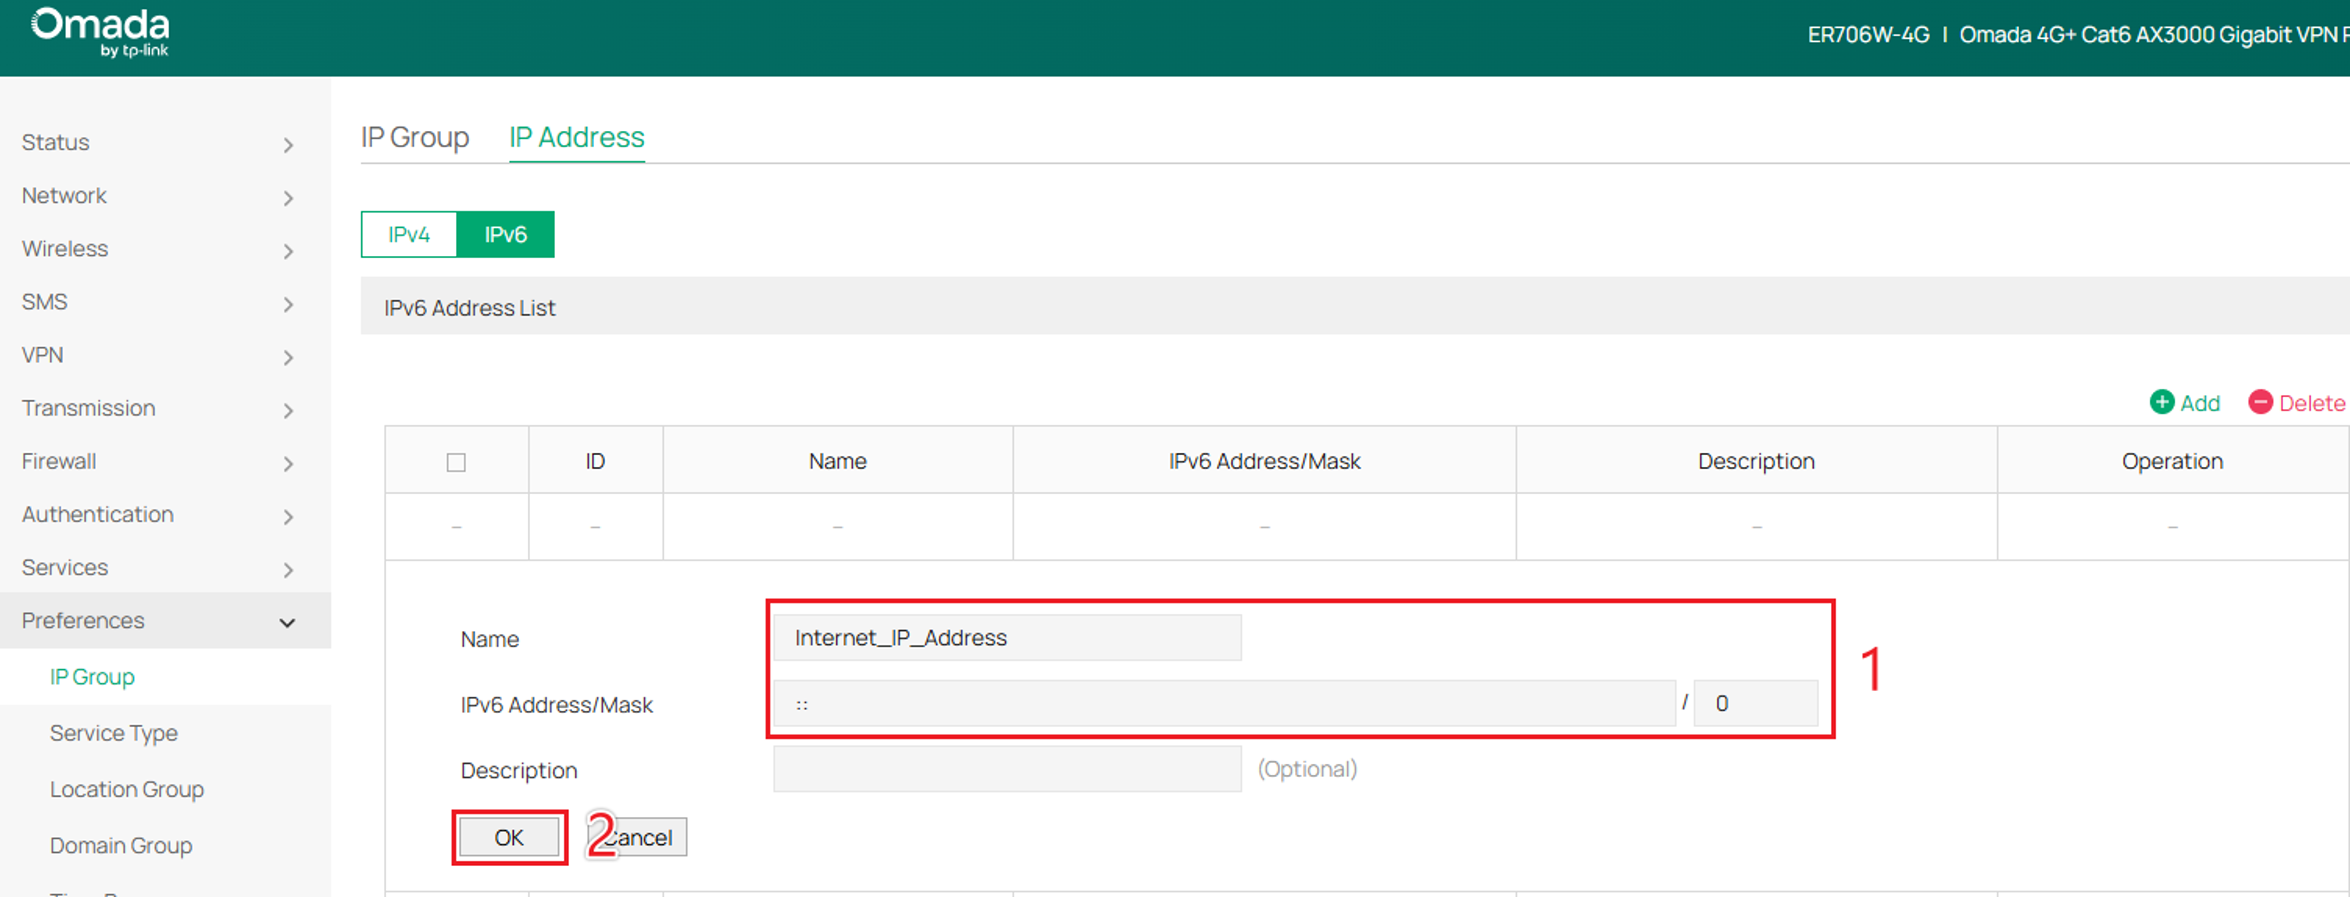
Step 3. Repeat the previous step to create Internet_IP_Address. Enter ::/0 in IPv6 Address/Mask to match all IPv6 addresses, then click OK.
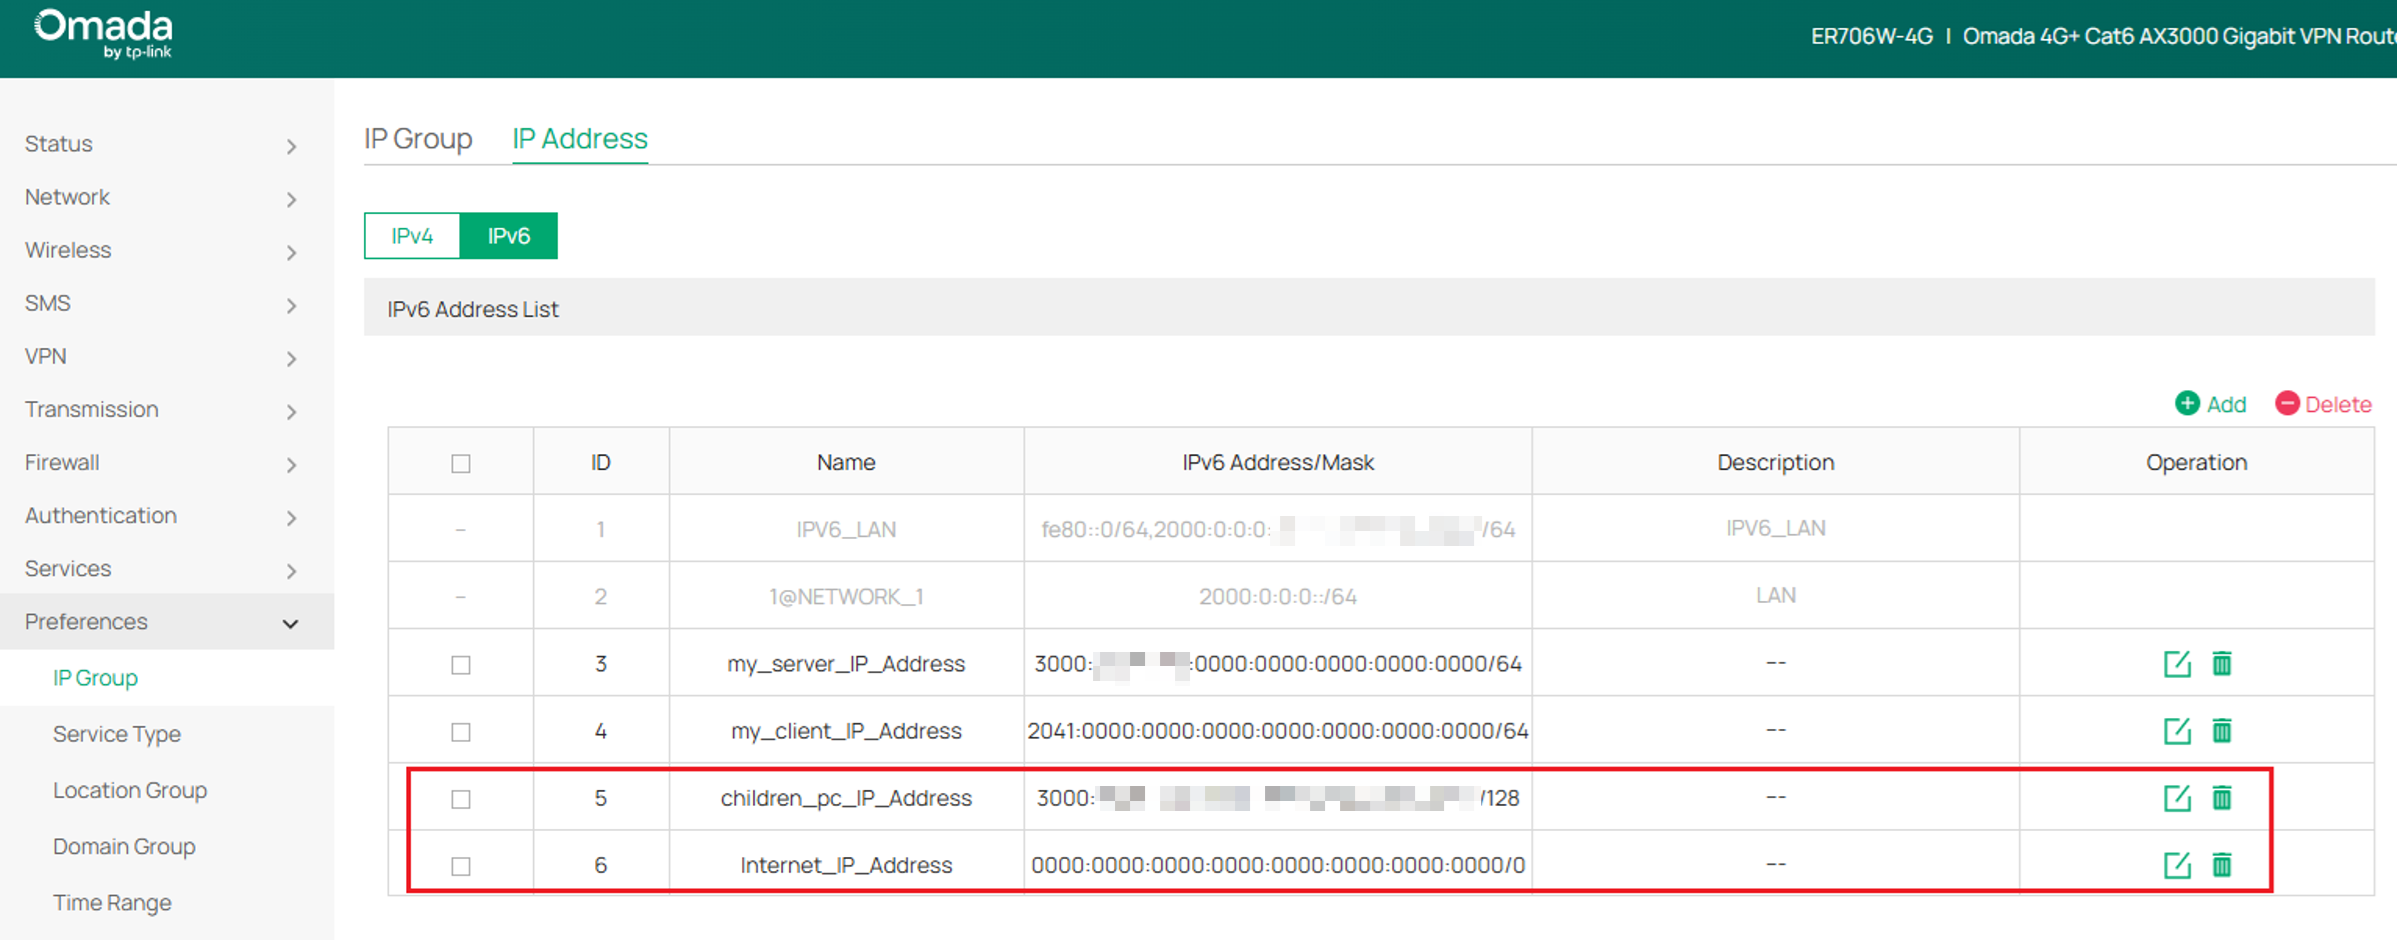
Step 4. Confirm that children_pc_IP_Address and Internet_IP_Address appear in the IPv6 address list.
Step 5. Go to Preferences > IP Group, select the IP Group tab and IPv6, then click Add.
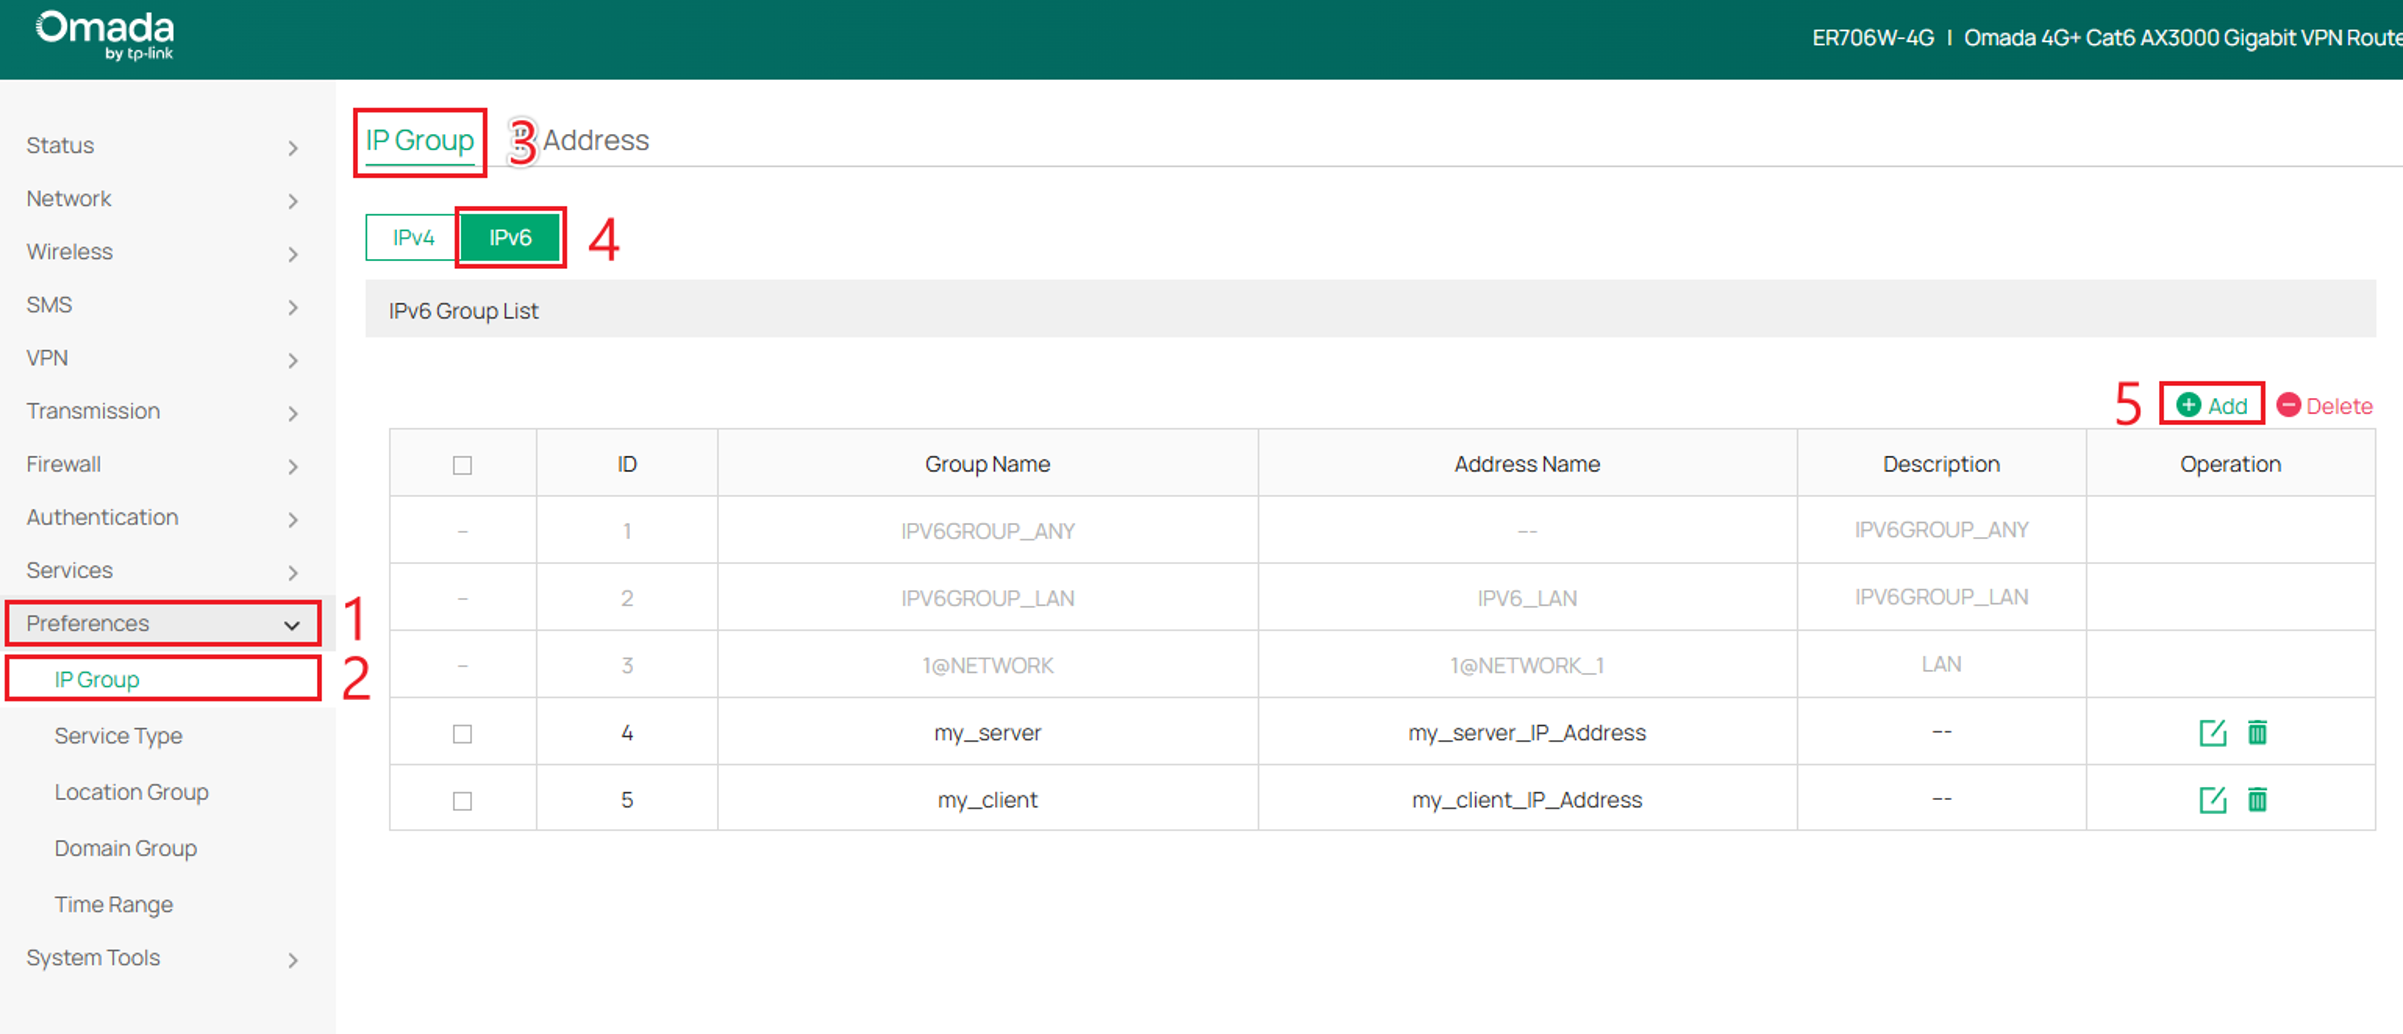
Step 6. Enter children_pc as the Group Name and select children_pc_IP_Address under Address Name. Click OK.
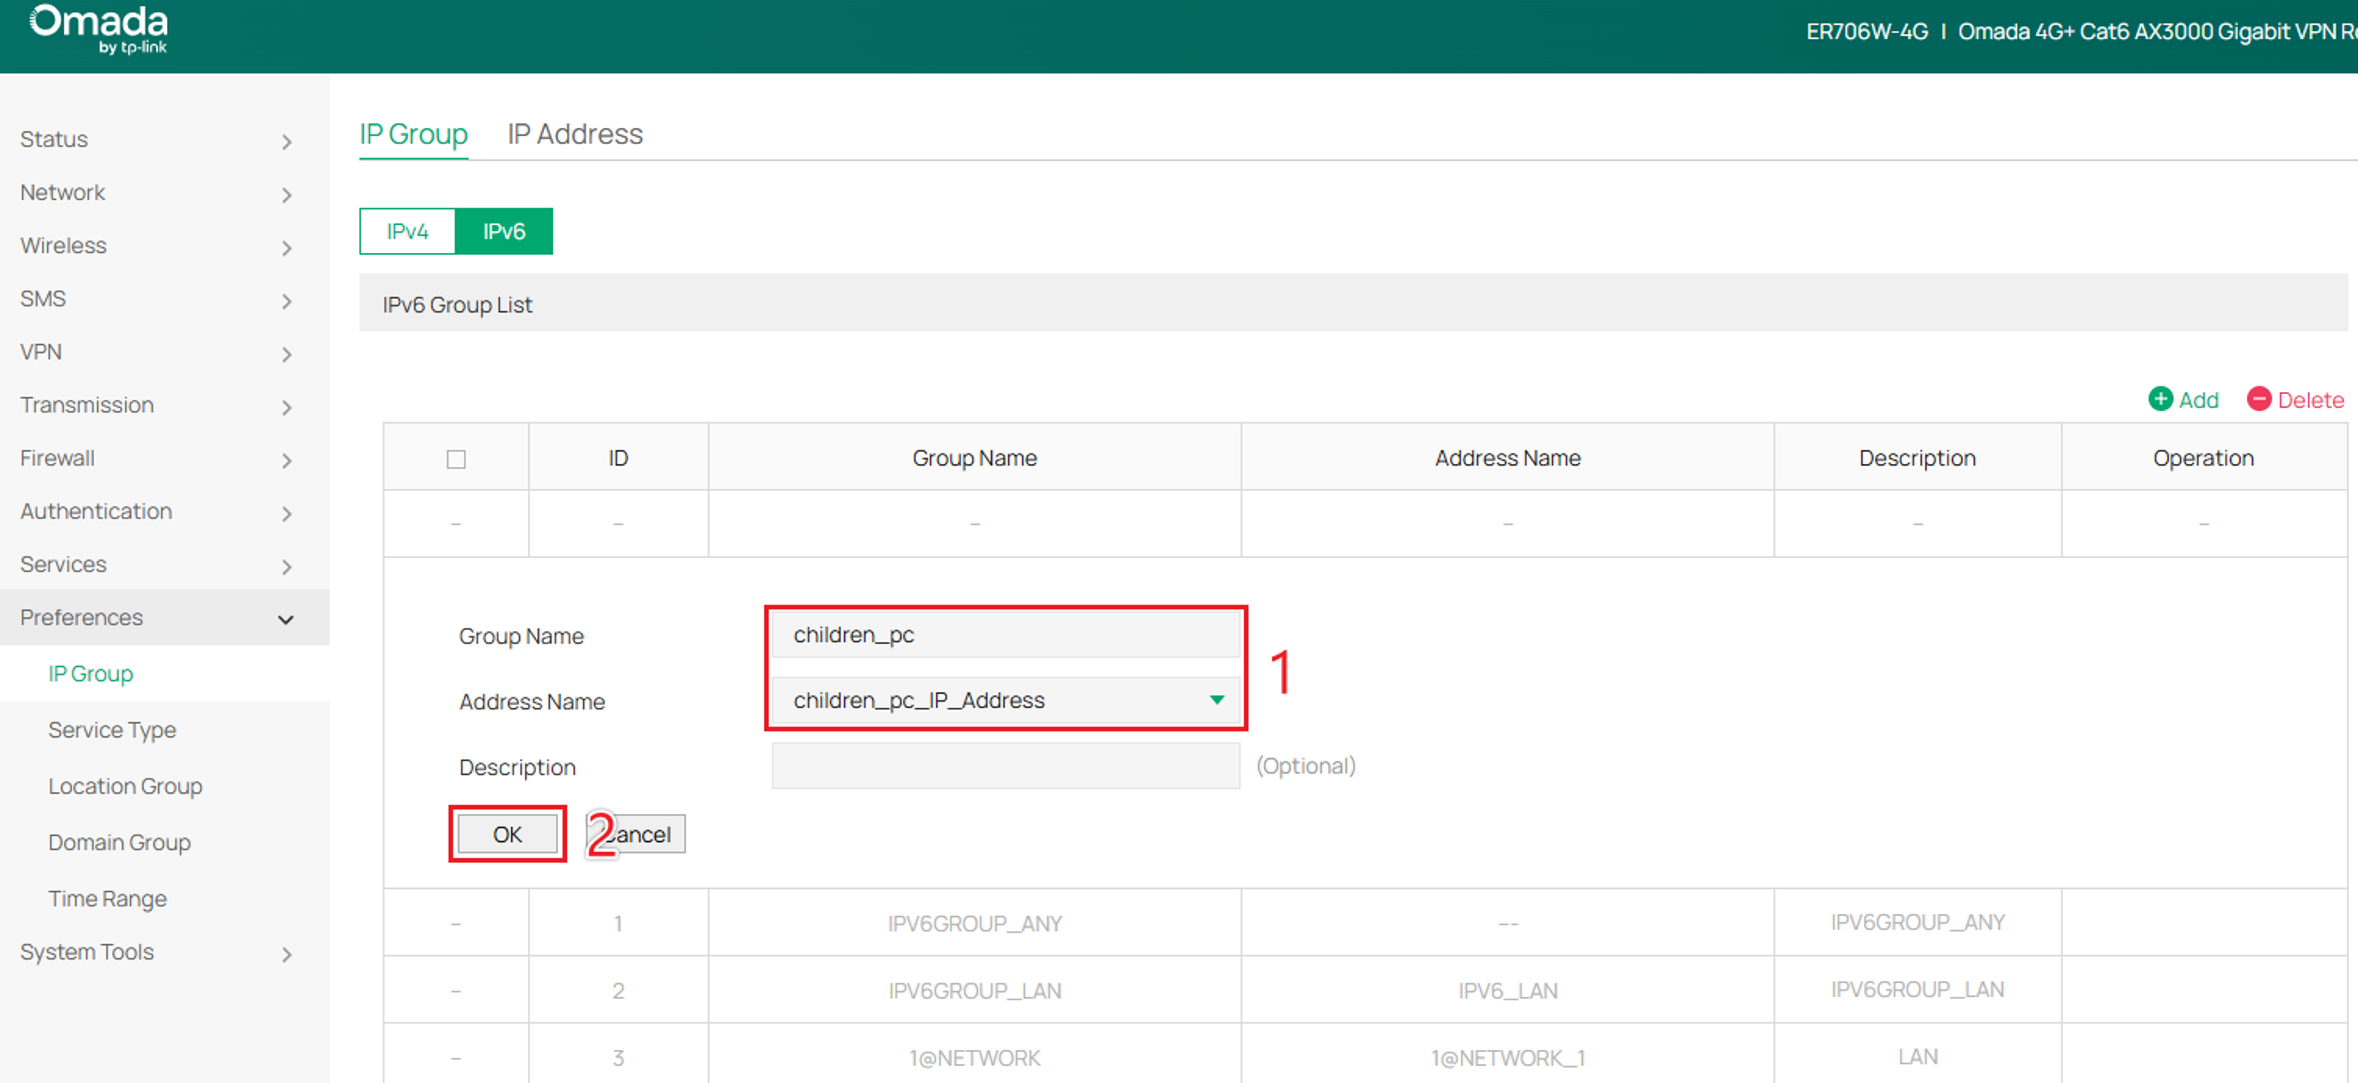
Step 7. Repeat the previous step to create Internet, using Internet_IP_Address as the Address Name. Click OK.
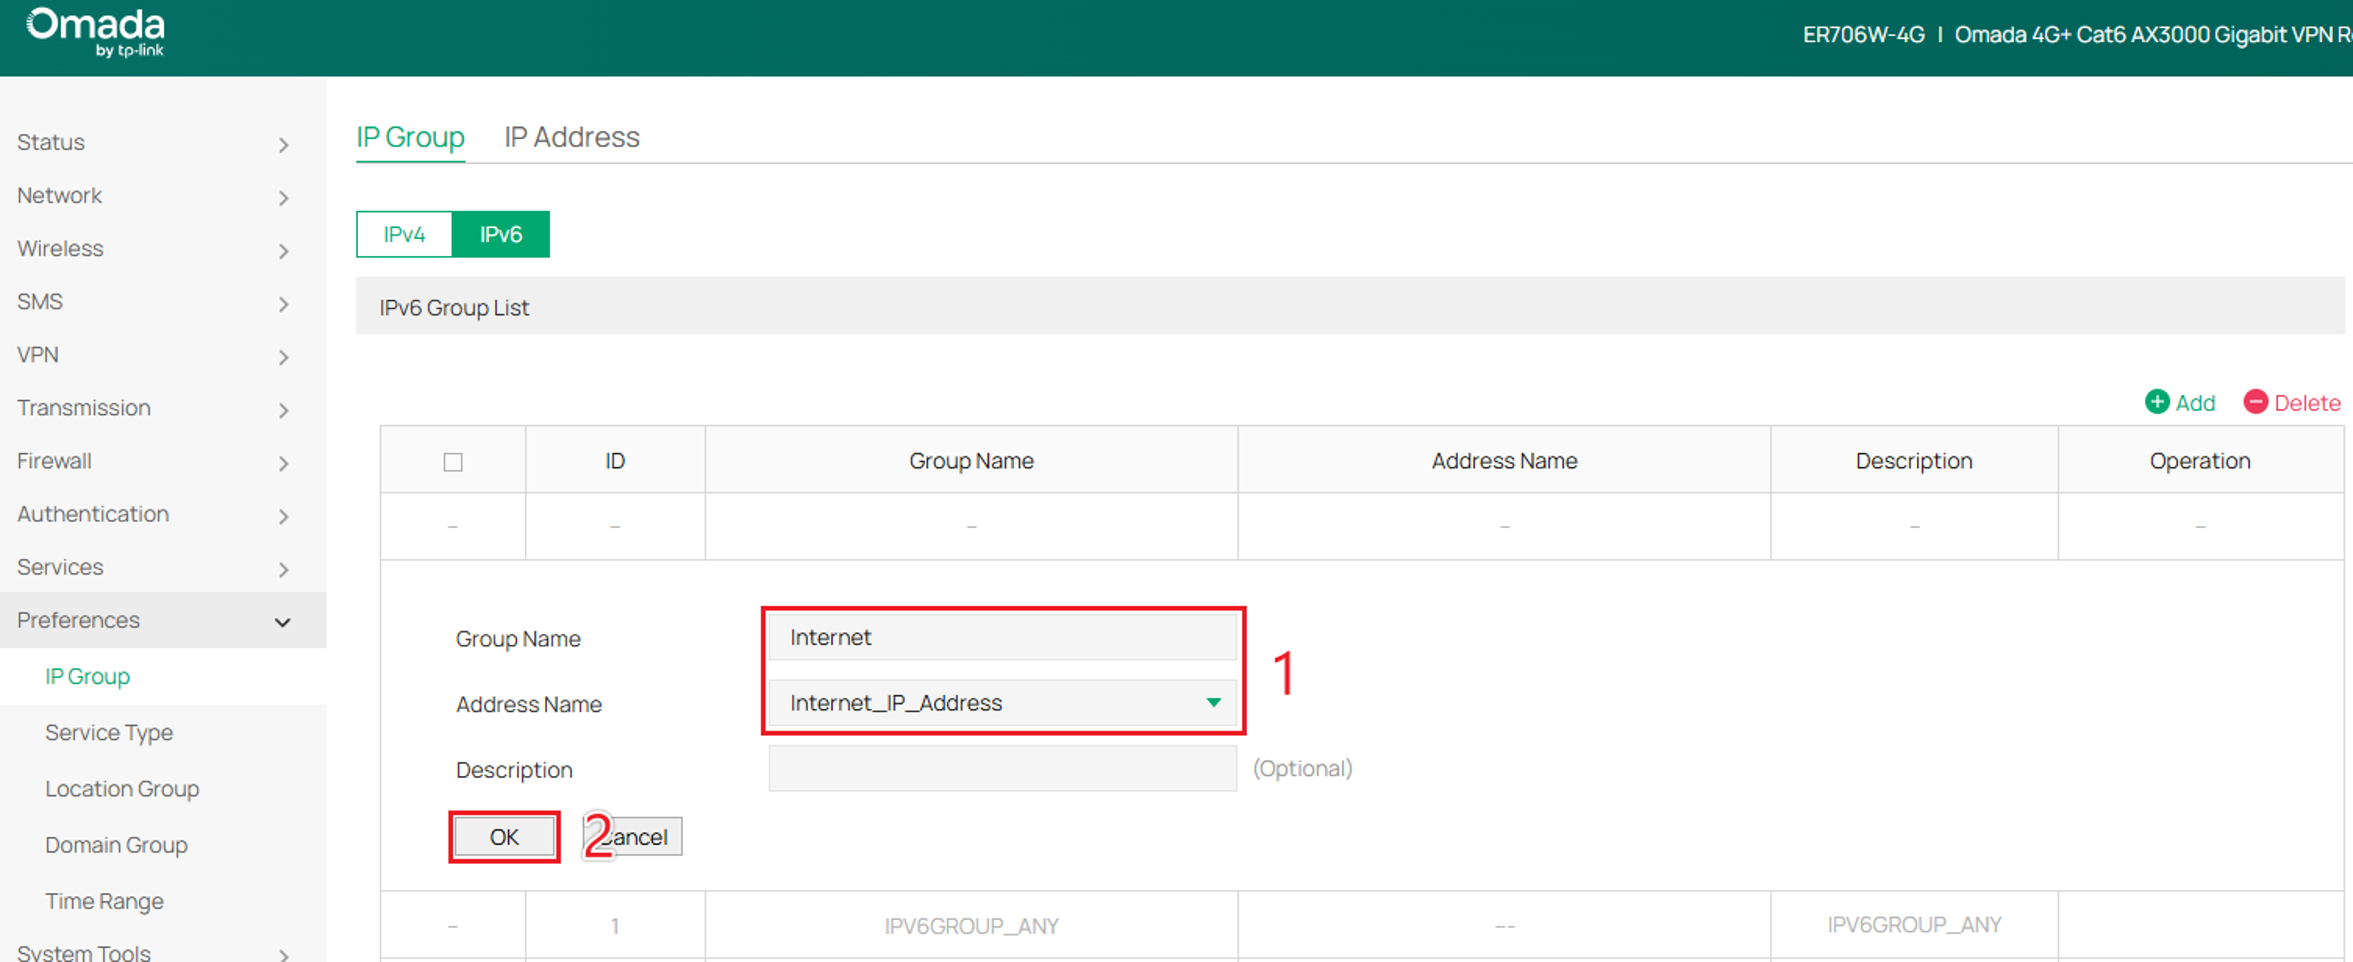
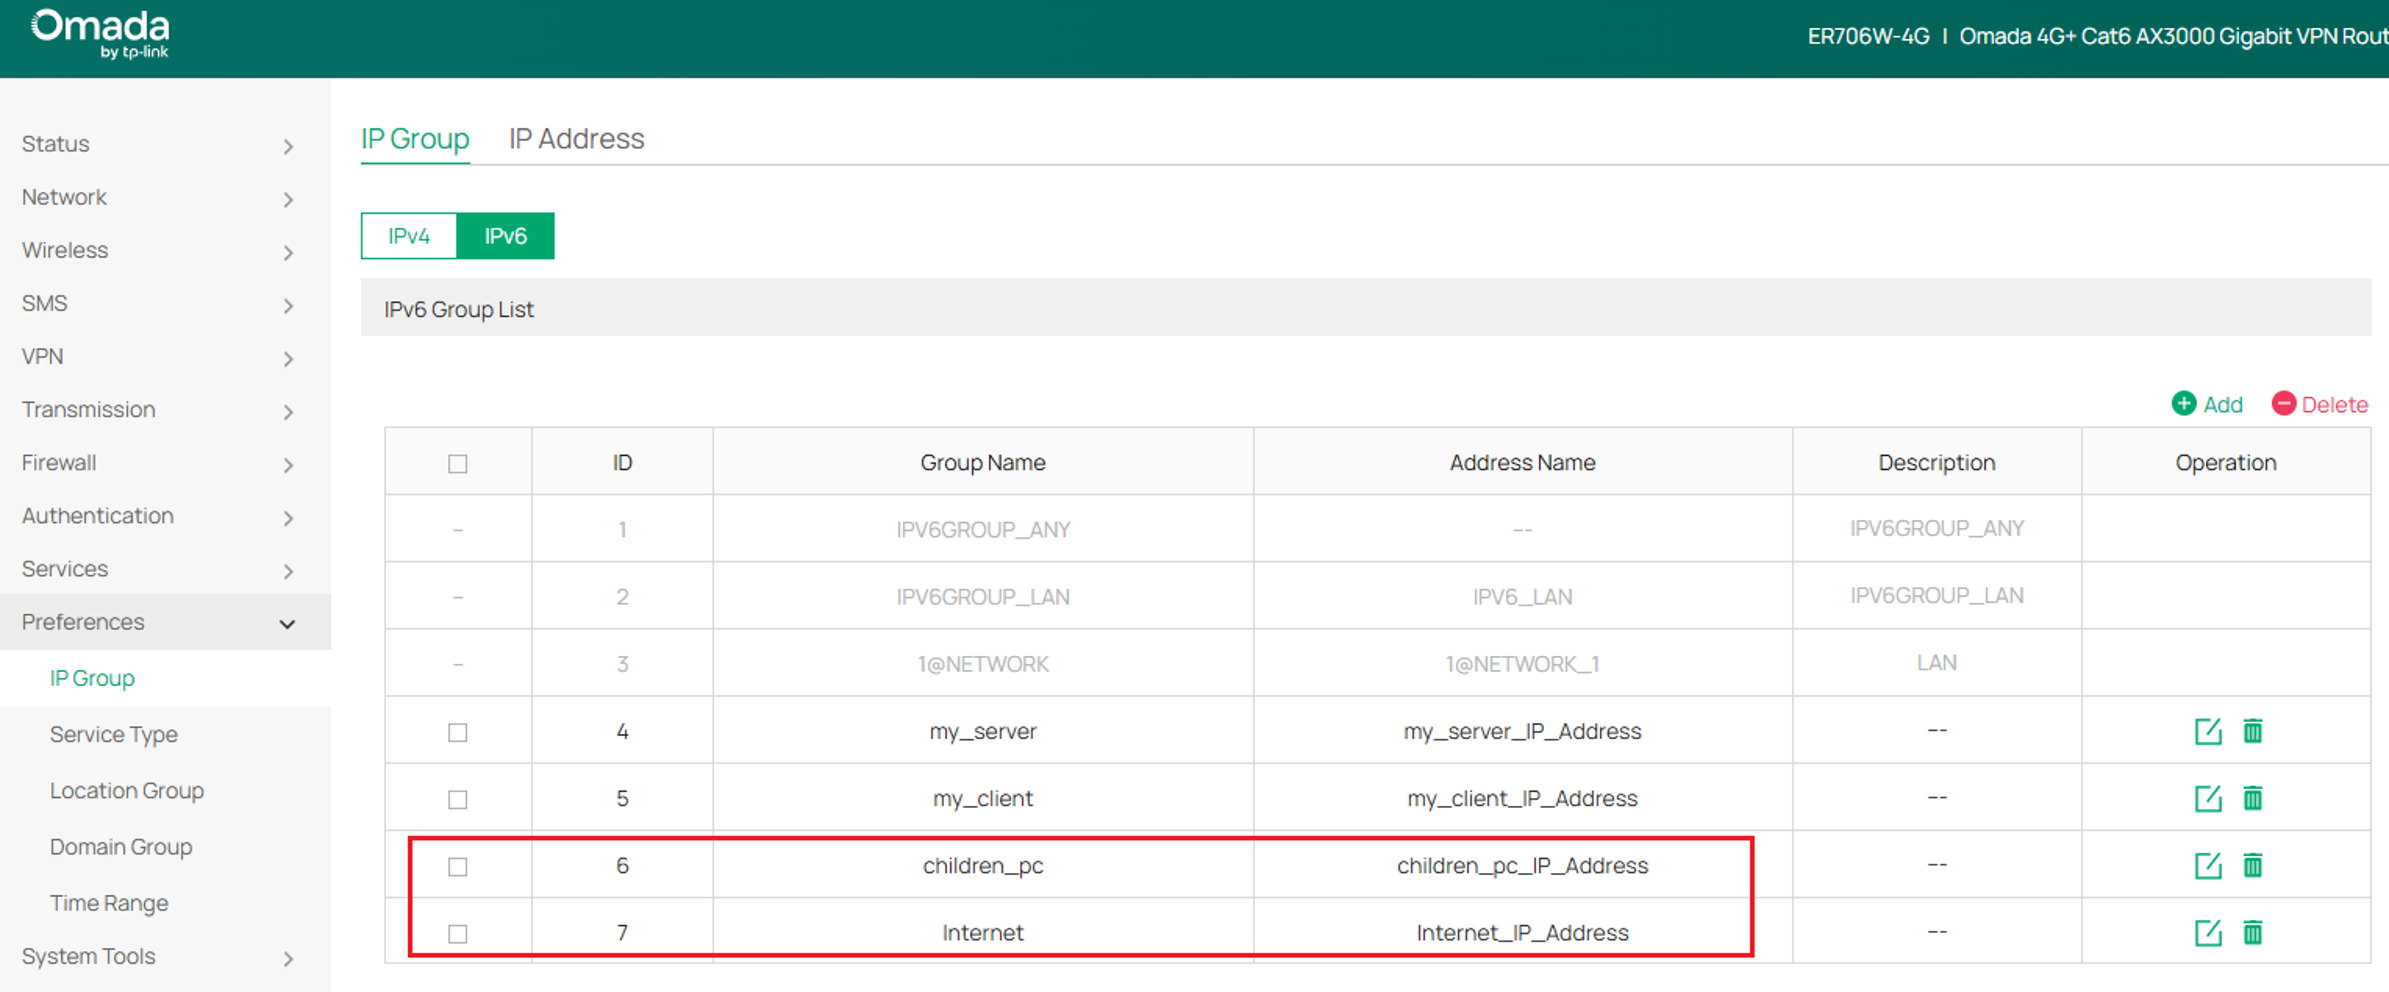
Step 8. Confirm that both children_pc and Internet appear in the IPv6 group list
.
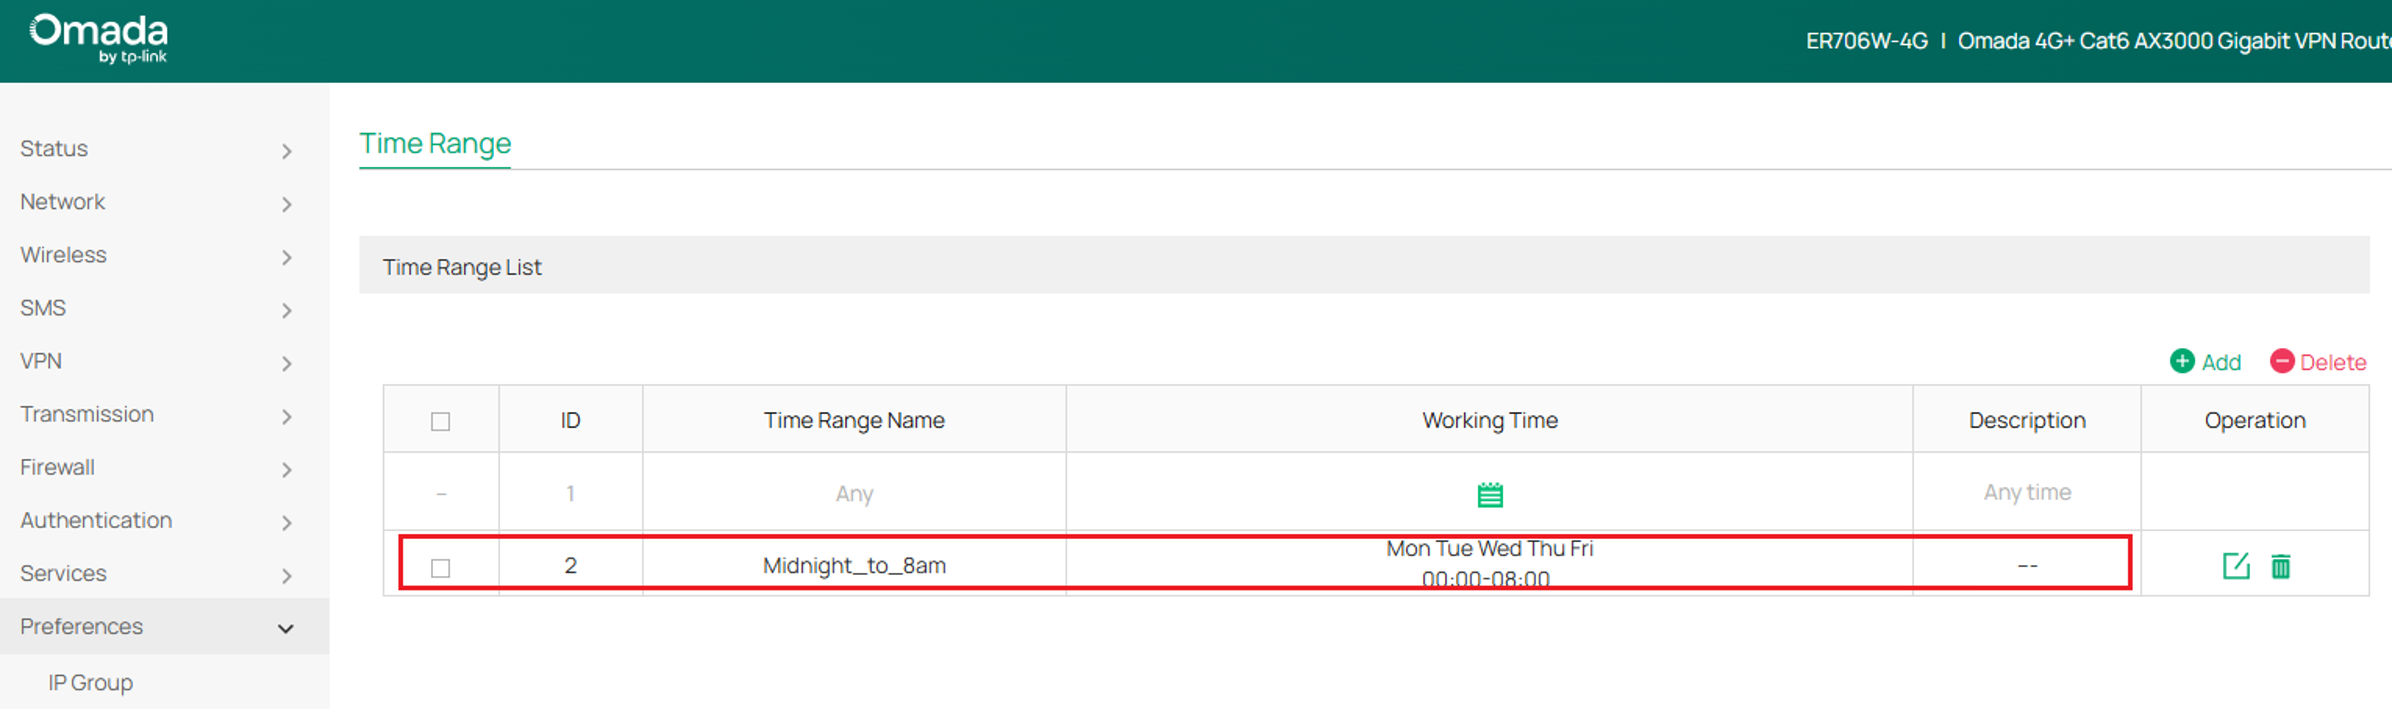
Step 9. Go to Preferences > Time Range and click Add. Enter Midnight_to_8am as the Time Range Name and configure the schedule from 12:00 a.m. to 8:00 a.m., Monday through Friday. Click OK to save the settings.
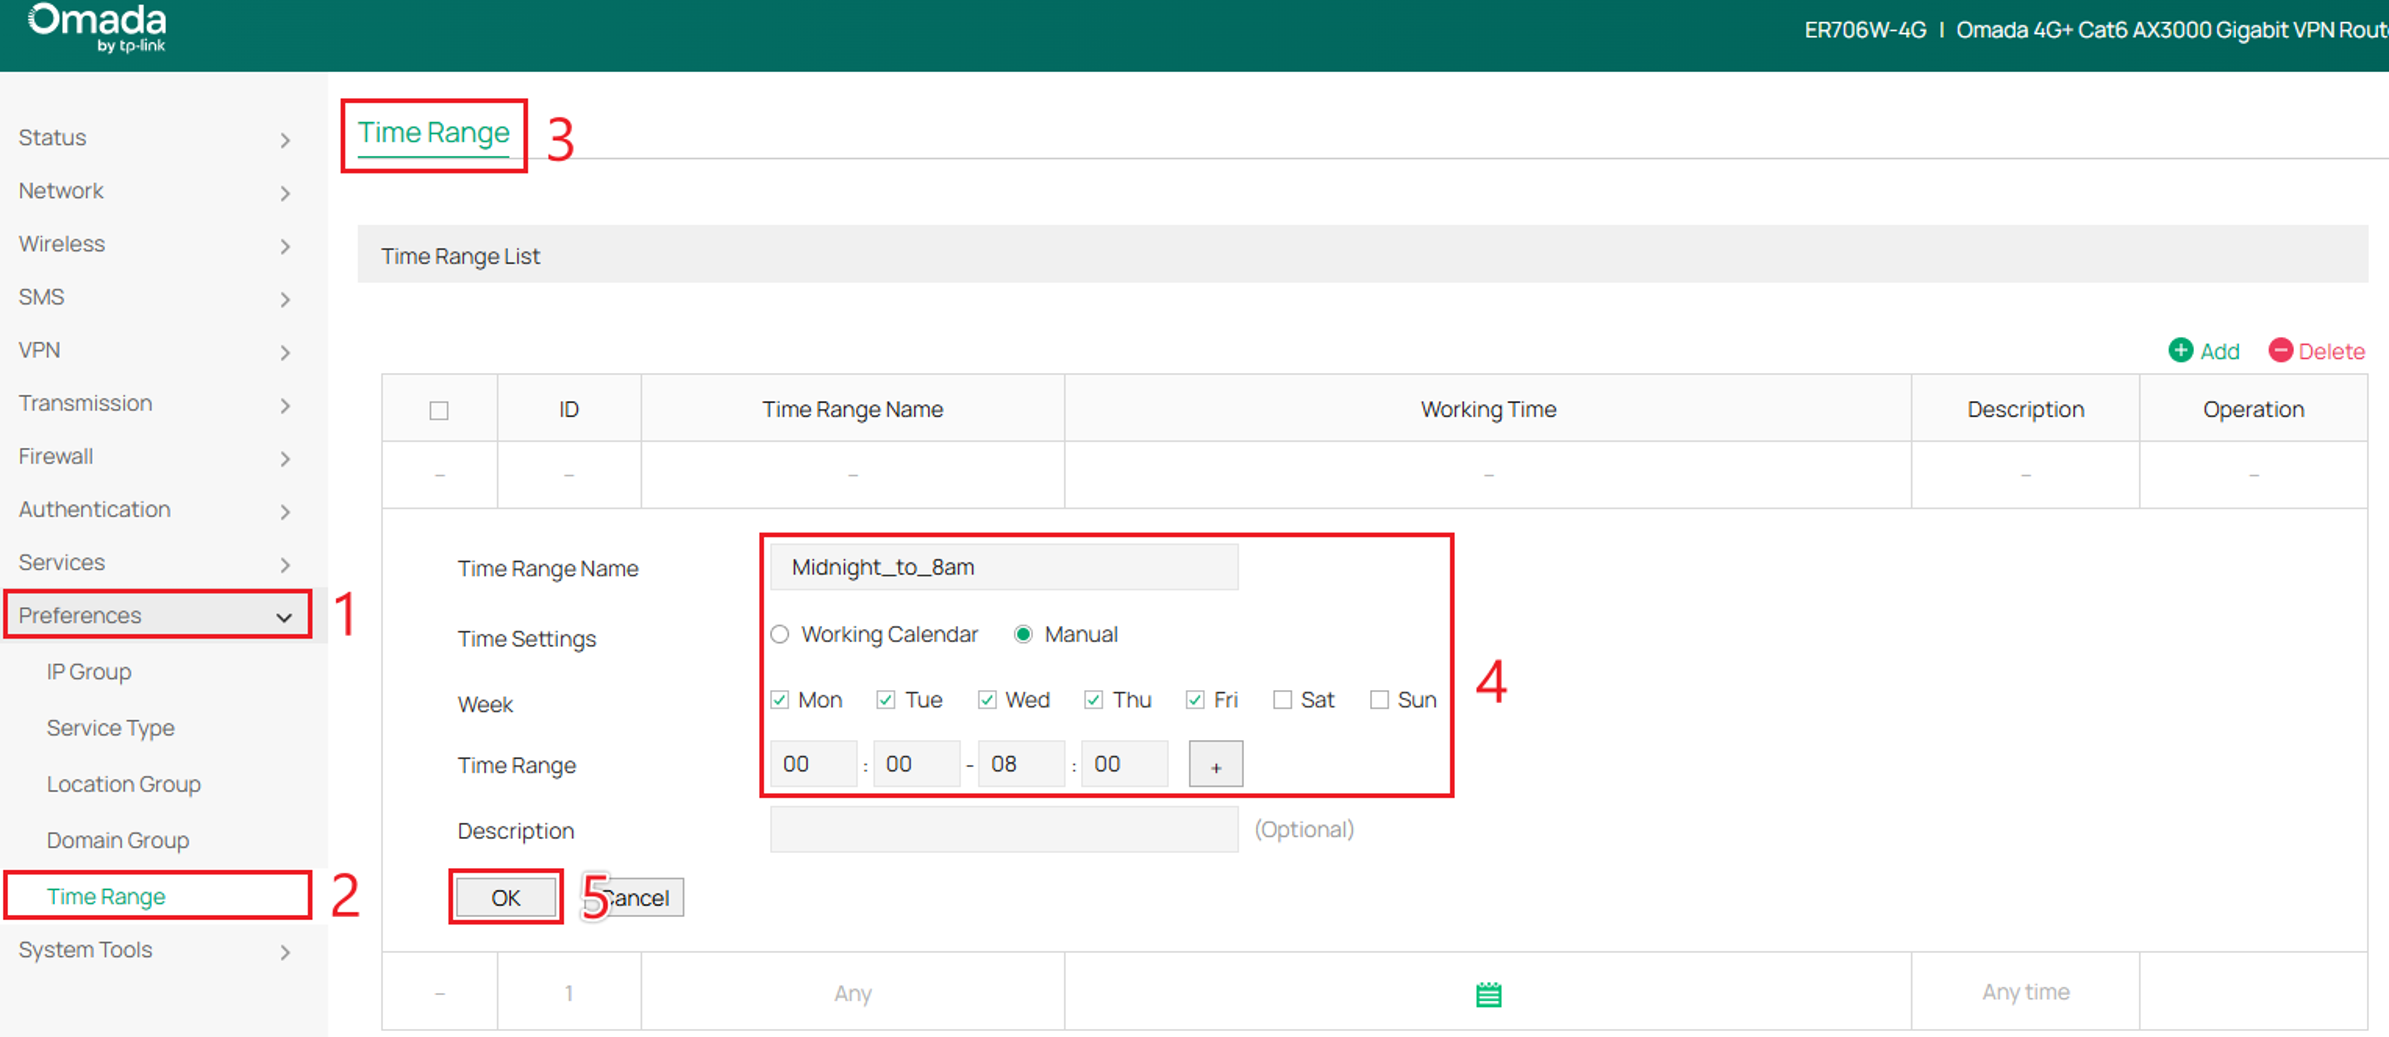
Step 10. Confirm that Midnight_to_8am appears in the Time Range list.
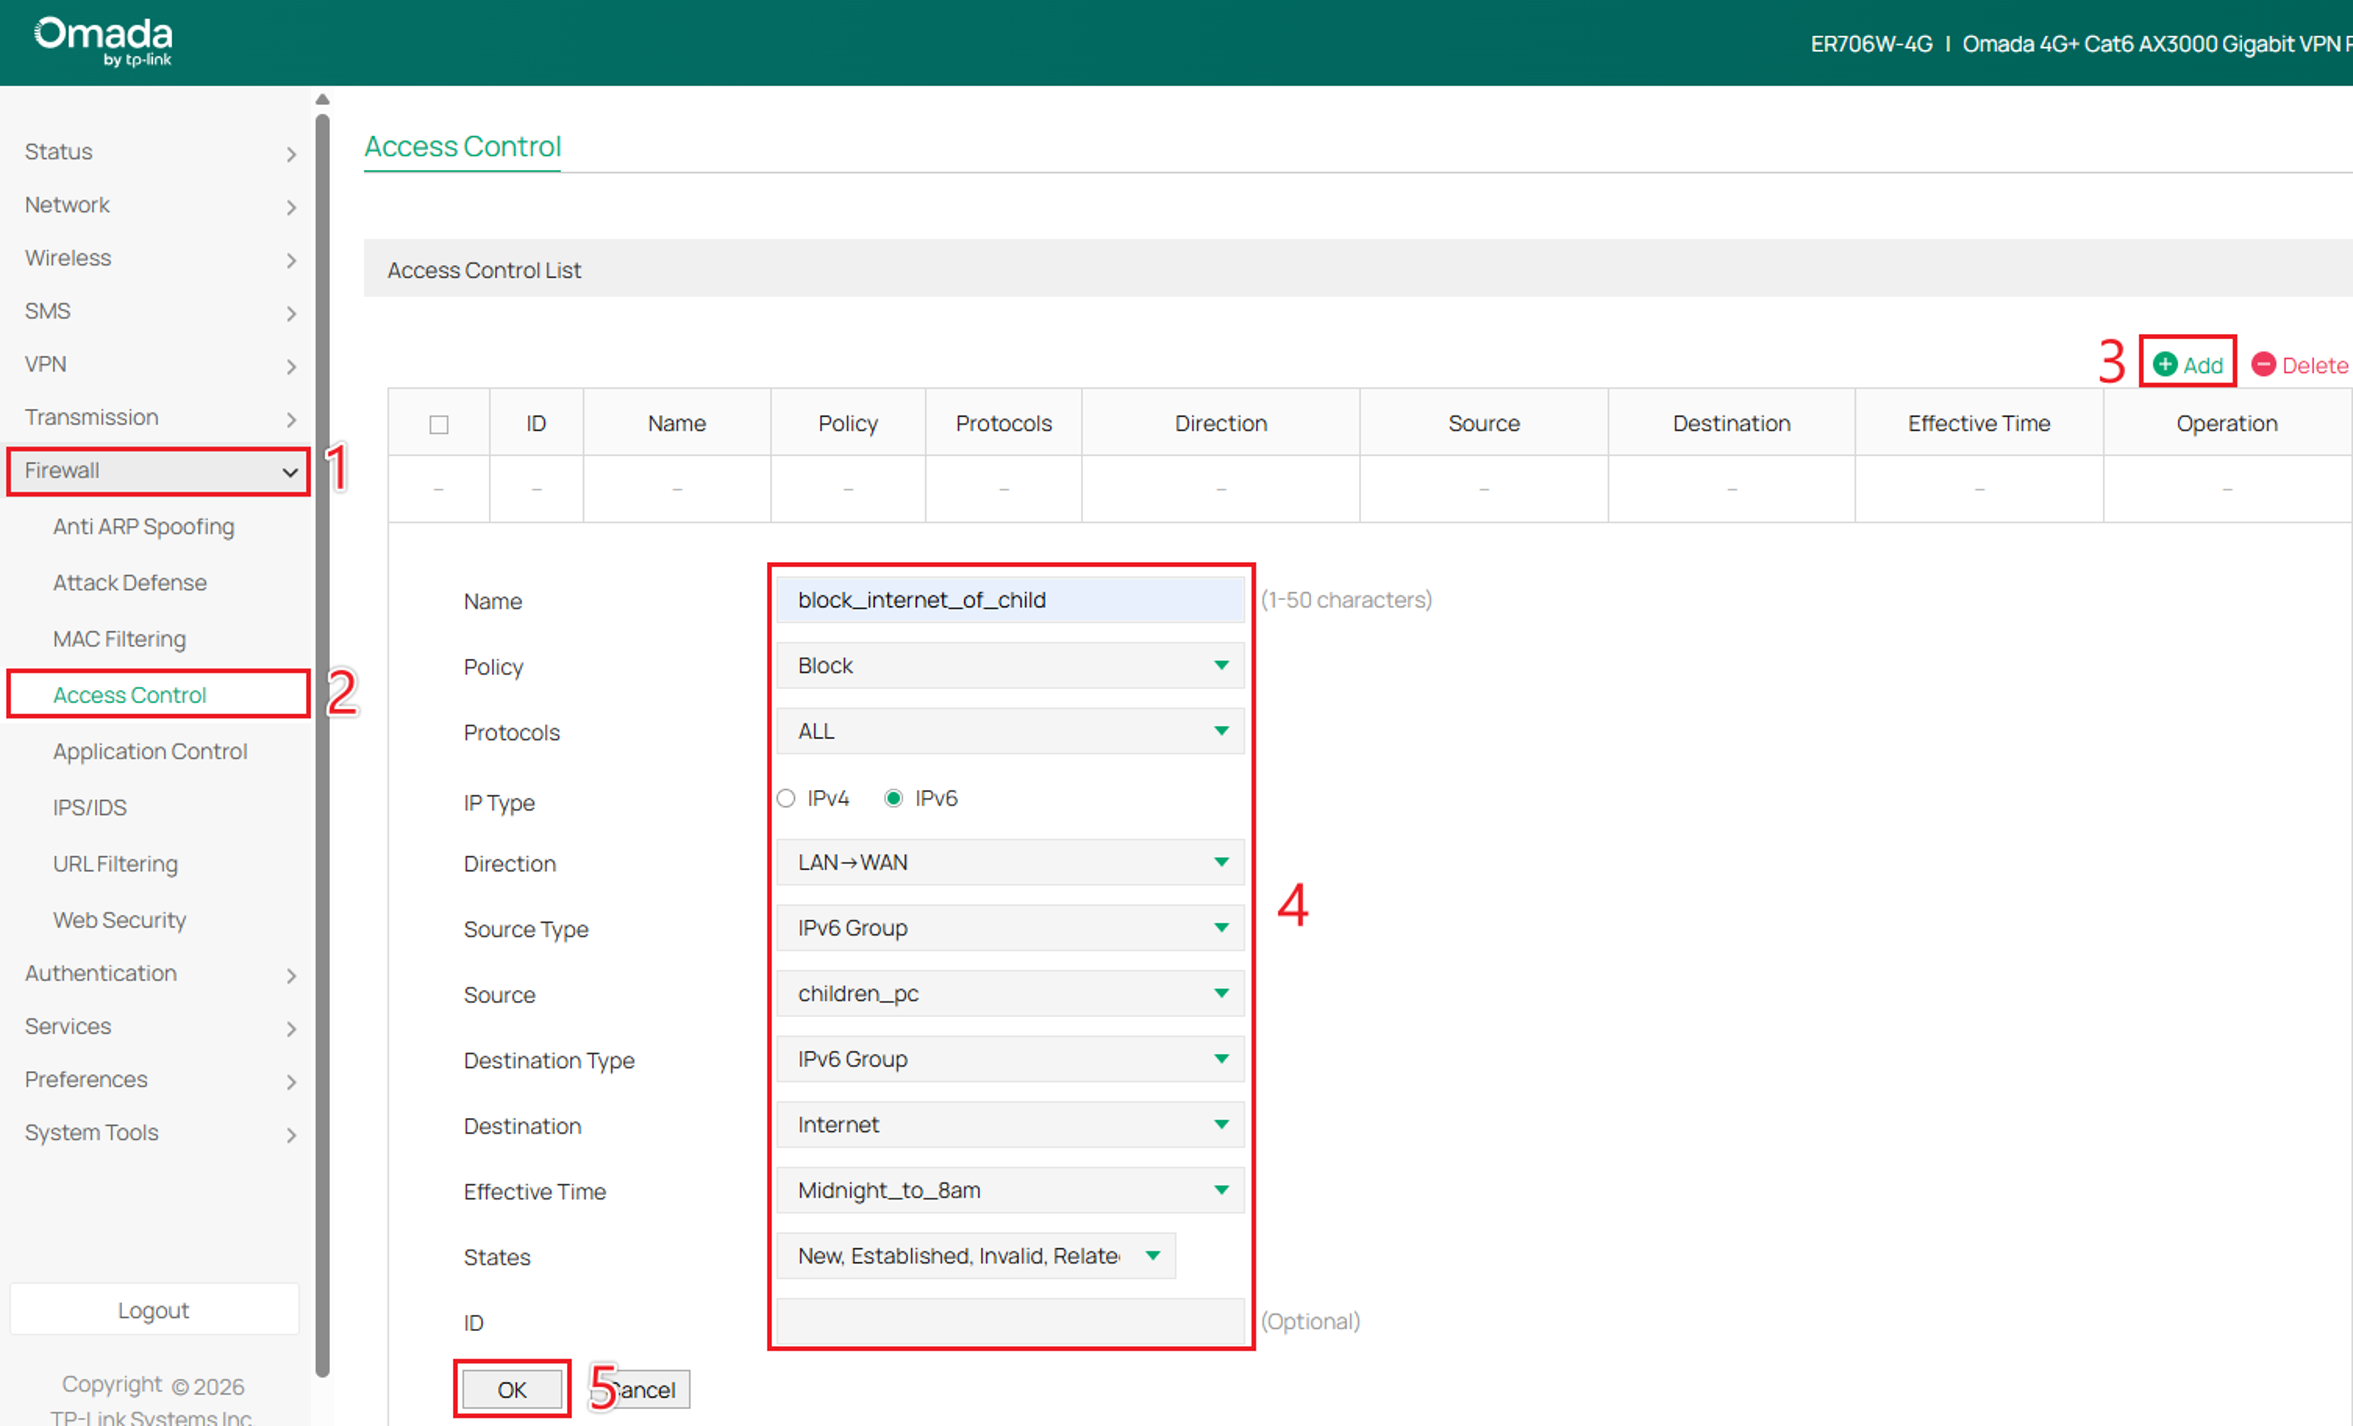
Step 11. Go to Firewall > Access Control, click Add, and configure the following ACL rule:
Name: block_internet_of_child
Policy: Block
Protocols: ALL
IP Type: IPv6
Direction: LAN->WAN
Source Type: IPv6 Group
Source: children_pc
Destination Type: IPv6 Group
Destination: Internet
Effective Time: Midnight_to_8am
States: New, Established, Invalid, Related
Click OK to complete the configuration.
Note: This IPv6 ACL rule does not restrict IPv4 traffic. If clients also have IPv4 connectivity, they may still access the internet over IPv4. Configure an additional IPv4 ACL rule if both protocols need to be restricted.
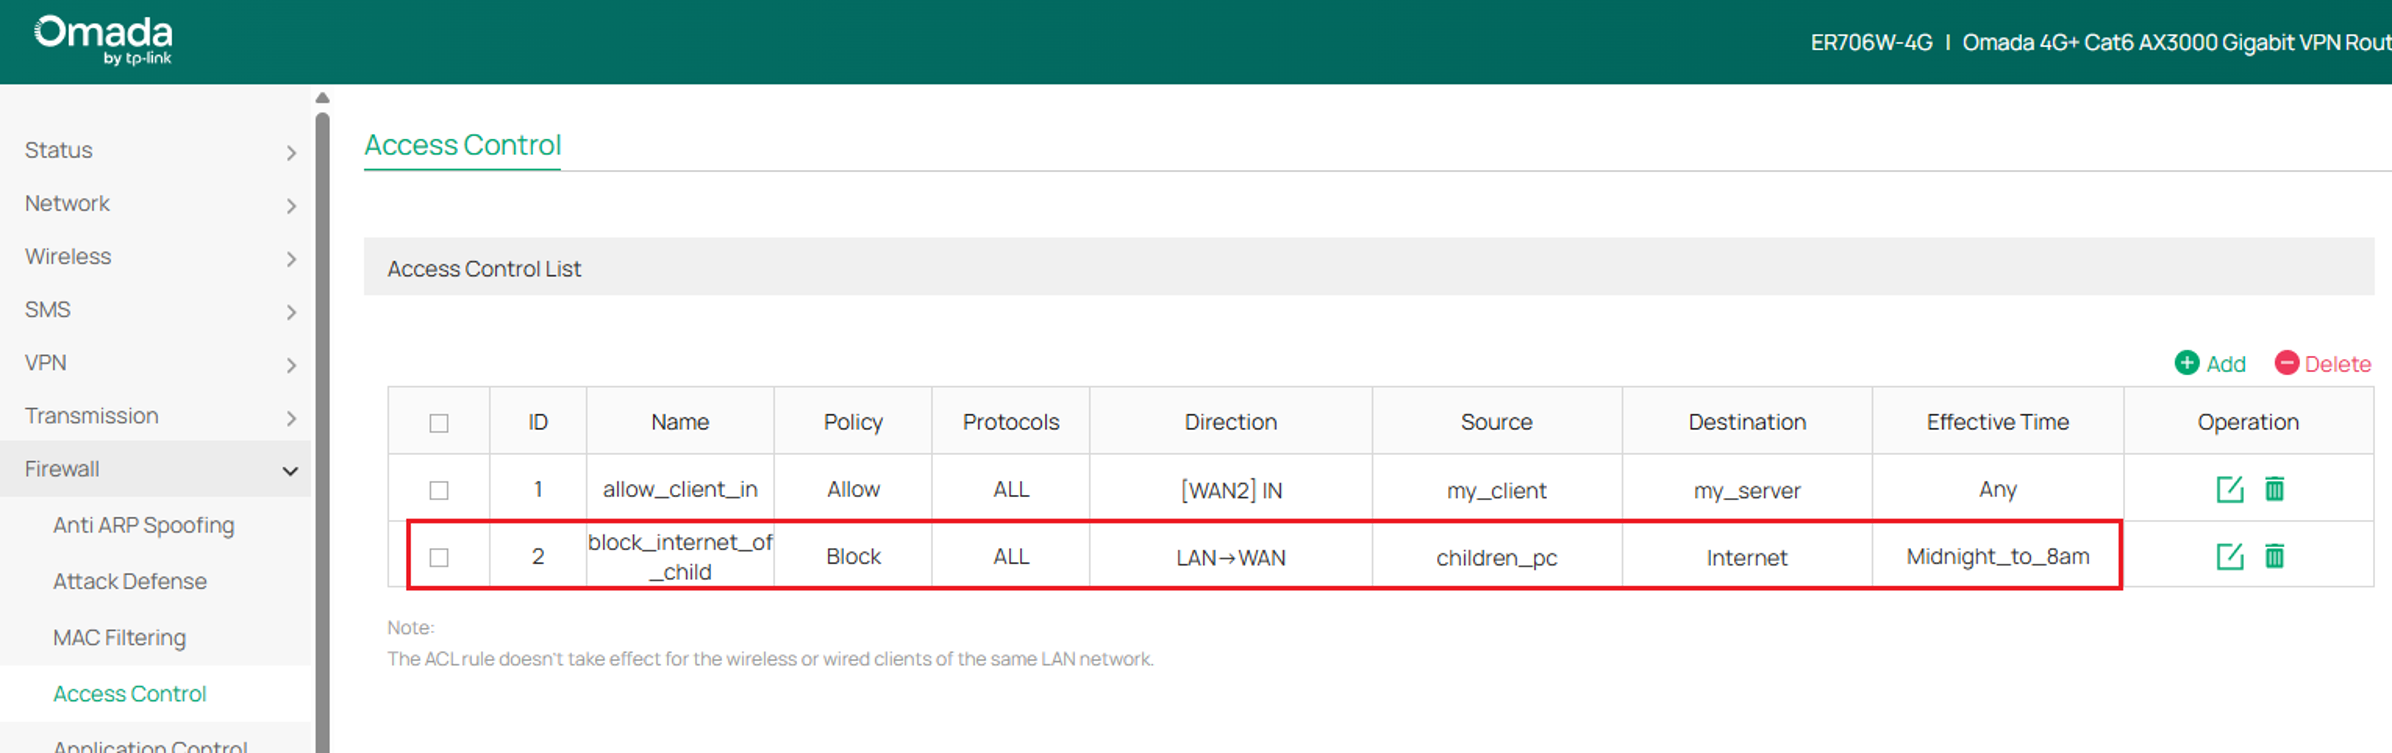
Step 12. Confirm that the new ACL rule appears in the Access Control List with the Block policy and the configured Effective Time.
Verification
The following verification steps apply to both Controller mode and Standalone mode. Test IPv6 connectivity before and after applying the relevant ACL configuration to confirm that traffic is permitted or blocked as intended.
Block access to internal network from the internet
After establishing the IPv6 connection, the internal network can access the internet.
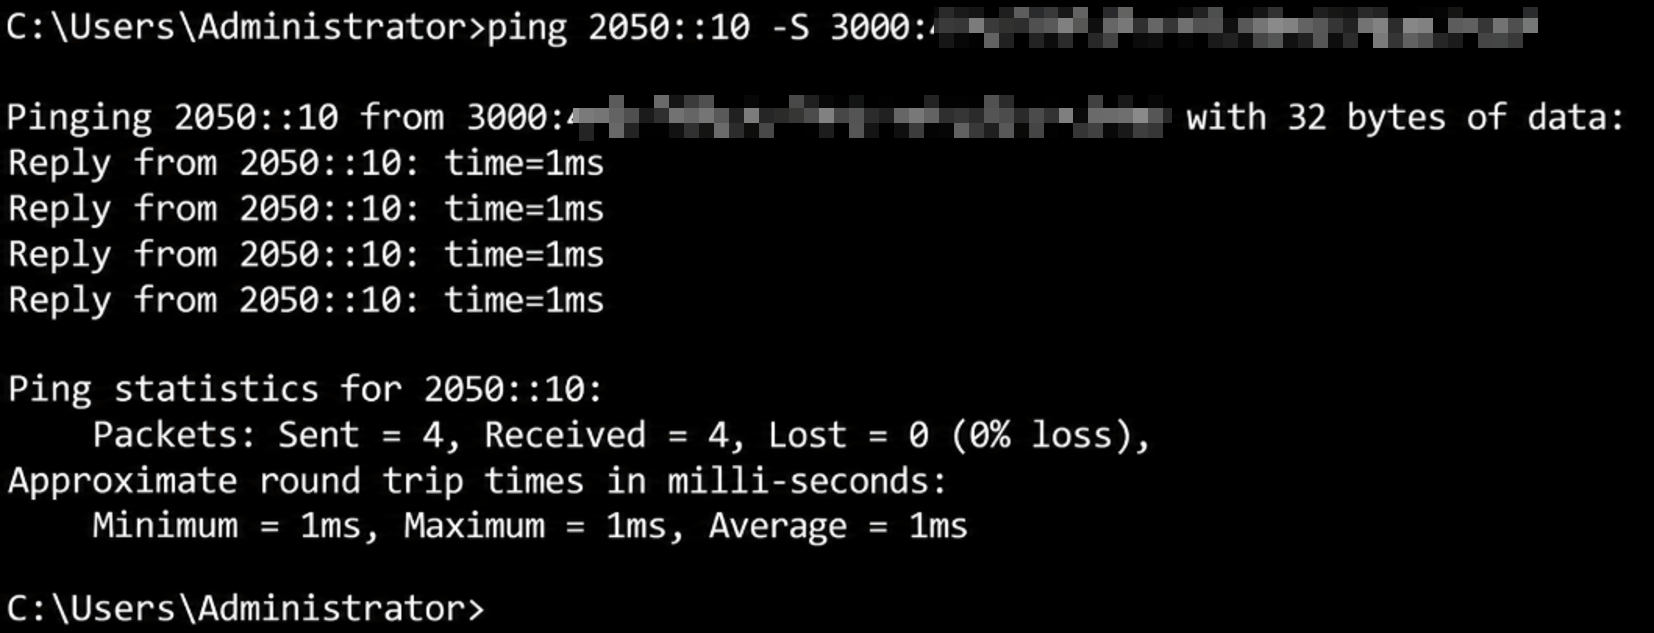
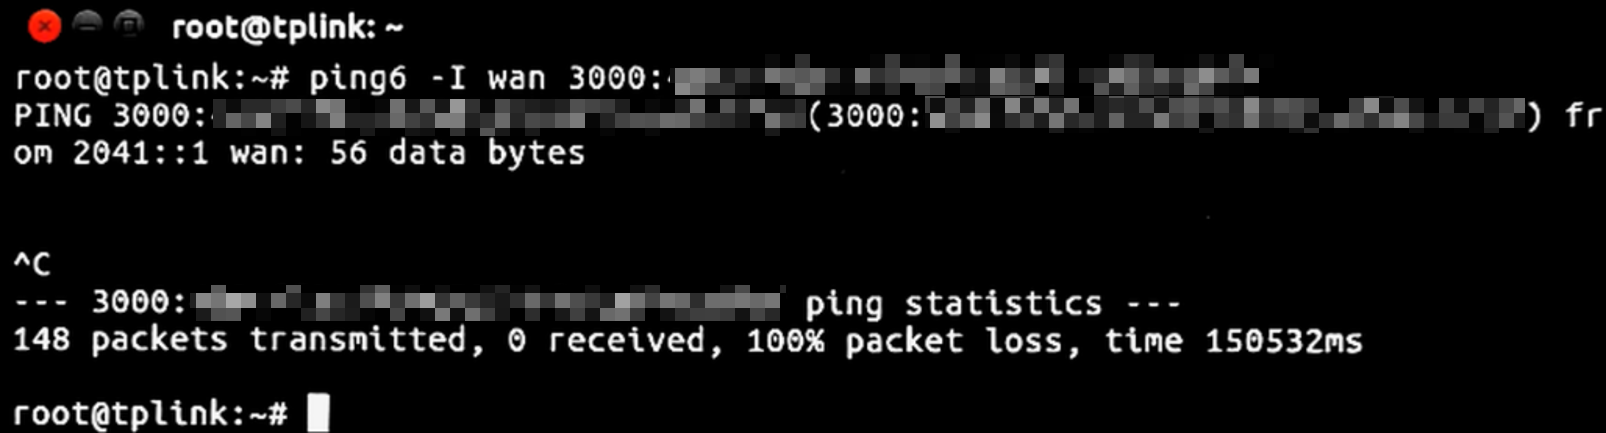
In this example, an external IPv6 ping to a LAN device receives no replies, consistent with the gateway's default inbound firewall behavior.
Note: A failed ping alone does not confirm that all inbound IPv6 traffic is blocked.
Allow access to internal network from the internet
After establishing the IPv6 connection, the internal network can access the internet.
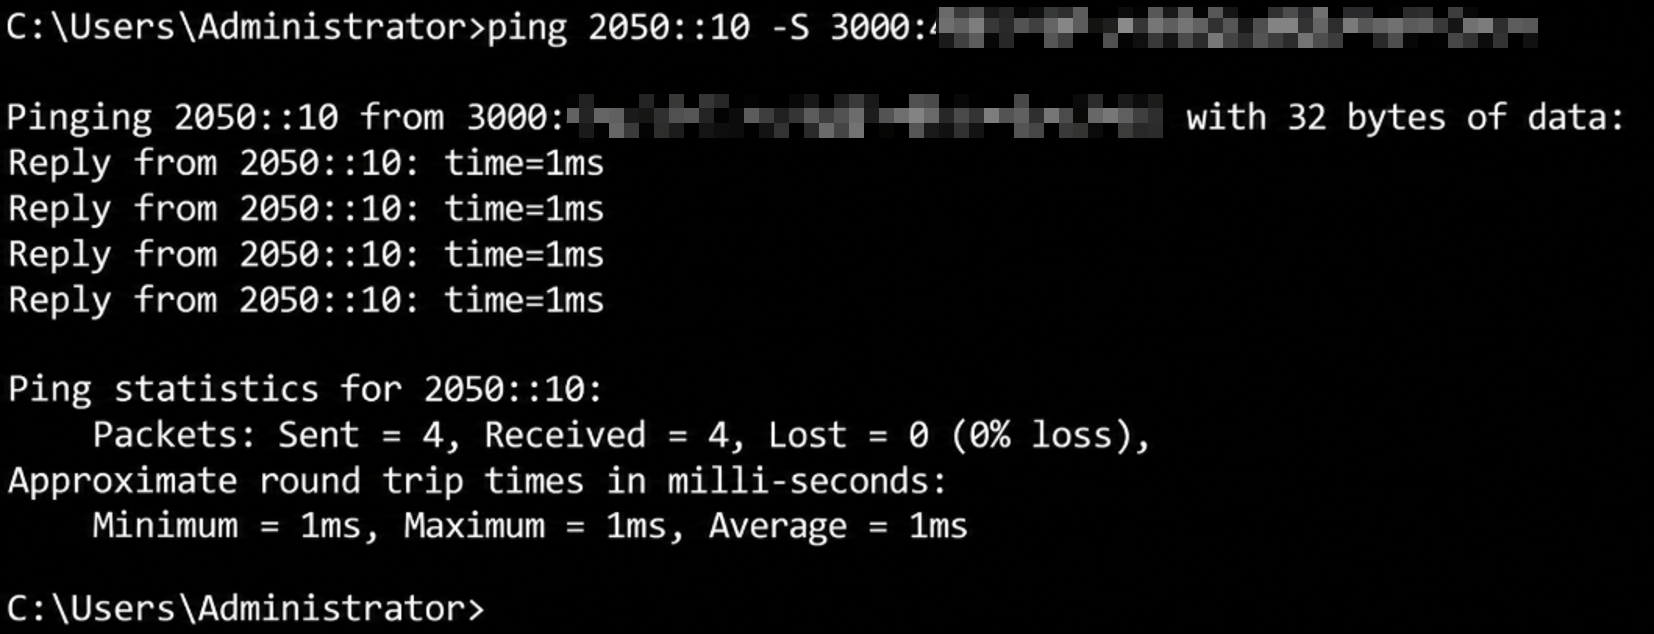
Before configuring the ACL rule, the external network cannot access the internal network. After configuring the Permit rule in Controller mode or the Allow rule in Standalone mode, the specified external source can access the internal network.
Block access to the internet
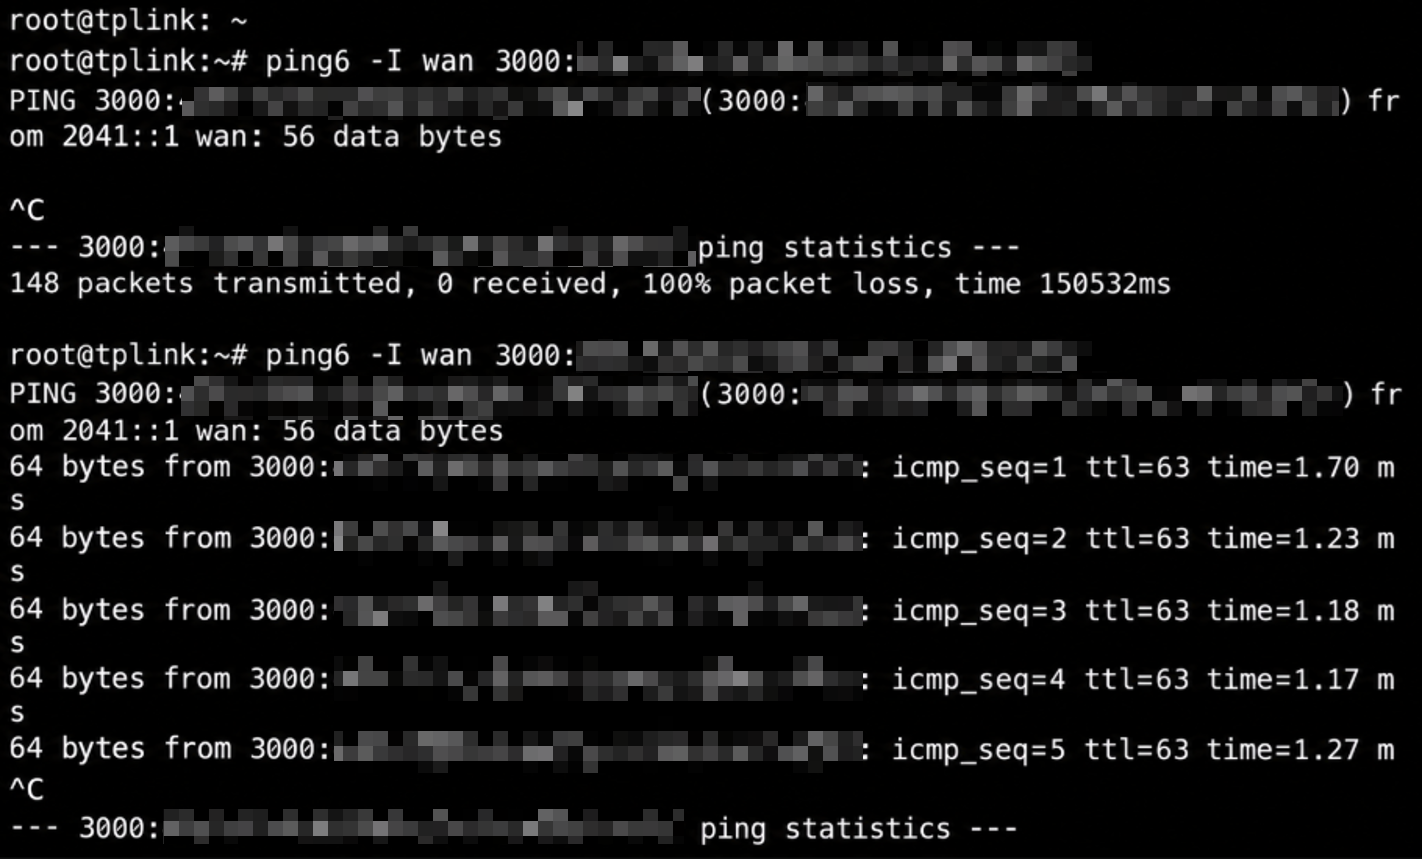
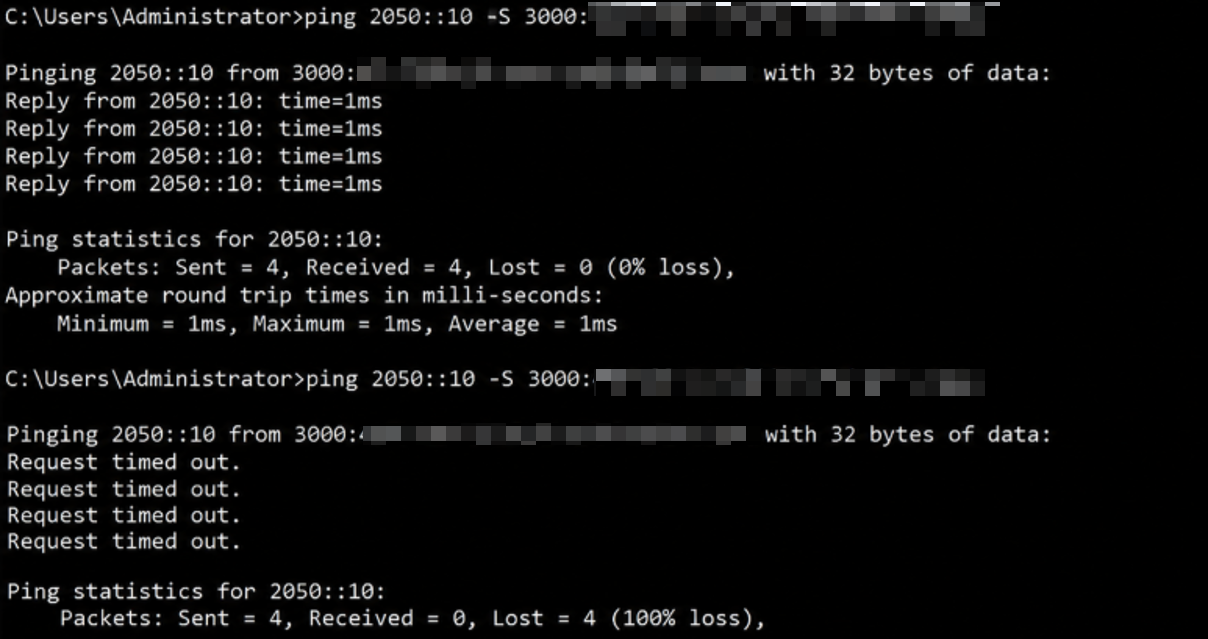
Outside the configured time range, the device in the children_pc group can reach the test IPv6 destination. During the configured time range, the IPv6 ping fails, indicating that the ACL rule is blocking the matching traffic.
Conclusion
You have now configured IPv6 Access Control on the Omada Gateway to manage inbound access and restrict internet connectivity for selected devices or networks. Use Gateway ACL rules and rule priority to apply IPv6 access policies based on your network requirements.
To learn more about each function and configuration, please visit Support Home to download or check the manual for your product.
QA
Q1: Why can an external IPv6 device not access my internal network after IPv6 is enabled?
A1: By default, the gateway's WAN firewall blocks most new IPv6 connections initiated from the internet to LAN devices. To permit inbound access, configure a Permit Gateway ACL rule in Controller mode or an Allow rule in Standalone mode.
Q2: Why is my inbound IPv6 ACL rule not allowing traffic from the internet?
A2: Verify that the rule is enabled and that the Direction, Source IPv6 Group, and Destination IPv6 Group are configured correctly. Ensure the Policy is set to Permit in Controller mode or Allow in Standalone mode.
Q3: Which WAN direction should I select for an inbound IPv6 ACL rule?
A3: Select the inbound direction for the WAN interface receiving the traffic, such as WAN2 In or SFP WAN/LAN1 In.
Q4: Why is my LAN client not receiving an IPv6 address?
A4: Verify that IPv6 is configured correctly on the WAN and LAN interfaces, including prefix delegation if applicable. Confirm that the client is connected to the intended LAN and receives a global IPv6 address and an IPv6 default gateway.
Q5: Why can a device still access the internet after I create a Deny or Block rule?
A5: Verify that the rule uses the [LAN -> WAN] direction and the correct Source IPv6 Group. In Controller mode, set the Policy to Deny and Destination to IPv6Group_Any. In Standalone mode, set the Policy to Block and select the configured destination IPv6 Group.
Also confirm that the client's active IPv6 address matches the configured IPv6 Group. If the client uses additional or temporary IPv6 addresses, a /128 entry may not match all its traffic. Check the rule order and configured schedule, using Time Schedule in Controller mode or Effective Time in Standalone mode.
Note: IPv6 ACL rules only affect IPv6 traffic. If the device also has IPv4 connectivity, it may still access the internet using IPv4. Configure an additional IPv4 ACL rule if both protocols need to be restricted. More information can be found in our Omada Gateway Access Control Configuration Examples FAQ.
Q6: Does the configured time range affect when an ACL rule is active?
A6: Yes. The ACL rule applies only during the configured time range. In Controller mode, enable Time Schedule. In Standalone mode, configure a Time Range and select it under Effective Time. Outside the scheduled period, this rule does not apply.
Q7: Does the order of Gateway ACL rules matter?
A7: Yes. Rules are evaluated from top to bottom, and the first matching rule determines whether traffic is permitted or denied. Subsequent rules are not evaluated for that traffic.
Q8: Do I need to create an ACL rule to block unsolicited IPv6 traffic from the internet?
A8: Generally, no. The gateway's WAN firewall blocks most new inbound IPv6 connections to LAN devices by default. This does not necessarily apply to services running on the gateway itself.
Q9: Can I use different names for the IPv6 Groups shown in this guide?
A9: Yes. Group names are customizable. Ensure each group contains the correct IPv6 address or prefix and that the ACL references the intended group.
Q10: How can I verify that an IPv6 ACL rule is working?
A10: Test connectivity before and after applying the rule. For example, use IPv6 ping tests from the appropriate internal or external device and confirm that the result matches the configured policy.
