


Contents
Objective
This article provides installation instructions for waterproofing and lightning protection of the Omada IPC and NVR.
Requirements
- Omada IPC and NVR
- Lightning Arrester
- Grounding wire
Introduction
This article explains how to install waterproof and lightning protection devices to safeguard Omada IPCs and NVRs. This guide assumes that you have already purchased Omada IPCs and NVRs and that the installation environment is susceptible to rain and lightning. It can help you prevent damage to the devices caused by lightning and rain during daily use.
Installation
After purchasing the devices, customers can install the waterproof accessories included in the IPC packaging to prevent water ingress when the IPC is installed outdoors. Customers can also purchase lightning protection devices to safeguard their devices against lightning strikes.
Waterproof Installation
Each IPC packaging box includes a set of waterproof accessories used to prevent water ingress into the Ethernet Interface and Power Cord when the IPC is installed outdoors.
Ethernet Cable
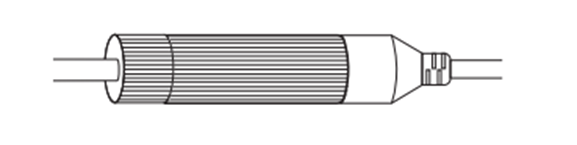
Step 1. Route the network cable through the following components in order: the fix nut, the waterproof ring, and then the waterproof jacket.

Step 2. Fix the O-ring to the network interface of the camera and connect the network cables.
Step 3. Attach the network interface with the waterproof jacket, then twist to lock.
Step 4. Insert the waterproof ring into the waterproof jacket. Rotate the fixing nut to secure it to the waterproof jacket.
Power Cord
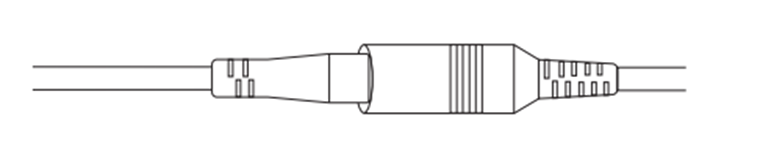
Step 1. Place the Waterproof Seal between the Male Power Connector and the Female Power Connector.

Step 2. Insert the Male Power Connector into the Female Power Connector.
Lightning Protection
The use of high-level lightning protection equipment can enhance the level of lightning protection and prolong the lifespan of systems; however, correct and quality construction is a more critical factor for all lightning protection systems. To prevent the hazards of induced lightning strikes, the following aspects are crucial: grounding, reasonable wiring, and the use of lightning arresters. The equipment must be installed and constructed according to the following guidelines to minimize the risk of damage from lightning strikes.
Grounding
Grounding is not only essential for the prompt discharge of overvoltage and overcurrent induced in equipment by lightning strikes, but also a necessary measure for ensuring personal safety.
Grounding Principle:
- Single-point Grounding Principle: All devices within the same system should share a common grounding point to ensure uniformity of the grounding potential. This helps to prevent interference and malfunctions caused by potential differences between different devices.
- Independent Grounding System: The grounding system for surveillance equipment should be separate from the grounding systems of other electrical equipment to avoid mutual interference. The use of building lightning rods or down conductors for equipment grounding is strictly prohibited. This can enhance the anti-interference and lightning protection capabilities of the surveillance system.
- Proper Grounding Line Layout: Grounding wires should be as short as possible and have a sufficiently large cross-sectional area to minimize grounding resistance.
- High-quality Grounding Materials: Grounding wires and grounding devices should be made of high-quality materials that meet national standards to ensure adequate grounding.
Grounding Method:
Requirements for camera grounding
- Grounding Wire/Cable: The cross-section of the copper-core insulated wire and cable should not be less than 6 square millimeters.
- Burial Depth: The burial depth should be at least 0.5 meters.
- Grounding Resistance: The grounding resistance should be less than 4 ohms.
Typical camera grounding schemes
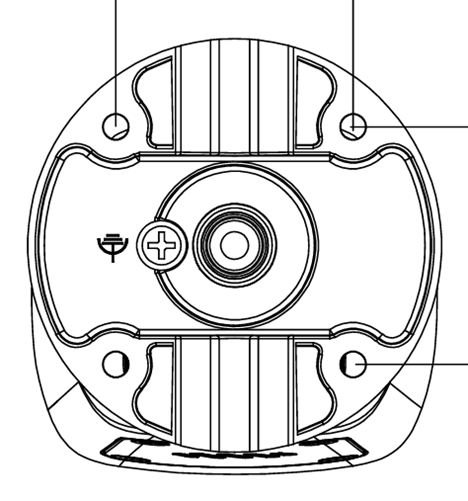
- Direct Grounding: For metal cases, connect the metal case of the camera to the grounding wire via the grounding terminal of the camera. Alternatively, you can directly install the camera on a metal pipe, provided the metal pipe is grounded.
Reasonable Wiring
Reasonable wiring can effectively reduce damage to surveillance equipment caused by lightning strikes. When wiring outdoors, please follow these requirements:
Wiring Principles
-
Keep Distance from High Voltage: Signal transmission lines must be at least 50 meters away from high-voltage equipment or cables.
-
Prefer Underground Wiring: Outdoor cables should generally be buried; overhead wiring is prohibited.
-
Shielding: Cables connecting to equipment should be run inside grounded metal pipes for protection.
-
No Unprotected Overhead Wiring: Do not run overhead wires between buildings without protective measures.
-
Avoid Exterior Wall Routing: Do not run cables along building exteriors to connect devices on different floors.
Recommended Wiring Methods
-
Underground Routing: Lay all wires underground and route them into buildings from below. It is recommended to bury a steel wire along the pipeline and connect one end to the building’s lightning protection ground for shielding.
-
Lightning Protection: Before connecting cables to equipment, always install a signal lightning arrester at the appropriate port.
-
Protected Overhead Wiring: For overhead outdoor wiring, run wires through a grounded metal pipe (at least 15 meters long) before they enter the building. Ensure both ends of the pipe are grounded. Also, install a signal lightning arrester before connecting to the equipment.
-
Shielded Network Cable: Shielded network cables do not require routing through metal pipes, but ensure the shielding layer is grounded. Also install a signal lightning arrester before connection.
-
No Protection Measures: If wiring must be exposed outdoors without any protection, be sure to install a signal lightning arrester at the connection port.
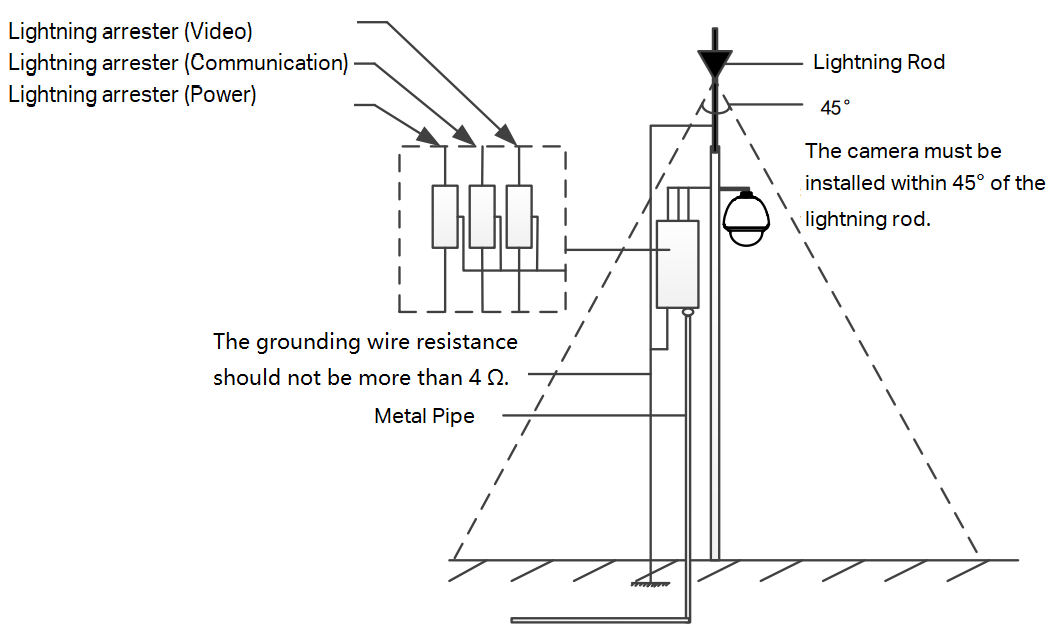
Note: This installation diagram is for reference only.
Lightning Arrester Installation
The network port lightning arrester can be used to protect the Ethernet cable interface (RJ45 connector). When installing outdoors, connect the network port lightning arrester in series before the cable connects to the device interface.
Here are some tips for purchasing and using a signal lightning arrester:
- When purchasing a signal lightning arrester, verify that the port rate the lightning arrester can protect matches the port rate of the device. If it does not match, it cannot be used.
- Choose a lightning arrester that meets the relevant standards; otherwise, it may affect the signal transmission quality between devices.
- Purchase a network port lightning arrester as needed. Install the network port lightning arrester by carefully following its user manual.
Install the network lightning arrester (surge protector) by following the steps below:
- Determine the installation location: Select an area close to the camera and convenient for wiring.
- Connect the network cable: Connect the Ethernet cable from the external network into the "IN" interface of the lightning arrester, and then connect the "OUT" interface of the lightning arrester to the network device via an Ethernet cable.
- Grounding: Connect the grounding terminal of the lightning arrester to the grounding system using the grounding wire. Ensure that the grounding resistance meets the requirements.
Conclusion
You can protect your device from water ingress and lightning damage.
Get to know more details of each function and configuration please go to Download Center | TP-Link to download the manual of your product.
