


How to configure Portal Authentication on Omada Controller (v6.2 and above)


Contents
Configure a Portal on the Omada Controller
Configure the Authentication-Free Access Control Policy
Introduction
Portal authentication provides authentication service to the clients that only need temporary access to the network, such as the customers in a restaurant or in a supermarket. To access the network, these clients need to enter the authentication login page and use the correct login information to pass the authentication. In addition, you can customize the authentication login page and specify a URL which the authenticated clients will be redirected to.
Portal authentication takes effect on SSIDs and LAN networks. EAPs authenticate wireless clients which connect to the SSID with Portal configured, and the gateway authenticates wired clients which connect to the network with Portal configured. For Wi-Fi Gateways, it would authenticate its own wireless clients. To make Portal authentication available for wired and wireless clients, ensure that both the gateway and EAPs are connected and working properly.
The controller provides 7 types of Portal authentication: No Authentication, Simple Password, Hotspot, RADIUS Server, External LDAP Server, External Portal Server, Google. You can select different types for different portals based on your needs.
Moreover, if you want to allow clients to access specific URLs or allow specific clients to access the internet without portal authentication, you can configure the Access Control policy. There are two ways:
- Pre-Authentication Access: With Pre-Authentication Access enabled, unauthenticated clients are allowed to access the subnets and web resources specified in the Pre-Authentication Access List.
- Authentication-Free Client: With Authentication-Free Client enabled, specific clients can access the internet without authentication.
Note: When utilizing the Portal function, make sure your Omada Controller is running.
Requirements
- Omada Network (Software Controller / Hardware Controller / Cloud-Based Controller, v6.2 and above)
- Omada EAP
Configuration
Configure a Portal on the Omada Controller
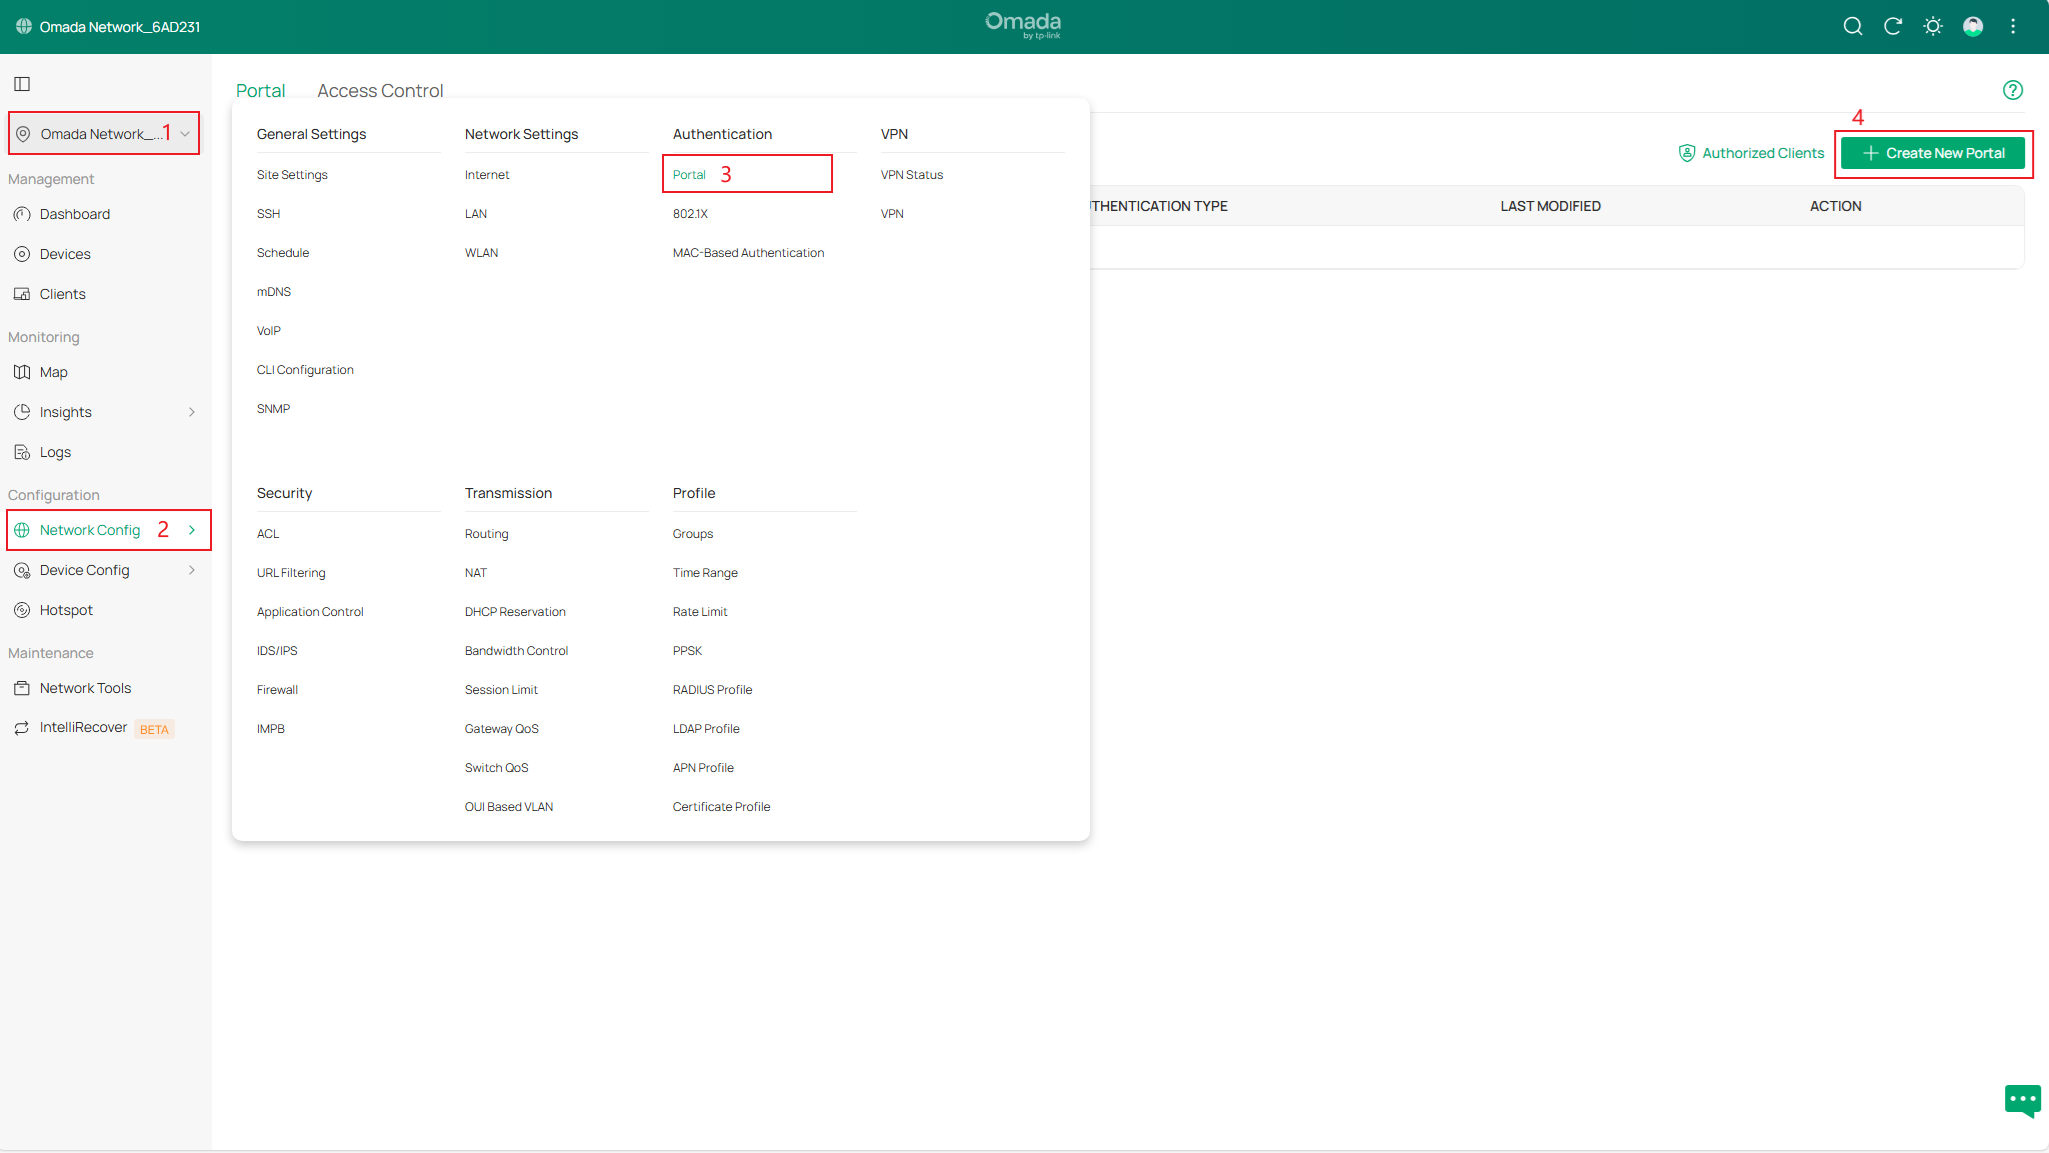
Step 1. Log in to the Controller via a web browser. In Site View, Network Config > Authentication > Portal, and click “Create New Portal”.
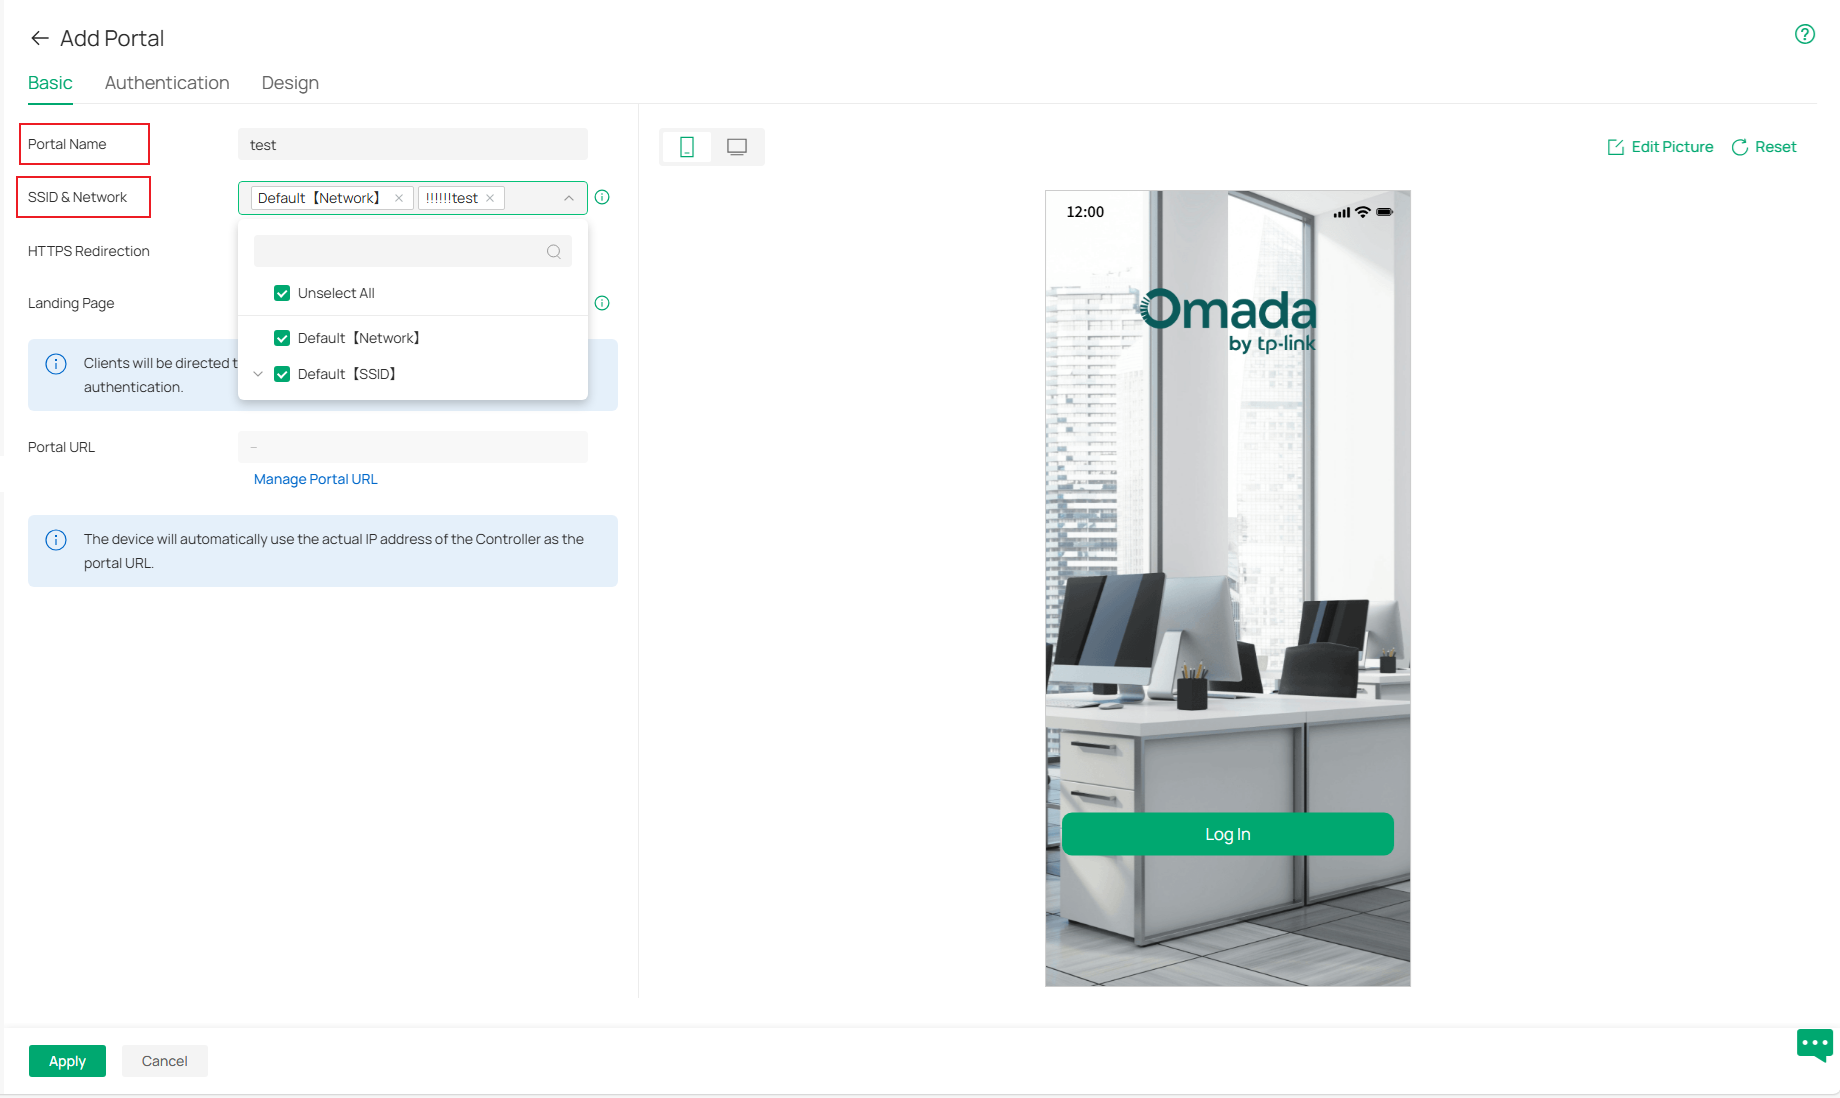
Step 2. In the Create New Portal section, set the Portal Name and select the SSID & Network to configure Portal authentication on the Basic page.
Step 3. Go to the Authentication interface, select the Authentication Type. Depending on the controller version, different authentication options may be available.
- No Authentication: If selected, all wireless clients connected to the EAP can access the internet without any authentication. They will still see the preset login page.
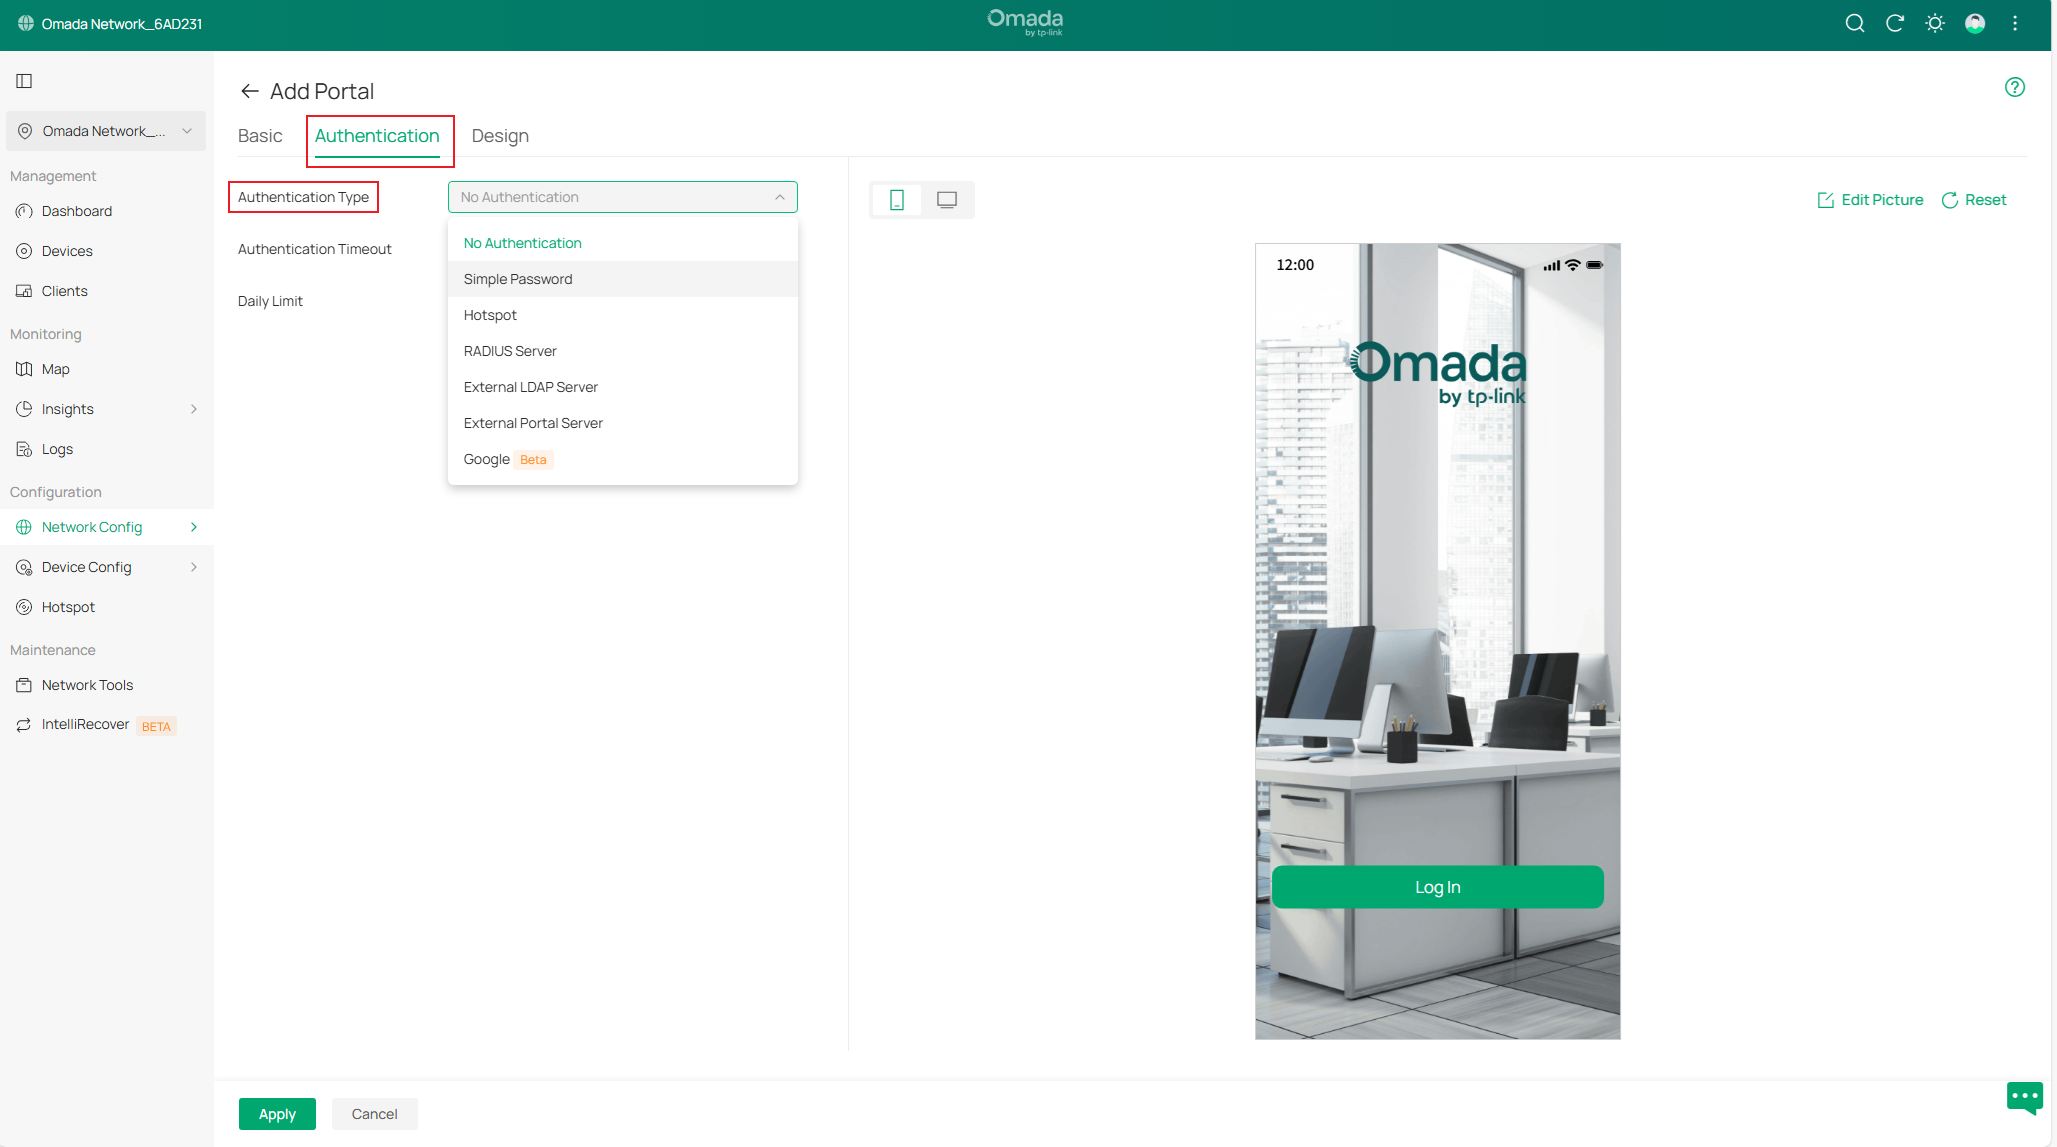
- Simple Password: If selected, all wireless clients connected to the EAP must authenticate with the password you set.

- Hotspot: If selected, clients can use one or more Hotspot authentication methods:
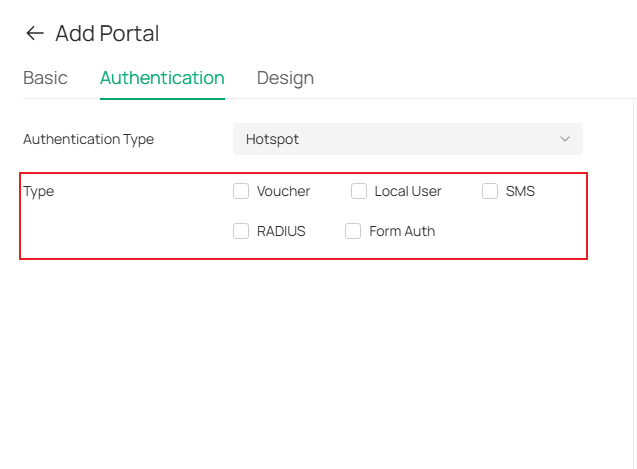
Voucher
Customers can authenticate using a unique credential code generated by the Omada for a specific duration. You can print the voucher codes from the Controller and distribute them to your customers. This helps you link your customers’ network access to your business.
Local User
Customers need to enter the correct username and password of the login account to pass the authentication.
SMS
Customers can authenticate with the verification code they receive on their mobile phones.
RADIUS
Customers need to enter the correct username and password stored in the RADIUS server to pass the authentication.

Note: Currently RADIUS authentication in Portal function doesn’t support RADIUS VLAN assignment. Client still could pass authentication, but wouldn’t get configured VLAN in RADIUS server through Portal Authentication.
Form Auth
Customers need to fill out a questionnaire created by the network administrator to pass the authentication. This method can be used to gather feedback from customers.
- RADIUS Server: If selected, clients can authenticate using the correct username and password stored in the RADIUS Server. Omada Controller includes a built-in RADIUS Server from version 5.12 onwards.

Note: Currently RADIUS authentication in Portal function doesn’t support RADIUS VLAN assignment. Client still could pass authentication, but wouldn’t get configured VLAN in RADIUS server through Portal Authentication.
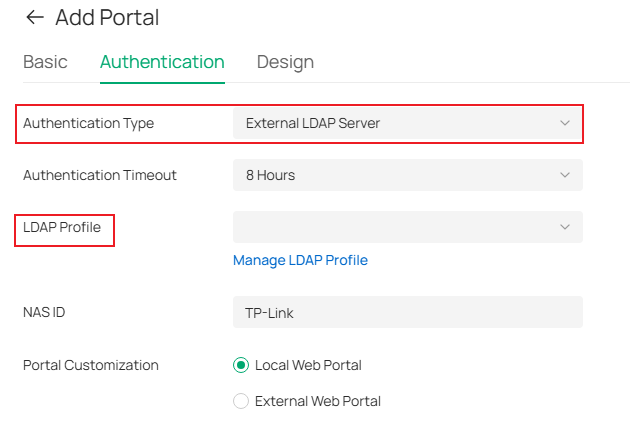
- External LDAP Server: If selected, clients can authenticate using an external LDAP server. This feature has been supported since Controller v5.12.
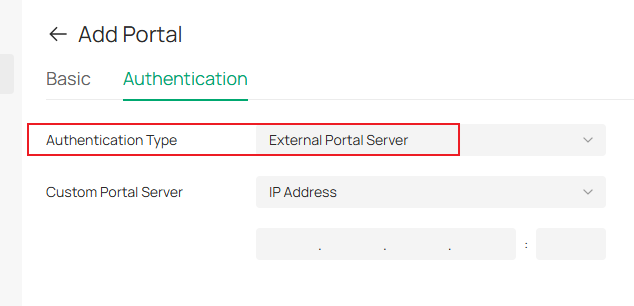
- External Portal Server: If selected, clients can authenticate using an external Portal server. You need to specify the IP address or URL of the Portal server.
- Google: Clients will be redirected to the Google login page and are required to complete the Google account login to pass the authentication.
Please refer to this FAQ to configure Google Authentication:
https://www.tp-link.com/support/faq/4381/
Note: This function currently only applies to SSIDs.
Step 4. Configure other parameters in the Create New Portal section. Parameters may vary by Authentication Type.
- Authentication Timeout (in Authentication page): When the set time is reached, clients need to re-authenticate. This parameter is available when Authentication Type is No Authentication, Simple Password, RADIUS Server, External LDAP Server or Google.
- Daily Limit (in Authentication page): If enabled, clients cannot re-authenticate on the same day after the authentication expires. This parameter is available when Authentication Type is No Authentication.
- NAS ID (in Authentication page): Set the NAS ID field in the authentication packet, which is set to TP-Link by default. This parameter is available when Authentication Type is RADIUS server.
- Disconnect Requests (in Authentication page): Enable this feature if needed. This feature takes effect only when the RADIUS server can access the Controller.
- Portal Logout (in Authentication page): Allow users to log out of the portal by accessing a URL and cancel their authentication. This parameter is available when the Authentication Type is RADIUS server. It has been supported since Controller v5.14.
- Authentication Mode (in Authentication page): Supports PAP and CHAP authentication mode. This parameter is available when Authentication Type is RADIUS server. CHAP has been supported since Controller v5.12.
- Portal Customization (in Authentication page): Supports Local Web Portal and External Web Portal. For the Local Web Portal, the login page is provided by the built-in Portal Server of the Controller. For the External Web Portal, you need to specify the URL of the authentication login page provided by the External Web Portal server. This parameter is available when Authentication Type is RADIUS server or External LDAP Server.
- HTTPS Redirection (in Basic page): If enabled, unauthenticated clients will be redirected to the HTTPS Portal authentication page. This parameter is available across all Portal authentication types.
- Landing Page (in Basic page): Select a way to log in to the page according to your needs. This configuration option is available for all Portal authentication types.
Note: If you select the Success Page, when using the Voucher or Local User authentication in the portal, clients will be able to see their remaining available time and expiration time on the success page after authentication. If rate limiting is configured, the remaining data usage will also be displayed.
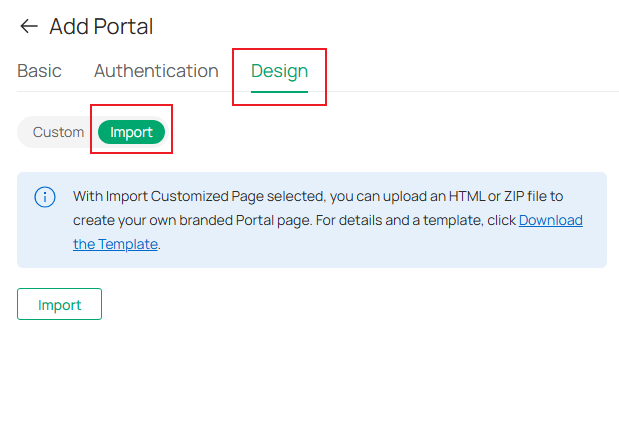
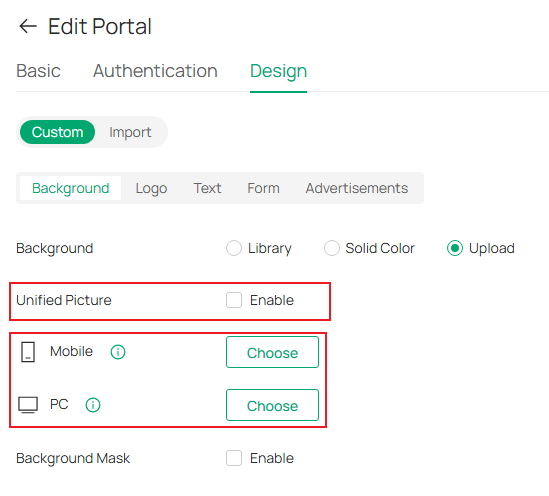
Step 5. Go to the Design interface, select Custom to edit the current portal page or Import a customized Portal file.

Step 6. Customize other parameters, such as Language, Background, and Logo. Text, Form and Advertisements can be customized. You can preview the Portal page on PC and Mobile Phone in real time.
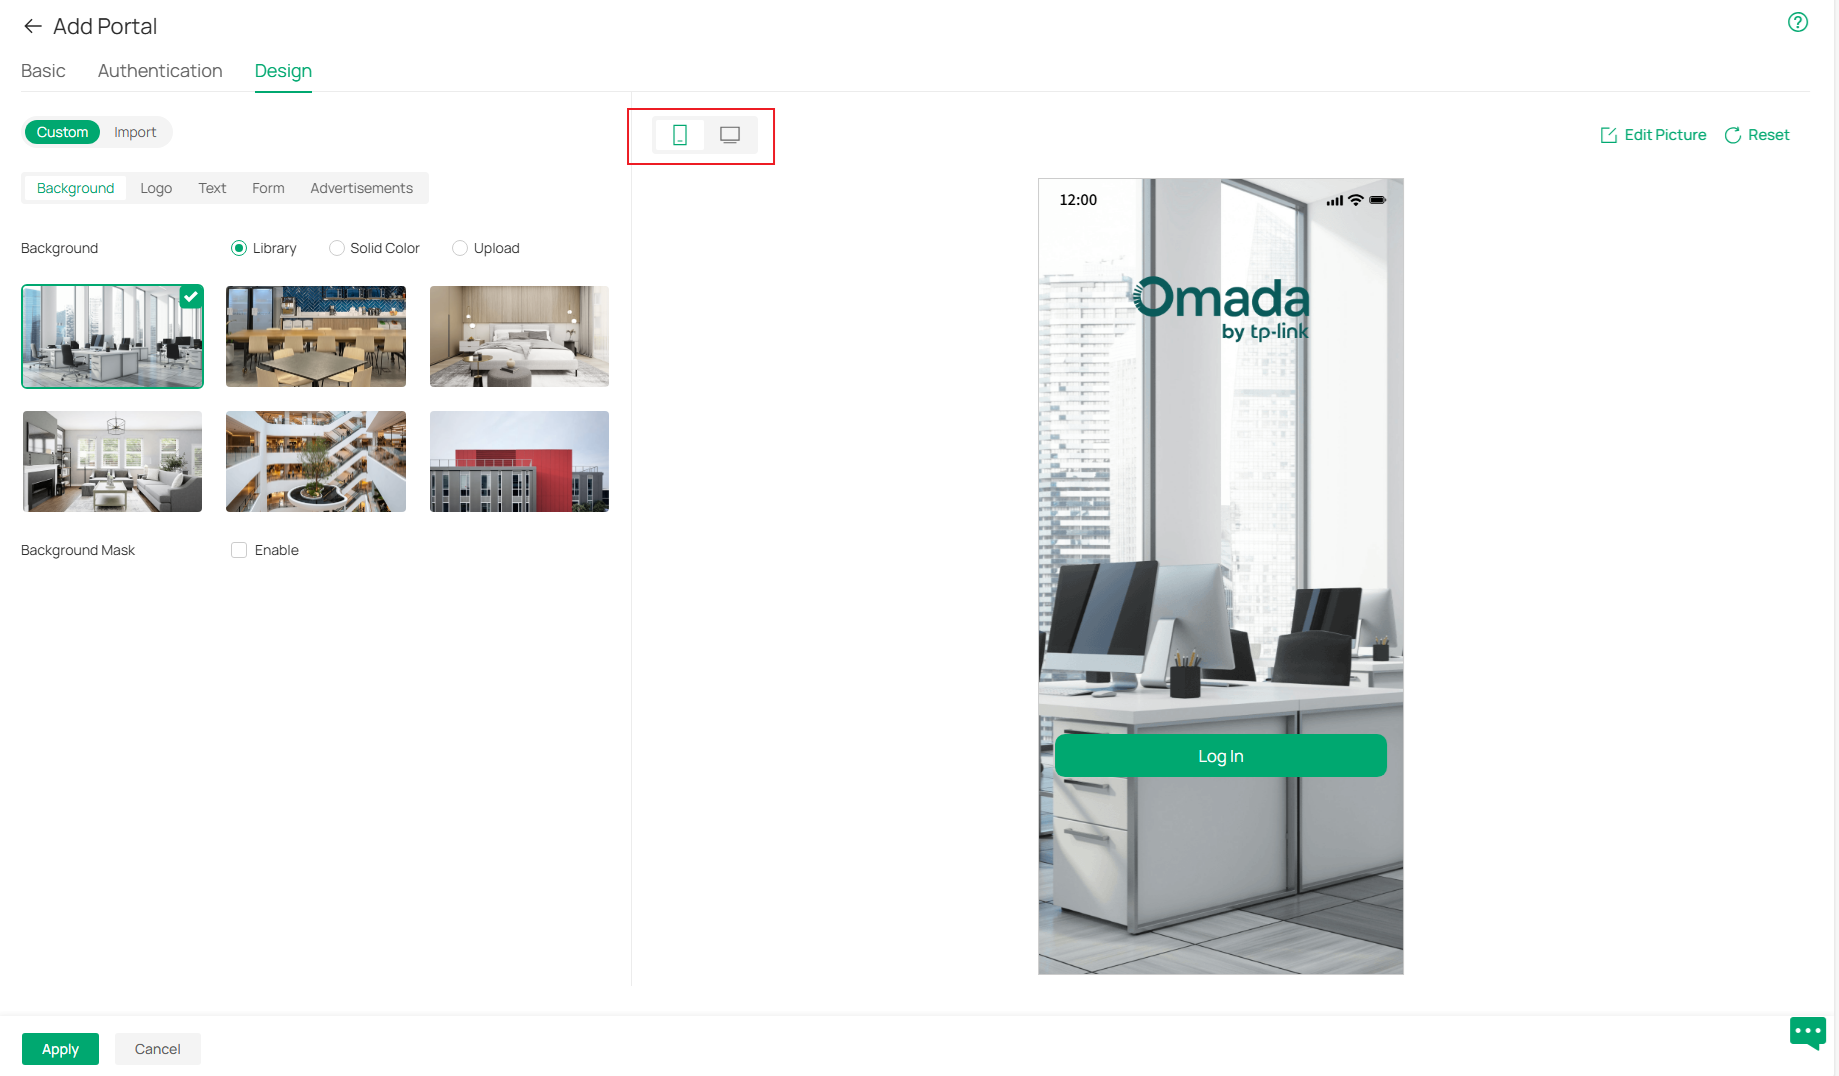
Note: When creating or editing a portal, different background images can now be uploaded for mobile and PC clients by disabling Unified Picture function on Custom > Background.
Step 7. Apply the settings. Last modified time is showed on Portal page.

Configure the Authentication-Free Access Control Policy
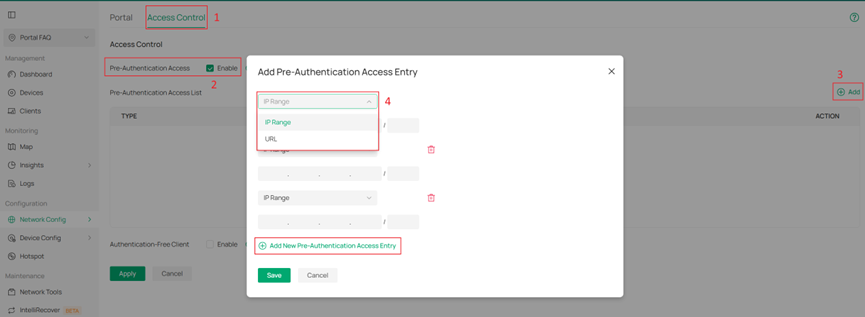
Step 1. In Site View, Network Config > Authentication > Portal >Access Control.
Step 2. Enable Pre-Authentication Access. Click Add.
Step 3. Select URL or IP Range.
Step 4. Specify the entry and save the settings.
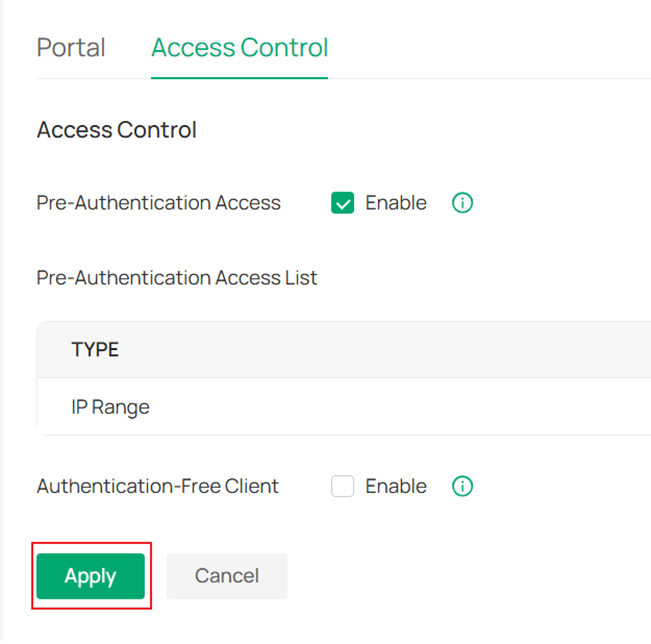
Step 5. Check and Apply the settings.
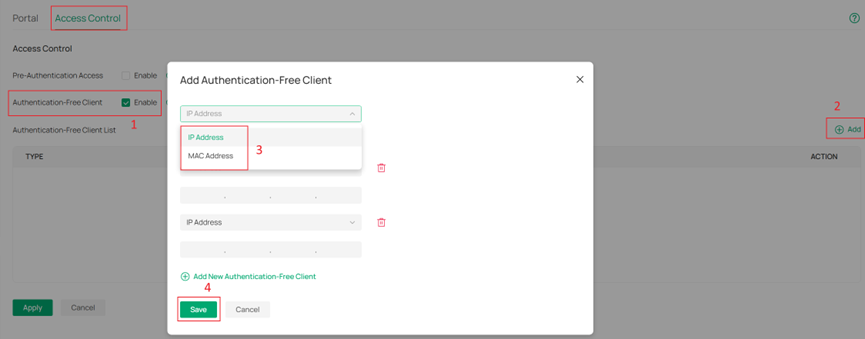
Step 6. Enable Authentication-Free Client and click Add. Configure accordingly and click Save, Apply in order.
Get to know more details of each function and configuration please go to Download Center to download the manual of your product.
