Omada Pro License Configuration Guide (for Cloud-Based Controller)
TP-Link Omada Pro controller provides centralized management of gateways, switches, and access points from the Software Defined Networking (SDN) platform.
Licenses are required to manage devices centrally with the Omada Pro controller. This guide will introduce how to obtain and assign licenses to your devices.
1. Assign and Manage Licenses for Cloud-Based Controller
For management and configurations on the Cloud-Based Controller, each device should be bound with an activated license. Before binding licenses to devices, you need to purchase licenses and assign them to your controller.
1.1 Purchase Licenses
Contact the sales staff to purchase licenses for cloud services. The licenses will be assigned to your TP-Link account.
1.2 Assign Licenses to the Cloud-Based Controller
1. Visit https://omada.tplinkcloud.com and log in with your TP-Link ID.
Note: If you don’t have a TP-Link ID, sign up for one and activate it.
2. Go to License > Omada Pro Cloud-Based Controller. Click Assign Licenses to Controller at the upper right corner.
3. Check your remaining licenses, select the controller, and specify the quantity of licenses to assign.

4. Click Confirm. The licenses will be assigned to the controller.
1.3 Revoke Licenses from the Cloud-Based Controller
After license assignment, you can revoke licenses if the controller no longer needs them.
1. Visit https://omada.tplinkcloud.com and log in with your TP-Link ID.
Note: If you don’t have a TP-Link ID, sign up for one and activate it.
2. Go to License > Omada Pro Cloud-Based Controller. Click Revoke Licenses at the upper right corner.
3. Select the controller and specify the quantity of licenses to revoke.

4. Click Confirm. The licenses will be revoked and can be assign to another controller if needed.
2. Assign and Manage Licenses for MSP Customers
If you have enabled MSP (Managed Service Provider) mode, follow the steps below to assign license to your customers:
2. 1 Assign Licenses to Customers
1. Launch your controller.
2. In MSP View, go to License > License Assignment. Click Assign Licenses at the upper right corner.
3. Check your remaining licenses, select the customer, and specify the quantity of licenses to assign.

4. Click Confirm. The licenses will be assigned to the customer.
2.2 Revoke Licenses from Customers
After license assignment, you can revoke licenses if the customer no longer needs them.
1. Launch your controller.
2. In MSP View, go to License > License Assignment. Click Revoke Licenses at the upper right corner.
3. Select the customer and specify the quantity of licenses to revoke.

4. Click Confirm. The licenses will be revoked and can be assign to another customer if needed.
3. Assign and Manage Licenses for Devices
Note:
- One license can be bound with only one device at a time.
- If a device with license bound is removed from the controller, the license will be unbound automatically and can be bound to another device if needed.
3.1 Automatic Binding/Unbinding
For the Controller in Global View
1. Launch your controller.
2. Go to the License page. Enable Auto-Active and enable Auto-Renewal for sites.


For the Controller in MSP View
1. Launch your controller.
2. Go to the License page. Enable Auto-Active and enable Auto-Renewal for customers.


3.2 Manual Binding/Unbinding
If you don’t want the controller to automatically assign device licenses, you can manually bind and unbind device licenses.
1. Launch your controller.
2. Go to the Devices page.
3. Bind or unbind device licenses according to your needs.
- To bind a device license:
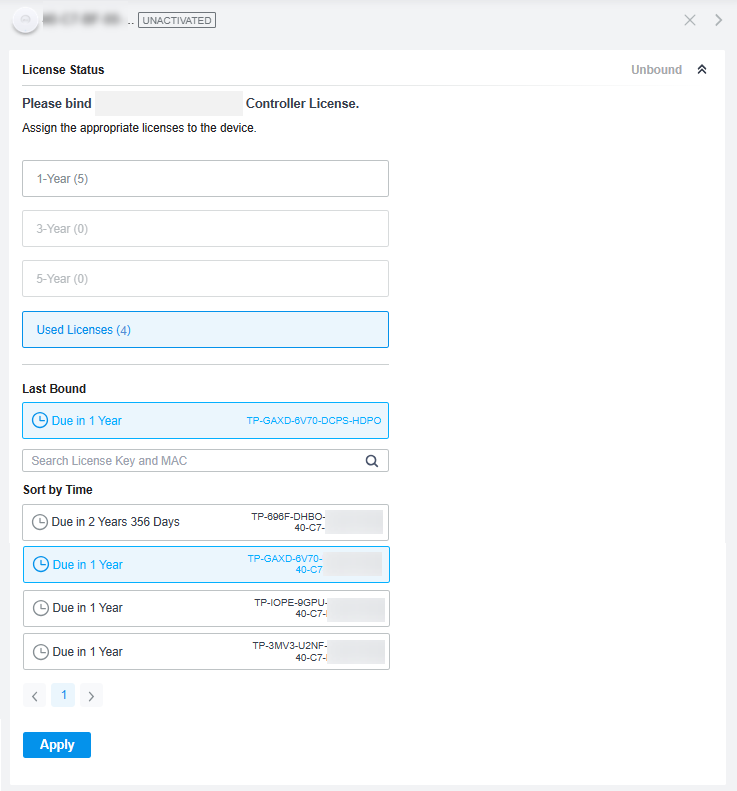
Locate an unactivated device and click Activate. In the License Status section, choose an appropriate license to bind. You can bind a new license or a used license (such as the one last bound). If you have many used licenses, you can search by license key or MAC.

- To unbind a device license:
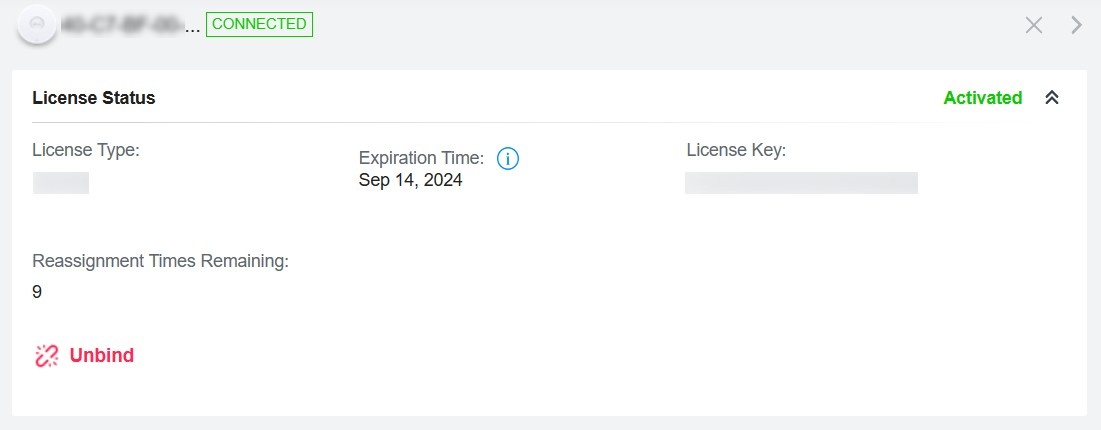
Click an activated device to open the Properties window. In the License Status section, click Unbind. The license will be unbound and can be bound to another device if needed.
Note: When the reassignment times remaining is 0, the license will be unable to be bound to other devices except the current device.


