


Contents
Configure 802.1X on the Controller
Turn on 802.1X authentication for your computer
Introduction
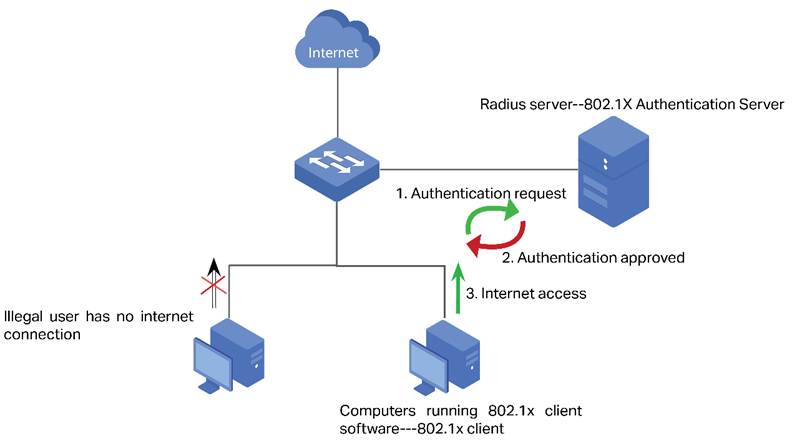
802.1X access authentication system is widely used in an Ethernet environment as a solution to provide authentication access for clients. 802.1X access authentication is based on “port”, which means the access control and AAA authentications for clients are based on the “port” of NAS (Network Access Server). If the client connects to the port of the NAS and passes the authentication of the Radius Server, then the client can get access to the resources belonging to the NAS, but not the other way around.
Note: In this article NAS (Network Access Server) refers to Omada switch which acts as 802.1X Authenticator in 802.1X system. Computers or Servers running Radius server software act as 802.1X Authentication server in 802.1X system. Below is the illustration of 802.1X access authentication system.
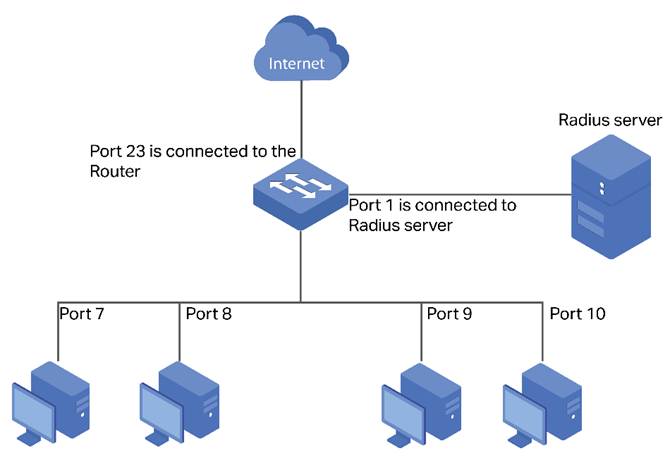
As shown in the topology below, port 1 of the switch is connected to the Radius server, which provides the authentication for the 802.1X supplicant. Port 23 is connected to uplink port which is a router connecting to the Internet. Switch acts as the 802.1X authenticator as well as the NAS for the system. And what we need is a system that only allows legal users who have passed the authentication of the Radius Server through the switch to get internet access.
Requirements
- Omada Controller (Omada Network Application / Hardware Controller / Omada Cloud-Based Controller, V6.0 and above)
- Omada Switches (Omada Campus Switche / Omada Aggregation Switches / Omada Access Max Switches / Omada Access Pro Switches / Omada Access Plus Switches / Omada Access Switches)
Configuration
Build up a Radius Server
This article takes FreeRadius as an example to build up a Radius Server on a local computer.
Step 1. Install FreeRadius on Ubuntu. Freeradius can be installed online with the command sudo apt install freeradius, or from the source file Build with the freeradius installation guide Building FreeRADIUS.
Step 2. Configure clients.conf for FreeRadius. For testing from external machines, edit /etc/freeradius/clients.conf and add an entry. There are many examples and the syntax is easy:
client tplink {
ipaddr = 192.168.0.100
secret = testing123
}
Step 3. Define an user and password. Edit /etc/freeradius/users and create an example user account as the first entry. i.e. at the top of the file, such as:
admin Cleartext-Password := "admin"
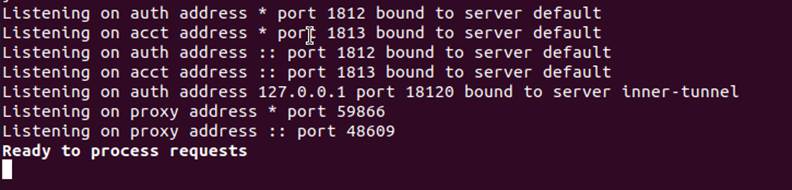
Save the configuration of the above file, start FreeRadius server, "Ready to process requests" will appear, which indicates that your freeradius server installation is successful:
Configure 802.1X on the Controller
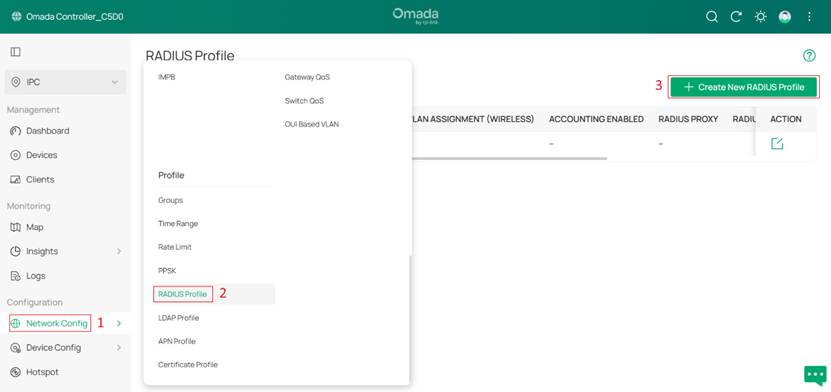
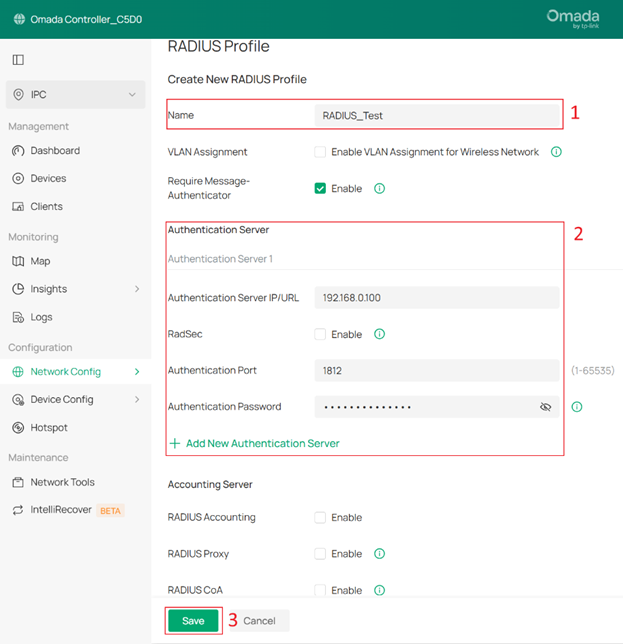
Step 1. Setting the RADIUS Profile.
Log in Controller, go to Network Settings > Profile > RADIUS Profile, click Create New RADIUS Profile and edit the Name of the RADIUS server in the name field. Enter the IP address of the radius server in Authentication Server IP/URL and the radius port value in Authentication Port. Enter the shared key of the radius server in Authentication Password. Once the settings are complete, click Save to save the configuration.
VLAN Assignment: VLAN Assignment is applicable only when the device supports the feature. To make this feature work properly, it is recommended to upgrade your devices to the latest firmware version.
VLAN Assignment is not currently supported when a client is authenticated by Portal with RADIUS Server or RADIUS Hotspot.
If the dynamic VLAN is the same as the VLAN of the Default Network, network abnormalities may occur. Please do not configure this on the external RADIUS server.
Require Message-Authenticator: This option applies only when the device supports this feature. When enabled, the device requires RADIUS response messages to include a valid Message-Authenticator attribute.
Note: Enabling this option may cause authentication failures since non-EAP authentication messages (such as PAP and CHAP) typically do not include the Message-Authenticator attribute.
RadSec: RadSec is applicable only when the device supports the feature. To make this feature work properly, it is recommended to upgrade your devices to the latest firmware version. If there are old devices in the device list that do not support this feature, it is recommended to configure a backup server that is not enabled with this feature.
RADIUS Accounting: RADIUS Accounting is a feature that tracks and records user session activities (such as login time, duration, and data usage) for monitoring and billing purposes.
RADIUS Proxy: This option is only supported by EAP PPSK, EAP MAC-Based Authentication, EAP WPA-Enterprise, and EAP 802.1X mode. It does not support the RadSec feature.
RADIUS CoA: If enabled, TP-Link devices will act as a RADIUS Dynamic Authorization Server and will respond to RADIUS Change-of-Authorization and Disconnect messages sent by the RADIUS servers. This option is only supported by EAP PPSK, EAP MAC-Based Authentication, EAP WPA-Enterprise, and 802.1X.
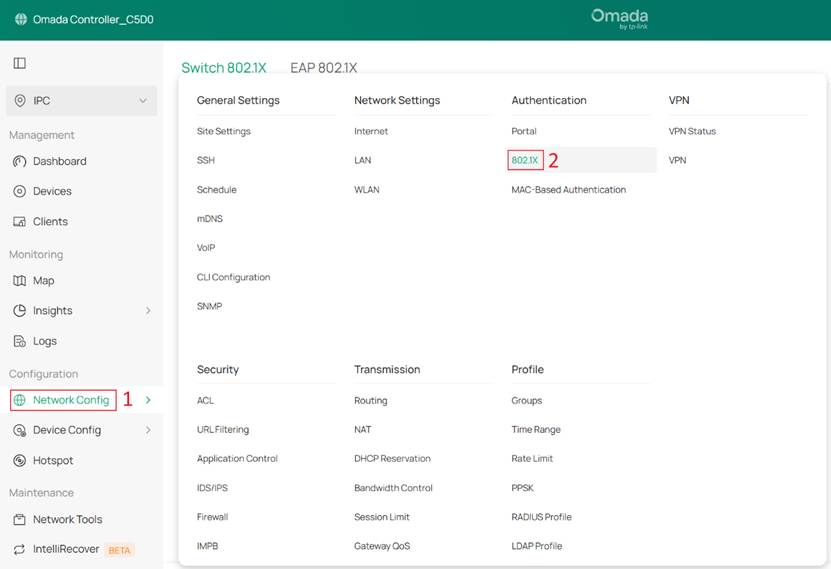
Step 2. Configure 802.1X authentication. Go to Network Settings > Authentication > 802.1X.
Turn on the 802.1X button. In the RADIUS Profile column, select the radius server created in Step 1 and set others as you wish. Then, click the +Add to select the devices need to enable 802.1X.
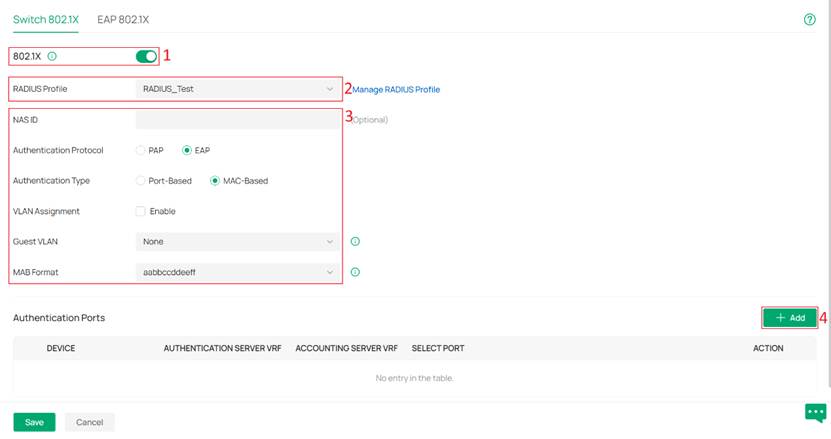
Note 1: MAC Based indicates any device connected to the corresponding port needs independent authentication before getting access to the network. While Port Based indicates all devices connected to one port can get access to the network as long as one of them has passed the authentication of corresponding port.
Note 2: In Controller V6.2 and above, and with compatible switch firmware, you can enable VLAN Assignment while selecting MAC-Based.
NAS ID: Configure a Network Access Server Identifier (NAS ID) for authentication. Authentication request packets from the 802.1x-enabled switch to the RADIUS server carry the NAS ID. The RADIUS server can classify users into different groups based on the NAS ID, and then choose different policies for different groups.
Authentication Protocol: Select the authentication protocol for exchanging messages between the switch and RADIUS server. As a bridge between the client and RADIUS server, the switch forward messages for them. It uses EAP packets to exchange messages with the client, and processes the messages according to the specified authentication protocol before forwarding them to the RADIUS server.
- PAP: The EAP packets are converted to other protocol (such as RADIUS) packets, and transmitted to the RADIUS server.
- EAP: The EAP packets are encapsulated in other protocol (such as RADIUS) packets, and transmitted to the authentication server. To use this authentication mechanism, the RADIUS server should support EAP attributes.
Authentication Type: Select the 802.1X authentication type.
- Port-Based: After a client connected to the port gets authenticated successfully, other clients can access the network via the port without authentication.
- MAC-Based: Clients connected to the port need to be authenticated individually. The RADIUS server distinguishes clients by their MAC addresses.
VLAN Assignment: This feature allows the RADIUS server to send the VLAN configurations to the port dynamically. After the port is authenticated, the RADIUS server assigns the VLAN based on the username of the client connecting to the port. The username-to-VLAN mappings must already be stored in the RADIUS server database.
Guest VLAN: Assign a VLAN for guest clients whose authentication fails or times out.
MAB Format: Select clients’ MAC address format which the controller uses for authentication. Then configure the MAC addresses in the specified format as usernames for the clients on the RADIUS server.
Step 3. Select the devices on which you want to enable 802.1X, then click the × or any blank area on the left to return. You can also switch the device display mode from the upper-right corner, choosing either Topology View or List View.
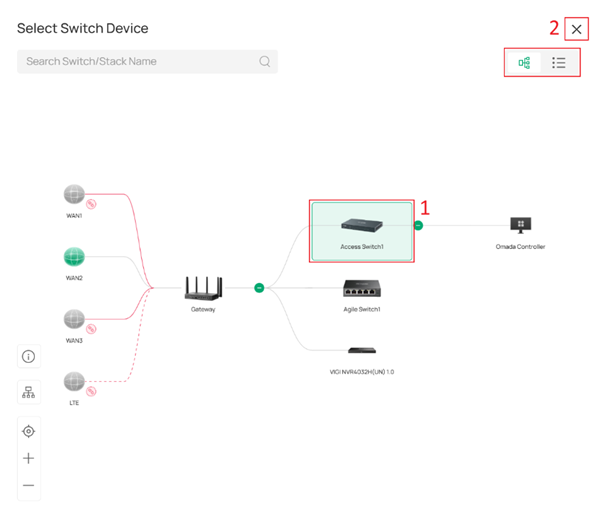
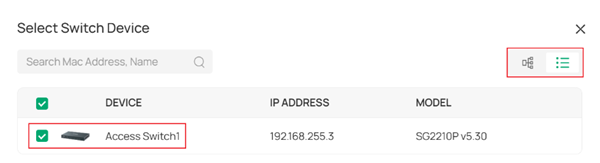
Note: Agile Switches do not support 802.1X authentication, so they cannot be selected here.
Select the Authentication Mode and the ports. Once completed, click Save to apply the configuration.
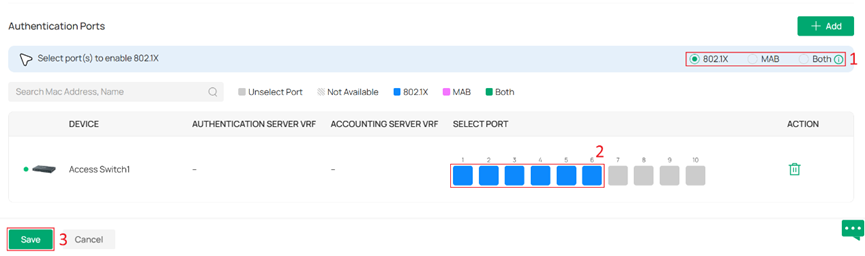
Authentication Mode: You can choose 802.1X Only, MAB Only, or Both. Both means the port supports both MAB and 802.1X authentication. If 802.1X authentication is not initiated or fails, the port will automatically initiate MAB authentication every 30 seconds.
Turn on 802.1X authentication for your computer
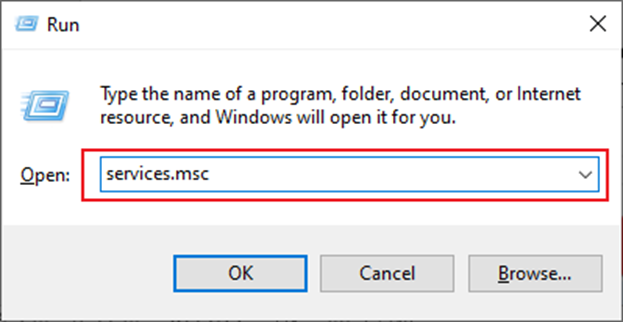
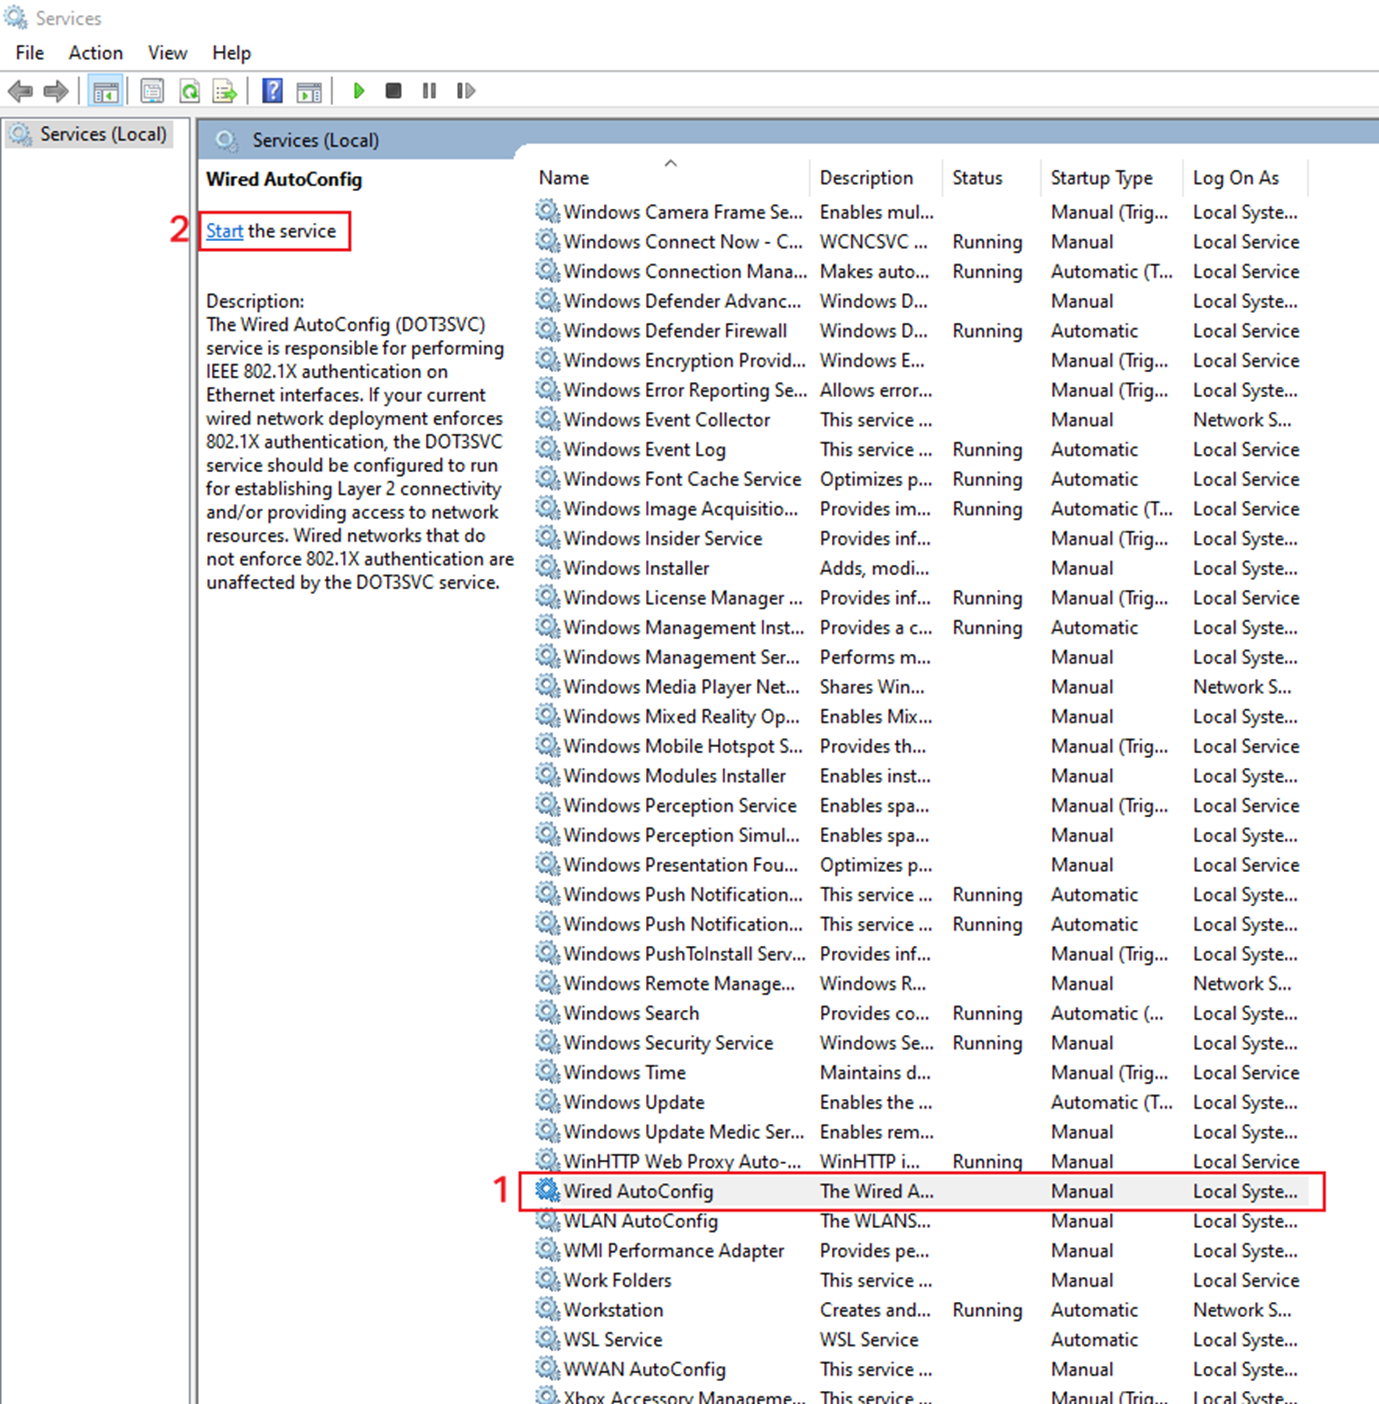
Step 1. Press the Win+R and enter services.msc.
You will see the following screen.
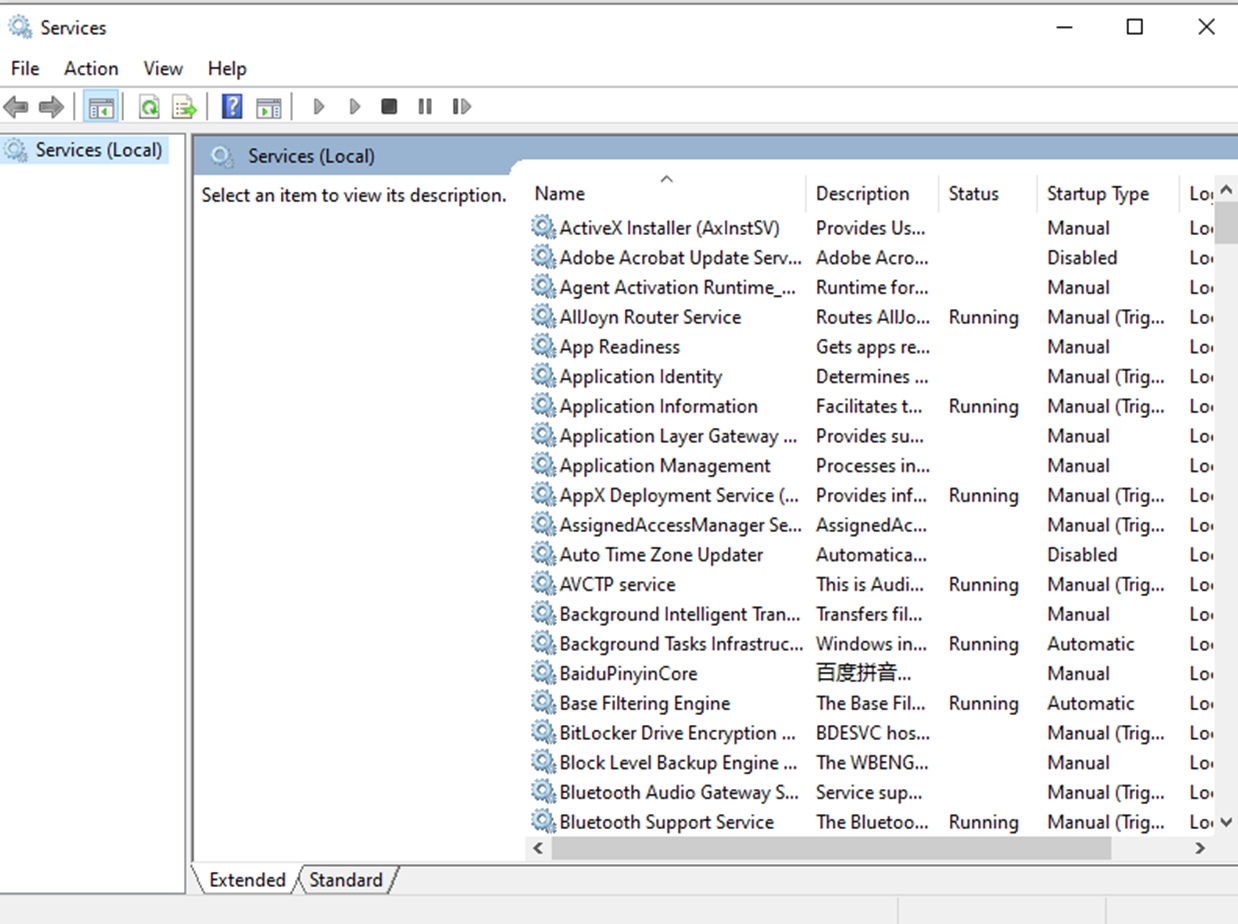
Step 2. Find Wired AutoConfig and click Start to enable 802.1X authentication.
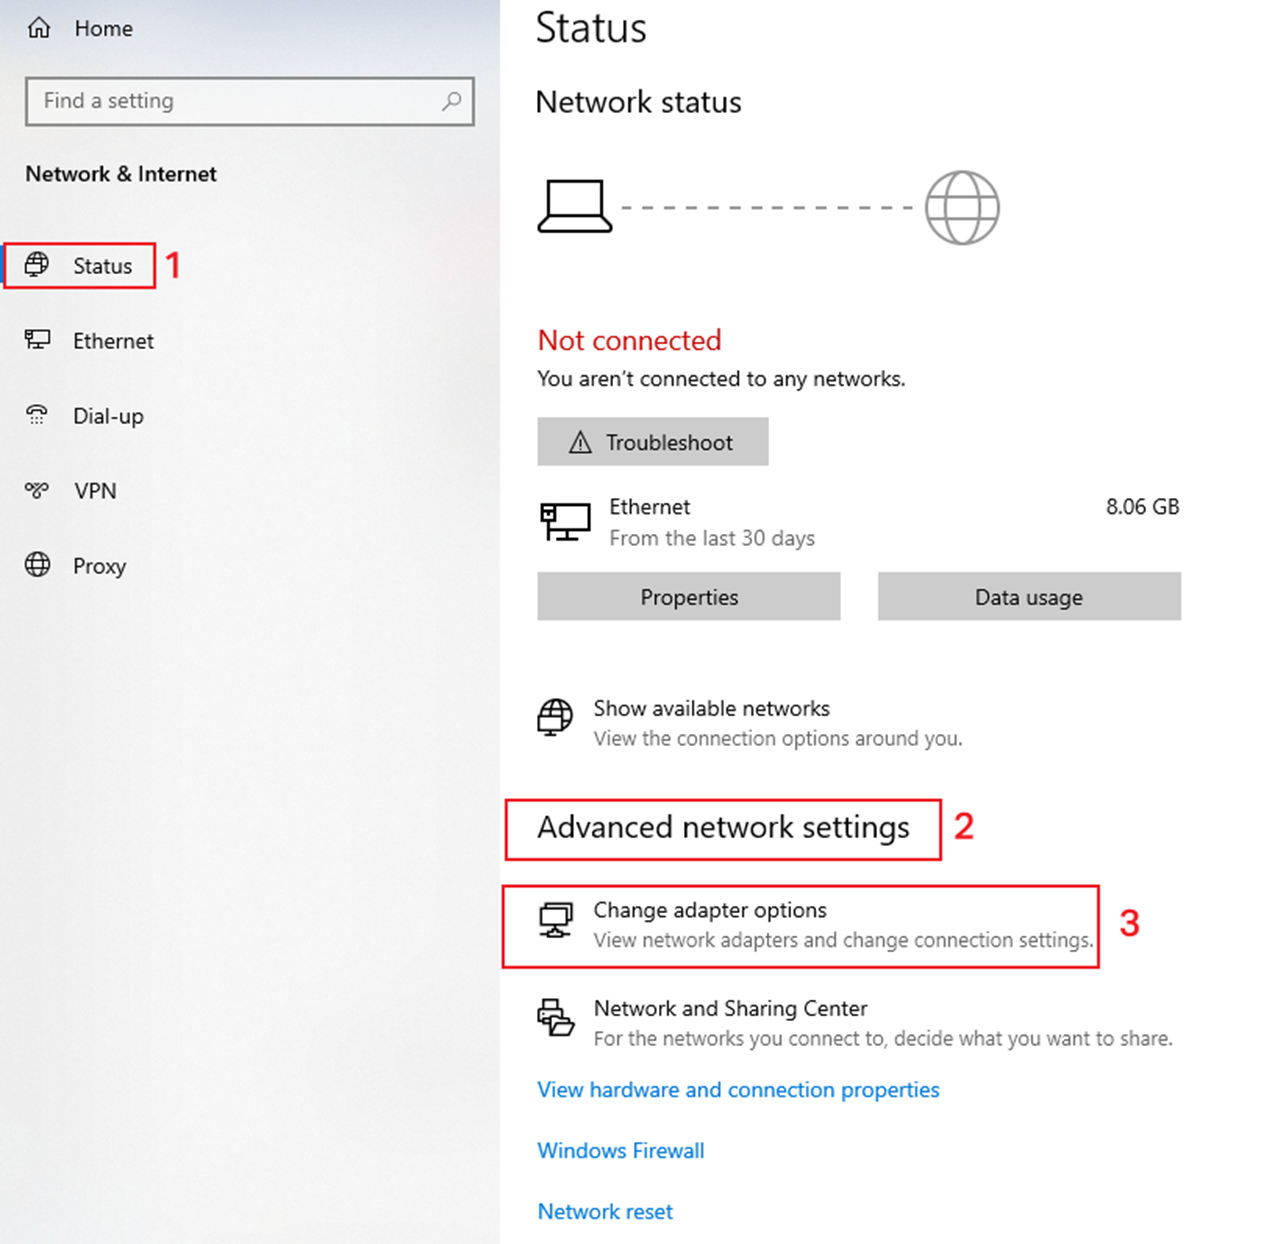
Step 3. Open Network & Internet settings and enable 802.1X authentication.
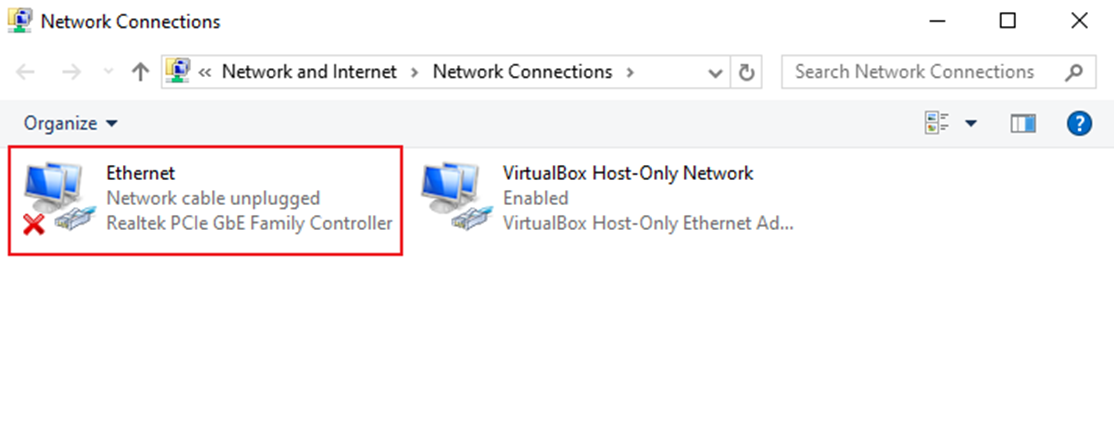
Double-click the NIC to be authenticated:
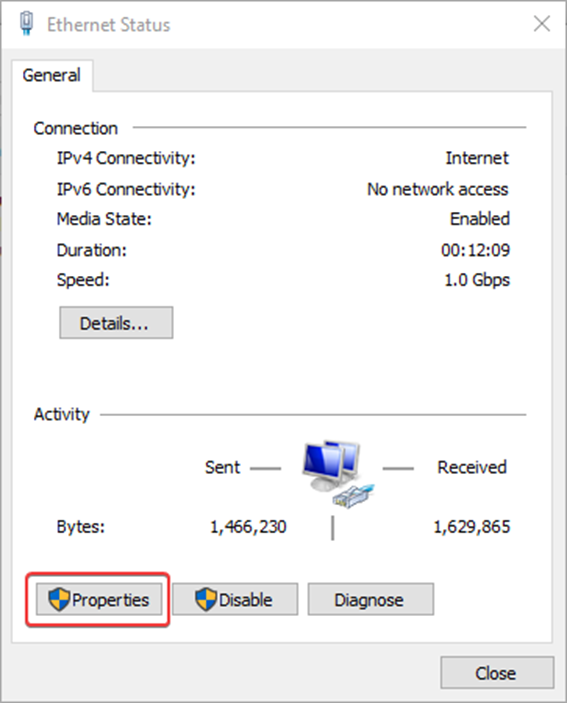
Click Properties:
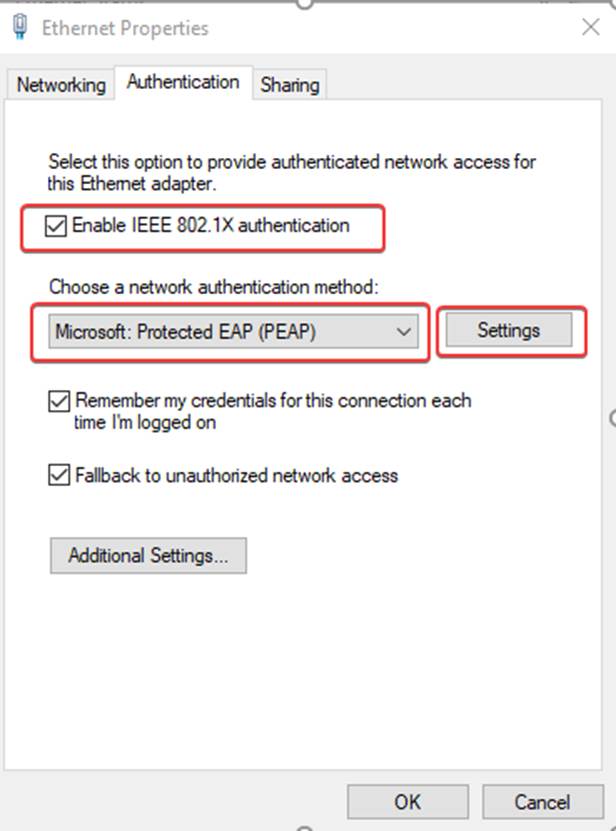
You will see the Authentication options bar, click to enter. Tick Enable IEEE 802.1X authentication and select PEAP for network authentication method. Finally, click Settings to configure the PEAP properties.
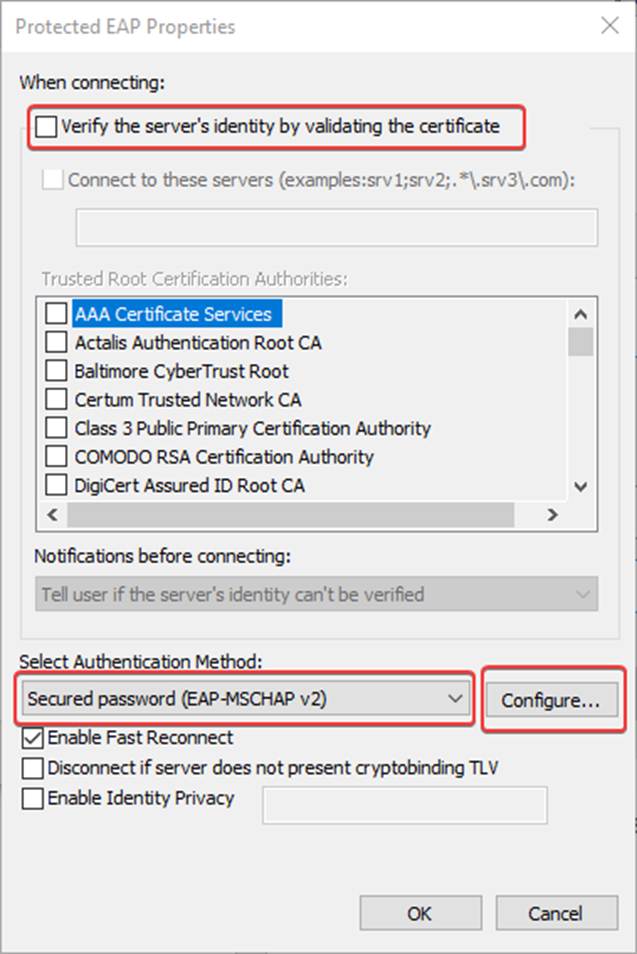
Disable Verify the server's identity by validating the certificate and select EAP-MSCHAP v2 for Authentication method. Click Configure to enter the EAP MSCHAP v2 properties interface.
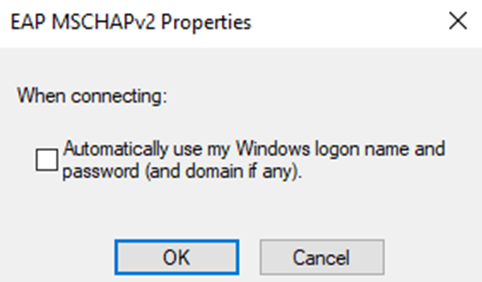
Uncheck Automatically use my Windows logon name and password (and domain if any).
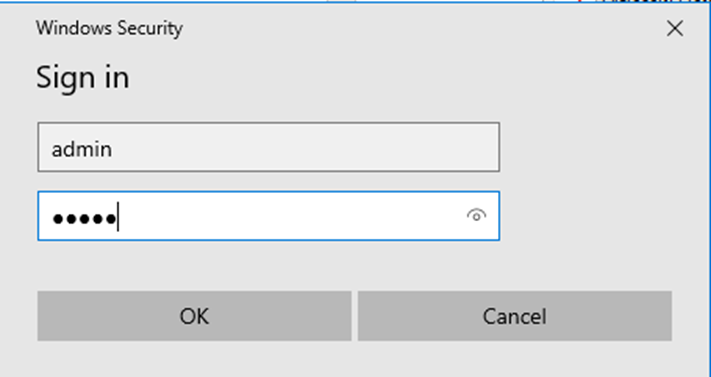
Click OK and save the settings. The computer will automatically pop up the following interface, enter the account and password, complete the authentication you can access the Internet. The account and password are set in Step 3.
Conclusion
You have successfully configured 802.1X for switch and are authenticated to access the Internet.
Get to know more details of each function and configuration please go to Download Center to download the manual of your product.
