


Content
Configuration for Standalone Mode Using PC
Configuration for Standalone Mode Using Omada App
Configuration for Controller Mode Using PC
Configuration for Controller Mode Using Omada App
Introduction
This article introduces the configuration and steps to pair and configure EAP bridges in Standalone Mode and on the Omada Controller via PC and Omada App.
Requirements
- Omada Wireless Bridge EAP
Configuration
Configuration for Standalone Mode Using PC
Scenario 1: Pairing a Client AP to the Main AP
Network Topology
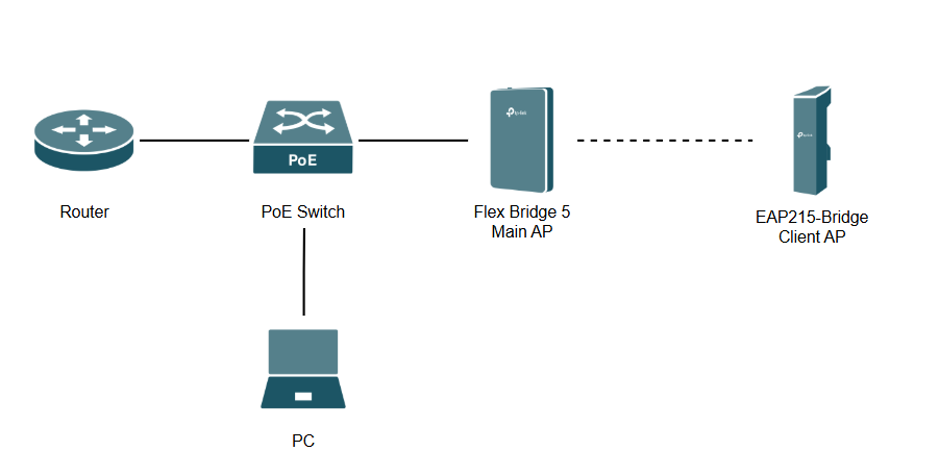
Note: A Windows 11 Laptop is used for this section along with a router, PoE switch, Flex Bridge 5 as the Main AP, and EAP215-Bridge as the Client AP.
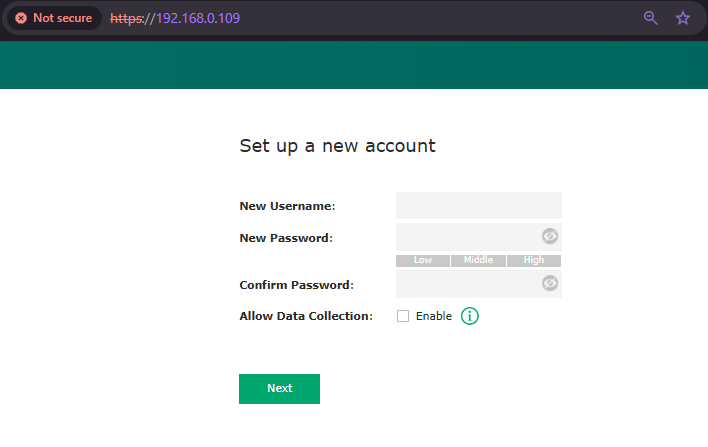
Step 1. Power on the Bridge APs and log in to the Standalone web GUI of the Main AP on the PC. For example, the IP address of the Main AP for this article is 192.168.0.109 so you should type https://192.168.0.109 in your web browser's address bar to log into the web GUI.
First, follow the initial setup steps and create the device’s account, and then you can log in to it.
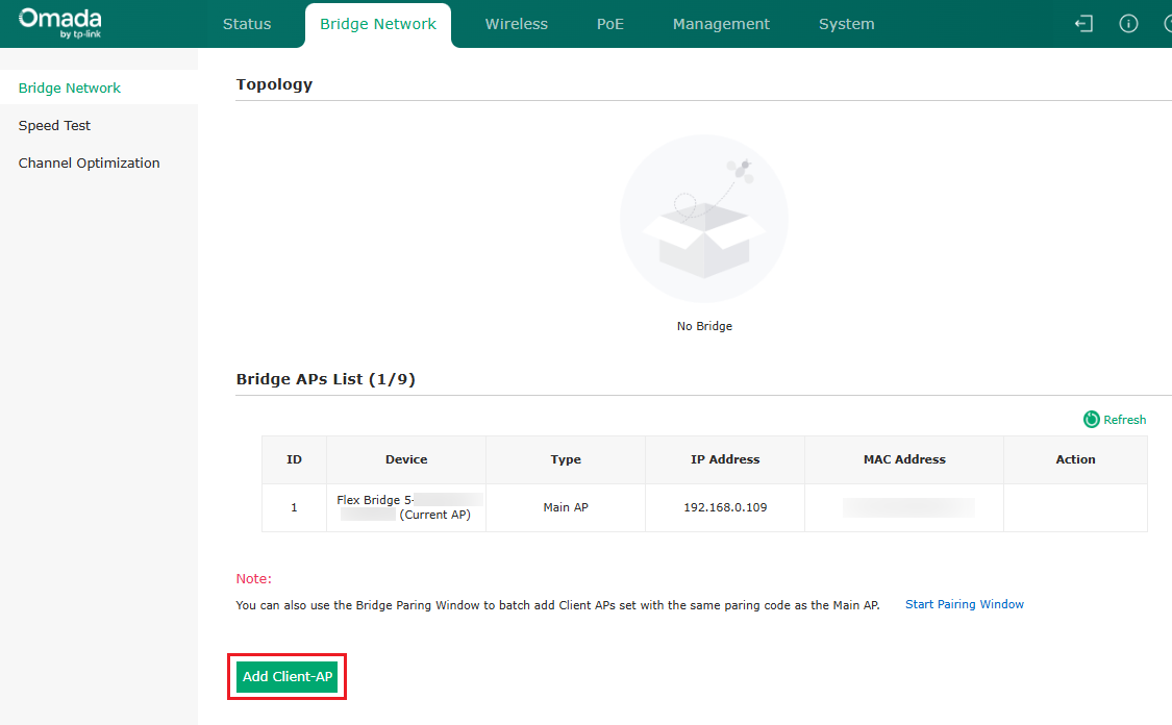
Step 2. Go to Bridge Network and select Add Client-AP.
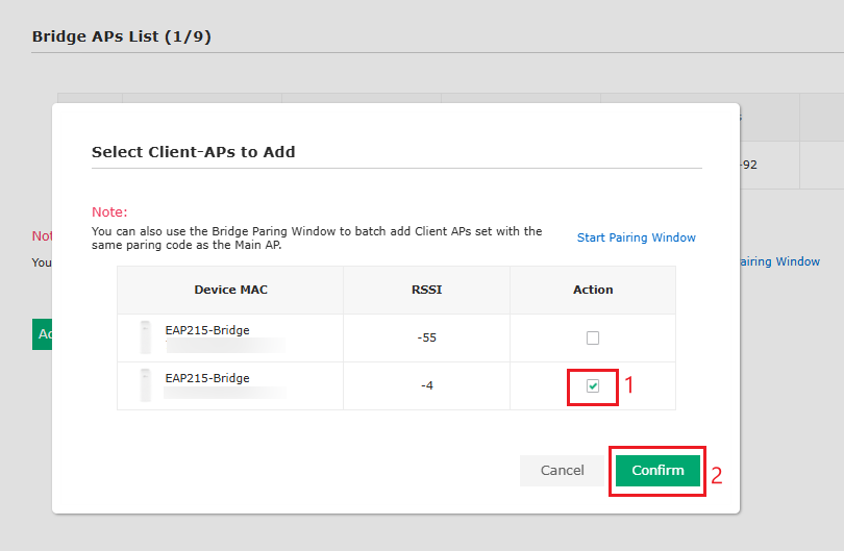
Step 3. Select the correct client AP based on MAC address and select Confirm.
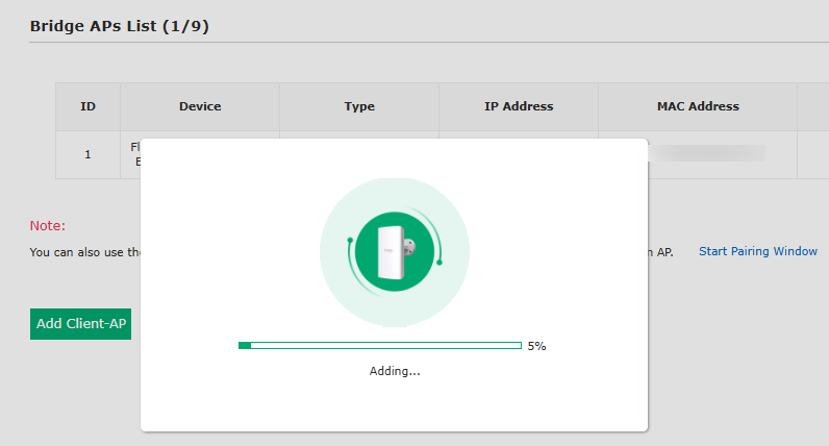
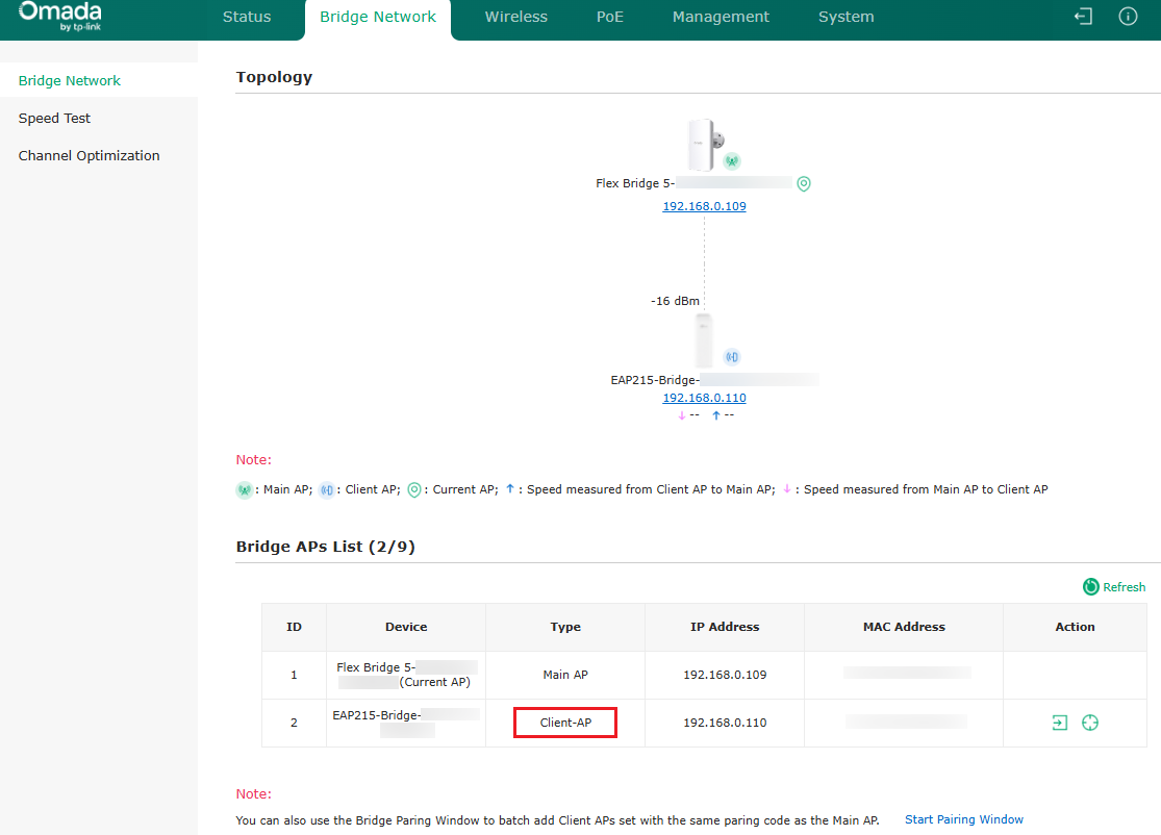
Step 4. The Client AP will now be connected to the Main AP.
Scenario 2: Pairing and Scanning for Main AP on Client AP
Network Topology
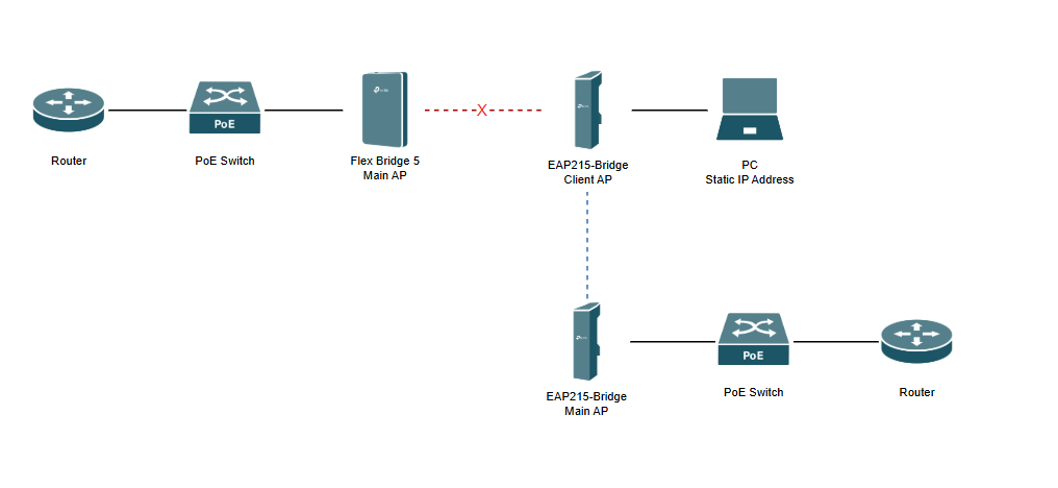
Note: A Windows 11 Laptop is used for this section along with a router, PoE switch, EAP215-Bridge as the Main AP, and EAP215-Bridge as the Client AP.
Step 1. Log in to the web management interface of the Client AP by entering its assigned IP address into a web browser.
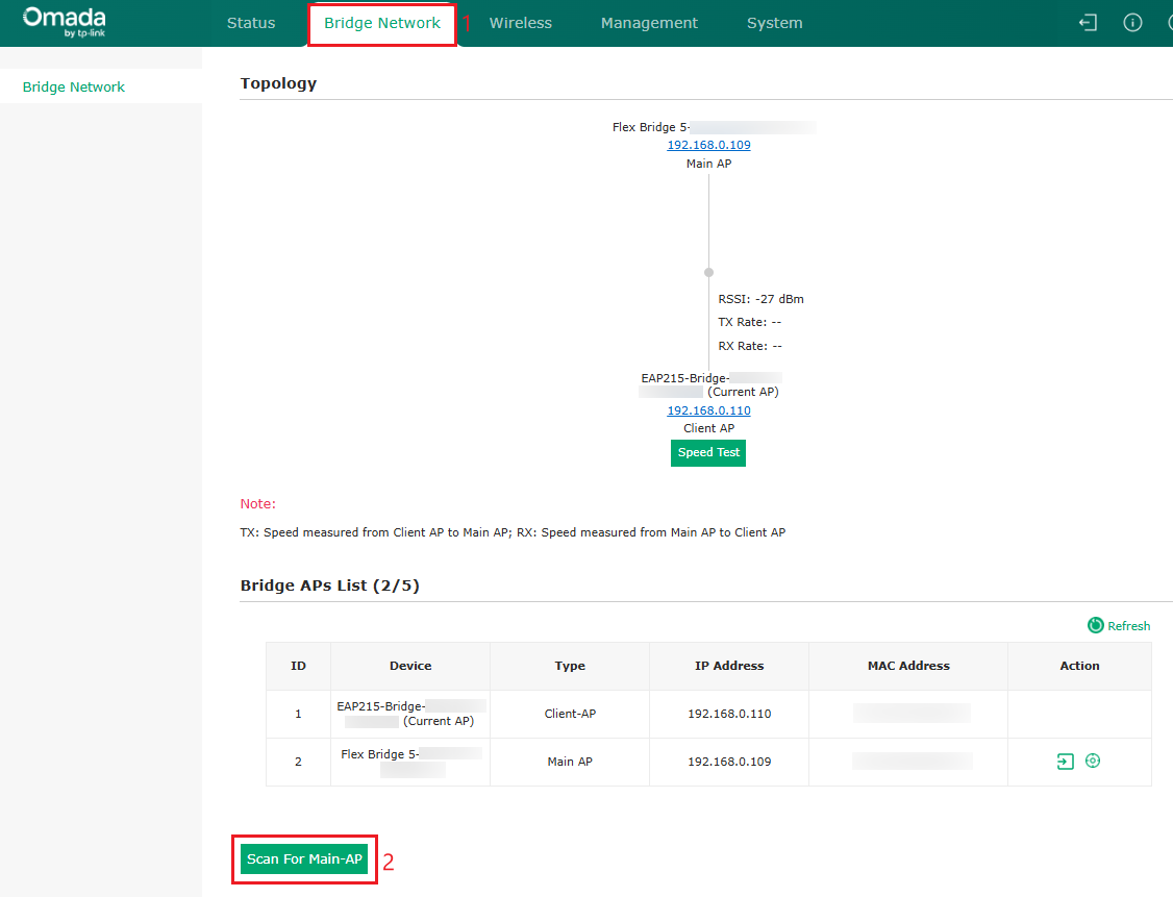
Step 2. Once on the Web UI of the Client AP, go to Bridge Network and select Scan For Main AP
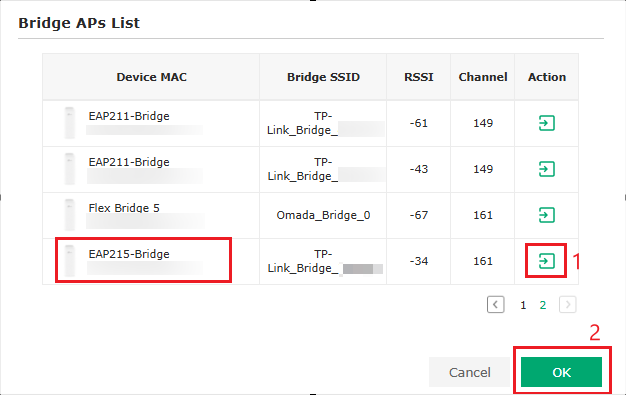
Step 3. Find the Bridge AP that will be the new Main AP and select Launch.
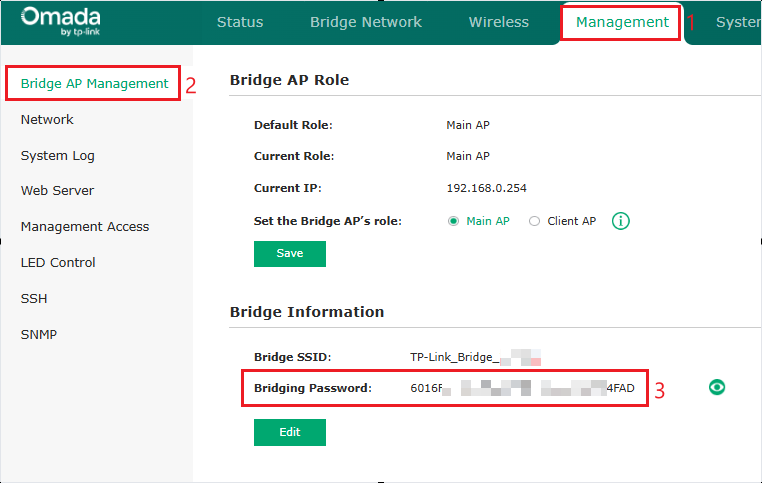
Step 4. You will be prompted to enter a Bridging Password which can be found in Management > Bridge AP Management of the Main AP:
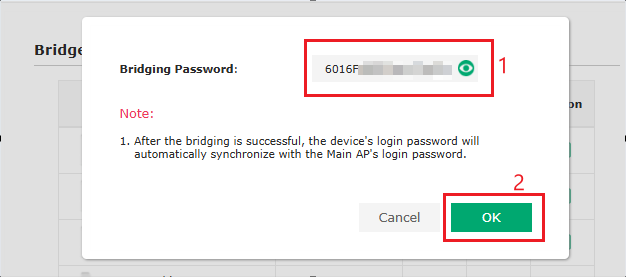
Step 5. Enter the Bridging Password from the new Main AP into the Bridging Password field on the Client AP.
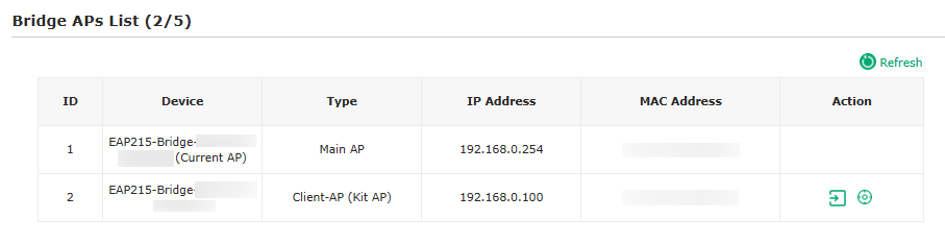
Step 6. The Client AP will now be connected to the new Main AP.
Configuration for Standalone Mode Using Omada App
Scenario 1: Pairing a Client AP to the Main AP
Network Topology
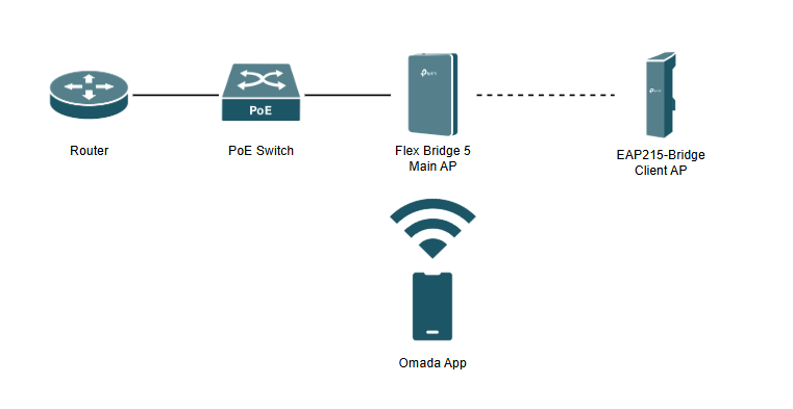
Note: An Android phone using Omada App in Standalone Mode is used for this section along with a router, PoE switch, Flex Bridge 5 as the Main AP, and EAP215-Bridge as the Client AP. We will be pairing the EAP215-Bridge Client AP to the Flex Bridge 5 Main AP from the Flex Bridge 5 UI.
Step 1. Power on the Bridge APs and connect to the SSID listed on the device on the Main AP (ex. Omada_2.4GHz_XXXX).
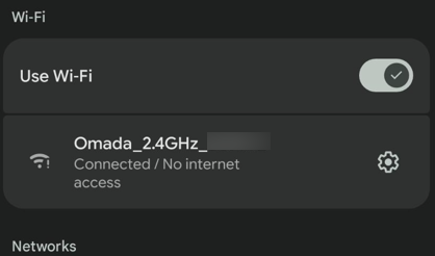
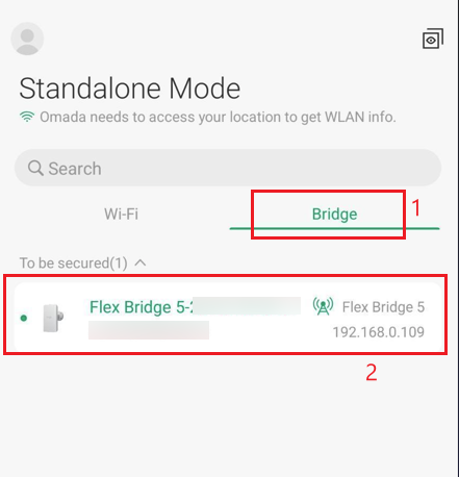
Step 2. Open the Omada App in Standalone Mode and go to Bridge and tap on the Main AP you are connected to.
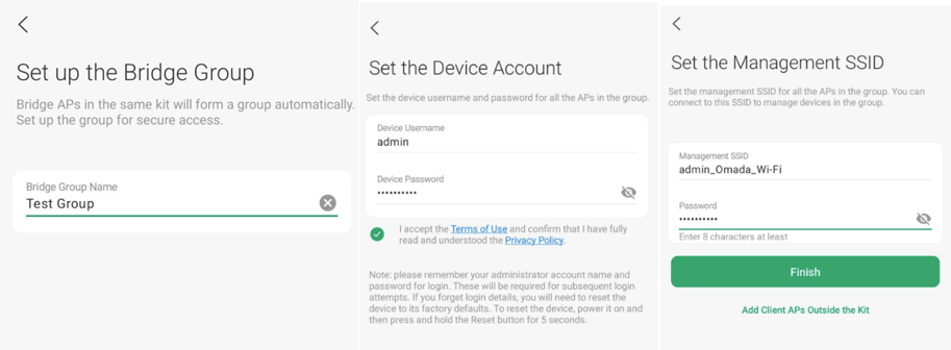
Step 3. Configure the setup steps by creating Bridge Group, configuring Device authentication details, setting the Management SSID, and connecting to the new Management SSID.
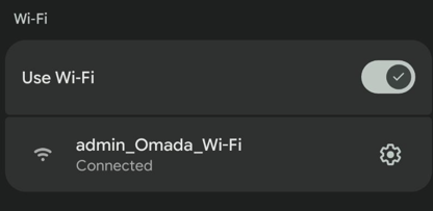
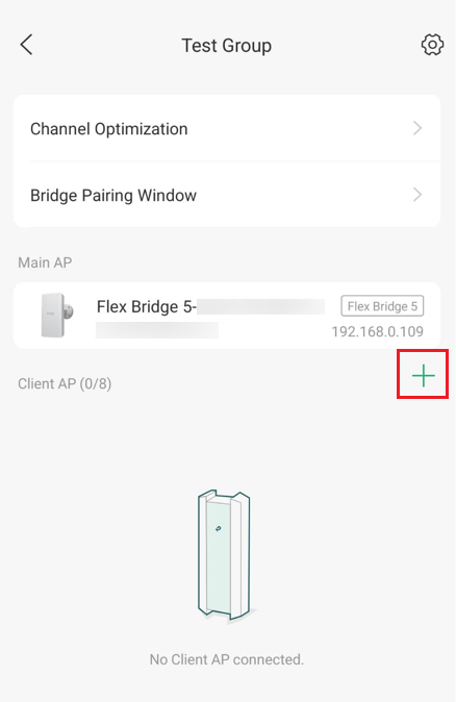
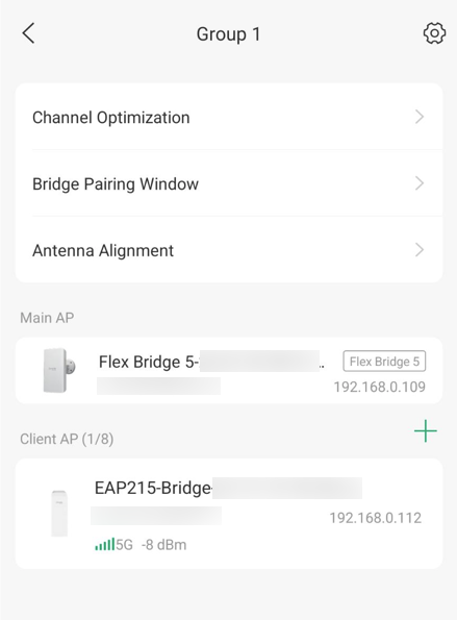
Step 4. Once connected to the new Management SSID, select the Bridge Group that was created and hit the “+” button to add a Client AP.
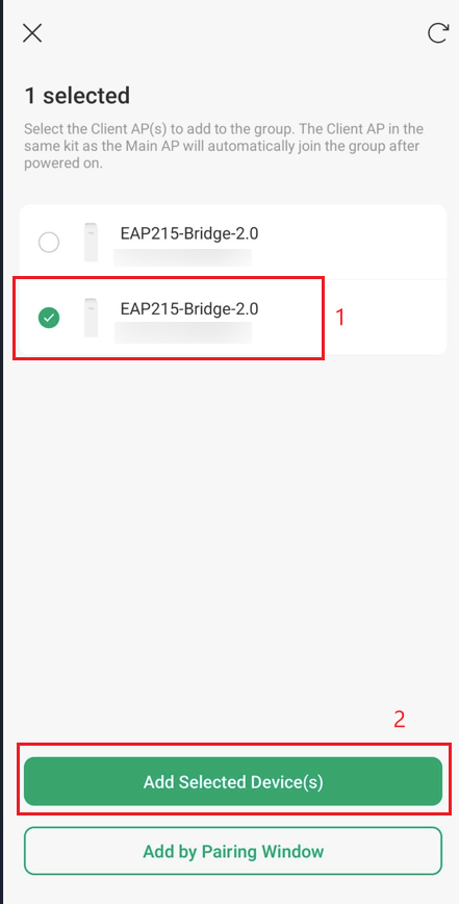
Step 5. Select the Client AP to connect to.
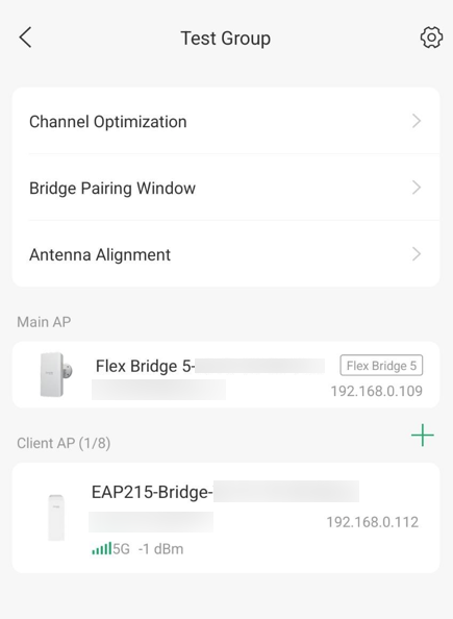
Step 6. The Client AP will now be wirelessly bridged to the Main AP.
Scenario 2: Pairing and Scanning for Main AP on Client AP
Network Topology
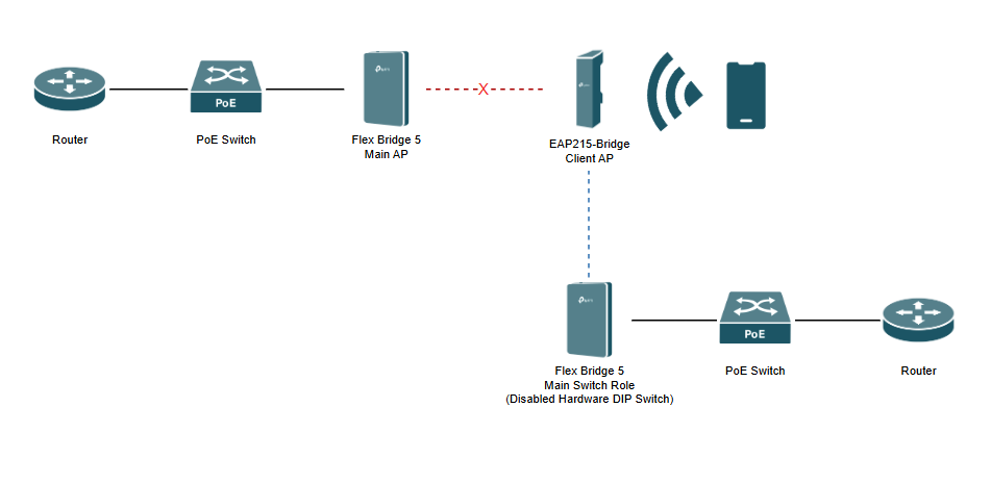
Note: An Android Phone with the Omada App in Standalone Mode is used for this section along with a router, PoE switch, Flex Bridge 5 as the Main AP, and EAP215-Bridge as the Client AP.
Note: If connecting to a Main AP like the Flex Bridge 5 that has a hardware pairing DIP switch, disable the DIP Switch in its settings or the Client AP may have trouble discovering it. You will then be able to pair via Main/Client Switch Role.
Step 1. Power on the Bridge APs and connect to the SSID listed on the device on the Client AP (ex. Omada_2.4GHz_XXXX).
Note: If the Client AP is currently connected to a Main AP, it will need to be factory reset so you can connect to its default Management SSID again.
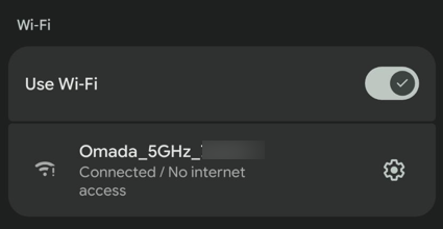
Step 2. Open the Omada App in Standalone Mode and go to Bridge and tap on the Client AP you are connected to.
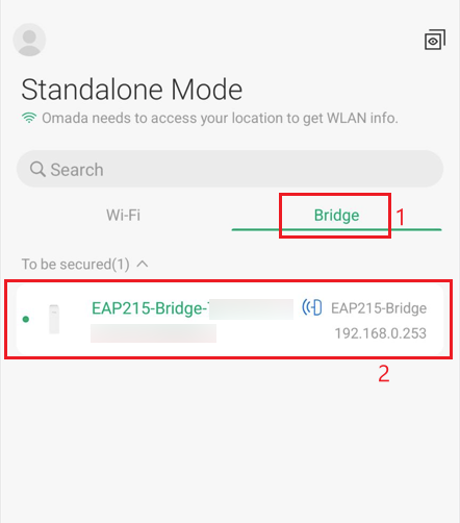
Step 3. You will be prompted to pair with a Main AP. Select and pair to the Main AP.
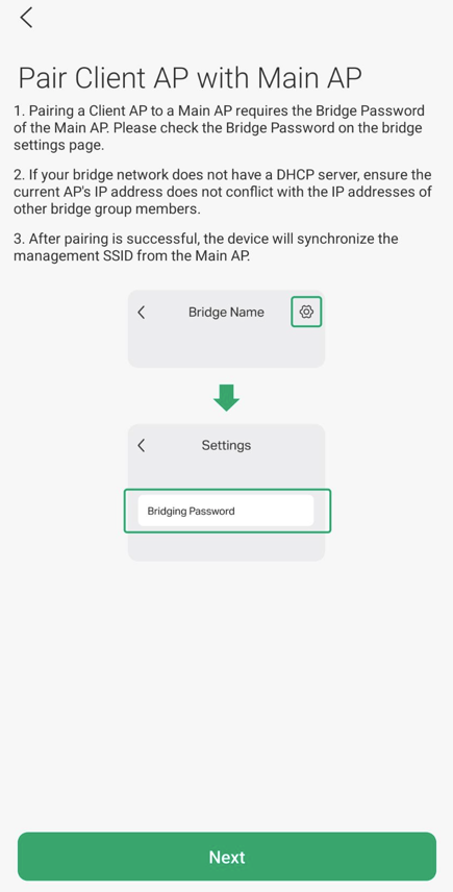
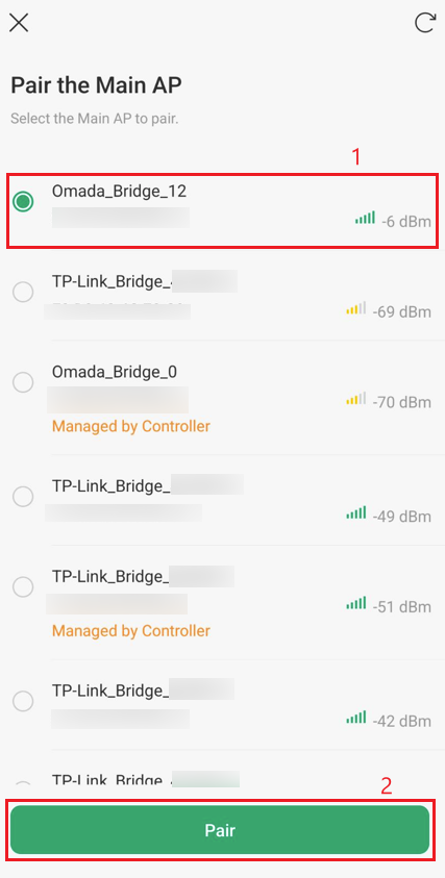
Step 4. Find the Bridge Password on the new Main AP which can be found in Bridge > Group Settings > Bridge SSID on the new Main AP.
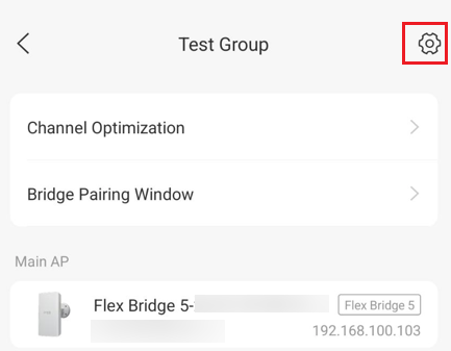
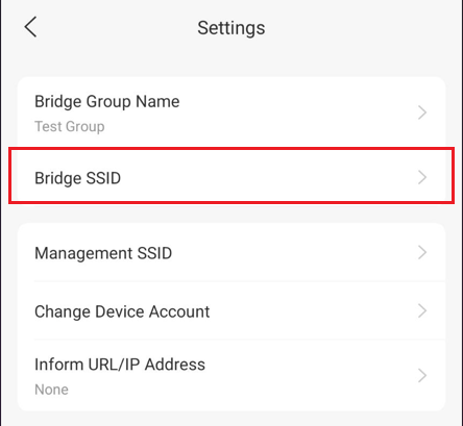
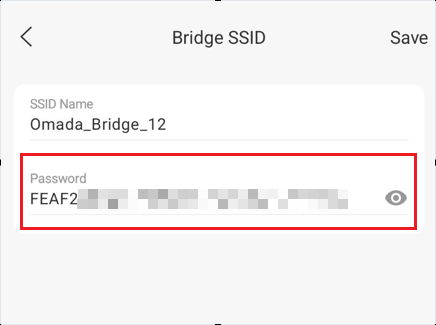
Note: The Main AP will need to be configured by completing the initial setup steps on that device prior to scanning and connecting to it from the Client AP.
Enter the Bridge Password on the Client AP.
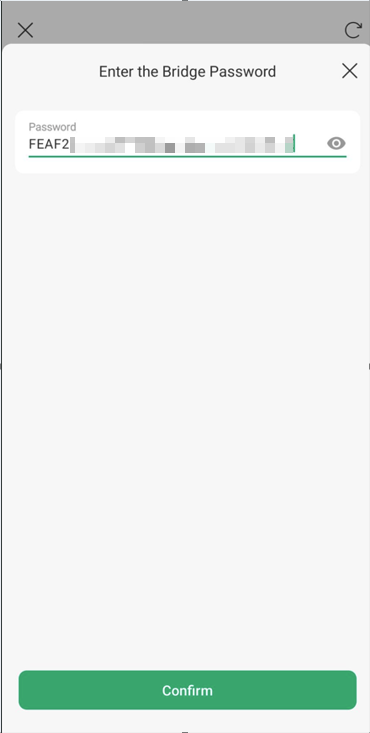
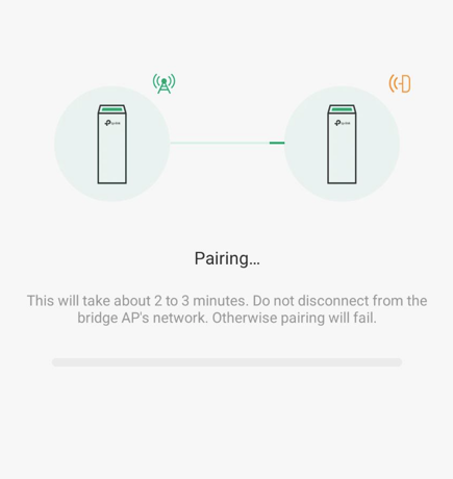
Step 5. Once it’s done pairing, you will disconnect from the Client AP. From here, connect to the Management SSID set up on the new Main AP and the Client AP will be connected.
Configuration for Controller Mode Using PC
Network Topology
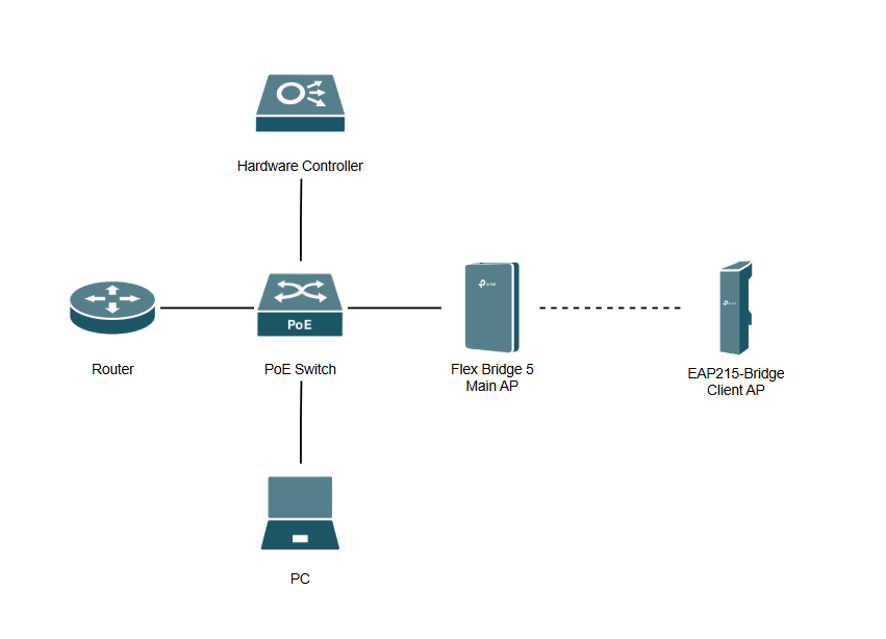
Note: A Windows 11 Laptop is used for this section along with a hardware controller, router, PoE switch, Flex Bridge 5 as the Main AP, and EAP215-Bridge as the Client AP.
Step 1. Power on the Bridge APs and log in to the Controller. Go to Site > Devices and adopt your Main AP.
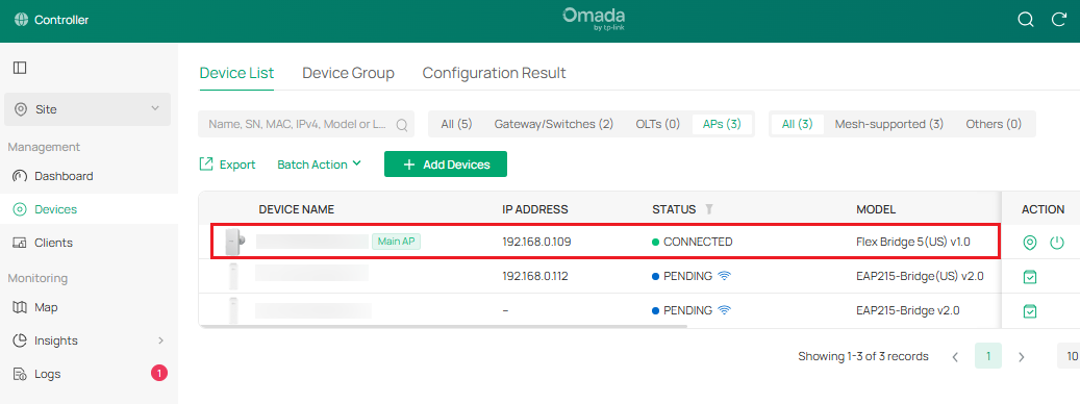
Step 2. The Client AP should be in a Pending state. Click the Adopt button and select the Main AP as the uplink.
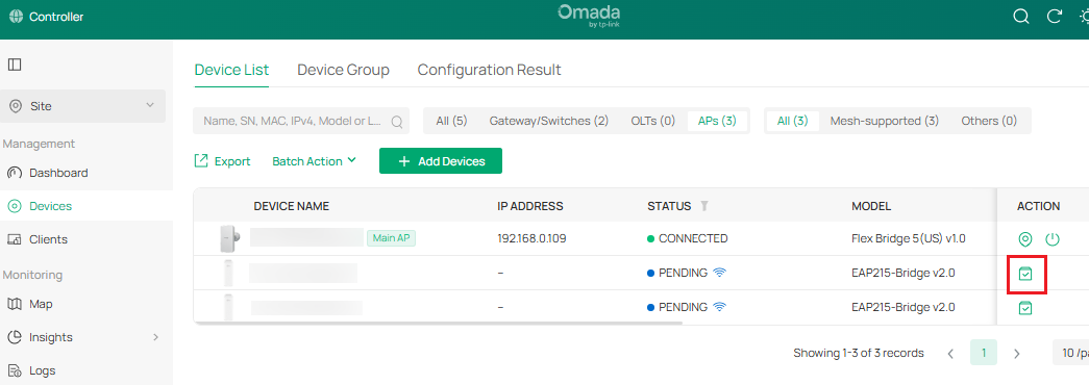
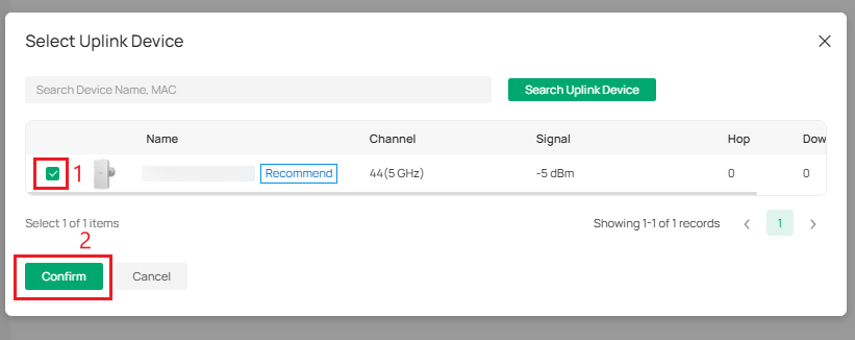
Note: Some Main and Client APs may auto pair without having to click “Adopt” due to its auto-pairing functionality and predefined roles.
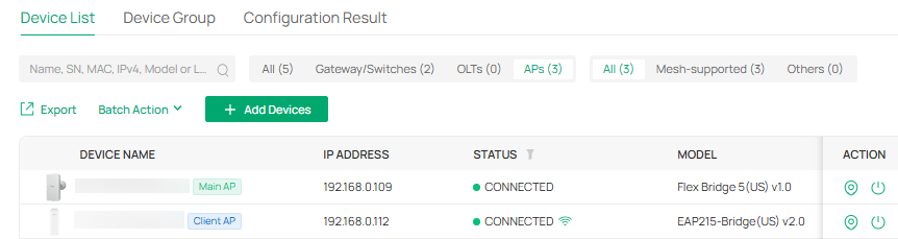
Step 3. The Client AP will now be connected to the Main AP.
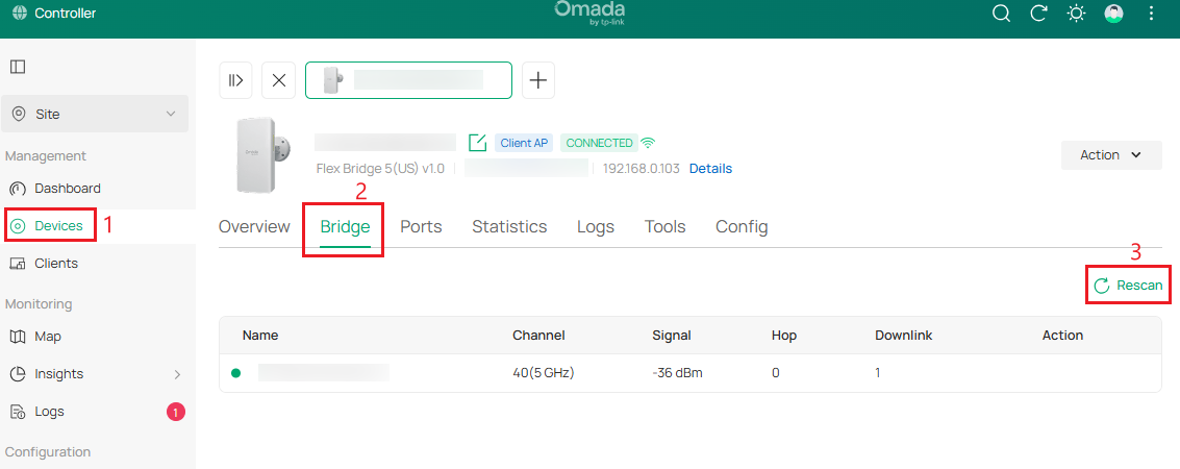
Note: If the Client AP needs to connect and scan for a different Main AP on the same subnet, go to the Client AP’s configuration interface and go to Bridge > Rescan and select the other Main AP you want to connect to.
Configuration for Controller Mode Using Omada App
Network Topology
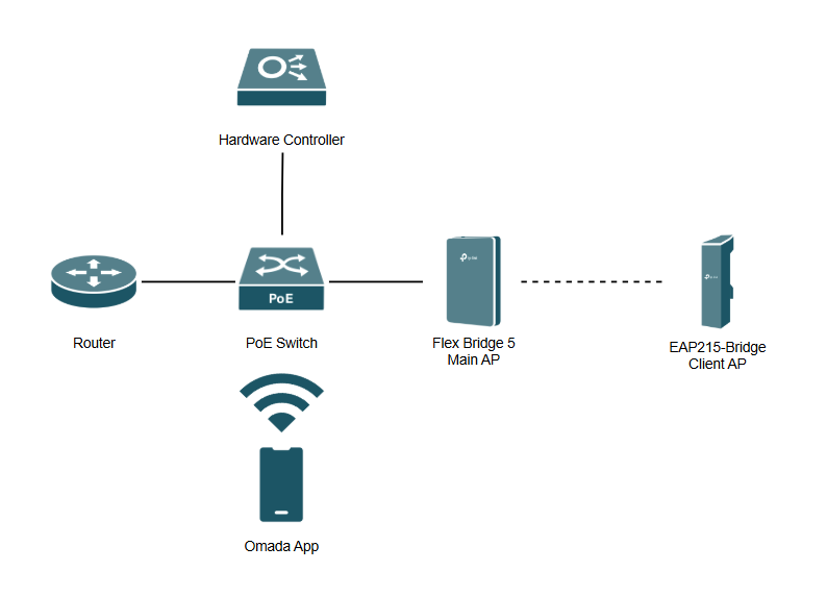
Note: An Android Phone with Omada App is used for this section along with a hardware controller, router, PoE switch, Flex Bridge 5 as the Main AP, and EAP215-Bridge as the Client AP.
Step 1. Connect the Bridge APs to the network and power them on.
Step 2. Connect the phone to an SSID in the LAN where the Main AP is located.
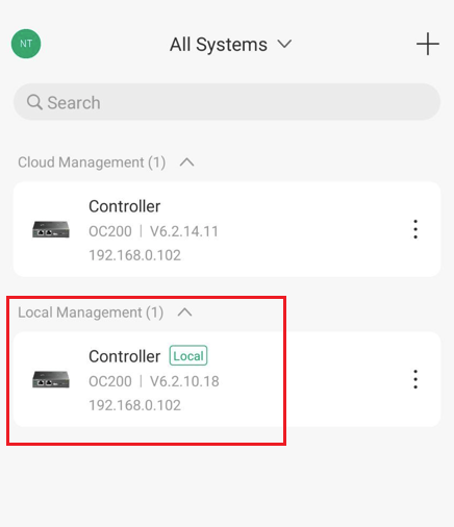
Step 3. Select Controller Mode and click on your controller under Local Management.
Step 4. Go to Site > Devices and adopt your Main AP.
Step 5. The Client AP should be in a Pending state. Click the Adopt button and select the Main AP as the uplink.
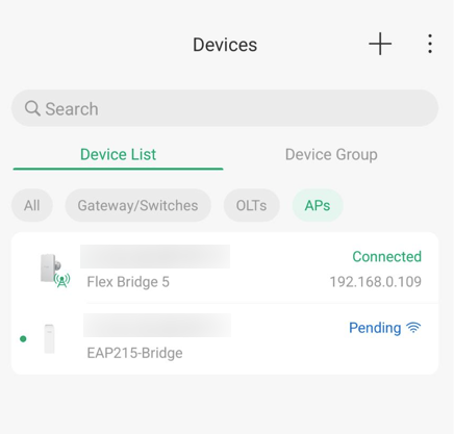
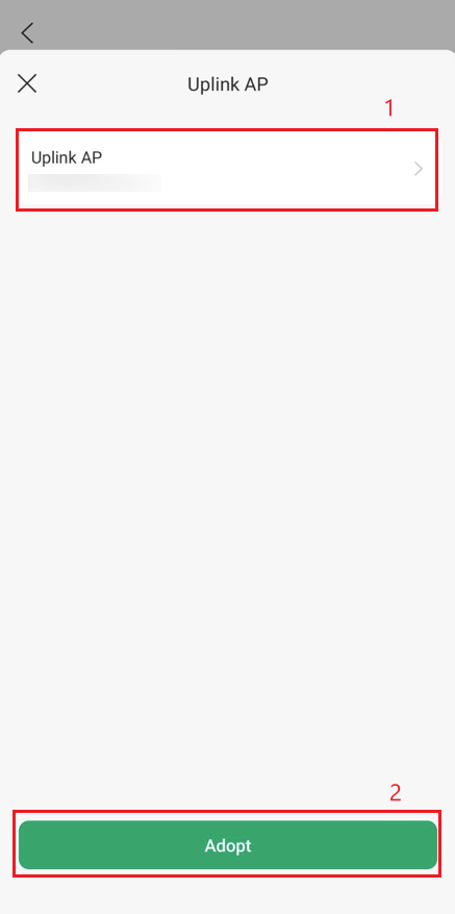
Note: Some Main and Client APs may auto pair without having to click “Adopt” due to its auto-pairing functionality and predefined roles.
Step 6. The Client AP will now be connected to the Main AP.
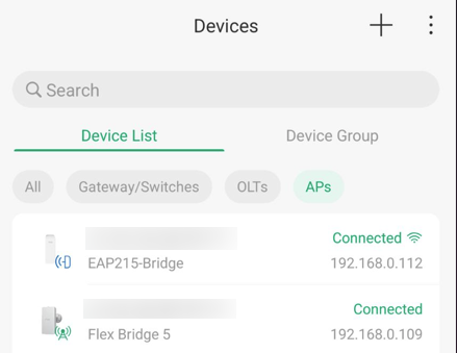
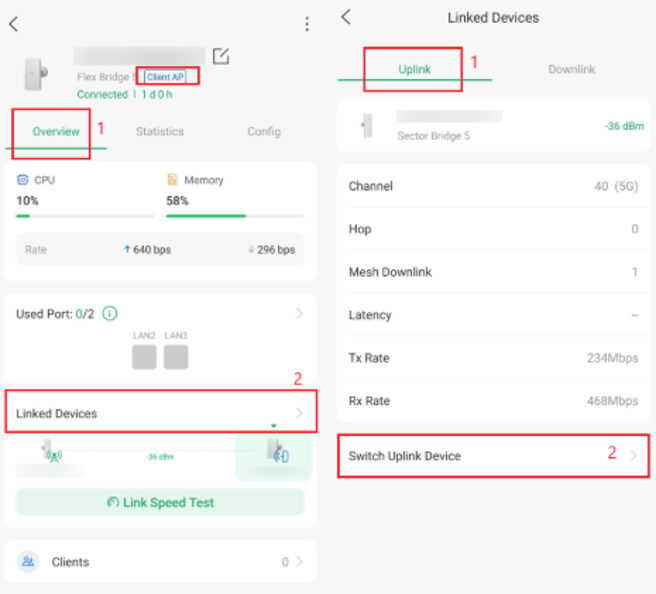
Note: If the Client AP needs to connect to a different Main AP on the same subnet, go to the Client AP’s configuration interface and go to Overview > Linked Devices > Uplink > Switch Uplink Device > Rescan and select the other Main AP you want to connect to.
Multiple Bridges Auto-Pairing
EAP-Bridge v3.0
EAP-Bridge v3.0 also supports the function of Multiple Bridge Auto-Pairing. For example, with EAP-Bridge v3, by pressing the button on both the Main AP and the Client AP, you can open a bridging window. The two devices will then automatically form a bridge network, whether they come from the same kit or not.
Press and hold the button for less than 1 second to open the pairing window. The window will automatically close after 2 minutes. During this period, all RSSI LEDs of both the Main AP and the Client AP will blink 1 second on, 1 second off, indicating that pairing is in progress.
Since the EAP-Bridge within the same kit automatically finds each other when powered on, the Multiple Bridge Auto-Pairing feature is typically used to connect EAPs from different kits. Below is how you can configure it.
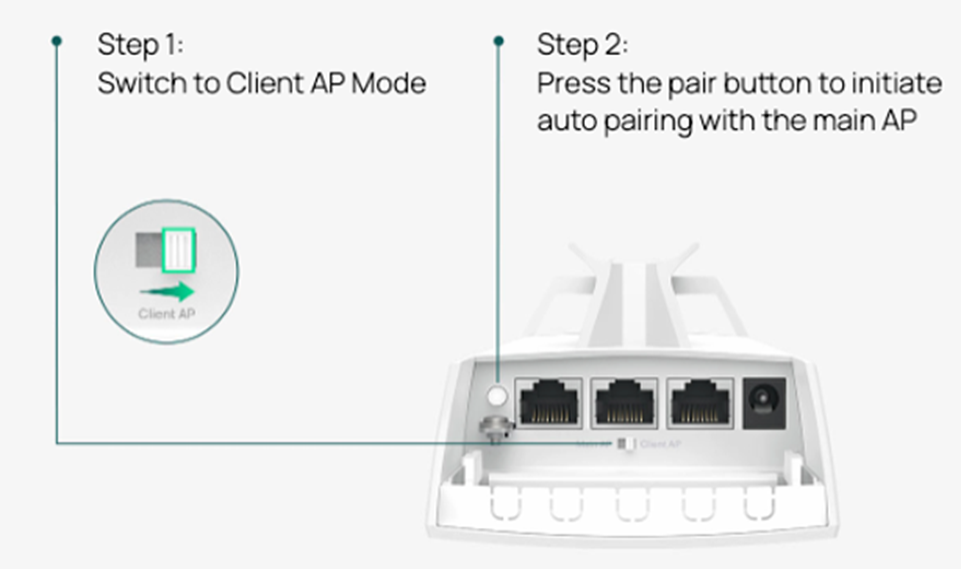
Flex Bridge 5
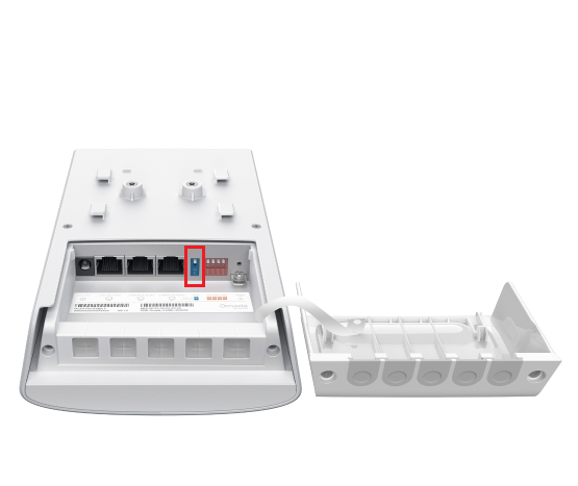
The Flex Bridge 5 streamlines setup with Pairing Code Switches for auto-pairing when connecting with Flex or Sector models; when connecting to other bridge kits, the Role Switch can still be used, followed by adding the device manually via the web interface.
Conclusion
In this guide, we covered how to pair and configure EAP bridges in both Standalone Mode and via the Omada Controller using a PC or the Omada App. While certain models support auto-pairing via hardware DIP switches or factory presets, manual setup may be required in mixed deployments of different Bridge EAP models or if auto-pairing fails. In these cases, setting the hardware Role Switches and pairing manually via the Web UI or Omada App ensures a stable, secure bridge connection.
To learn more about each function and configuration, please visit Support Home to download or check the manual for your product.
QA
Q1: How do two devices self-organize the network?
A1: For devices of the same kit, one AP is wired to the gateway or switch, obtains a dynamic IP address and becomes the Main AP, while the other becomes the Sub AP after powered on. The PtP network will then be automatically set up.
Q2: How can I know the antennas in the PtP network have been aligned properly?
A2: It is recommended to use the Antenna Alignment tool which can be found in Standalone Mode.
Q3: How many Sub APs can a Main AP connect to? How many hops does it support at most?
A3: For Bridge kit models, the supported capacity is 1:4. Sector Bridge 5 supports 1:32, while Flex Bridge 5 supports 1:8.
Q4: Is EAP-Bridge compatible with Omada Mesh?
A4: Only the Bridge APs working on the same frequency band can build a bridge network with each other. The Bridge AP models cannot build a Mesh network with non-Bridge ones.
Q5: Can different hardware models of EAP Bridge be used together?
A5: For EAP215-Bridge, EAP211-Bridge and EAP115-Bridge, their V1 can only work with another V1, not V2 or V3. However, their V2 and V3 can be used together.
