


Contents
Configure MAC Filtering in the site view (effective on the gateway)
Configure MAC Filter in the SSID (effective on the AP or wireless gateway)
Introduction
MAC Filtering is a network access control feature that restricts network access by allowing or blocking specific MAC addresses and manages network access behaviors. Currently, MAC Filtering in site settings takes effect on the gateway, while MAC Filter in SSID settings takes effect on the AP or wireless gateway.
This article mainly explains how to use the APP to operate the controller and create MAC Filtering. Depending on your controller type, the following requirements apply:
- If you are using a Cloud-based Controller, the APP only needs to be able to connect to the internet.
- If you are using a Local Controller (software controller or hardware controller) and cloud access is enabled, the APP must meet one of the following conditions: either connect to the internet or connect to a local Wi-Fi network that can communicate with the controller.
- If you are using a Local Controller and cloud access is not enabled, the APP needs to be able to connect to a local Wi-Fi network and communicate with the controller.
Requirements
- Software Controller / Hardware Controller / Cloud-based Controller
- Omada APP (using V5.0 as an example)
- Omada Gateway (using ER706W as an example)
- Omada EAP (using EAP613 as an example)
Configuration
The following two sections provide detailed steps for configuring MAC Filtering in the site view and MAC Filter in the SSID using the APP.
First, adopt the devices into the controller. For specific steps on adoption using different controllers, refer to the FAQs below:
- How to discover and adopt Omada devices on Omada Central using the Site URL
- How to discover Omada devices via Software Controller and Hardware Controller
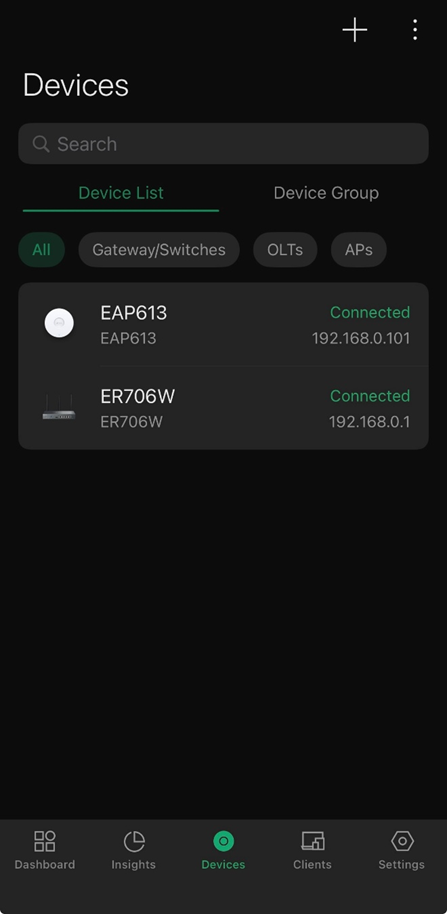
After adoption, you can view the devices in the Devices tab of the APP.
Configure MAC Filtering in the site view (effective on the gateway)
Step 1. Enable the MAC Filtering feature
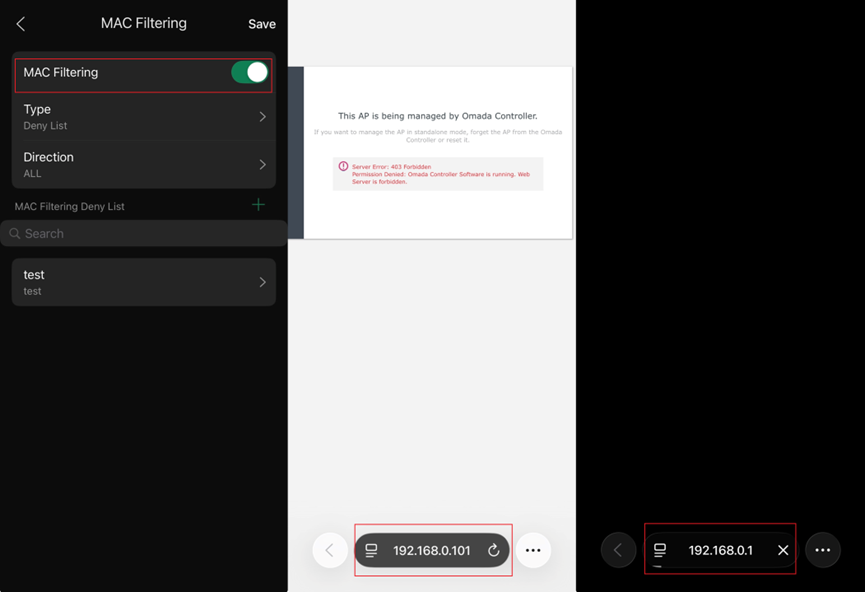
In the Settings tab under the site view, click on Network Security, locate MAC Filtering, and enable it.
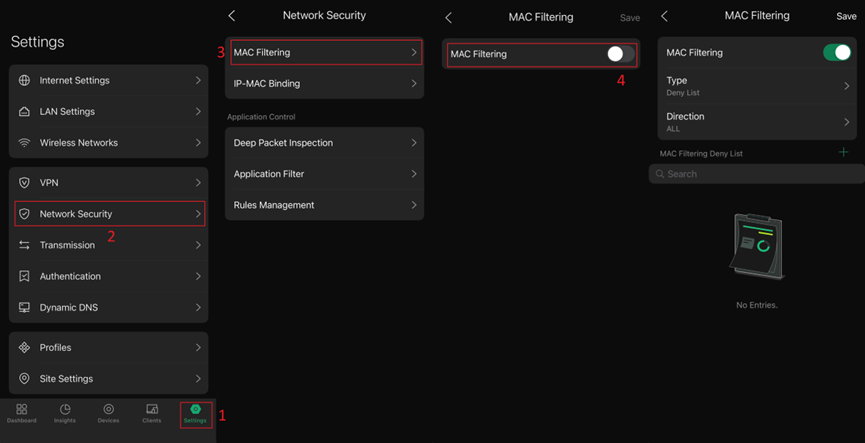
The default Type is set to Deny List, which means it will deny packets with the MAC addresses listed below and allow all others. Please note that in Deny List mode, do not add the controller's MAC address to the list. You can also change it to Allow List, which will allow packets with the MAC addresses listed below and deny all others. When Allow List is selected, Omada devices will be automatically added to the allow list after adoption, until the list reaches 8192 entries.
Select the direction to All if you want the policy to apply to both LAN-to-LAN and LAN-to-WAN traffic. Select LAN -> WAN if you want the policy to apply only to traffic from LAN to WAN.
There are two methods to configure the MAC addresses to be added: one is using MAC Group, and the other is using MAC Address. These will be explained in Step 2 and Step 3, respectively.
Step 2. Add using MAC Group
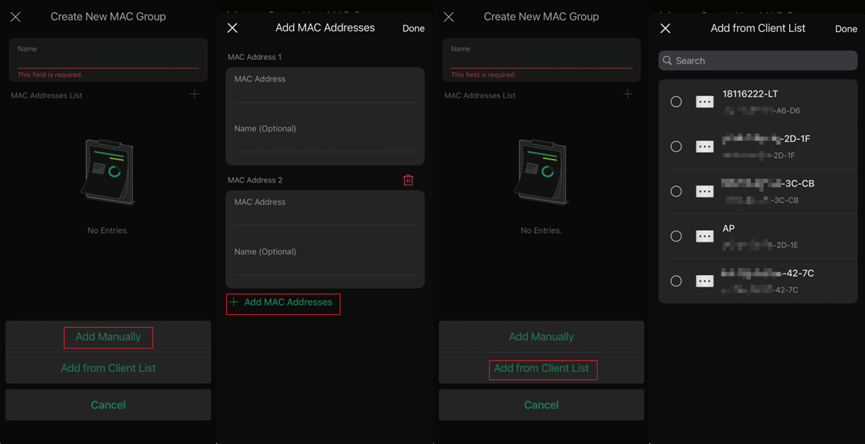
In the Settings tab under the site view, navigate to MAC Group in the Profiles section, enter a name, and click the + button on the right.
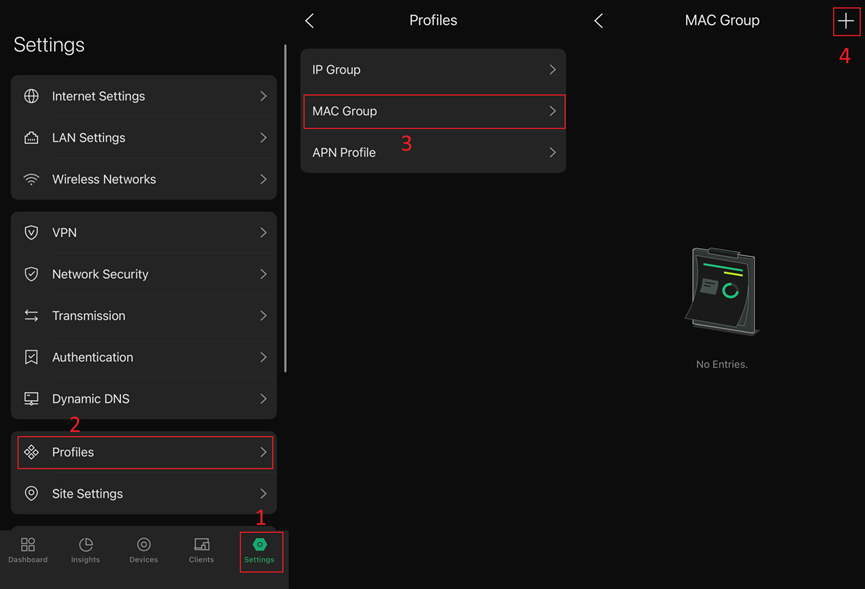
Then, you can either manually enter MAC addresses or select Add from Client List to add a MAC Group.
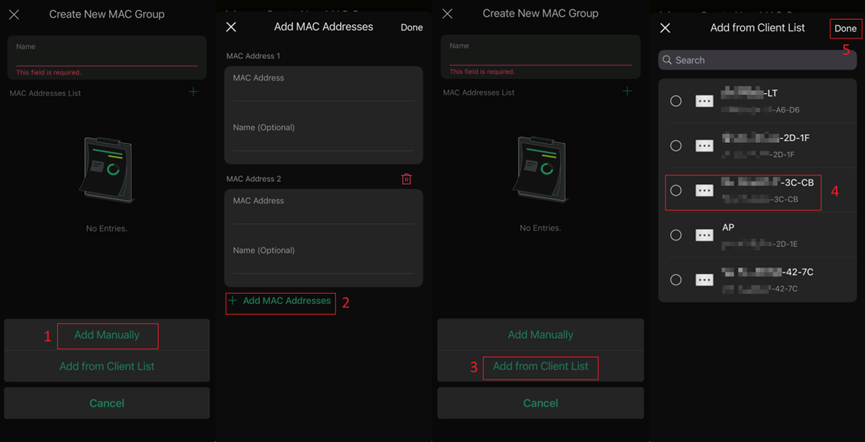
Note: When entering manually, APP will automatically insert hyphens in the correct positions of the MAC address and convert any lowercase letters to uppercase.
When importing from the client list, simply select the devices you wish to add to this MAC Group.
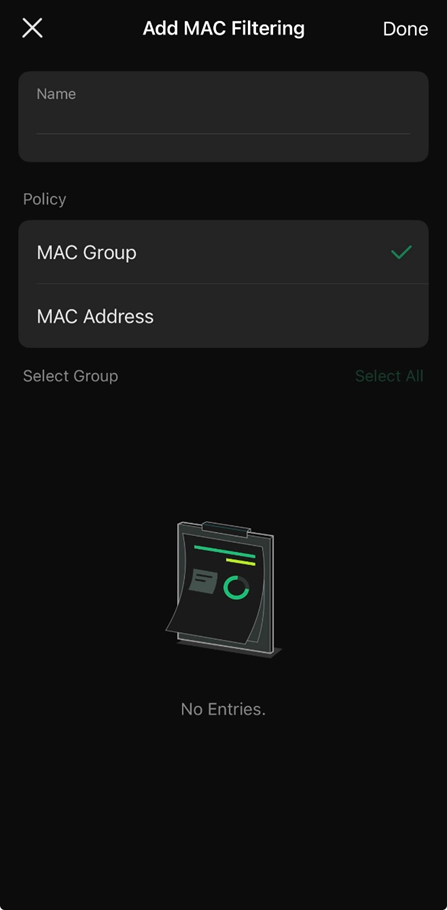
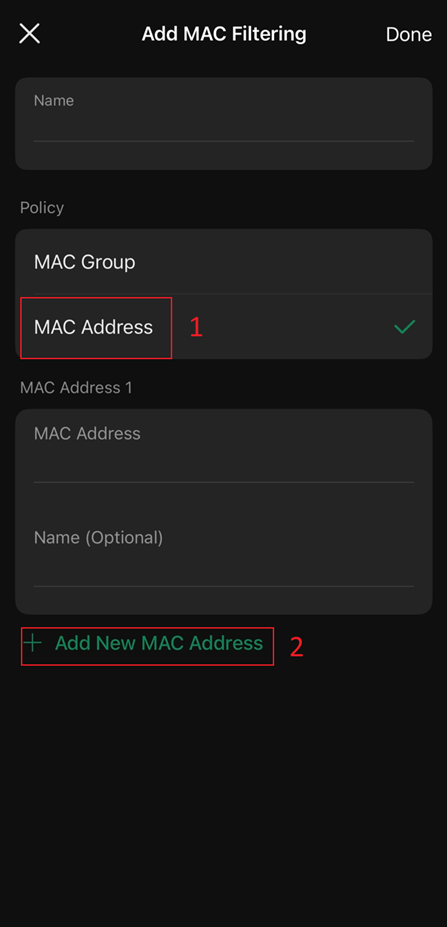
Step 3. Enter MAC Address directly
Return to the MAC filtering configuration page in Step 1, where you can bind MAC addresses to this rule by entering them directly.
Configure MAC Filter in the SSID (effective on the AP or wireless gateway)
Step 1. Configure MAC Filter in the SSID
You can also configure MAC Filter in the SSID settings to control communication between devices with specific MAC addresses and this wireless network.
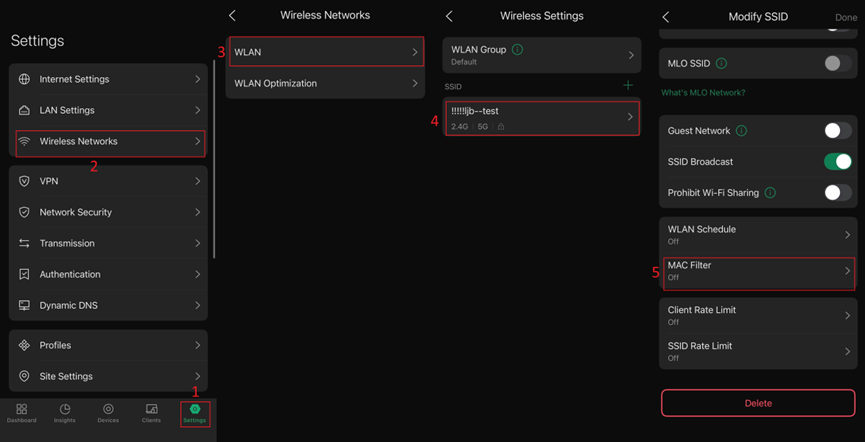
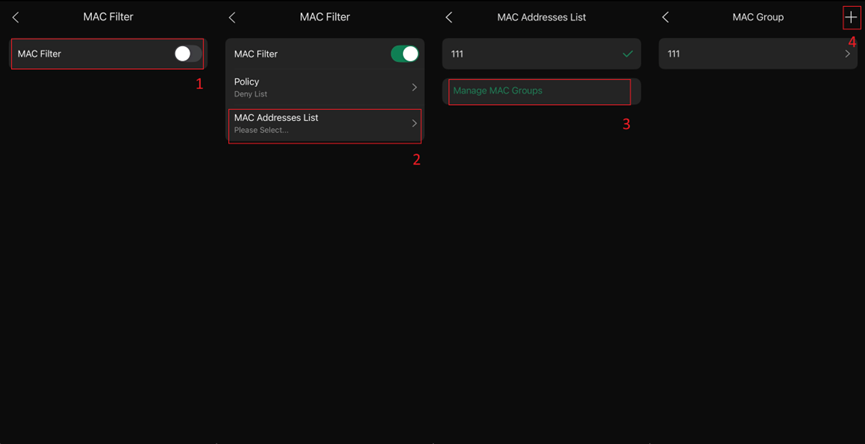
Step 2. Configure the MAC Filter option in a new or existing SSID:
You can directly select an existing entry from the MAC Group, or click Manage MAC Groups to navigate to the MAC Group settings page, where you can modify existing entries or create a new one.
There are two ways to create a new MAC Group: Add Manually and Add from Client List, as shown in the following figure:
Verification
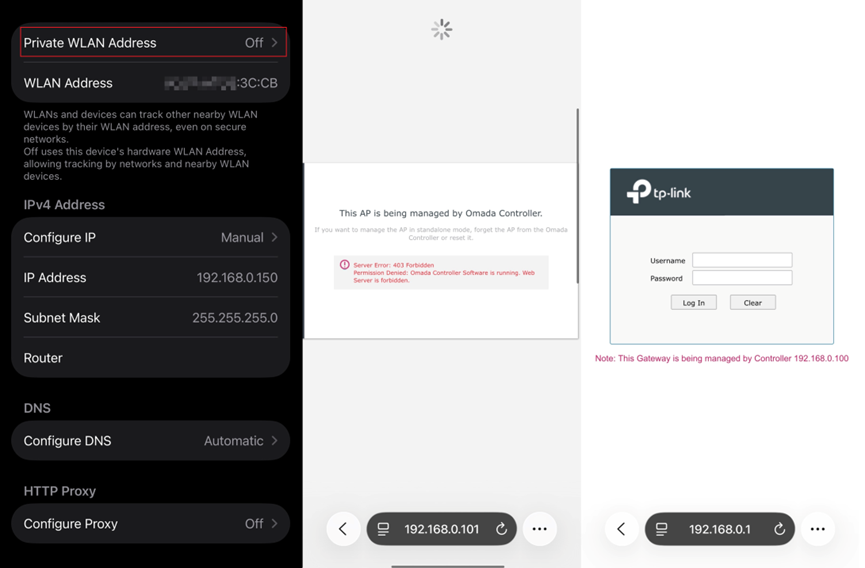
Create a MAC Group and add a phone's MAC address to it (ensure MAC randomization is disabled). Use Deny-type MAC Filtering for verification. For simplicity, configure the phone with a static IP and subnet mask on the test SSID, ensuring it is in the same subnet as the gateway and AP's IP addresses. During testing, disable mobile data. Then the phone should be able to normally access the management interfaces of the AP and gateway.
Step 1. Only enable MAC Filtering in Network Security without enabling MAC Filter in the SSID
It is observed that in this scenario, the AP's webUI remains accessible, but the gateway's webUI fails to load.
Step 2. Enable MAC Filter in the SSID
Regardless of whether the gateway's MAC Filtering is enabled, as long as MAC Filter is activated in the SSID, the phone will be unable to connect to this SSID and consequently cannot access the webUI of either the gateway or the AP.
Conclusion
This article explains how to use the APP to configure MAC Filtering in the site view and the MAC Filter function in the SSID, and demonstrates the differences between the two through practical testing in the Verification section.
Get to know more details of each function and configuration please go to Download Center to download the manual of your product.
QA
Q1: Why does the device go offline from the controller after configuring MAC Filtering?
A1: Note that if using the Deny type, the MAC address of the controller cannot be placed in the deny list; if using the Allow type, ensure that the MAC address of the controller is included in the allow list.
Q2: Why is the MAC Filtering feature not effective for certain wireless clients?
A2: Some wireless clients will use random MAC addresses instead of their real MAC addresses when connecting to a wireless network, so called private MAC or virtual MAC. This feature may cause the MAC filter settings invalid, so please be careful with the configuration. Here is the article about the private MAC Address on iOS devices , please take it as a reference: Use private Wi-Fi addresses on Apple devices - Apple Support.
This article applies to: MAC Filtering in Network Security applies to all gateways, while MAC Filter in SSID applies to all wireless gateways and most APs (except for a few APs such as FLEX BRIDGE or specially customized firmware).
