


Contents
Introduction
Port Security allows you to set a limit on the number of MAC addresses that can be learned on a switch port, preventing MAC table exhaustion caused by malicious flooding attacks and ensuring stable network performance. When the number of learned MAC addresses exceeds the configured threshold, the switch can block unauthorized addresses, restrict abnormal traffic, or send alerts to administrators for timely response, preventing‑table exhaustion caused by malicious flooding attacks and ensuring stable network performance.
This feature is commonly used in enterprise access networks to control endpoint connections, in high security environments to mitigate MAC flooding risks, and in shared or public access areas—such as meeting rooms, hotels, or multitenant networks—to prevent unauthorized device access and maintain reliable service.‑security environments to mitigate MAC flooding risks, and in shared or public access areas—such as meeting rooms, hotels, or multi‑tenant networks—to prevent unauthorized device access and maintain reliable service.
Requirements
- Omada Access, Access Plus, Access Pro, Access Max, Aggregation, Campus Switch
- Omada Controller (Software Controller / Hardware Controller / Cloud Based Controller, V6.0 and above)
Configuration
In Standalone Mode
Step 1. Log in to the Switch Device Web Page and navigate to Security > Port Security.
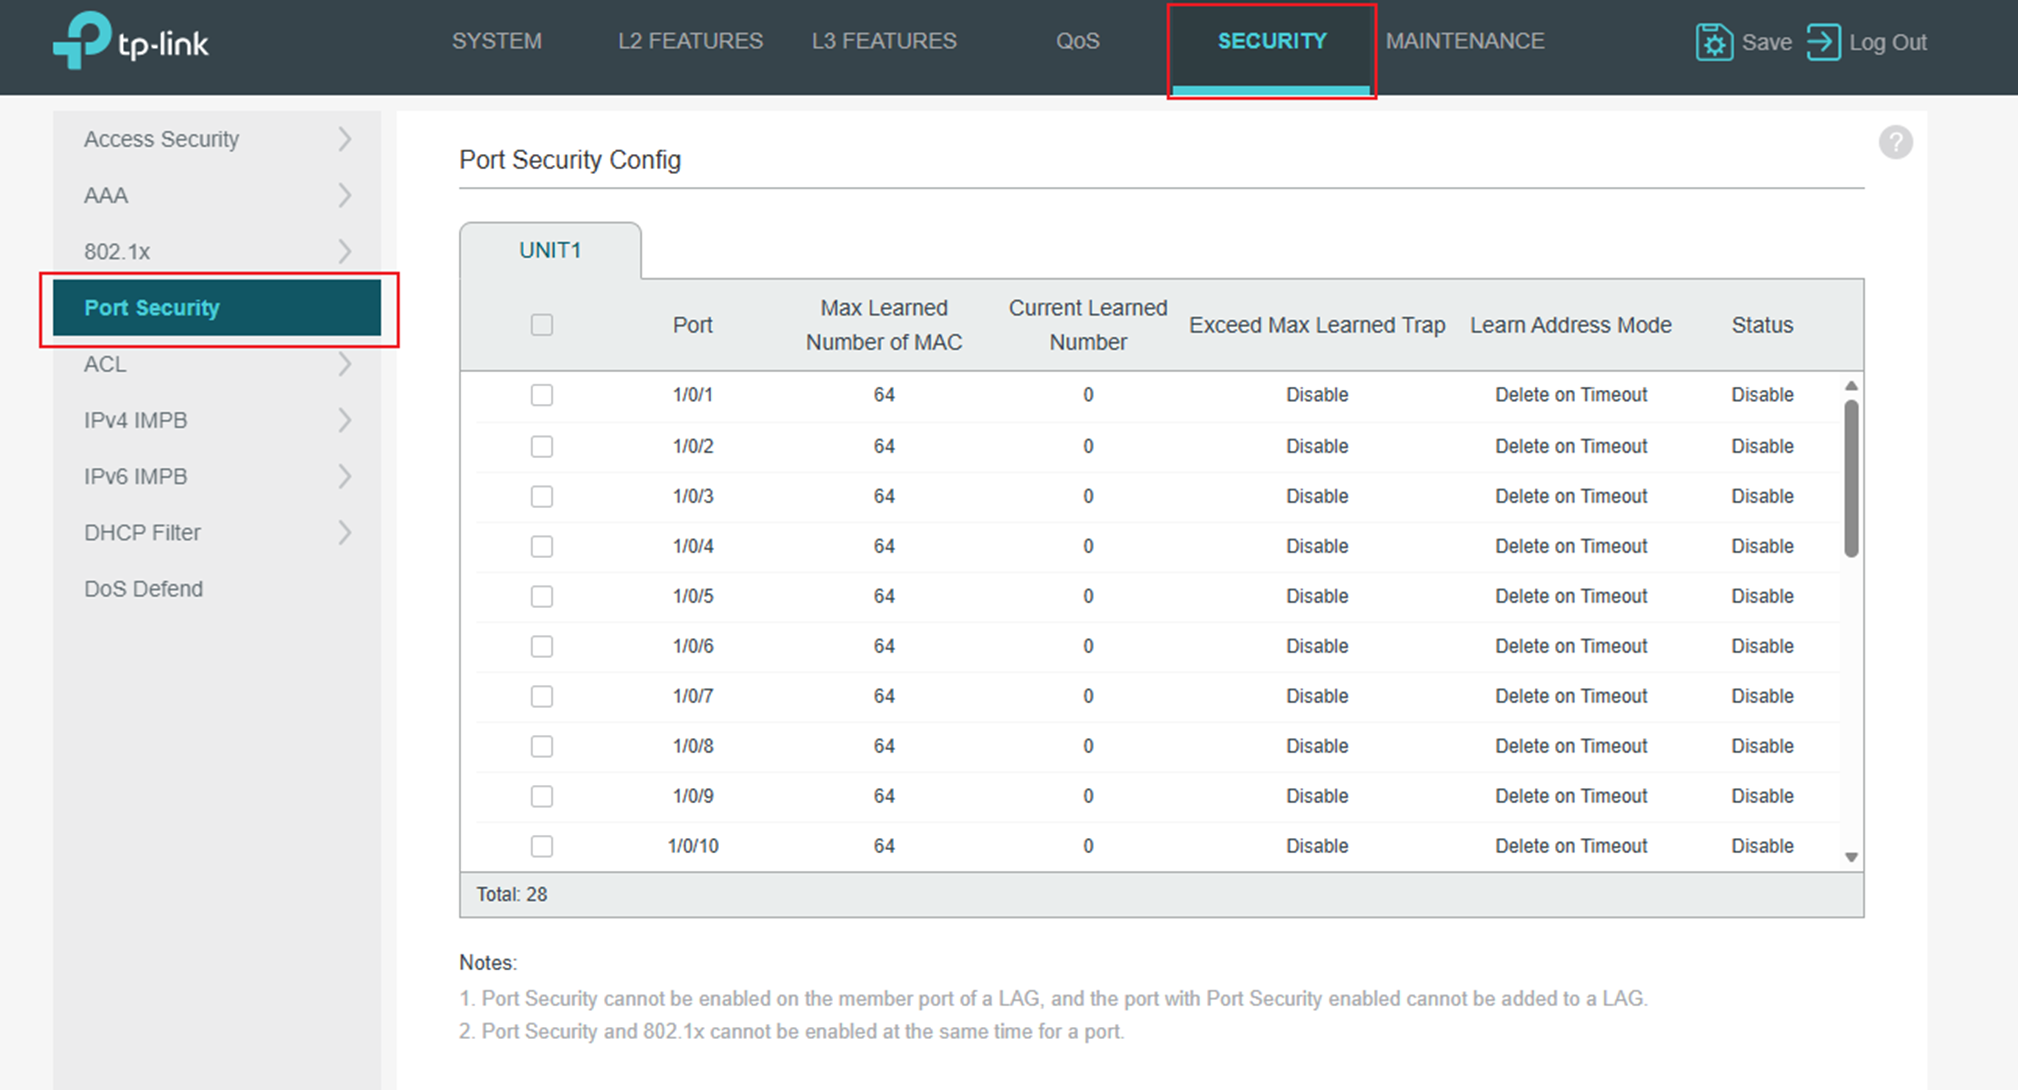
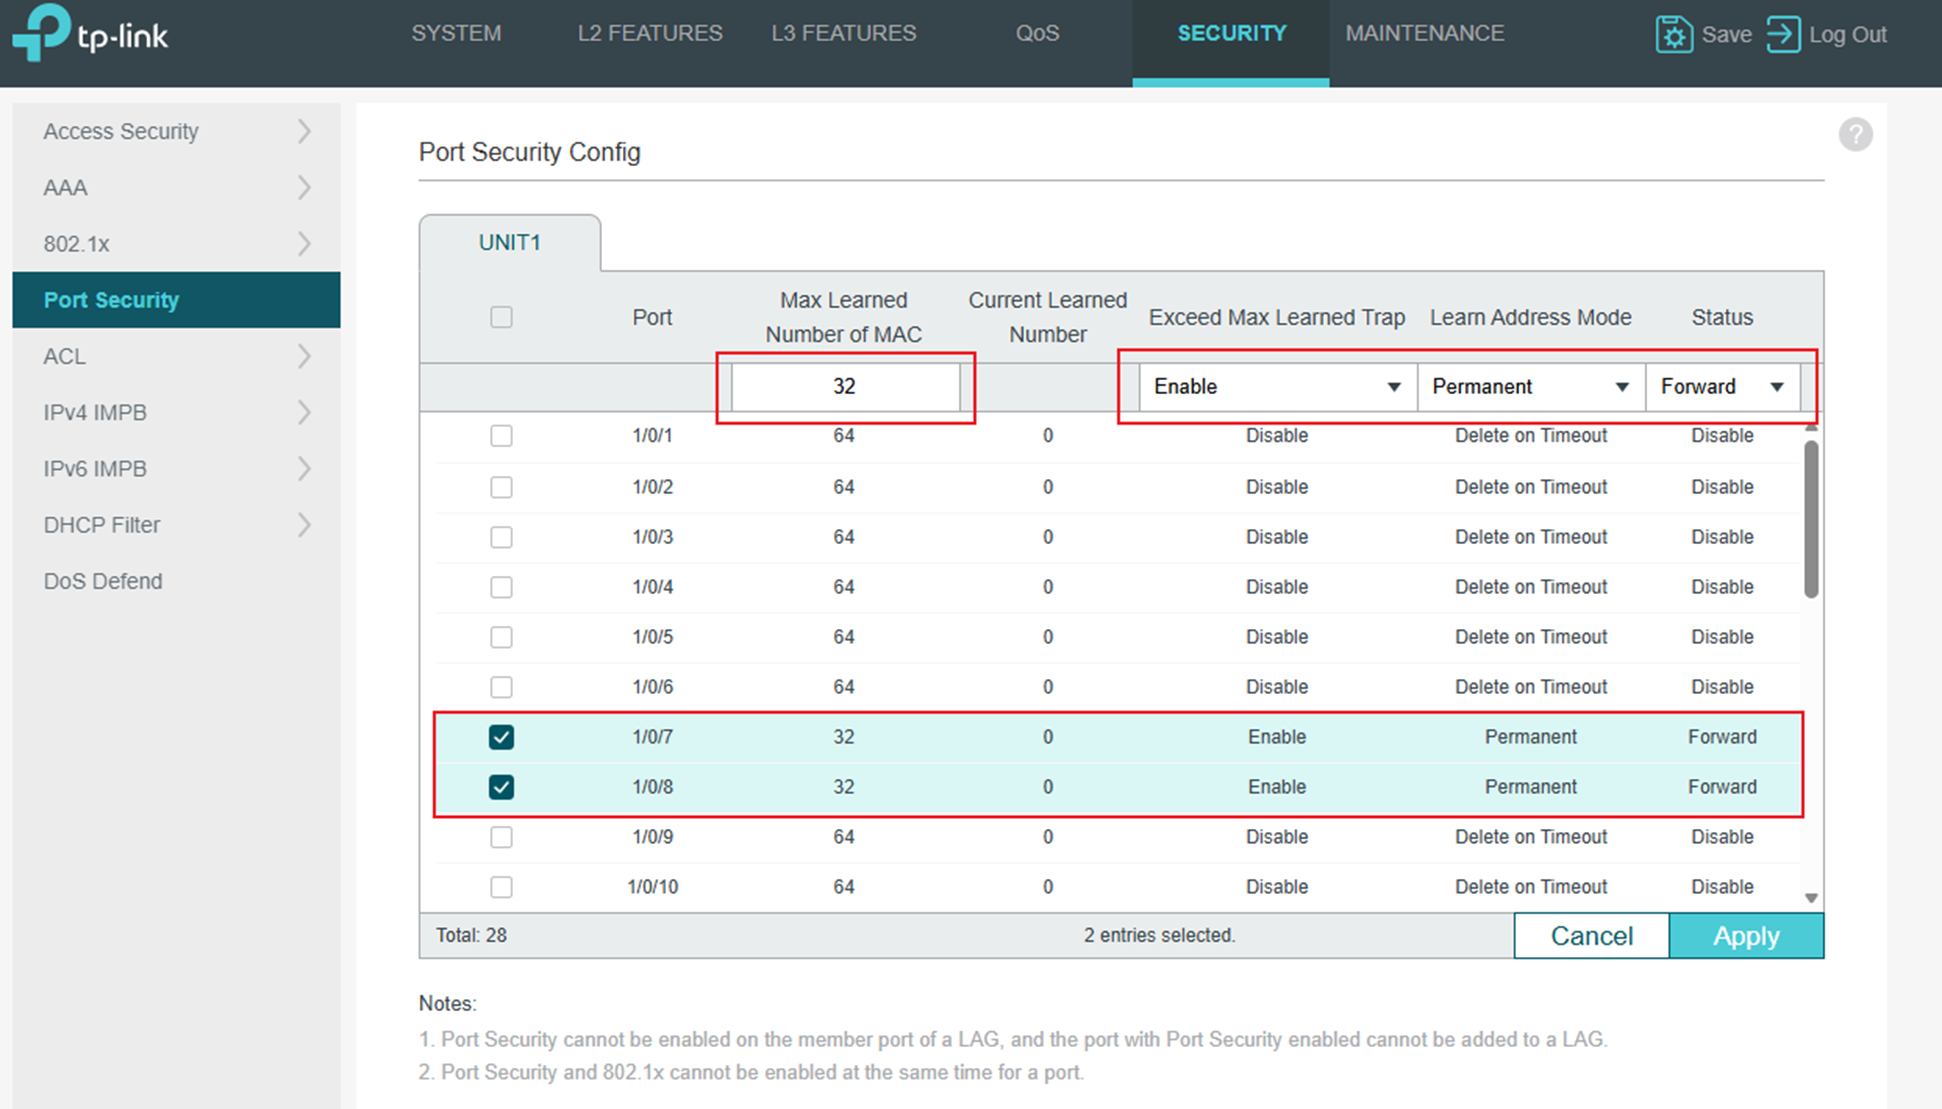
Step 2. Select one or more ports and configure the following parameters. Click Apply.
The explanation of parameters is as follows:
|
Port |
Displays the port number. |
|
Max Learned Number of MAC |
Specify the maximum number of MAC addresses that can be learned on the port. When the learned MAC address number reaches the limit, the port will stop learning. It ranges from 0 to 64. The default value is 64. |
|
Current Learned MAC |
Displays the current number of MAC addresses that have been learned on the port. |
|
Exceed Max Learned Trap |
Enable Exceed Max Learned, and when the maximum number of learned MAC addresses on the specified port is exceeded, a notification will be generated and sent to the management host. |
|
Learn Address Mode |
Select the learn mode of the MAC addresses on the port. Three modes are provided: Delete on Timeout: The switch will delete the MAC addresses that are not used or updated within the aging time. It is the default setting. Delete on Reboot: The learned MAC addresses are out of the influence of the aging time and can only be deleted manually. The learned entries will be cleared after the switch is rebooted. Permanent: The learned MAC addresses are out of the influence of the aging time and can only be deleted manually. The learned entries will be saved even if the switch is rebooted. |
|
Status |
Select the status of Port Security. Three kinds of status can be selected: Drop: When the number of learned MAC addresses reaches the limit, the port will stop learning and discard the packets with the MAC addresses that have not been learned. Forward: When the number of learned MAC addresses reaches the limit, the port will stop learning but send the packets with the MAC addresses that have not been learned. Disable: The number limit on the port is not effective, and the switch follows the original forwarding rules. It is the default setting. |
Note: Port Security cannot be enabled on the member ports of a LAG, and the port with Port Security enabled cannot be added to a LAG.
On one port, Port Security and 802.1x cannot be enabled at the same time.
Using CLI in Omada Controller
Step 1. Log in to the Controller web page and switch to the Site view. Navigate to Devices > Config > Device CLI.
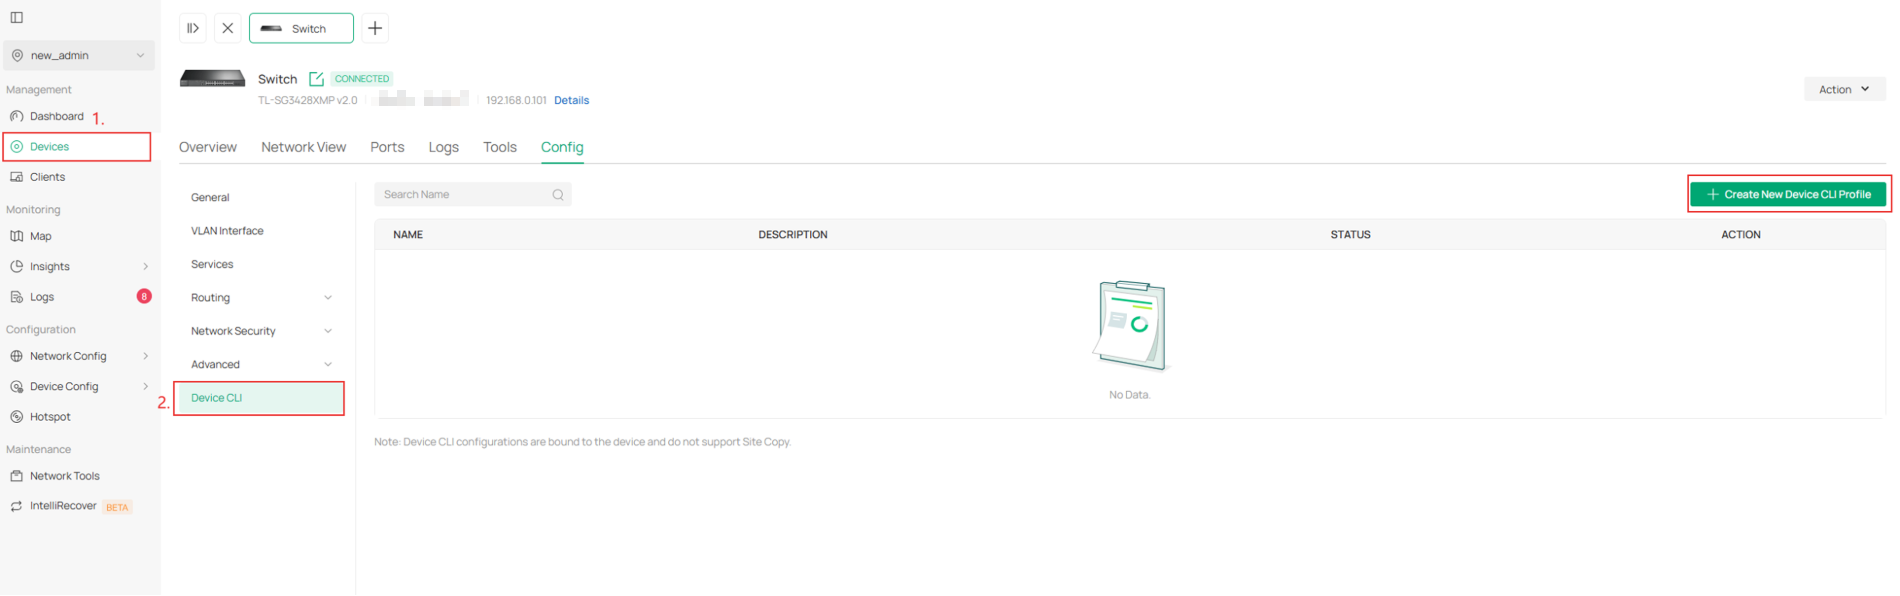
Step 2. Enter the commands.
Enter interface configuration mode:
interface { fastEthernet port | range fastEthernet port-list | gigabitEthernet port | range gigabitEthernet port-list | ten-gigabitEthernet port | range ten-gigabitEthernet port-list }
Enable the port security feature of the port and configure the related parameters:
mac address-table max-mac-count { [max-number num] [exceed-max-learned enable | disable] [mode { dynamic | static | permanent } ] [ status { forward | drop | disable } ]}
The explanation of parameters is as follows:
|
max-number |
Default Setting: 64 |
|
|
The maximum number of MAC addresses that can be learned on the port. |
num |
The valid values are from 0 to 64. The default value is 64. |
|
exceed-max-learned |
Default Setting: Disable |
|
|
With exceed-max-learned enabled, when the maximum number of MAC addresses on the specified port is exceeded, a notification will be generated and sent to the management host. |
enable |
Enable exceed-max-learned. |
|
disable |
Disable exceed-max-learned. |
|
|
mode |
Default Setting: Delete on Timeout |
|
|
Learn mode of the MAC address. There are three modes |
dynamic |
The switch will delete the MAC addresses that are not used or updated within the aging time. |
|
static |
The learned MAC addresses are out of the influence of the aging time and can only be deleted manually. The learned entries will be cleared after the switch is rebooted. |
|
|
permanent |
The learned MAC address is out of the influence of the aging time and can only be deleted manually. The learned entries will be saved even the switch is rebooted. |
|
|
sticky |
The Learned MAC addresses are out of influence of aging time and can only be deleted manually. The learned entries will be automatically saved periodically, and can also be manually saved by performing a configuration save. When the switch is rebooted, the unsaved MAC addresses will be cleared and the saved MAC addresses will be reloaded. |
|
|
status |
Default Setting: Disable |
|
|
Status of port security feature. By default, it is disabled.
|
forward |
When the number of learned MAC addresses reaches the limit, the port will stop learning but send the packets with the MAC addresses that have not been learned. |
|
drop |
When the number of learned MAC addresses reaches the limit, the port will stop learning and discard the packets with the MAC addresses that have not been learned. |
|
|
disable |
The number limit on the port is not effective, and the switch follows the original forwarding rules. It is the default setting. |
|
Enter the command in the CLI window, then click Save.

Step 3. Apply the commands.

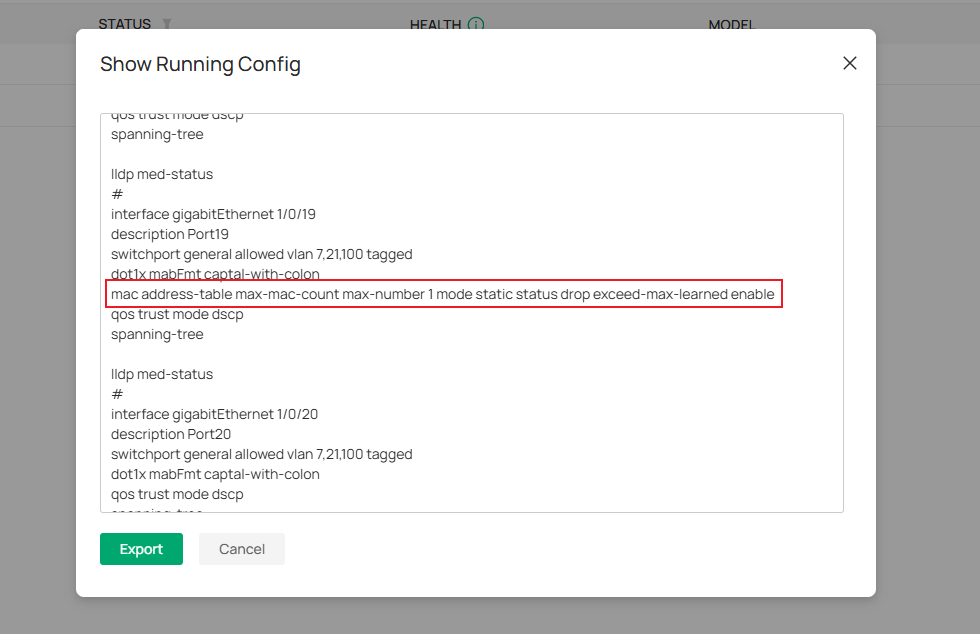
Verification
If the command takes effect:
Step 1. Navigate to Devices, then show the running config of the switch configured with the command.

Step 2. Find the configuration port, and you can see that the command of Port Security is included.
If the configuration fails:
Step 1. A pop-up notification appears in the upper-right corner of the controller.
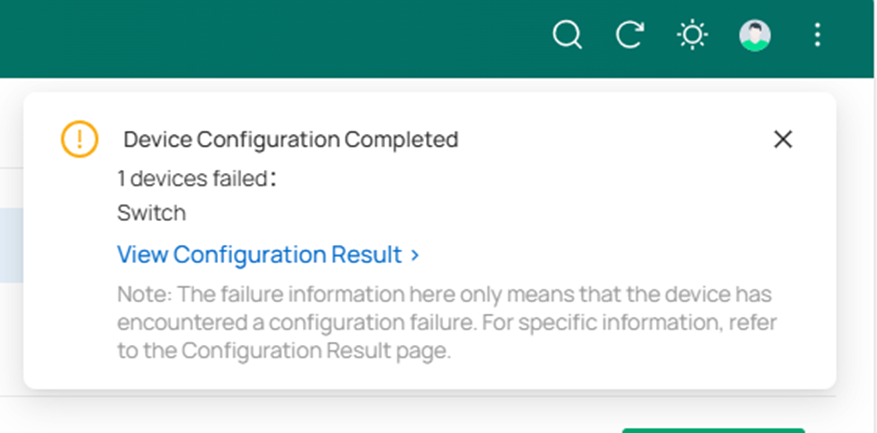
Step 2. Navigate to Devices>Configuration Result to check the details and failure cases.

Conclusion
This article introduces how to configure the Port Security feature in standalone mode and Omada controller.
Get to know more details of each function and configuration please go to Download Center to download the manual of your product.

