


Contents
Lightlink VPN Configuration (Administrator)
Remote Client Configuration (Remote User)
Introduction
Lightlink VPN is designed for zero-configuration remote access, allowing users to securely access your network from anywhere. Lightlink VPN uses an invite-based setup. The administrator generates an invite (link or email), and the invited user opens it in the Navi App and taps “Connect” to start the VPN.
This article will introduce how to use this function.
Requirements
- Omada Fusion Gateway
- Omada APP
- Wi-Fi Navi APP
Configuration
Lightlink VPN Configuration (Administrator)
- Configure via Fusion Controller page
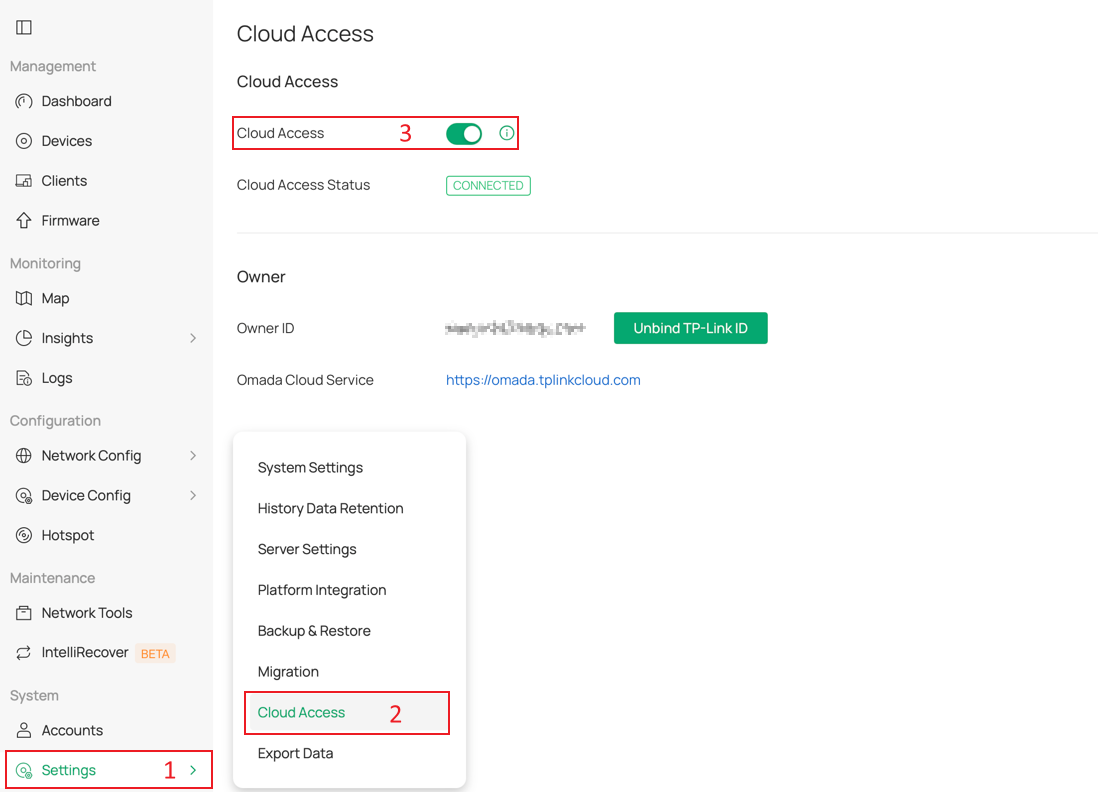
Step 1. (Optional) Access Fusion’s Controller page, navigate to Settings > Cloud Access and enable Cloud Access. The email invitation feature in Lightlink VPN may require Cloud Access to function.
Step 2. Navigate to the Lightlink VPN page.
Lightlink VPN is located at Network Config > Lightlink VPN. Navigate to the page and enable the feature.
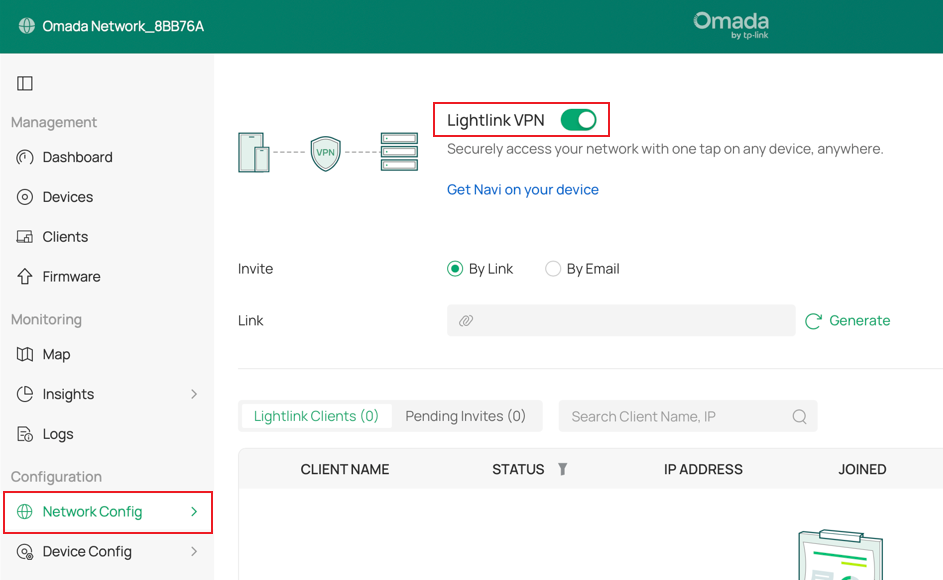
Step 3. Generate a link and invite users to join.
Currently, you can generate a link (valid for 24 hours) and share it with the Navi app to allow devices with the Navi app installed to access your network resources via VPN.
There are two ways to invite devices to join: by generating a link and by sending an email. They are actually very similar. When you invite a device using an email address, that email address will receive an email containing a link.
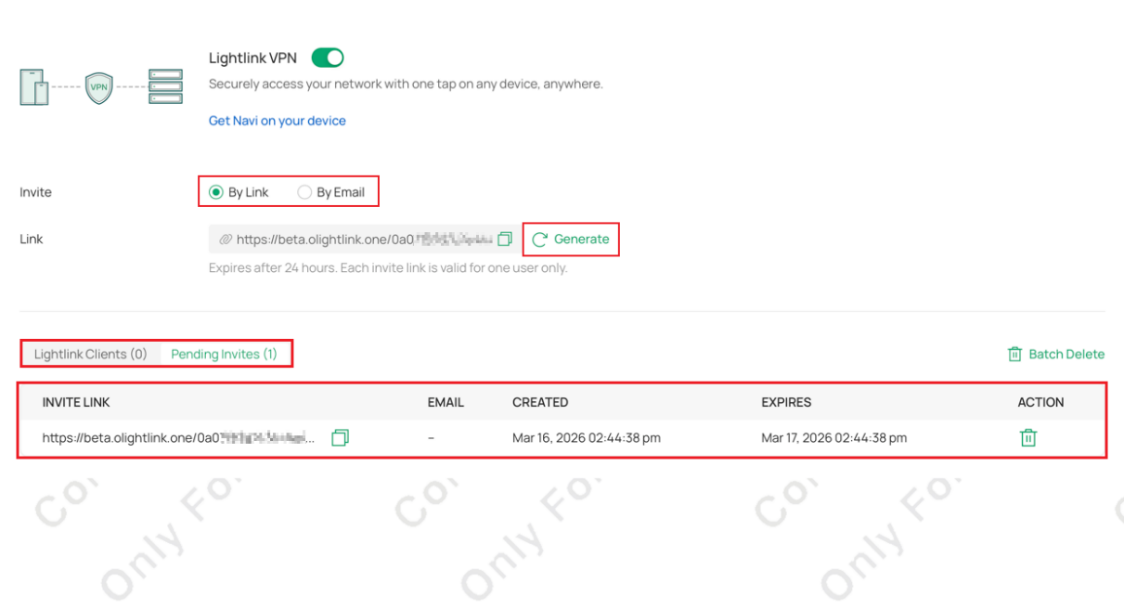
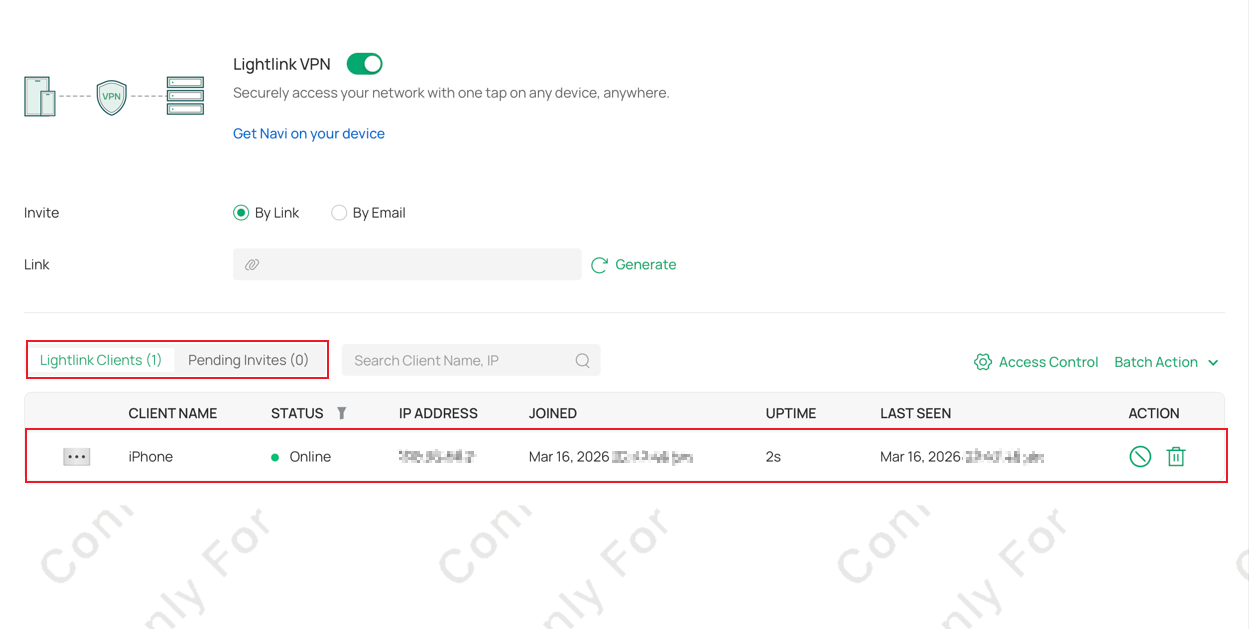
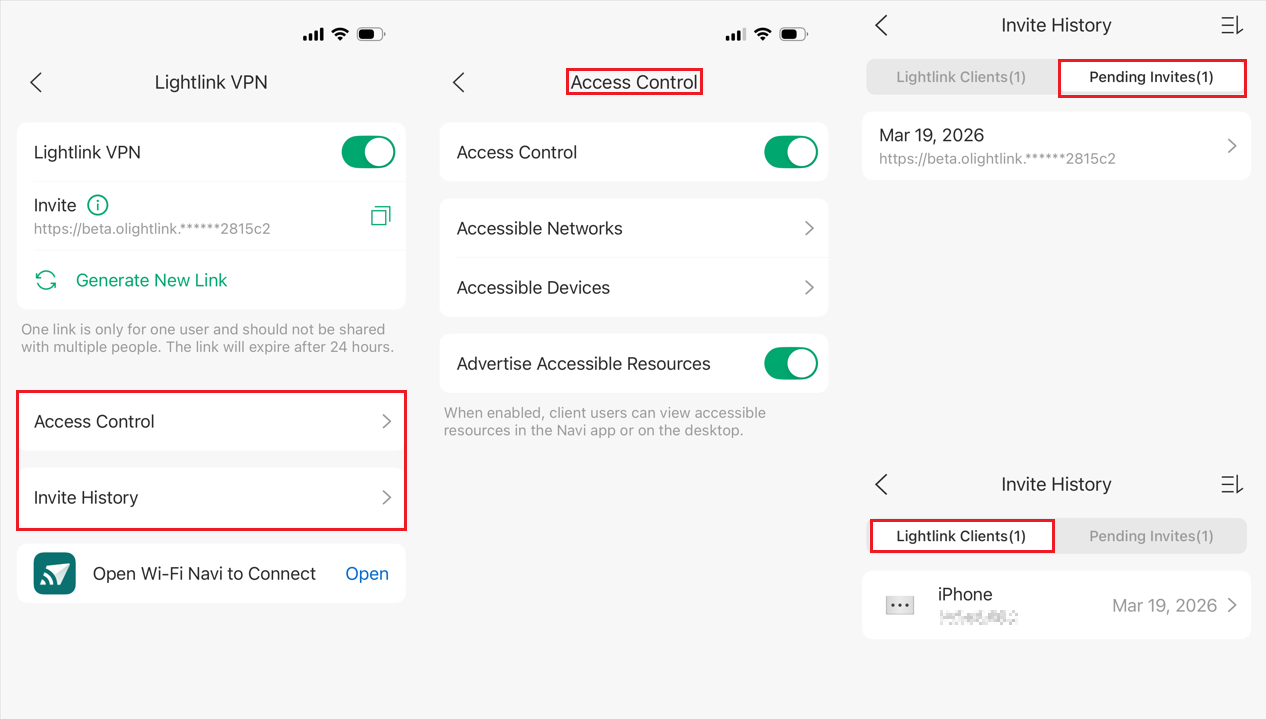
Below is a list where each generated link appears in the Pending Invites section and remains there until a device successfully establishes a VPN tunnel using that link. You can also manually invalidate unused links here.
Once the client establishes a VPN tunnel through this link, the Pending Invites entry will disappear, and a Lightlink Clients entry will appear, roughly as shown in the image. You'll notice "Action" buttons on the right side of the entry. They can temporarily disable or delete a device for your management purposes.
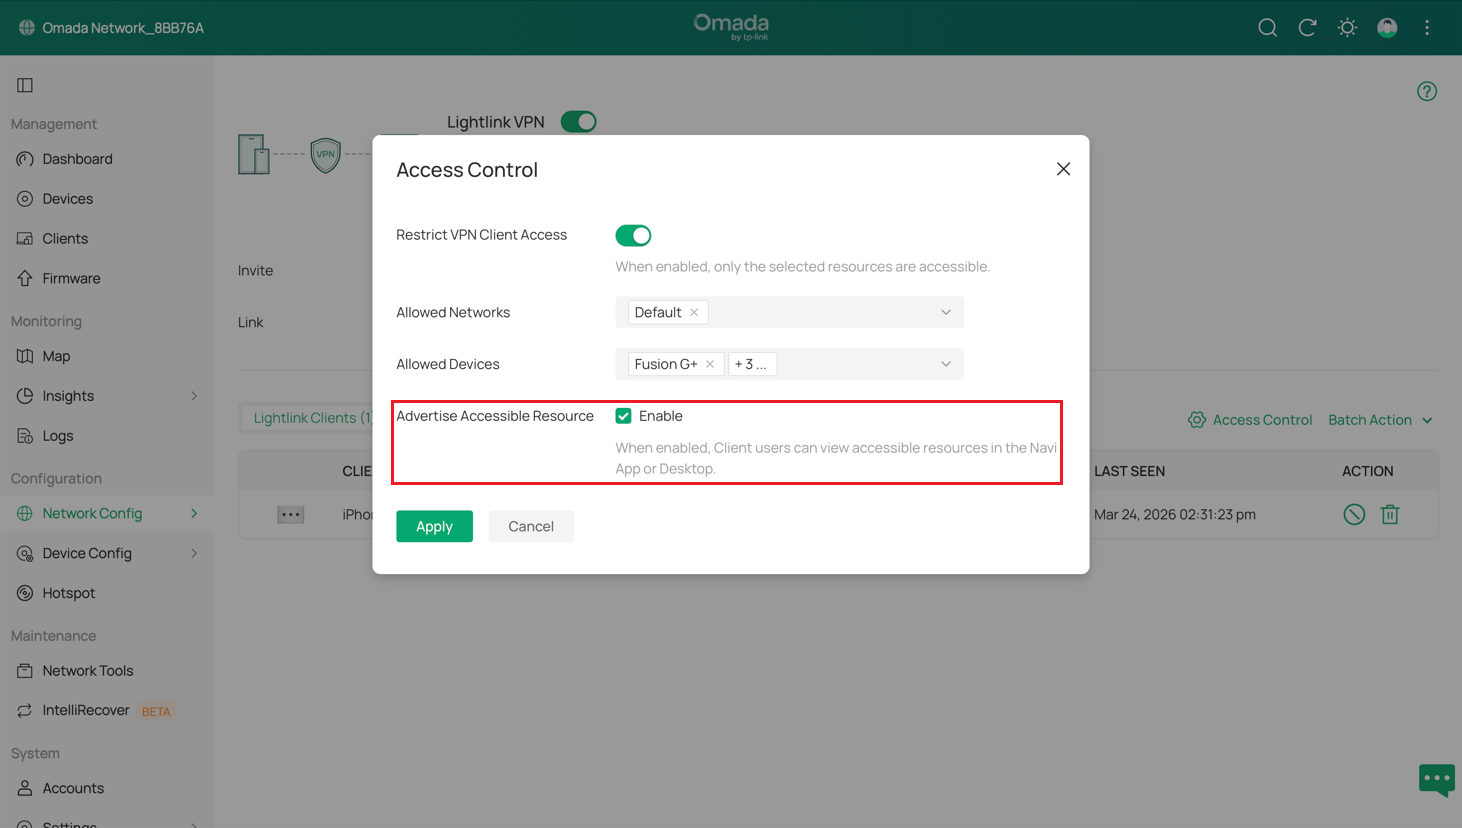
Step 4. (Optional) Access Control
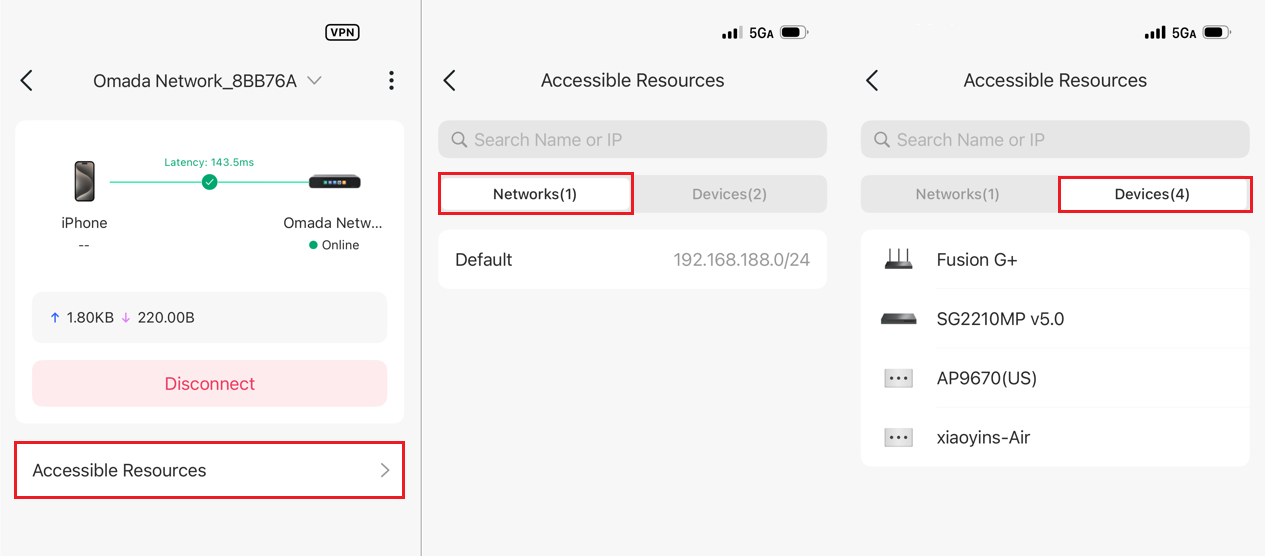
By default, with Access Control disabled, the VPN Client can access all resources in the local area. You can also control access through the Access Control feature. This allows you to restrict VPN clients from accessing certain local area networks/devices/clients to ensure security.If you enable Advertise Accessible Resource, the VPN Client will clearly show the resources that are accessible. After modifying the configuration here, clients that have already established a VPN tunnel may need to disconnect the tunnel and reconnect for the changes to take effect.
- Configure via Omada APP
Step 1. Open the Omada app and go to the Fusion management page. If you are unsure how to manage your Fusion using the Omada app, you can refer to the article Getting started with an Omada Fusion Gateway | Omada Network Support. The page should look something like the image below.
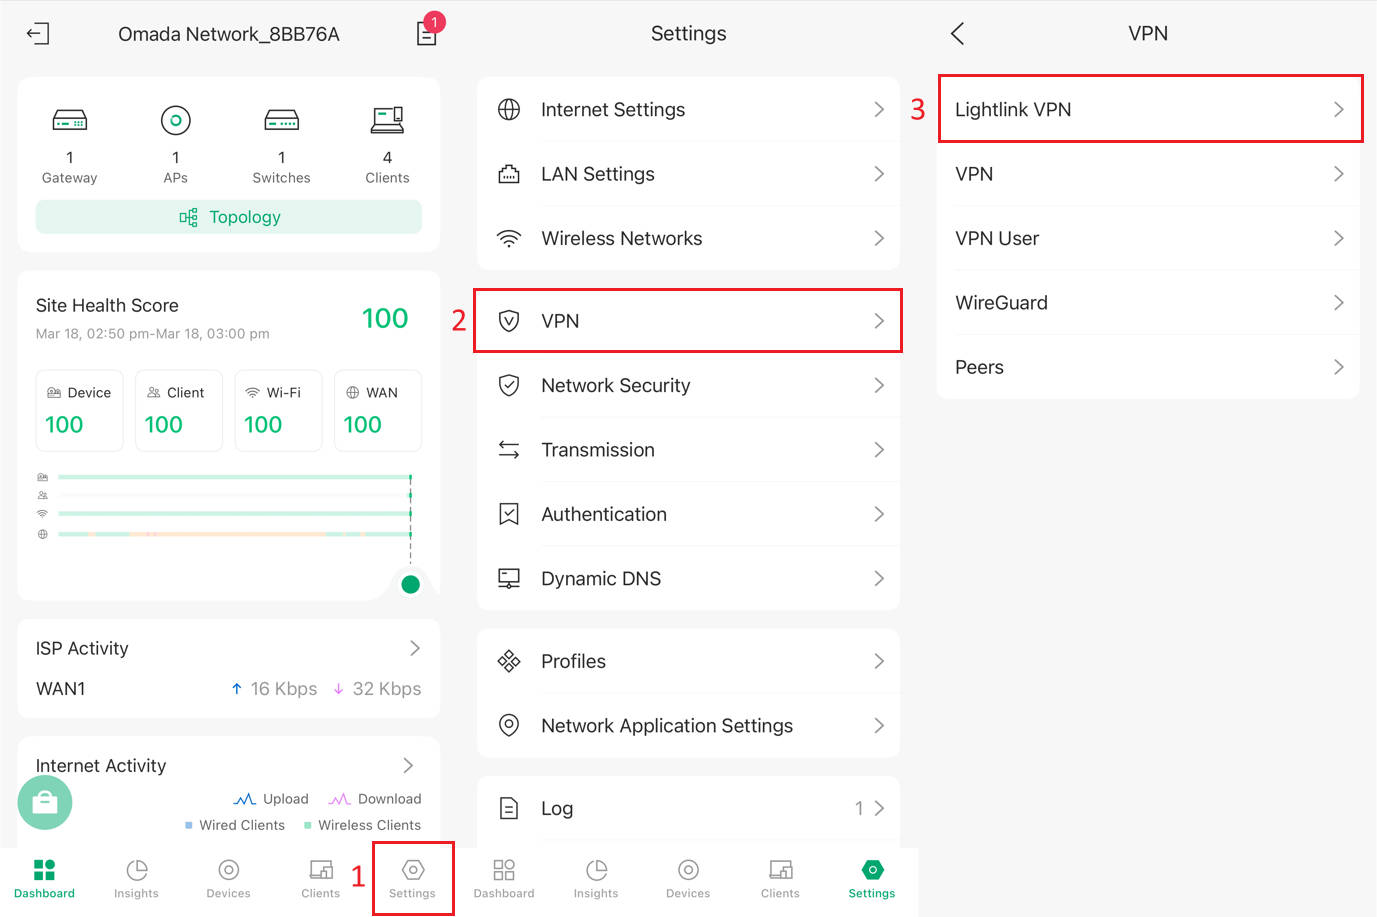
Step 2. Navigate to the Lightlink VPN page.
Lightlink VPN is available at Settings > VPN > Lightlink VPN of the Omada APP.
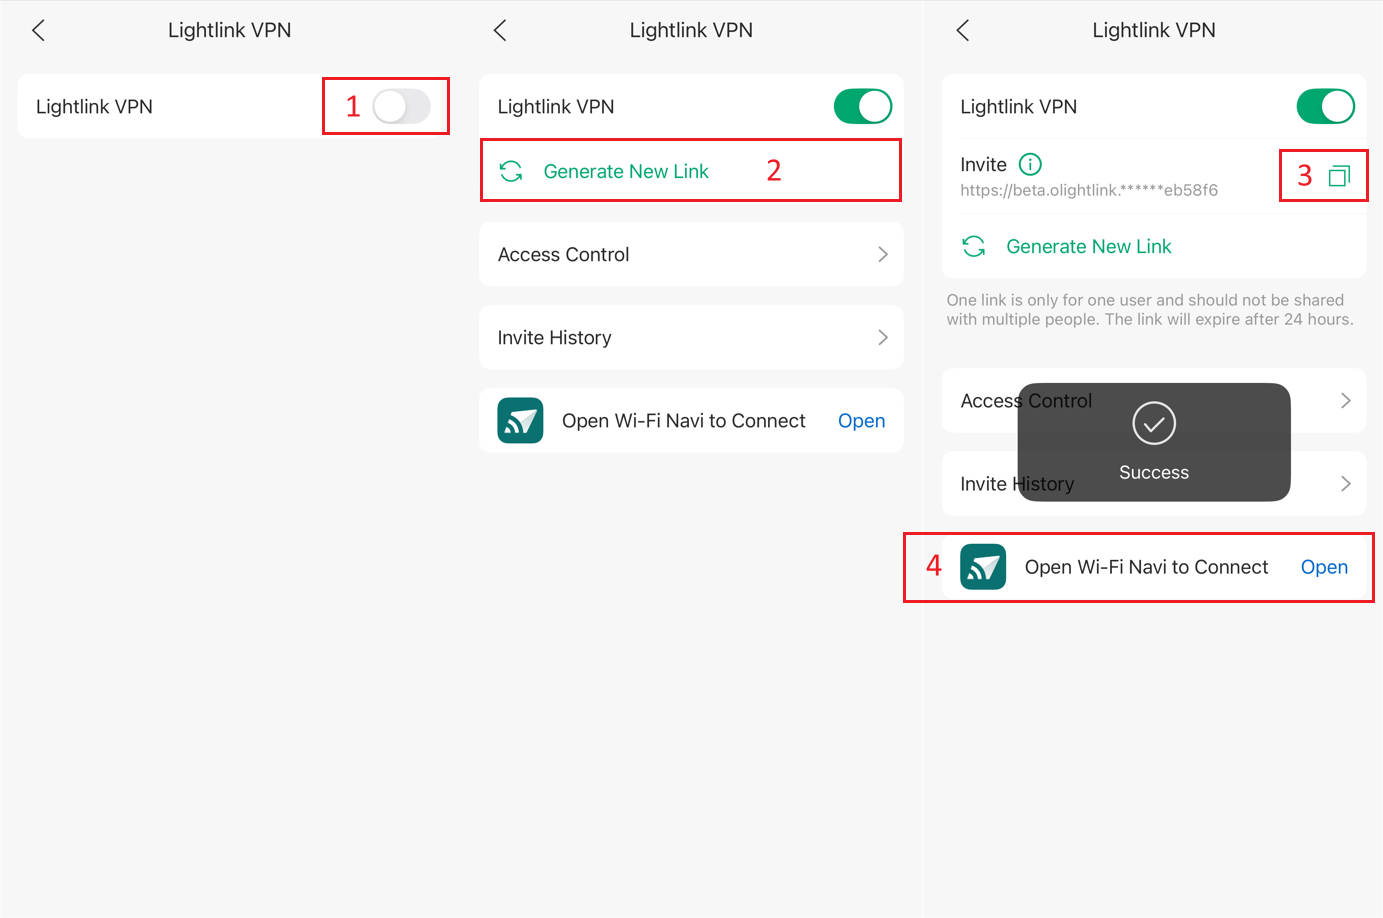
Step 3. Enable Lightlink VPN and generate an invitation link
Currently, you can generate a link and share it with the Navi app to allow devices with the Navi app installed to access your network resources via VPN. A generated link will expire if it is not used within 24 hours.
Step 4. Access Control and Other Functions
Access Control: You can control access through the Access Control feature. This allows access to certain LANs/devices/clients via VPN
Invite History: Once the VPN is successfully established, the Pending Invites entry disappears, and a new entry appears in Lightlink Clients. You can manage Lightlink Clients and Pending Invites here.
Remote Client Configuration (Remote User)
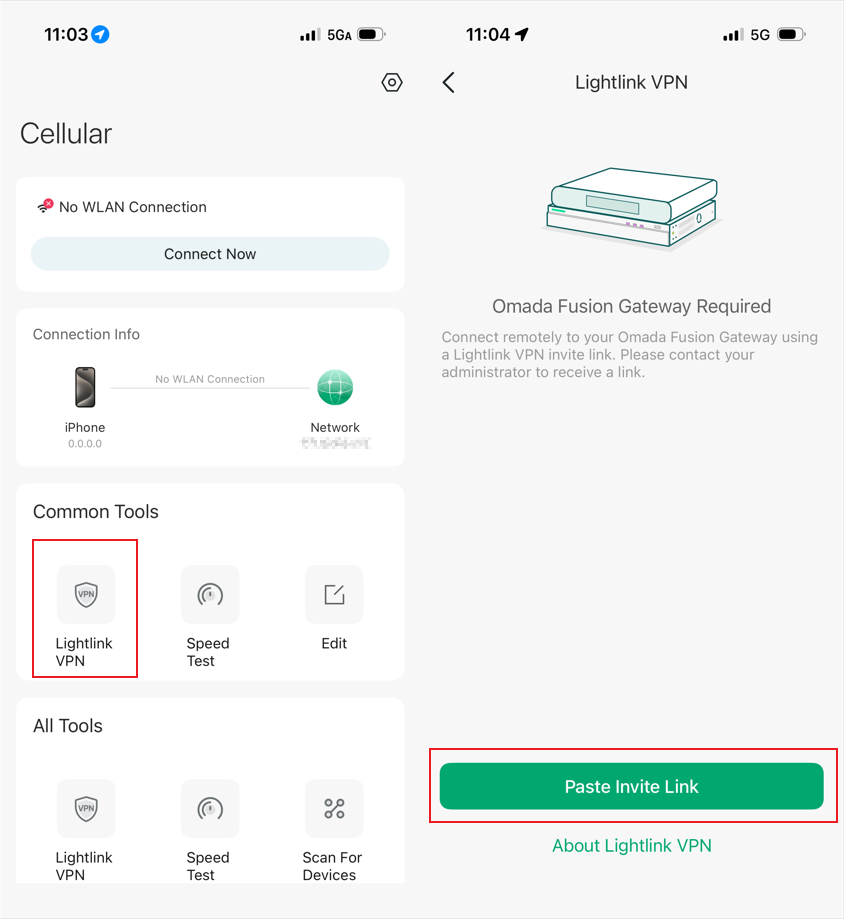
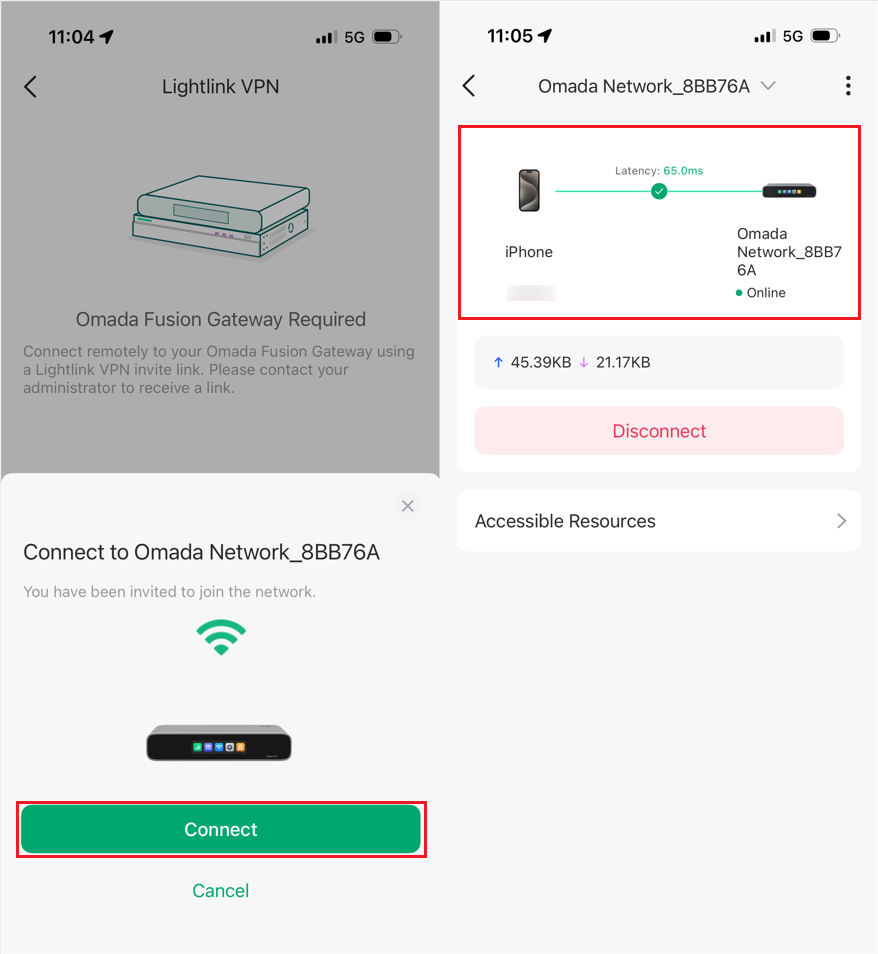
Step 1. Establish a VPN connection using the invitation link.
Install the Navi app on the client that needs to access network resources via VPN, and open the Lightlink VPN tool. I'll use an iPhone as an example here.
Note: Pasting the invitation link is just one common practice; in reality, there are many more flexible options. For example, if administrator share the invitation link with remote users via email, there will be instructions on clicking the link or within the email content. When the link is copied to the clipboard, Navi may also automatically guide the user to establish a VPN connection (this may require granting clipboard permissions).
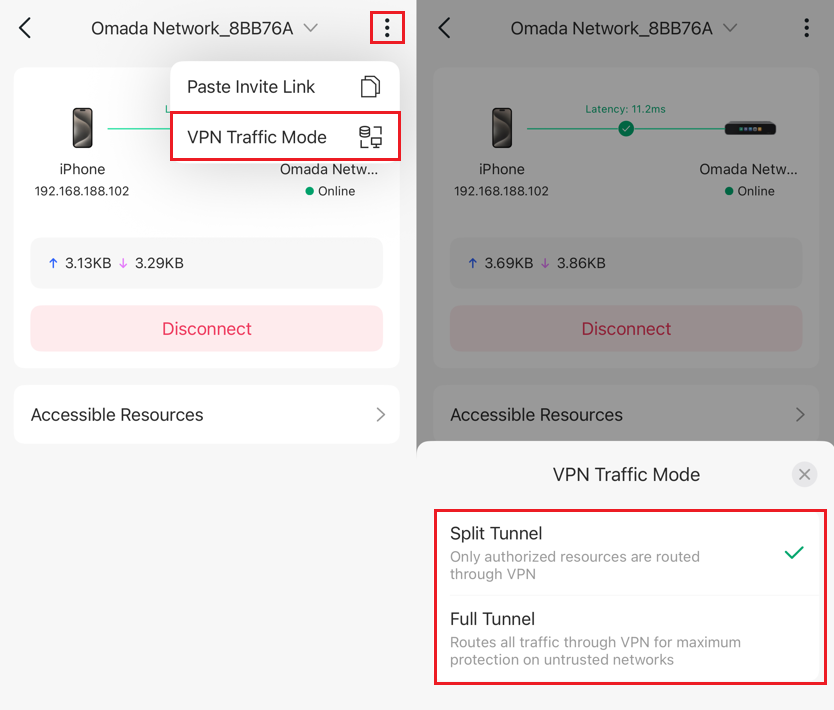
Step 2. VPN Traffic Mode
Split Tunnel and Full Tunnel: The Navi app uses Split Tunnel mode by default. In this mode, only traffic accessing internal network resources goes through the VPN tunnel. Full Tunnel is self-explanatory; all traffic goes through the VPN tunnel. If you notice that your traffic rules are not meeting expectations, you can switch the VPN connection mode here.
Verification
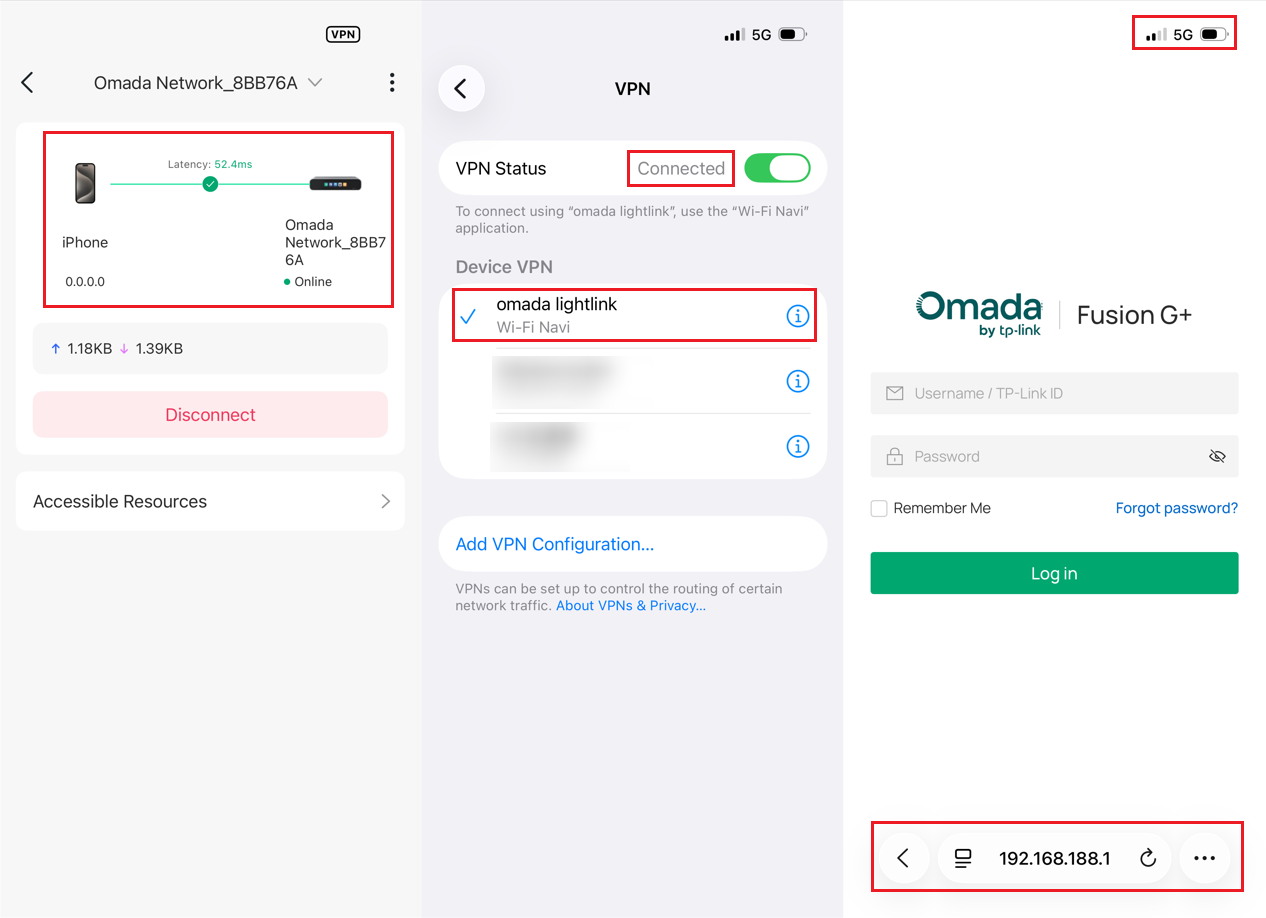
After successfully establishing a VPN connection, remote user can access resources on the network. For example, in Access Control, I added Fusion, therefore, the client can use cellular data to remotely access Fusion's management page via VPN.
Conclusion
This is the configuration process for Lightlink VPN. You can enable this feature to access resources under Fusion from outside.
Get to know more details of each function and configuration please go to Download Center to download the manual of your product.
QA
Q1: After the VPN connection is established, if the WiFi connection is switched (e.g., from the company WiFi to a mobile hotspot) or unexpectedly disconnected, do I need to manually reconnect?
A1: When a change in network status is detected, reconnection will be automatically triggered, eliminating the need for manual reconnection. Furthermore, Lightlink VPN supports multi-WAN auto failover. If a WAN connection in Fusion goes down, the client automatically reconnects using another available WAN.
Q2: Does Lightlink VPN support non-public IP (NAT environments)?
A1: Lightlink VPN supports NAT traversal and works in most non-public IP environments. However, connectivity may depend on your network and ISP. In some cases, such as strict carrier restrictions, enterprise firewalls, connections may fail or be unstable.
