


Contents
Configure MAC Learning Limit Authentication
Introduction
Port Security helps protect switch access ports from unauthorized devices and excessive endpoint connections. In Omada Controller, Port Security provides two authentication methods:
- LLDP Authentication: Allows only devices whose LLDP information matches configured rules to communicate through the port.
- MAC Learning Limit Authentication: Limits the number of MAC addresses that can be learned on a port, helping prevent unauthorized expansion and MAC table exhaustion attacks.
This article explains how to configure both authentication methods through Omada Controller.
Requirements
- Omada Controller v6.4 or later
- Managed switches (firmware that supports Port Security features)
Configuration
Port Security can be configured on individual ports, multiple selected ports, or through Port Profiles for large-scale deployment.
Configure LLDP Authentication
LLDP Authentication allows only devices whose LLDP information matches configured rules to communicate through the port.
Step 1. Before enabling LLDP Authentication, go to Network Config > Site Settings > LLDP and enable LLDP globally.
Note: At a minimum, Switch LLDP must be enabled; otherwise, LLDP Authentication cannot function on switch ports.
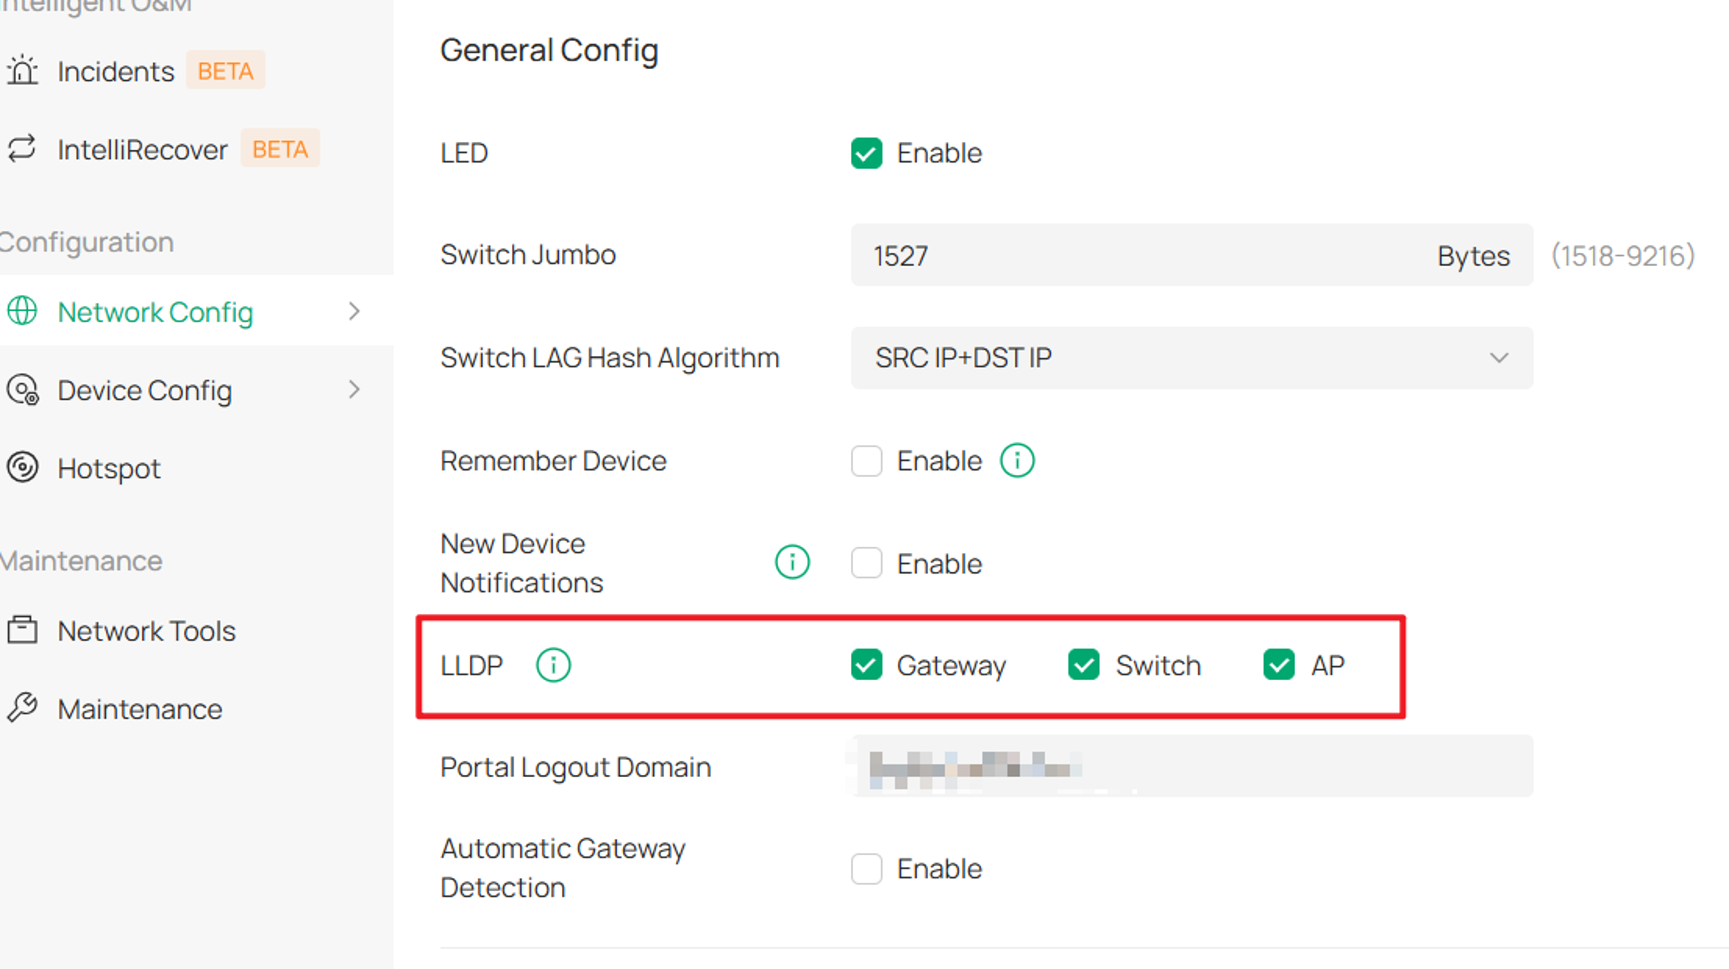
Step 2. LLDP Authentication can be configured at either the individual port level or through a Port Profile.
Per-port configuration path: Site > Devices > Device Details > Ports > Port
Port Profile configuration path: Site > Device Config > Switch Ports > Port Profile
The following example uses Port Porfile coniguration.
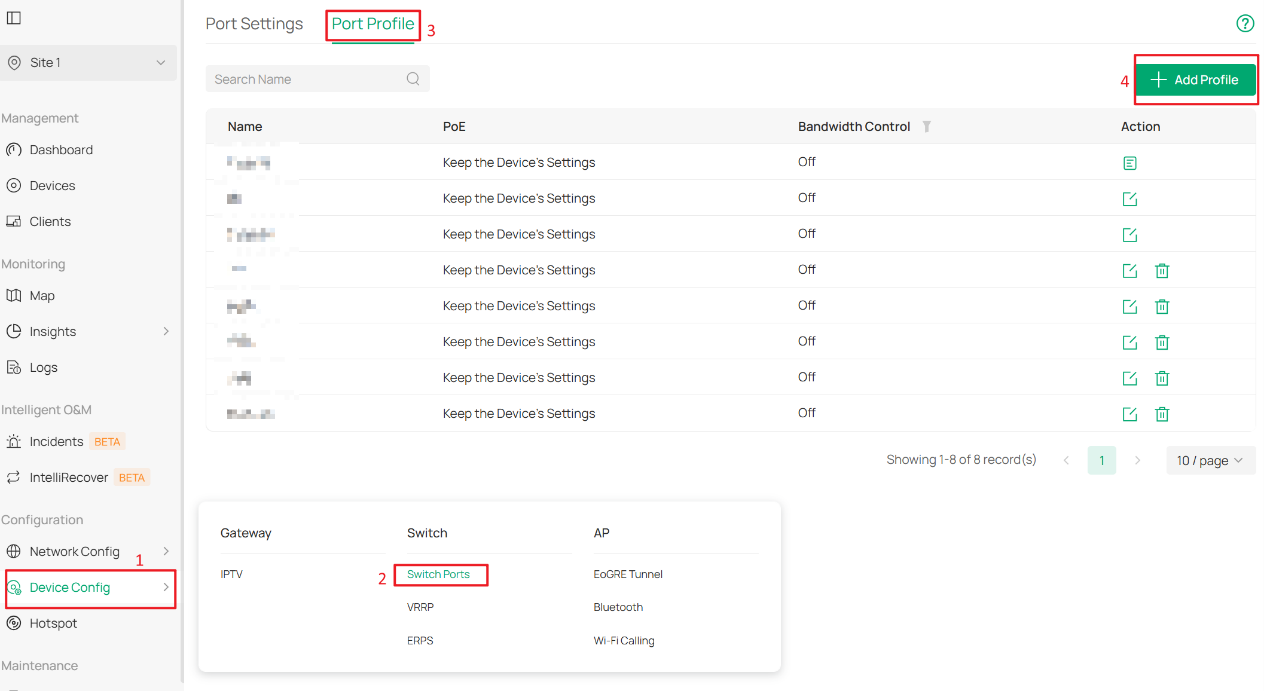
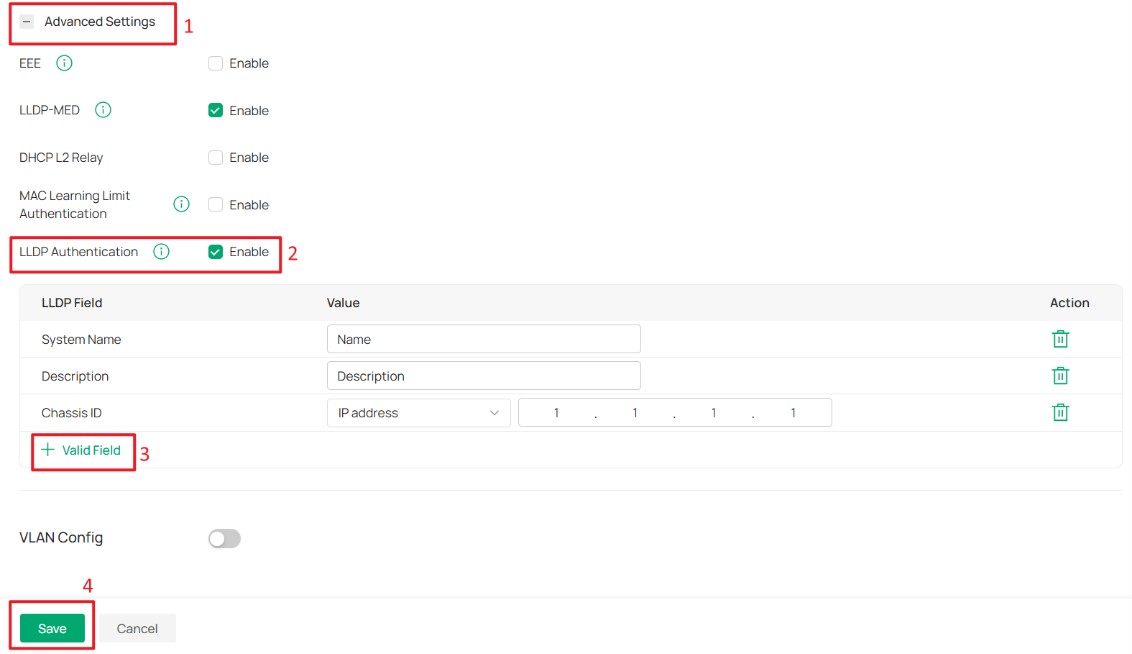
Step 3. Enable LLDP Authentication and configure validation rules.
Under Advanced Settings > LLDP Authentication > Enable.
Click + Valid Field to add one or more LLDP validation rules. Configure the LLDP Field and Value parameters according to the LLDP information advertised by the connected device.
Only devices whose LLDP information matches the configured rules can communicate through this port.
Note: Multiple LLDP validation rules can be configured for the same port. The validation logic is an OR condition, meaning a device is considered authenticated if any configured LLDP rule matches the LLDP information advertised by the device.
Supported LLDP Fields and Matching Rules
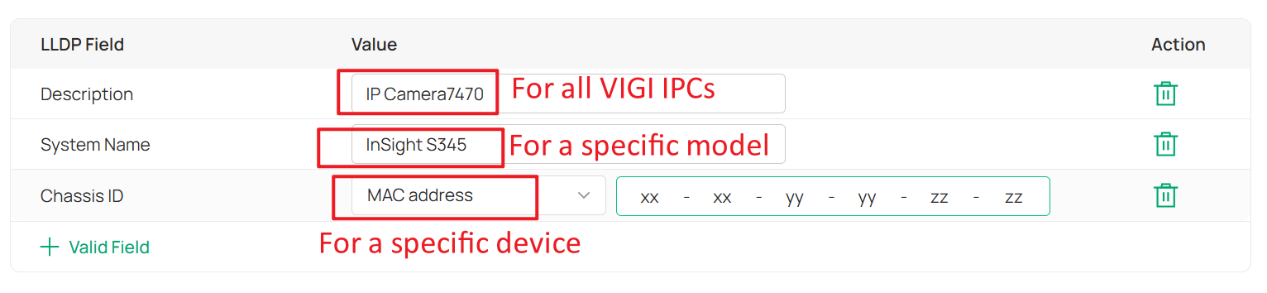
LLDP Authentication rules can be configured at different levels depending on the access control requirements. In general, authentication can be applied to:
- All devices within a product category;
- A specific device model within a product category;
- A specific device identified by its MAC address.
The following IPC examples demonstrate how to configure LLDP Authentication for each scenario.
For recommended LLDP fields, matching values, and configuration guidance for different TP-Link product lines, refer to the table below.
|
Device Type |
LLDP Fields |
Matching Rule |
Example |
Notes |
|
Gateway |
System Name, Description, Chassis ID |
Authentication succeeds if at least one configured rule matches. |
System Name: Device Name |
All Omada Gateways: Use Description and enter Omada Multi-Gigabit VPN Router. |
|
IPC |
System Name, Description, Chassis ID |
Authentication succeeds if at least one configured rule matches. |
System Name: Device model name (e.g. InSight S345) |
All VIGI IPCs: Use Description and enter IP Camera7470. |
|
OLT |
System Name, Description, Chassis ID |
Authentication succeeds if at least one configured rule matches. |
System Name: Device Name |
All DeltaStream OLTs: Use Description and enter DeltaStream. |
|
NVR |
System Name, Description, Chassis ID |
Authentication succeeds if at least one configured rule matches. |
System Name: Device model name (e.g. VIGI NVR2016H-16MP(UN) 2.0) |
All VIGI NVRs: Use Description and enter Network Video Recorder7470. |
|
Omada Switch |
System Name, Description, Chassis ID |
Authentication succeeds if at least one configured rule matches. |
System Name: Device Name |
All Omada Switches: Use Description and enter Omada. For firmware released before 2024, enter JetStream instead. |
|
ES Switch |
System Name, Description, Chassis ID |
Authentication succeeds if at least one configured rule matches. |
System Name: Device Name |
All ES Switches: Use Description and enter Omada. |
|
AP |
System Name, Description, Chassis ID |
Authentication succeeds if at least one configured rule matches. |
System Name: Device Name |
Legacy APs: Use Description and enter Linux. |
- Multiple LLDP validation rules can be configured for the same port.
- Authentication succeeds when at least one configured LLDP rule matches the LLDP information advertised by the connected device.
- For APs, the recommended field depends on the firmware generation:
- Legacy AP models typically use Description values beginning with Linux.
- Wi-Fi 8 and future AP models typically use Description values beginning with Omada.
- System Name and Chassis ID can also be used when more granular device identification is required.
- On certain TP-Link devices, System Name is derived from the Device Name and may change if the Device Name is modified in Omada Controller.
- For third-party devices, users must obtain and verify the LLDP packet information advertised by those devices before configuring LLDP Authentication rules. The required LLDP fields and values may vary depending on the vendor, model, and firmware version.
Supported Chassis ID types
If Chassis ID is selected, the following identifier types are supported:
- Chassis Component
- Interface Alias
- Port Component
- MAC Address
- IP Address
- IPv6 Address
- Interface Name
- Locally Assigned
The input format must match the selected identifier type. For example:
- MAC Address: Enter a MAC address.
- IP Address: Enter an IPv4 address.
- IPv6 Address: Enter an IPv6 address.
- Other Types: Enter a text string.
Note: The configured value does not need to match the entire LLDP field. The connected device is considered valid as long as the selected LLDP field contains the configured value.
Finally, click Save to apply the Port Profile.
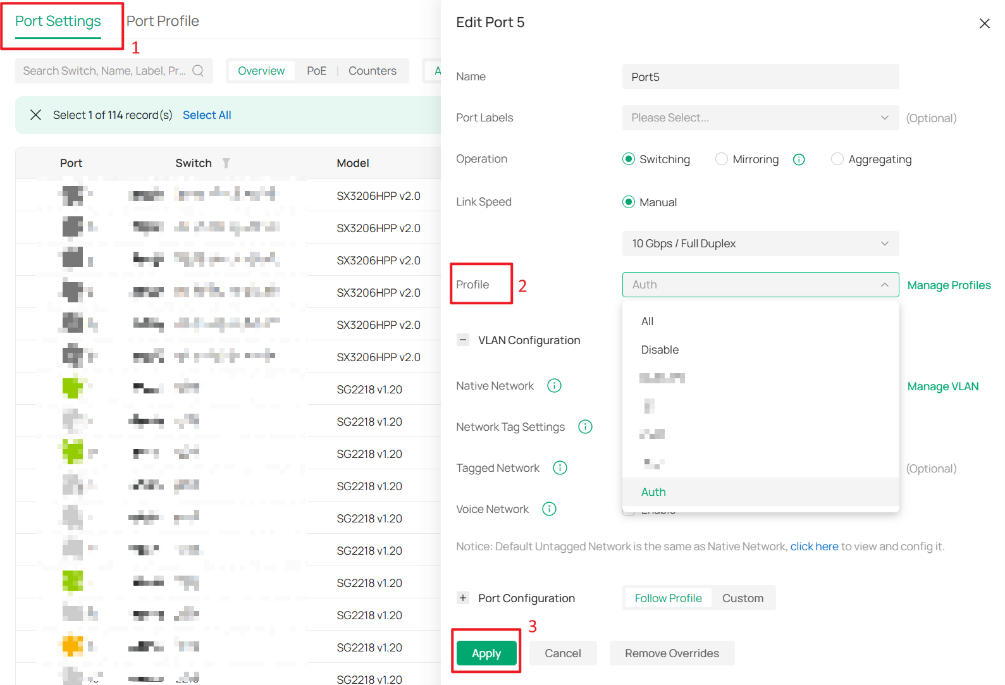
Step 4. Apply the Port Profile to the Target Switch Port.
Navigate to Port Settings > Select the switch port > Edit, select the Port Profile created in the previous steps from the Profile drop-down list, and then click Apply.
Configure MAC Learning Limit Authentication
Step 1. MAC Learning Limit Authentication is configured in the same Port Profile page used for LLDP Authentication.
Under Advanced Settings > MAC Learning Limit Authentication > Enable.
In the Max Learned MAC Addresses field, specify the maximum number of MAC addresses that the port is allowed to learn. Configure this value based on the maximum number of devices that are expected to connect through the port.
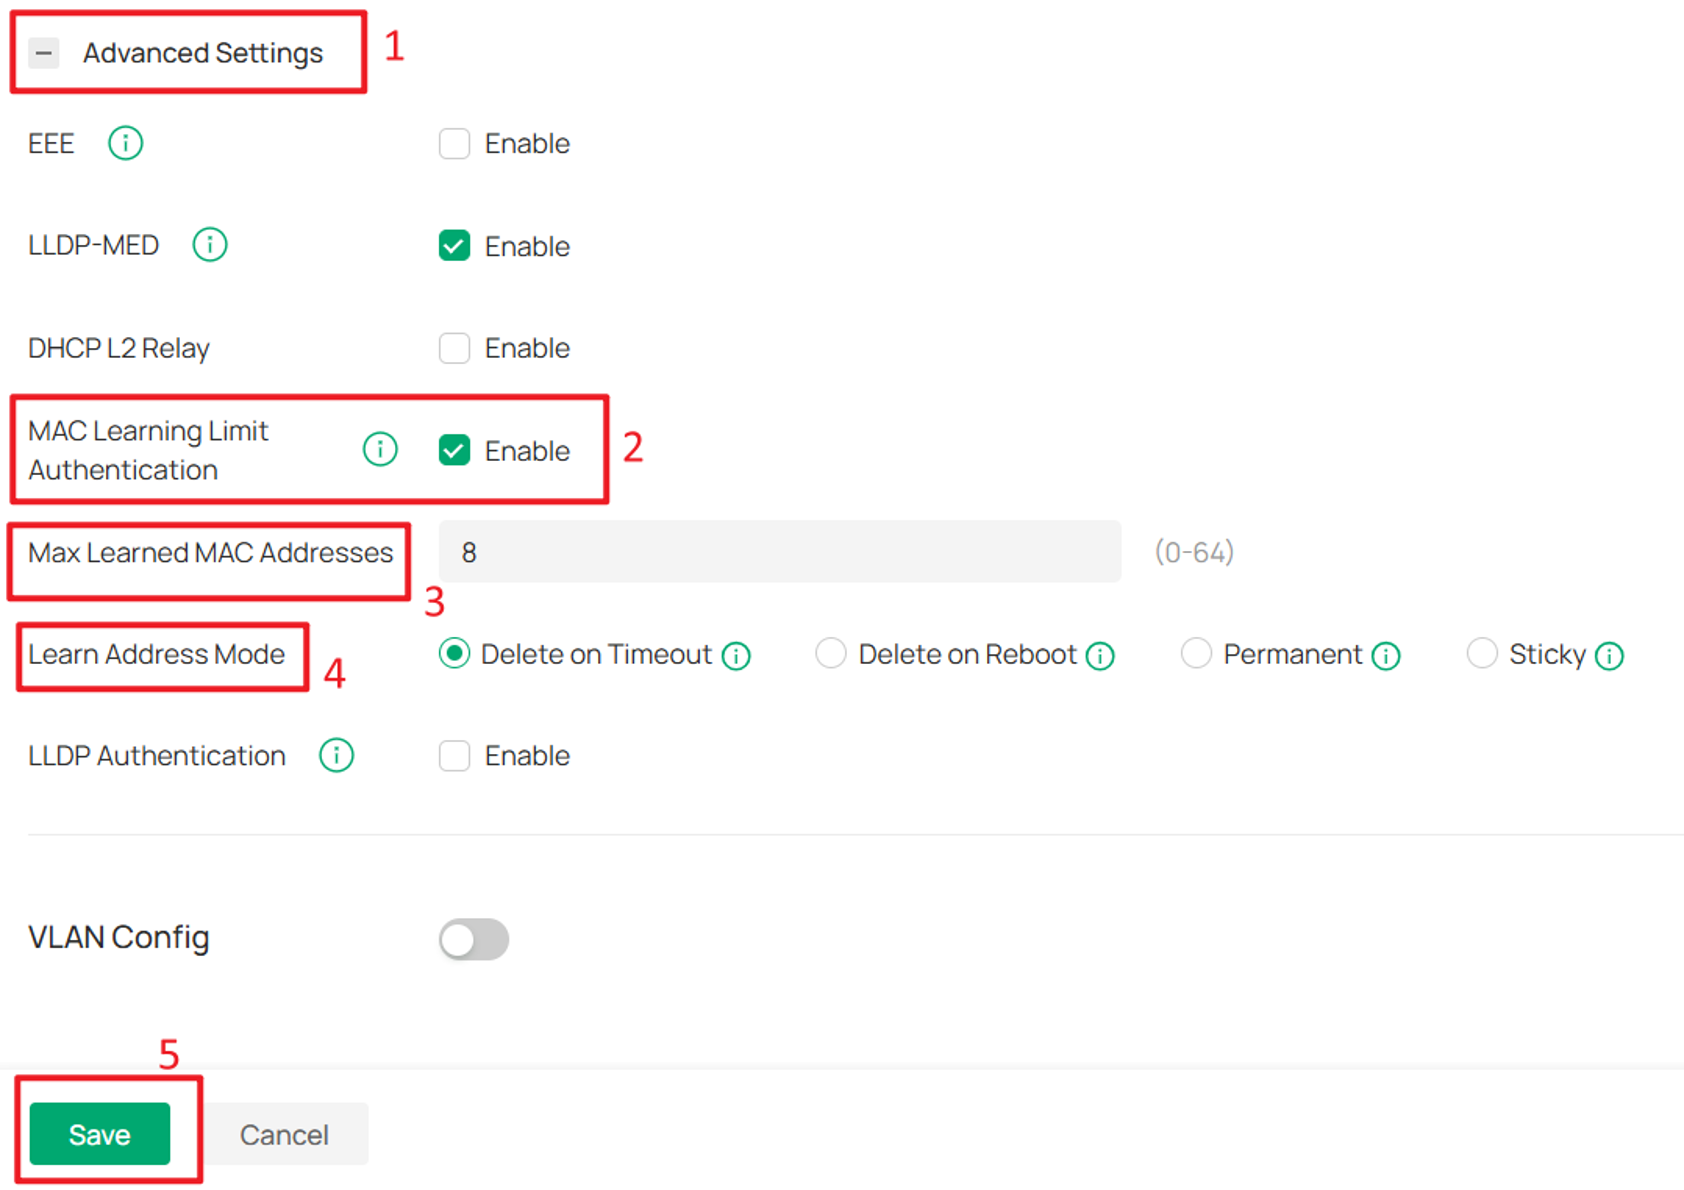
Next, select a Learn Address Mode to define how learned MAC addresses are retained and removed.
|
Learn Address Mode |
Description |
|
Delete on Timeout (Default) |
The switch removes MAC addresses that are not used or updated within the aging time. |
|
Delete on Reboot |
Learned MAC addresses are not affected by aging time and can only be removed manually. All learned MAC addresses are cleared after the switch reboots. |
|
Permanent |
Learned MAC addresses are not affected by aging time and can only be removed manually. Learned MAC addresses remain after the switch reboots. |
|
Sticky |
Learned MAC addresses are not affected by aging time and can only be removed manually. The switch periodically saves learned MAC addresses. After a reboot, saved MAC addresses are retained while unsaved MAC addresses are removed. |
Finally, click Save to apply the Port Profile.
Note:
- MAC Learning Limit Authentication cannot be used together with 802.1X Authentication or MAC-Based Authentication (MAB) on the same port. If a port is already configured with 802.1X or MAB, MAC Learning Limit Authentication cannot be enabled. Likewise, enabling MAC Learning Limit Authentication prevents 802.1X or MAB from being configured on that port.
- MAC Learning Limit Authentication is also incompatible with Link Aggregation (LAG). A port with MAC Learning Limit Authentication enabled cannot be added to a LAG group, and MAC Learning Limit Authentication cannot be configured on ports that are members of a LAG group.
Step 2. Apply the Port Profile to the Target Switch Port.
Apply the Port Profile to the target switch port as described in Step 4 of the LLDP Authentication section.
Conclusion
Port Security provides two authentication methods to enhance switch port security and control network access.
LLDP Authentication allows only devices with matching LLDP information to communicate through a port, while MAC Learning Limit Authentication restricts the number of MAC addresses that can be learned on a port. By applying these settings through Port Profiles, administrators can efficiently deploy consistent access control policies across multiple switch ports.
To learn more about each function and configuration, please visit Support Home to download or check the manual for your product.
