


Contents
Introduction
The Migration feature in Omada Controller includes Site Migration and Controller Migration, supporting the migration of either an individual site or an entire controller.
Starting with Omada Controller v6.4, Site Migration supports cross-version migration by importing compatible site backup files generated by Omada Controller v6.0.0.x or later.
This article explains how to perform Site Migration and Controller Migration using the Migration feature.
Requirements
- Omada Controller (Hardware Controller/Software Controller/Cloud-Based Controller)
Configuration
Before proceeding with migration, review the following requirements and considerations:
Device compatibility:
- ER7212PC only supports migration between ER7212PC devices.
Version compatibility:
- Starting from Omada Controller v6.4, cross-version Site Migration is supported.
- For cross-version Site Migration, the target controller must run Omada Controller v6.4 or later.
- Only site backup files generated by Omada Controller v6.0.0.x or later can be imported.
- Site backup files generated by Omada Pro Controller are not supported.
- For Omada Controller v5.0.x and later, Controller Migration supports importing configuration files generated by Omada Controller v5.0.x and above. The first three parts of the source controller version number must be equal to or lower than those of the target controller version.
Migration recommendations:
- For legacy deployments, direct migration across multiple major controller versions is not recommended. To ensure configuration compatibility and minimize migration risks, upgrade the controller sequentially using the recommended path: v3 > v4 > v5 > v6. After each upgrade, verify that the controller and sites are operating normally before proceeding to the next version.
- During cross-version Site Migration, some historical records may not be retained because of differences in database structures between controller versions. These may include historical statistics, event logs, reports, and client history records. Site configurations are retained when supported by the target controller version.
Site migration
Site Migration allows the configurations and data of a specific site to be migrated from the source controller to a compatible target controller.
Starting from Omada Controller v6.4, cross-version Site Migration is supported. Compatible site backup files generated by Omada Controller v6.0.0.x or later can be imported into the target controller.
The Site Migration process consists of three steps: Export Site, Import Site, and Migrate Devices.
Step 1. Export the site.
Export site configurations and device management information as a backup file for migration.
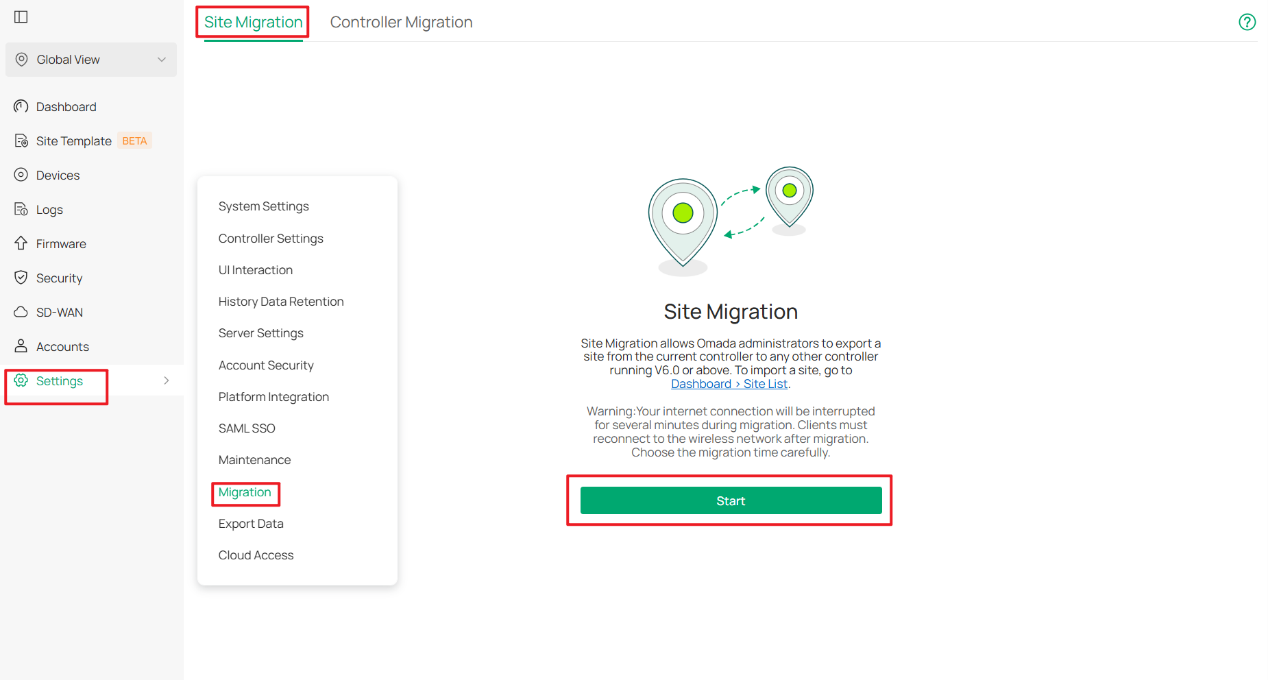
Launch the controller and access the Global View. Go to Settings > Migration. On the Site Migration tab, click Start.
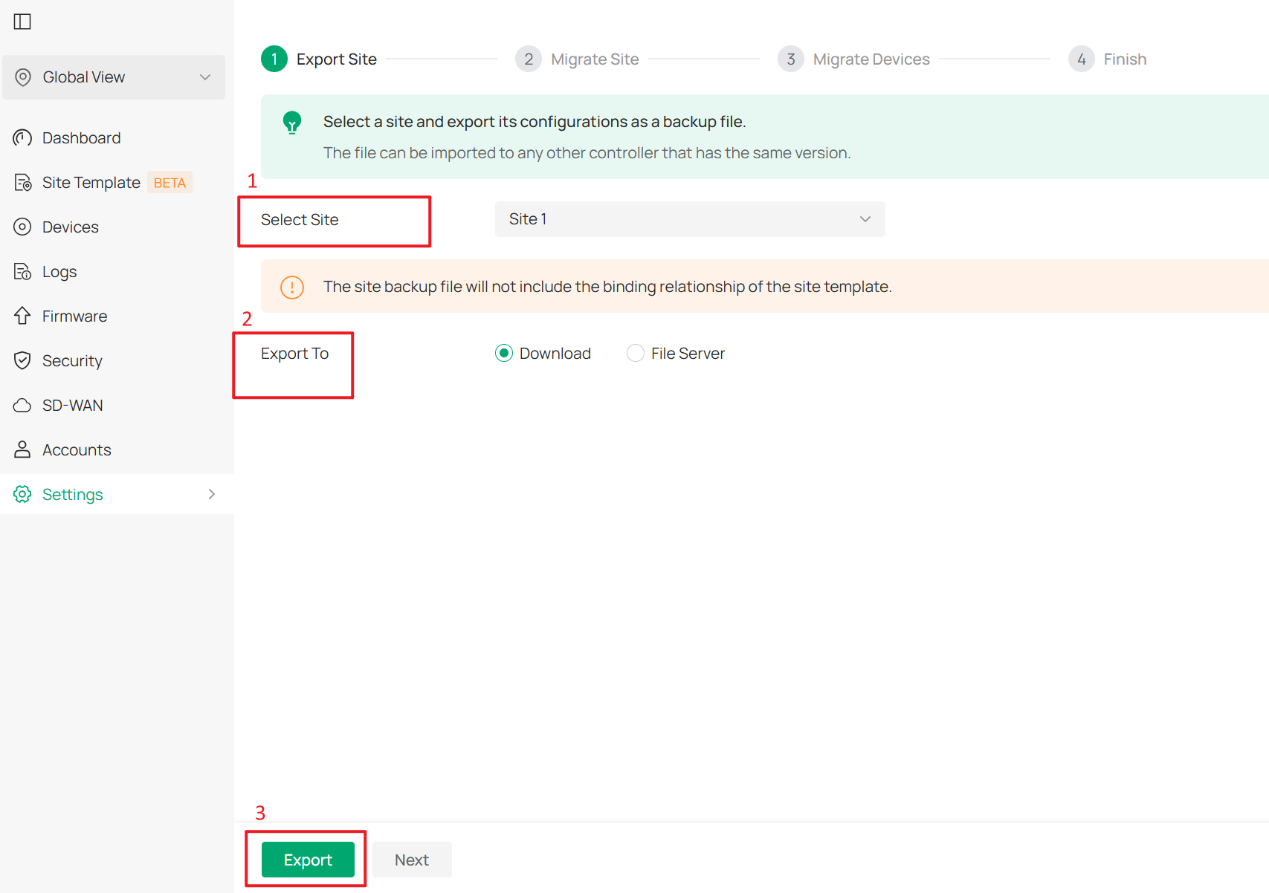
Select the site to be exported from the Select Site drop-down list. Select where to export and save the backup file, and then click Export to download the site backup file.
If a site backup file has already been created, click Next to continue.
Step 2. Import the site.
Import the site backup file exported in Step 1 into the target controller.
Note:
- Only Site backup files generated from Omada Controller v6.0.0.x or later can be imported.
- For Site Cross-Version Migration, the target controller must run Omada Controller v6.4 or above.
- Backup files generated by Omada Pro Controller are not supported.
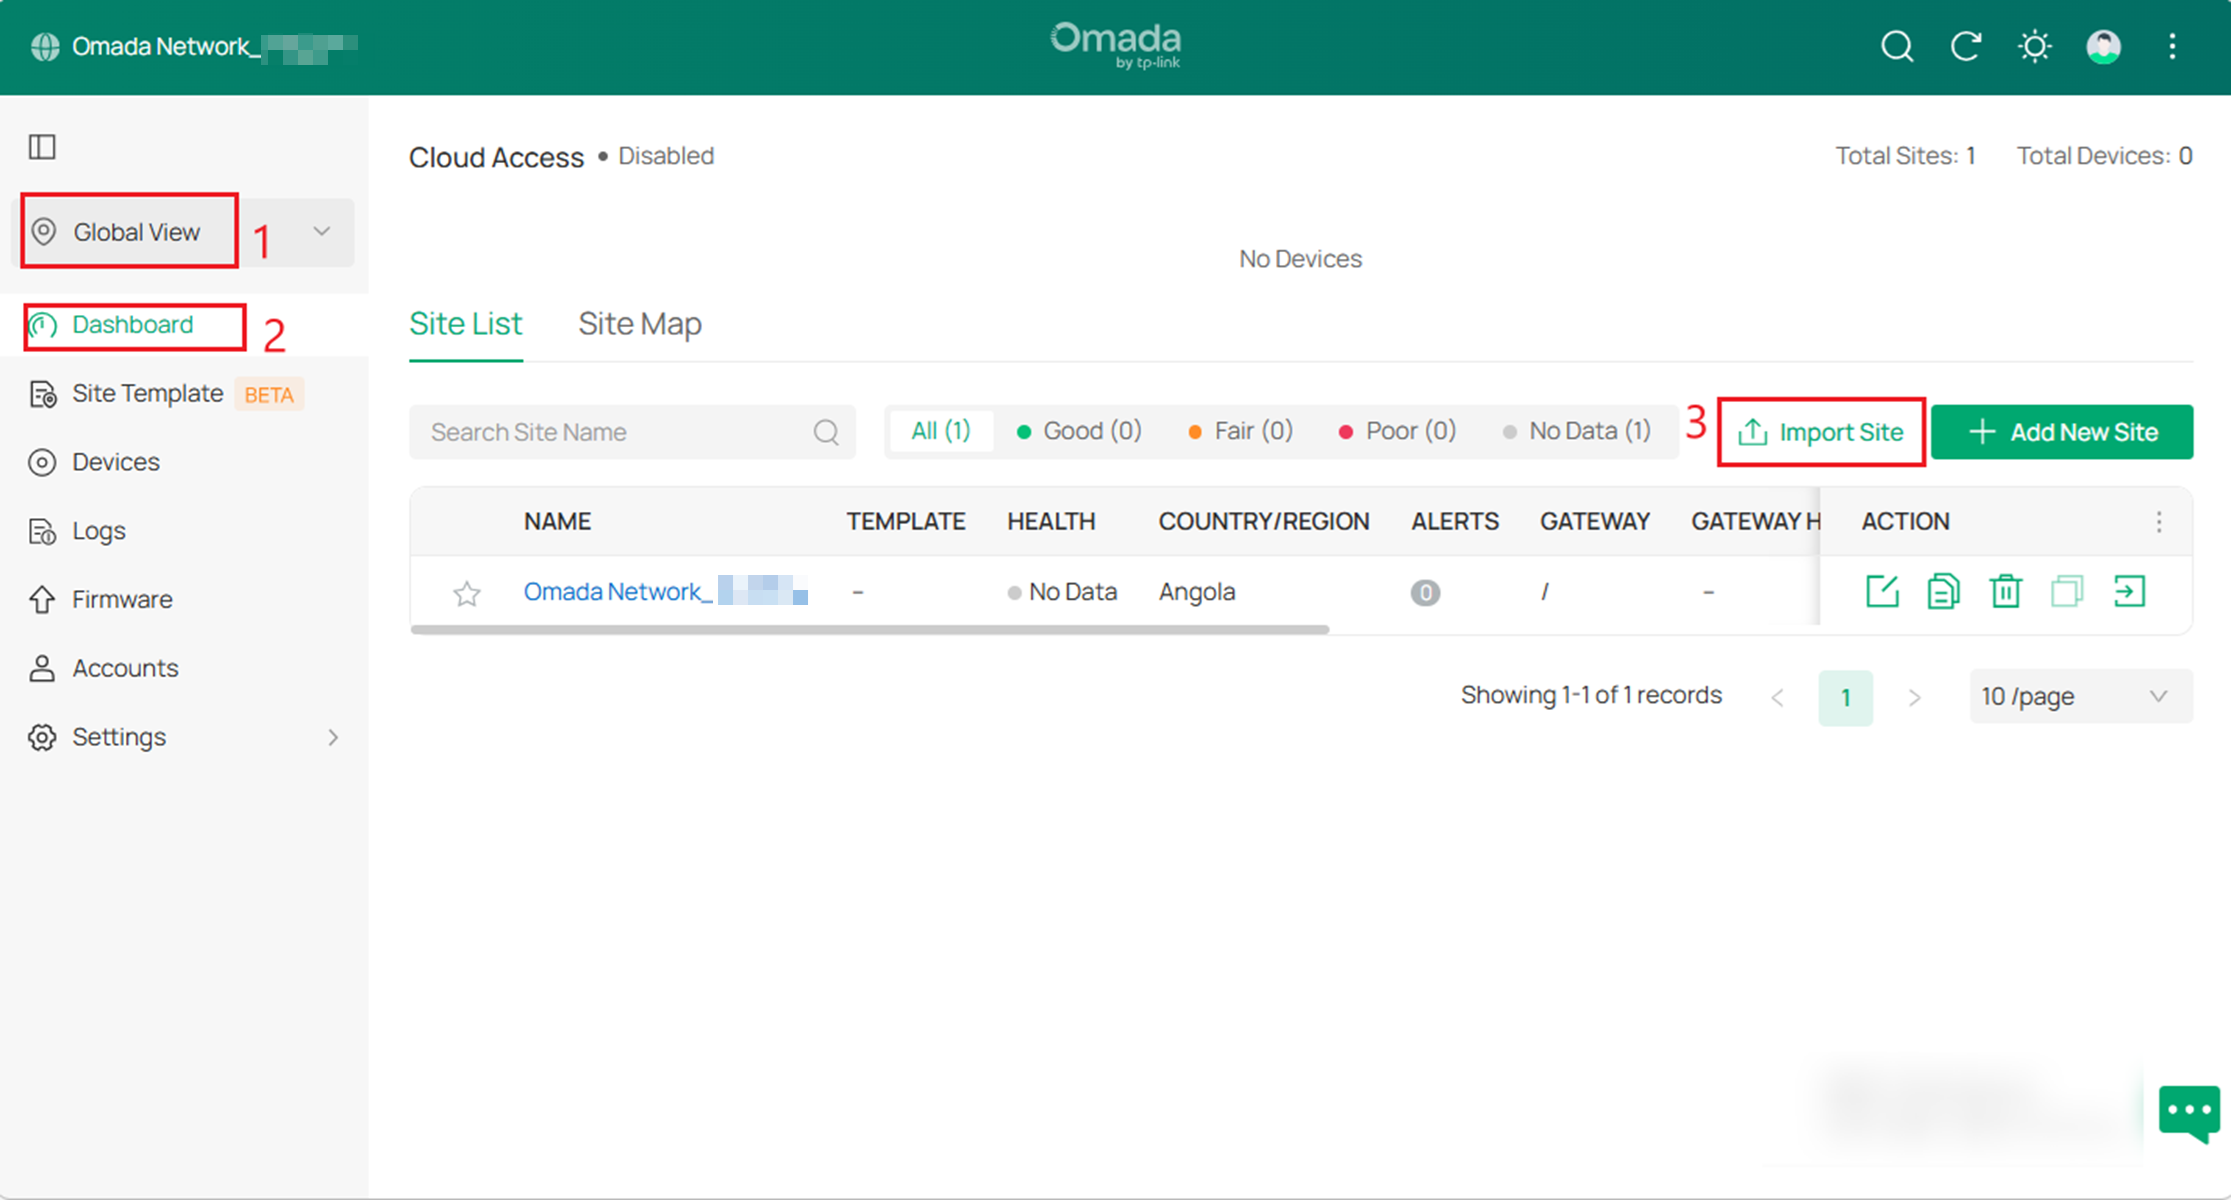
Log in to the target controller and access Global View. Go to Dashboard > Site List, and click Import Site.
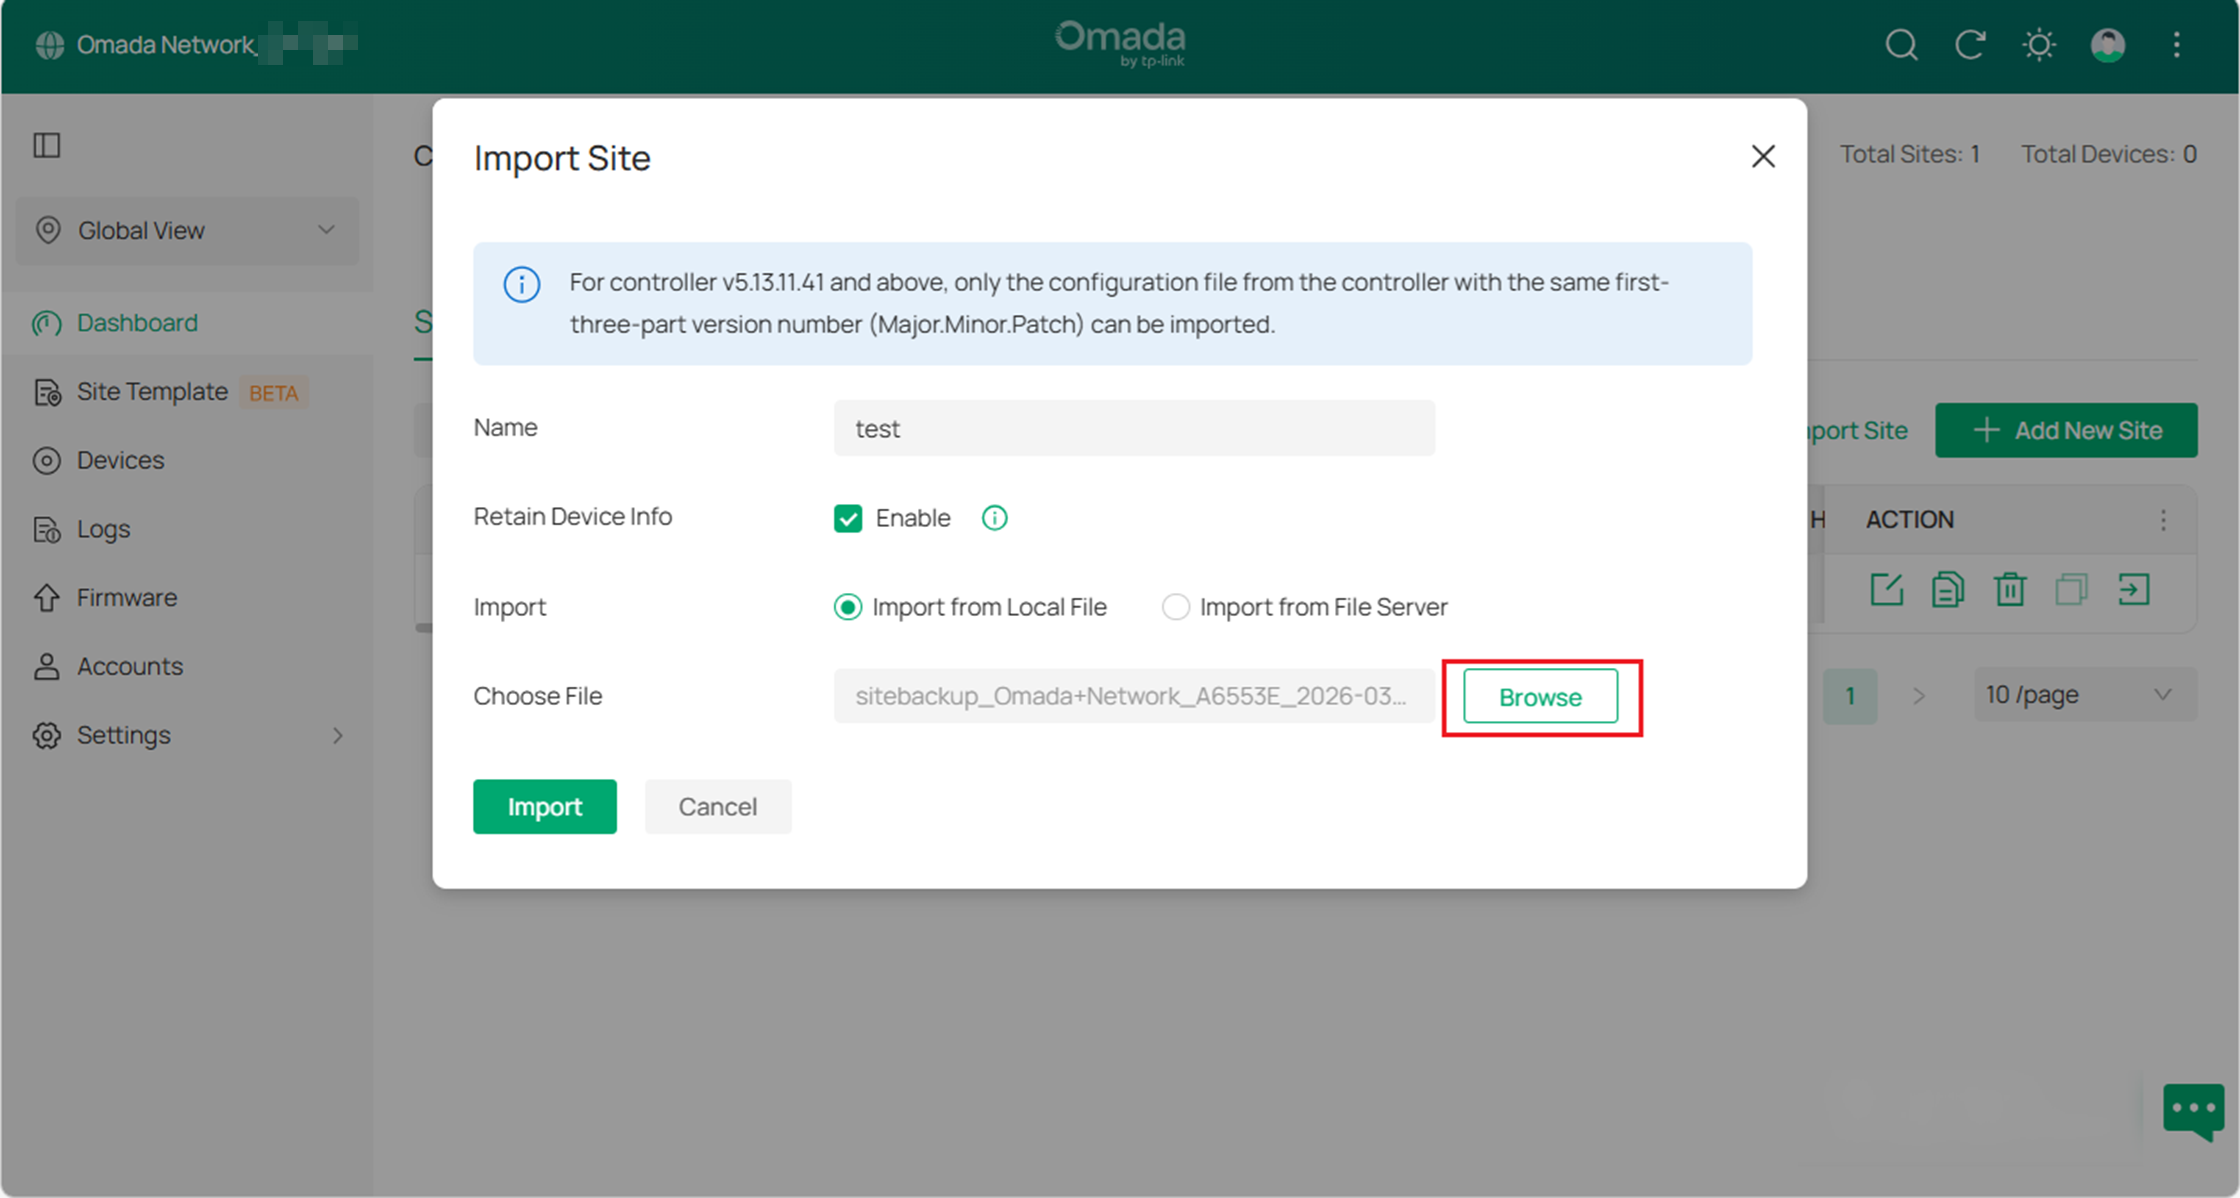
Enter a unique name for the imported site. Click Browse, select the site backup file exported in Step 1, and click Import.
After the site backup file has been successfully imported into the target controller, return to the source controller and click Confirm.
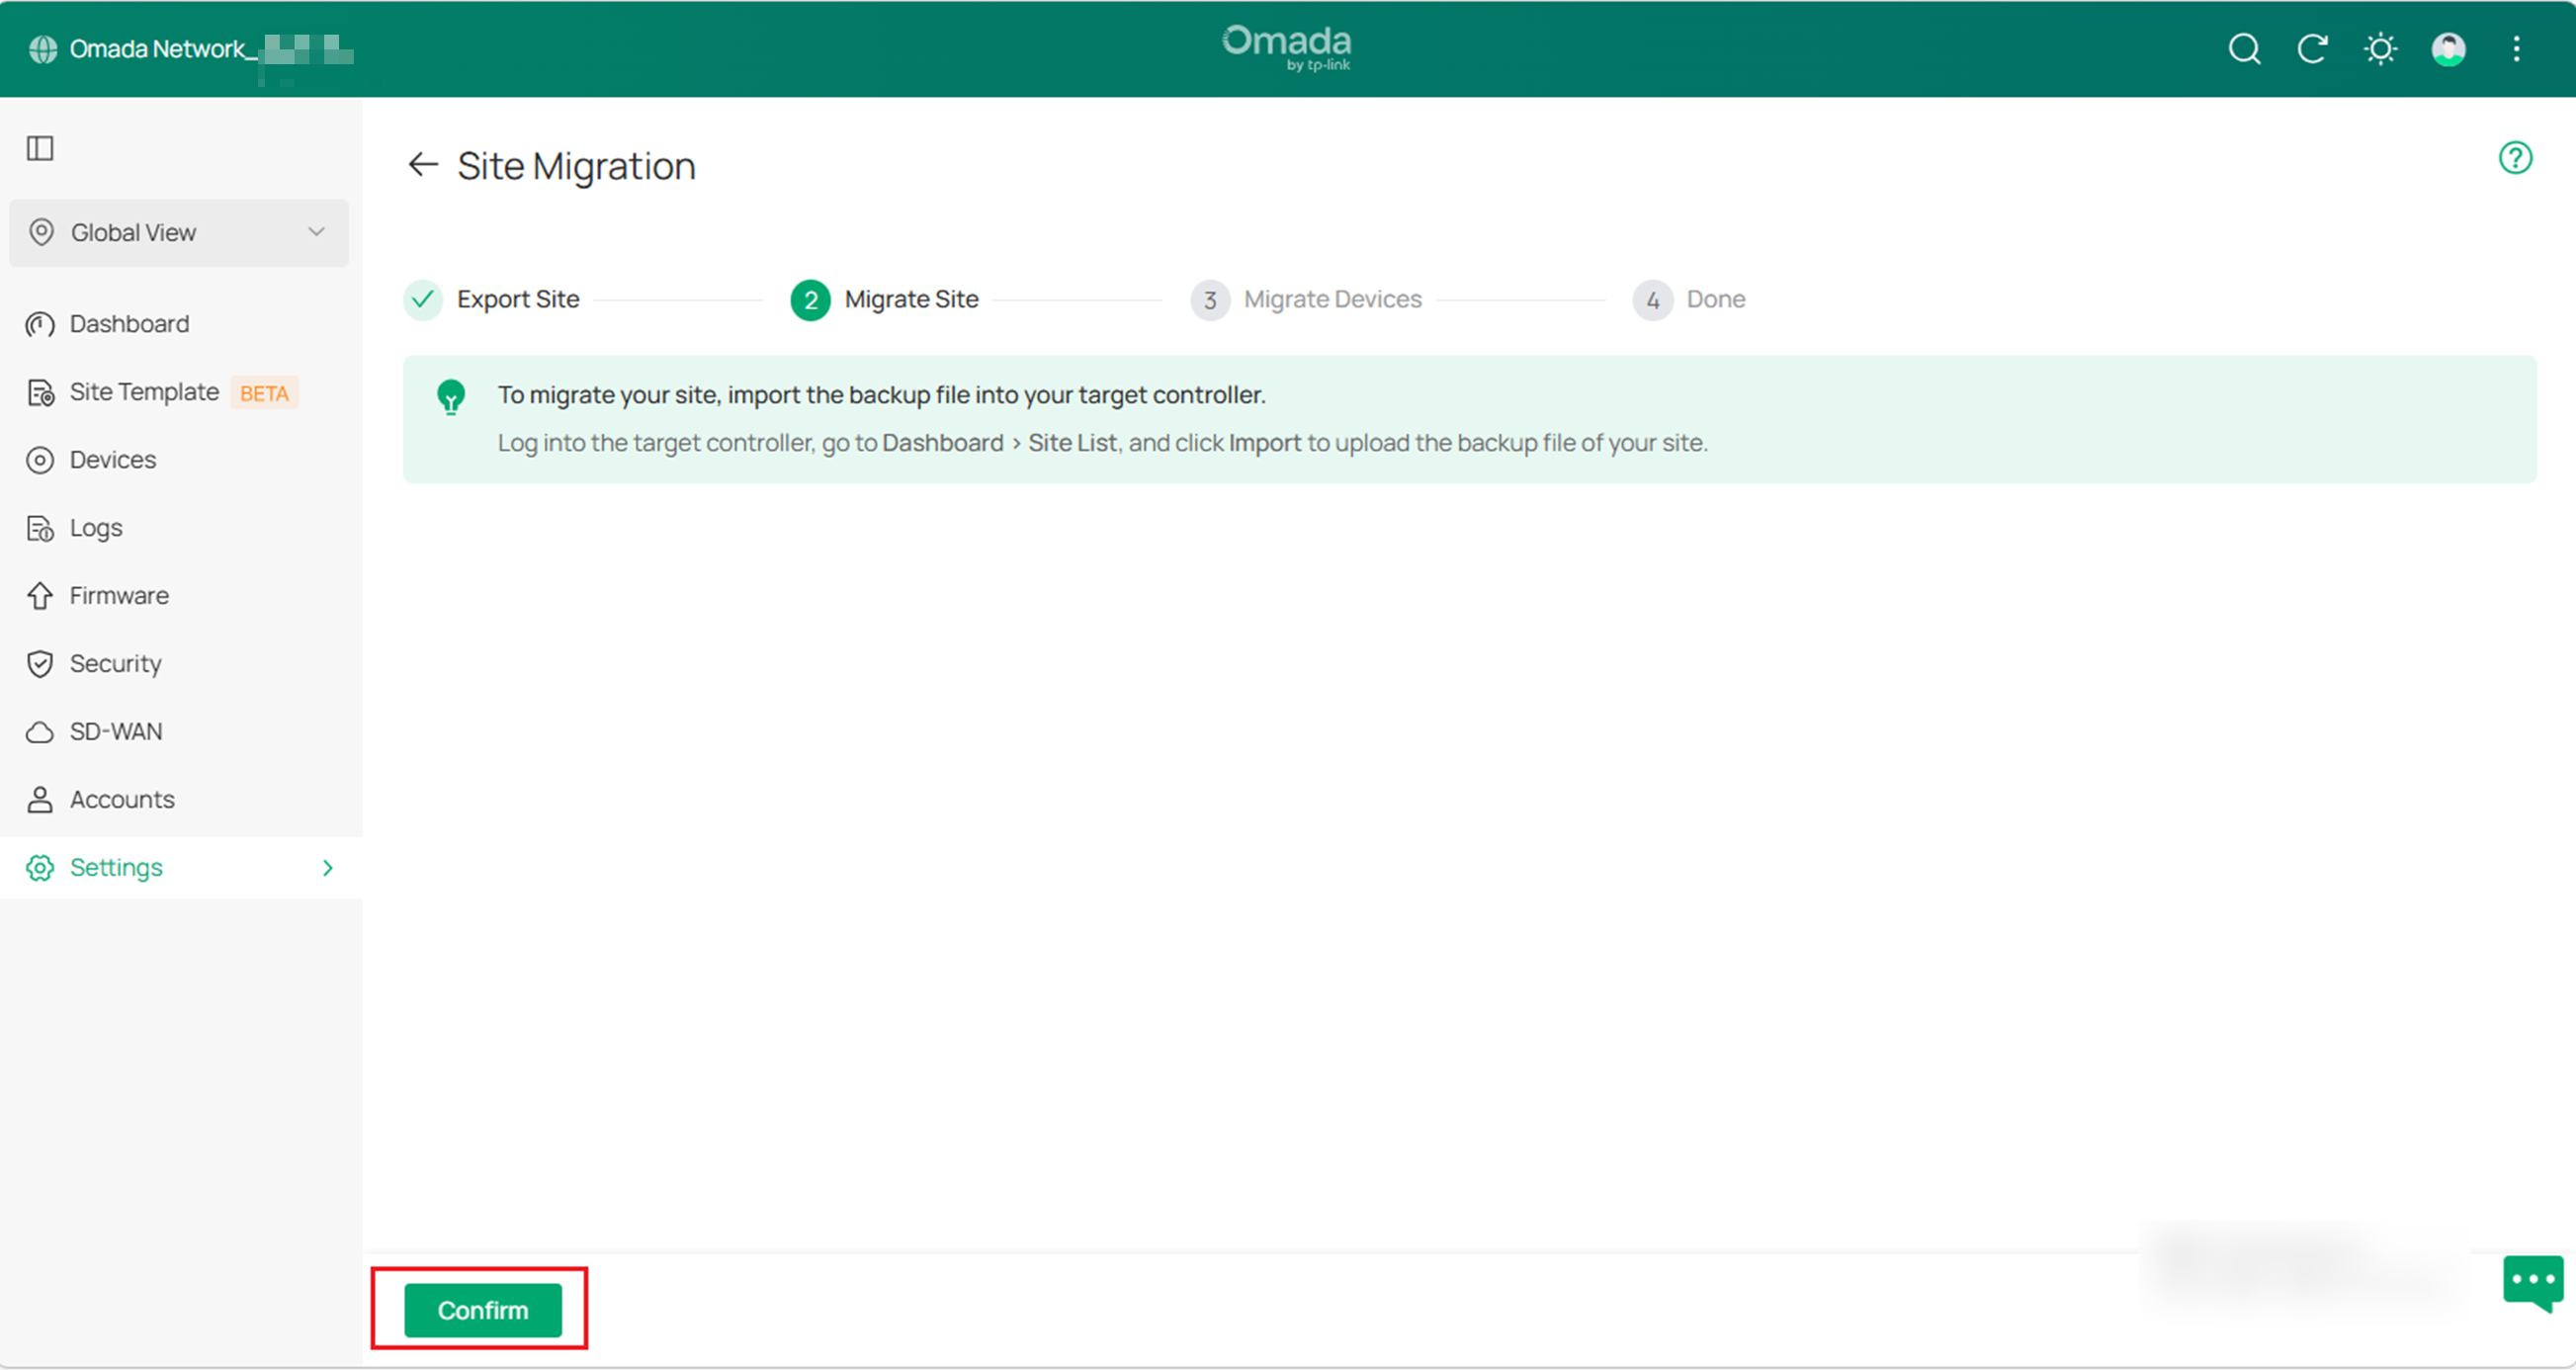
Step 3. Migrate the devices.
Migrate the devices on the original site to the target controller.
Obtain the IP address or Inform URL of the target controller, and enter it in the Controller IP/Inform URL field.
For a Hardware Controller or Software Controller, enable Device Management under Global View > System Settings on the target controller. Enter the Device Management Hostname/IP, and save the settings.
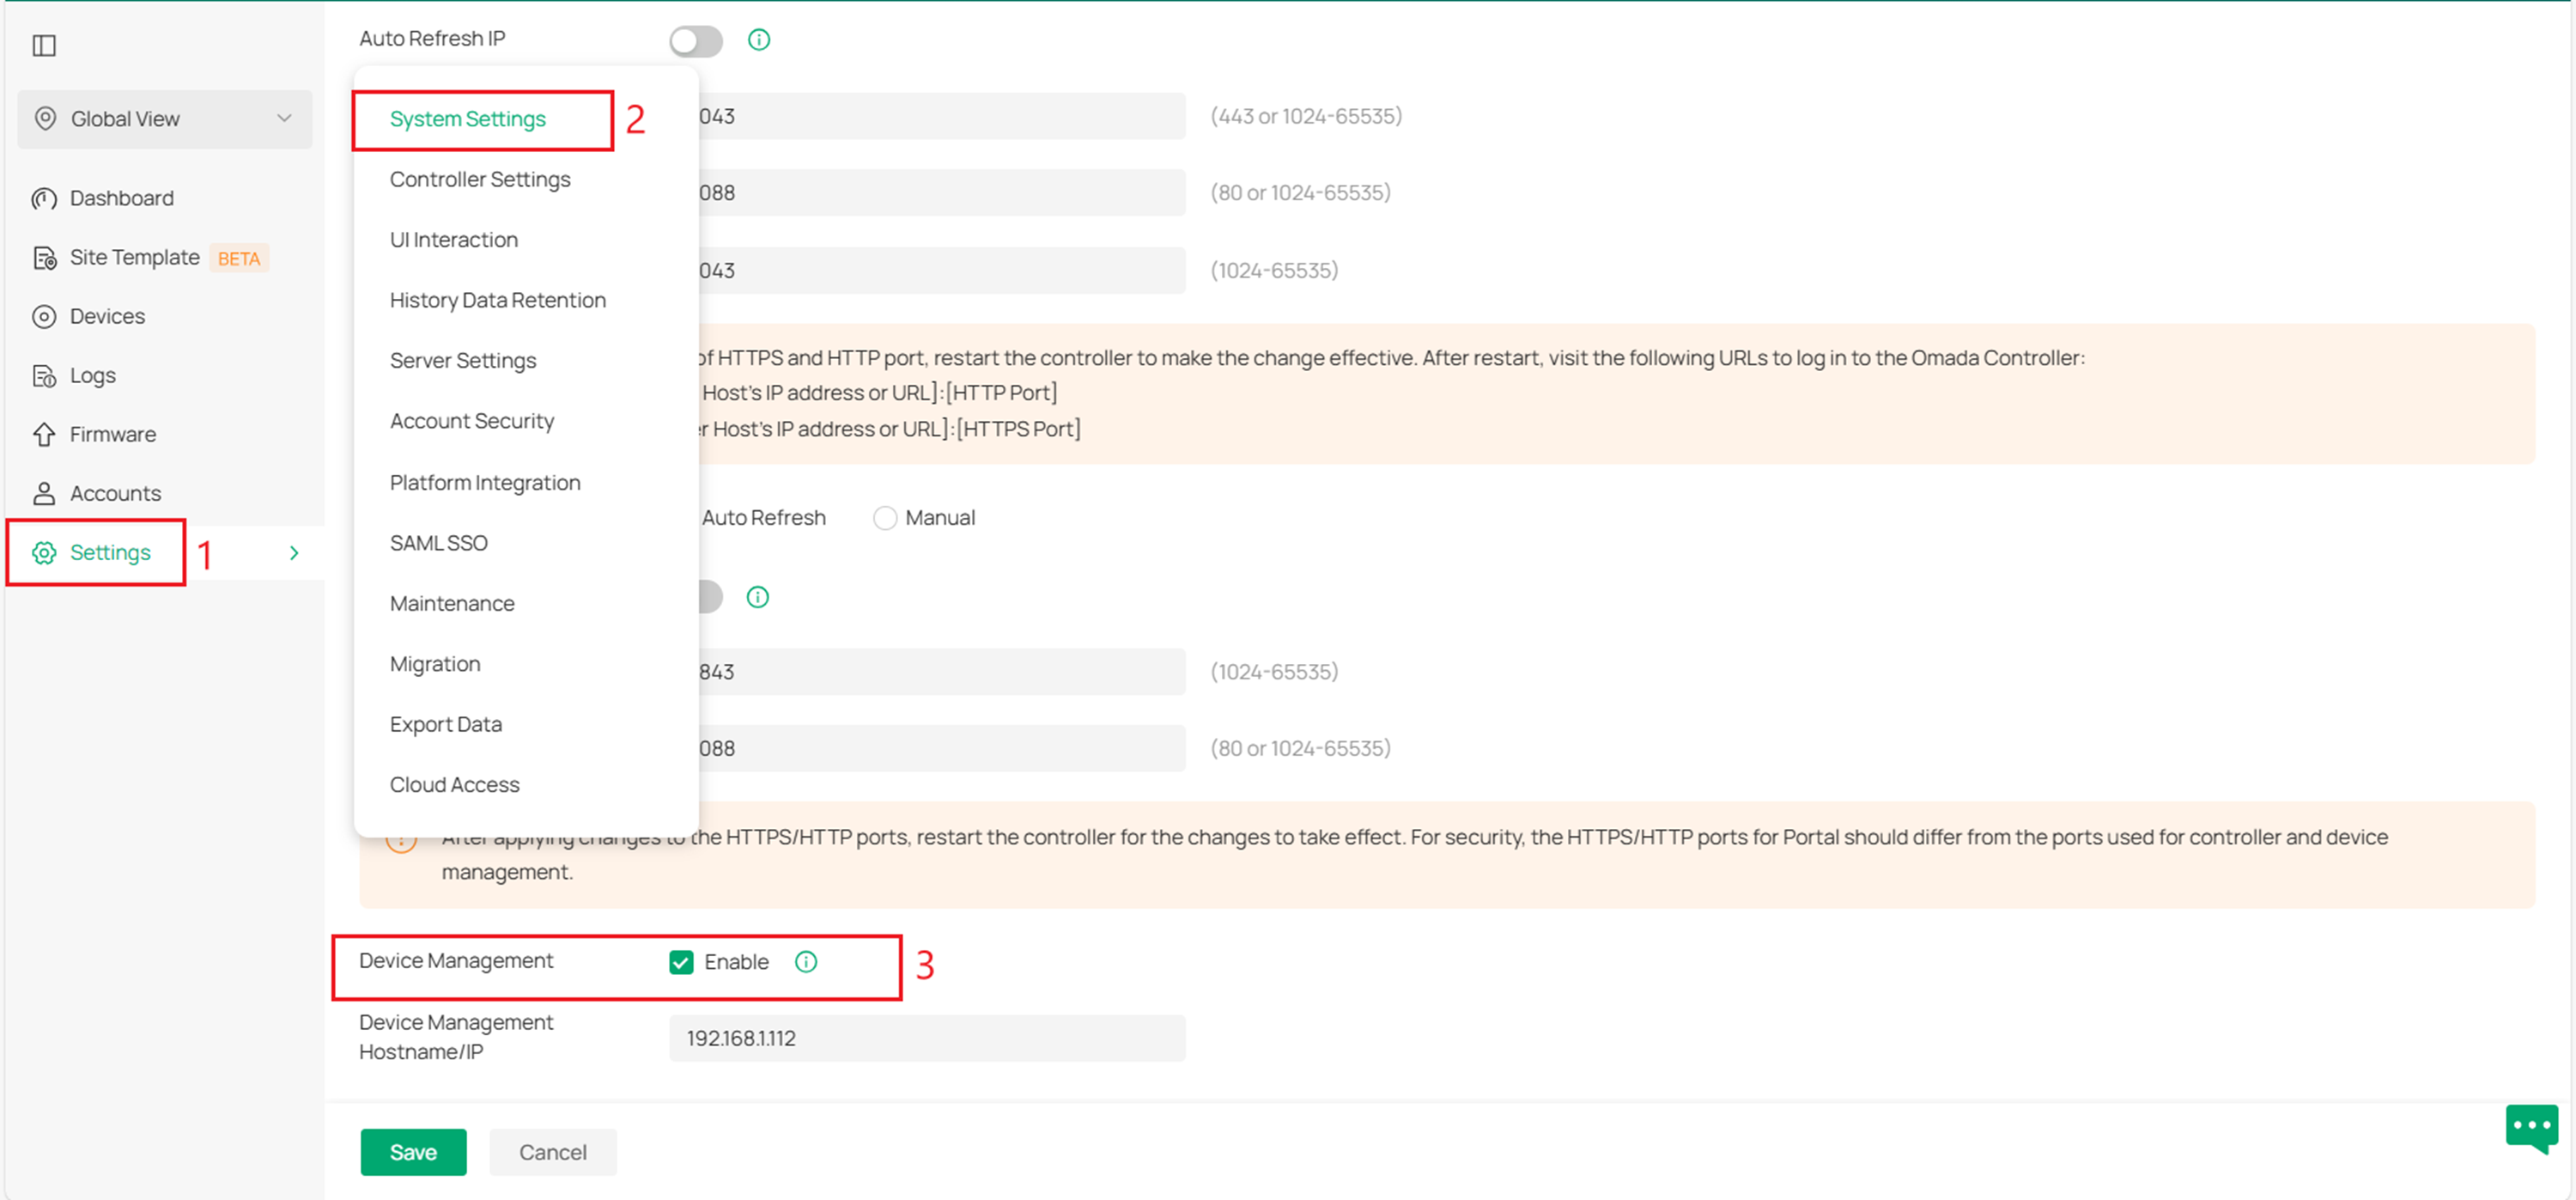
Go to the Dashboard page and copy the site URL.
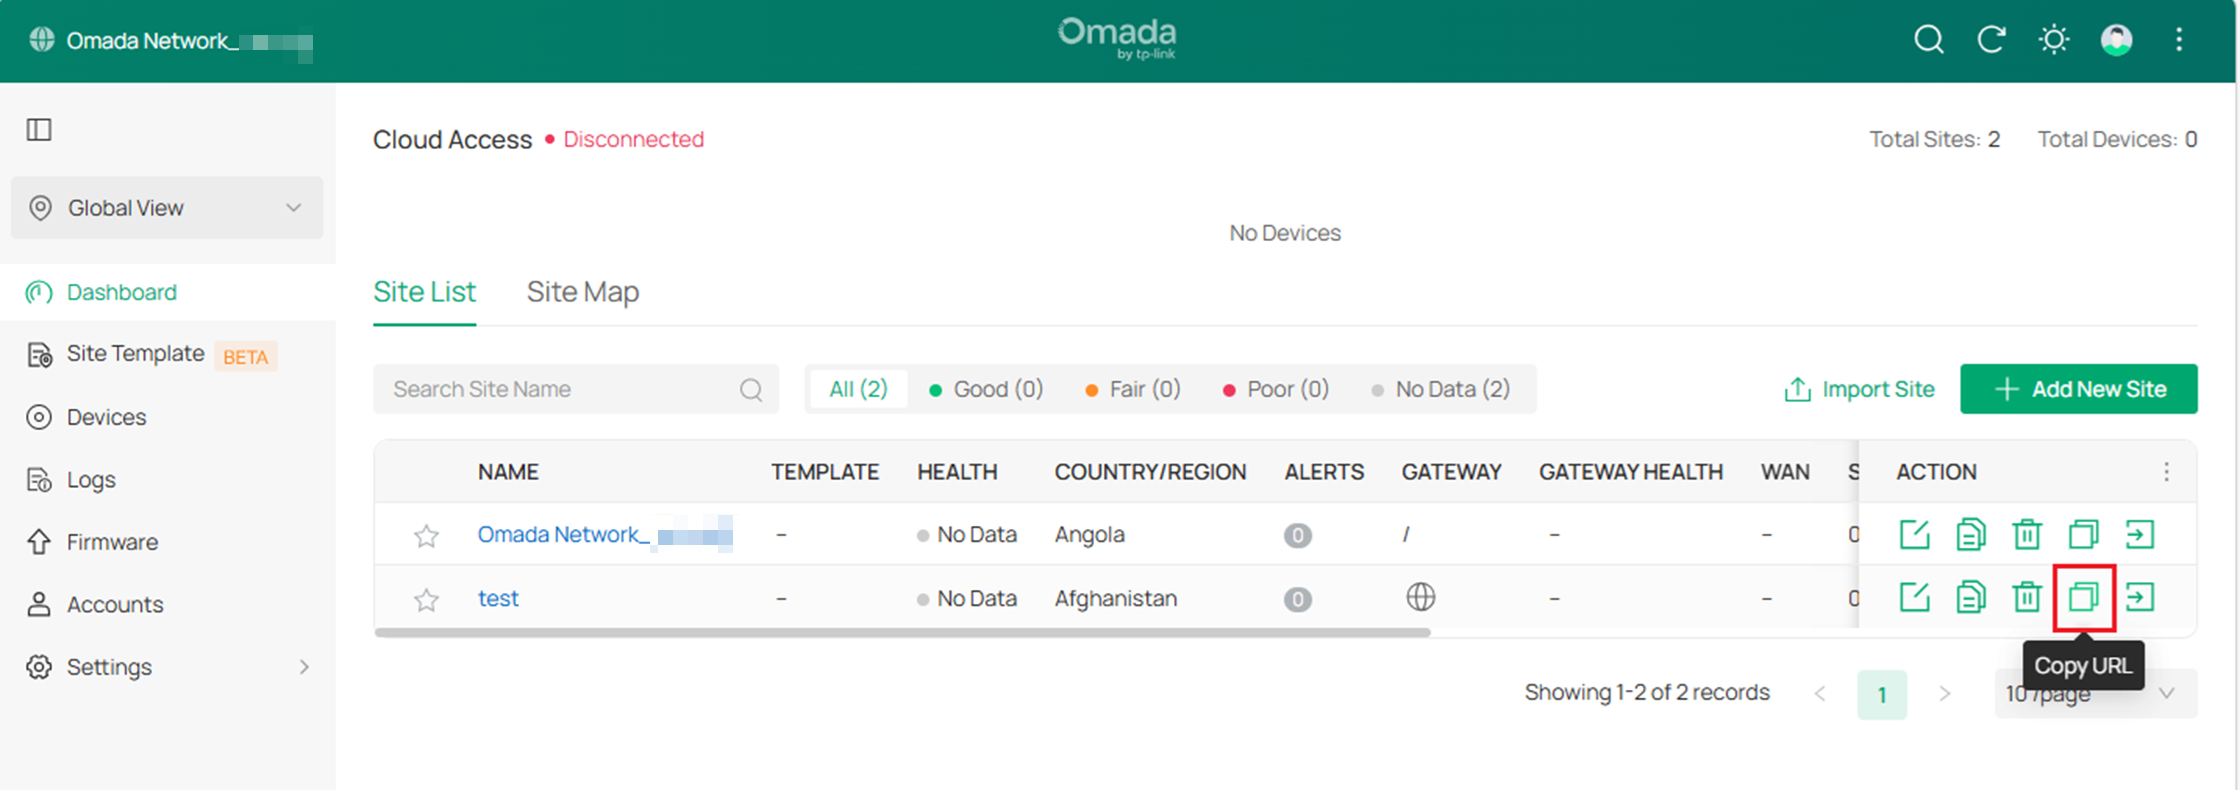
Note: Hardware Controllers and Software Controllers support the site URL for device migration.
For a Cloud-Based Controller, go to More > Copy Inform URL on the home page and copy the Inform URL.
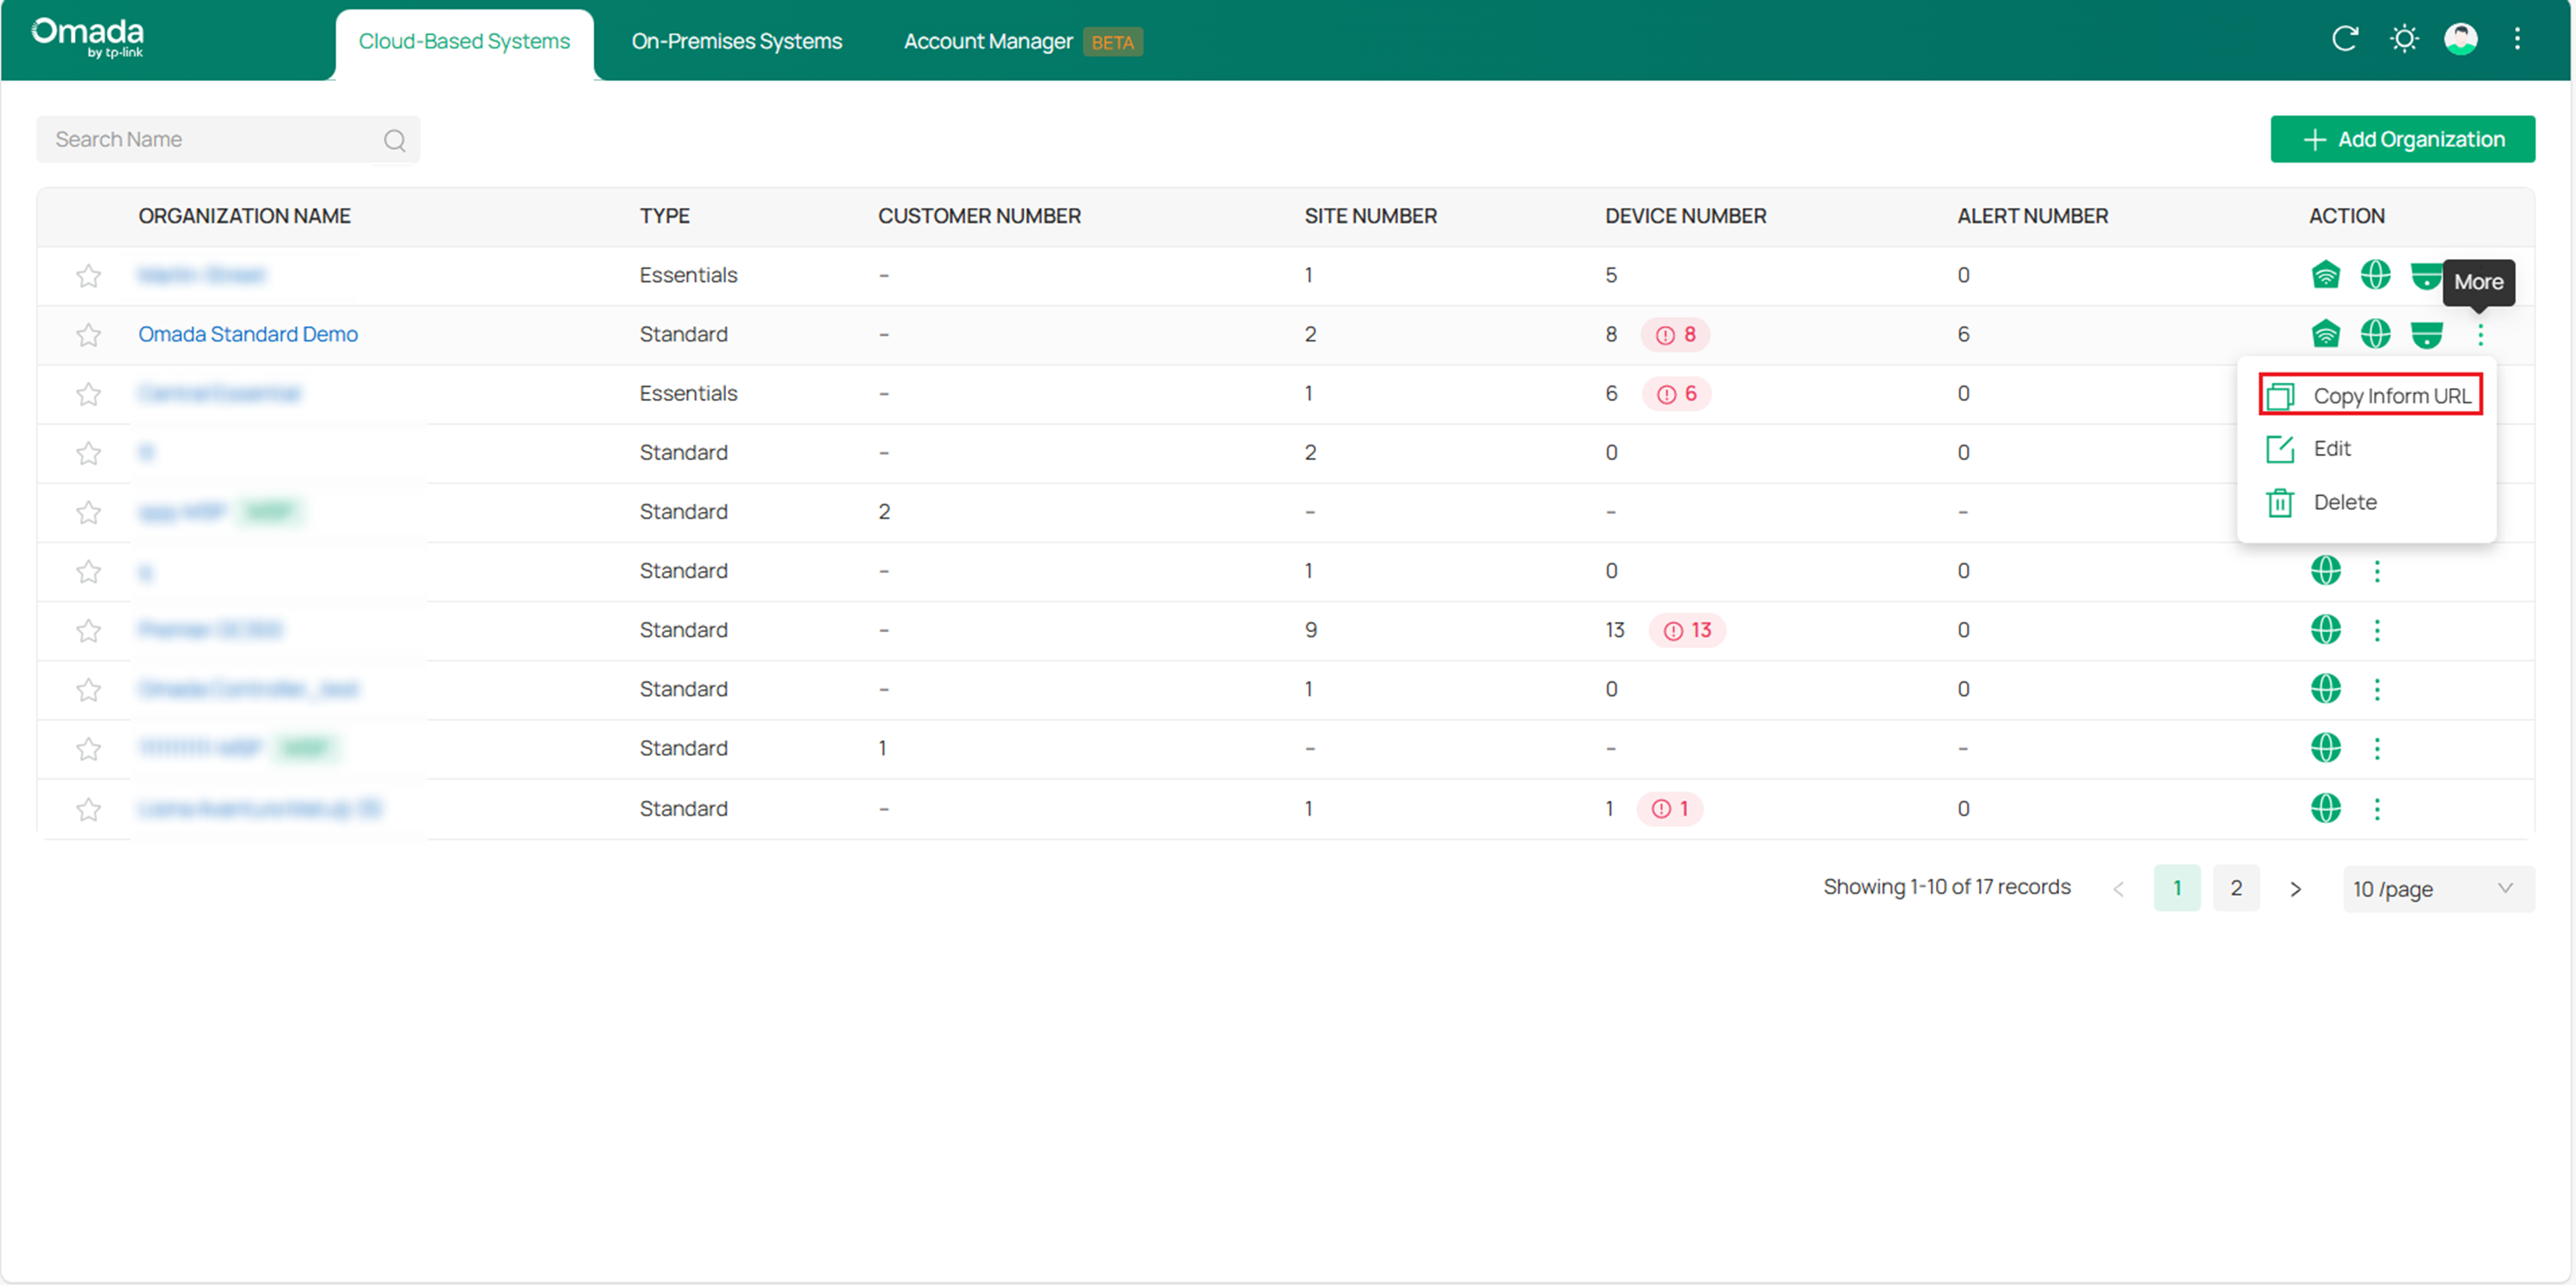
Return to the source controller and enter the applicable URL in the Controller IP/Inform URL field.
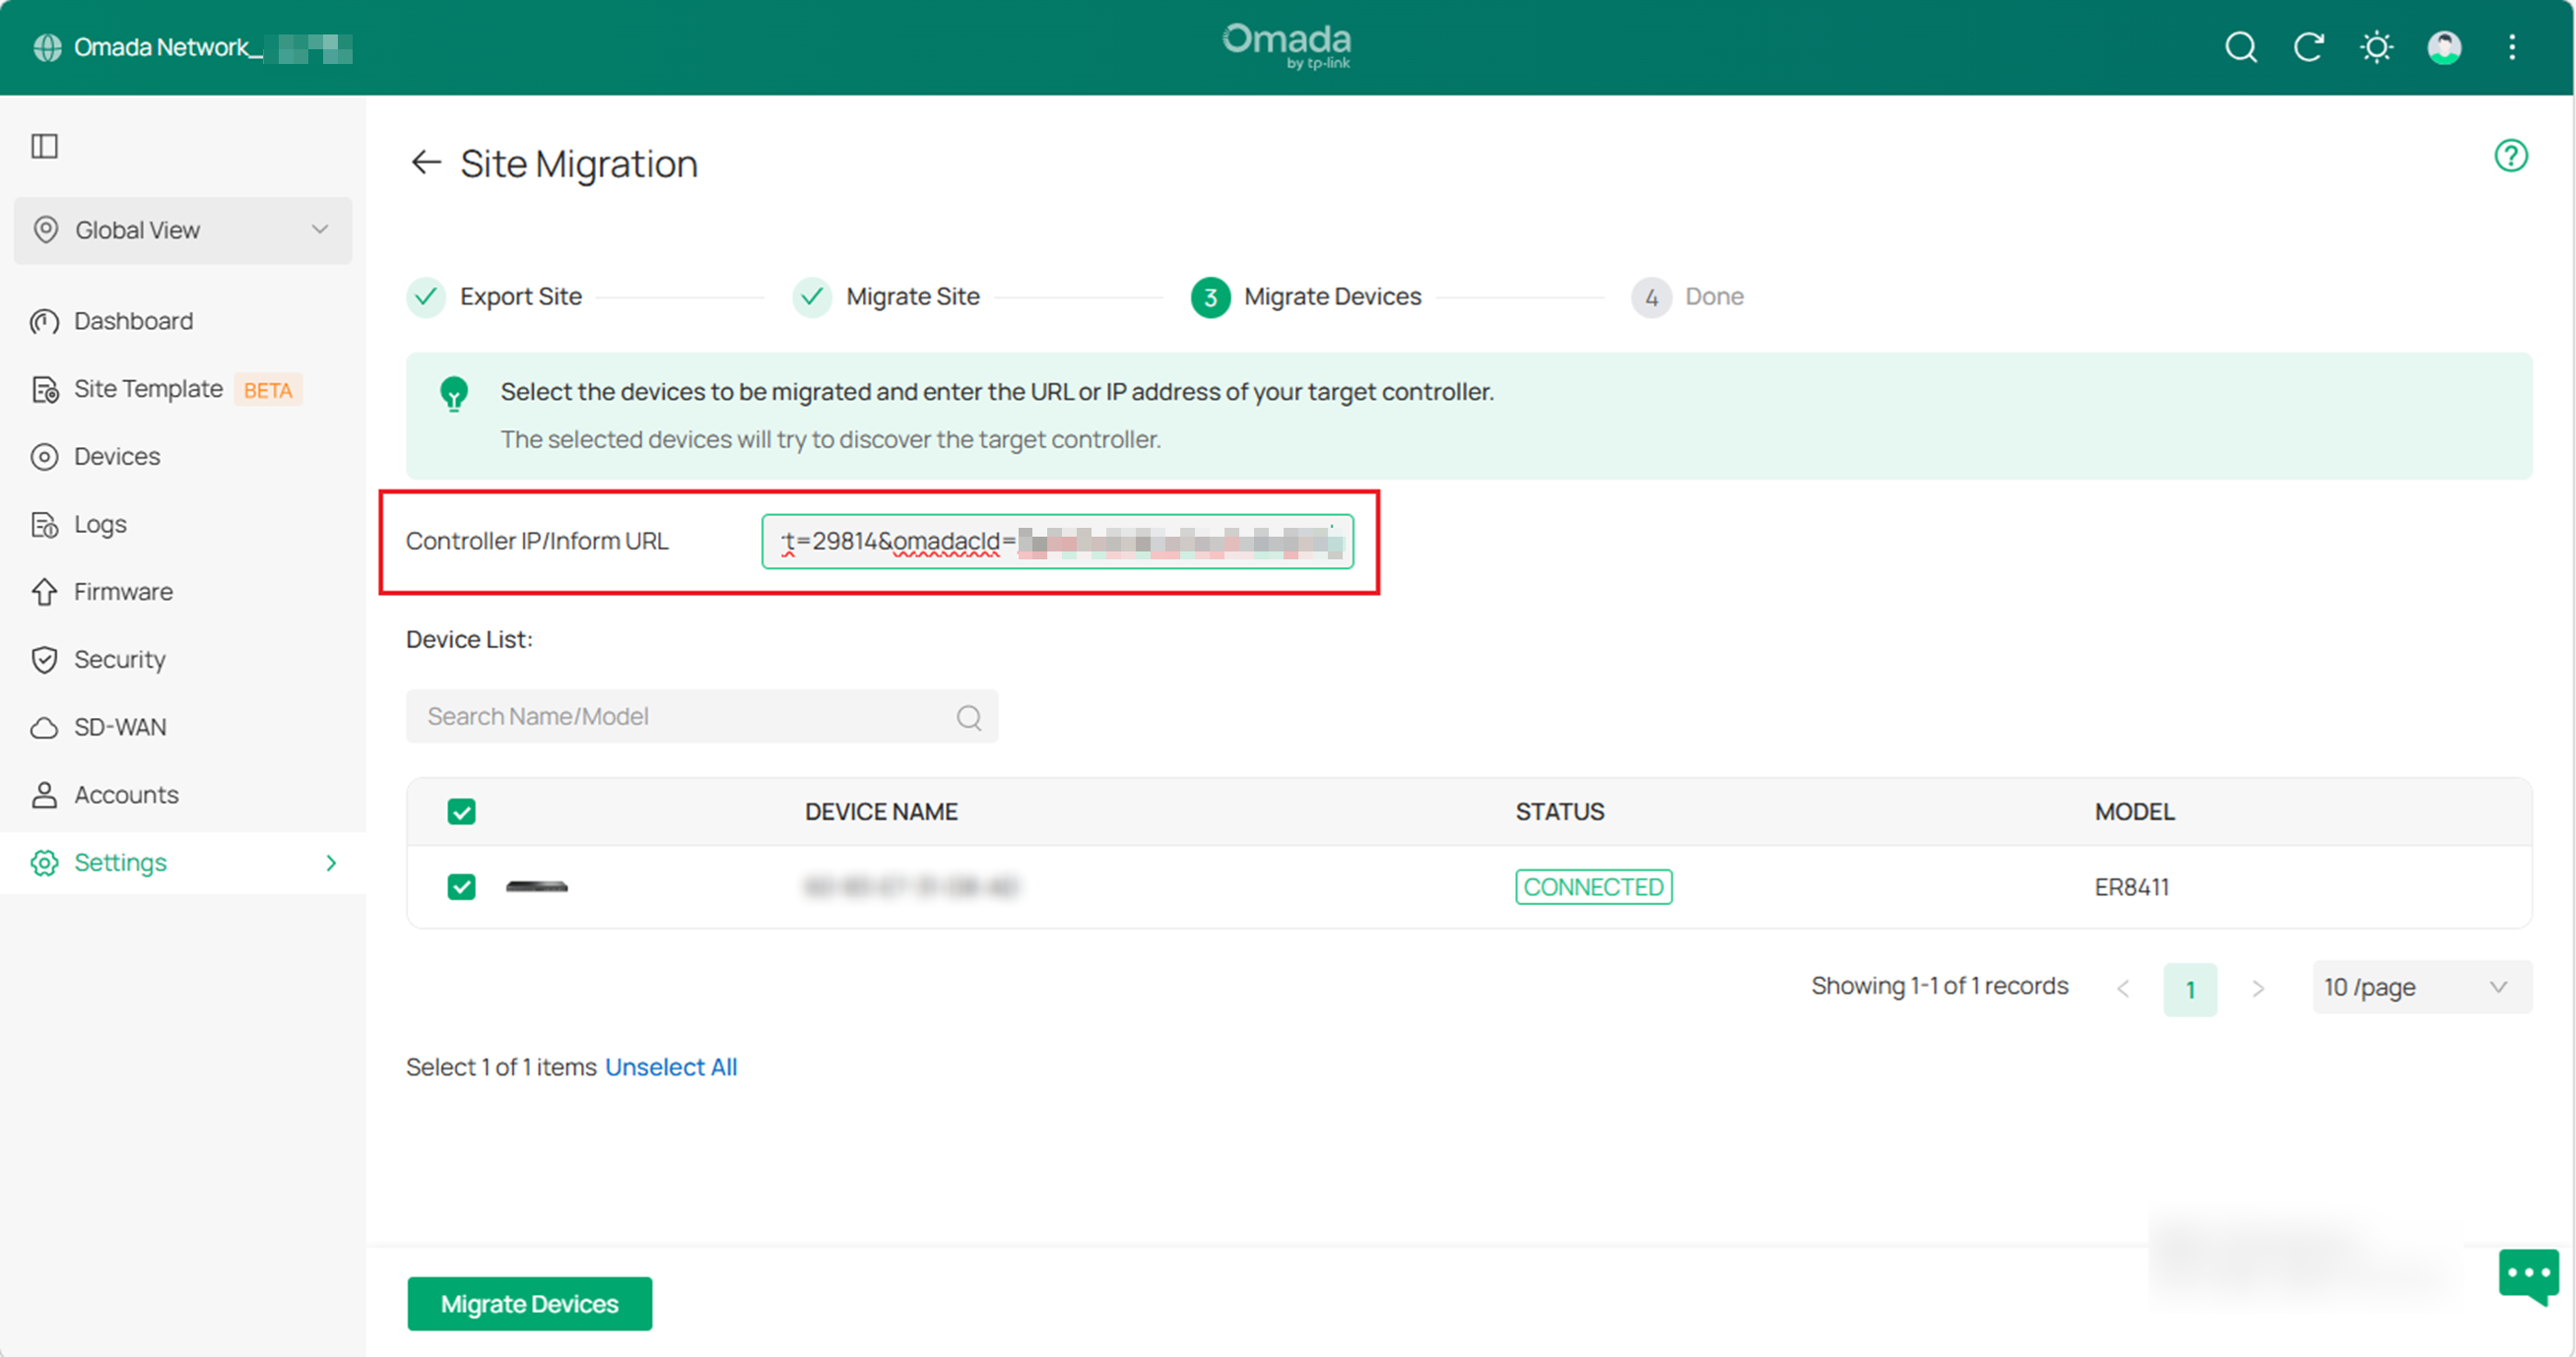
Note: Ensure that the correct IP address or URL of the target controller is entered. Otherwise, the managed devices cannot communicate with or be adopted by the target controller.
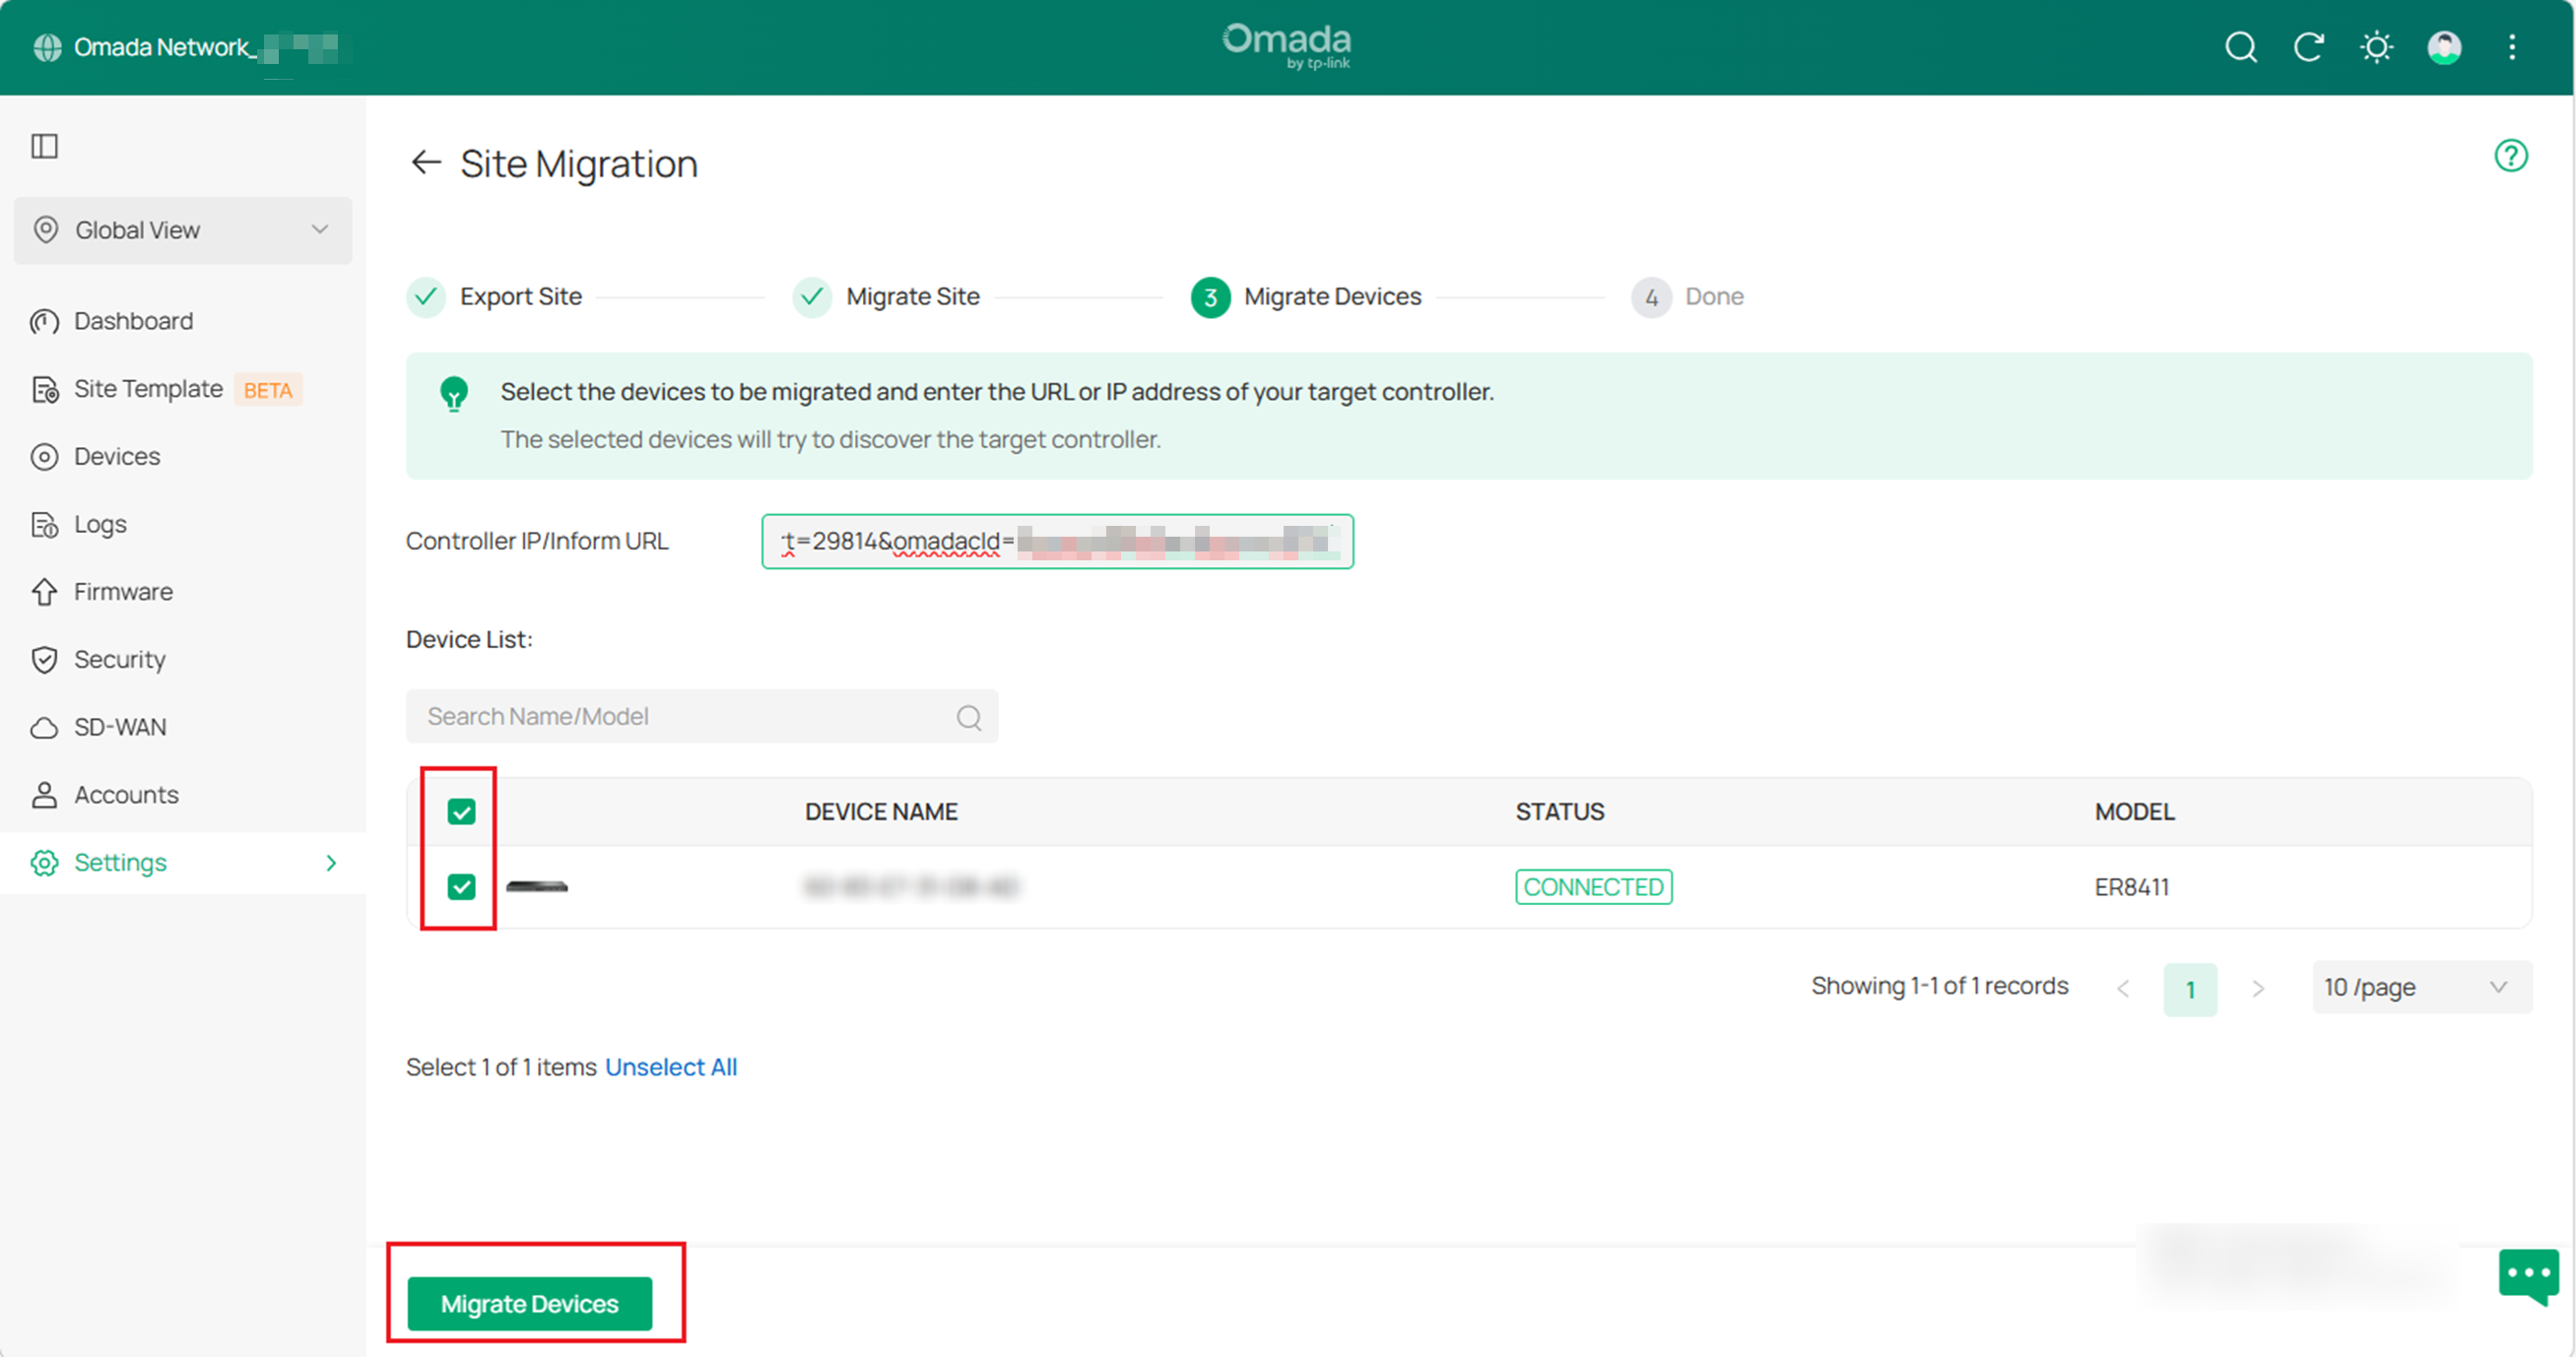
Select the devices to be migrated. By default, all devices are selected. Click Migrate Devices to migrate the selected devices to the target controller.
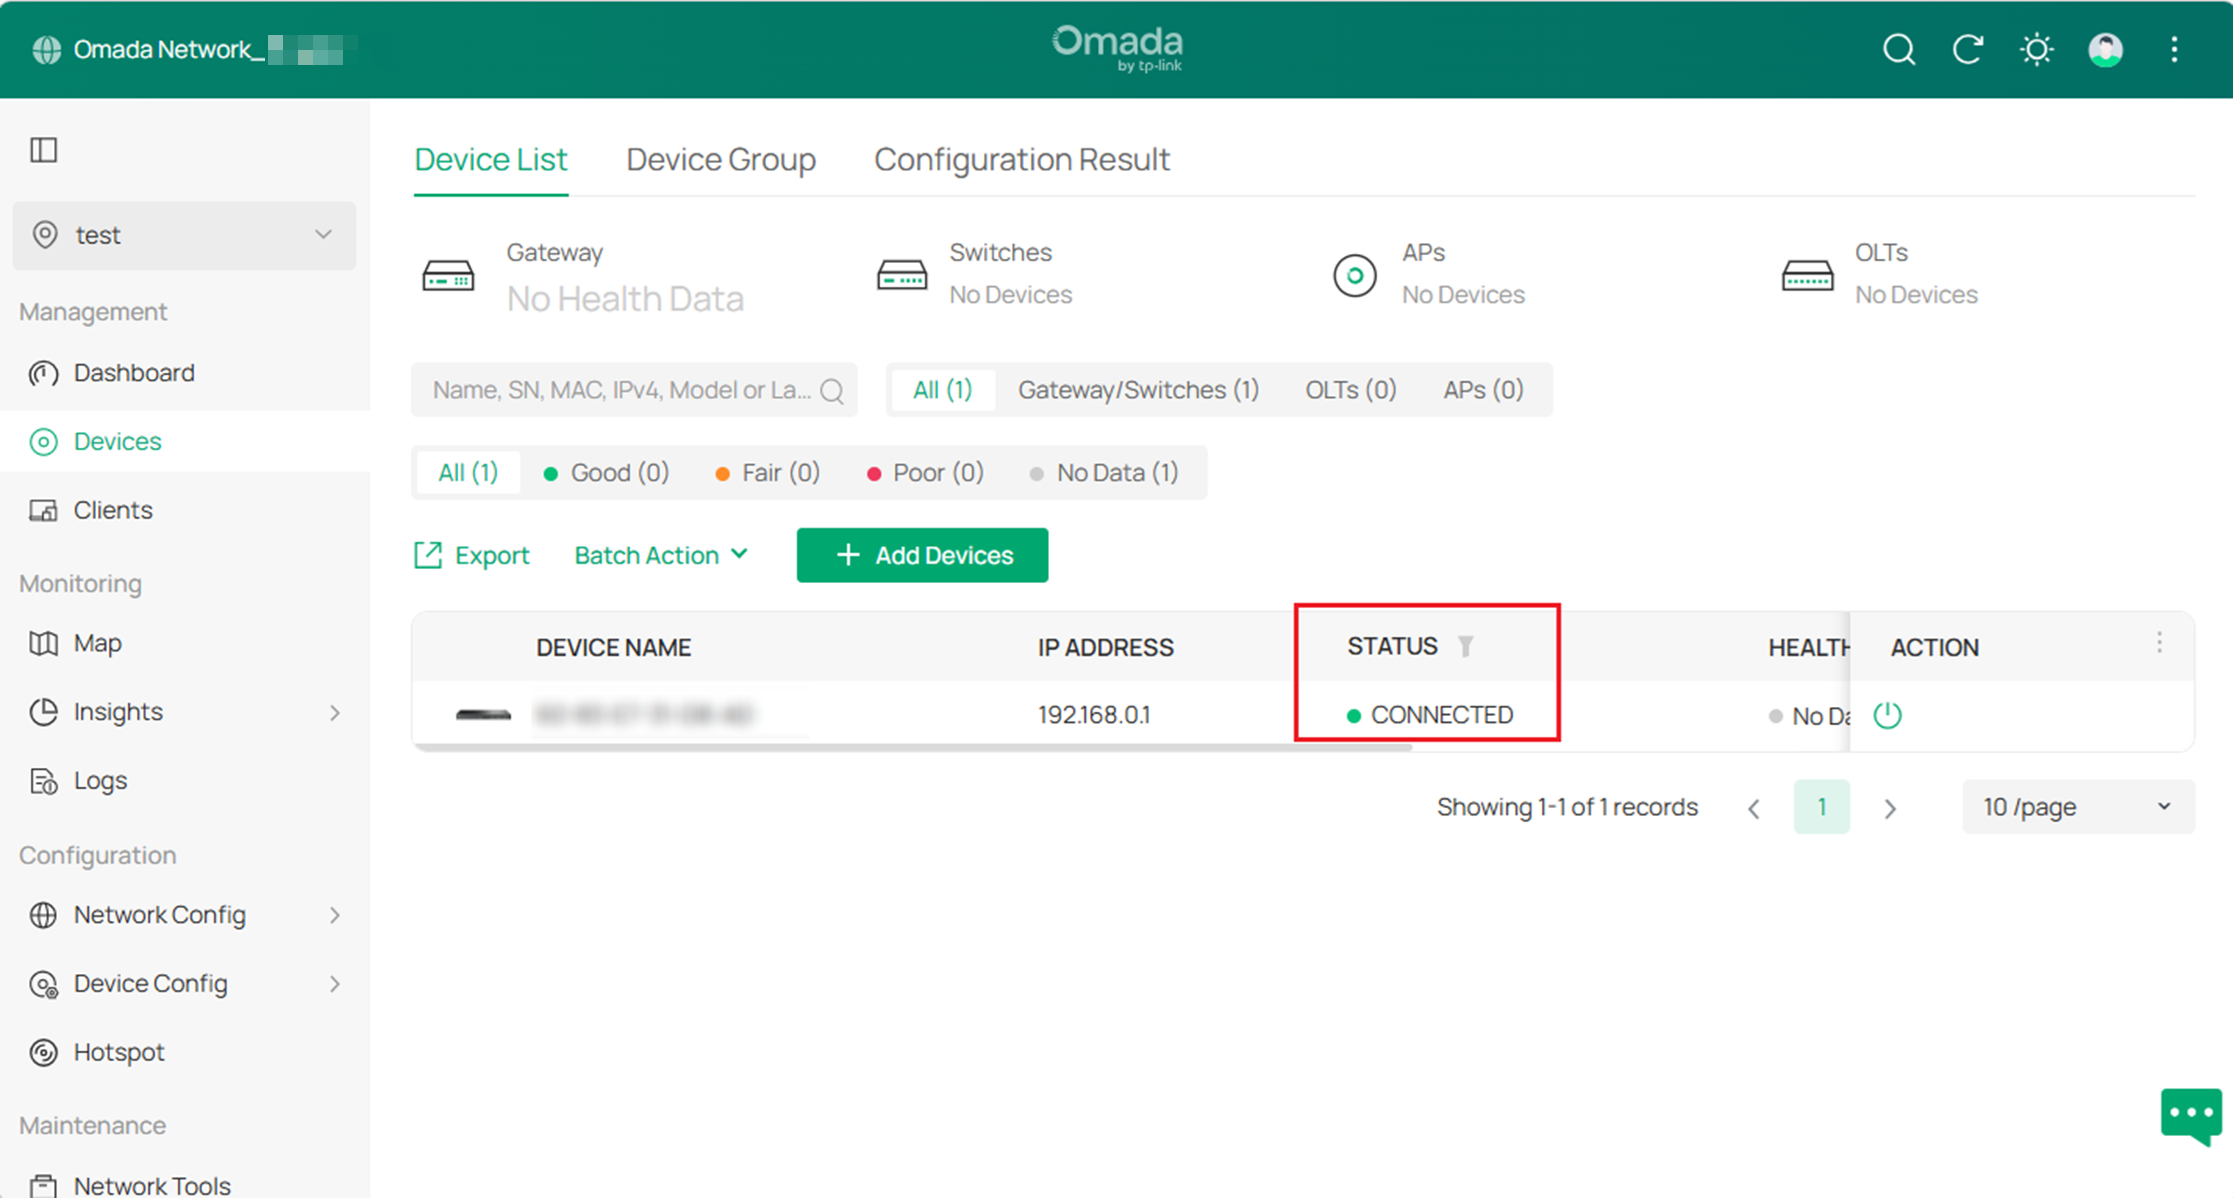
On the target controller, go to the Devices page and verify that all migrated devices are visible and show the Connected status.
After confirming that all migrated devices are connected to the target controller, return to the source controller and click Forget Devices to complete the migration.
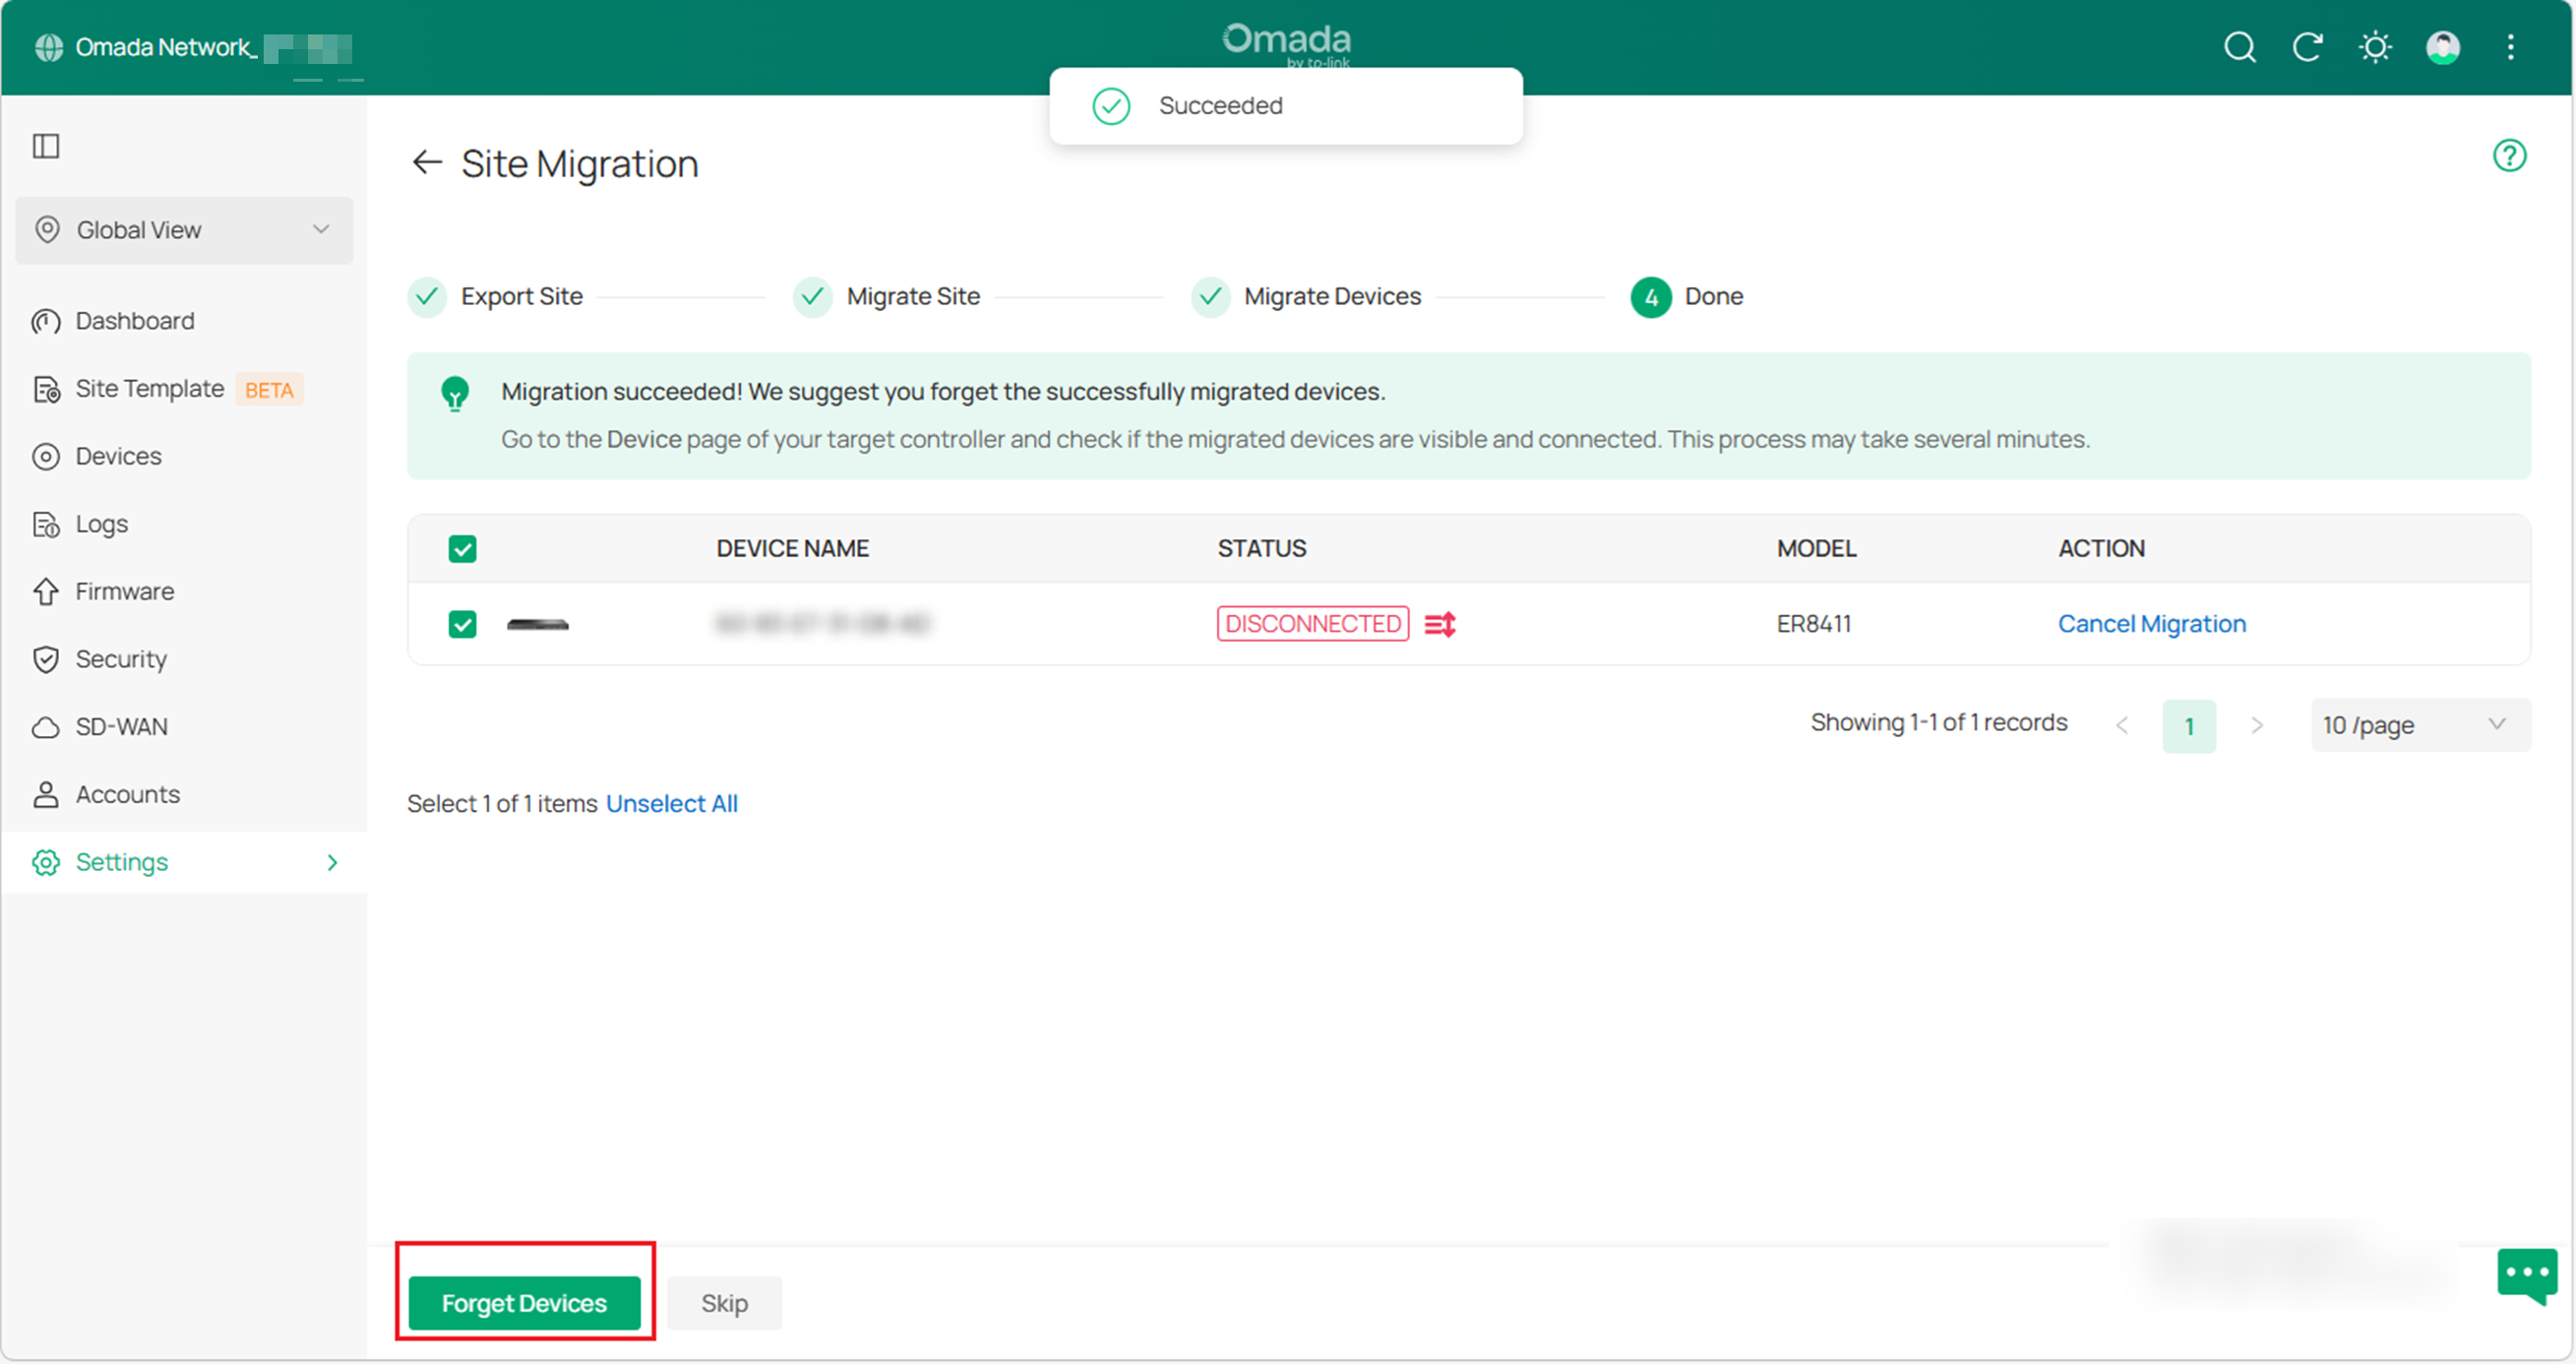
After confirming that the site configurations, data, and devices have been successfully migrated, delete the previous site if it is no longer required.
Controller migration
Controller Migration allows the configurations, data, and managed devices of the source controller to be migrated to a compatible target controller.
The Controller Migration process consists of three steps: Export Controller, Import Controller Backup, and Migrate Devices.
Note: ER7212PC controller backup files can only be imported into another ER7212PC. Importing an ER7212PC controller backup into other controller models or controller types is not supported.
Step 1. Export the controller.
Export the configurations and data of the current controller as a backup file.
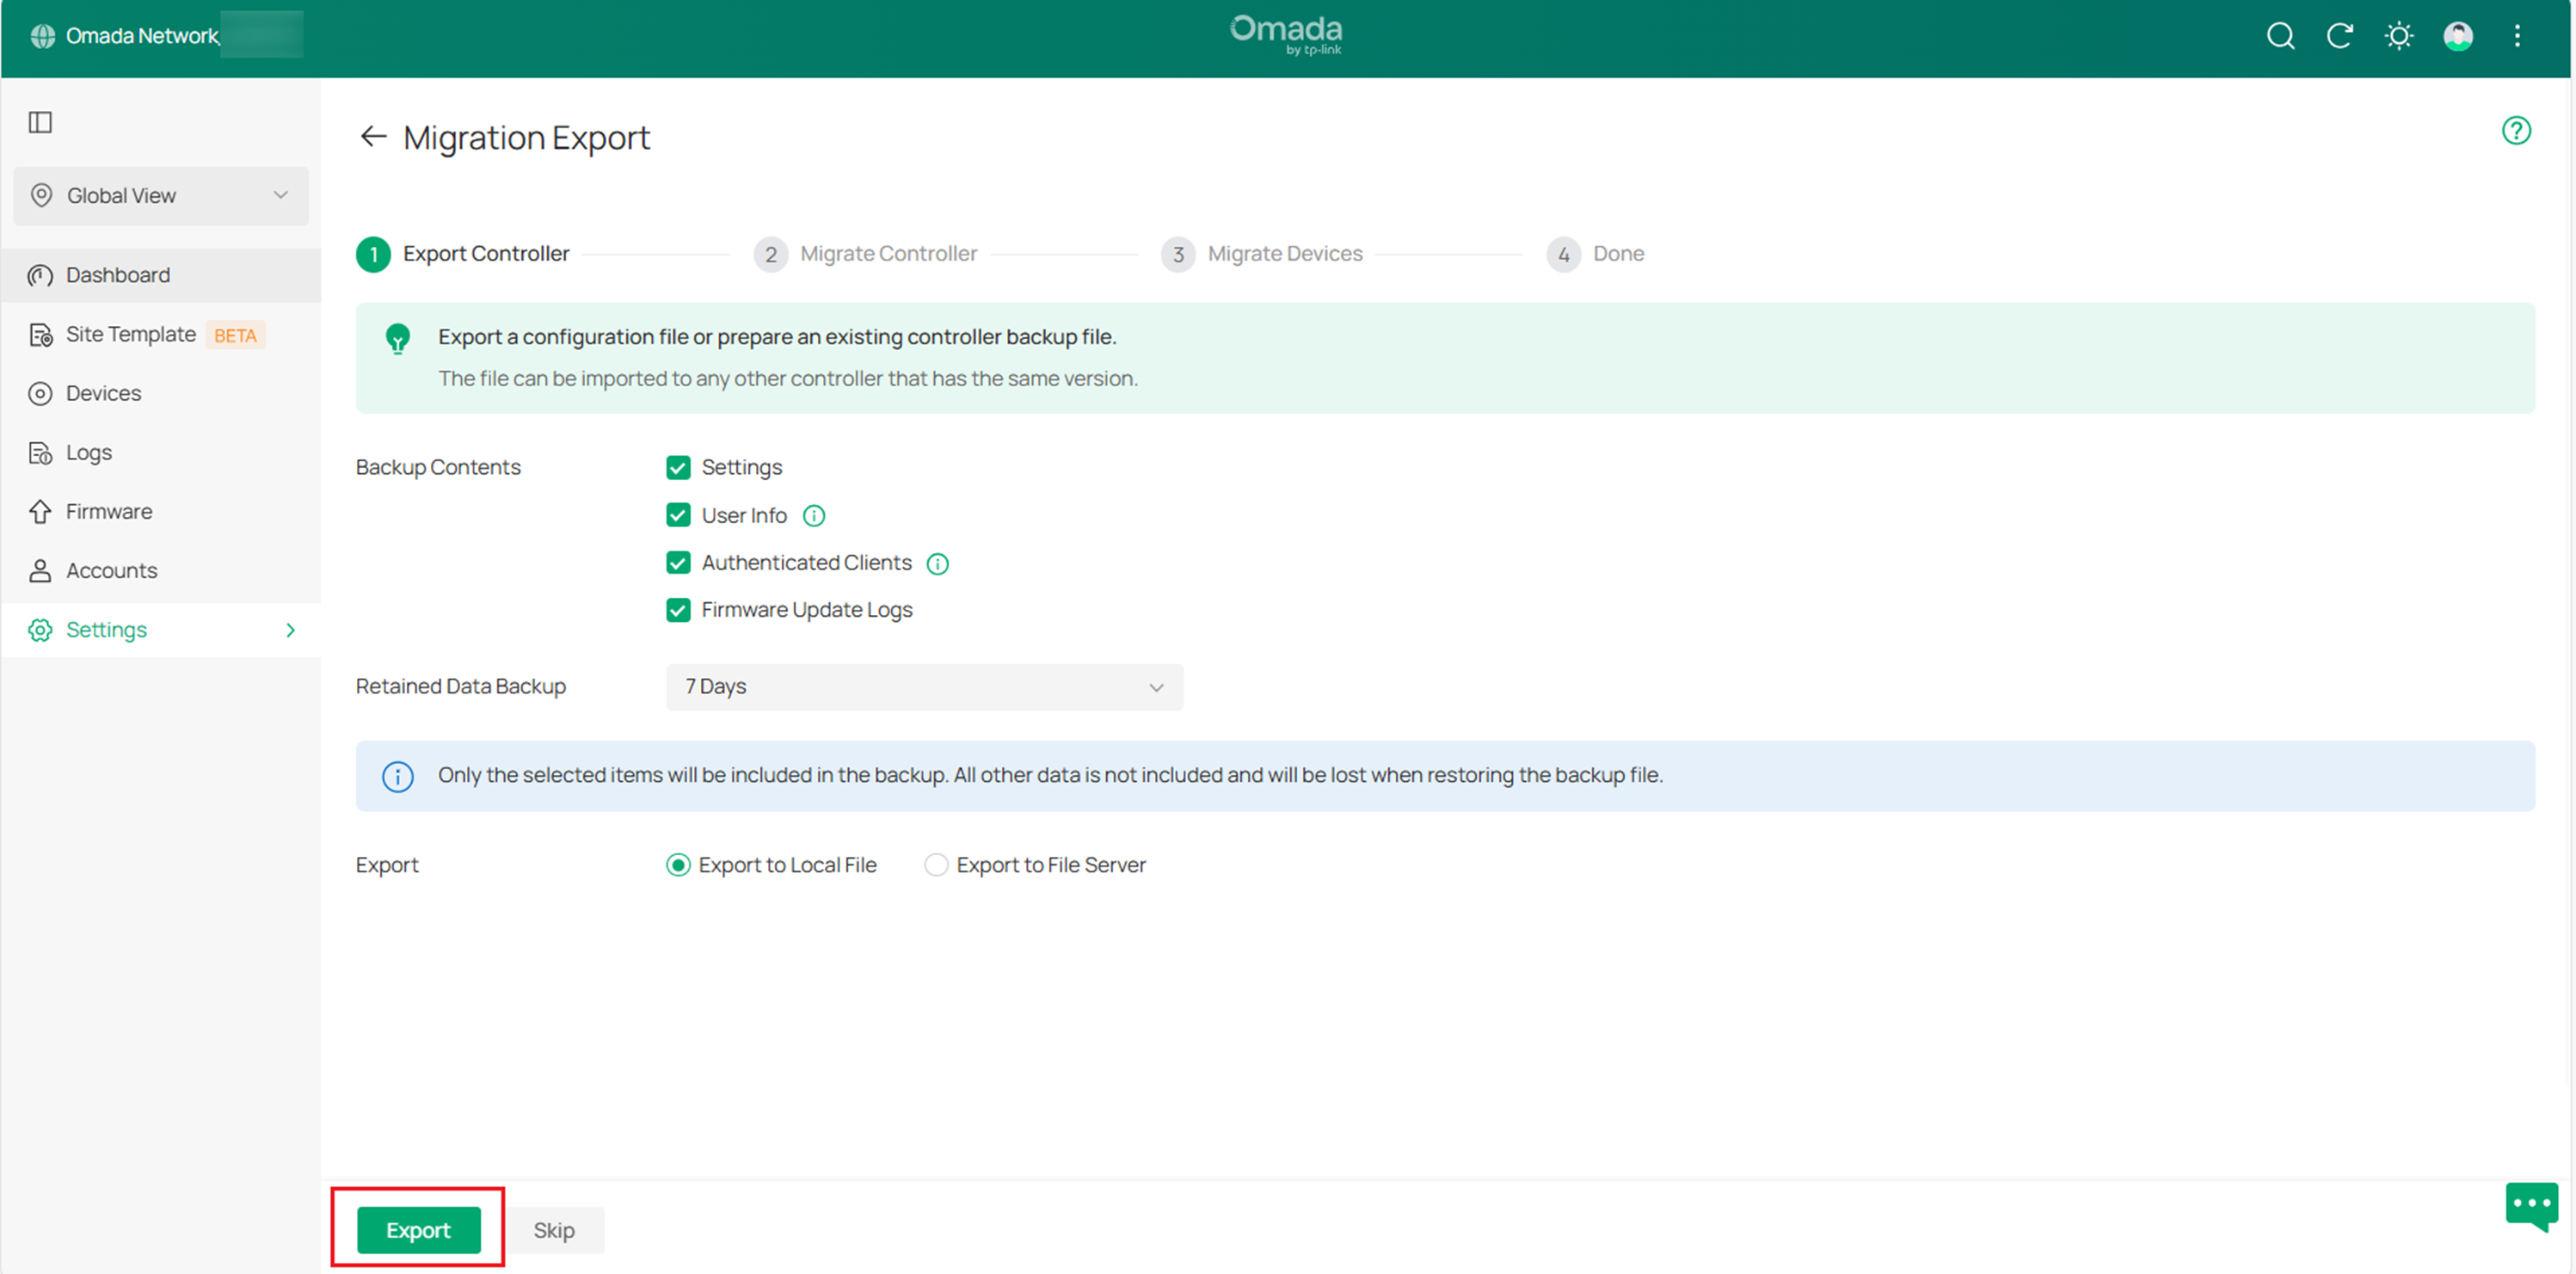
Log in to the source controller and access Global View. Go to Settings > Migration. On the Controller Migration tab, click Start Export on the Migration Export page.
If a compatible controller backup file is already available, proceed directly to the import process.
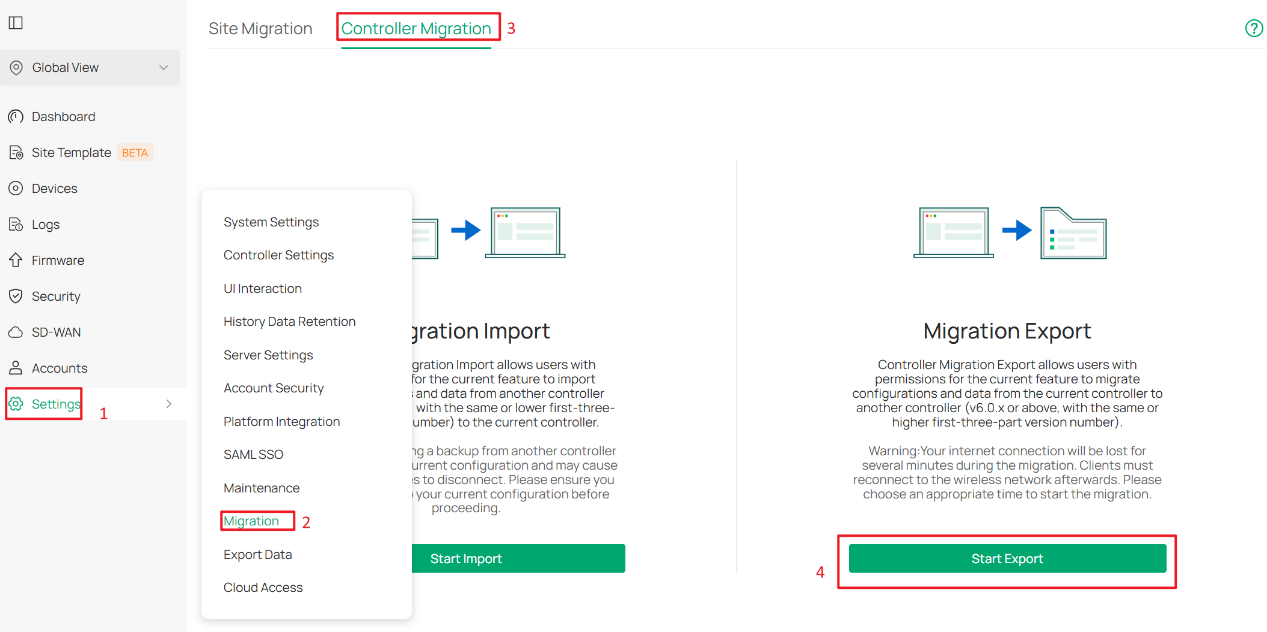
Select the data to include in the controller backup.
If only Settings and User Info are selected, Retained Data Backup is not displayed. A time range is required only when Authenticated Clients or Firmware Update Logs are included.
Click Export to export the selected configurations and data as a controller backup file. If a backup file has already been created, click Skip.
Step 2. Import the controller backup.
In the target controller, import the current controller's backup file.
Log in to the target controller and access Global View. Go to Settings > Migration > Controller Migration, and click Start Import.
Click Browse, select the backup file exported from the source controller, and click Import.
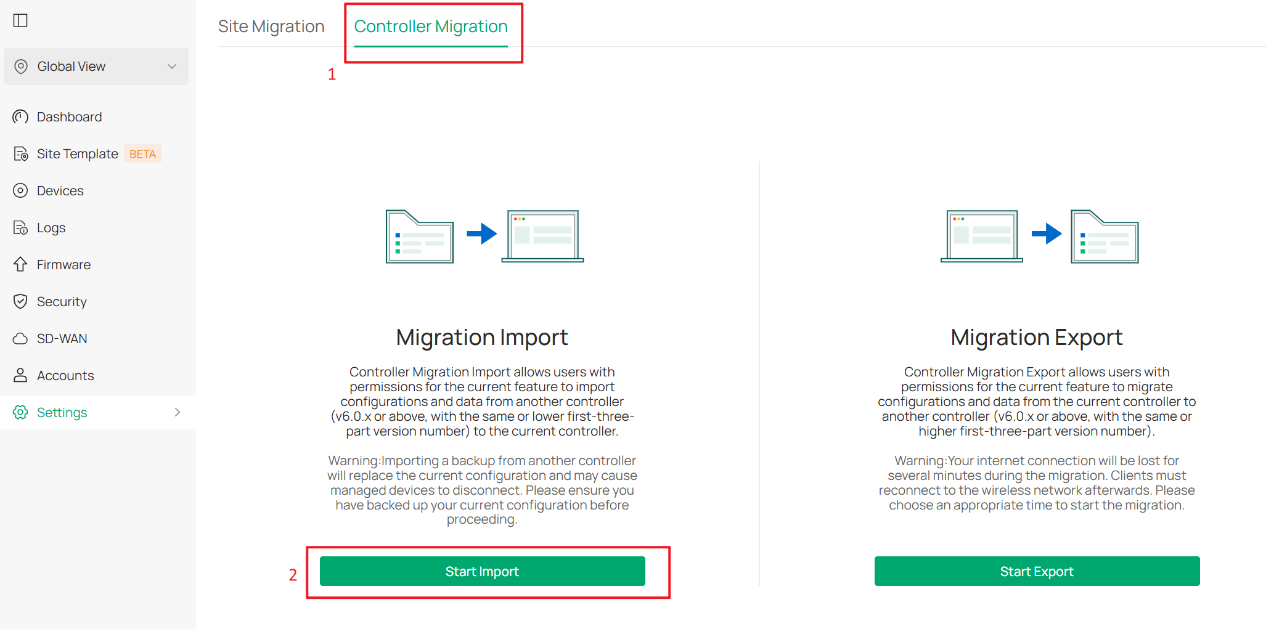
Note: Migration Import supports importing configurations from compatible controllers.
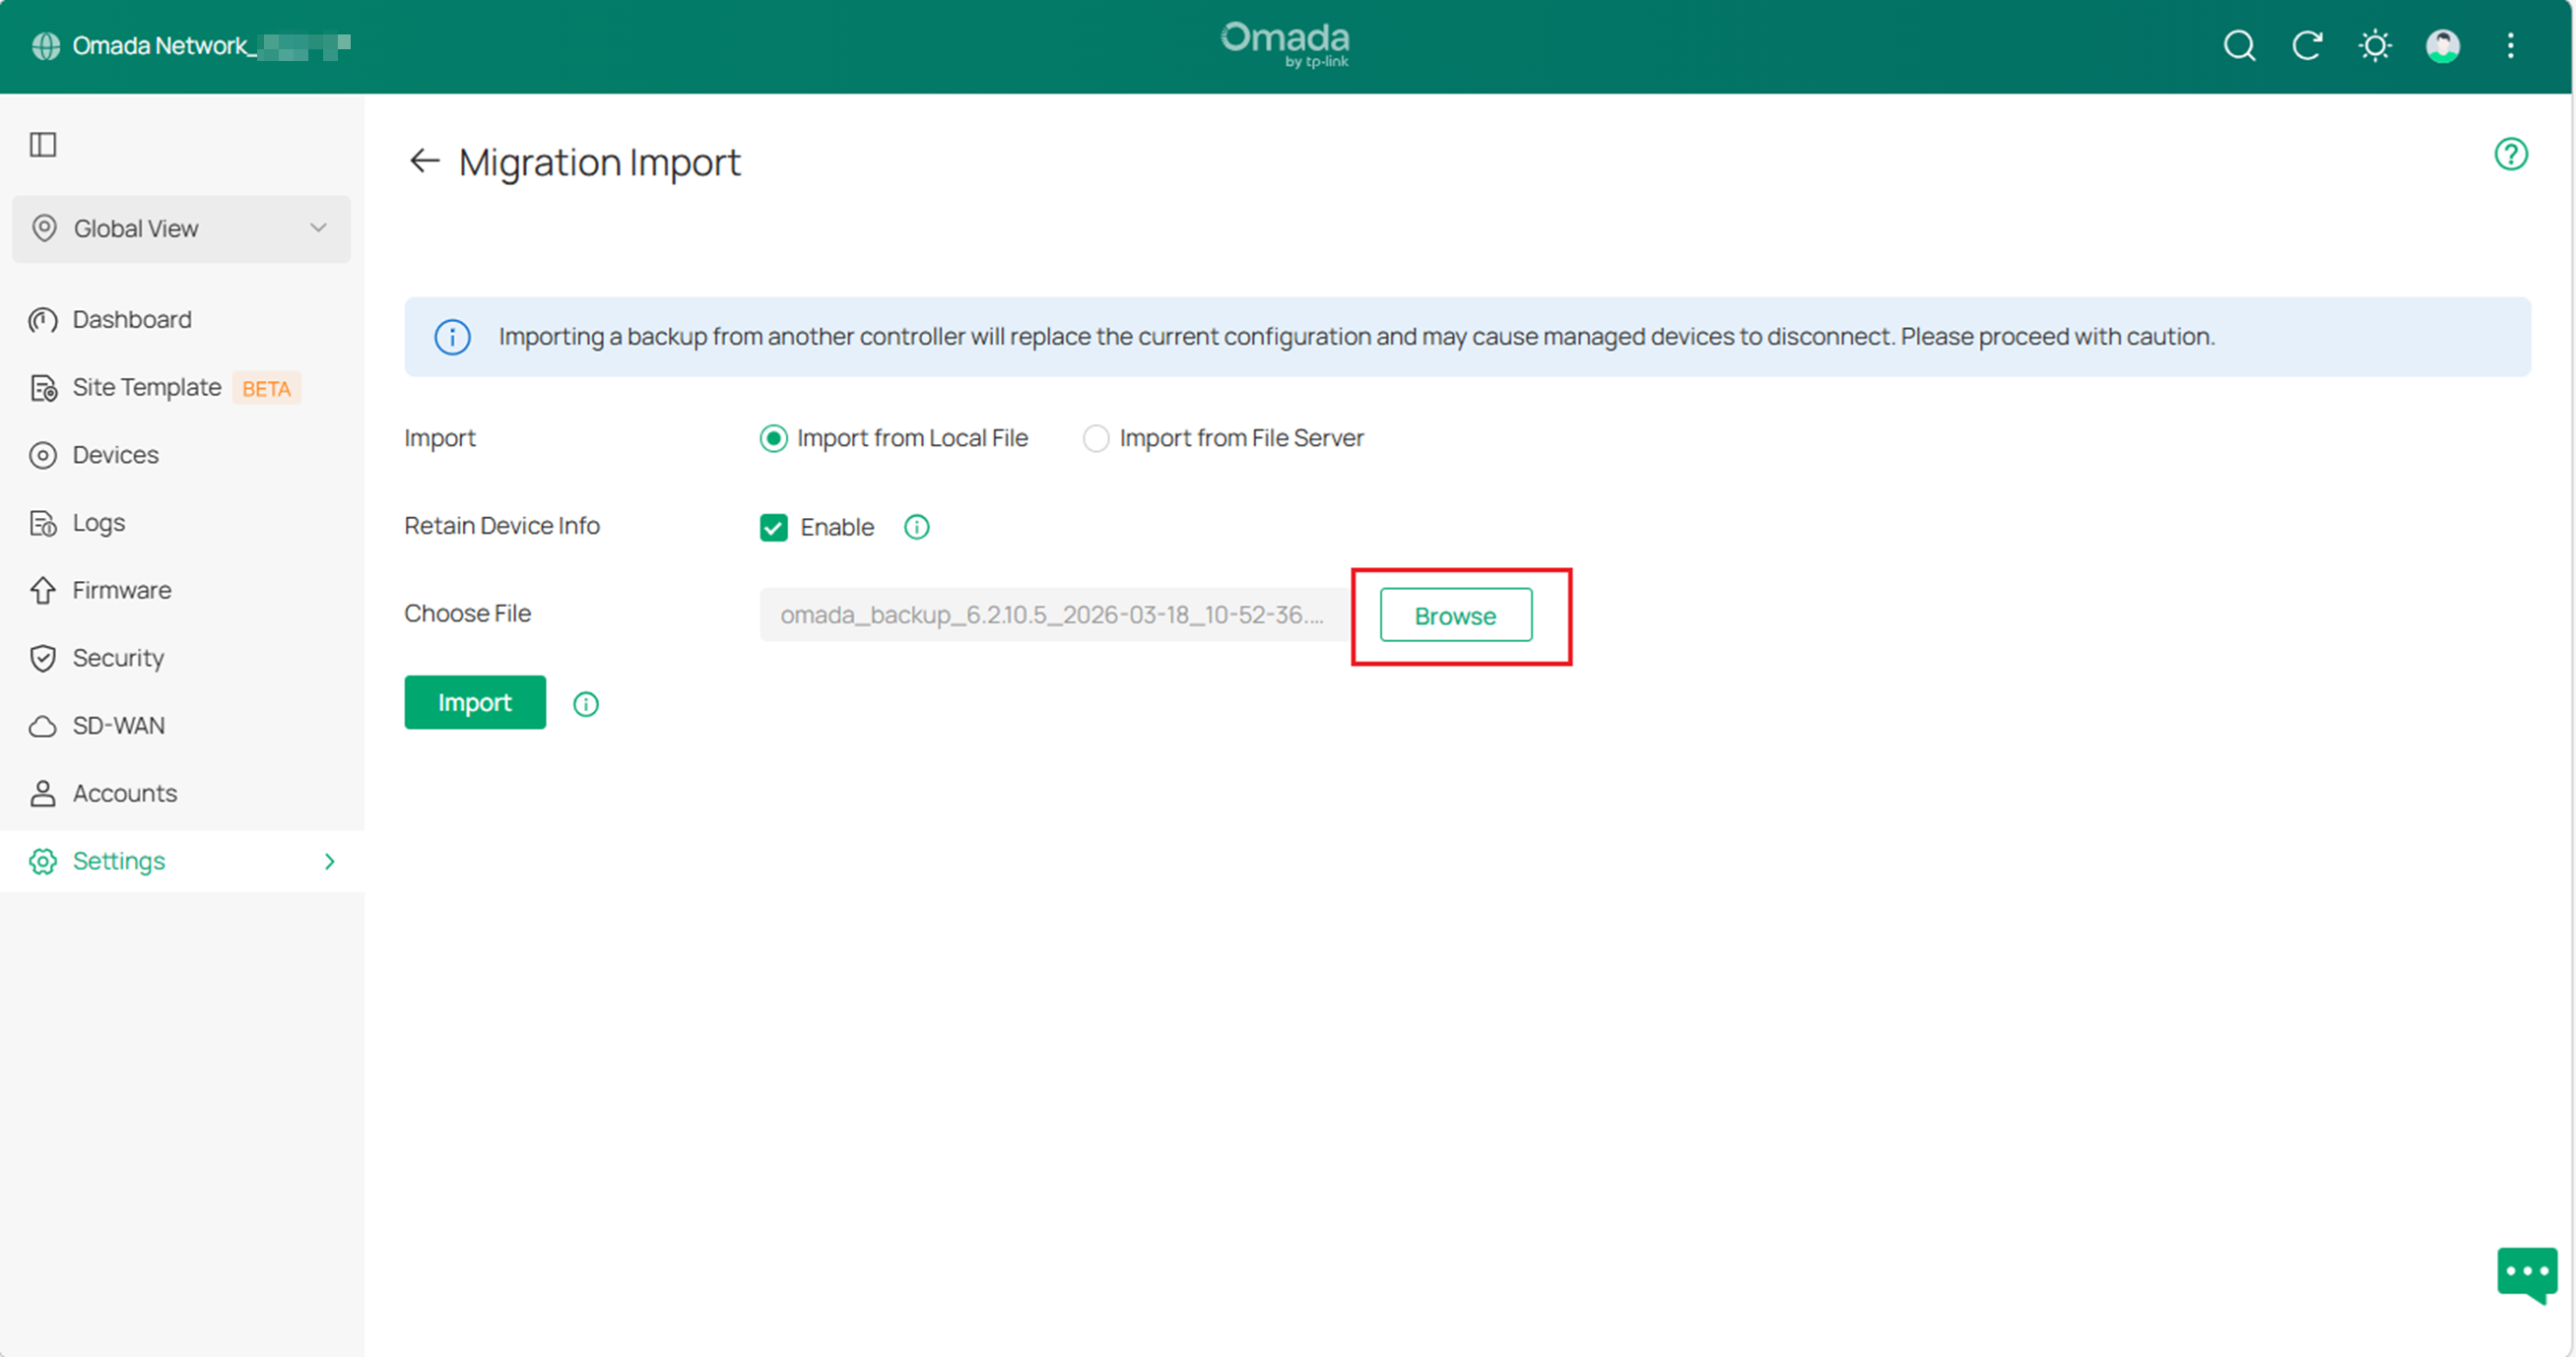
After the backup file has been successfully imported into the target controller, return to the source controller and click Confirm.
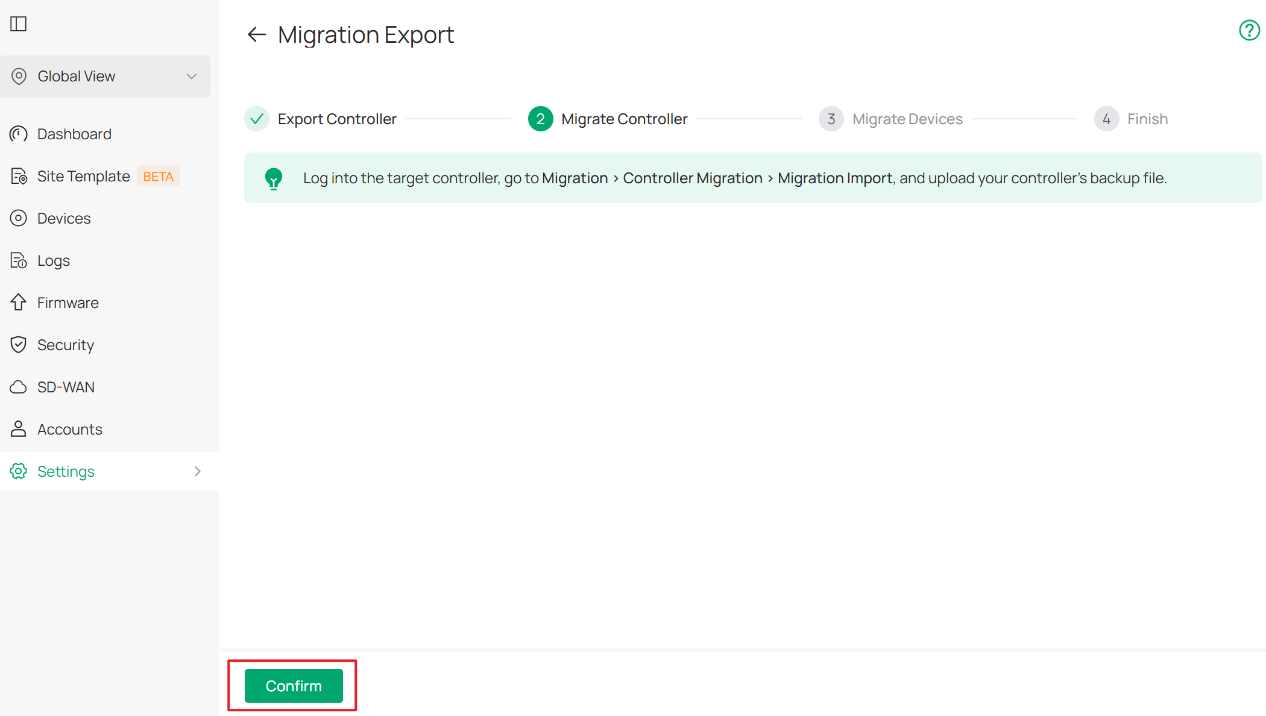
Note: For Omada Controller v5.15.24 and later, do not skip the backup file import step on the target controller. If device migration is performed before the backup file is imported, the target controller cannot automatically adopt the migrated devices. Complete the migration steps in the specified order.
Step 3. Migrate the devices.
Migrate the managed devices from the source controller to the target controller.
Enter the IP address or URL of the target controller in the Controller IP/Inform URL field.
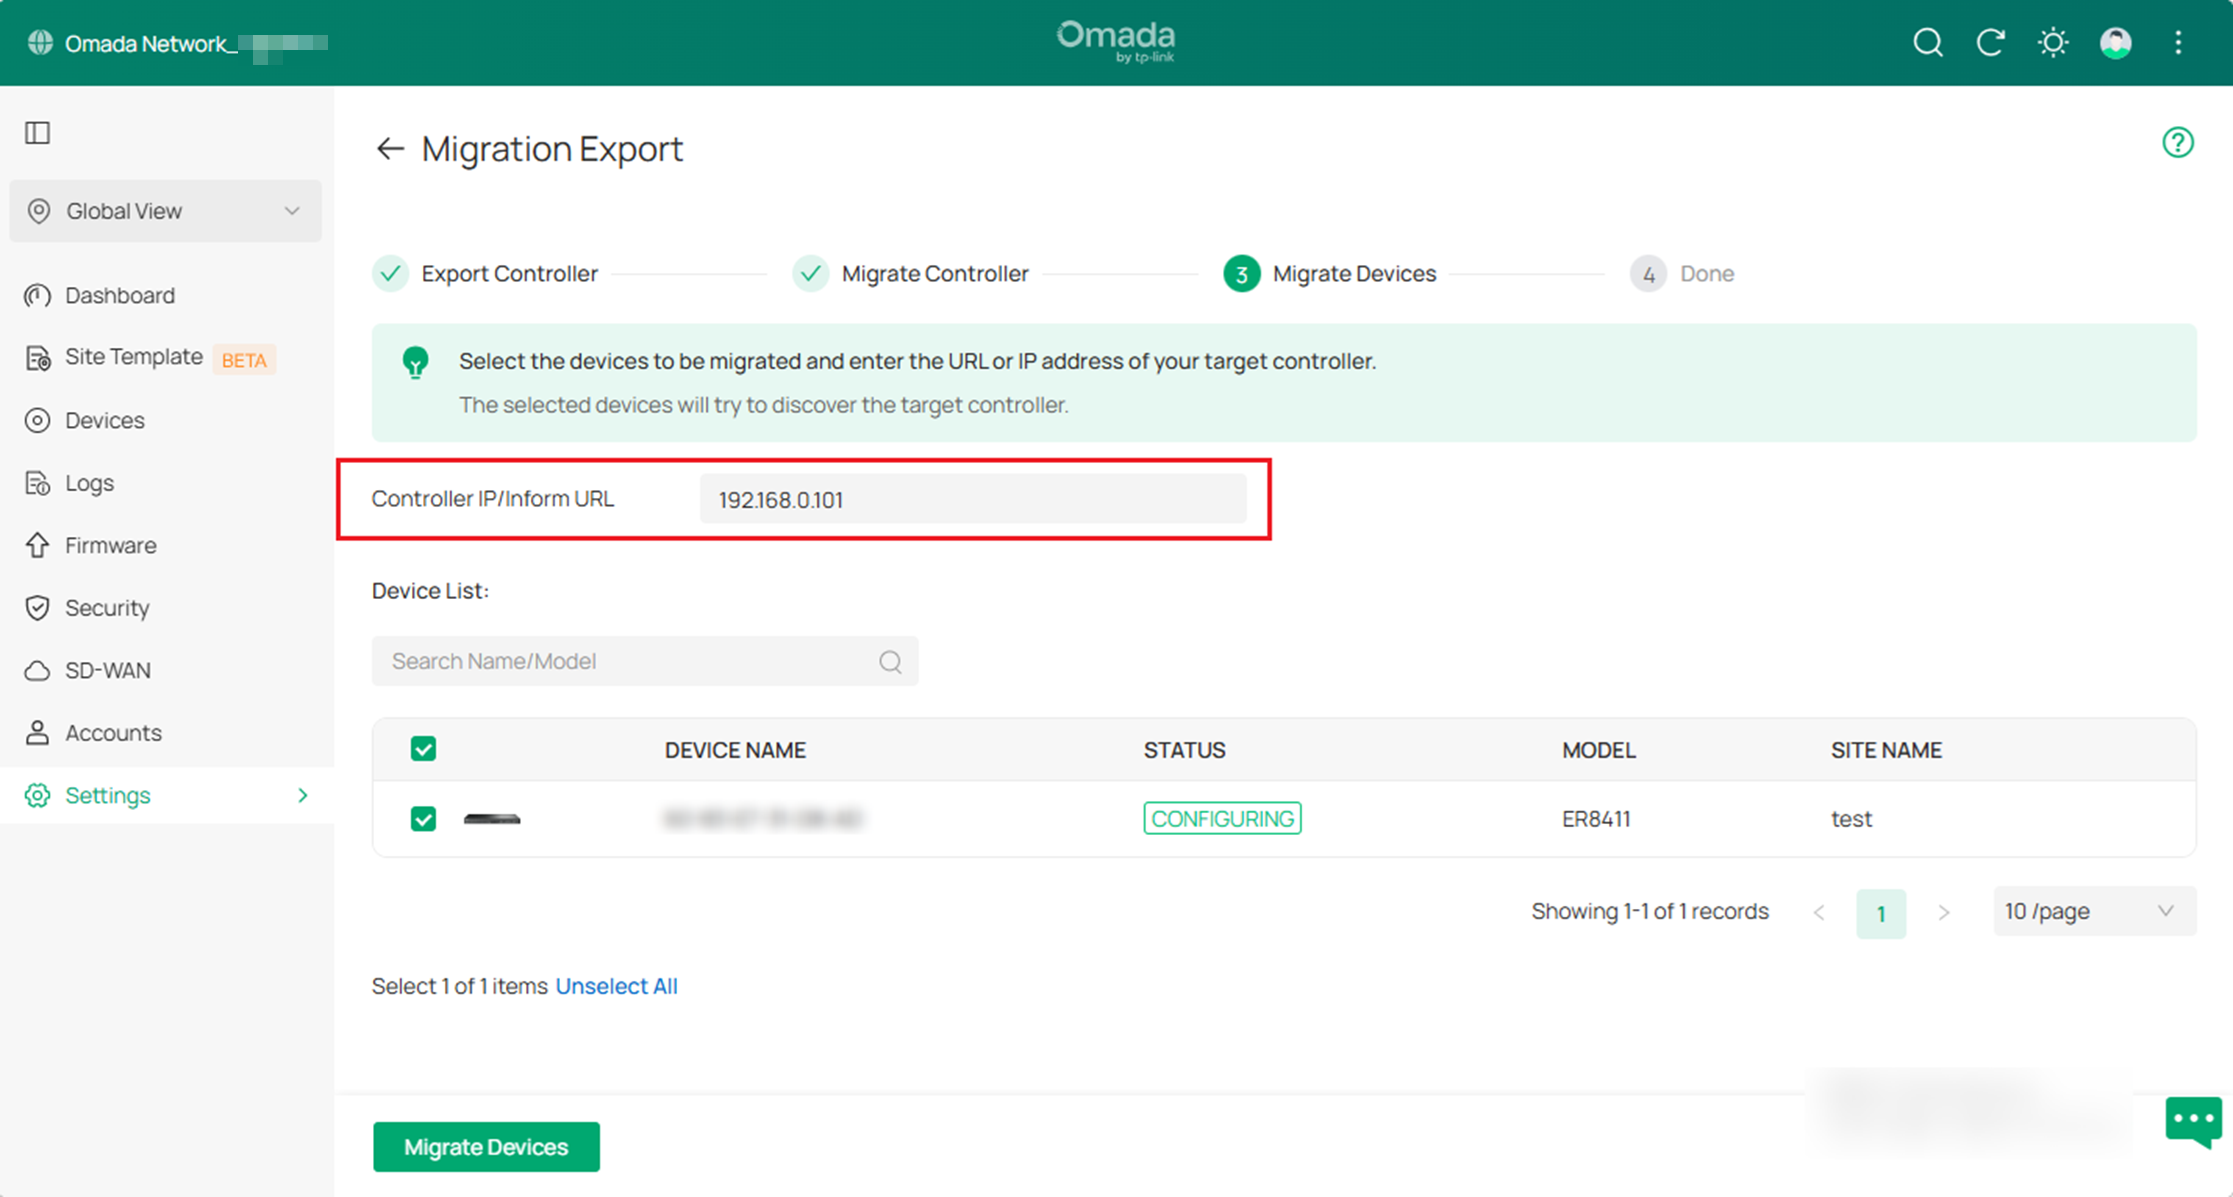
Note: Ensure that the correct IP address or URL of the target controller is entered. Otherwise, the managed devices cannot communicate with or be adopted by the target controller.
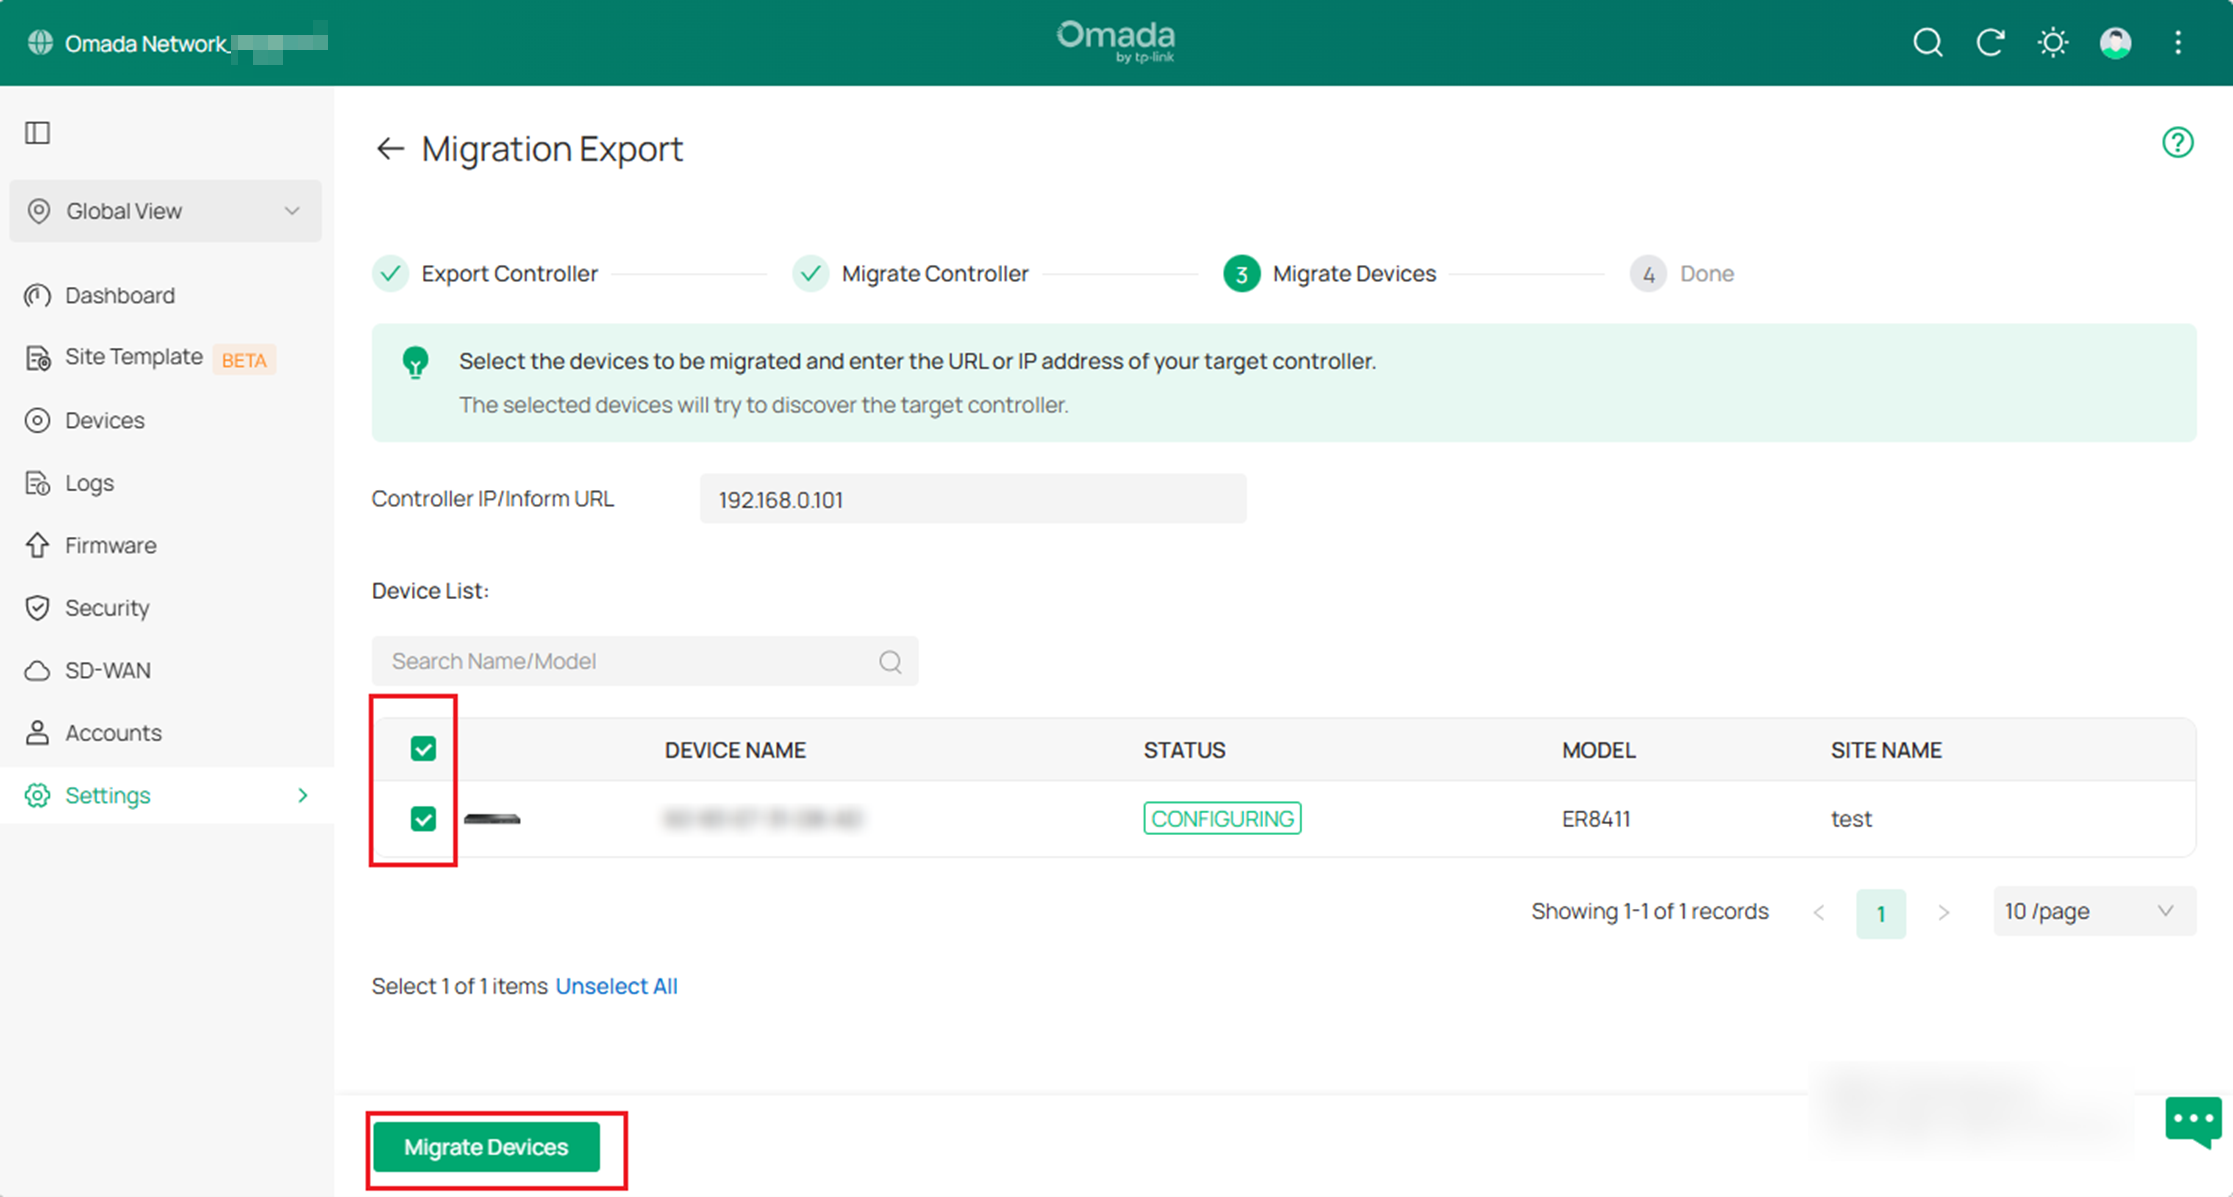
Select the devices to be migrated. By default, all devices are selected. Click Migrate Devices to migrate the selected devices to the target controller.
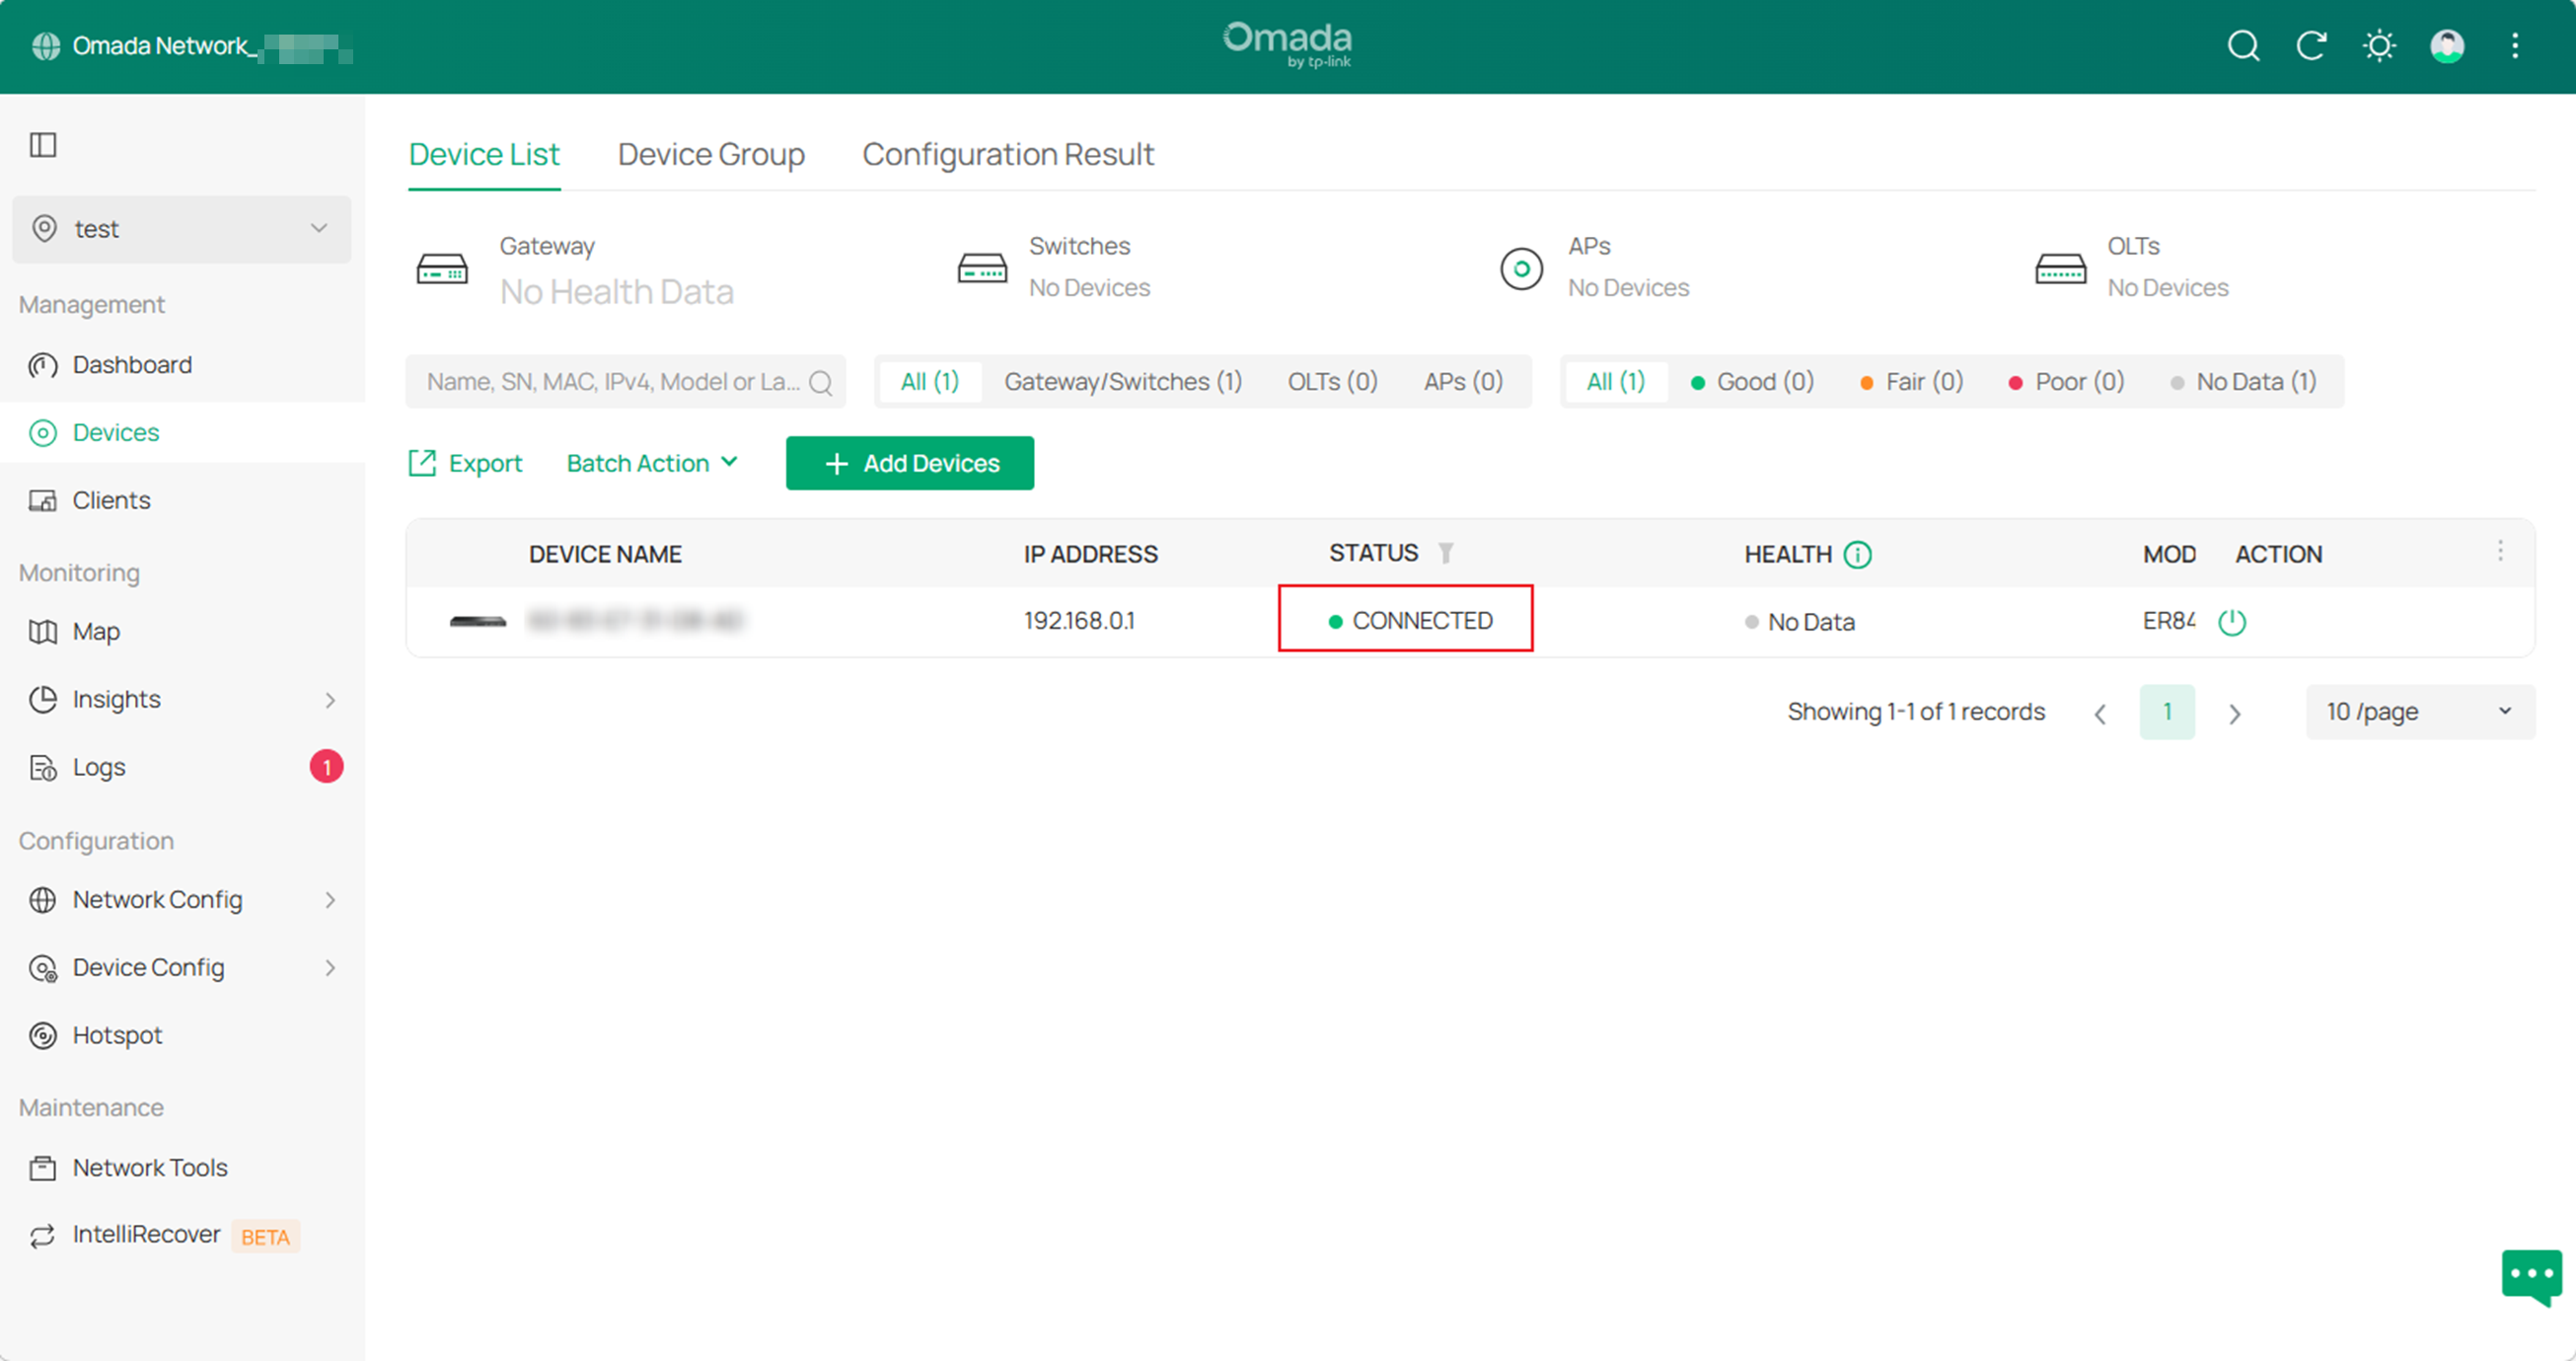
On the target controller, go to the Devices page and verify that all migrated devices are visible and show the Connected status.
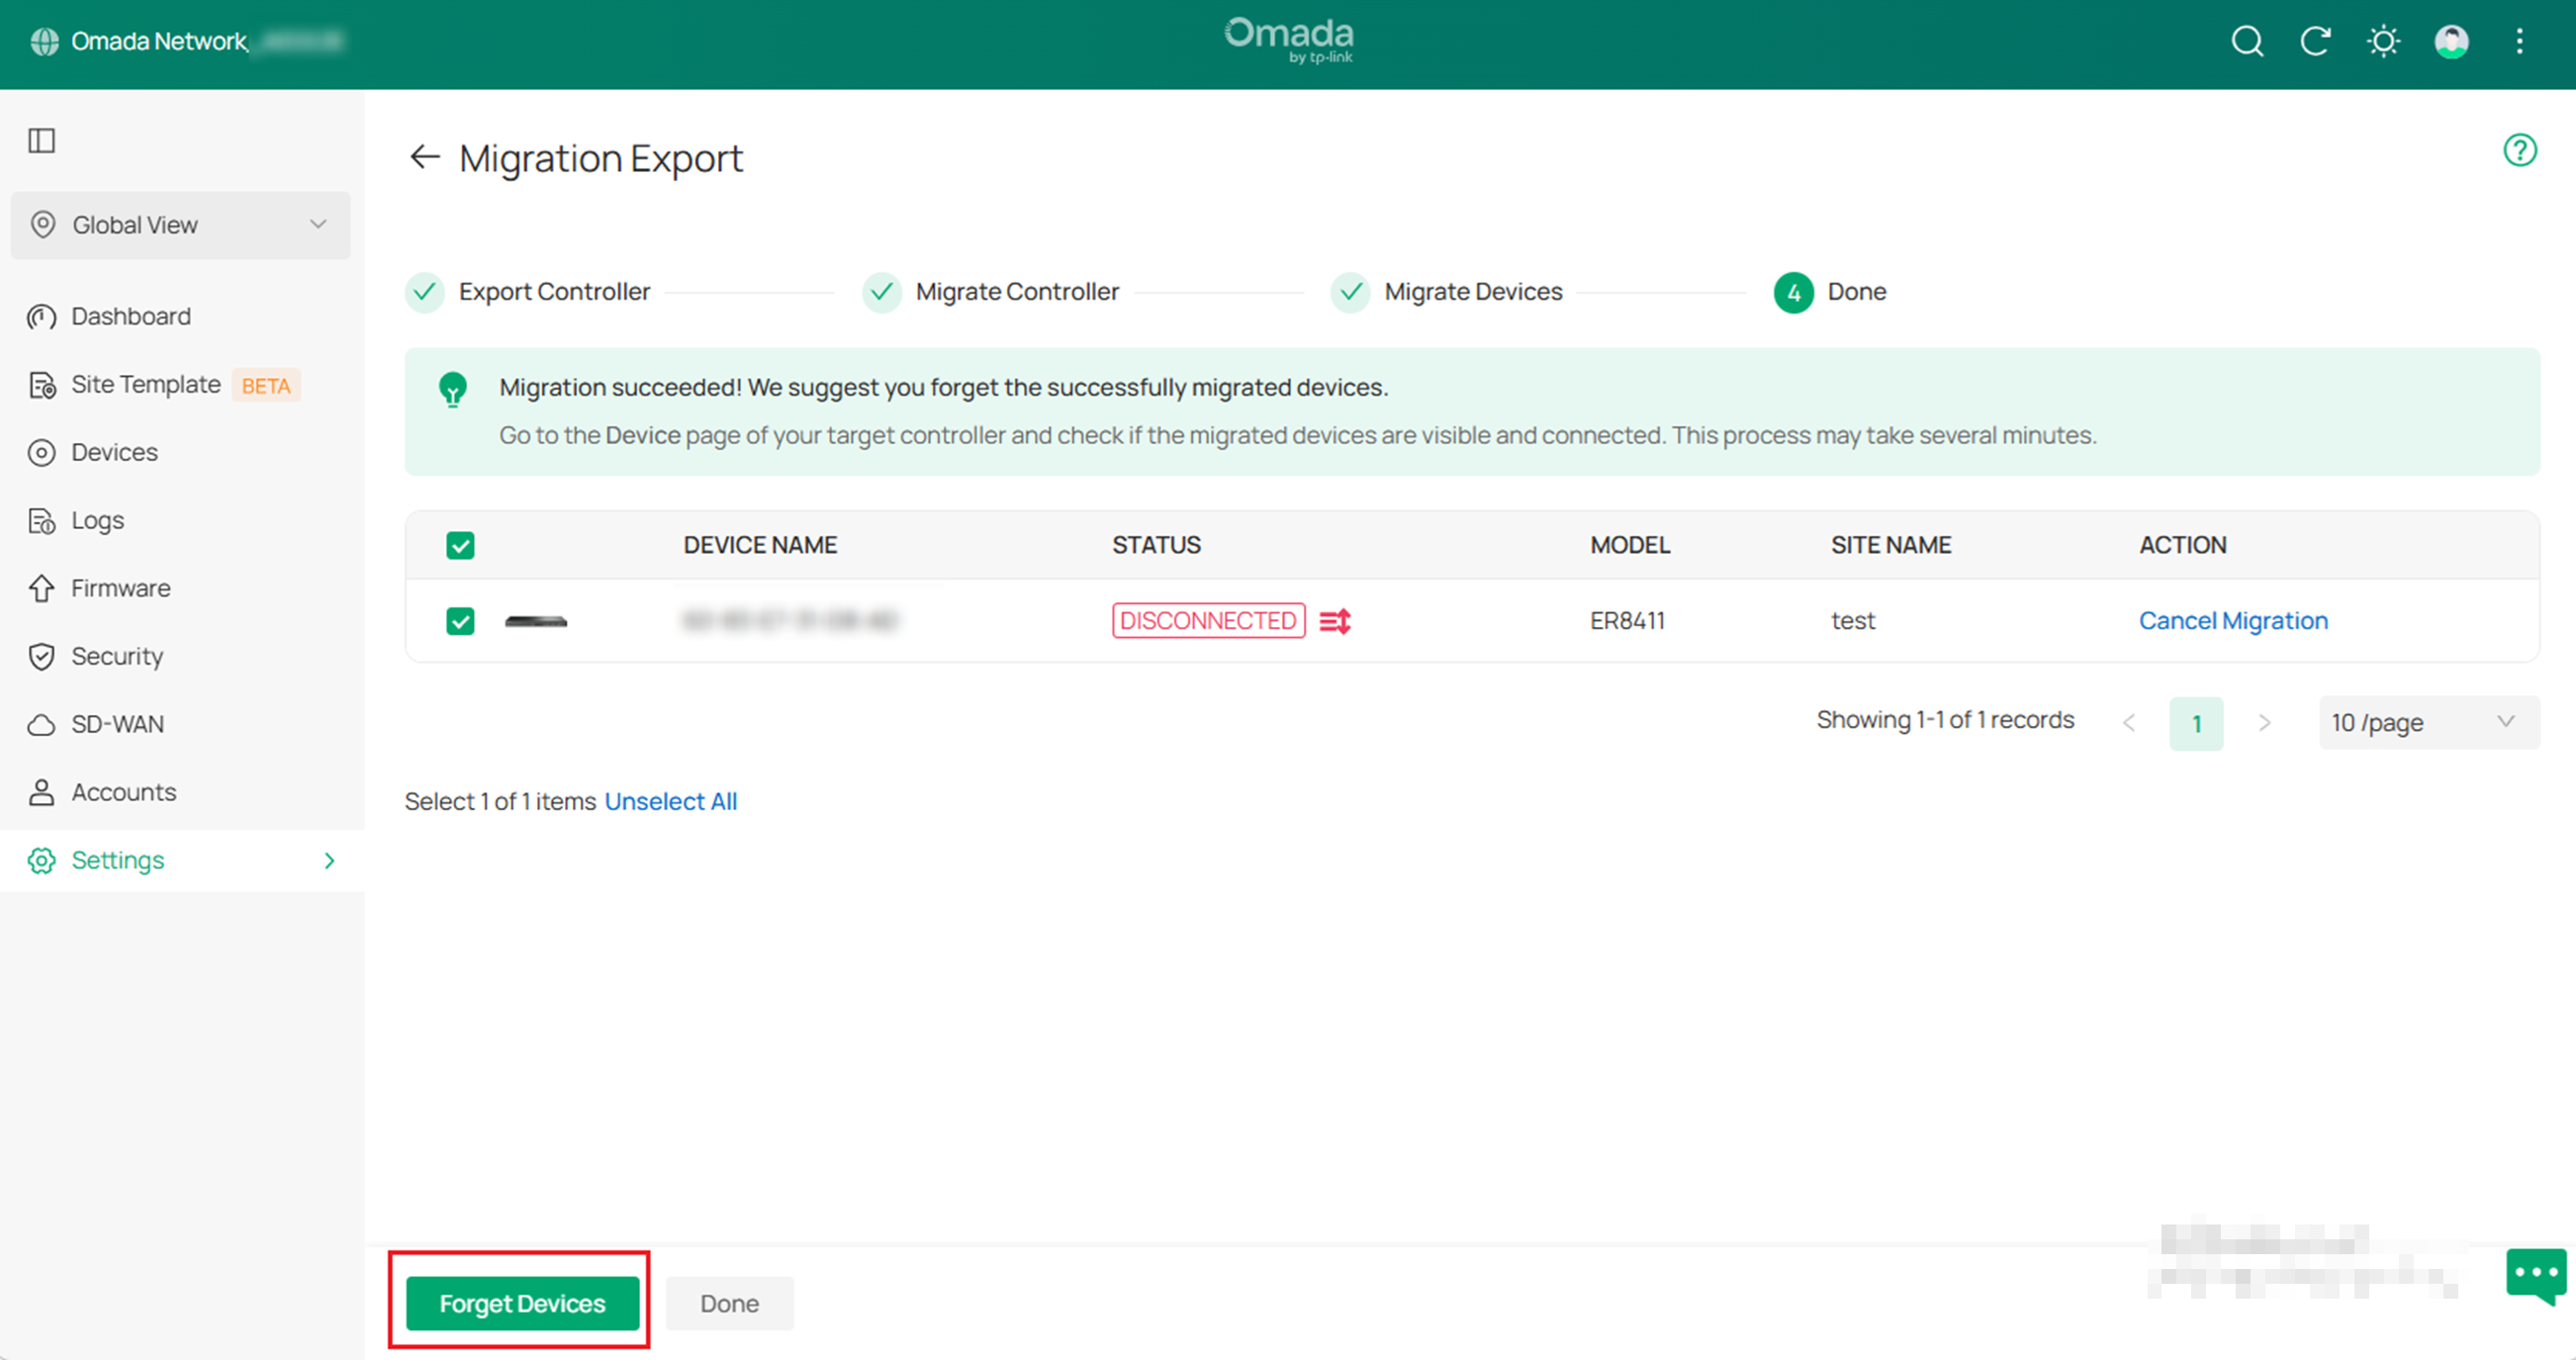
After confirming that all migrated devices are connected to the target controller, return to the source controller and click Forget Devices to complete the migration.
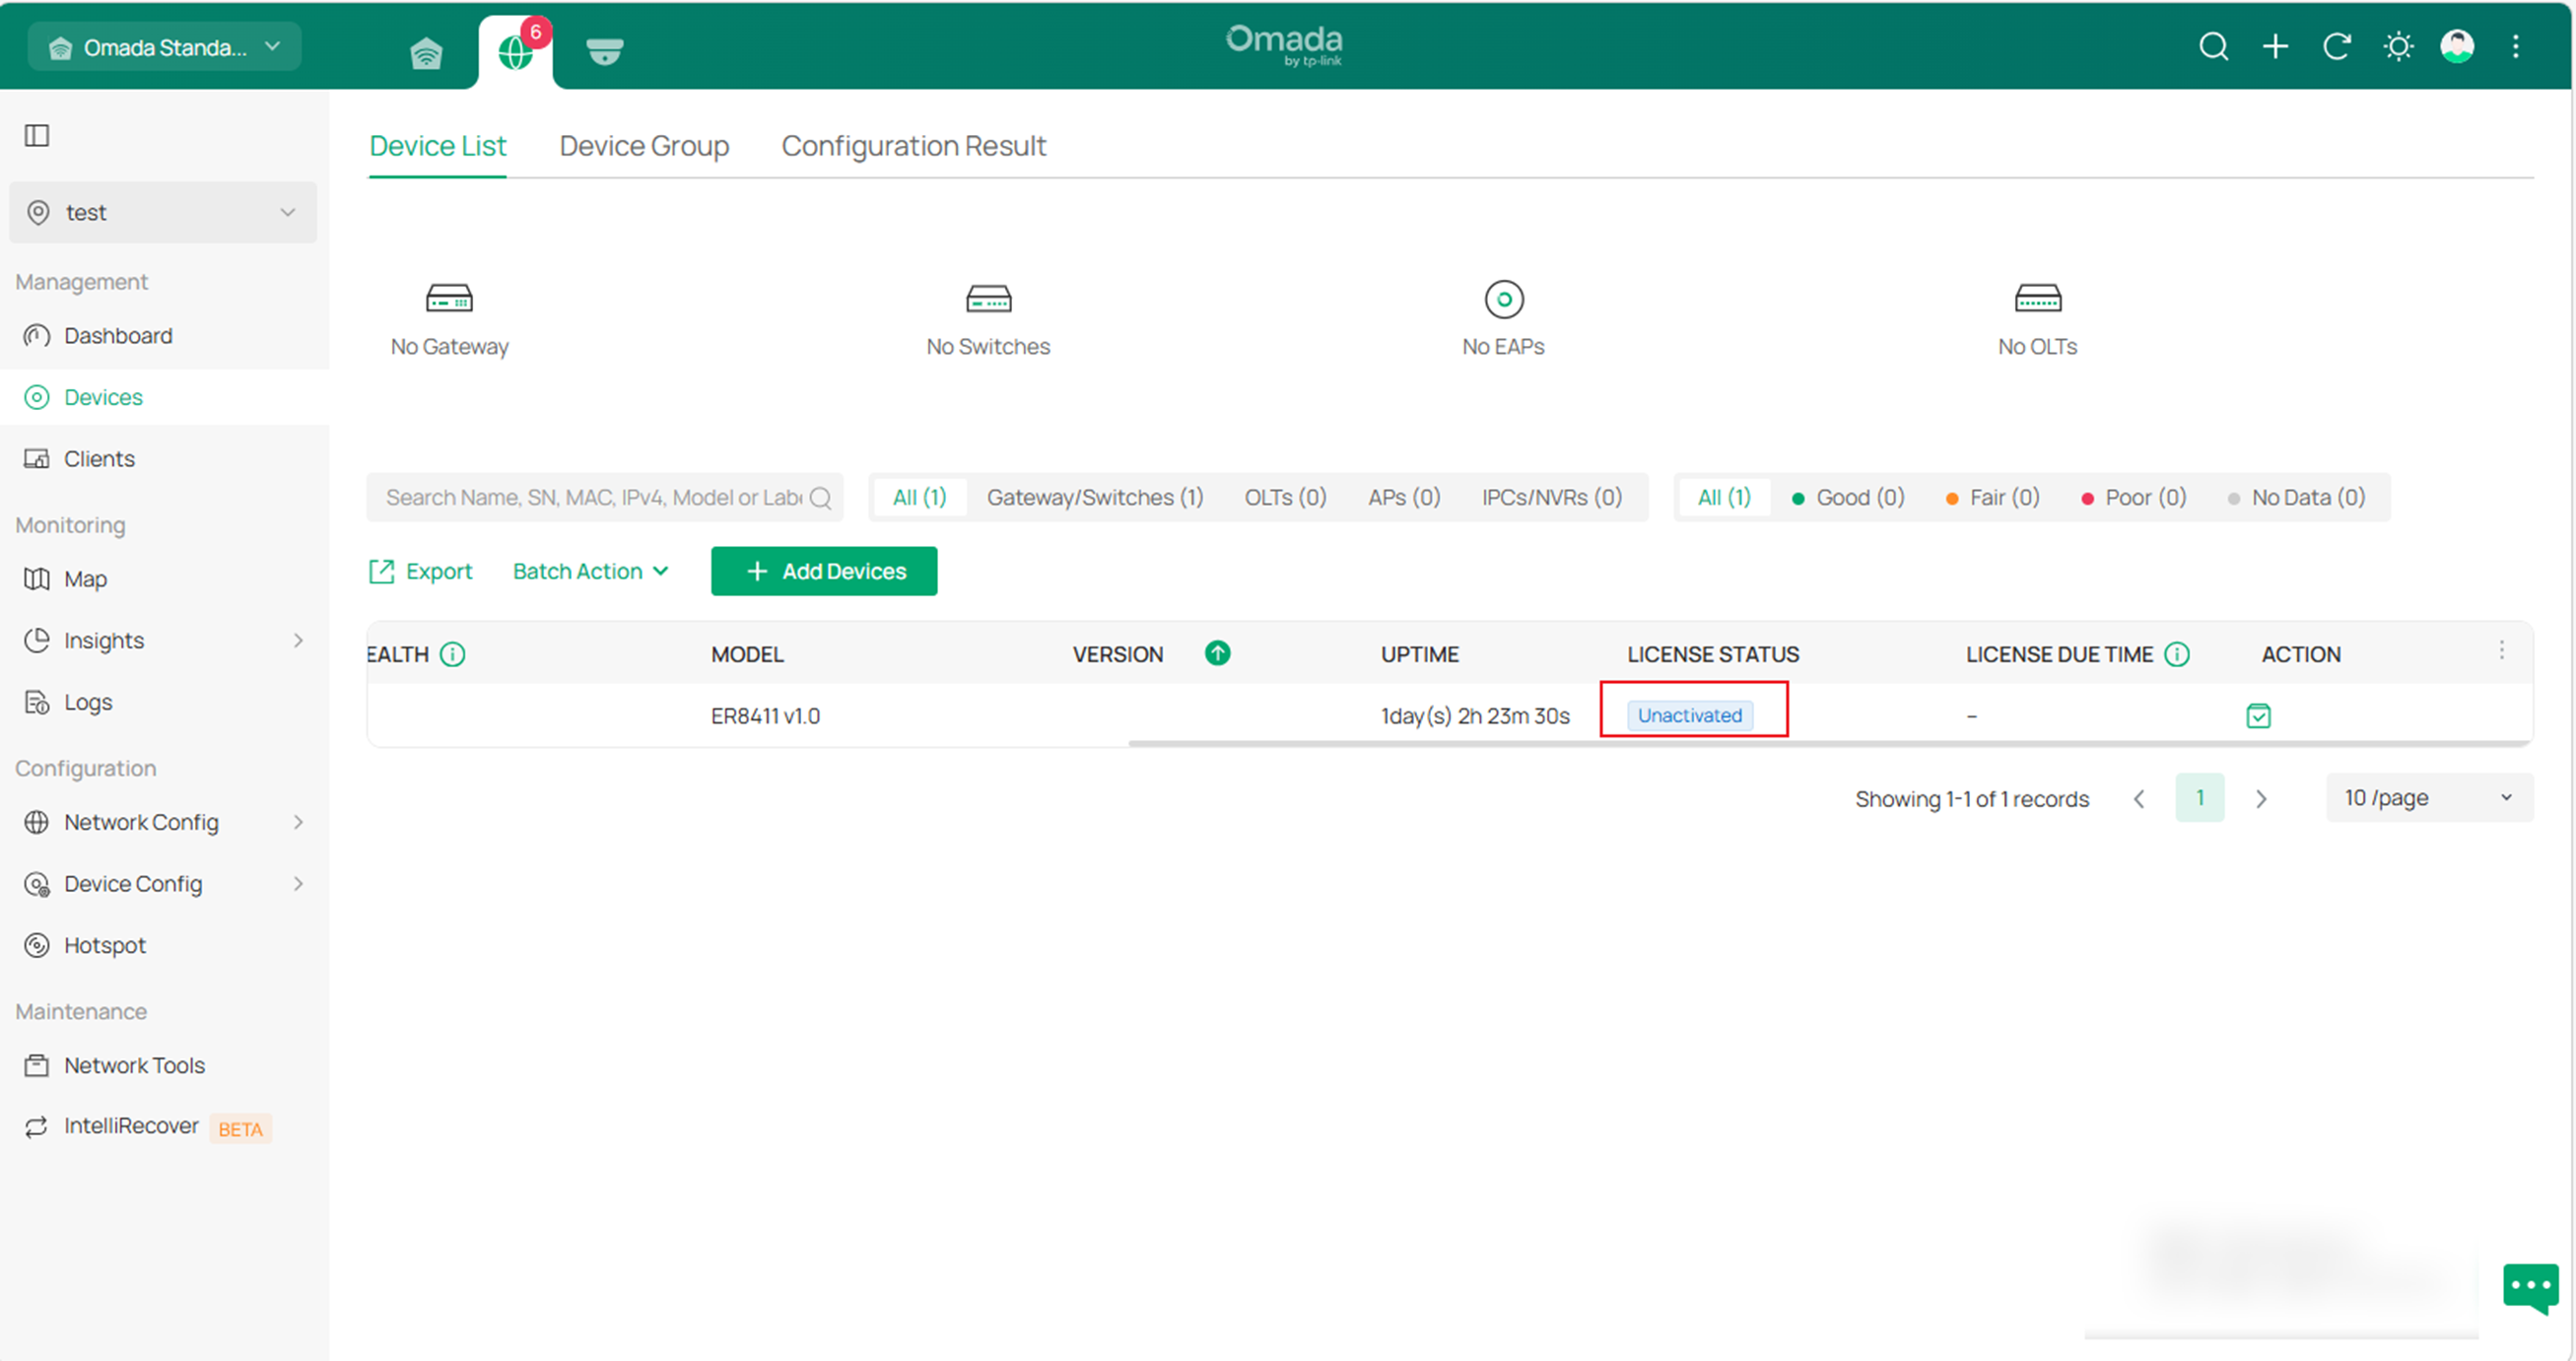
When migrating from an on-premises controller to a Cloud-Based Controller, the migrated devices may appear with the Unactivated status on the target controller.
Assign the required licenses to activate the migrated devices. For detailed instructions, refer to the Omada License Configuration Guide
After confirming that the configurations, data, and managed devices have been successfully migrated, remove or uninstall the previous controller if it is no longer required.
Conclusion
After confirming that the configurations, data, and managed devices have been successfully migrated, remove or uninstall the previous controller if it is no longer required.
To learn more about each function and configuration, please visit Support Home to download or check the manual for your product.
