


Contents
Method 1: Add a Third-Party Camera via ONVIF
Method 2: Add a Third-Party Camera via RTSP
Introduction
The Omada Fusion Pro Series supports both ONVIF and RTSP, allowing you to add and manage a wide range of third-party IP cameras. This enables flexible surveillance deployments without being limited to a specific camera brand.
ONVIF is an industry-standard protocol that supports both video streaming and device management, while RTSP is primarily used for video streaming. In general, ONVIF is recommended whenever supported by the camera, as it provides additional management and configuration capabilities.
The images below illustrate the difference between the two methods. Cameras added via ONVIF support configuration options such as stream, video, and event settings, whereas cameras added via RTSP provide video streaming only.
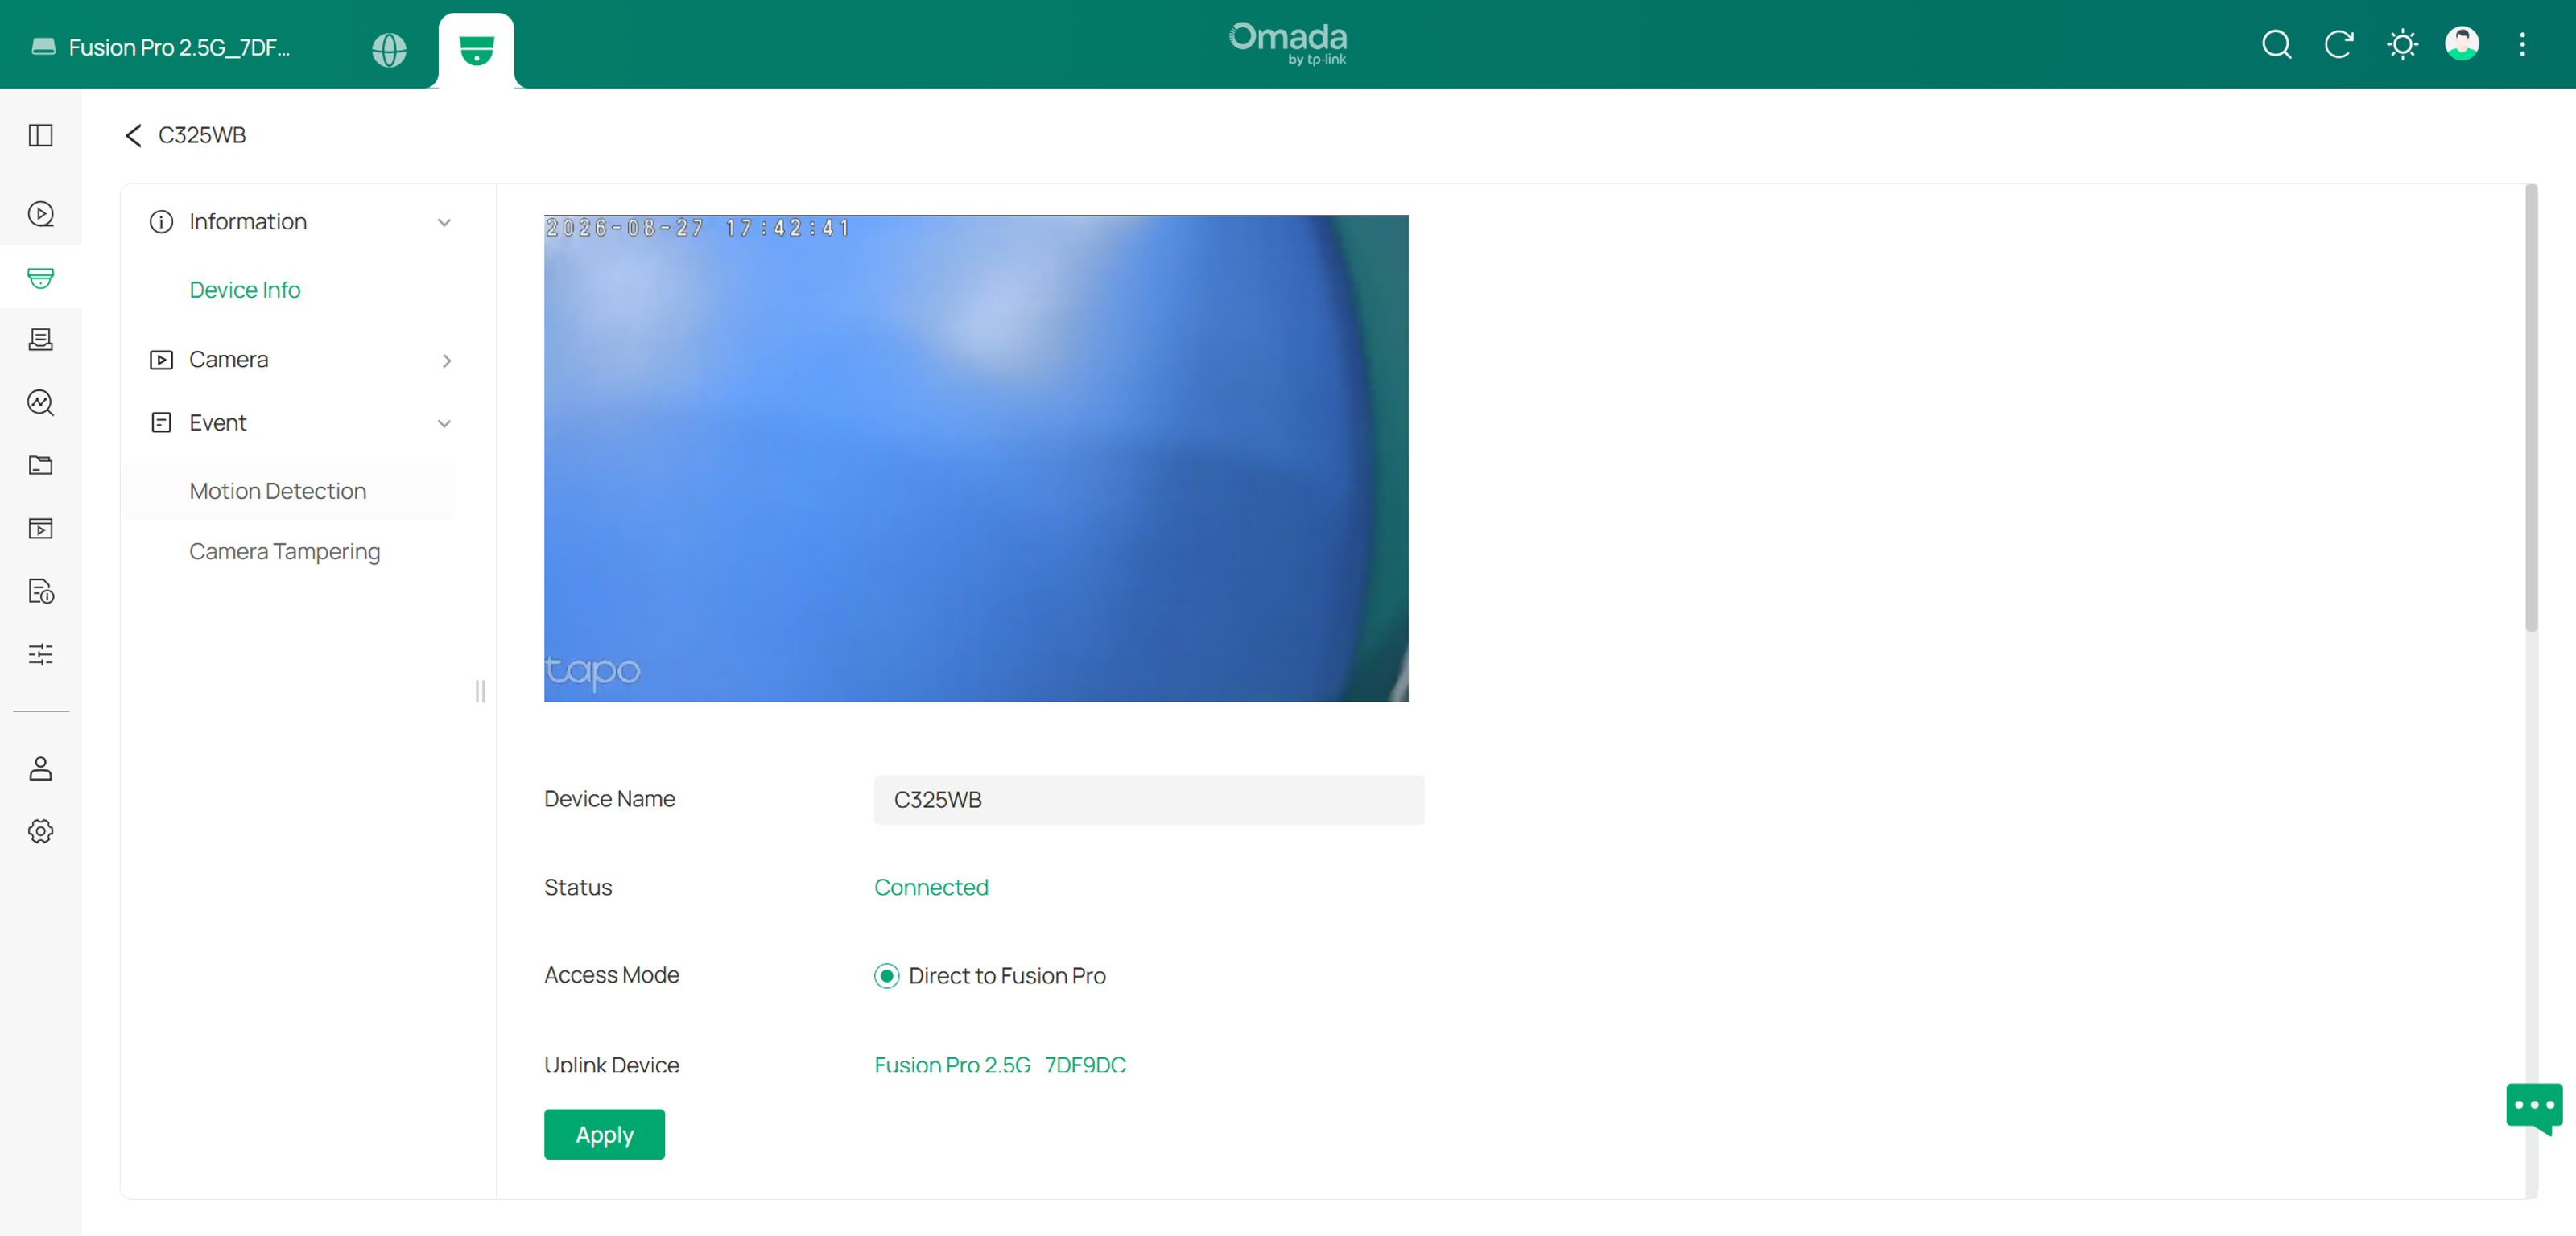
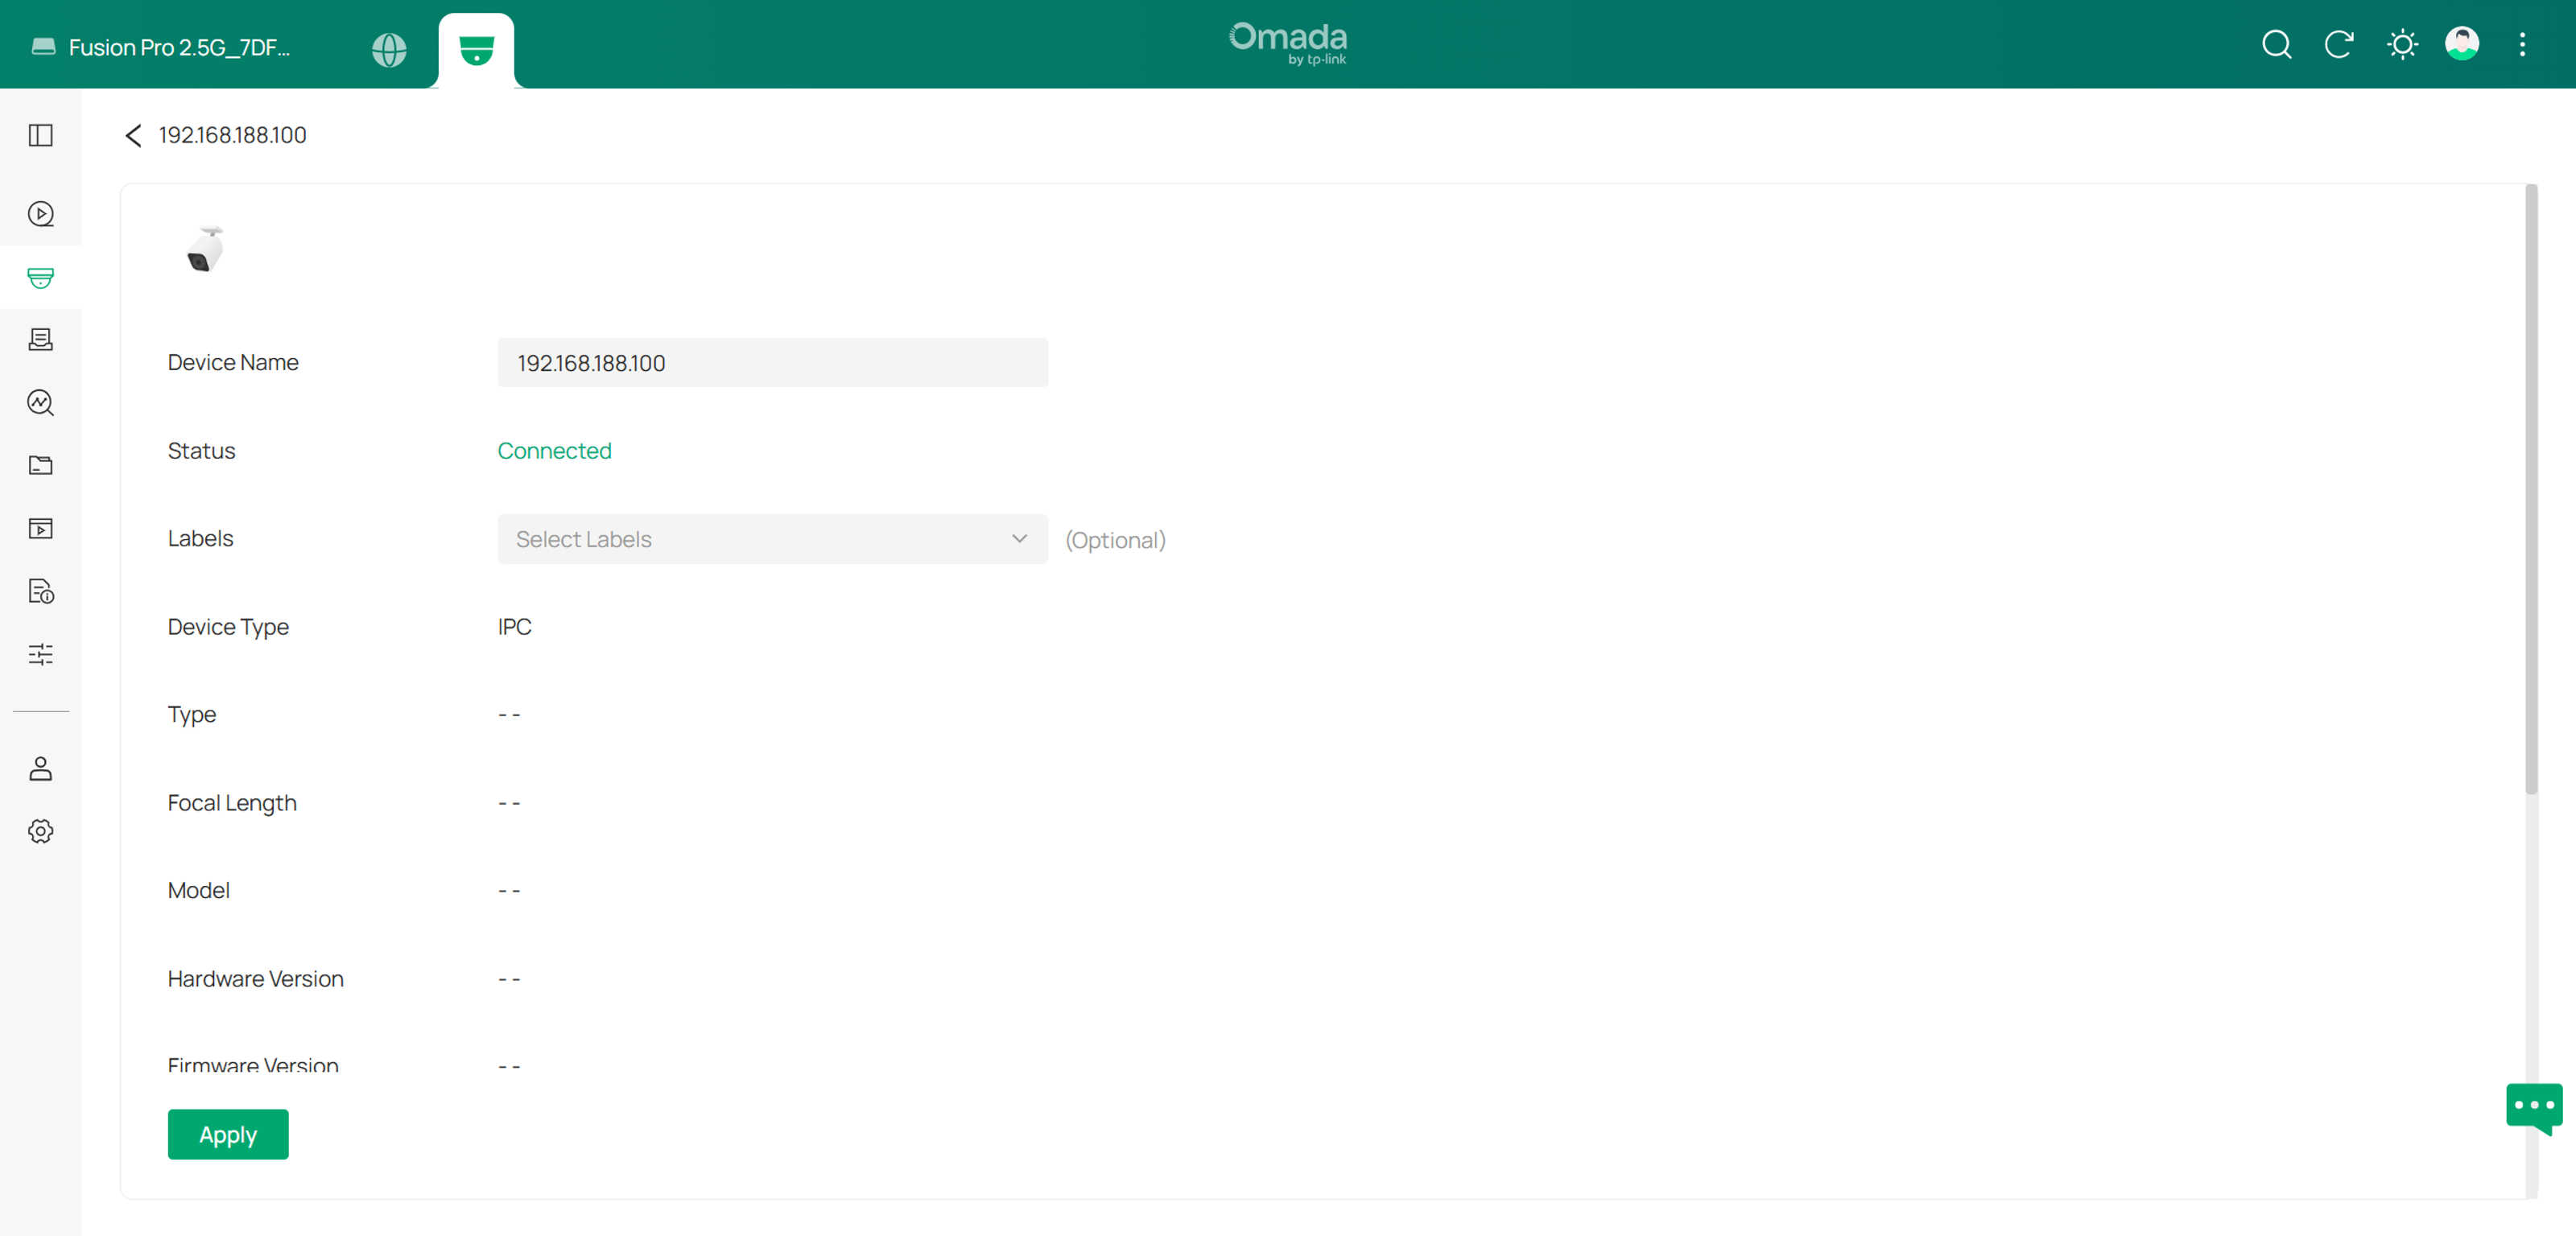
This guide explains how to add third-party cameras to the Omada Fusion Pro Series using ONVIF or RTSP, along with key configuration requirements and considerations for successful integration.
Requirements
- Omada Fusion Pro Series
- An ONVIF-compatible camera. In this article, a Tapo camera is used as an example.
Note: Third-party camera integration requires ONVIF support and ONVIF to be enabled on the camera. Refer to the camera manufacturer's documentation for configuration details.
Method 1: Add a Third-Party Camera via ONVIF
Enable ONVIF on the Camera
Before a camera can be added through ONVIF, some models require initial configuration. This typically includes completing the camera's setup process and enabling ONVIF in the camera settings. Once ONVIF is enabled, the camera can be added and managed by the Omada Fusion Pro Series through the ONVIF protocol.
For Tapo cameras, configure the Tapo ONVIF account by following the steps below.
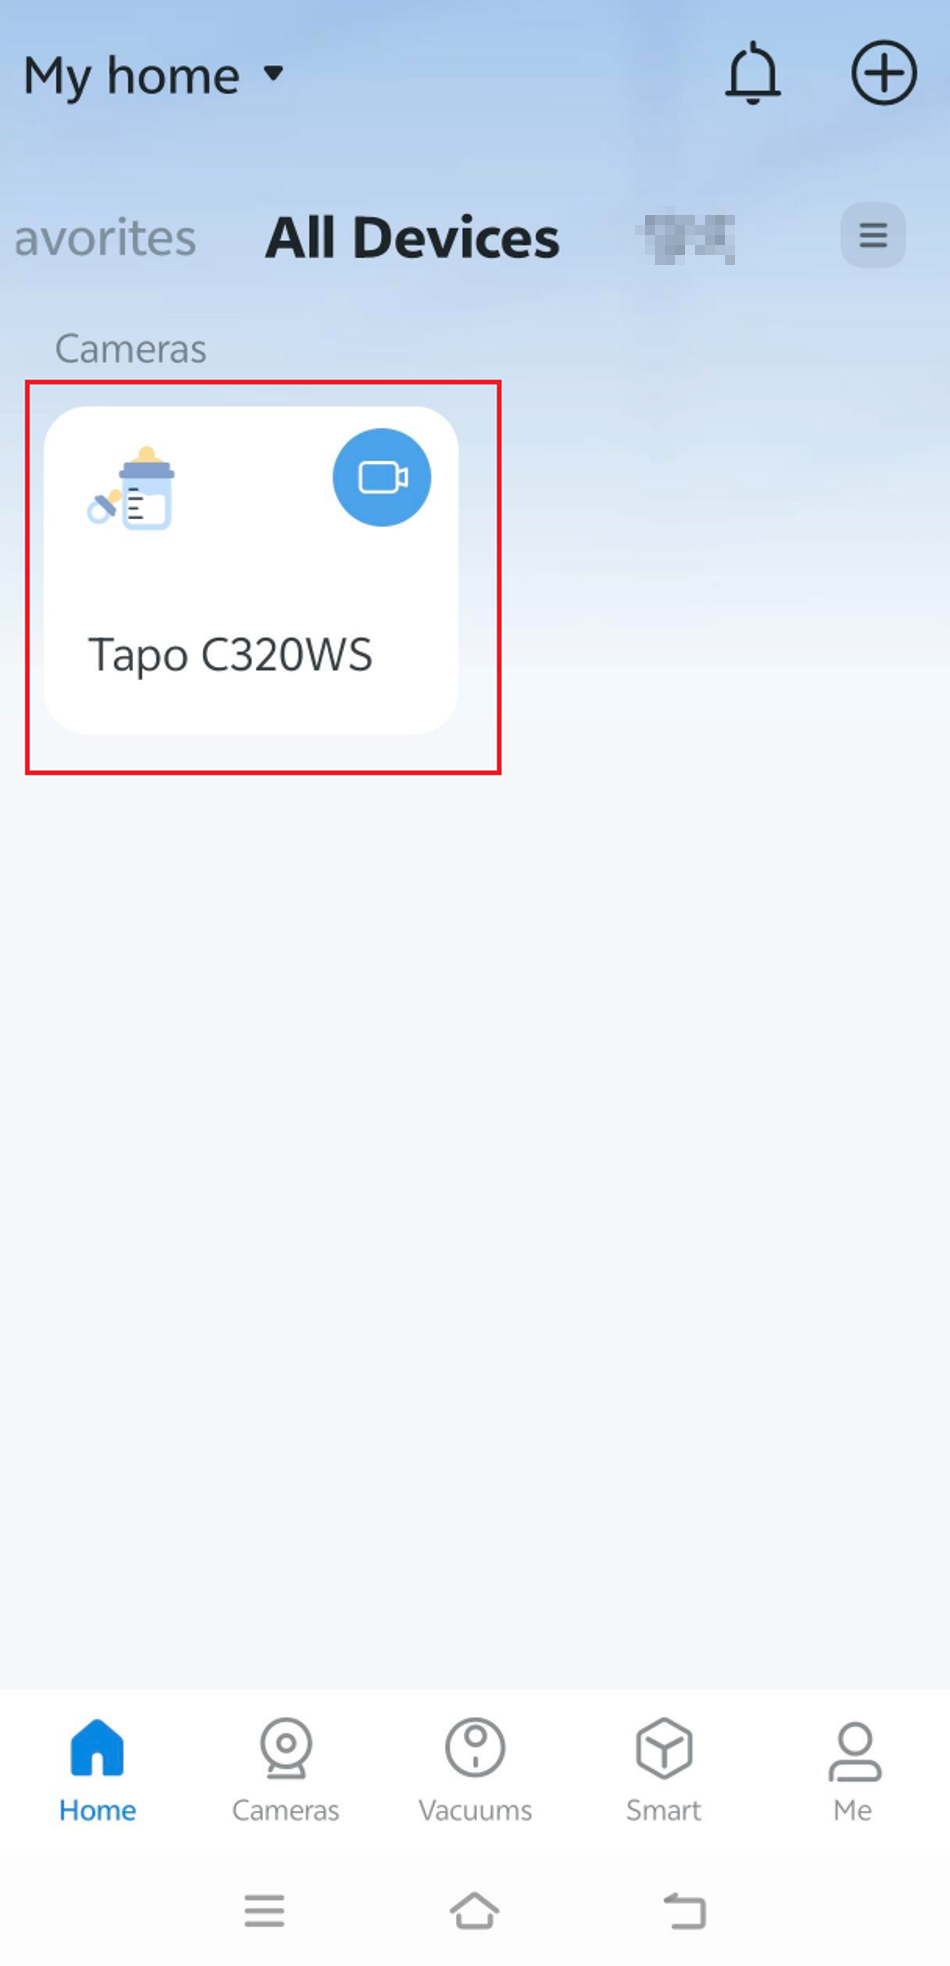
Step 1. Select the Tapo Camera in Tapo APP.
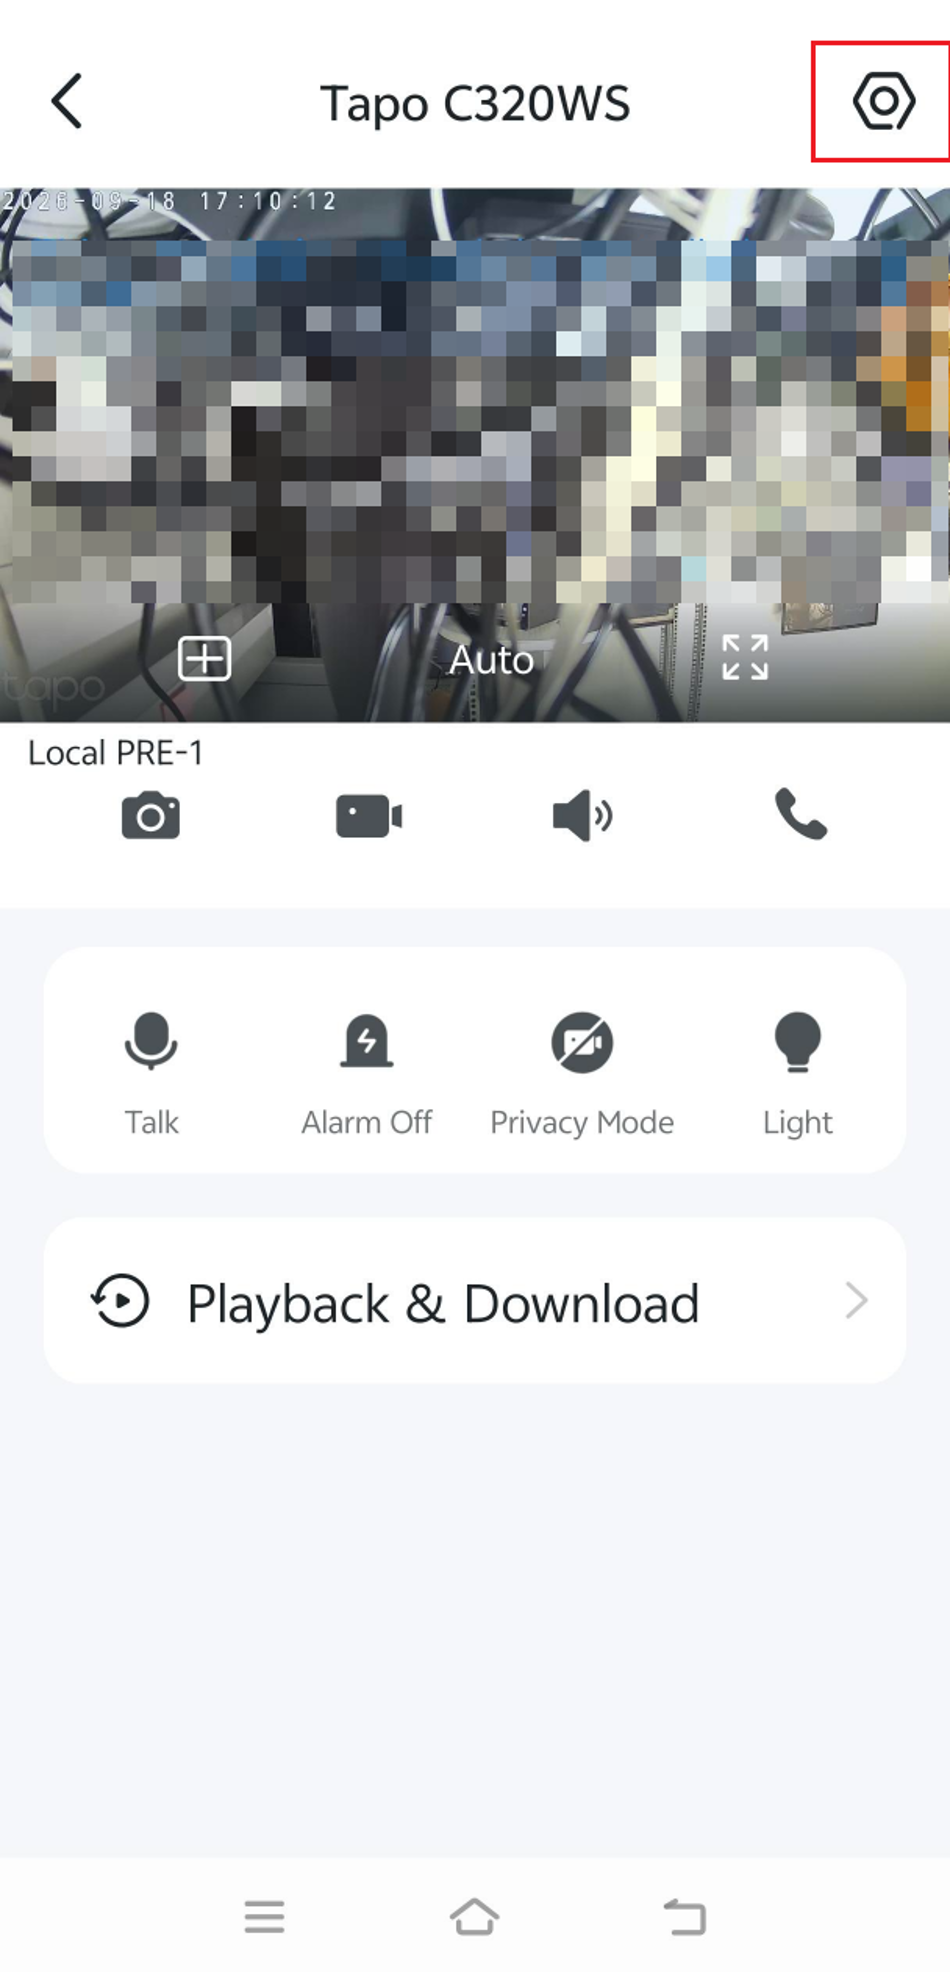
Step 2. Click the Settings icon on the top right.
Step 3. In Camera Settings page, scroll down and click Advanced Settings.
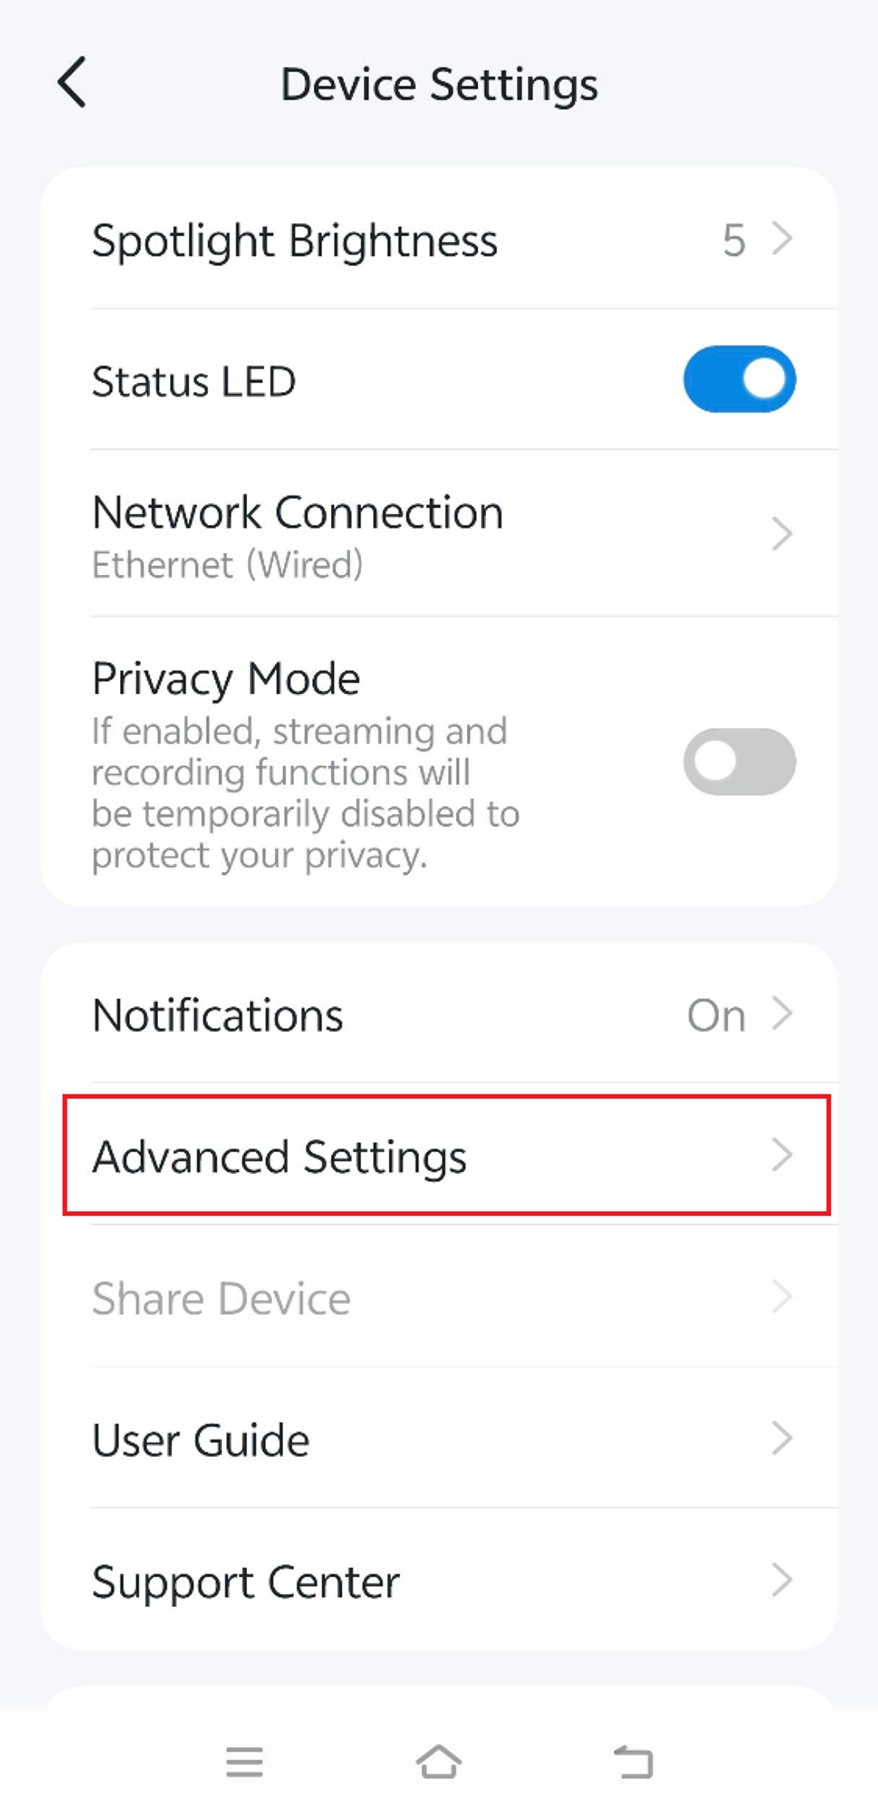
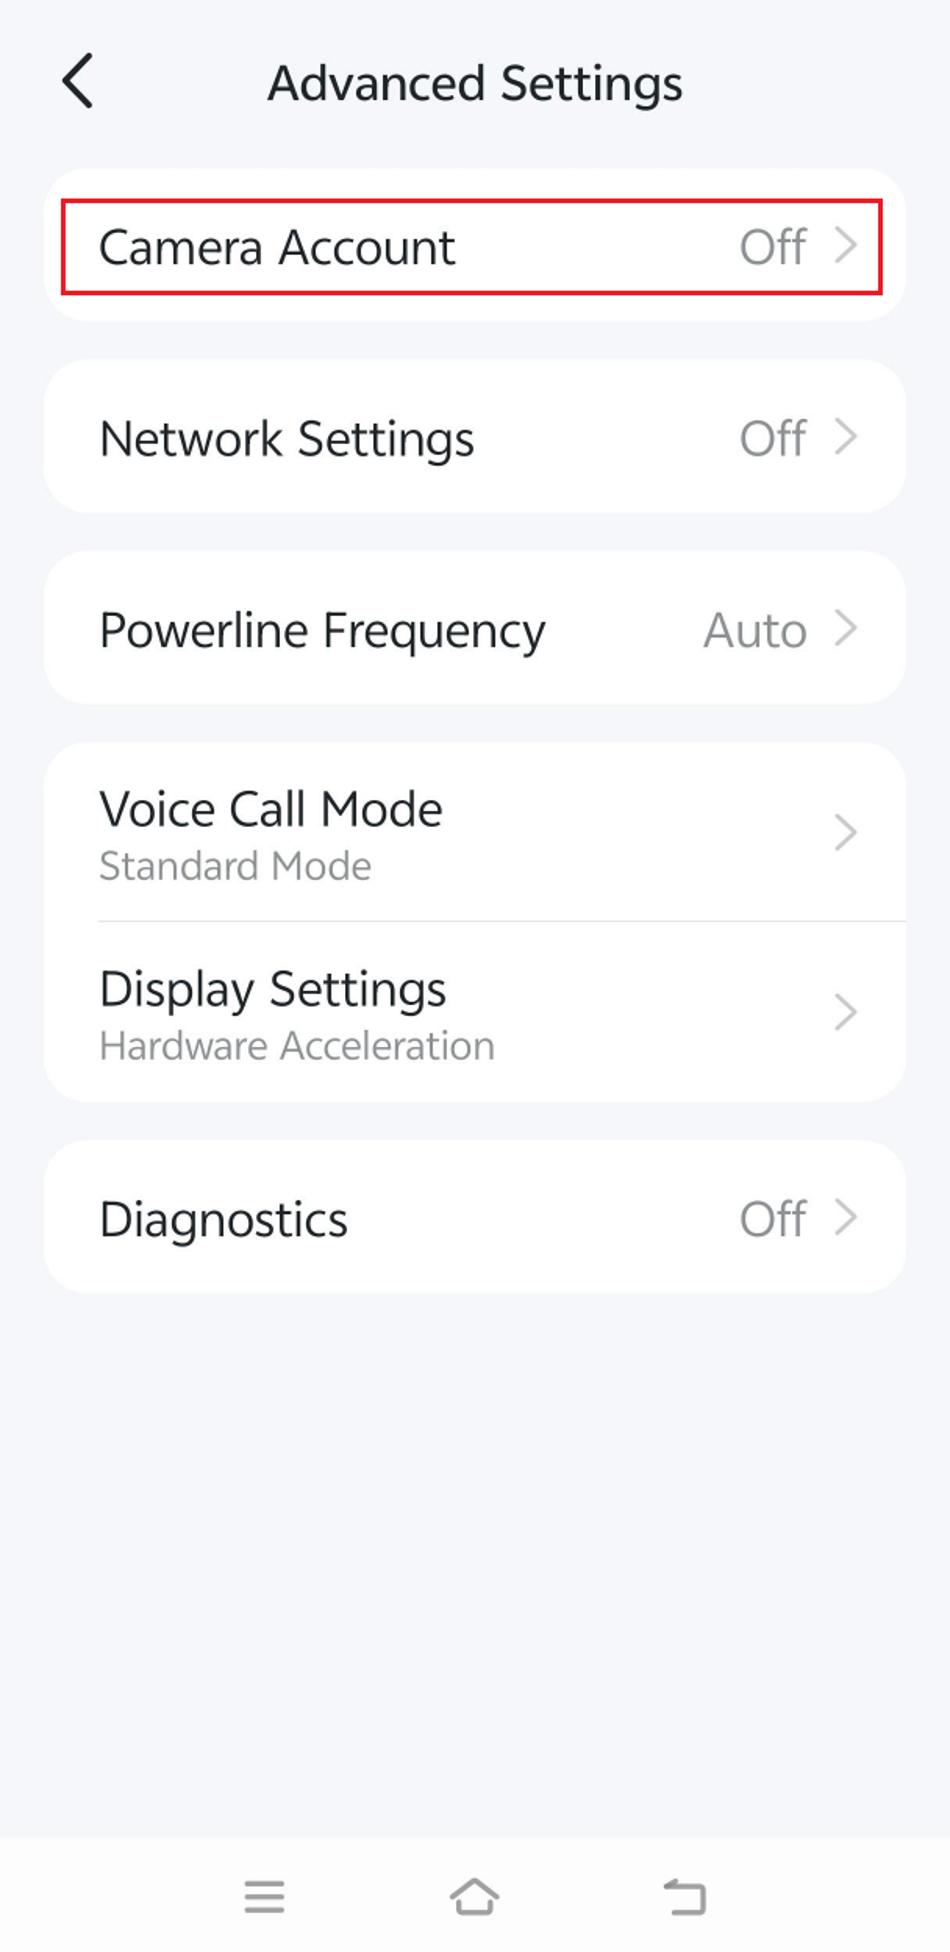
Step 3. In Advanced Settings page, click Camera Account.
Step 3. In Camera Account page, set an account and a password, then click Create.
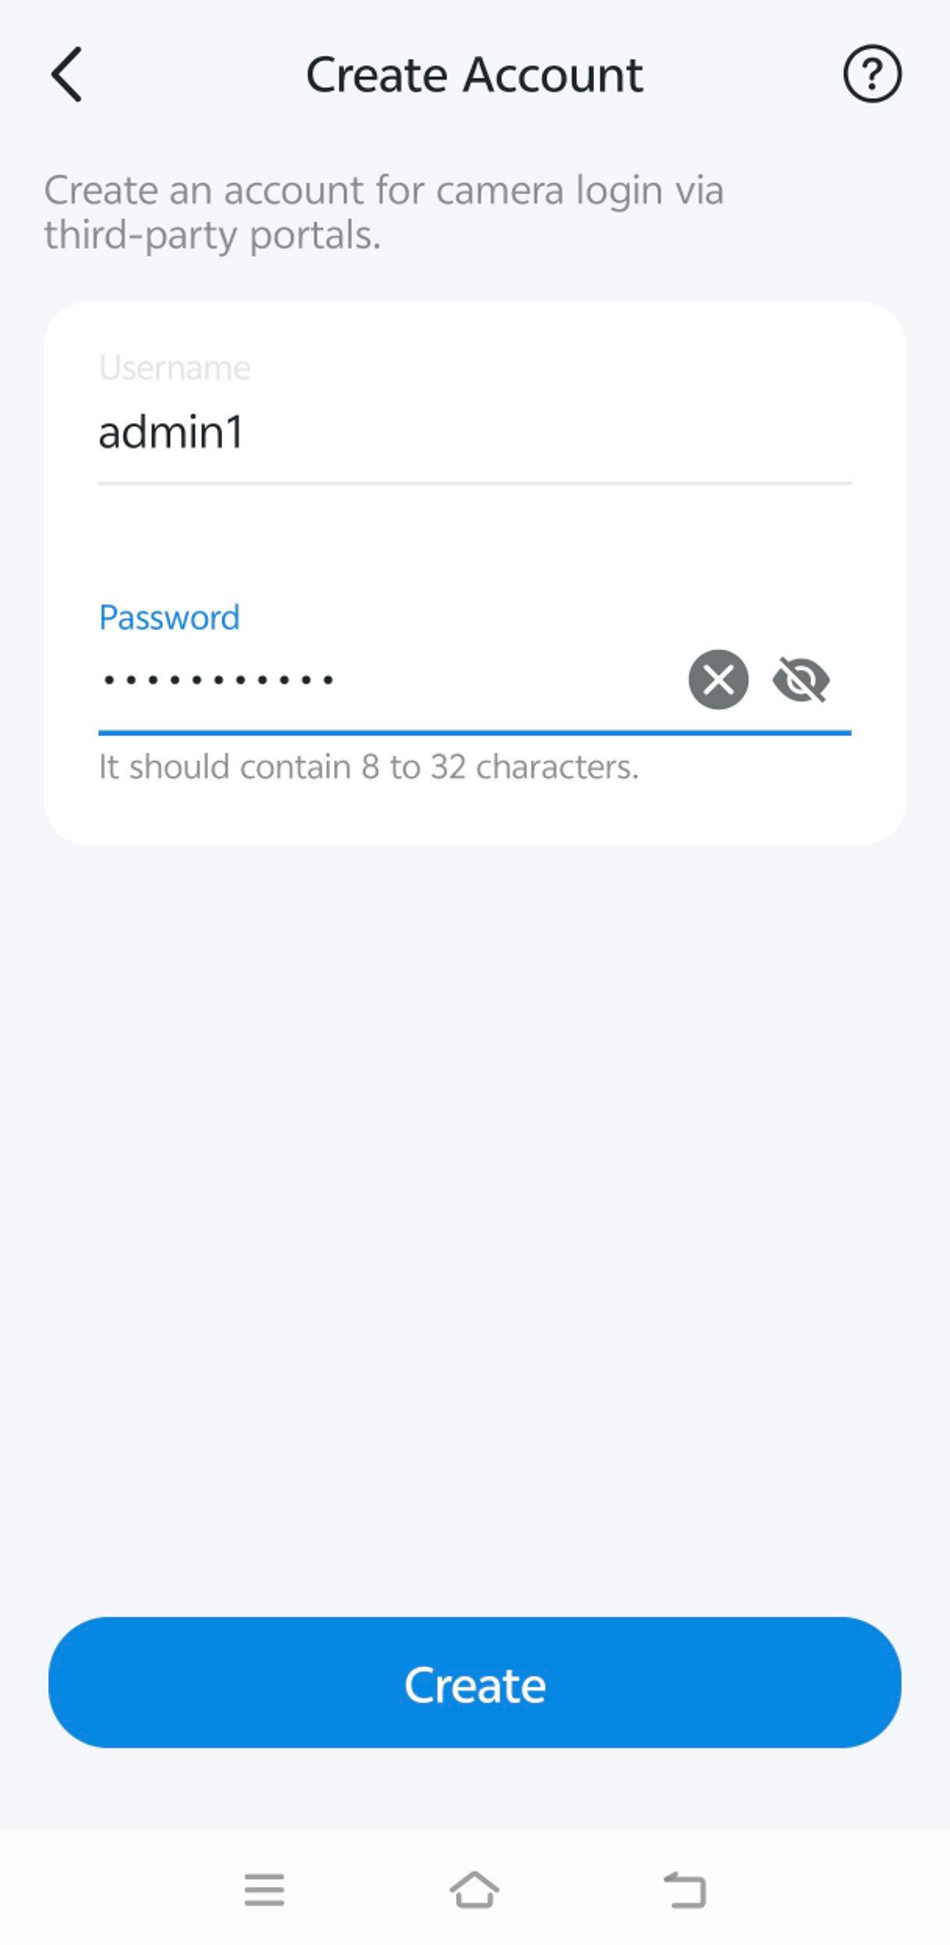
When adding a camera via ONVIF to Fusion Pro, you will have to enter the proper management port, which may vary by manufacturer. For Tapo, the ONVIF management port is 2020.
Please refer to the third-party camera vendor's official documentation or support website to obtain the correct ONVIF management port.
Add a Camera via ONVIF
The ONVIF protocol provides both video streaming and device management capabilities. Before you begin, ensure the third-party camera is connected to the same network as the Fusion Pro device.
Add a Camera Using Auto Find
Follow the steps below to automatically discover and adopt a compatible ONVIF camera.
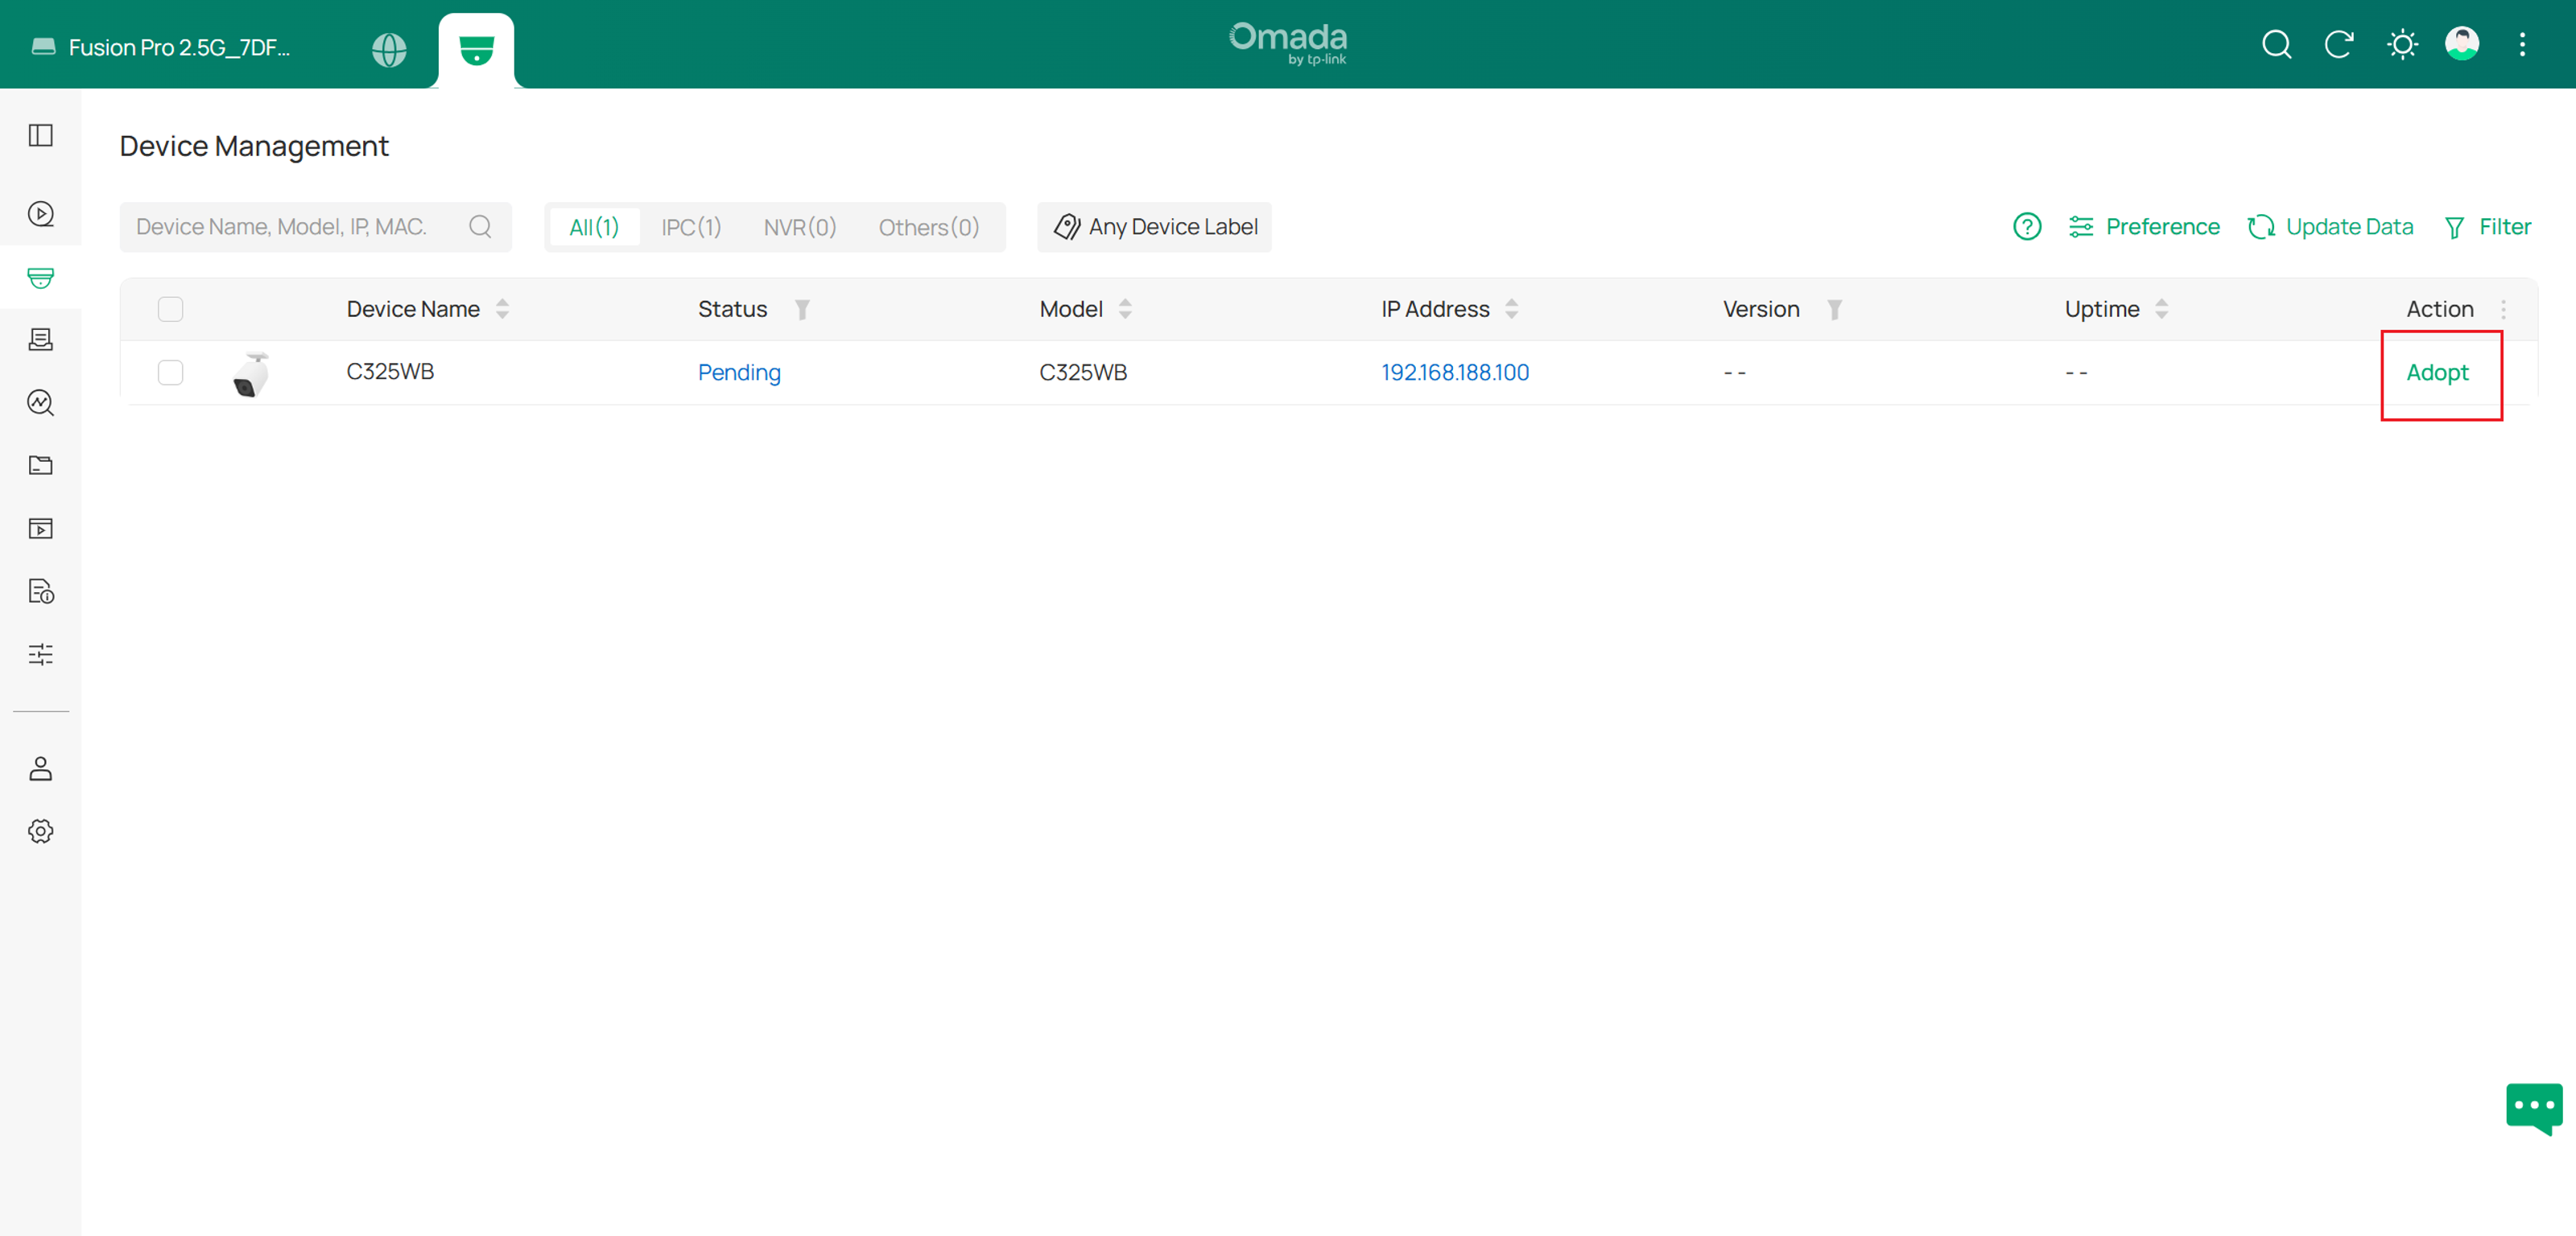
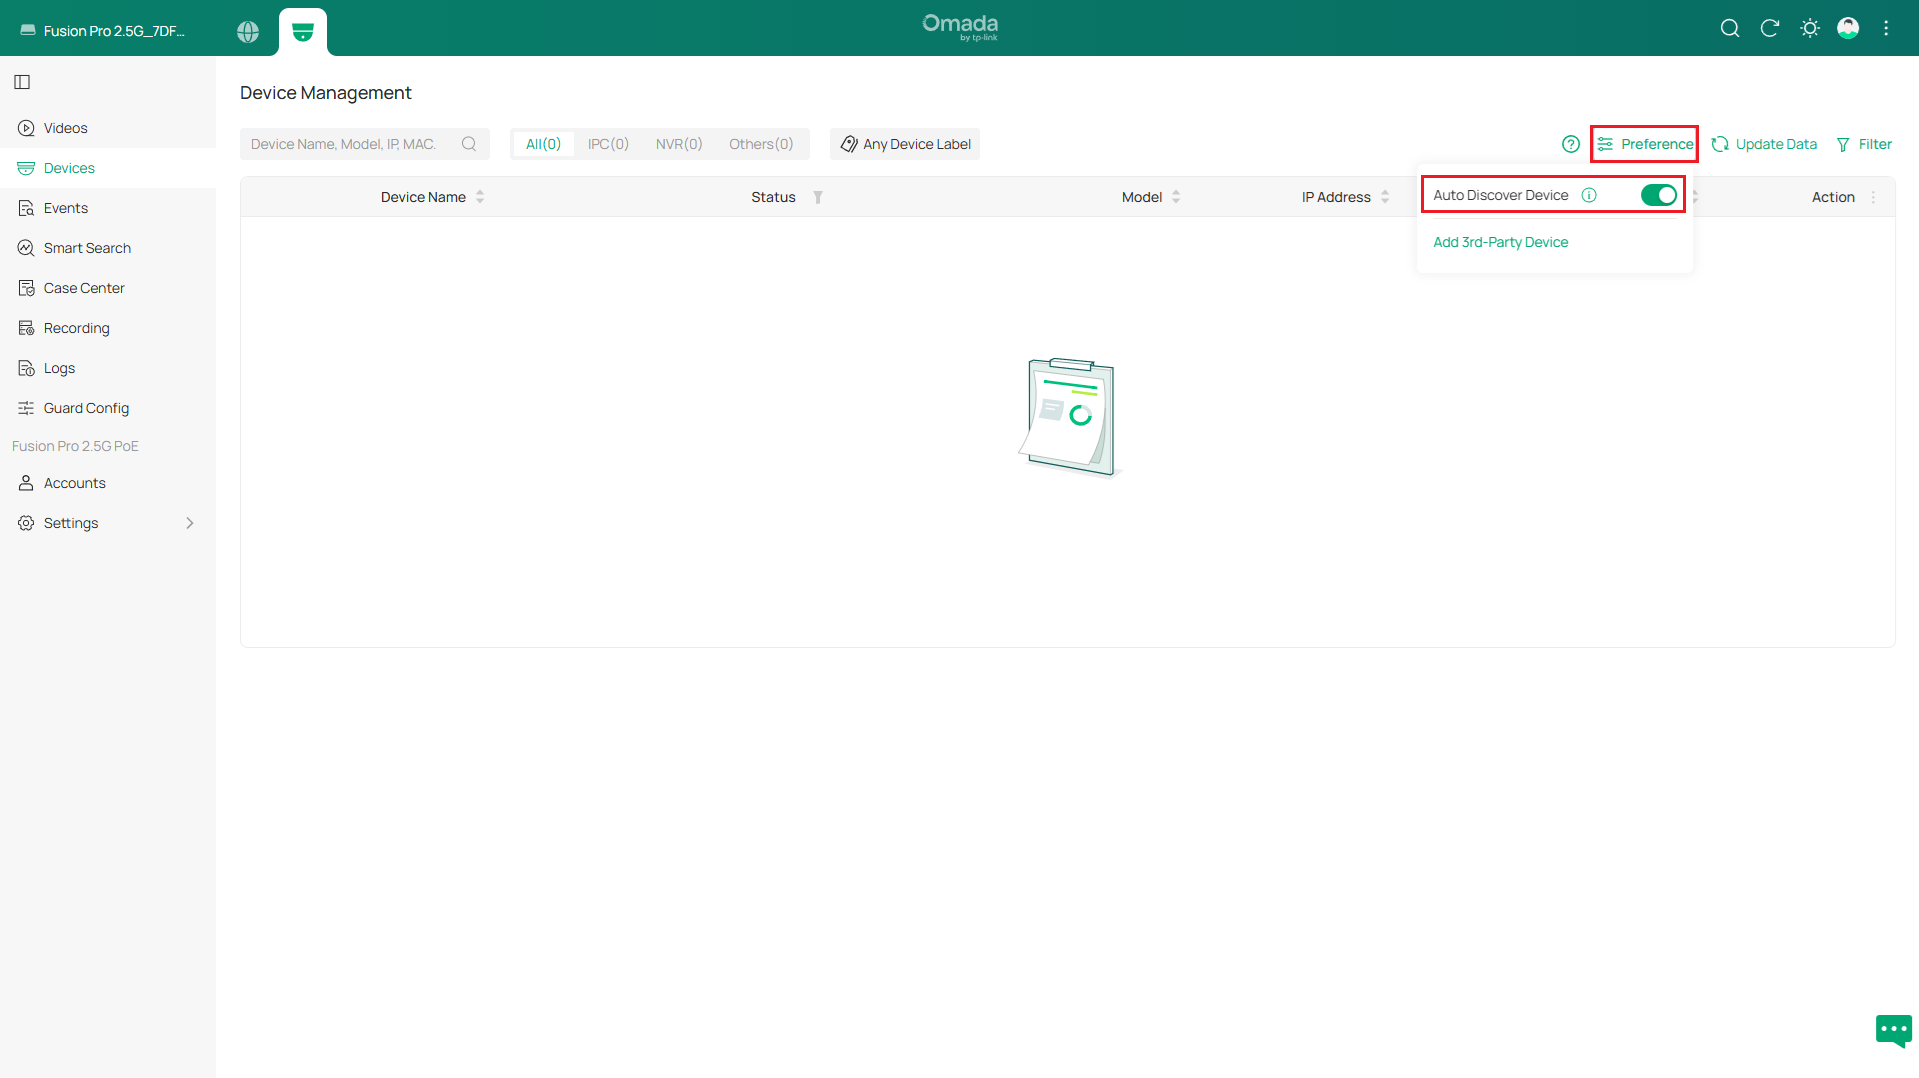
Step 1. Log in to the Fusion Pro web management interface and go to Guard System > Device Management. The camera should appear in Pending status. Click Adopt to add the camera to Fusion Pro management. If the camera does not appear in the list, click Preference and ensure Auto Discover Device is enabled.[YL12]
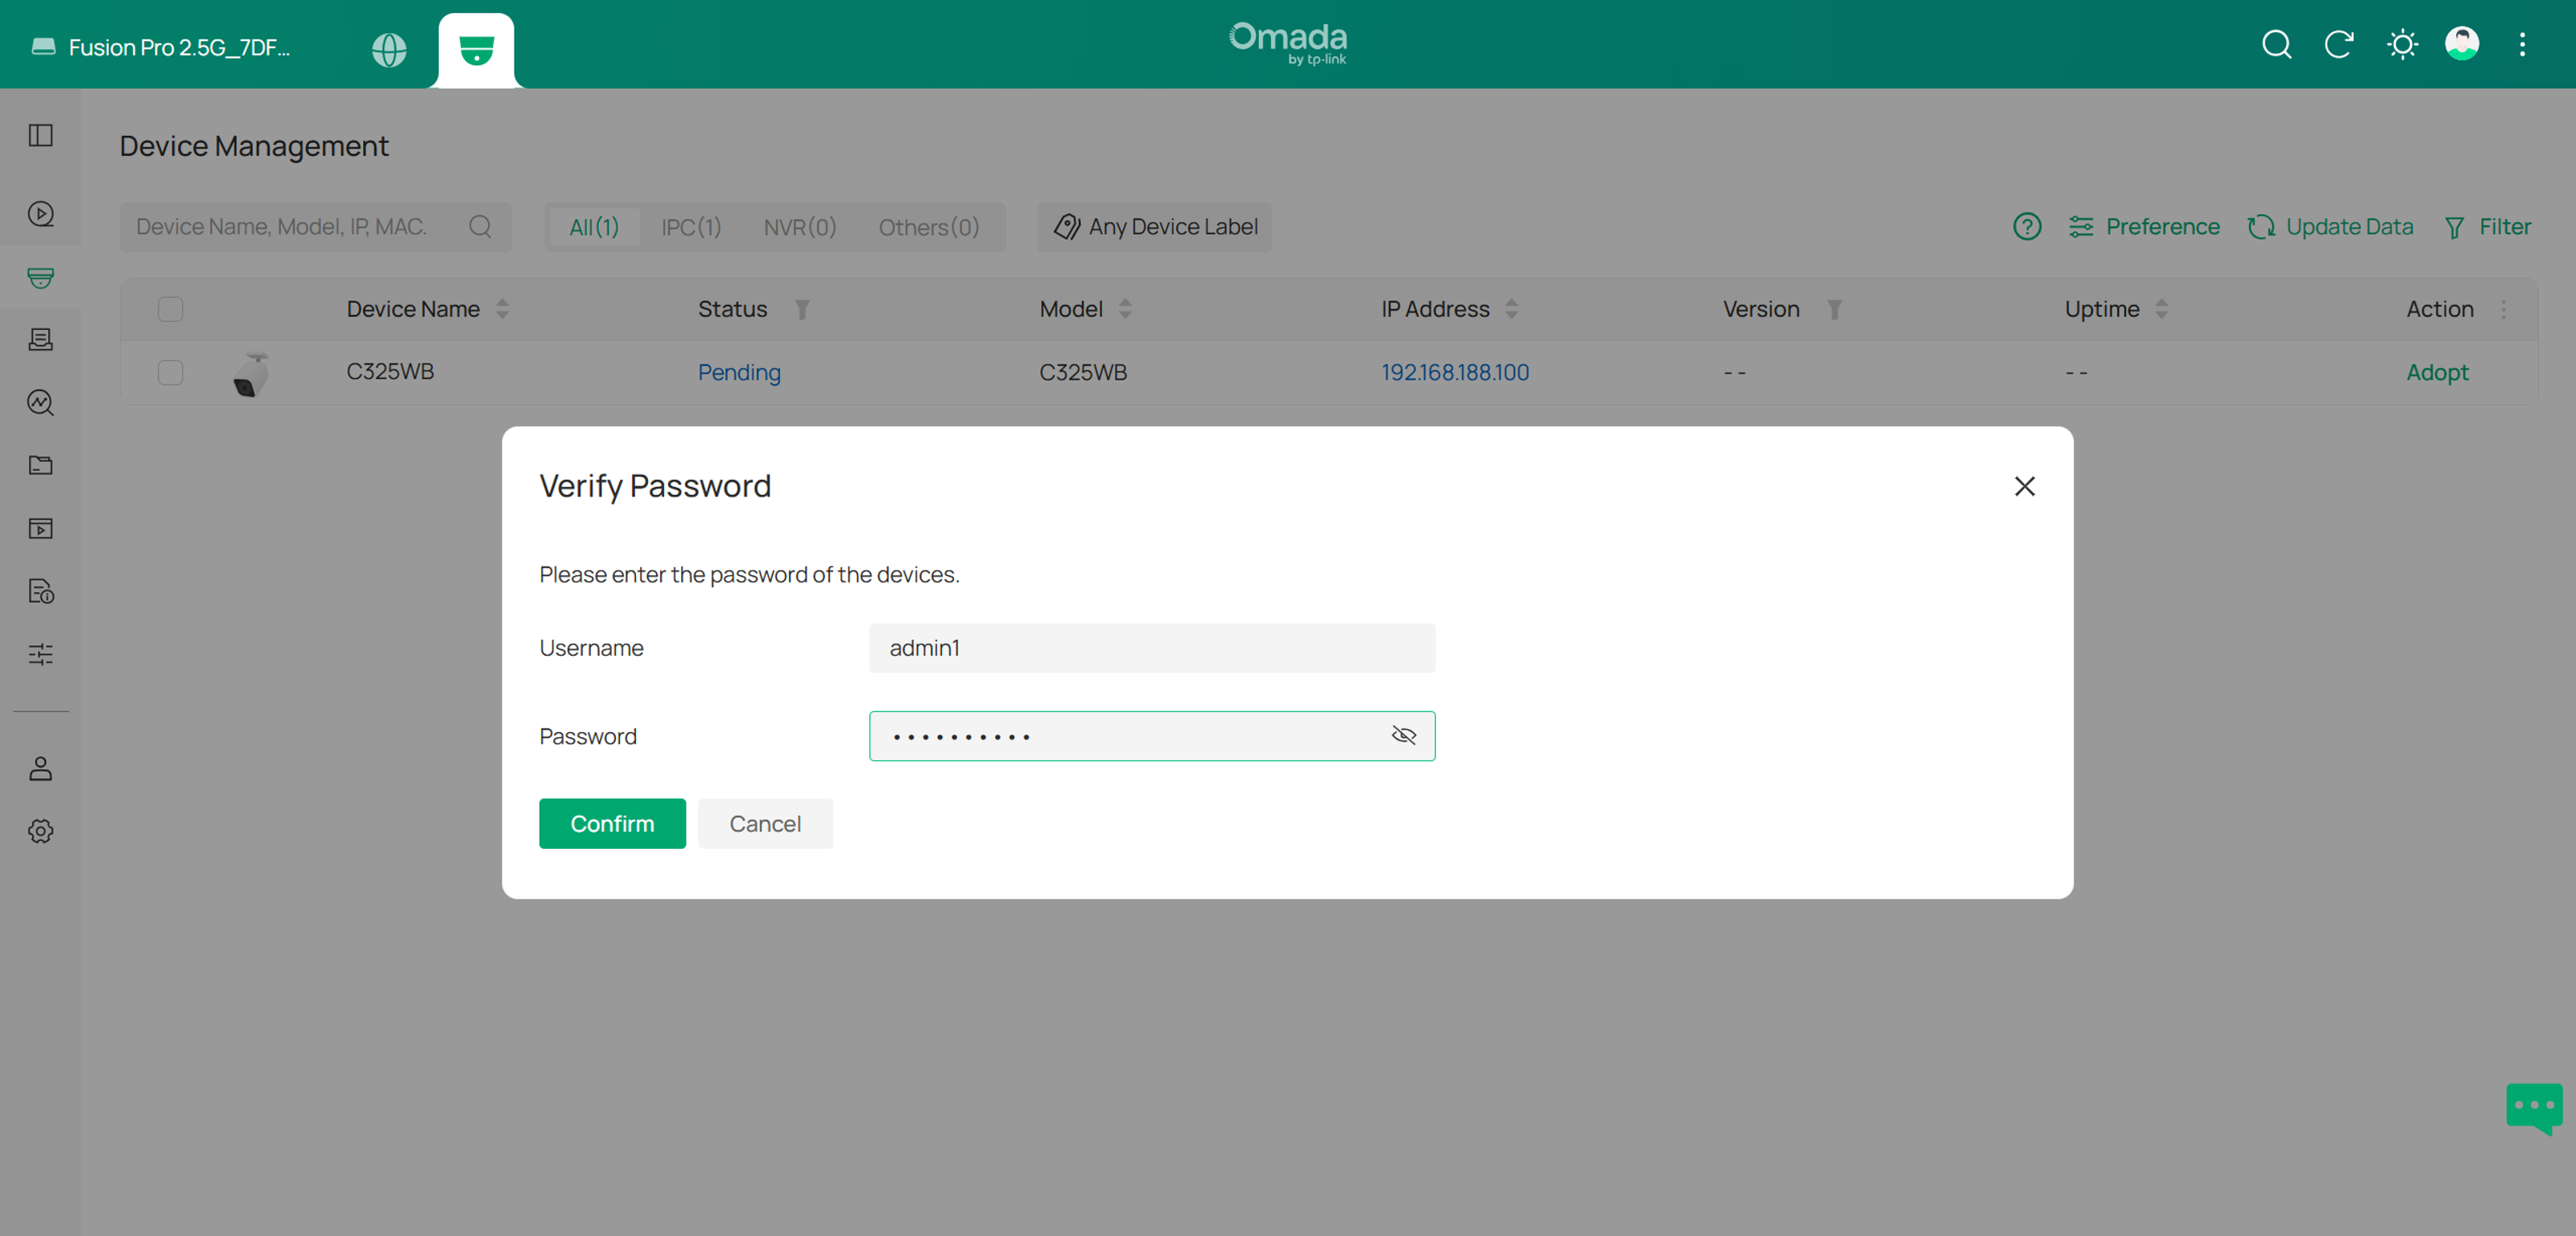
Step 2. Enter the camera's ONVIF username and password for verification. These credentials were configured during the ONVIF account setup process.
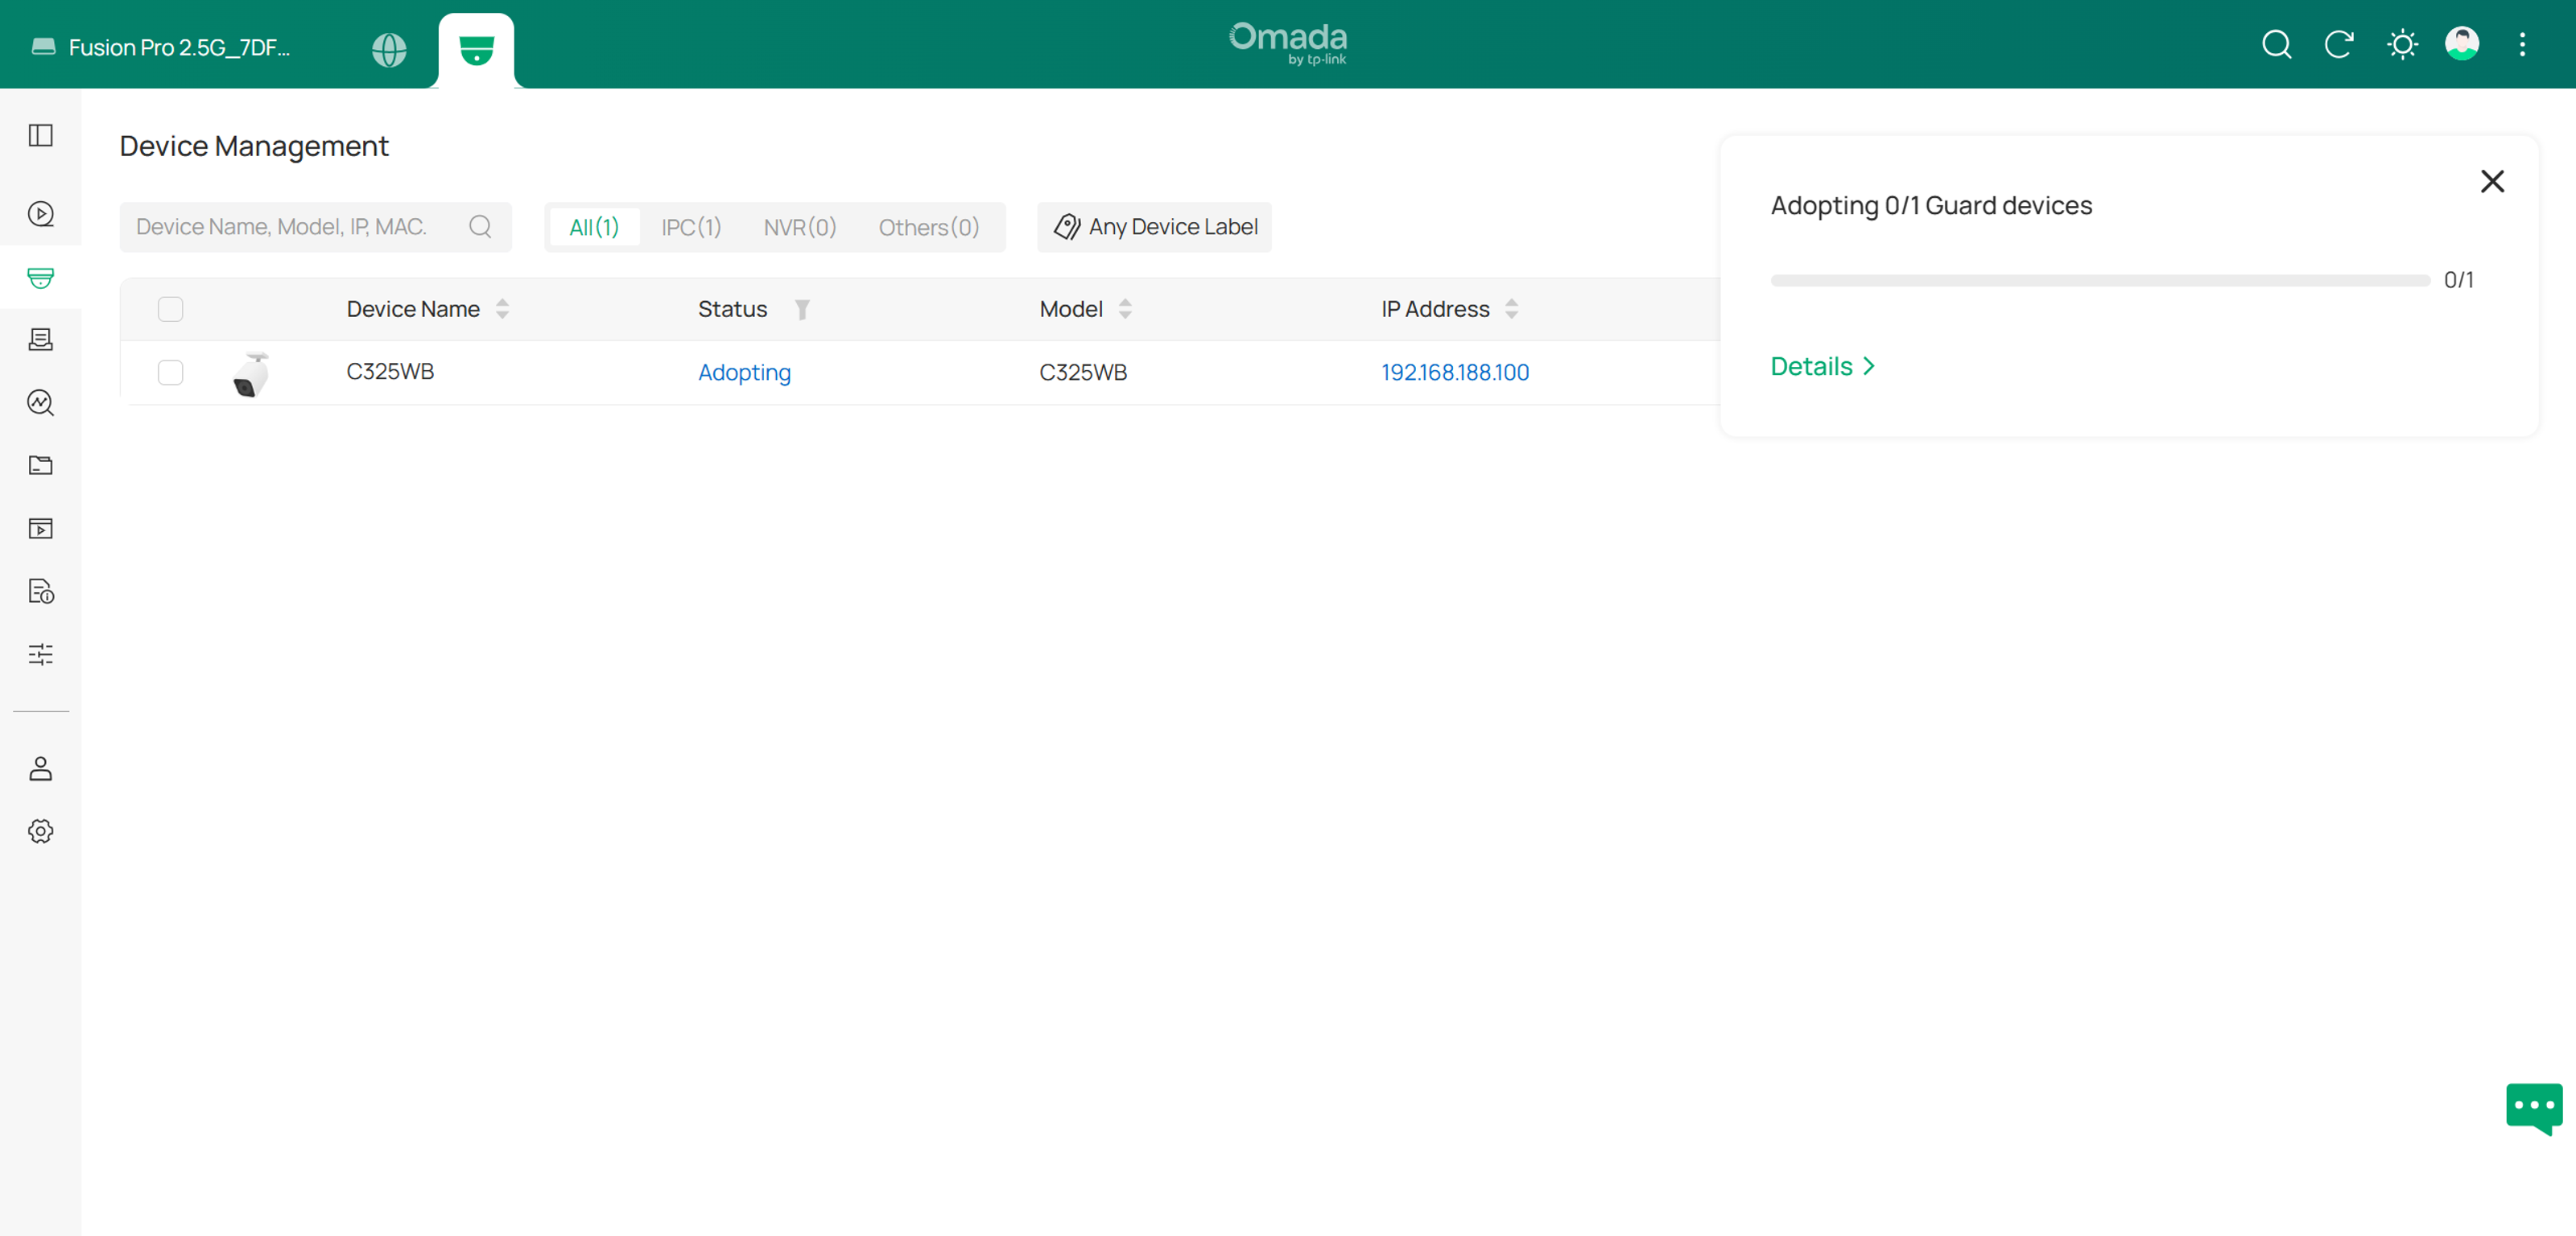
Step 3. Wait for the adoption process to complete. The Adoption Result notification will appear in the upper-right corner. Click Details to view additional information.
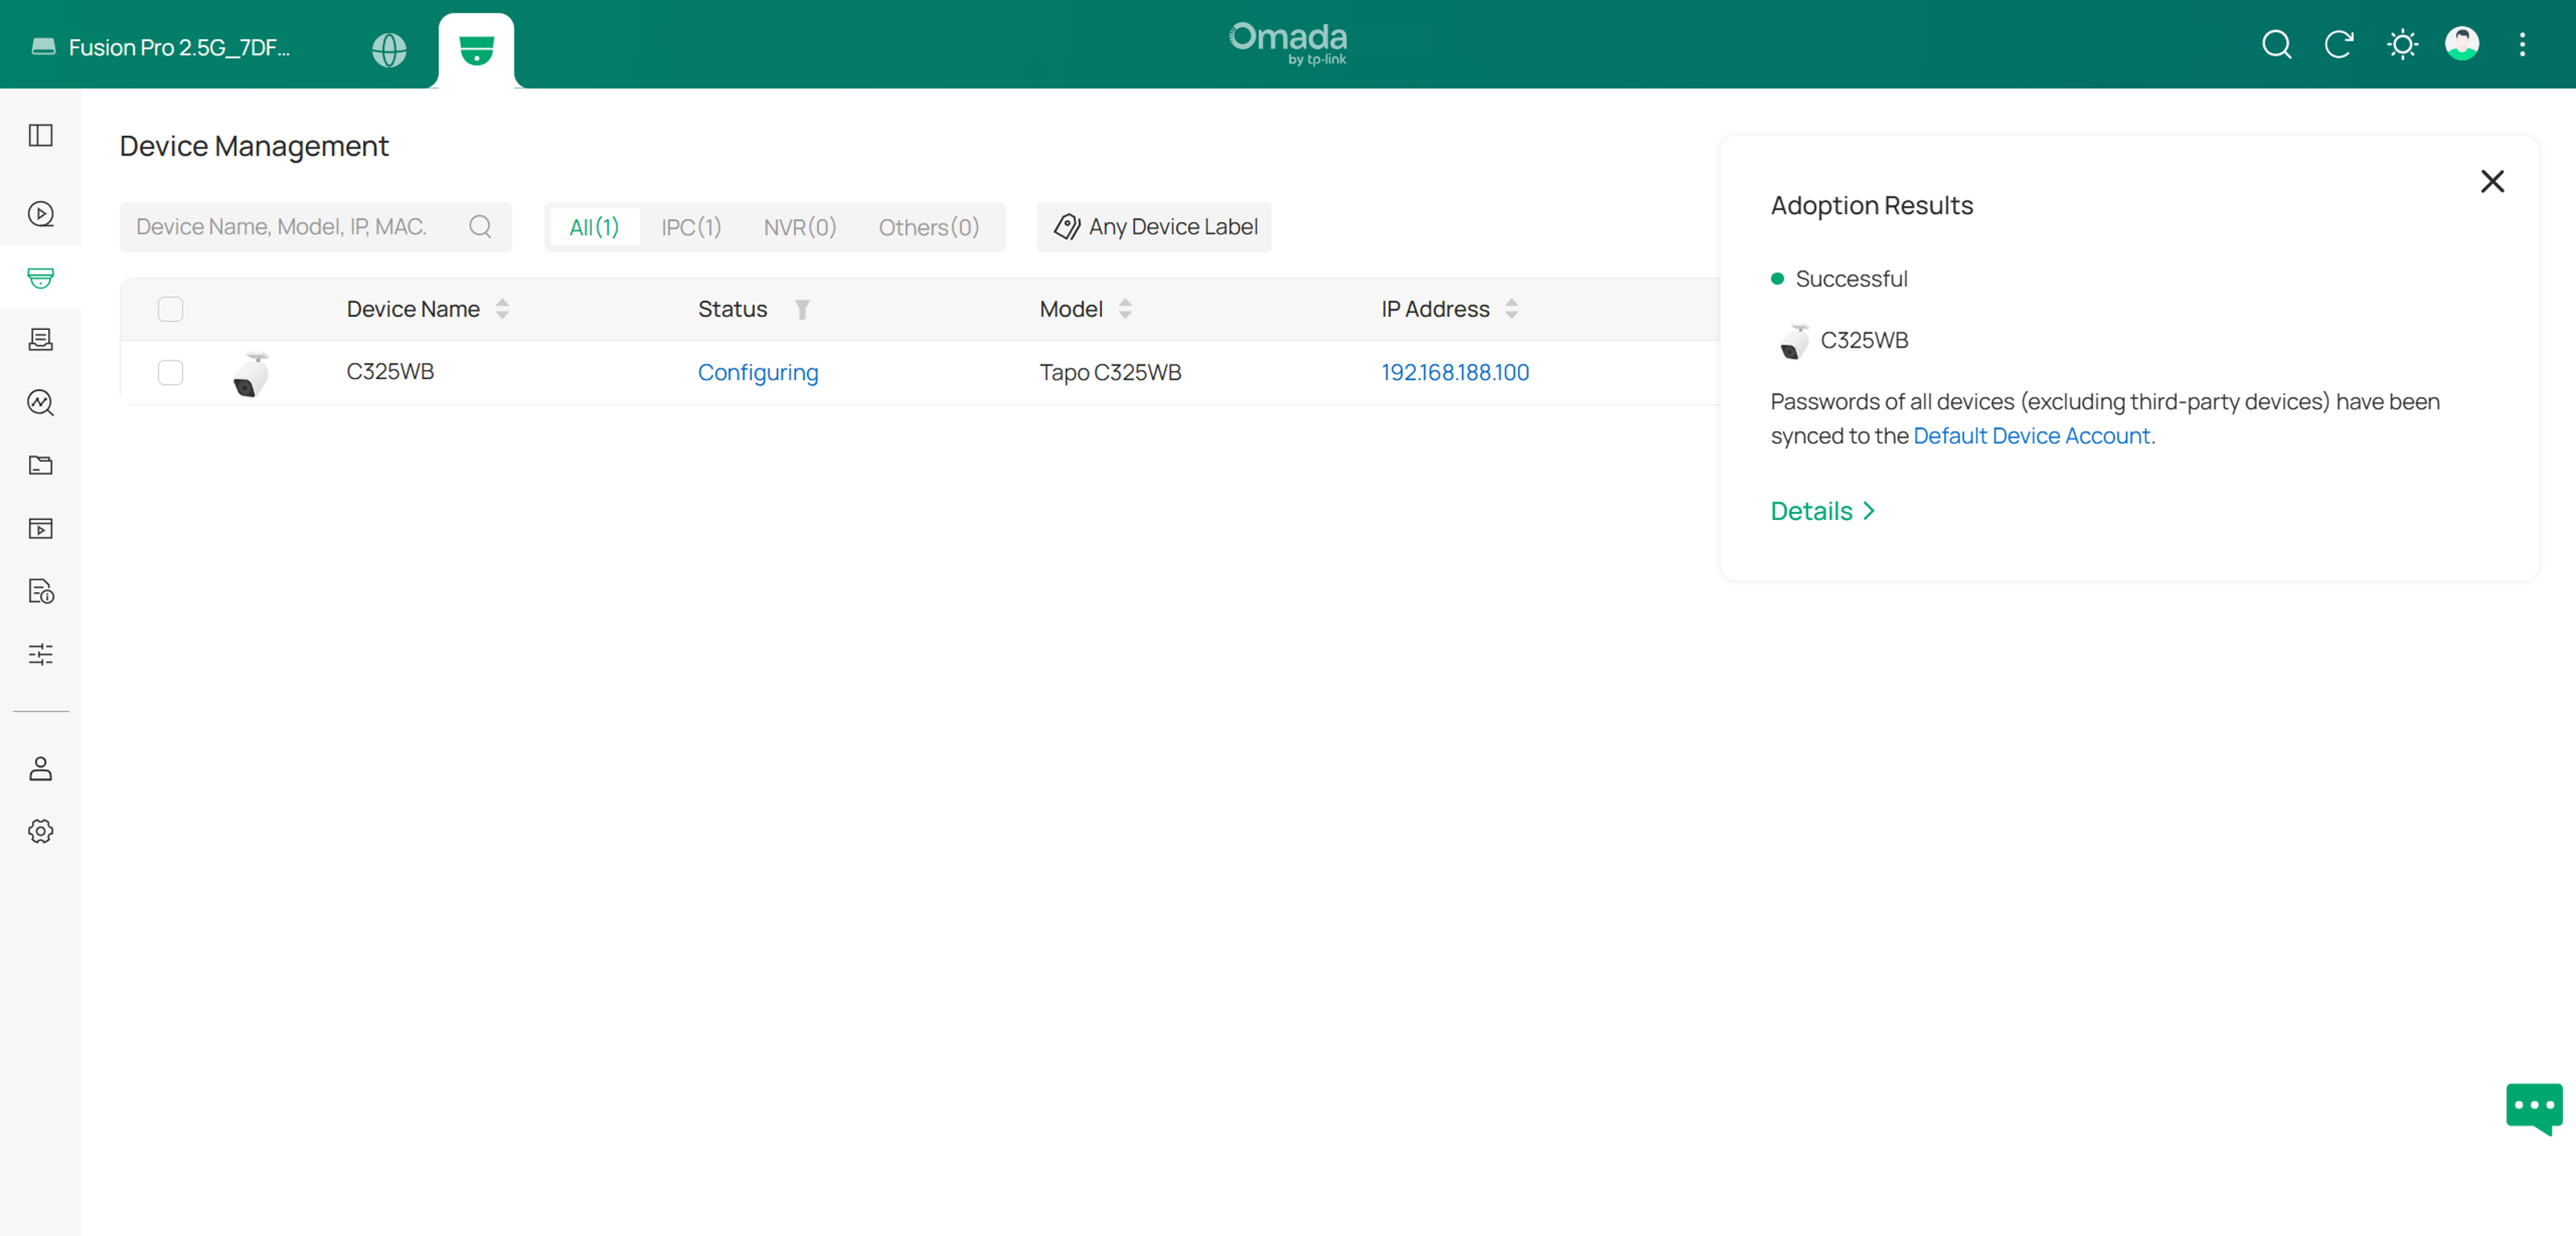
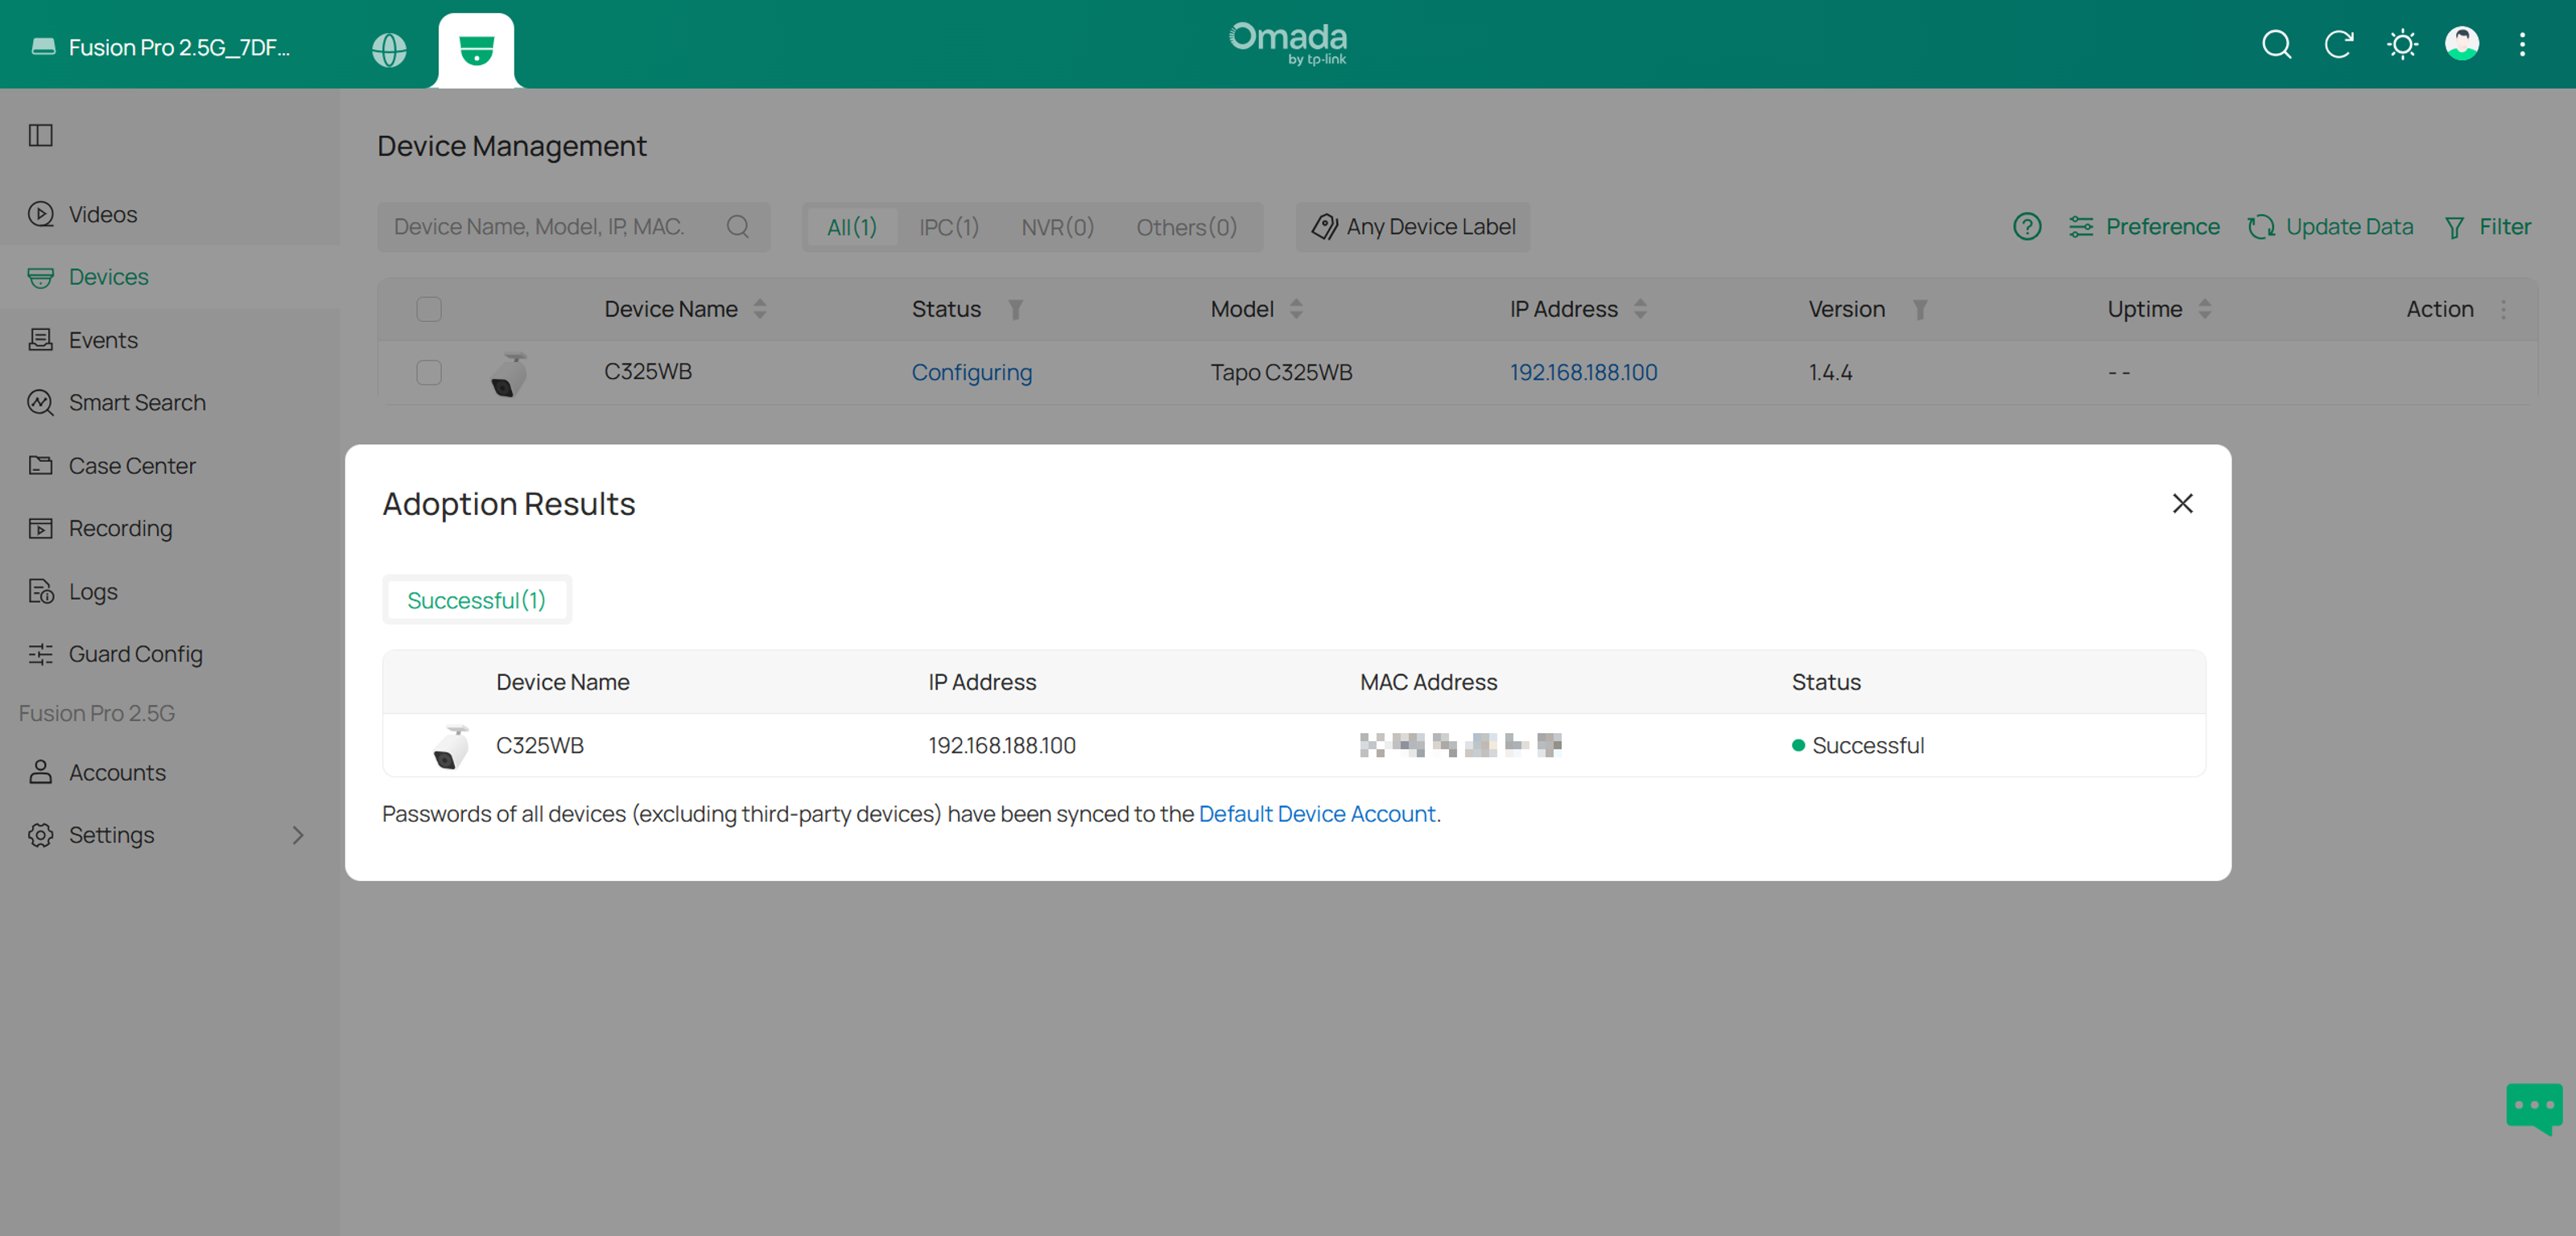
Note: Third-party device’s username and password will not be synced to the Default Device Account. Please keep your device’s account in mind.
Add a Camera Manually
If the camera does not appear on the Device Management page, check if the camera's ONVIF account is enabled, then try adding it manually using the following steps.
Step 1. Go to Device Management and click Preference > Add Third-Party Device.
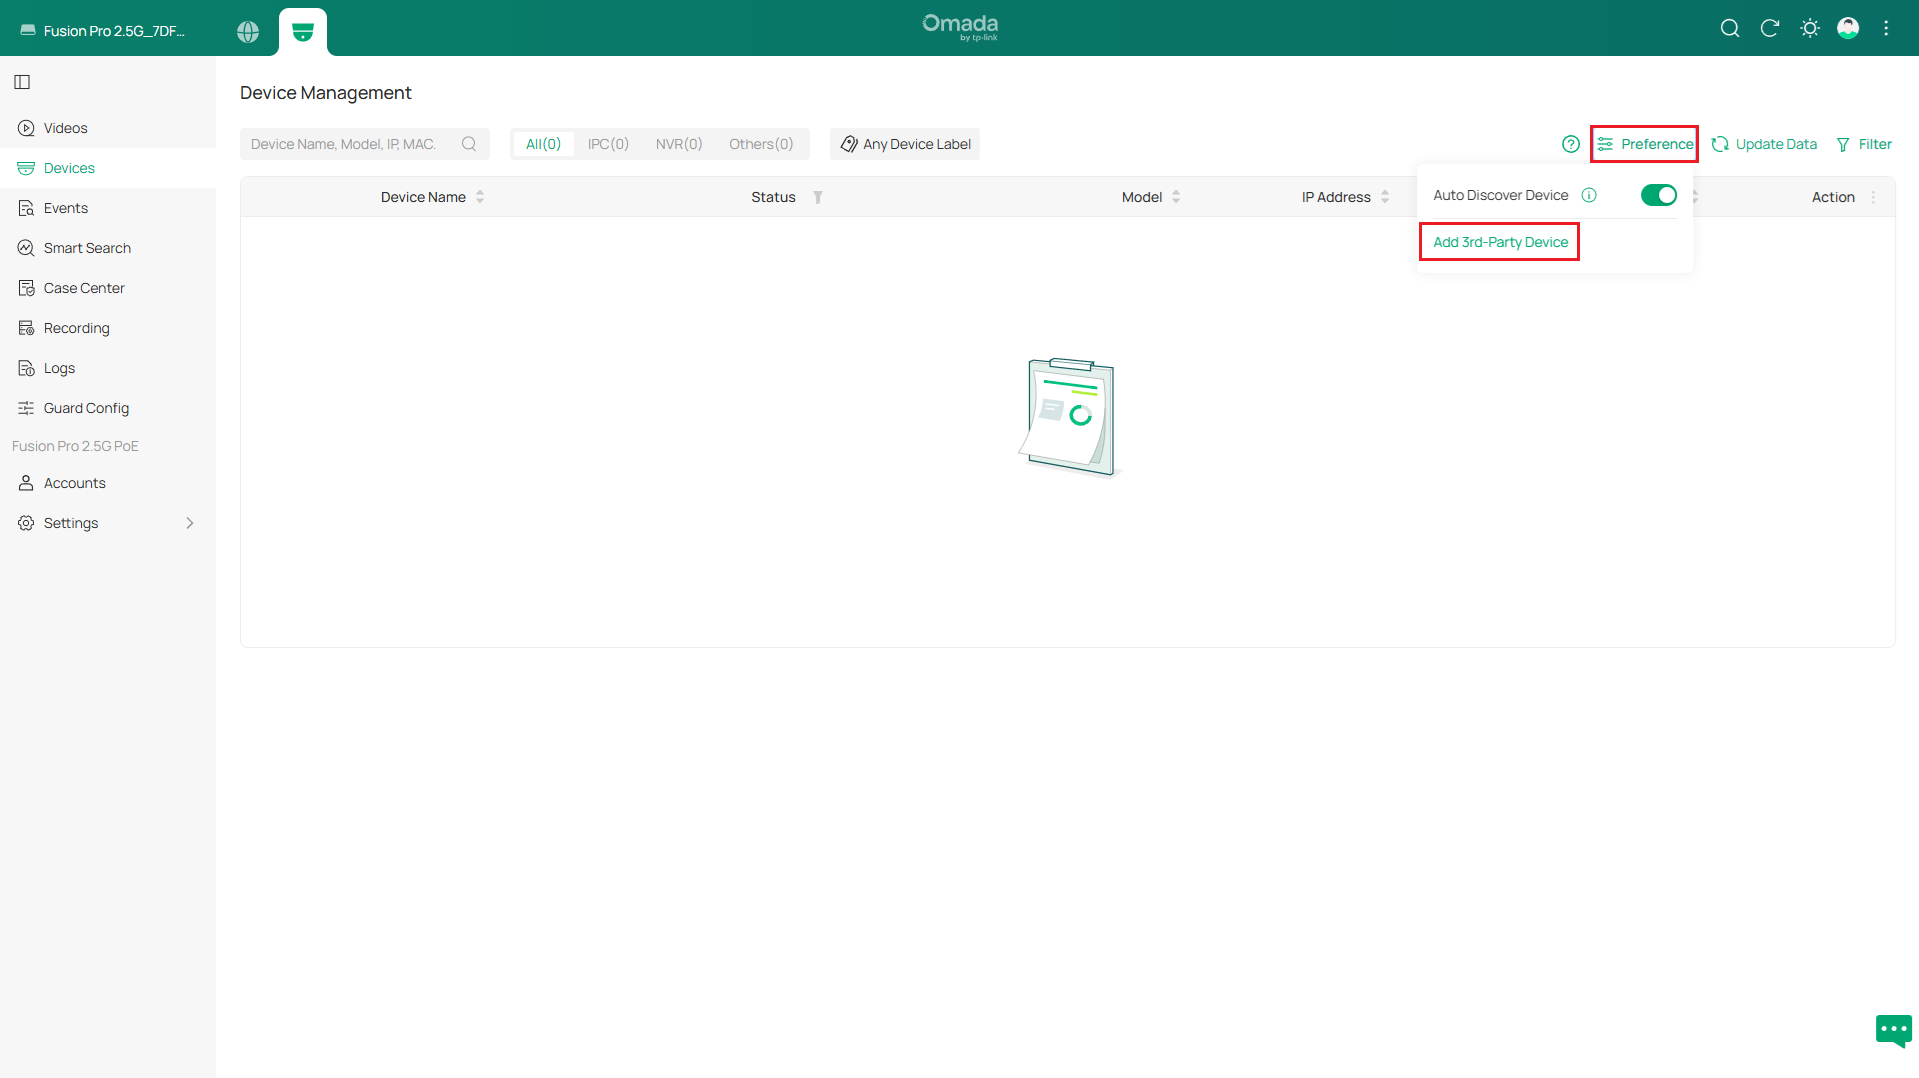
Step 2. In the Add Third-Party Device window, select ONVIF as the protocol. Enter the camera's IP Address, Management Port, Username, and Password, then click Apply.
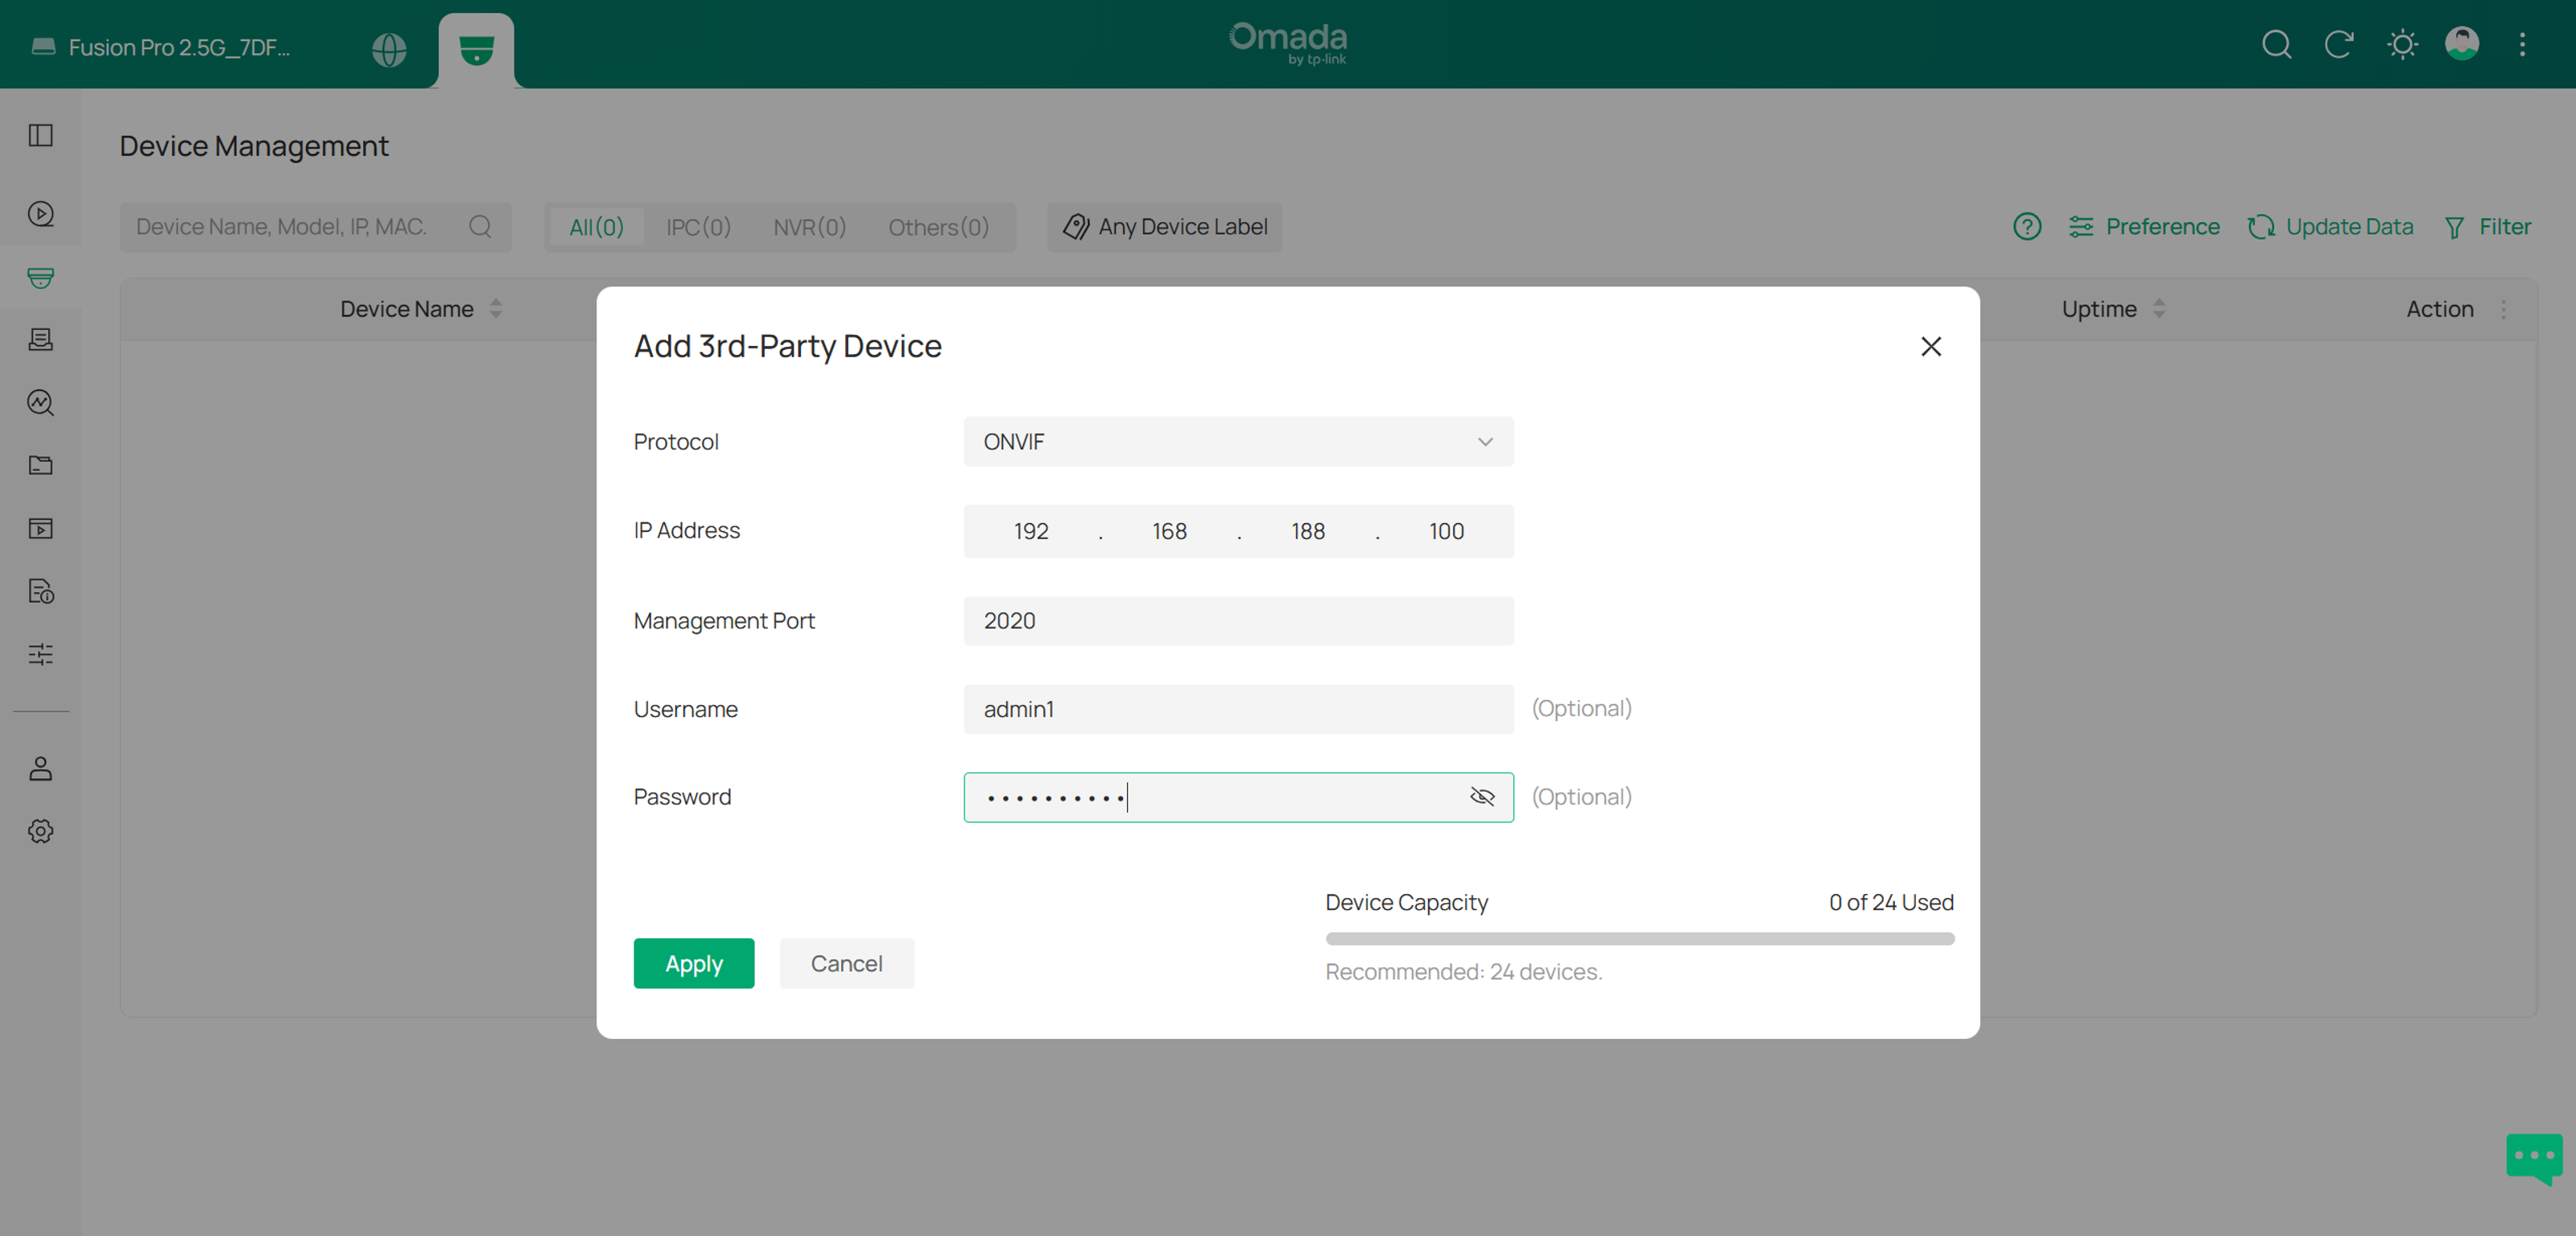
Note: ONVIF Management Port may vary from manufactures. For Tapo, the port is 2020. You may refer to the device manufacture’s official website for the proper ONVIF port.
Step 3. Wait for the adoption process to complete. The Adoption Result notification will appear in the upper-right corner. Click Details to view additional information.
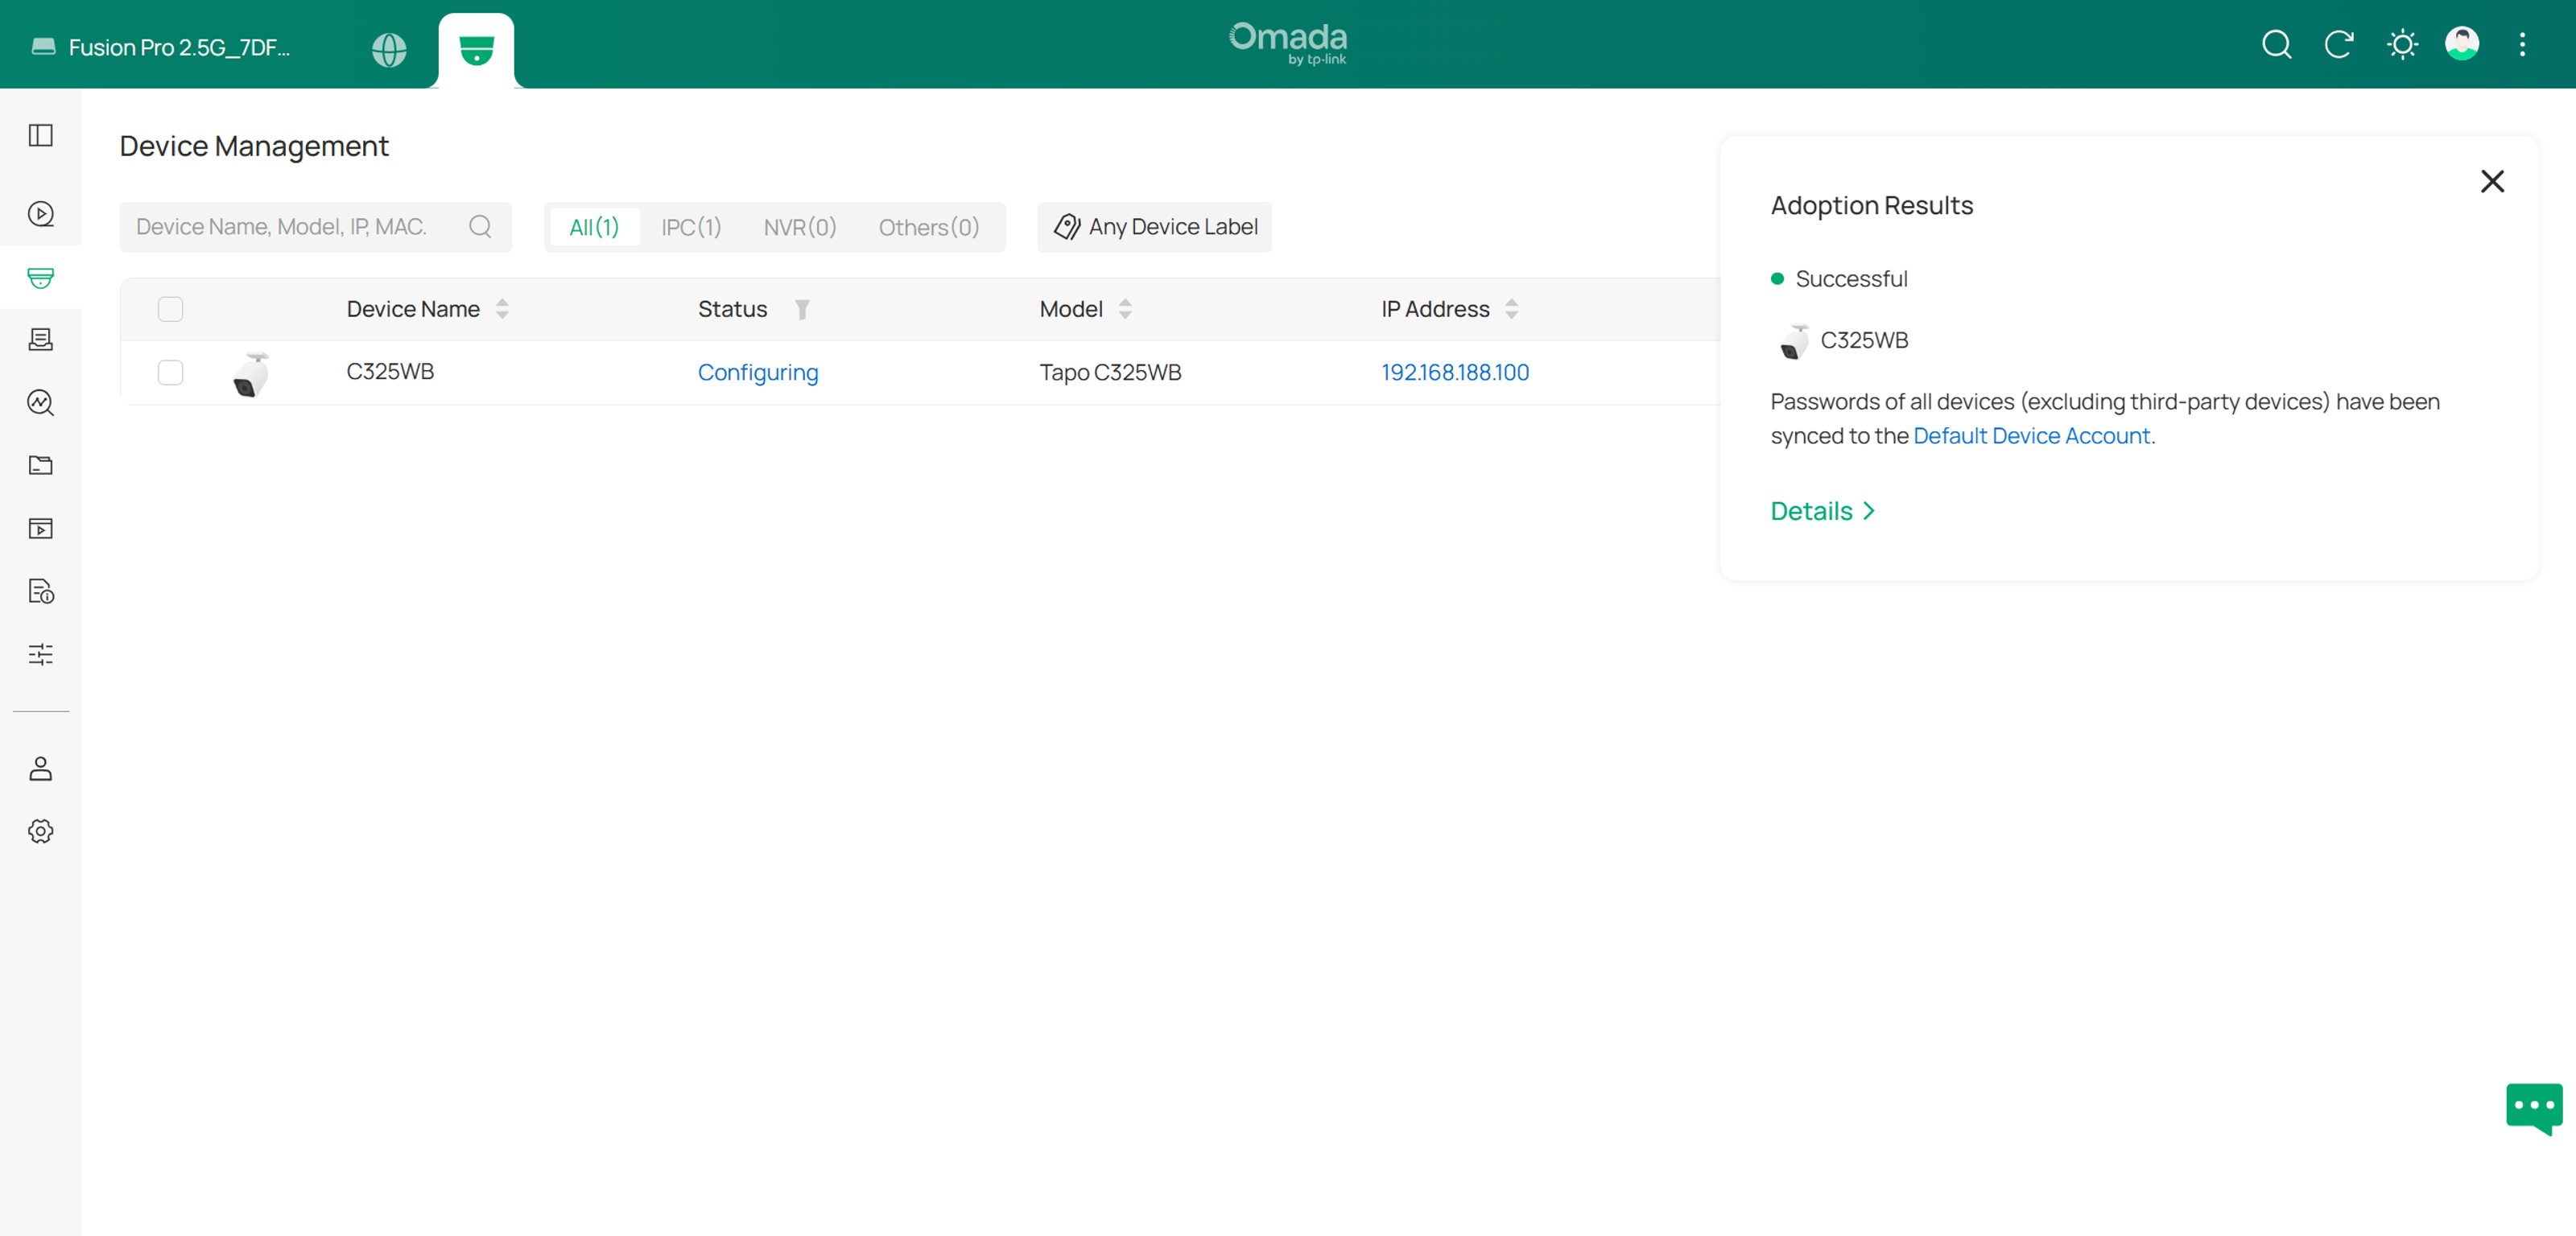
Note: Third-party device’s username and password will not be synced to the Default Device Account. Please keep your device’s account in mind.
Method 2: Add a Third-Party Camera via RTSP
Obtain the RTSP URL
When adding a third-party camera through RTSP, you must manually enter the camera's RTSP URL. The URL typically follows this format:
rtsp://<username>:<password>@<ip_address>:<port>/<video_path>
Because RTSP URL formats vary by manufacturer and model, refer to the camera vendor's documentation or support website for the correct RTSP URL.
Add a Camera via RTSP
RTSP provides broad compatibility for video streaming but does not support device management functions. Before you begin, ensure the third-party camera is connected to the same network as the Fusion Pro device.
Step 1. Go to the Guard System > Device Management. Click Preference > Add 3rd-Party Device.
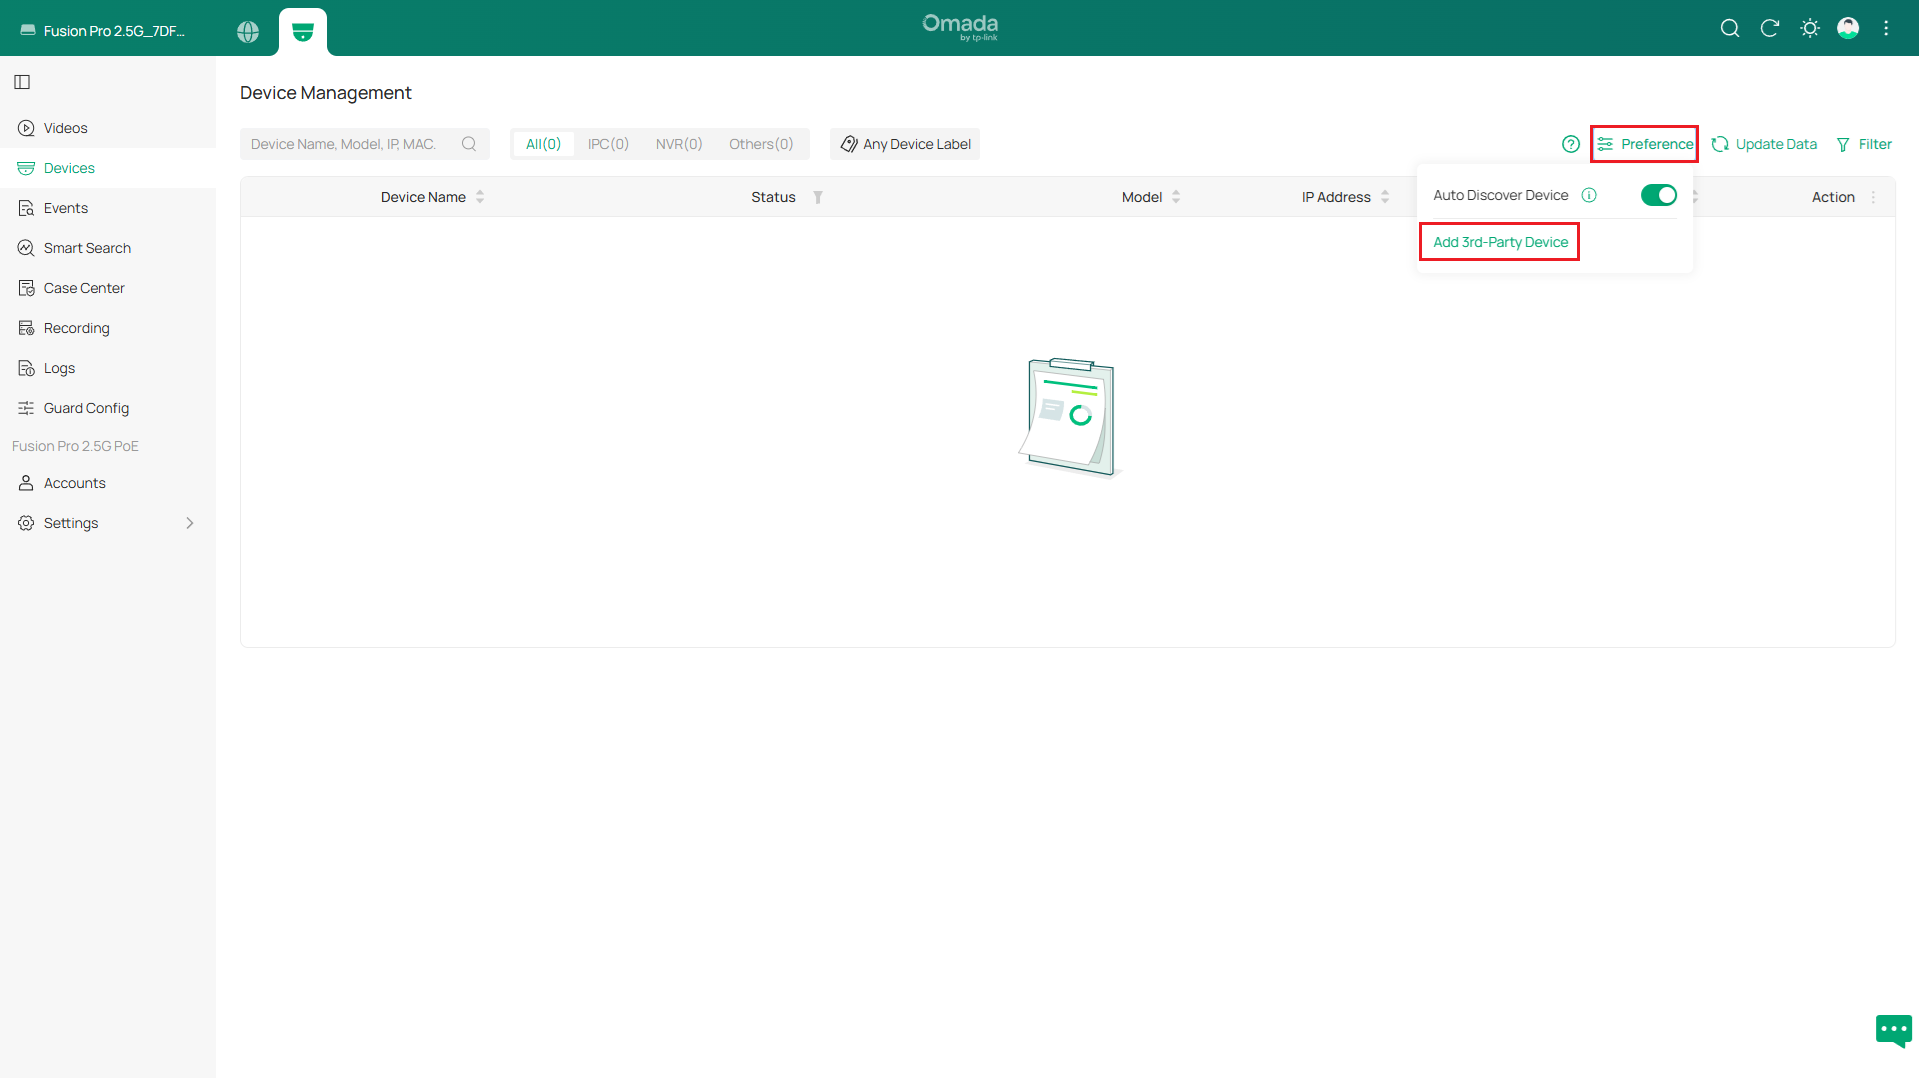
Step 2. In the pop-up window, select the protocol as RTSP. Fill the Resource Path with the proper RTSP URL. The URL typically follows the format:
rtsp://<username>:<password>@<ip_address>:<port>/<video_path>
Click Apply to continue.
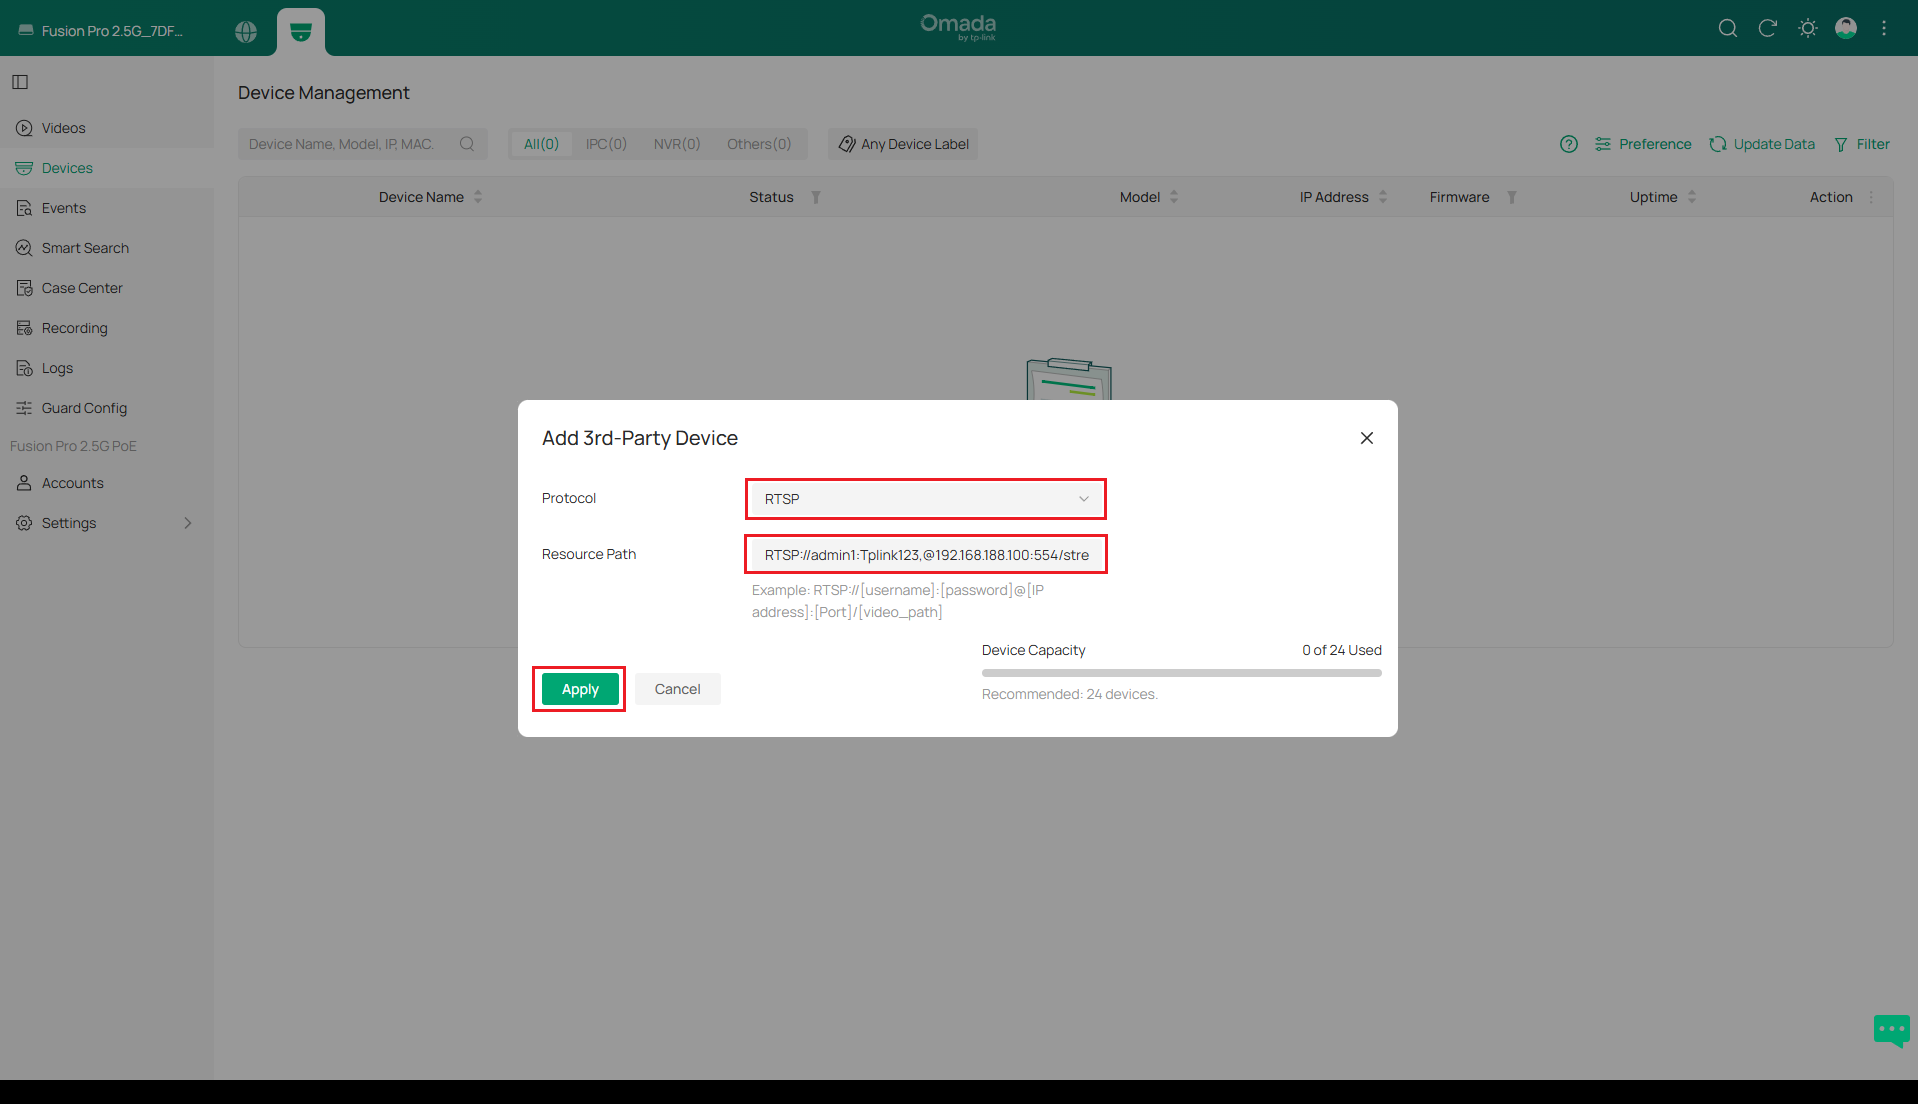
Note: The <Port> in URL stands for RTSP Streaming Port, which may vary from manufactures. For Tapo, the port is 554. You may refer to the device manufacture’s official website for the proper RTSP streaming port.
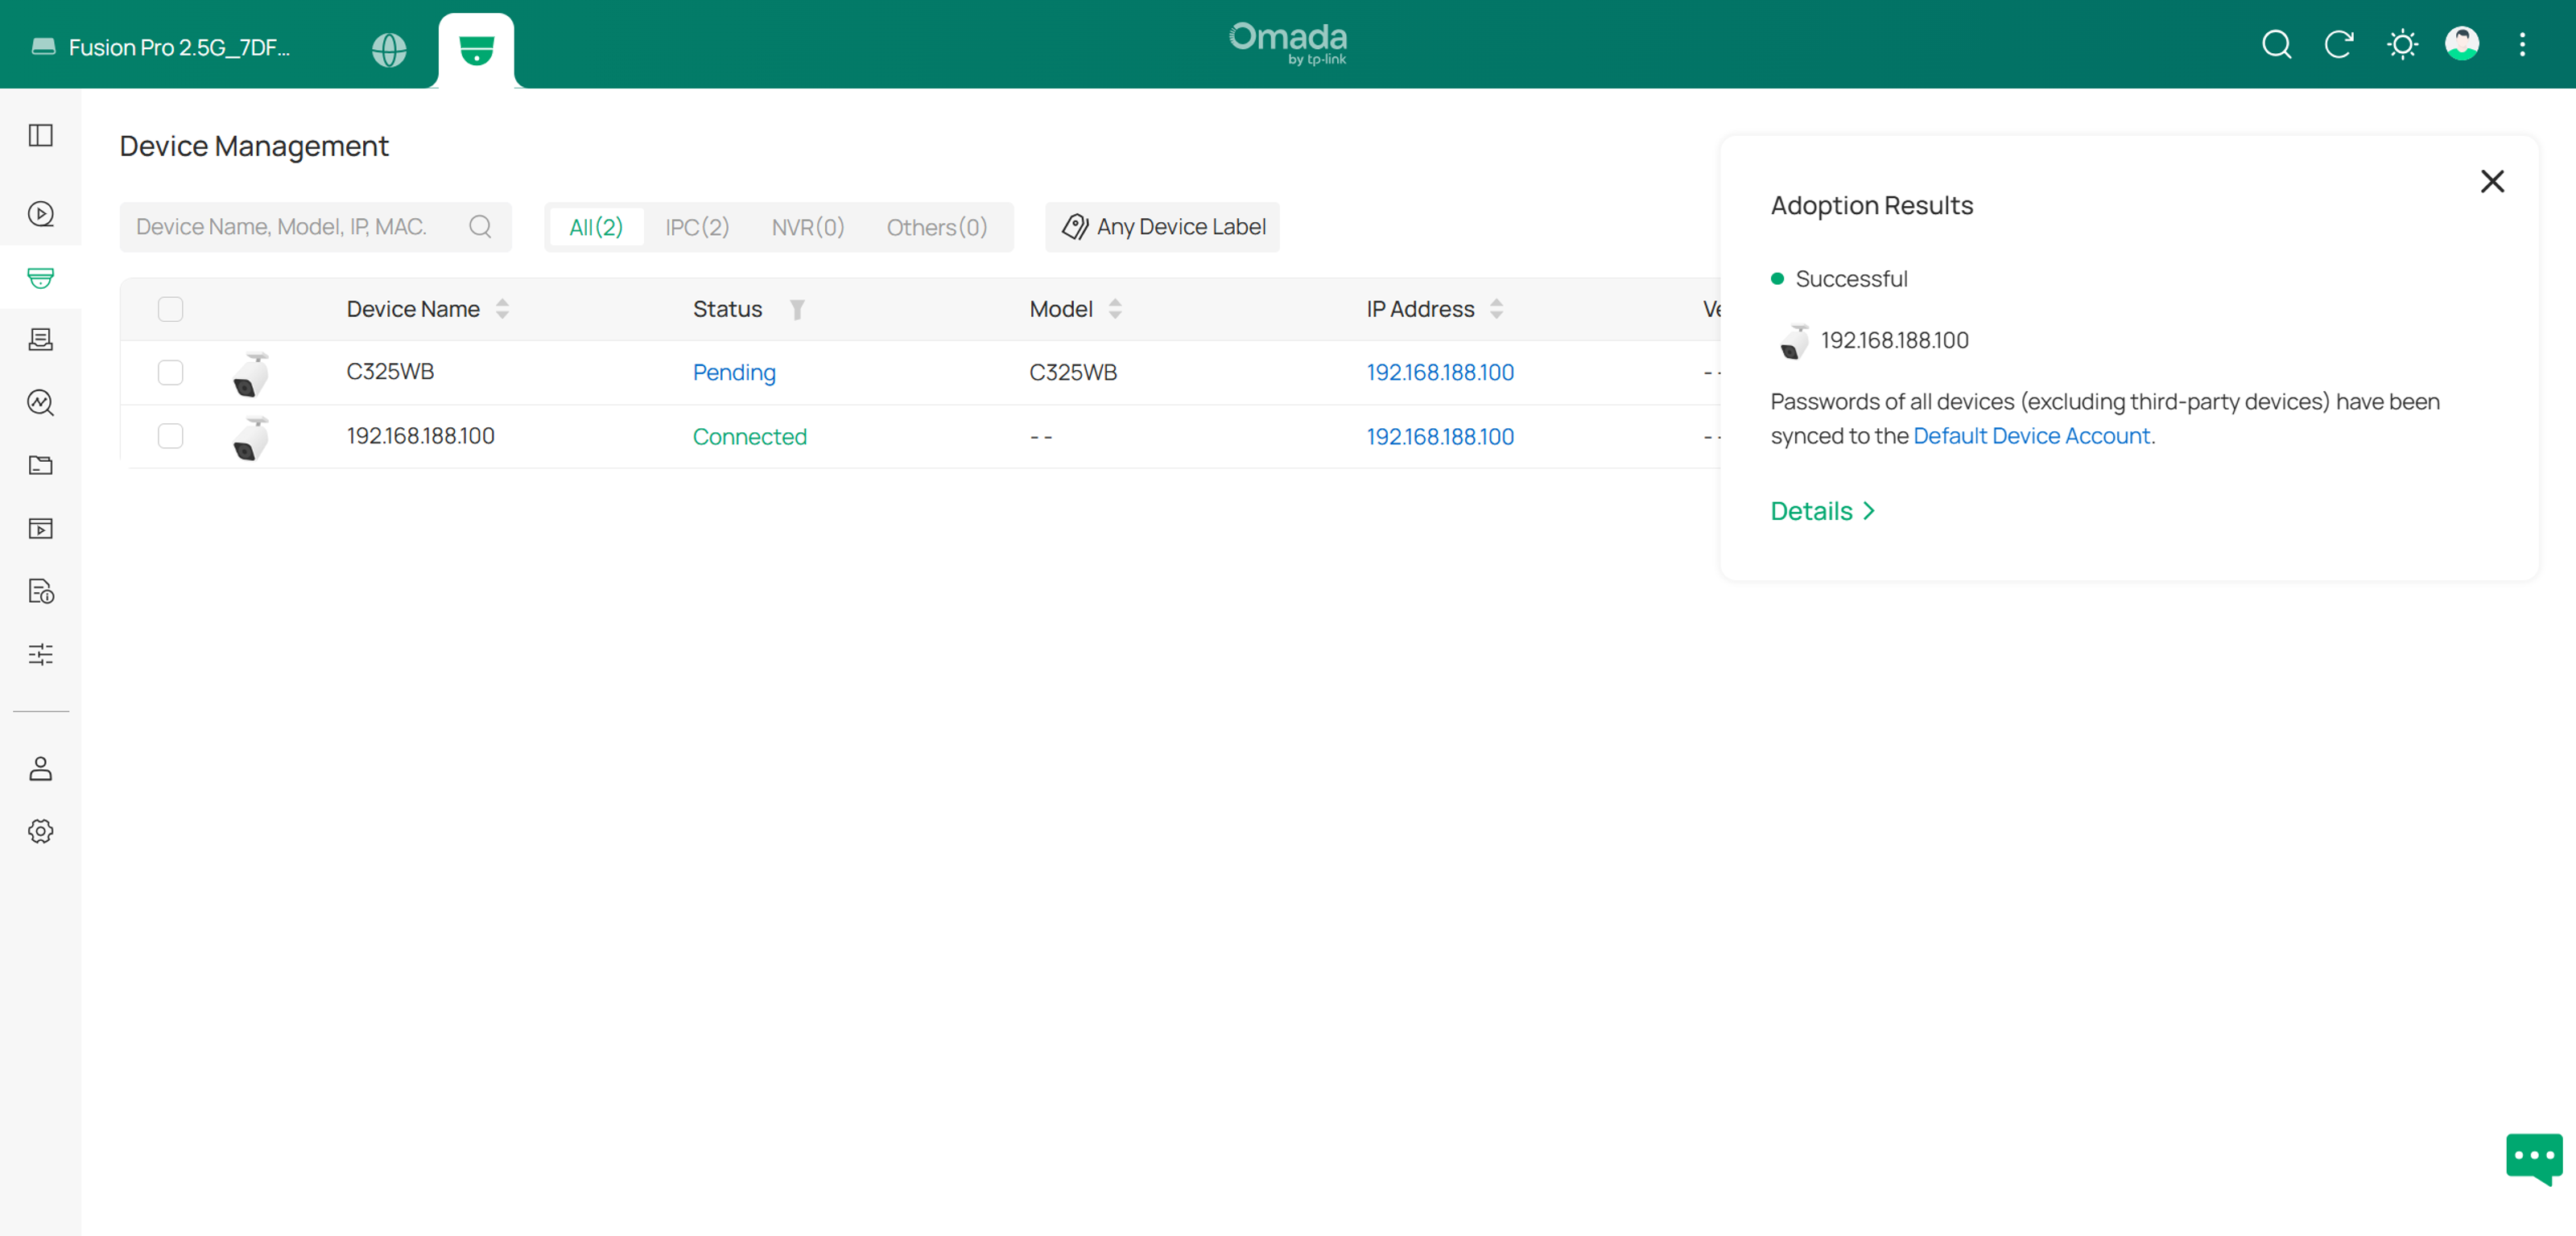
Step 3. Wait for the adoption process to complete. The Adoption Result notification will appear in the upper-right corner. Click Details to view additional information.
Conclusion
The Omada Fusion Pro Series supports the integration of third-party cameras through both ONVIF and RTSP. By configuring the correct credentials, ports, and protocol settings, users can easily add compatible cameras and build a flexible surveillance solution using multiple camera brands.
To learn more about each function and configuration, please visit Support Home to download or check the manual for your product.
QA
Q1: Why do I need to configure the camera before adding it to the Fusion Pro?
A1: Many cameras require initial setup (activation, password creation, ONVIF enablement) before they can communicate with other devices.
Q2: Why can’t I connect even after entering credentials?
A2: Double-check the username/password, ONVIF port, and ensure no firewall or network restrictions are blocking communication. Please note that some manufacturers require a dedicated ONVIF account, which may be different from the camera's web or APP login account.
Q3: Why is there no video in Live View after adding the camera?
A3: Verify the channel assignment, stream settings, and ensure the camera supports compatible ONVIF profiles.
Q4: Why do some features (like Motion Detection, Bit Rate) not work?
A4: ONVIF compatibility varies by model and profile; some advanced features may not be supported across brands.
Q5: Why does Omada Fusion Pro show settings that are not supported by the camera (such as stream settings)?
A: Some third-party cameras may report non-standard ONVIF capability information. Before modifying settings such as resolution or bitrate, please verify that the corresponding options are supported by the camera, as changing unsupported parameters may cause abnormal behavior or device reboots.
Q6 Does the camera need a static IP address?
A5: Not required but recommended for stability and easier management.
Q7: What ONVIF profile is recommended?
A6: Profile S is commonly used for video streaming; check camera specifications for compatibility.
Q8: Can I use cameras from any brand with Omada Fusion Pro?
A7: Yes, as long as they support ONVIF, though functionality may vary depending on implementation.
