


How to Use the Device and Client List in Omada Controller v6.4


Contents
Device and Client List Configuration
Introduction
Effective network administration relies on how quickly administrators can view, locate, and configure connected hardware. In Omada Controller v6.4, the user interface for both the Devices and Clients pages has undergone major interaction upgrades. These improvements include customizable drag-and-drop column positioning, a newly adapted “Auto Find Device” pop-up, new Filter functionality, and quick-access batch operations. Whether you are maintaining a campus deployment or rolling out new access points, these streamlined controls reduce navigation overhead and allow you to tailor the Devices and Clients list to your workflow.
Device and Client List Configuration
Devices
Customizing Column Positions
The Devices list now supports dynamic drag-and-drop adjustments, allowing administrators to rearrange table columns to prioritize the data most relevant to their workflow (such as placing IP Address, MAC Address, or Uptime next to the device name). This is a user-level setting, and the order will be retained even if the same user logs in from a different browser.
Step 1. Log in to your Omada Controller web interface and select your target site from the site drop-down list.
Step 2. In the left navigation menu, click Devices to open the devices table.
Step 3. Hover your cursor over the title header of the column you want to move (for example, IP Address).
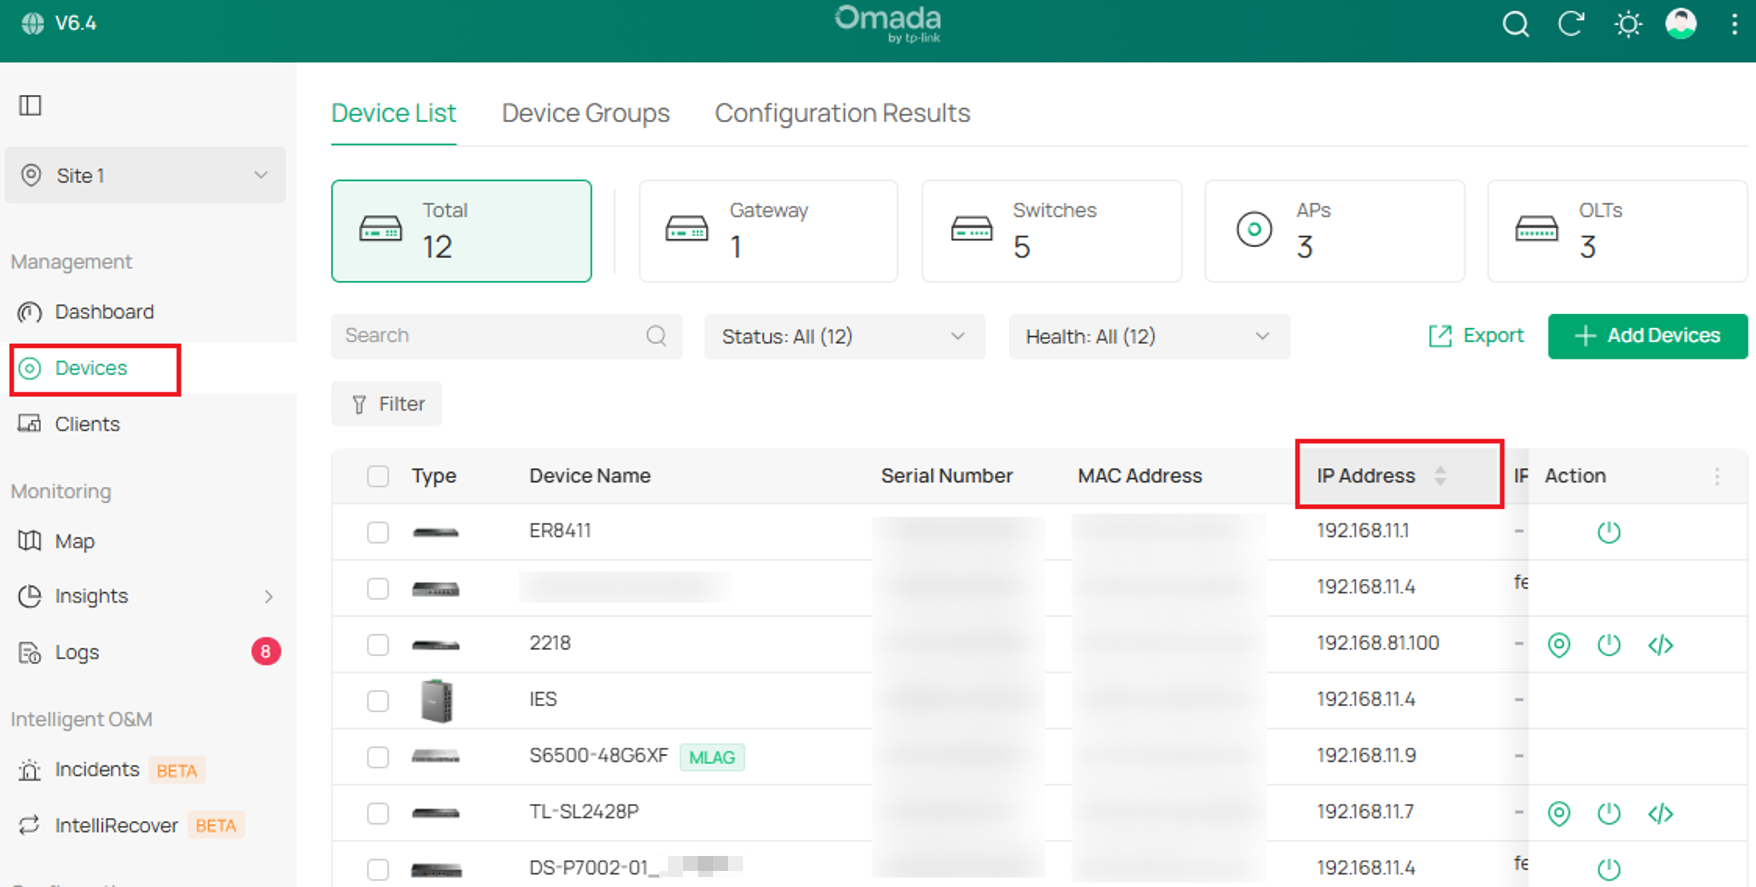
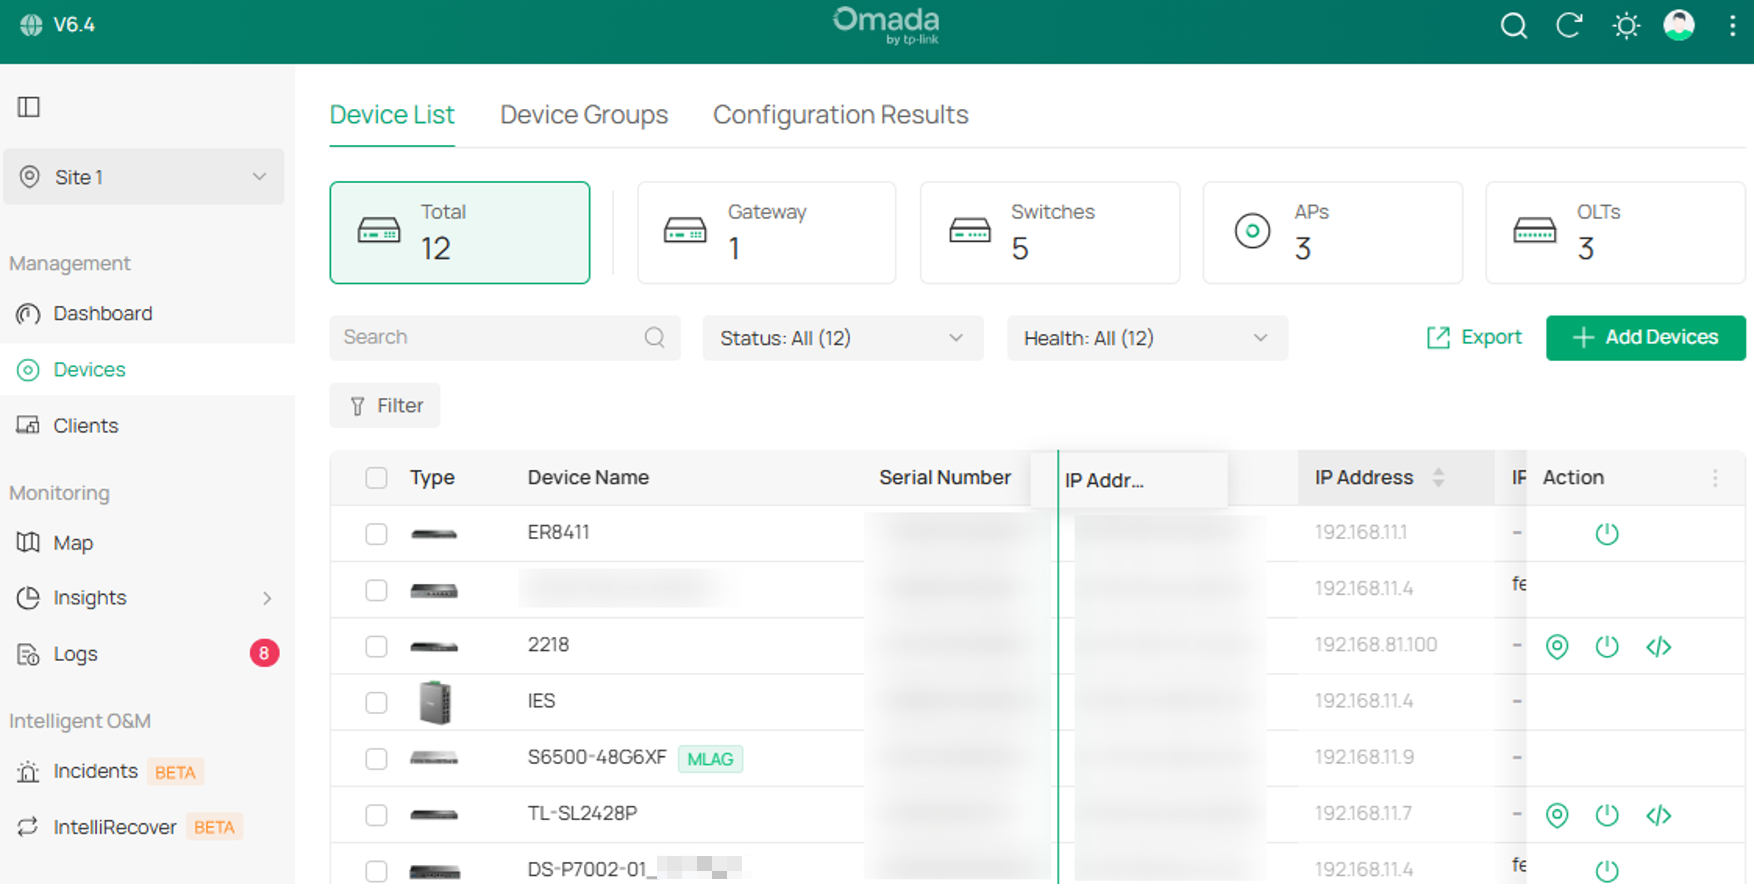
Step 4. Click and hold the column header, drag it horizontally to your preferred position across the table header row, and release the mouse button. The column will snap into its new location immediately.
Auto Find Devices
In Omada Controller v6.4 Device List, unadopted devices won't show in the device list, and it will only show managed devices. Newly detected, unadopted Omada hardware will trigger a prompt banner directly on the Devices page.
Step 1. Navigate to the Devices page from the left navigation panel.
Step 2. A prompt displayed at the top of the device table will display unadopted devices in the network.
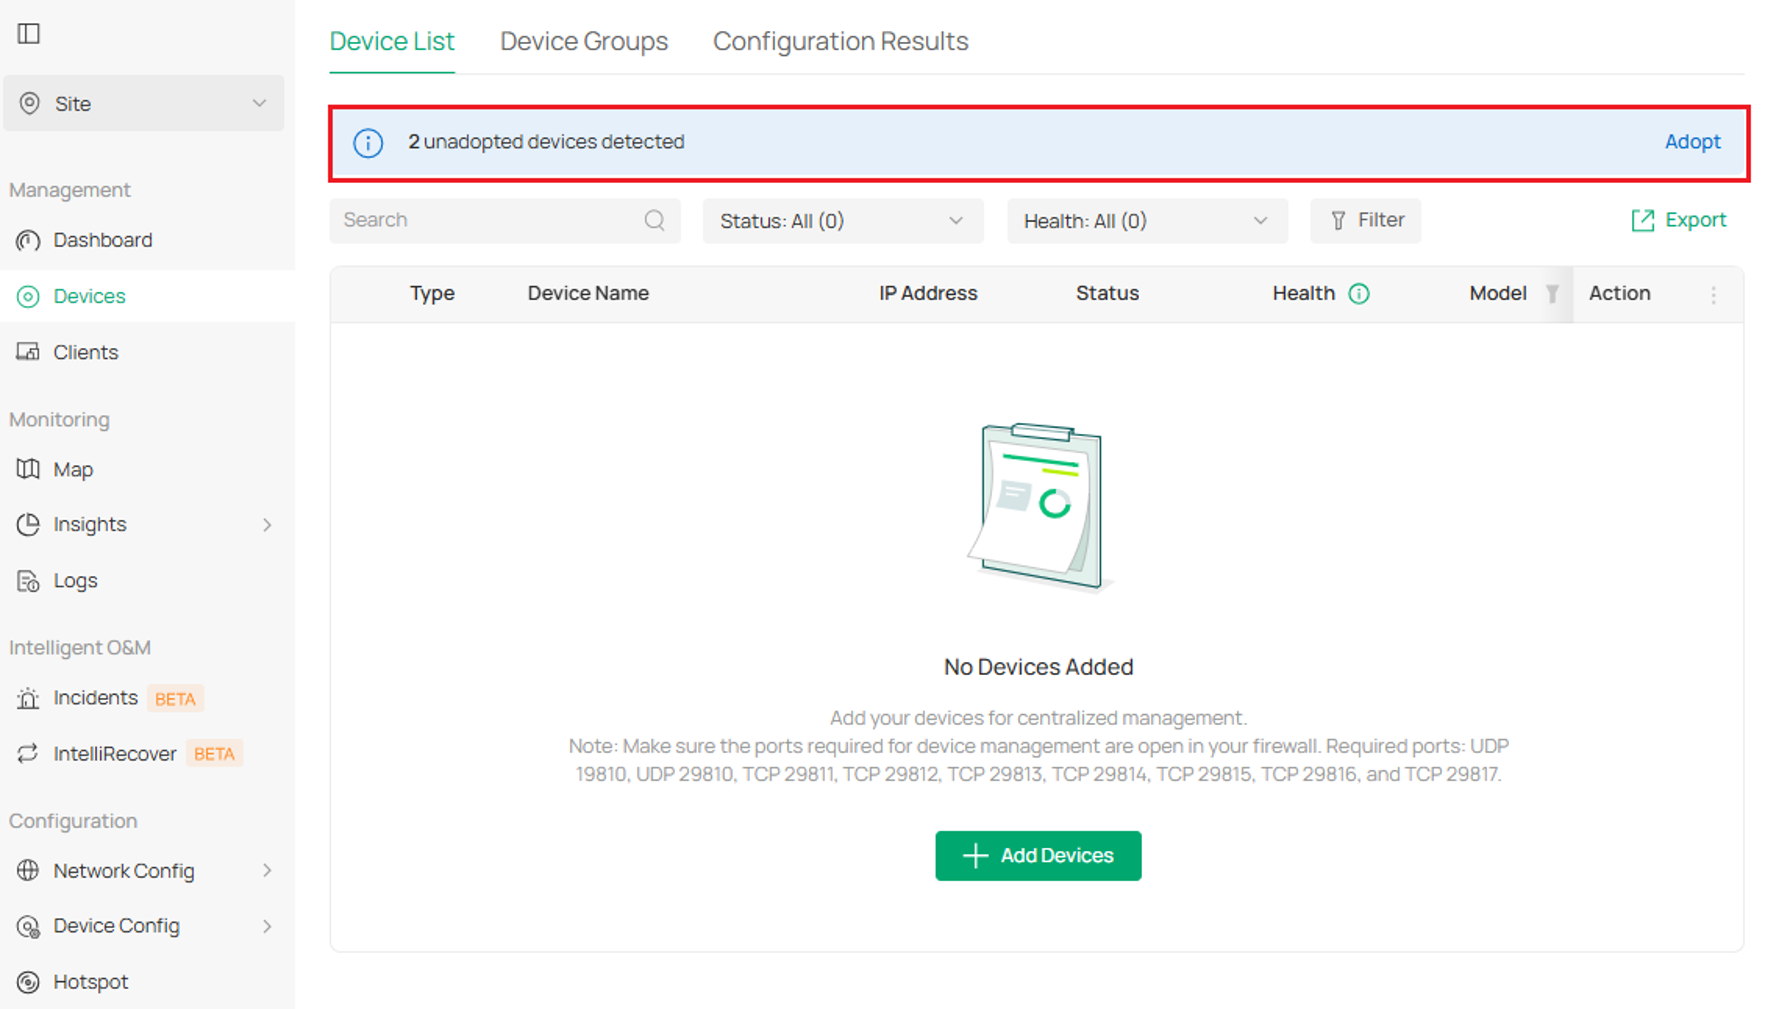
Step 3. Select Adopt in the banner and detected and unadopted devices will display.
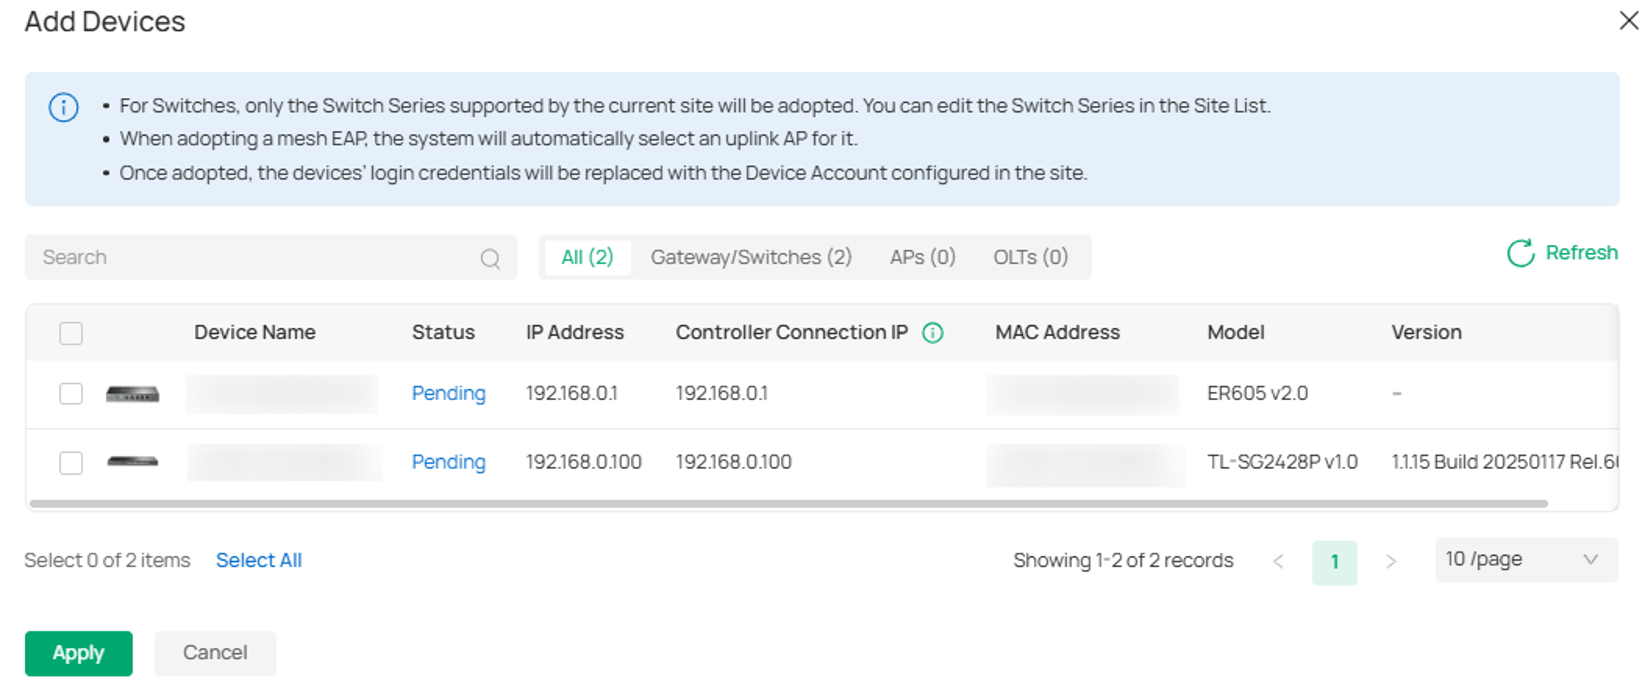
Step 4. Select the detected and unadopted devices you want to adopt and select Apply. The device’s status will change from Configuring to Connected.
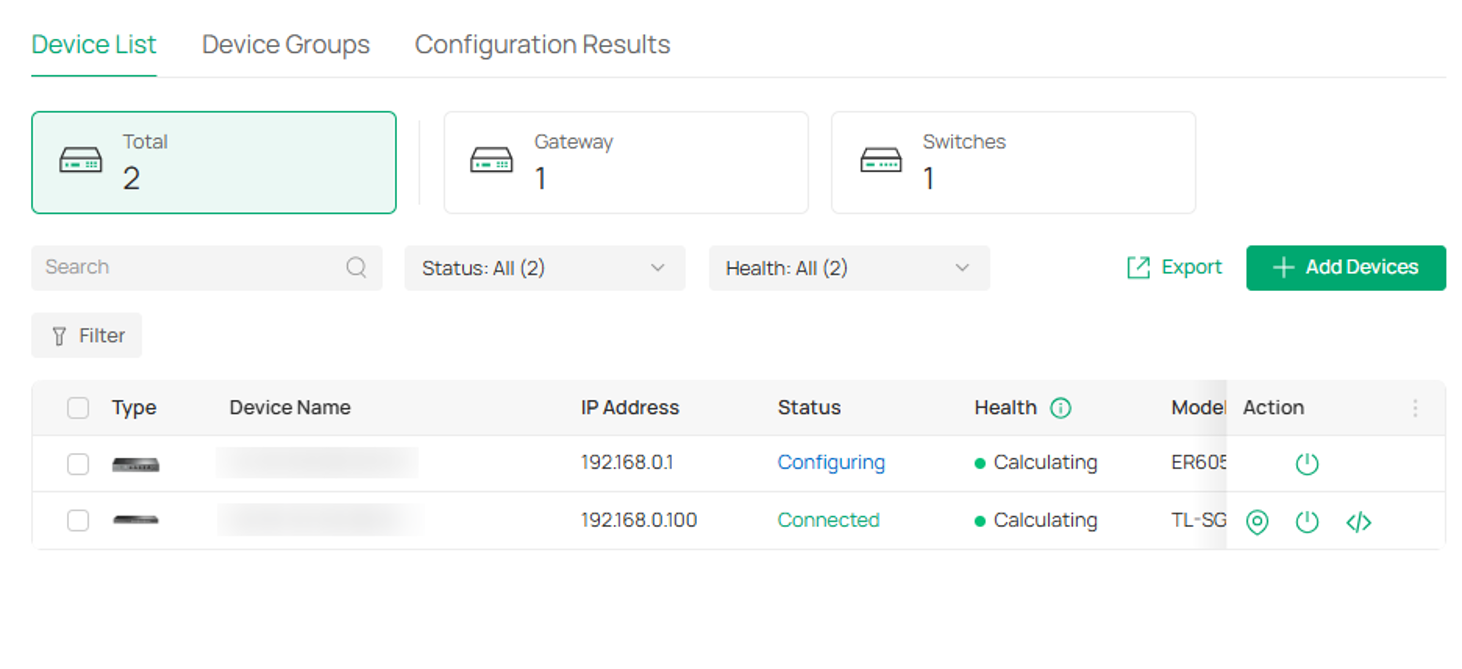
Multi-Attribute Filtering
The filter interaction on the Devices list has been adapted into a condition-based filtering system with visual tags, enabling administrators to drill down into complex networks without manual sorting.
Step 1. Navigate to the Devices page from the left navigation menu.
Step 2. Locate the search and filter toolbar positioned directly above the table and click the Filter icon button.
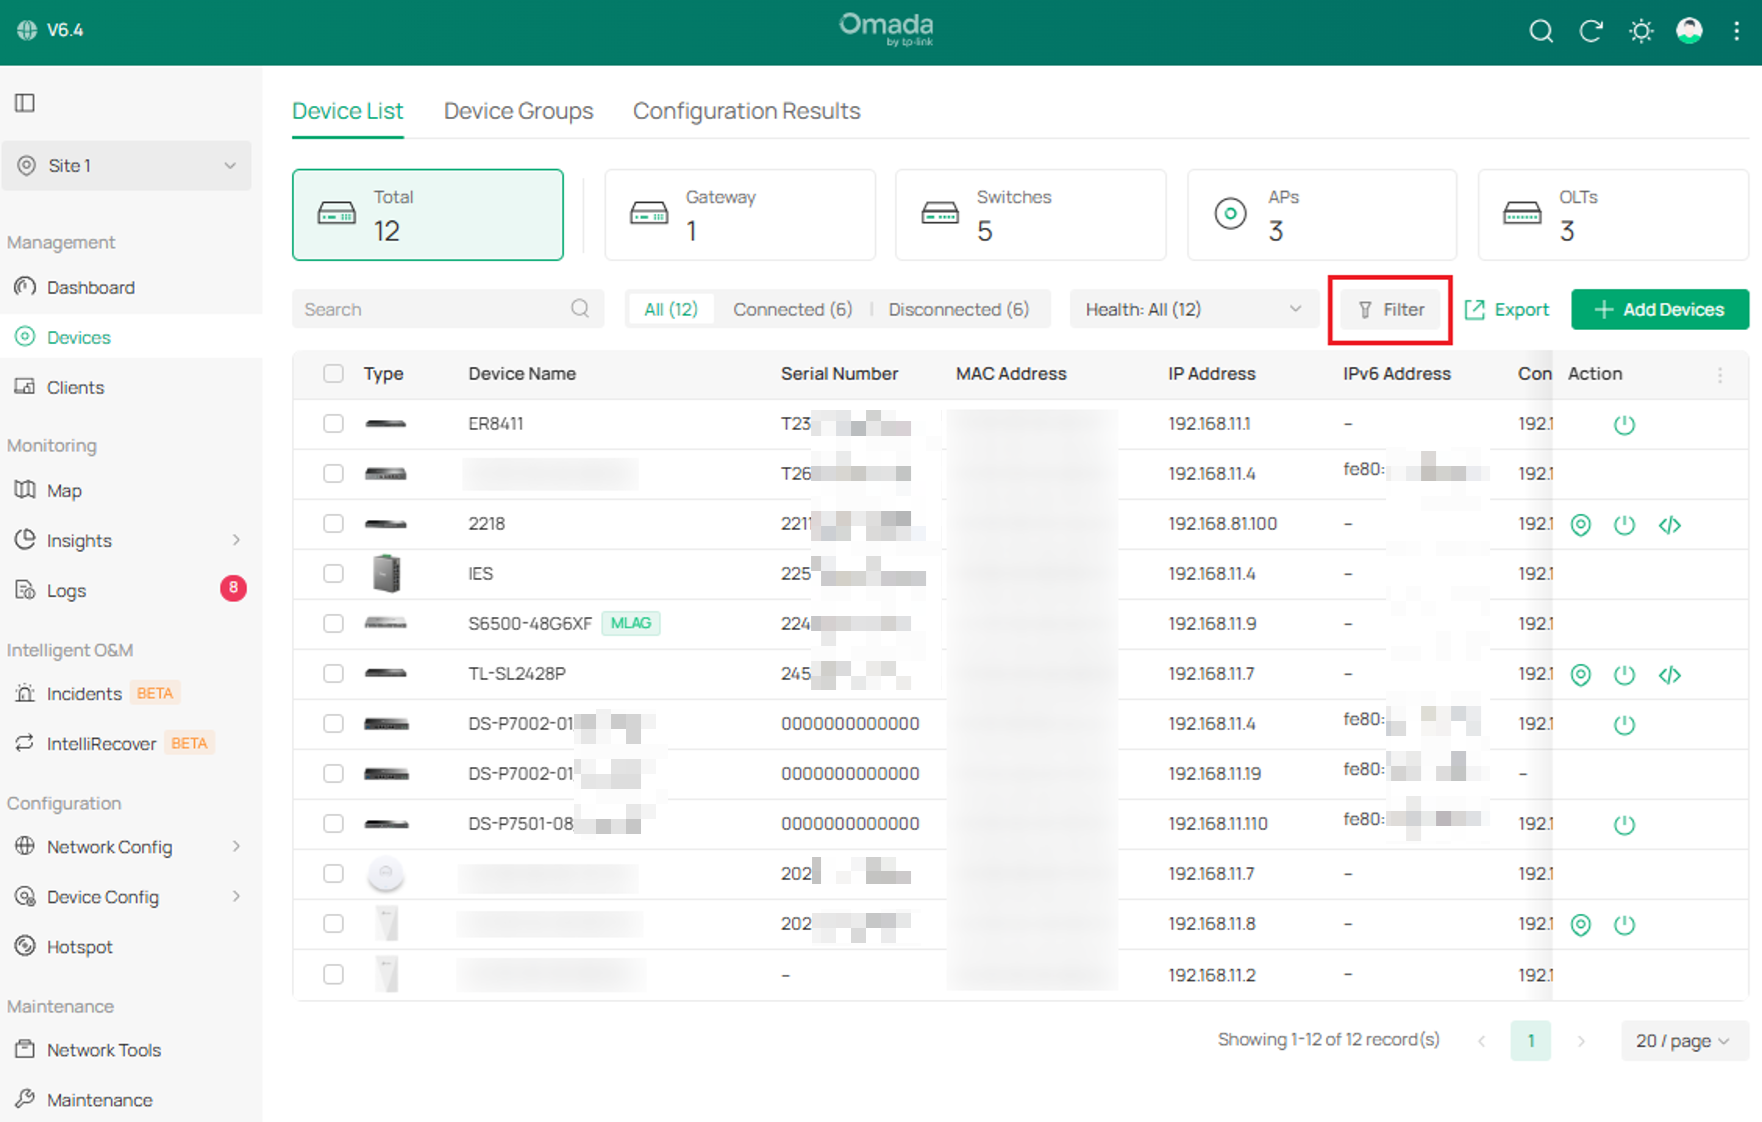
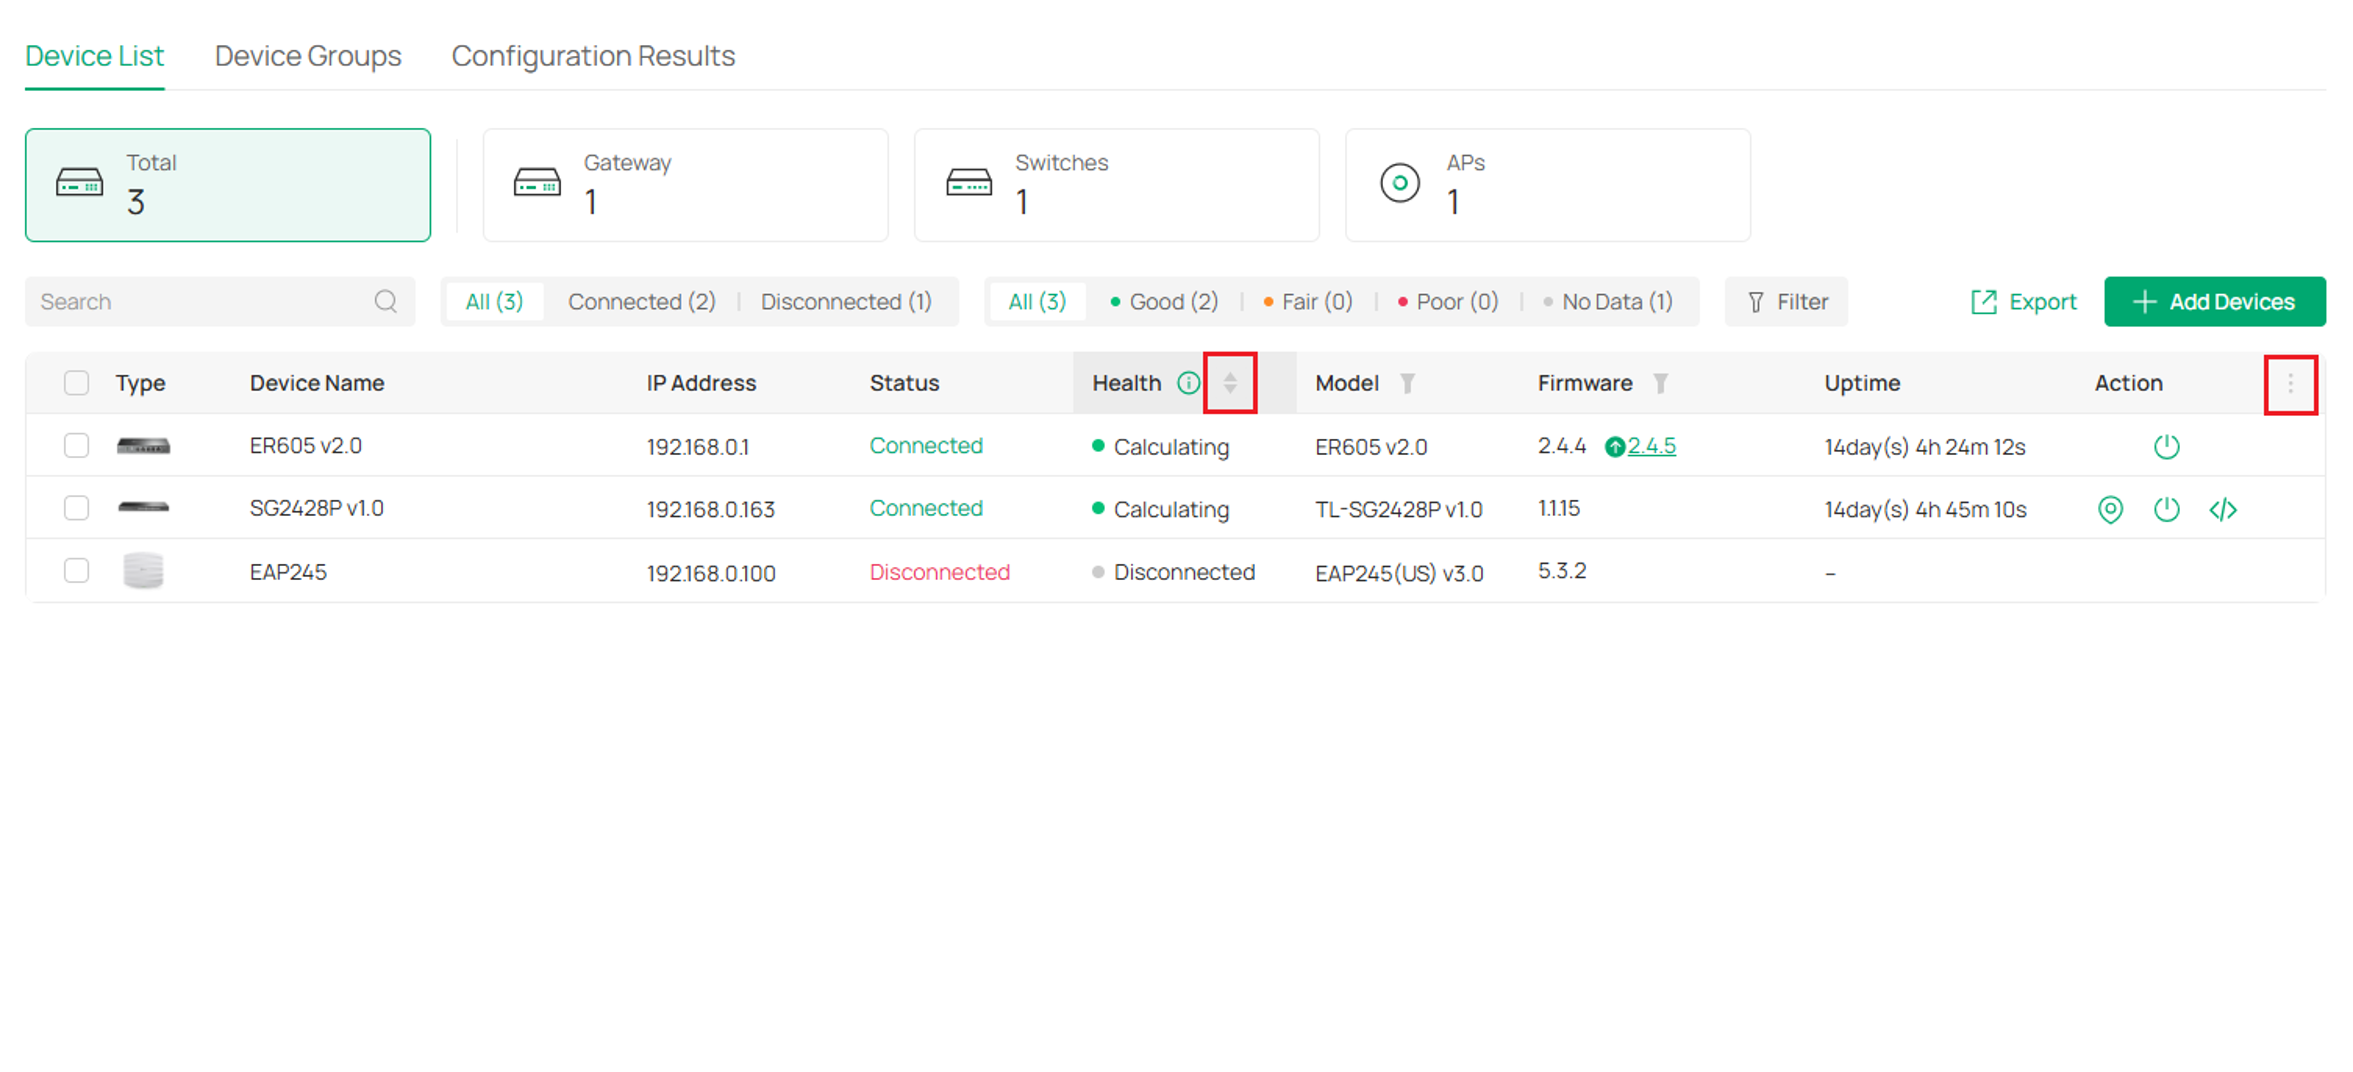
In addition to the filter panel, the tabs above the table also support quick-click filtering. The filter options in the panel can also be accessed directly from the table headers (next to the column names).
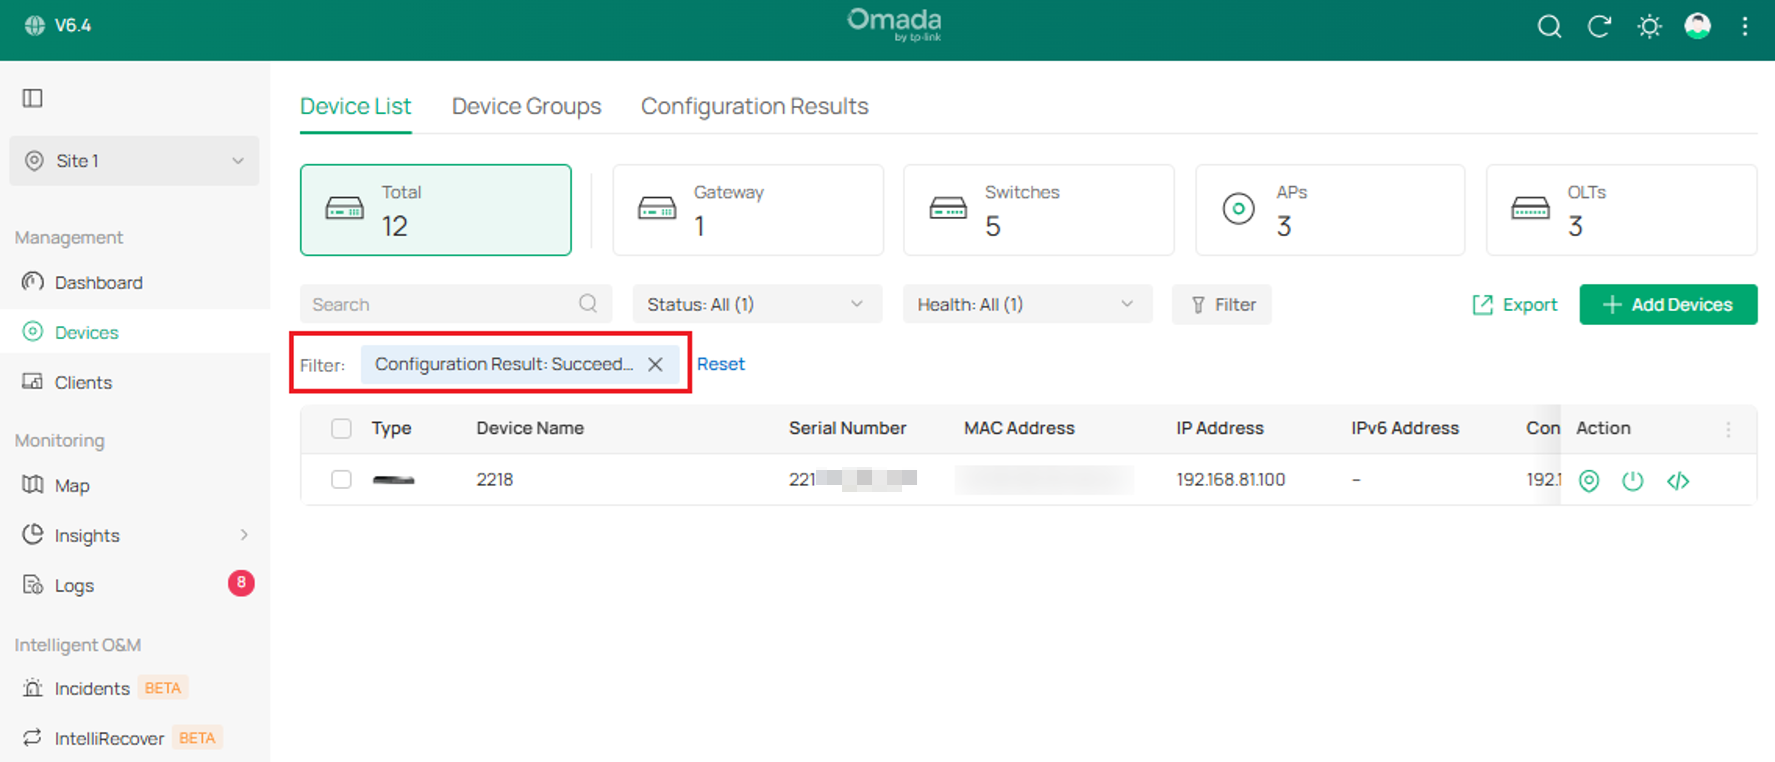
Step 3. After clicking Filter, select your desired filtering parameters from the drop-down menu. Filter by Device Labels, Firmware, Configuration Result, Model, Uplink Device, Uplink Duplex, MLAG Name, AP Groups, Uptime, and Added Time:
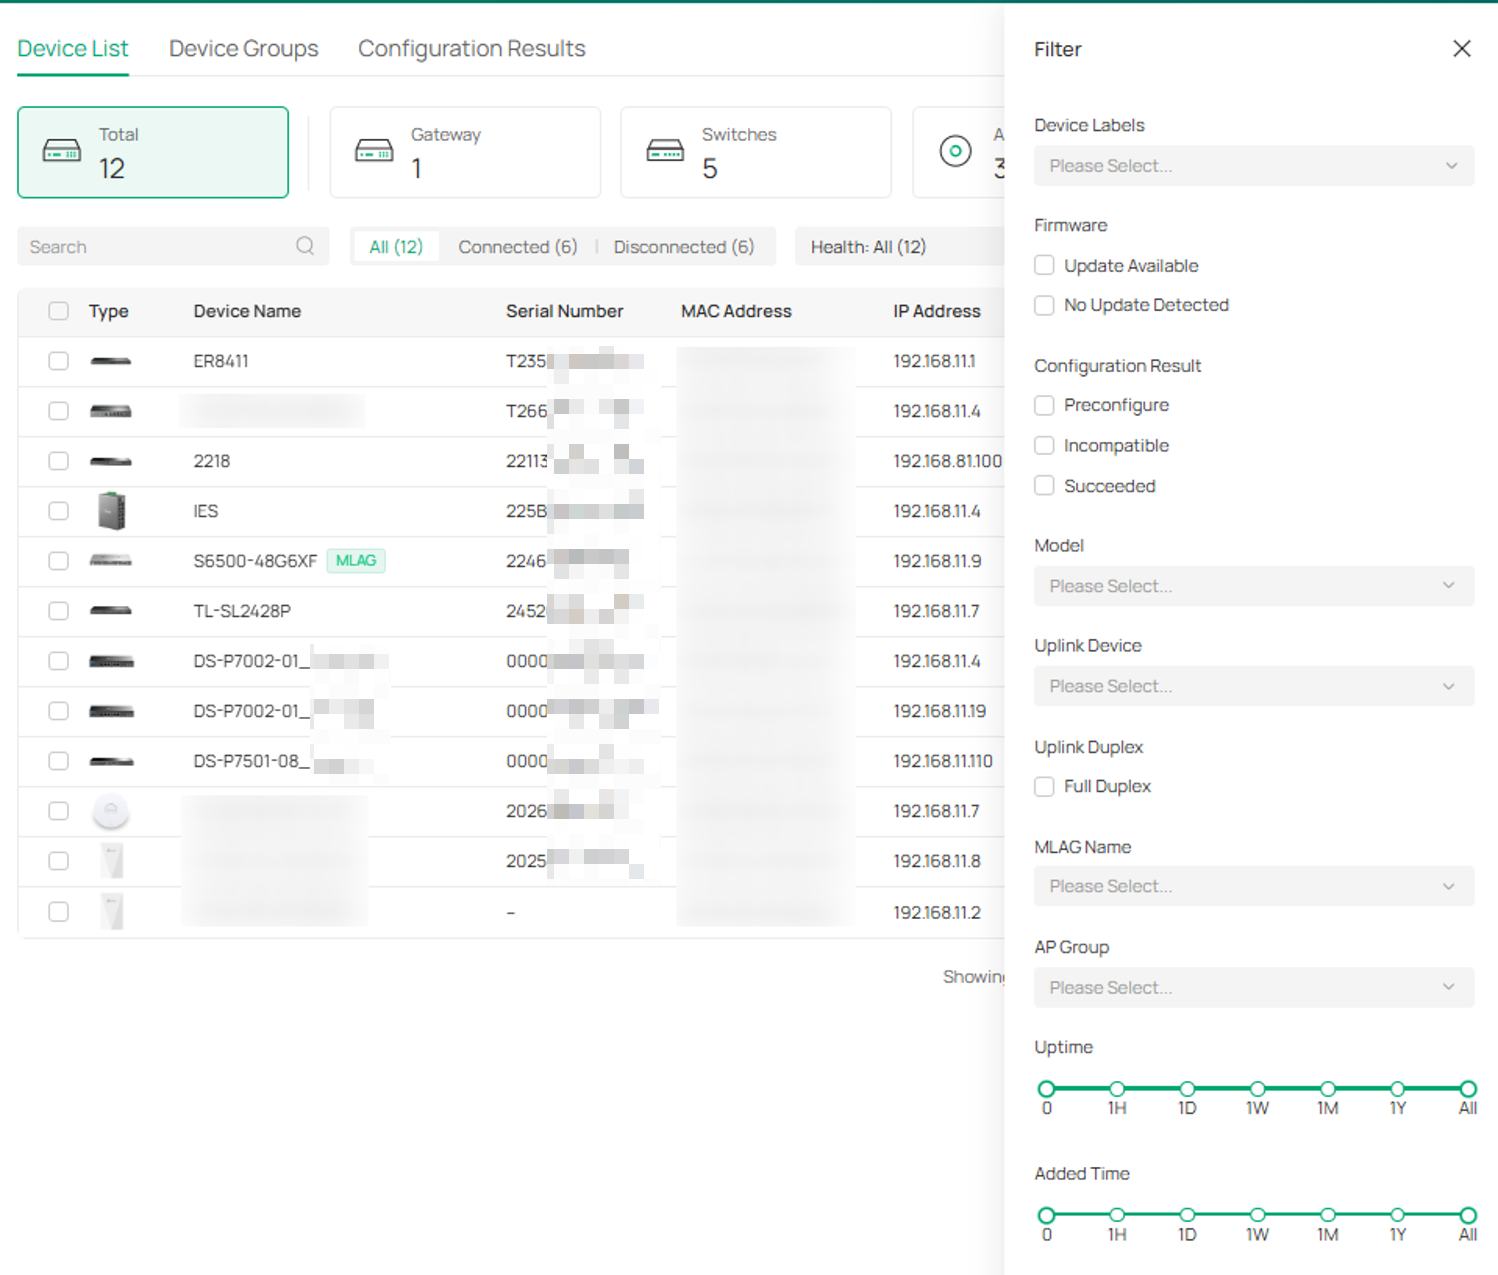
Step 4. Observe the active filter tags that appear in the filter bar. To remove an individual condition, click the X icon on that specific tag. To remove all active criteria at once, click Reset.
Batch Operations
Batch operations allow administrators to execute mass maintenance, provisioning, and policy enforcement across multiple selected devices.
Step 1. Navigate to the Devices page.
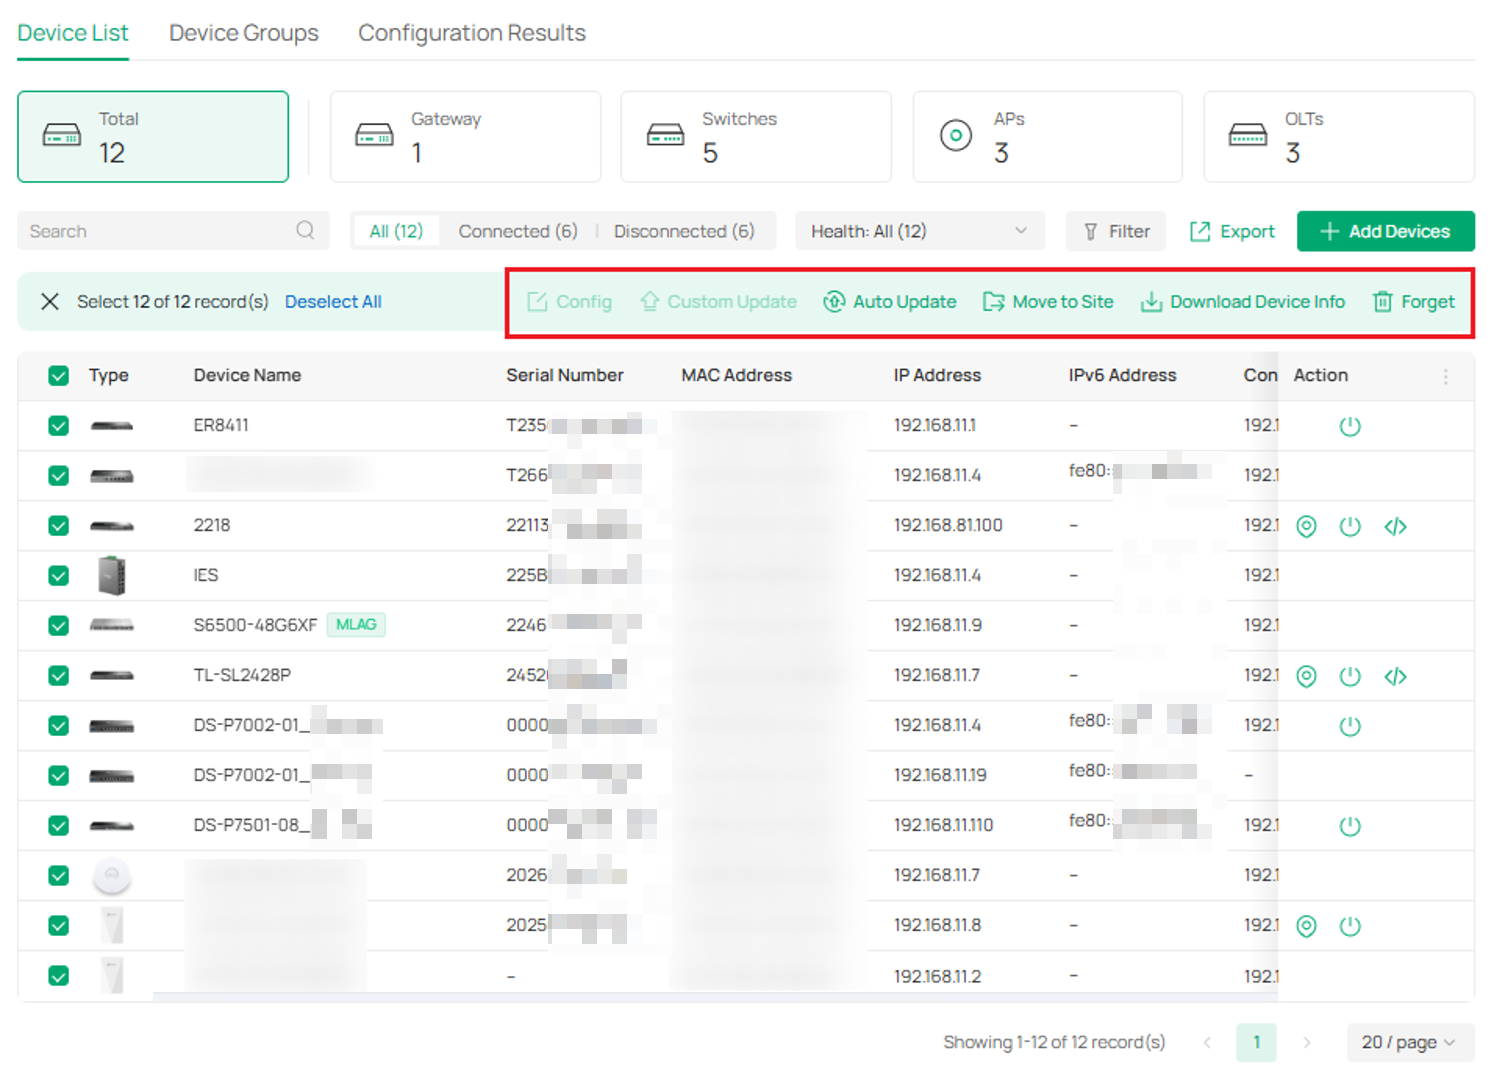
Step 2. Select the checkbox located on the far-left side of each device entry you wish to manage. Selecting at least one checkbox reveals the floating Batch Operation toolbar above the table header.
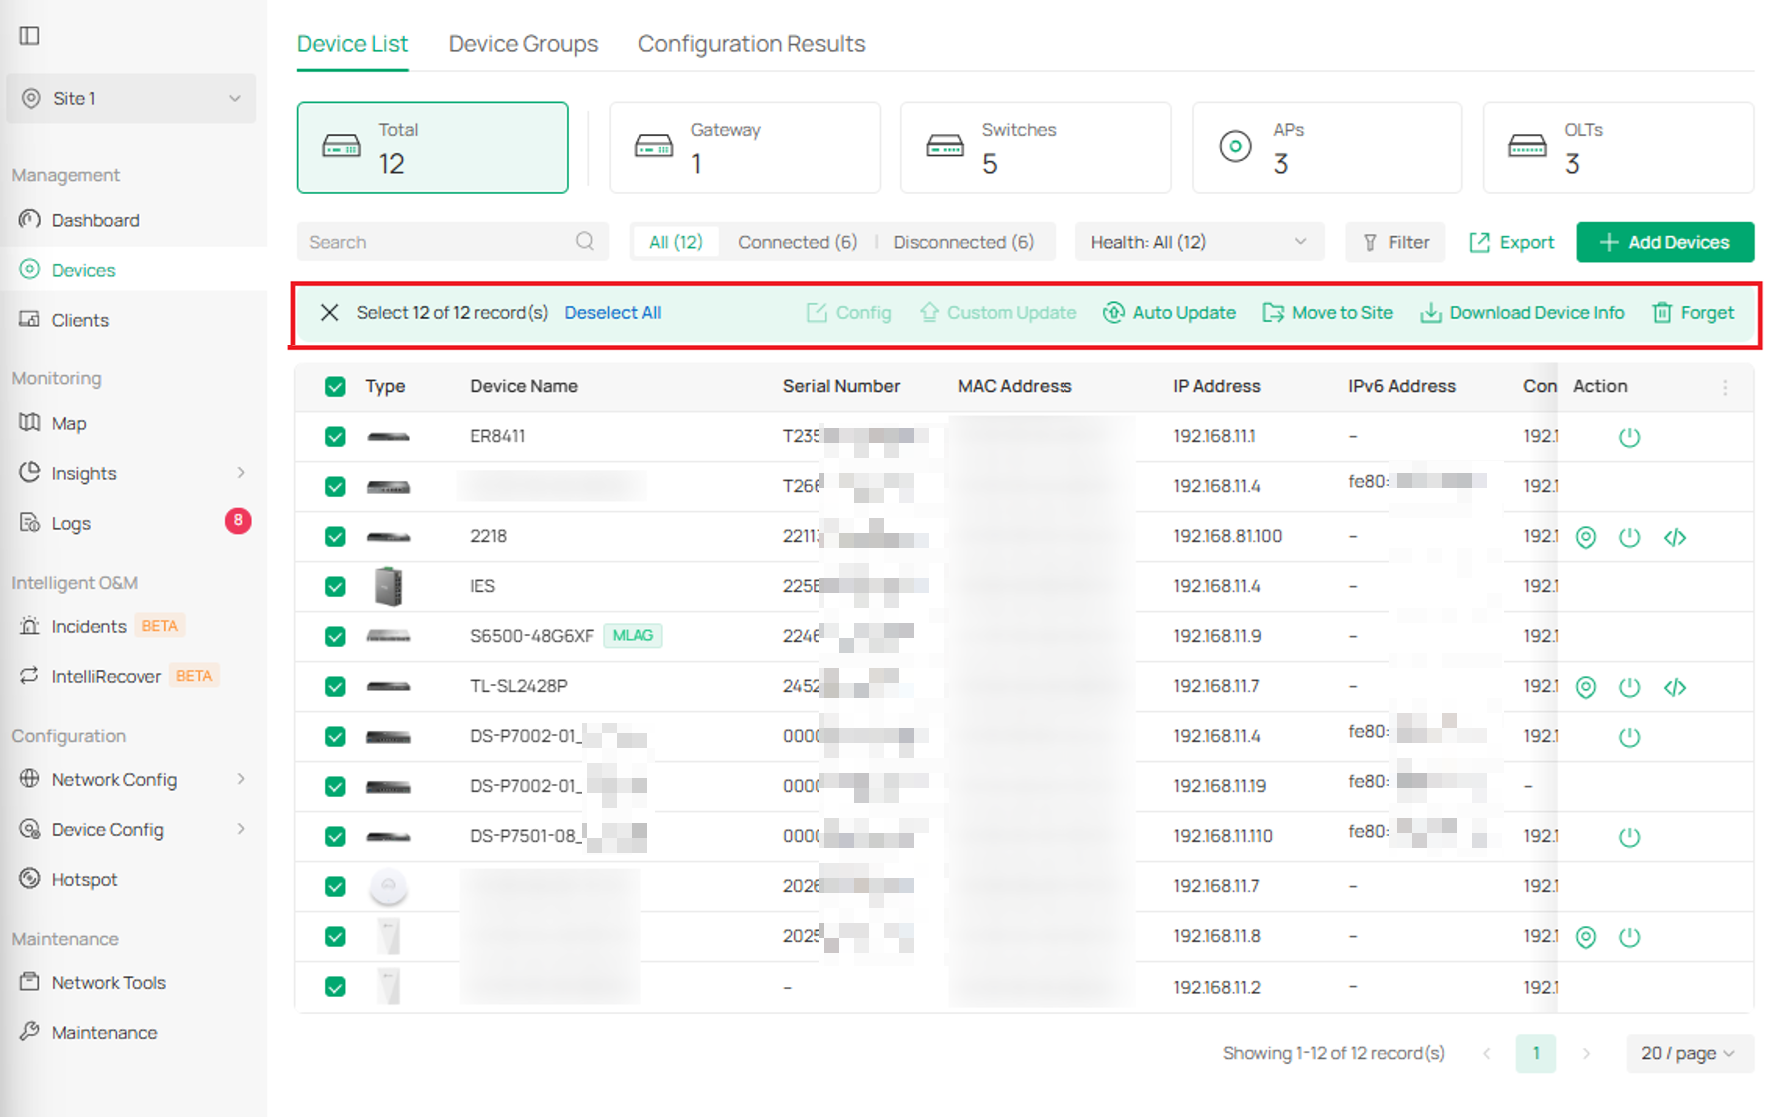
Step 3. Select the desired batch operation from the toolbar. You can batch Config, Custom Update, Auto Update, Move to Site, Download Device Info, and Forget. For migrating devices, bulk cancellation of migration is also supported. If using Omada Cloud-Based Controller, it also supports bulk binding and unbinding of licenses.
Clients
Customizing Column Positions
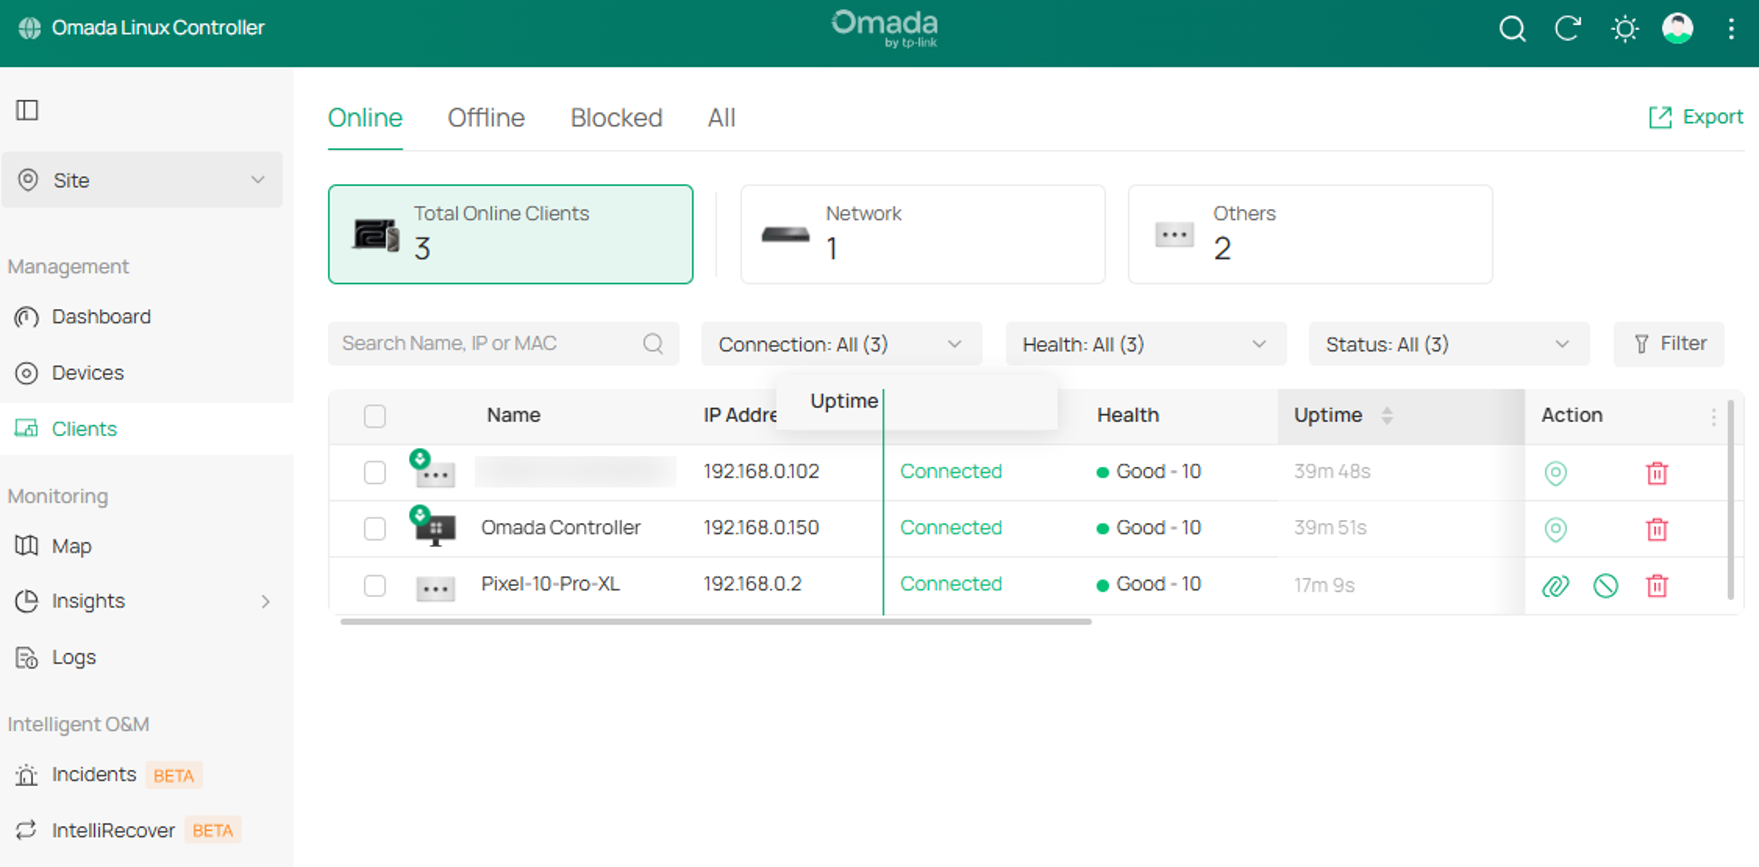
The Clients list now supports dynamic drag-and-drop adjustments, allowing administrators to rearrange table columns to prioritize the data most relevant to their workflow (such as placing IP Address, Health, or Uptime next to the client’s name).
Step 1. Log in to your Omada Controller web interface and select your target site from the site drop-down list.
Step 2. In the left navigation menu, click Clients to open the clients table.
Step 3. Hover your cursor over the title header of the column you want to move (for example, Uptime).
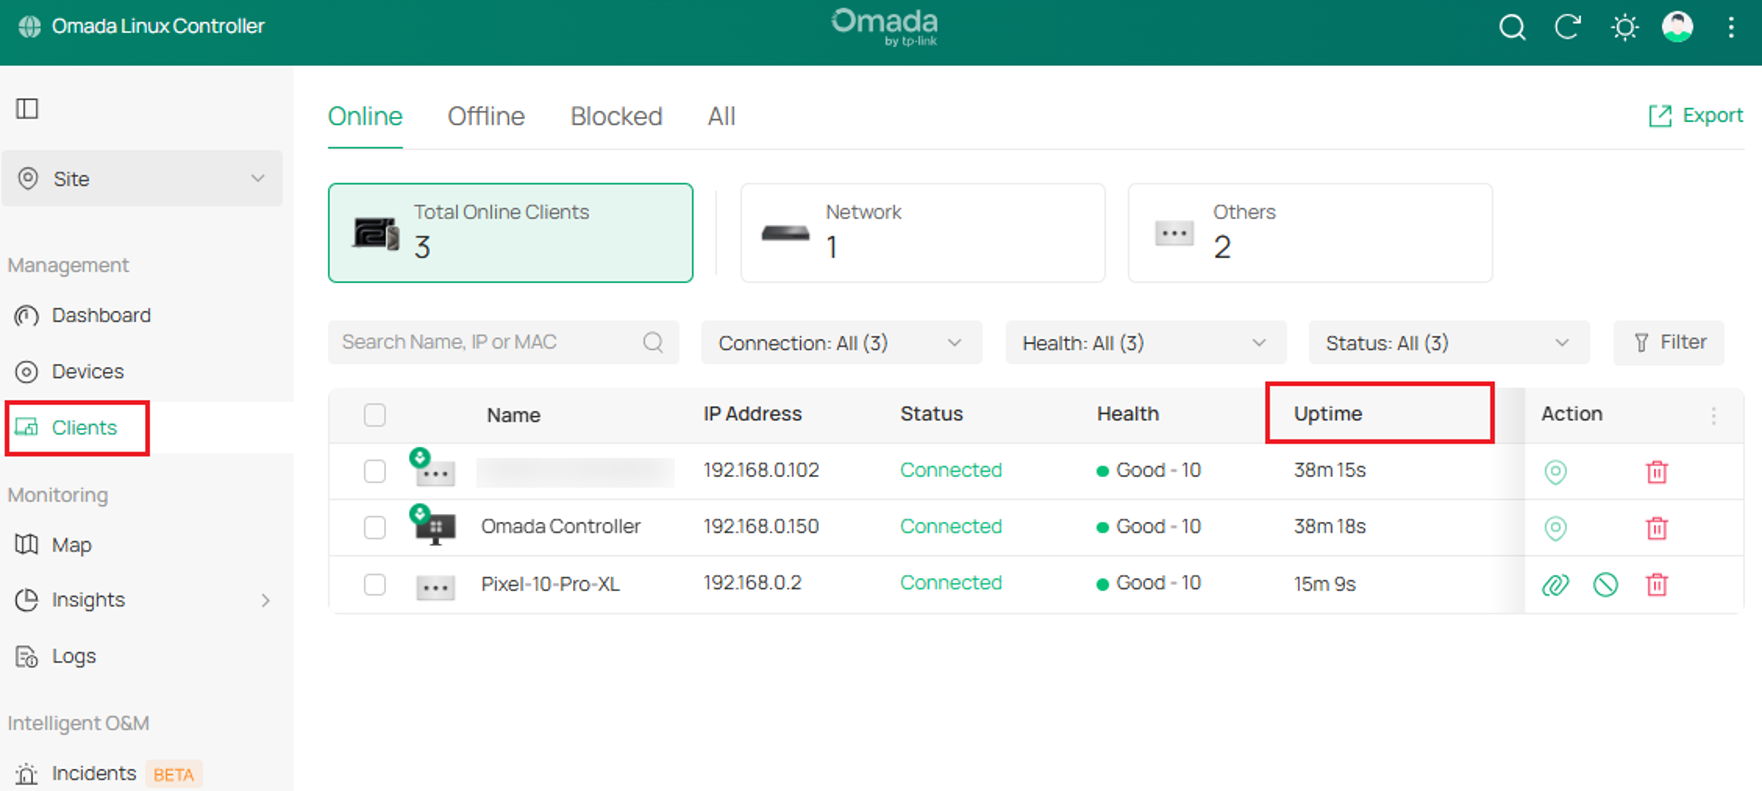
Step 4. Click and hold the column header, drag it horizontally to your preferred position across the table header row, and release the mouse button. The column will snap into its new location immediately.
Multi-Attribute Filtering
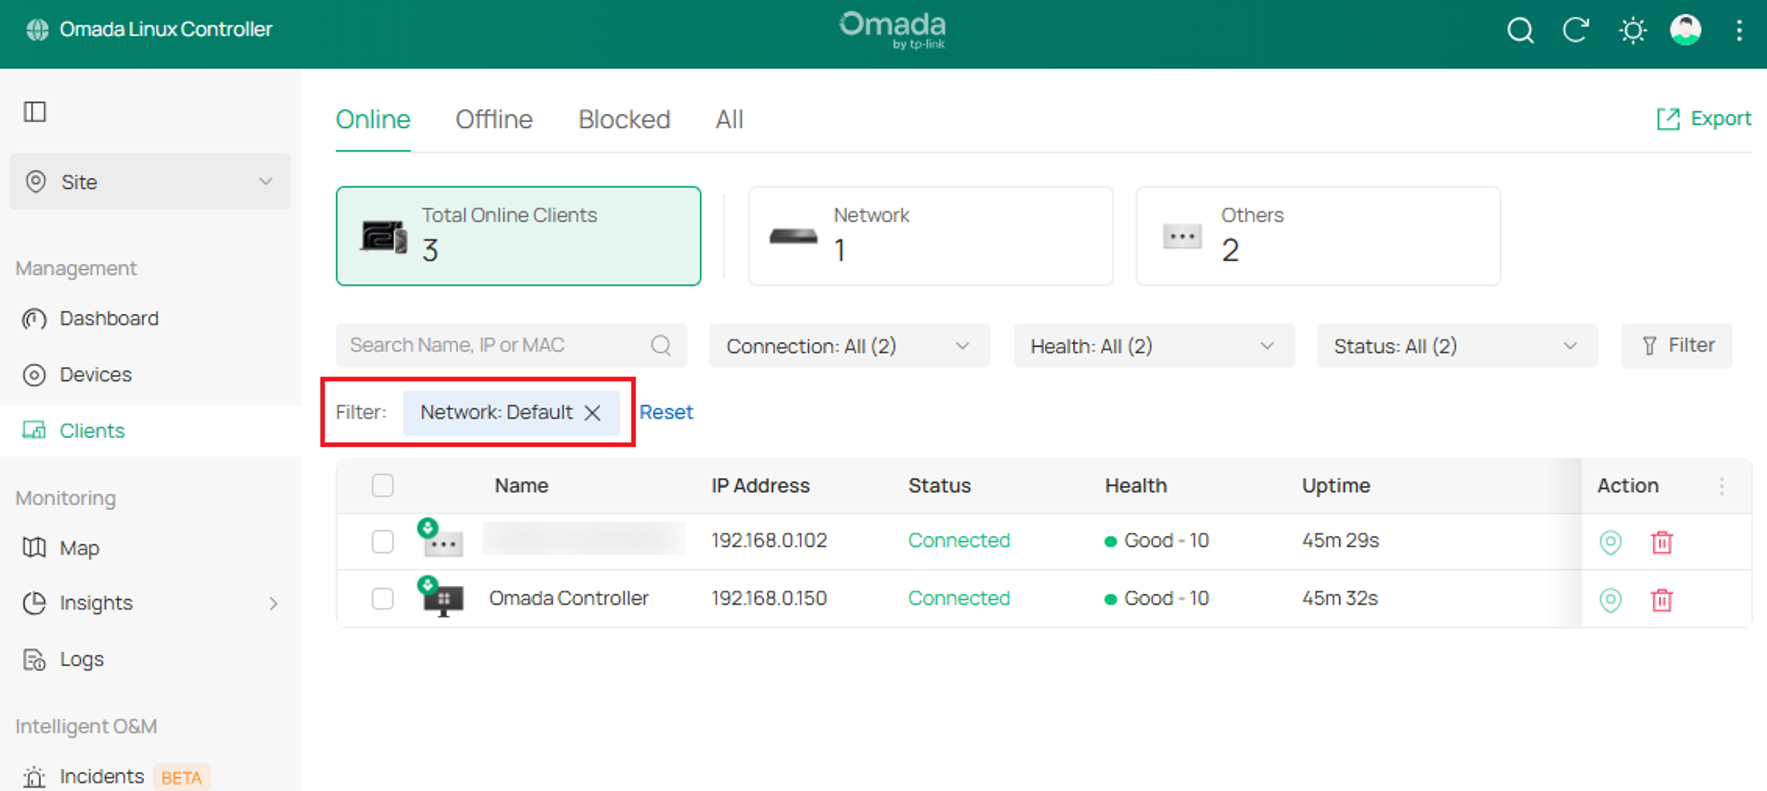
The filter interaction on the Clients lists has been adapted into a condition-based filtering system with visual tags, enabling administrators to view client connections without manual sorting.
Step 1. Navigate to the Clients page from the left navigation menu.
Step 2. Locate the search and filter toolbar positioned directly above the table and click the Filter icon button.
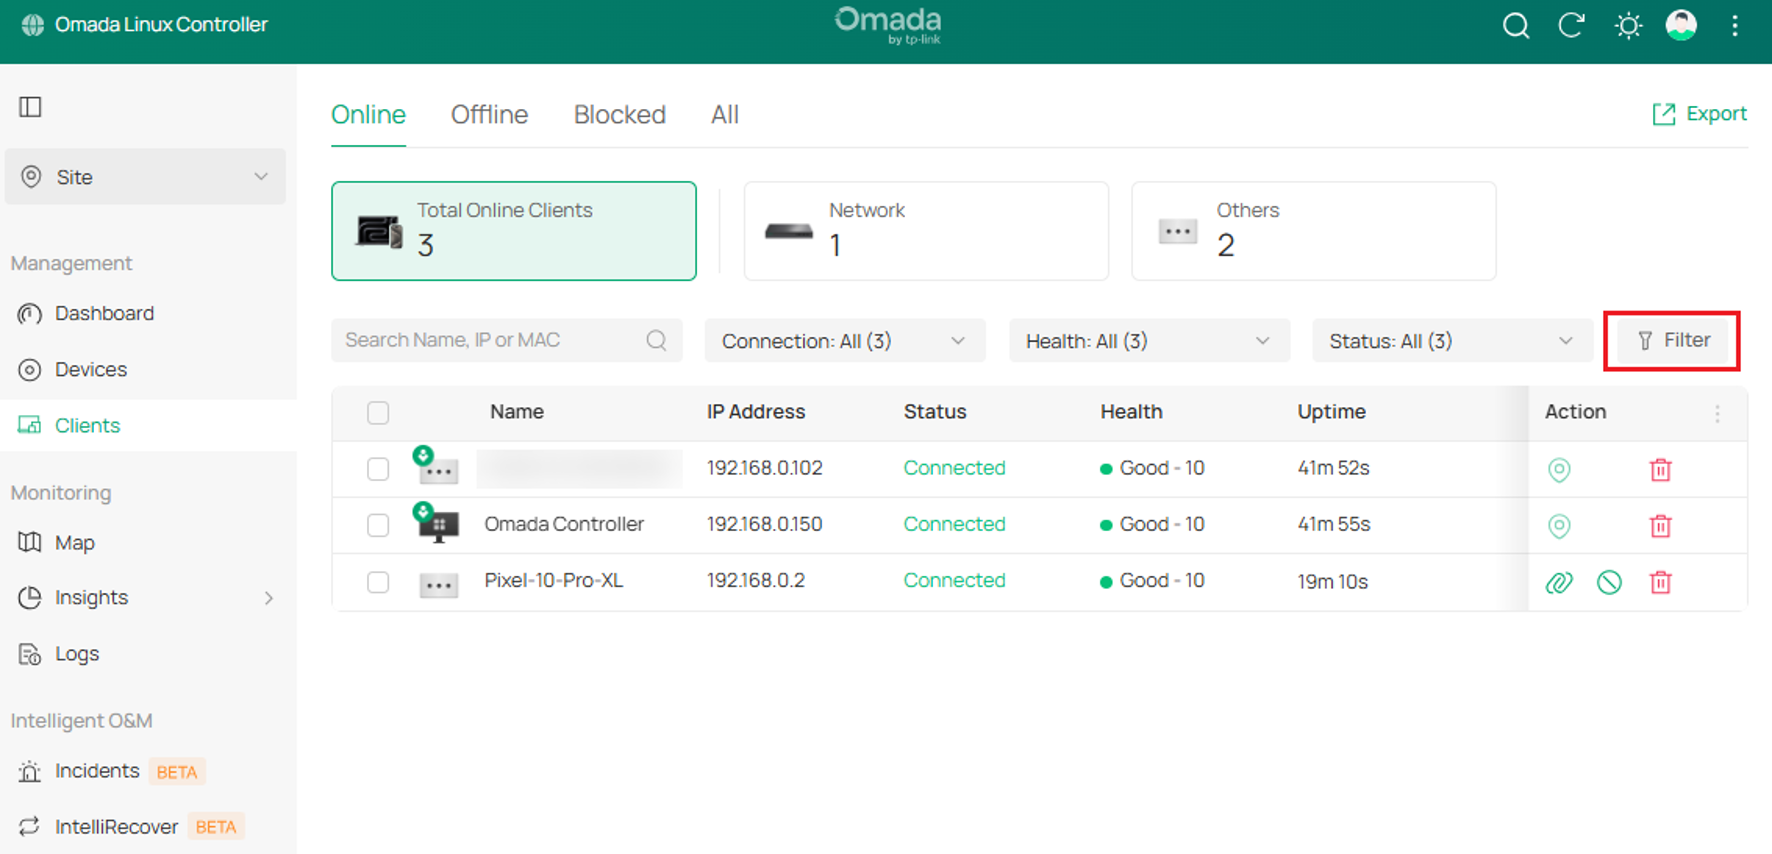
In addition to the filter panel, the tabs above the table also support quick-click filtering. The filter options in the panel can also be accessed directly from the table headers (next to the column names).
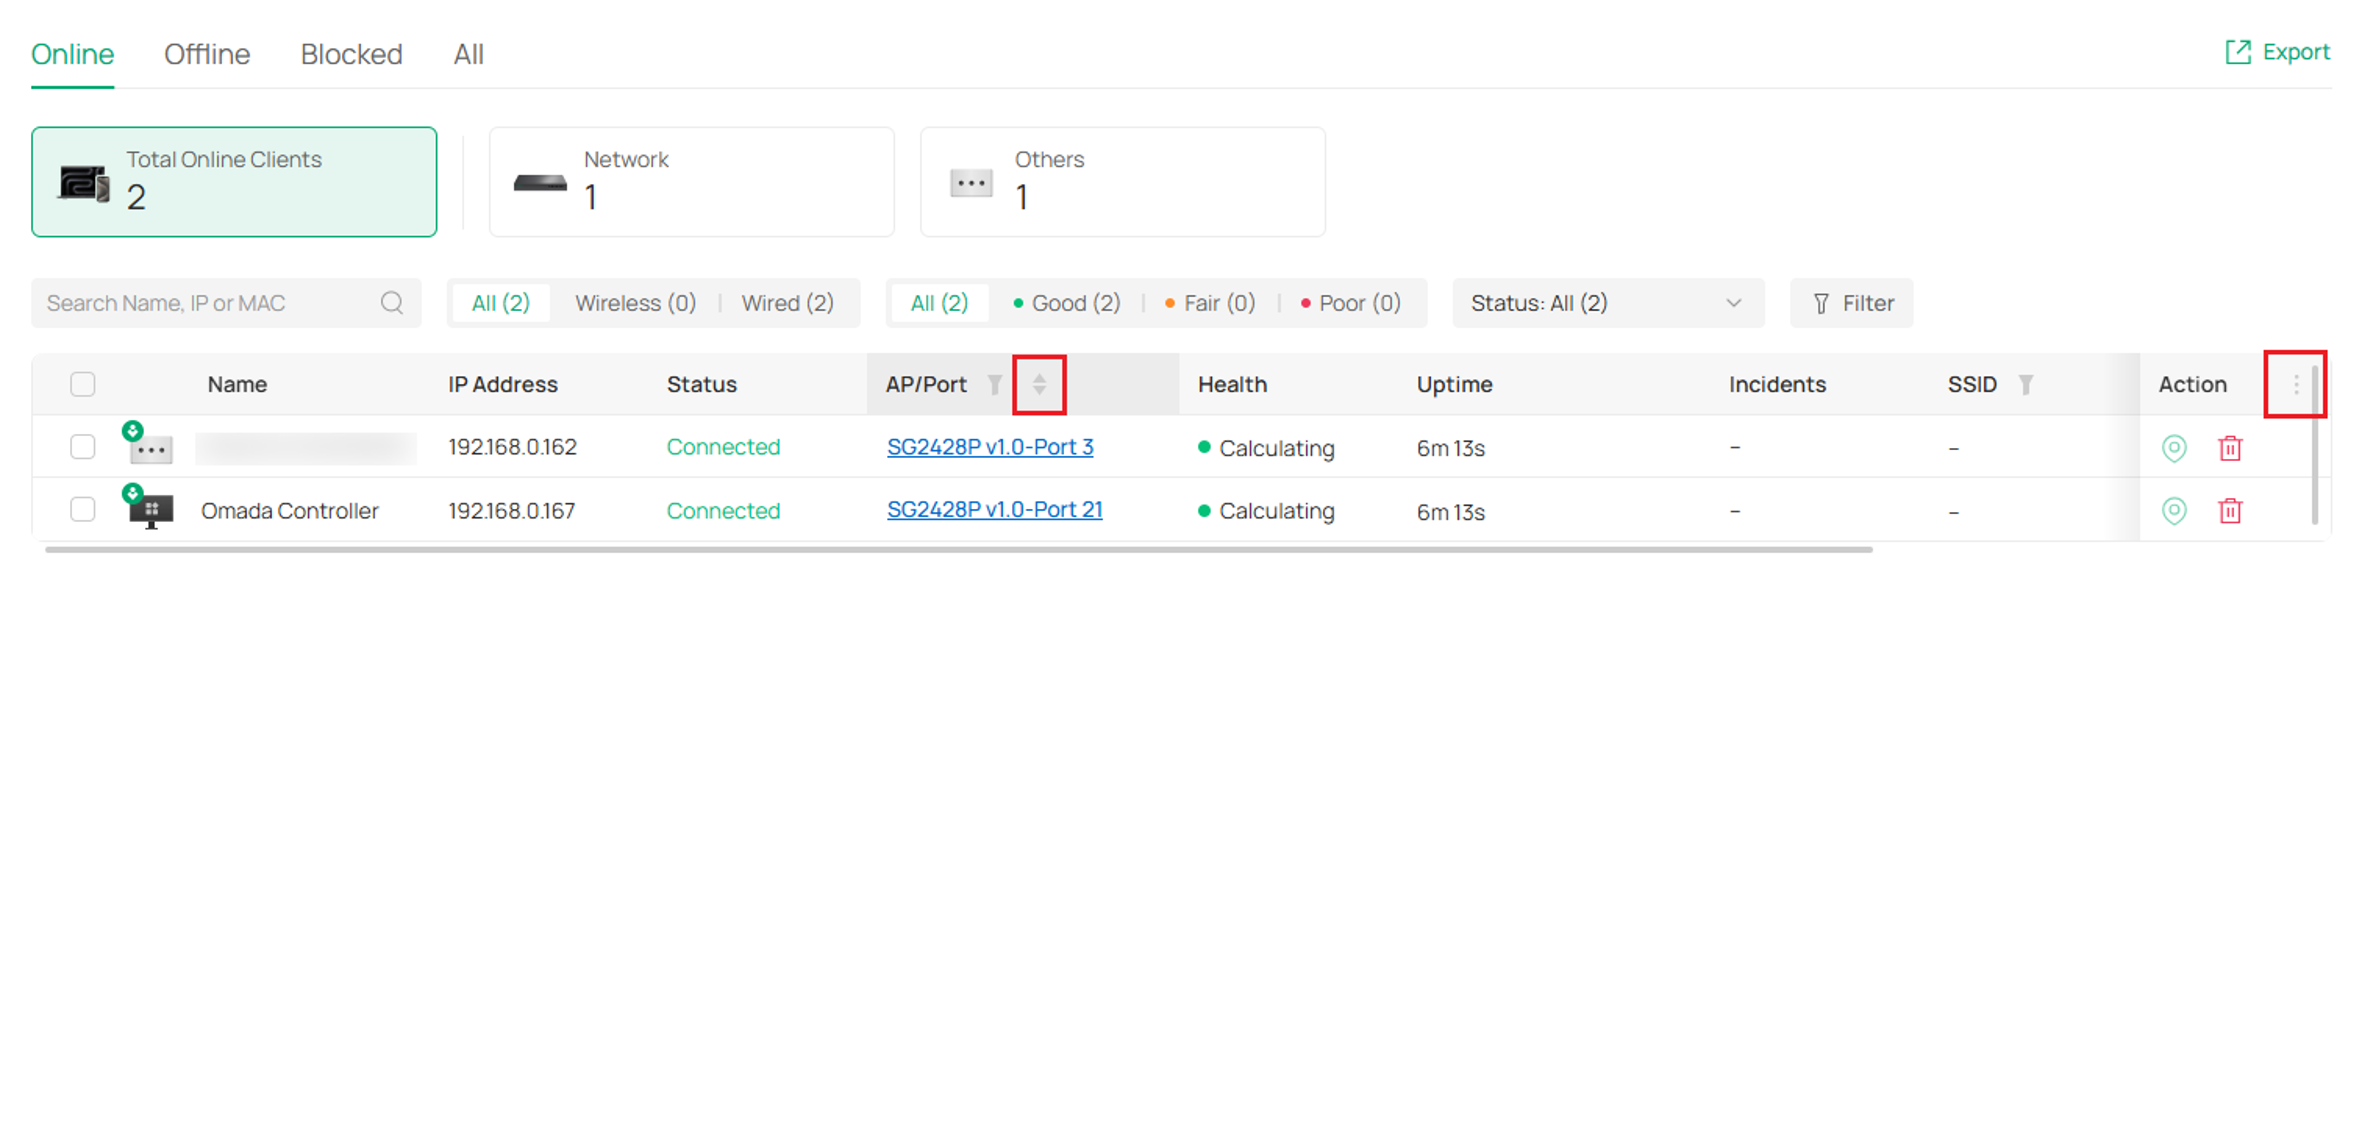
Step 3. After clicking Filter, select your desired filtering parameters from the drop-down menu. Filter by Client Type, Vendor, Model, Authentication Type, AP/Port, Network, SSID, PPSK Profile, Wireless Connection, Access Type, VLAN, and Rate Limit.
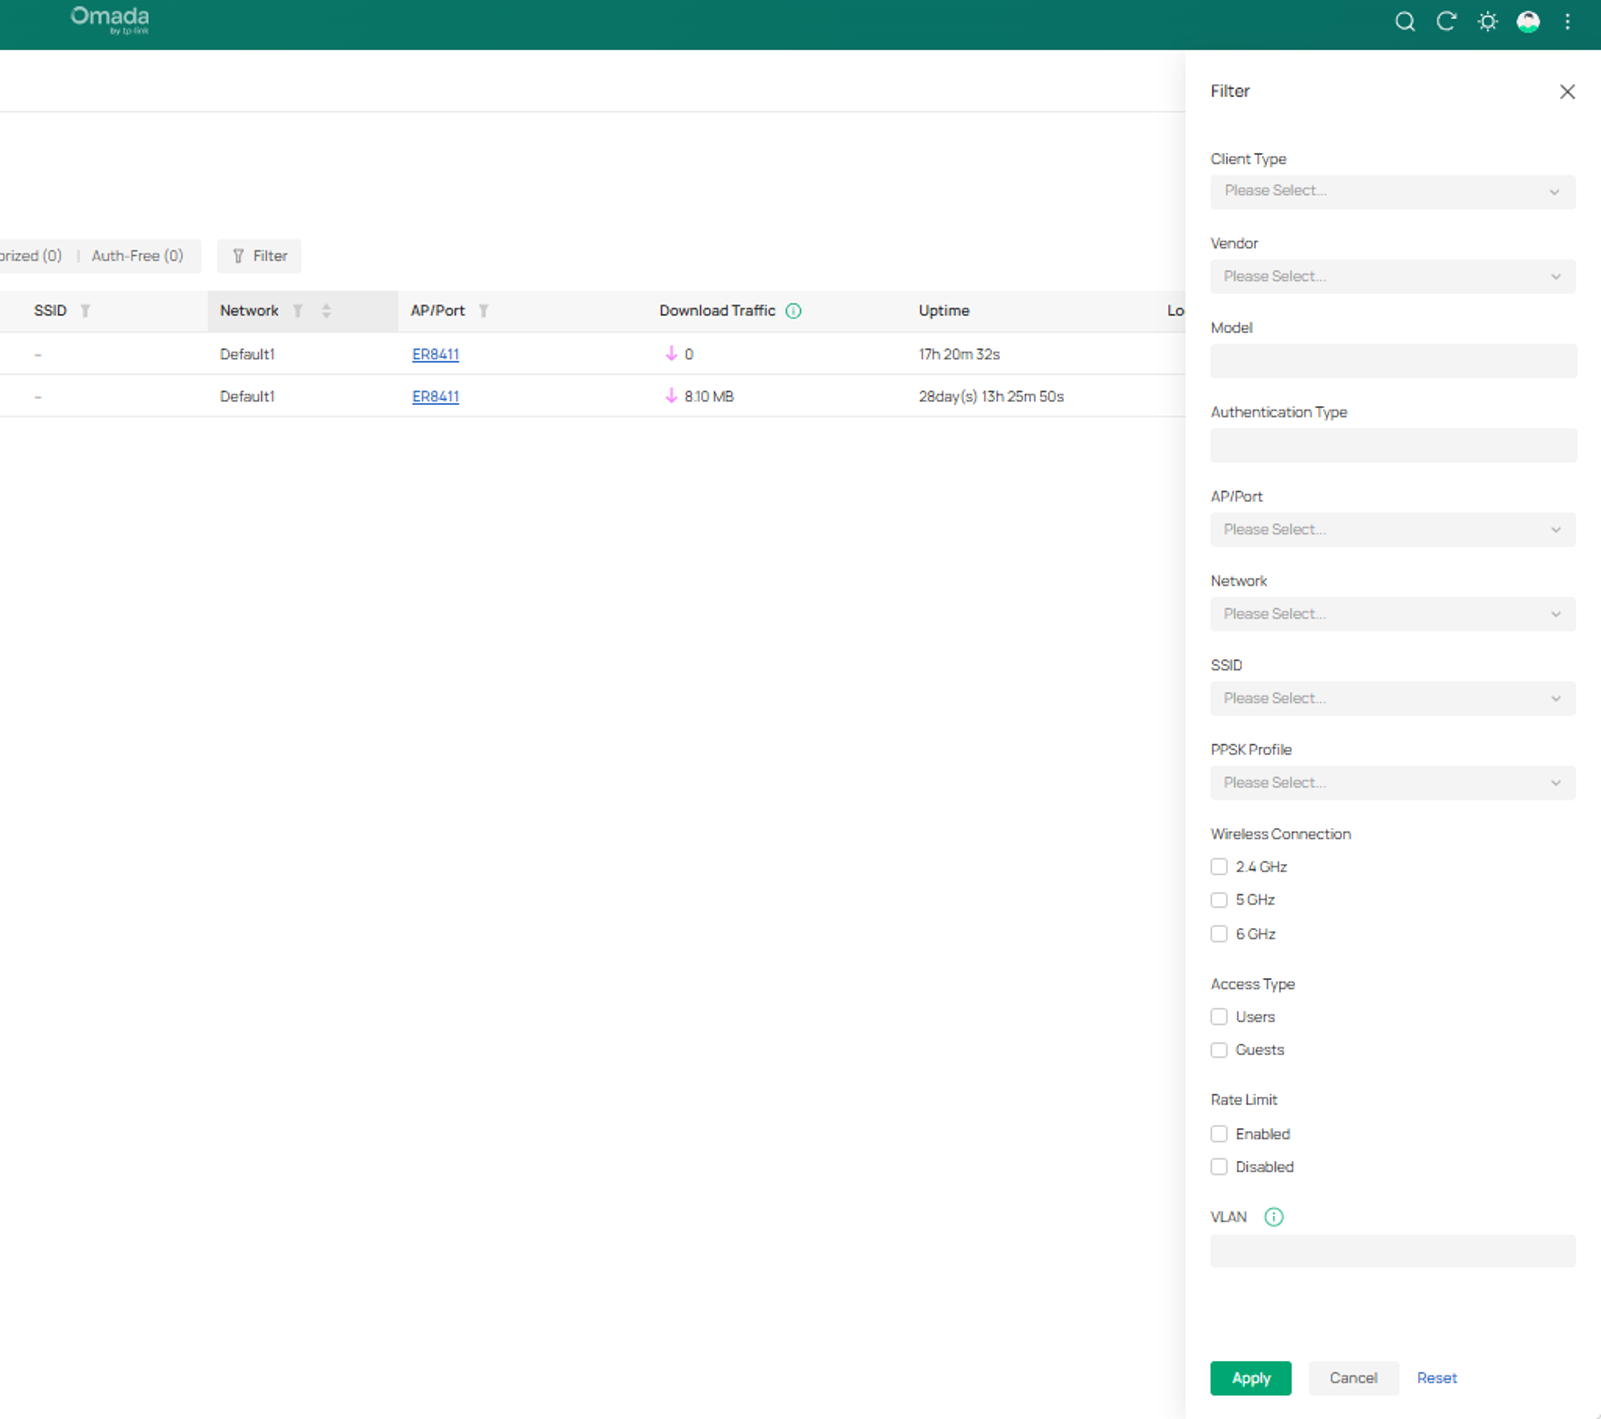
Step 4. Observe the active filter tags that appear in the filter bar. To remove an individual condition, click the X icon on that specific tag. To remove all active criteria at once, click Reset.
Batch Operations
Batch operations allow administrators to execute mass maintenance and authorization enforcement across multiple selected clients.
Step 1. Navigate to the Clients page.
Step 2. Select the checkbox located on the far-left side of each client entry you wish to manage. Selecting at least one checkbox reveals the floating Batch Operation toolbar above the table header.
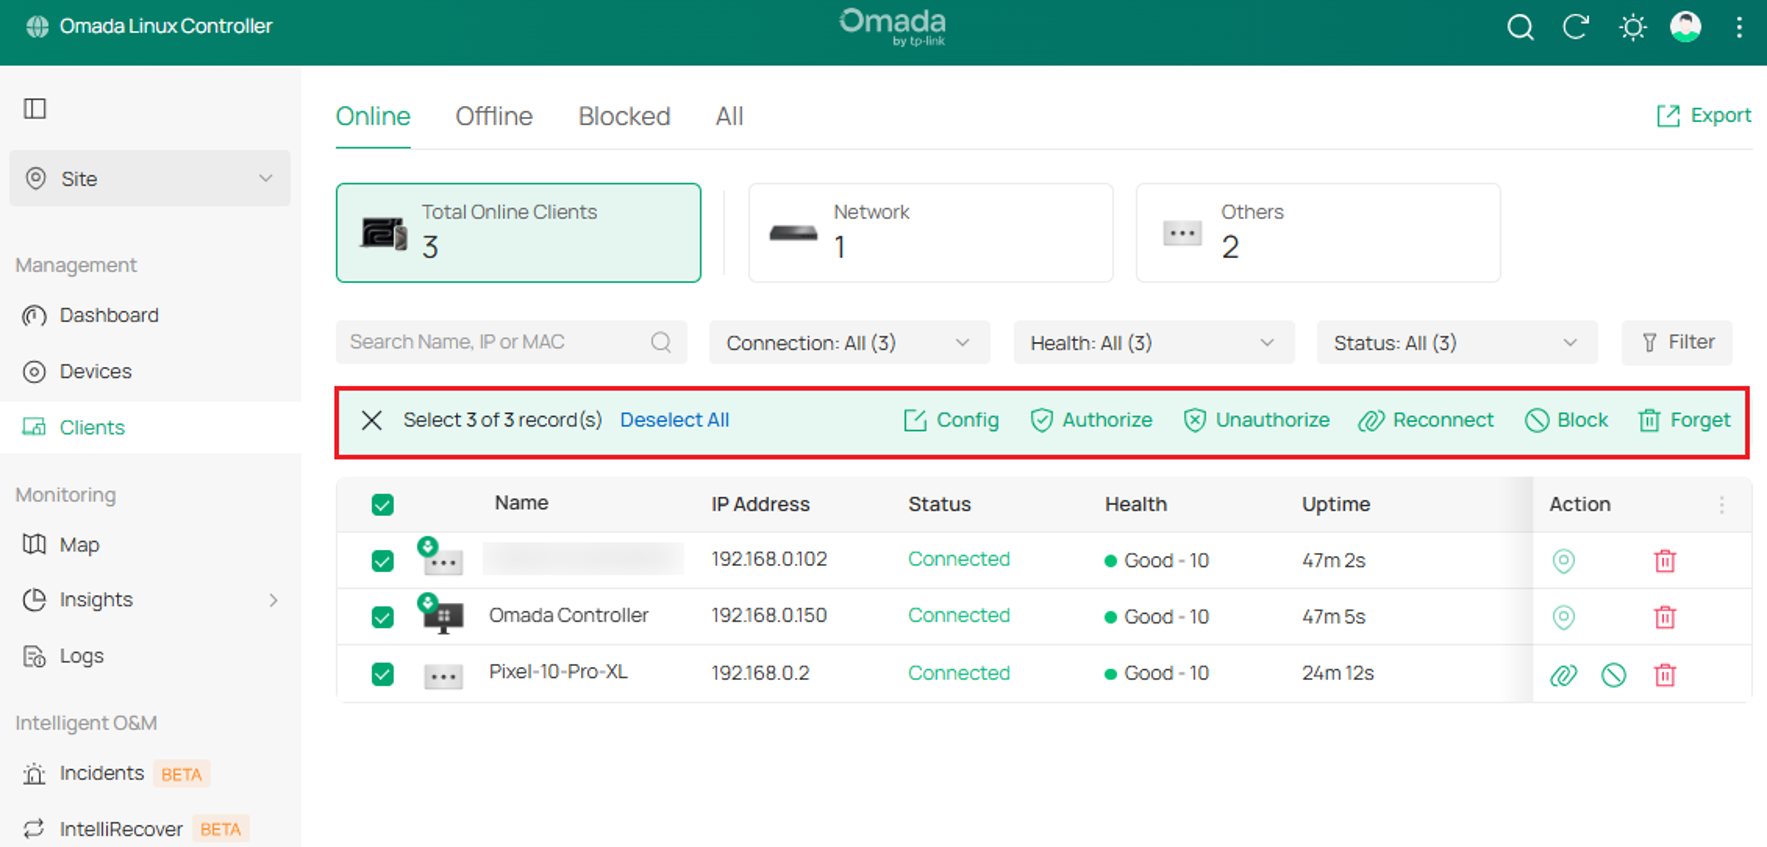
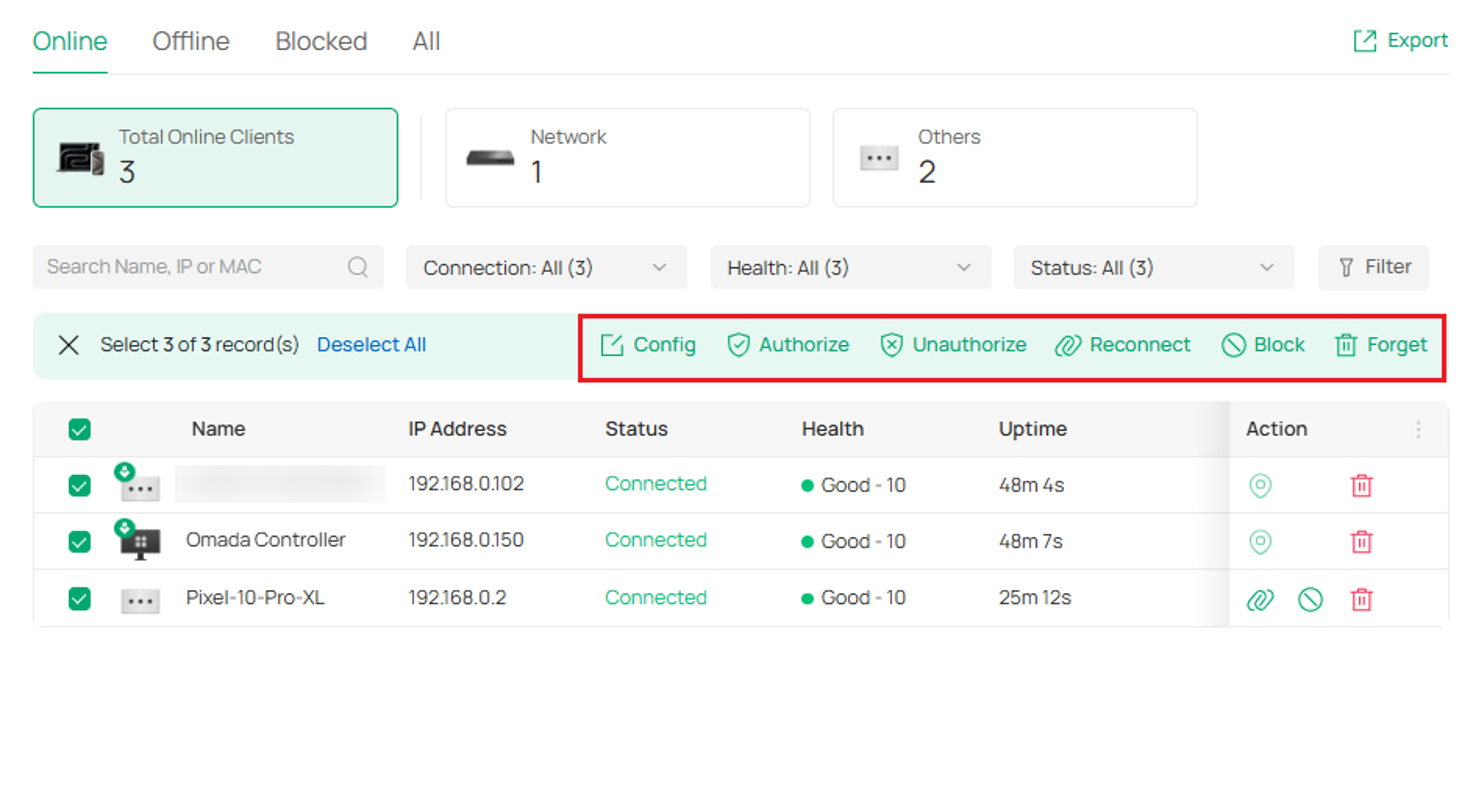
Step 3. Select the desired batch operation from the toolbar. You can batch Config, Authorize, Unauthorize, Reconnect, Block, and Forget:
Conclusion
We have now successfully configured and utilized the updated Device and Client list interactions in Omada Controller v6.4. By leveraging drag-and-drop column positioning, responsive Auto Find Device discovery notifications, multi-condition filtering tags, and bulk batch actions, you can significantly reduce network administration time and manage large-scale deployments with greater precision.
To learn more about each function and configuration, please visit Support Home to download or check the manual for your product.
QA
Q1: What should I do if the "Auto Find Device" prompt fails to detect a newly installed Omada device?
A1: Verify that the device is powered on, that its LED indicates ready status, and that it is connected to the same Layer 2 broadcast domain as the controller. If the device is located across a Layer 3 network or routed VLAN, ensure DHCP Option 138 is configured with the controller's IP address. Also, verify if the 'Auto Discovery Device' toggle has been disabled. This setting can be found in Network Config > Site Settings > General Config and is enabled by default. Automatic detection of adoptable devices operates only when this switch is set to enabled.
Q2: Can I reset the column layout back to its default order after dragging and rearranging headers?
A2: Yes. Click the three dots and if it’s not a “Custom Column”, you can switch to a different display option and back to reset the view. For example, if you are on “Default Columns” and want to reset to its default state, switch to “All Columns” then back to “Default Columns.”
