


Contents
Configuration for Layer 2 Device Discovery
Configuration for Layer 3 Device Discovery
Configuration for ZTP via device key (Controller v5.15.24 and above)
Objective
This article intends to help customers discover their Omada devices via the Software Controller and Hardware Controller.
Requirements
- Omada Devices
- Omada Controller (Software Controller/Hardware Controller)
Introduction
With the Omada Software Controller and Hardware Controller, you can discover your Omada devices through simple configurations. After device discovery, you can adopt and manage your devices according to your needs. Generally, the Software Controller and Hardware Controller support discovering your Omada Devices through Layer 2 and Layer 3 networks:
- Discovering devices at Layer 2: This scenario means that the Omada devices exist in the same network as the Controller’s. For example, the IP address of a device is 192.168.0.x/24, the IP address of the Controller is 192.168.0.y/24. This scenario mostly applies to networks with small scales with fewer devices that are easy to manage.
- Discovering devices at Layer 3: This scenario means that the Omada devices exist in a different network from the Controller’s. For example, the IP address of a device is 192.168.0.x/24, the IP address of the Controller is 192.168.1.x/24. This scenario mostly applies to large-scale deployments with more devices and separated sites where the devices are physically far away from the Controller.
- Discovering device via Device Key (ZTP): This scenario means allowing remote pre-configuration and auto-syncing settings through cloud access. Both the Omada Controller and Omada devices must be able to connect to the Internet and access the tplink cloud.
Configuration for Layer 2 Device Discovery
Step 1. Connect your Omada devices and your Controller to the same network.
Step 2. Confirm that your devices are accessible to the Controller.
- Hardware Controller:
1. Log in to your Controller though the IP address of your Controller via browser.
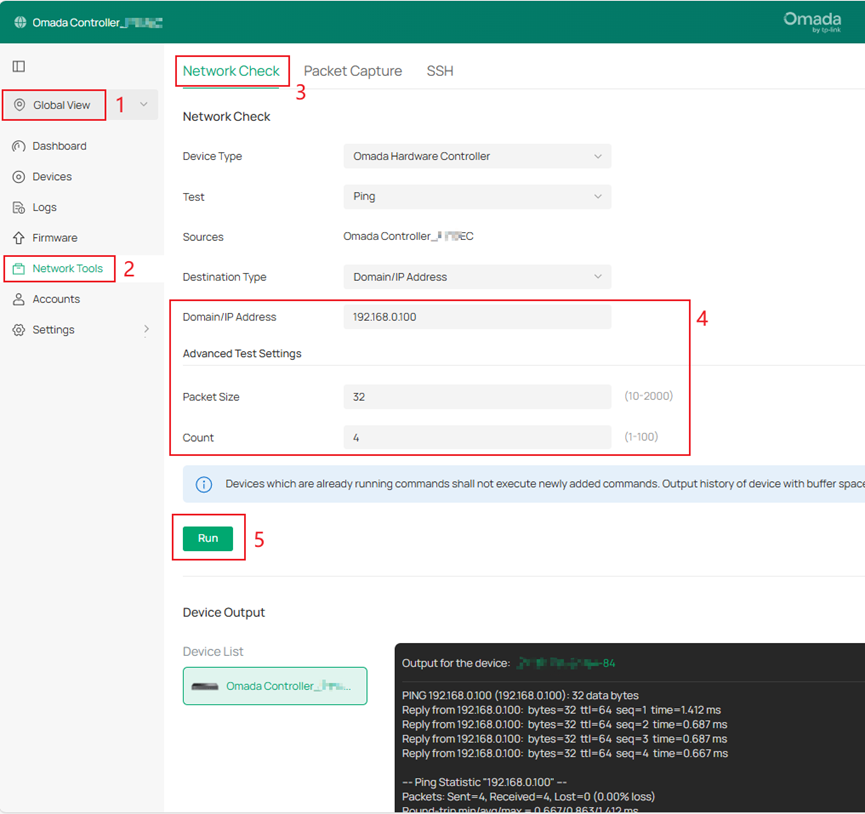
2. Go to Global View > Network Tools> Network Check. Input the IP address of your device into the Domain/IP Address field. Set the Packet Size and Count according to your needs.
3. Click Run. Find the test result in the following Device Output section.
- Software Controller:
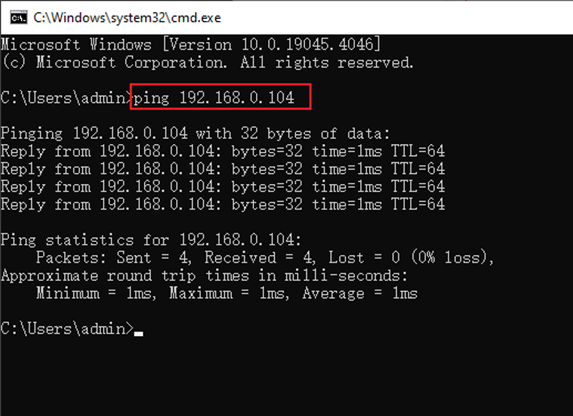
1. On the PC where your Software Controller runs, press "win+R" to open the Run window, enter cmd then press OK to access the command line.

2. Use the ping command to check the accessibility between your Controller and your device.
Step 3.
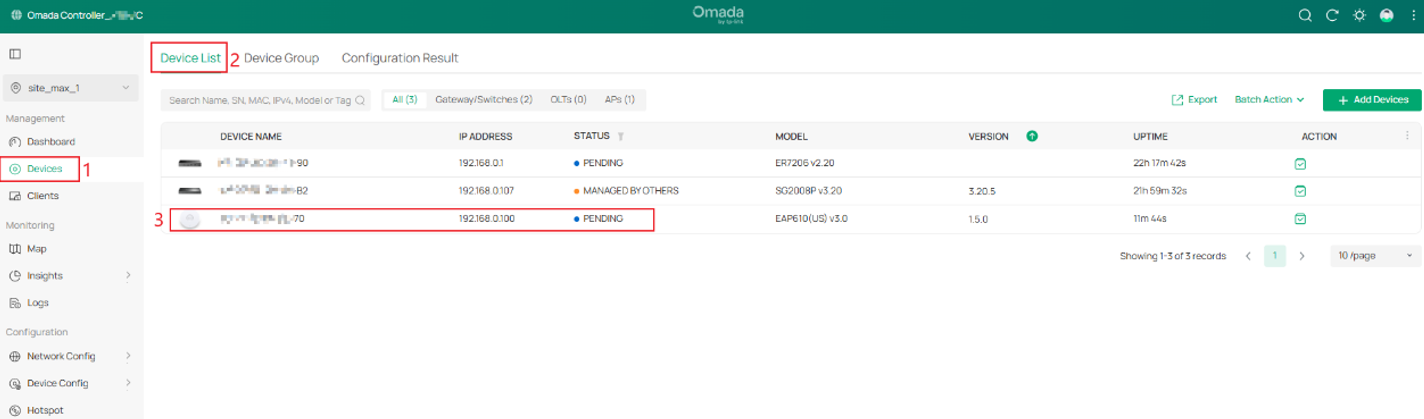
After confirming that your devices are accessible to the Controller, they will appear in the Device list of the site.
Configuration for Layer 3 Device Discovery
To discover your Omada devices on a Layer 3 network, you need to provide the IP address of your Controller to the devices. Typically, we achieve this using the following methods: DHCP Option, Discover Utility, and Inform URL.
DHCP Option 138
This method is commonly used to adopt APs and Switches. We use DHCP Server to deliver the IP address of the Controller to Omada devices. DHCP Option 138 and 43 are commonly used for this purpose. You can select the appropriate option based on your requirements. Here, we use DHCP Option 138 as an example to introduce the configuration process:
Step 1. Log in to your Controller via web browser and adopt the Omada gateway to your Controller as a DHCP Server.
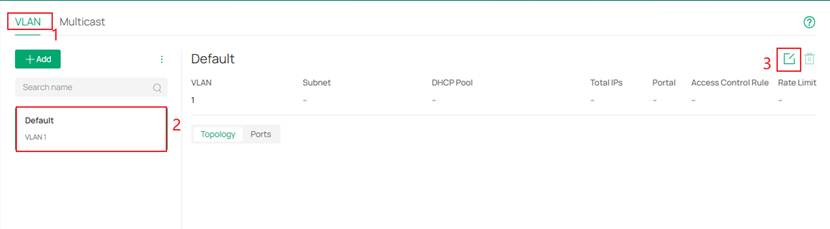
Step 2. Go to Site View > Network Config > Network Settings >LAN.

Then click the Edit button.
Step 3. Enable the DHCP Settings Overrides first. Then go to Advanced DHCP Options, input the Controller’s IP address into Option 138, then click Next.
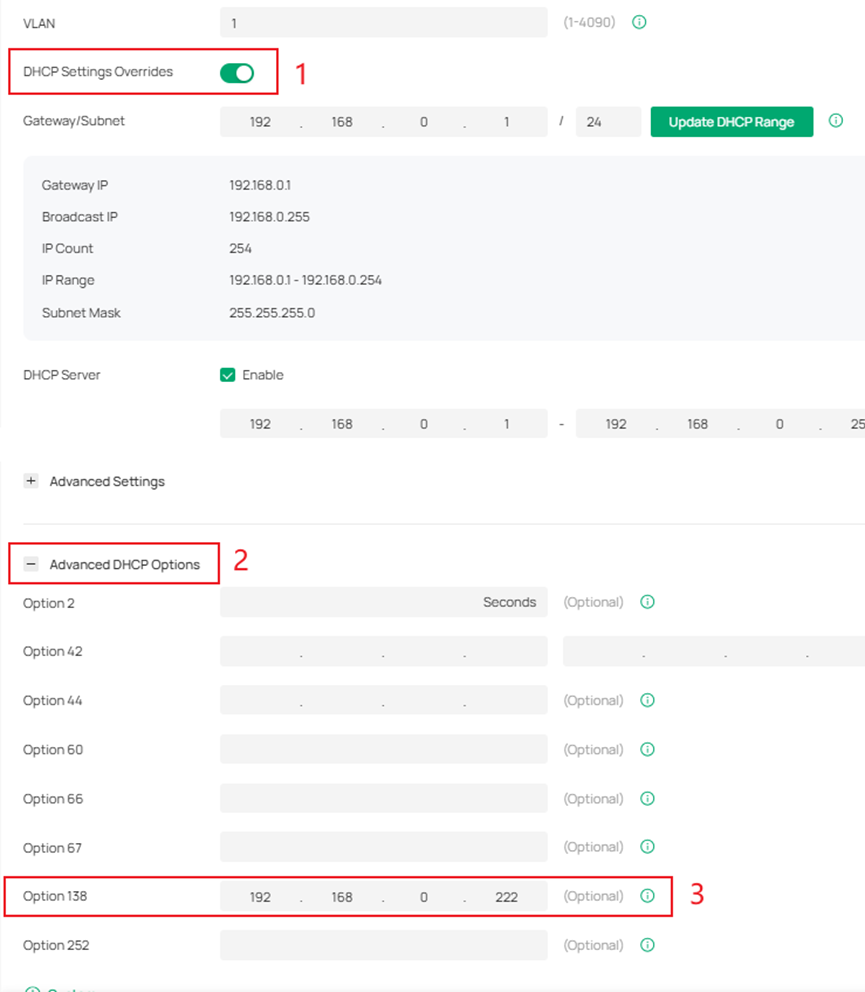
Step 4. Connect your Switches or APs to your gateway. The IP address of your Controller will be delivered to your devices through DHCP Option 138. Then your devices can access to the Controller, they will appear in the Device list of the site view.
Discovery Utility
Step 1. Install the Discovery Utility on your PC by referring to How to Install TP-Link Omada Discovery Utility on Windows and macOS PCs.
Step 2. Connect your PC to the same network as your Omada devices and run the Discovery Utility. Then select the Omada device you are going to adopt and click Manage.

Step 3. Input the following information to the pop-up window and click Apply.
Center IP/Inform URL: The IP address of your Controller.
Username: The username when you log in to the management page of your device.
Password: The password when you log in to the management page of your device.

Step 4. After clicking Apply, the Status of the Device Information window will change from Pending to Adopting, Configuring, and then to Setting Succeed. Once it shows Setting Succeed, the IP address of your Controller has been successfully delivered to your device.

Inform URL
Connect a PC to the same network as your Omada devices and log in to the management page of your device via accessing the IP address of your device in browser.
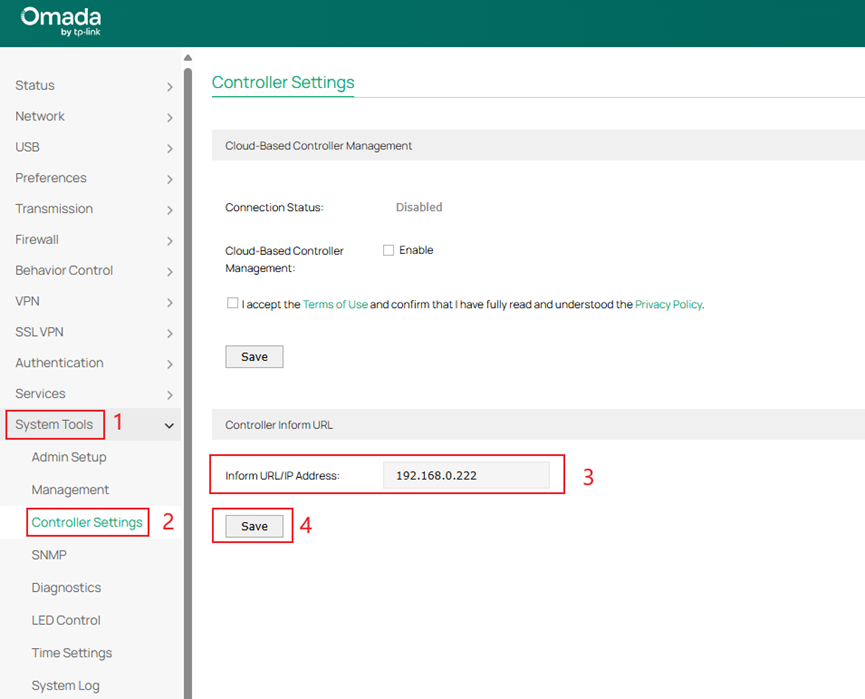
- AP: Go to System > Controller Settings > Controller Inform URL. Input the IP address of your Controller in Inform URL/IP Address and click Save.
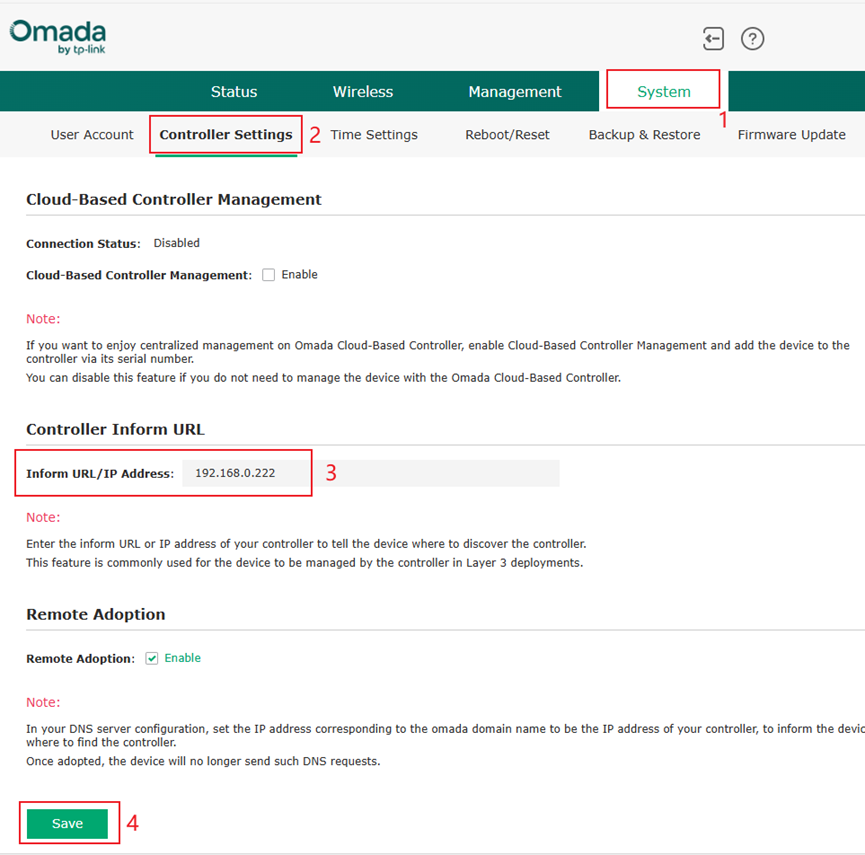
- Switch: Go to SYSTEM > Controller Settings > Controller Inform URL. Input the IP address of your Controller in Inform URL/IP Address and click Save.

- Gateway: Go to System Tools > Controller Settings > Controller Inform URL. Input the IP address of your Controller in Inform URL/IP Address and click Save.
Configuration for ZTP via Device Key (Controller v5.15.24 and above)
No need to send out IT experts for on-site configuration with ZTP (Zero-Touch Provisioning), saving manpower and manual on-site configuration time. This scenario means allowing remote pre-configuration and auto-syncing settings through cloud access. Both the Omada Controller and Omada devices must be able to connect to the Internet and access the tplink cloud.
Challenge:
- On-site deployment struggles with effective ZTP, requiring excessive manual operations by installers.
- Difficulty identifying the site of discovered devices when adopting devices across three layers using Discovery Utility without inventory management.
Solution:
- Offline Provisioning: Both Omada Central and On-Premises Controllers support ZTP, allowing remote pre-configuration and auto-syncing settings through cloud access.
- Site Inform URL, combined with the Discovery Utility tool, ensures that after on-site installation by the installer, devices are only discovered and adopted within the specific site.
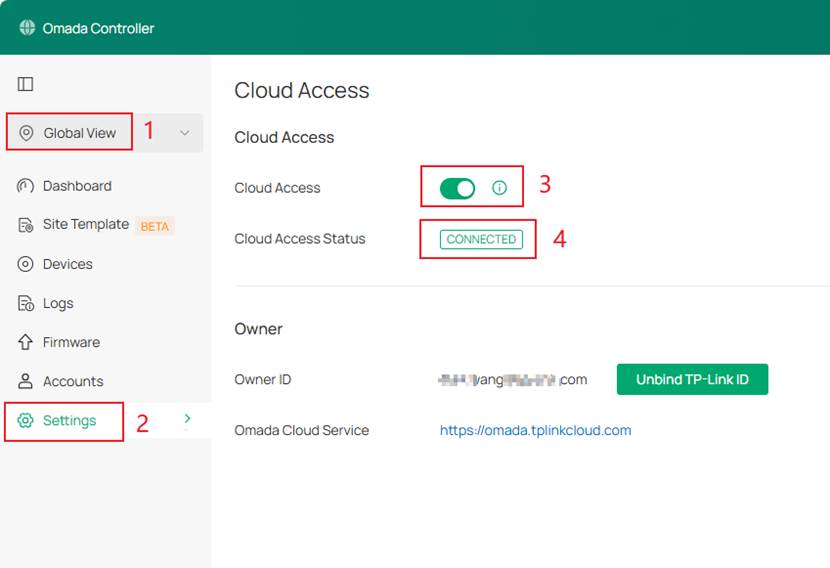
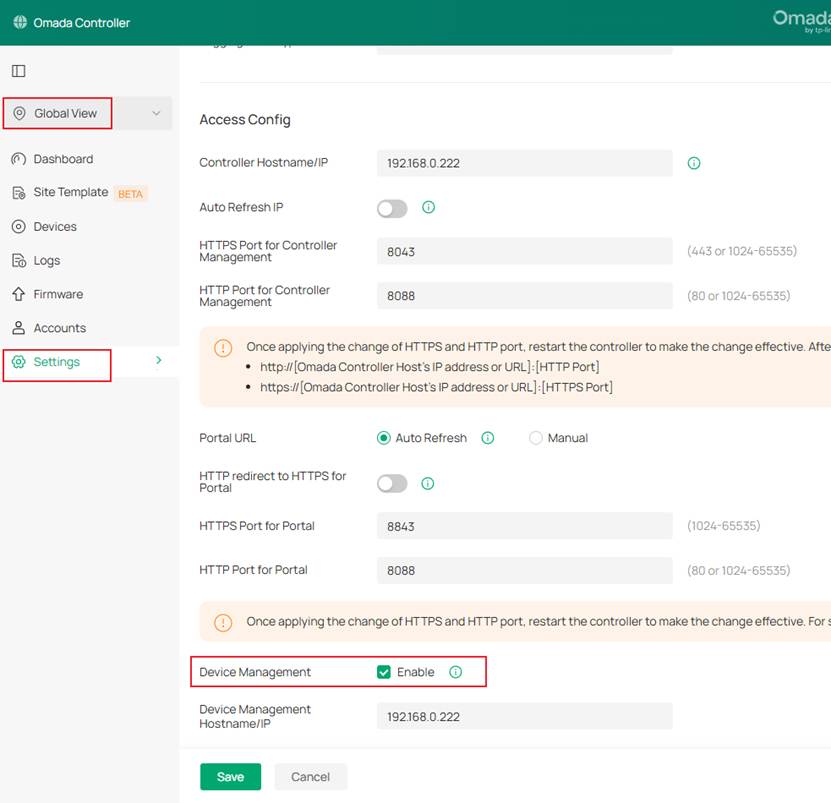
Step 1. Lunch your Omada Controller, Go to Global View > Settings > Cloud Access, enable Cloud Access, make sure that Cloud Access Status is ‘CONNECTED’.
Step 2. Go to Global View > Settings > System Settings, enable Devices Management and input current Omada Controller IP Address.
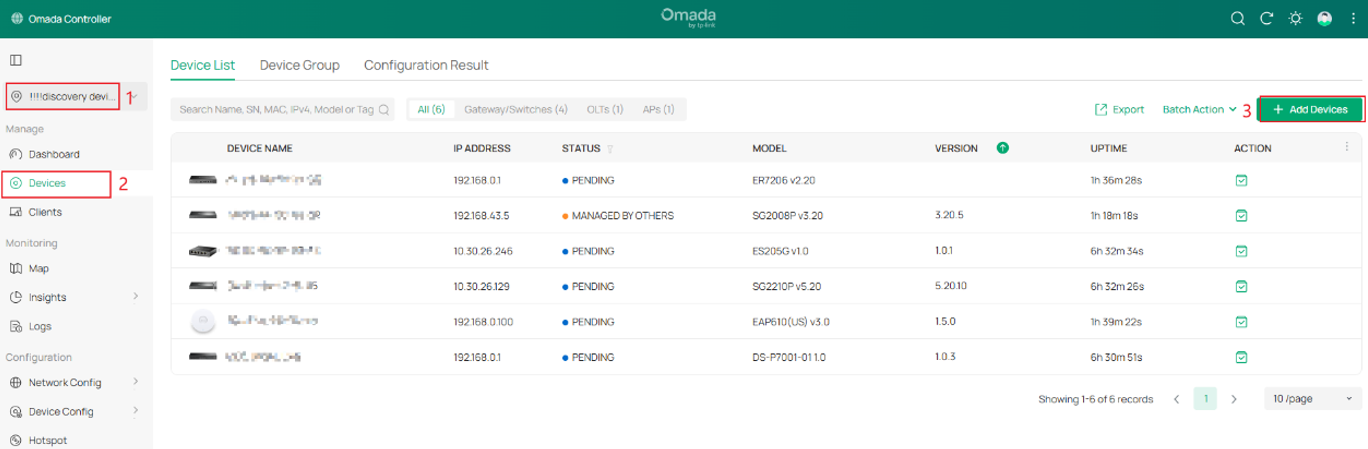
Step 3. Go to Site > Devices, Click Add Devices.
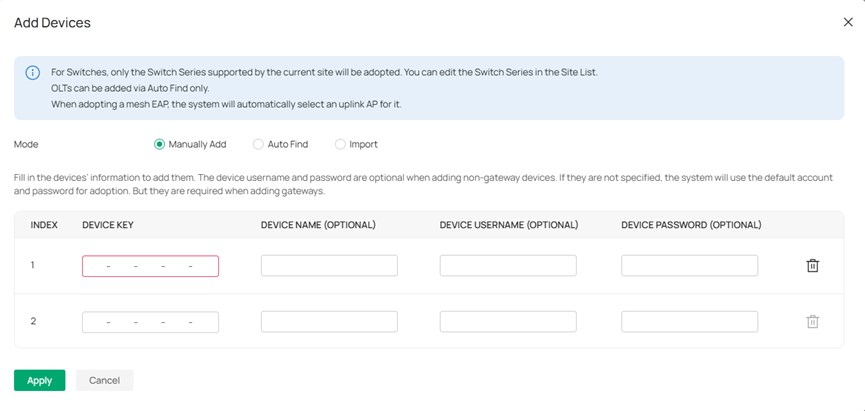
Step 4. Choose a mode to add devices via Device key.
- Manually Add
Choose Manually Add. In the DEVICE KEY field, enter the device key displayed on the product package or label. Click Apply to add the device.
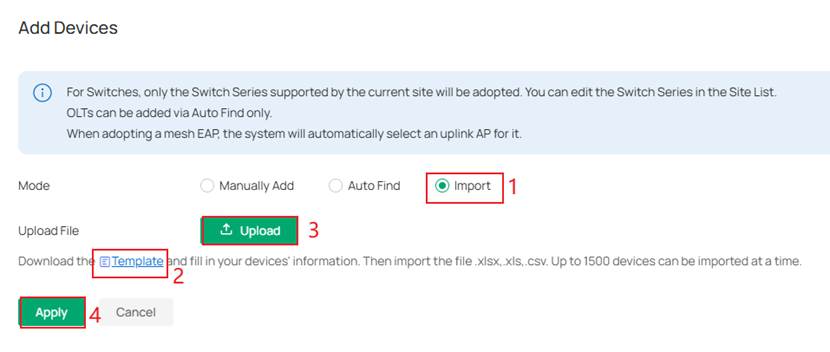
- Import
Choose Import device key. Click Template to download the template. In the template, you can enter up to 1500 devices. Save the template after editing. Then click Upload to import the template. Click Apply to add the devices.
Step 5. Then you can check the device list in your Site at Devices > Device List. If the devices are not connected to the internet (Offline), they will be in the PRECONFIGURE state.
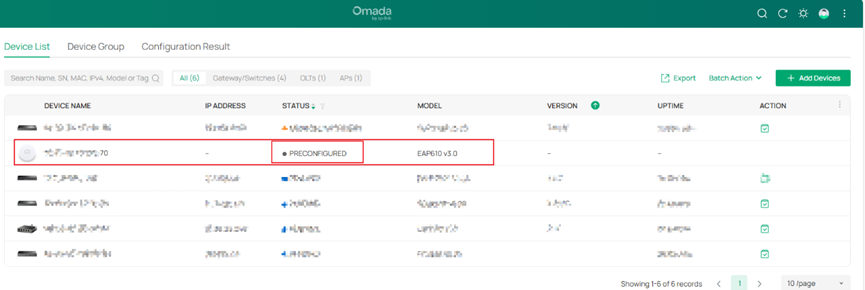
When the devices are online, their status will become CONNECTED and they are now successfully adopted to the Omada Controller.
Log in to your Controller via web browser, go to Devices. If you have successfully configured your Omada devices via Layer 2 and Layer 3 configuration, your devices will show up in the list with the status “pending”.
Now your Omada Software/Hardware Controller has discovered your Omada devices successfully.
Get to know more details of each function and configuration please go to Download Center to download the manual of your product.
1. What Should I Do If I Fail to Discover the Devices via Local Controller?
Re. Please refer to the following steps for troubleshooting:
Step 1. Ensure the network your device is connected to is functioning properly. Verify that all switch ports between the device and the gateway/DHCP server are configured with the correct VLAN tags and that there are no issues, such as network loops, present in the network.
Step 2. Check the communication between the device and the Controller:
- If the device and the Controller are in the same network or VLAN, use the built-in ping tool on the Hardware/Software Controller or perform the ping command on the PC running the Software Controller to the device IP address to ensure the device is reachable.
- If the device and the Controller are in different networks or VLANs, check your Layer 3 network configurations and whether you have already enabled device adoption in a different network via DHCP Option 138/Discovery Utility/Inform URL.
Step 3. Check whether the following ports in the network have been blocked or disabled by firewalls or antivirus software. For Software Controller users in particular, check the status of the port connected to the PC that runs the Controller.
|
Port |
Hardware Controller |
Software Controller |
Note |
|
29810 |
√ |
√ |
Discover |
|
29814 |
√ |
√ |
Manage |
|
29815 |
√ |
√ |
Manage |
|
29816 |
√ |
√ |
Manage |
|
29811/29812 |
√ |
√ |
Manage |
|
19810 |
√ |
√ |
OLT devices |
2. What Should I Do If I Can’t Discover an AP Wirelessly?
Re. Please refer to the following steps for troubleshooting:
Step 1. Make sure your APs are powered on and functioning properly.
Step 2. Appropriately shorten the linear distance between the wireless APs.
Step 3. Move obstacles away to reduce their impact on wireless signals and wireless channel utilization between your wireless APs.
