


Contents
Adoption when a device does not appear in the device list
Adopting a device with an existing password
Adopting a camera connected through an NVR
Troubleshooting device discovery and adoption
Introduction
The Omada Guard App allows users to discover, adopt, configure, and manage compatible IP cameras, NVRs, and SightCast devices through a Fusion Pro Gateway.
This FAQ explains how to add devices directly to a Fusion Pro Gateway or manage cameras connected through an NVR. It also covers common device discovery and adoption issues, including administrator credentials, network connectivity, firmware compatibility, and device capacity limitations.
Before starting, ensure the Omada Guard App is installed on your mobile device, and the initial configuration of the Fusion Pro Gateway is complete. For more information, refer to How to Set Up and Manage a Fusion Pro Gateway with the Omada and Omada Guard Apps.
Requirements
- Mobile device with the Omada Guard App installed and access to the Fusion Pro Gateway.
- Omada Fusion Pro Gateway that has completed its initial configuration.
- Compatible IP camera, NVR, or SightCast device.
- Network connectivity between the Fusion Pro Gateway and the devices being added.
- Compatible firmware versions for the Fusion Pro Gateway and connected devices.
Note: The Fusion Pro 2.5G Gateway supports managing only one NVR at a time.
Configuration
IP cameras can be managed directly through a Fusion Pro Gateway or connected through a compatible NVR.
For direct management, connect the camera to the network managed by the Fusion Pro Gateway and adopt it through the Devices page.
For NVR-managed cameras, connect the cameras through a compatible NVR and access them through the NVR's device list in the Omada Guard App.
The following sections explain the device adoption procedures, including how to add devices that are not automatically discovered or require existing administrator credentials.
Device discovery and adoption
Before adopting a device, ensure it is powered on, connected to the appropriate network, and accessible to the Fusion Pro Gateway. The following procedures explain how to adopt compatible devices and troubleshoot common adoption issues.
Normal adoption procedure
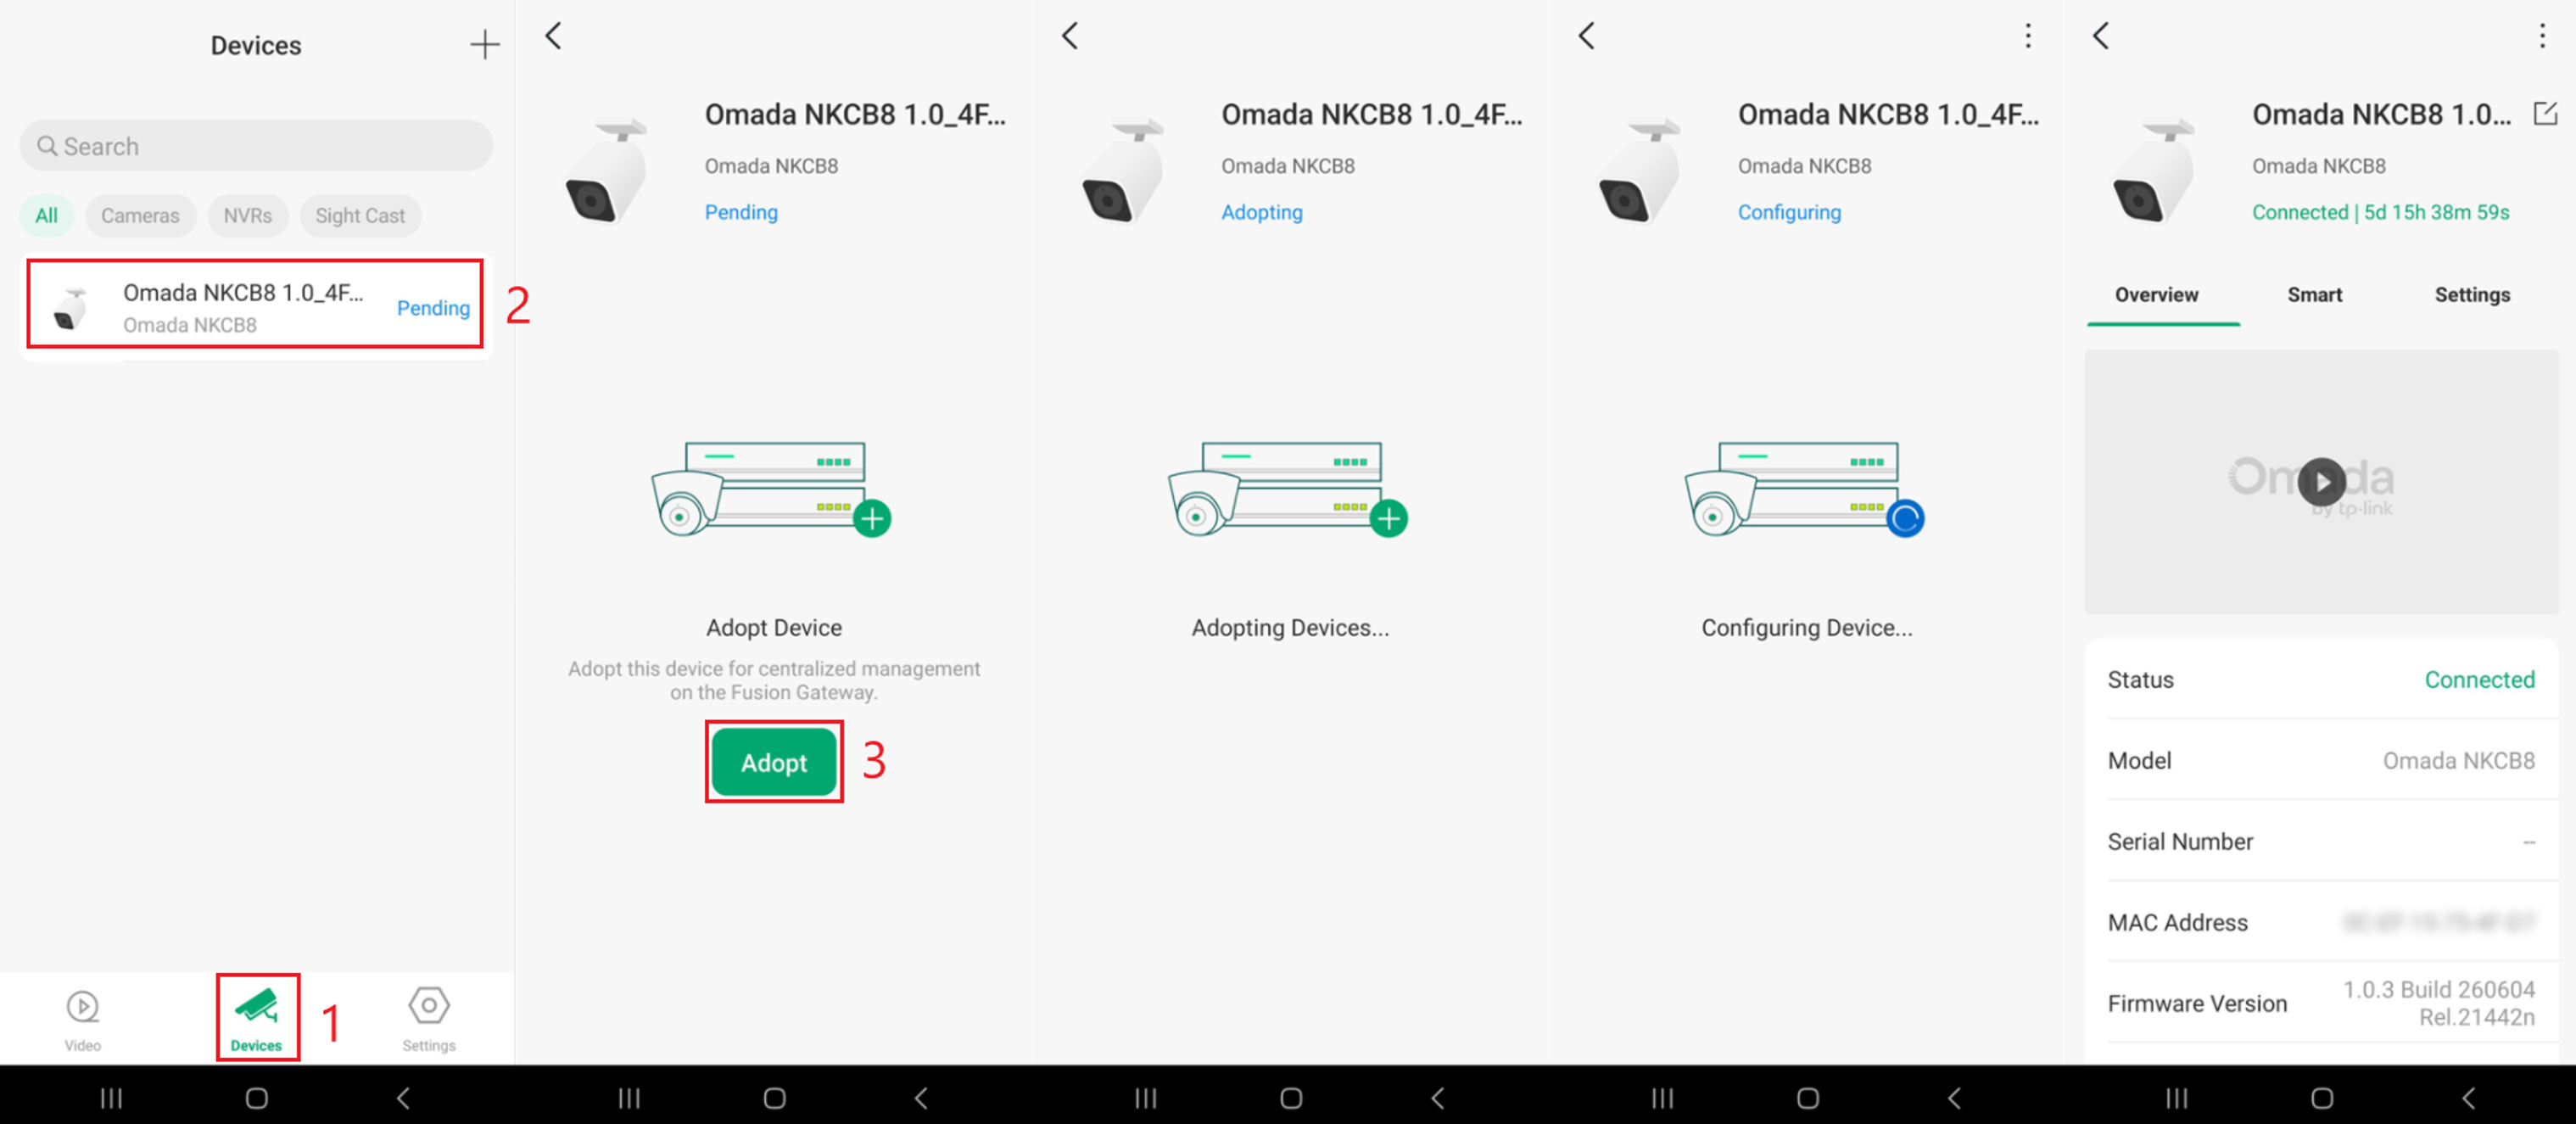
Step 1. Open the Omada Guard App and navigate to the Devices tab. Select the device you want to add, then tap Adopt.
The Fusion Pro Gateway will begin adopting and configuring the device. Once the process is complete, the device status will change to Connected, and its management options will become available.
Note: The same general discovery and adoption procedure applies to compatible IP cameras, NVRs, and SightCast devices.
Adoption when a device does not appear in the device list
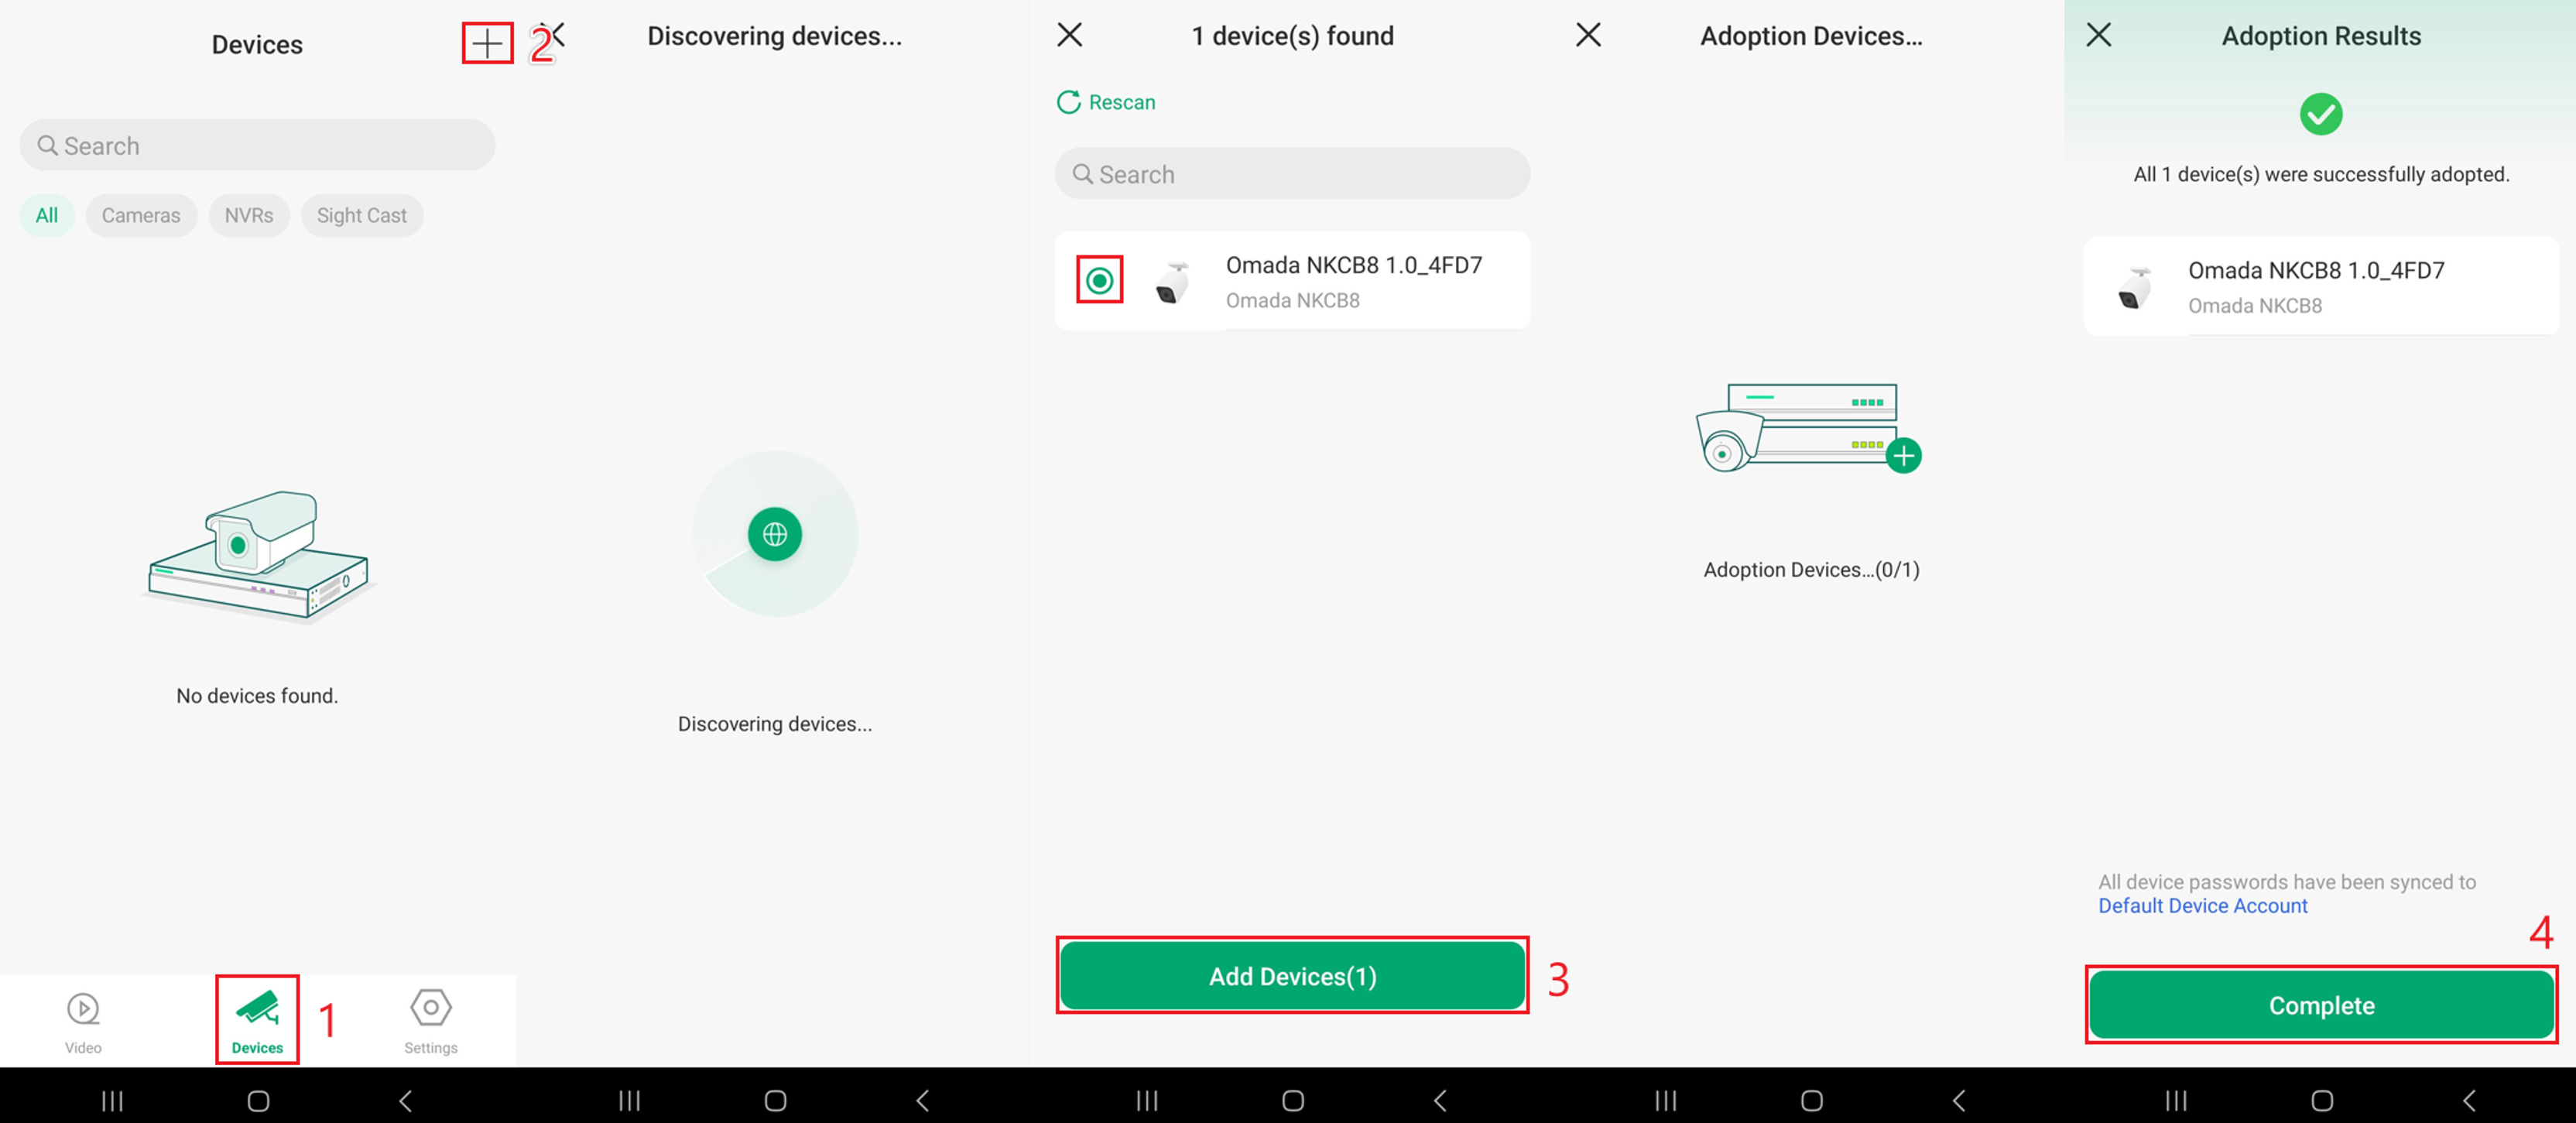
If a compatible device does not appear in the device list, use the device discovery function to search for it.
Step 1. Open the Omada Guard App and navigate to the Devices tab. Tap the + icon in the upper-right corner to search for available devices. Once the device is discovered, select it and tap Add Device(s). Wait for the adoption process to complete, then tap Complete.
Note: If the device is not discovered, tap Rescan. If it still does not appear, verify that the device is powered on, connected to the correct network and VLAN, and reachable by the Fusion Pro Gateway. Check for network isolation or other restrictions that may prevent device discovery.
Adopting a device with an existing password
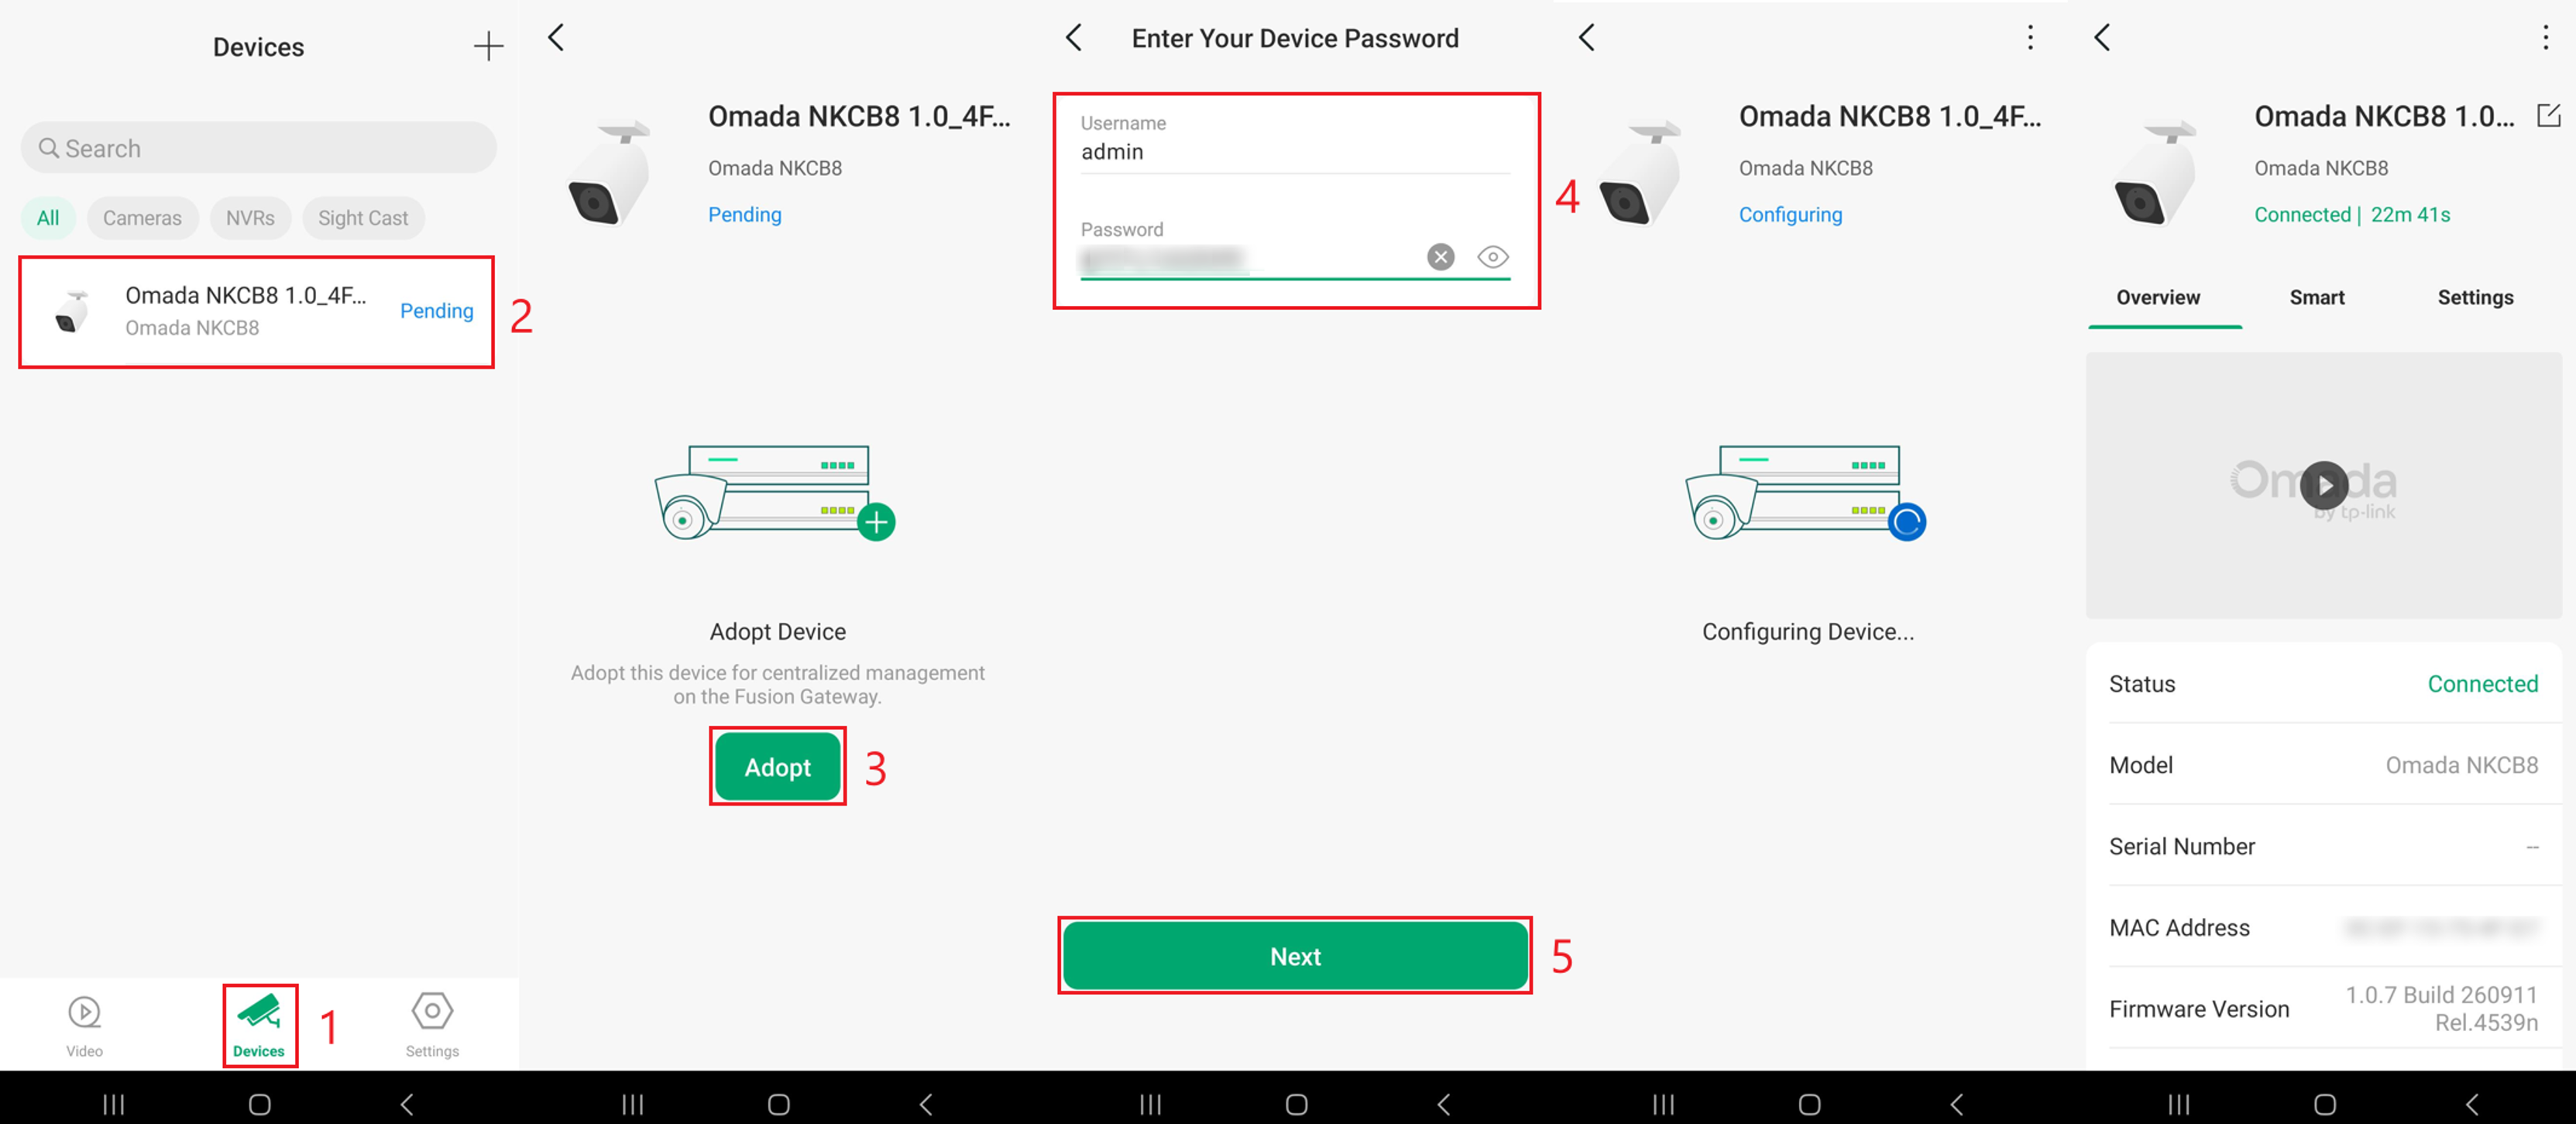
If an IP camera has been configured previously, its administrator credentials may differ from those used by the Fusion Pro Gateway. The existing credentials must be provided during adoption.
Step 1. Open the Omada Guard App and navigate to the Devices tab. Select the device, then tap Adopt. When the Enter Your Device Password prompt appears, enter the device's existing Username and Password, then tap Next. Wait for the adoption process to complete. Once successful, the device status will change to Connected.
Note: If the administrator credentials are unavailable, a factory reset may be required before the device can be adopted.
Adopting a camera connected through an NVR
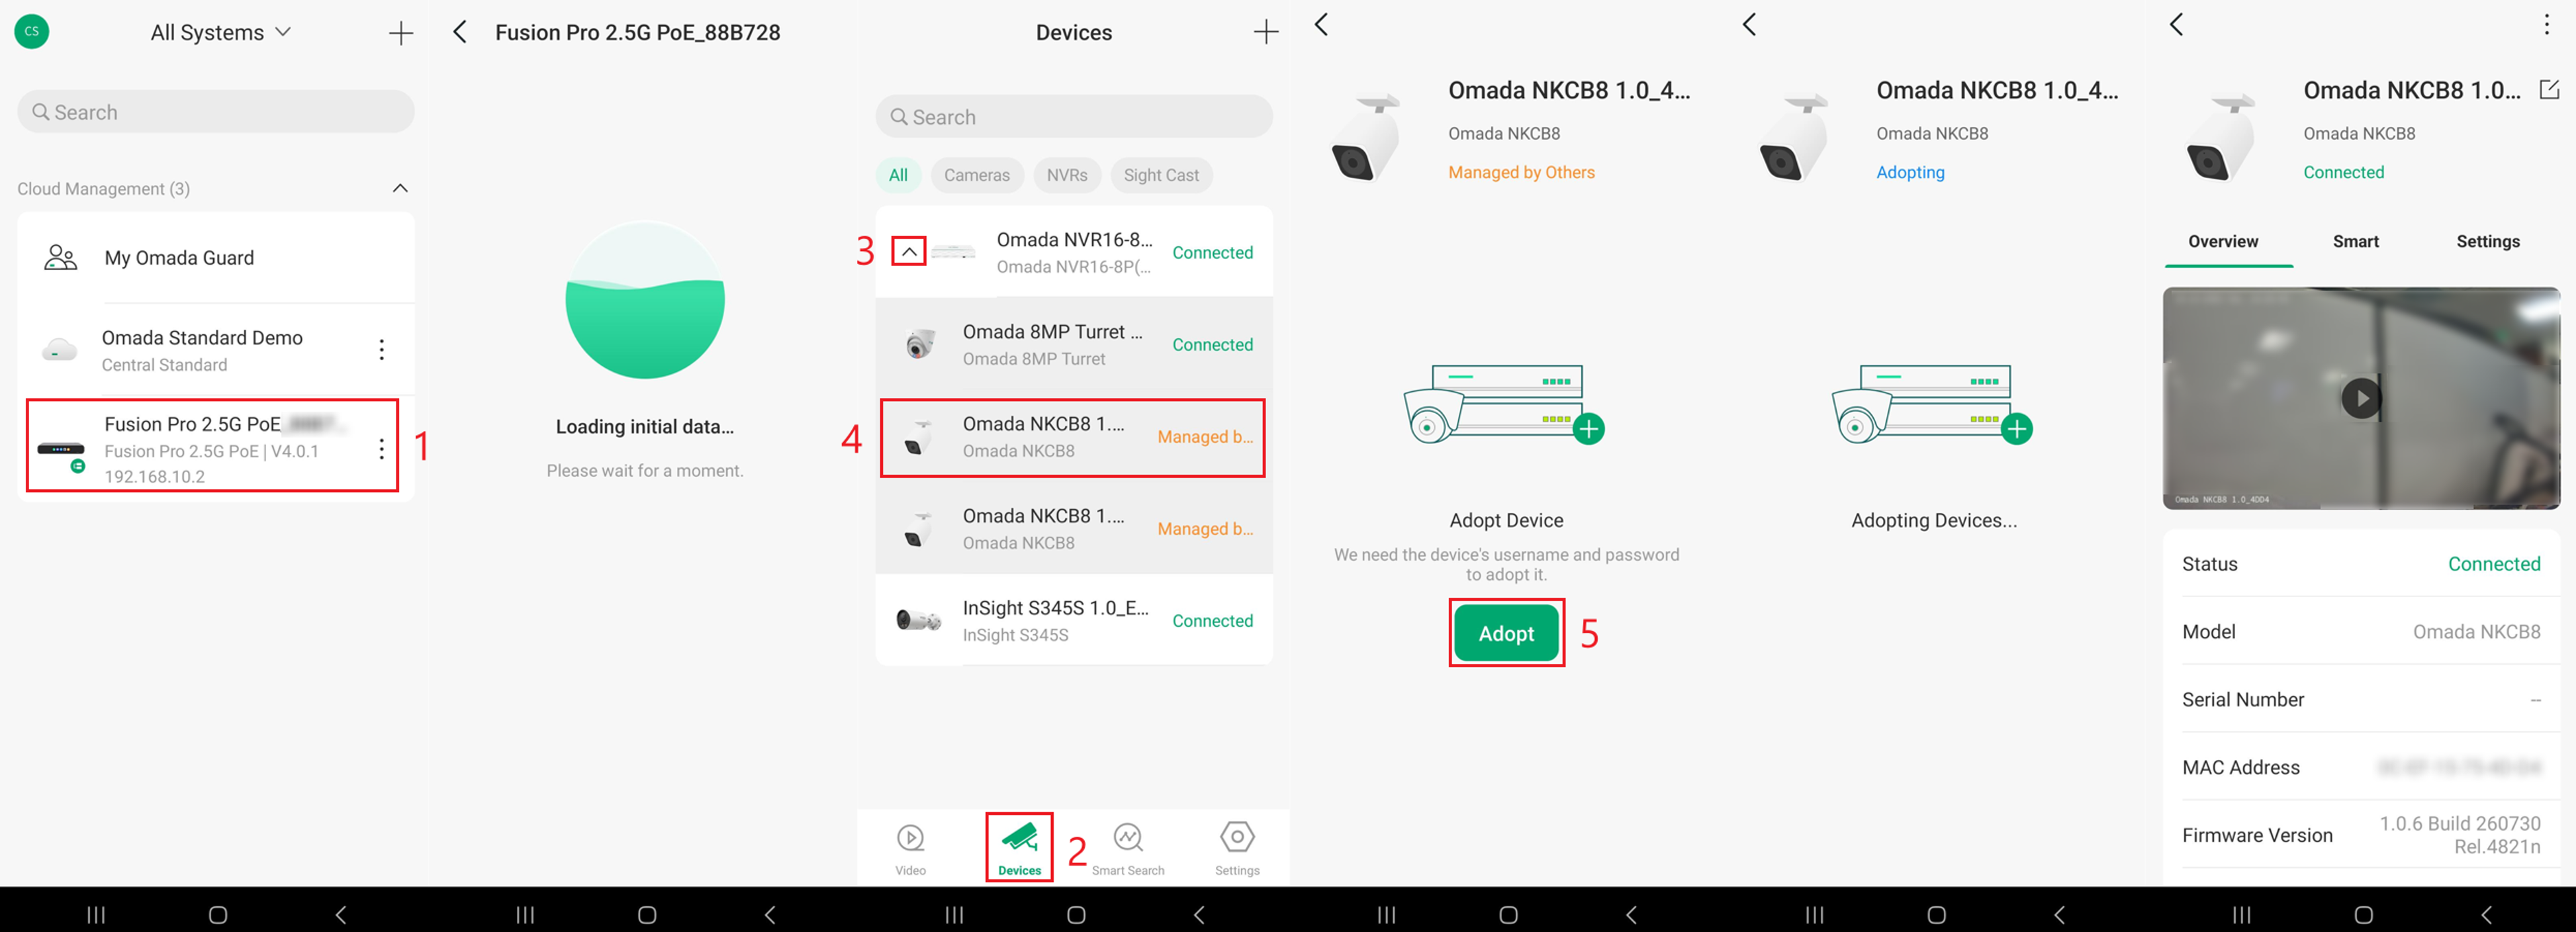
The following topology illustrates a Fusion Pro 2.5G Gateway connected to an Omada NVR16-8P, which manages multiple IP cameras.

Step 1. Open the Omada Guard App and select the Fusion Pro Gateway. Navigate to the Devices tab and tap the drop-down arrow next to the NVR to display its connected IP cameras. Select the IP camera you want to add, then tap Adopt. Wait for the adoption process to complete and verify that the camera status changes to Connected.
Note: If the camera has existing administrator credentials, enter them when prompted. If the camera is already managed by another account or system, its existing management association may need to be removed before it can be adopted. A factory reset may be required if the administrator credentials are unavailable.
Troubleshooting device discovery and adoption
If a device cannot be discovered or adopted through the Fusion Pro Gateway, follow these troubleshooting steps.
Step 1. Check device connectivity. Ensure the device is powered on and connected to the network. Verify that the Fusion Pro Gateway can communicate with the device.
Step 2. Verify network configuration. Check that the device is connected to the appropriate network and VLAN. Ensure that network isolation, firewall rules, or other restrictions are not preventing communication.
Step 3. Check device compatibility. Confirm that the device is supported by the Fusion Pro Gateway and is running compatible firmware.
Step 4. Verify administrator credentials. If the device has been configured previously, enter its existing administrator username and password when prompted.
Step 5. Check the device management status. If the device is already managed by another account or system, verify its existing management association and remove it if necessary before attempting adoption again.
Step 6. Retry device discovery and adoption. Return to the Devices tab and tap the + icon to search for available devices. If the device is not found, tap Rescan. Once discovered, select the device and follow the adoption procedure.
Note: If the administrator credentials are unavailable, a factory reset may be required. Resetting the device will erase its existing configuration.
Device management
The Devices page displays devices managed through the Fusion Pro Gateway, including their names, models, IP addresses, and connection statuses.
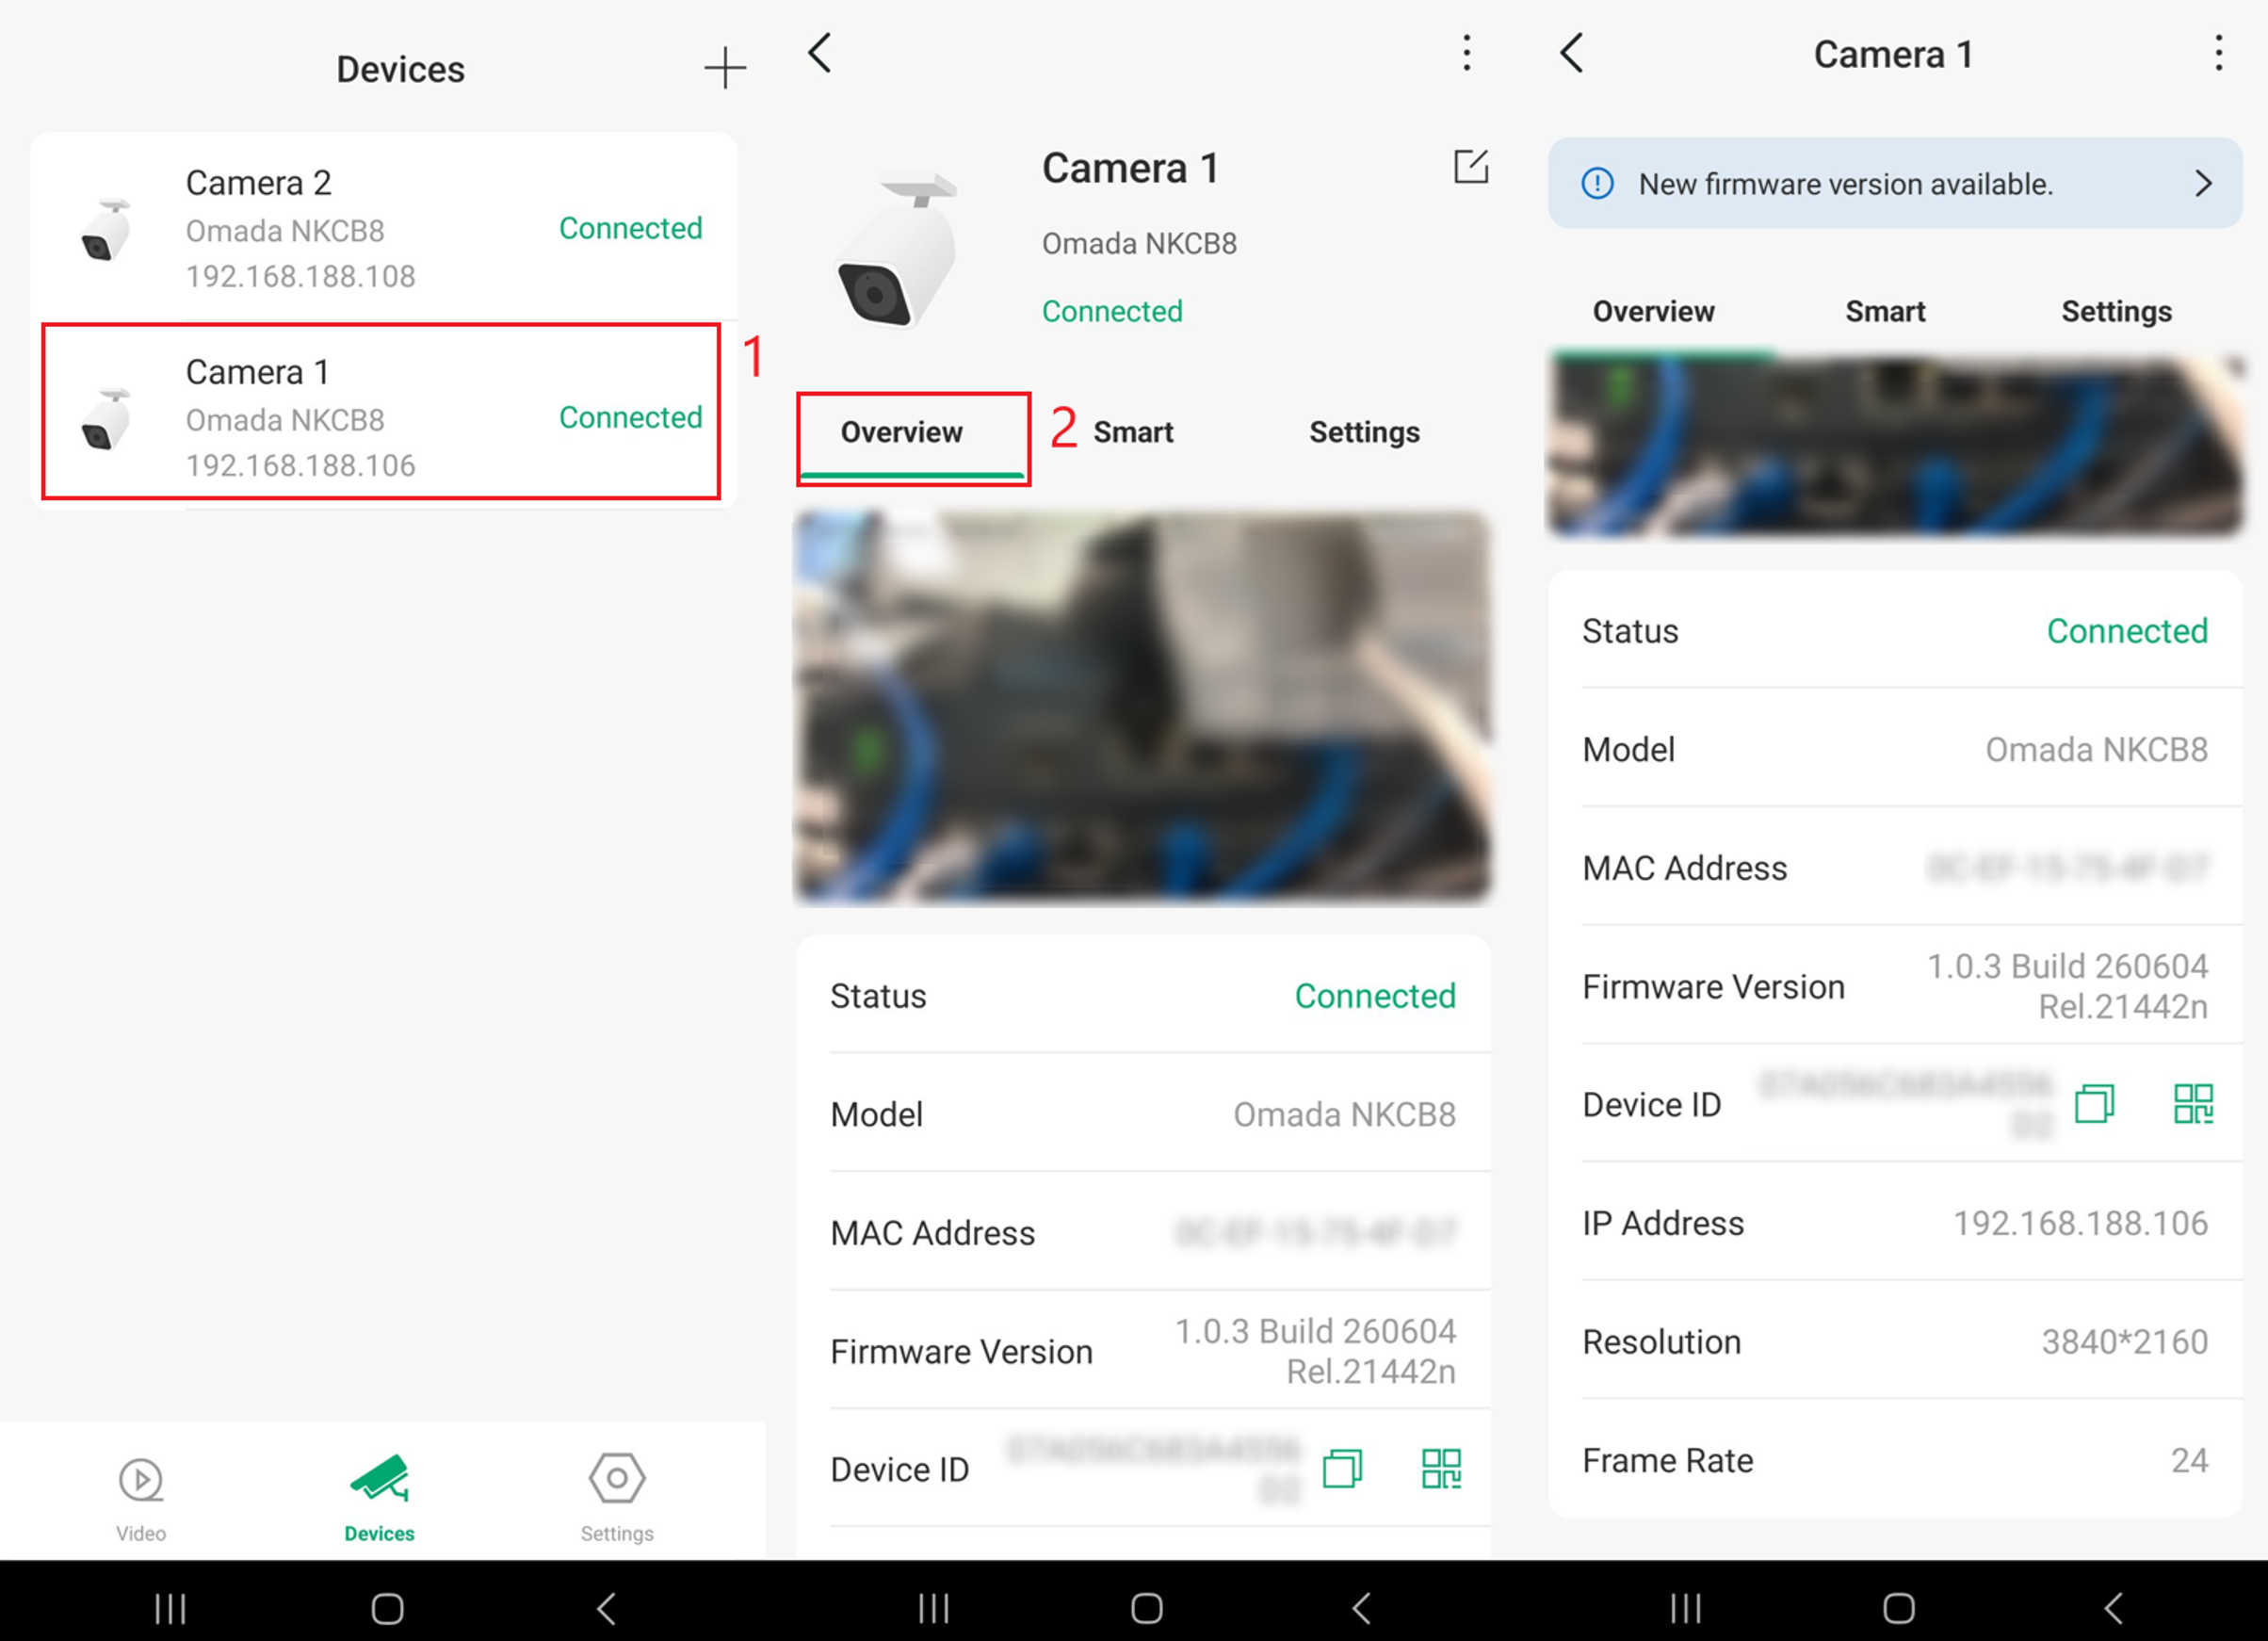
Select a device to open its management page. For supported IP cameras, the page contains three tabs: Overview, Smart, and Settings.
Device overview
The Overview tab displays the live camera feed and basic information about the selected device, including:
- Status: Current connection status of the device.
- Model: Device model number.
- MAC Address: Hardware MAC address of the device.
- Firmware Version: Currently installed firmware version.
- Device ID: Unique identifier assigned to the device.
- IP Address: Current IP address of the device.
- Resolution: Video resolution of the camera.
- Frame Rate: Video frame rate of the camera.
To access the Overview tab, select a camera from the Devices page. The device management page opens with the Overview tab selected by default.
If a firmware update is available, a notification will appear at the top of the page.
Smart
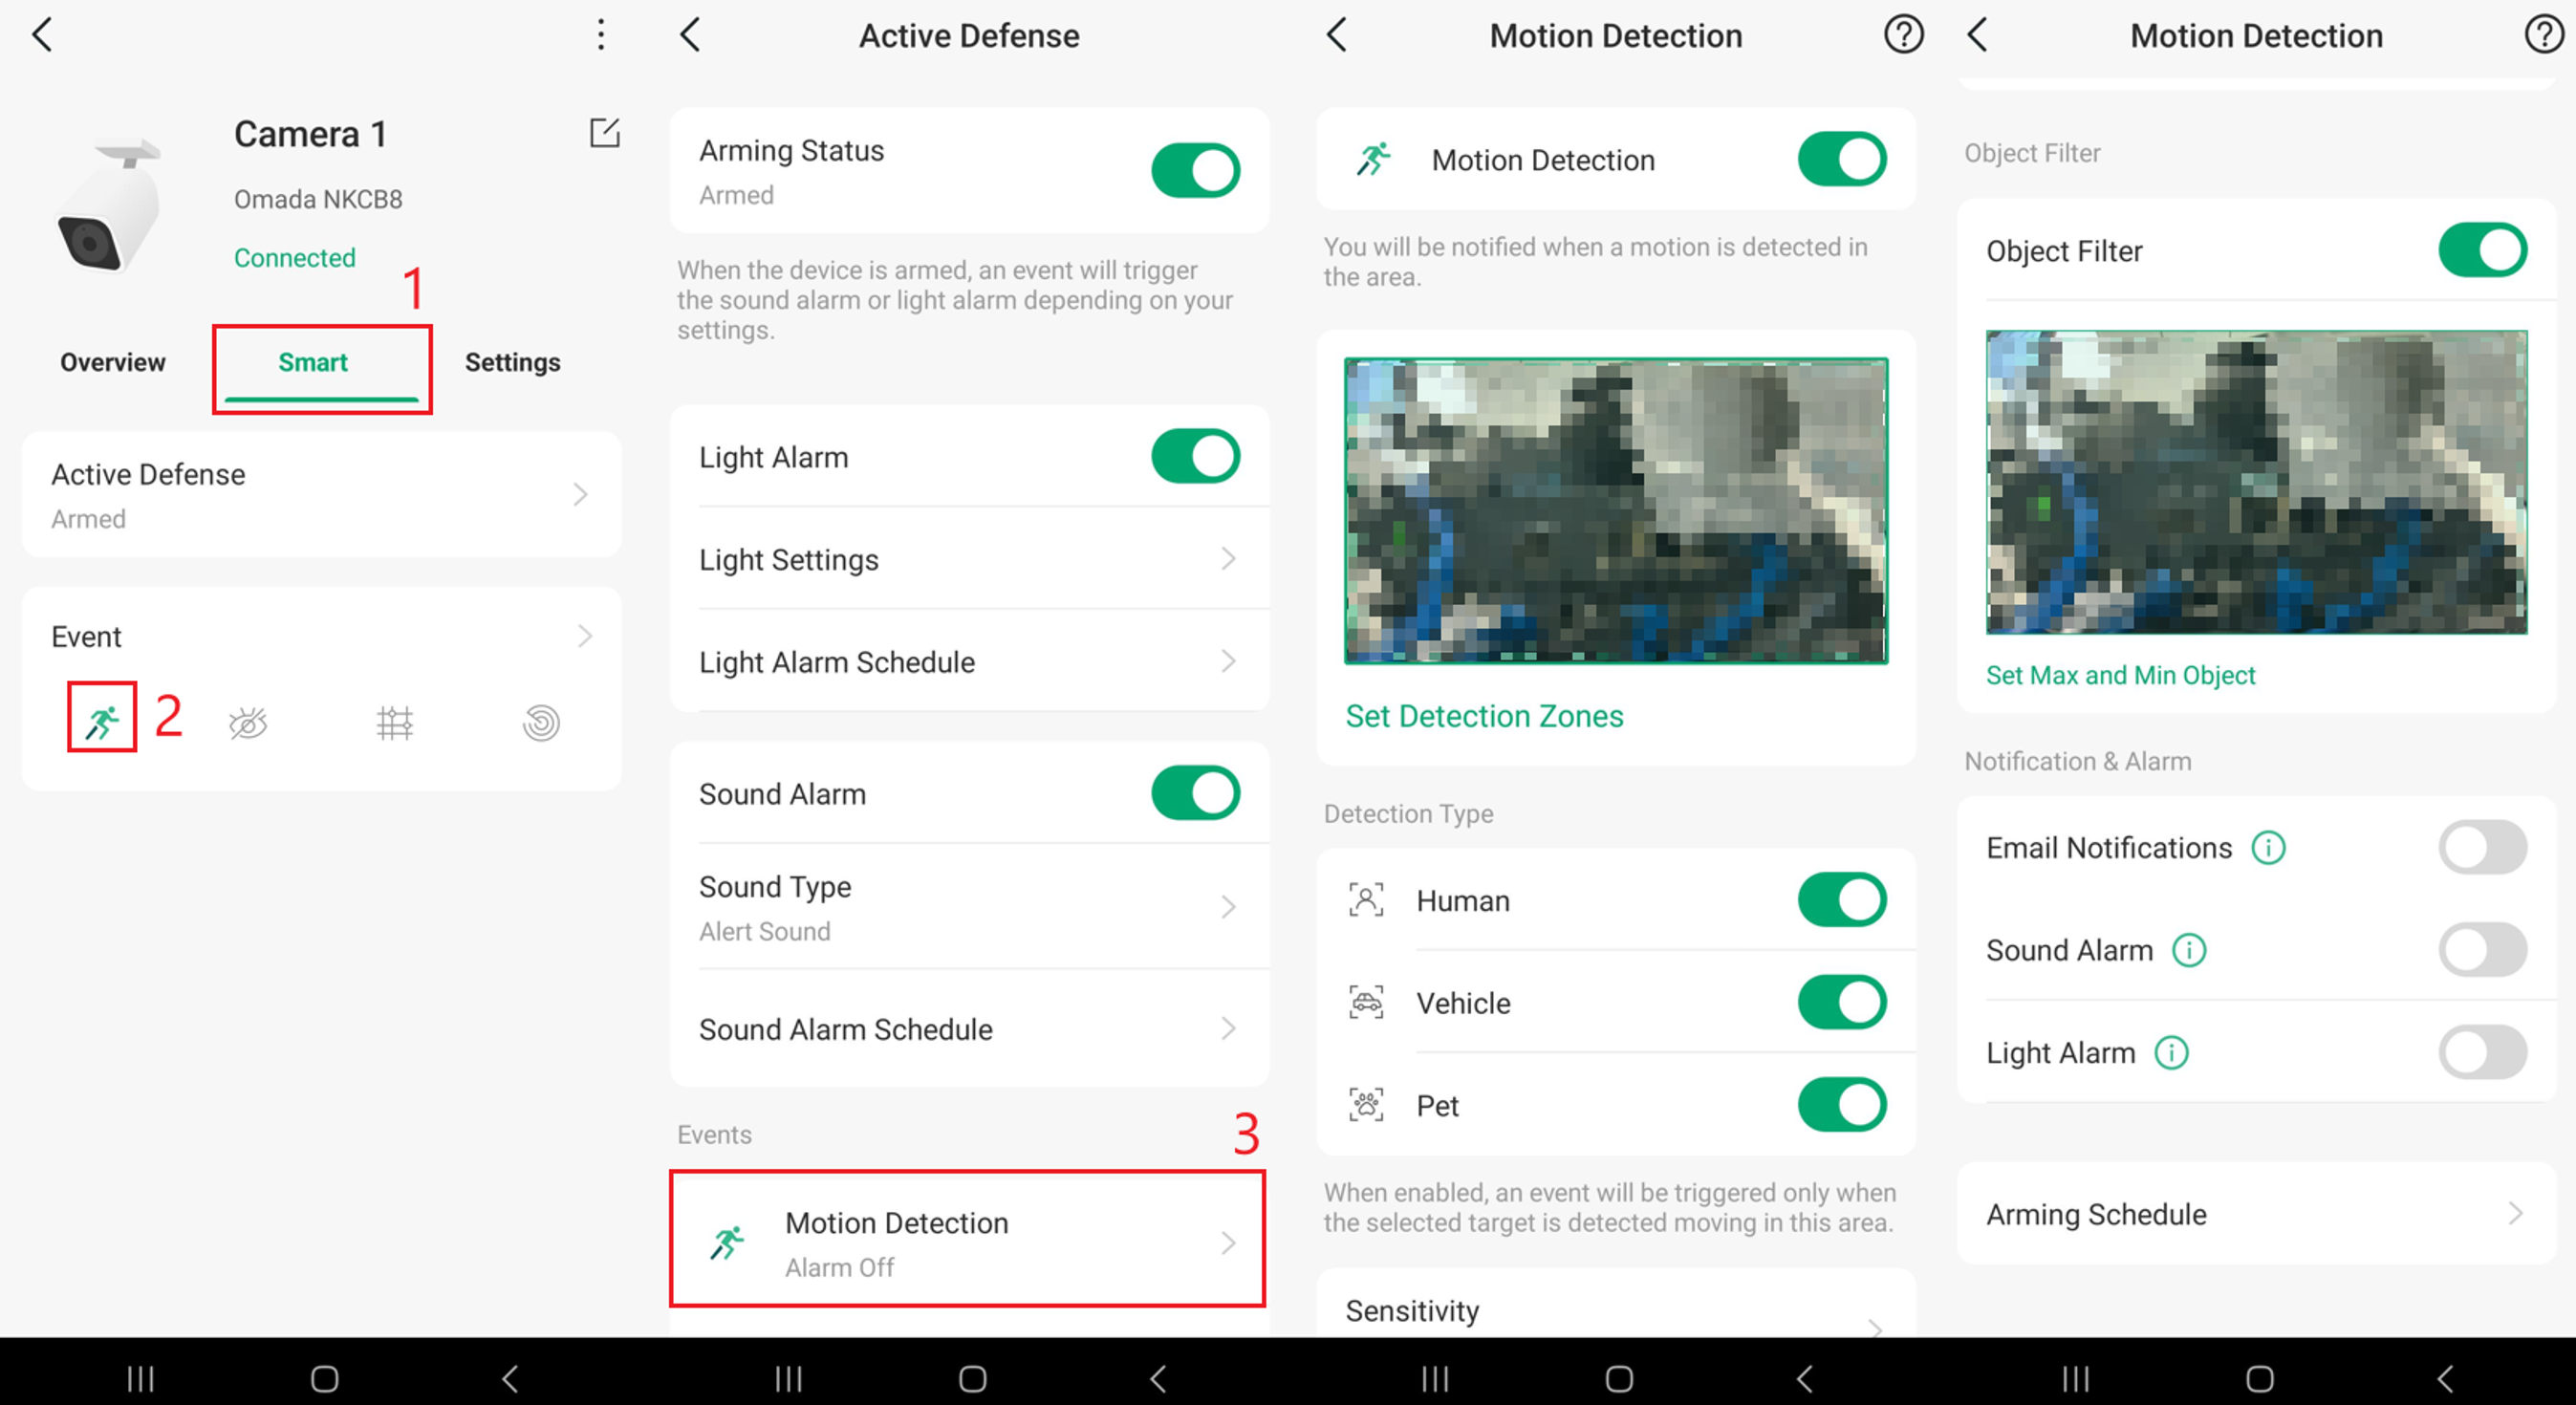
The Smart tab allows you to configure supported smart detection features and alerts.
In this example, navigate to Smart > Motion Detection to configure detection zones, object filters, sensitivity, notifications, alarms, and arming schedules. Available features depend on the camera model and firmware version.
Settings
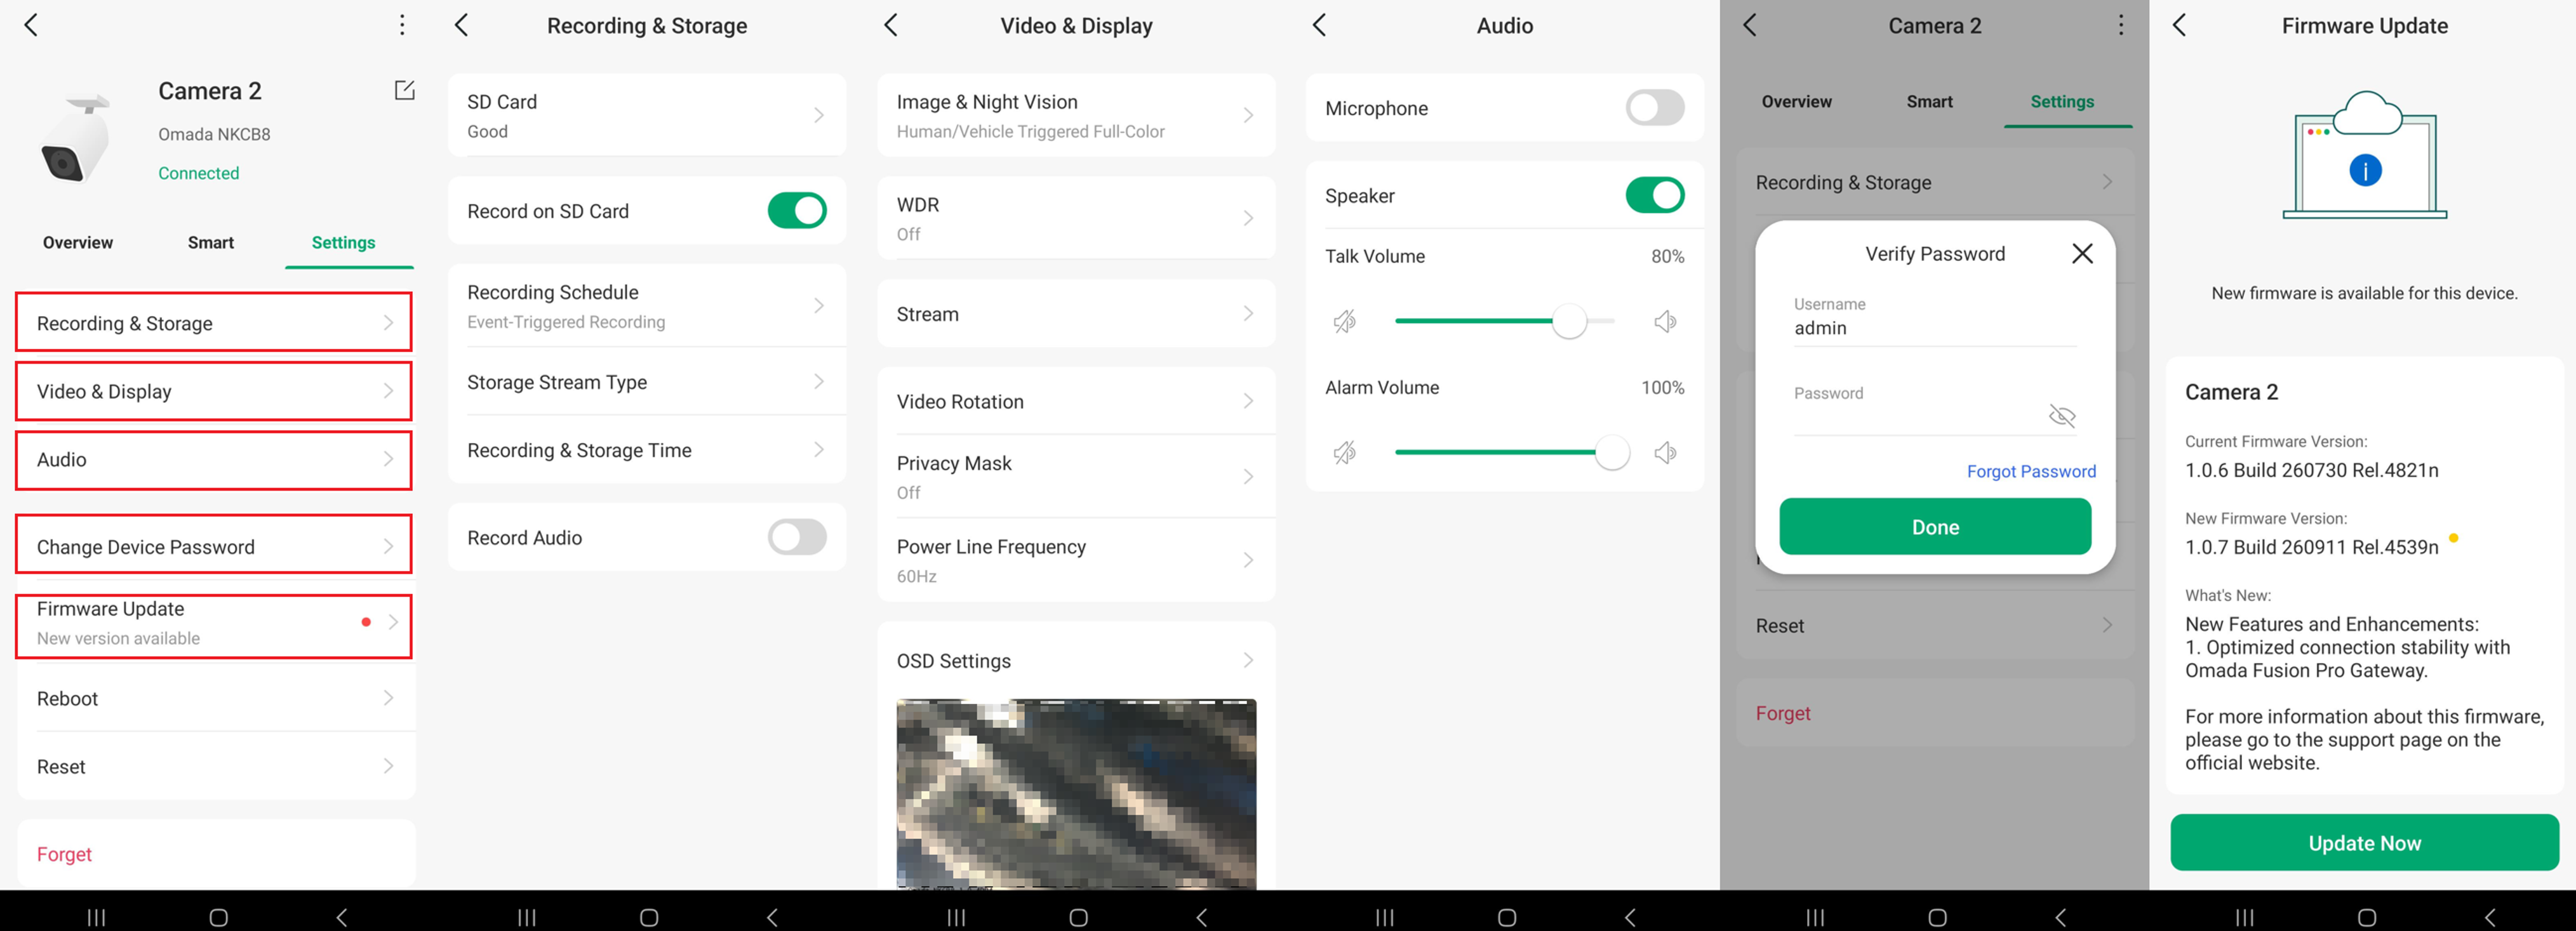
The Settings tab provides access to the selected device's configuration and maintenance functions, including recording, video, audio, firmware updates, and device management.
Available settings depend on the device model and firmware version.
The following settings are available:
- Recording & Storage: Manage SD card storage, recording schedules, recording modes, storage duration, and audio recording.
- Video & Display: Configure image and night vision settings, video streams, resolution, privacy masks, and on-screen display (OSD) settings.
- Audio: Enable or disable the microphone and speaker, and adjust audio volume levels.
- Change Device Password: Update the device's administrator password. The current device credentials must be verified before making changes.
- Firmware Update: Check the current firmware version, view available updates, and upgrade the device firmware.
- Reboot: Restart the selected device.
- Reset: Restore the device to its factory default settings.
- Forget: Remove the selected device from management through the Fusion Pro Gateway.
Channel limits
The maximum number of camera channels supported by an NVR depends on its model. However, the channel count is not the only factor that determines how many cameras can be connected.
In the example below, the Omada NVR16-8P supports up to 16 camera channels. The Channel field displays 5/16, indicating that 5 channels are currently in use.
Other limitations include incoming bandwidth and processing capacity. Cameras operating at higher resolutions, frame rates, or bitrates may consume more resources, potentially preventing the NVR from supporting its maximum number of camera channels simultaneously.
For example, an NVR that supports 16 channels may not necessarily support 16 cameras operating at their highest available resolution, frame rate, and bitrate at the same time.
When planning an NVR deployment, consider both:
- Channel capacity: The maximum number of camera channels supported by the NVR.
- Bandwidth and resource capacity: The total amount of camera traffic and processing that the NVR can support.
The Overview page can be used to check the current channel usage and other device information, including NVR status, firmware version, IP address, and storage capacity.
To view information about an adopted NVR in the Omada Guard App, select the drop-down arrow to display the IP cameras connected to the NVR. Select the NVR to open its Overview tab, then scroll down to view the Channel field, which displays the current channel usage and maximum supported channels.
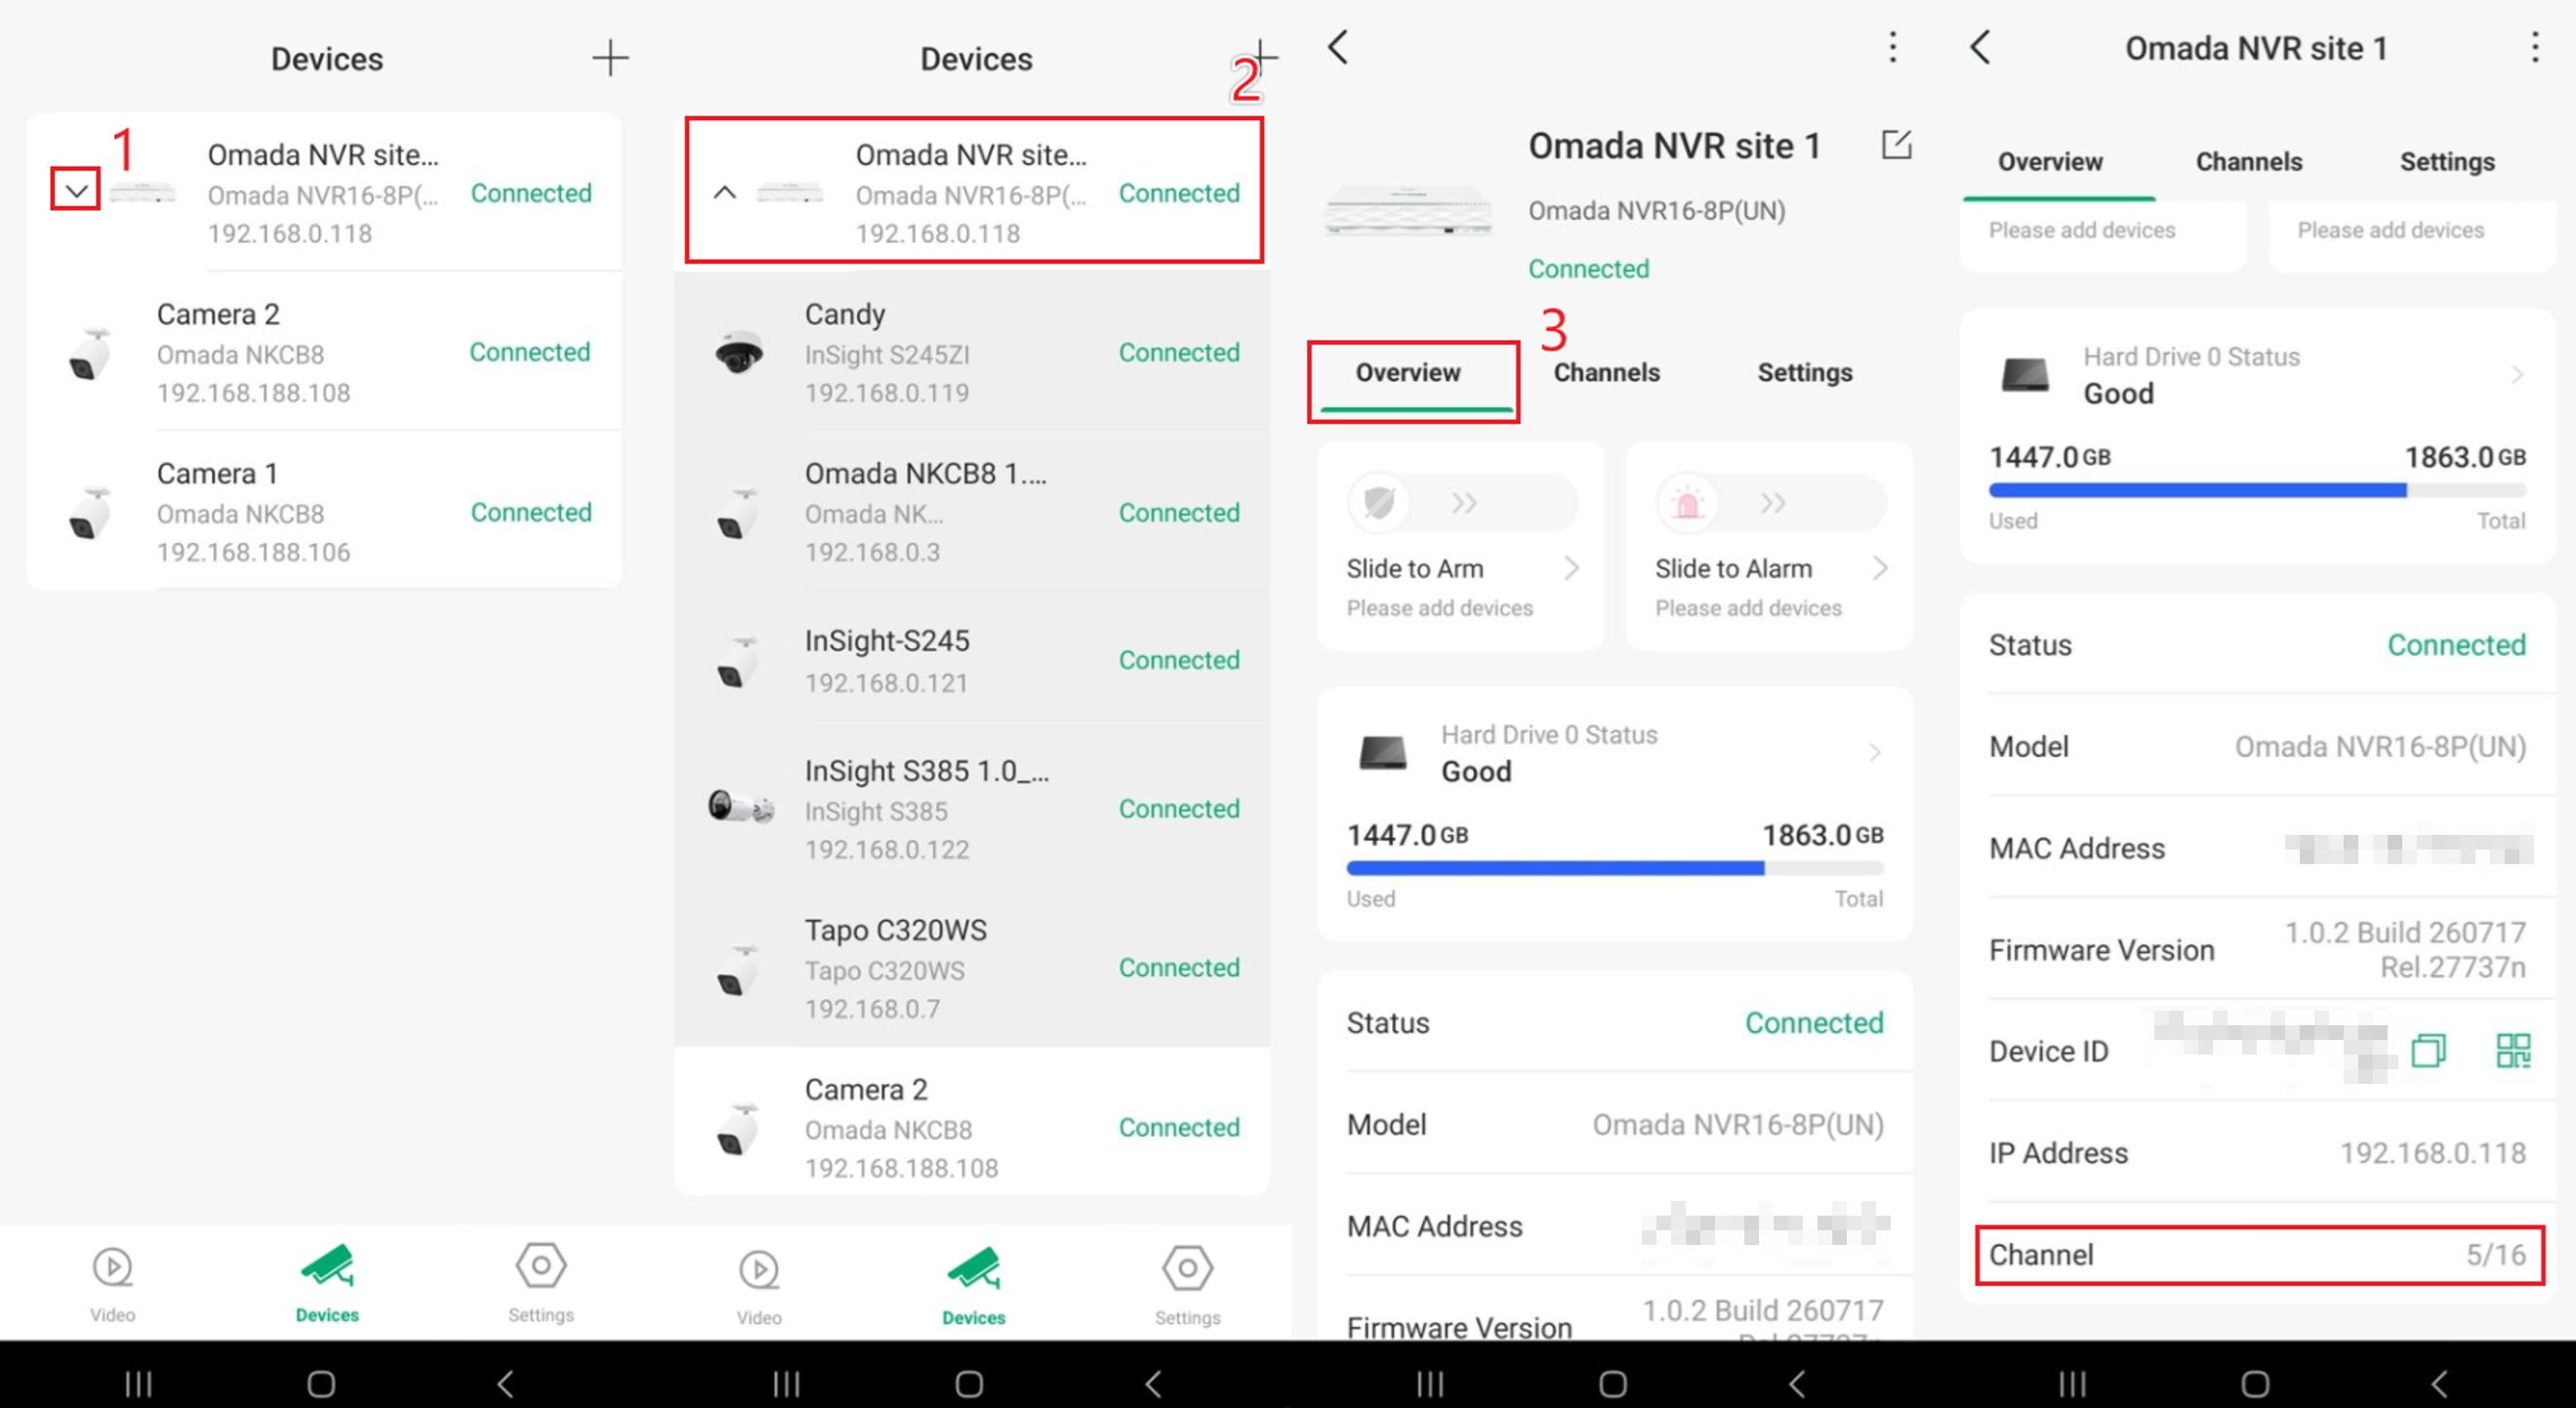
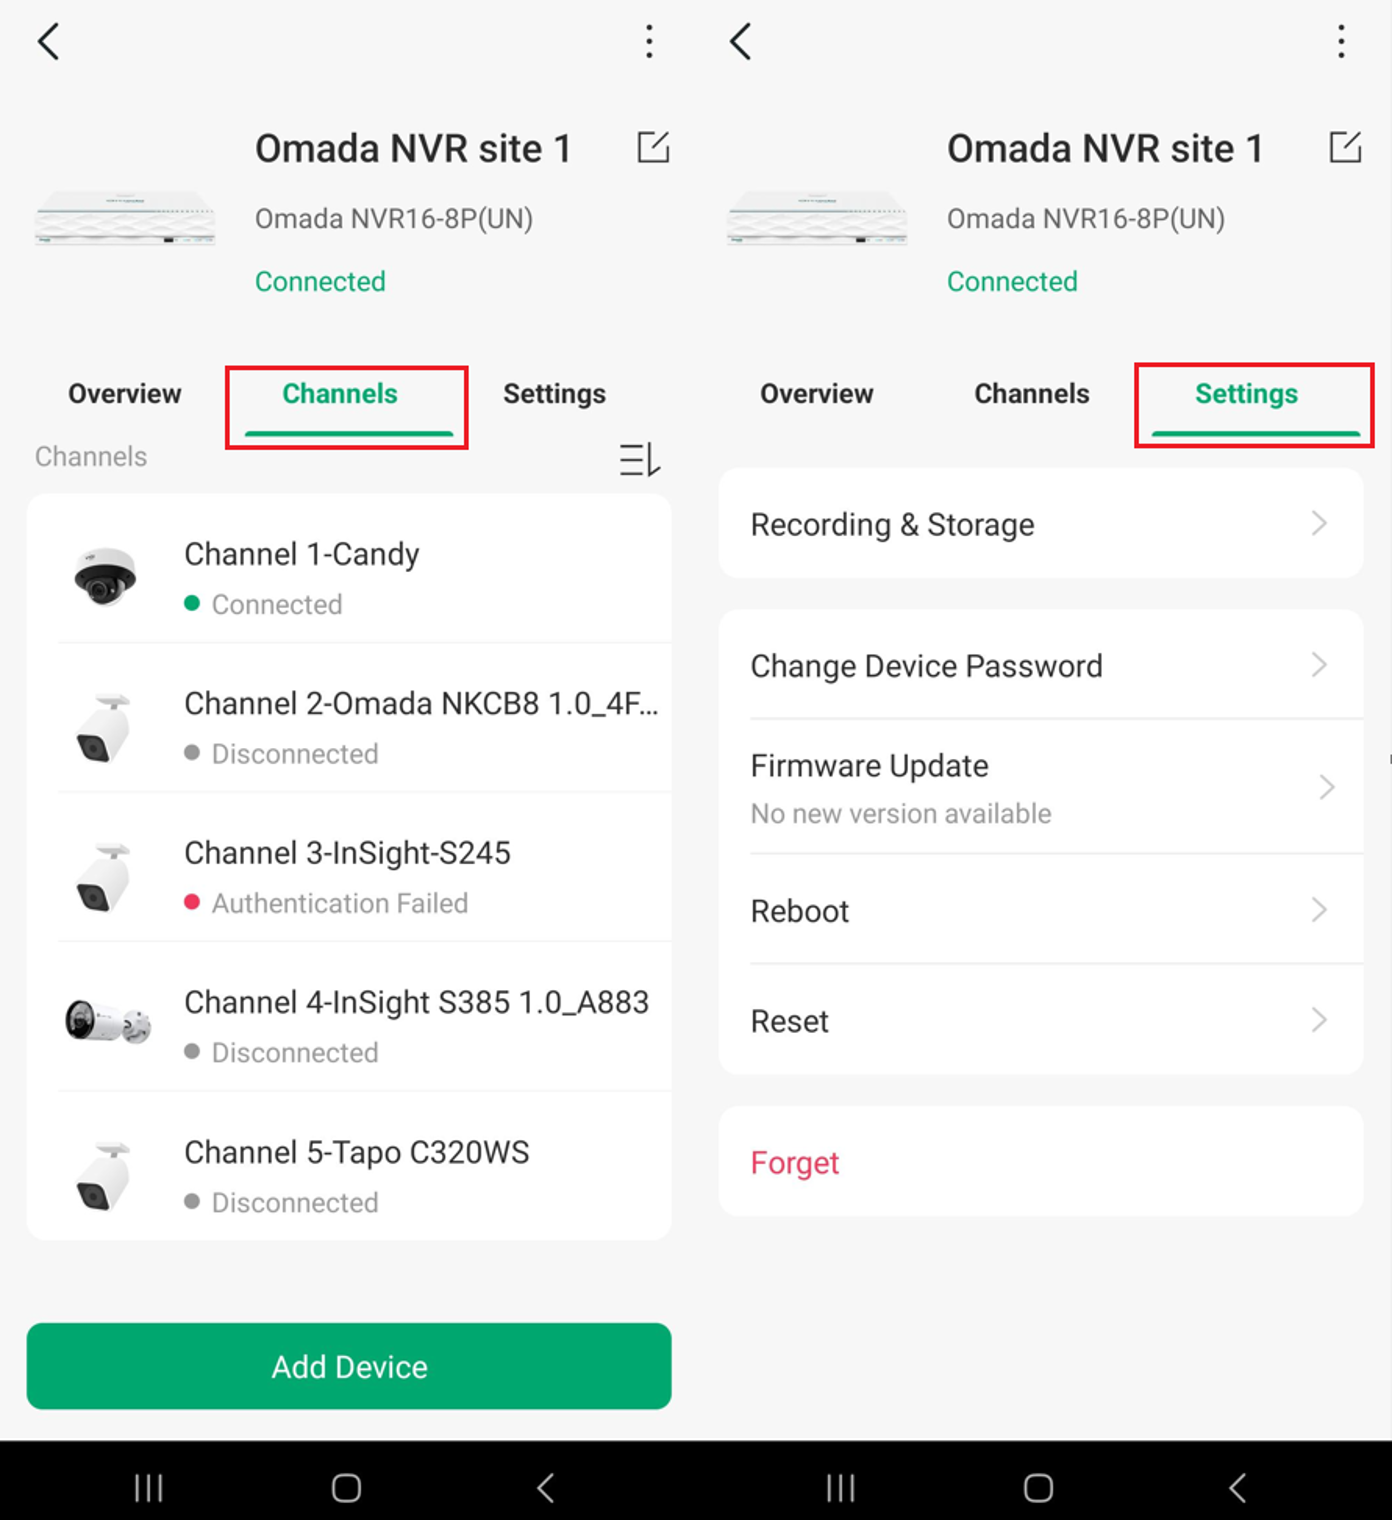
Further information about the NVR can be found within the Channels and Settings menus.
Conclusion
You have now learned how to discover, adopt, and manage compatible IP cameras and NVRs through a Fusion Pro Gateway using the Omada Guard App.
By ensuring device compatibility, network connectivity, valid administrator credentials, and sufficient device capacity, you can successfully add and manage your surveillance devices.
To learn more about each function and configuration, please visit Support Home to download or check the manual for your product.
QA
Q1: Why can't the Omada Guard App discover my IP camera?
A1: Ensure the camera is powered on, compatible with the Fusion Pro Gateway, and connected to the correct network. Verify that the camera is reachable by the gateway and that network isolation or VLAN restrictions are not preventing discovery.
Q2: What should I do if my camera does not appear in the device list?
A2: Navigate to the Devices tab and tap the + icon to search for available devices. If the camera is not found, tap Rescan. Verify the camera's network connectivity and check for VLAN or firewall restrictions.
Q3: Why am I being asked for a device password during adoption?
A3: The camera may have been configured previously and requires its existing administrator credentials. Enter the correct username and password to complete adoption.
Q4: What should I do if a camera is already managed by another account or system?
A4: Verify whether the camera is still managed by another account or system. Remove its existing management association if necessary, then attempt adoption again. If prompted, enter the camera's administrator credentials. A factory reset may be required if the credentials are unavailable.
Q5: Why does a device fail to adopt even though it has been discovered?
A5: Verify that the device is compatible with the Fusion Pro Gateway and running supported firmware. Check its network connectivity and administrator credentials. If the device is already managed by another system, resolve the existing management association before attempting adoption again.
Q6: Can I manage cameras connected through an NVR using the Omada Guard App?
A6: Yes. When a compatible NVR is managed through the Fusion Pro Gateway, its connected cameras can be displayed in the Devices tab. Expand the NVR entry to view the cameras and access the available management options.
Q7: Why can't I add more cameras to my NVR even though channels are available?
A7: The NVR may have reached its supported bandwidth or processing capacity. Higher camera resolutions, frame rates, and bitrates consume additional resources. Check the NVR's channel usage and supported capacity.
Q8: Where can I check the number of available NVR channels?
A8: Select the NVR from the Devices page and open the Overview tab. Scroll down to the Channel field to view the number of channels currently in use and the maximum supported.
Q9: How can I update the firmware of an adopted camera?
A9: Select the camera from the Devices page and navigate to Settings > Firmware Update. Check for available updates and follow the instructions to upgrade the firmware.
Q10: How can I remove a camera from the Omada Guard App?
A10: Select the camera from the Devices page and navigate to Settings > Forget. Follow the confirmation prompts to remove the device from management.
