


Contents
Configuration for Controller Management
Configuration for Standalone Management
Objective
This article describes configuring the Installation Type for Outdoor AP under Controller and Standalone management.
Requirements
-
Omada Outdoor AP
-
Omada Controller (Software Controller / Hardware Controller / CBC, v5.15.20 or above)
Introduction
When it comes to outdoor wireless products, there are significant differences among various countries and regions in terms of channel availability and transmission power limitations for Wi-Fi in the 5GHz and 6GHz frequency bands. For example, only the UNII-5 band (5925MHz-6425MHz) within the 6GHz range can be utilized in some regions, whereas in other countries and regions, using 6GHz outdoors is strictly prohibited.

Omada Outdoor Access Points feature an installation type that empowers customers to configure the products to operate indoors or outdoors manually. By doing so, these APs can, to the fullest extent possible, fulfill customers' diverse usage needs across multiple scenarios while adhering to the relevant laws and regulations in different regions, with the ultimate goal of ensuring an optimal wireless network experience. Please check the table below to learn the 5GHz and 6GHz limitations for indoor/outdoor modes for Omada Outdoor APs with different region codes and which region code APs support installation type. For APs that support the Installation Type feature, a total of three operating modes can be configured, Default/Indoor/Outdoor, respectively:
-
Default Mode: Indoor Mode for 5GHz, Outdoor Mode for 6GHz
-
Indoor Mode: There are no restrictions on the channel or transmit power of the device. Both 5GHz and 6GHz radios will work in Indoor mode.
-
Outdoor Mode: Limit the device's operating channel and transmit power according to local regulations. Both 5GHz and 6GHz radios will work in Outdoor mode.
|
Region Code |
Operating Mode |
5GHz |
6GHz |
Installation Type |
|
US |
Indoor |
UNII-1 to UNII-3 with standard power |
UNII-5 and UNII-7 with standard power (AFC is mandatory) |
No need to support |
|
Outdoor |
UNII-1 to UNII-3 with standard power |
UNII-5 and UNII-7 with standard power (AFC is mandatory) |
||
|
EU |
Indoor |
UNII-1 to UNII-2C with standard power |
UNII-5 with low-power |
Support |
|
Outdoor |
UNII-2C with standard power |
\ |
||
|
JP |
Indoor |
UNII-1 to UNII-2C with standard power |
UNII-5 with very low power |
Support |
|
Outdoor |
UNII-2C with standard power |
UNII-5 with very low power |
||
|
CA |
Indoor |
UNII-1 to UNII-3 with standard power (Some power limitations exist in UNII-2A, and 5600-5650MHZ is unavailable) |
UNII-5 and UNII-7 with standard power, UNII-6 with low power |
Support |
|
Outdoor |
UNII-2A to UNII-3 (Some power limitations exist in UNII-2A, and 5600-5650MHZ is unavailable) |
UNII-5 and UNII-7 with standard power, UNII-6 with low power (AFC is mandatory) |
||
|
TW |
Indoor |
UNII-1 to UNII-3 with standard power |
UNII-5 with low-power |
Support |
|
Outdoor |
UNII-1 to UNII-3 with standard power |
UNII-5 with very low power |
||
|
PH |
Indoor |
UNII-1 to UNII-3 with standard power |
UNII-5 with low-power |
Support |
|
Outdoor |
UNII-1 to UNII-3 with standard power |
UNII-5 with very low power |
Taking the EAP772-Outdoor, which is Omada's first tri-band Outdoor AP, as a case in point, this article will elaborate on how to configure the Installation Type under both Standalone management and Controller management as well as the related precautions.
Configuration
Configuration for Controller Management
Step 1. Log in to Omada Controller and go to the Site’s Devices page. After the target EAP772-Outdoor has been adopted successfully, click it to open its property window. Then, go to Config > Radios and select the desired installation type (Default/Indoor/Outdoor).

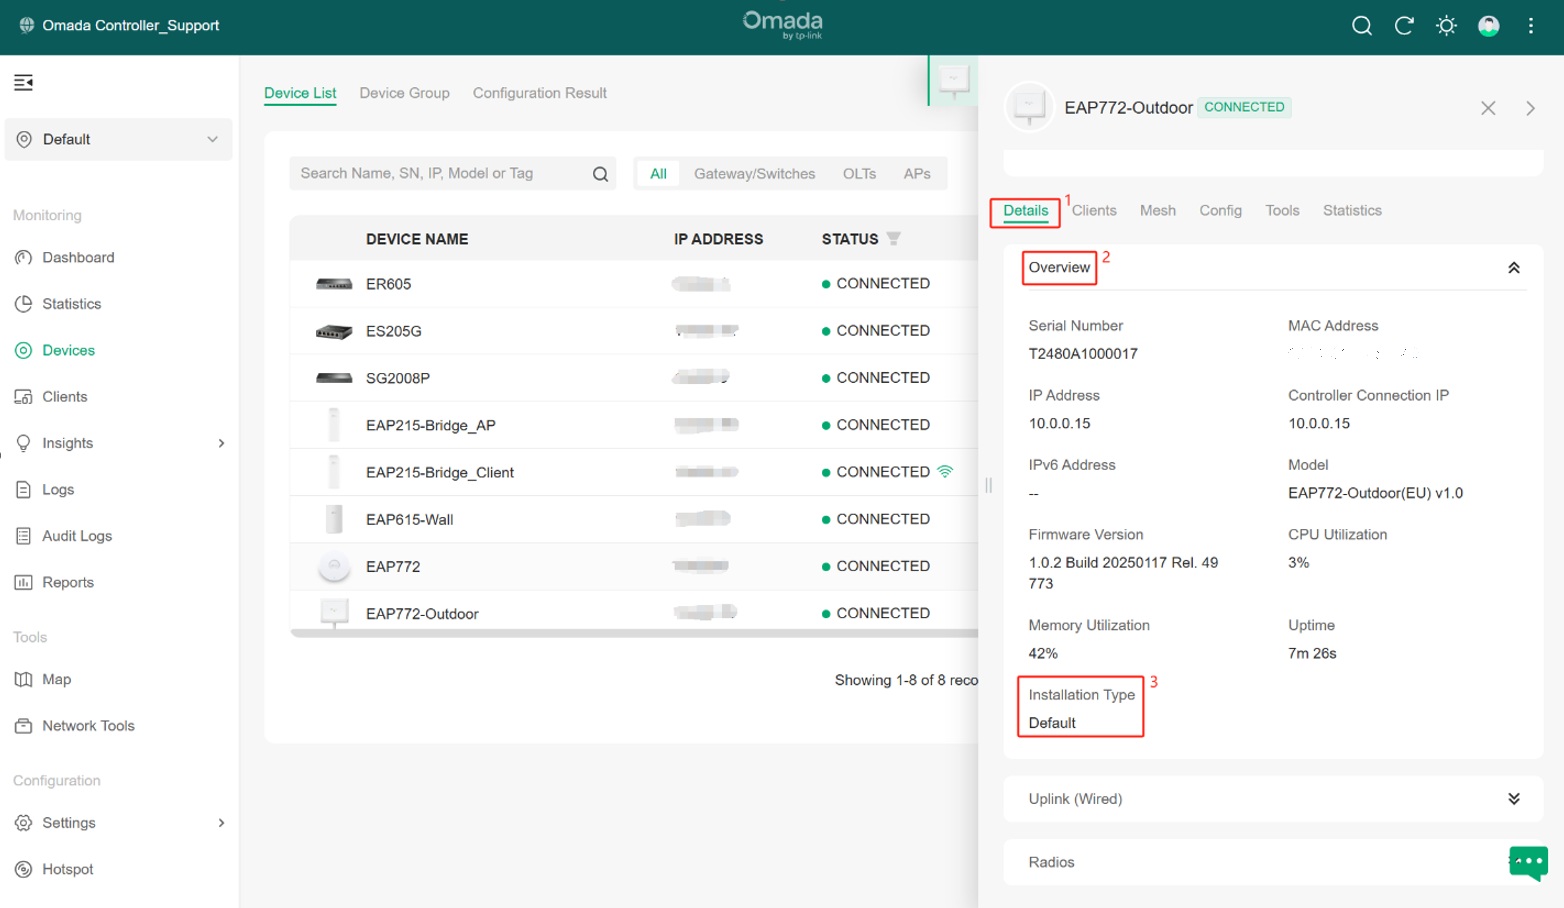
Step 2. Go to Details > Overview on its property window, and we can see that the Installation type has been set successfully according to your configuration.
Configuration for Standalone Management
Step 1. Open your PC or mobile phone browser and access the AP’s GUI by entering its IP address. Then go to Wireless > Wireless Settings > General Setting to select the desired Installation Type (Default/Indoor/Outdoor).

Step 2. Go to Status > Device, and we can see that the Installation type has been set successfully according to your configuration.

Conclusion
The above is the entire Introduction and configuration of the Installation Type function; please configure it according to your actual needs.
FAQ
1. What’s the difference between Channel Limit and Installation Type?
Re.
-
Installation Type is developed based on the Channel Limit feature and replaces the latter with the Controller v5.15.20.
-
Channel limit is a site-level configuration, and when the “Channel Limit” is turned on, all outdoor APs on the site will take effect. However, the Installation Type is a device-level configuration; you can configure different working modes for different devices on the same site, which makes the deployment more flexible.
-
Channel Limit is only effective for 5GHz, while Installation Type can be configured for 5GHz and 6GHz.
Get to know more details of each function and configuration please go to Download Center to download the manual of your product.
