In a few cases, your Omada Gateway may become bricked during the firmware upgrade. The most common cause is an unpredictable power failure. This article will guide you to enter the emergency mode to recover the firmware.
1.Prepare the firmware.
Download the latest firmware for your Omada Gateway from TP-Link official website, unzip it to get the .bin file.
For ER605: https://www.tp-link.com/en/support/download/er605/#Firmware
For ER7206: https://www.tp-link.com/en/support/download/er7206/#Firmware
2.Connect your computer to the Omada Gateway
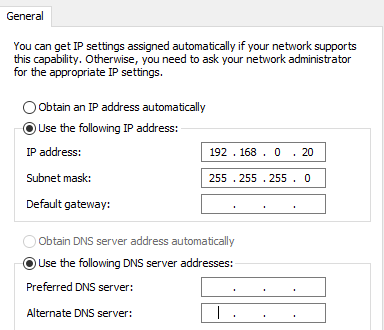
Go to Control Panel –> Network and Internet –> Network and Sharing Center –> Change adapter settings, right-click your Ethernet adapter go to Properties –> Internet Protocol Version 4 (for a detailed guide, please refer to How to configure wired TCP/IP Properties of my computer?), and set the IP address/subnet mask as 192.168.0.20/255.255.255.0, as shown below.

3.Force Omada Gateway into Emergency Mode.
Unplug the power cable of the Omada Gateway and connect your computer wired to the LAN port of the Omada Gateway with an Ethernet cable.
Press and hold the RESET button, then plug in the power cable, after that all the LEDs will flash, then wait until the LEDs of the connected ports to light up, now you can release the RESET button.
4.Open a Browser to upload the firmware.
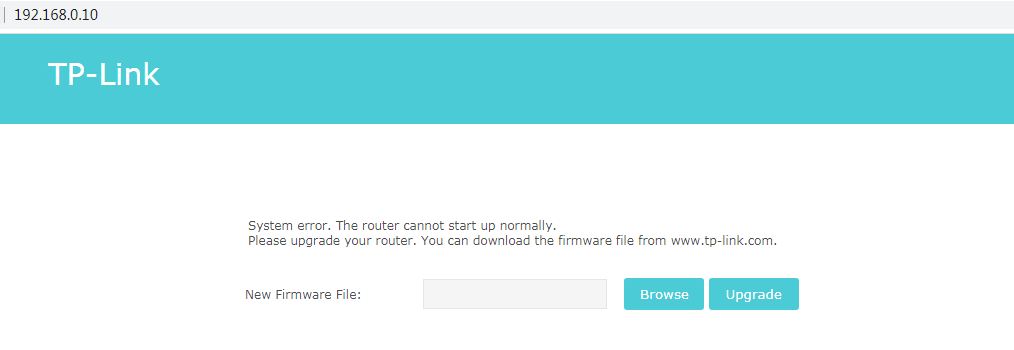
Open a browser and input 192.168.0.10 to the address bar, you will enter the following page. Click “Browse” to select the firmware (.bin file), then click “Upgrade”. After upgrading, the router will reboot and work normally.

Related Articles:
How to setup your SafeStream router in standalone mode?
How to establish a PPTP Server by Omada Gateway in Standalone mode?
How to establish an L2TP Server by Omada Gateway in Standalone mode?
How to use firmware recovery on the Pharos products


