


Contents
Configure abnormal incident thresholds and severity levels on the Controller
Configure incident notifications
Understand incident categories and coverage
Analyze incident root causes and maintenance suggestions
Introduction
In Controller v6.3, Intelligent Incident Detection is expanded beyond Omada Pro Controller, bringing advanced network diagnostics to a wider range of deployments. The Incidents page has also been redesigned with updated event categories and types, while user experience and anomaly detection accuracy have been further improved. Refer to the Tutorial for details on the new structure and functionality.
The system continuously monitors network behavior to detect issues such as client connection failures, DHCP server conflicts, and AP high noise floor conditions. Each incident provides event details, impact analysis, root cause analysis, and maintenance recommendations, helping administrators quickly identify and resolve network problems. Controller v6.3 also introduces a refined classification system with nine categories: Access, Authentication, Roaming, Wireless Environment, Wired Environment, Link, WAN & Services, Device Status, and Security.
Some aspects of this article follow the design of Pro Controller and can be used as a reference: How to configure abnormal on Omada Pro Controller
Requirements
- Omada Controller v6.3 and above (Software / Hardware / Cloud-Based)
- Omada Devices (Gateway, Switch, and EAP) with firmware versions that support Intelligent Incident Detection.
Configuration
Configure abnormal incident thresholds and severity levels on the Controller
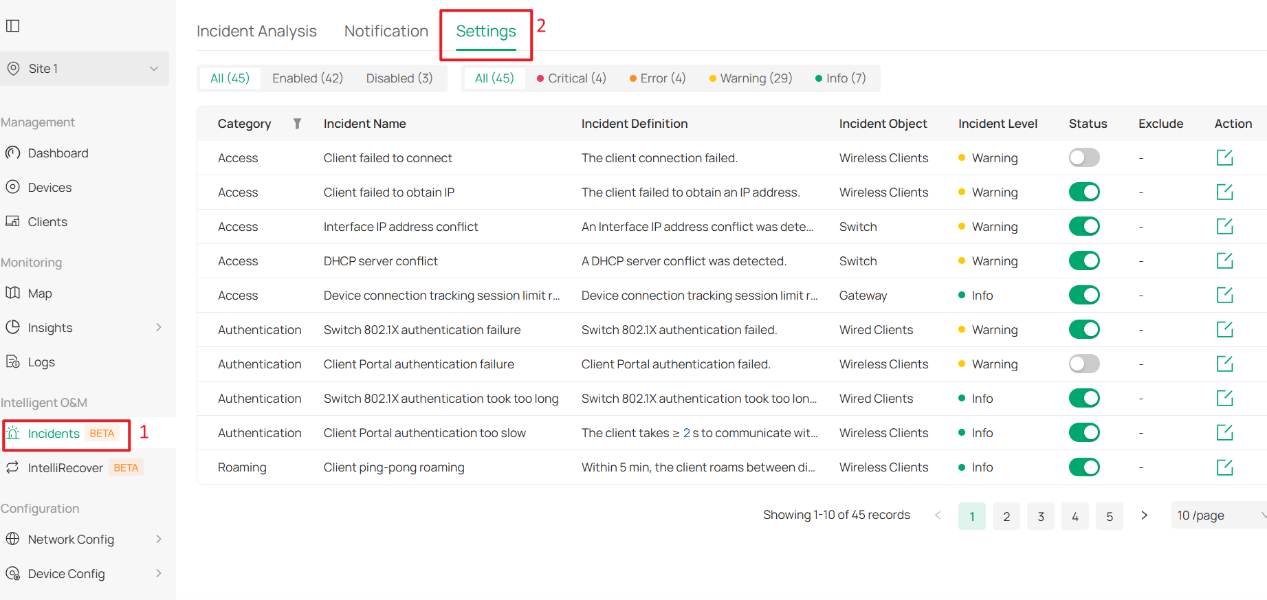
Step 1. Go to: Site View Incidents > Settings. Here you can find the Edit button in the Action column.
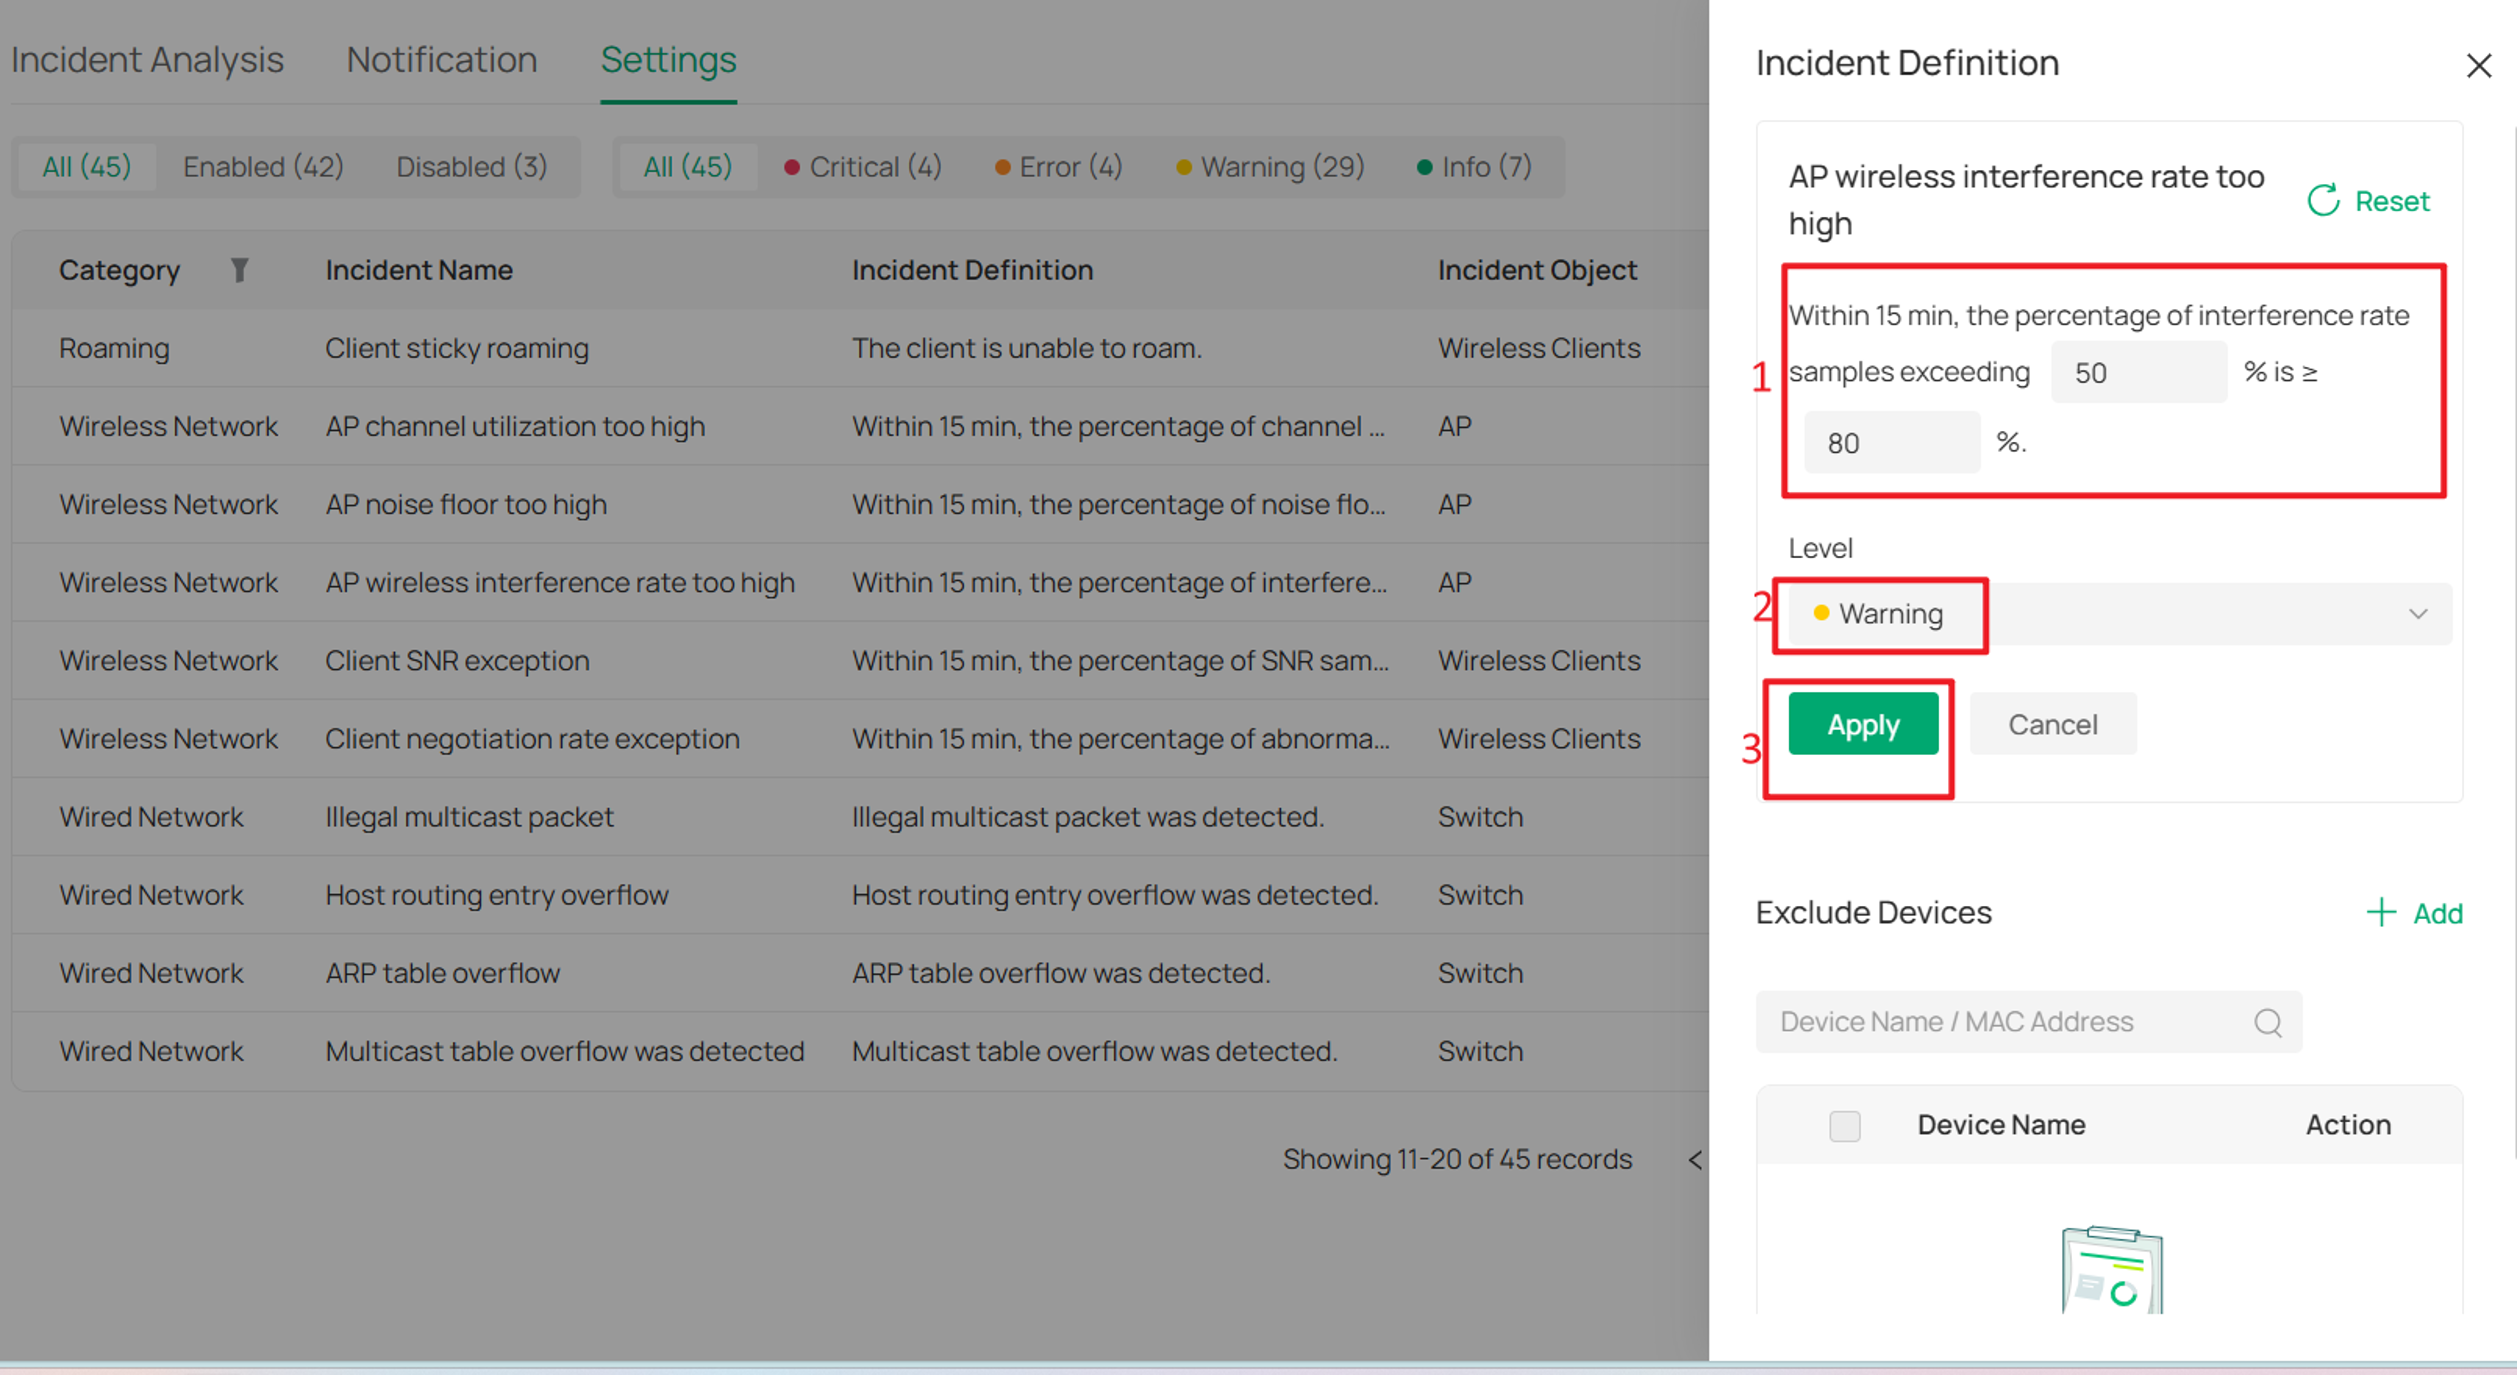
Step 2. Click the Edit button and the Incident Definition window will pop up. Specify the threshold in the Trigger Event field (if applicable) and select the Level for incident severity. Click Apply to save your configuration.
Exclude Devices / Exclude Clients
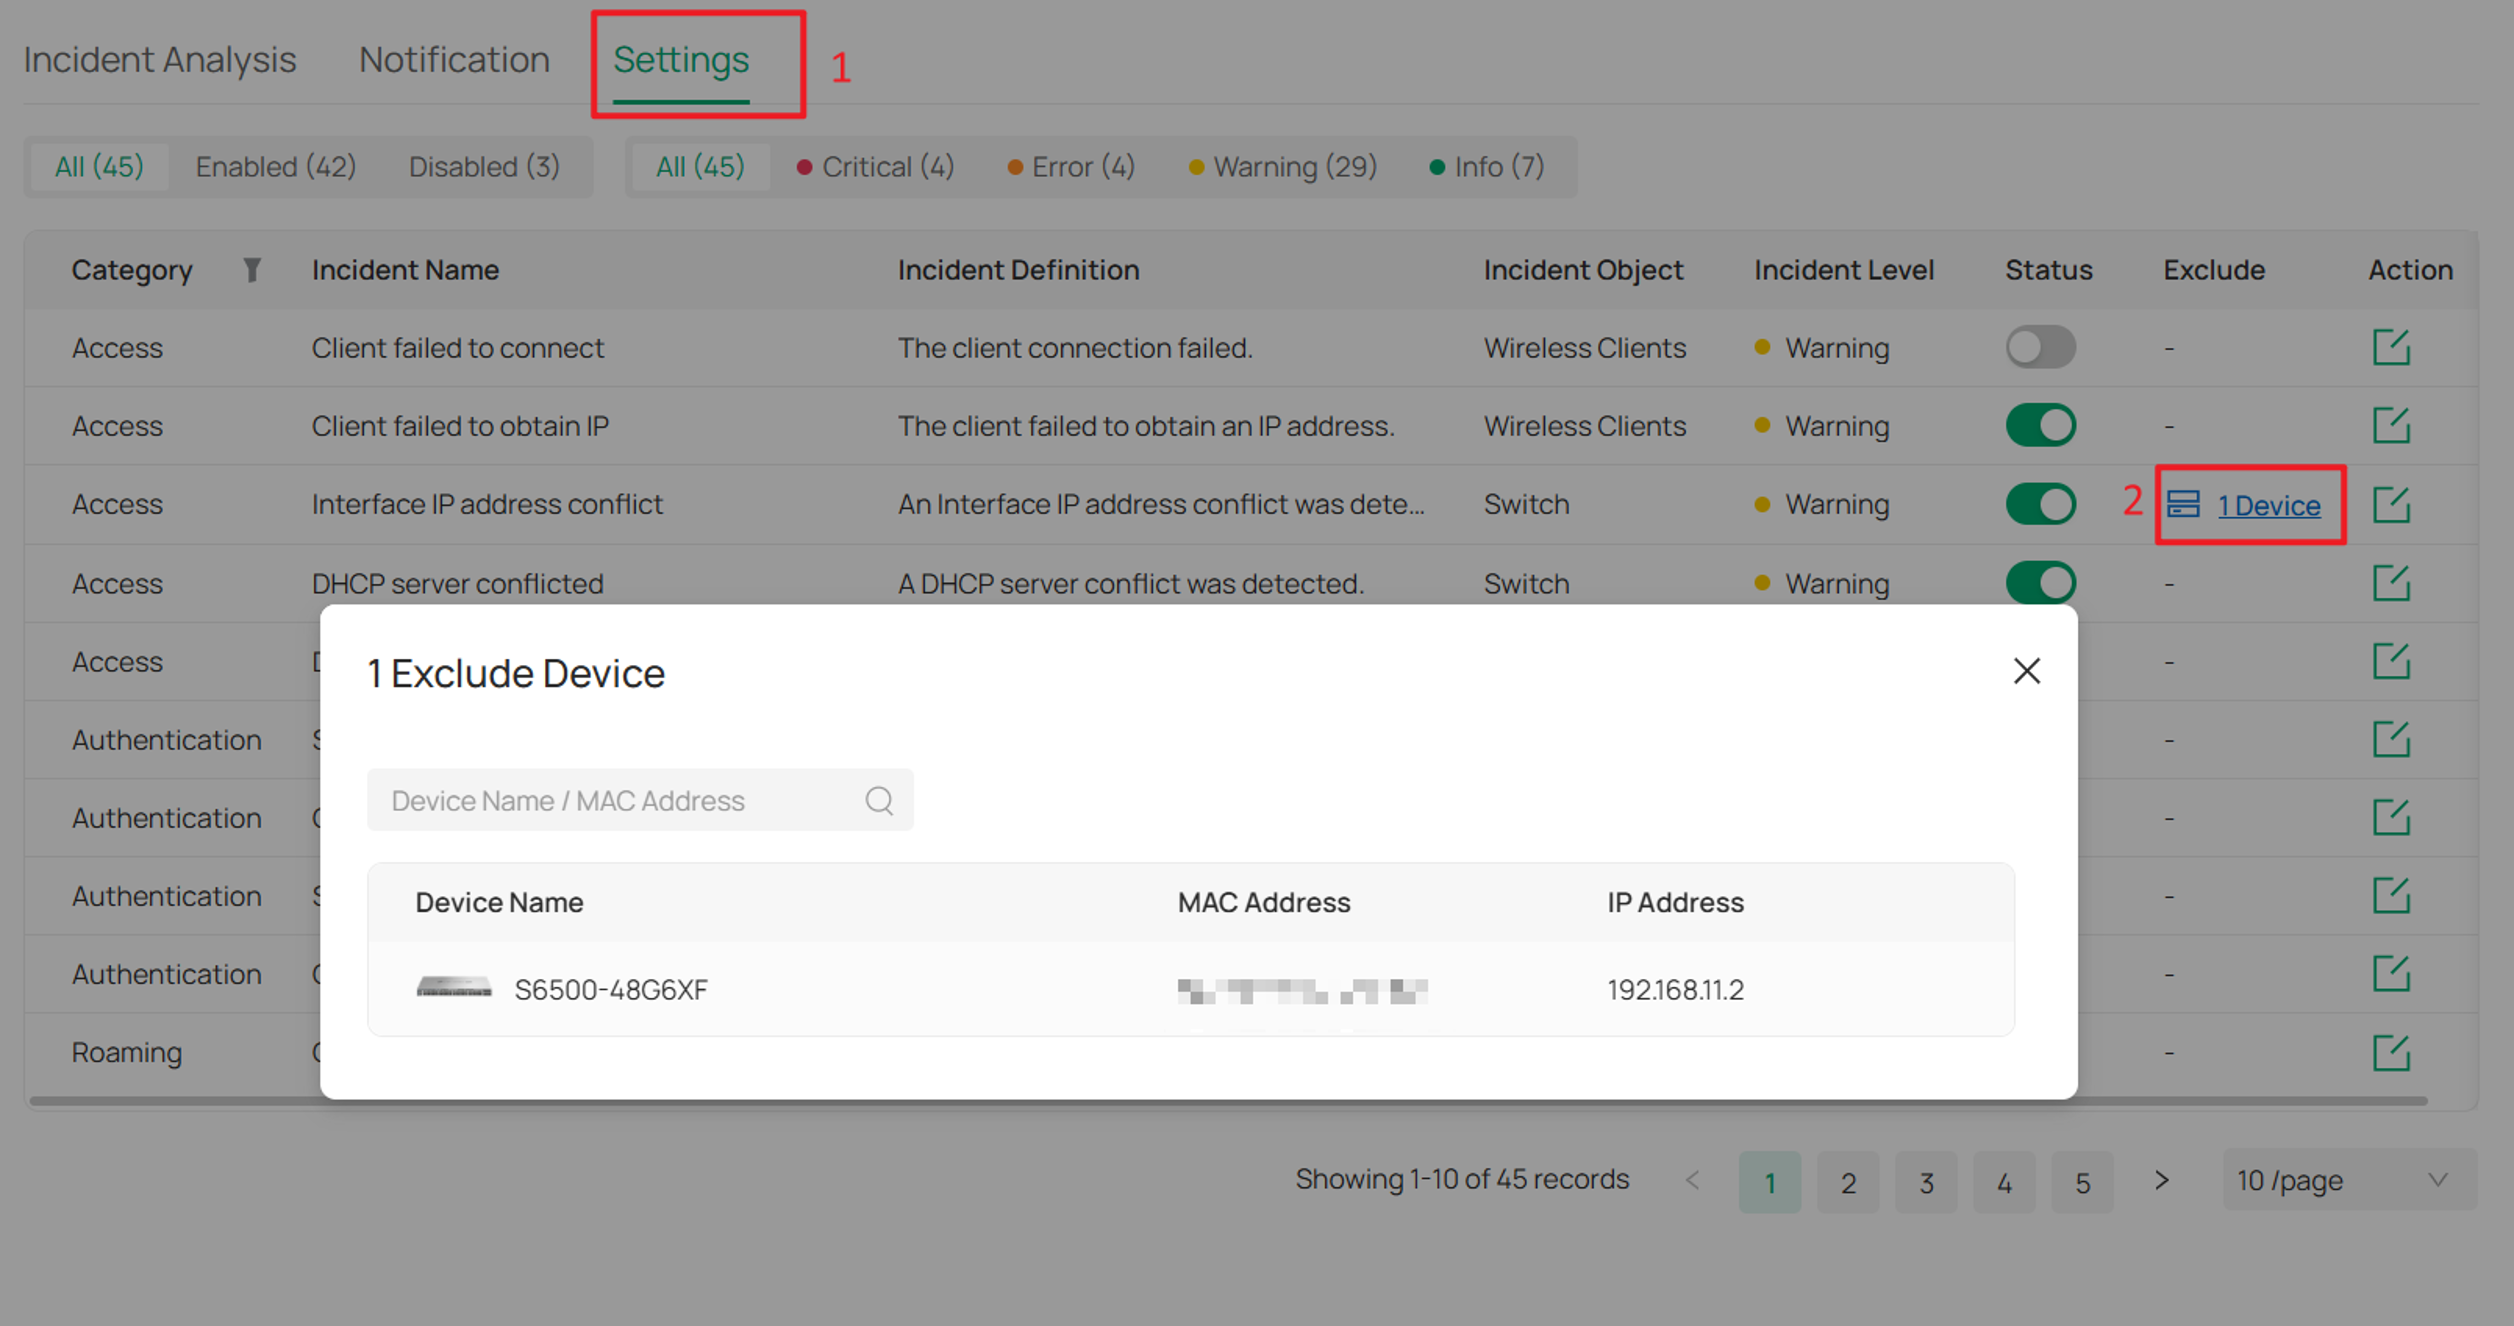
Click Add to add adopted devices or online clients to the exclusion list for the selected incident type. The Controller will skip incident detection for the devices or clients in the exclusion list and will no longer generate the corresponding type of incident for them.
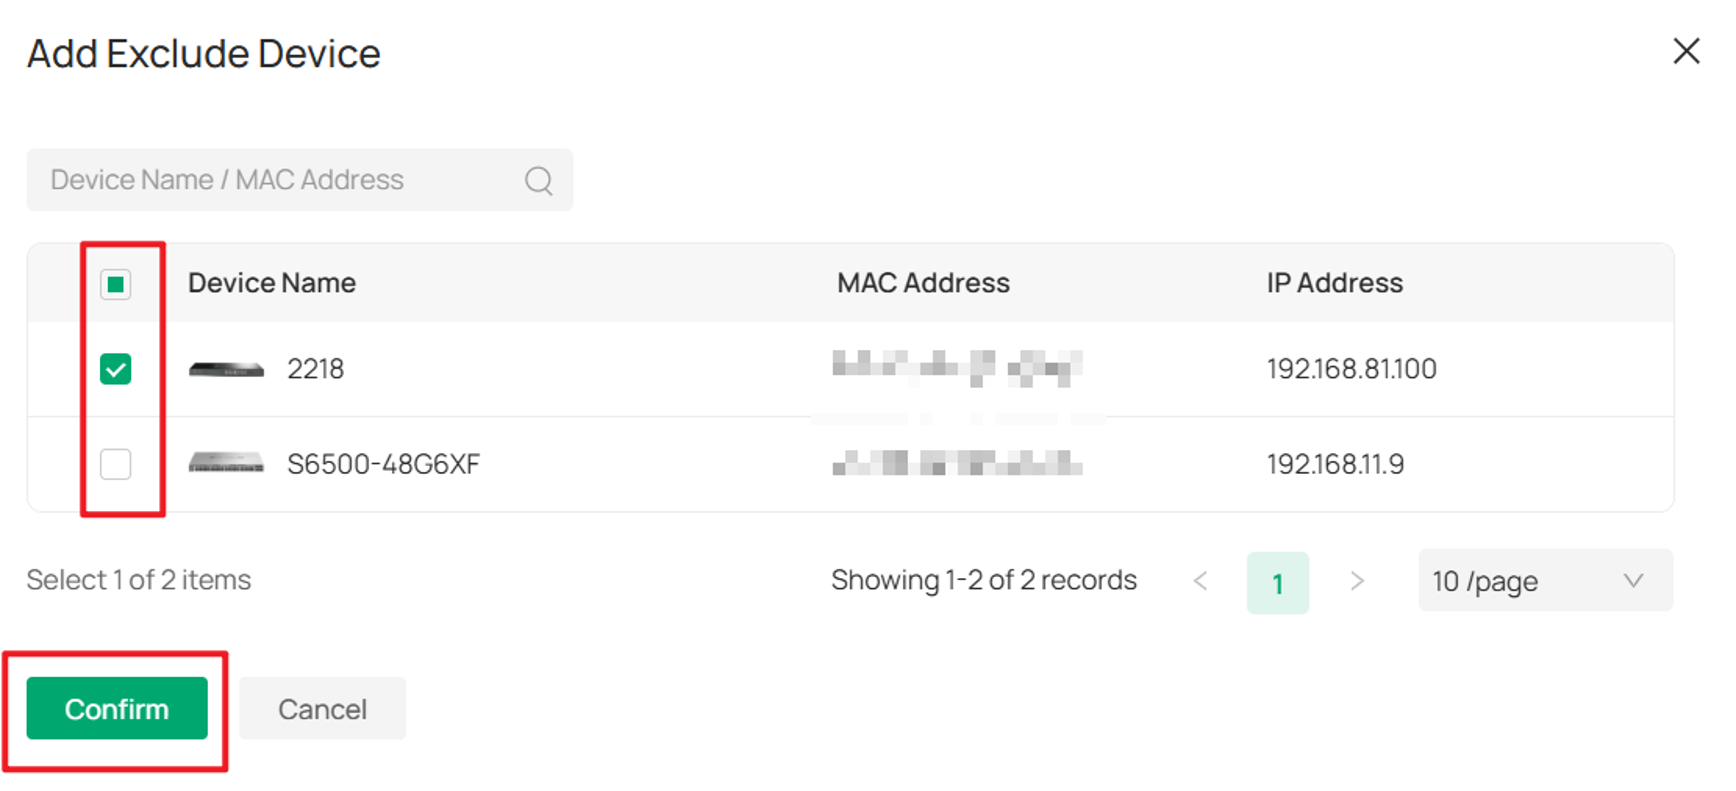
In addition, all existing incidents of the same type associated with the excluded device or client will be automatically marked as Ignored. Likewise, marking an incident as Ignored will automatically add the affected device or client to the corresponding exclusion list.
Configure incident notifications
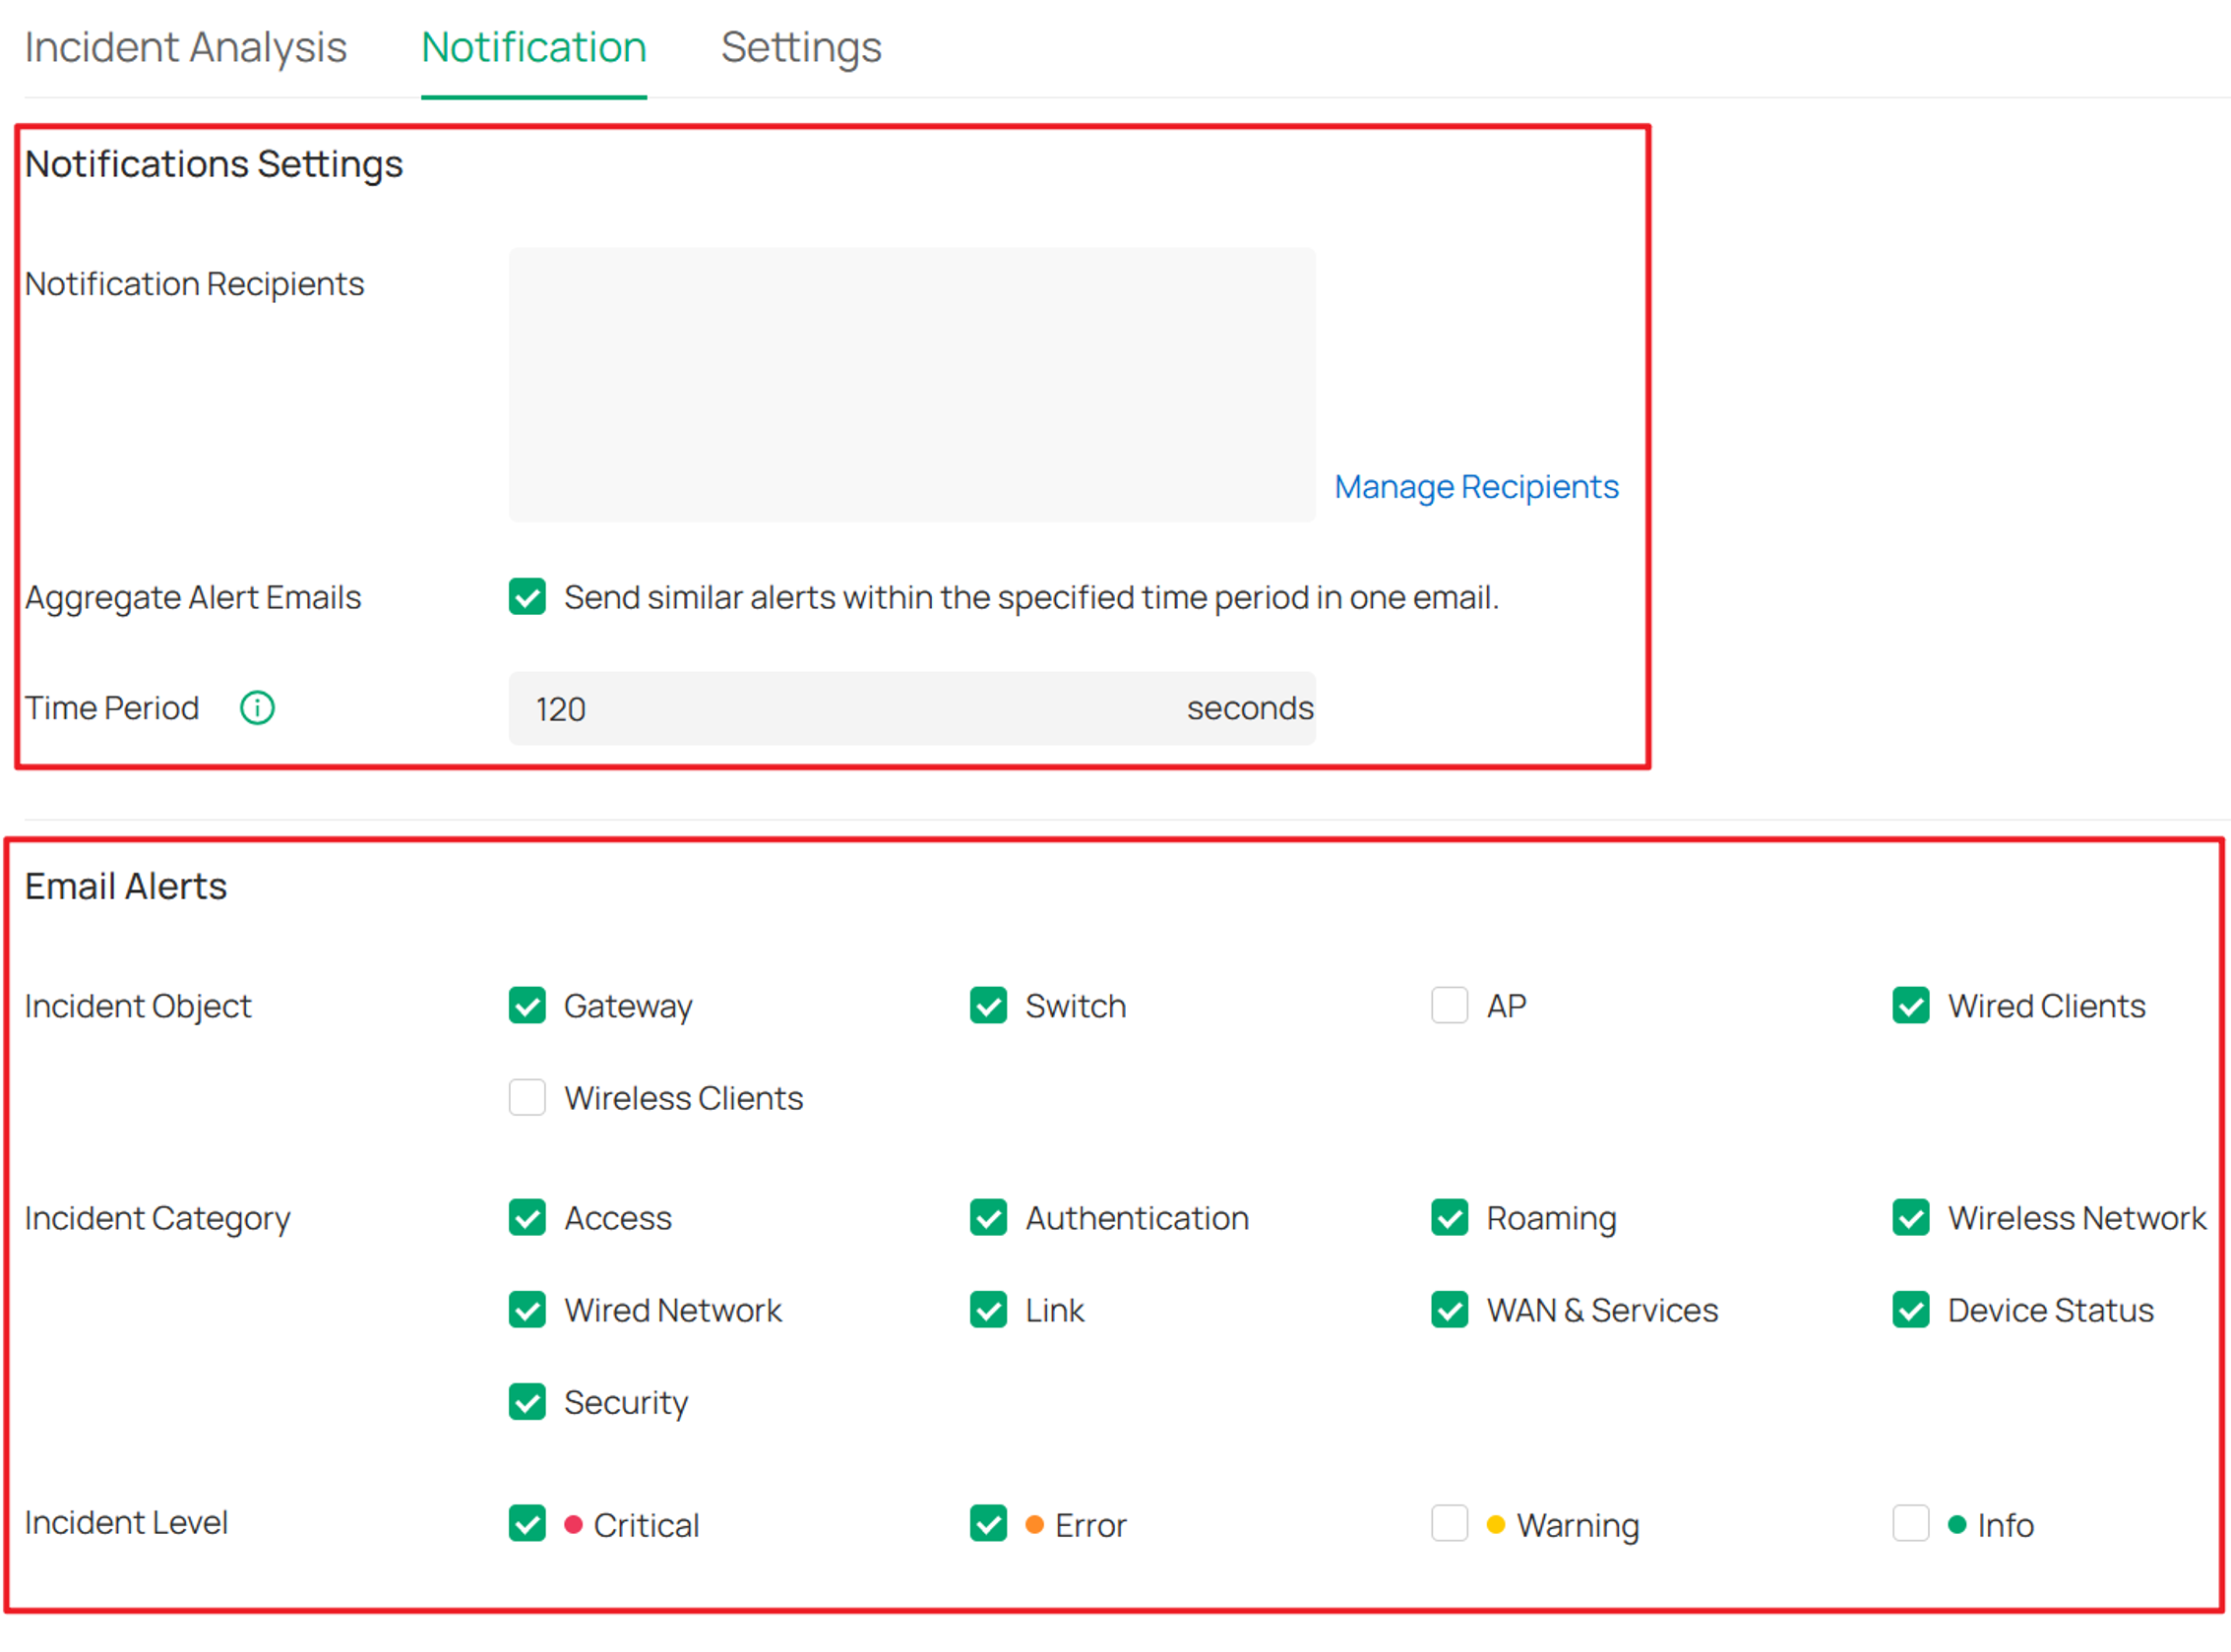
Step 1. Log in to the Controller via web browser and go to Site View Incidents > Notification.
Select which incidents trigger email notifications. You can filter notifications by Incident Object (Gateway, Switch, AP, Wired Clients, Wireless Clients), Incident Category (such as Access, Authentication, Roaming, Device Status, and Security), and Incident Level (Critical, Error, Warning, or Info). Only incidents matching the selected criteria will be included in notification emails.
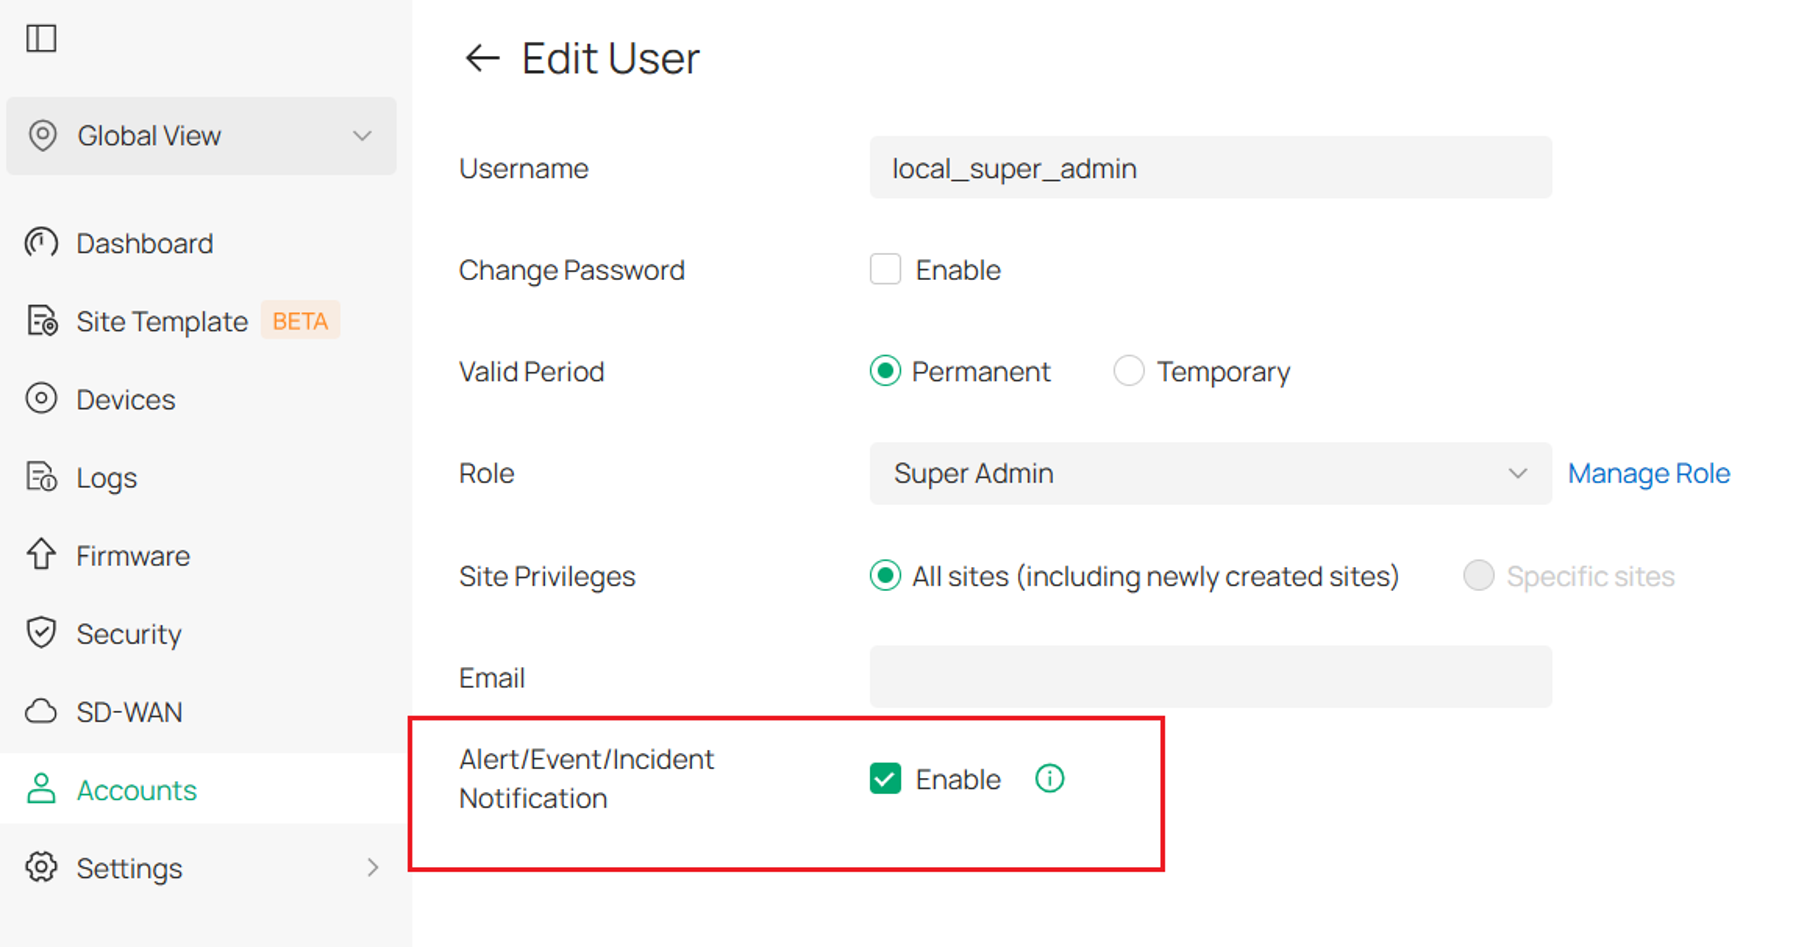
Step 2. Go to Global > Account > User > Alert/Event/Incident Notification and enable notifications for the required users.
This configuration applies only to Controller users. The recipients must be added to the Controller and have valid TP-Link ID email addresses. If you want to send notifications to other email addresses that are not configured as Controller users or do not have TP-Link ID accounts, configure an Email Server and specify the desired recipients there.
Understand incident categories and coverage
This section provides an overview of the types of issues covered under each incident category. It helps users quickly understand how Incidents detection in Controller v6.3 spans across APs, switches, gateways, and clients, and what kinds of problems are monitored within each category.
|
Category |
Coverage |
|
Access |
Covers client access and IP allocation issues, including DHCP server conflicts, interface IP conflicts, client connection failures, and failures in obtaining IP addresses, as well as device connection tracking session limit reached.. |
|
Authentication |
Covers authentication-related issues such as 802.1X authentication failures or delays, and Client Portal authentication failures or slow responses when interacting with devices or external services. |
|
Roaming |
Focuses on wireless client roaming experience, including frequent ping-pong roaming, sticky clients that cannot roam properly and so on. |
|
Wireless Network |
Monitors wireless radio conditions, including high channel utilization, high noise floor, high interference, low client SNR, and abnormal client negotiation rates. |
|
Wired Network |
Covers switching and forwarding issues such as illegal multicast packets, ARP/routing/multicast table overflows, high port utilization, traffic imbalance in LAG groups, packet loss, and storm control events. |
|
Link |
Focuses on link stability and Layer 2 connectivity issues, including loop detection, ports receiving error packets, ports frequently going up and down, LACP failures, and frequent MAC migrations. |
|
WAN & Services |
Covers WAN performance and service availability, including DDNS abnormalities, high bandwidth utilization high latency, and VPN connection failures. |
|
Device Status |
Reflects device health, including AP batch offline events, high CPU utilization (AP/gateway/switch), PoE power limit exceedance, and abnormal optical module parameters. |
|
Security |
Covers security-related risks, including unauthorized login attempts on gateways or switches and detection of attack packets on WAN or LAN ports. |
Analyze incident root causes and maintenance suggestions
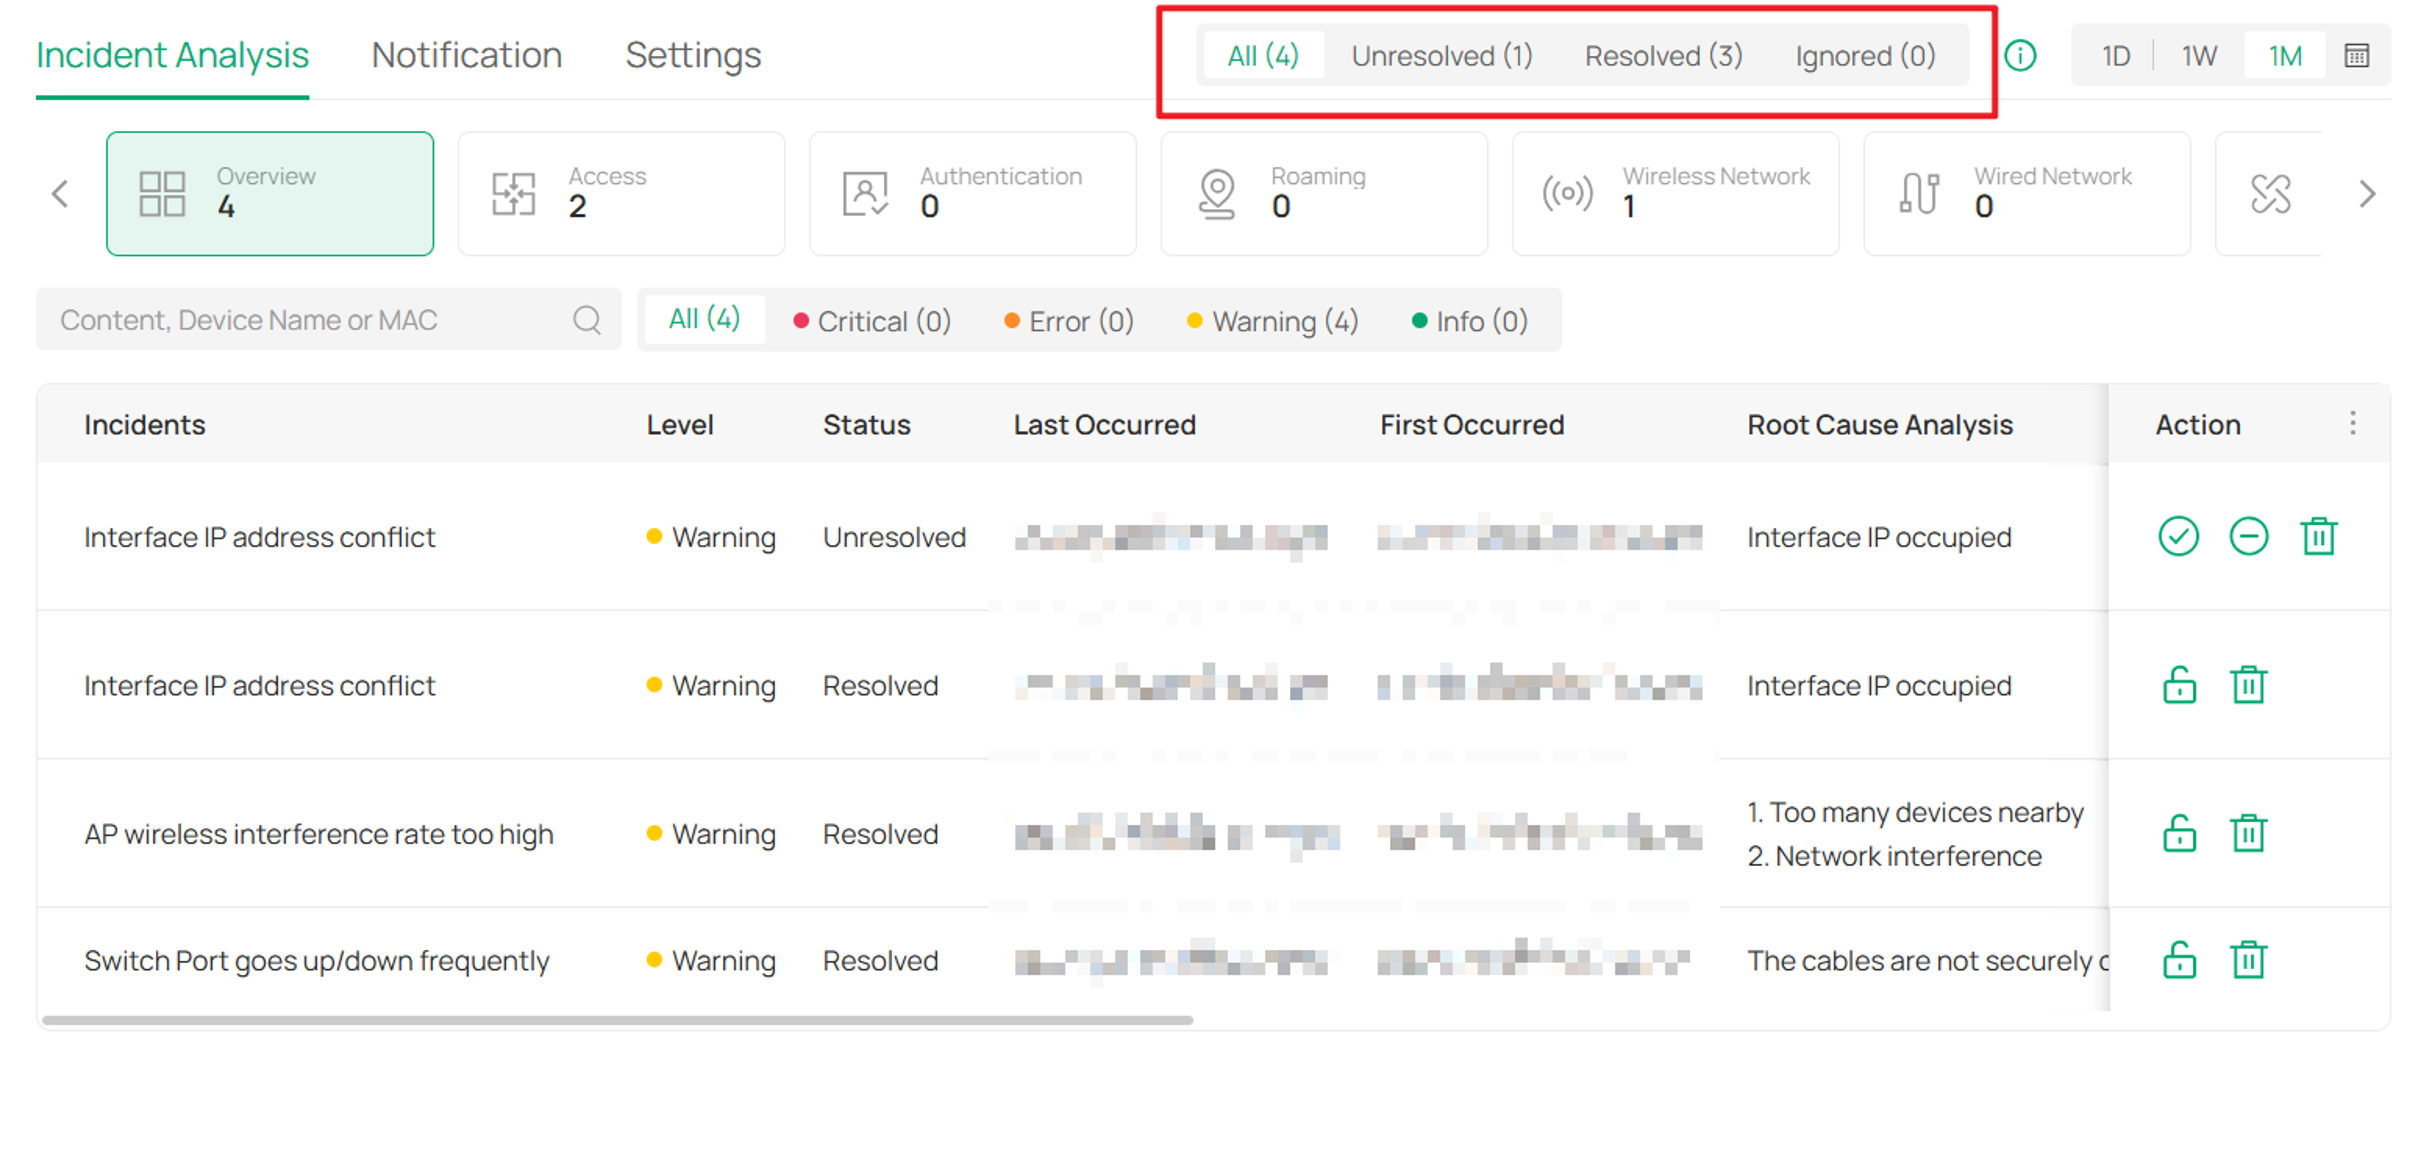
Step 1. Log in to the Controller via a web browser and go to Site View Settings > Incidents > Incident Analysis > Overview. This page lists all detected abnormal incidents, including incident details, affected device, first occurrence time, and severity level.
Note: V6.3 uses an incident aggregation counting mechanism, whereas Controller Pro uses event count–based statistics. In V6.3, repeated occurrences of the same event type on the same device are aggregated and counted as a single incident.
For example, if a device reports the "Loop Detected" event 100 times, the Unresolved count in Controller Pro would be 100. In V6.3, these repeated events are aggregated into a single incident, so the Unresolved count would be 1.
You can update the incident status to Solve or Ignore, delete records in the Action column, and search by content, device name, or MAC address.
Incidents can be filtered by severity level, category, and status.
Status definitions:
Incident Status Definitions
Because this article applies to Controller v6.3 and above, status behavior varies slightly between versions.
Controller v6.3
- Ongoing: The issue is currently active and being detected.
- Unresolved: The incident has occurred but has not yet been addressed.
- Resolved: The issue has stopped occurring or has been resolved.
- Ignored: The incident has been dismissed and requires no further action.
Controller v6.4 and Later
Starting from Controller v6.4, Ongoing is no longer displayed as a separate incident status. Instead, it becomes an incident attribute indicating that the issue is currently being detected.
The available statuses are:
- Unresolved: The incident has occurred and has not yet been resolved.
- Resolved: The issue is no longer occurring or has already been handled.
- Ignored: The incident has been excluded from further detection for the selected device or client.
Ignored Behavior (Controller v6.4 and Later)
Controller v6.4 enhances the behavior of the Ignored status.
When an incident is marked as Ignored:
- A confirmation dialog is displayed.
- The affected device or client is automatically added to the corresponding Exclude Devices or Exclude Clients list in the incident configuration.
- The same incident type is no longer generated for that device or client unless the exclusion entry is removed.
Likewise, adding a device or client to the exclusion list automatically marks corresponding incidents as Ignored.
Adding a device to the exclusion list prevents the selected incident type from being generated on that device and automatically marks all corresponding incidents as Ignored.
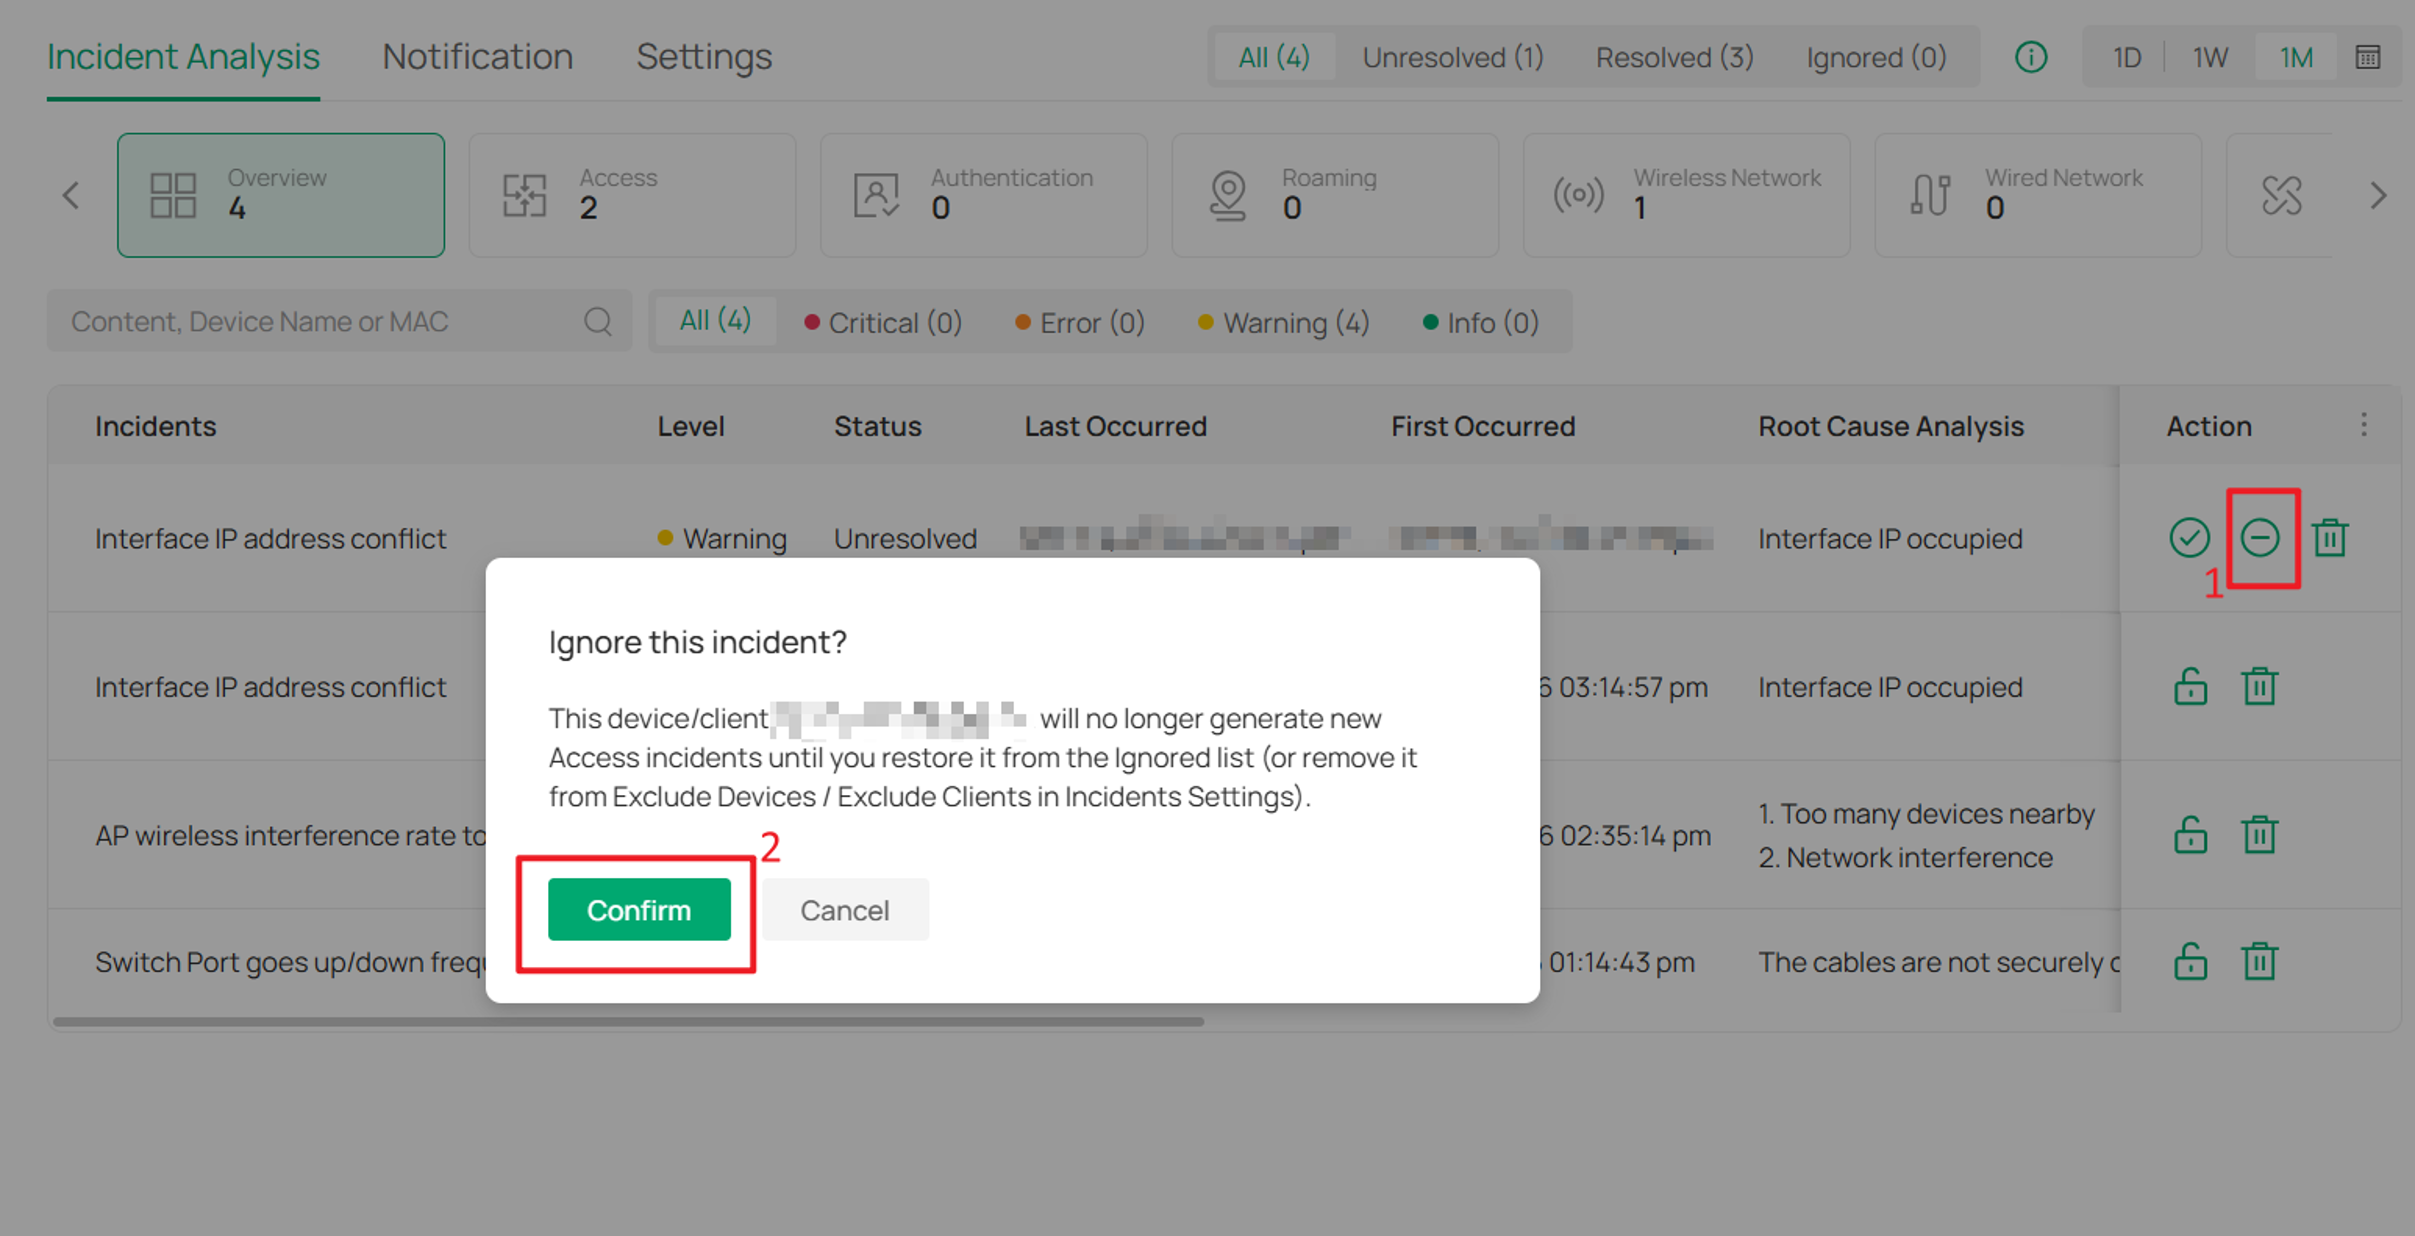
Mark an incident as Ignored to automatically add the affected device or client to the exclusion list for that incident type.
Resolution Method and Resolution Time
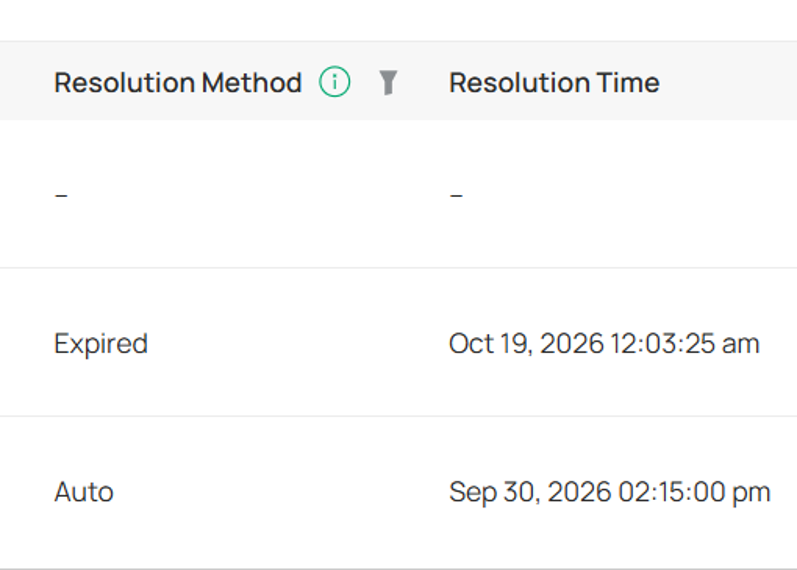
Resolution Method: Indicates how the incident was marked as Resolved.
• Auto: The Controller automatically marks the incident as Resolved after detecting that the abnormal condition no longer exists.
• Manual: The incident was manually marked as Resolved by an administrator.
• Expired: More than 7 days have passed since the incident occurred. The incident is considered expired and is automatically marked as Resolved.
Resolution Time: Indicates the time when the incident status changed to Resolved.
Step 2. View Incident Details
Select an incident entry to open the Incident Detail panel.
Incident Detail
Displays:
- Incident category
- Incident content
- Start time
- Severity level
- Current status
Incident Analysis
Displays:
- Event timeline
- Diagnostic details
- Possible causes
- Related analysis data
Incident status can be modified individually or in batches from this page.
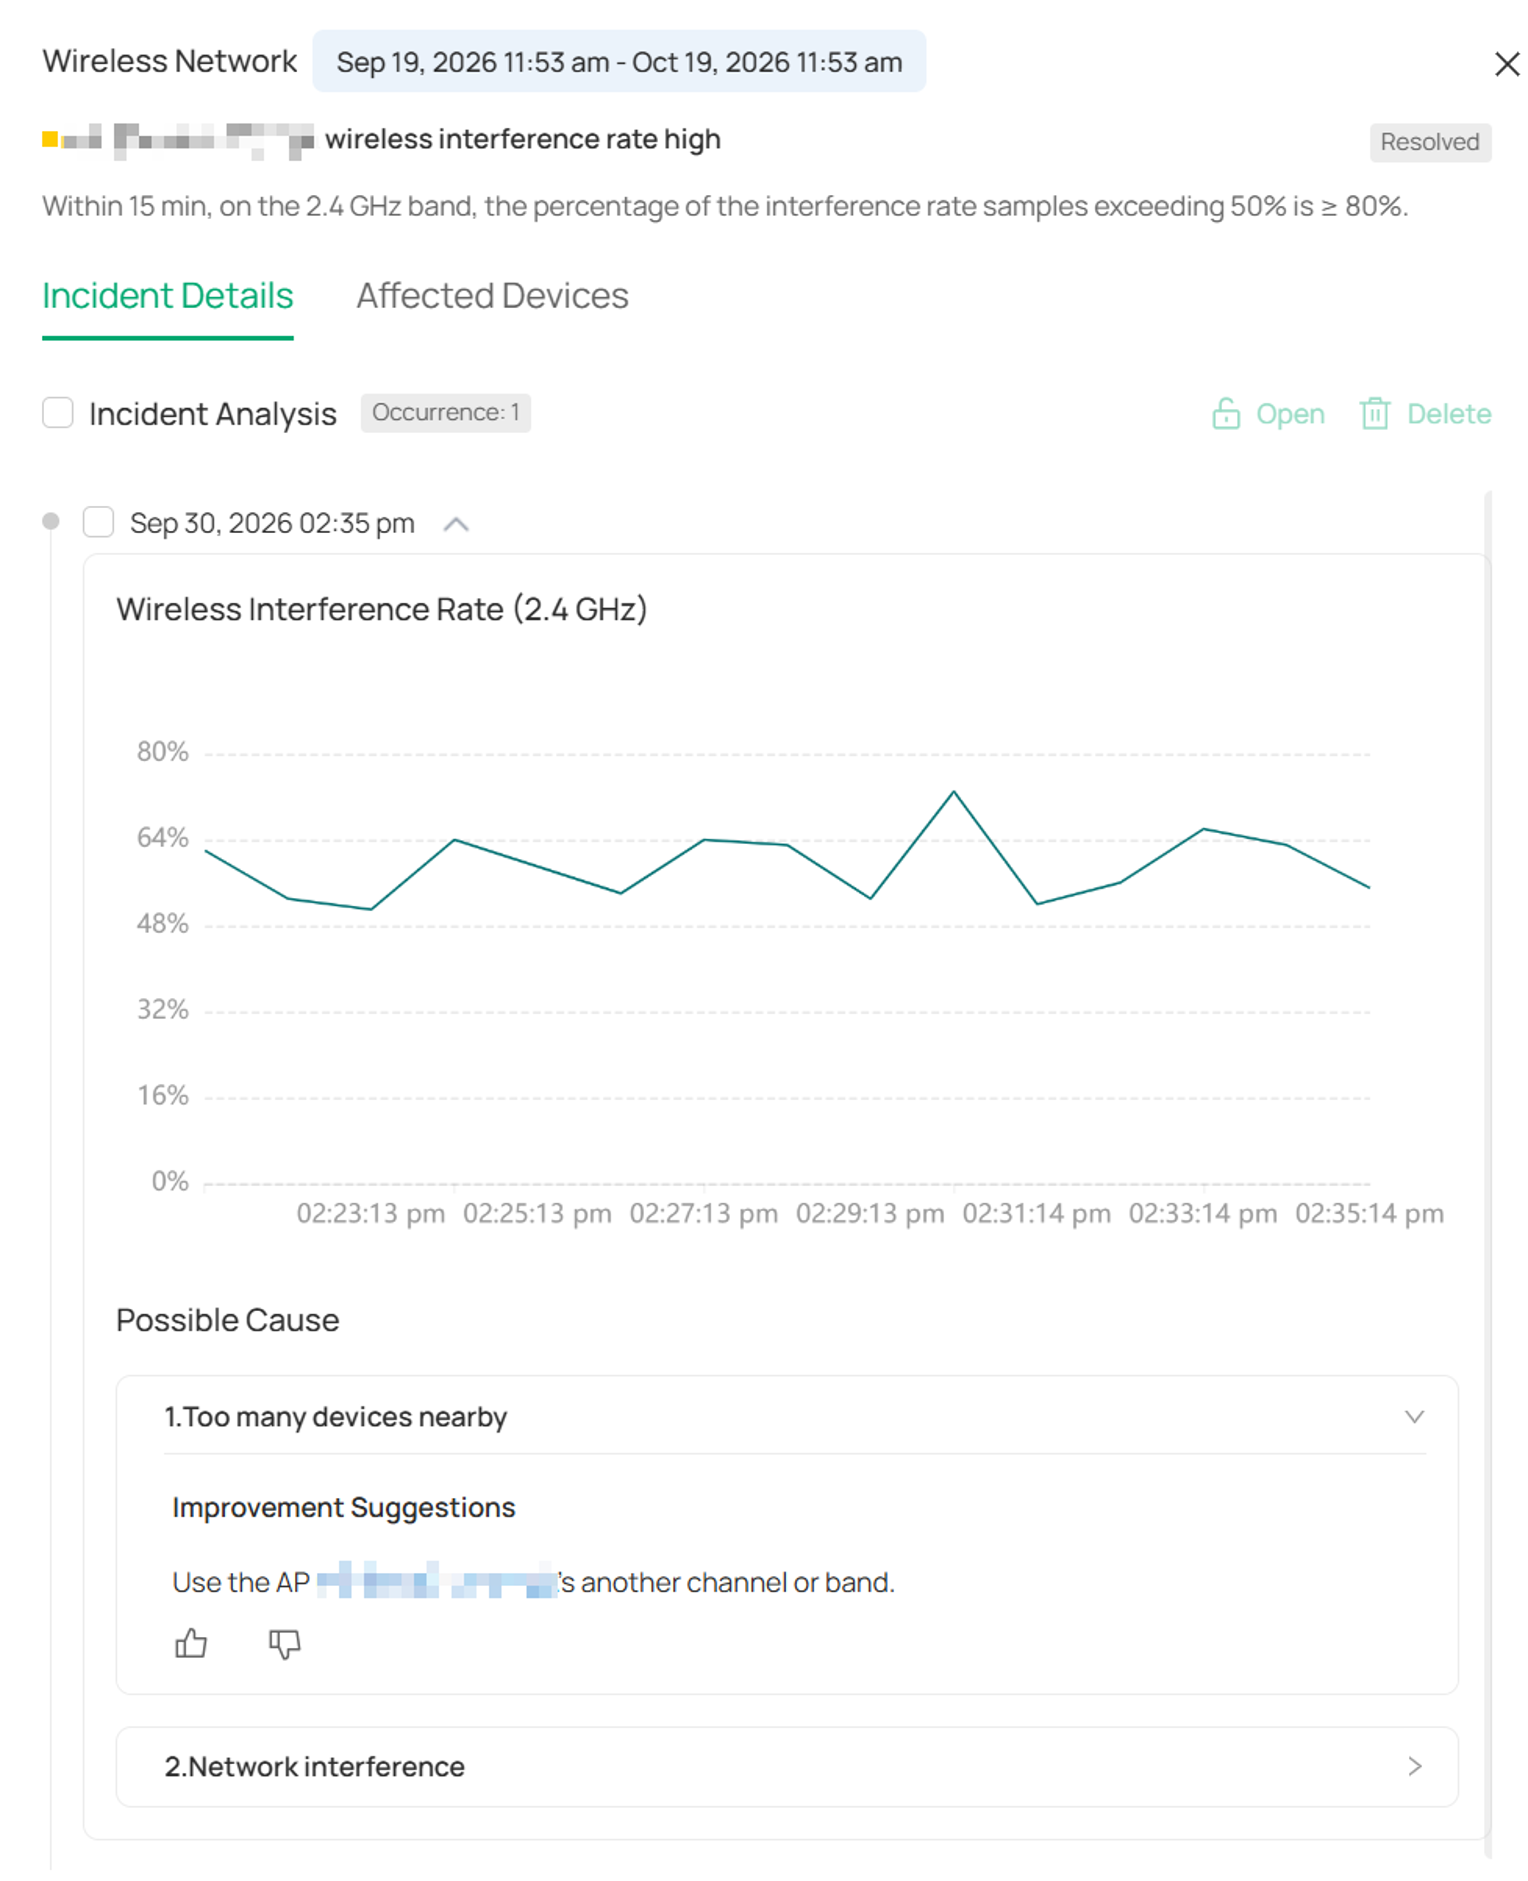
Incident Visualization Formats
Depending on the incident type, analysis information may be presented in several formats:
- Curves: CPU, memory, RSSI, and other performance metrics.
- Timeline: Device online/offline status and port UP/DOWN events.
- List: Top clients, protocol distribution, and other detailed records.
- Protocol Replay: Authentication process replay for authentication-related incidents.
- PoE Status: Per-port and total PoE power consumption information.
For incidents that are currently being detected, the detail page displays incident duration and the latest reporting data.
Version Note
- In Controller v6.3, actively occurring incidents may be displayed with the Ongoing status.
- In Controller v6.4 and later, actively occurring incidents are displayed as Unresolved incidents with ongoing detection information.
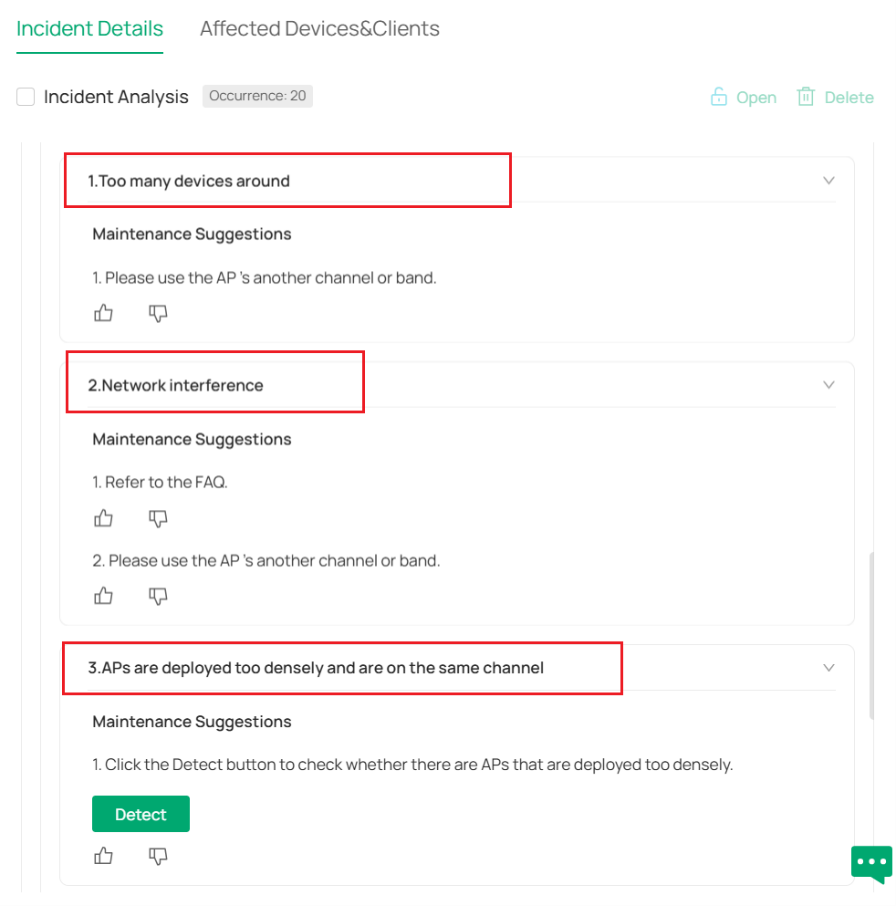
Step 3. View Root Cause Analysis and Maintenance Suggestions
Expand Incident Analysis to display additional information, including:
- Incident description
- Possible causes
- Root cause analysis
- Recommended maintenance actions
Click the expand icon to view detailed maintenance suggestions.
Depending on the incident type, root cause analysis information may be displayed in different formats.
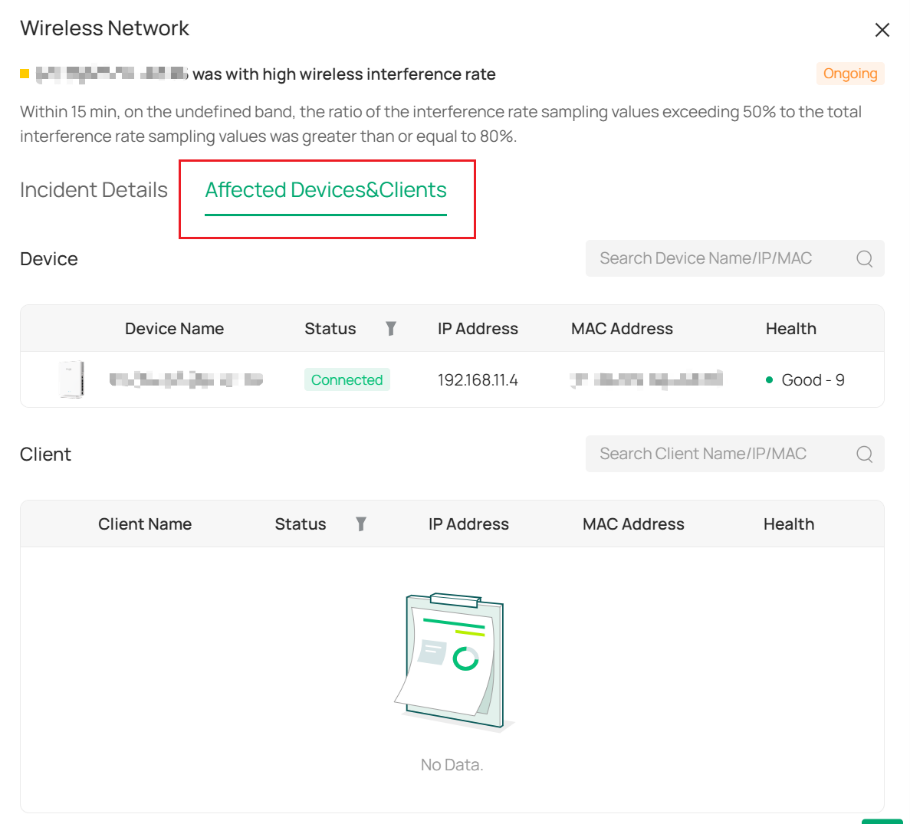
Step 4. View Affected Devices and Clients
Navigate to the Affected Devices & Clients tab.
This page displays all devices and clients affected by the selected incident.
Device entries can be selected to access detailed configuration and diagnostic pages for further troubleshooting.
Conclusion
By completing the steps above, you can successfully configure and use the Intelligent Incident Detection feature on Omada Controller v6.3 and above to monitor, analyze, and troubleshoot network issues.
To learn more about each function and configuration, please visit Support Home to download or check the manual for your product.
QA
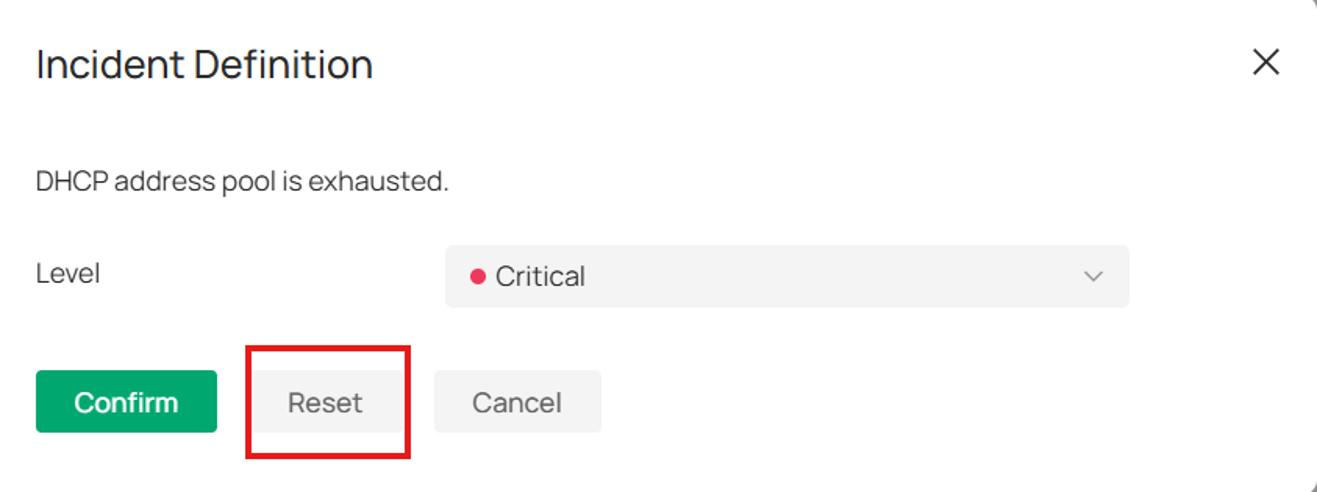
Q1: How can I restore the default configuration after customizing the settings?
A1: You can click the Reset button to restore the default configuration. Remember to click Confirm to save the configuration.
Q2: Why do I receive alert emails before the specified time period?
A2: When the number of incidents reaches 100, alert emails will be sent immediately even before the time period you set.
Q3: Why can’t I see certain types of anomalies?
A3: This may be due to disabled detection switches, unsupported device models, incompatible firmware versions, or no anomalies occurring within the selected time range.
