


Contents
Configuration via Omada App (Standalone Mode)
Configuration via Standalone Web UI
Configuration via Omada App - Tool Kit (for Controller-Managed Devices)
Introduction
EAP-Bridge devices use directional antennas to establish a point-to-point wireless bridge between a Main AP and a Client AP. Because these devices are often installed over long distances, improper antenna alignment can result in weak signal strength, reduced throughput, or an unstable wireless connection. Since visual alignment alone may not provide the best results, EAP-Bridge includes an Antenna Alignment feature that uses real-time RSSI values to help you fine-tune antenna positioning for optimal wireless performance.
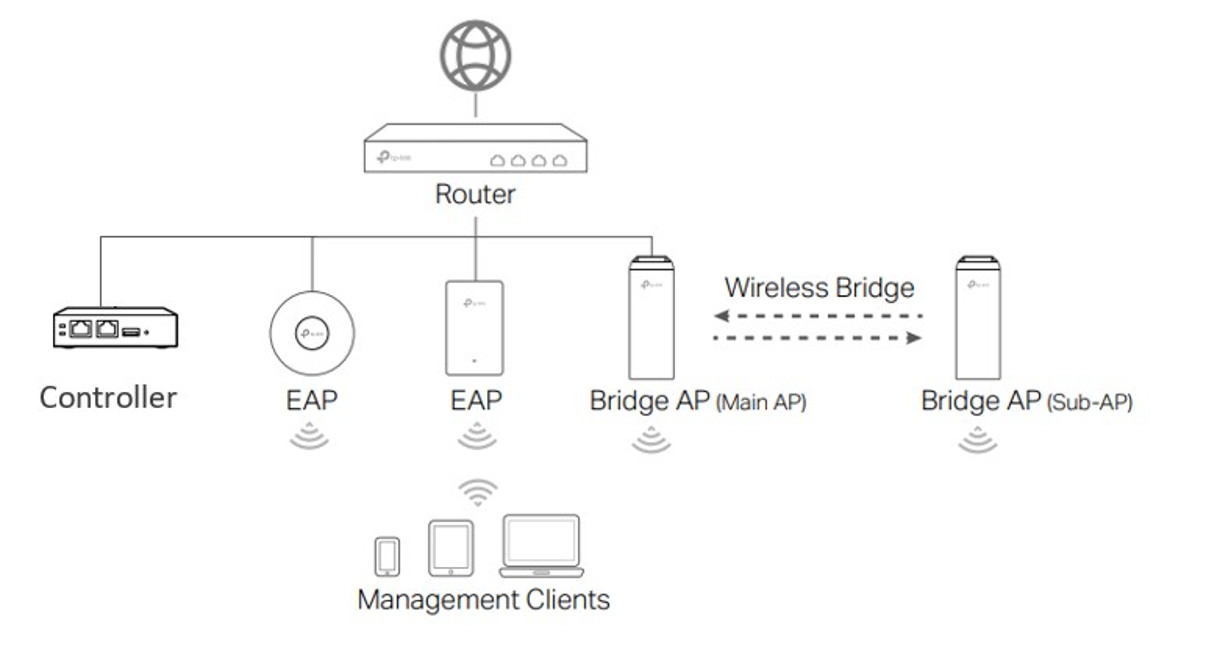
As shown in the typical topology below, the router is connected to the Internet through its WAN port and provides DHCP services on the LAN. An EAP-Bridge kit (consisting of a Main AP and a Client AP) is powered on with factory default settings. The Main AP and the PC running the Omada Controller are connected to the router via Ethernet and obtain IP addresses from the same subnet.
Requirements
- Omada wireless bridge APs
- Omada APP v5 and above
- Omada Controller (hardware/software/cloud-based controller)
Configuration
Configuration via Omada App (Standalone Mode)
Step 1. Pair the EAP Bridge kit according to the instructions, How to Pair and Configure EAP Bridges. Access EAP Bridge’s management interface via the Omada APP standalone mode.
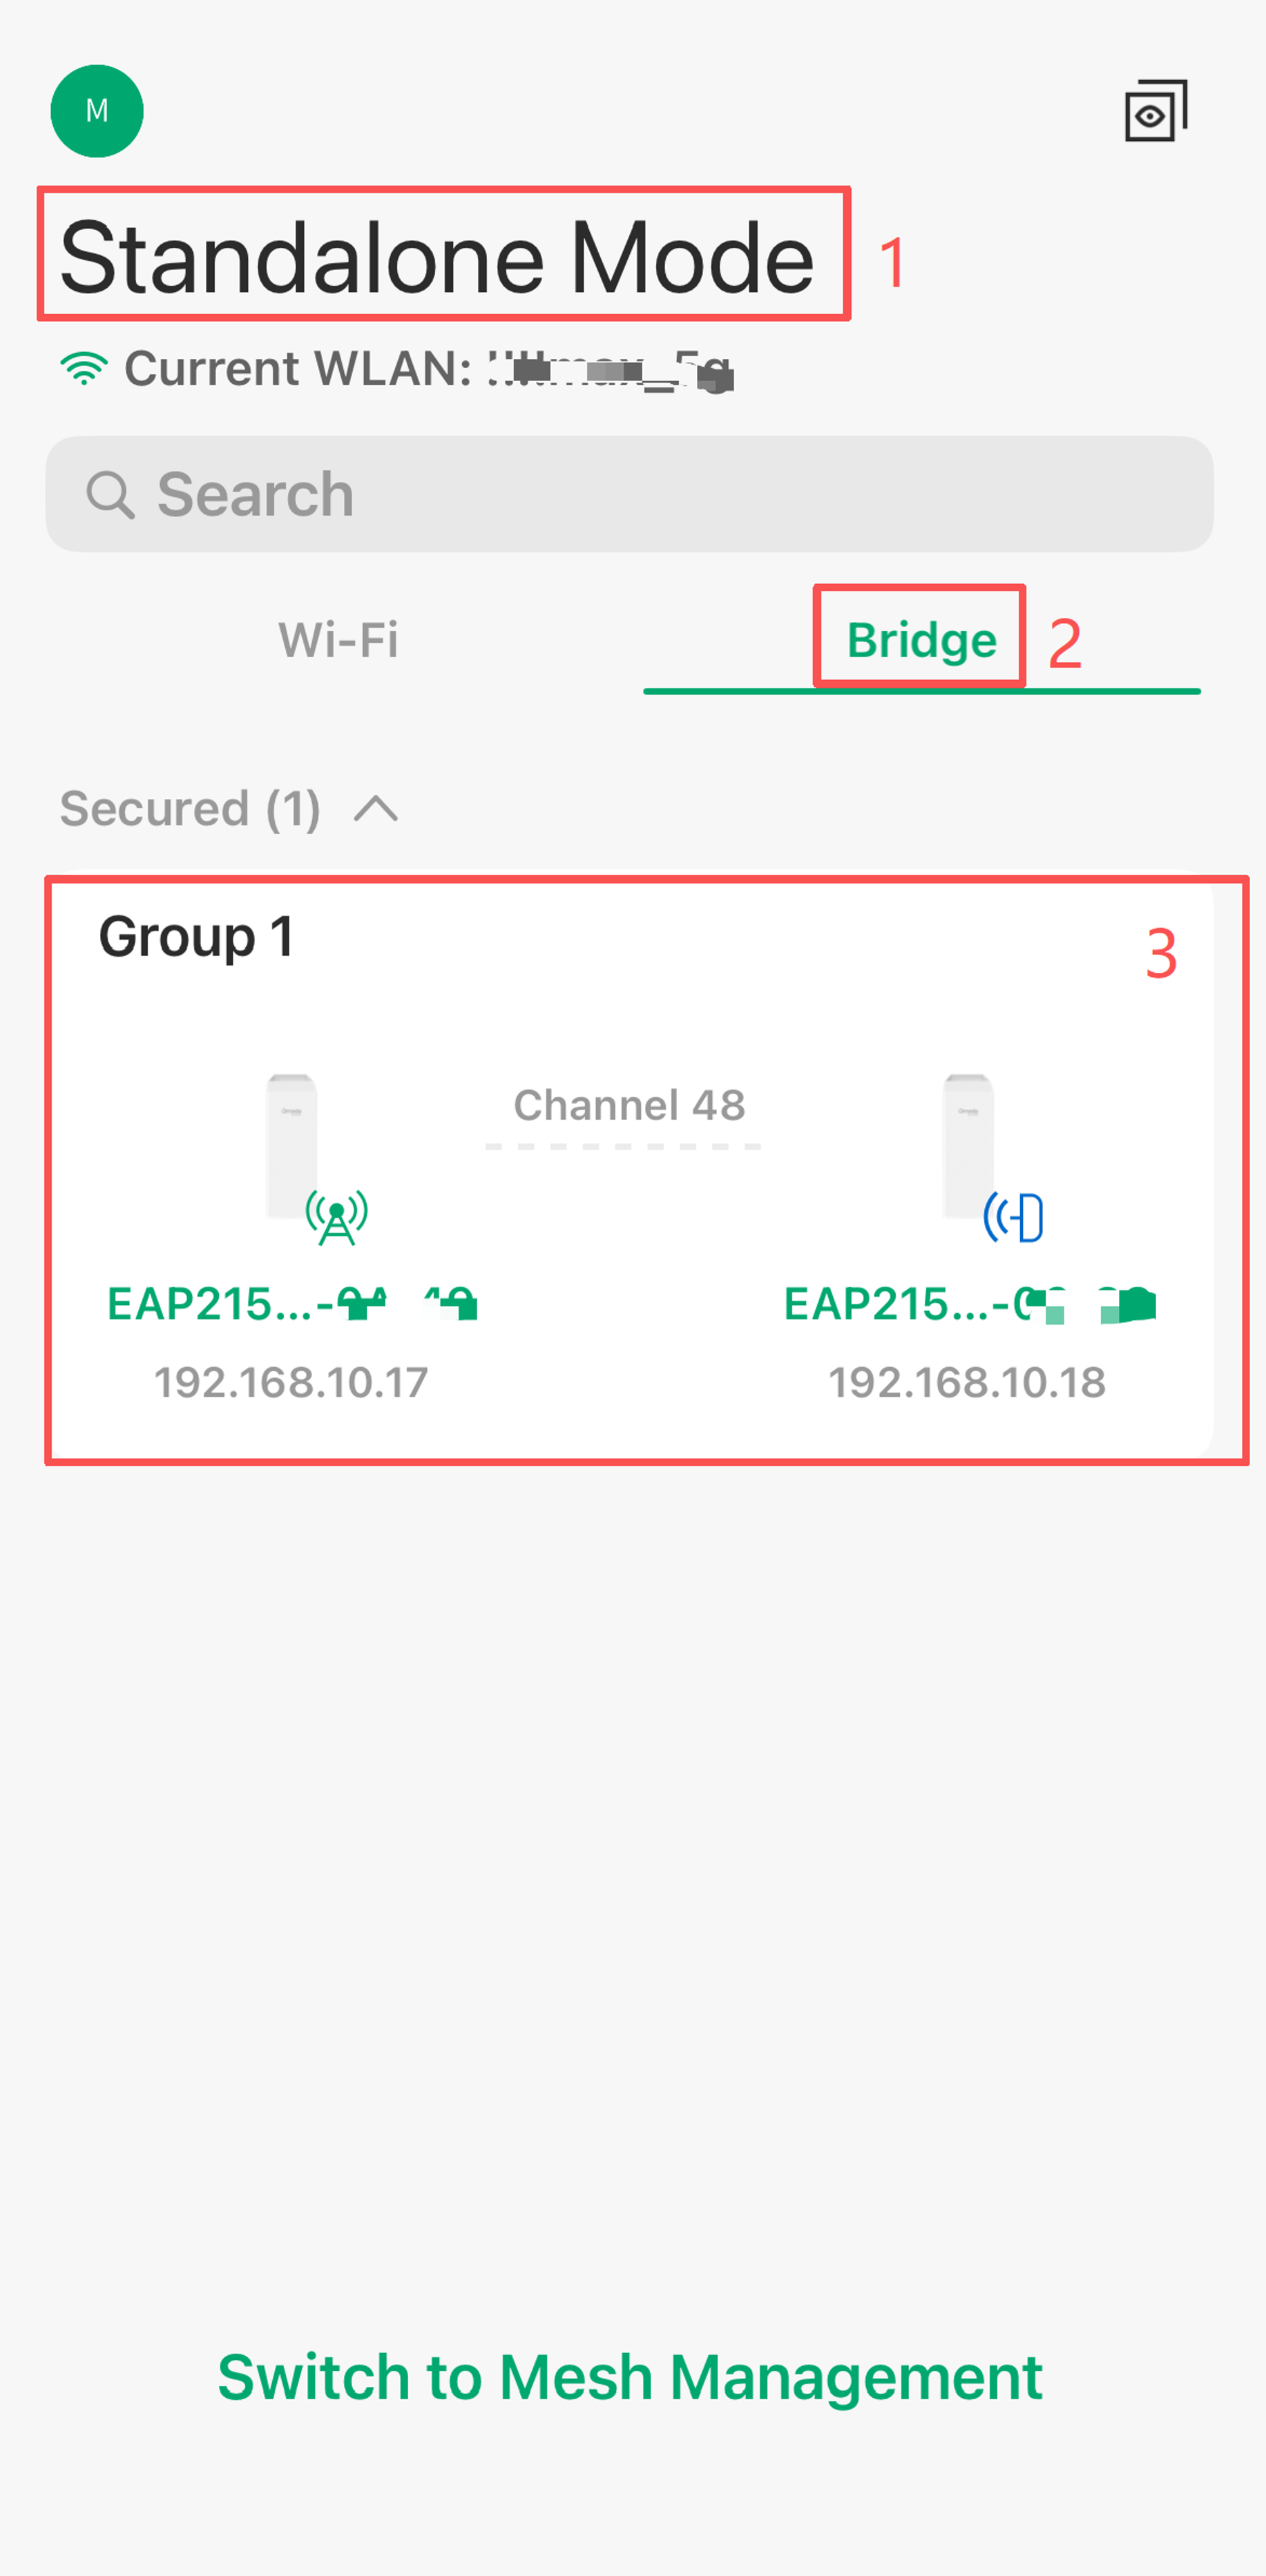
Step 2. Then go to Bridge Group detailed page, you can see the Antenna Alignment.
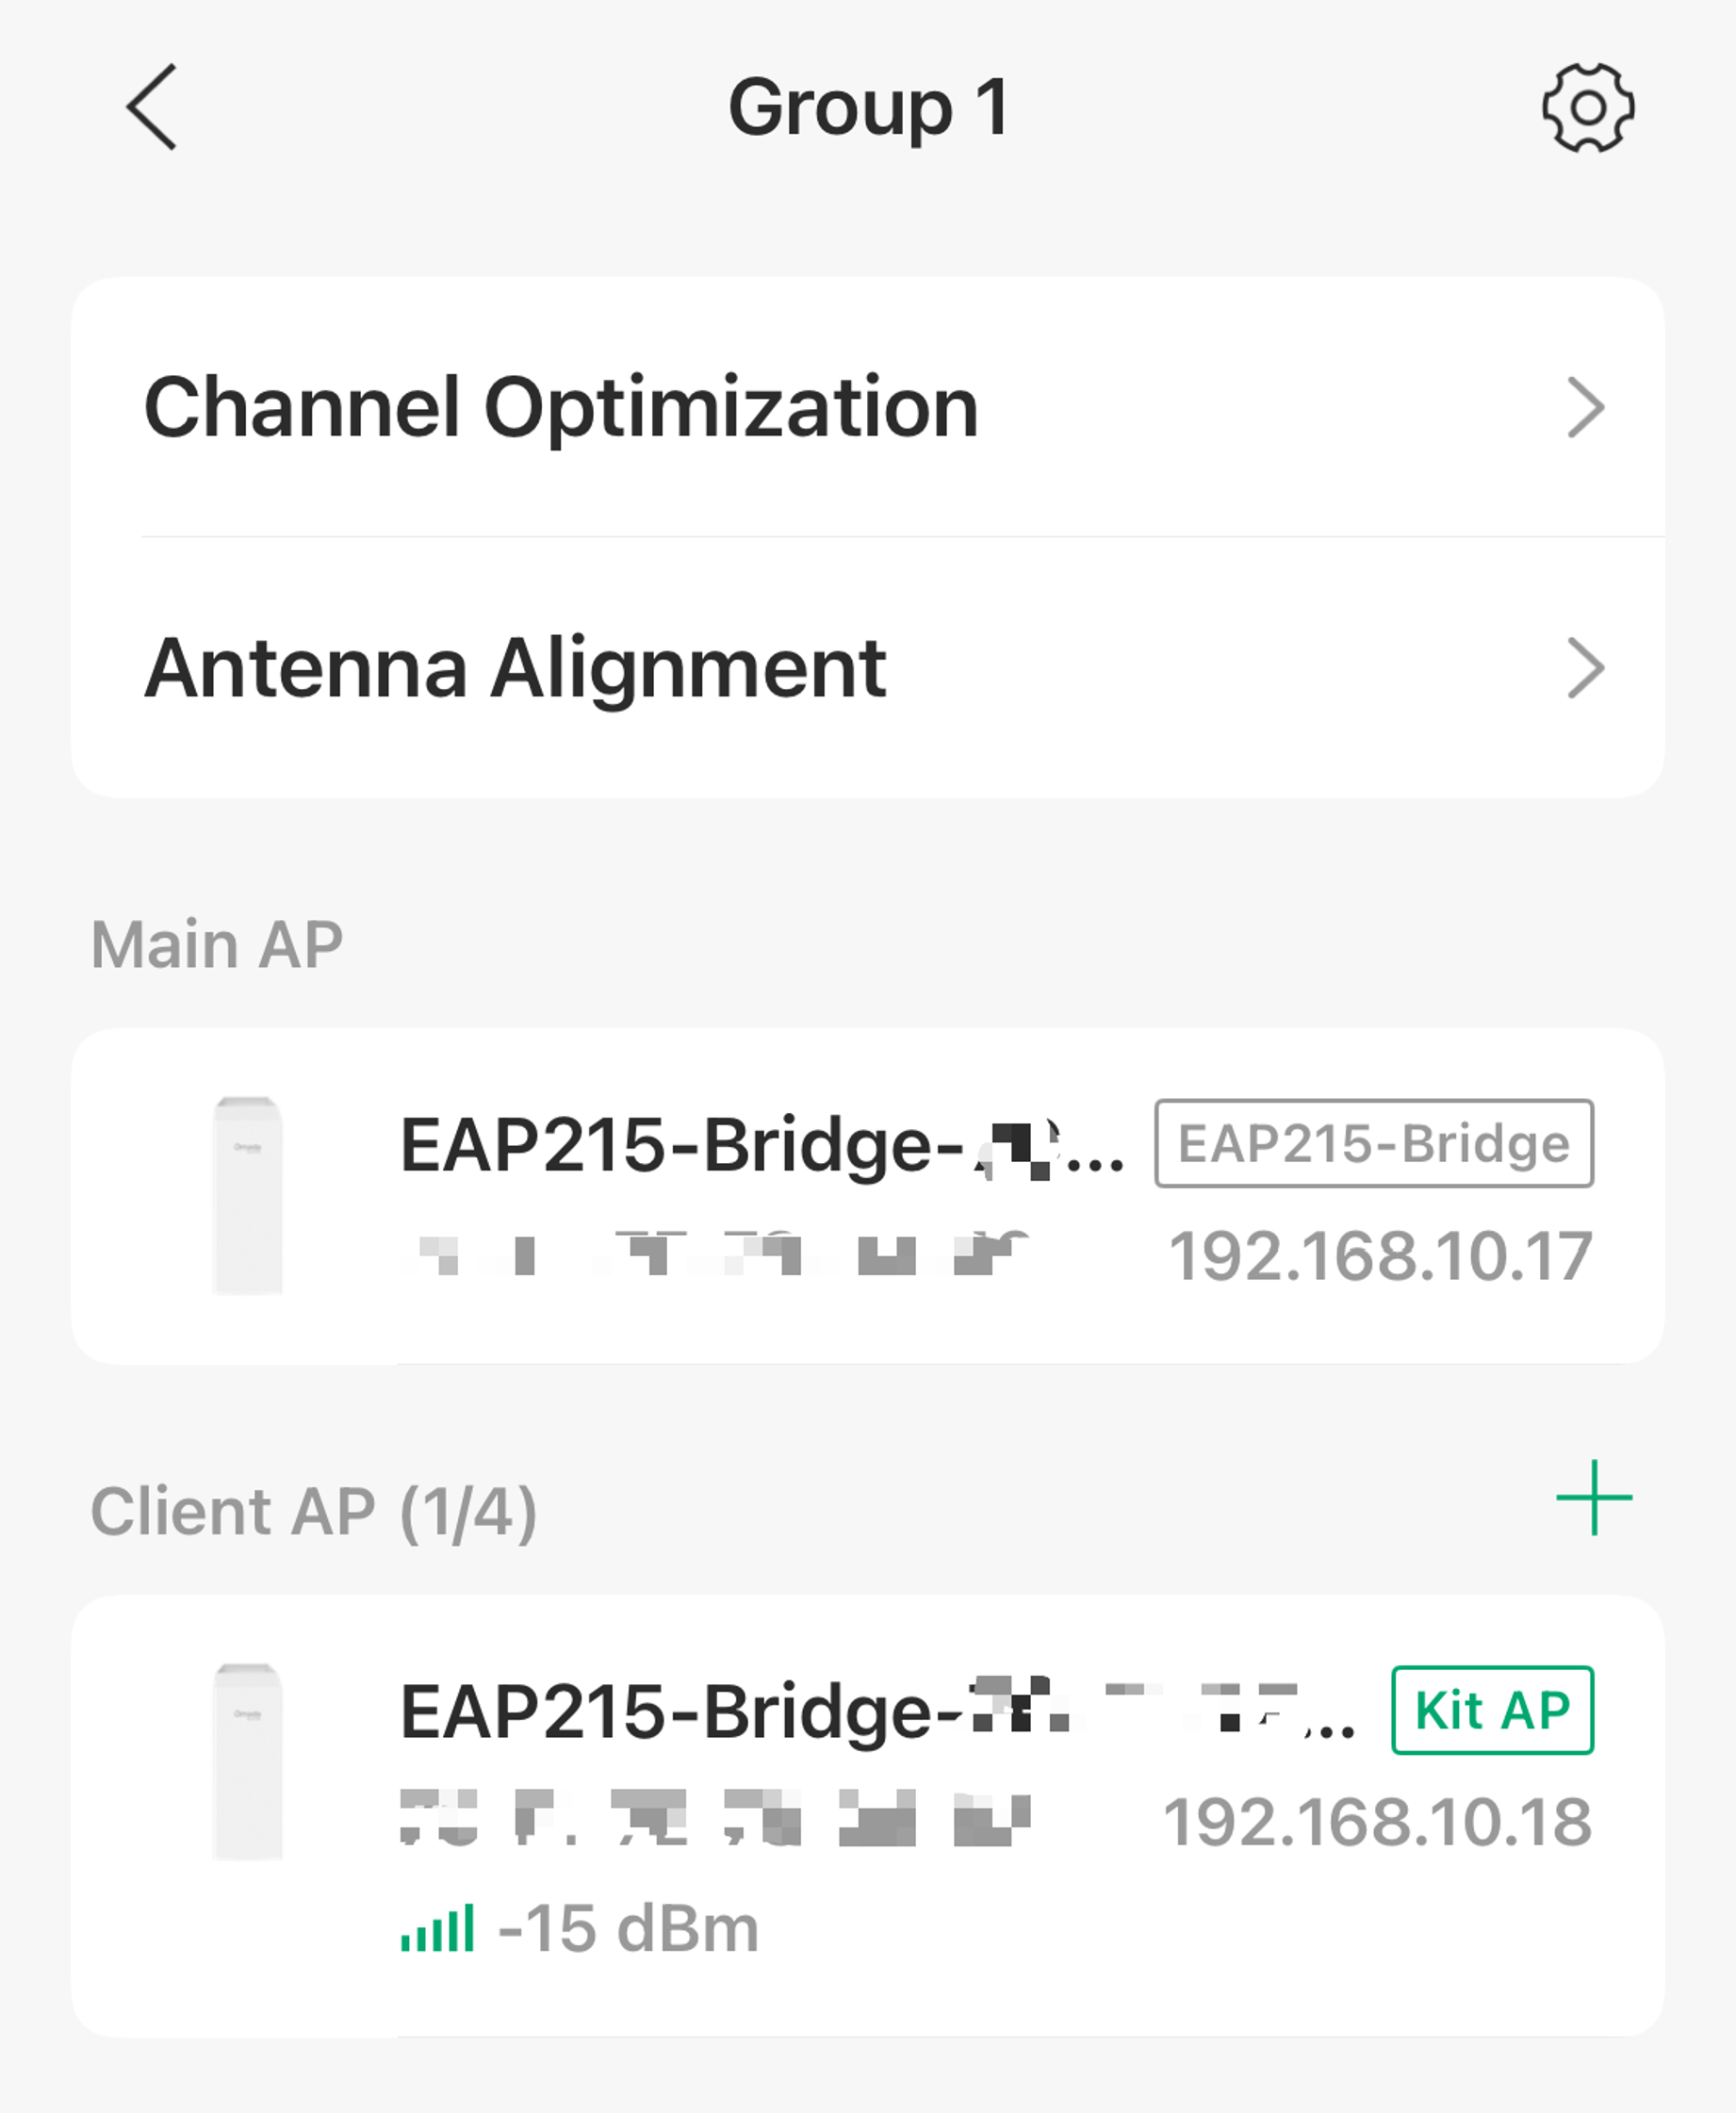
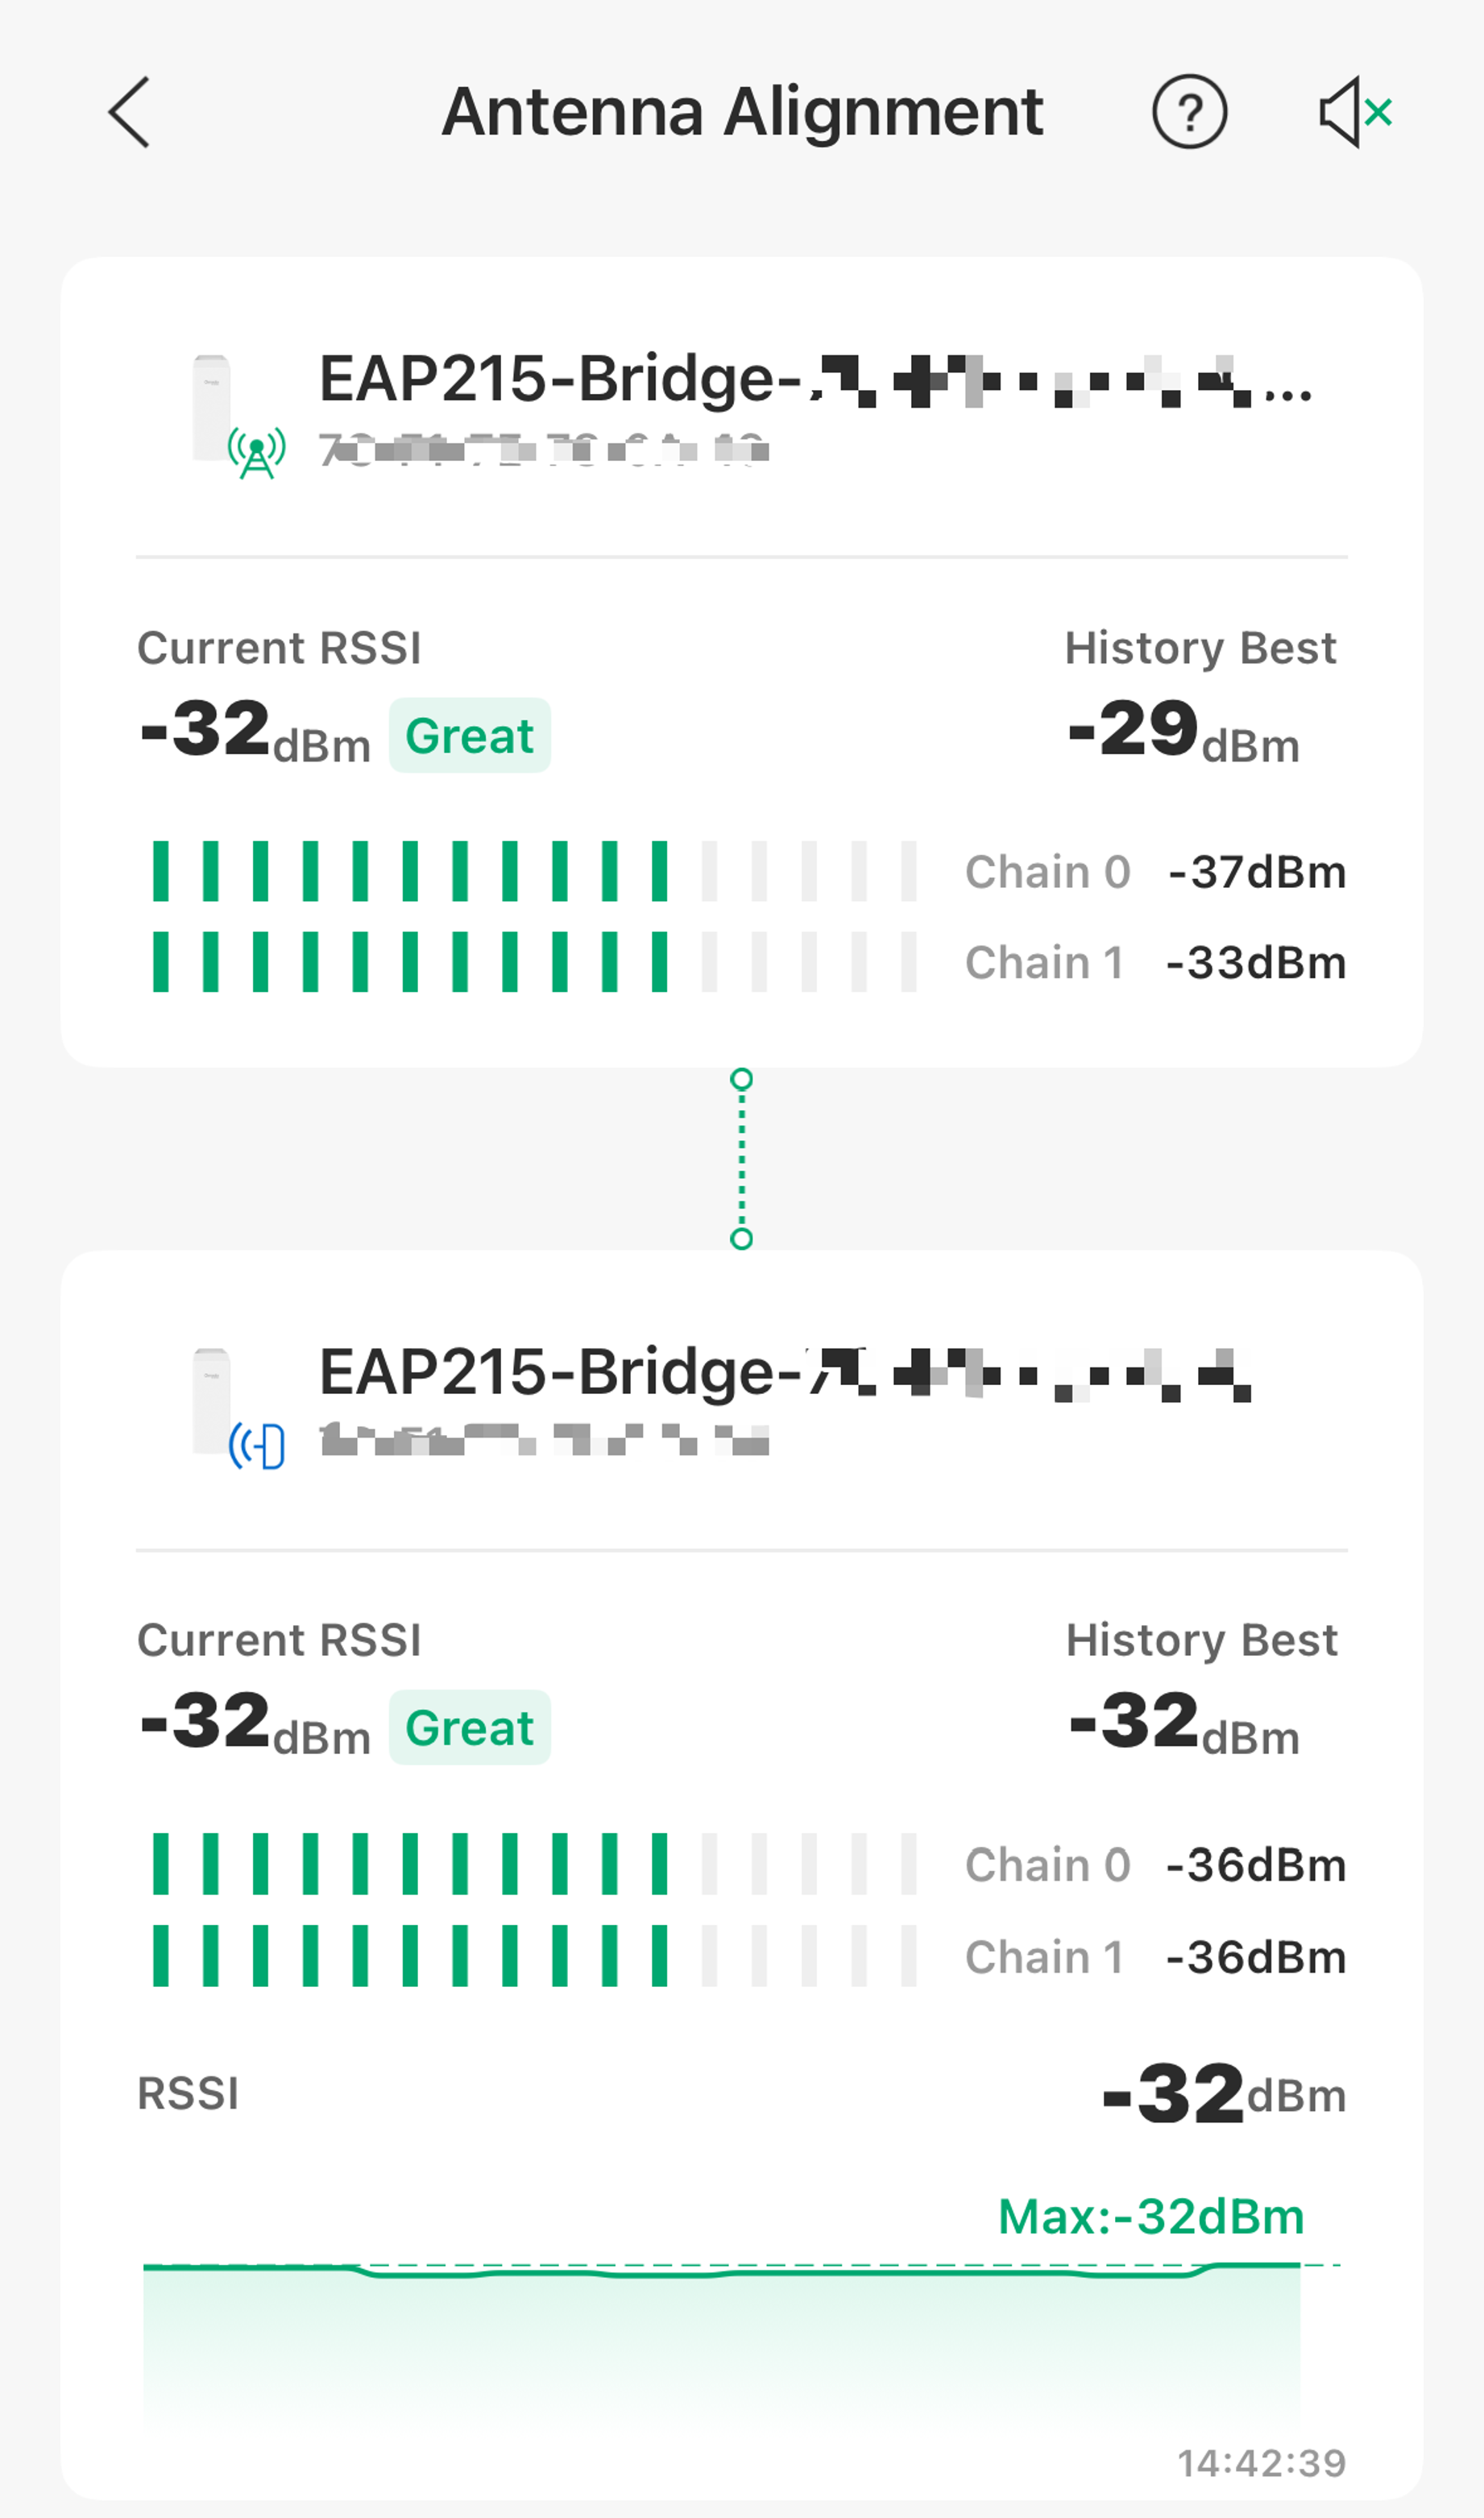
Step 3. In the Alignment page, you can view the RSSI of both the main AP and the client AP.
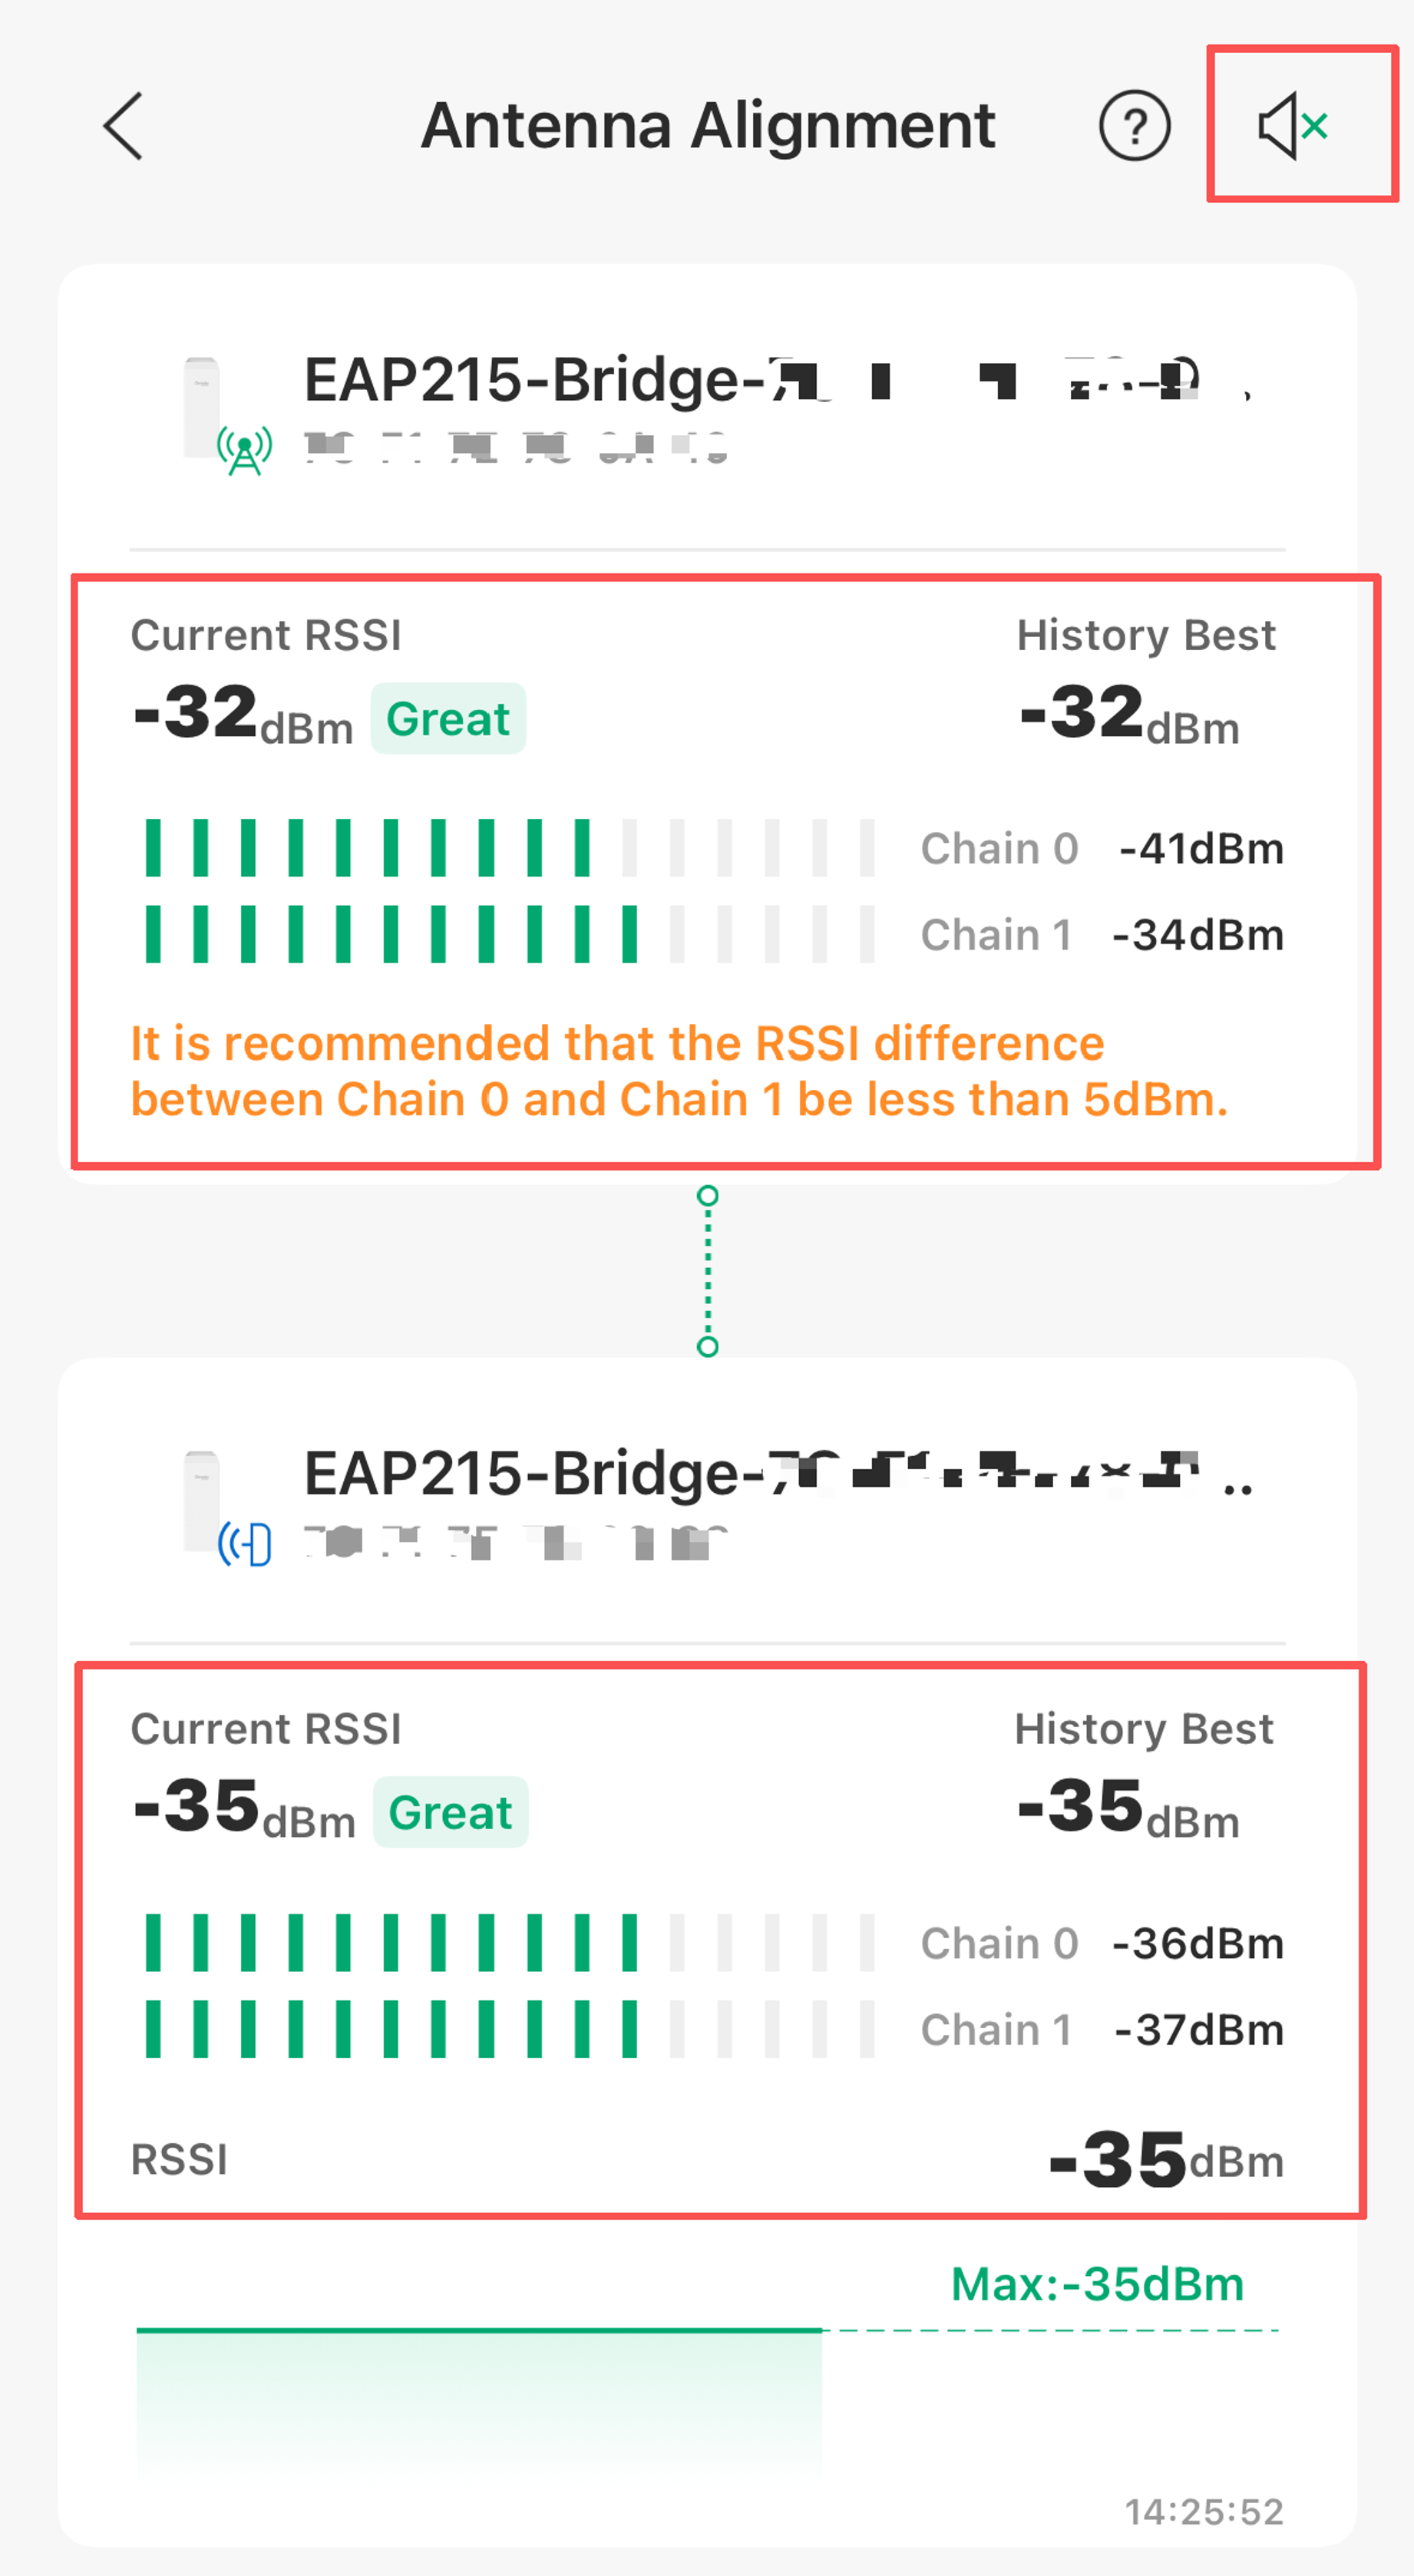
Step 4. To perform an antenna alignment, slowly rotate the AP and check the real-time RSSI values. Look for the angle where both values are high, and the difference is the smallest.
Ensure that the RSSI values of both antennas are relatively high and that the difference between Chain 0 and Chain 1 is no more than 5 dBm. If the difference exceeds 5 dBm, a warning message will appear: “It is recommended that the RSSI difference between Chain 0 and Chain 1 be less than 5 dBm.”
You can tap the speaker icon to help calibrate the antennas, which is on the top right side of the screen. With this feature enabled, the app will ring faster when the signal is strong and slower when it’s weak.
Note: RSSI values are classified as Great (>= -65dBm), Good (-65dBm to -70dBm), Average (-70dBm to -80dBm), and Low (<= -80dBm).
Verification
You can find the change in the Current RSSI after the alignment. During adjustment, you might see that the current RSSIs are not the same. Finally, find the angle where both values are high and the difference is the smallest.
Configuration via Standalone Web UI
Step 1. Pair the EAP Bridge kit according to the instructions, "How to Pair and Configure EAP Bridges." Access EAP Bridge’s standalone interface by visiting its IP address on a web browser.
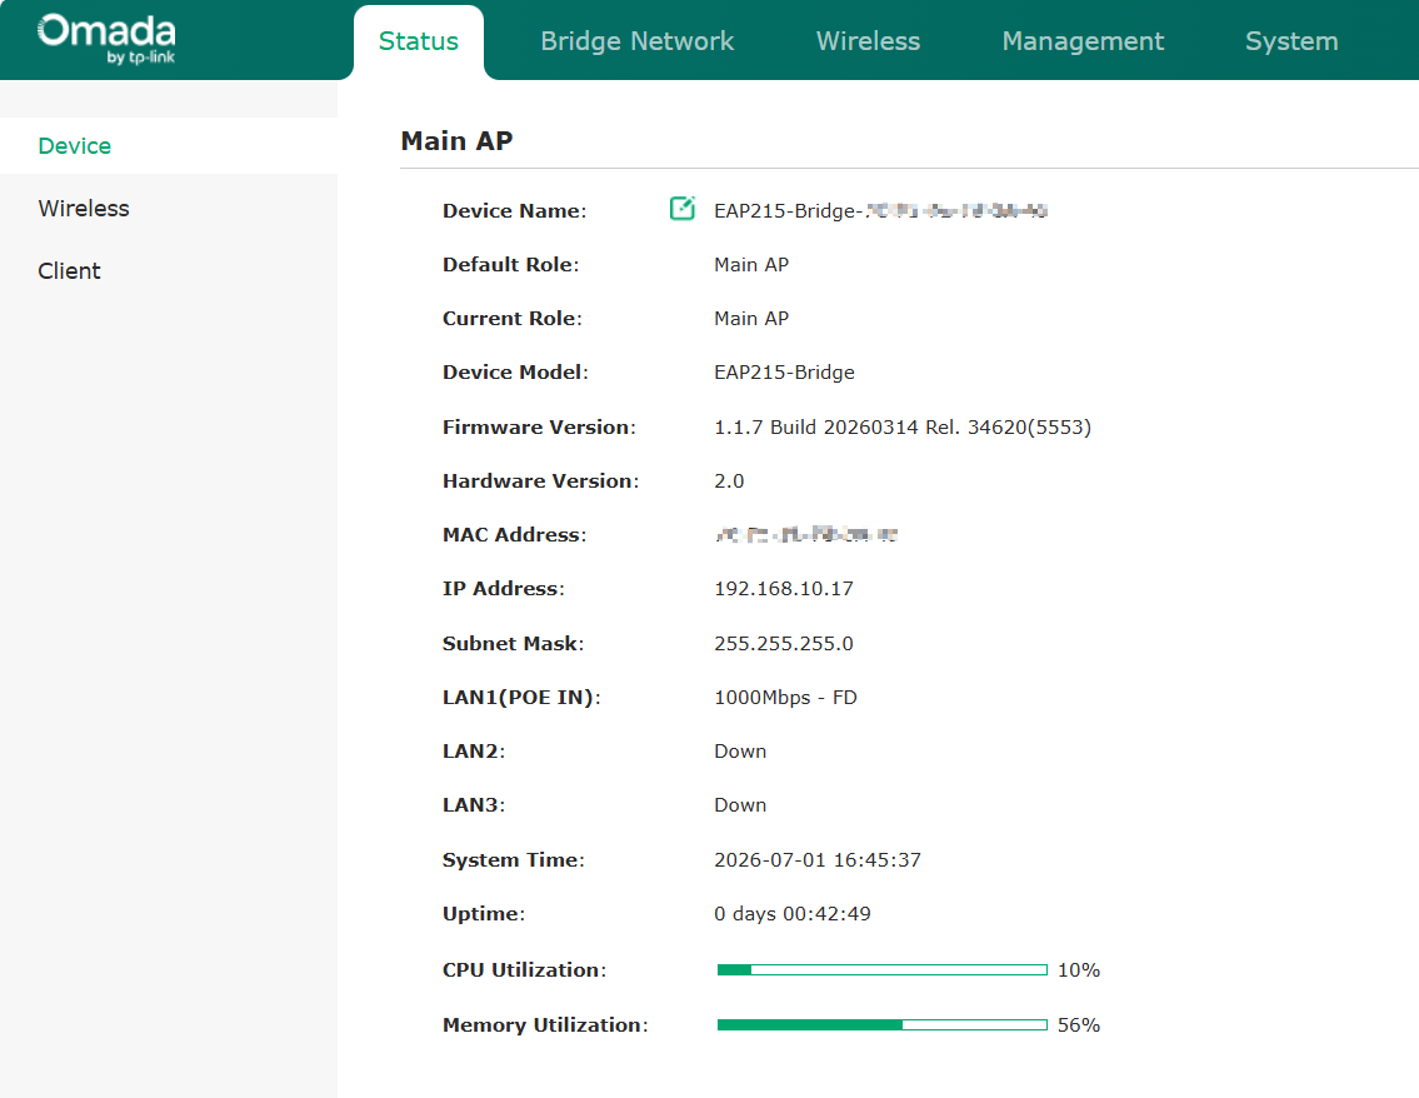
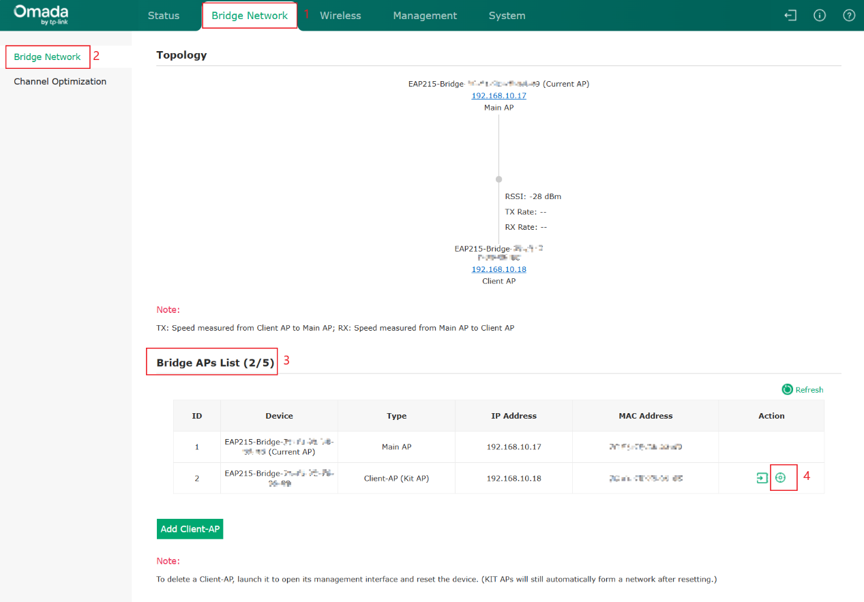
Step 2. Go to Bridge Network > Bridge APs List, and you can see the Align button
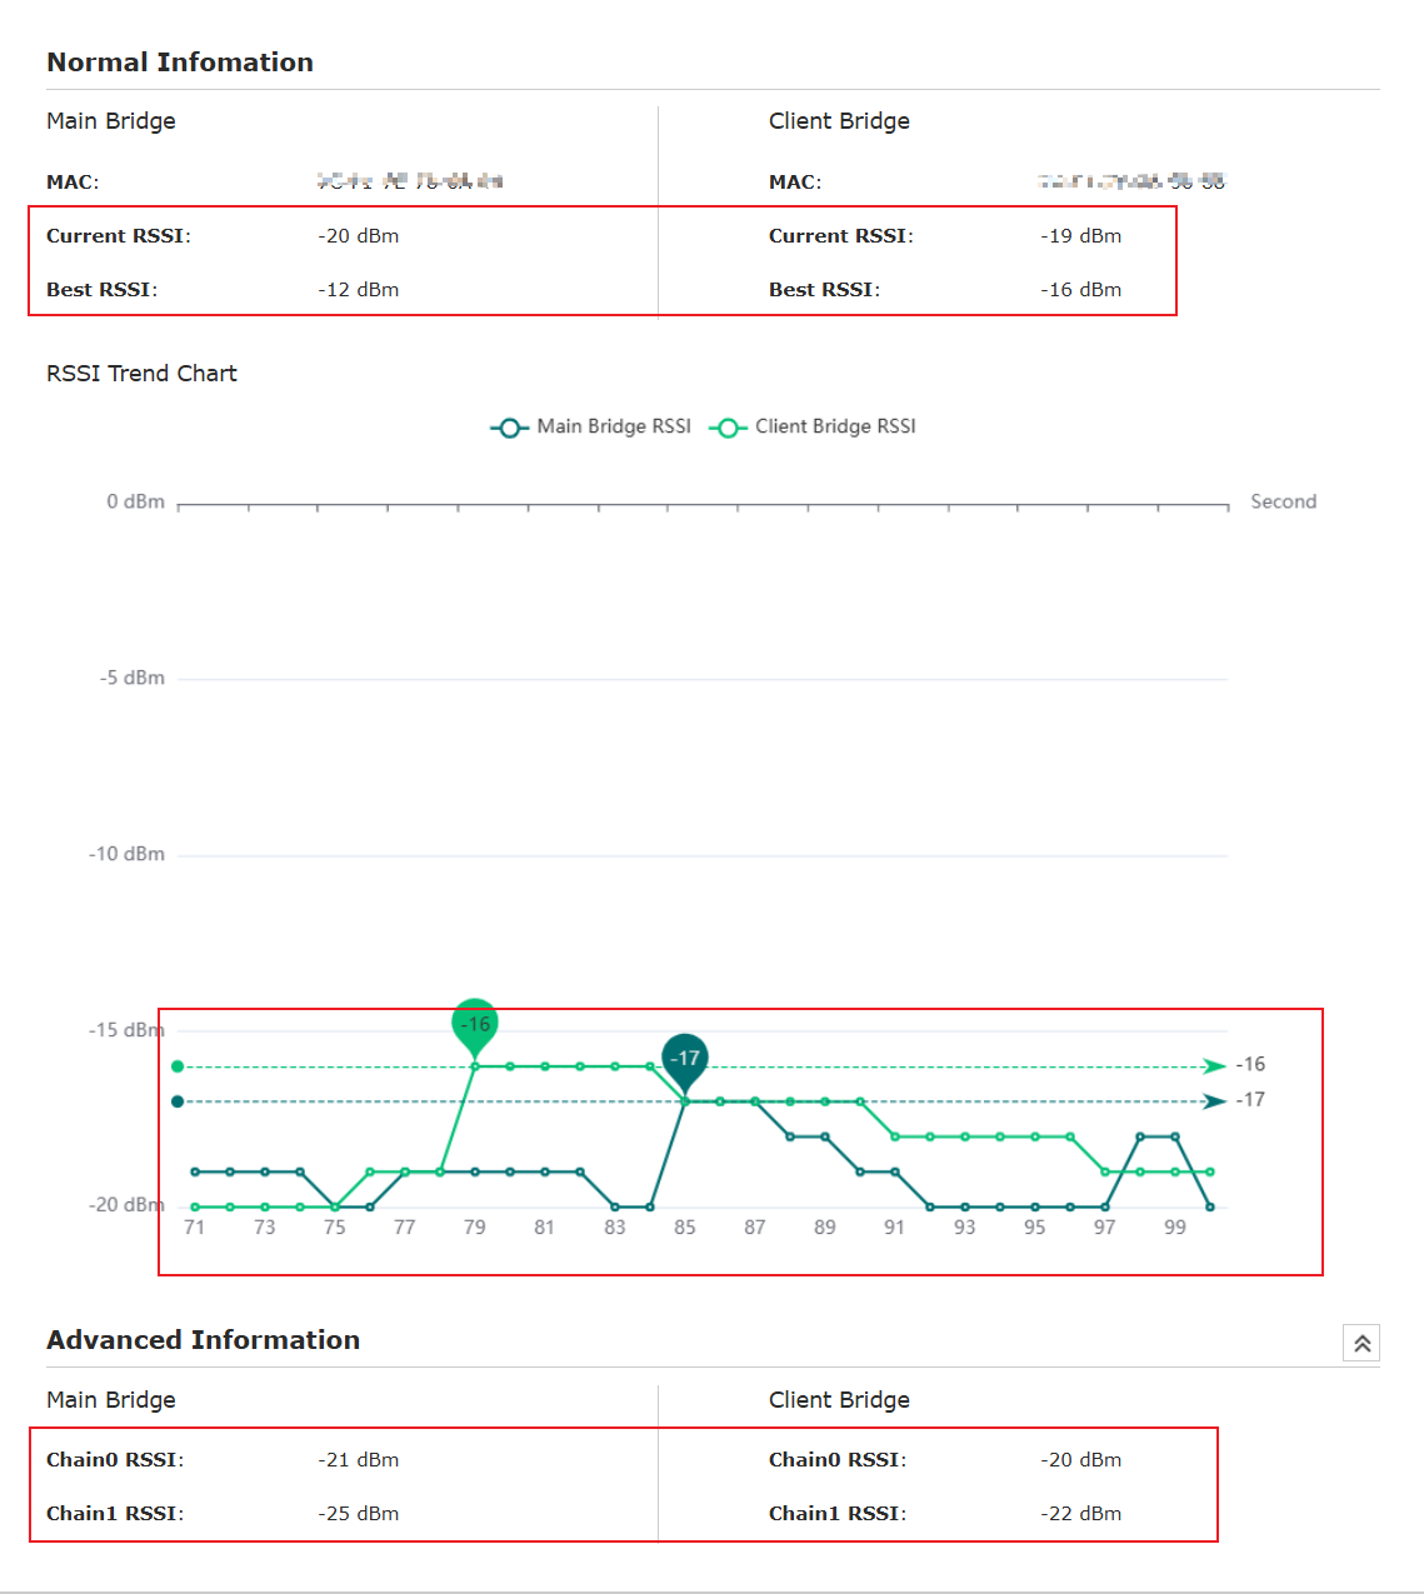
Step 3. Click the Align button to view the RSSI info on two APs.
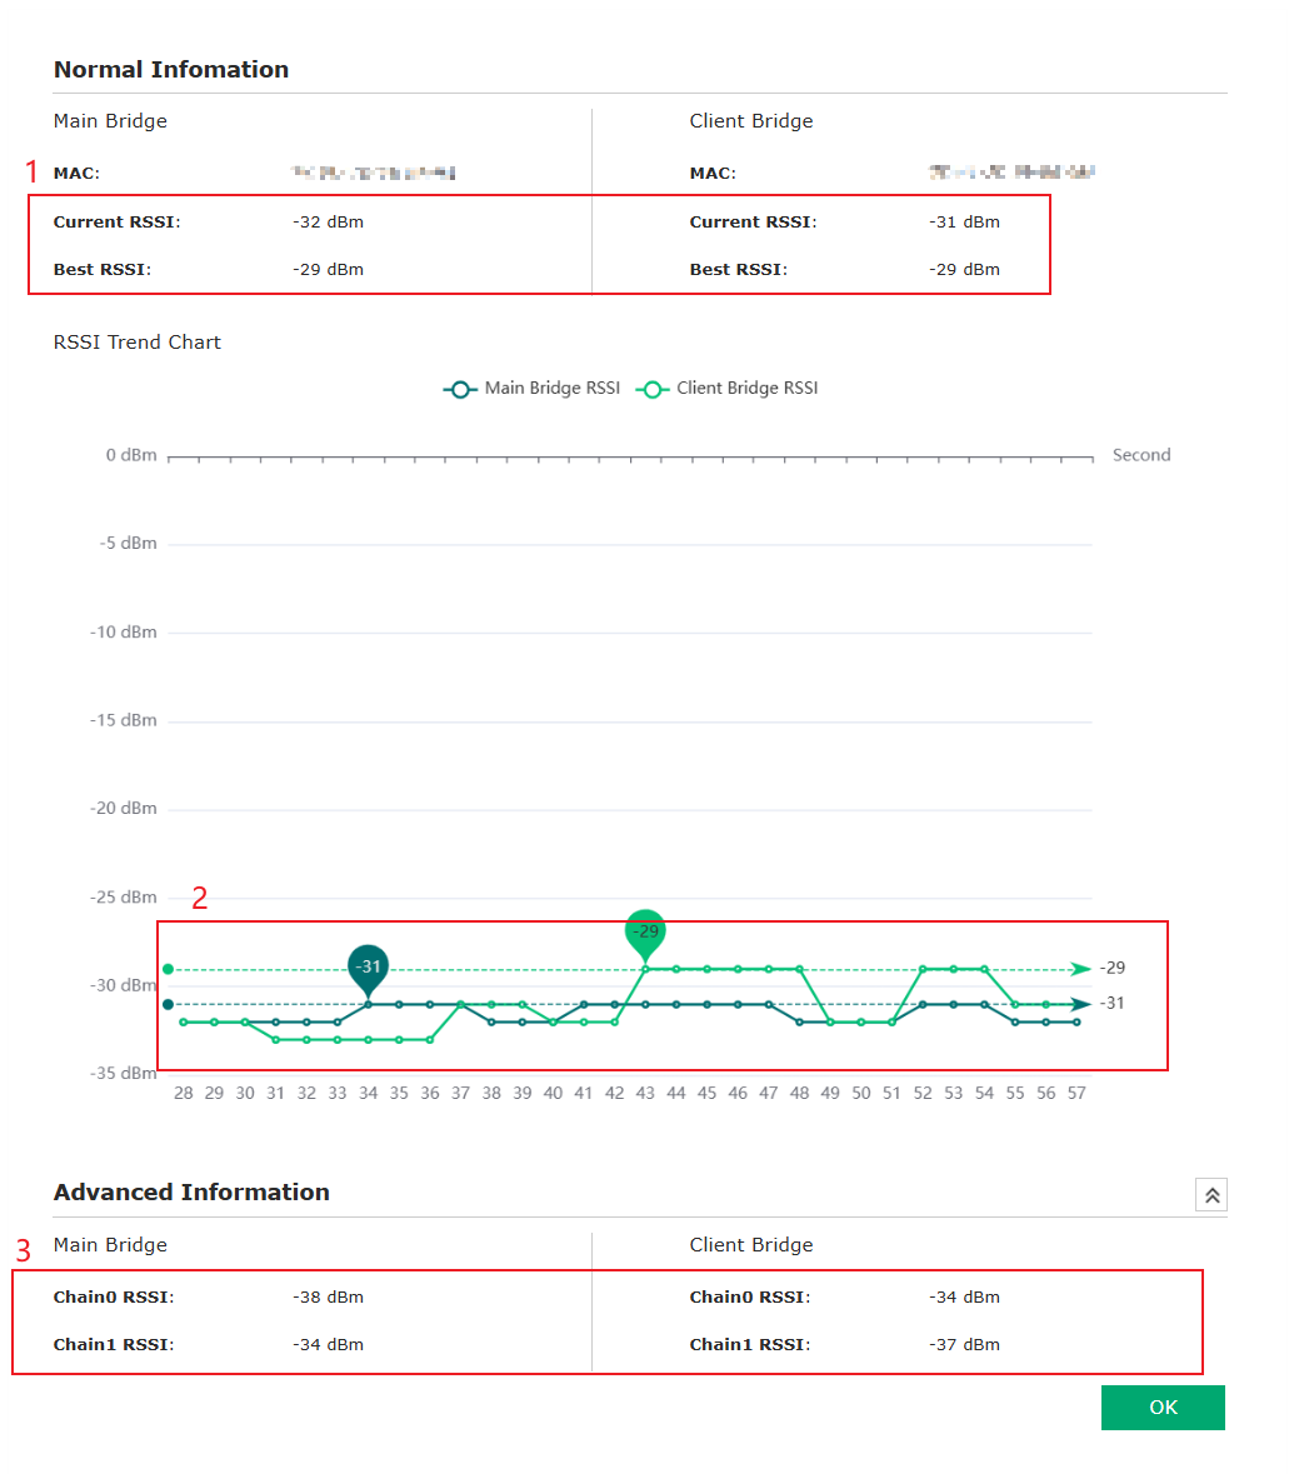
The first red outline shows the Bridge of two APs' current RSSI and the Best RSSI. Current RSSI refers to the RSSI of the AP for now. The best RSSI is recommended during the alignment process.
The Second red outline displays the diagram of Bridge APs RSSI over time, changing continuously as the RSSI changes.
The third part shows the RSSI of two antennas for each AP.
Step 4. Slowly rotate the AP and observe the changes in the dual RSSI values. Look for the angle where both values are high and the difference is the smallest. Ensure that the RSSI values of both antennas are relatively high and the difference is no more than five dBm.
Verification
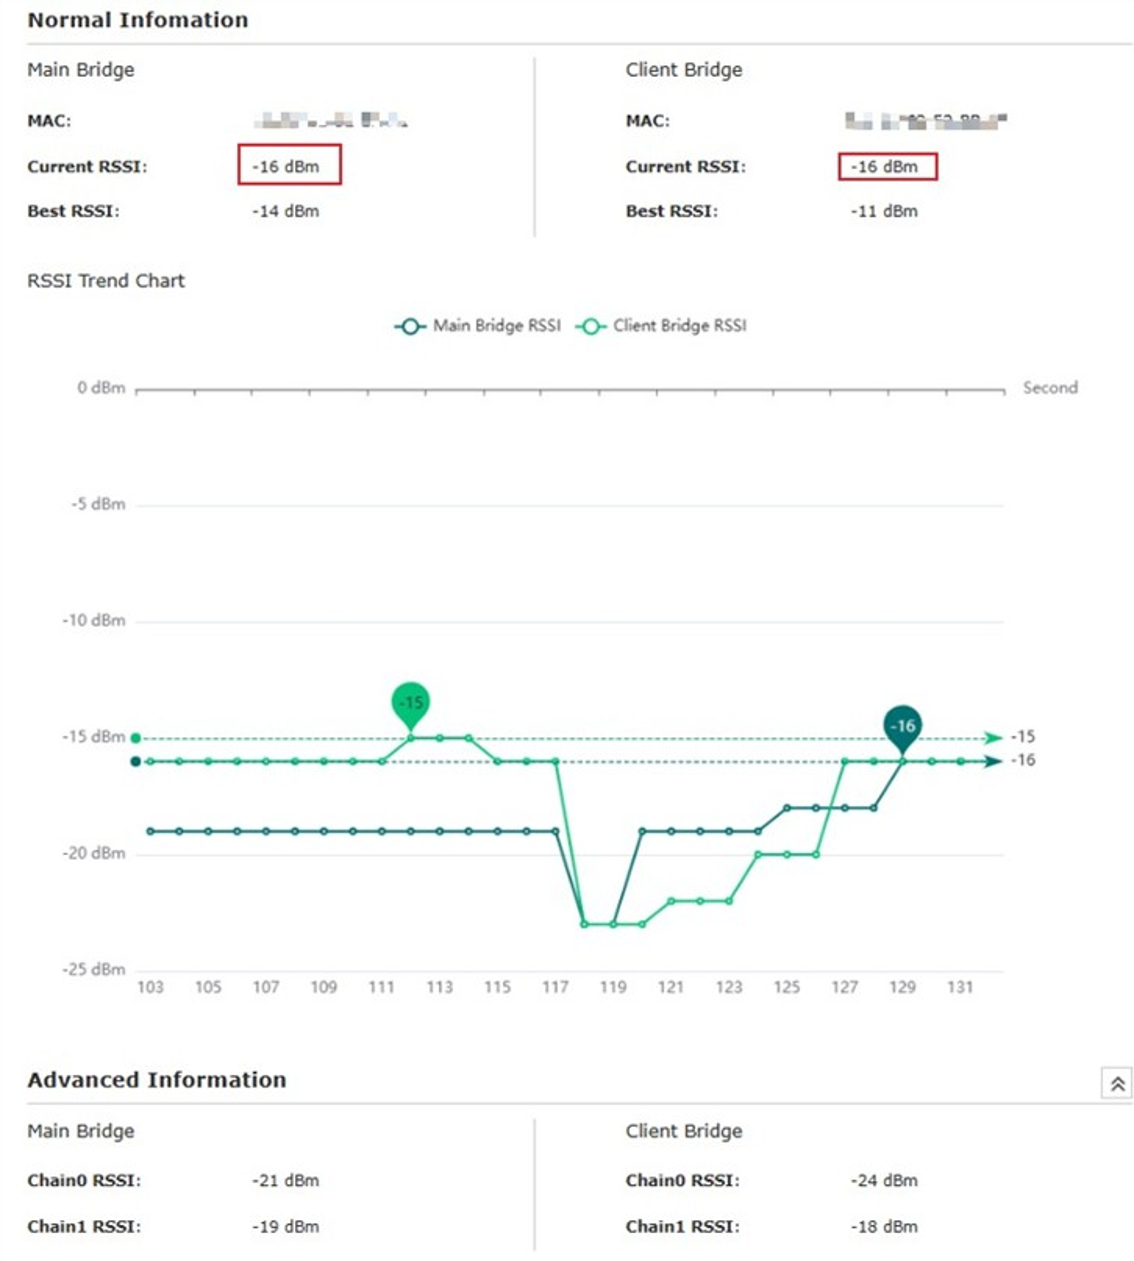
You can find the change in the Current RSSI after the alignment. During adjustment, you might see that the current RSSIs are not the same.
After the adjustment, they will get synchronized and have a stronger signal strength than before.
Configuration via Omada App – Tool Kit (for Controller‑Managed Devices)
During redeployment, when your Bridge APs are managed by the Omada Controller, you can use the Signal Calibration feature in the Omada App to calibrate the antennas, ensuring optimal antenna alignment for the best wireless quality.
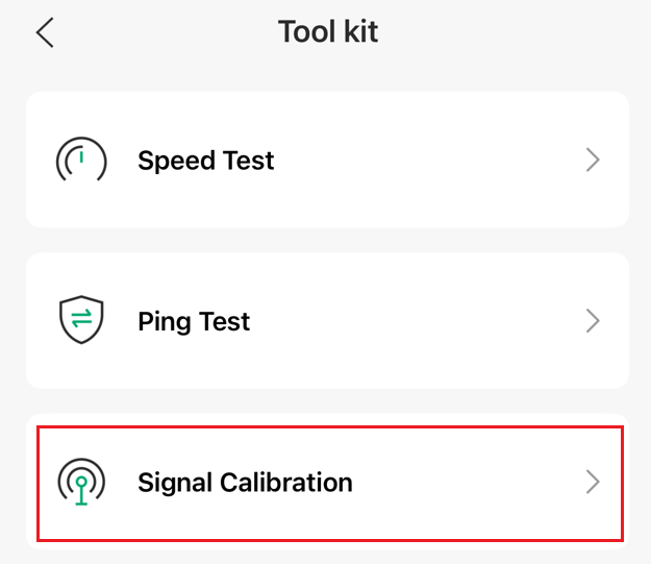
Step 1. Tap the Signal Calibration to enter the Signal Calibration tool.
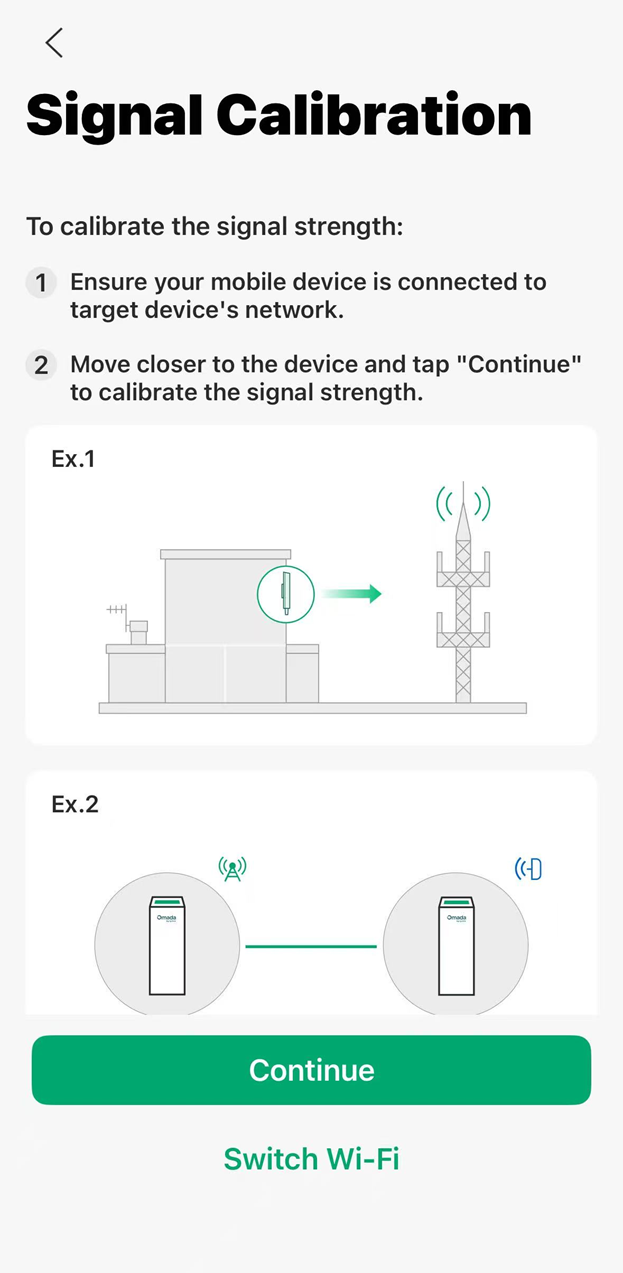
Step 2. Tap on Continue to start the signal calibration or tap on Switch Wi-Fi to change network.
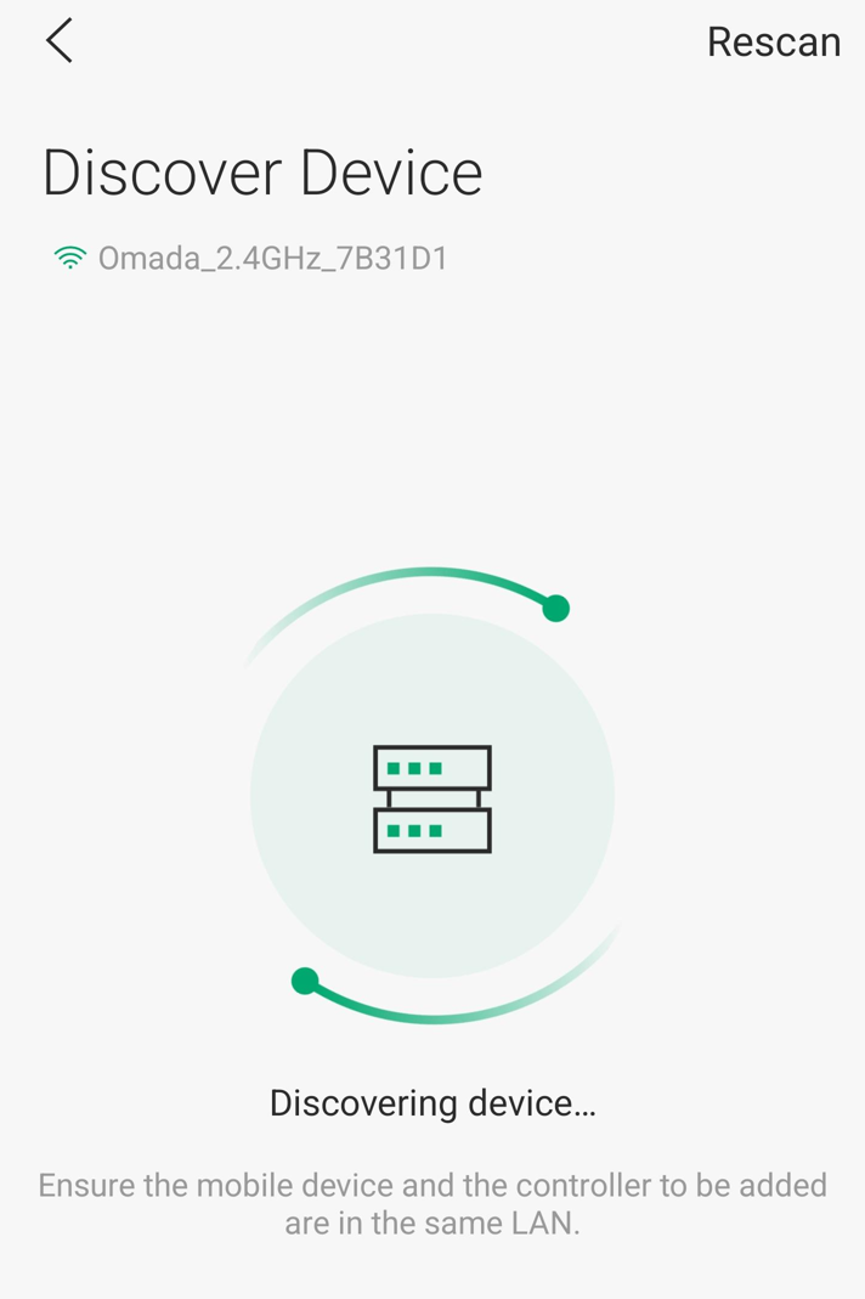
Step 3. Waiting for discovering device.
Step 4. Check the Signal Calibration result.
When your controller managed Bridge AP devices, and your Omada APP will scan the paired bridge devices.
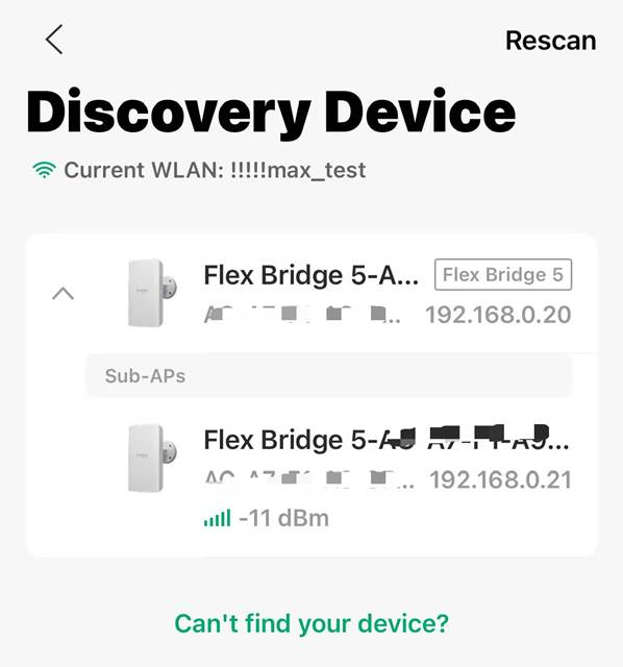
Click devices to do perform antenna alignment.
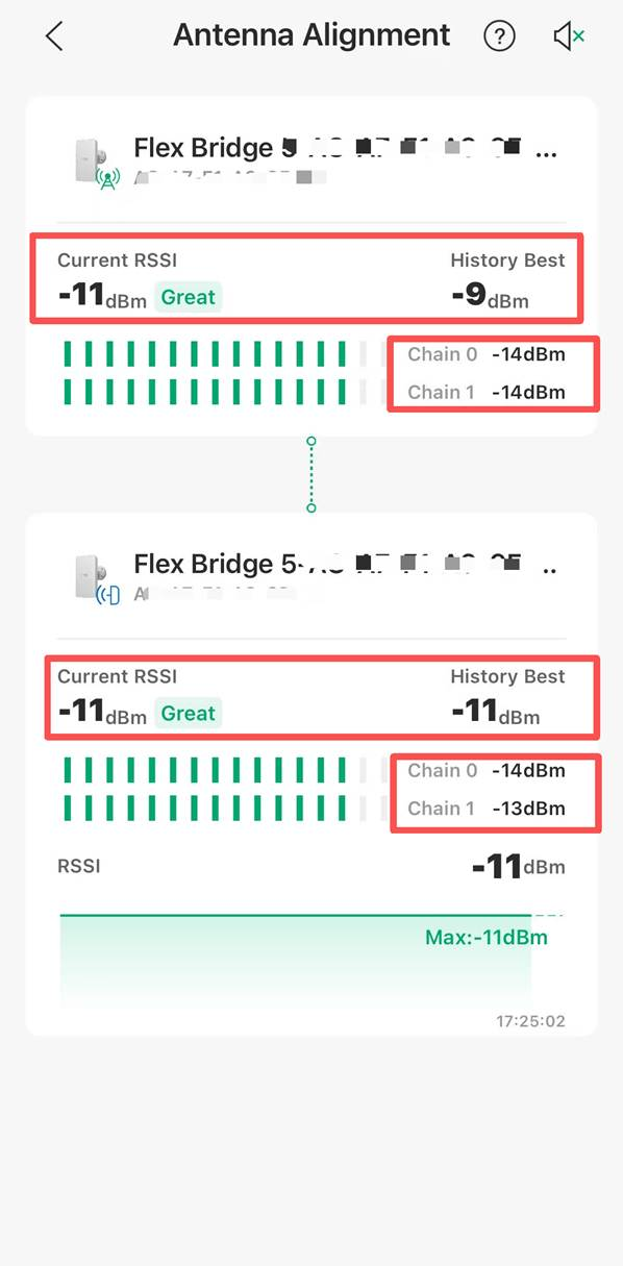
The result shows the Bridges’ current RSSI and the History Best RSSI. Slowly rotate the bridge and observe the changes in the dual RSSI values between Chain 0 and chain 1. Then look for the angle where both values are high and the difference is the smallest. Ensure that the RSSI values of both antennas are relatively high and the difference is no more than 5 dBm.
Conclusion
Now that you've finished Aligning Antennas for Optimal EAP-Bridge Connection.
QA
Q1. What is the best installation environment?
A1: Please select a high and open place without any interference or reflection.
Q2. What is the best RSSI for connection?
A2: There is no fixed RSSI value. Ideally, for each AP, the RSSI values of its two wireless links should both be high and the difference between them should be less than 5 dBm (this refers to the gap between the two wireless RSSI values of the same AP), rather than the RSSI gap between two different APs.
Q3. Why can't I keep the RSSI gap within 5, no matter what I do?
A3: Please check for any metal obstructions or strong reflectors, and adjust the installation position of the AP.
Q4. Why do the RSSI values of the two antennas differ significantly?
A4: Interference in the environment has varying effects on antennas of different polarization types. The presence of obstructions causes reflection, resulting in significant differences in RSSI for antennas of other polarizations.
When the distance is close, the near-field effect exists, leading to inaccurate results.
To learn more about each function and configuration, please visit Support Home to download or check the manual for your product.
