


Contents
Option 1: Trust the default self-signed certificate
Option 2: Upload a trusted SSL certificate
Introduction
HTTPS certificates play a critical role in securing web-based communications between users and devices. By enabling encryption, an HTTPS certificate helps protect sensitive information, such as usernames, passwords, and configuration data, from being intercepted or modified during transmission. In addition, certificates verify the identity of the website or device, ensuring that users are connecting to a legitimate and trusted service. Browsers may display HTTPS security warnings when a certificate has expired, is self-signed, or cannot be validated by a trusted Certificate Authority (CA). This article introduces two methods for handling HTTPS certificate expiration warnings and provides guidance to help users restore secure access to the web interface.
Requirements
- SSL Certificate
- Omada Controller (Software Controller / Hardware Controller / Omada Fusion Gateways)
Configuration
If a browser displays certificate warnings when accessing the Omada Controller web interface, use one of the following methods.
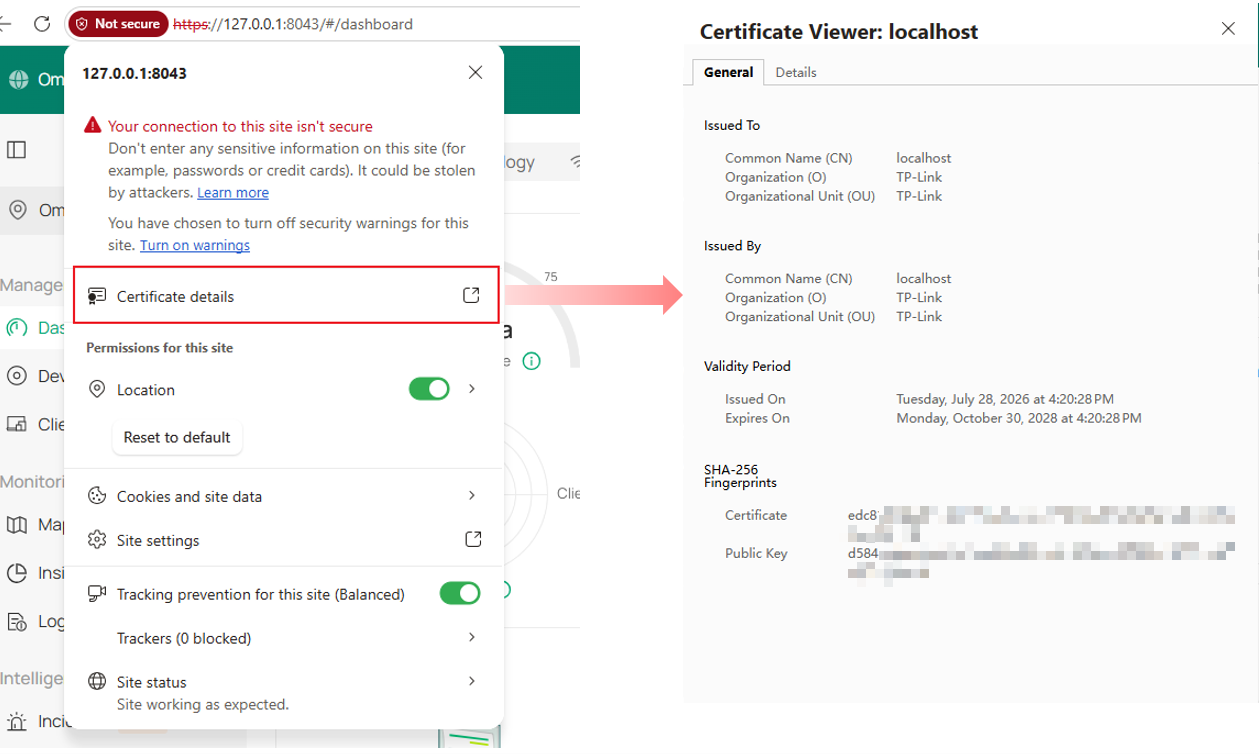
Option 1: Trust the default self-signed certificate
By default, Omada Controller uses a self-signed HTTPS certificate. Since this certificate is not issued by a public Certificate Authority (CA), browsers may display security warnings even when the connection is secure.
This behavior is expected and does not necessarily indicate a security issue.
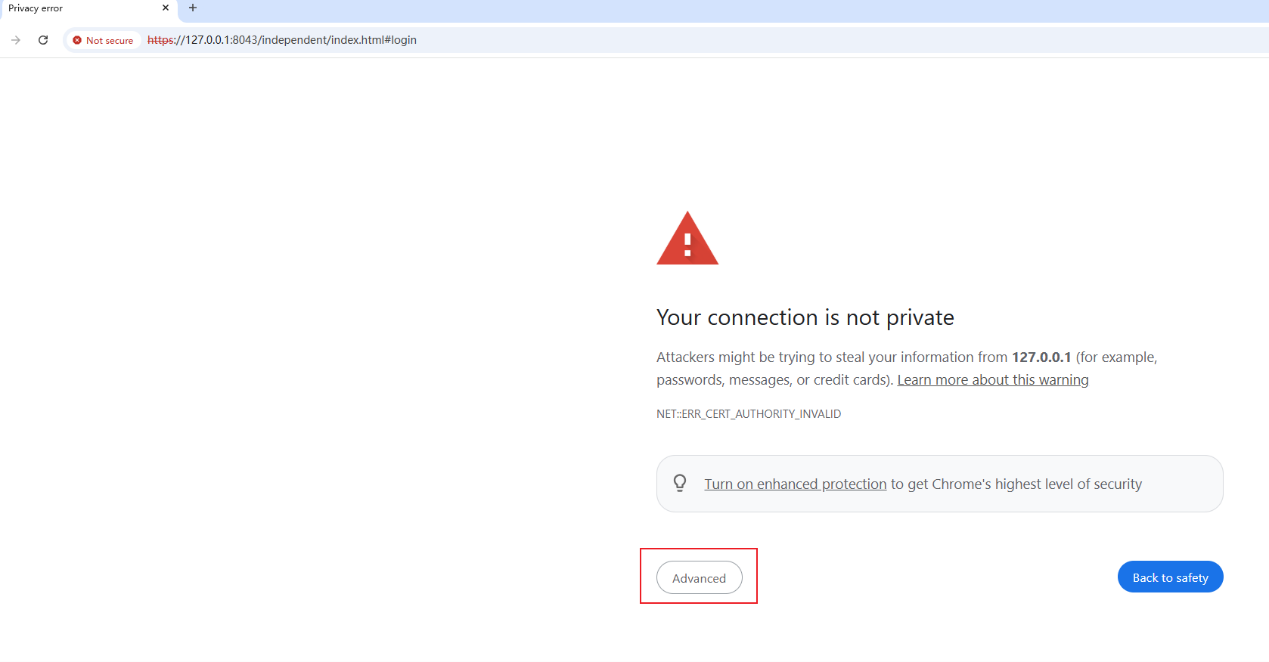
The following example uses Google Chrome.
Step 1. Click Advanced.
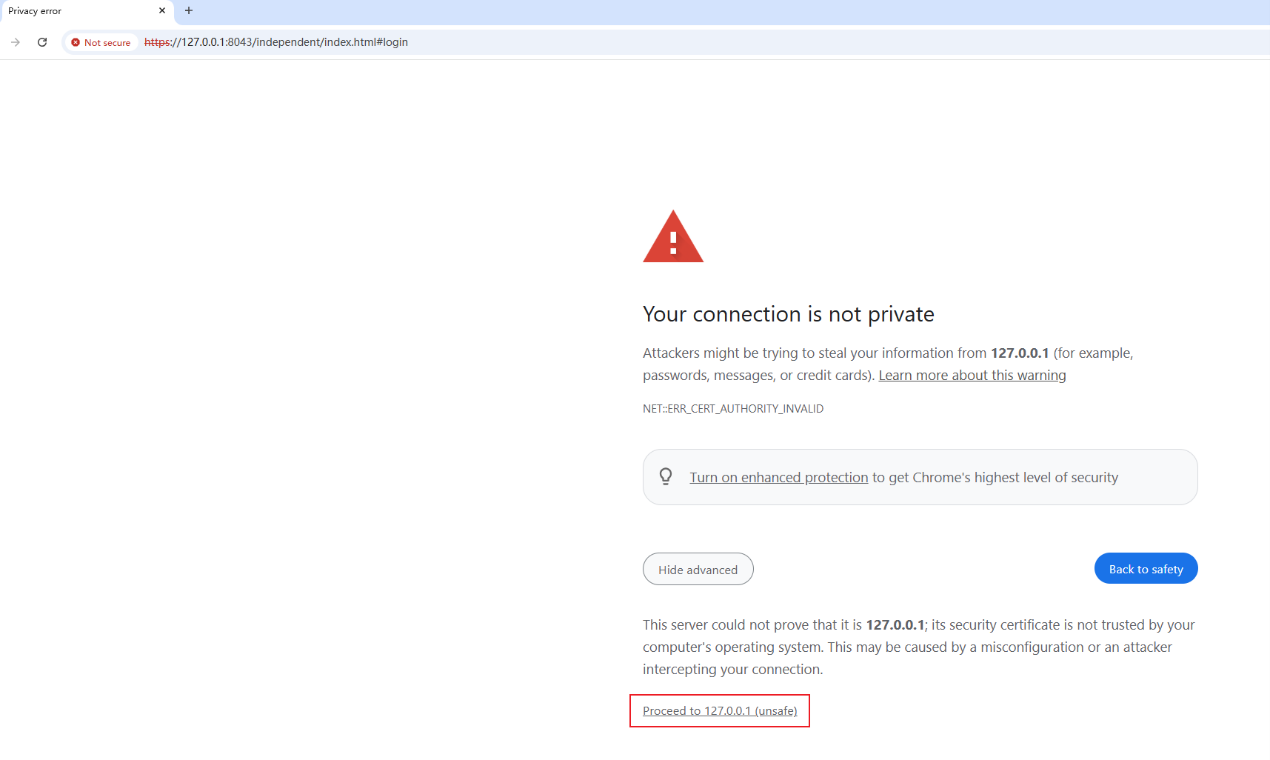
Step 2. Click Proceed to 127.0.0.1 (unsafe)
When using a self-signed certificate, the browser may ask the user to trust the certificate again after the service has been mounted or running for an extended period, such as one week, even within the same browser session.
This behavior only affects local access scenarios and does not affect CBC scenarios, as CBC does not use this certificate.
This is expected browser security behavior. Because a self-signed certificate does not have a trusted certificate authority to verify its identity, the browser may allow access only through a temporary security exception. Browsers may periodically clear or refresh these exceptions to reduce the risk of man-in-the-middle attacks. Therefore, after the browser refreshes its certificate status cache, the user may need to trust the certificate again.
The browser will trust the certificate for the current session and allow access to the Omada Controller web interface.
Option 2: Upload a trusted SSL certificate
Uploading a trusted SSL certificate helps eliminate browser security warnings and provides a trusted HTTPS connection to the Controller.
Step 1: Navigate to the configuration page
Omada Fusion Gateways:
Navigate to Settings > System Settings > Advanced.
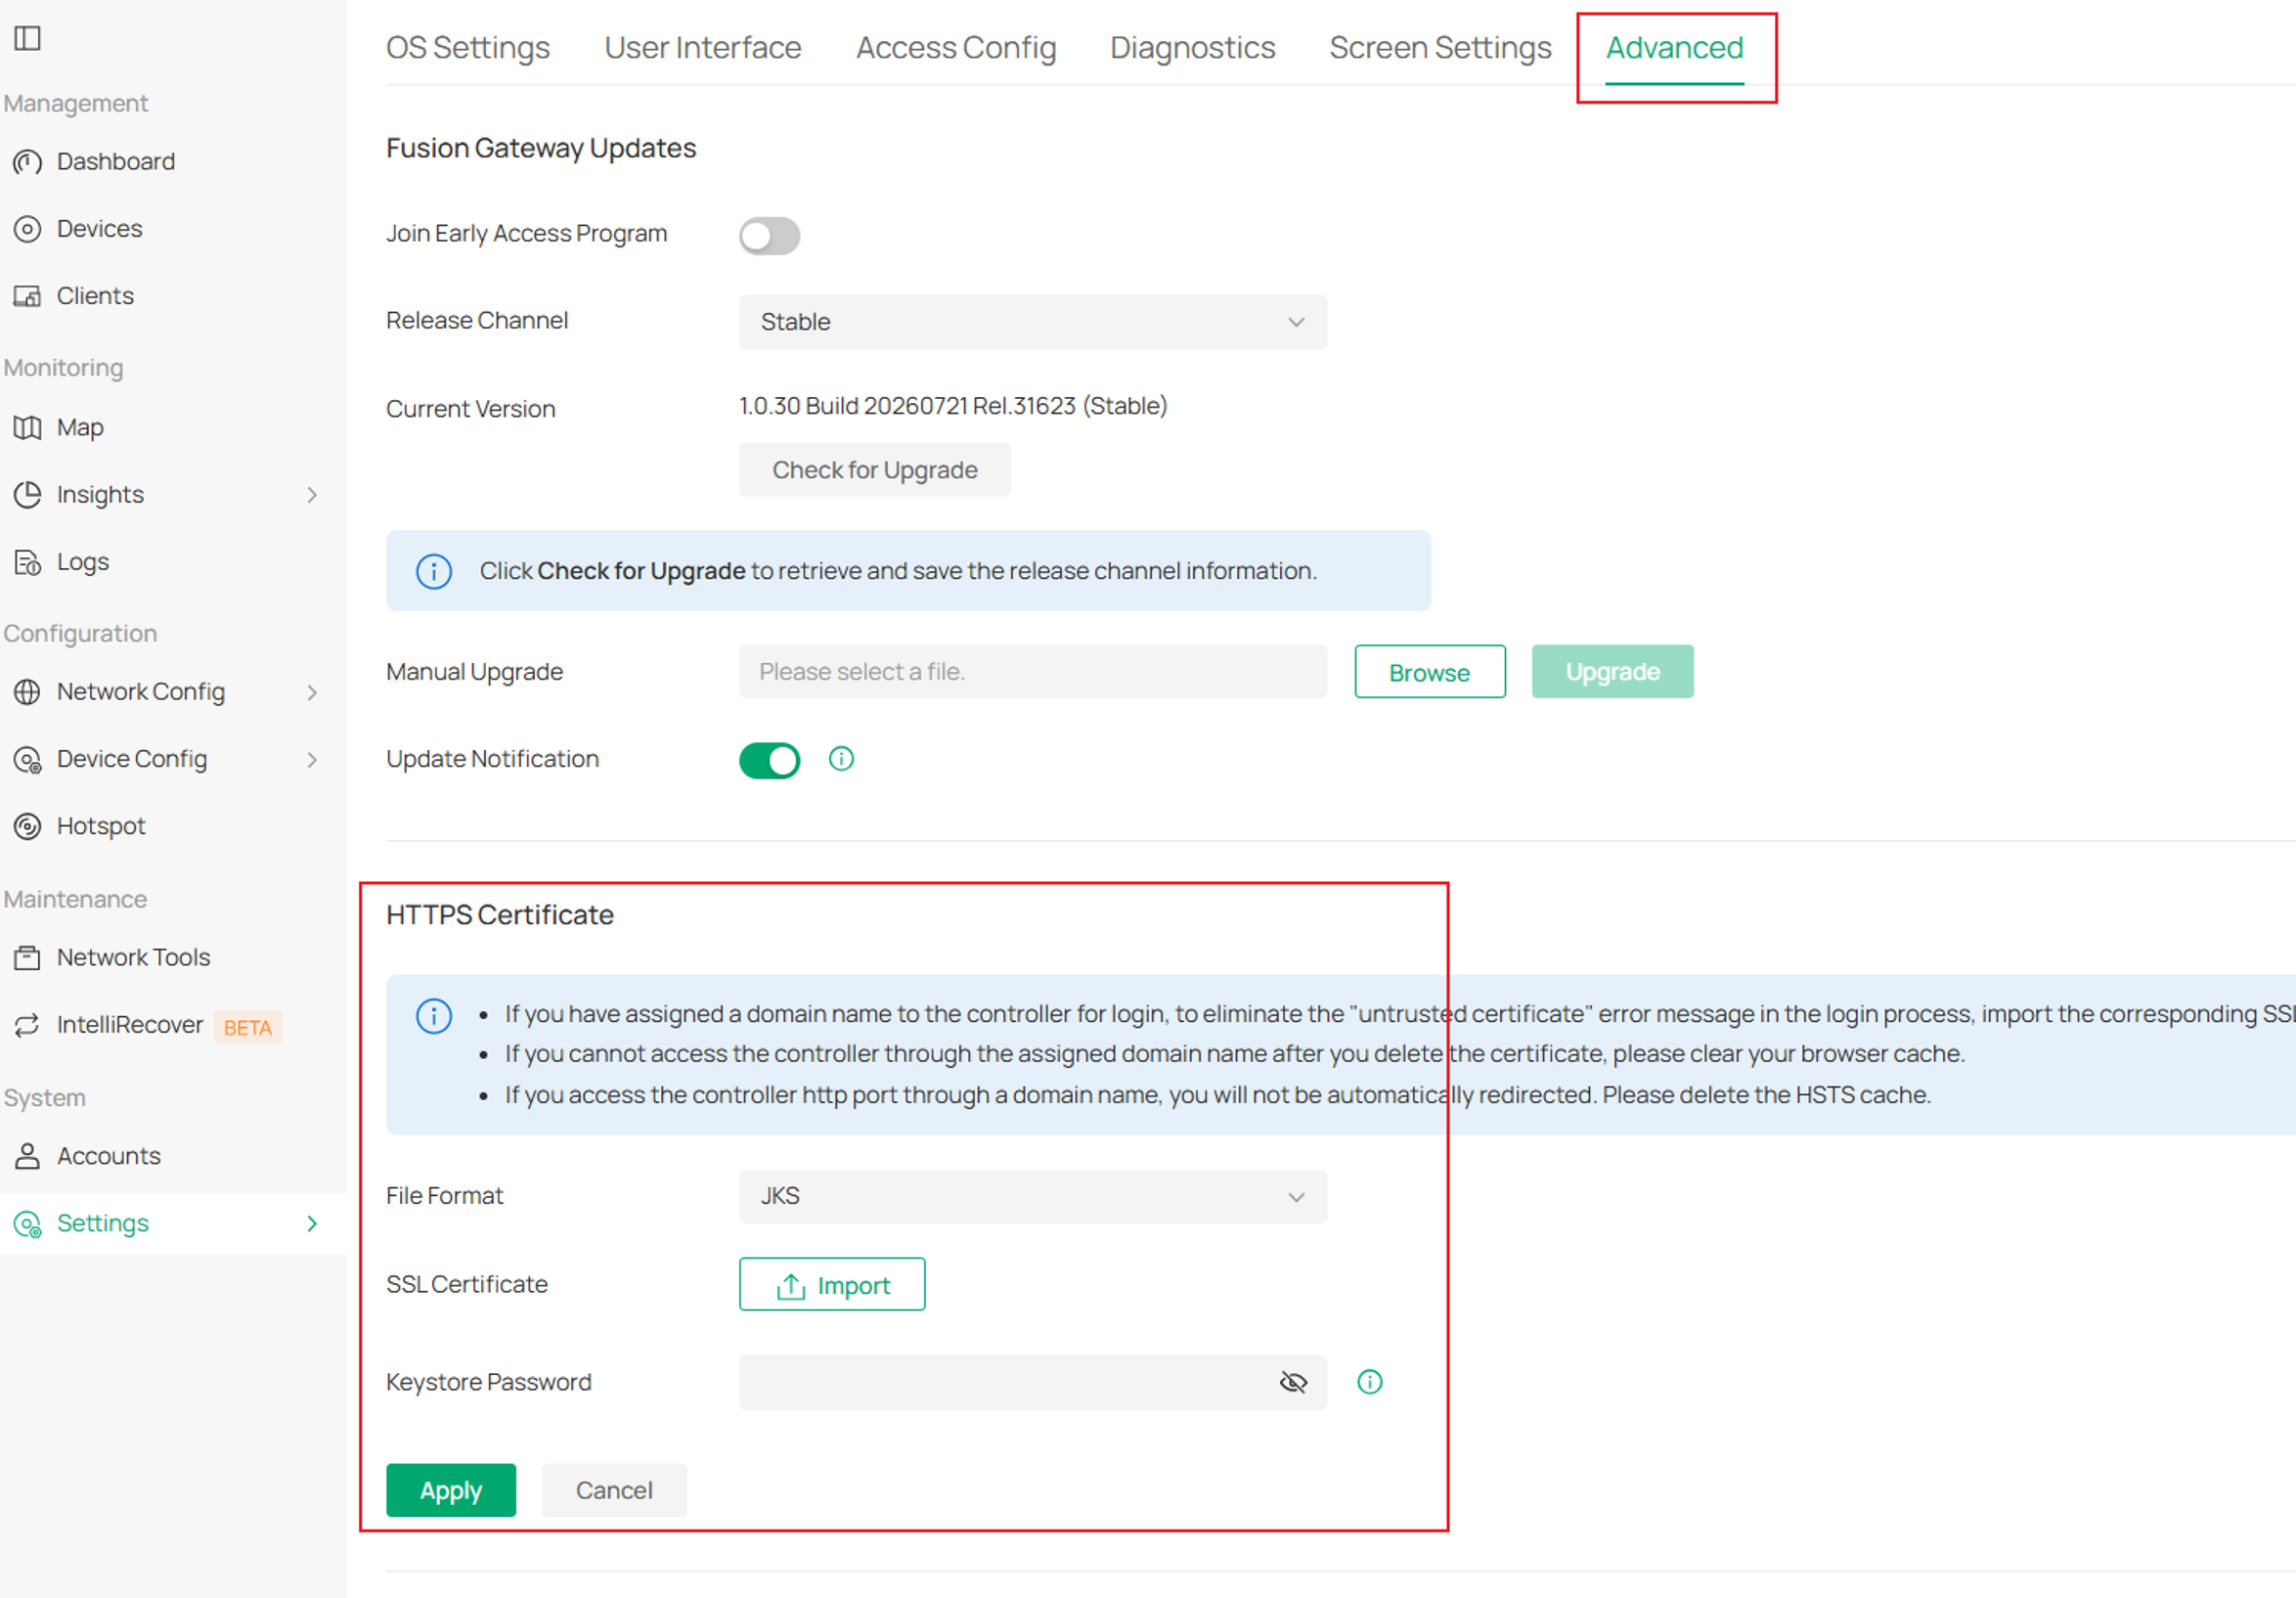
Omada Software Controller:
Navigate to Global > Settings > System Settings.
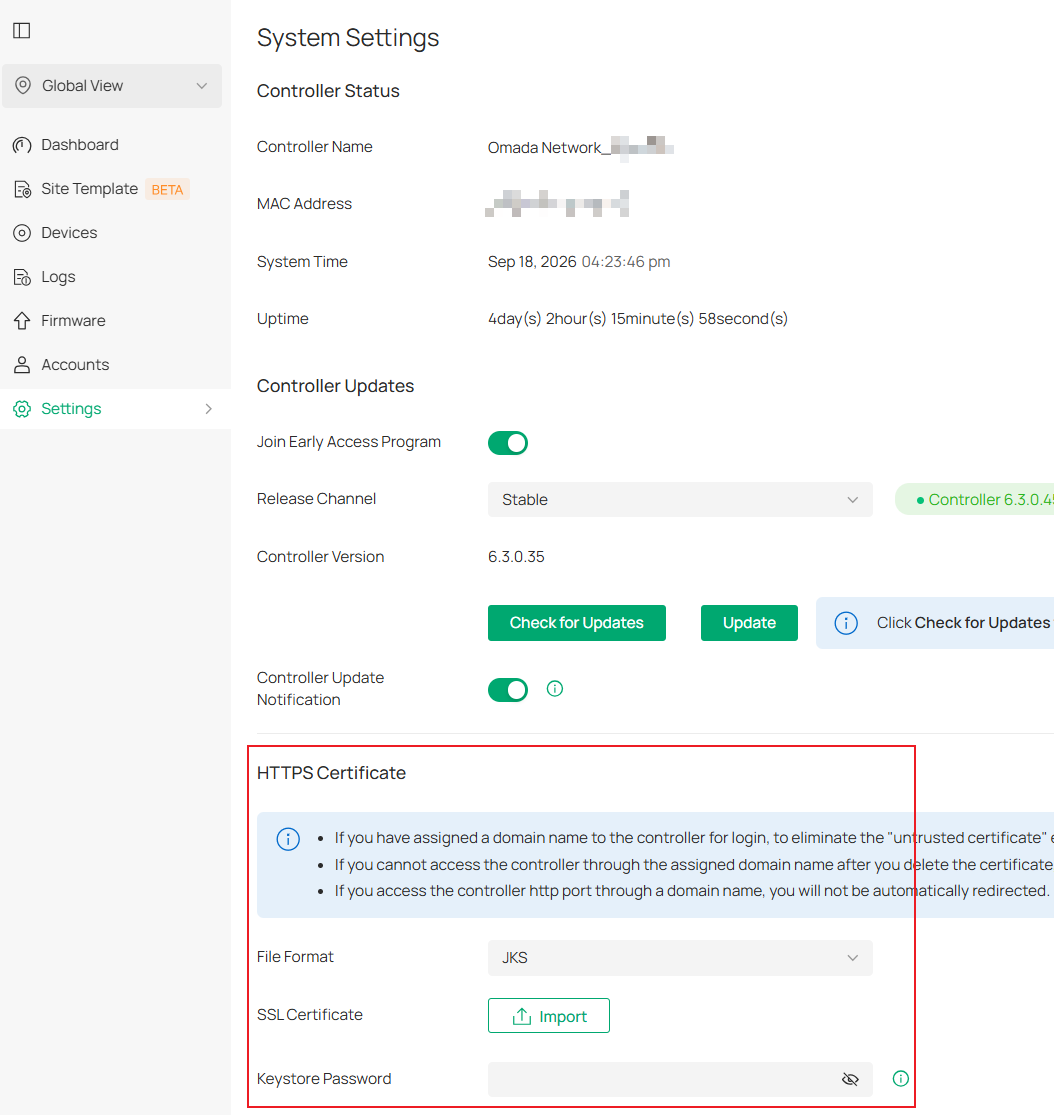
Omada Hardware Controller:
Navigate to Global > Settings > System Settings.
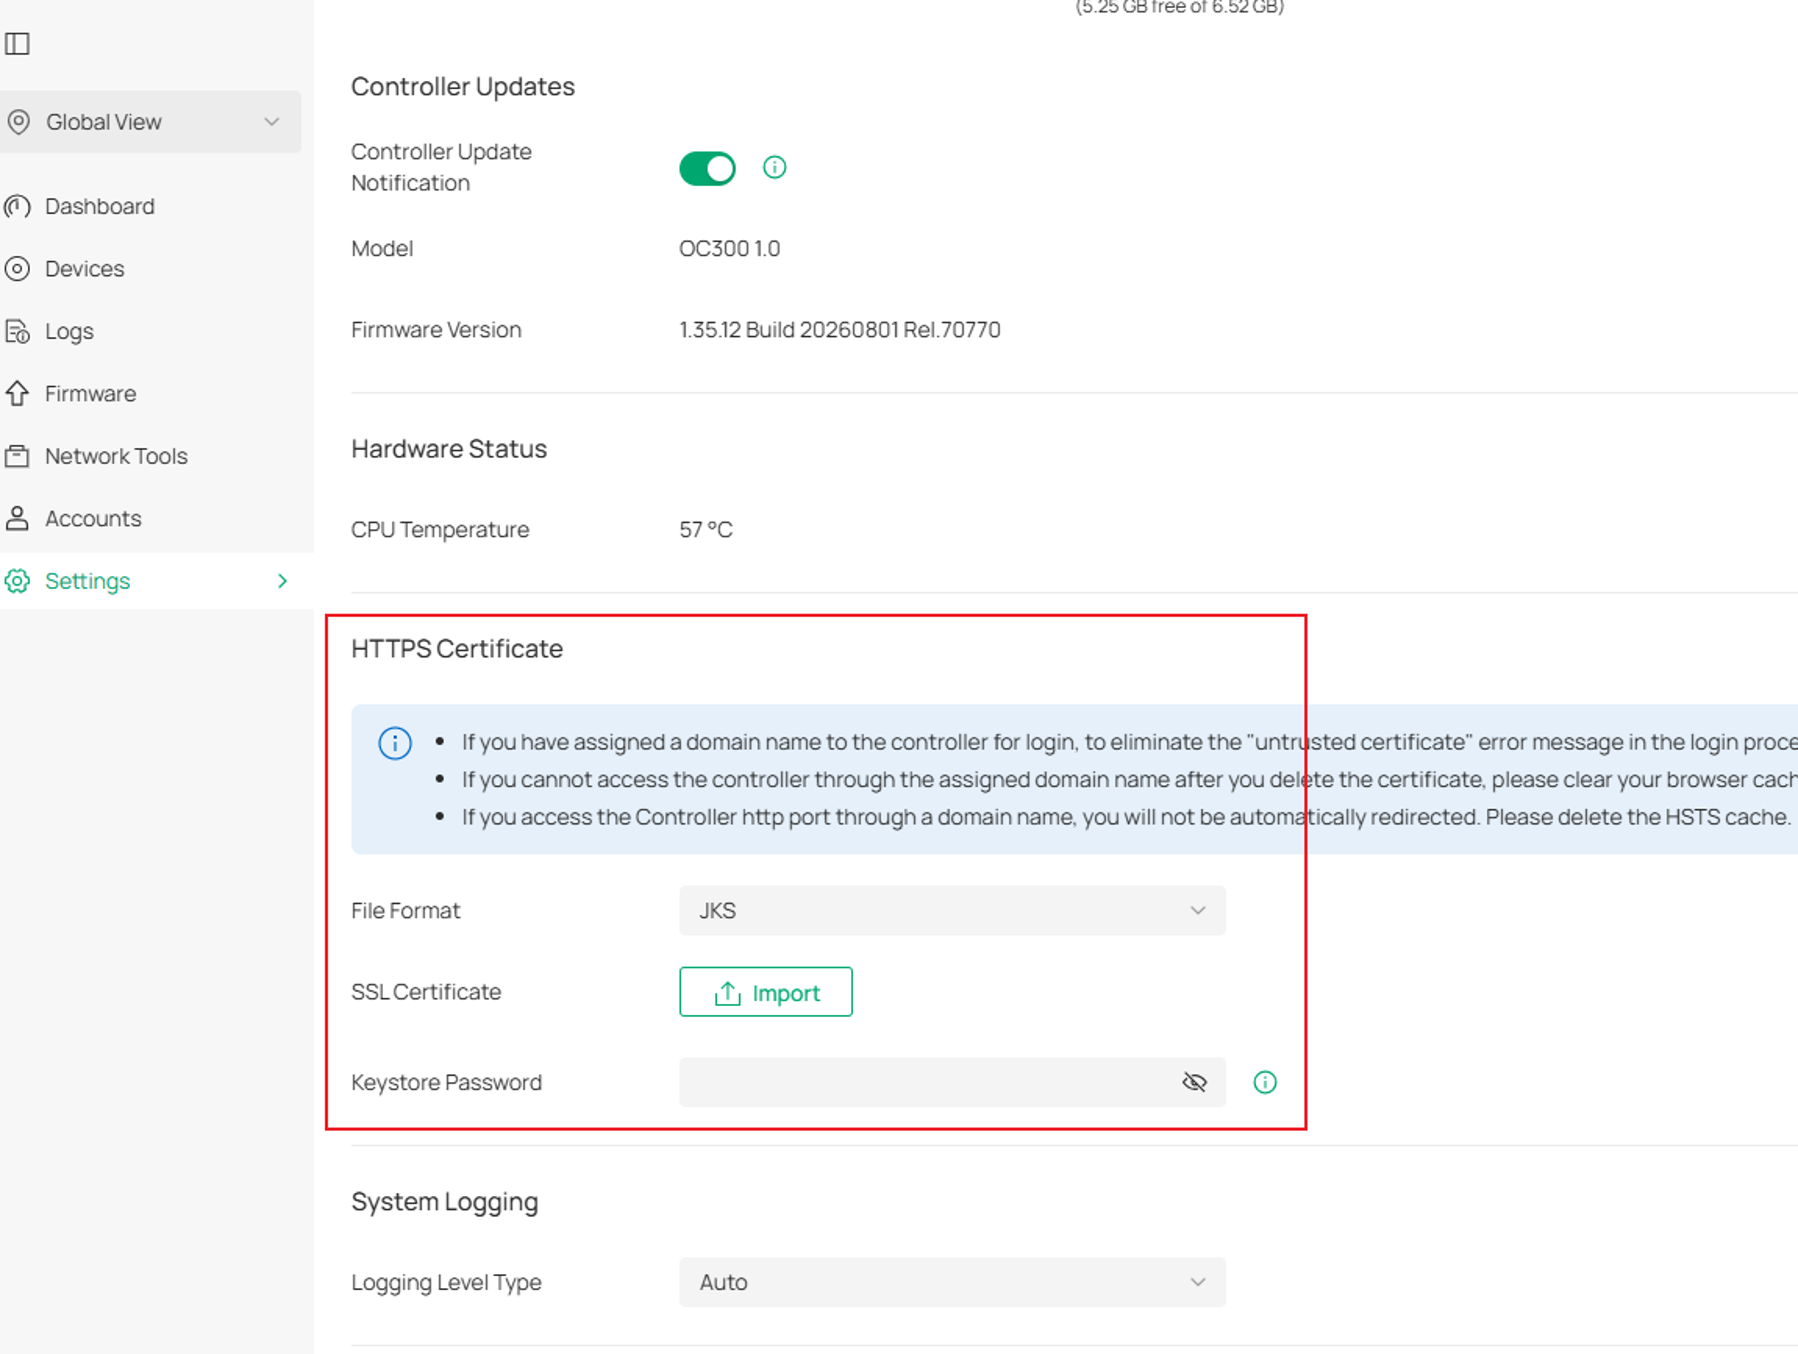
Step 2: Prepare the SSL certificate
Omada Controller supports SSL certificates in PEM, PFX (PKCS#12), and JKS (Java KeyStore) formats.
The certificate format used typically depends on the operating system, application platform, and certificate management practices of the deployment environment.
|
Format |
Typical Environment |
Contains Private Key |
Human-Readable Text Format |
Common Sources |
|
PEM |
Linux / OpenSSL |
Usually stored separately |
Yes |
OpenSSL, Let's Encrypt, Internal CA |
|
PFX (PKCS#12) |
Windows / Enterprise PKI |
Yes |
No |
AD CS, IIS Export, Public CA |
|
JKS (Java KeyStore) |
Java Applications |
Yes |
No |
Java Keytool, Java PKI Workflows |
If a certificate has not yet been generated, refer to:
How to Configure SSL Certificates for Omada Controller
Convert a PEM certificate to PFX
Use the following OpenSSL command to convert a PEM certificate and private key into a PFX certificate:
openssl pkcs12 -export -inkey <private_key_file> -in <certificate_file> -out <output_pfx_file>
When prompted, enter an export password. This password is required when importing the generated PFX certificate into the Controller.
The following example converts https.key and https_chain.pem into a PFX certificate named https.pfx.

Convert a PFX certificate to JKS
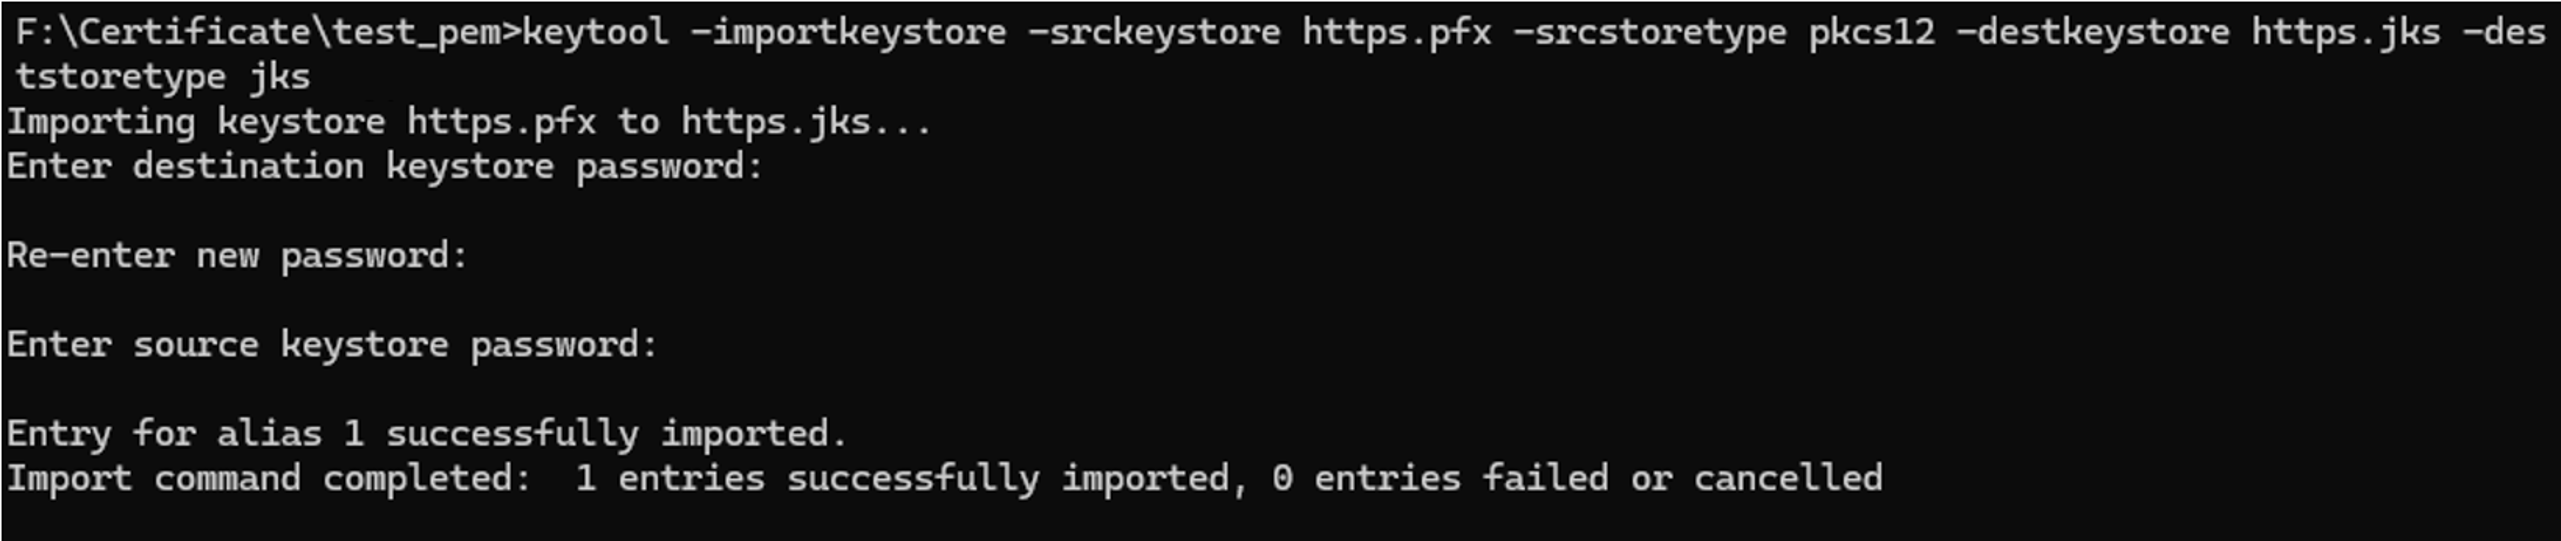
Use the following keytool command to convert a PFX (PKCS#12) certificate into a JKS (Java KeyStore) certificate:
keytool -importkeystore -srckeystore <source_pfx_file> -srcstoretype PKCS12 -destkeystore <destination_jks_file> -deststoretype JKS
Before running the command, ensure that the Java Development Kit (JDK) is installed. The keytool utility is included with the JDK and is typically located in the Java installation's bin directory.
Notes:
- Destination keystore password: Password for the generated JKS certificate. This password is required when importing the certificate into the Controller.
- Source keystore password: Password associated with the source PFX certificate.
Step 3: Import the certificate into the Controller
After preparing the required certificate format, upload it to the Controller.
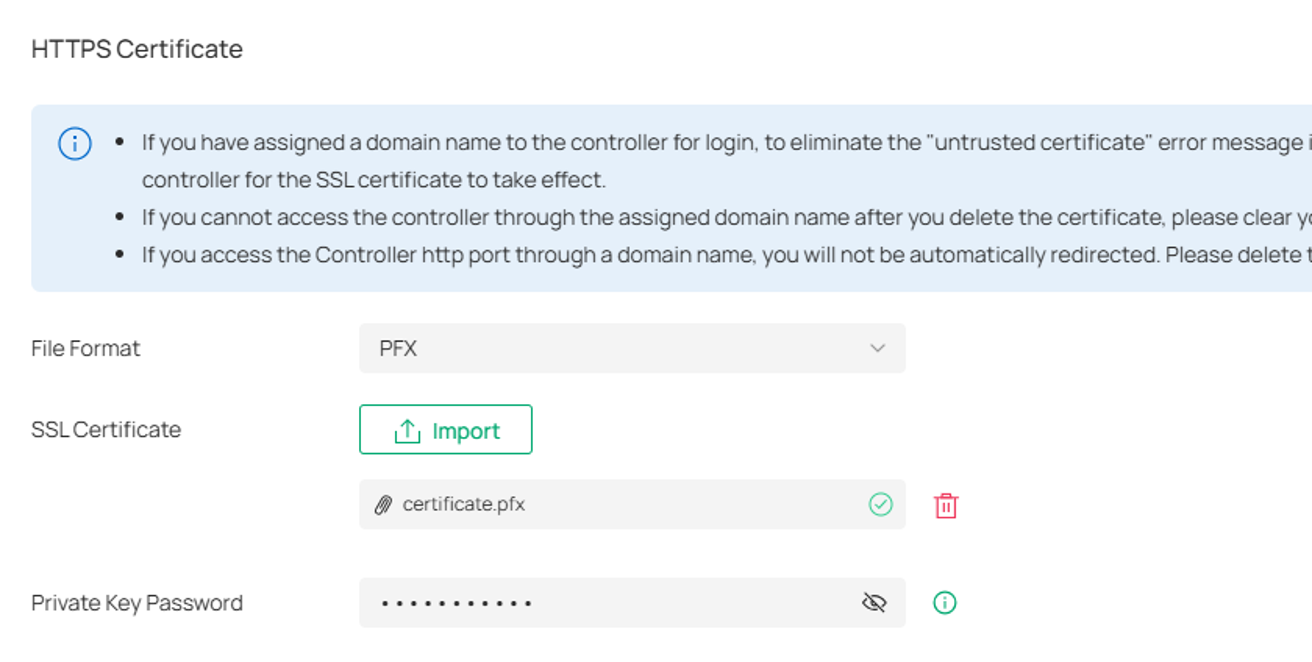
PFX Certificate
Upload the PFX file and enter the associated certificate password.

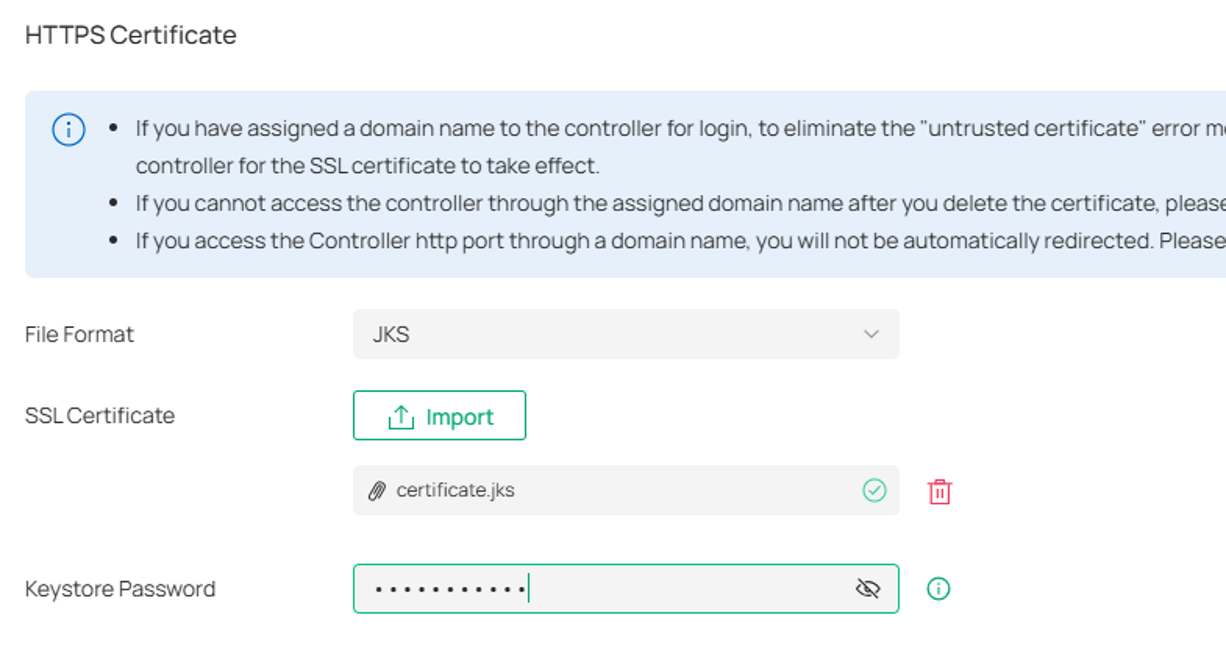
JKS Certificate
Upload the JKS file and enter the associated certificate password.

PEM Certificate
Upload both the certificate file and the corresponding private key file.

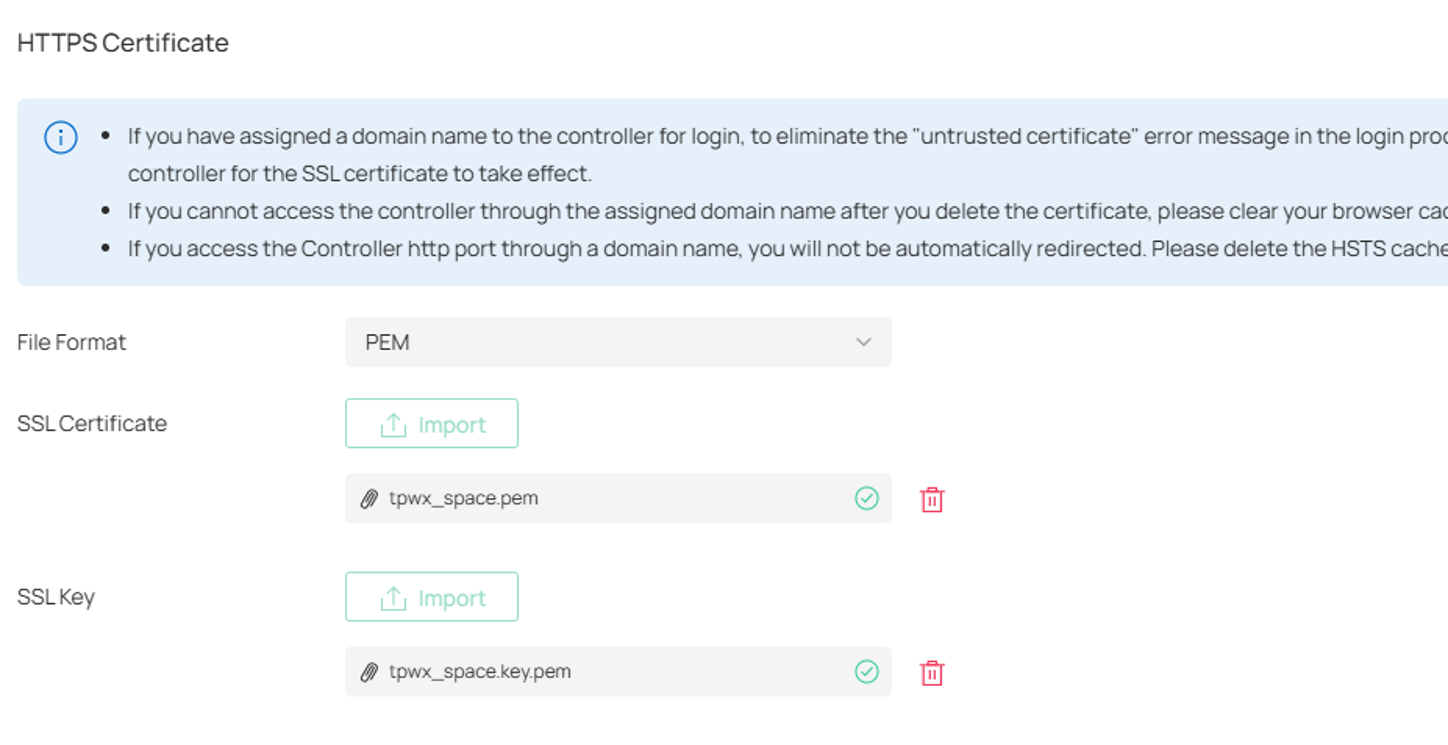
Note: Only unencrypted RSA private keys are supported. If an encrypted private key is uploaded, the certificate cannot be imported successfully.
Step.4 Refresh the browser page or Reboot the Controller
After uploading and saving the certificate, additional action is required for the certificate to take effect.
Omada Fusion Gateways:
For the Omada Fusion Gateways and the ER7212PC V2 running Controller version 6.4 or later, refresh the browser page after uploading the certificate for it to take effect.
Omada Hardware Controller:
For the OC, the certificate will take effect after it is uploaded and the browser page is refreshed.
Omada Software Controller:
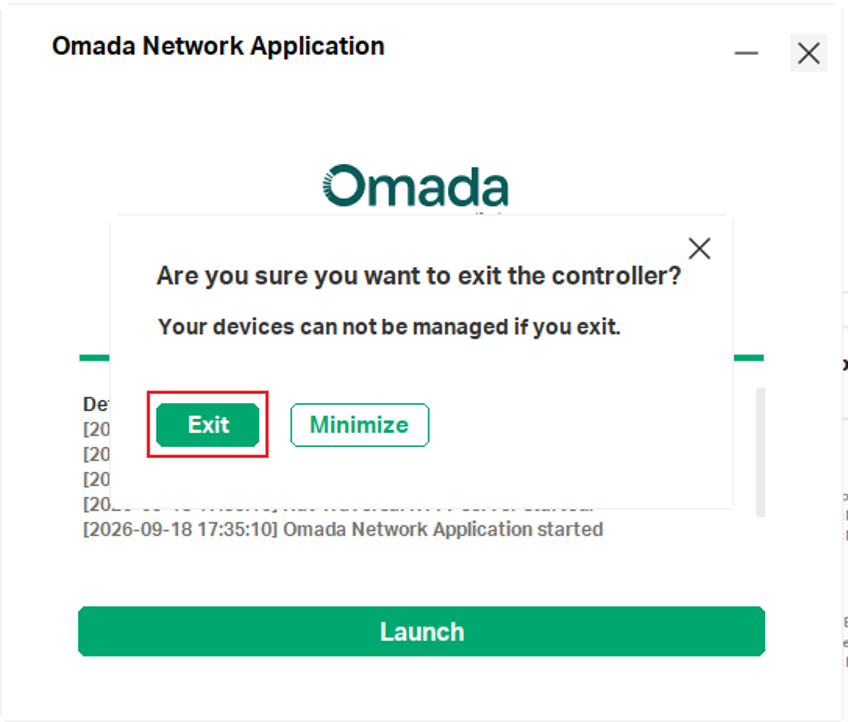
For the Windows/Linux Software Controller, a restart is required for the certificate to take effect.
Exit the Controller application and start it again.
Verification
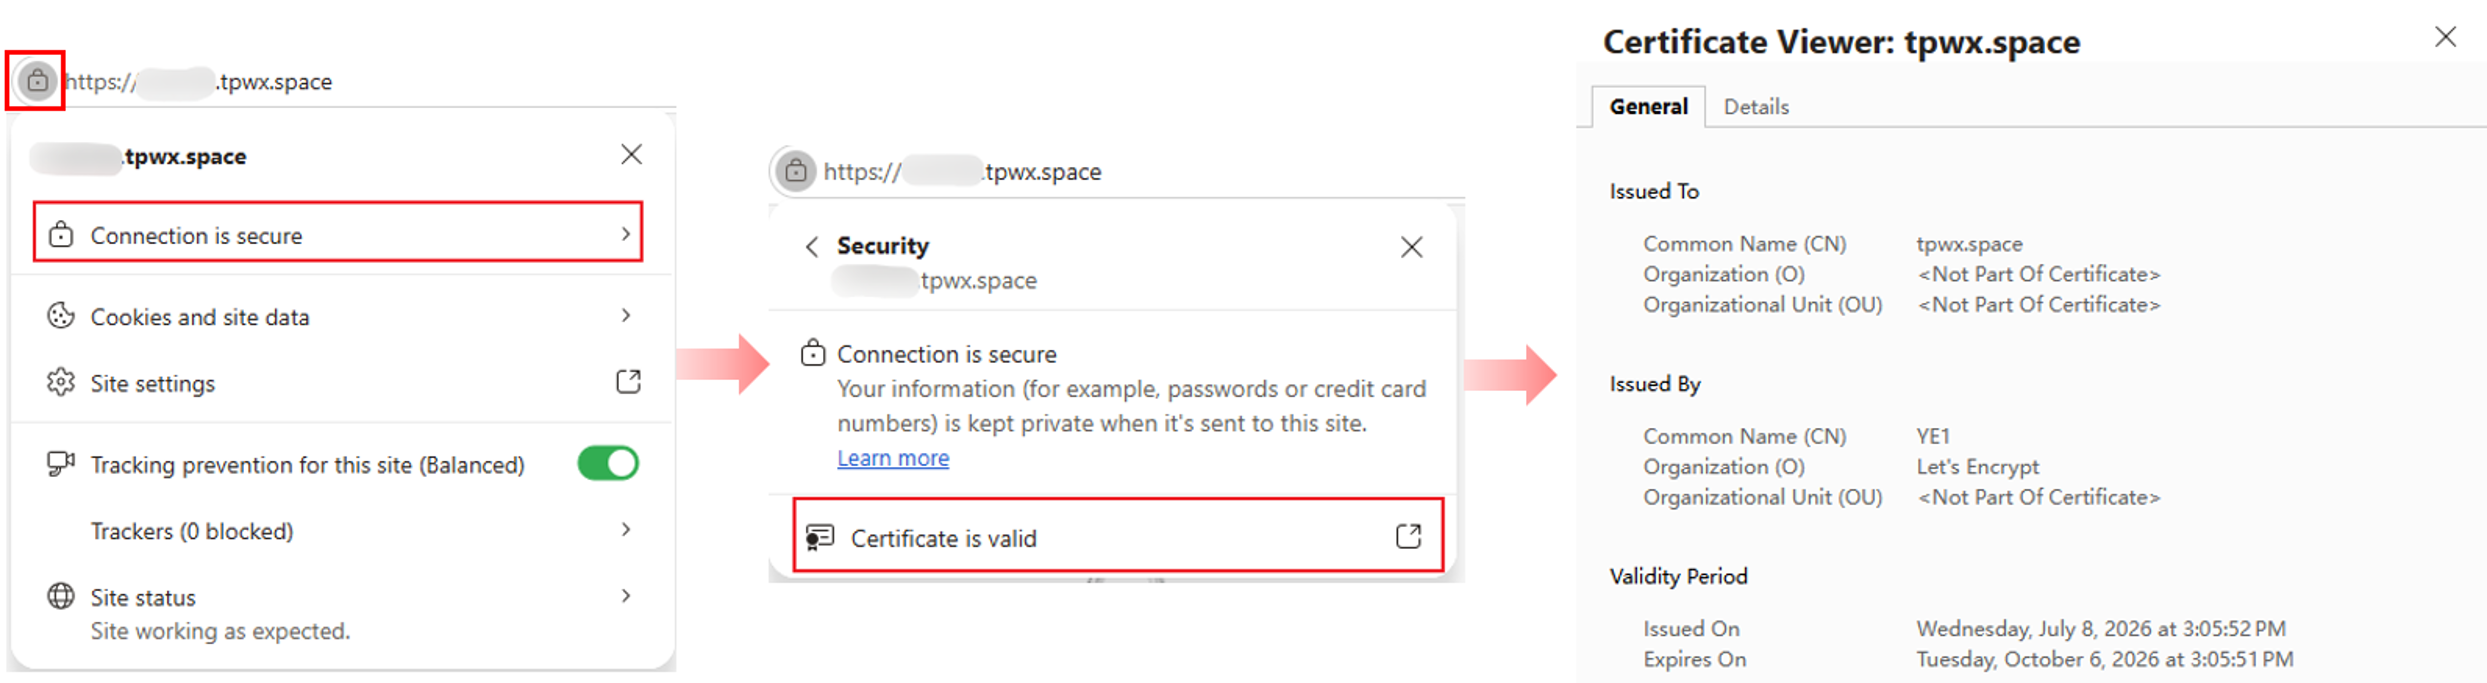
Access the Omada Controller using the hostname, domain name, or IP address specified in the certificate.
Verify that:
- No browser security warning is displayed.
- The HTTPS connection is marked as secure.
- The certificate information matches the uploaded certificate.
Conclusion
HTTPS certificate warnings on Omada Controller can be resolved either by trusting the default self-signed certificate or by deploying a trusted SSL certificate. For production environments, uploading a trusted PEM, PFX, or JKS certificate is recommended to eliminate browser warnings and provide a trusted HTTPS experience.
After the certificate is applied and the Controller is restarted, administrators can securely access the Omada Controller web interface without certificate-related interruptions.
To learn more about each function and configuration, please visit Support Home to download or check the manual for your product.

