

Contents
Configuration – Create the WLAN Group
Configuration – Add SSIDs to the WLAN Group
Apply the WLAN Group to a single EAP
Apply the WLAN Group to a group of EAPs
Introduction
The WLAN Group feature simplifies wireless network deployment by enabling administrators to create predefined groups of SSIDs and wireless settings. These groups can be quickly applied to EAP devices, ensuring consistent configuration across the network. Depending on deployment requirements, different WLAN Groups can be assigned to specific EAPs, or a single WLAN Group can be applied to all EAPs.
Requirements
- Omada Controller (This article uses Omada Controller 6.2 as an example.)
- An Omada EAP
Configuration – Create the WLAN Group
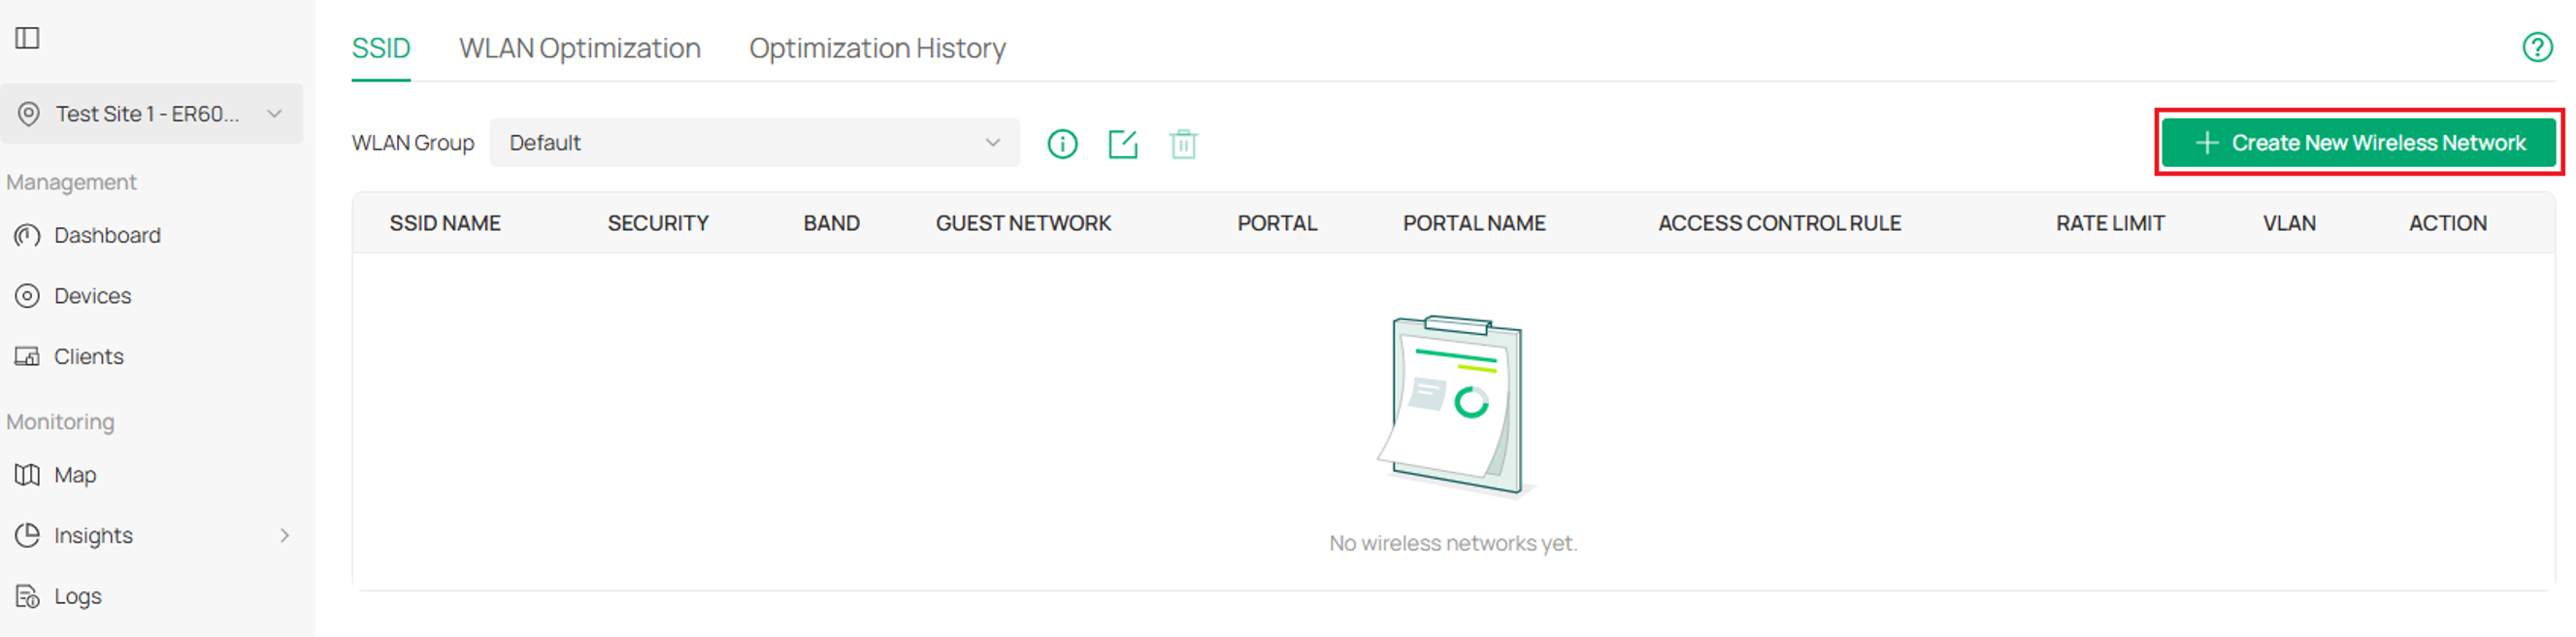
Step 1. Go to Site View > Network Config > WLAN.

Step 2. Select Create New Wireless Network.
Step 3. For a simple Wireless Network, complete the fields, Network Name (SSID), Band, Security and Security Key. Select Apply when complete.
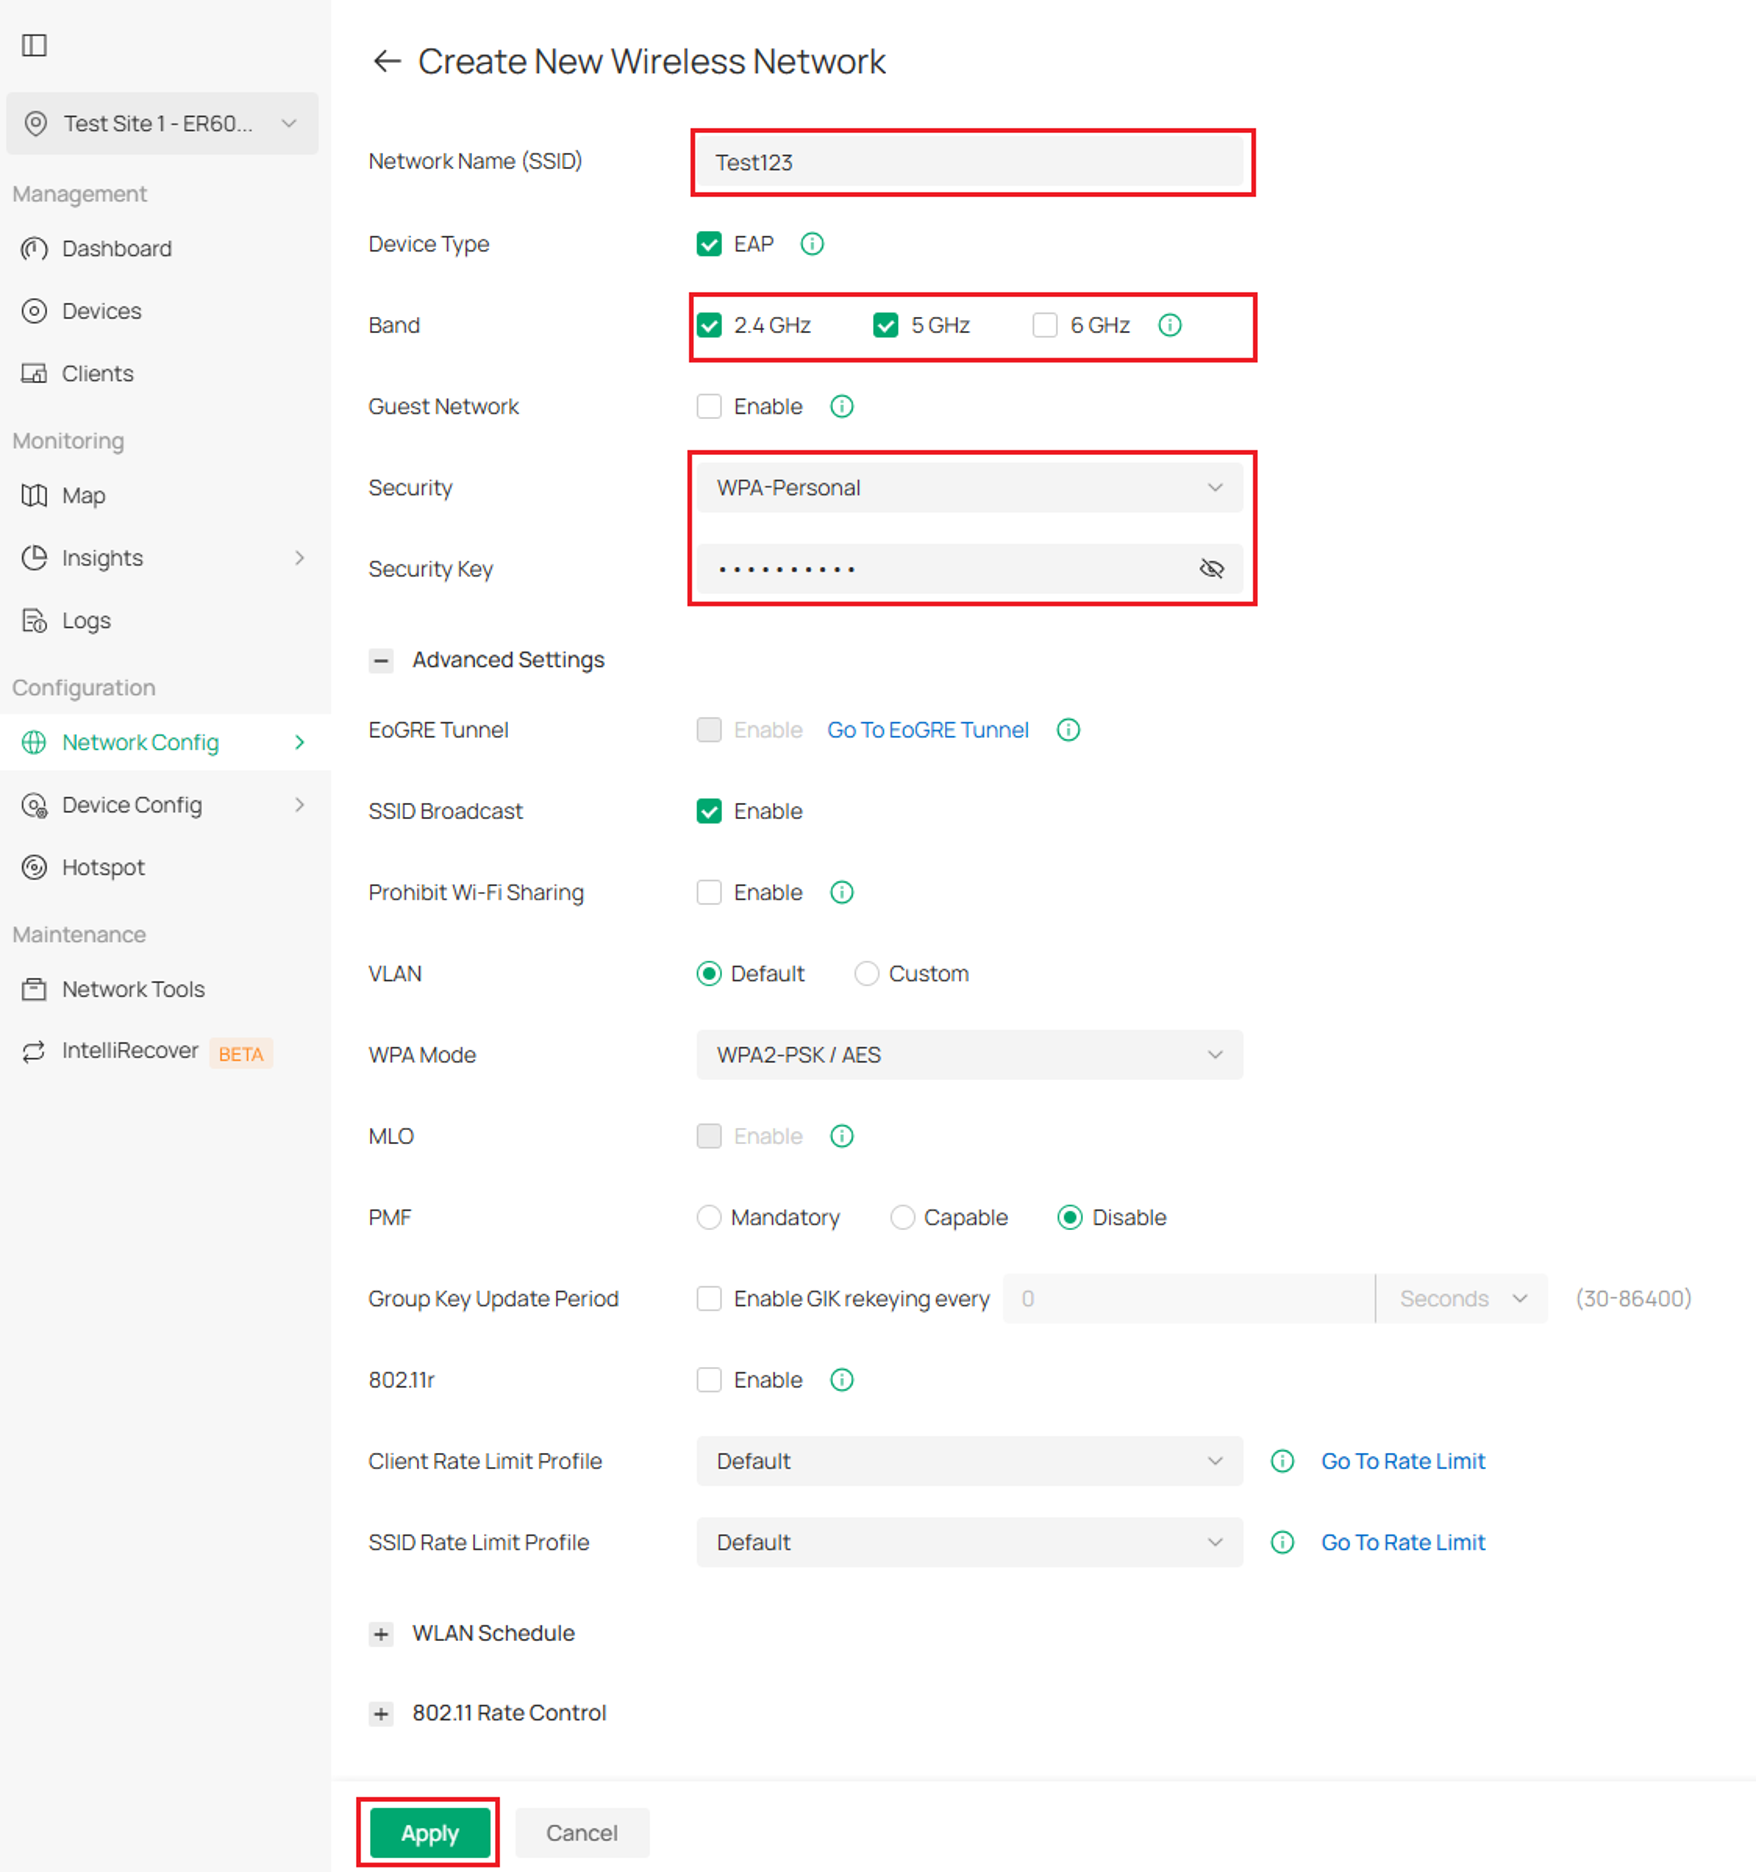
Explanation of common SSID settings:
Network Name (SSID): Specify the network name (SSID) to identify the wireless network. The wireless clients choose the SSID on their WLAN settings page to connect to the wireless network.
Device Type: Select the type of device that the wireless network can apply to.
Band: Enable the 2.4 GHz, 5 GHz and/or 6 GHz radio band(s) for the wireless network.
Guest Network: When enabled, all the clients connecting to the SSID are blocked from reaching any private IP subnet.
Security: Select the encryption method for the wireless network based on needs.
SSID Broadcast: When enabled, wireless devices broadcast the SSID (network name) in the air, and the SSID will appear in the list of available wireless networks. When disabled, users must enter the SSID manually to connect to the wireless network.
Prohibit Wi-Fi Sharing: When enabled, the connected clients will be prohibited to share the Wi-Fi with other clients.
VLAN: Configure the uplink port VLANs corresponding to the SSID.
Default: Using untagged transmission.
Custom: Modifying the VLAN ID by binding one or multiple networks or manually entering one or multiple VLAN IDs. If a device does not support multiple VLANs, the smallest VLAN you configured will be applied to the SSID. When a client connects to the SSID, it will be assigned to one of the VLANs you configured.
WPA Mode: If you select WPA-Personal or WPA-Enterprise as the security strategy, you can select the WPA Mode including the version of WPA (WPA-PSK, WPA2-PSK, WPA/WPA2-PSK and WPA-PSK/WPA3-SAE for WPA-Personal, and WPA-Enterprise, WPA2-Enterprise, WPA/WPA2-Enterprise and WPA3-Enterprise for WAP-Enterprise) and the encryption type.
- WPA encryption type:
- Auto: EAPs automatically determine the encryption type during authentication.
- AES: AES stands for Advanced Encryption Standard.
MLO: MLO (Multi-Link Operation) enables Wi-Fi 7 devices to simultaneously send and receive data across different frequency bands and channels. This ensures fast and reliable connections even in dense network environments.
Configuration – Add SSIDs to the WLAN Group
WLAN Groups allow different wireless network (SSID) configurations to be assigned to different EAPs or Wireless Gateways within the same deployment. This is useful when different locations, buildings, departments, or user groups require different wireless networks or settings. A WLAN Group contains one or more wireless networks and can be applied to selected devices as needed. By default, a WLAN Group named Default is created and applied to all EAPs and Wireless Gateways.
Step 1. Go to Site View > Network Config > WLAN.
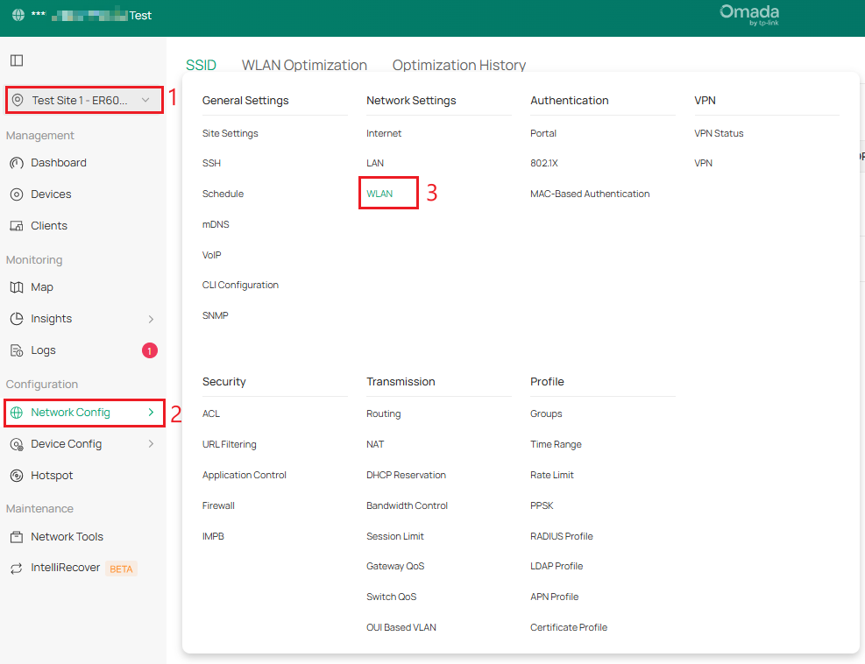
Step 2. SSID > Select the WLAN Group drop down menu > Create New Group.

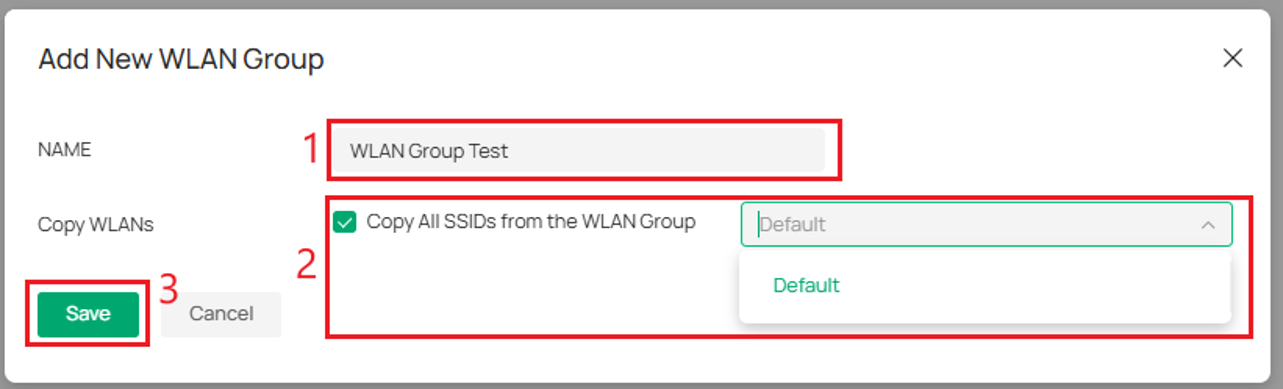
Step 3. Name the new WLAN Group.
Note: WLAN Groups can be copied by ticking the Copy all SSIDs from the WLAN Group option and selecting the WLAN Groups to be copied.
Select Save.
Step 4. The new WLAN Group can be found by selecting it within the WLAN Group drop-down menu. 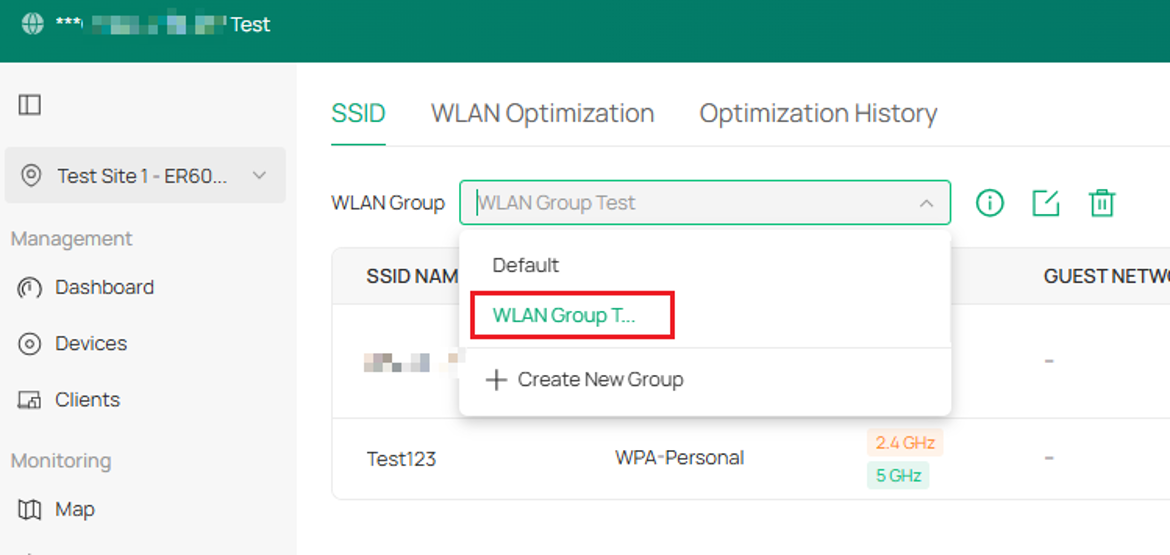
Apply the WLAN Group to a single EAP
In this example, a WLAN Group will be applied to a EAP670. This device is currently on the default WLAN group. This will be changed to WLAN Group: WLAN Group Test.
Note: Only after a WLAN Group is applied to the EAP, the SSIDs of the WLAN Group will take effect.
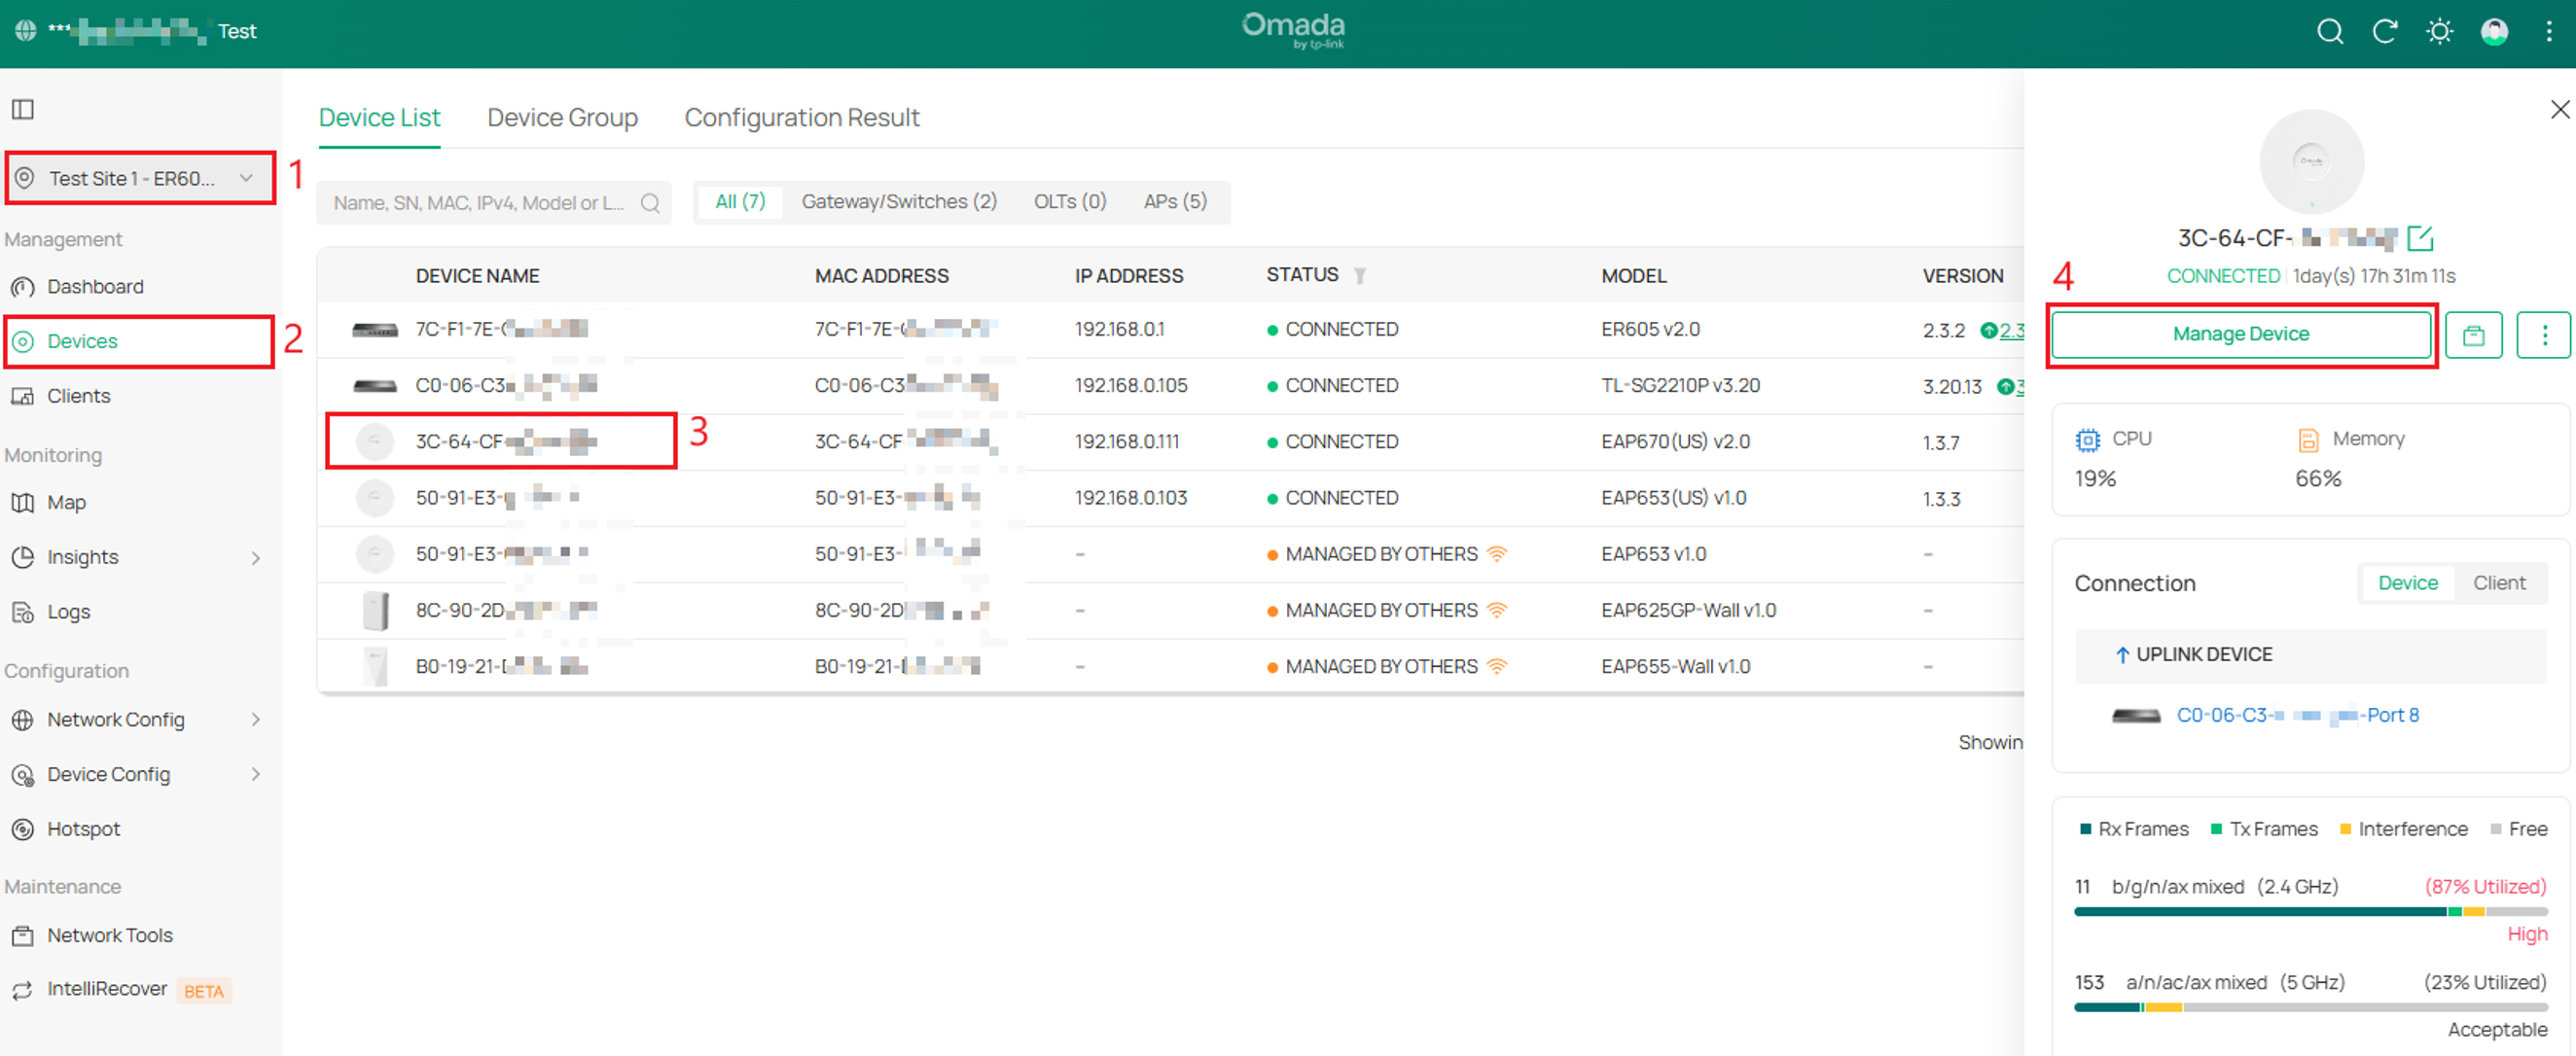
Step 1. Go to Site View > Devices > Select the EAP Device > Manage Device.
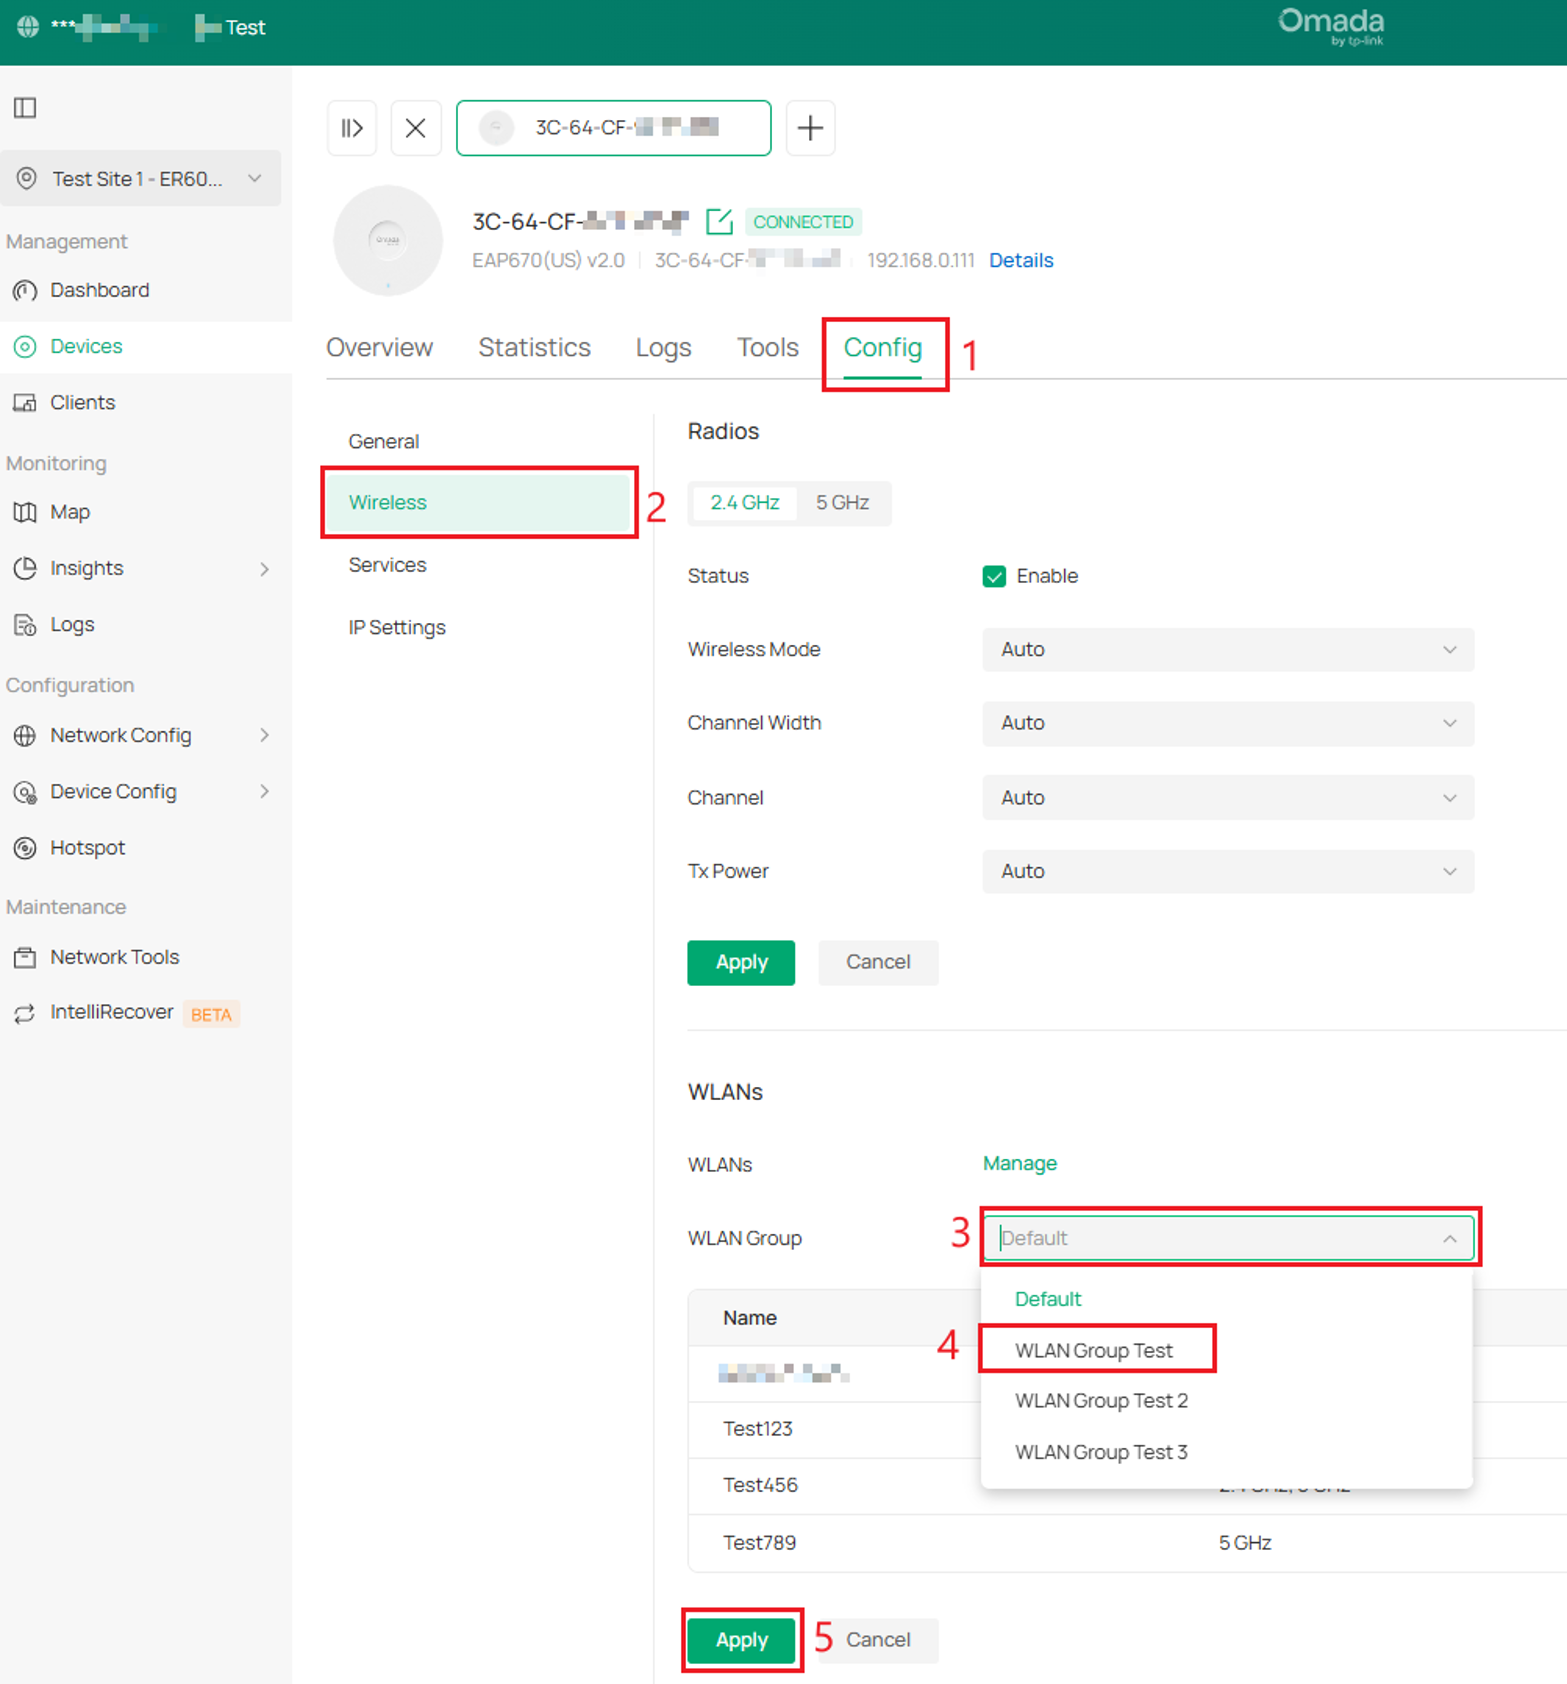
Step 2. Go to Config > Wireless. In the WLAN Group drop down menu, select WLAN Group Test > Apply. After selecting Apply, the EAP will reconfigure, and after a minute will now broadcast the new WLAN Group.
Apply the WLAN Group to a group of EAPs
In this example, a WLAN Group will be applied to a batch config of two devices – EAP653 and a EAP670. These devices are currently on the default WLAN group. This will be changed to WLAN Group: WLAN Group Test.
Note: Only after a WLAN Group is applied to the EAP, the SSIDs of the WLAN Group will take effect.
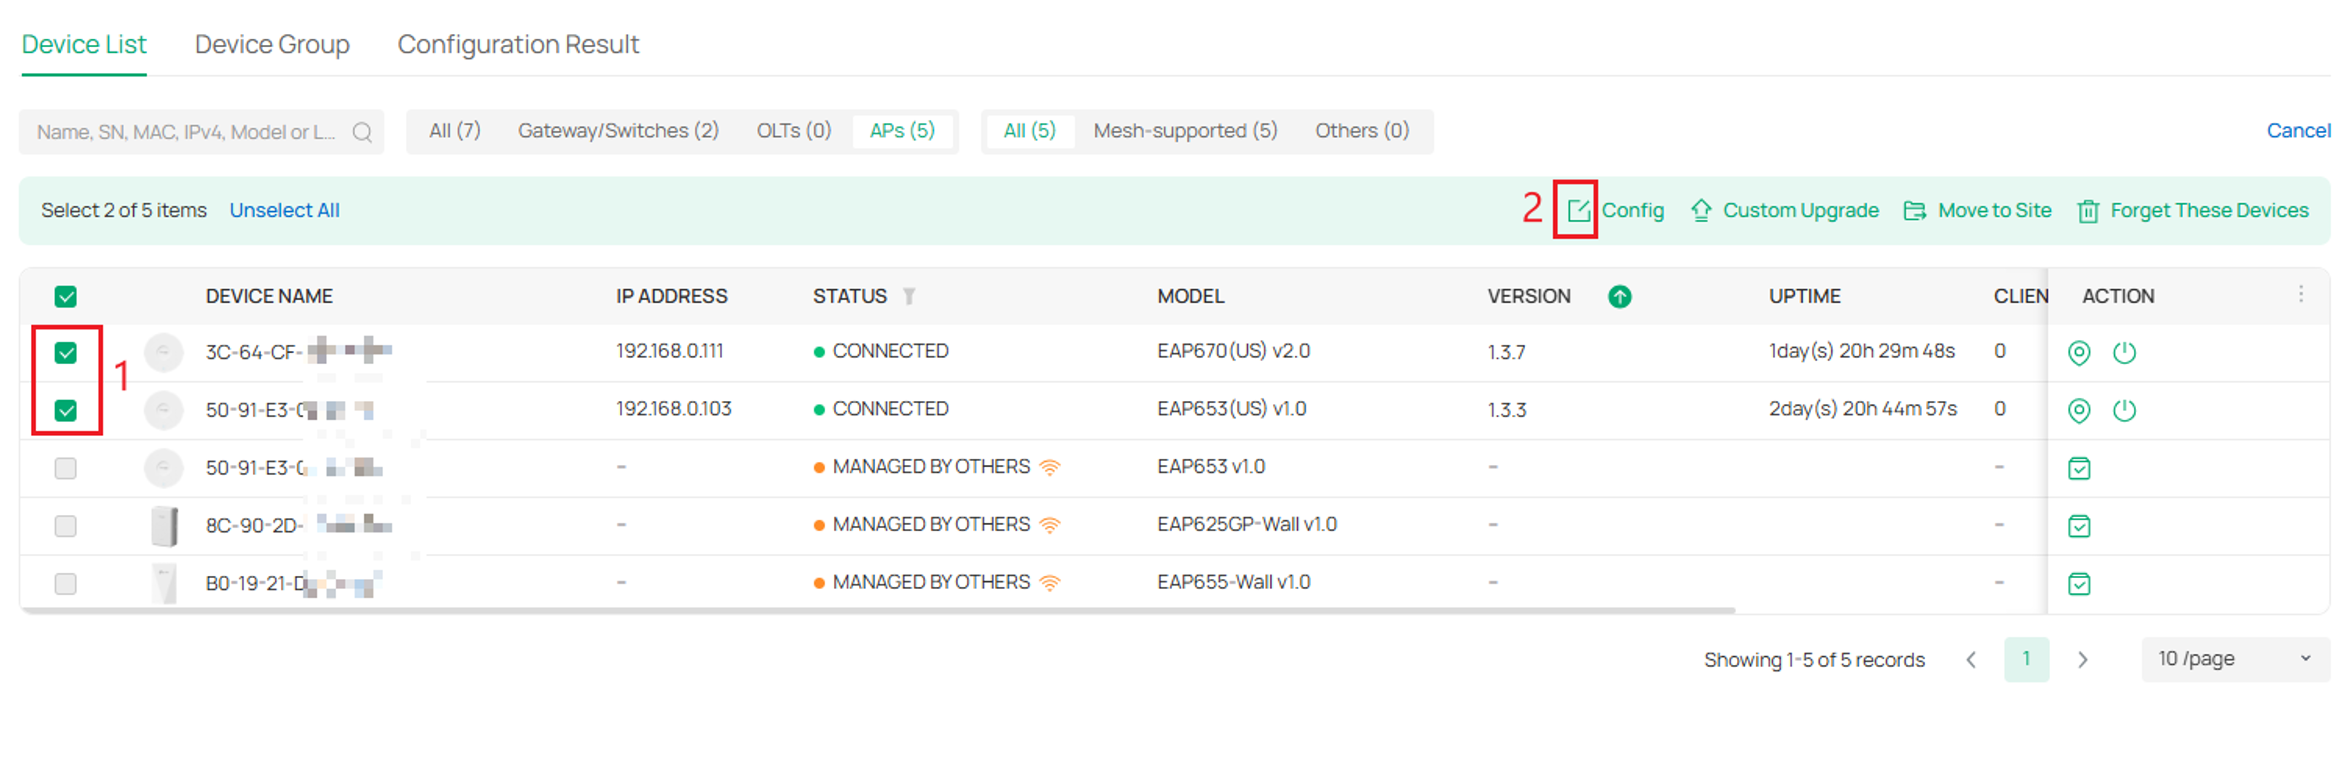
Step 1. Go to Site View > Devices > APs (optional) > Batch Action > Batch Config.
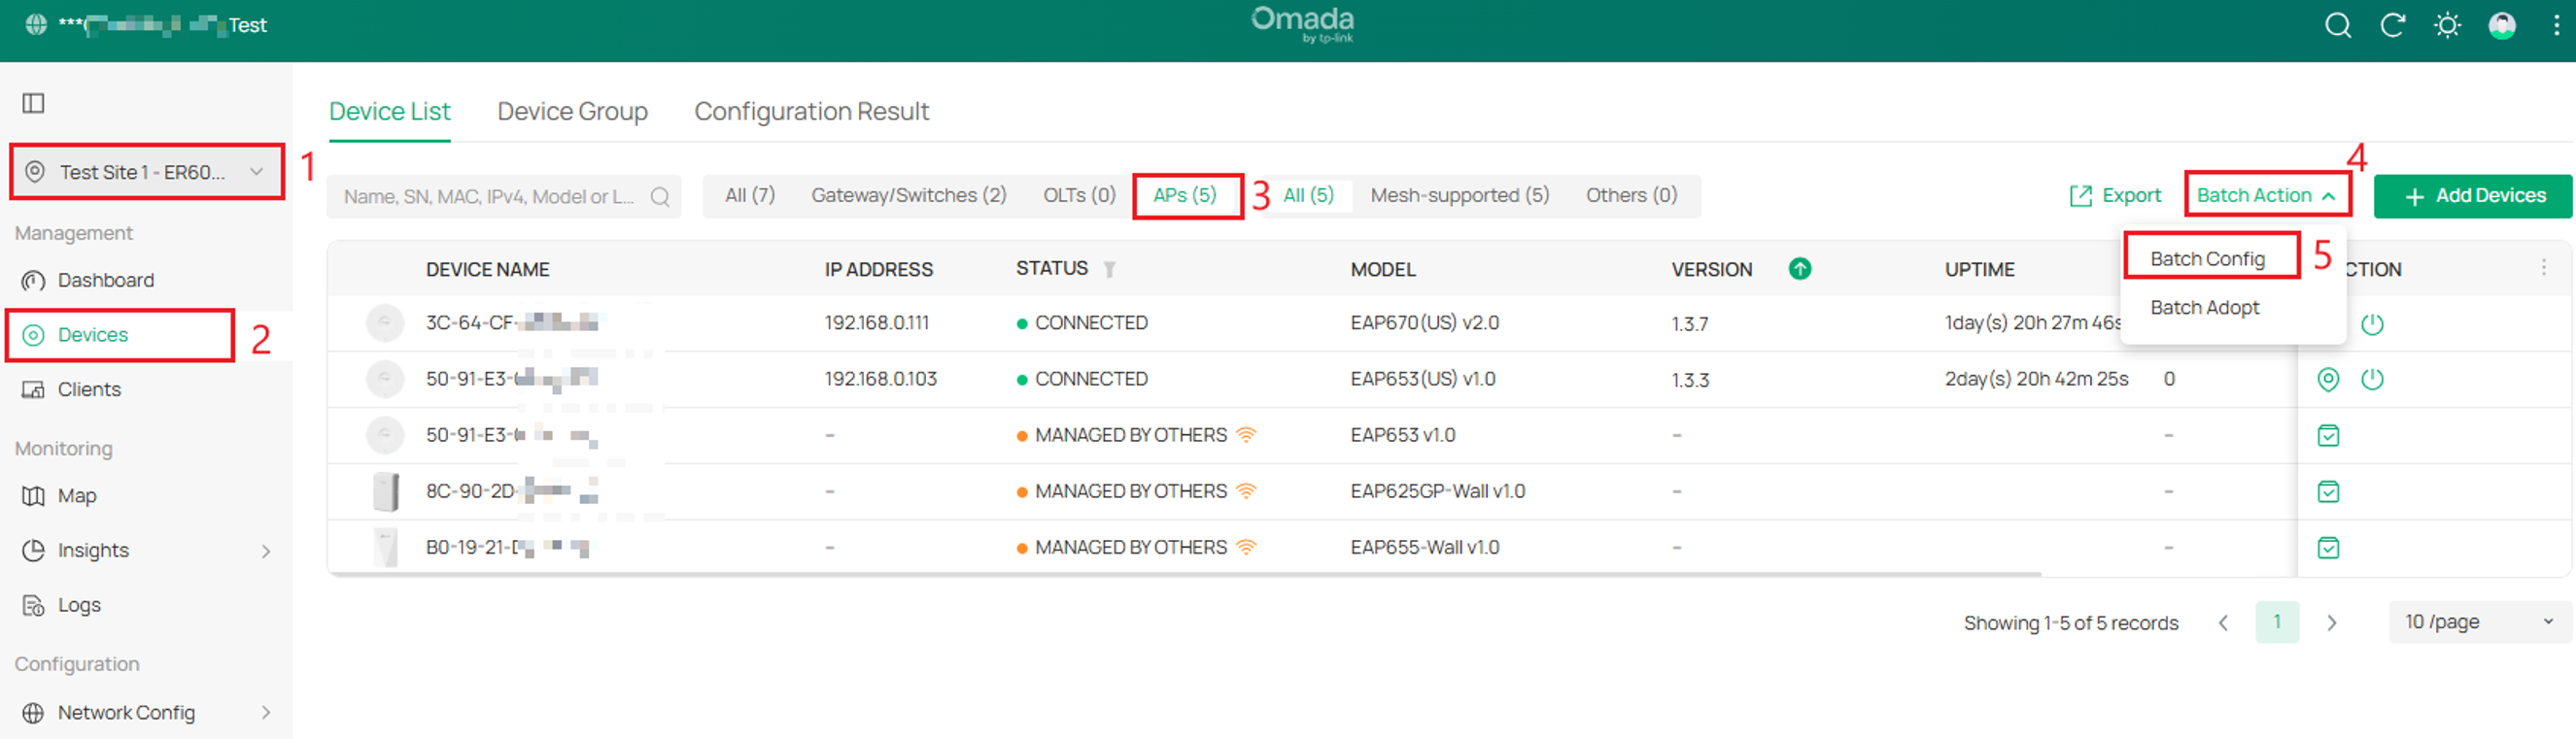
Note: Selecting APs is optional. It is a helpful option to sort the Device List to only AP devices.
Step 2. Select the devices > Config.
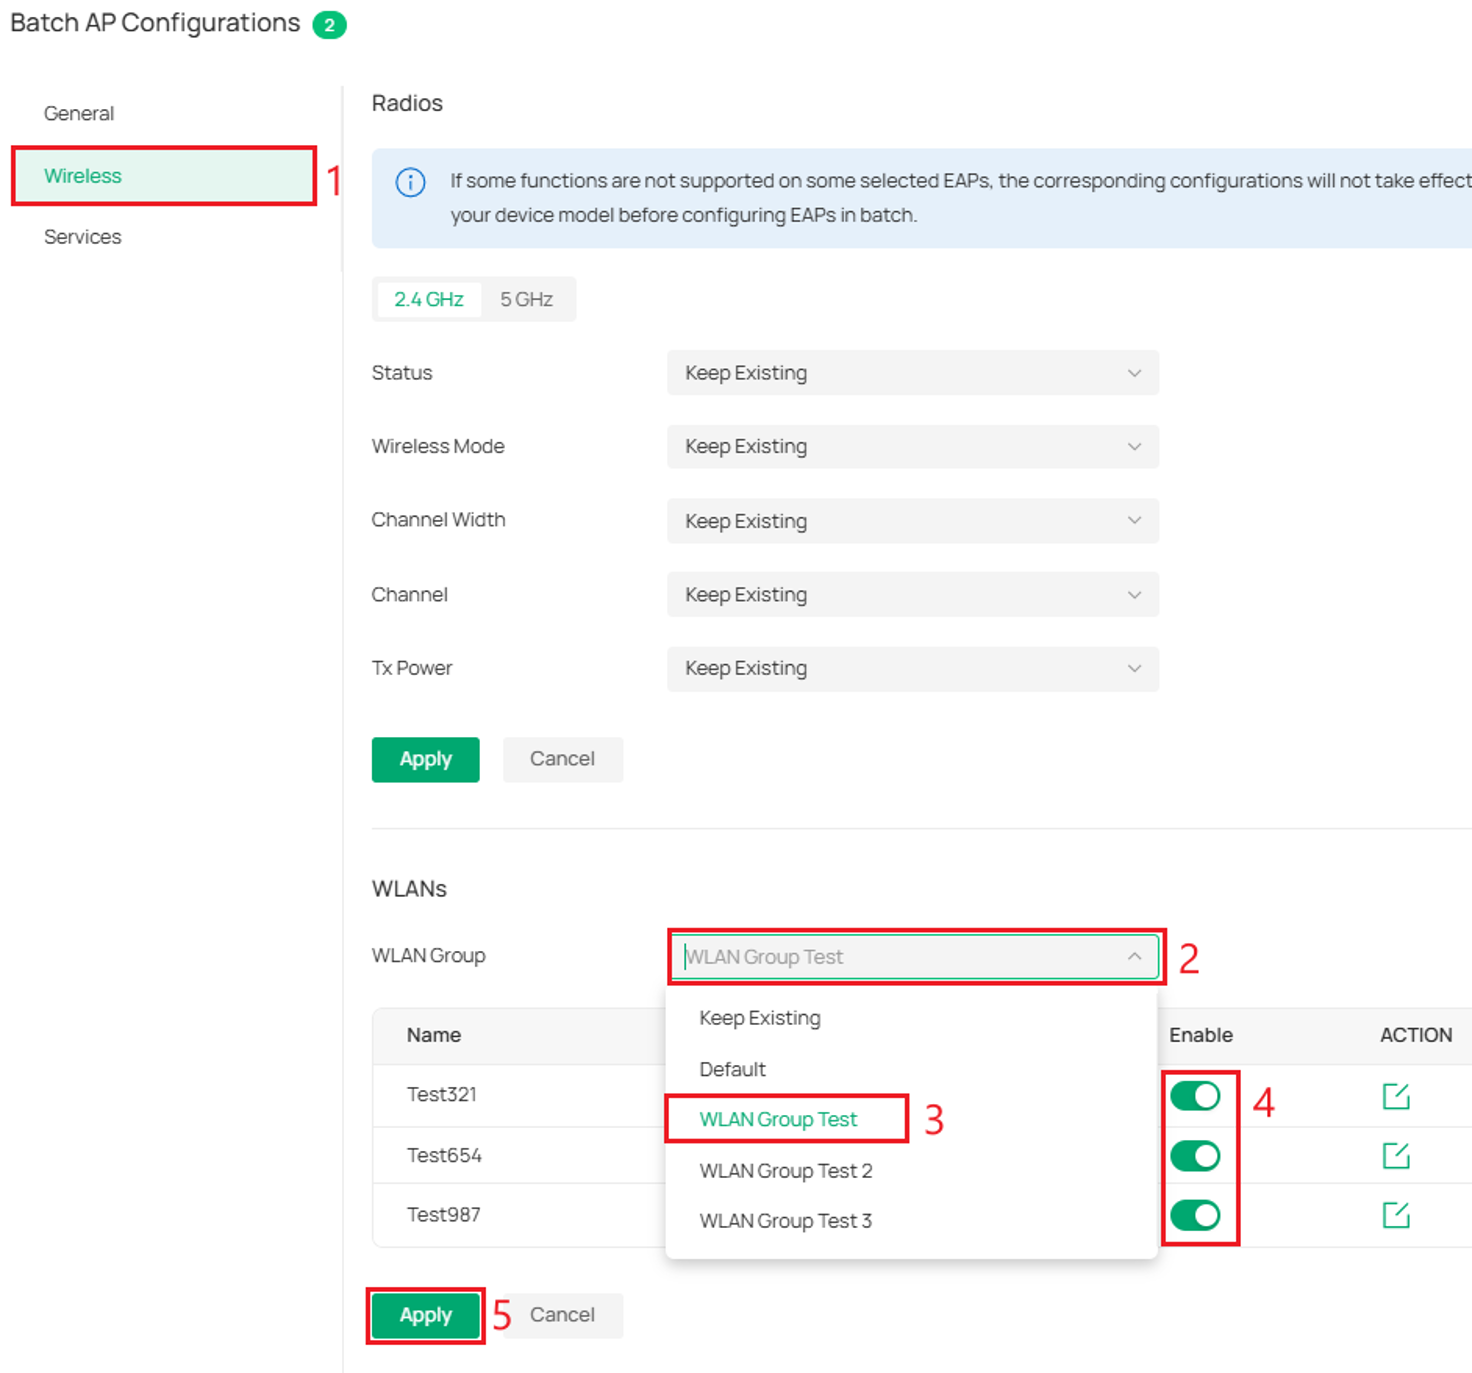
Step 3. Wireless > WLAN Group drop down menu > Select the WLAN > Enable the SSID for the Batch configuration > Apply. After selecting Apply, the EAP’s will reconfigure, and after a minute will now broadcast the new WLAN Group.
Conclusion
You have now successfully configured a WLAN Group in Omada Controller and applied it to one or more EAPs. By using WLAN Groups, you can efficiently manage SSID configurations across your wireless network, ensuring consistent settings while simplifying future deployments and administration.
QA
Q1: Can a WLAN Group contain multiple SSIDs?
A1: Yes. A WLAN Group can include one or more SSIDs, allowing multiple wireless networks to be deployed together.
Q2: Can different EAPs use different WLAN Groups?
A2: Yes. WLAN Groups can be assigned to individual EAPs, enabling different locations, departments, or user groups to use different wireless network configurations.
Q3: Can I apply a WLAN Group to multiple EAPs at the same time?
A3: Yes. Use the Batch Config feature to assign a WLAN Group to multiple EAPs simultaneously, reducing deployment time and ensuring configuration consistency.
Q4: Will applying a new WLAN Group interrupt wireless service?
A4: Yes. When a new WLAN Group is applied, the EAP will reconfigure and may briefly stop broadcasting while the changes take effect. Wireless service typically resumes within about a minute.
Q5: Why can't I delete a WLAN Group? AN error message appears:"The WLAN Group with SSIDs cannot be deleted."
A5: Each SSID must be deleted before deleting the WLAN Group. To the right of the WebUI under SSID and WLAN Group, select the Delete Action button to delete each SSID. Once all the SSIDs have been deleted, you may now delete the WLAN Group.
To learn more about each function and configuration, please visit Support Home to download or check the manual for your product.
