


Contents
Objective
This article describes how to optimize wireless performance of EAP products, we will introduce some common optimization suggestions.
Requirements
- Omada Network Application v6.2.10 and above
- Omada EAP
Suggestions
Wireless connection is susceptible to environment interference and it may cause the unstable connection or SSID disappearance. Especially for 2.4G radio, it would be influenced by much interference from other wireless devices in our daily environment like Bluetooth devices (i.e. wireless speakers, mouse, etc.), microwave oven and USB interface. In this case, we need to do optimization to make Omada EAPs work in less interference and clearer channel or adjust transmission power and bandwidth to get better performance. In this article, we will introduce some common optimization suggestions.
Installation
Obstacles such as walls and wireless interference from devices like microwaves and Bluetooth speakers can cause significant interference to WiFi signals. Therefore, it is advisable to avoid installing EAP devices near these objects. Here we discuss according to EAP types:
1) Ceiling-mounted EAPs:
Install EAPs in the middle of the ceiling rather than in the corners. To minimize interference between EAPs, maintain a recommended distance of 10-12 meters between them while ensuring optimal wireless coverage.
2) Wall-mounted EAPs:
When installing wall-mounted EAPs, avoid placing large furniture such as TVs or cabinets directly in front of them. It is also important to keep these EAPs away from wireless devices like microwaves and Bluetooth speakers to reduce interference.
3) Outdoor EAPs:
For outdoor EAPs, mount them high, such as on roof, and ensure they are positioned away from large trees to optimize signal strength and minimize interference.
Channel and Channel Width Optimization
802.11 n/ac/ax protocols support to bind two or more channels together to increase network bandwidth. Although the channel binding technology can improve the bandwidth, the wider channel also means more frequency resources are occupied and it may increase the wireless interference.
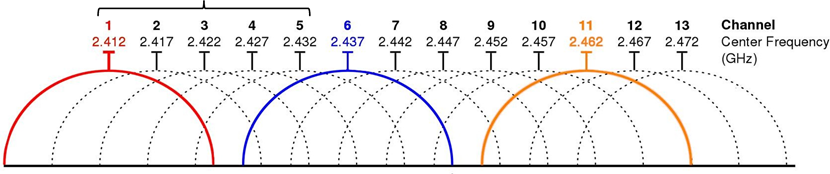
1) For 2.4GHz radio, we can use 14 channels (EU version supports 1-13 channels, US version supports 1-11 channels), but there are only 3 non-overlapping channels in fact. We recommend to use channel 1,6,11 when deploying 2.4GHz network (with 20MHz Channel Width).
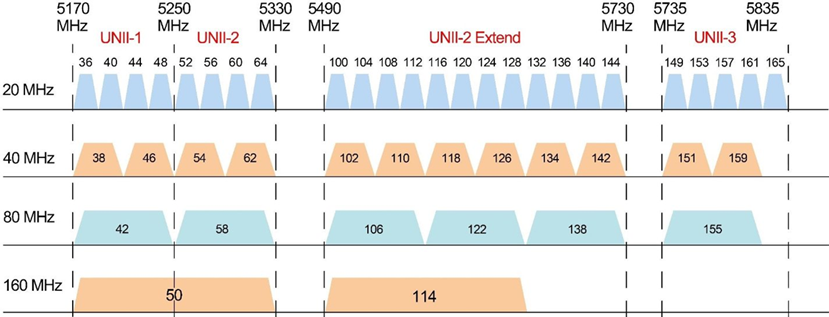
2) For 5GHz radio, it has more channel resources which are all non-overlapping (with 20MHz channel width).
- 5G has weak anti-interference capability. When strong interference is present, performance is suppressed by the interference.
- High bandwidth (80MHz/160MHz) offers a high performance but weak anti-interference capability; low bandwidth offers a low performance ceiling but strong anti-interference capability.
- Multi-level options:
- Anti-interference mode (20 MHz, suitable for strong interference environments)
- Balanced mode (40 MHz)
- High-bandwidth mode (≥80 MHz, suitable for weak interference environments)
A generally good empirical value is 40 MHz, but it is not suitable for all cases. Therefore, based on the information provided above, the appropriate bandwidth should be selected according to the specific interference conditions.
If the performance is still not ideal, you can use a third-party app to check for the least congested wireless channel in your wireless environment:
1) Download one radio scanning APP on your phone, here we take Wi-Fi Analyzer as example > connect to the SSID you want to optimize > open the APP:
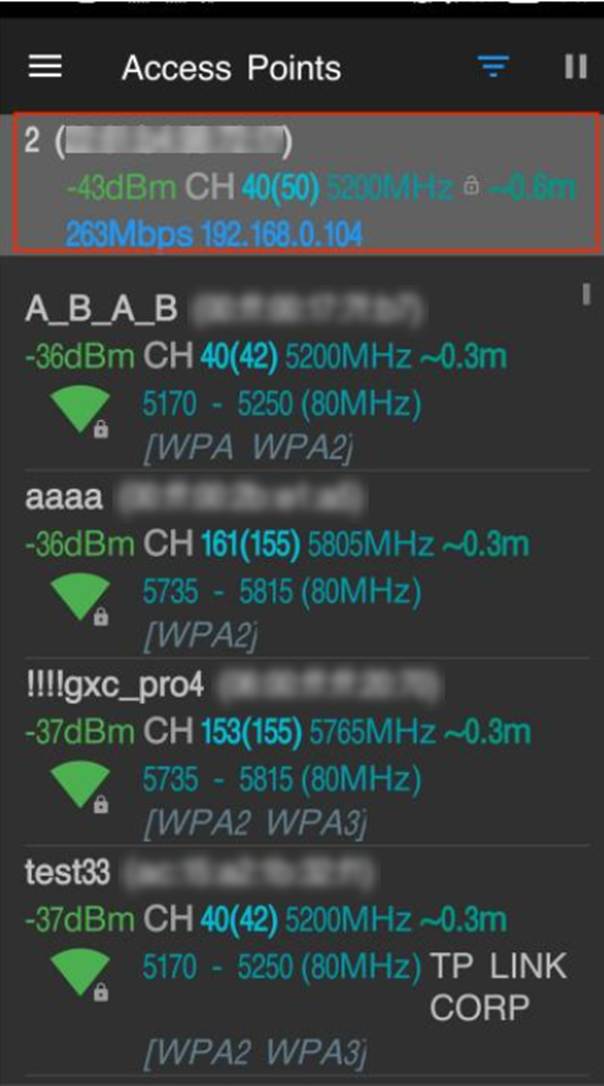
The SSID marked in the image above is the EAP your phone has connected to and the list below are SSIDs surrounding you. This page will show SSID names, broadcasting device MAC address, signal strength, country code, working channel, middle frequency, approximate distance, speed, IP address your phone gets and encryption method.
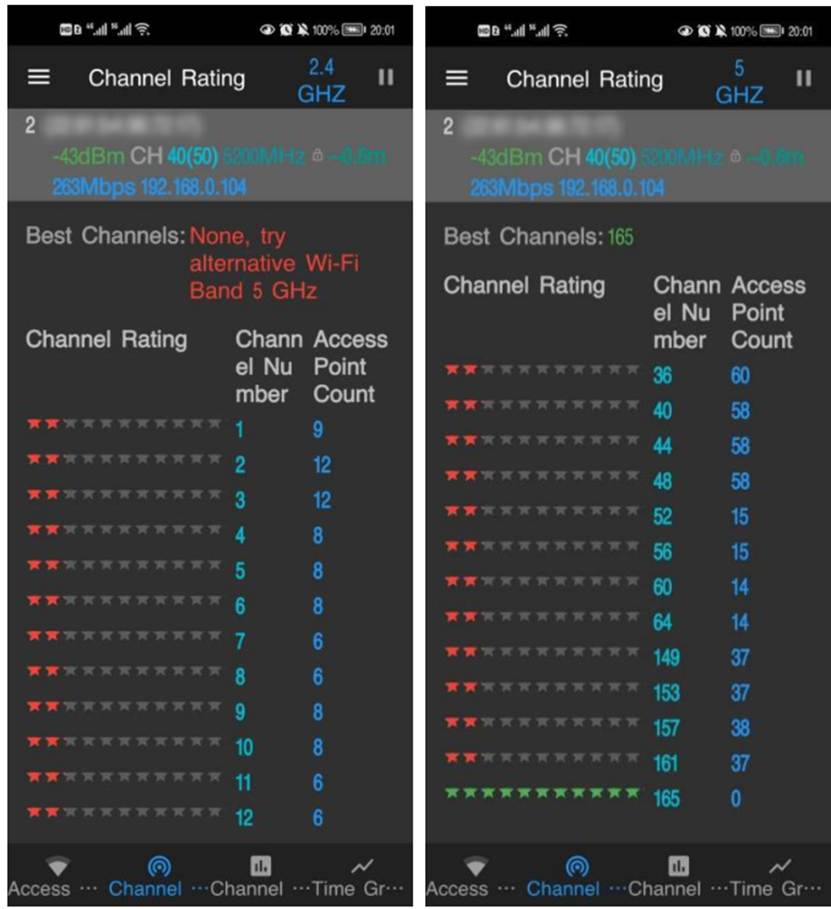
2)Go to Channel Rating page, you will see evaluation results of channels with stars, the more stars, the better. You can switch band on right top and choose the best channel for EAP or put EAP where your devices could mostly get good signal within your range of activity.
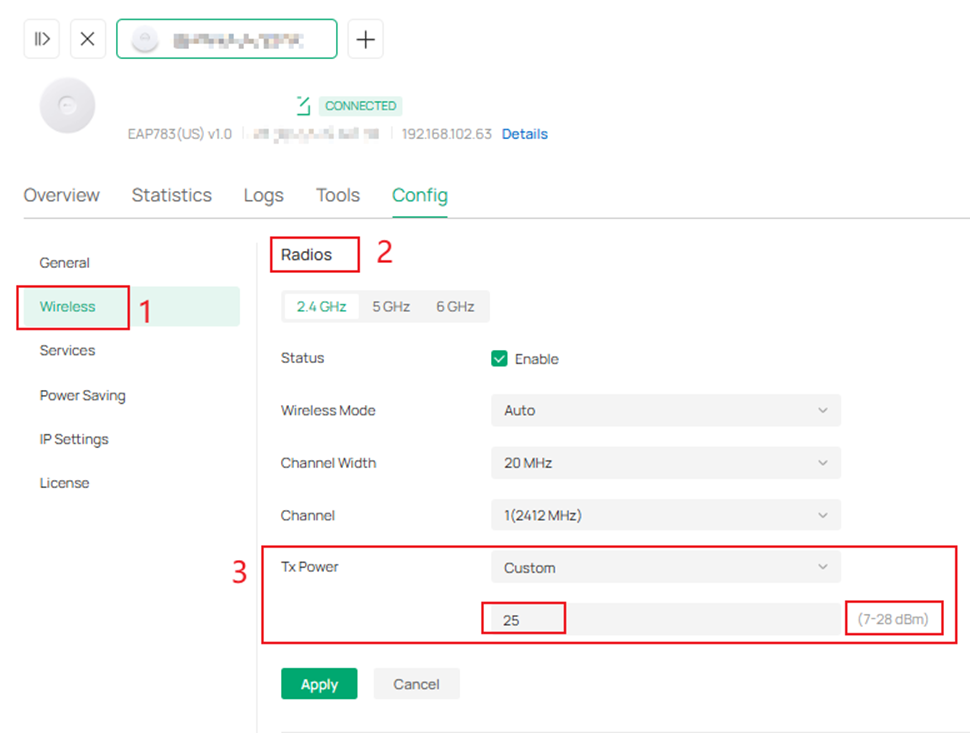
Transmit Power Optimization
Omada EAP series allow customer to select different level Tx Power: Low, Medium, High, and Custom. A larger Tx power is not always better, because larger Tx power also means more interference to the adjacent APs.
In the actual wireless environment, if the distance between adjacent AP is much close (less than 12 meters), it’s recommended to decrease the Tx power for reducing the wireless interference. For example, if the Tx power is 28dBm, we can decrease it to 25dBm first for checking. If the wireless connection is still not stable, we can decrease the Tx power again.
Firmware Updates
If your EAP has not been updated with firmware for a long time, it is recommended to update it to the latest version. New firmware updates may help optimize wireless performance.
1) If you manage the EAP via its standalone web interface, please refer to the link to update EAP firmware.
2) If you are using Omada controller, please double click the EAP unit, then go to custom upgrade:

WLAN Optimization function on Omada Controler
WLAN Optimization improves wireless network performance by automatically selecting the best channel, bandwidth, power, and other configurations for your APs based on scan results, traffic load, deployment size, and client factors. This ensures wireless clients for each AP can enjoy a better Wi-Fi experience.
You can run WLAN optimization manually, schedule it to run at set times, or enable its adaptive mode for automatic optimization.
1) Go to Controller > Network Config > Network Settings >WLAN > WLAN Optimization, click Optimize to run a manual WLAN optimization. Initiate an optimization or set an optimization schedule for the controller to scan the wireless environment and optimize the wireless configuration of the APs based on the scan results.
Note: Your internet connection will be unavailable for several minutes during scanning and optimization. Please schedule this process during a low-traffic period.

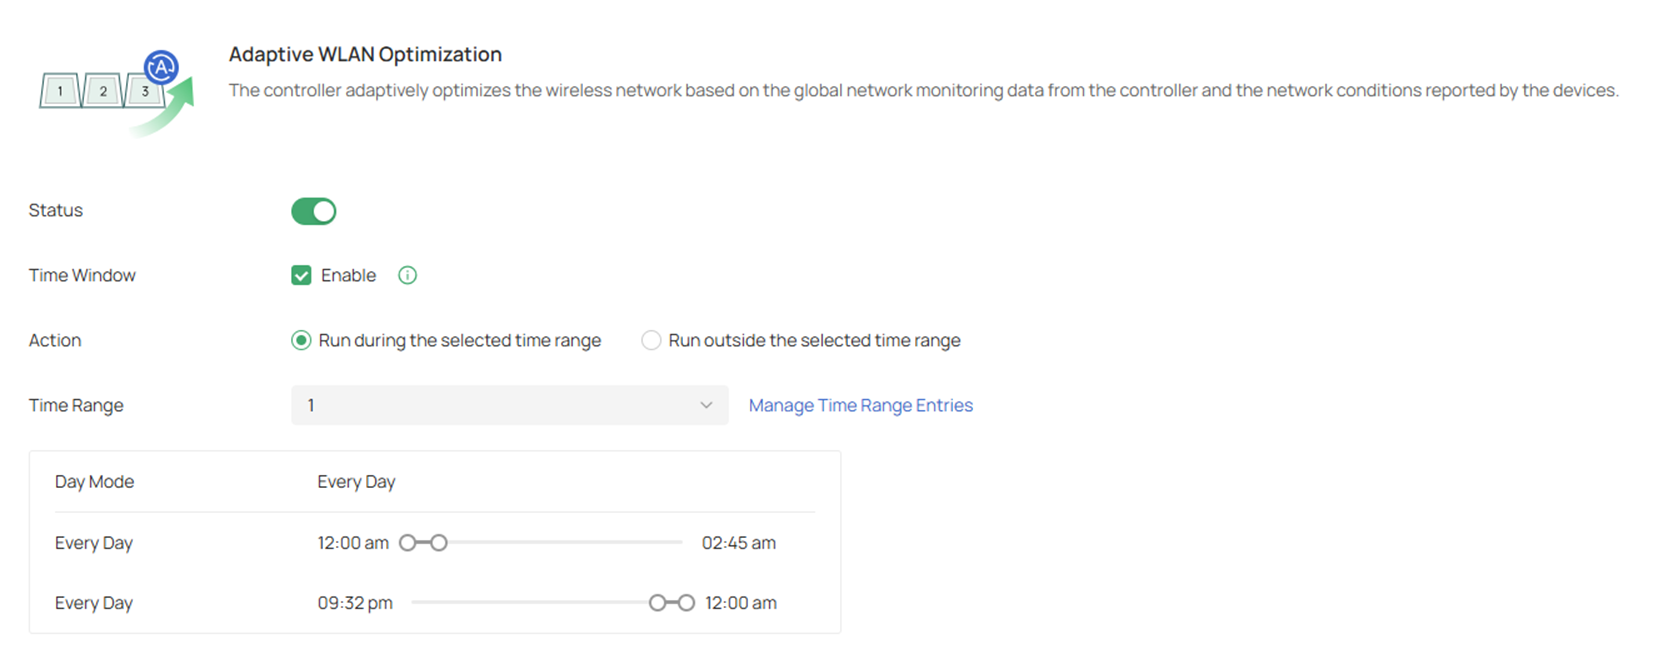
2) Enable Adaptive WLAN Optimization and configure the automatic optimization parameters. The controller adaptively optimizes the wireless network based on the global network monitoring data from the controller and the network conditions reported by the devices.
Note:
- If your firmware doesn’t support WLAN Optimization at all, or your EAP is in mesh, it will be listed in the Excluded APs List below.
- If you don’t want to change any settings on specific EAP, you could Add it into Excluded APs List to avoid being modified.
- WiFi experience may be influenced during optimization, please select the spare time to scan and optimize to reduce its impact on user experience.
- Because the APs should stay connected during optimization, please set a different time for WLAN Optimization and Reboot Schedule. It is recommended to stagger at least 10 minutes to avoid dissatisfactory results.
4)View the optimization results in Optimization History.
Last 20 Records: Displays the last 20 successful records, including Wi-Fi performance scores before and after optimization and the number of APs optimized.
WLAN Optimization History: Displays all WLAN optimization records, including time, type, number of APs optimized, duration, mode, success status, and Wi-Fi environment scores before/after optimization.
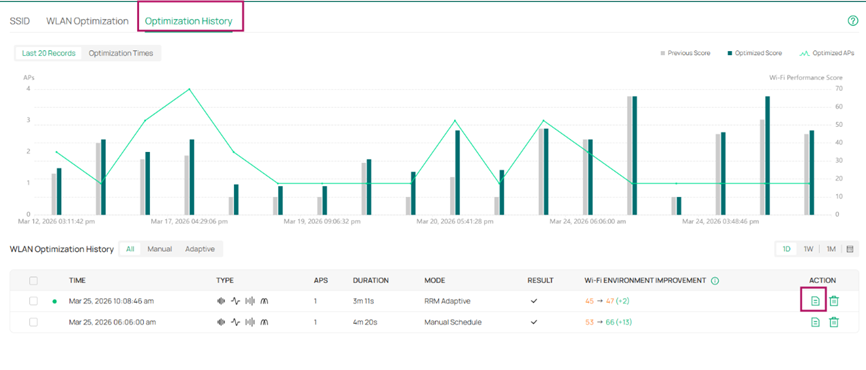
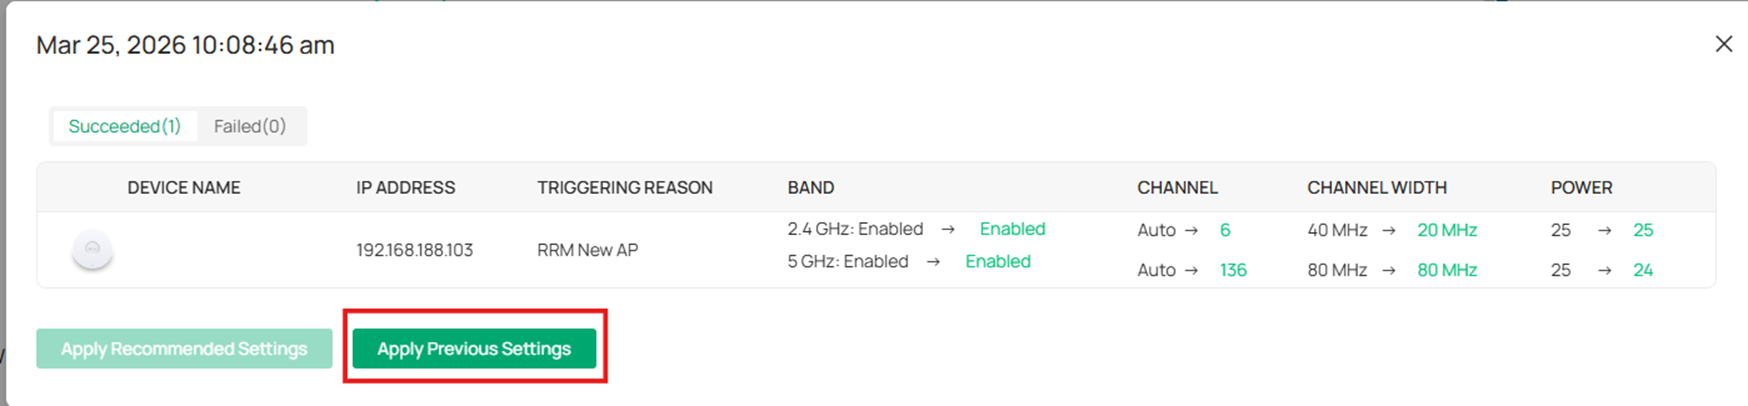
You can click Optimization Record Detail > Apply Previous Settings if you want to restore the previous configurations.
Note: Once this optimization is done, the recommended settings are automatically applied to all EAPs you selected and the button Apply Recommended Settings is inoperable; if you want to keep the original settings, you could click the Apply Previous Settings to change back.
For more configuration details about WLAN Optimization function, please refer to How to configure RRM | Omada Network Support
Conclusion
Please choose the suitable methods to optimize your wireless performance. Finally, if none of the above helps, please contact support.
Our Technical Support contact information can be found at Omada Network Support
Get to know more details of each function and configuration please go to Download Center to download the manual of your product.
