


Contents
Configuration for Bandwidth Control
Configuration for VoIP Prioritization
Configuration for Tagging Outbound Traffic
Introduction
This document outlines the configuration of Quality of Service (QoS) on an Omada Gateway operating in Standalone mode. QoS is a traffic management feature that enables the prioritization of specific applications, services, or devices, ensuring that critical network traffic is delivered with minimal latency and consistent performance.
By implementing QoS policies, administrators can control bandwidth utilization, reduce the impact of congestion, and maintain service quality for latency-sensitive applications such as voice, video, and real-time data transmission. This is especially important in environments where multiple devices and services compete for limited network resources.
This guide provides detailed instructions for configuring QoS settings through the gateway’s local web management interface, including traffic prioritization and bandwidth control. Proper configuration will help optimize overall network performance and ensure reliable operation based on the specific requirements of your network environment.
Requirements
- Omada Gateway
Configuration
The following section demonstrates how to configure Gateway QoS in Standalone Mode by defining the WAN bandwidth, allocating bandwidth to traffic classes, creating classification rules, and prioritizing VoIP traffic.
Configuration for Bandwidth Control
The Bandwidth Control section defines the total inbound and outbound bandwidth available on the selected WAN interface and allocates portions of that bandwidth among Class 1, Class 2, Class 3, and Others. The configured percentages determine each class’s share of the available bandwidth. This section does not identify the traffic assigned to each class; traffic classification is configured separately under Class Rules.
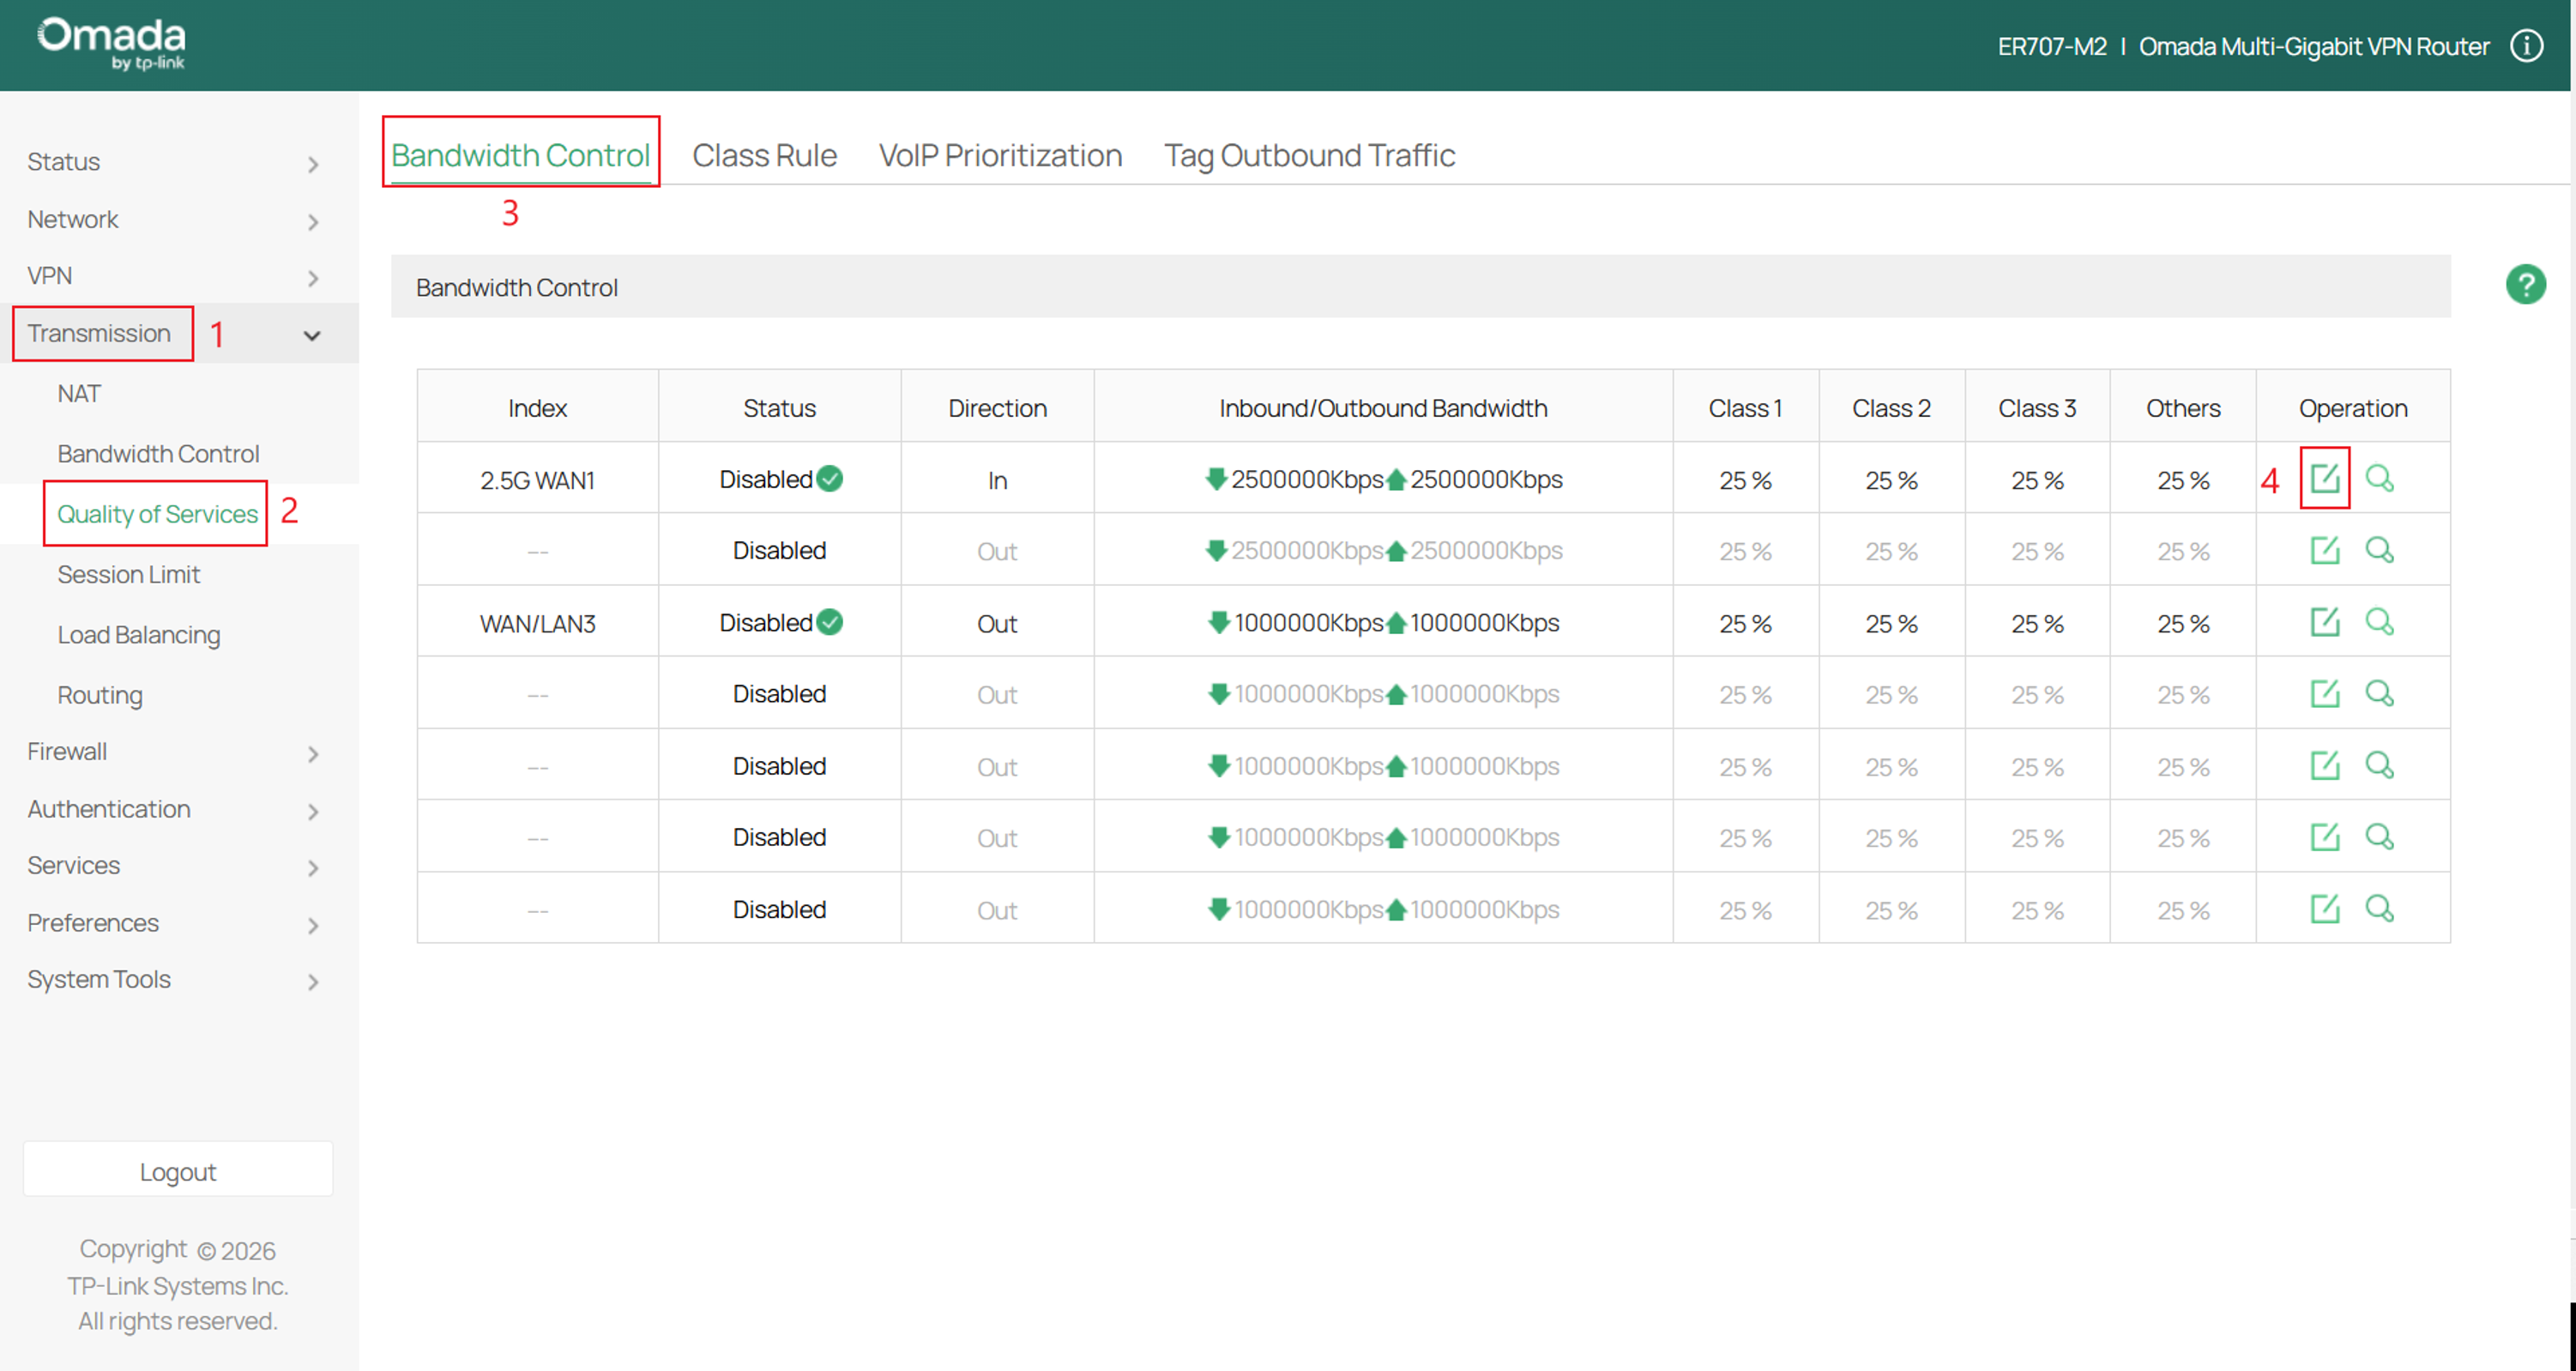
Step 1. In the router, navigate to Transmission > Quality of Services > Bandwidth Control > and select Edit to configure the classes.
Step 2. Configure the parameters, then click OK.
In this example, Inbound Bandwidth and Outbound Bandwidth are set to 2,500,000 Kbps (2.5 Gbps), representing the available bandwidth of the WAN connection. Enter the actual bandwidth provided by your ISP rather than the maximum speed supported by the physical WAN port.
Each class is assigned a percentage of the total WAN bandwidth. These percentages do not reserve bandwidth continuously; they determine how the available bandwidth is distributed among the classes when network congestion occurs. Traffic that does not match a configured Class Rule is automatically assigned to Others and uses the bandwidth allocation assigned to that category.
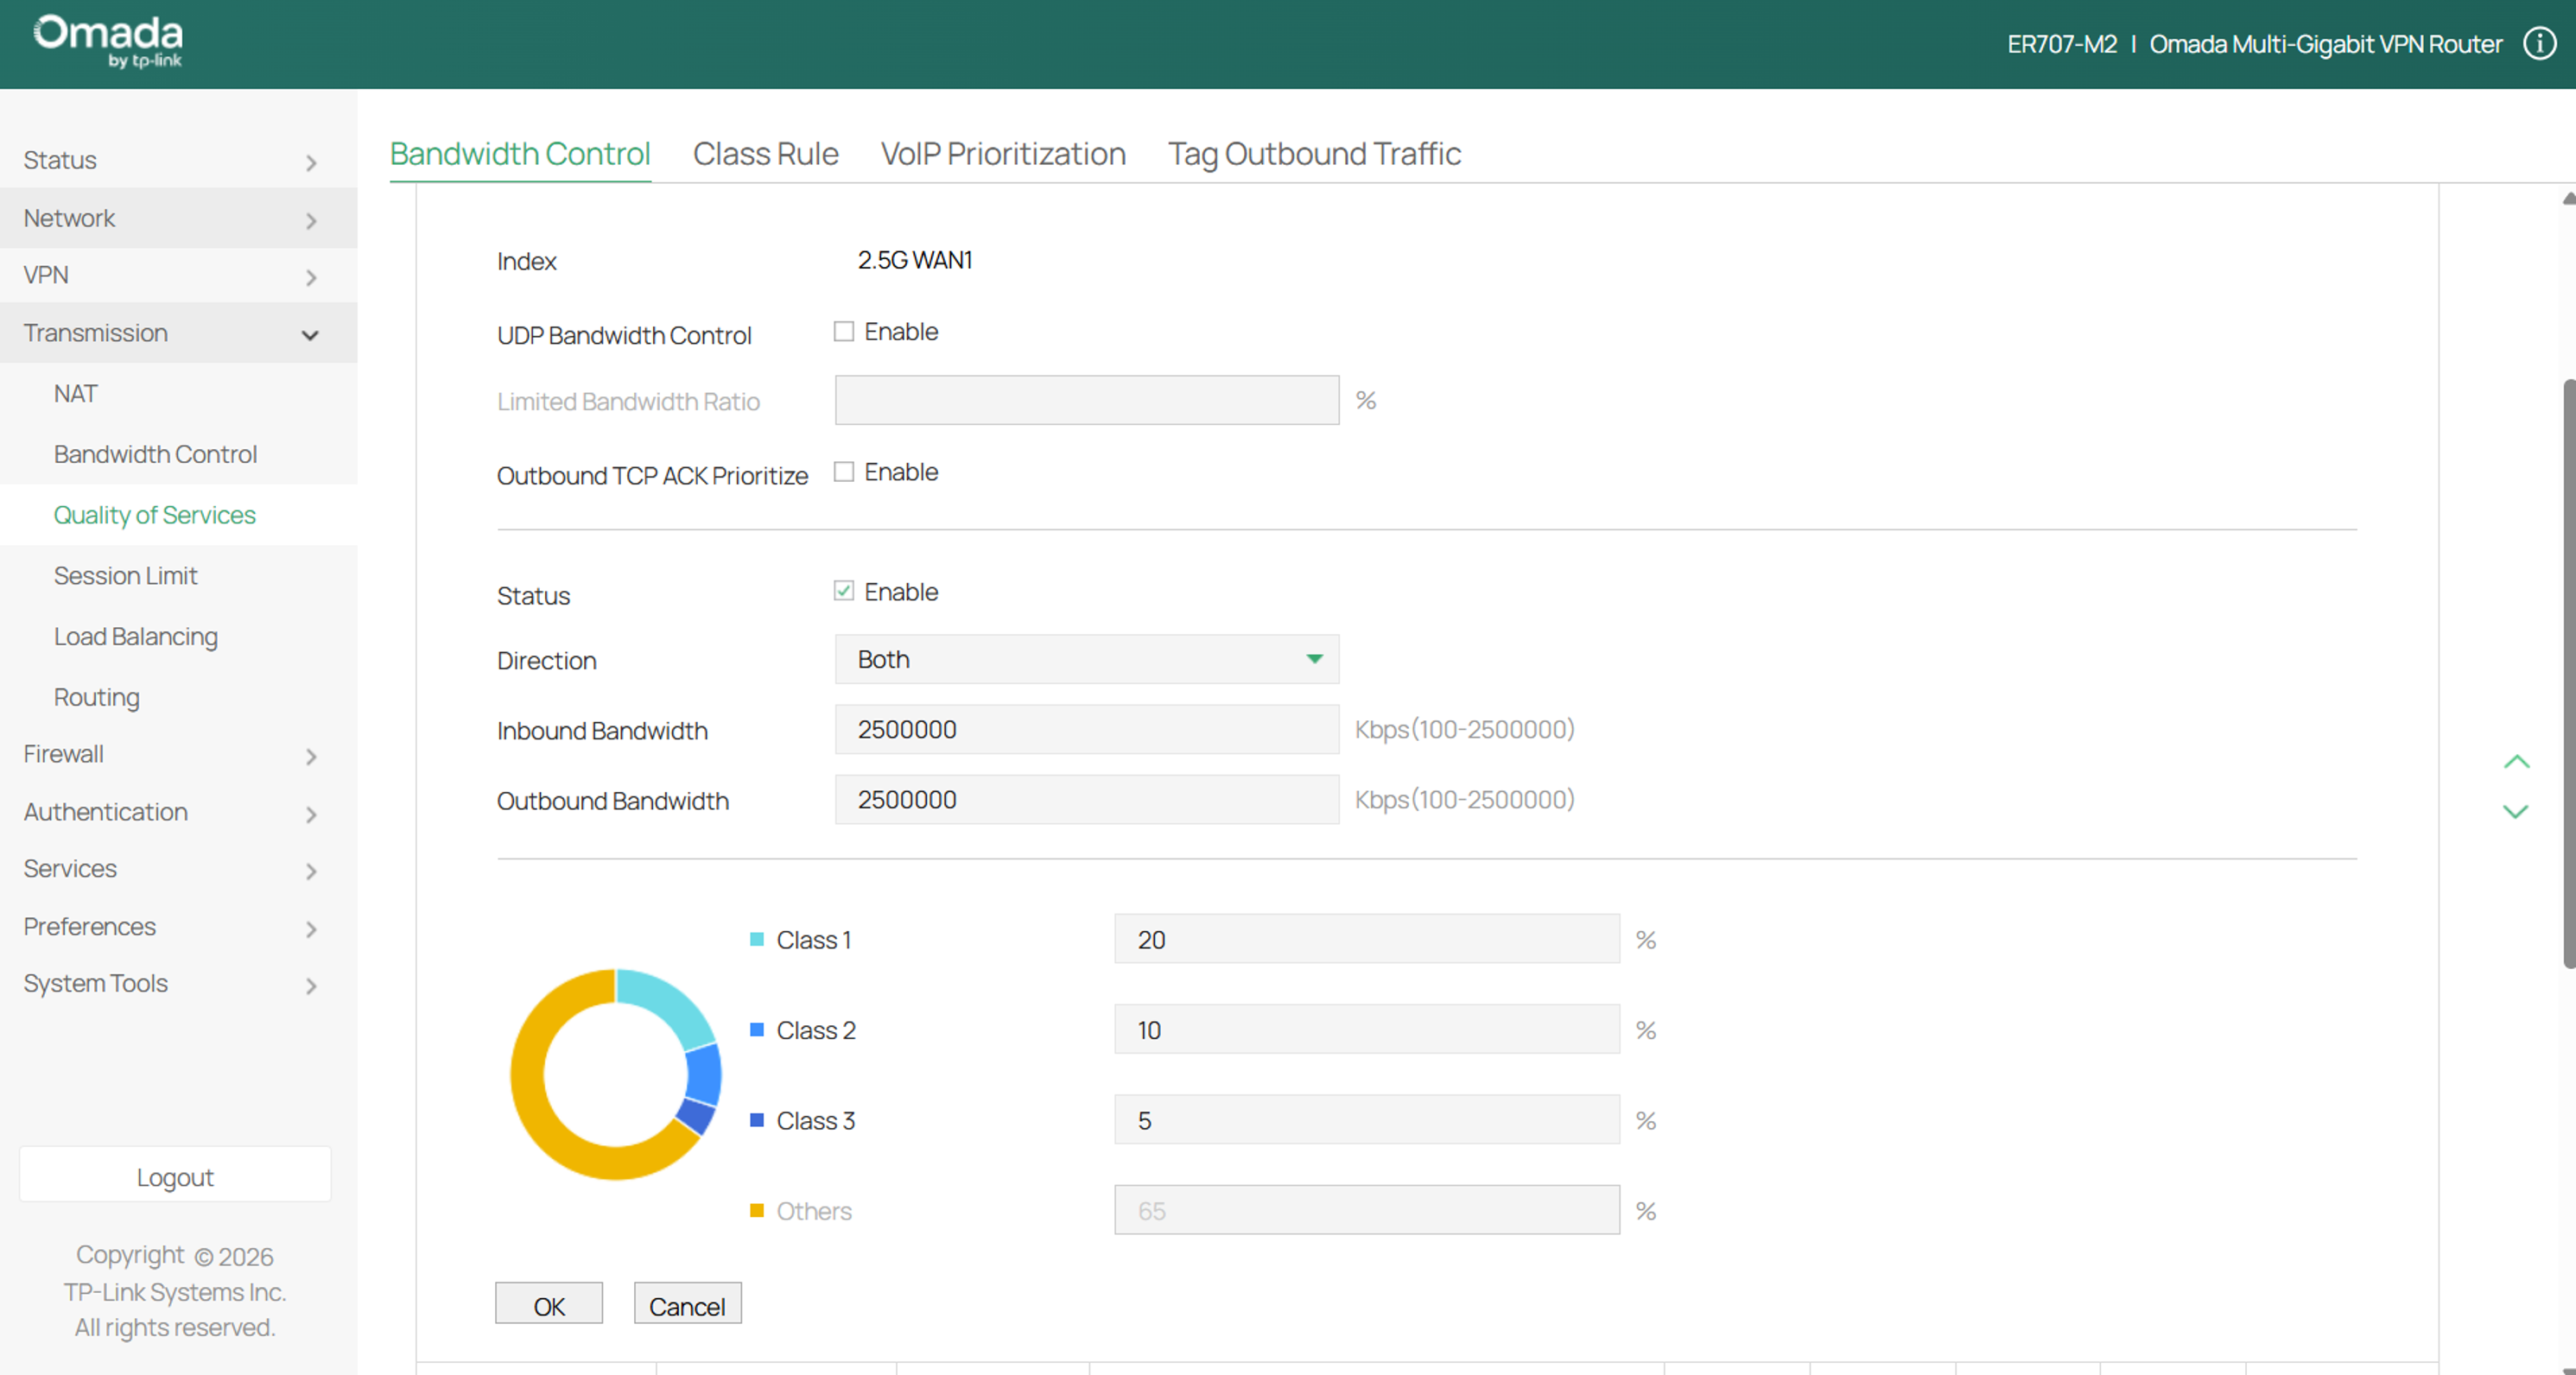
UDP Bandwidth Control: Check the box to enable UDP bandwidth control.
Limited Bandwidth Ratio: When UDP Bandwidth Control is enabled, specify the maximum bandwidth ratio allowed for UDP traffic in each class.
Outbound TCP ACK Prioritize: Check the box to prioritize outbound TCP ACK packets.
Quality of Service Status: Enable or disable QoS for the current entry.
Direction: Specify the direction of the controlled traffic. "Out" means control sending packets. "In" means receiving packets. "Both" means both are controlled.
Inbound/Outbound Bandwidth: Enter the maximum threshold of the inbound/outbound bandwidth.
Class1/Class2/Class3/Others: Specify the percentage of WAN bandwidth assigned to class1, class2, class3 and other traffic flowing through the WAN port.
Configuration for Class Rules
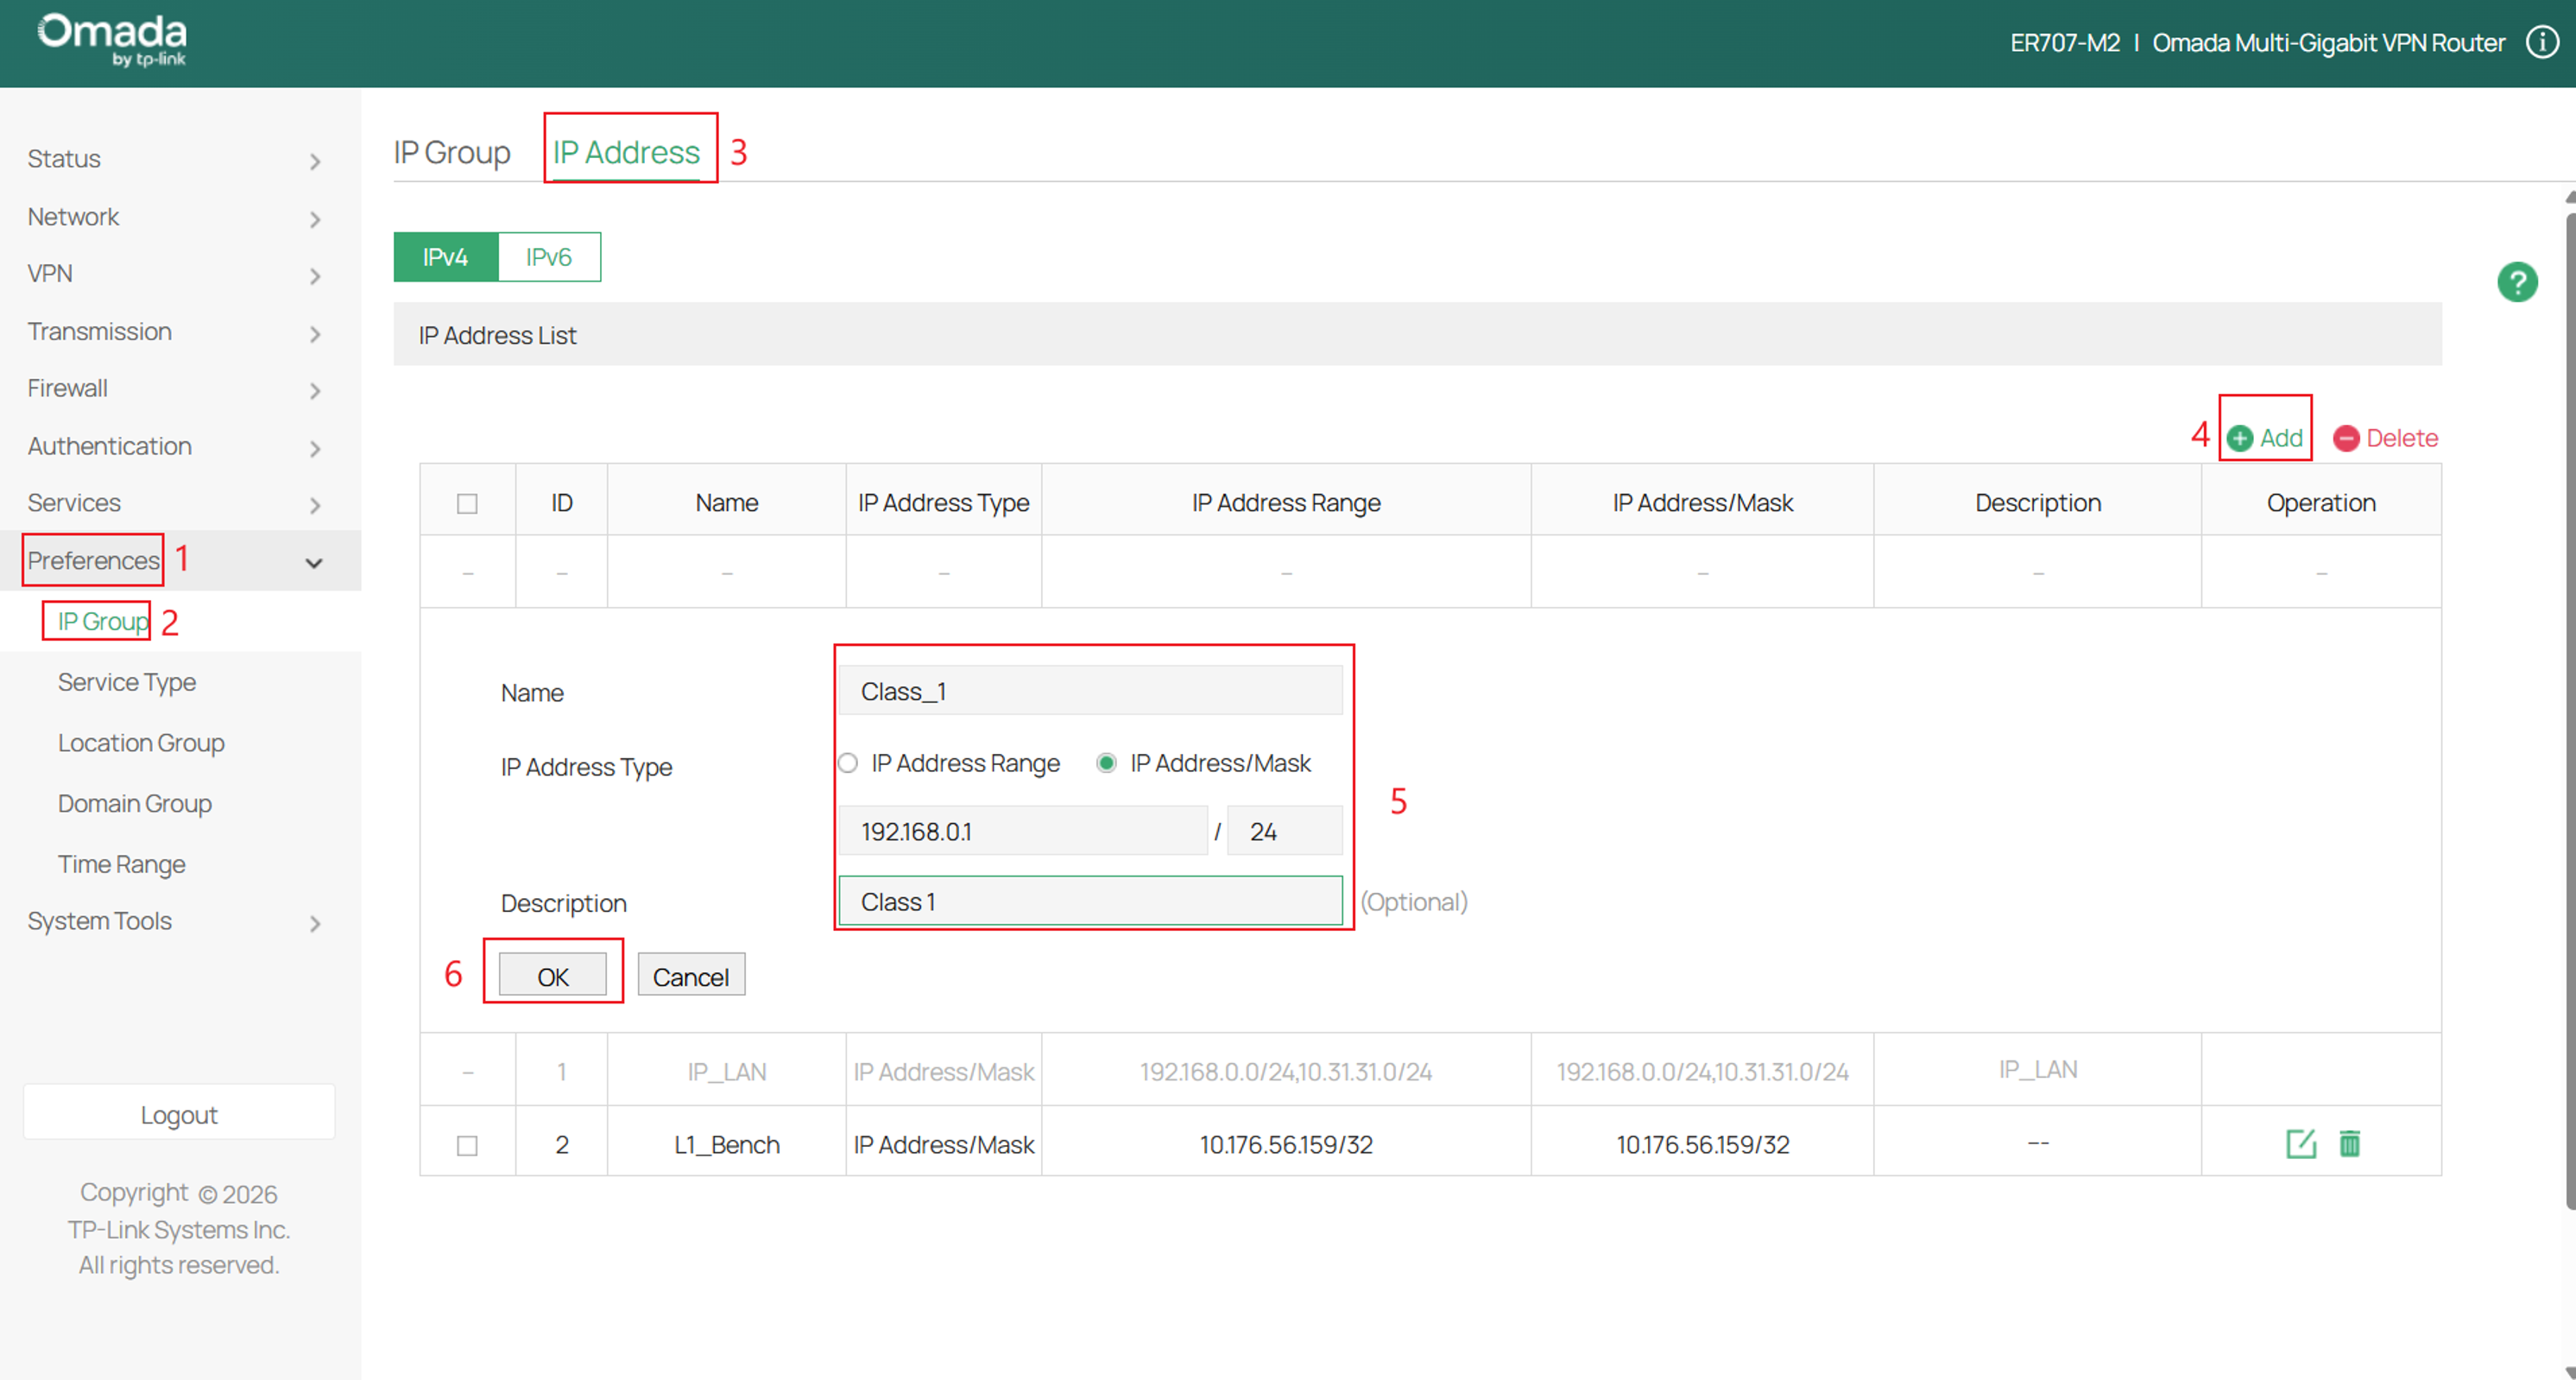
Step 1. Before configuring Class Rules, create the required IP Groups.
Navigate to Preferences > IP Group > IP Address > select Add > fill in the parameters > click OK.
Repeat steps for other classes.
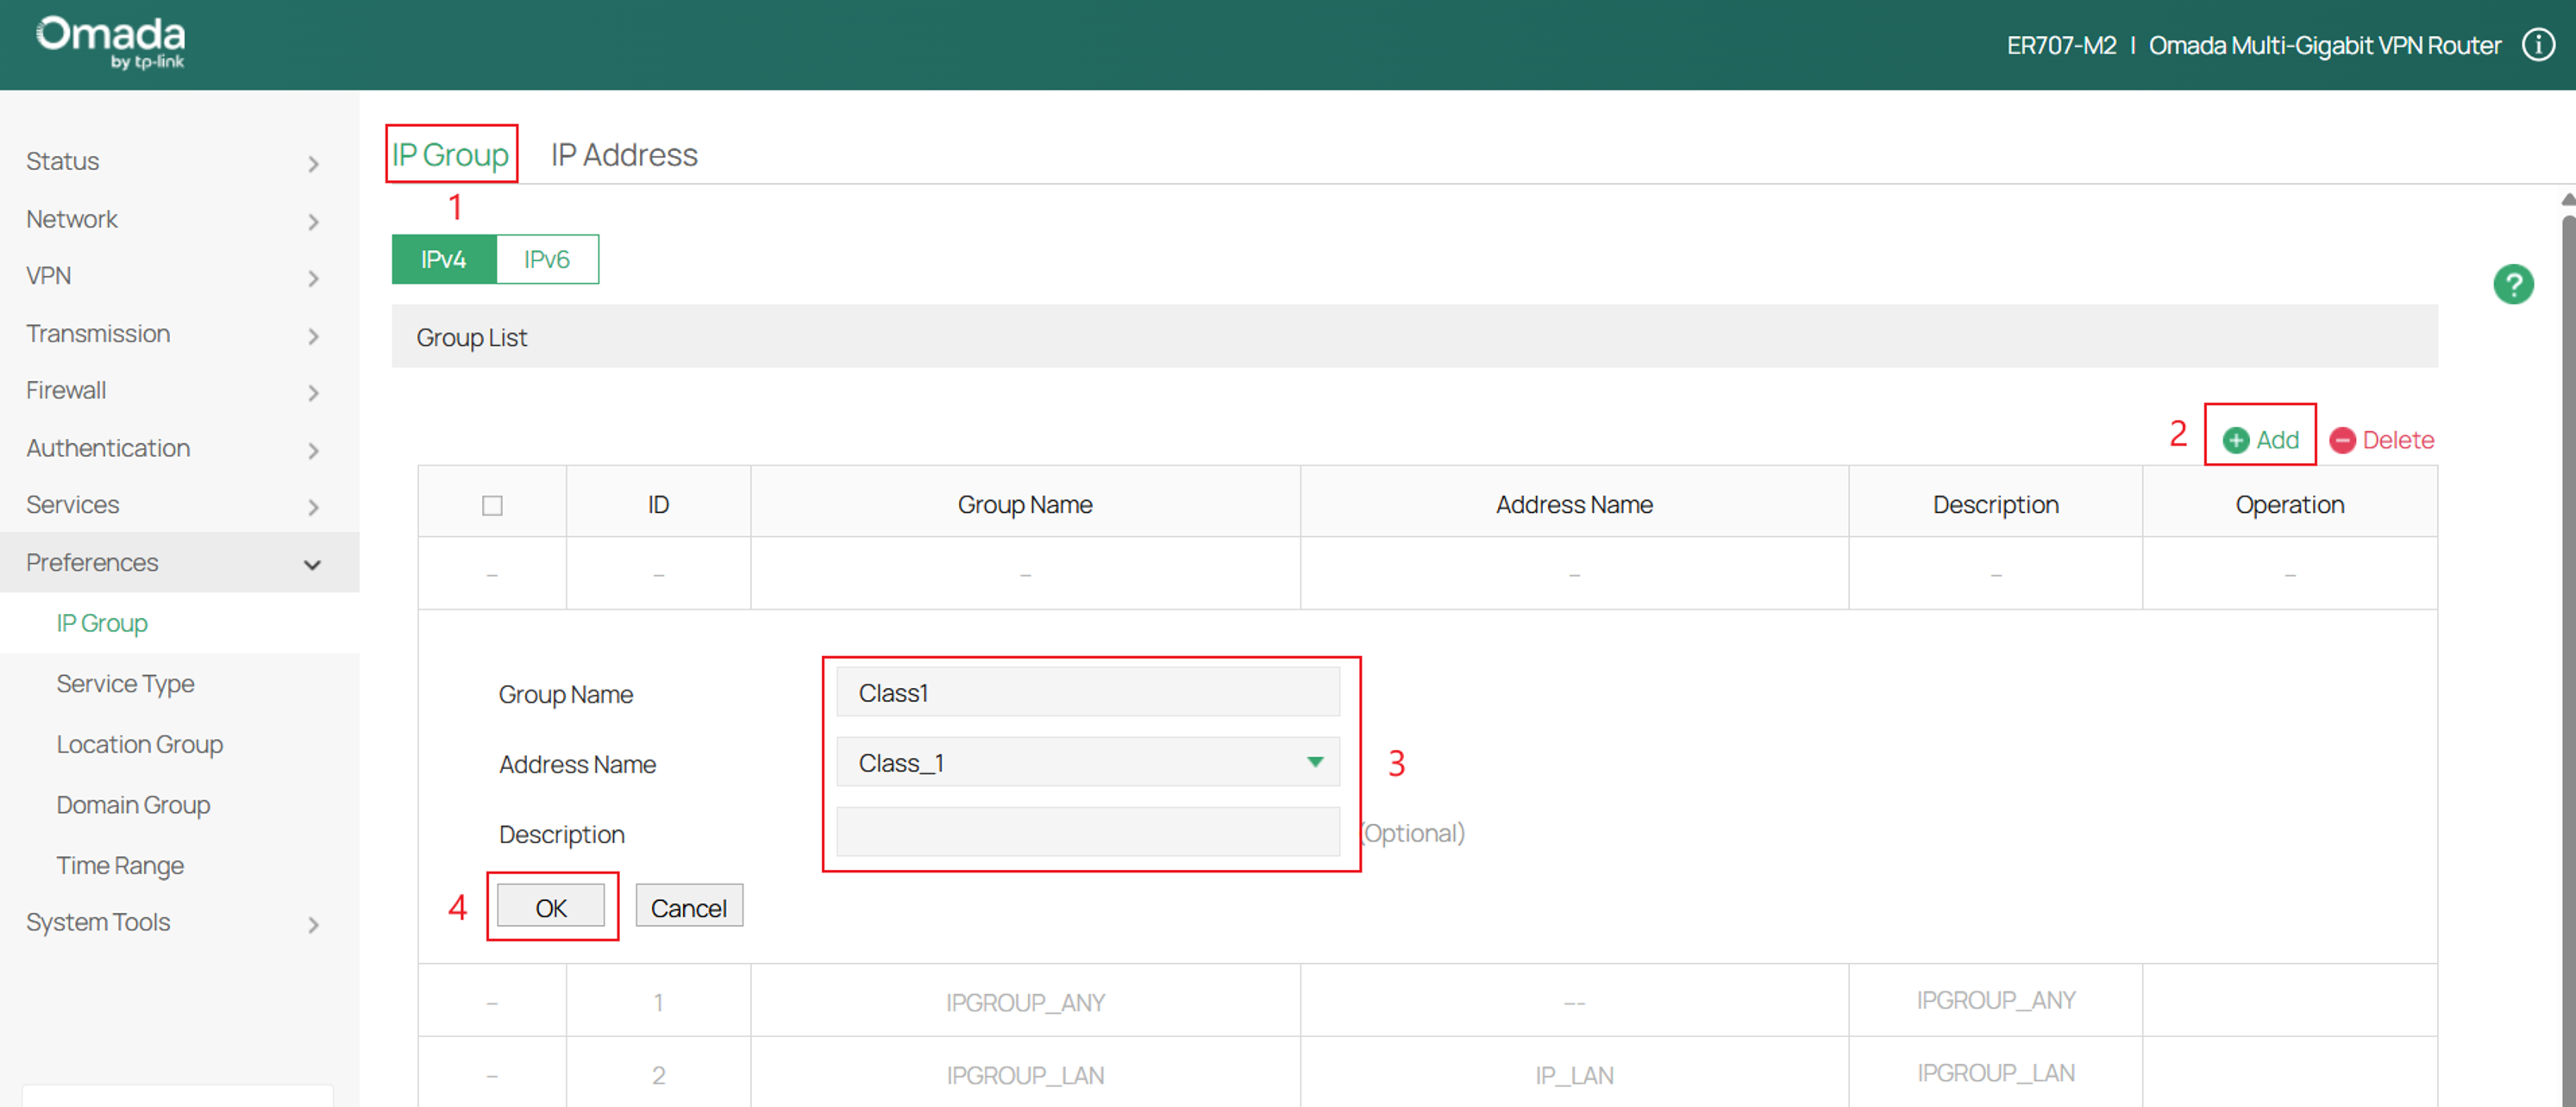
Step 2. Next go to IP Group > click Add > fill in the parameters > click OK once complete.
Repeat steps for other classes.
Step 3. Lastly, go to Transmission > Quality of Services > Class Rule > click Add > fill in the parameters > click OK.
A Class Rule is a set of matching conditions used to identify traffic. In this example, the gateway matches IPv4 traffic originating from the Class1 IP Group, traveling to any remote address, carrying the BE DSCP value, and using any service type. Traffic matching all these conditions is assigned to QoS Class 1 and uses its configured bandwidth allocation. Unmatched traffic is assigned to Others.
The Class Rule does not assign or modify DSCP markings. If an endpoint, switch, or another device is already marking traffic, select the corresponding DSCP value in the rule. For unmarked traffic, select BE. Use Tag Outbound Traffic when the gateway needs to apply a DSCP or IP Precedence marking.
Repeat steps for other classes.
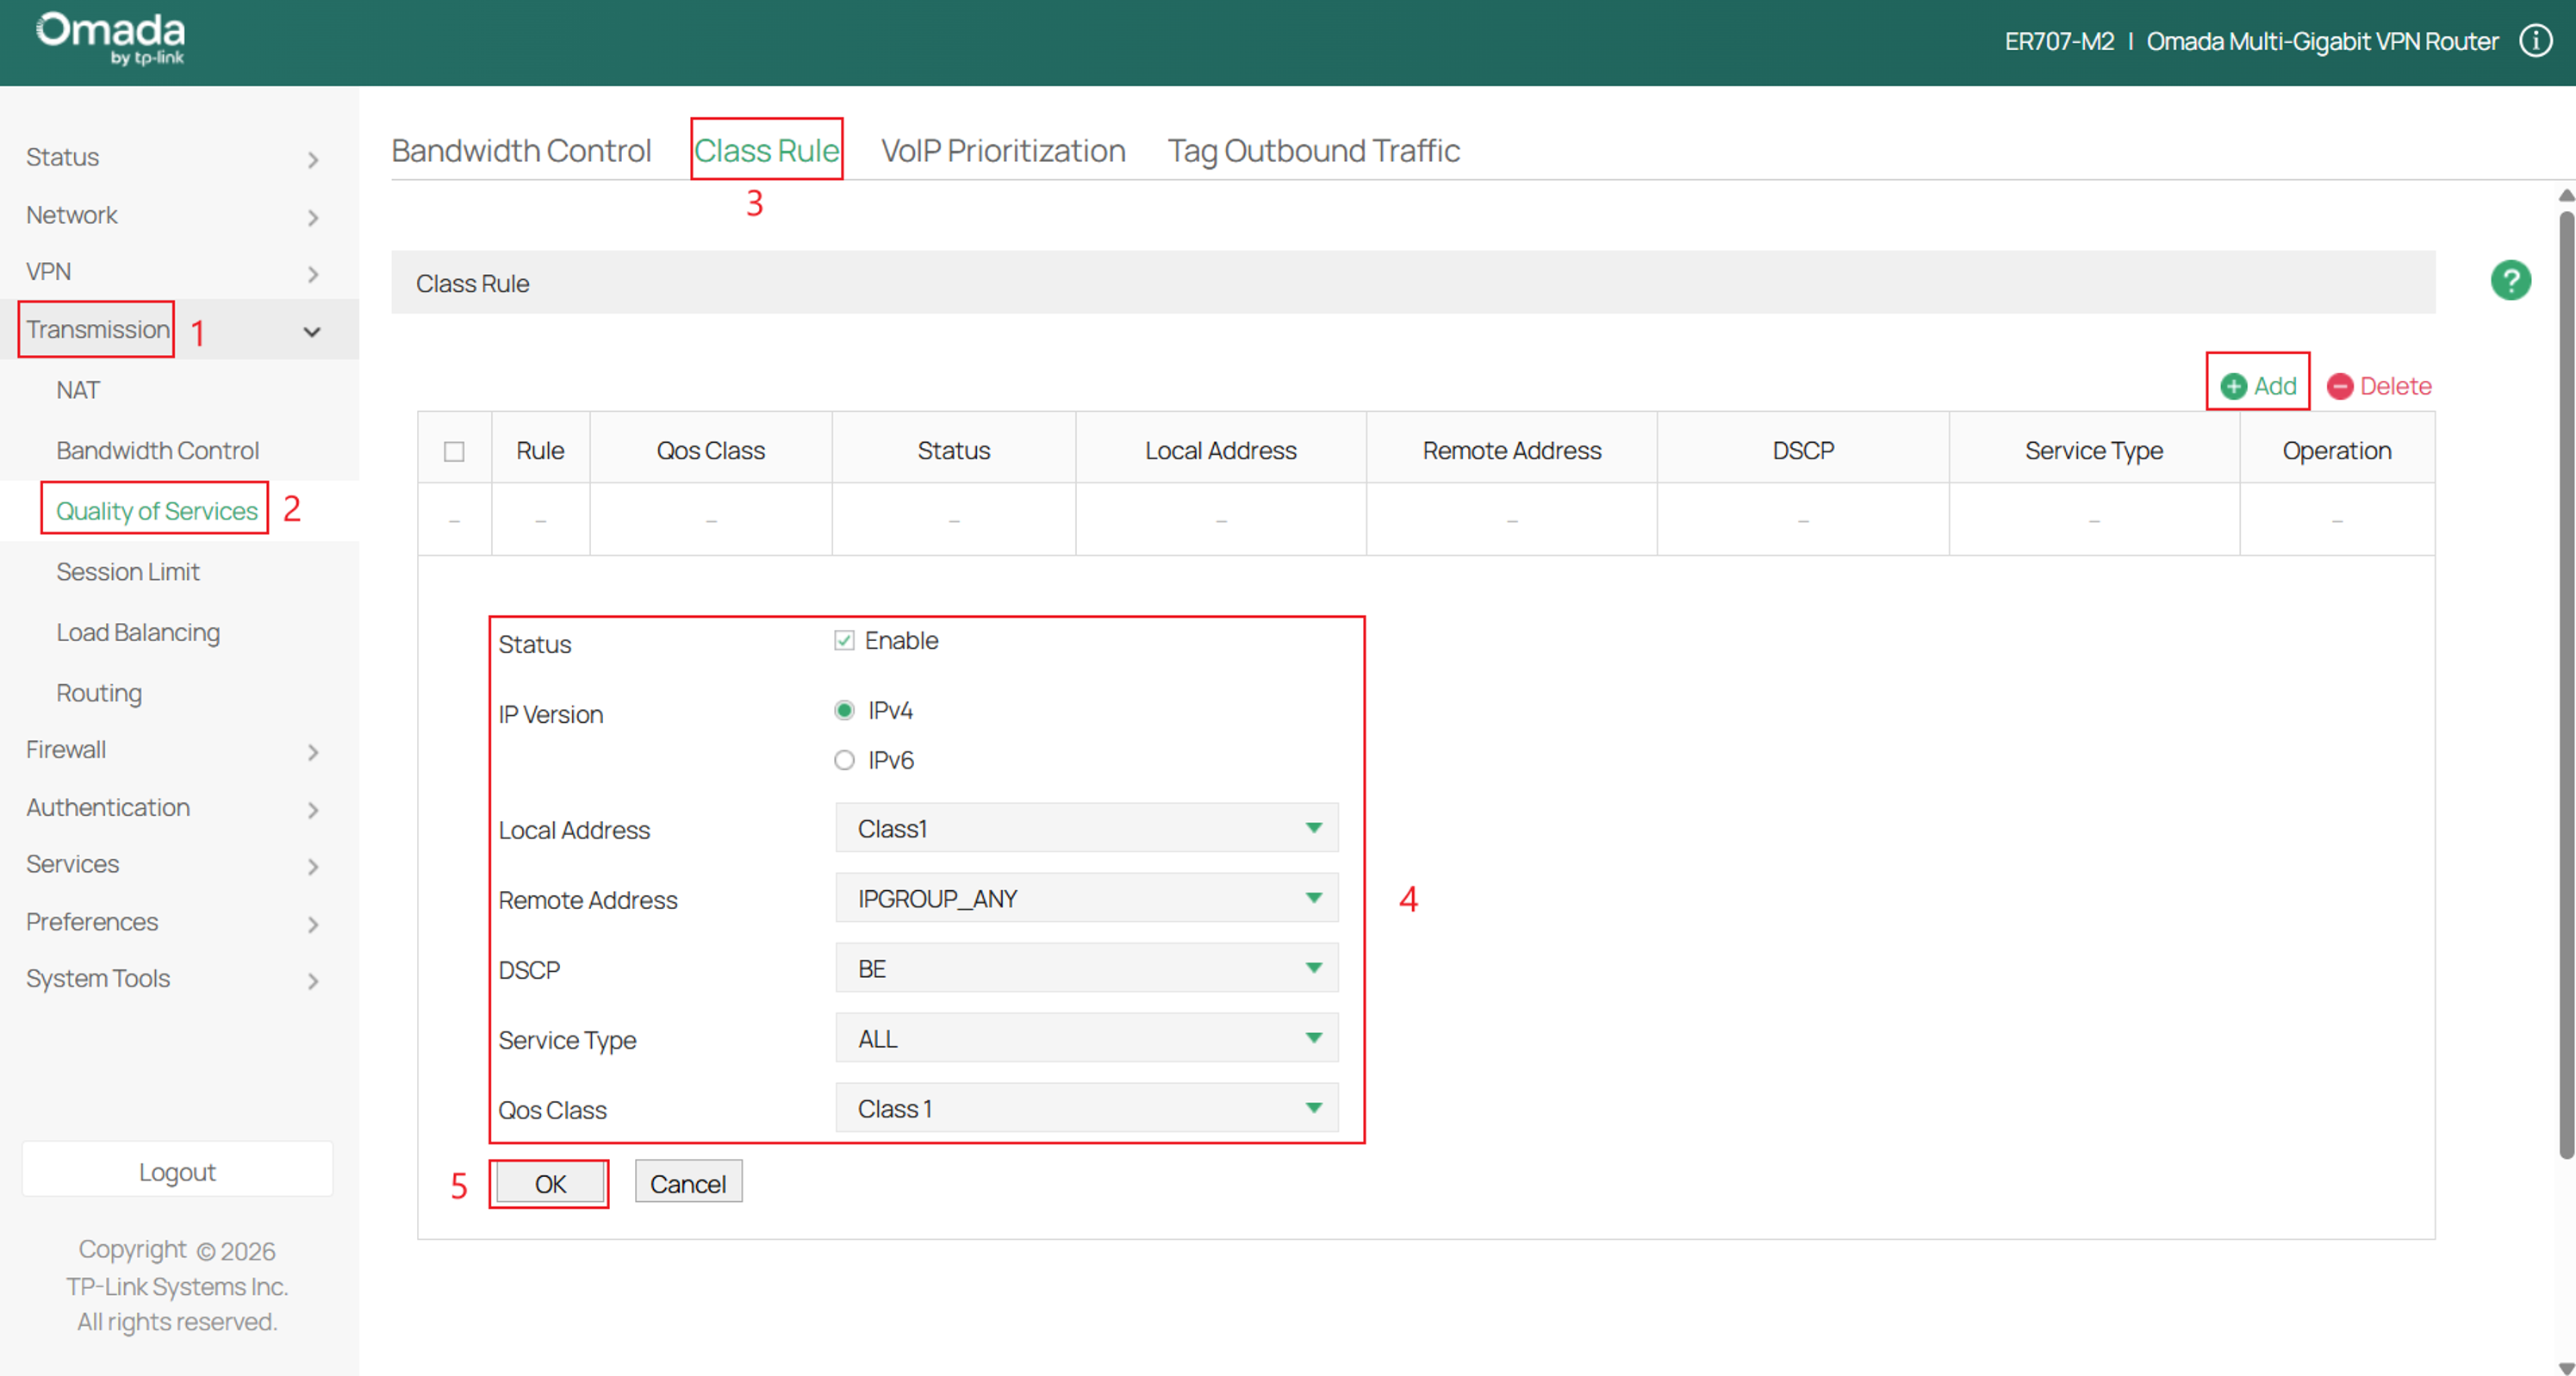
IP Version: Specify the protocol version: IPv4 or IPv6.
Local Address: Match the source IP address of the traffic. For IPv4 protocol, you can use the IP Group object configured in the Preferences > IP Group module. For the IPv6 protocol, you can use the IPv6 Group object configured in the Preferences > IPv6 Group module. QoS does not take effect on the traffic of lan>lan. When configuring the class rule, Local Address and Remote Address cannot select IPGROUP on the lan side at the same time.
Remote Address: Match the destination IP address of the traffic. For IPv4 protocol, you can use the IP Group object configured in the Preferences > IP Group module. For the IPv6 protocol, you can use the IPv6 Group object configured in the Preferences > IPv6 Group module. QoS does not take effect on the traffic of lan>lan. When configuring the class rule, Local Address and Remote Address cannot select IPGROUP on the lan side at the same time.
DSCP: Match the DSCP value of the traffic.
Service Type: Match the port number of the traffic. Select the service type object defined in the Preference > Service Type module.
QoS Class: Select Class1/2/3.
Configuration for VoIP Prioritization
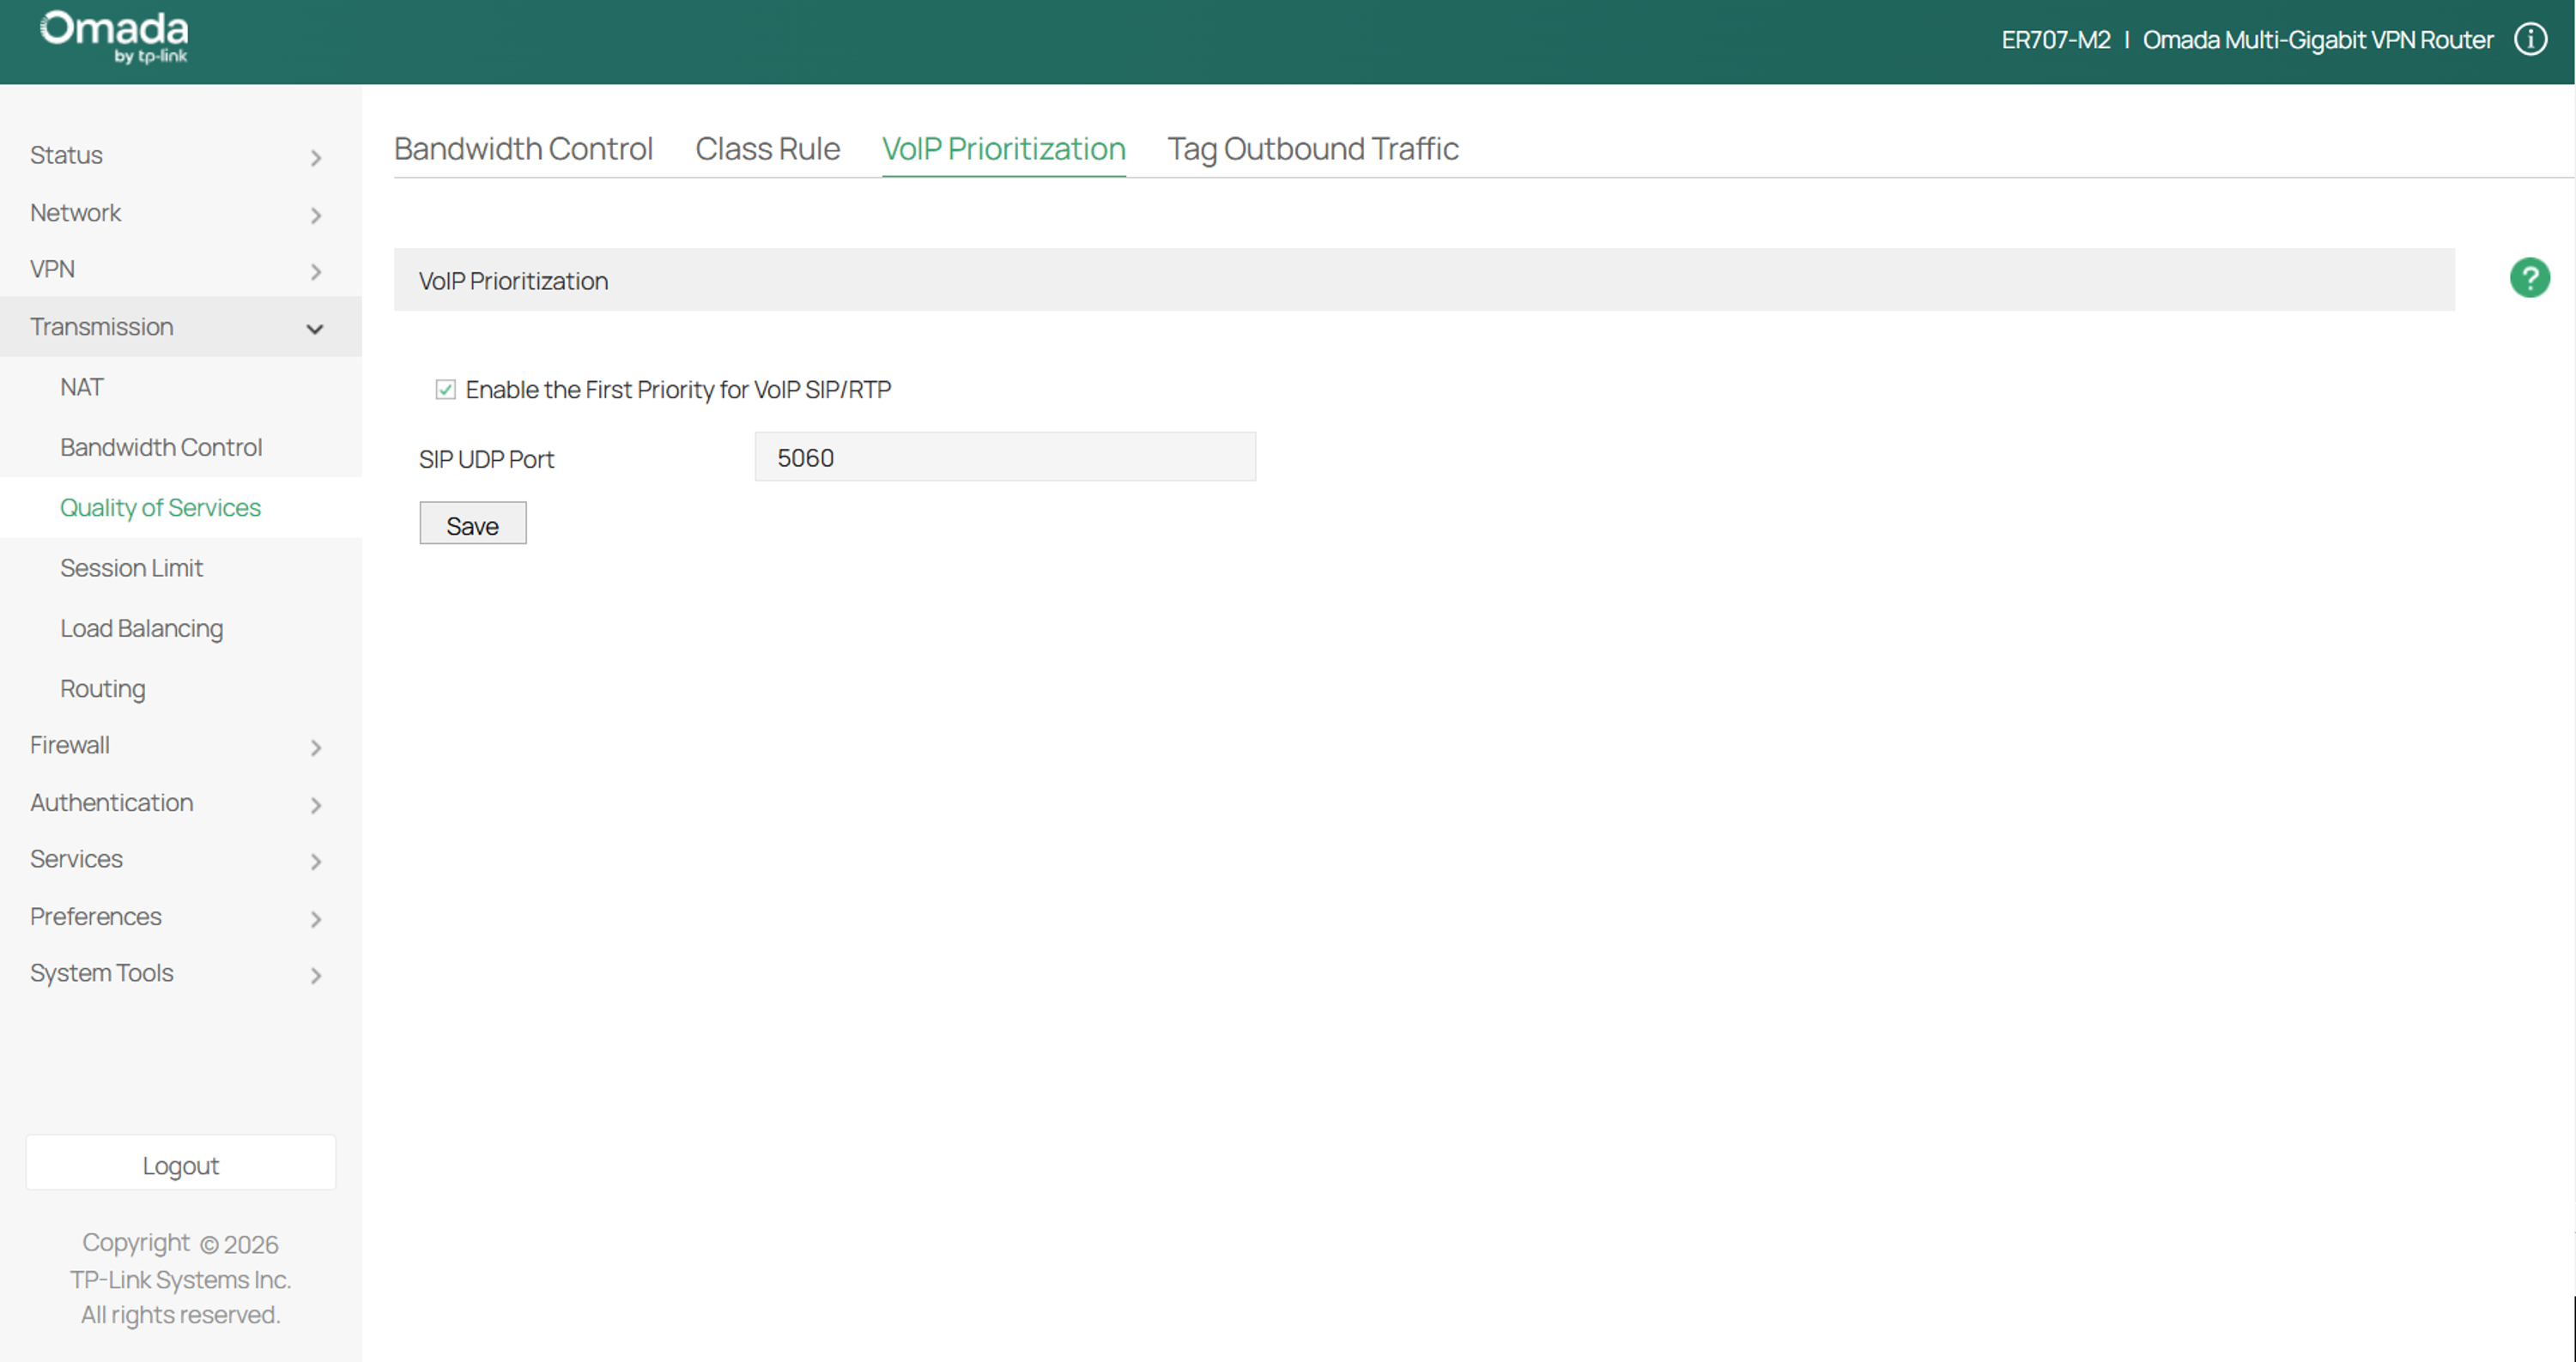
For VoIP Prioritization navigate to Transmission > Quality of Services > VoIP Prioritization > fill in the parameters > click Save
VoIP Prioritization gives SIP signaling and associated RTP voice traffic the highest forwarding priority during network congestion, helping reduce latency, jitter, and packet loss during calls.
Enable First Priority for VoIP SIP/RTP, enter the UDP port used by the VoIP system for SIP signaling, typically port 5060, and click Save. If the VoIP provider uses a different SIP port, enter that port instead. This feature prioritizes existing bandwidth; it does not increase the WAN connection’s total bandwidth.
Configuration for Tagging Outbound Traffic
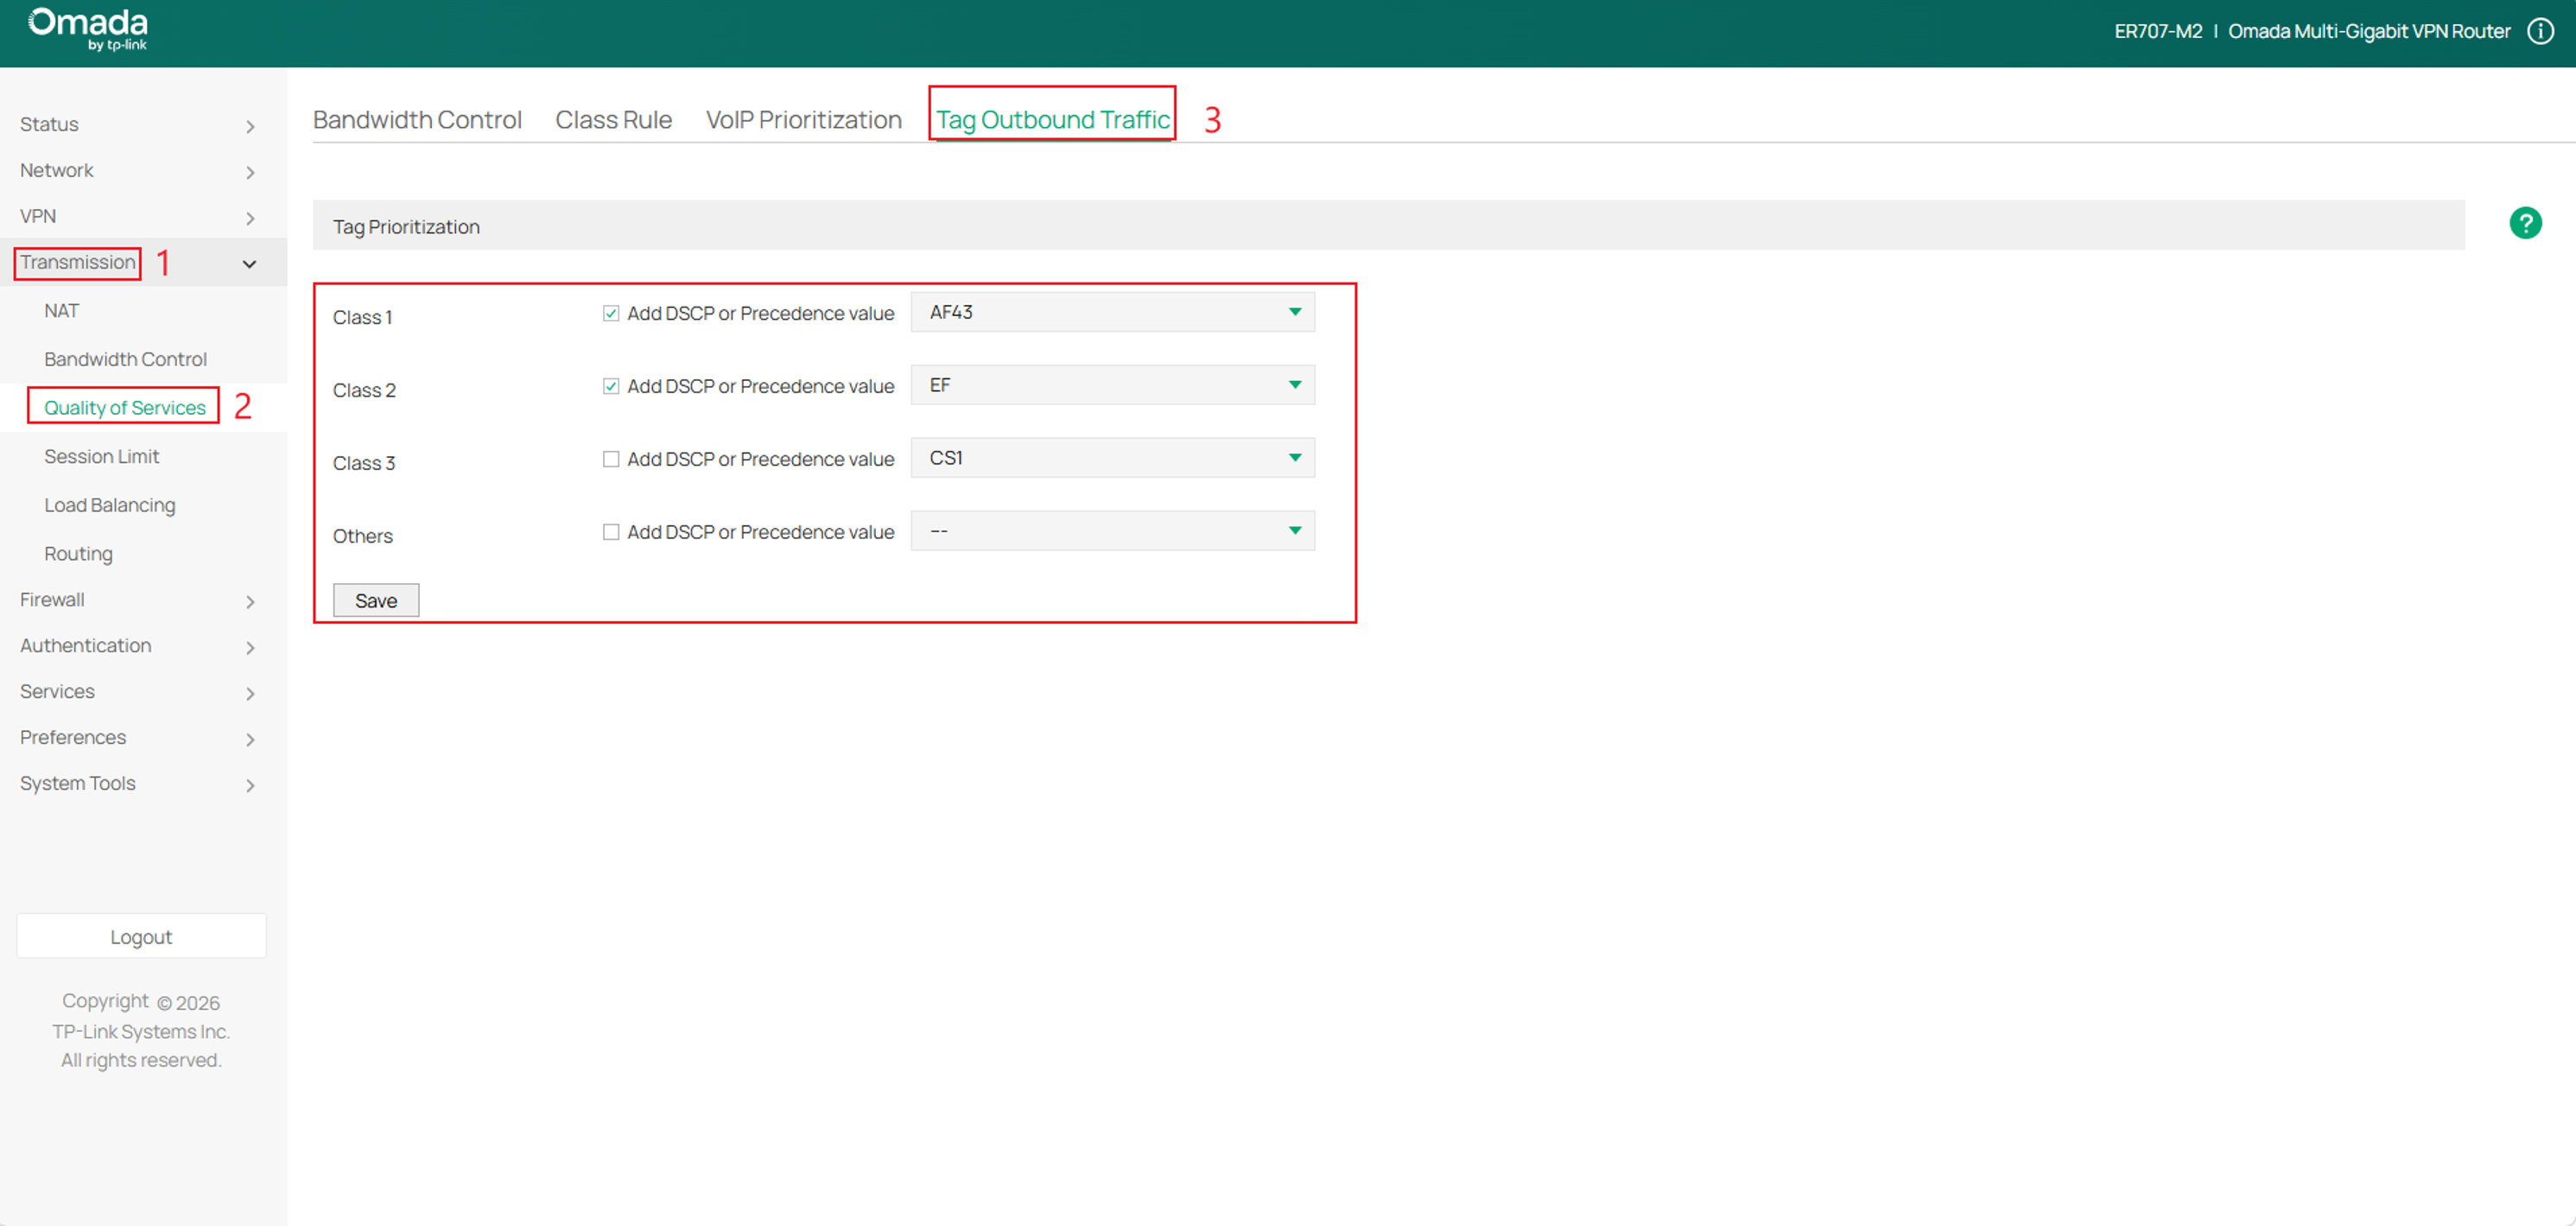
Navigate to Transmission > Quality of Services > Tag Outbound Traffic > fill in the parameters > click Save.
Tag Outbound Traffic applies a DSCP or IP Precedence value to packets after they have been assigned to a QoS class. Unlike Class Rules, which match traffic and assign it to Class 1, Class 2, Class 3, or Others, this section marks the packets as they leave the gateway so other QoS-aware network devices can identify and prioritize them.
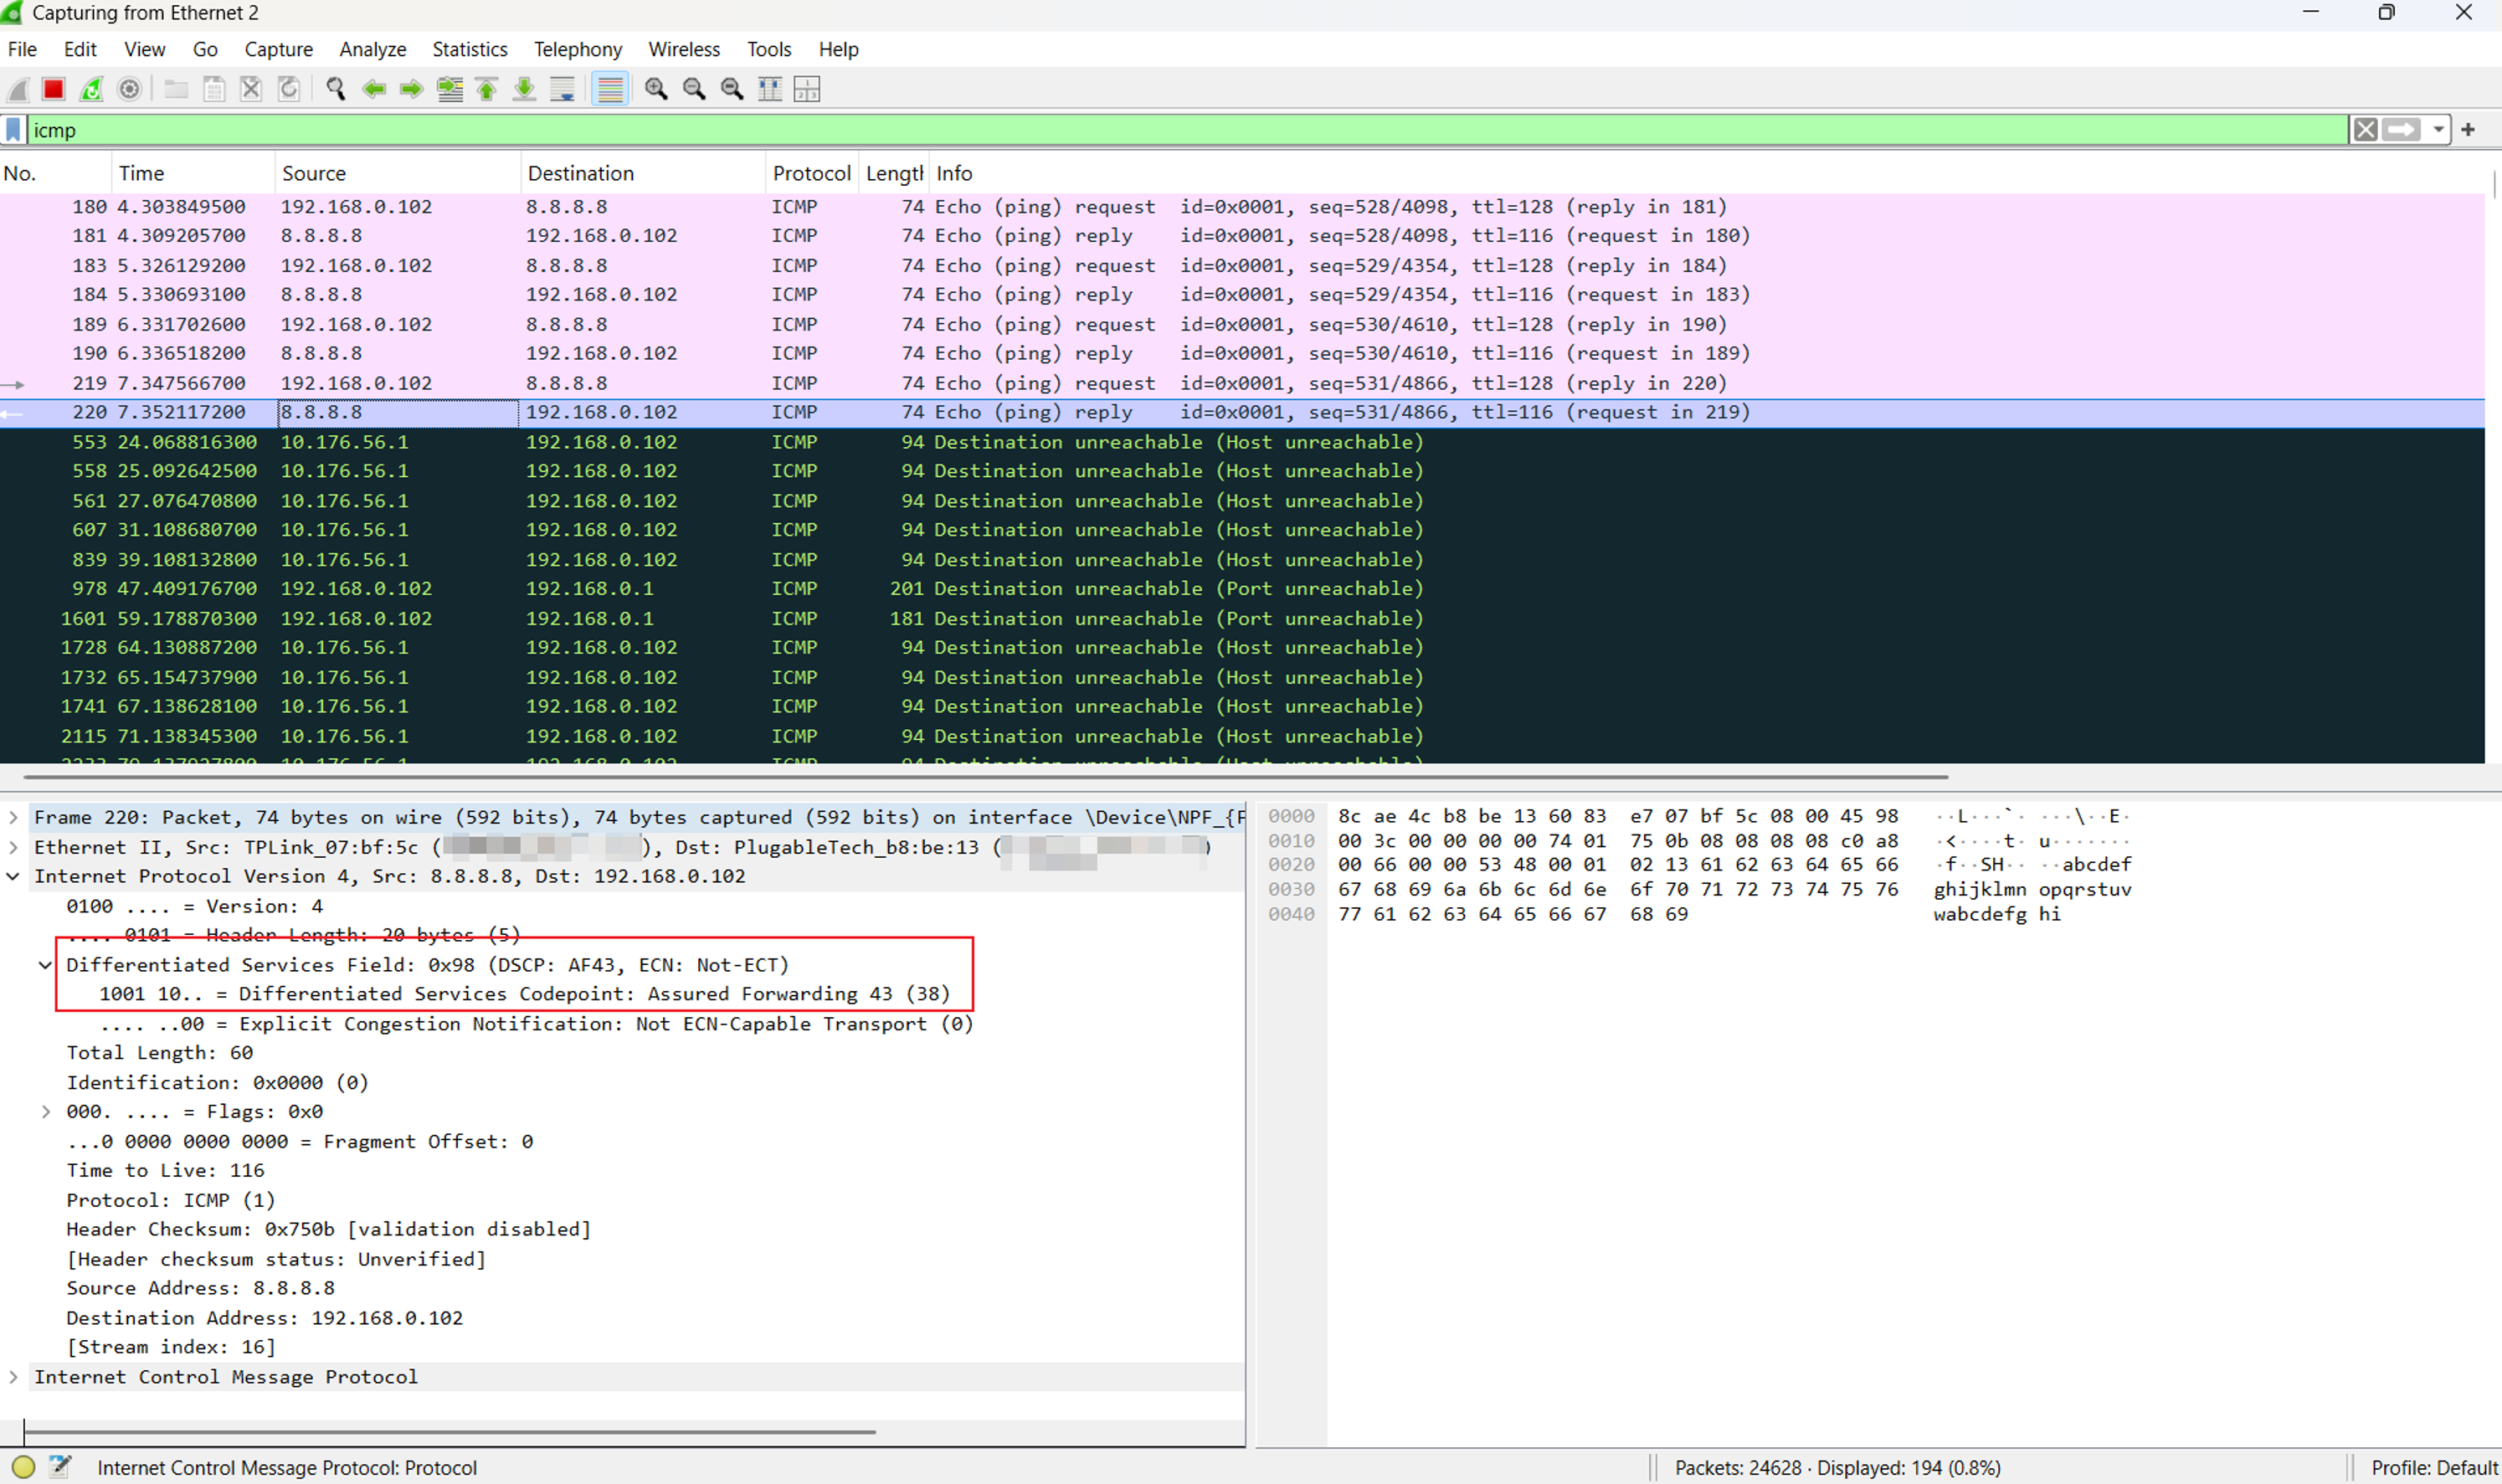
In this example, outbound traffic assigned to Class 1 is marked as AF43, while traffic assigned to Class 2 is marked as EF. Traffic assigned to Class 3 or Others is not marked. Click Save after configuring the required values.
Note: Downstream devices or the ISP may honor, change, or remove DSCP markings. To verify markings applied by the gateway, capture packets on the WAN side of the gateway.
Verification
Class Rule Verification:
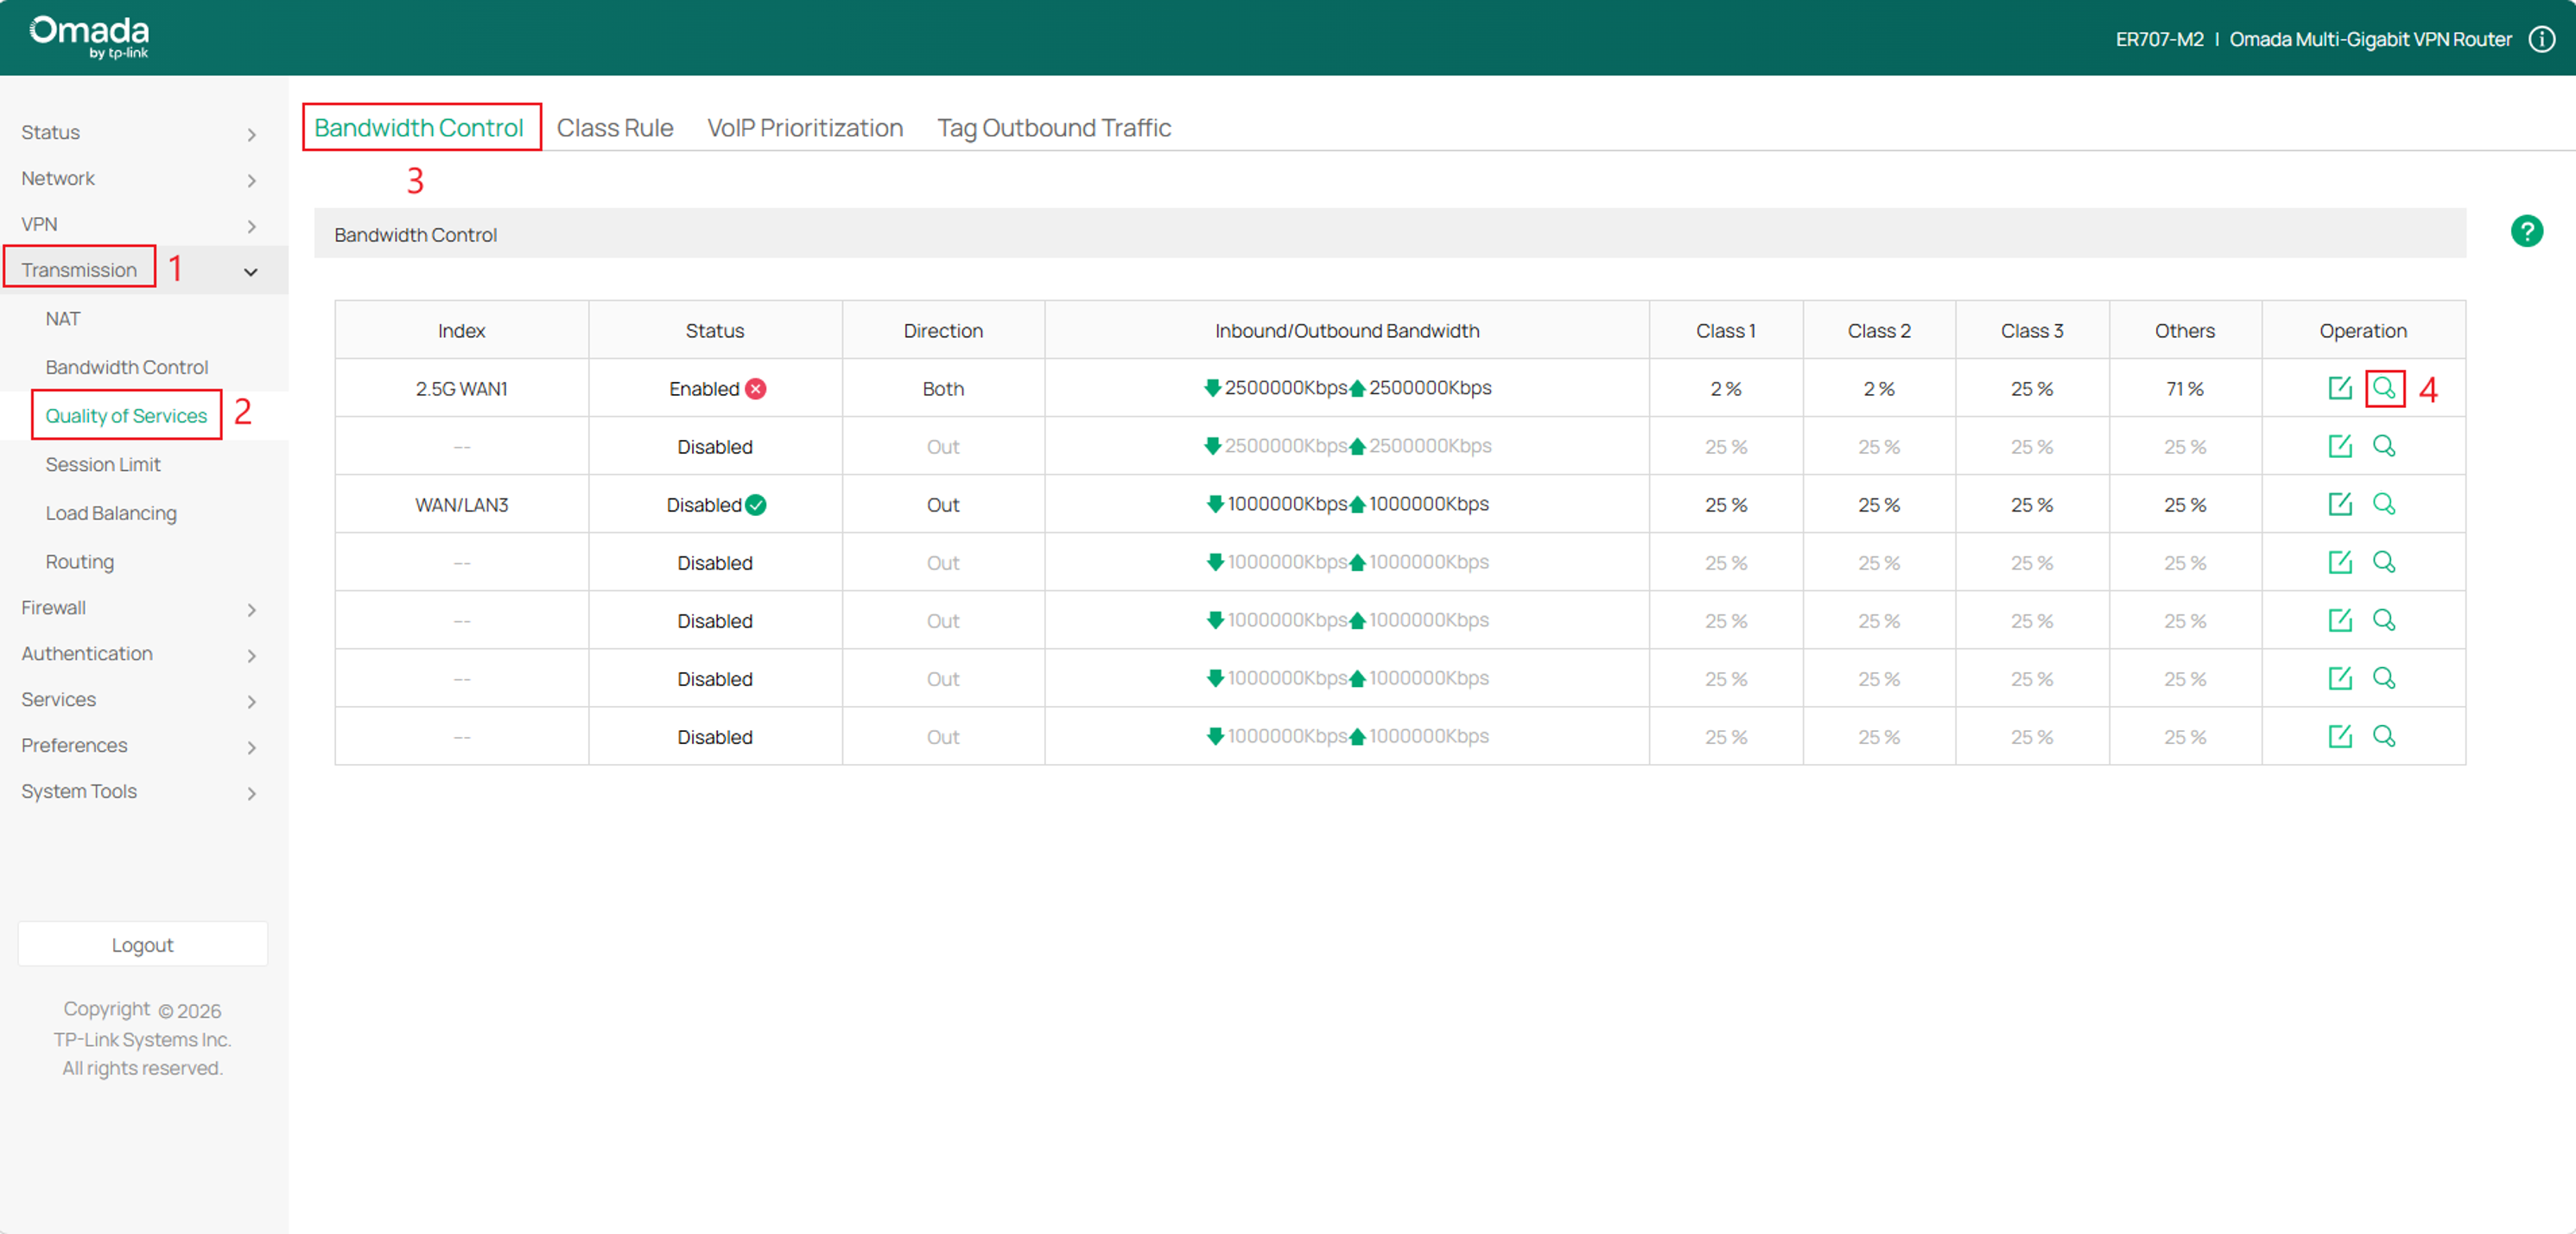
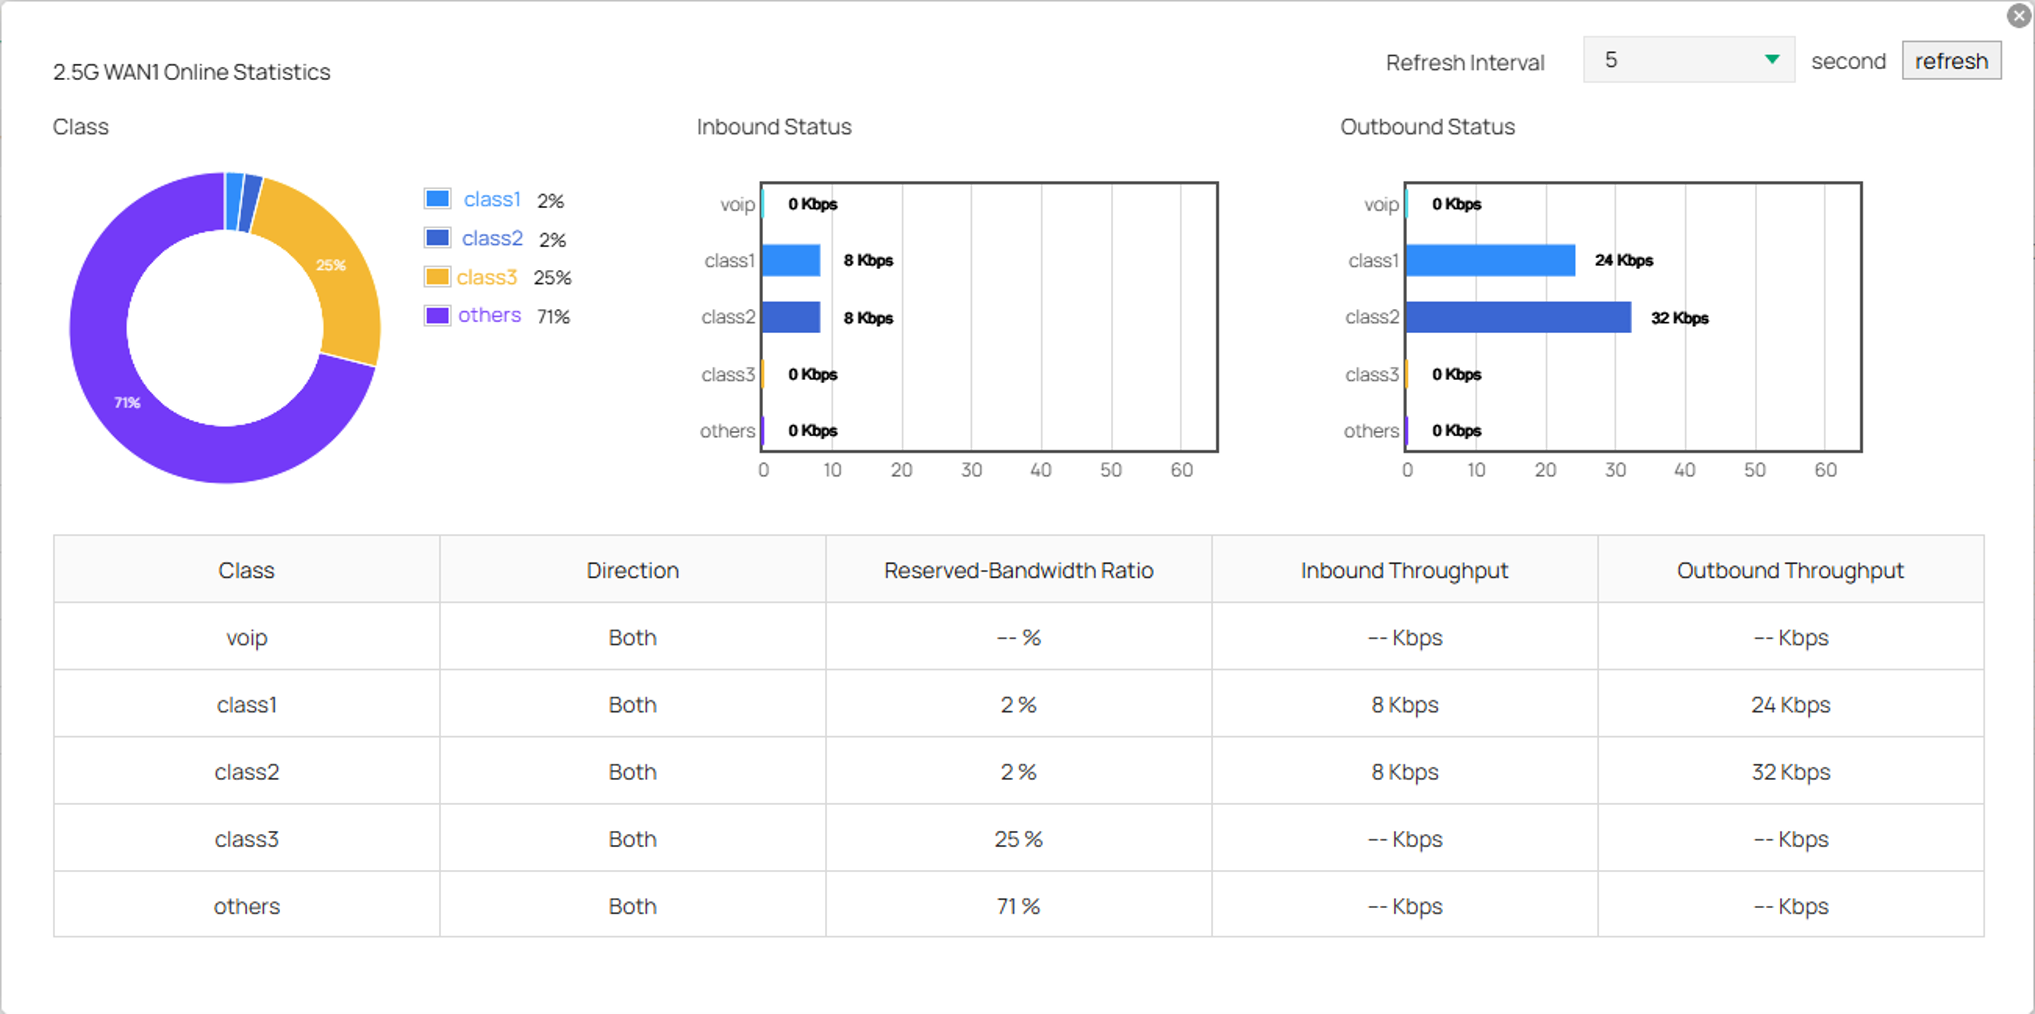
To verify your Bandwidth Control and Class Rules are working navigate to Transmission > Quality of Services > Bandwidth Control > and under the Operation click Details.
Verifying DSCP Tagging
To verify DSCP tagging, generate traffic from a device included in a configured QoS class and run a packet capture on that device.
In this example, the device pings 8.8.8.8. The packet capture shows the echo reply after it has passed through the gateway and is forwarded to the local device. Although the reply enters the gateway through the WAN interface, it exits through the LAN interface toward the client. In Wireshark, confirm that the DSCP value matches the value configured for the corresponding QoS class.
Conclusion
You have now successfully configured Quality of Service on the Omada Gateway in Standalone Mode. By defining the available WAN bandwidth, creating Class Rules, prioritizing VoIP traffic, and optionally applying outbound DSCP markings, the gateway can classify traffic and distribute bandwidth more effectively during network congestion.
To learn more about each function and configuration, please visit Support Home to download or check the manual for your product.
QA
Q1: Why is traffic being assigned to Others instead of the intended QoS class?
A1: Traffic is assigned to Others when it does not match every condition in a configured Class Rule. Verify the IP Group Settings, IP version, Local and Remote Address groups, existing DSCP value, Service Type, rule status, and rule order. If another device already marks the traffic, make sure the Class Rule matches that DSCP value. After making changes, start a new traffic session and review the WAN statistics again.
