


Contents
Introduction
Wi-Fi Calling (VoWiFi) establishes an IP-secbased‑ encrypted tunnel between the client device and the carrier’s core network, carrying voice and SMS traffic over enterprise Wi-Fi infrastructure. This enables stable voice services in areas with weak cellular coverage.
To meet the demands of high-density and poor-coverage environments such as multi-dwelling units (MDUs), nursing homes, campuses, hospitals, and industrial parks, Omada Controller and access points now provide a dedicated Wi-Fi Calling optimization feature. You can create Wi-Fi Calling profiles based on your carriers and their evolved packet data gateways (ePDGs), then apply them across wireless networks to avoid repeated configuration.
This guide describes how to configure this feature to ensure reliable voice services over your Omada Wi-Fi network.
Requirements
- Omada Network Application v6.2.10 and above
- EAP (The firmware is fully compatible with Controller v6.2)
Configuration
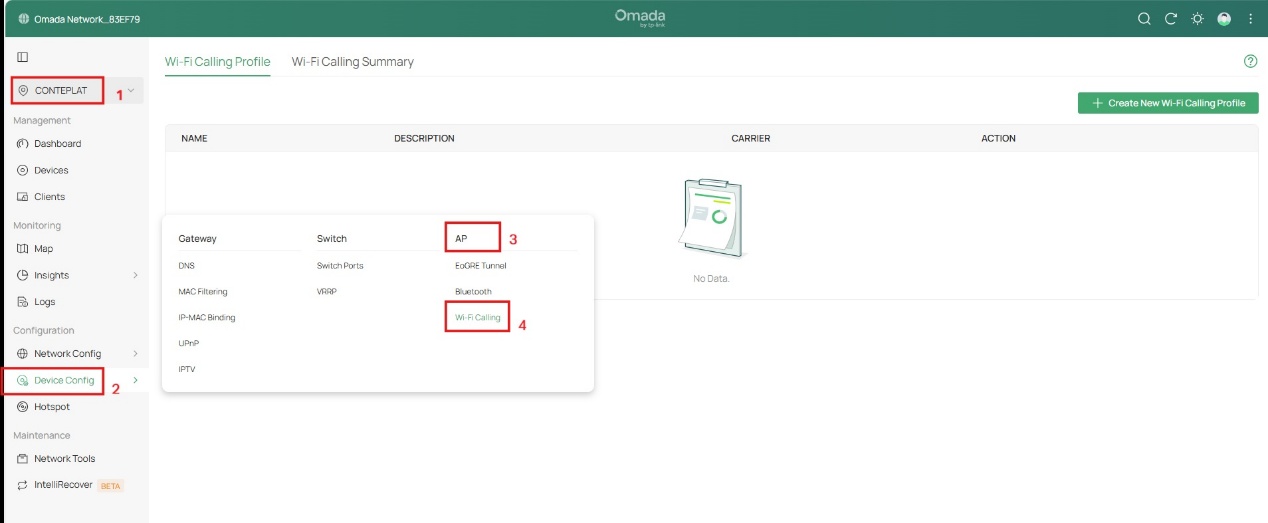
Step 1. Log in to the management interface of fusion gateway via web browser, go to Site View > Configuration > Device Config > AP > Wi-Fi Calling to enter Wi-Fi Calling configuration page, as shown in the picture below.
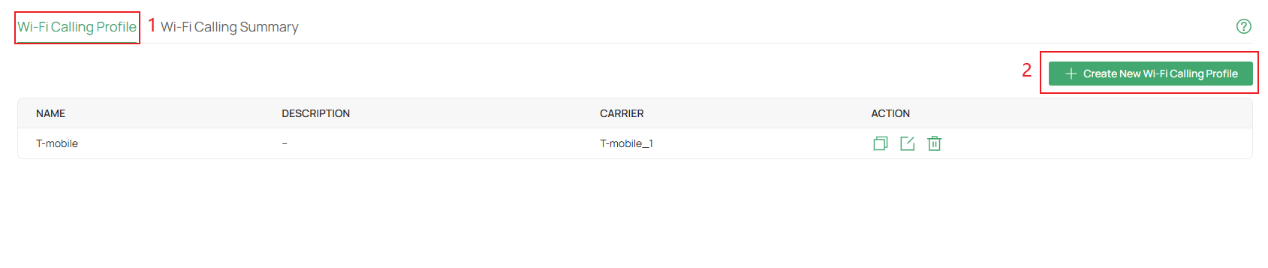
Step 2. Click Create New Wi-Fi Calling Profile to add Wi-Fi Calling profiles.
Step 3. Specify the profile name, then configure the related parameters.
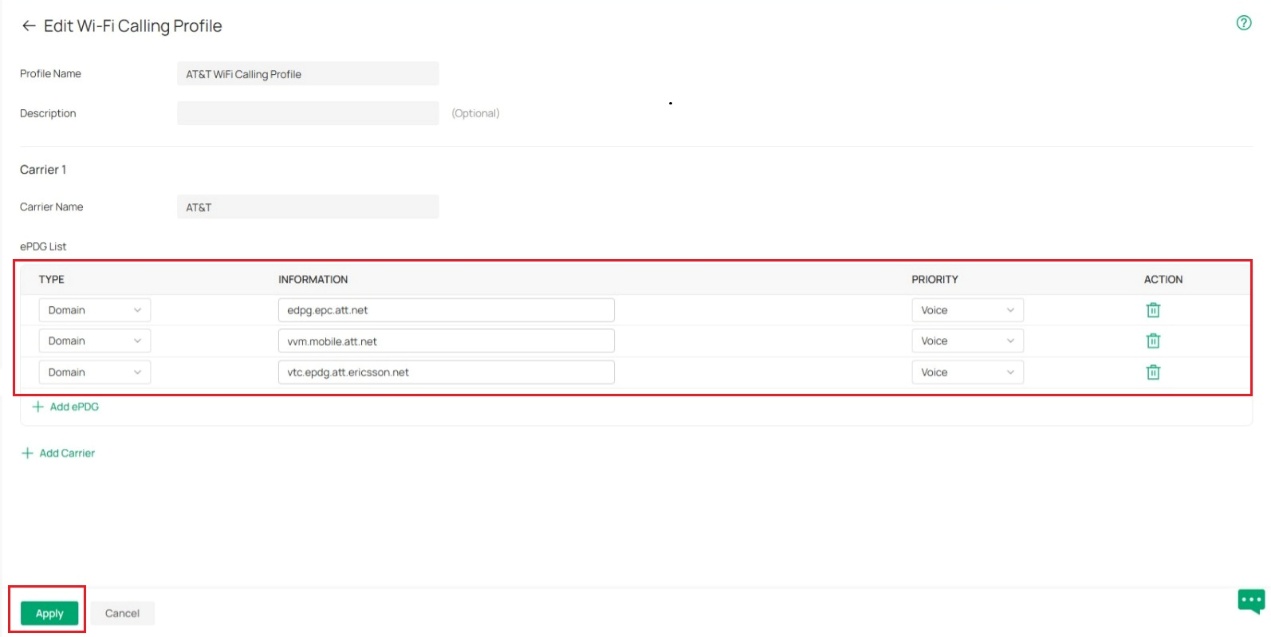
- Profile Name: Specify the name of the profile.
- Description: Enter a description for identification.
- Carrier Name: Enter the name of a carrier.
- ePDG List: Supports up to 25 ePDG entries.
- Type: Select Domain Name or IP Address(IPv4/IPv6) to define the evolved packet data gateway (ePDG) address. Default format: Domain.
- Information: Enter the ePDG Domain in the form of the selected type.
Below is a list of ePDG domain information for common operator carriers , provided for reference only.
Note: Since an operator may have multiple domain names, please confirm with the operator that the ePDG domain name configuration is accurate.
|
AT&T |
epdg.epc.att.net |
|
AT&T |
sentitlement2.mobile.att.net |
|
AT&T |
vvm.mobile.att.net |
|
AT&T East Coast |
vtc.epdg.att.ericsson.net |
|
AT&T West Coast |
cnc.epdg.att.erricson.net |
|
Rogers |
epdg.epc.mnc720.mcc302.pub.3gppnetwork.org |
|
SmarTone |
epdg.epc.mnc006.mcc454.pub.3gppnetwork.org |
|
Sprint |
primgw.vowifi2.spcsdns.net |
|
T-Mobile |
ss.epdg.epc.mnc260.mcc310.pub.3gppnetwork.org |
|
T-Mobile |
epdg.epc.mnc260.mcc310.pub.3gppnetwork.org |
|
T-Mobile |
crl.t-mobile.com |
|
Verizon |
wo.vzwwo.com |
Priority: Select the transmission priority of data packets using this ePDG entry. Default value: "Voice".
- Voice: Highest priority, used for real-time audio streaming. Recommended for Wi-Fi calls.
- Video: Second highest priority, used for video streaming.
- Best Effort: Third highest priority, used for normal data traffic.
- Background: Lowest priority, used for background tasks.
Step 4. Then click Apply to save the profile. Now you can apply the profile to wireless networks.
Wi-Fi Calling Profile page displays the created entries, including Name, Description, Carrier, and Action. It supports creating, copying, editing, and deleting entries.
Notes:
- A maximum of 8 profiles can be created. When this limit is reached, the button for creating a new entry is disabled (grayed out).
- If the entry is already applied, a pop-up window will appear when attempting to delete it, stating: 'Failed to delete this profile because it is applied.

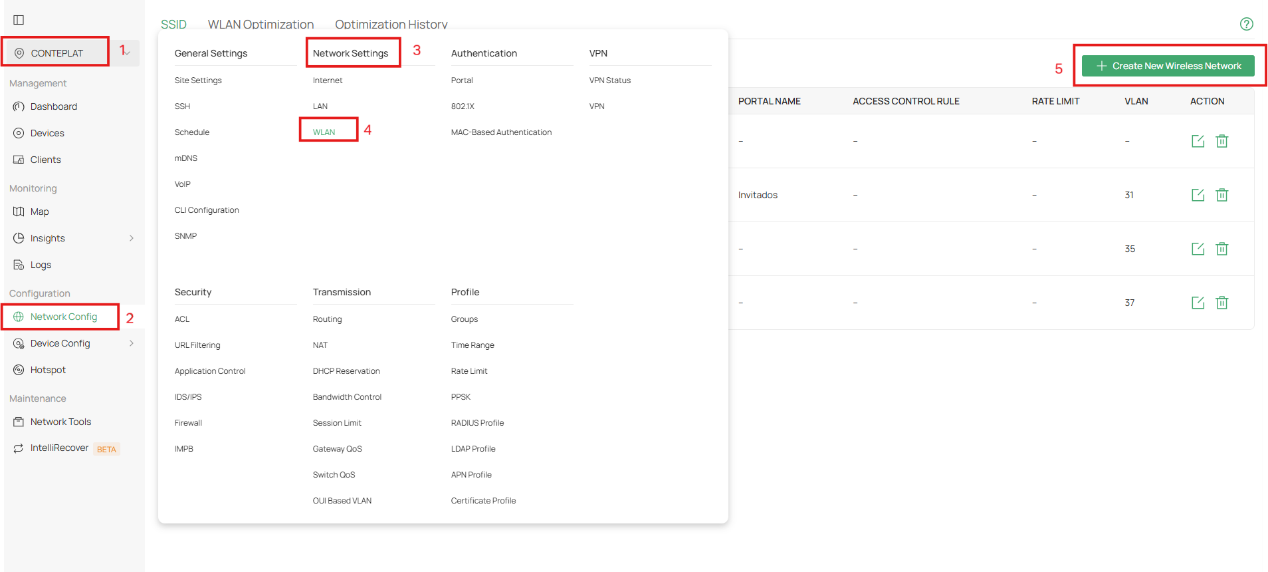
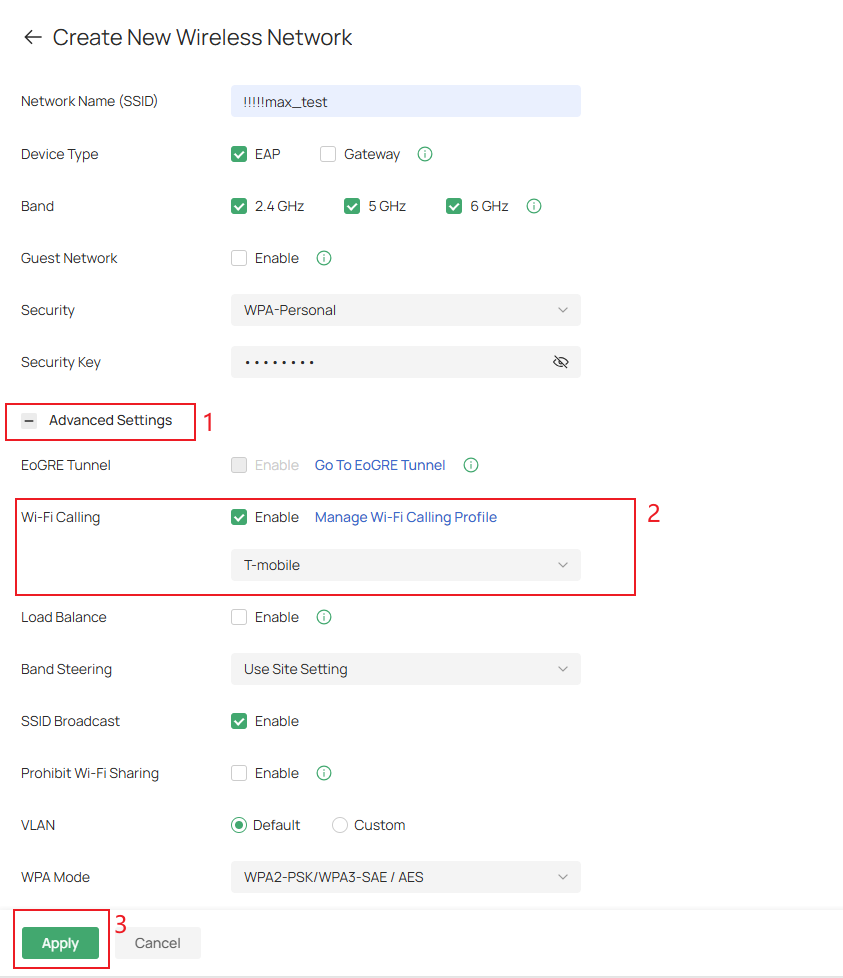
Step 5. Go to Site View > Network Config > Network Settings > WLAN > Create New wireless Network, you can creat ssid and apply the profile to wireless networks.
Step 6. Go to Advance Settings > Wi-Fi Calling, enable Wi-Fi Calling feature and selet the Wi-Fi Calling Profile. Then click Apply to save your configuration.
Step 7. After that, you have finished to configure Wi-Fi Calling feature on Omada Controller. You can enable Wi-Fi Calling in your phone's settings, turn on Wi-Fi, and connect to the wireless network you just created.
Step 8. Go to Site View > Configuration > Device Config > AP > Wi-Fi Calling > Wi-Fi Calling Summay to enter Wi-Fi Calling summary page.
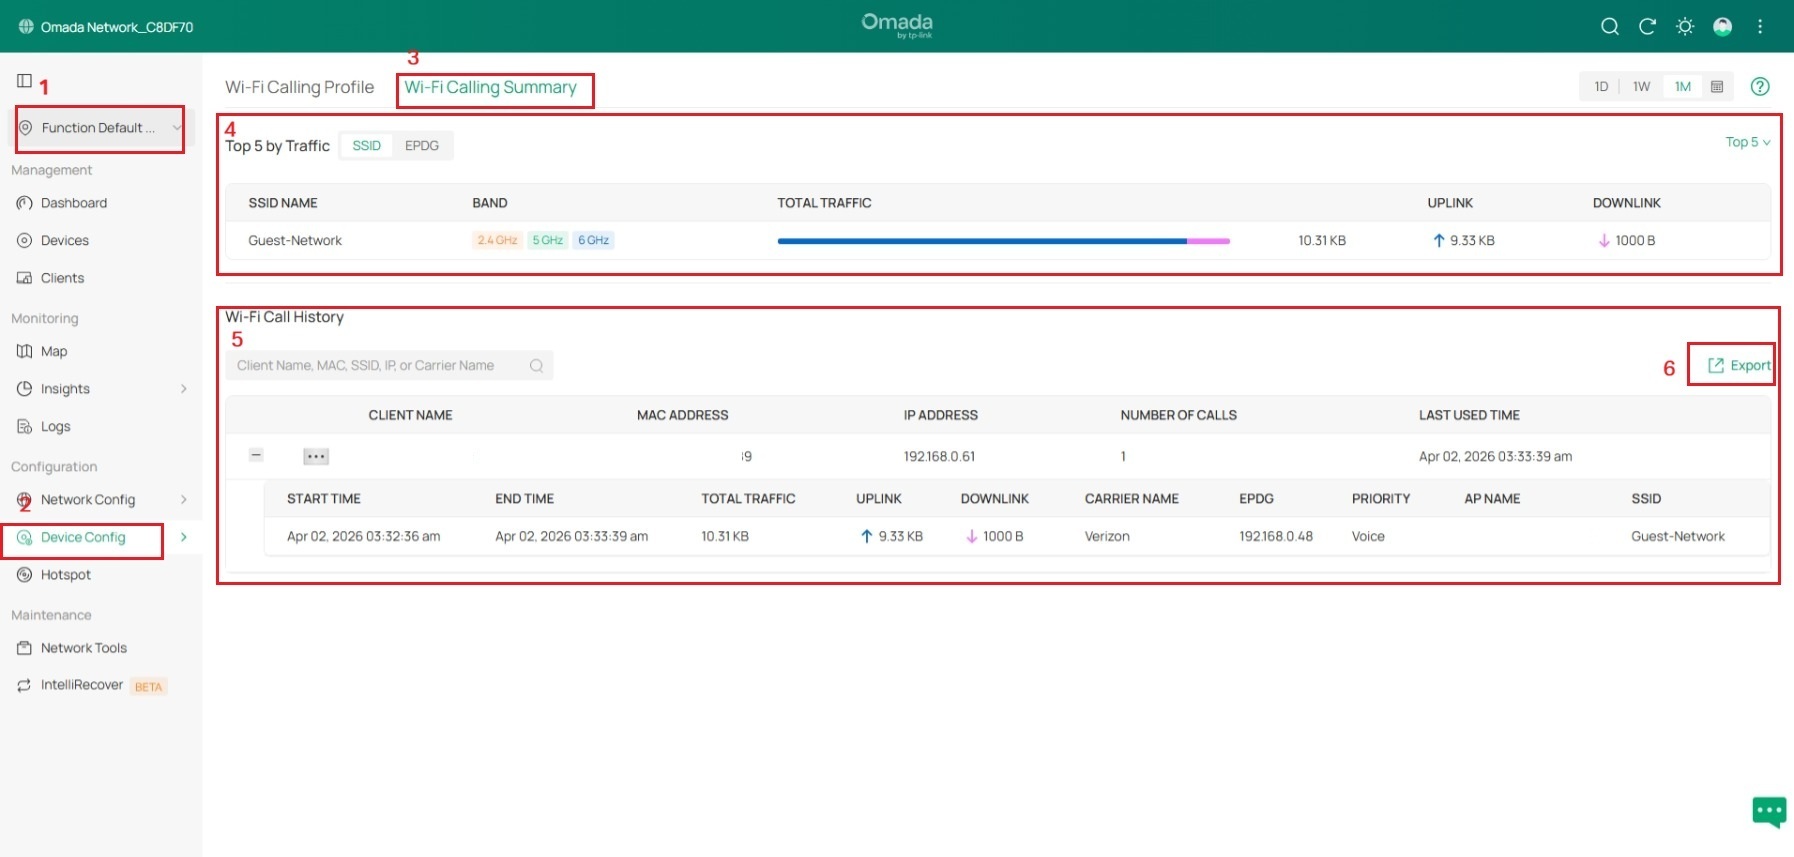
Traffic section:
- The Traffic section displays the top 10 entries by traffic volume, with two available views: SSID and ePDG. You can switch between the two views, and the default view is the SSID dimension.
- The two views are named “Top X SSIDs by Traffic” and Top X ePDGs by Traffic”. The value of X can be set to 5, 10, or 20 in the upper-right corner, with a default of 5.
- SSID entries : Displays the SSID name and the band(s) used (supports multiple bands)– Identify which SSID carries the most Wi‑Fi Calling traffic. Use this insight to create and enable targeted SSIDs, reducing pressure on a single SSID.
- ePDG entries : Displays the domain name/IP address and the associated carrier name, in the format set when the user creates the entry — either domain name or IP address – Identify the best‑performing carrier. Add more ePDG domain entries for that carrier and apply appropriate QoS policies.
Note: No export function is provided, as this page is intended primarily for monitoring purposes.
Wi-Fi Calling History:
- Displays Wi‑Fi Calling session records, one entry per call, including: Client Name, MAC, IP, total traffic (uplink/downlink), Carrier Name, Priority, AP Name, SSID, Wi‑Fi Calling Profile, ePDG, Start/End Time.
- For an ongoing call, the End Time field displays " Call in Progress ".
- Supports exporting Wi-Fi Calling Historical data.
Conclusion
You have learned how to configure Wi-Fi Calling on Omada Controller.
Get to know more details of each function and configuration, please go to Download Center to download the manual of your product.
