Contents
Introduction
Requirements
Configuration
Verification
Conclusion
This article introduces the WAN Settings Override feature in Omada Network, designed to resolve network interruptions caused by the WAN connection type defaulting to DHCP when migrating an Omada Gateway from standalone mode to centralized management of Omada Network.
With this feature, you can pre-configure the connection type and relevant settings before the Omada Gateway is adopted by the Omada Network. This ensures the Omada Gateway automatically applies the correct WAN configuration upon adoption to maintain network connectivity, enabling a seamless transition from standalone mode to centralized management of Omada Network.
- Omada Network v6.2 and above
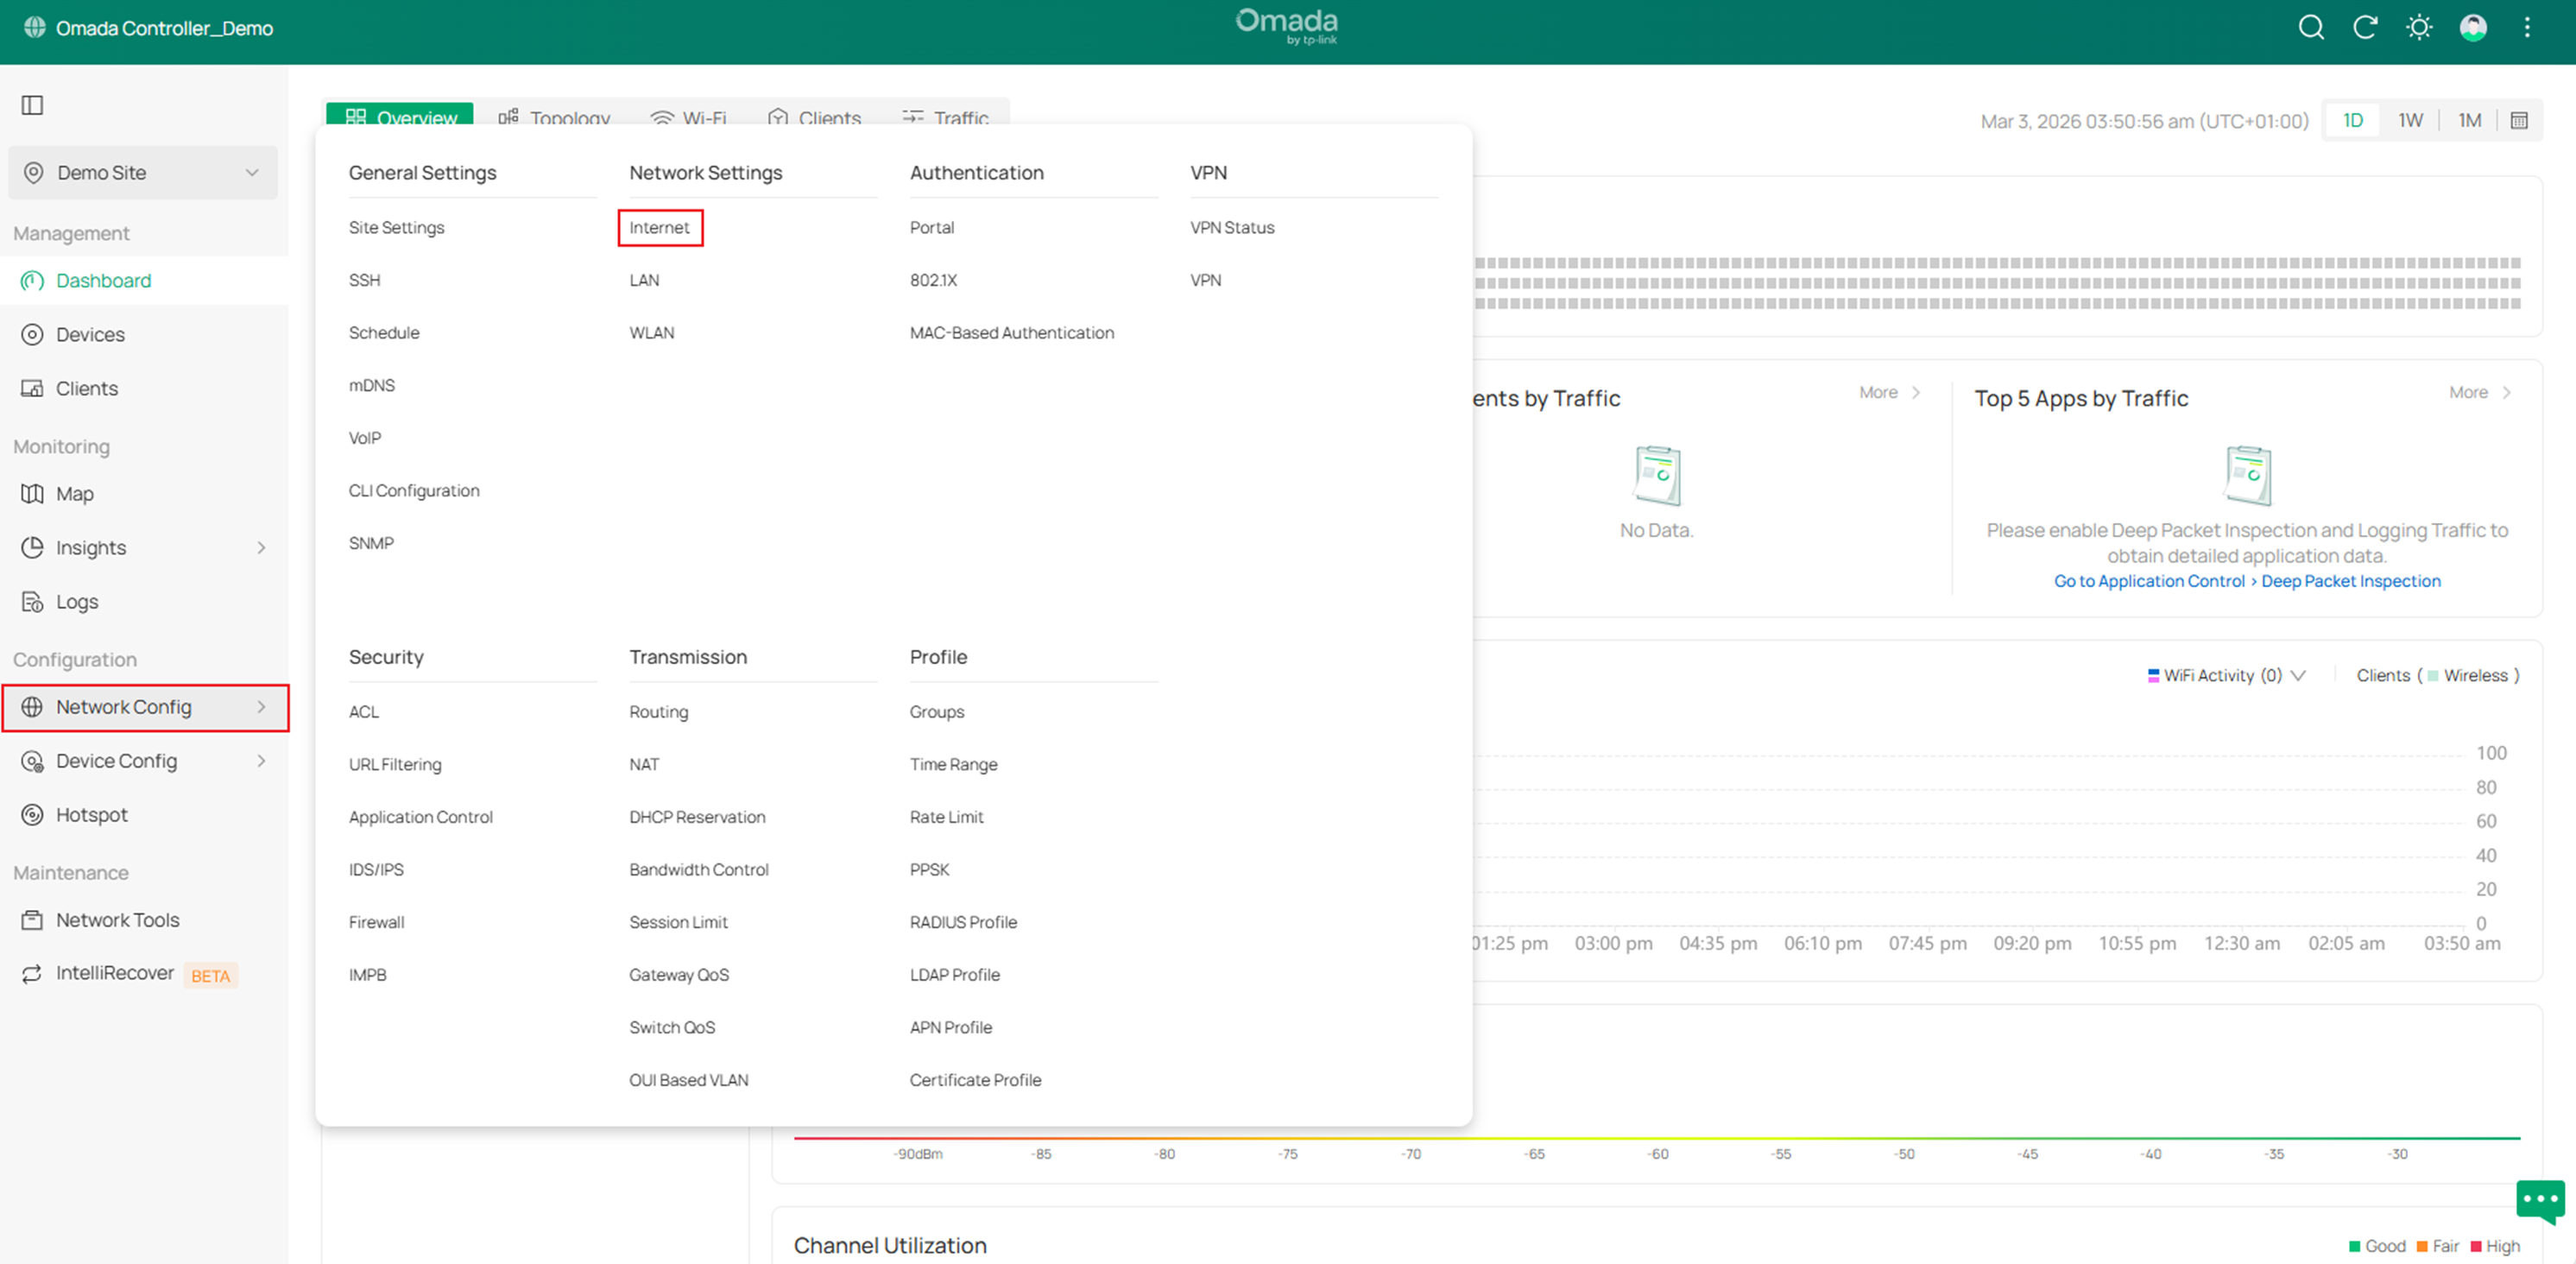
Step 1. Go to Network Config > Network Settings > Internet.
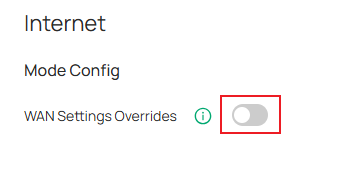
Step 2. Enable WAN Settings Overrides to start pre-configuring WAN settings.
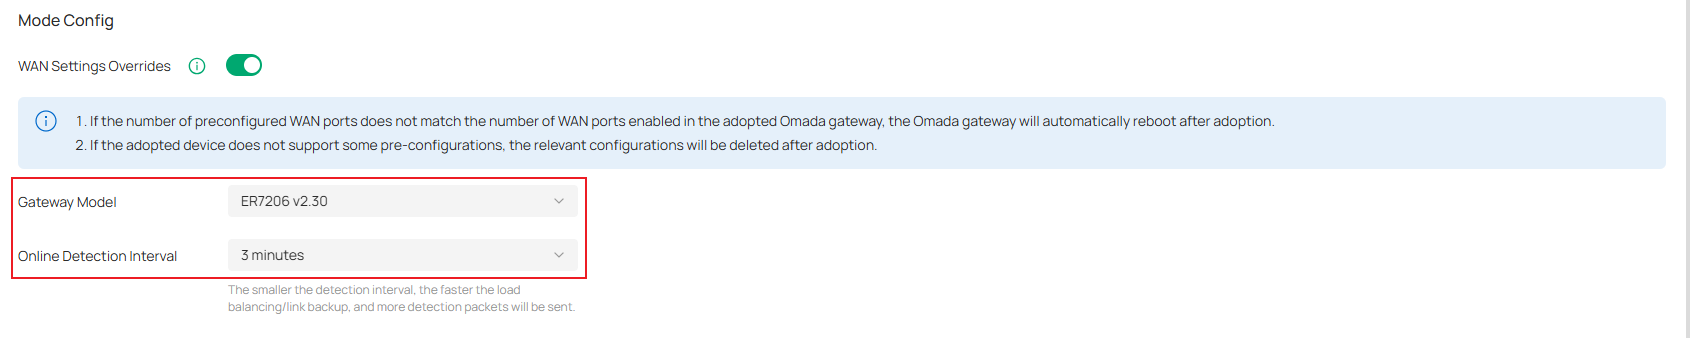
Step 3. Select the Gateway Model to be deployed and configure the Online Detection Interval. With the Online Detection function, you can easily know the online status of the WAN port at the specified interval. The smaller the detection interval, the faster the load balancing/link backup, and the more detection packets will be sent.
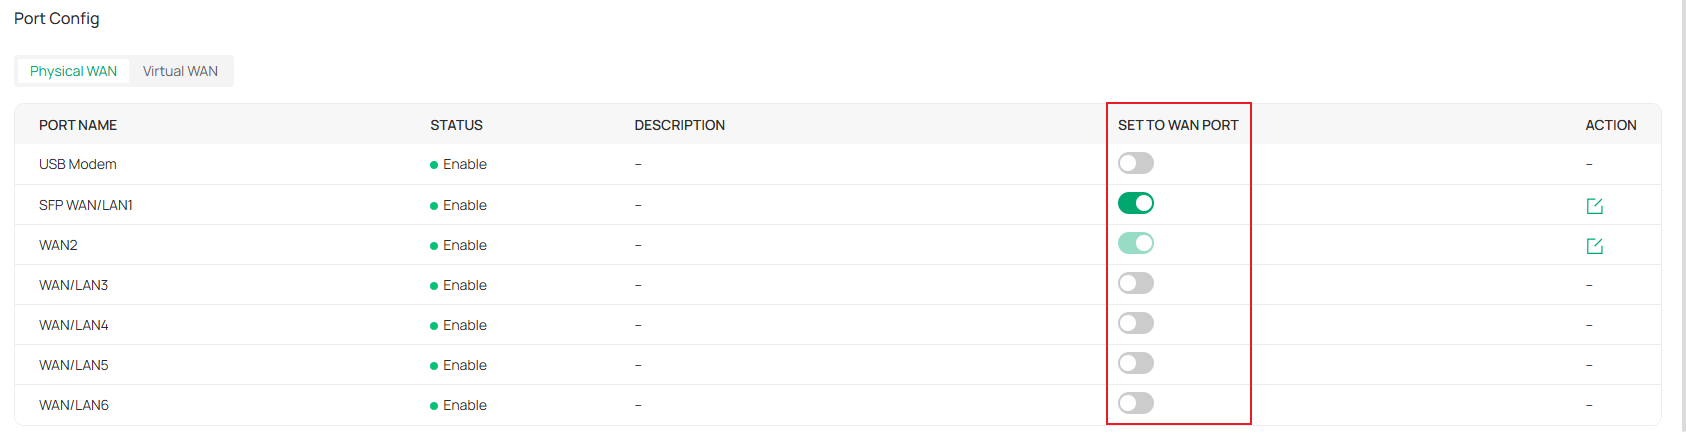
Step 4. Configure physical WAN ports.
Enable SET TO WAN PORT for one or more physical ports to configure them as WAN ports as needed. On certain gateway models, some ports may be forced to function as WAN ports.
Click the Edit button for a specific physical WAN port to pre-configure its dial-up settings.
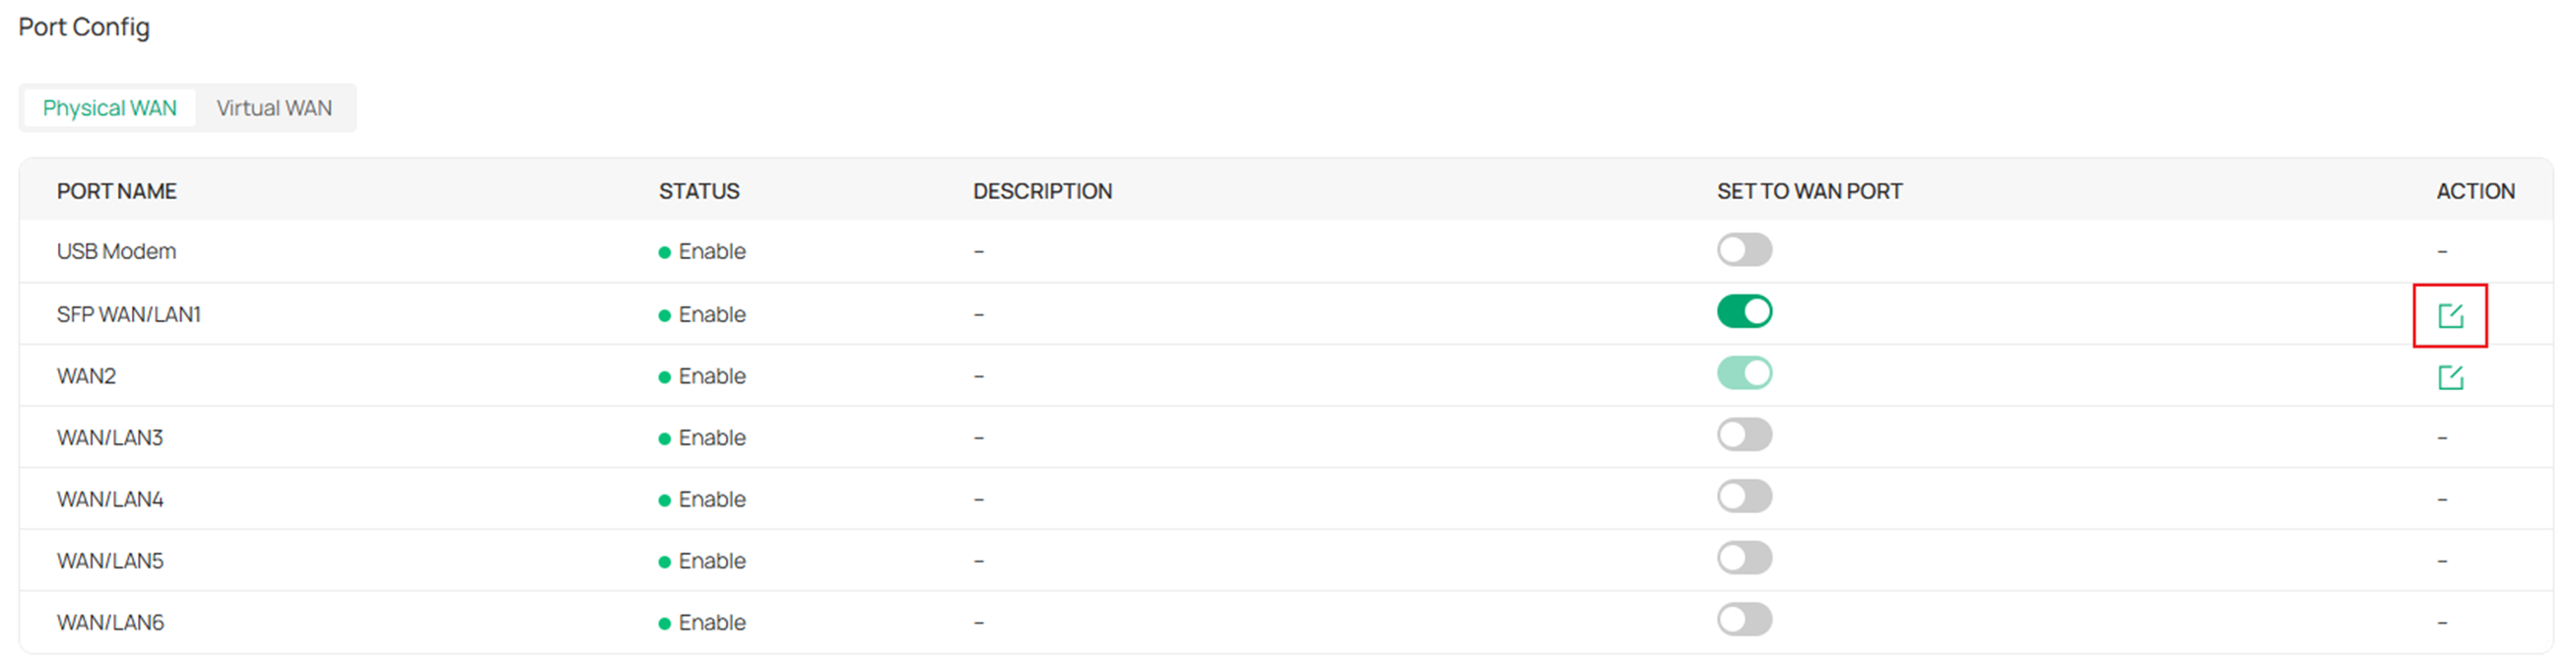
If needed, you can name a physical port and customize the MAC address of a physical WAN port.

Select an IPv4 connection type for this physical WAN port and configure related settings according to the requirements of the Internet Service Provider.
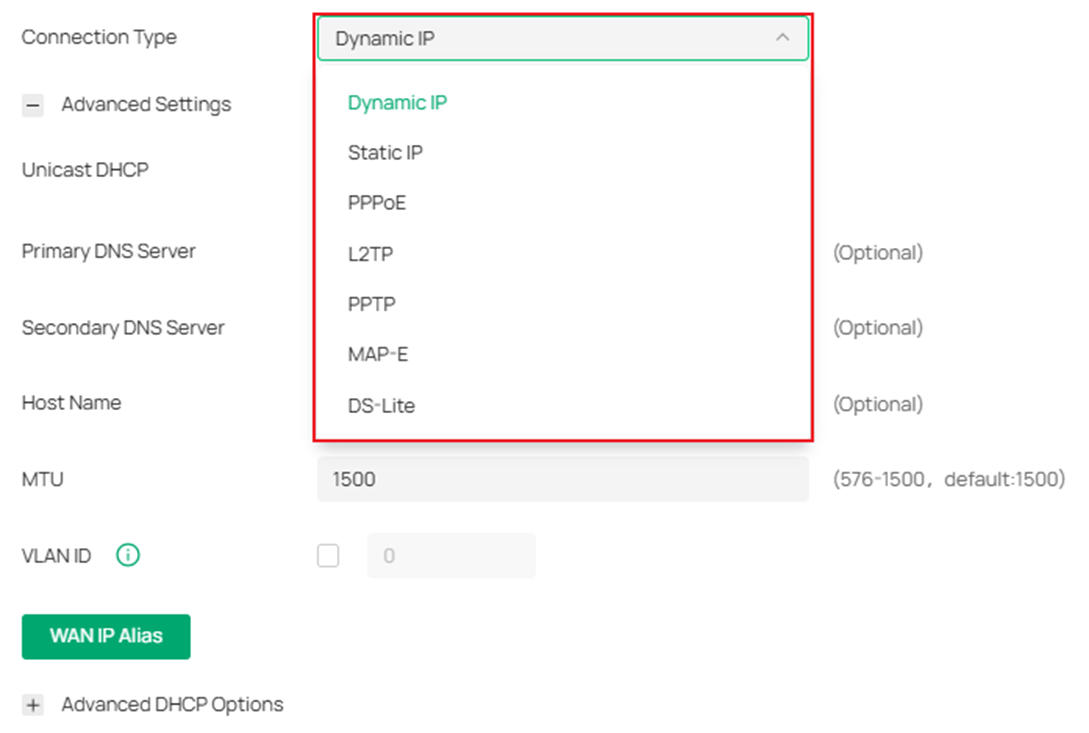
Here is a table providing an overview of all IPv4 connection types supported by Omada Gateways.
|
Connection Type
|
Description
|
|
Dynamic IP
|
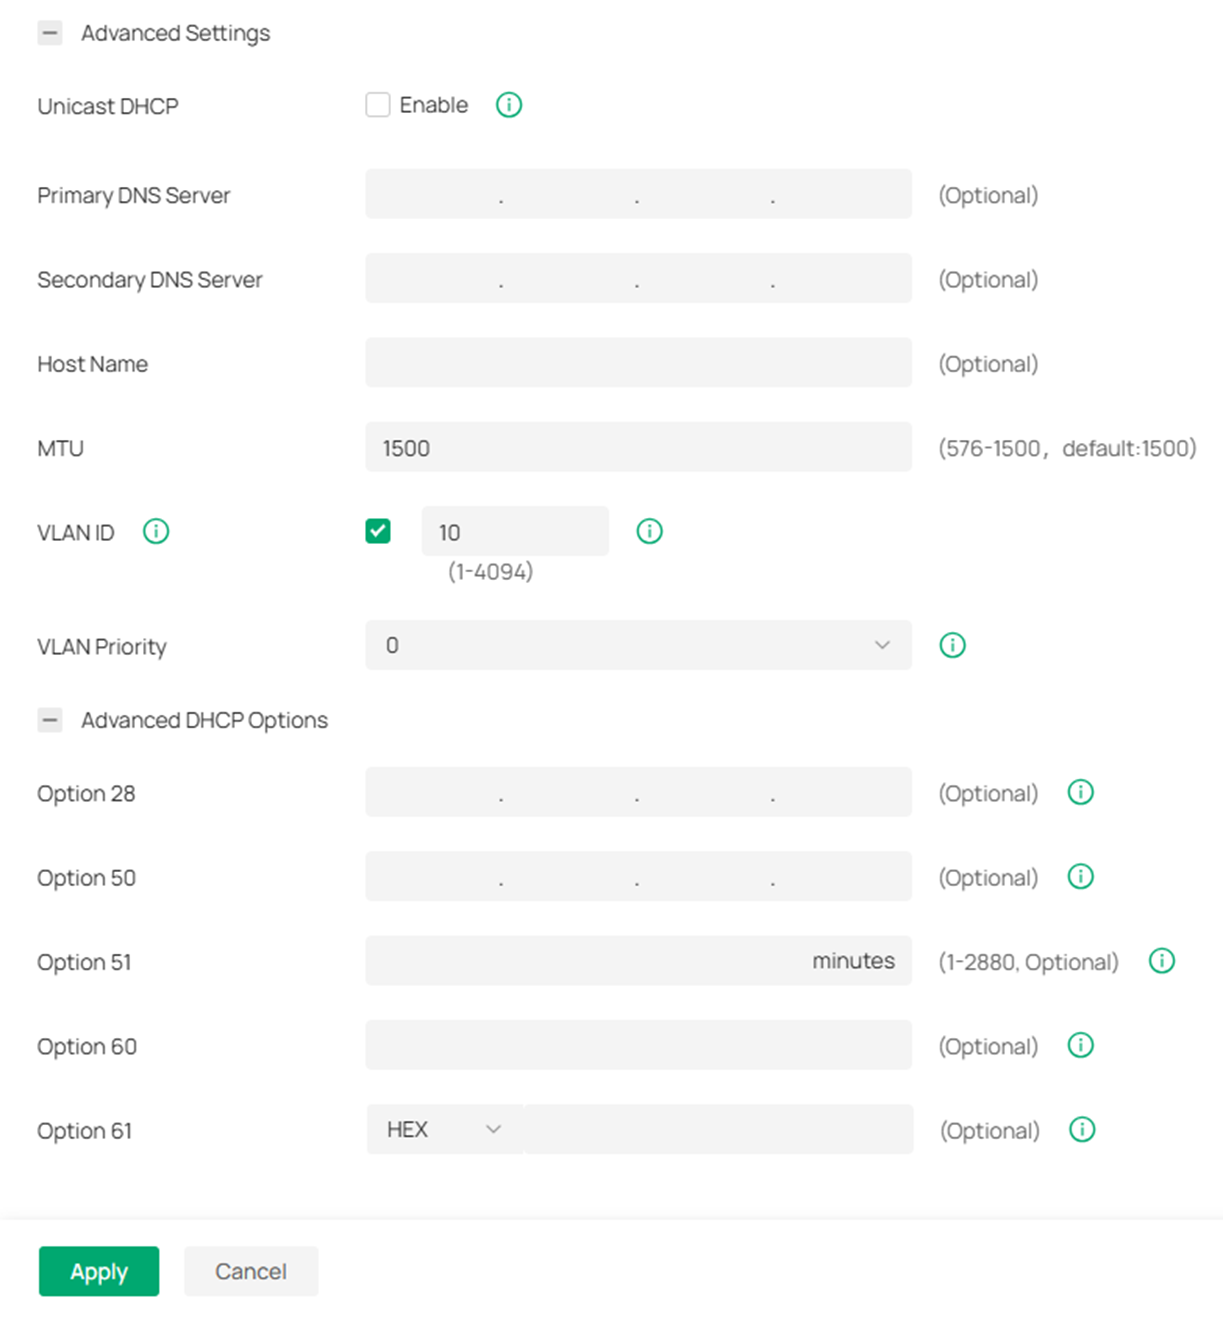
- Unicast DHCP: With this option enabled, the gateway will require the DHCP server to assign the IP address by sending unicast DHCP packets. Usually, you do not need to enable the option.
- Primary DNS Server (Optional): Enter the IP address of the primary DNS server provided by your ISP.
- Secondary DNS Server (Optional): Enter the IP address of the secondary DNS server, which provides redundancy in case the primary DNS server goes down.
- Host Name (Optional): Enter a name to identify the gateway.
- MTU: Specify the MTU (Maximum Transmission Unit) of the WAN port. MTU is the maximum data unit transmitted in the physical network.
- VLAN ID: If the WAN port has VLAN enabled, enter the VLAN ID, and the WAN port will automatically join the VLAN. By default, the egress rule of the VLAN is UNTAG, so the packets sent by the WAN port do not carry VLAN tags. If you want the packets sent by the WAN port to carry VLAN tags, configure its egress rule as TAG.
- VLAN Priority: Priority is available only when VLAN is enabled. The VLAN Priority feature can prioritize the internet traffic as needed. You can determine the priority level for the traffic by specifying the tag. The tag ranges from 0 to 7.
- WAN IP Alias: WAN IP Alias supports configuring multiple IP addresses on one WAN port, and these IP addresses can be used to configure virtual servers and other functions.
- Advanced DHCP Option: Configure the advanced DHCP Option.
- Option 28: Specify the broadcast address to use on the client's subnet.
- Option 50: Set request IP options for the DHCP client.
- Option 51: Set the IP address lease time option for the DHCP client.
- Option 55: Set the request parameter list options for the DHCP client. The client uses this option to indicate which network configuration parameters need to be obtained from the server. The content of this option is the option value corresponding to the parameter requested by the client.
- Option 60: Enter the value for DHCP Option 60. DHCP clients use this field to optionally identify the vendor type and configuration of a DHCP client. Mostly, it is used in scenarios where the APs apply for different IP addresses from different servers according to the needs
- Option 61: Set client identification options. Currently, the default is the LAN MAC address
|
|
Static IP
|
- IP Address: Enter the IP address provided by your ISP.
- Subnet Mask: Enter the subnet mask provided by your ISP.
- Default Gateway: Enter the default gateway provided by your ISP.
- Primary DNS Server (Optional): Enter the IP address of the primary DNS server provided by your ISP.
- Secondary DNS Server (Optional): Enter the IP address of the secondary DNS server, which provides redundancy in case the primary DNS server goes down.
- MTU: Specify the MTU (Maximum Transmission Unit) of the WAN port. MTU is the maximum data unit transmitted in the physical network.
- VLAN ID: If the WAN port has VLAN enabled, enter the VLAN ID, and the WAN port will automatically join the VLAN. By default, the egress rule of the VLAN is UNTAG, so the packets sent by the WAN port do not carry VLAN tags. If you want the packets sent by the WAN port to carry VLAN tags, configure its egress rule as TAG.
- VLAN Priority: Priority is available only when VLAN is enabled. The VLAN Priority feature can prioritize the internet traffic as needed. You can determine the priority level for the traffic by specifying the tag. The tag ranges from 0 to 7.
- WAN IP Alias: WAN IP Alias supports configuring multiple IP addresses on one WAN port, and these IP addresses can be used to configure virtual servers and other functions.
|
|
PPPoE
|
- Username: Enter the username of your PPPoE account provided by your ISP.
- Password: Enter the password of your PPPoE account provided by your ISP.
- Get IP Address from ISP: With this option enabled, the gateway gets an IP address from the ISP when setting up the WAN connection. With this option disabled, you need to specify the IP Address provided by your ISP.
- Primary DNS Server (Optional): Enter the IP address of the primary DNS server provided by your ISP.
- Secondary DNS Server (Optional): Enter the IP address of the secondary DNS server, which provides redundancy in case the primary DNS server goes down.
- Connection Mode
- Connect Automatically: The gateway activates the connection automatically when the connection is down. You need to specify the Redial Interval, which decides how often the gateway tries to redial after the connection is down.
- Connect Manually: You can manually activate or terminate the connection.
- Time-Based: During the specified period, the gateway will automatically activate the connection. You need to specify the Time Range when the connection is up.
- Redial Interval: Specify the interval to decide how often the gateway tries to redial after the connection is down.
- Service Name: Keep it blank unless your ISP requires you to configure it.
- MTU: Specify the MTU (Maximum Transmission Unit) of the WAN port. MTU is the maximum data unit transmitted in the physical network.
- MRU: Specify the MRU (Maximum Receive Unit) of the WAN port. MRU is the maximum data unit transmitted in the Data Link Layer.
- MSS Clamping: Specify the upper limit of the value of the MSS (Maximum Segment Size) field negotiated by the sending and receiving parties when establishing a TCP connection to avoid IP fragmentation. If the value of the MSS field negotiated by the communication parties exceeds the specified value, the gateway will change the negotiated MSS field to the specified value
- Disabled: Disable the MSS Clamping function, and the gateway will not intervene in the MSS value negotiated by the communication parties.
- Auto: Automatically calculate MSS value based on path MTU.
- Custom: User-defined MSS value.
- VLAN ID: If the WAN port has VLAN enabled, enter the VLAN ID, and the WAN port will automatically join the VLAN. By default, the egress rule of the VLAN is UNTAG, so the packets sent by the WAN port do not carry VLAN tags. If you want the packets sent by the WAN port to carry VLAN tags, configure its egress rule as TAG.
- VLAN Priority: Priority is available only when VLAN is enabled. The VLAN Priority feature can prioritize the internet traffic as needed. You can determine the priority level for the traffic by specifying the tag. The tag ranges from 0 to 7.
- Secondary Connection: Secondary connection is required by some ISPs. Select the connection type required by your ISP.
- None: Select this if the secondary connection is not required by your ISP.
- Static IP: Select this if your ISP provides you with a fixed IP address and subnet mask for the secondary connection. You need to specify the IP address and subnet mask provided by your ISP.
- Dynamic IP: Select this if your ISP automatically assigns the IP address and subnet mask for the secondary connection.
|
|
L2TP
|
- Username: Enter the username of your L2TP account provided by your ISP.
- Password: Enter the password of your L2TP account provided by your ISP.
- VPN Server/Domain Name: Enter the VPN Server/Domain Name provided by your ISP.
- Get IP Address from ISP: With this option enabled, the gateway gets an IP address from the ISP when setting up the WAN connection. With this option disabled, you need to specify the IP Address provided by your ISP.
- Primary DNS Server (Optional): Enter the IP address of the primary DNS server provided by your ISP.
- Secondary DNS Server (Optional): Enter the IP address of the secondary DNS server, which provides redundancy in case the primary DNS server goes down.
- Connection Mode:
- Connect Automatically: The gateway activates the connection automatically when the connection is down. You need to specify the Redial Interval, which decides how often the gateway tries to redial after the connection is down.
- Connect Manually: You can manually activate or terminate the connection.
- Time-Based: During the specified period, the gateway will automatically activate the connection. You need to specify the Time Range when the connection is up.
- Redial Interval: Specify the interval to decide how often the gateway tries to redial after the connection is down.
- MTU: Specify the MTU (Maximum Transmission Unit) of the WAN port. MTU is the maximum data unit transmitted in the physical network.
- MSS Clamping: Specify the upper limit of the value of the MSS (Maximum Segment Size) field negotiated by the sending and receiving parties when establishing a TCP connection to avoid IP fragmentation. If the value of the MSS field negotiated by the communication parties exceeds the specified value, the gateway will change the negotiated MSS field to the specified value
- Disabled: Disable the MSS Clamping function, and the gateway will not intervene in the MSS value negotiated by the communication parties.
- Auto: Automatically calculate MSS value based on path MTU.
- Custom: User-defined MSS value.
- VLAN ID: If the WAN port has VLAN enabled, enter the VLAN ID, and the WAN port will automatically join the VLAN. By default, the egress rule of the VLAN is UNTAG, so the packets sent by the WAN port do not carry VLAN tags. If you want the packets sent by the WAN port to carry VLAN tags, configure its egress rule as TAG.
- VLAN Priority: Priority is available only when VLAN is enabled. The VLAN Priority feature can prioritize the internet traffic as needed. You can determine the priority level for the traffic by specifying the tag. The tag ranges from 0 to 7.
- Secondary Connection: Secondary connection is required by some ISPs. Select the connection type required by your ISP.
- Static IP: Select this if your ISP provides you with a fixed IP address and subnet mask for the secondary connection. You need to specify the IP address and subnet mask provided by your ISP.
- Dynamic IP: Select this if your ISP automatically assigns the IP address and subnet mask for the secondary connection.
|
|
PPTP
|
- Username: Enter the username of your PPTP account provided by your ISP.
- Password: Enter the password of your PPTP account provided by your ISP.
- VPN Server/Domain Name: Enter the VPN Server/Domain Name provided by your ISP.
- Get IP Address from ISP: With this option enabled, the gateway gets an IP address from the ISP when setting up the WAN connection. With this option disabled, you need to specify the IP Address provided by your ISP.
- Primary DNS Server (Optional): Enter the IP address of the primary DNS server provided by your ISP.
- Secondary DNS Server (Optional): Enter the IP address of the secondary DNS server, which provides redundancy in case the primary DNS server goes down.
- Connection Mode:
- Connect Automatically: The gateway activates the connection automatically when the connection is down. You need to specify the Redial Interval, which decides how often the gateway tries to redial after the connection is down.
- Connect Manually: You can manually activate or terminate the connection.
- Time-Based: During the specified period, the gateway will automatically activate the connection. You need to specify the Time Range when the connection is up.
- Redial Interval: Specify the interval to decide how often the gateway tries to redial after the connection is down.
- MTU: Specify the MTU (Maximum Transmission Unit) of the WAN port. MTU is the maximum data unit transmitted in the physical network.
- MSS Clamping: Specify the upper limit of the value of the MSS (Maximum Segment Size) field negotiated by the sending and receiving parties when establishing a TCP connection to avoid IP fragmentation. If the value of the MSS field negotiated by the communication parties exceeds the specified value, the gateway will change the negotiated MSS field to the specified value
- Disabled: Disable the MSS Clamping function, and the gateway will not intervene in the MSS value negotiated by the communication parties.
- Auto: Automatically calculate MSS value based on path MTU.
- Custom: User-defined MSS value.
- VLAN ID: If the WAN port has VLAN enabled, enter the VLAN ID, and the WAN port will automatically join the VLAN. By default, the egress rule of the VLAN is UNTAG, so the packets sent by the WAN port do not carry VLAN tags. If you want the packets sent by the WAN port to carry VLAN tags, configure its egress rule as TAG.
- VLAN Priority: Priority is available only when VLAN is enabled. The VLAN Priority feature can prioritize the internet traffic as needed. You can determine the priority level for the traffic by specifying the tag. The tag ranges from 0 to 7.
- Secondary Connection: Secondary connection is required by some ISPs. Select the connection type required by your ISP.
- Static IP: Select this if your ISP provides you with a fixed IP address and subnet mask for the secondary connection. You need to specify the IP address and subnet mask provided by your ISP.
- Dynamic IP: Select this if your ISP automatically assigns the IP address and subnet mask for the secondary connection.
|
|
MAP-E
|
- MAP-E: Select the connection type according to your ISP information.
- V6 plus: Provided by JPIX, it is Japan's most widely adopted MAP-E service. It uses algorithms to allocate public IPv4 port ranges to user routers, supporting port mapping within specified ranges and offering the broadest device compatibility.
- IPv6 Option: Provided by BIGLOBE. Its technical logic closely resembles v6 plus, with NAT handled locally by the router. Primarily targeting its own broadband subscribers, it provides a high-speed IPoE environment that supports some inbound connections.
- OCN virtual connect: Provided by NTT Com. Utilizes dedicated port calculation logic and gateway pools specifically tailored for OCN and Plala users.
- VLAN ID: If the WAN port has VLAN enabled, enter the VLAN ID, and the WAN port will automatically join the VLAN. By default, the egress rule of the VLAN is UNTAG, so the packets sent by the WAN port do not carry VLAN tags. If you want the packets sent by the WAN port to carry VLAN tags, configure its egress rule as TAG.
- VLAN Priority: Priority is available only when VLAN is enabled. The VLAN Priority feature can prioritize the internet traffic as needed. You can determine the priority level for the traffic by specifying the tag. The tag ranges from 0 to 7.
|
|
DS-Lite
|
- DS-Lite: Select the connection type according to your ISP information.
- Auto: AFTR name will be automatically identified based on your ISP information.
- Manual: Manually enter the AFTR Name provided by your ISP, which could be a URL or an IPv6 address.
- Transix(gw.transix.jp): Provided by Multifeed. IPv4 traffic is tunneled and encapsulated to the carrier's AFTR for centralized NAT translation.
- Xpass(dgw.xpass.jp): Provided by ARTERIA. Its underlying mechanism aligns with transix, enabling IPv4 access through carrier-grade NAT.
- V6 connect(dslite.v6connect.net): Provided by Asahi Net. It employs DS-Lite protocol encapsulation for IPv4 traffic, with all NAT state managed by the carrier side.
- VLAN ID: If the WAN port has VLAN enabled, enter the VLAN ID, and the WAN port will automatically join the VLAN. By default, the egress rule of the VLAN is UNTAG, so the packets sent by the WAN port do not carry VLAN tags. If you want the packets sent by the WAN port to carry VLAN tags, configure its egress rule as TAG.
- VLAN Priority: Priority is available only when VLAN is enabled. The VLAN Priority feature can prioritize the internet traffic as needed. You can determine the priority level for the traffic by specifying the tag. The tag ranges from 0 to 7.
|
It should be noted that when MAP-E or DS-Lite is selected as the connection type, some features like NAT, VPN, UPnP, IGMP Proxy, and DDNS on this physical WAN port will not be available.
Configured IPv6 for the physical WAN port if needed. (When the selected connection type is MAP-E or DS-Lite, IPv6 is enabled by default and cannot be disabled.)
Here is a table providing an overview of all IPv6 connection types supported by Omada Gateways.
|
Connection Type
|
Description
|
|
Dynamic IP
(SLAAC/DHCPv6)
|
- Get IPv6 Address: Select the proper method by which your ISP assigns an IPv6 address to your gateway.
- Automatically: With this option selected, the gateway will automatically select SLAAC or DHCPv6 to get IPv6 addresses.
- Via SLAAC: With SLAAC (Stateless Address Auto-Configuration) selected, your ISP assigns the IPv6 address prefix to the gateway, and the gateway automatically generates its own IPv6 address. Also, your ISP assigns other parameters, including the DNS server address, to the gateway.
- Via DHCPv6: With DHCPv6 selected, your ISP assigns an IPv6 address and other parameters, including the DNS server address, to the gateway using DHCPv6.
- Non-Address: When selected, the WAN port will not configure an IPv6 global address.
- Prefix Delegation: Select Enable to get an address prefix by a DHCPv6 server from your ISP or Disable to designate an address prefix for your LAN port manually. Clients in the LAN will get an IPv6 address with this prefix.
- Prefix Delegation Size: With Prefix Delegation enabled, enter the Prefix Delegation Size to determine the length of the address prefix. If you are not sure about the value, you can ask your ISP.
- DNS Address: Select whether to get the DNS address dynamically from your ISP or designate the DNS address manually.
- Get from ISP Dynamically: The DNS address will be automatically assigned by the ISP.
- Use the Following DNS Addresses: Enter the DNS address provided by the ISP.
|
|
Static IP
|
- IPv6 Address: Enter the static IPv6 address information received from your ISP.
- Prefix Length: Enter the prefix length of the IPv6 address received from your ISP.
- Default Gateway: Enter the default gateway provided by your ISP.
- Primary DNS Server: Enter the IP address of the primary DNS server provided by your ISP.
- Secondary DNS Server:(Optional) Enter the IP address of the secondary DNS server, which provides redundancy in case the primary DNS server goes down.
|
|
PPPoE
|
- Share the same PPPoE session with IPv4: If your ISP provides only one PPPoE account for both IPv4 and IPv6 connections, and you have already established an IPv4 connection on this WAN port, you can check the box, then the WAN port will use the PPP session of the IPv4 PPPoE connection to get the IPv6 address. In this case, you do not need to enter the username and password of the PPPoE account. If your ISP provides two separate PPPoE accounts for the IPv4 and IPv6 connections, or the IPv4 connection of this WAN port is not based on PPPoE, do not check the box and manually enter the username and password for the IPv6 connection.
- Username: Enter the username of your PPPoE account provided by your ISP.
- Password: Enter the password of your PPPoE account provided by your ISP.
- Get IPv6 Address: Select the proper method by which your ISP assigns an IPv6 address to your gateway.
- Automatically: With this option selected, the gateway will automatically select SLAAC or DHCPv6 to get IPv6 addresses.
- Via SLAAC: With SLAAC (Stateless Address Auto-Configuration) selected, your ISP assigns the IPv6 address prefix to the gateway, and the gateway automatically generates its own IPv6 address. Also, your ISP assigns other parameters, including the DNS server address, to the gateway.
- Via DHCPv6: With DHCPv6 selected, your ISP assigns an IPv6 address and other parameters, including the DNS server address, to the gateway using DHCPv6.
- Non-Address: When selected, the WAN port will not configure an IPv6 global address.
- Specified by ISP: You should manually enter the IPv6 address provided by your ISP.
- Prefix Delegation: Select Enable to get an address prefix by a DHCPv6 server from your ISP, or Disable to designate an address prefix for your LAN port manually. Clients in the LAN will get an IPv6 address with this prefix.
- Prefix Delegation Size: With Prefix Delegation enabled, enter the Prefix Delegation Size to determine the length of the address prefix. If you are not sure about the value, you can ask your ISP.
- DNS Address: Select whether to get the DNS address dynamically from your ISP or designate the DNS address manually.
- Get from ISP Dynamically: The DNS address will be automatically assigned by the ISP.
- Use the Following DNS Addresses: Enter the DNS address provided by the ISP.
|
|
6to4 Tunnel
|
- DNS Address: Select whether to get the DNS address dynamically from your ISP or designate the DNS address manually.
- Get from ISP Dynamically: The DNS address will be automatically assigned by the ISP.
- Use the Following DNS Addresses: Enter the DNS address provided by the ISP.
|
|
Pass-Through
(Bridge)
|
- No configuration is required for this type of connection.
|
Step 5. Configure virtual WAN ports.
Click Create New Virtual WAN to start pre-configuring a virtual WAN if needed.

Select a physical WAN port on which the virtual WAN port will be created. Then name the virtual WAN and customize its MAC address if needed.

Select an IPv4 connection type for this virtual WAN port and configure related settings according to the requirements of the Internet Service Provider. Virtual WAN ports currently support only three connection types: Dynamic IP, Static IP, and PPPoE.

Like physical WAN ports, virtual WAN ports also support advanced settings such as DNS servers, MTU, and VLAN ID.
It should be noted that: The settings of VLAN ID for a virtual WAN port and its related physical WAN port cannot be identical.
Step 5. Configure load balancing and link backup if needed.
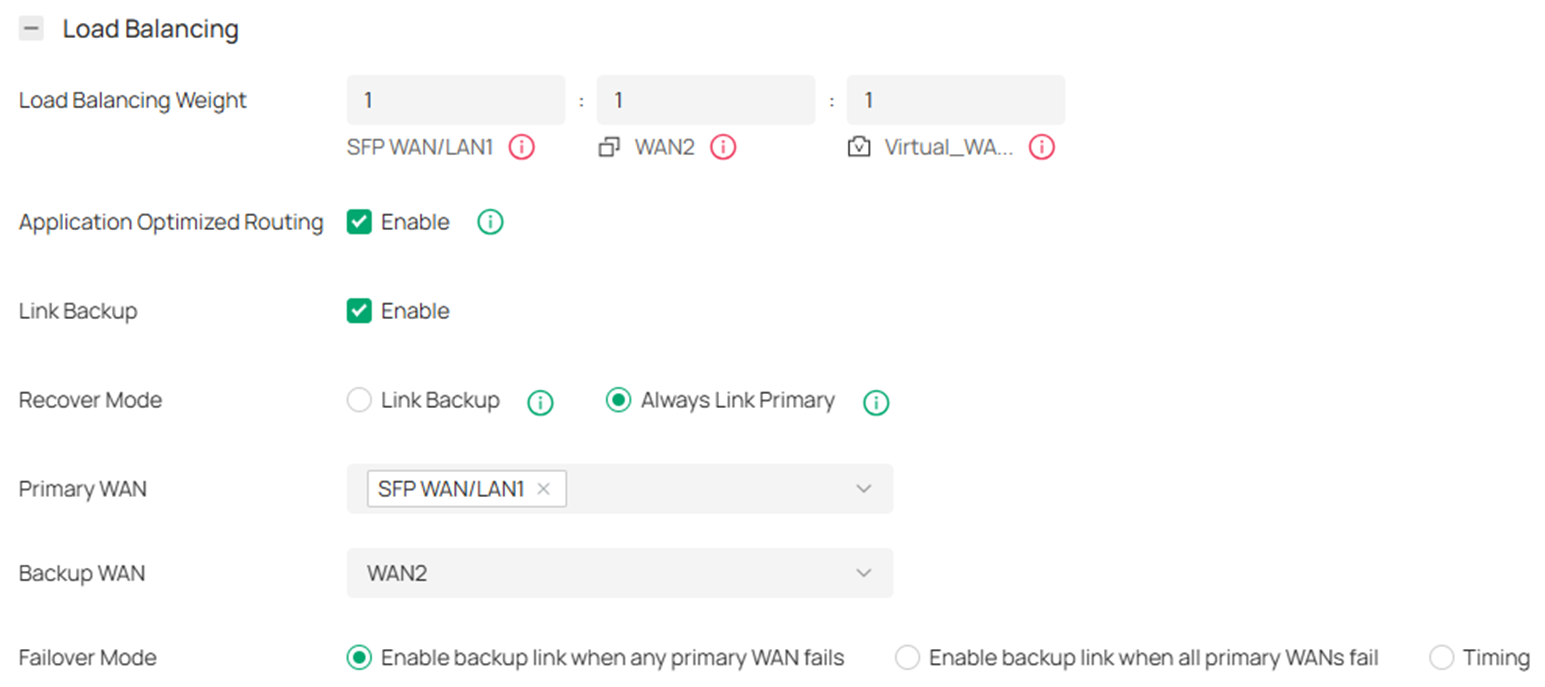
Specify the ratio of network traffic that each WAN port carries. The default load balancing weight of a Virtual WAN port is 0.
- Application Optimized Routing
With Application Optimized Routing enabled, the router will consider the source IP address and destination IP address (or destination port) of the packets as a whole and record the WAN port they pass through. Then the packets with the same source IP address and destination IP address (or destination port) will be forwarded to the recorded WAN port. This feature ensures that multi- connected applications work properly.
With Link Backup enabled, the gateway will switch all the new sessions from dropped lines automatically to another to keep an always-on-line network. Currently, virtual WAN ports cannot function with Link Backup.
- Recover Mode (required only when Link Backup is enabled)
- Link Backup: The system will try to forward the traffic via the backup WAN port when the primary WAN fails. Even if the primary WAN is recovered, it will not switch back unless the backup WAN fails.
- Always Link Primary: Traffic is always forwarded through the primary WAN port unless it fails. The system will try to forward the traffic via the backup WAN port when it fails and switch back when it recovers.
- Primary WAN (required only when Link Backup is enabled)
Specify the primary WAN port. You can choose one or more primary WAN ports to perform load balancing.
- Backup WAN (required only when Link Backup is enabled)
Specify a backup WAN that will take over to forward the traffic when the primary WAN fails.
- Failover Mode (required only when Link Backup is enabled)
- Enable backup link when any primary WAN fails: Link Backup will be enabled when any one of the primary WANs fails.
- Enable backup link when all primary WANs fail: Link Backup will be enabled only when all primary WANs fail.
- Timing: Link Backup will be enabled after the specified effective time is reached. When the effective time starts, traffic on the primary WAN will be switched to the backup WAN; when the effective time ends, traffic on the backup WAN will be switched to the primary WAN.
Step 6. Configure an automatic speed test if needed, and the gateway will automatically test the speed of all WAN ports according to the predefined time.

Adopt the Omada Gateway to verify if the preconfigured settings are retained and active, enabling the Gateway to automatically connect to the internet.
We have now completed our introduction to how to use the WAN Settings Override feature of Omada Network.
Get to know more details of each function and configuration please go to Download Center to download the manual of your product.


