


How to configure Link Aggregation for EAP


Contents
Configuration in Standalone mode
Configuration in Controller mode
Introduction
Link Aggregation, also known as LAG, combines multiple physical network links into a single logical link. This setup helps increase bandwidth, provides redundancy, and ensures continuous network service even if one link fails. And LAG can also balance the load, which can make full use of both links. Configuring LAG on EAP enhances network performance, especially in high-traffic environments.
Requirements
- Omada EAP supporting LAG feature
- Switches supporting LAG feature
Configuration
The LAG setting is called “Trunk” in EAP. This function is only available with switches that support configuring static LAG rules on their ports.
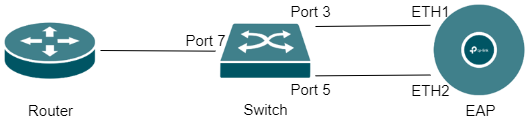
Note: It is strongly recommended to only connect Port 3 to ETH1 before completing all configurations. Because the two links without LAG configured will cause a loop problem, which may reduce the performance of the switch and even lead to network paralysis.
Configuration in Standalone mode
Step 1. Log in to the web management page of EAP. Here is an introduction on how to log in to the EAP web management page: How do I login to the web management page of the EAP Series products (Standalone mode)?
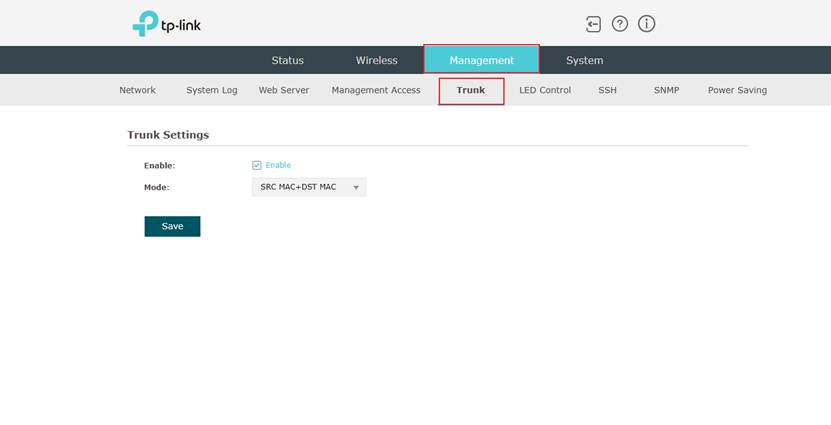
Step 2. Go to Management > Trunk > Trunk Settings, then click Enable to enable this function on EAP. Regarding the mode, it is recommended to keep the default SRC MAC+DST MAC settings. And don’t forget to click Save to save your configuration.
Note: When configuring SRC MAC, the source MAC address is used as the hash input, so traffic with different source MACs may be forwarded via different links. When configuring DST MAC, traffic with different destination MACs will be distributed across different links.
It is generally recommended to configure SRC MAC+DST MAC to achieve more effective load balancing.
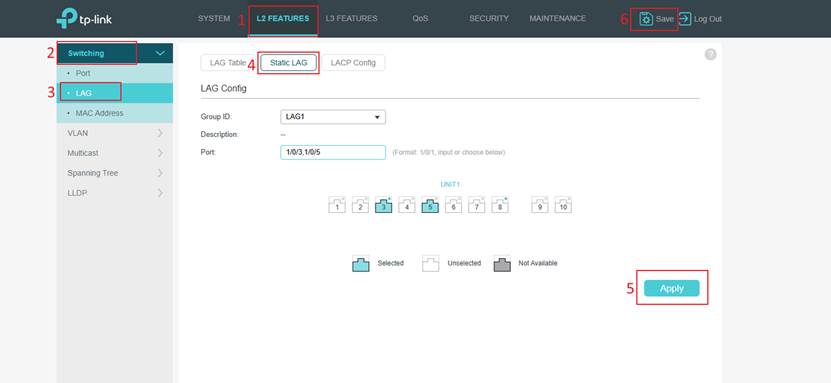
Step 3. Log in to the switch web management page by switch IP address. In L2 FEATURES > Switching > LAG > Static LAG, you can choose any Group ID available. In Port, you can select the two ports connected to the EAP as the member ports for the LAG group. In this case, they are Port 3 and Port 5. Then click the Apply and Save button to ensure the configuration is saved successfully.
Note: Currently, our EAP only supports static LAG. Please don’t choose LACP.
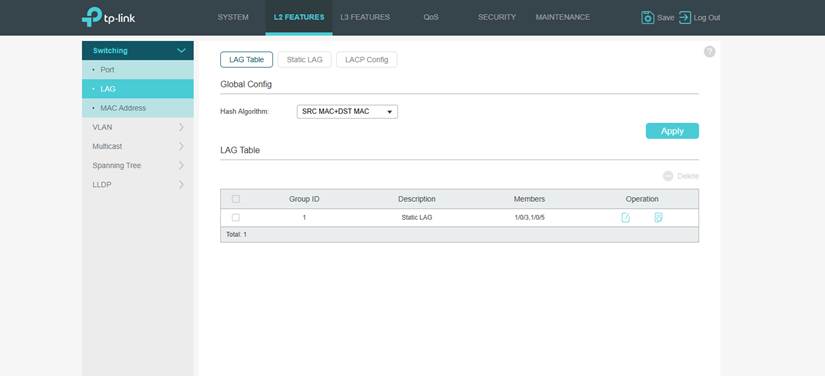
Step 4. After that, you can view the entries you configured in the LAG Table.
Note: In Static LAG, the configuration of the member ports needs to be identical.
Step 5. Now you can connect the switch port 5 and the EAP's ETH2 port with the second Ethernet cable. So far, all the settings are completed!
Configuration in Controller mode
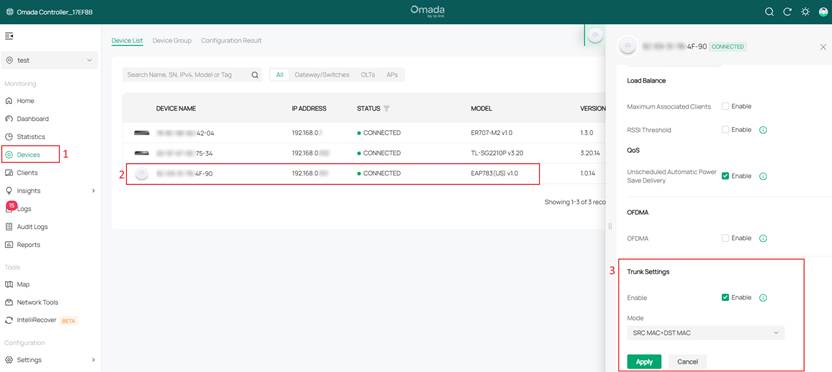
Step 1. Log in to the controller with your TP-Link ID. Go to Devices > select EAP > Config > Advanced > Trunk Settings to enable this function. Then select Mode and click the Apply button.
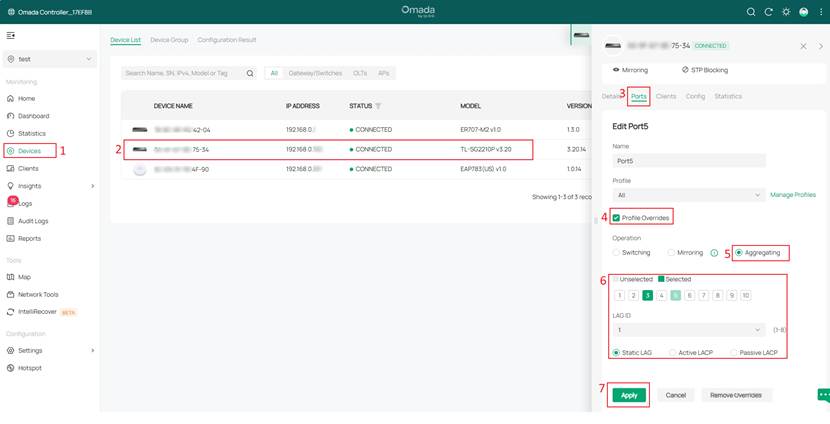
Step 2. Click on the switch and go to switch Ports > enable Profile Overrides > Aggregating to select the ports requiring LAG configuration, set the LAG ID, and select Static LAG. Then click Apply to save the settings.
Note: Currently, our EAP only supports static LAG. Please don’t choose LACP.
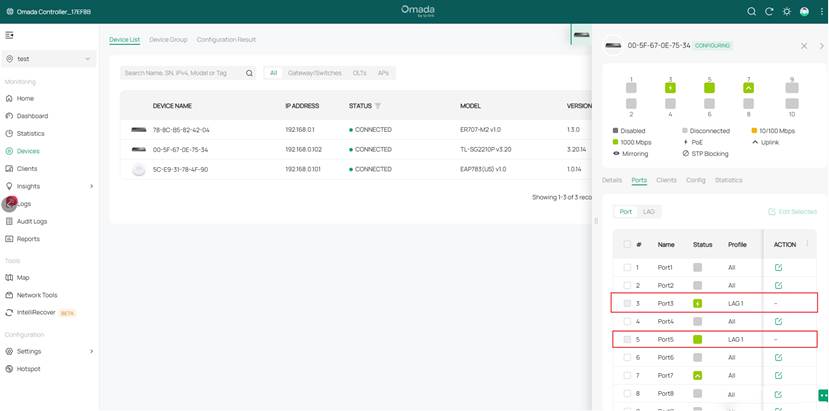
Step 3. After configuration is complete, you will see the switch port display LAG. Now you can connect port 5 of the switch and the EAP's ETH2 port with the second Ethernet cable. All setup is now complete.
Conclusion
Configuring LAG on EAP is a straightforward process that significantly enhances network performance and reliability. By following these steps, you can effectively implement LAG to support higher bandwidth and ensure stable network connectivity.
Get to know more details of each function and configuration please go to Download Center to download the manual of your product.
QA
1. Which switches support LAG?
Re: Except for Unmanaged Switches, most Omada Switches support LAG, Easy Smart Switches usually only support Static LAG.
2. Will the Omada Access Point support LACP?
Re: Yes. The AP9788 will support LACP in the future.
