


Como configurar a função Bluetooth no controlador Omada


Conteúdo
Objetivo
Este artigo detalha o princípio e as vantagens da tecnologia Bluetooth IoT e fornece diretrizes específicas de configuração e estratégias de aplicação para Bluetooth IoT.
Requisitos
- Controlador Omada (v6.1 e superior)
- EAP (Hardware e Firmware suportam a funcionalidade Bluetooth)
- Servidor IoT de terceiros
Introdução
Com o crescimento explosivo dos dispositivos da Internet das Coisas (IoT) , o alto consumo de energia e os altos custos das tecnologias tradicionais de comunicação sem fio (como Wi-Fi e redes celulares) tornaram-se cada vez mais evidentes. O Bluetooth para IoT está emergindo como uma solução essencial de curto alcance, oferecendo baixo consumo de energia, ampla compatibilidade, redes flexíveis e segurança robusta. Os protocolos Bluetooth Low Energy (BLE) mais comuns incluem o protocolo iBeacon da Apple , o protocolo Eddystone do Google e outros protocolos proprietários de fabricantes, como a Minew .
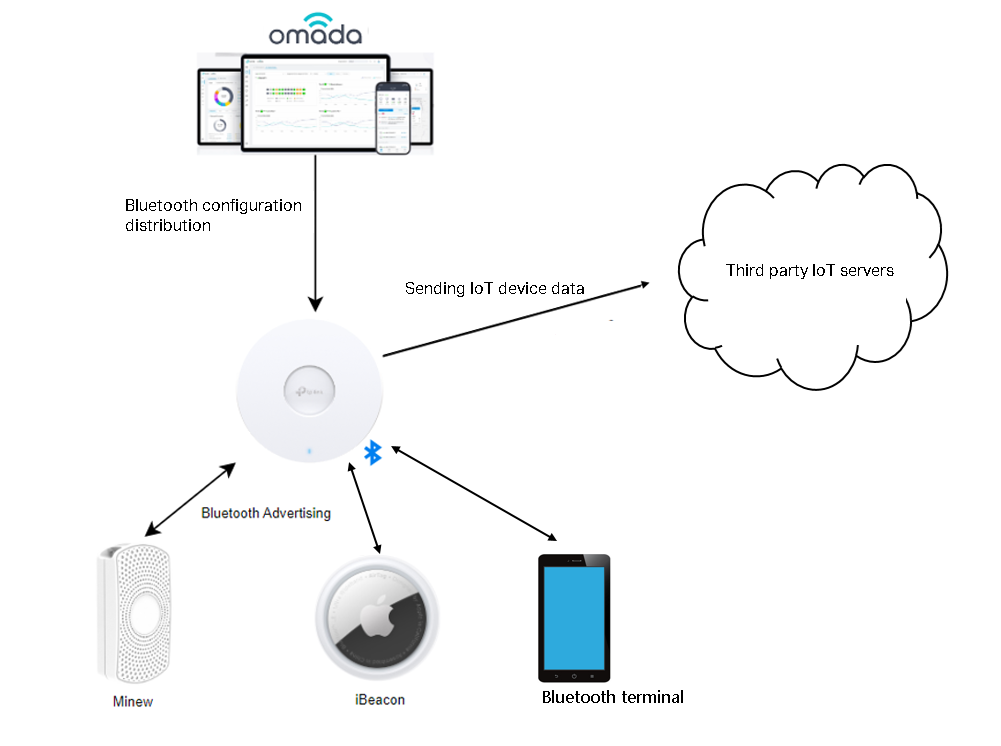
O Bluetooth IoT é uma solução de posicionamento interno de baixo custo que permite o posicionamento de terminais Bluetooth, o posicionamento de tags Bluetooth e a geração de relatórios de dados Bluetooth.
O princípio básico é que um EAP possui um recurso Bluetooth integrado que pode detectar sinais Bluetooth próximos. O EAP pode estimar aproximadamente a posição de uma etiqueta Bluetooth com base na intensidade do sinal do quadro Bluetooth, e vários EAPs podem fornecer um posicionamento mais preciso. Vários EAPs enviarão os sinais Bluetooth coletados para o servidor de posicionamento e o servidor de aplicativos dedicados ao processamento dos dados, a fim de coordenar o posicionamento da etiqueta com outras funções correspondentes.
O diagrama do princípio básico é o seguinte:
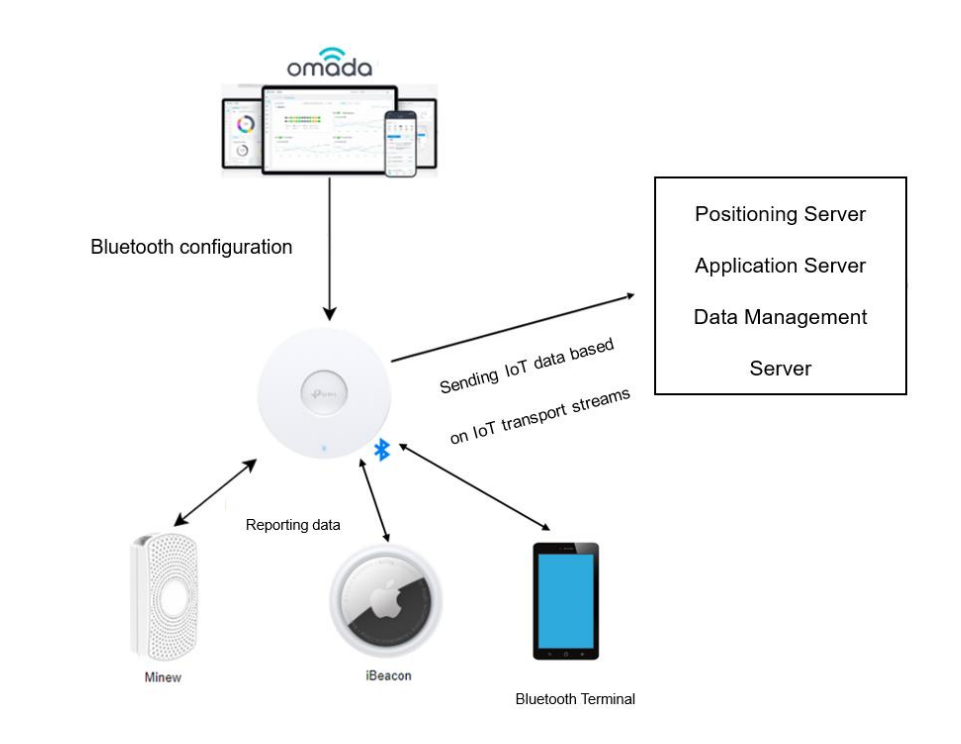
A funcionalidade de posicionamento IoT via Bluetooth divide-se principalmente em três partes:
- Transmissão de sinais Bluetooth (Bluetooth Advertising).
Esta parte depende principalmente de várias etiquetas Bluetooth, terminais Bluetooth e outros dispositivos. Ao implantar etiquetas Bluetooth, esses dispositivos enviam automaticamente quadros de transmissão Bluetooth.
Atualmente, o EAP também suporta publicidade Bluetooth . O envio de frames iBeacon pelo EAP pode auxiliar no posicionamento de terminais Bluetooth, possibilitando cenários de aplicação típicos, como navegação em ambientes internos.
- Coleta e envio de informações Bluetooth (fluxos de transporte IoT).
This part primarily depends on the EAP devices. When combined with sensor Tags that support Bluetooth functionality, this feature can be used for typical scenarios such as asset management, personnel tracking, and environmental monitoring.
- Processing Information and Application Implementation on the Server
This part mainly relies on third-party IoT servers. Please refer to the usage guidelines of the respective third-party servers.
EAP plays an important role in the transmission, collection, and reporting of Bluetooth data, while the third part mainly relies on third-party servers, with different processing methods used to realize different functions.
Meanwhile, EAPs can actively broadcast iBeacon frames, collect Bluetooth information, and report the data to the specified servers to meet different needs.
Configuration
The Preparation before Configuration
Step 1. Install and deploy the IoT positioning server. We have not yet officially released our IoT server product. Please prepare a third-party IoT server.
Step 2. Install and deploy BLE tags, securing them to items requiring inventory.
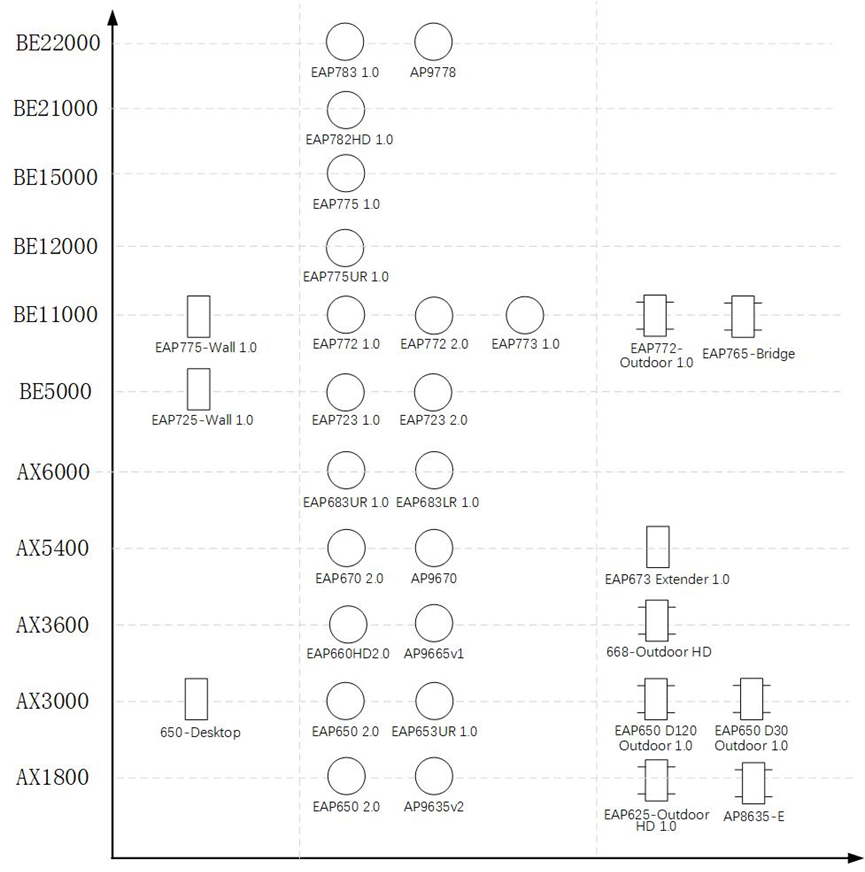
Step 3. Verify that both the EAP hardware and firmware support Bluetooth.
The following hardware currently support Bluetooth. When the firmware is adapted to Omada controller v6.1, Bluetooth IoT features will be supported.
The configuration includes three parts: Radio Settings, Bluetooth advertising and IoT Transport Streams.
The following demonstrates the configuration steps using Omada Controller v6.1.0.19 and EAP772 1.0.
The Configuration of Radio Settings
Radio Settings controls the enabling/disabling of the Bluetooth module. Launch the Omada Controller, go to Site View > Device Config > EAP > Bluetooth > Radio Setting.
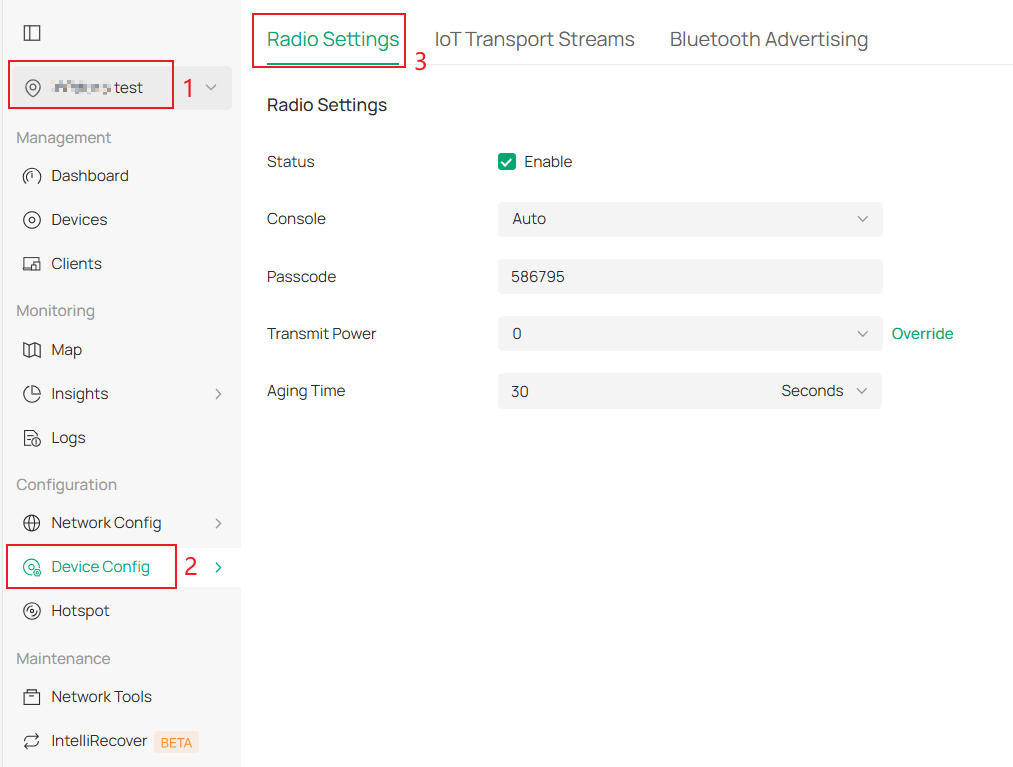
- Status: Bluetooth Master Switch. When enabled, IoT Transport Streams and Bluetooth Advertising functions become active.
- Console: The Bluetooth Console can be configured to Auto, On or Off. The Auto mode is to turn off the Bluetooth console when the device connects to the controller and automatically turn it on when disconnected. This is useful for troubleshooting when the device disconnects unexpectedly, allowing you to connect to the EAP Bluetooth console via the Omada app for diagnostics. (Please wait for releasing Omada APP v5.1)
- Passcode: The pairing code for connecting the Omada APP to the EAP device via Bluetooth console. (Please wait for releasing Omada APP v5.1)
- Transmit Power: Bluetooth Advertising transmit power (dB). The following values are currently supported: [-20, -18, -15, -12, -10, -9, -6, -5, -3, 0, 1, 2, 3, 4, 5,14, 15, 16, 17, 18, 19, 20]. The higher the transmit power, the longer the coverage range. In actual deployment, ensure that the Bluetooth terminal receives the strongest Bluetooth signal from the nearest AP. Adjust this value according to the actual coverage to avoid interfering with the positioning of nearby APs. It is recommended that all APs use the same transmit power.
- Aging Time: The Aging Time to control the EAP devices aging time. If no data is received from a device within a certain period, the entry for that device will be deleted. As a result, AP will no longer forward the data to the IoT server. If the AP receives data from that device again in the future, the device will be re-added, and its Bluetooth data will continue to be reported. The Aging Time can be configured in seconds, minutes, or hours.
The Configuration of Bluetooth Advertising
After configuring Bluetooth advertising on an EAP, the EAP will send iBeacon advertising frames with a specific configured UUID-Major-Minor-RSSI Calibration Value field, which can help realize Bluetooth terminal positioning in specific application scenarios.
Step 1. Launch the Omada Controller, go to Site View > Device Config > EAP > Bluetooth > Bluetooth Advertising.
On the Bluetooth Advertising page, you can configure rules for the EAP to broadcast iBeacon packets. There is a default profile, which cannot be deleted but can be disabled. You can add an Advertising profile and assign it to the specific EAPs.
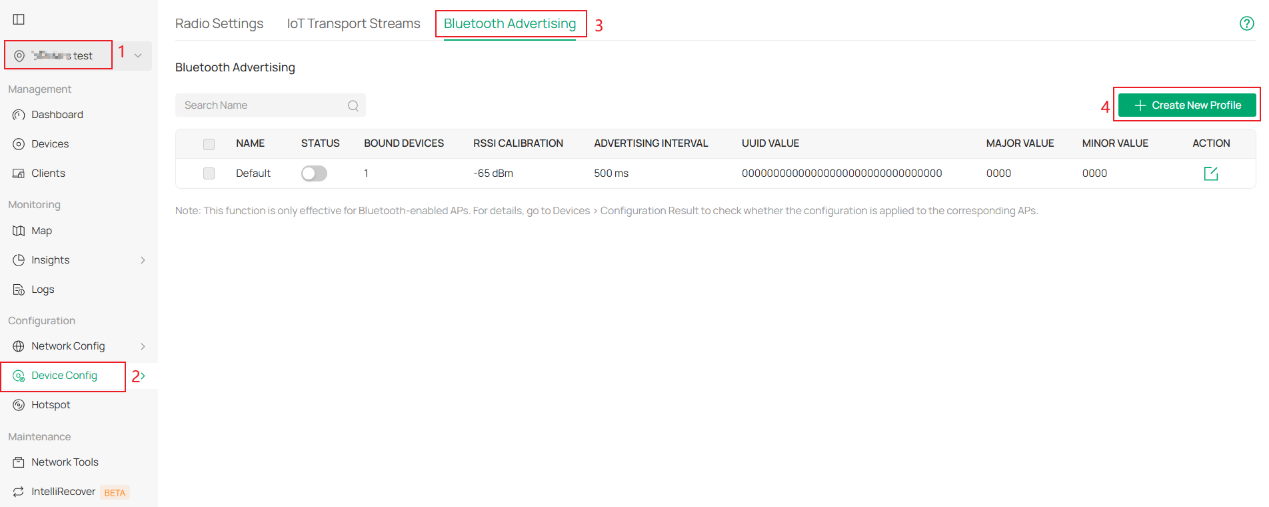
Step 2. Click Create New Profile, and configure the iBeacon frame-related parameters.
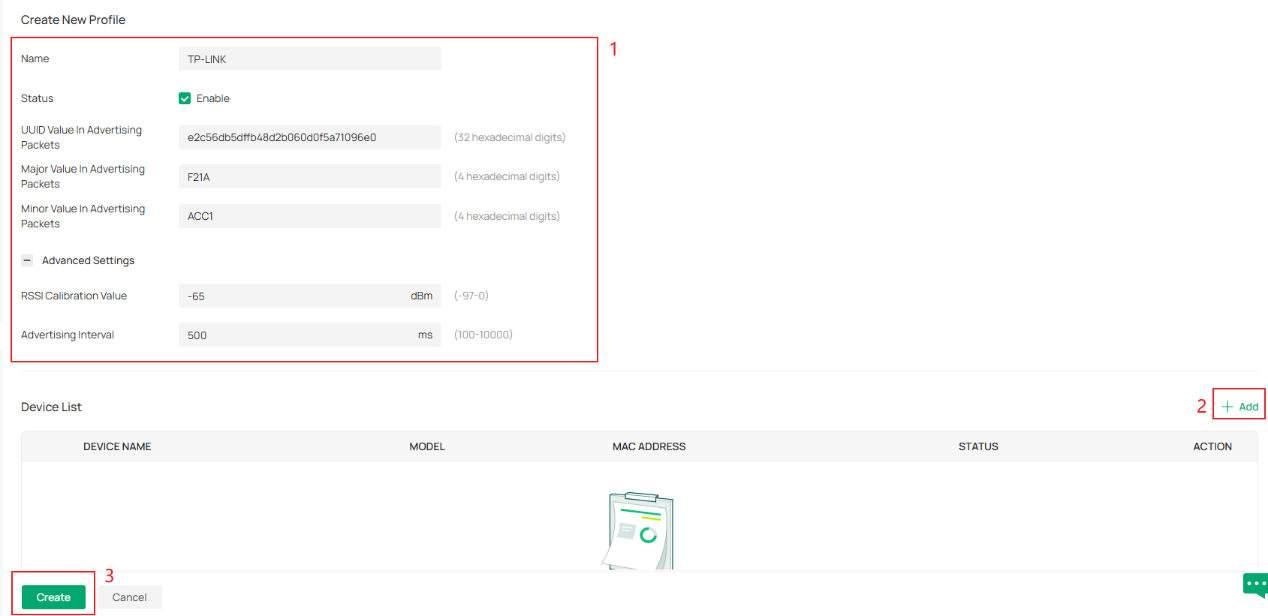
Parameters Explanation:
|
Item |
Configuration |
|
Name |
Enter a name to identify the profile. |
|
Status |
Enable or disable the profile. |
|
UUID Value In Advertising Packets |
The UUID (Universally Unique Identifiers) of the advertising iBeacon packet. (32 hexadecimal digits) |
|
Major Value In Advertising Packets |
The Major value of an advertising iBeacon packet, indicating a larger group. (4 hexadecimal digits) |
|
Minor Value In Advertising Packets |
The Minor value of an adverting iBeacon packet, indicating a smaller group. (4 hexadecimal digits) |
|
RSSI Calibration Value |
-65dB by default. |
|
Advertising Interval |
Specify a value between 100 and 3000 ms. |
|
Device List |
The default Site-level entry does not feature this list. Only custom entries support configuration of specific devices. Currently, one Bluetooth Advertising profile can be configured for a single device. |
Step 3. Click Add to apply the newly added adverting profile to the specified EAP devices. In this way iBeacon frames sent by EAP in different areas can be inconsistent to distinguish the locations. As shown in the following figure:

The Configuration of IoT Transport Streams
By configuring the IoT Transmission Streams, AP can collect the required Bluetooth information and report it to a third-party IoT server. The network topology is as follows:
Step 1. Go to the Site View > Device Config > EAP > Bluetooth > IoT Transport Steams page.
On this page, you can configure rules for EAP to handle and report IoT data. It is Site-level configuration and all configuration will be applied to wireless devices on the current Site, and device-level configuration overrides are not supported.
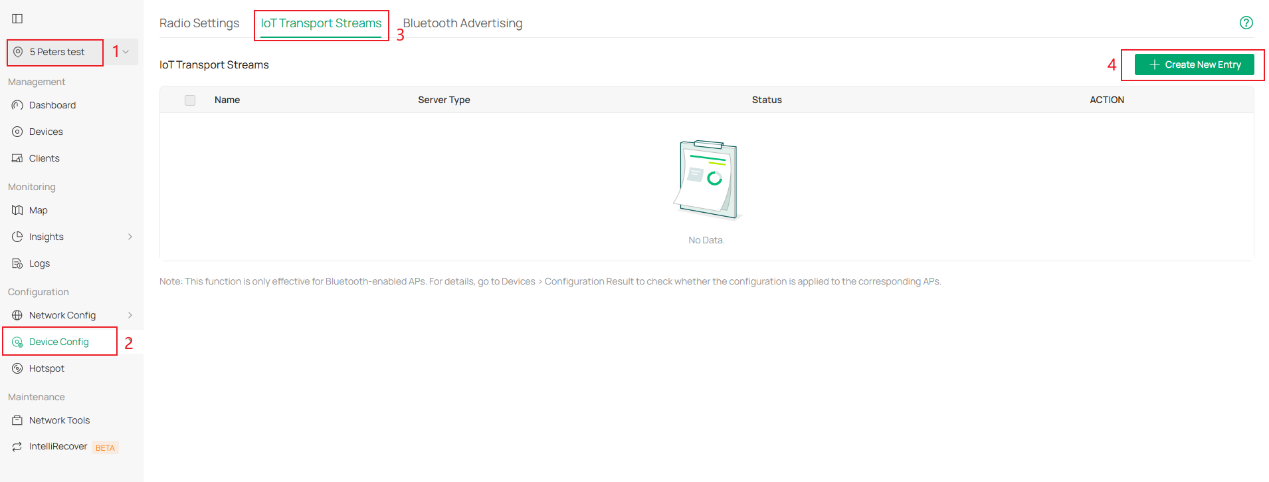
Step 2. Click Create New Entry to configure the rules for the EAP to forward Bluetooth data. Up to 4 entries are currently supported.
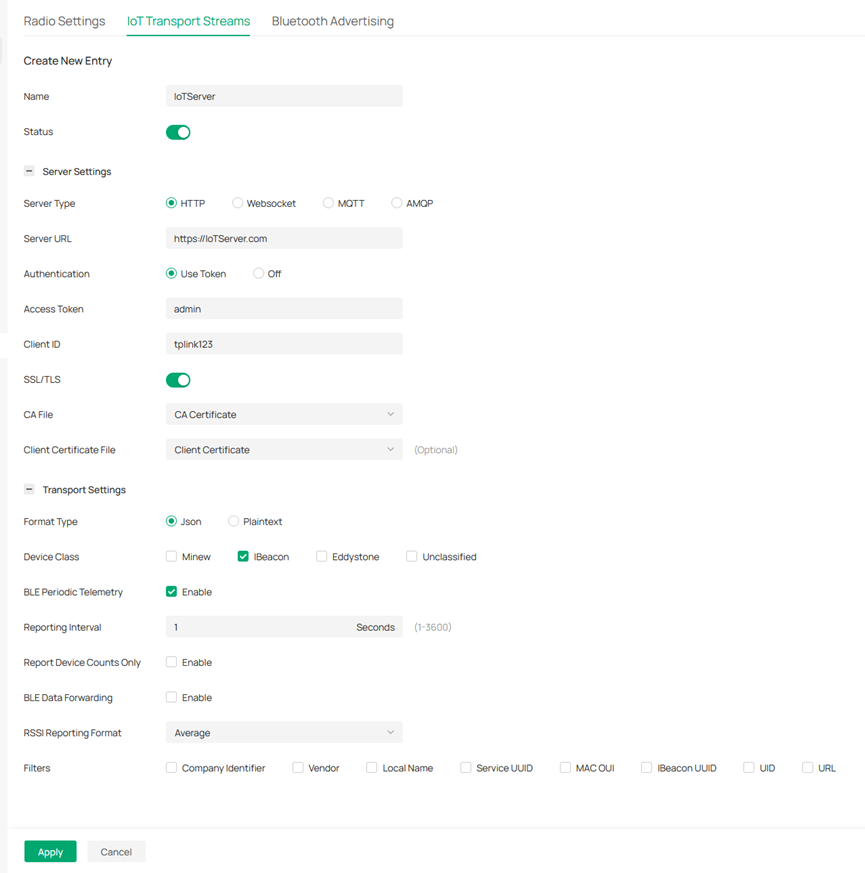
Parameters Explanation:
|
Item |
Configuration |
|
Name |
Enter a name to identify the profile. |
|
Status |
enable or disable the entry. |
|
|
|
|
Server Type |
Supported HTTP, WebSocket, MQTT, and AMQP |
|
Server URL |
Enter the url of the third-party IoT server. The prefix must be consistent with the Server Type and SSL/TLS configuration. Currently supported prefixes include: http/https, ws/wss, mqtt/mqtts, amqp/amqps. |
|
Authentication |
Refers to the authentication method of the server. Access Token: Indicates the token used for identity authentication. Client ID: Indicates the ID used for identity authentication. Authentication information is used for server authentication and establishing secure communication with the server. A legal token needs to be generated on the management side of the IoT server. |
|
SSL/TLS |
Enabled by default. Currently, all server types support enabling SSL/TLS. |
|
CA file |
Certificates from a CA or self-signed certificates are used to validate the server's certificate. You can create them quickly on the current page or via Site > Network Config > Profile > Certificate Profile. |
|
Client Certificate File |
Issued by a CA authority or generated locally, this certificate authenticates the server's identity. Optional, but required when enabling mutual authentication on the server side. Configuration method: You can create it quickly on this page or via Site > Network Config > Profile > Certificate Profile. |
|
|
|
|
Format Type |
The formats supported for data submission currently include JSON, plain text, and Protobuf. Note: Currently, only WebSocket supports Protobuf. |
|
Device Class |
The supported manufacturers and protocols, ibeacon, Eddystone, Minew, and unclassified |
|
Reporting Interval |
The reporting interval for the EAP to report IoT information. The shorter the interval, the better the real-time performance. |
|
Report Device Counts Only |
When enabled, EAP will only report the number of Bluetooth devices. Enable this feature if you just need to know the number of the Bluetooth device around EAP. |
|
BLE Periodic Telemetry |
It is enabled by default. When disabled, EAP will not periodically report IoT data. |
|
BLE Data Forwarding |
When enabled, AP will report the Bluetooth raw Data to the server |
|
RSSI Reporting Format |
Select the RSSI reporting format. There are five options, Average, Max, Last, Smooth, and Bulk.
|
|
Filters |
Custom the filters for EAP to filter IoT devices.
|
The above configurations are a general settings. Additional configurations may be required for different Server Types. Below is an overview of each Server Type and its corresponding additional configurations.
HTTP/HTTPS
Hypertext Transfer Protocol (HTTP) is a simple request-response protocol that typically runs over TCP. With SSL/TLS enabled, it becomes HTTPS.
Currently, no additional configuration is required for HTTP/HTTPS.
WebSocket / WebSockets
WebSocket is a network transmission protocol that supports full-duplex communication, allowing both the client and the server to actively send messages to each other. With WebSocket, the client and server only need to perform a single handshake to establish a persistent connection, enabling bidirectional data transfer. The WebSocket protocol operates at the application layer of the OSI model. It was standardized by the IETF as RFC 6455 in 2011, with subsequent specifications supplemented by RFC 7936. When SSL/TLS is enabled, the protocol becomes WebSockets.
Currently, no additional configuration is required for WebSocket/WebSockets.
The Configuration of MQTT
MQTT (Message Queuing Telemetry Transport) is a lightweight communication protocol based on the publish/subscribe model. It operates over TCP/IP and was introduced by IBM in 1999. The key advantage of MQTT is its ability to provide reliable, real-time messaging for remote devices with minimal code and limited bandwidth. As a low-overhead, bandwidth-efficient instant messaging protocol, it is widely used in IoT, small devices, mobile applications, and similar fields. When SSL/TLS is enabled, the protocol becomes MQTTS.
The additional configurations currently required for MQTT/MQTTS are as follows:
- MQTT General Config
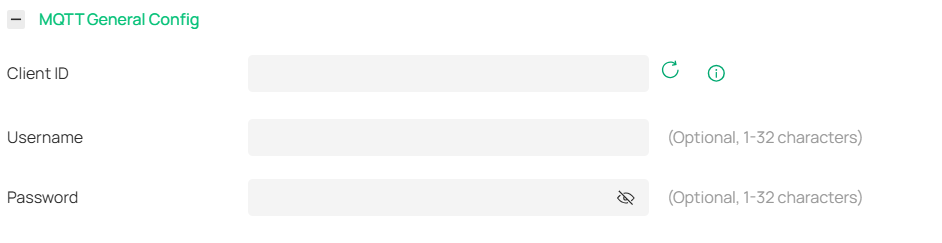
Parameters Explanation:
|
Item |
Configuration |
|
Client ID |
Client ID is used to uniquely identify a client connection and session. Each client must have a distinct ID. If two clients share the same ID, the connection with the first client will be terminated. The Client ID is randomly generated based on a timestamp. |
|
Username |
Username for user authentication on the MQTT server. |
|
Password |
Password for user authentication on the MQTT server. |
- MQTT Advanced Config (MQTT 3.1.1)
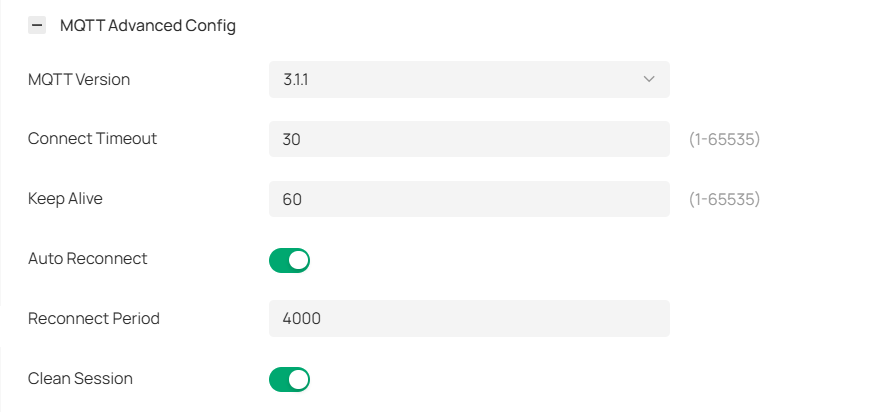
Parameters Explanation:
|
Item |
Configuration |
|
MQTT Version |
MQTT version can select 3.1.1 and 5.0. Version 5.0 is by default. |
|
Connect Timeout |
Connection timeout, measured in seconds, with a valid range of 1 to 65535s. |
|
Keep Alive |
Keep Alive specifies the heartbeat interval (in seconds) between the client and the server. The client periodically sends keep‑alive packets to the server to maintain an active connection. The unit is seconds, and the valid value range is 1‑65535. Note: Please note that if the Keep Alive is set to 0, the server will not check the device’s keep‑alive packets for timeout. |
|
Auto Reconnect |
Auto-reconnect determines whether to automatically re-establish the connection when it is interrupted. Enabled by default. |
|
Reconnect Period |
Reconnect Interval specifies the time interval (in seconds) for attempting automatic reconnection after a disconnection. The unit is seconds, and the valid value range is 1‑65535. |
|
Clean session |
Clean Session Flag - When establishing an MQTT connection, this flag can be set to indicate how the server should handle the previous session state. If the "Clean Session" flag is enabled, the server will delete any previously stored information for this client, including subscriptions and QoS (Quality of Service) messages. Enabled by default. |
- MQTT Advanced Config (MQTT 5.0)
With the upgrade to MQTT 5.0, several configurable properties have been added in the Advanced section based on the connection configuration of the 3.1.1 protocol, along with configurable User Properties, while the General section remains unchanged. Additionally, the Clean Session attribute from version 3.1.1 has been replaced with the Clean Start attribute.
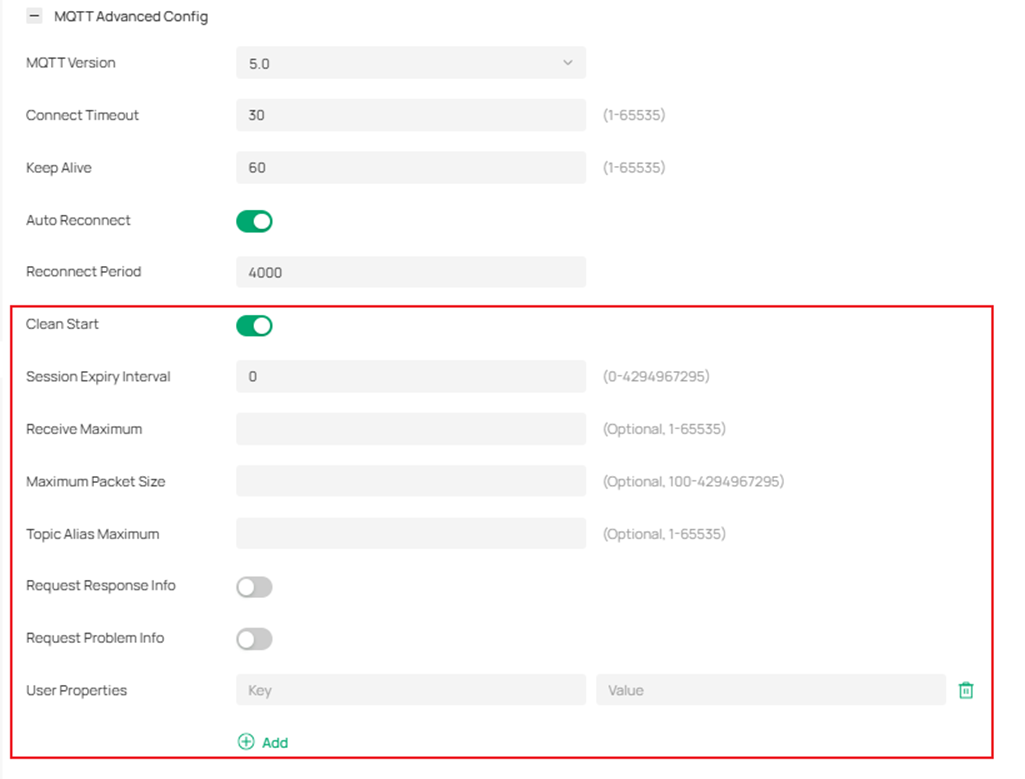
Parameters Explanation:
|
Item |
Configuration |
|
Clean Start |
Clean Start specifies whether to reuse an existing session. When Clean Start is set to 0, if the server has a session associated with the Client ID specified during the client connection, it must restore communication using that existing session. When Clean Start is set to 1, both the client and server must discard any existing session and establish a completely new session. Enabled by default. |
|
Session Expiry Interval |
Session Expiry Interval indicates how long a session can be retained on the server after the client disconnects. The unit is seconds, and the valid value range is 0‑4294967295 (2³²). |
|
Receive Maximum |
Receive Maximum is used to declare the maximum number of QoS 1 and QoS 2 messages that the server and client are willing to process simultaneously. The peer must adhere to this limit when sending messages. The valid value range is 1–65535. |
|
Maximum Packet Size |
Maximum Packet Size specifies the maximum allowable length of an MQTT packet. The valid value range is 100–4,294,967,295 bytes. |
|
Topic Alias Maximum |
Topic Alias Maximum defines the maximum number of topic aliases that the client is capable of receiving from the server. The valid value range is 1–65535. Topic Alias (MQTT v5.0) allows the sender to map a topic name to an alias represented by a two-byte integer. During message transmission, this alias can then be used in place of the original topic name, thereby reducing bandwidth consumption. |
|
Request Response Info |
Request Response Information allows the client to use this value to request response information in the CONNACK packet from the server. When set to 0, the server must not return response information. When set to 1, the server may include response information in the CONNACK packet. Disabled by default. |
|
Request Problem Info |
Request Problem Information allows the client to use this value to indicate whether to send a reason string or user properties in case of an error. Disabled by default. |
|
User Properties |
User Properties — Custom user-defined attributes in key‑value pairs. |
- MQTT Published Config (MQTT 3.1.1)
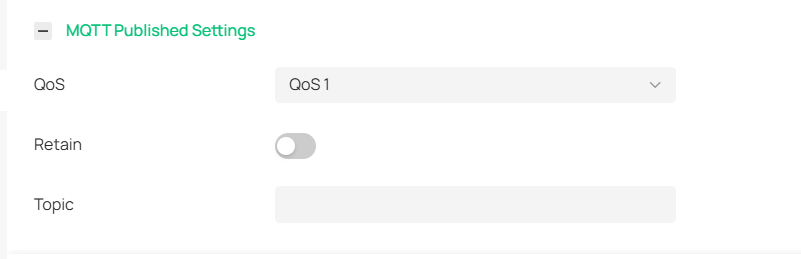
Parameters Explanation:
|
Item |
Configuration |
|
QoS |
MQTT provides three levels of Quality of Service (QoS) to ensure message reliability across different network conditions:
Default QoS is set to QoS 1 (At least once). |
|
Retain |
Retained Messages allow a publisher to mark a message as "retained." When the server receives such a message, it stores it in a dedicated retained message store. This ensures that the message is not lost even if subscribers are not currently connected to the server. When a subscriber later connects (or reconnects), the server will retrieve the retained message from its store and deliver it to the subscriber. Disabled by default. |
|
Topic |
Topic serves as the foundation of MQTT message routing, used to identify and differentiate messages. Publishers can specify a message's topic when publishing, while subscribers can choose to subscribe to topics of interest to receive relevant messages. |
- Meta Config (MQTT 5.0)
With the upgrade to MQTT 5.0, an additional "Meta" section has been introduced based on the 3.1.1 protocol. The Meta configuration page is shown below:
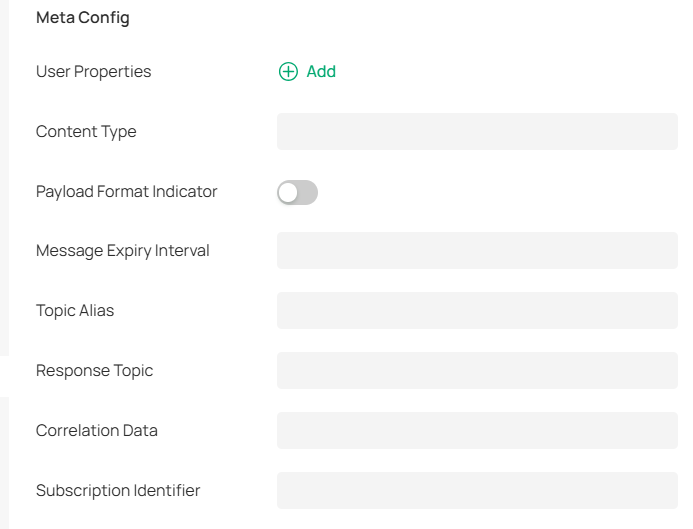
Parameters Explanation:
|
Item |
Configuration |
|
User Properties |
User Properties (in Meta Configuration) – Custom user-defined attributes in key‑value pairs. Note: This should be distinguished from the "User Properties" configurable under the MQTT 5.0 Advanced config. |
|
Content Type |
Content Type is used to describe the type of message content, facilitating processing by the receiver. It can be specified using MIME types (e.g., text/plain) or a custom string that describes the message content. |
|
Payload Format Indicator |
Payload Format Indicator indicates whether the message content is a UTF-8 encoded string. Disabled by default. |
|
Message Expiry Interval |
Message Expiry Interval (MQTT 5.0) allows a client to set an expiration time for a message, preventing messages that have remained on the server for an extended period from being forwarded to subscribers. |
|
Topic Alias |
Topic Alias (MQTT 5.0) enables the sender to map a topic name to an alias represented by a two-byte integer. During message transmission, this alias is then used in place of the original topic name to reduce bandwidth consumption. |
|
Response Topic |
Response Topic (MQTT 5.0) allows the requester to specify a desired response topic in the request message. After processing the request appropriately, the responder publishes its response to this designated topic. If the requester has subscribed to that response topic, it will receive the corresponding response. |
|
Correlation Data |
Correlation Data allows the requester to include associated data in the request. The responder must return this correlation data intact in the response, enabling the requester to identify which original request the response belongs to. This mechanism prevents incorrect mapping of responses to requests in scenarios where the responder does not return responses in the order of requests or when a response (e.g., with QoS 0) is lost due to a network disconnection. On the other hand, it also allows a requester interacting with multiple responders—such as controlling various smart home devices via a smartphone—to manage responses returned asynchronously from all responders by subscribing to just a single response topic. |
|
Subscription Identifier |
Subscription Identifier enables MQTT clients to manage their subscription lists more efficiently, improving subscription performance and reducing network traffic. Prior to MQTT 5.0, each subscription required sending a full subscription request including the topic name, QoS level, and other parameters. With the Subscription Identifier, the client only needs to send a single subscription request carrying this identifier. Similarly, when unsubscribing, only the identifier needs to be sent. This approach reduces network overhead and communication latency, thereby enhancing subscription efficiency. |
The Configuration of AMQP
AMQP (Advanced Message Queuing Protocol) is an open standard application-layer protocol designed for message-oriented middleware, providing a unified messaging service. It was created by J.P. Morgan in 2003 specifically for systems requiring high reliability and sophisticated functionality. Based on this protocol, clients and message brokers can exchange messages seamlessly, unrestricted by differences in client/broker products, programming languages, or other conditions. When SSL/TLS is enabled, the protocol becomes AMQPS.
The additional configurations currently required for AMQP/AMQPS are as follows:
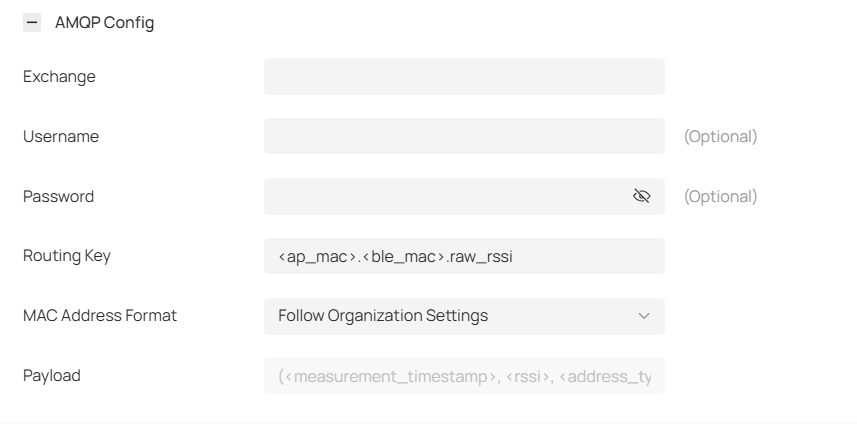
Parameters Explanation:
|
Item |
Configuration |
|
Exchange |
Exchange acts as a message router. It receives messages sent by producers and routes them to one or more queues based on the message's routing key. |
|
Username/Password |
Username/Password Authentication is used to verify user identity. |
|
Routing Key |
Routing Key is used to bind an exchange to a queue. The default format is: <ap_mac>.<ble_mac>.raw_rssi (applied during data transmission). |
|
Payload |
The data format for BLE Data Forwarding is available only when Format Type is set to Plaintext. If Format Type is set to Json, data will be transmitted according to TP‑Link's defined format. The default format is: |
Both the Routing Key and Payload support the use of angle brackets (<>) as wildcards. During reporting, these wildcards will be replaced with actual data. All currently supported wildcards are listed below:
|
Wildcards |
Description |
|
ap_mac |
Mac address of AP device |
|
ble_mac |
Mac address of BLE device |
|
measurement_timestamp |
Timetamp of BLE packet |
|
rssi |
RSSI of the BLE packet |
|
address_type |
Broadcast channel of the BLE packet |
|
adv_raw_data |
Raw advertising data of the BLE packet |
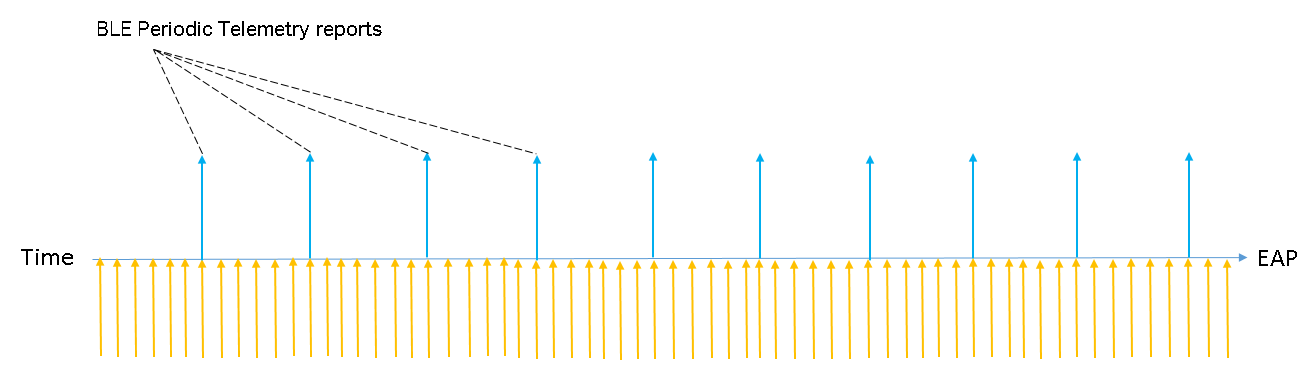
BLE Telemetry
BLE Telemetry is a configuration of periodic reporting. When it is enabled, the AP will periodically report Bluetooth data according to the set interval. The AP will continuously collect Bluetooth information, interpret the data, and then report it in the specified format.
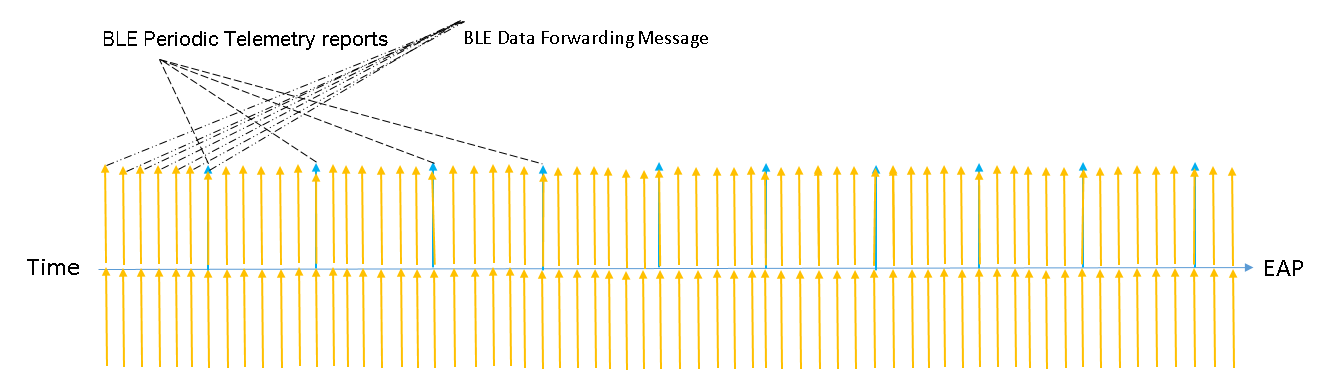
BLE Data Forwarding
When BLE Data Forwarding is enabled, the AP will automatically forward the BLE advertising frames of the specified protocols that it has collected. The data, the raw data received by the AP, is forwarded in real-time. Therefore, the forwarding frequency can also reflect the advertising interval of other Bluetooth devices. It should be noted that when BLE Data Forwarding is enabled, BLE Telemetry should also be enabled. If BLE Data Forwarding is considered as the primary mode, the reporting interval can be set higher. Furthermore, the Device Class selected in the IoT Transport Streams entry and the filter entry can also affect the data in Data Forwarding. The AP will filter the Bluetooth information based on these two filtering criteria before forwarding the data.
After completing the above configuration, you can view the Bluetooth data upload status on the third-party IoT Server page.
Parameter Optimization Recommendations
Para obter o desempenho ideal do Bluetooth, recomenda-se as seguintes estratégias de otimização de parâmetros:
- Estratégia de Distribuição do EAP
Precisão de posicionamento: Para maximizar a precisão do posicionamento, monte os EAPs a uma altura inferior a 3 metros, mantenha uma distância de 3 a 15 metros entre cada um e assegure-se de que pelo menos três EAPs recebam cada mensagem da etiqueta Bluetooth.
Distância máxima de posicionamento: O alcance teórico é de 100 metros, mas a distância máxima recomendada entre os pontos de acesso de emergência (EAPs) e os clientes não deve ultrapassar 50 metros.
- Configuração do parâmetro de intervalo de relatório
1-10: Para cenários com alto volume de tráfego ou requisitos de tempo real elevados.
10-60: Para cenários com volume de tráfego médio ou requisitos moderados de tempo real.
>60: Para cenários com baixo volume de tráfego ou baixos requisitos de tempo real.
Cenários e soluções de aplicação
- Navegação interna
Quando os EAPs (BLE ou Wi-Fi) são instalados em lojas, atrações turísticas ou estacionamentos, e os usuários utilizam um telefone celular com Bluetooth ativado ou conectado ao Wi-Fi, o servidor de posicionamento pode coletar dados do EAP para calcular a localização.
A plataforma de gerenciamento exibe a densidade de usuários, itinerários e outras informações. O servidor de posicionamento fornece os dados de localização para aplicativos de terceiros, como mapas, por meio de uma API aberta, facilitando o rastreamento da localização do usuário.
- Gestão de localização de ativos
Ao fixar as etiquetas BLE nos ativos a serem rastreados e implantar EAPs que podem receber frames iBeacon na área do escritório, os EAPs podem reportar as informações RSSI coletadas para o servidor de posicionamento, e o ativo pode ser localizado e rastreado através do aplicativo de gerenciamento móvel.
- Gestão e acompanhamento de pessoal
Quando as etiquetas BLE são fixadas nos pulsos de funcionários ou indivíduos sob sua responsabilidade (como pacientes) e os EAPs (Pontos de Acesso Emergencial) que podem receber frames iBeacon são implantados na área designada, os EAPs podem enviar as informações coletadas, como RSSI (Índice de Sinal Remoto), para o servidor de posicionamento, permitindo que a plataforma de gerenciamento monitore a localização coletiva e a trajetória de movimento dos funcionários e indivíduos sob sua responsabilidade.
- Geofencing
Quando os funcionários prendem as etiquetas BLE aos pulsos ou os usuários seguram o terminal móvel, e os EAPs são implantados na área de trabalho, o servidor de posicionamento pode coletar dados, como RSSI, dos EAPs para calcular a localização do usuário.
Conclusão
Seguindo os passos acima, você poderá configurar com sucesso o recurso de posicionamento Bluetooth IoT.
QA
P1: Problemas comuns e solução de problemas
A1:
|
Problemas |
Possível causa |
Solução de problemas |
|
As informações de localização analisadas são nulas. |
O protocolo de comunicação do cliente Bluetooth não suporta atualmente a análise das informações. |
Ative o encaminhamento de dados BLE para verificar se os dados transmitidos contêm informações de localização. |
|
O posicionamento está incorreto. |
Interferência severa |
Verifique a localização do EAP e a configuração de potência de transmissão. |
|
A localização é atualizada lentamente. |
Intervalo de relatório longo e alta latência do servidor EAP |
Verifique a configuração do intervalo de relatório e a conexão entre o EAP e o servidor. |
P2: Por que não consigo encontrar as configurações relacionadas ao Bluetooth no meu controlador Omada?
A2: Verifique a versão do seu controlador Omada. O recurso Bluetooth requer o controlador Omada versão 6.1 ou superior. Os controladores Omada Pro e Omada Cloud Essential não são compatíveis com esse recurso no momento.
Para obter mais detalhes sobre cada função e configuração, acesse a Central de Downloads e baixe o manual do seu produto.
