


Contents
Case 1: Troubleshoot Voice VLAN for IP phones without VLAN support
Case 2: Troubleshoot Auto VoIP for IP phones with VLAN support
Introduction
IP phones are widely used in modern business networks, where prioritizing voice traffic is essential for maintaining call quality. Omada switches support two QoS features. Voice VLAN and Auto VoIP, to prioritize voice traffic based on whether the IP phone supports VLAN-tagged packets.
- Voice VLAN is intended for IP phones that cannot send or receive VLAN-tagged packets. The switch identifies voice traffic based on the device's OUI (Organizationally Unique Identifier) and automatically applies the configured VLAN tag and 802.1p priority.
- Auto VoIP is intended for IP phones that support VLAN-tagged packets. It uses LLDP-MED (Link Layer Discovery Protocol – Media Endpoint Discovery) to advertise the required VLAN and QoS information, allowing the IP phone to tag its own voice traffic.
This article helps you troubleshoot common Voice VLAN and Auto VoIP issues on Omada switches. It first explains how to identify the correct feature based on the IP phone's capabilities, and then provides step-by-step troubleshooting procedures for common issues, such as IP phone registration failures and poor voice quality during calls.
Requirements
- Omada Switches (Omada Campus Switches / Omada Aggregation Switches / Omada Access Max Switches / Omada Access Pro Switches / Omada Access Plus Switches / Omada Access Switches)
Troubleshooting steps
Step 1. Check the type of IP phone
Refer to the product brochure or datasheet to determine whether the IP phone supports VLAN-tagged packets. Check whether the product documentation mentions support for the 802.1Q standard or VLAN configuration.
If the documentation does not provide relevant information, or if you are unsure whether the IP phone supports VLAN-tagged packets, search for additional information online or contact the IP phone manufacturer's technical support.
When contacting technical support, confirm whether the IP phone supports:
- 802.1Q
- VLAN configuration
- VLAN-tagged packets
Step 2. Verify the configuration method.
After confirming the VLAN capability of the IP phone, select the appropriate configuration method:
- If the IP phone does not support VLAN-tagged packets, configure Voice VLAN to add VLAN tags to voice packets.
- If the IP phone supports VLAN-tagged packets, configure Auto VoIP to allow the IP phone to send tagged voice packets.
Proceed based on the IP phone capability:
- IP phone does not support VLAN-tagged packets → Continue to Case 1: Troubleshooting Voice VLAN.
- IP phone supports VLAN-tagged packets → Continue to Case 2: Troubleshooting Auto VoIP.
Case 1: Troubleshoot Voice VLAN for IP phones without VLAN support
Scenario:
The IP phone cannot send or receive VLAN-tagged packets. Voice traffic is not tagged with the configured VLAN ID and cannot enter the dedicated voice VLAN, causing IP phone registration failure.
Step 1. Verify the Global Voice VLAN configuration
Go to QoS > Voice VLAN > Global Config and verify that a dedicated voice VLAN has been configured.
Before assigning a VLAN as the voice VLAN, ensure that the VLAN has already been created as an 802.1Q VLAN.
Also verify that:
- The voice VLAN is correctly configured throughout the network.
- IP phones in the voice VLAN can communicate with the SIP server and other voice services.
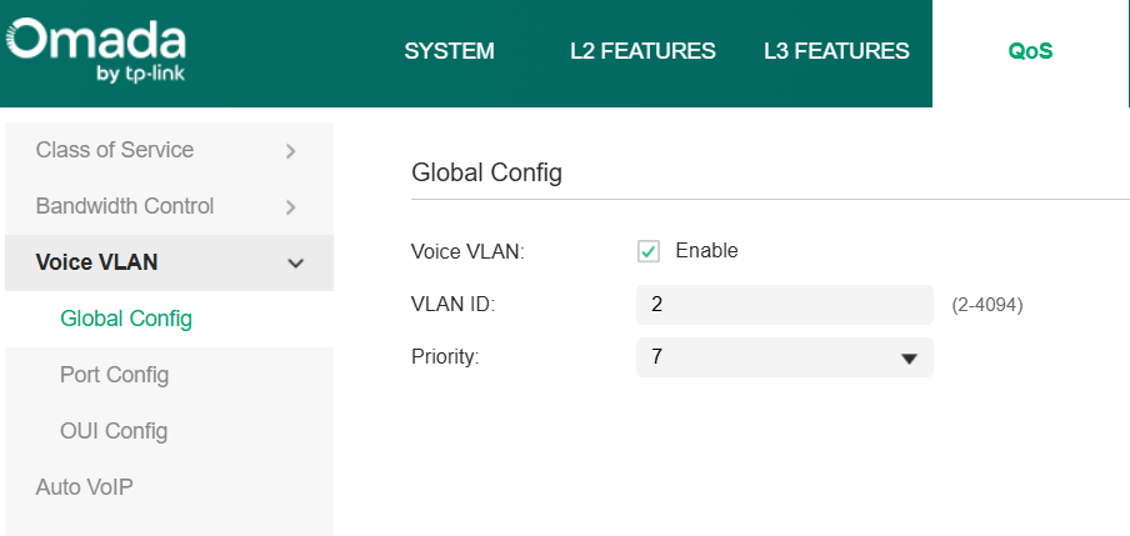
Step 2. Verify Voice VLAN port membership
After Voice VLAN is enabled on a port, the switch automatically adds the port to the configured voice VLAN as an untagged member.
In most deployments, no additional VLAN membership configuration is required.
If the port is dedicated to an IP phone only, configure the port's PVID (Port VLAN ID) as the voice VLAN ID so that all untagged traffic received on the port is assigned to the voice VLAN.
Step 3. Verify Voice VLAN status on the port
Go to the Voice VLAN Port Config page and verify that Voice VLAN is enabled on the corresponding port.
The Operational Status should normally display Active.
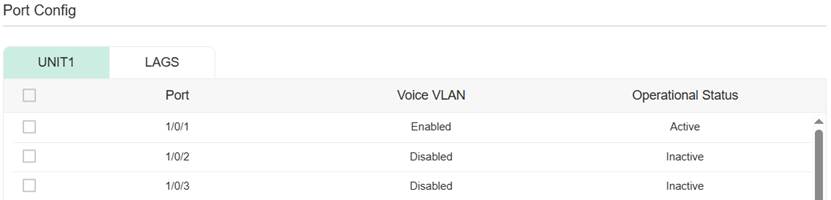
Step 4. Verify the IP phone OUI (Organizationally Unique Identifier) configuration
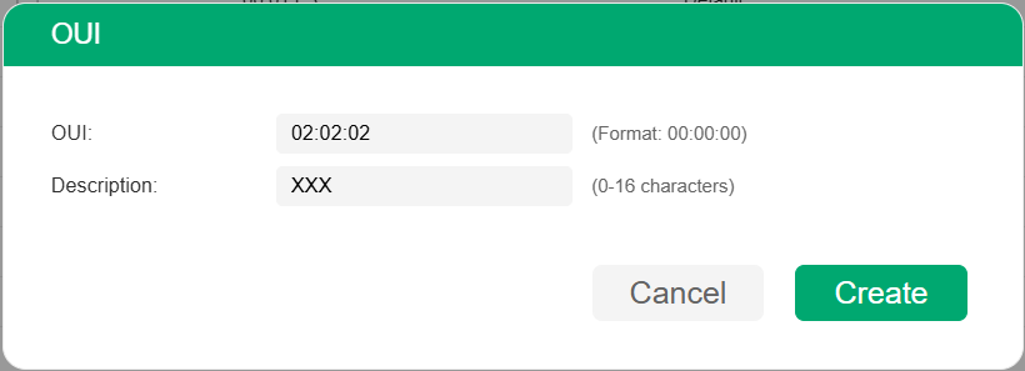
If the IP phone manufacture's OUI is not in the OUI Config List of the Voice VLAN page, traffic from the IP phone will not be forwarded to the Voice VLAN.
Omada switches include preconfigured OUIs for common IP phone brands. If the IP phone brand is not listed, manually add its OUI. On the OUI Config page, click Add and enter the required OUI information.
Verify that the IP phone manufacturer's OUI is listed in the OUI Config List under the Voice VLAN page.
Step 5. Verify Voice VLAN priority configuration
After verifying VLAN configuration, IP phones should be able to register and operate normally.
If issues such as call quality degradation, jitter, or noise occur, verify the Voice VLAN priority settings.
On the Global Config page, configure the priority level from 0 to 7:
- 0: Lowest priority
- 7: Highest priority
To ensure that the configured 802.1p priority is applied during forwarding:
Go to QoS > Class of Service > Port Priority > Port Priority Config and set Trust Mode to Trust 802.1p.
Ensure that other switches and network devices along the traffic path also preserve or trust the QoS markings.

Case 2: Troubleshoot Auto VoIP for IP phones with VLAN support
Scenario:
The IP phone supports VLAN-tagged packets but fails to register or experiences voice quality issues.
Auto VoIP uses LLDP-MED negotiation to provide VLAN and QoS information to IP phones. Verify LLDP-MED first, then check Auto VoIP settings.
Step 1. Verify LLDP and LLDP-MED configuration
Go to the L2 FEATURES > LLDP > LLDP Config page, and enable LLDP globally. LLDP for a port is usually enabled by default.
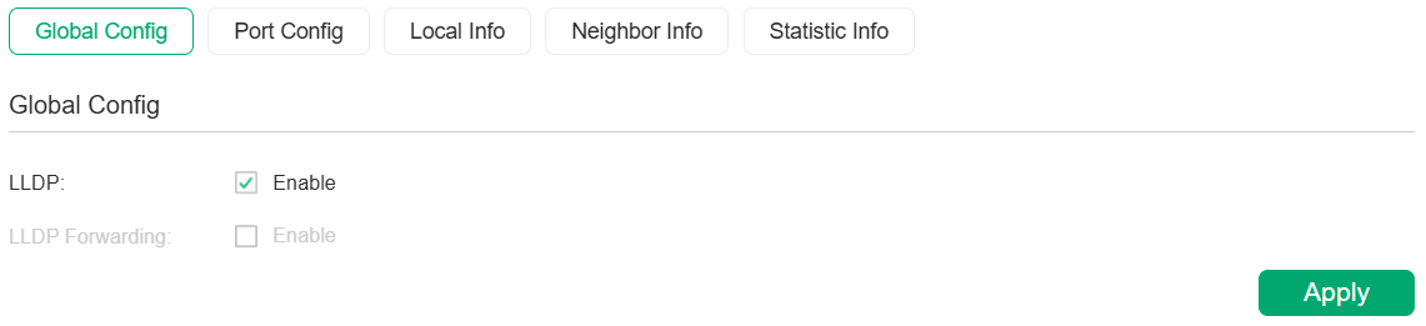
Then go to LLDP-MED Config > Port Config, and set the LLDP-MED Status of the corresponding port to Enabled. This will initiate LLDP-MED negotiation with the neighboring device.
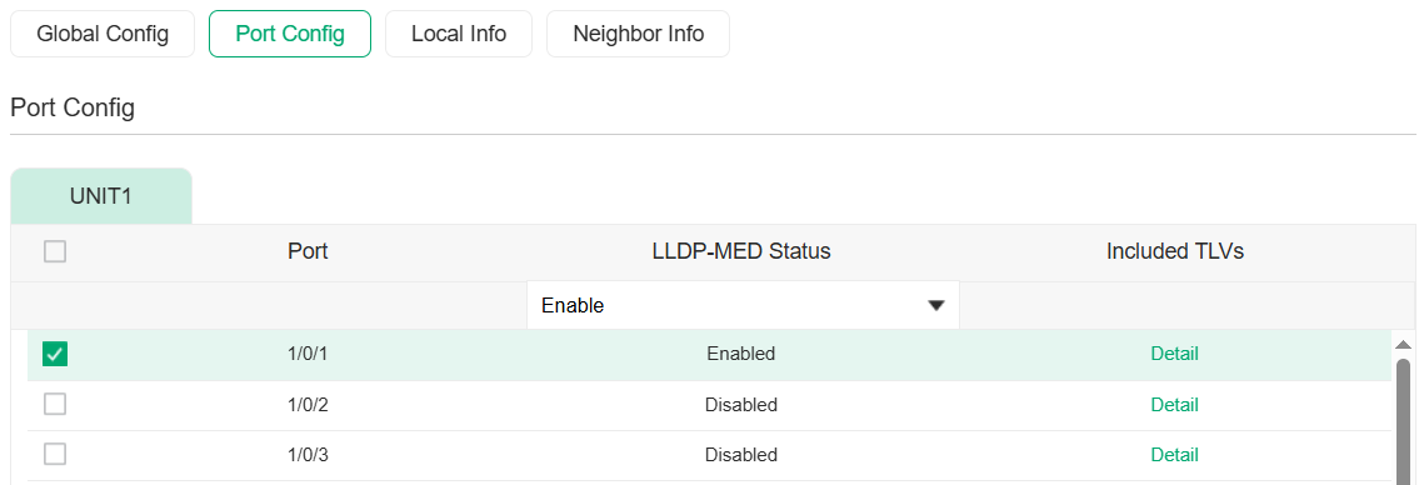
In the Neighbor Info section on the LLDP-MED Config page, you can click the port to check if it has obtained the information from the neighboring device.
Step 2. Verify Global Auto VoIP configuration
Ensure that Auto VoIP is enabled globally in QoS > Auto VoIP > Global Config. Unlike Voice VLAN, Auto VoIP does not configure a dedicated Voice VLAN or priority globally. Instead, it advertises voice network information to IP phones through LLDP-MED, while the VLAN ID and QoS parameters are configured on Port Config.

Step 3. Verify Auto VoIP port configuration
As shown in the figure below, each port can be configured with parameters such as Interface Mode, Value, CoS Override Mode, and DSCP Value.
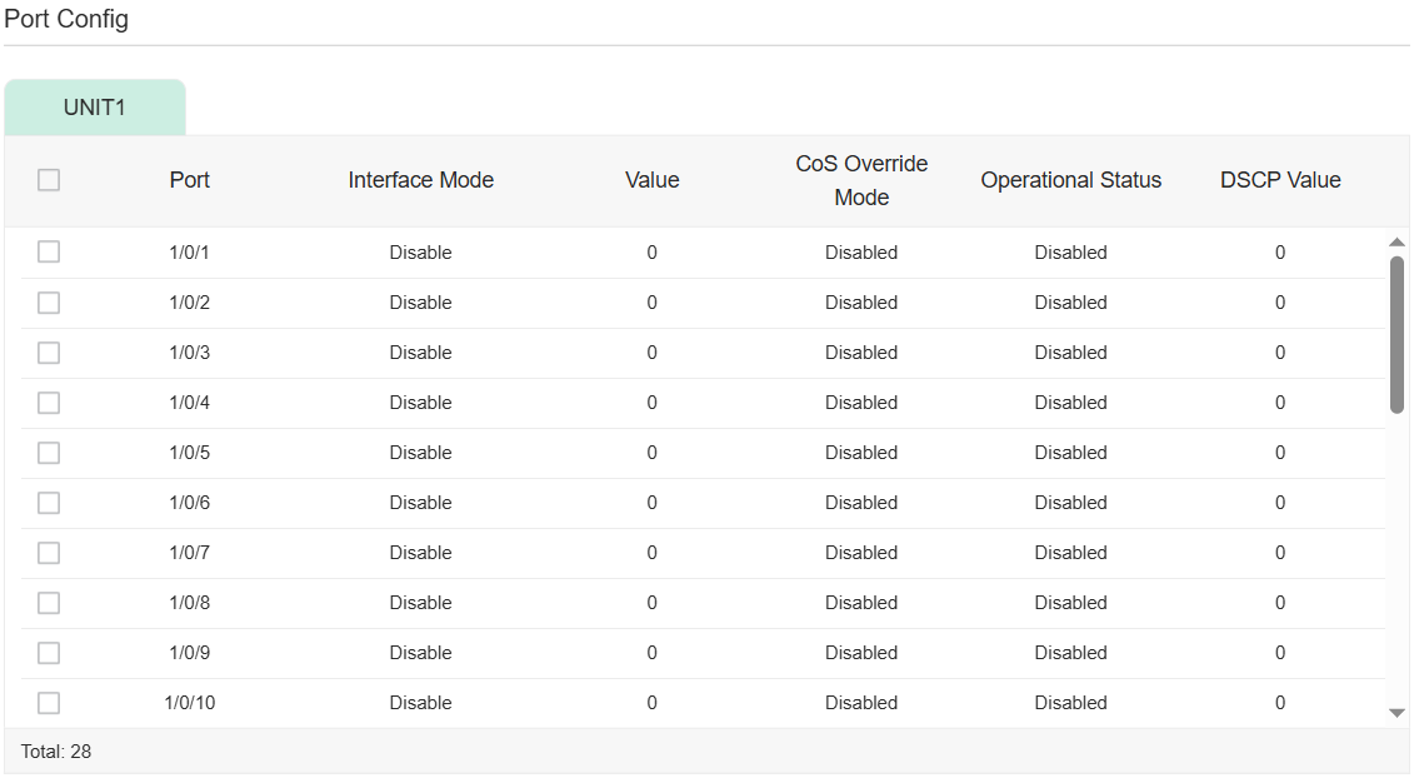
In most deployments, set Interface Mode to VLAN ID or VLAN ID && Dot1p. Configure the Value according to the voice VLAN settings used by the IP phone:
- For VLAN ID mode, enter the VLAN ID assigned to the IP phone.
- For VLAN ID && Dot1p mode, enter the VLAN ID and 802.1p priority value.
If the IP phone fails to register, first verify that the configured VLAN ID is correct and matches the voice VLAN configuration in the network. Also confirm that the VLAN is properly configured under L2 FEATURES > VLAN > 802.1Q VLAN.
Step 4. Verify Auto VoIP priority configuration
After verifying the VLAN configuration, IP phones should be able to register and operate normally. If call quality issues such as jitter, latency, or noise persist after confirming that the physical connections are working properly, verify the Auto VoIP priority configuration.
The priority mechanism depends on the selected Interface Mode:
- VLAN ID: Only the voice VLAN is advertised to the IP phone. Voice traffic priority is determined by the configured DSCP Value.
- VLAN ID && Dot1p: Both the voice VLAN and 802.1p priority are advertised to the IP phone. Voice traffic priority can be determined based on the configured 802.1p priority.
Using VLAN ID mode
When Interface Mode is set to VLAN ID, only the voice VLAN is advertised to the IP phone.
Since no 802.1p priority is advertised, voice traffic is typically prioritized based on the configured DSCP value. Configure an appropriate DSCP value (0–63) for voice traffic. A value in the range of 40–47 (typically 46, Expedited Forwarding) is recommended.
For CoS Override Mode, it is recommended to select Disabled. In this mode, the switch forwards voice traffic according to the configured DSCP value.
If CoS Override Mode is set to Enabled, the configured DSCP value is ignored and voice traffic is forwarded using the default TC-5 queue.
Using VLAN ID && Dot1p mode
When Interface Mode is set to VLAN ID && Dot1p, both the voice VLAN and the configured 802.1p priority are advertised to the IP phone.
Configure an appropriate 802.1p priority (0–7) for voice traffic if the IP phone is expected to mark outgoing packets with 802.1p priority.
When CoS Override Mode disabled, the forwarding priority used by the switch is determined by the Trust Mode configured under QoS > Class of Service > Port Priority > Port Priority Config.
Configure Trust Mode according to the QoS mechanism used in your network (for example, Trust 802.1p or Trust DSCP).
Other switches and network devices along the forwarding path should also be configured to preserve or trust the corresponding QoS markings. Otherwise, the configured priority may not take effect across the network.

Conclusion
By following the troubleshooting steps in this guide, you can diagnose and resolve common Voice VLAN and Auto VoIP issues on Omada switches, including IP phone registration failures and voice quality problems. If additional assistance is required, contact Omada Support or your IP phone vendor.
To learn more about each function and configuration, please visit Support Home to download or check the manual for your product.
