


Contents
Introduction
This FAQ explains how to use the Migration feature in Fusion Pro Series gateways. Fusion Pro Series integrates Omada OS, Network Application, and Guard Application, enabling the migration of system settings, application configurations, managed devices, and related data. The Migration feature allows administrators to transfer these configurations from one Fusion Pro Series gateway to another, reducing manual configuration effort and minimizing service disruption during device replacement or upgrade.
Note:
1, Migration is currently supported only between Fusion Pro Series gateways of the same model running the same software version. Cross-model migration is not supported.
2, The Migration feature currently supports only local management scenarios. Gateways managed through Cloud Access cannot be migrated using this feature at this time. Cloud Access migration support is planned for a future release.
Requirements
The source and target Fusion Pro Series controllers must be running the same software version.
Migration is supported only between Fusion Pro Series controllers of the same model. Cross-model migration is not supported.
Supported Fusion Pro Series models:
- Fusion Pro G+
- Fusion Pro 2.5G
- Fusion Pro 2.5G PoE
Configuration
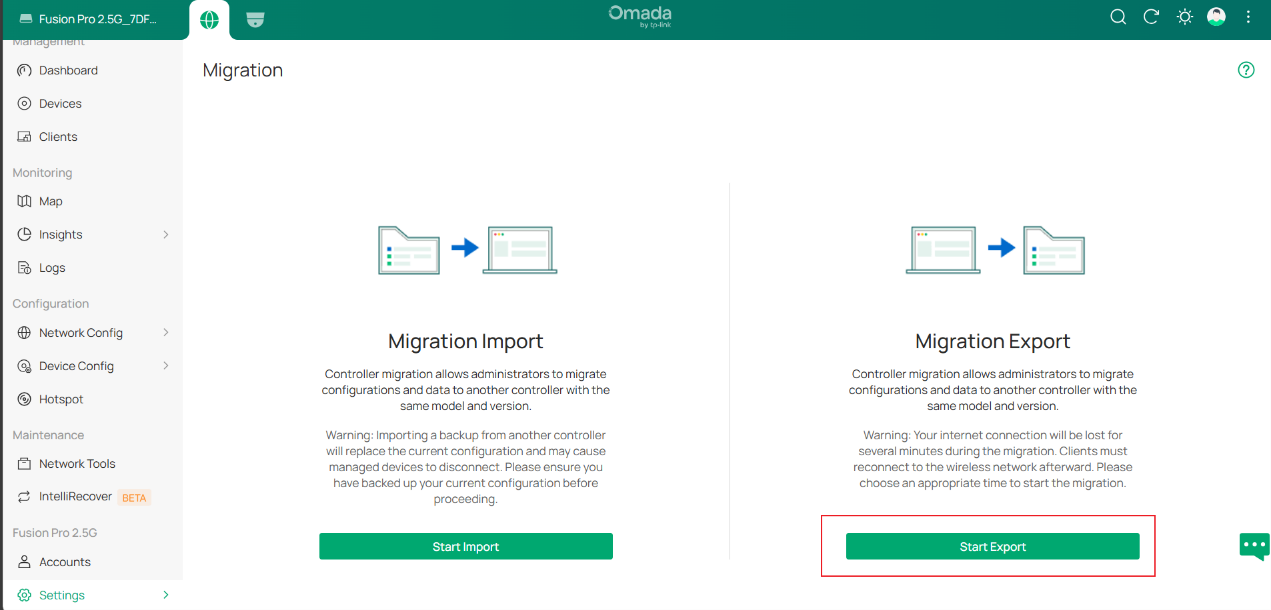
Step 1. Log in to the source Fusion Pro Series and go to Settings > Migration. Click Start Export to begin the migration process.
Step 2. Configure Export Parameters and Export the Configuration
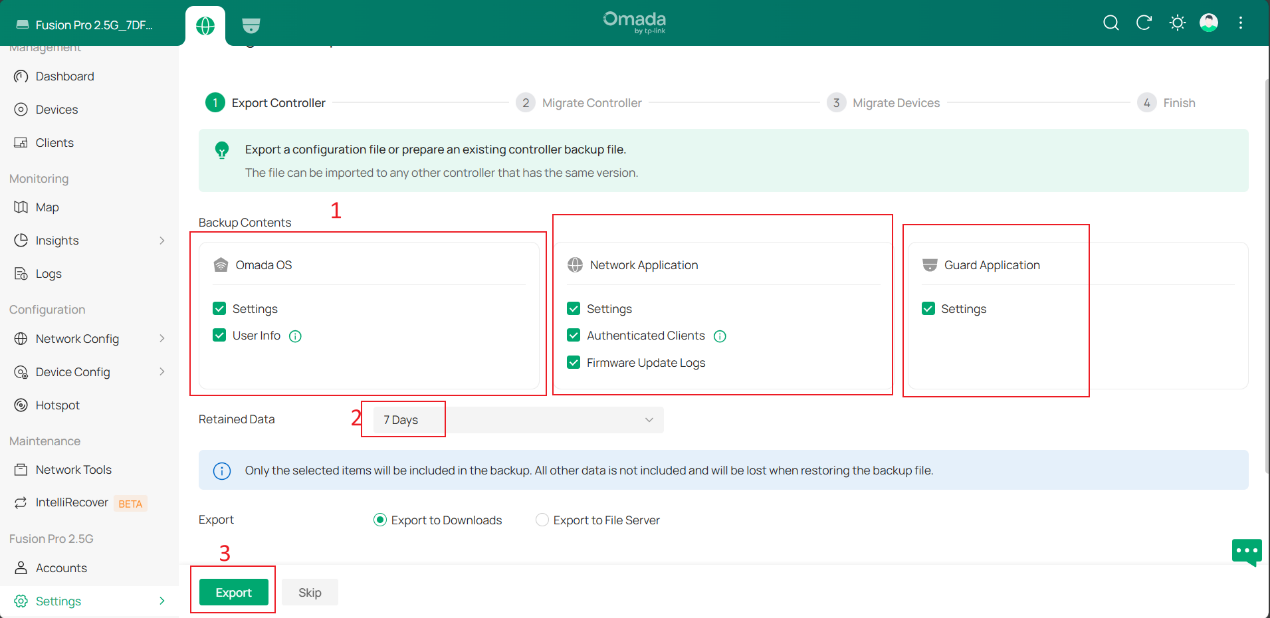
Select the configuration categories to be included in the migration package, including Omada OS, Network Application, and Guard Application. Optionally configure the Retained Data Backup period, then click Export to generate the migration file.
Note: Currently, configuration export supports either all three systems together (Omada OS + Network Application + Guard Application) or a single application export (Network Application only or Guard Application only). Exporting Omada OS independently or exporting arbitrary combinations of the three systems is not supported.
Step 3. Import the Configuration File on the Target Fusion Gateway
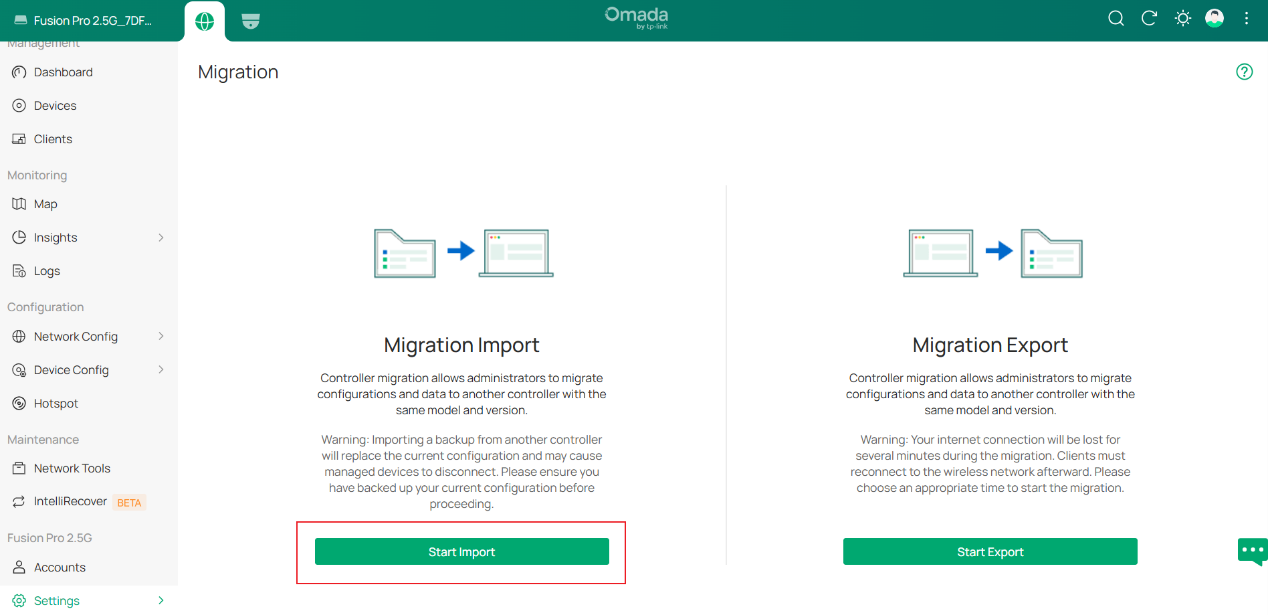
Log in to the target Fusion Gateway, go to Settings > Migration, and click Start Import. Then upload the migration file exported from the source controller and complete the import process.
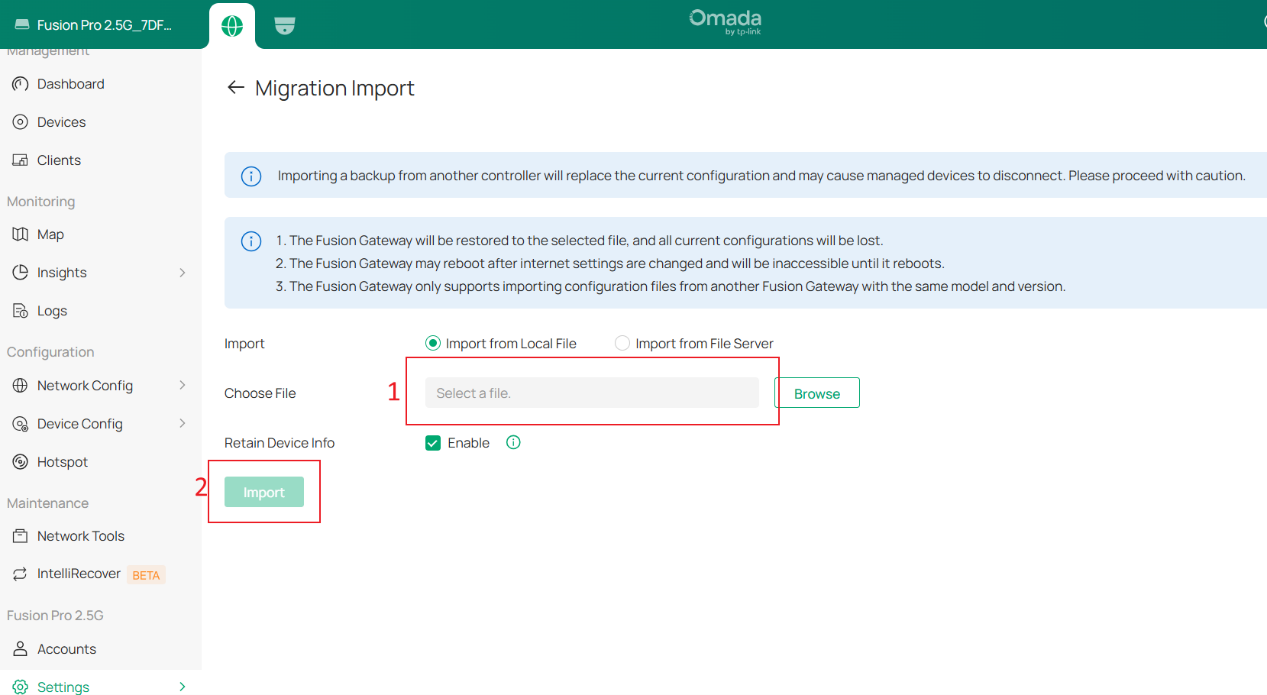
During the import process, the Fusion Gateway automatically detects which applications are included in the migration package, such as Omada OS, Network Application, and/or Guard Application, and only restores the configurations contained in the imported file.
If any application included in the migration package is not currently installed on the target Fusion Gateway, the system will automatically download and install the required application before proceeding with the restoration. The import confirmation page will display the applications to be restored for verification before the process starts.
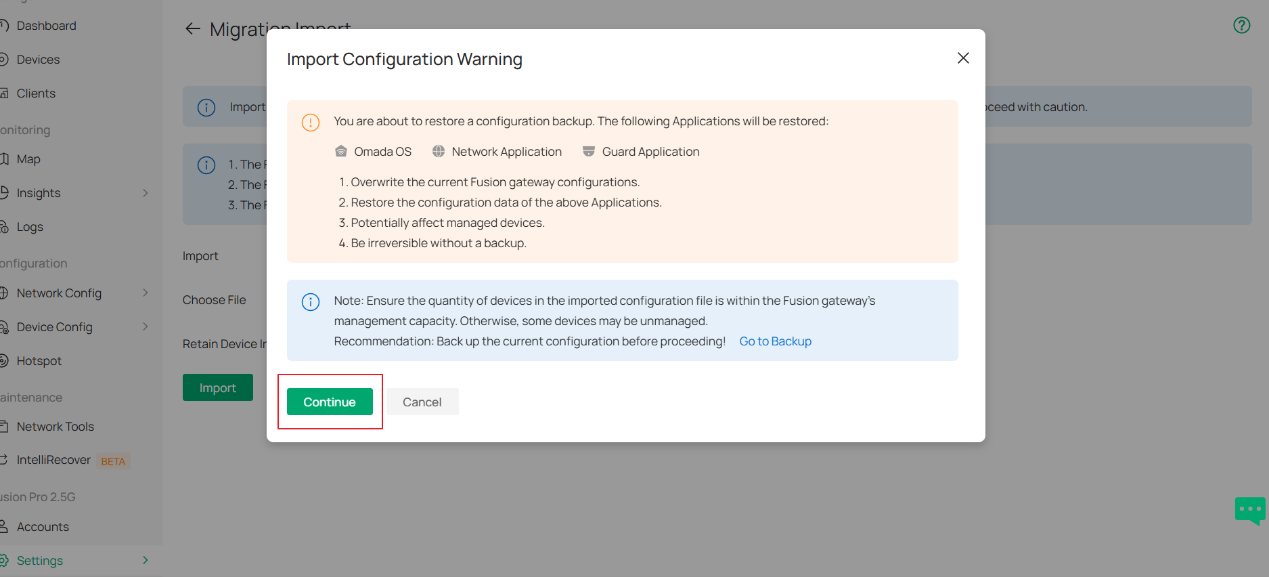
Step 4. Select Devices to Migrate
After the configuration file has been imported successfully on the target Fusion Gateway, return to the source Fusion Gateway and proceed to the Migrate Devices step.
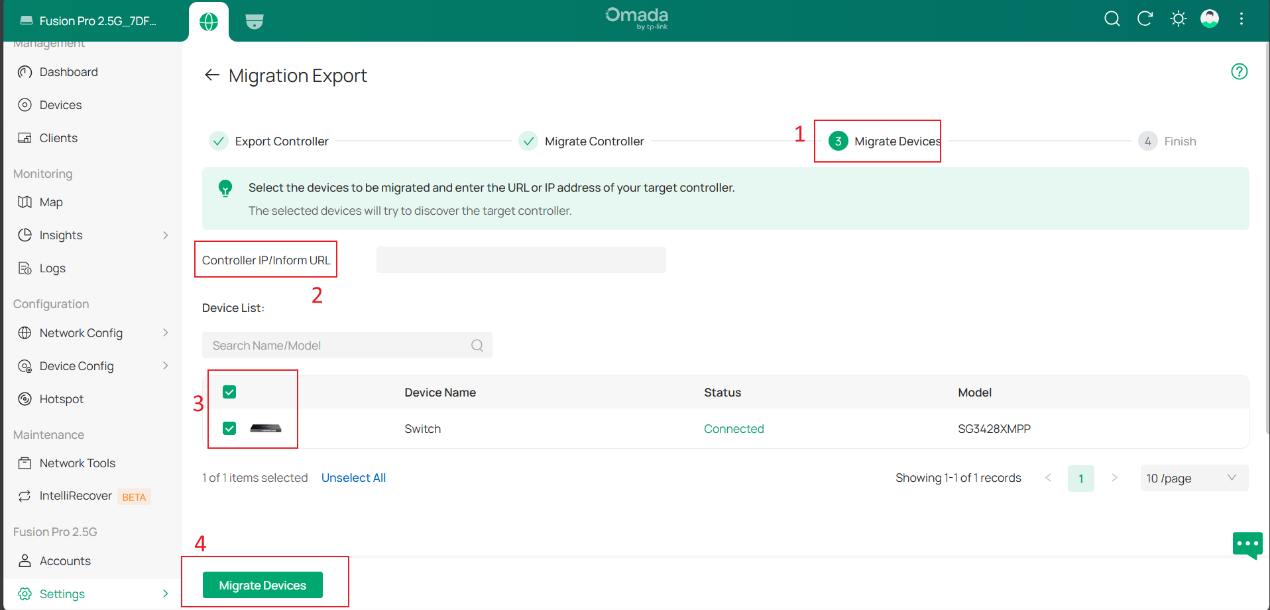
Before starting device migration, ensure that the Target Controller IP Address or Inform URL is different from that of the source controller. Since the default LAN IP address of a Fusion Gateway is typically 192.168.188.1, the target Fusion Gateway may require manual IP reconfiguration before migration.
Enter the target controller IP address or Inform URL, select the devices to migrate from Device List, and then click Migrate Devices.
When the confirmation dialog appears, review the migration notice and click Continue to start the device migration process.
Note:
1, If the target controller supports fewer devices than the source controller, some devices may fail to migrate. In addition, built-in Fusion Gateway or NVR devices support configuration migration only and cannot be migrated as managed devices.
2, During the migration process, both network devices and security devices managed by the Fusion Gateway can be migrated simultaneously. However, security devices added through ONVIF or RTSP protocols are not supported for migration and must be reconfigured manually on the target controller after migration.
Step 5. Complete the Device Migration
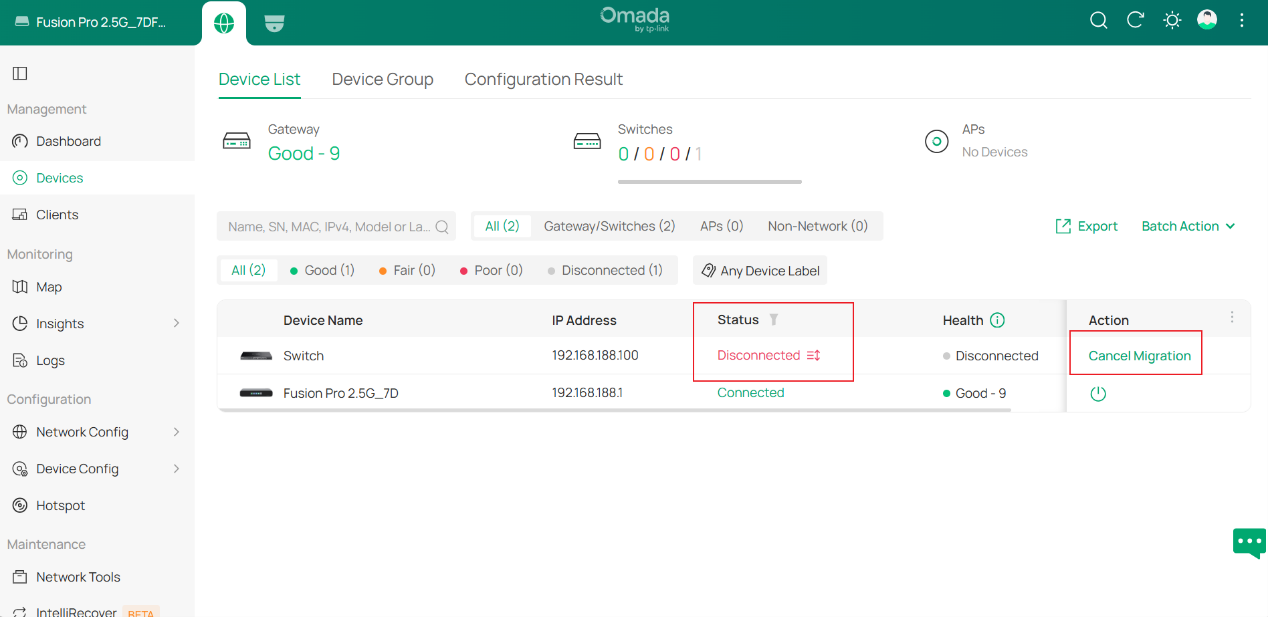
Wait for the migration process to finish after the migration task is submitted. During this stage, the selected devices will connect to the target controller and apply the migrated configuration.
You can monitor the migration status in Device List. Devices being migrated display the Migrating status. If necessary, click Cancel Migration to cancel the migration task for the selected device.
Note: Devices may temporarily disconnect while the migration is in progress. Do not power off or restart either controller until the migration process is complete.
Conclusion
You have now successfully migrated controller configurations and managed devices from one Fusion Pro Series controller to another. By using the Migration feature, you can transfer controller settings, application data, and selected devices efficiently, reducing manual reconfiguration efforts and minimizing service disruption during controller replacement or upgrade.
To learn more about each function and configuration, please visit Support Home to download or check the manual for your product.
QA
Q1: Which devices and applications are supported by the Migration feature?
A1: The Migration feature is designed for Fusion Pro Series Gateways running Omada OS. It supports migrating configurations related to Omada OS, Network Application, and Guard Application. Depending on the export option selected, users can migrate all three systems together or migrate the Network Application or Guard Application individually.
Q2: Can network devices and security devices be migrated together?
A2: Yes. During the Migrate Devices process, Fusion Gateway supports the simultaneous migration of both managed network devices and supported security devices. However, security devices added through ONVIF or RTSP protocols are not included in the migration process and must be added manually on the target Fusion Gateway after migration.
