


Contents
Introduction
Configuration settings and surveillance data are critical to maintaining stable network and security operations. When devices are replaced, upgraded, or encounter configuration issues, administrators may need a reliable method to preserve system settings and quickly restore services.
Omada Fusion Pro Gateway provides a Backup & Restore feature that allows administrators to create backups of system configurations and selected business data. By creating backup points, administrators can quickly roll back to a previous configuration state and reduce the impact of misconfigurations or unexpected changes.
This article explains how to create and restore backups on Omada Fusion Pro Gateway and describes the scope of configurations and data supported by the Guard application.
Requirements
- Omada Fusion Pro Gateway.
|
Model |
Hardware Version |
Firmware Version |
|
Fusion Pro 2.5G |
/ |
Omada Fusion Pro Gateway-Compatible Version |
|
Fusion Pro 2.5G PoE |
/ |
Omada Fusion Pro Gateway-Compatible Version |
Configuration
This section describes how to create, restore, and schedule backups on Omada Fusion Pro Gateway. It also explains the backup scope supported by Guard Application and the requirements for successful restoration.
Create a Backup
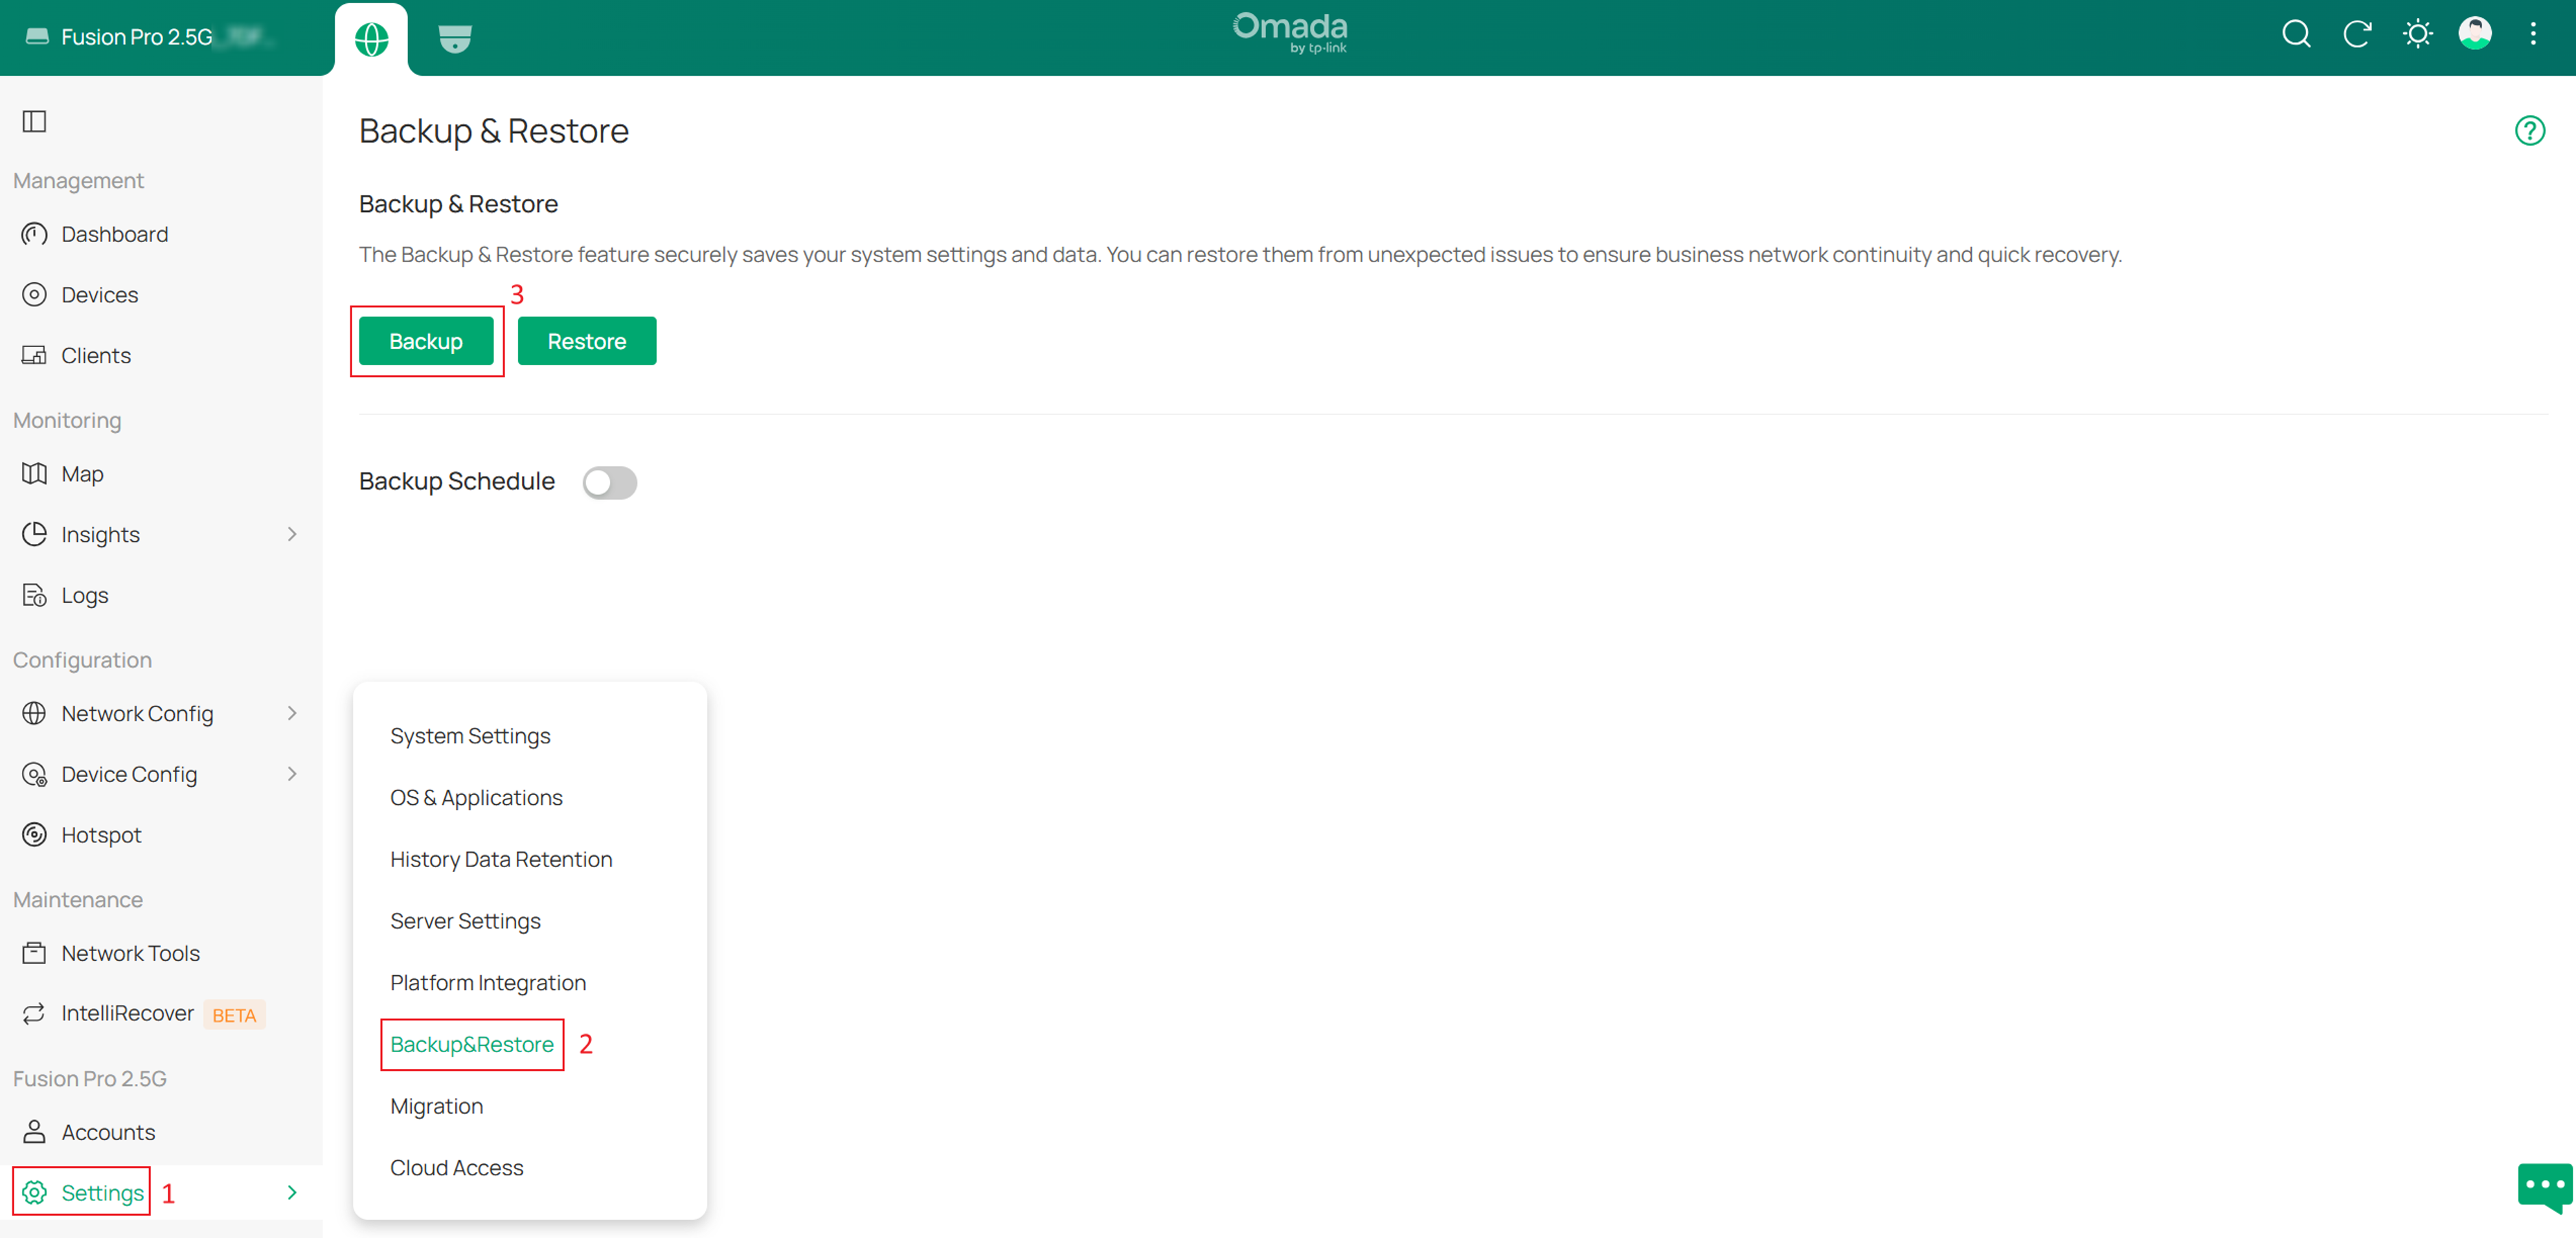
Step 1. Navigate to Settings > Backup & Restore, and click Backup.
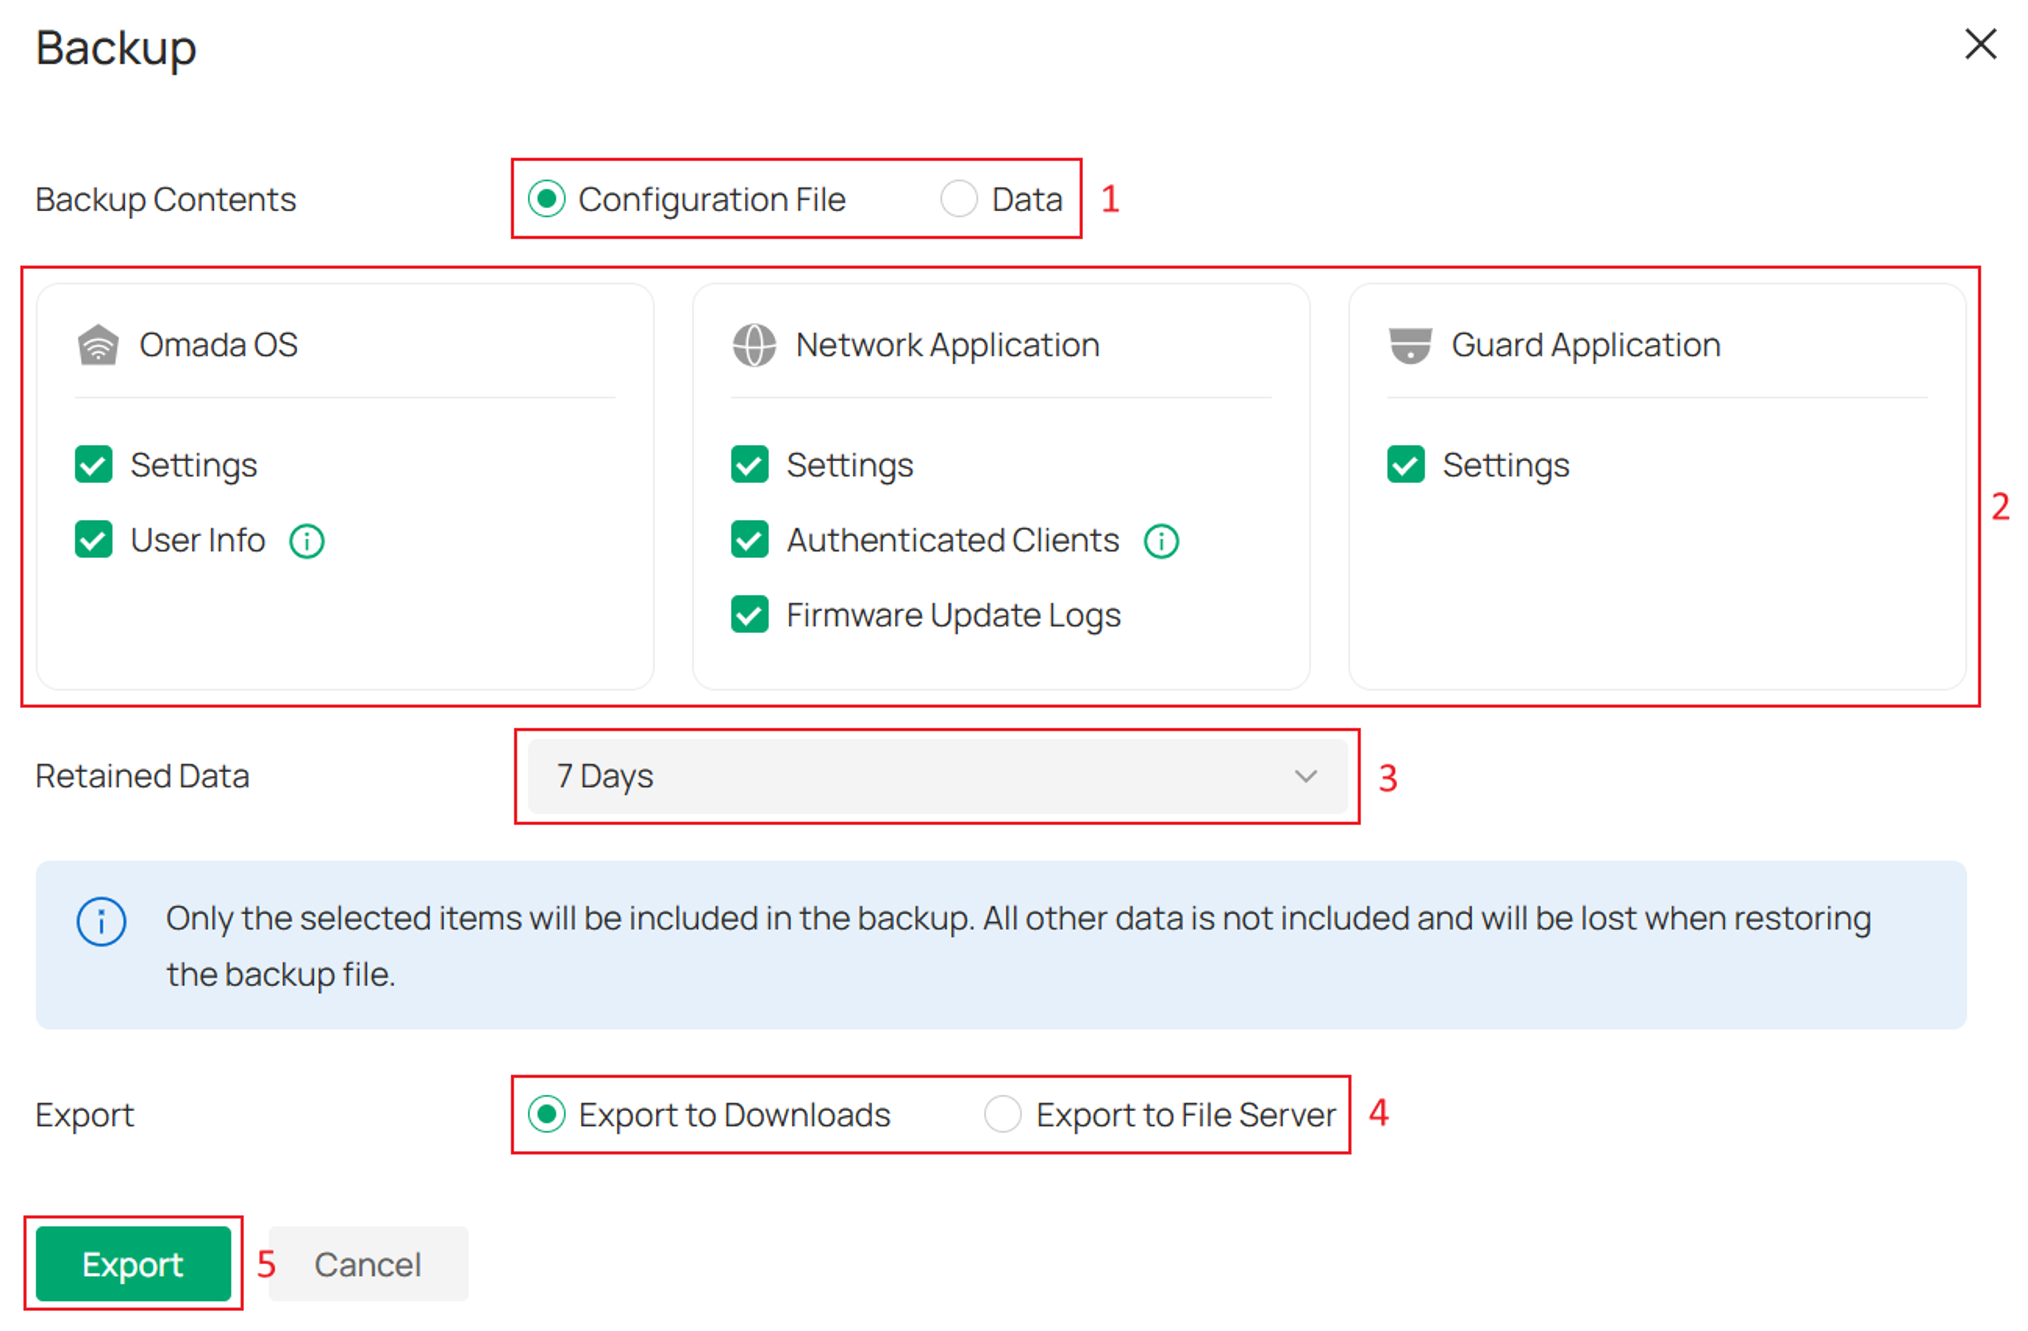
Step 2. Select the backup contents to be included in the backup file.
Fusion Pro Gateway allows administrators to include configuration settings and business data from Omada OS, Network Application, and Guard Application in a backup file.
Backup and restore operations are managed through the centralized Backup & Restore page in Omada OS. Guard Application can be backed up and restored independently, or together with Omada OS and Network Application as part of a unified system backup.
The available backup contents are organized into the following categories:
- Configuration File: contains system and application configuration settings.
- Data: contains business records and operational data generated by the system.
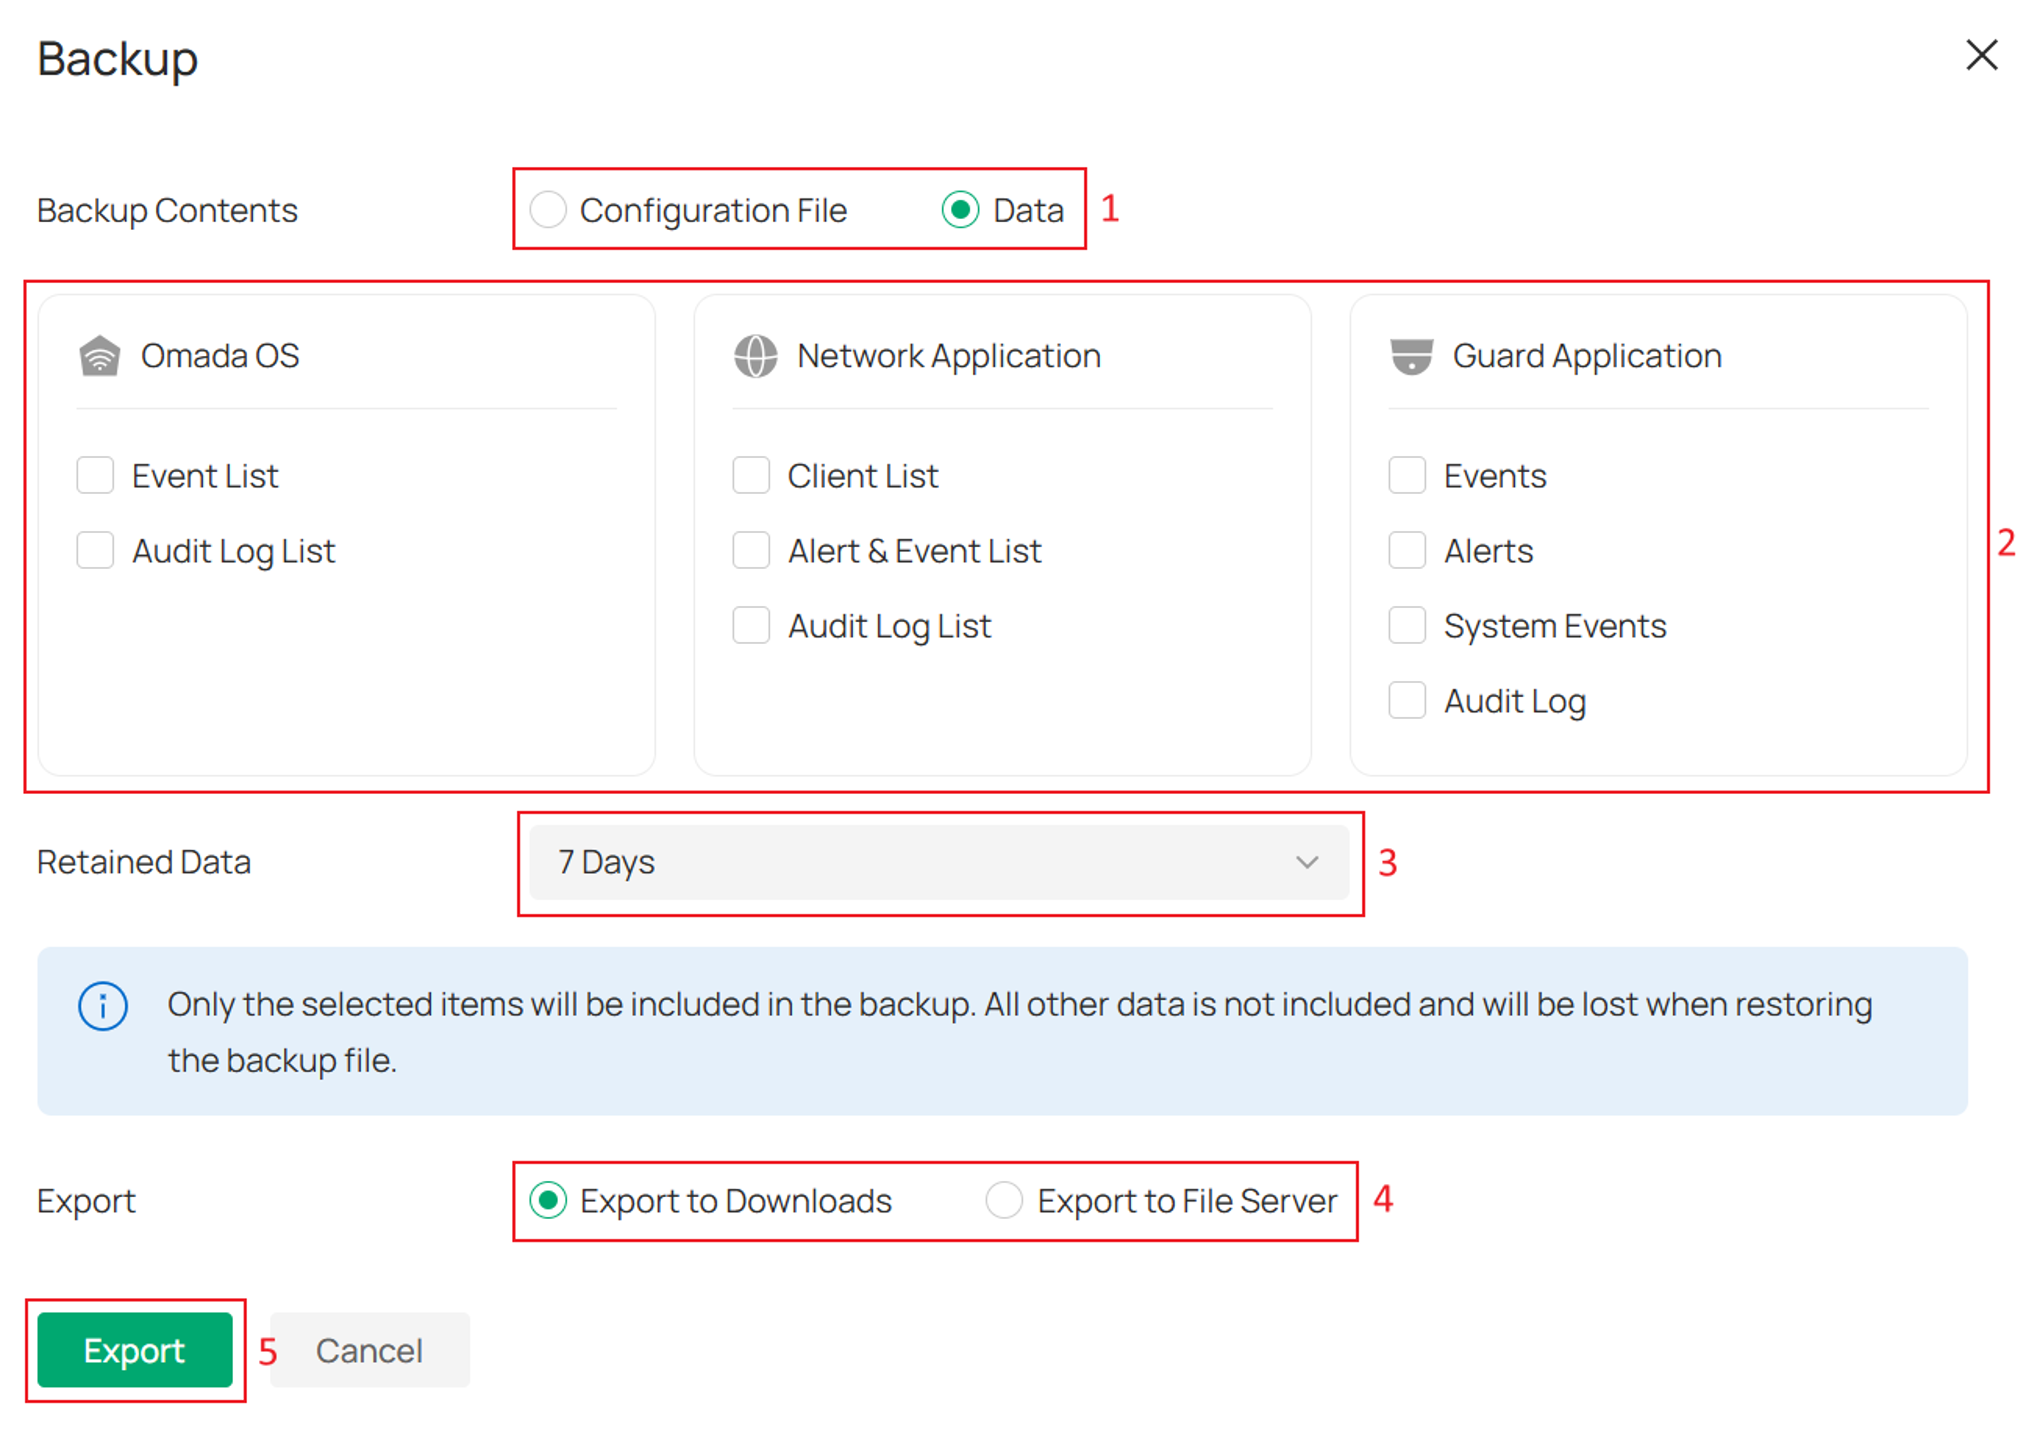
Step 3. Select the configuration file or data categories to be included in the backup.
Depending on your requirements, you can export either a Configuration File or Data.
- Configuration File exports the selected configuration settings as a .cfg file, which can be used for configuration restoration.
- Data exports business data as a compressed package containing related data files. Data and configuration settings are exported separately.
When Configuration File is included in the backup, the following configuration items are available:
Omada OS
- Settings
- User Info
Network Application
- Settings
- Authenticated Clients
- Firmware Update Logs
Guard Application
- Settings
When Data is included in the backup, the following business data can be included:
Omada OS
- Event List
- Audit Log List
Network Application
- Client List
- Alert & Event List
- Audit Log List
Guard Application
- Events
- Alerts
- System Events
- Audit Log
Step 4. Select the data retention period under Retained Data.
The selected retention period determines how much historical data will be included in the backup package. Longer retention periods may result in larger backup file sizes and longer export times.
Step 5. Select an export destination.
Fusion Pro Gateway supports the following export methods:
- Export to Downloads: The backup file is downloaded directly to the management computer.
- Export to File Server: The backup file is exported to a configured file server for centralized storage and management.
Step 6. Click Export to start the backup process.
After the export is completed successfully, the backup file can be used later to restore system configurations and supported business data on a compatible Fusion Pro Gateway device of the same model.
Restore a Backup
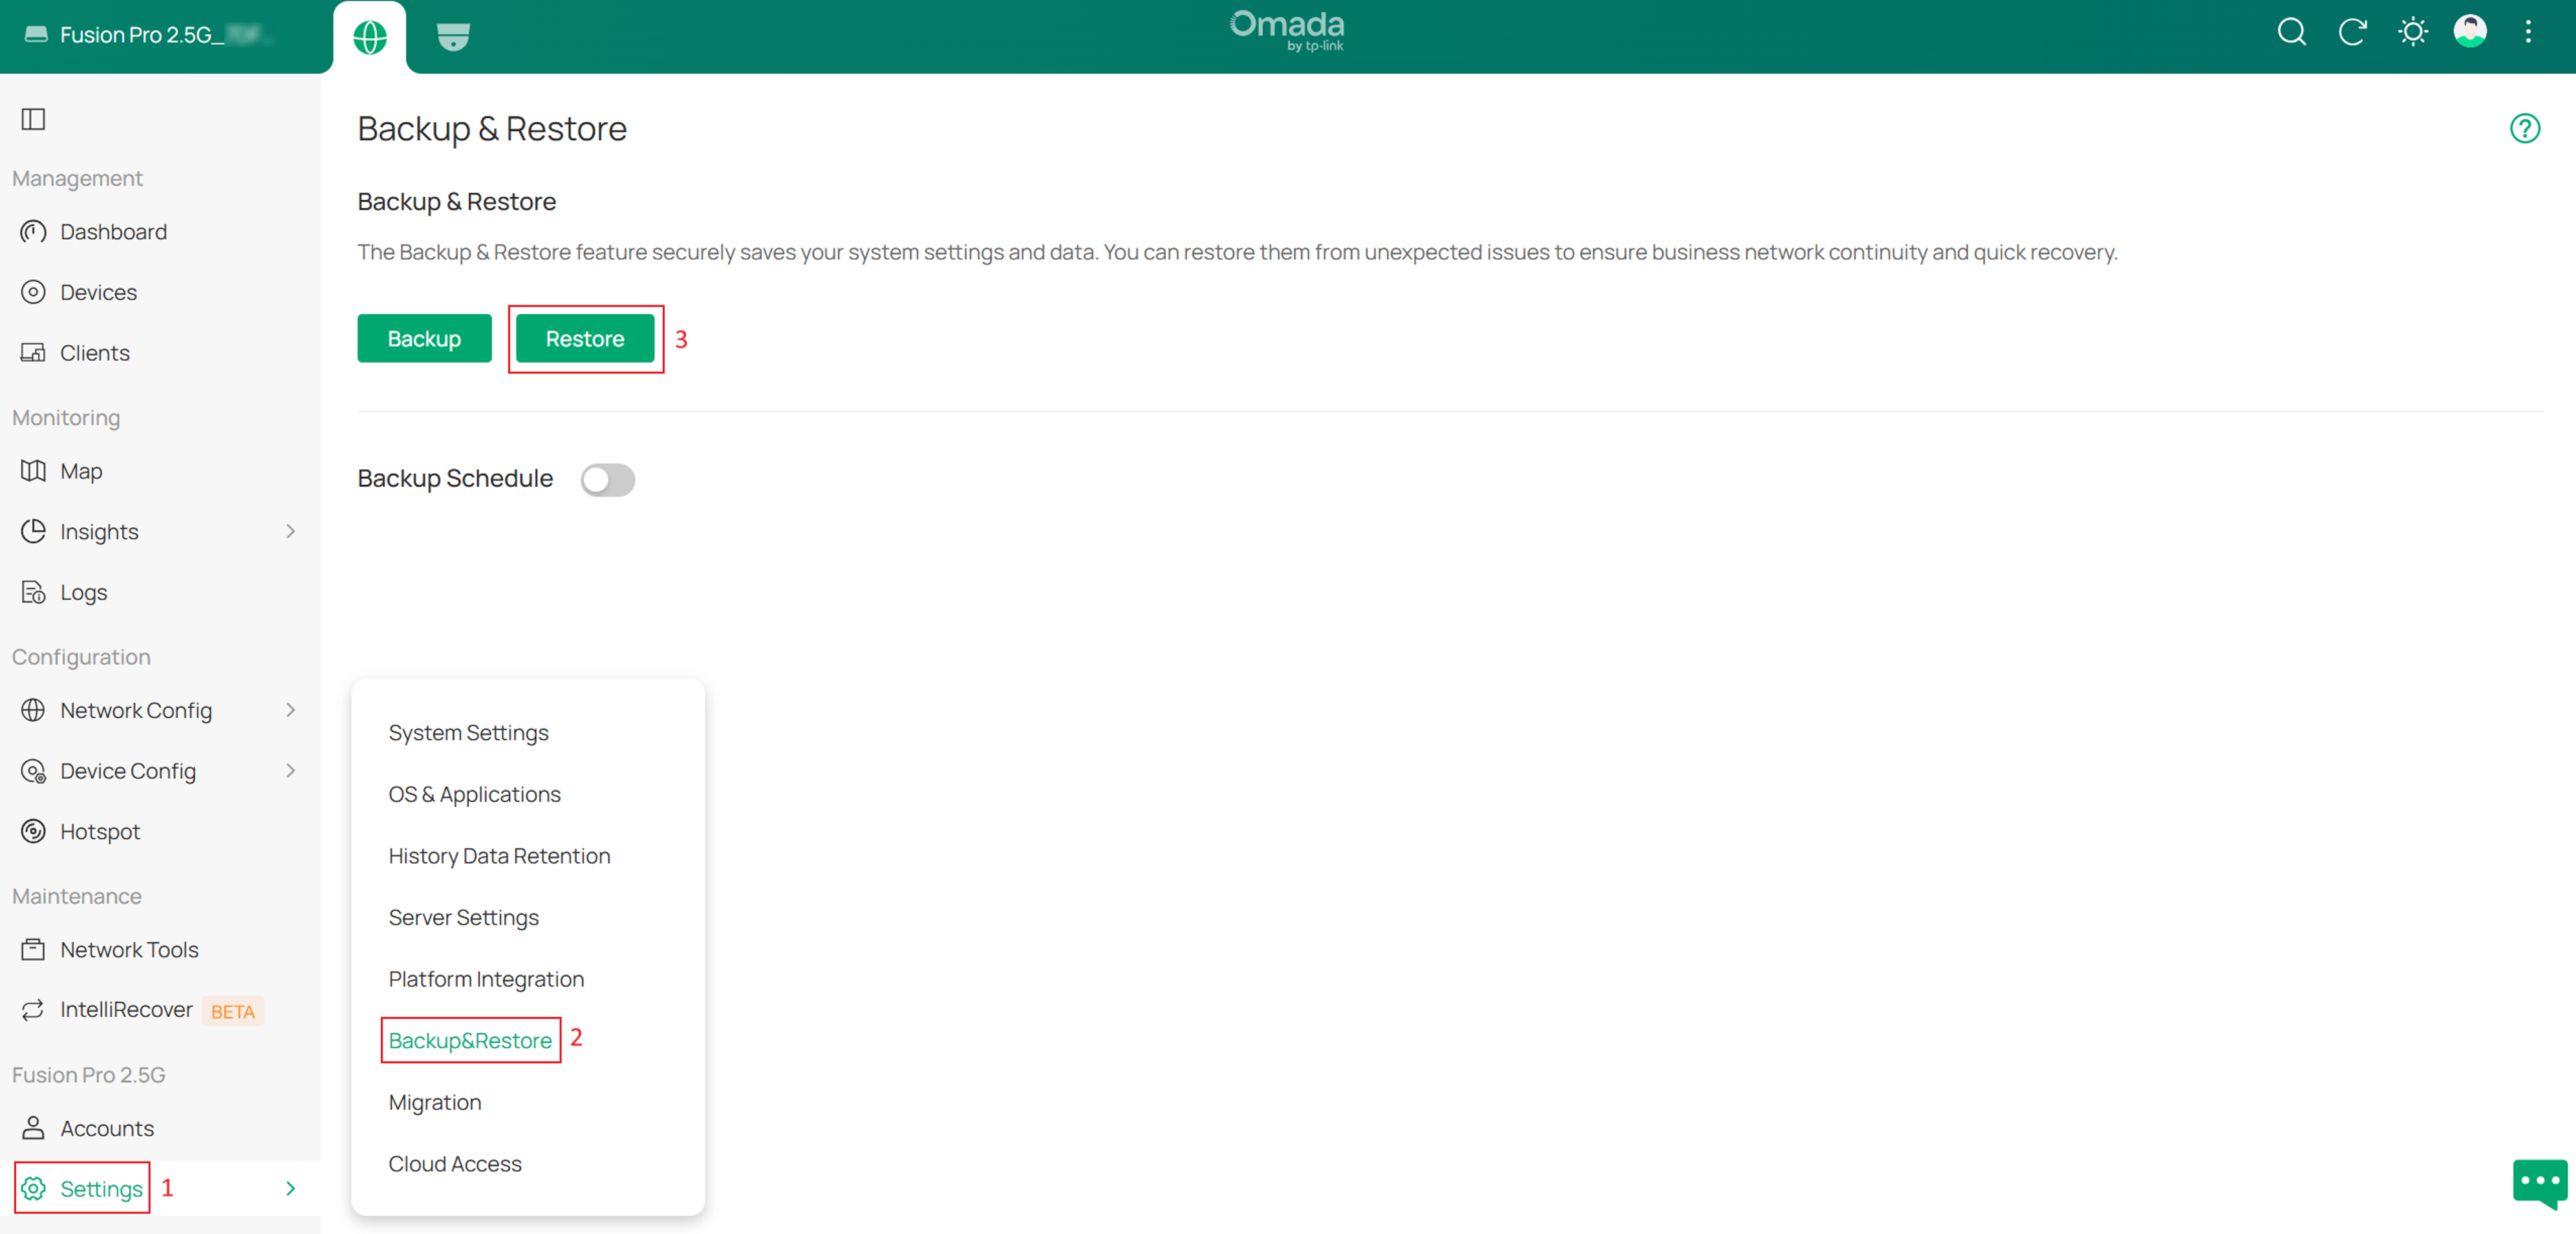
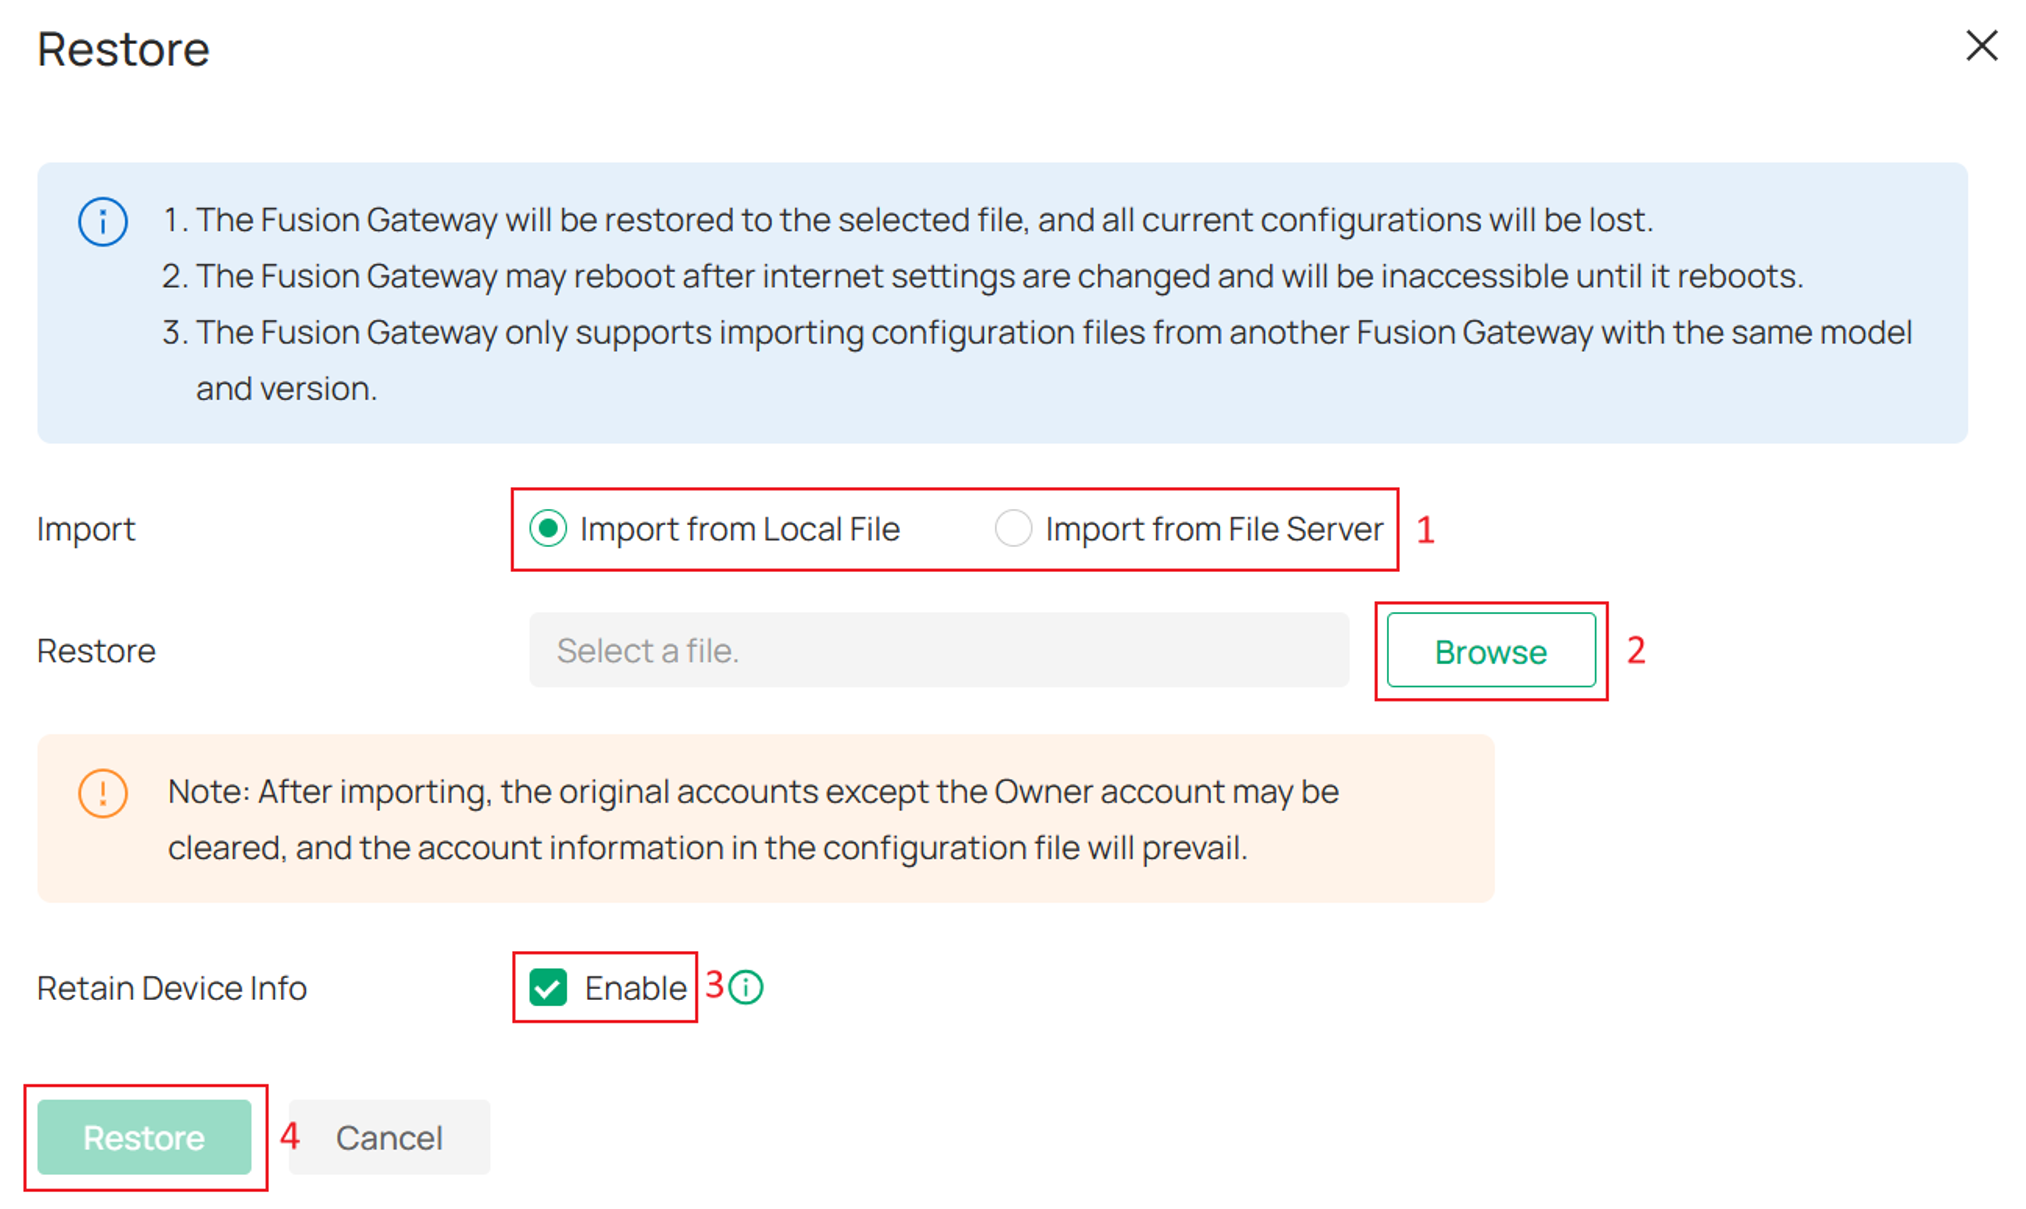
Step 1. Navigate to Settings > Backup & Restore, then click Restore.
Step 2. Choose the source of the backup file.
You can import a backup file from either of the following locations:
- Import from Local File: Upload a backup file stored on your local device.
- Import from File Server: Import a backup file from a configured file server.
After selecting the import source, click Browse and select the backup file to be restored.
Note: The Omada Fusion Pro Gateway only supports restoring backup files created from the same Omada Fusion Pro Gateway model.
Step 3. (Optional) Enable Retain Device Info if you want to restore device information stored in the backup file.
When Retain Device Info is enabled, device entries and supported device configurations stored in the backup file will be restored. If this option is disabled, only system and application settings will be restored.
After the restoration is completed, devices that can communicate with the Fusion Gateway normally will be automatically adopted. Otherwise, they will remain offline until connectivity is restored.
The Retain Device Info option supports directly managed IPCs and NVRs only. IPCs managed through an NVR are not included.
Step 4. Click Restore to start the restoration process.
During restoration:
- The current configuration on the Fusion Gateway will be replaced by the configuration contained in the backup file.
- Existing account information, except for the Owner account, will be overwritten by the account information stored in the backup file.
- The gateway may automatically reboot after the restoration is completed.
Step 5. Wait for the restoration process to complete.
If the restoration is successful, the Fusion Gateway will restart and load the restored configuration. Once the gateway comes back online, verify that the required services, devices, and settings have been recovered correctly.
Configure a Backup Schedule
Backup Schedule allows Fusion Pro Gateway to automatically create backup files at specified intervals, helping administrators maintain regular backups without manual intervention.
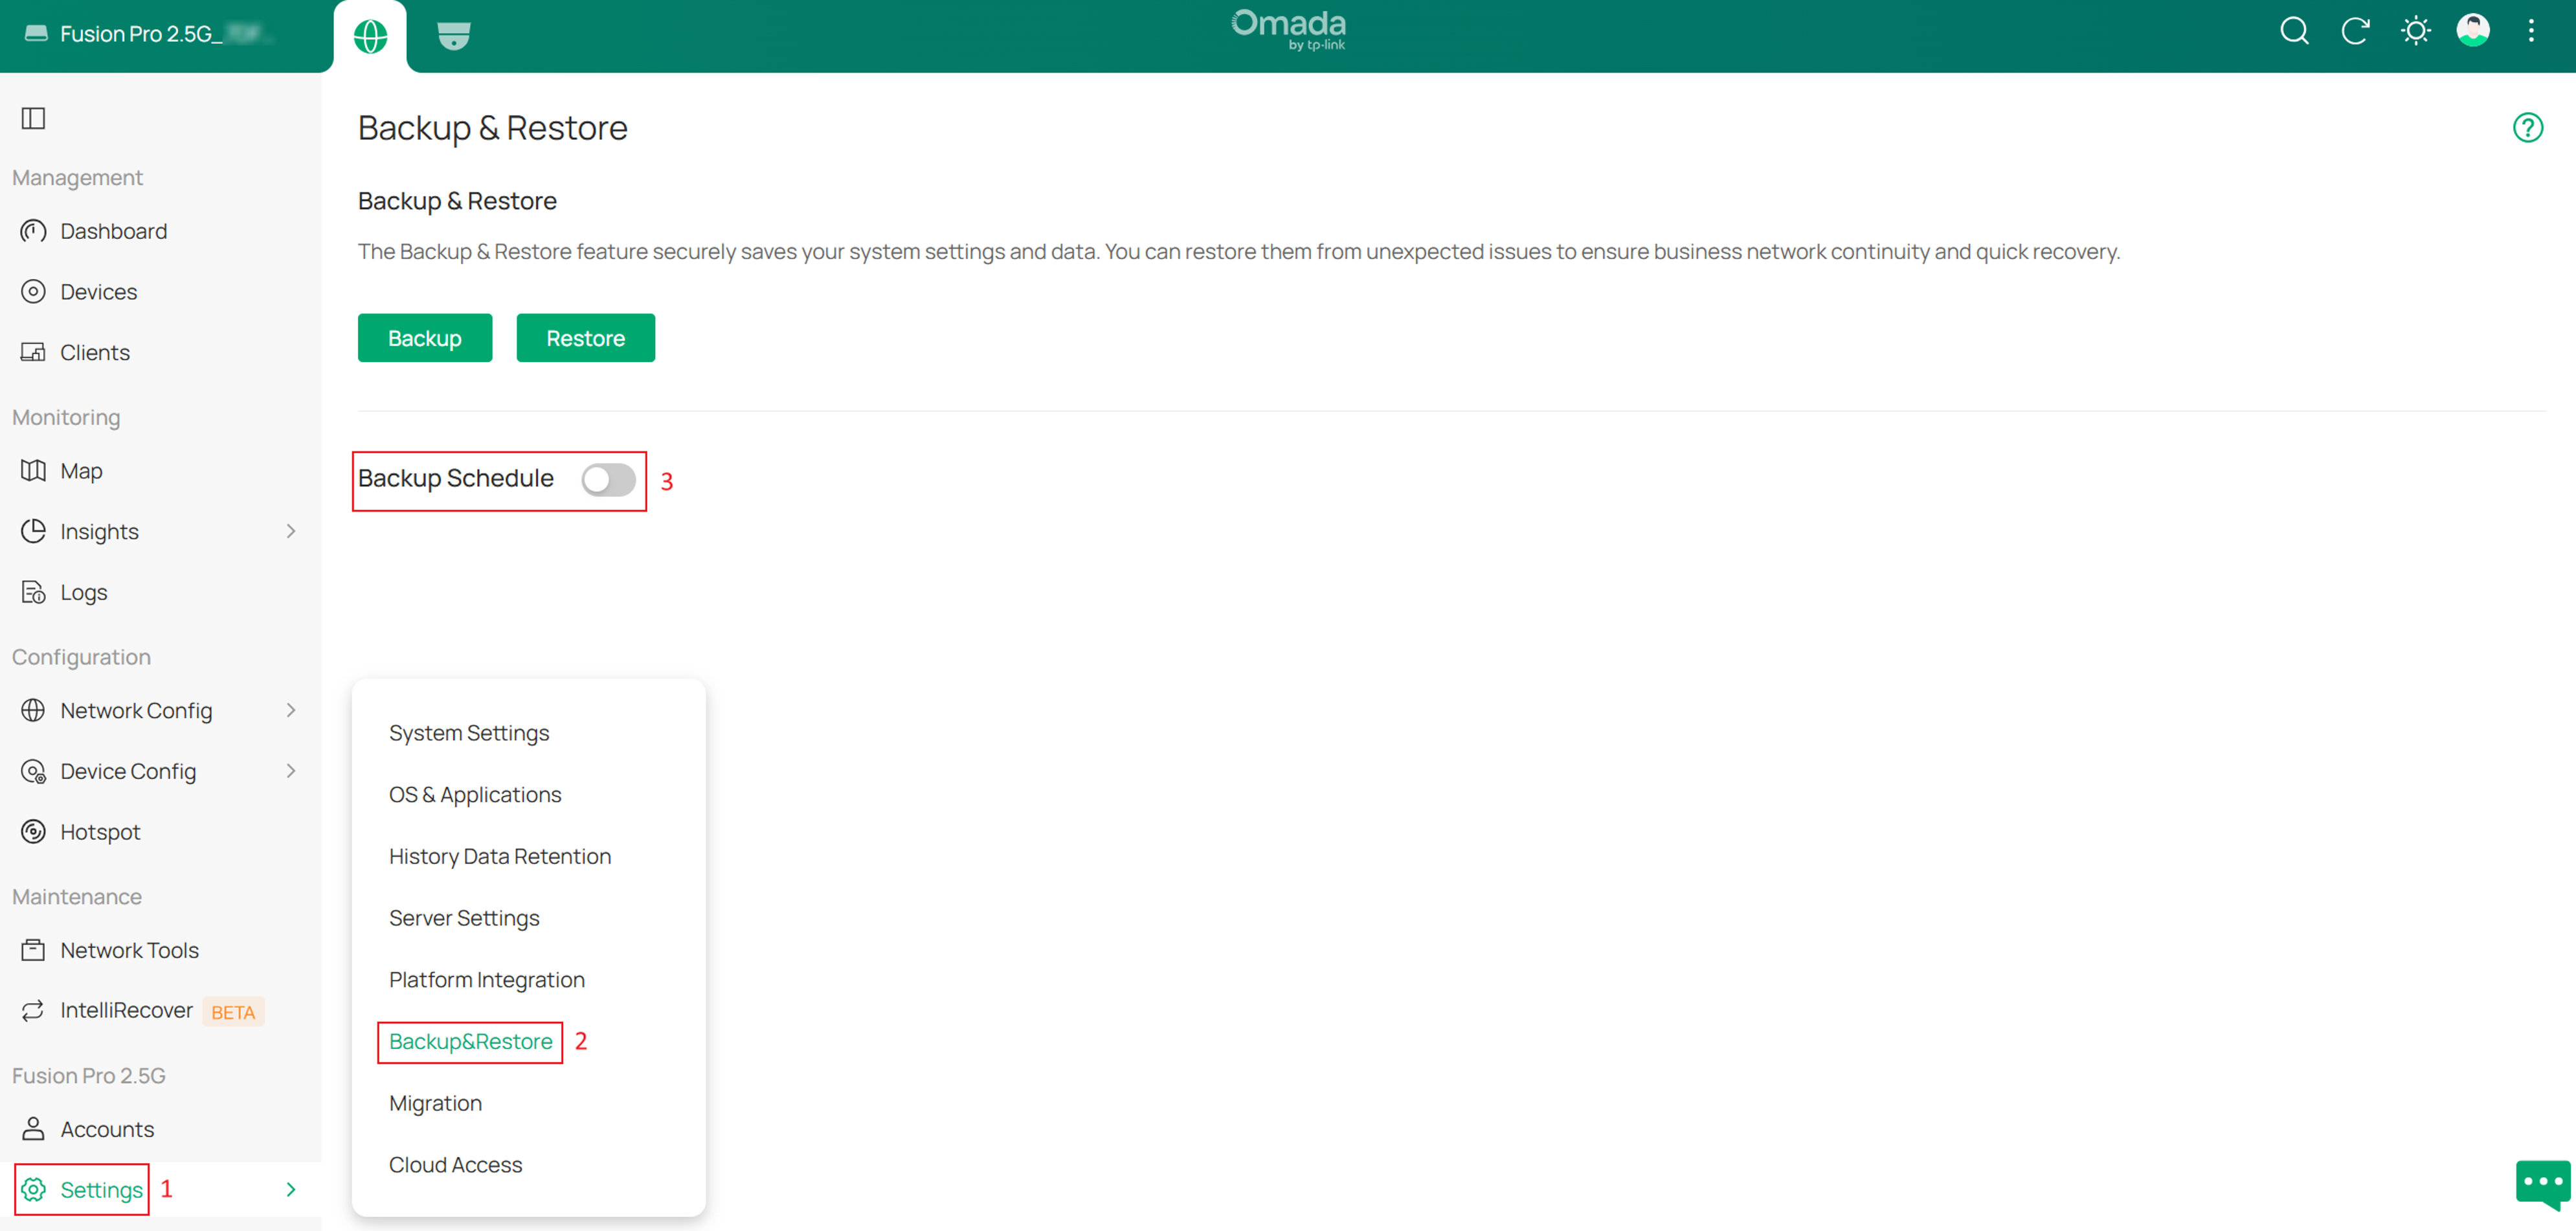
Step 1. Navigate to Settings > Backup & Restore, enable Backup Schedule, and configure the schedule settings.
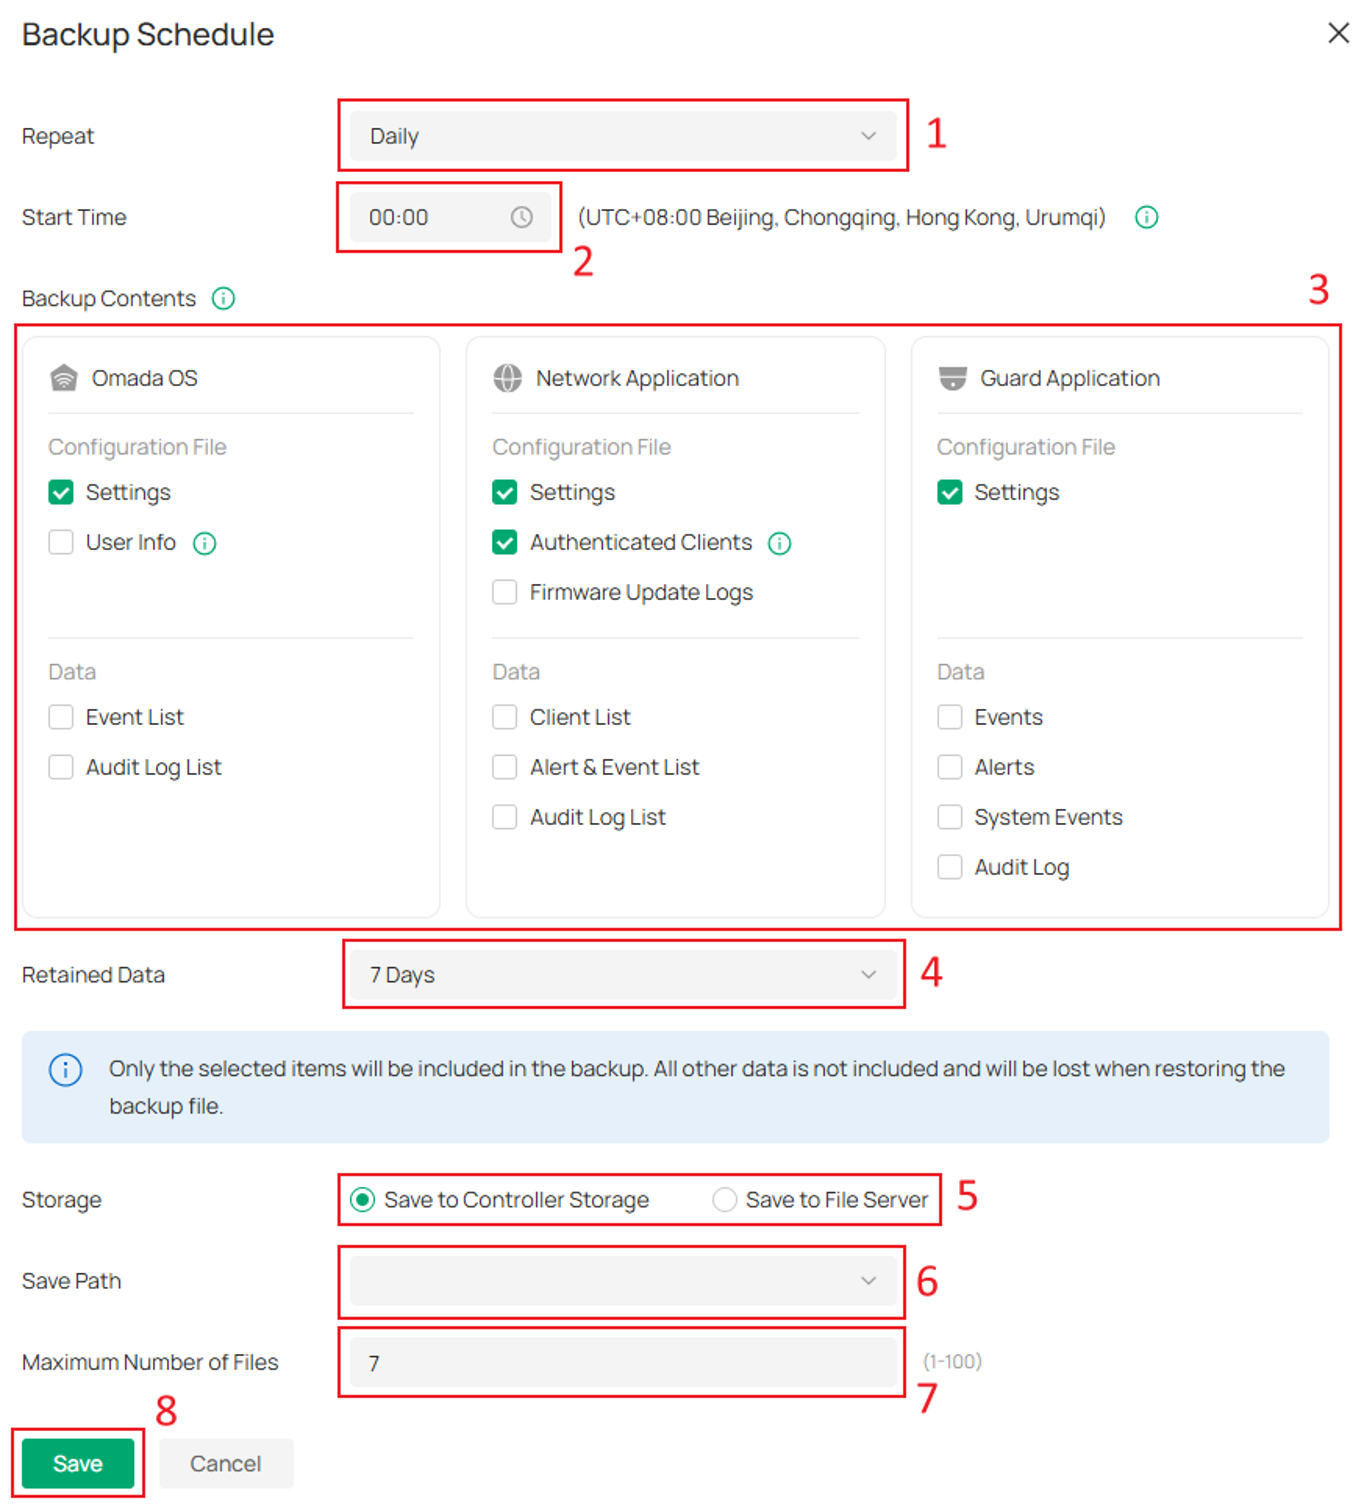
Step 2. Select the backup frequency under Repeat and specify the Start Time.
Fusion Pro Gateway can automatically execute backup tasks based on the configured schedule. The backup task will run at the specified time according to the device time zone.
Step 3. Select the backup contents and retained data period.
Configure the backup contents and the Retained Data period according to your requirements. The available backup contents, data categories, and retention period settings are the same as those described in the Create a Backup section. You can include configuration settings and business data from Omada OS, Network Application, and Guard Application in the scheduled backup.
Step 4. Select the backup storage location.
The following storage options are available:
- Save to Controller Storage: Backup files are stored locally on the Fusion Pro Gateway.
- Save to File Server: Backup files are automatically exported to a configured file server for centralized storage and management.
If Save to File Server is selected, specify the destination path under Save Path.
Step 5. Set the backup file retention limit.
Specify the maximum number of backup files that the system can retain.
When the retention limit is reached, the oldest backup files are automatically deleted to make room for newly generated backups.
For example, if the retention limit is set to 7, the system retains only the seven most recent backup files.
Step 6. Click Save to apply the backup schedule.
After the configuration is completed, Fusion Pro Gateway will automatically generate backup files according to the configured schedule.
Note: Scheduled backups support the same backup scope and restoration limitations as manual backups. Backup files can only be restored to the same Fusion Pro Gateway model. Cross-model restoration is not supported.
Guard Backup Content
The previous sections describe how to create and restore backup files. Although Guard Application can be included in a backup, not all Guard settings and data are supported.
This section describes the Guard settings and business data that can be backed up and restored.
Guard Settings Included in Backup
- Video: Supports backup and restoration of public view configurations. Recorded video files are not included in backup files.
- Device: Supports backup and restoration of the management status of directly adopted IPCs and NVRs (when Retain Device Info is enabled during restoration), as well as device configuration settings supported by the device offline configuration features. IPCs managed by an NVR are not supported.
- Event: Supports restoration of event notification rules. event notification rules can only be restored when user information from Omada OS is restored together with the backup.
- Recording: Supports backup and restoration of recording configuration, recording schedules and device recording settings.
- Log: Supports backup and restoration of Alert > Content Settings.
Guard Data Included in Backup
Guard also supports backup and restoration of the following business data:
- Event: Event entries.
- Log: Alert entries, System Event entries, and Audit Log entries.
Conclusion
You have now successfully learned how to create, schedule, and restore backups on Omada Fusion Pro Gateway.
By using the Backup & Restore feature, administrators can preserve system configurations and selected business data from Omada OS, Network Application, and Guard Application. Regular backups help simplify system maintenance, minimize downtime, reduce recovery time after configuration issues, and improve business continuity.
To learn more about each function and configuration, please visit Support Home to download or check the manual for your product.
QA
Q1: Can I restore a backup file to a different Fusion Pro Gateway model?
A1: No. Backup files can only be restored to the same Fusion Pro Gateway model. Restoring a backup file to a different model is not supported.
Q2: Are recorded videos included in the backup file?
A2: No. Backup & Restore only supports selected configuration settings and business data. Recorded video files stored on local storage devices are not included in backup files.
Q3: Can Guard Application be backed up separately?
A3: Yes. Guard Application can be backed up independently or together with Omada OS and Network Application as part of a unified backup and restoration process.
Q4: Why were my Event Notification Rules not restored?
A4: Event Notification Rules can only be restored when User Info from Omada OS is included in the backup and restored together with the Guard configuration.
