


Comment configurer le PPSK avec RADIUS (adresse MAC non liée) pour les réseaux 6 GHz


Contenu
Aperçu du protocole PPSK avec RADIUS (MAC non lié)
Configuration requise pour le serveur RADIUS
Flux de travail du serveur RADIUS
Implémentation du serveur RADIUS
Introduction
Avec l'introduction de la bande 6 GHz (Wi-Fi 6E/7), le protocole WPA3 est désormais requis pour répondre aux normes de sécurité les plus strictes. Le protocole PPSK avec RADIUS offre une solution d'accès plus sécurisée et plus facile à gérer. En attribuant un mot de passe unique à chaque client et en s'appuyant sur une gestion centralisée via un serveur RADIUS, il permet une meilleure isolation des utilisateurs et un contrôle d'accès plus flexible.
Étant donné que les réseaux 6 GHz nécessitent le protocole WPA3, et que WPA3 utilise l'authentification SAE, le point d'accès doit déterminer quelle clé pré-partagée (PSK) est associée au client pendant le processus d'authentification SAE.
Toutefois, lors de la connexion initiale, aucune liaison MAC-PSK n'est encore établie pour le client côté authentification. Par conséquent, l'authentification ne peut pas s'appuyer sur une liaison préétablie et doit être gérée via le processus MAC non lié. Une fois l'authentification réussie, le serveur d'authentification peut alors établir la liaison MAC-PSK du client pour les connexions suivantes.
Cet article décrit comment configurer PPSK avec RADIUS (MAC non lié) pour les réseaux 6 GHz.
Exigences
- Contrôleur Omada v6.2.10 ou version ultérieure
- Points d'accès Omada Wi-Fi 7 prenant en charge la bande de fréquence 6 GHz, avec un firmware entièrement compatible avec le contrôleur Omada v6.2.10 (Voir le tableau des modèles applicables ci-dessous pour les modèles et versions de firmware pris en charge.)
- Clients prenant en charge WPA3
- Un serveur RADIUS prenant en charge le protocole PPSK avec RADIUS (MAC non lié) pour les réseaux 6 GHz
(Pour plus de détails, reportez-vous à la section « Préparation du serveur RADIUS ».)
Modèles applicables
|
Modèle |
Version matérielle |
Version du firmware |
|
EAP775-Mur |
1,0 / 1,6 |
1.5.1 Build 20260415 Rel. 64731 |
|
EAP770 |
2.0 / 2.6 / 2.8 |
1.5.1 Build 20260415 Rel. 64731 |
|
EAP772 - Extérieur |
1,0 / 1,6 |
1.5.1 Build 20260415 Rel. 64731 |
|
EAP772 |
2.0 / 2.6 |
1.5.1 Build 20260415 Rel. 64731 |
|
EAP787 |
1,0 / 1,6 |
1.5.1 Build 20260415 Rel. 64731 |
|
AP9778 |
1.0 |
Prochainement disponible |
Aperçu du protocole PPSK avec RADIUS (MAC non lié)
Sur les réseaux 6 GHz (Wi-Fi 6E/7), le protocole WPA3 est requis pour garantir un niveau de sécurité plus élevé. Dans ce cas, lors de l'attribution de mots de passe Wi-Fi uniques (PPSK) à différents utilisateurs et de l'activation de la gestion centralisée, l'authentification doit être effectuée via un serveur RADIUS.
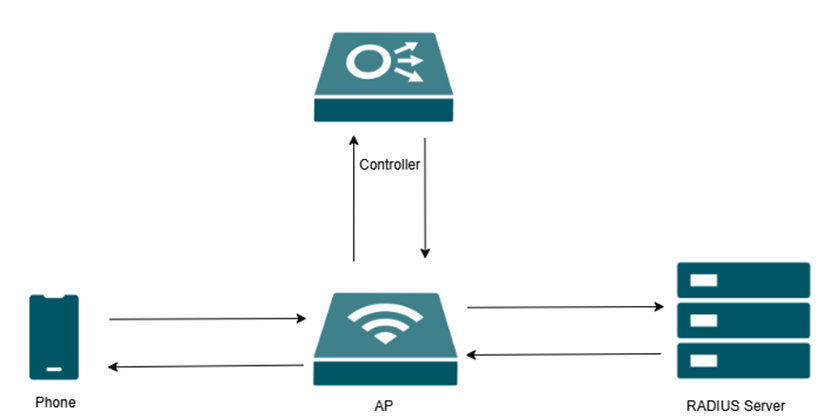
Comme illustré, les administrateurs configurent le SSID et les fonctionnalités associées sur le contrôleur. Le point d'accès (PA) transmet les requêtes d'authentification des clients au serveur RADIUS, qui stocke les informations relatives à la clé PPSK et effectue la vérification des identifiants. Une fois l'authentification réussie, le serveur RADIUS renvoie les informations de clé requises au PA.
Le protocole PPSK avec RADIUS (adresse MAC non liée) permet aux clients de s'authentifier initialement sans avoir à lier préalablement leur adresse MAC. Lorsqu'un client se connecte au réseau sans fil et saisit un mot de passe, le point d'accès transmet la requête d'authentification au serveur RADIUS, où le mot de passe est vérifié et authentifié.
Après une authentification réussie, le système associe automatiquement l'adresse MAC du client à la clé PPSK correspondante pour les connexions suivantes, améliorant ainsi l'efficacité d'accès tout en maintenant la sécurité.
Préparation du serveur RADIUS
Configuration requise pour le serveur RADIUS
1. Recherche MAC non liée
- Le point d'accès enverra des messages RADIUS Access-Request, identiques au processus WPA2 PPSK Unbound.
- The server must be able to:
- Match the correct PSK
- Return Access-Accept messages containing the PMK, which will be sent back to the AP as required
2. Establishing MAC and PSK bindings
- Upon completion of the Unbound MAC query process:
- The server must automatically create bindings between MAC addresses and PSKs
- These bindings are used to handle subsequent Bound MAC queries
3. Bound MAC lookup
- The AP will send RADIUS Access-Request messages, which are identical to the WPA2 PPSK Bound MAC query process
- When the server finds a matching entry, it must:
- Return the correct PSK via the Tunnel-Password attribute
4. Implementation considerations (for open-source RADIUS)
- Some RADIUS servers (e.g., FreeRADIUS) do not natively support Unbound MAC lookup
- Additional development may be required to:
- Support Unbound MAC authentication
- Implement MAC–PSK binding logic
- Integrate database-based lookup mechanisms
Note: Commercial solutions such as RG Nets and Roaming IQ have been verified to meet these requirements. Open-source solutions may require customization.
RADIUS Server Workflow
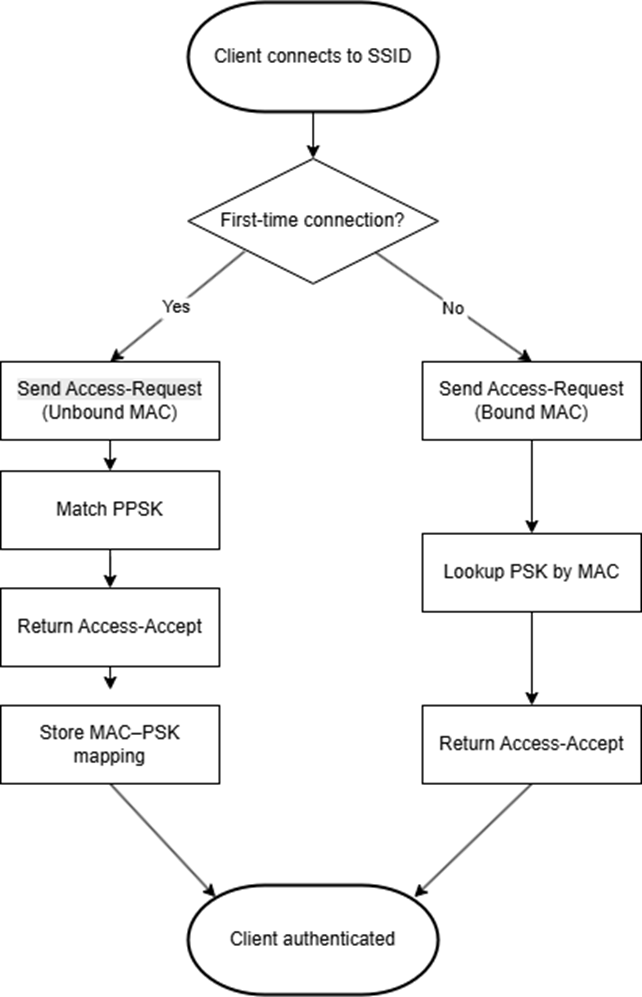
The following workflow applies to all RADIUS servers supporting PPSK with RADIUS (Unbound MAC).
I. When a client connects to the SSID for the first time, the AP sends an Access-Request (Unbound MAC) to the RADIUS server.
II. The RADIUS server matches the PPSK and returns an Access-Accept response.
III. After successful authentication, the RADIUS server establishes a binding between the client MAC address and the PPSK.
IV. For subsequent connections, the AP sends an Access-Request (Bound MAC), and the RADIUS server retrieves the corresponding PSK based on the stored MAC–PSK mapping to complete authentication.
RADIUS Server Implementation
The implementation approach depends on whether the RADIUS server natively supports Unbound MAC authentication.
I. Servers with Native Support (e.g., RG Nets & Roaming IQ)
For RADIUS servers with native support:
• Unbound MAC authentication is supported out of the box
• PPSK matching and MAC–PSK binding are handled internally
No additional customization is required.
II. Servers Requiring Customization (e.g., FreeRADIUS)
For RADIUS servers without native support, additional customization is required to implement the workflow described above:
- Unbound MAC authentication must be implemented to allow PPSK-based matching during the first connection.
- PPSK matching typically relies on external logic, such as scripts or database integration.
- MAC–PSK binding must be established after successful authentication to support subsequent connections.
- Subsequent authentication is performed based on database lookup using the client MAC address.
Configuration
Step 1. Configure the RADIUS Profile
After the APs are managed by the Omada Controller, launch the Site and enter the site view. Go to: Configuration > Network Config > Profile > RADIUS Profile. Click Create New RADIUS Profile to create a profile bound to the RADIUS server. If needed, Enable VLAN Assignment for Wireless Network.
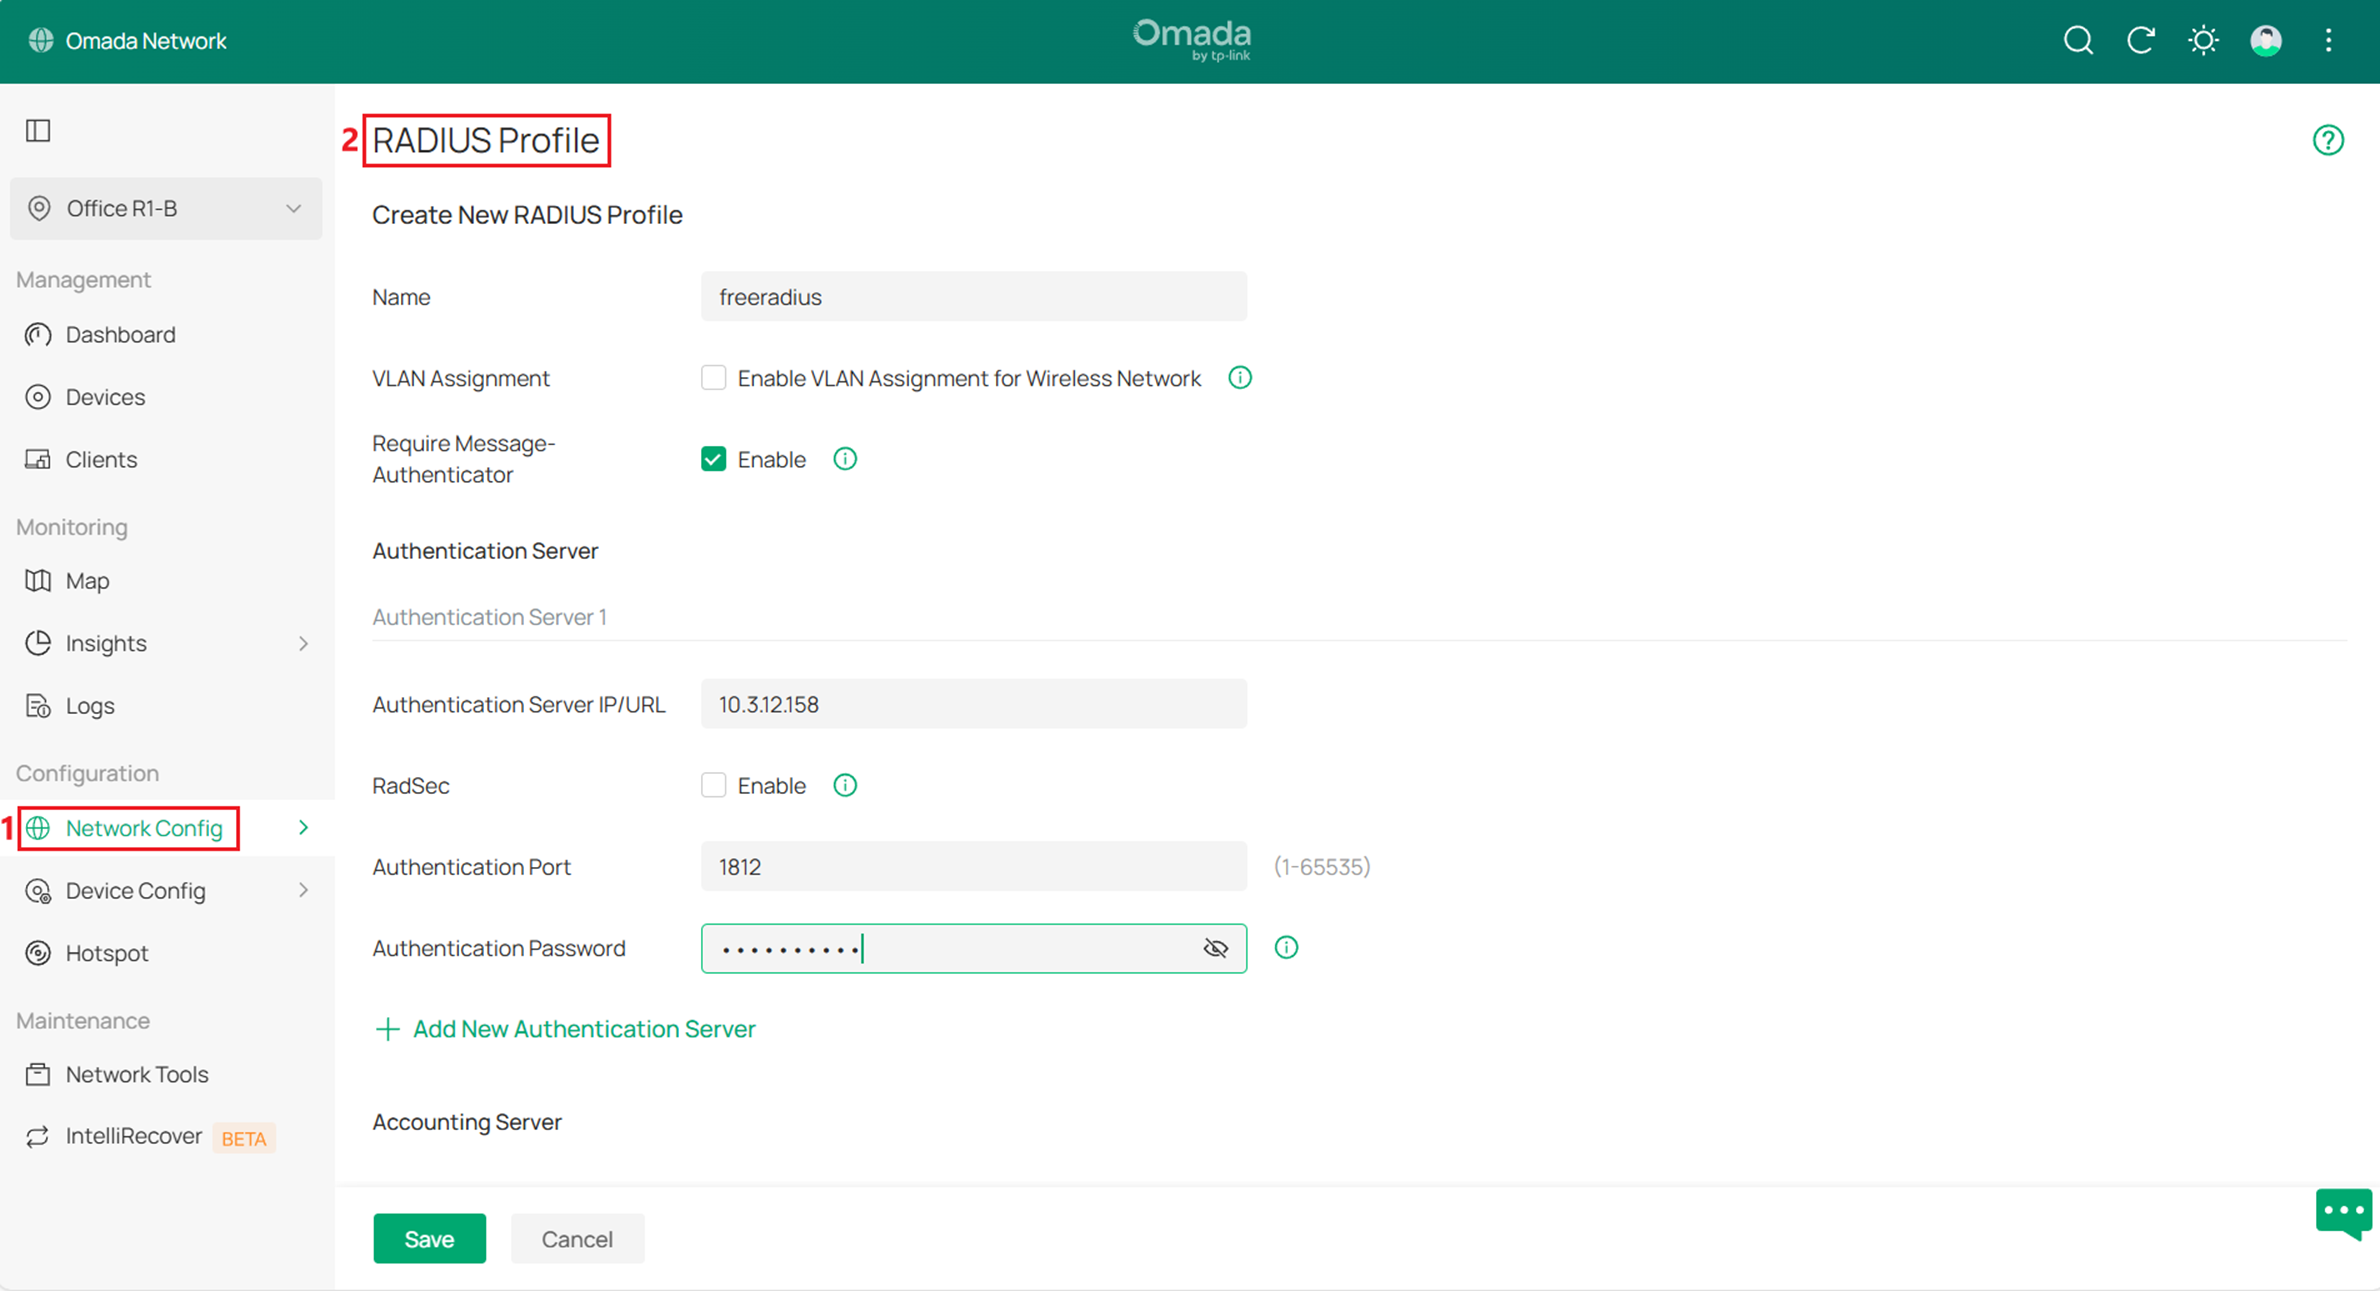
Note: Ensure the RADIUS server settings (IP address, authentication port, and Authentication Password) are consistent with the server configuration.
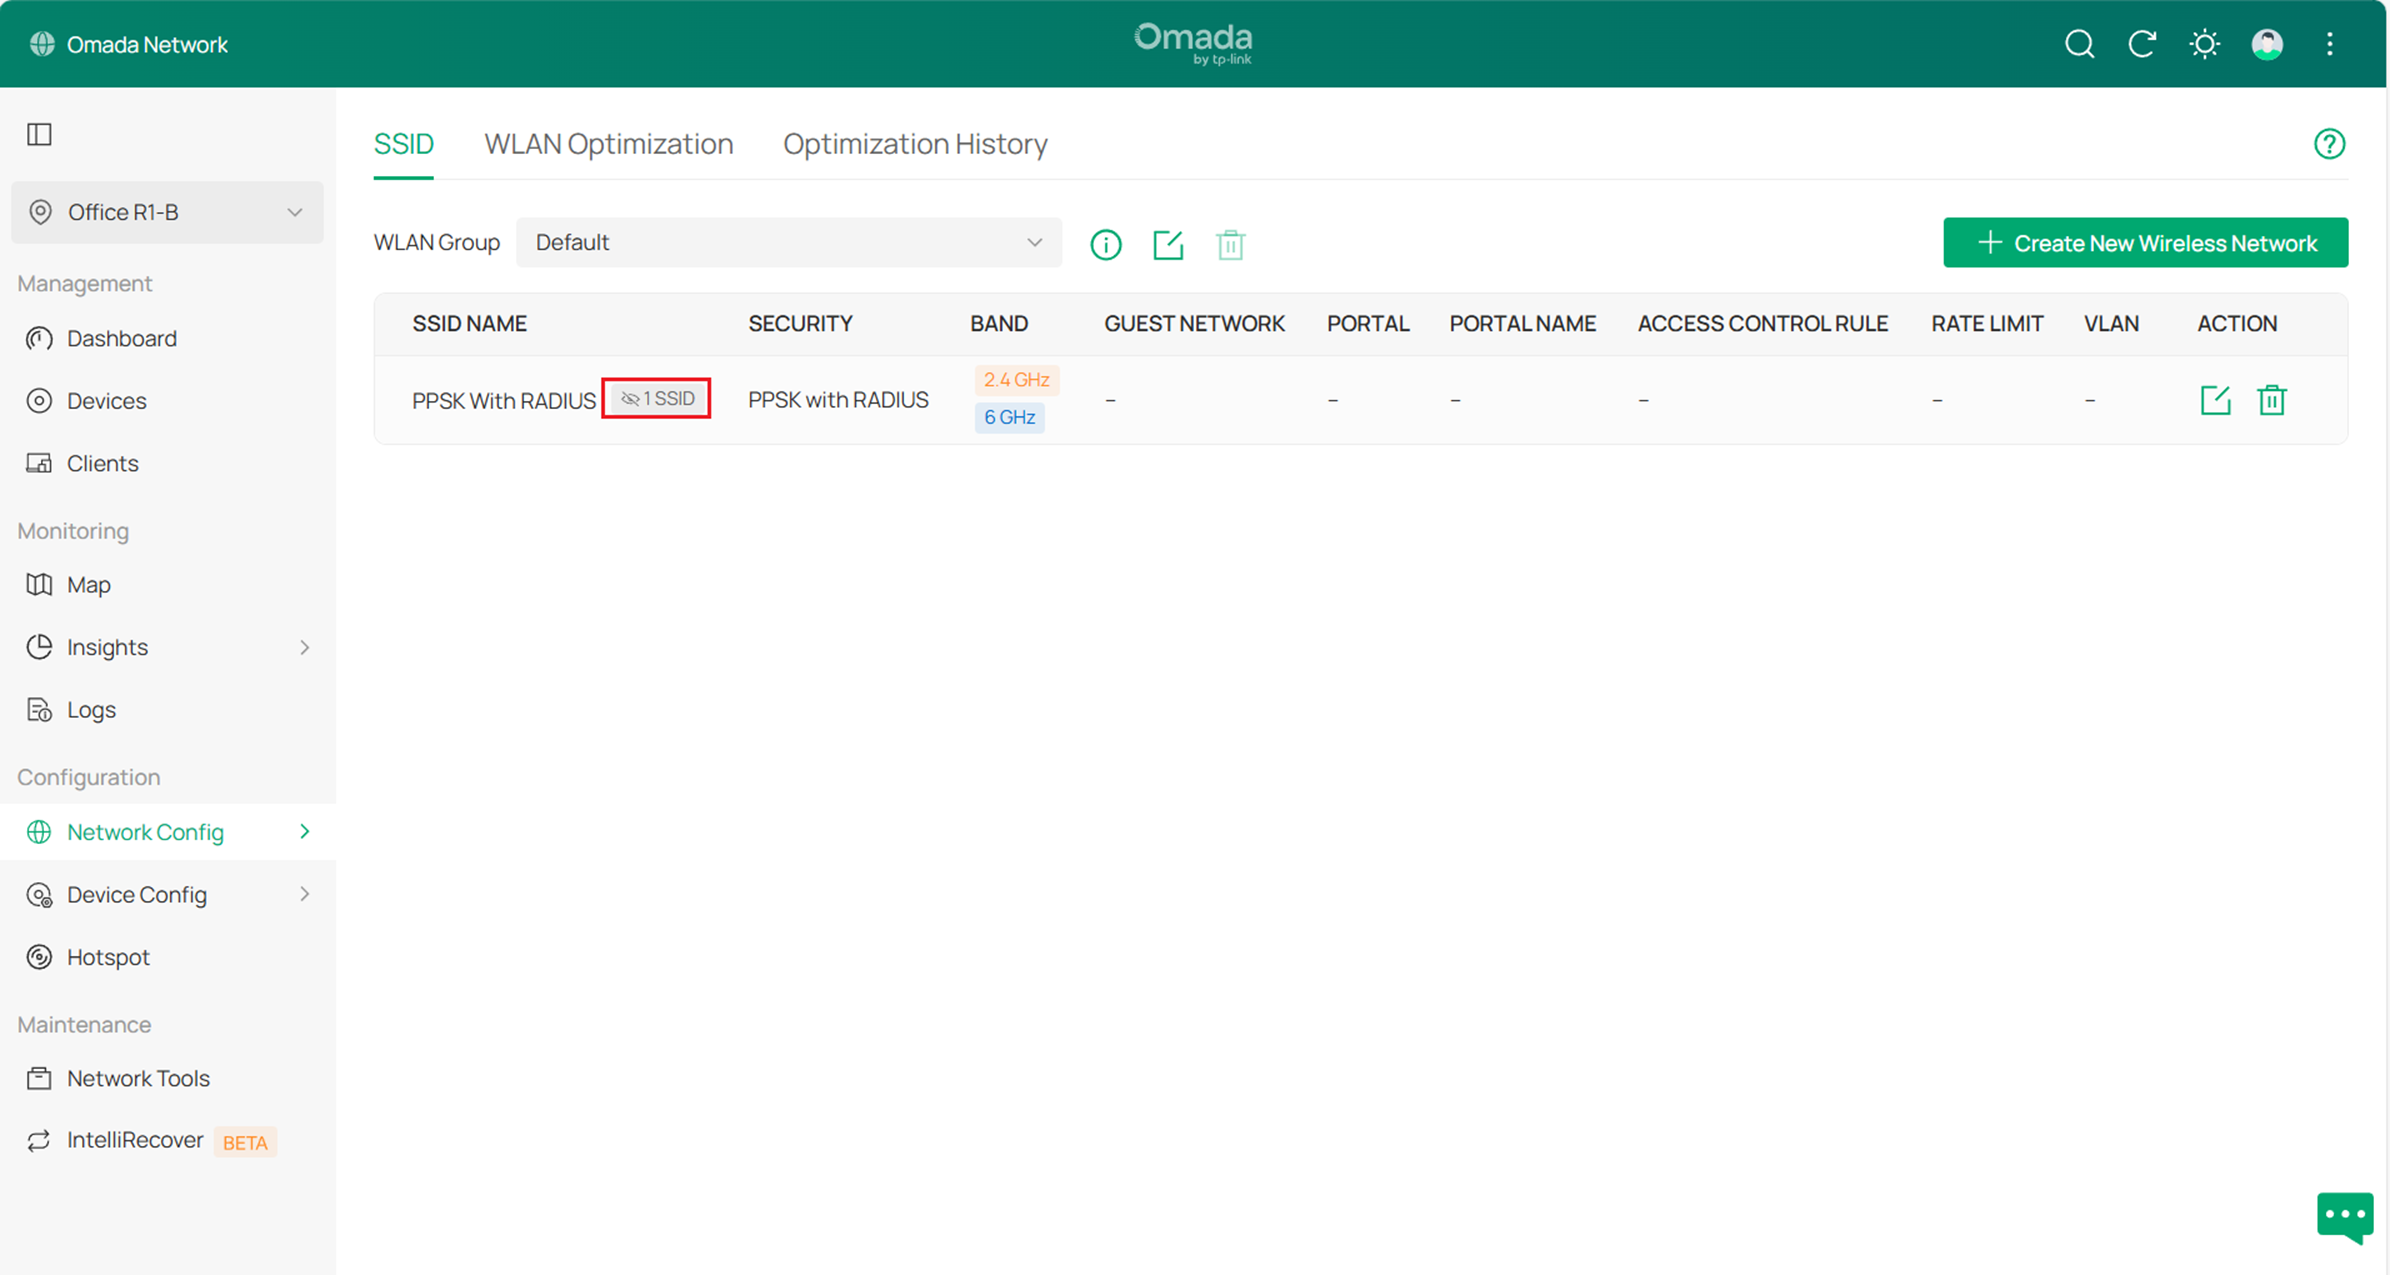
Step 2. Create the Wireless Network. Go to: Configuration > Network Config > Network Settings > WLAN, Click Create New Wireless Network to create a new SSID. Configure the SSID name, select the required bands (e.g., 2.4 GHz + 6 GHz, 5 GHz + 6 GHz, or 2.4 GHz + 5 GHz + 6 GHz), choose PPSK with RADIUS as the security mode, and select the RADIUS profile configured in Step 1, and the Authentication type is set to Generic RADIUS with unbound MAC. Configure other settings as needed, then click Apply to save the settings.
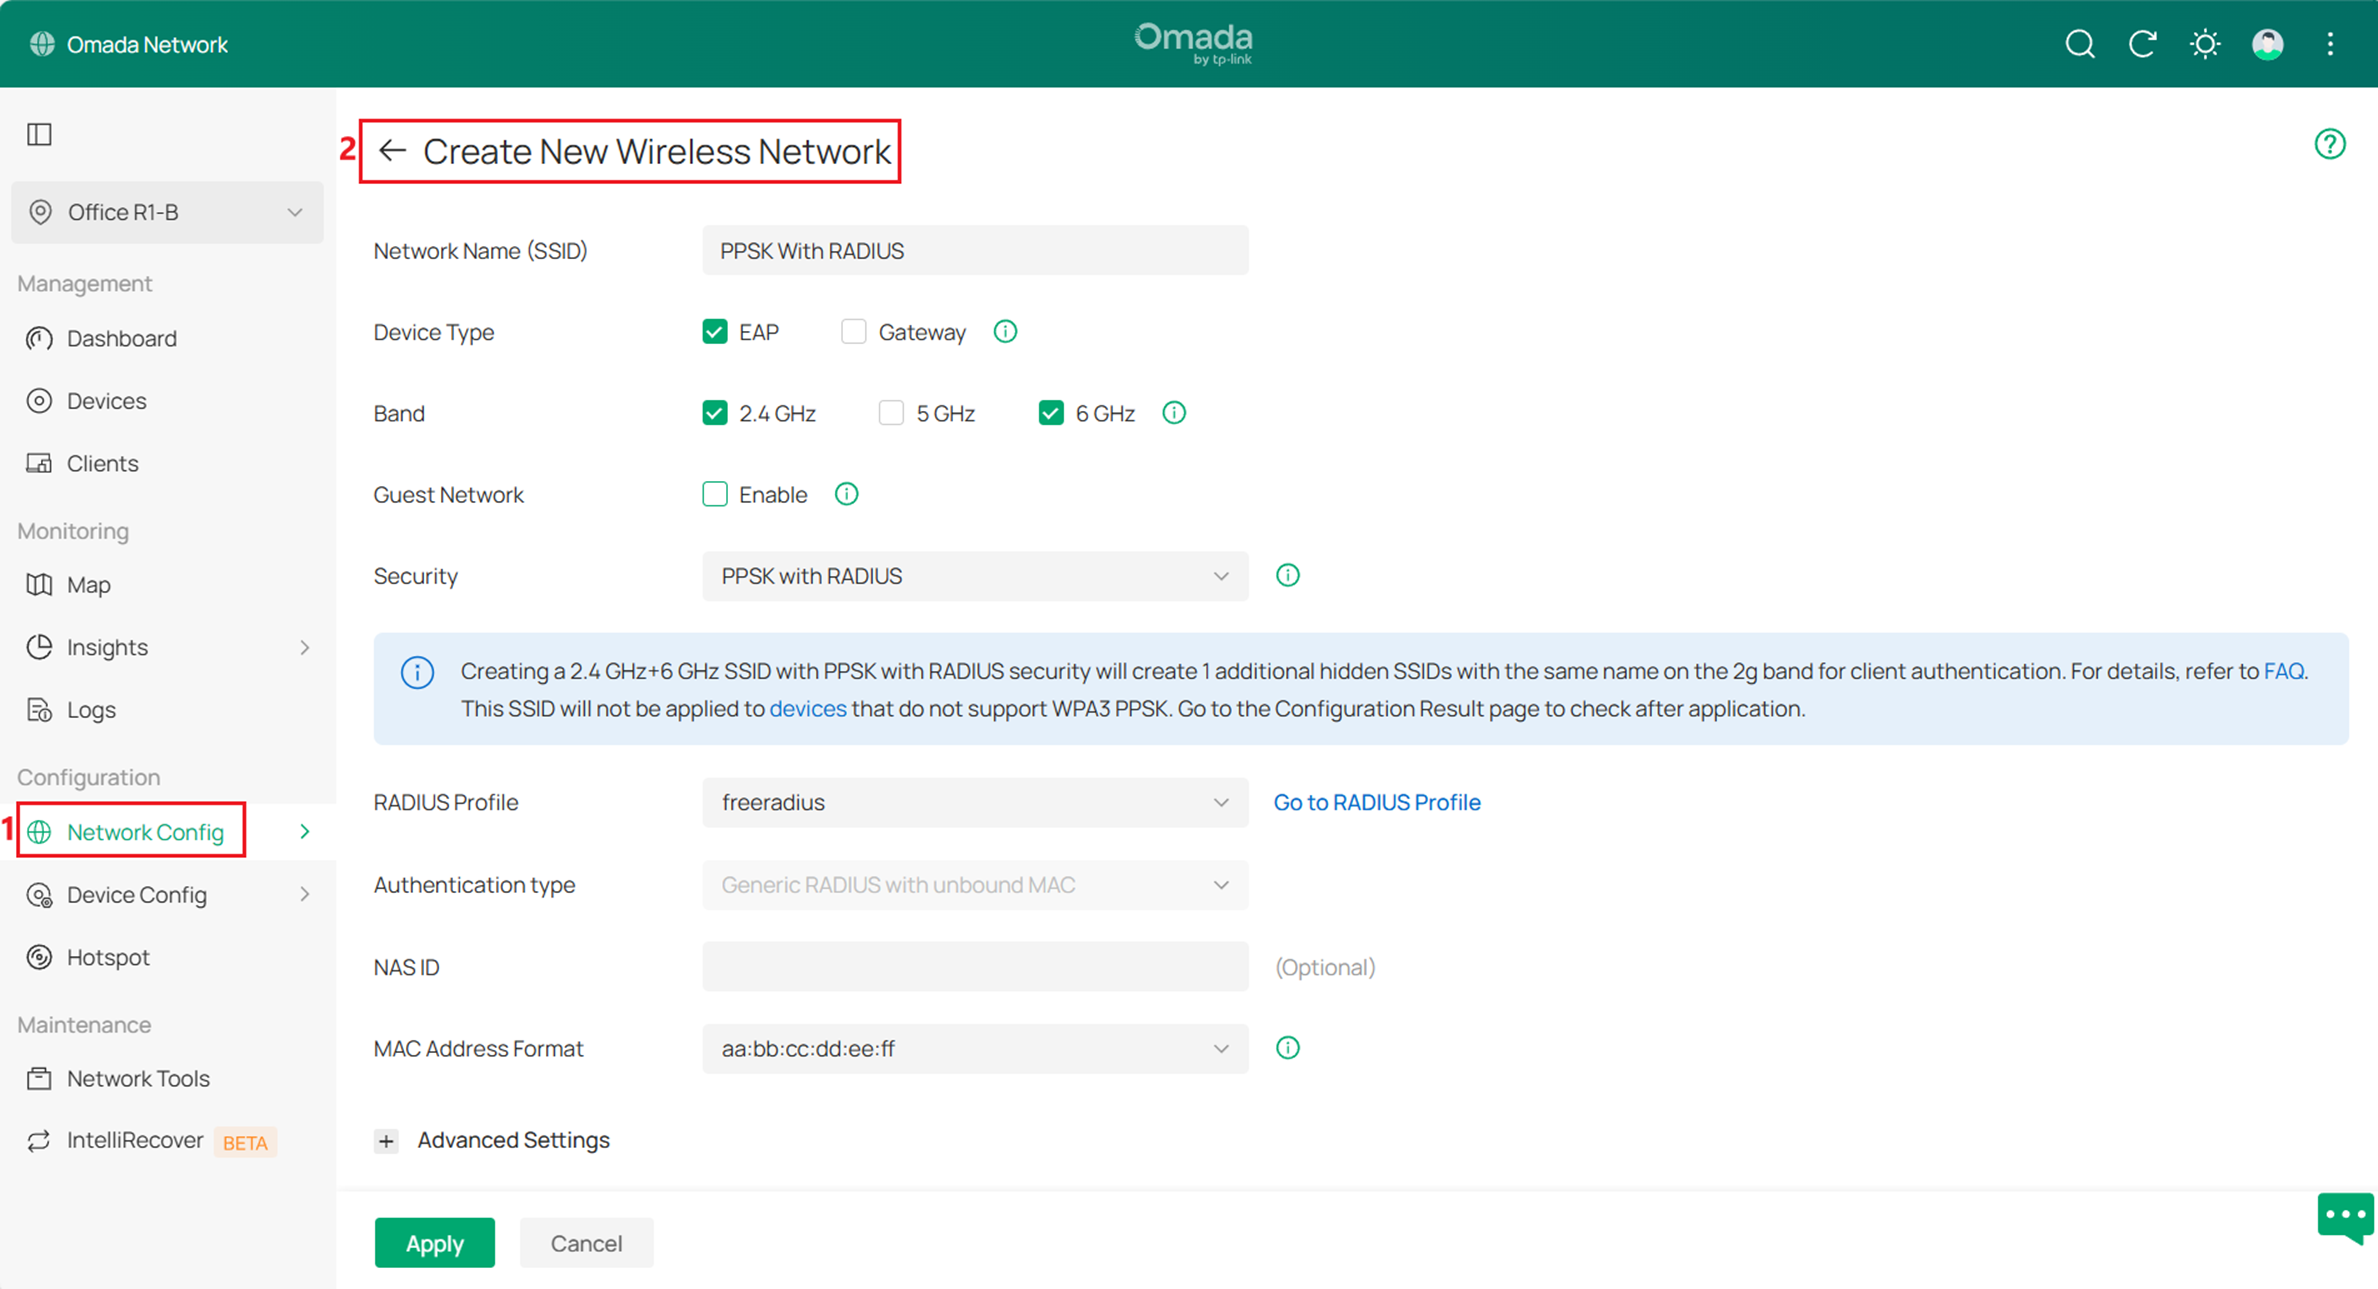
Note: Feature Limitations for 6 GHz PPSK SSID
I. The 802.11r option is not supported for 6 GHz PPSK SSIDs. This is because 6 GHz PPSK operates based on PPSK with RADIUS (Unbound MAC), which may introduce compatibility issues in RADIUS attribute handling when 802.11r is enabled.
II. The MLO option is not supported for 6 GHz PPSK SSIDs. MLO requires consistent security configurations across frequency bands, which is not applicable in this scenario.
When creating a multi-band SSID (including 6 GHz) with PPSK with RADIUS security, the system automatically creates additional hidden SSIDs on non-6 GHz bands for client authentication.
- 2.4 GHz + 6 GHz: one hidden SSID is created on the 2.4 GHz band
- 5 GHz + 6 GHz: one hidden SSID is created on the 5 GHz band
- 2.4 GHz + 5 GHz + 6 GHz: hidden SSIDs are created on both the 2.4 GHz and 5 GHz bands
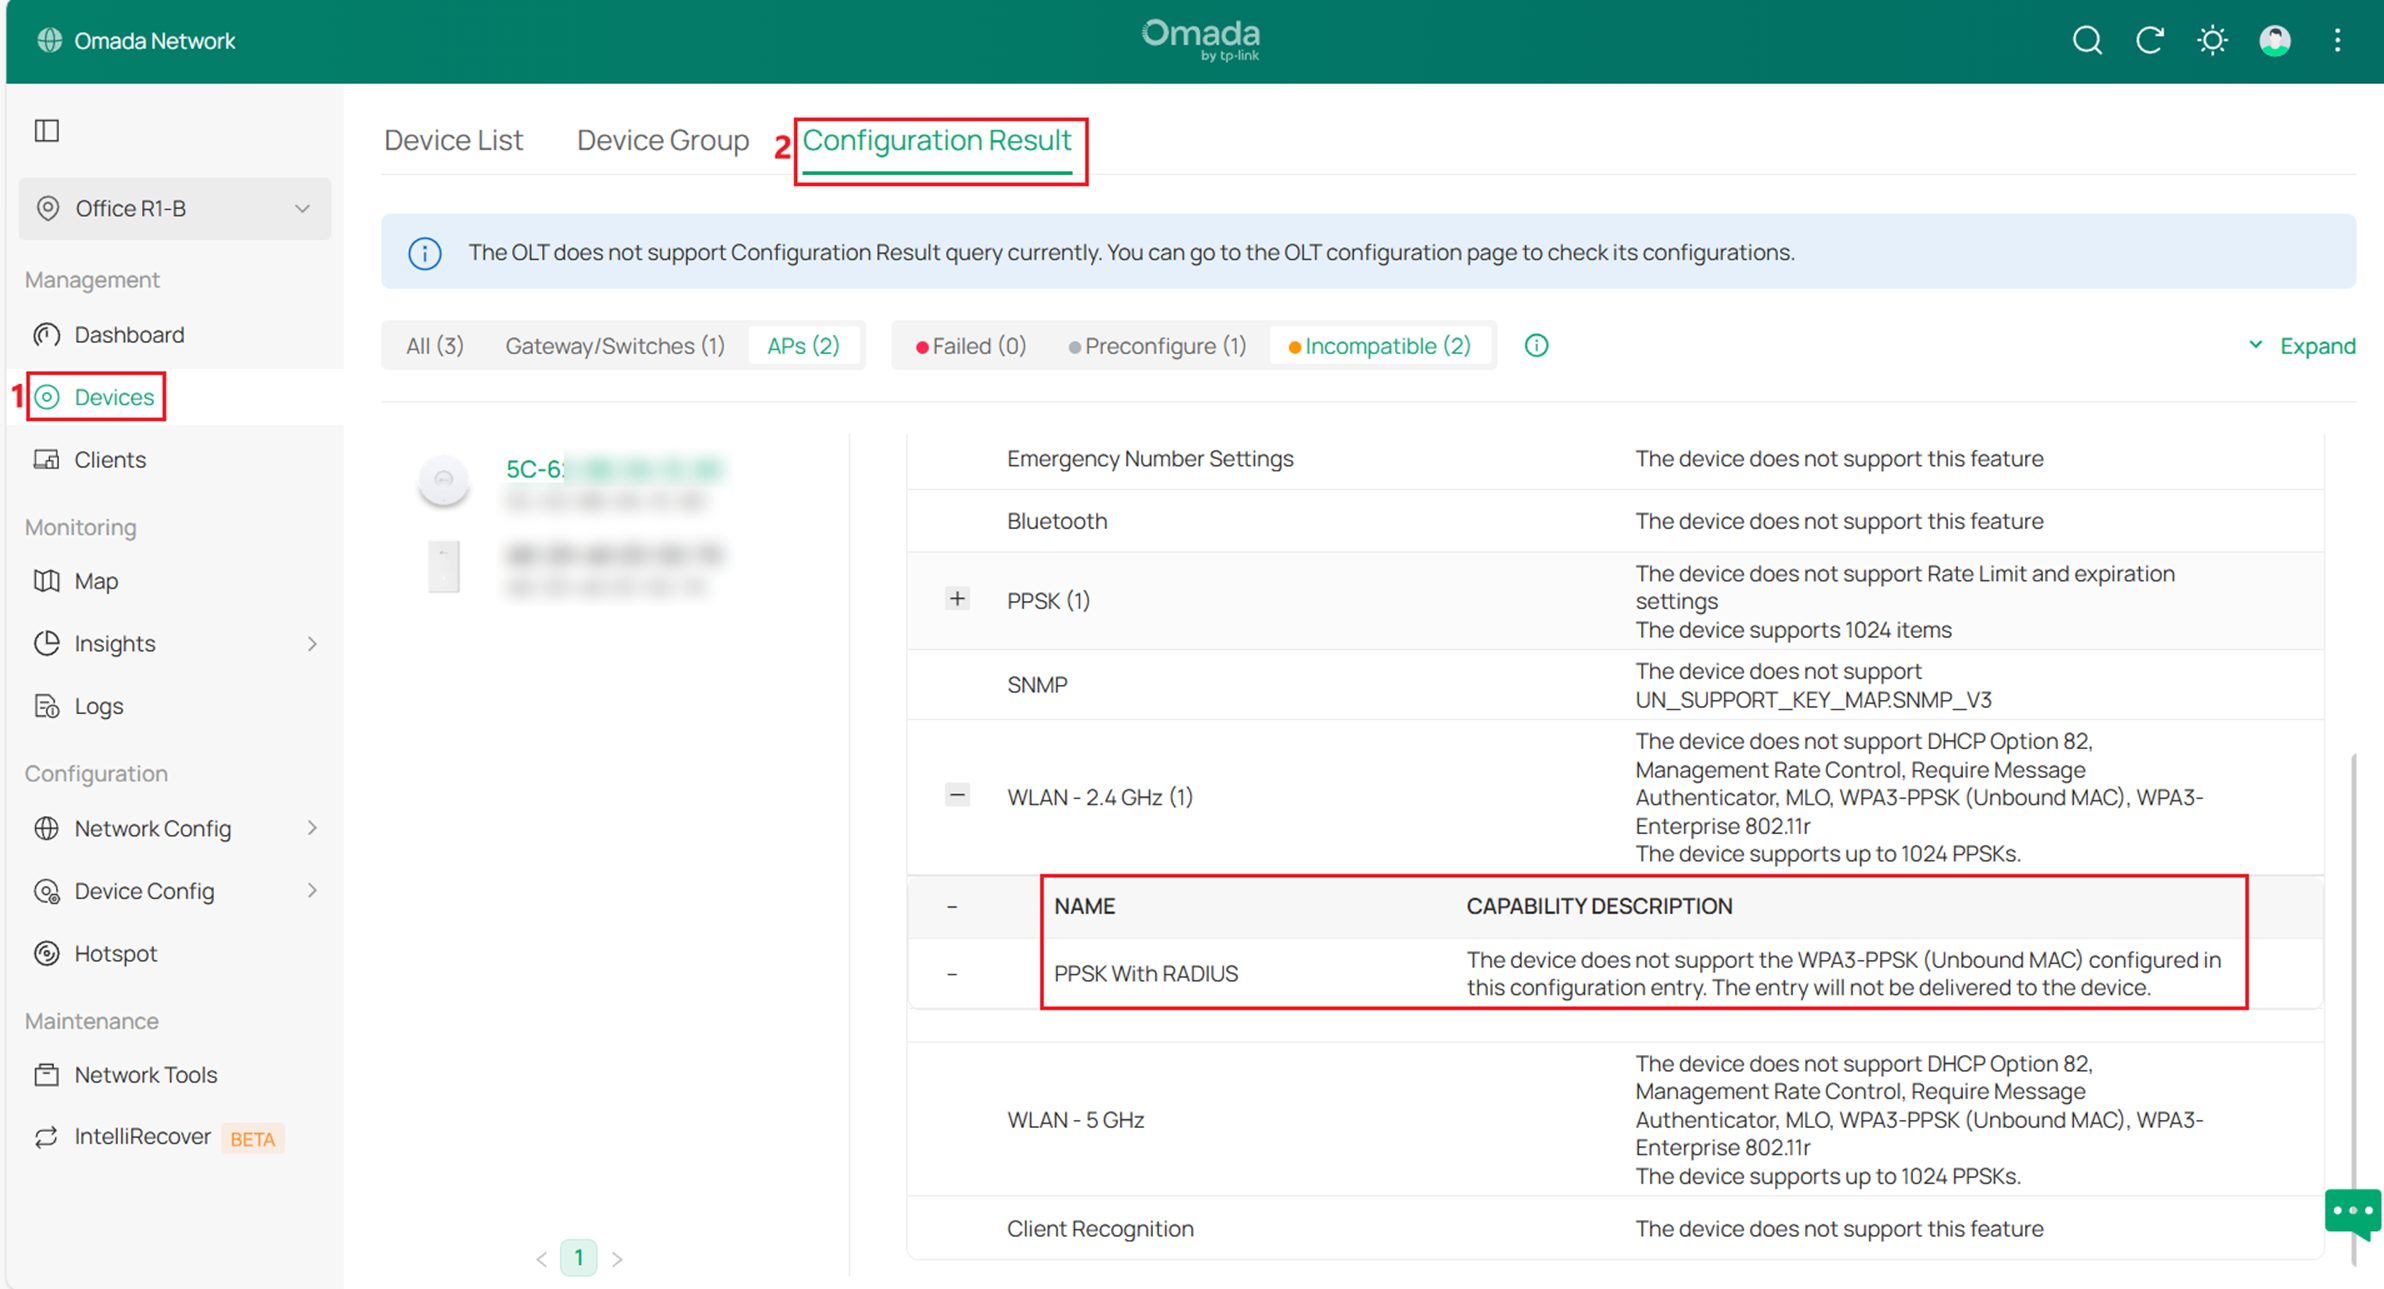
For APs that support PPSK but do not support 6 GHz PPSK, the SSID will only be applied as WPA2 PPSK with RADIUS (Unbound MAC). After applying the configuration, go to the Devices > Configuration Result page to check the status where unsupported devices will be marked as incompatible, as shown below.
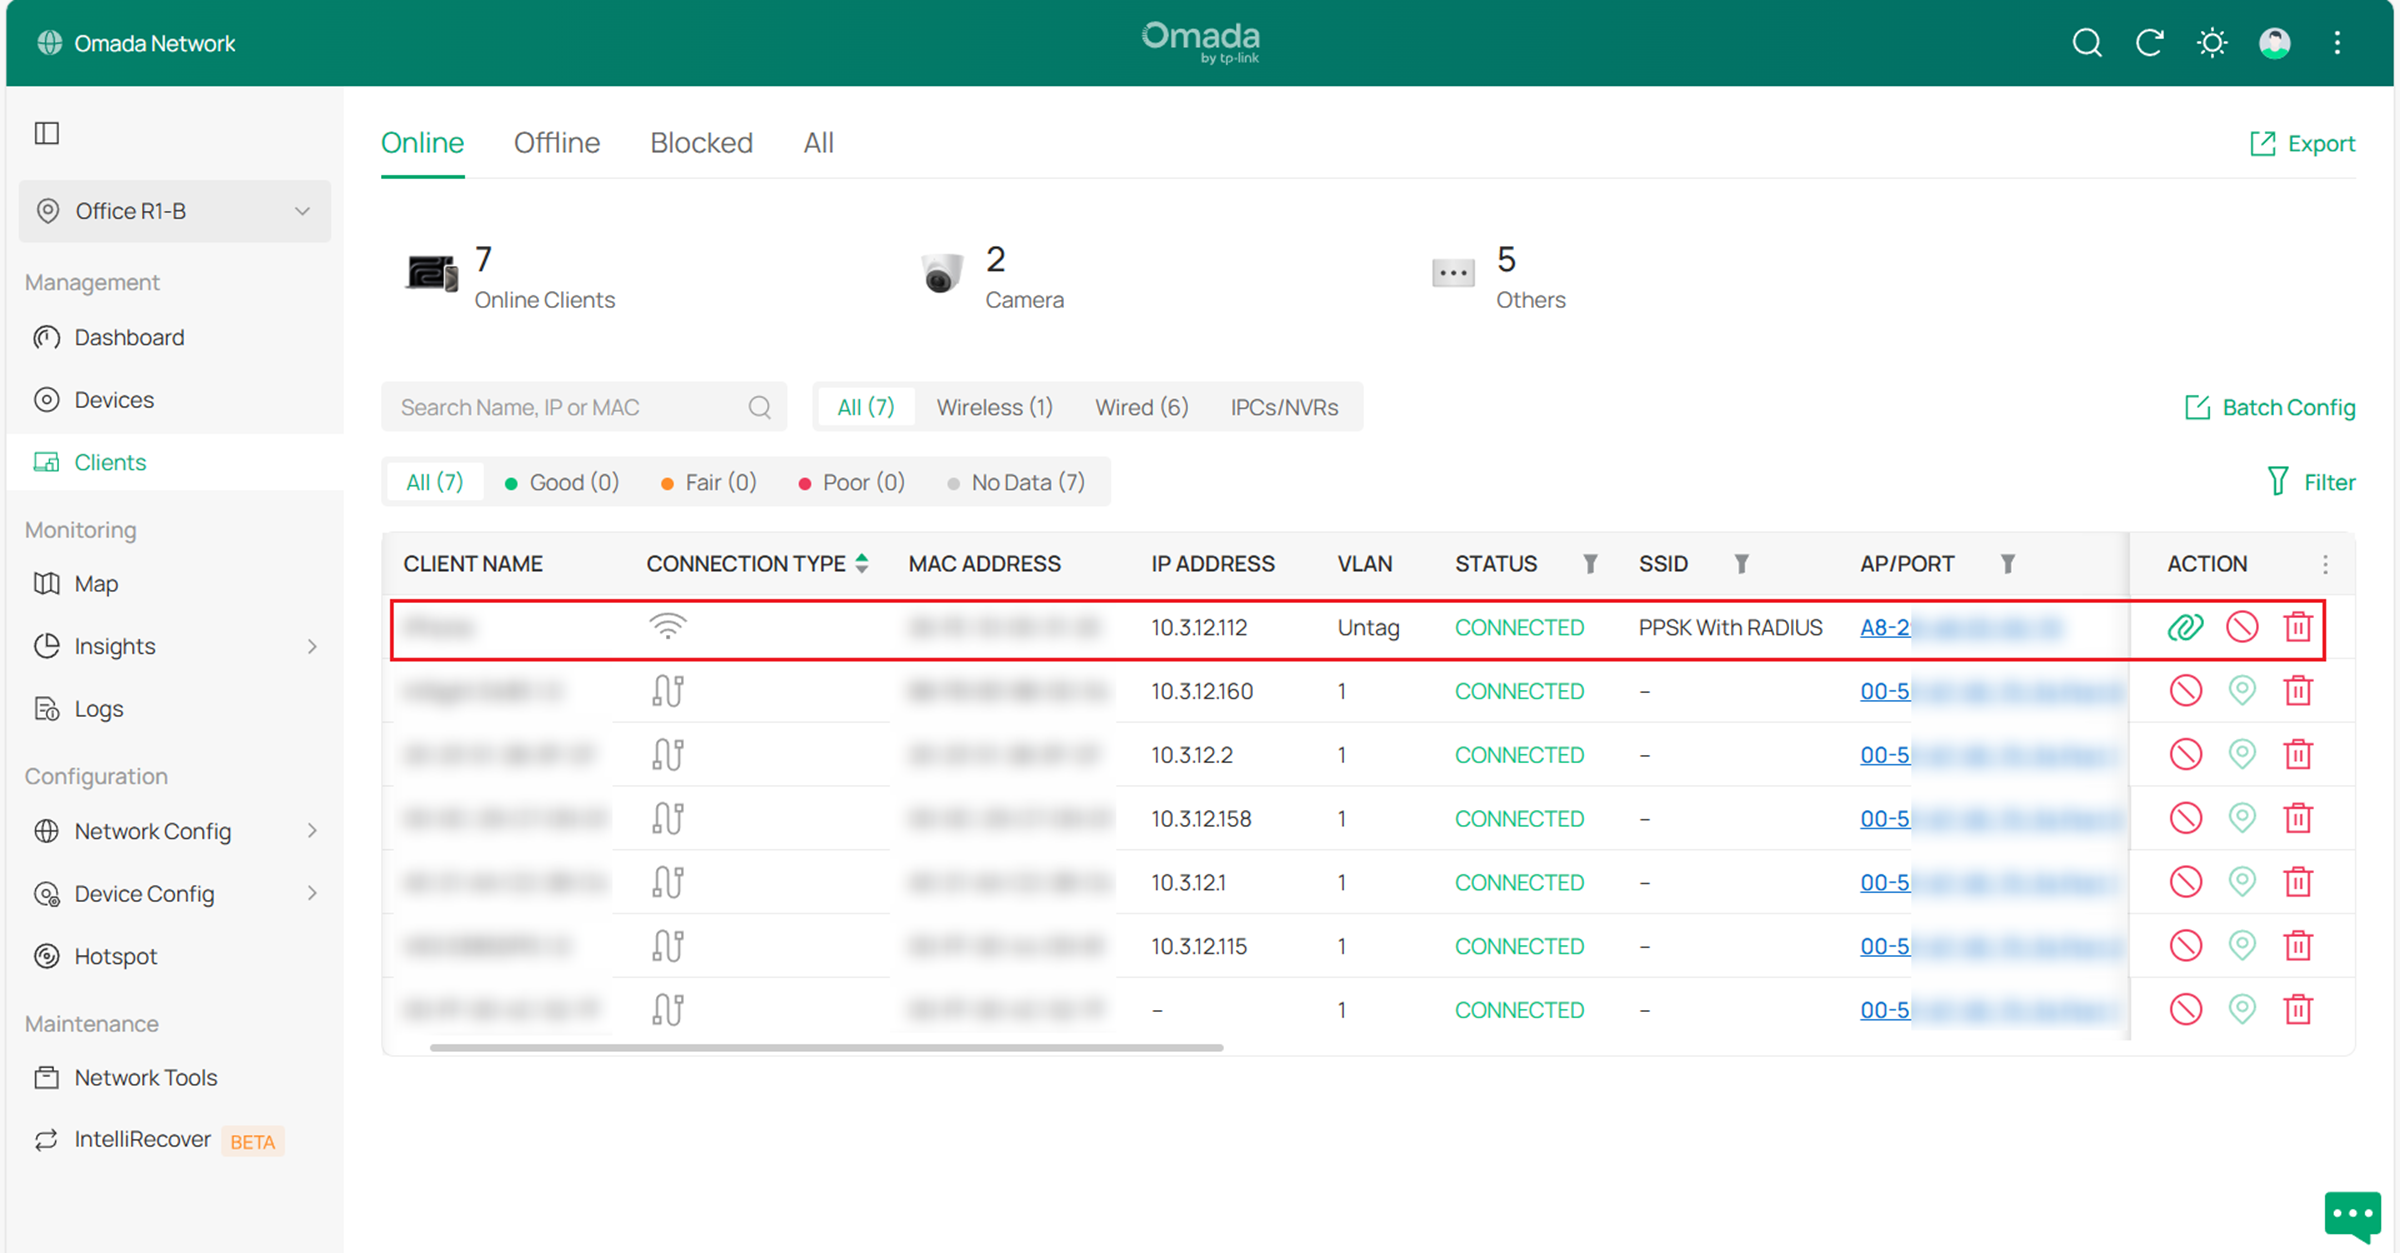
Step 3. Use a client to connect to the SSID created in Step 2. Enter the PPSK configured on the RADIUS server to complete authentication. After a successful connection, the authenticated client can be viewed in the Clients list.
Note:
The following client-side considerations may affect connection behavior:
• Due to client limitations, some devices (e.g., certain Windows laptops) may not be able to connect to the 6 GHz band. Forgetting the SSID and reconnecting may help resolve the issue.
• In some cases, the client may fail to connect on the first attempt. Reconnecting typically resolves the issue.
• Band Steering and Load Balance may affect the initial association process and interfere with PPSK registration on 6 GHz. To ensure successful registration, these features may not take effect during the first connection but will function normally afterward.
• After changing the PPSK, the client may need to connect more than once to complete authentication. The new password must first be registered via the hidden SSID on non-6 GHz bands before it can be used on other bands.
Conclusion
With the above steps, PPSK with RADIUS (Unbound MAC) authentication for 6 GHz networks can be configured to meet your network requirements.
To learn more about each function and configuration, please visit Support Home to download or check the manual for your product.
QA
Q1: Why is the 802.11r option not available for 6 GHz PPSK SSIDs?
A1: 802.11r is not supported for 6 GHz PPSK SSIDs because it may introduce compatibility issues in the RADIUS-based authentication process.
Q2: Why is MLO not supported for 6 GHz PPSK SSIDs?
A2: MLO is not supported because it requires consistent security configurations across different frequency bands. This requirement is not met in PPSK with RADIUS (Unbound MAC) deployments for 6 GHz networks.
Q3: Why does the client fail to connect or require multiple attempts?
A3: During the initial connection, the client may not complete the authentication or registration process successfully. Reconnecting typically resolves the issue.
If needed, forgetting the Wi-Fi network and reconnecting can help force the client to restart the connection process, allowing it to complete registration or reselect an appropriate band.
If the issue persists after multiple connection attempts, check whether the client uses MAC address randomization or a similar privacy feature for this Wi-Fi network. If available, try disabling this feature for this Wi-Fi network and reconnect to Wi-Fi. This may help improve authentication stability.
Q4 : Pourquoi la direction de bande et l’équilibrage de charge ne sont-ils pas actifs lors de la première connexion ?
A4 : La direction de bande et l’équilibrage de charge peuvent affecter le processus d’association initial et interférer avec l’enregistrement PPSK. Pour garantir un enregistrement réussi, ces fonctionnalités peuvent être désactivées lors de la première connexion, mais elles fonctionneront normalement une fois le client enregistré.
Q5 : Pourquoi dois-je me connecter plusieurs fois après avoir modifié le PPSK ?
A5 : Après la modification du PPSK, le client doit d’abord s’enregistrer via le SSID masqué sur les bandes autres que 6 GHz. Si le client tente de se connecter directement avant la fin de cette procédure, l’authentification risque d’être refusée. Se reconnecter permet de mener à bien l’enregistrement.
