


How to Use ANR on Omada Fusion Pro to Back up Recordings from a Camera SD Card


Contents
Introduction
ANR (Automatic Network Replenishment) enables a camera's SD card to be used as backup storage when network connectivity is lost. When the network is restored, the camera automatically synchronizes the footage from the SD card back to the system, filling any gaps in the recording history.
This article explains configuration steps to enable ANR:
- Enable ANR function for Fusion Pro
- (Optional) Enable ANR function for Omada/VIGI NVR that is managed by Fusion Pro
- Check Recording Schedules of Fusion Pro (Disk) and Camera (SD card) to ensure ANR is available
- Verify that Fusion Pro and Camera are recording videos properly.
Requirements
- Omada Fusion Pro 2.5G or Omada Fusion Pro 2.5G PoE, with a solid-state disk (SSD) installed.
- VIGI Camera that supports ANR, with a microSD card installed.
- The camera can be adopted directly by Omada Fusion Pro or managed by an VIGI/Omada NVR that supports ANR
Note: Ensure the camera’s SD card has sufficient storage capacity to retain recordings. If the SD card becomes full and older recordings are overwritten by loop recording before network connectivity is restored, the missing footage will no longer be available for synchronization.
Configuration
ANR is enabled on Fusion Pro by default. Follow the steps below to check or enable the ANR function
Enable ANR for Fusion Pro
If the camera is adopted directly by Fusion Pro, ANR would synchronize the footage from the camera SD card to the Fusion Pro’s storage. If the camera is managed by an NVR that is adopted by Fusion Pro, NVR’s ANR would synchronize the footage from the SD card to the NVR’s hard drive disk.
Step 1. Enable ANR in Storage Management
Enter the Omada Guard page. Navigate to Guard Config > Storage Management and turn on the ANR toggle switch.
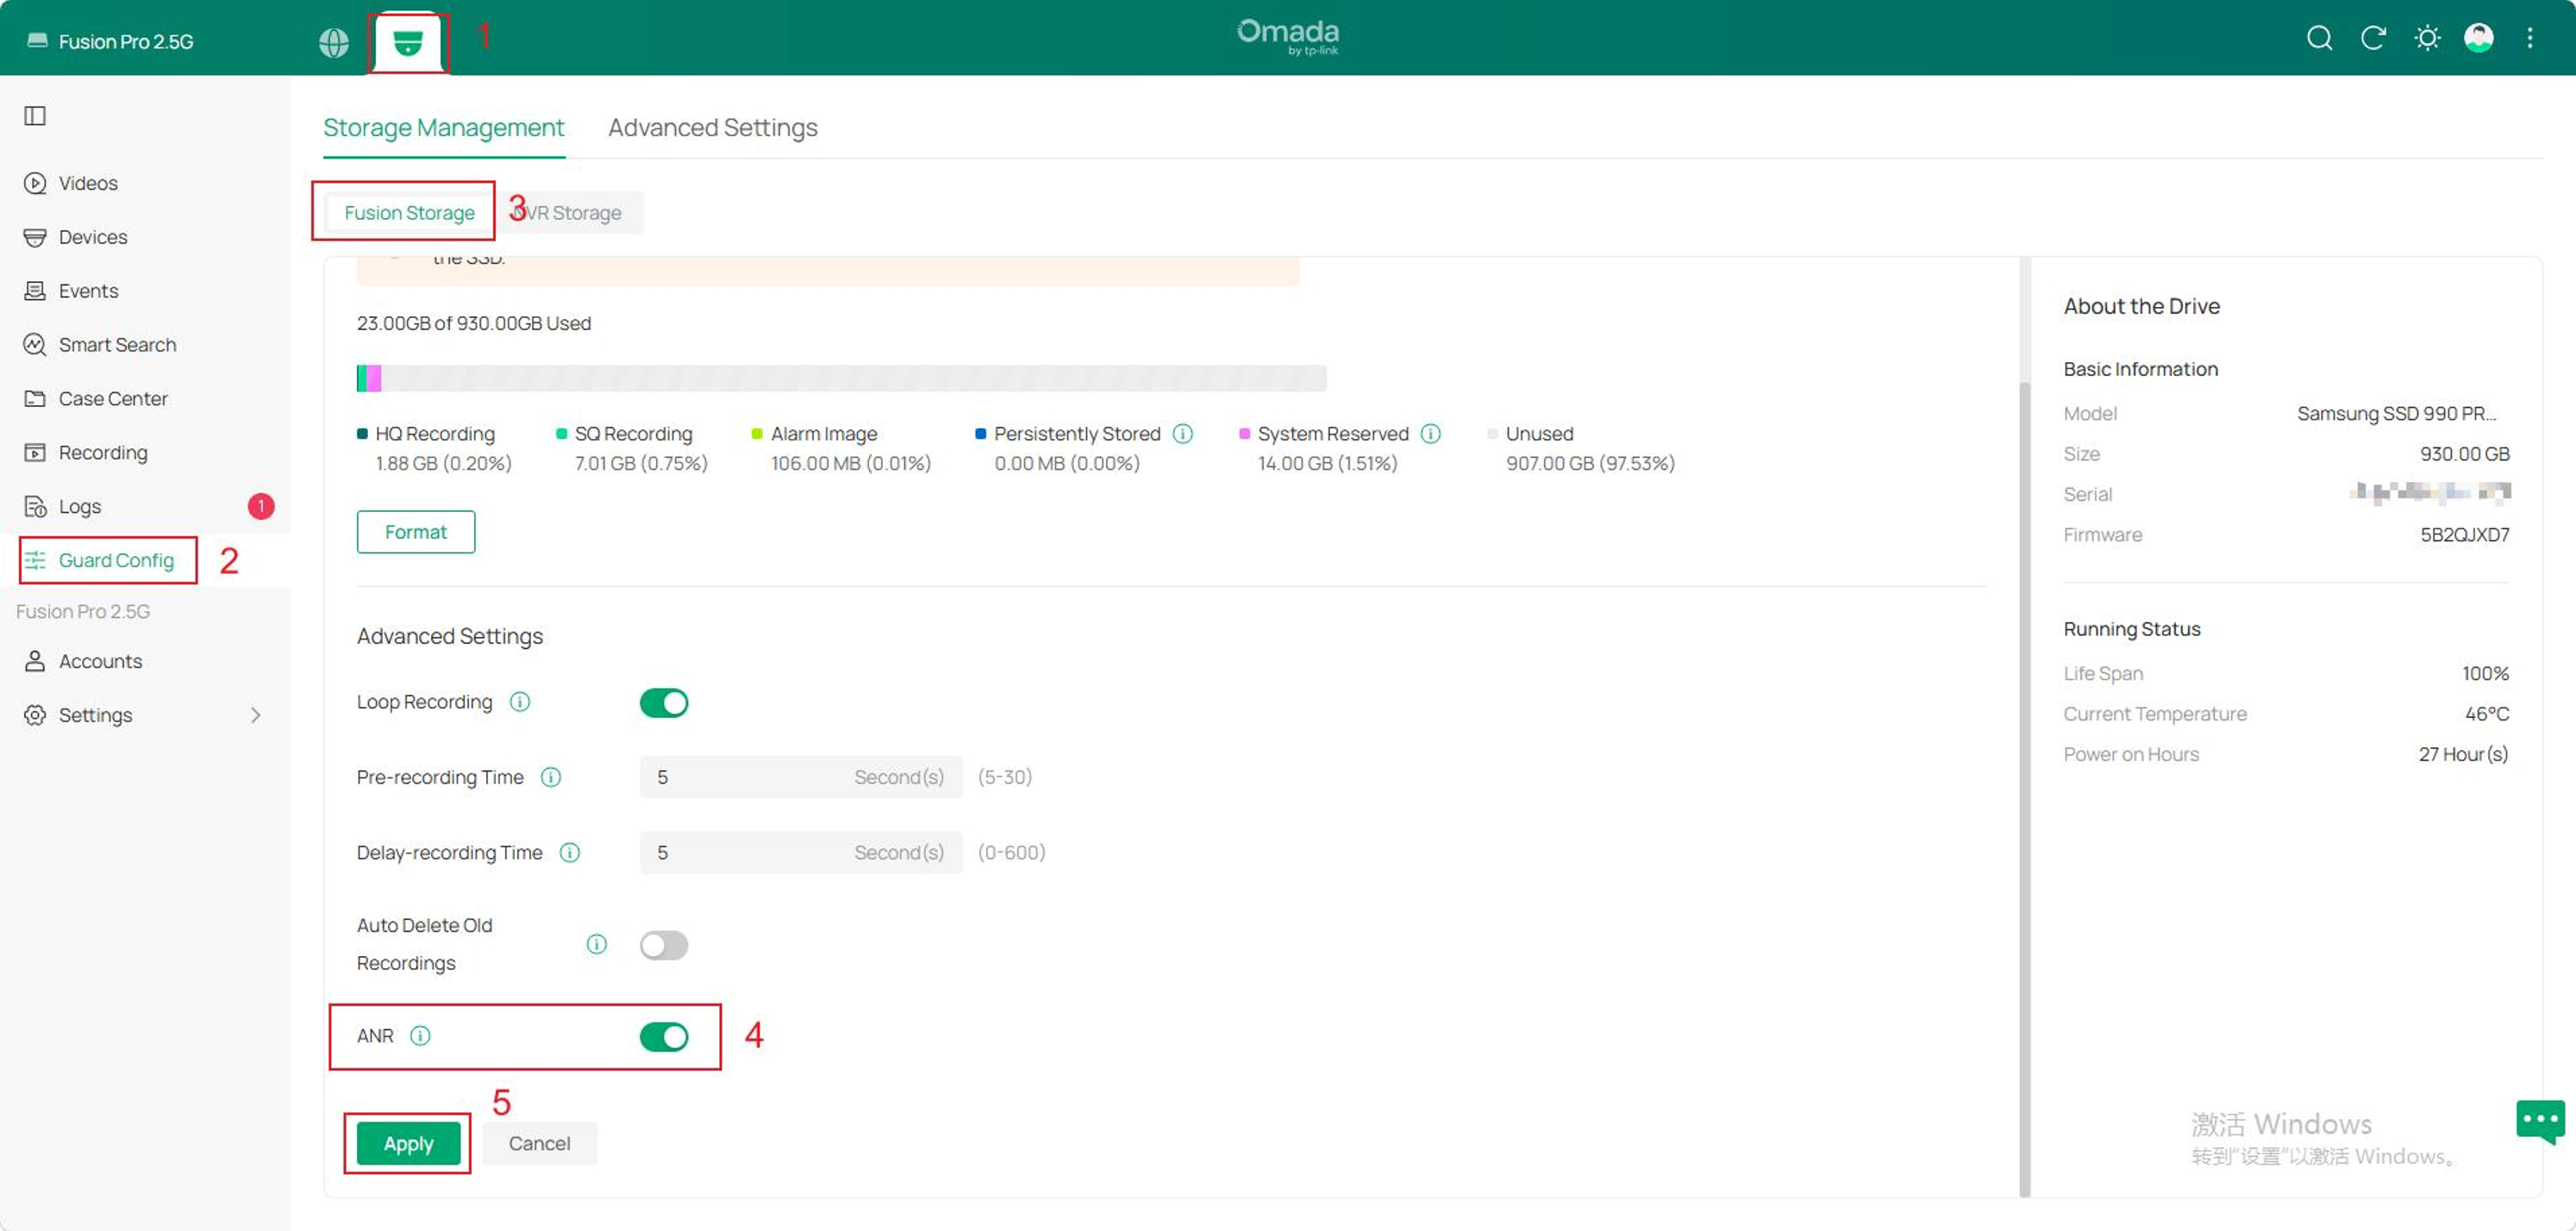
Once ANR is enabled, all Fusion-Pro-managed cameras with installed microSD cards become available for ANR recording backup.
Enable ANR for NVR
If the camera is managed by an Omada/VIGI NVR that supports ANR, adopt the NVR with Fusion Pro, then enable ANR for the NVR.
Step 1. Enable ANR in NVR’s Storage Page.
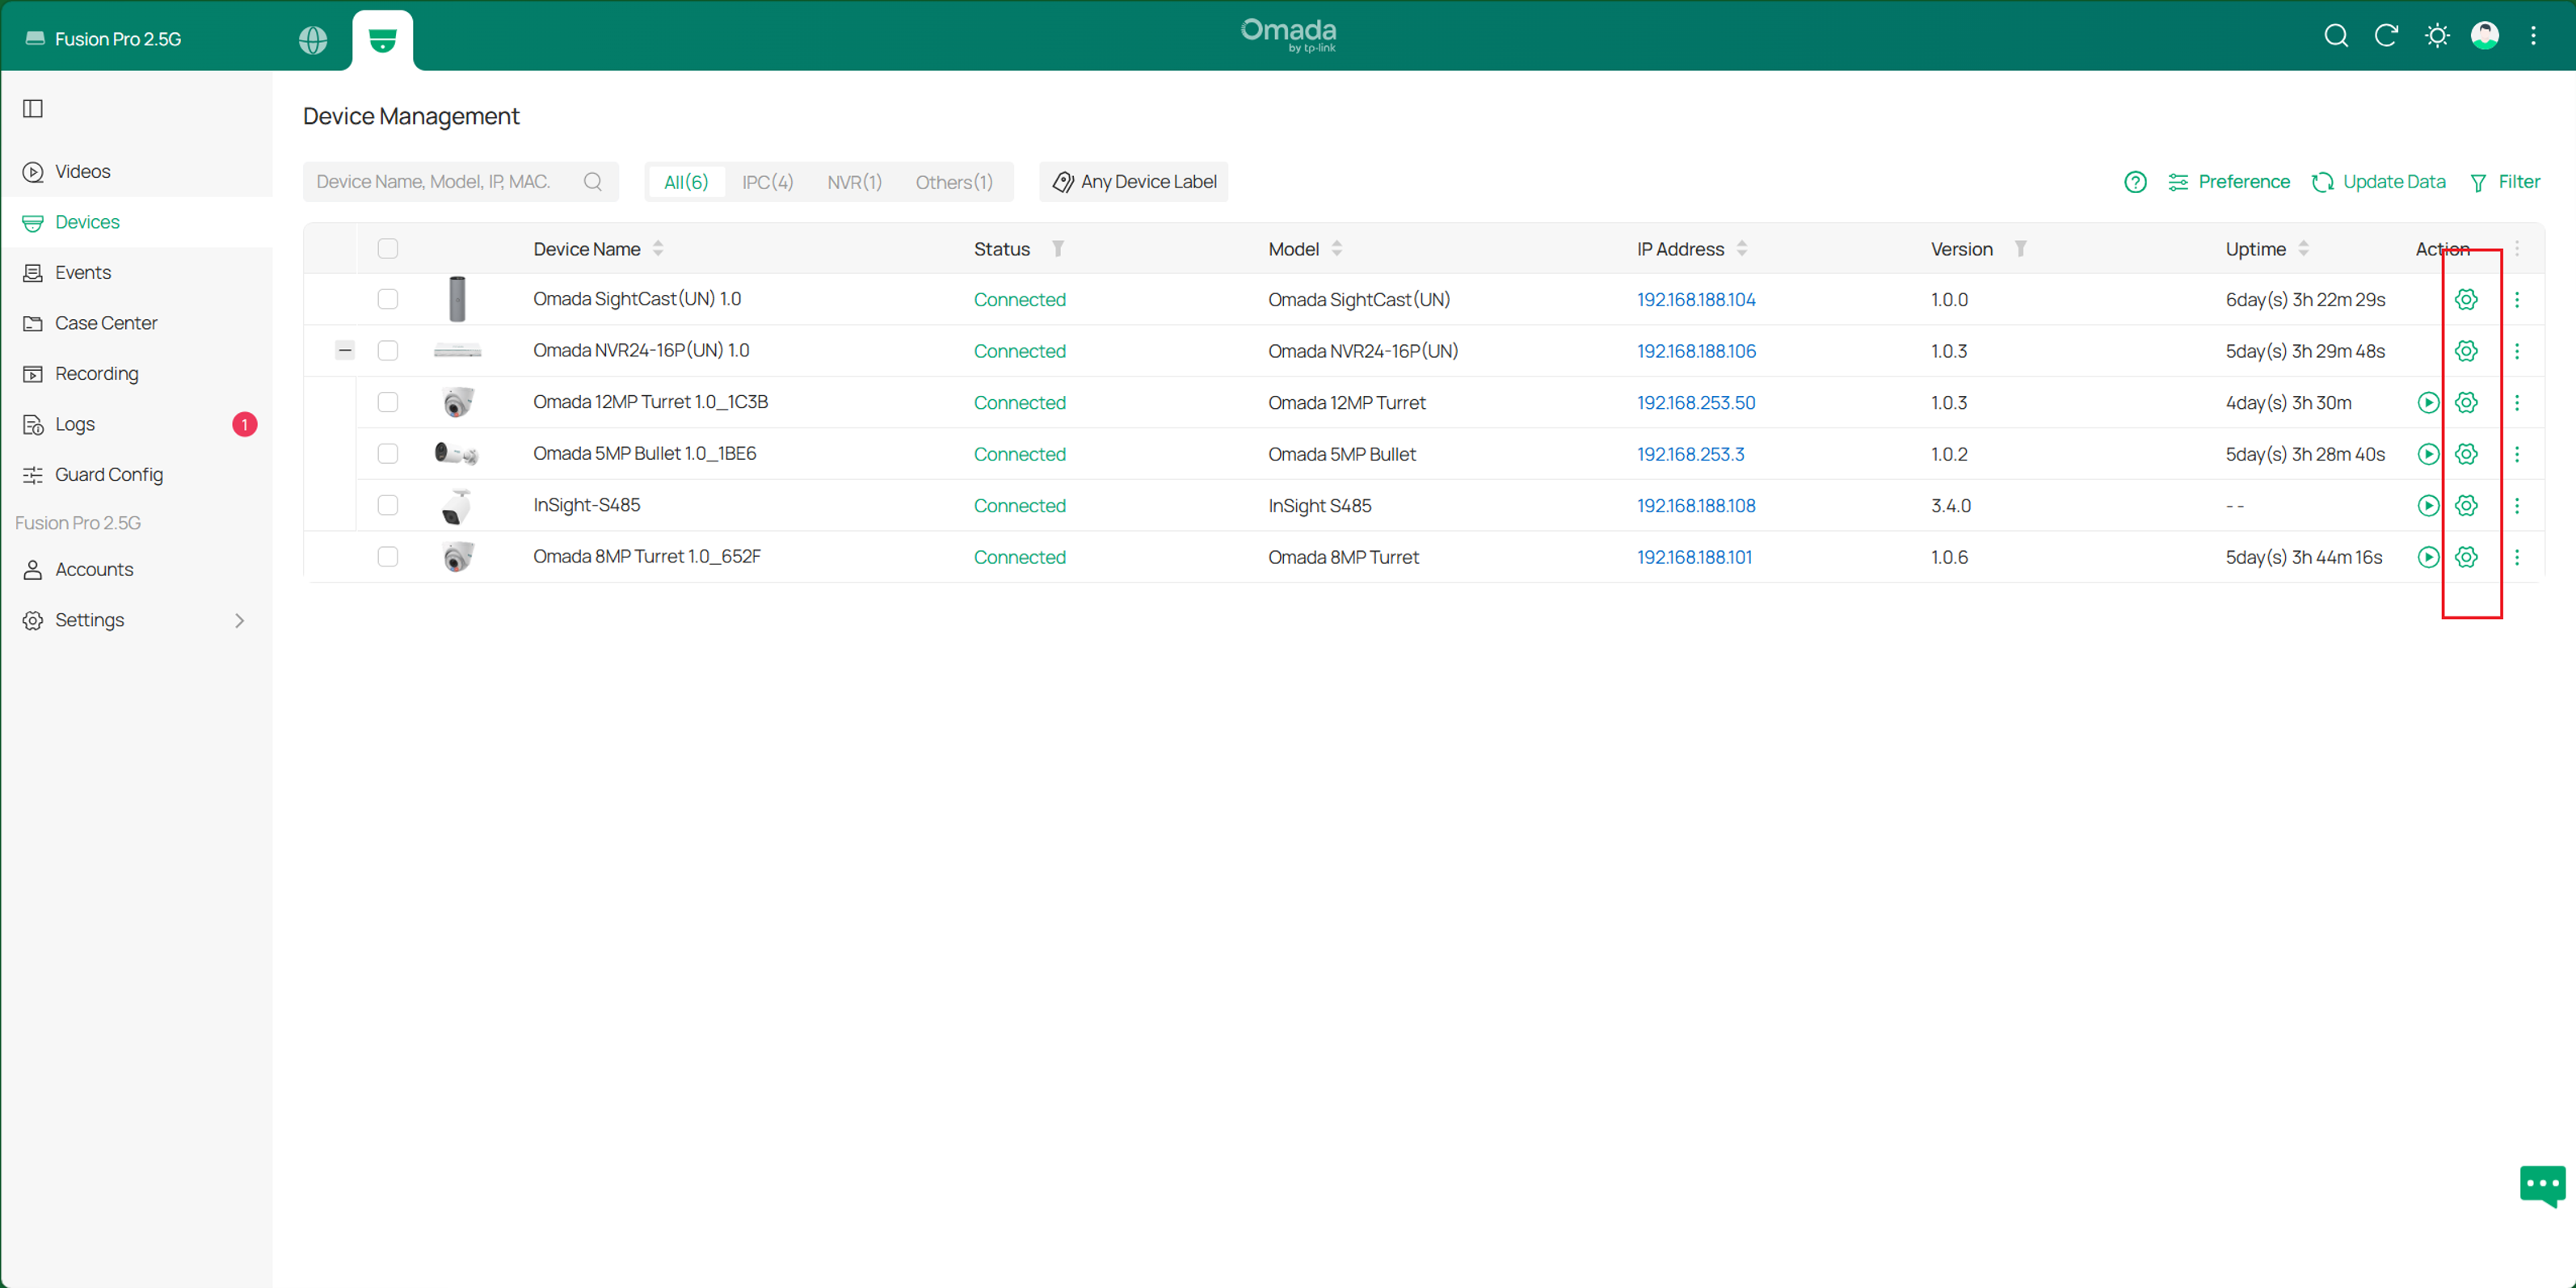
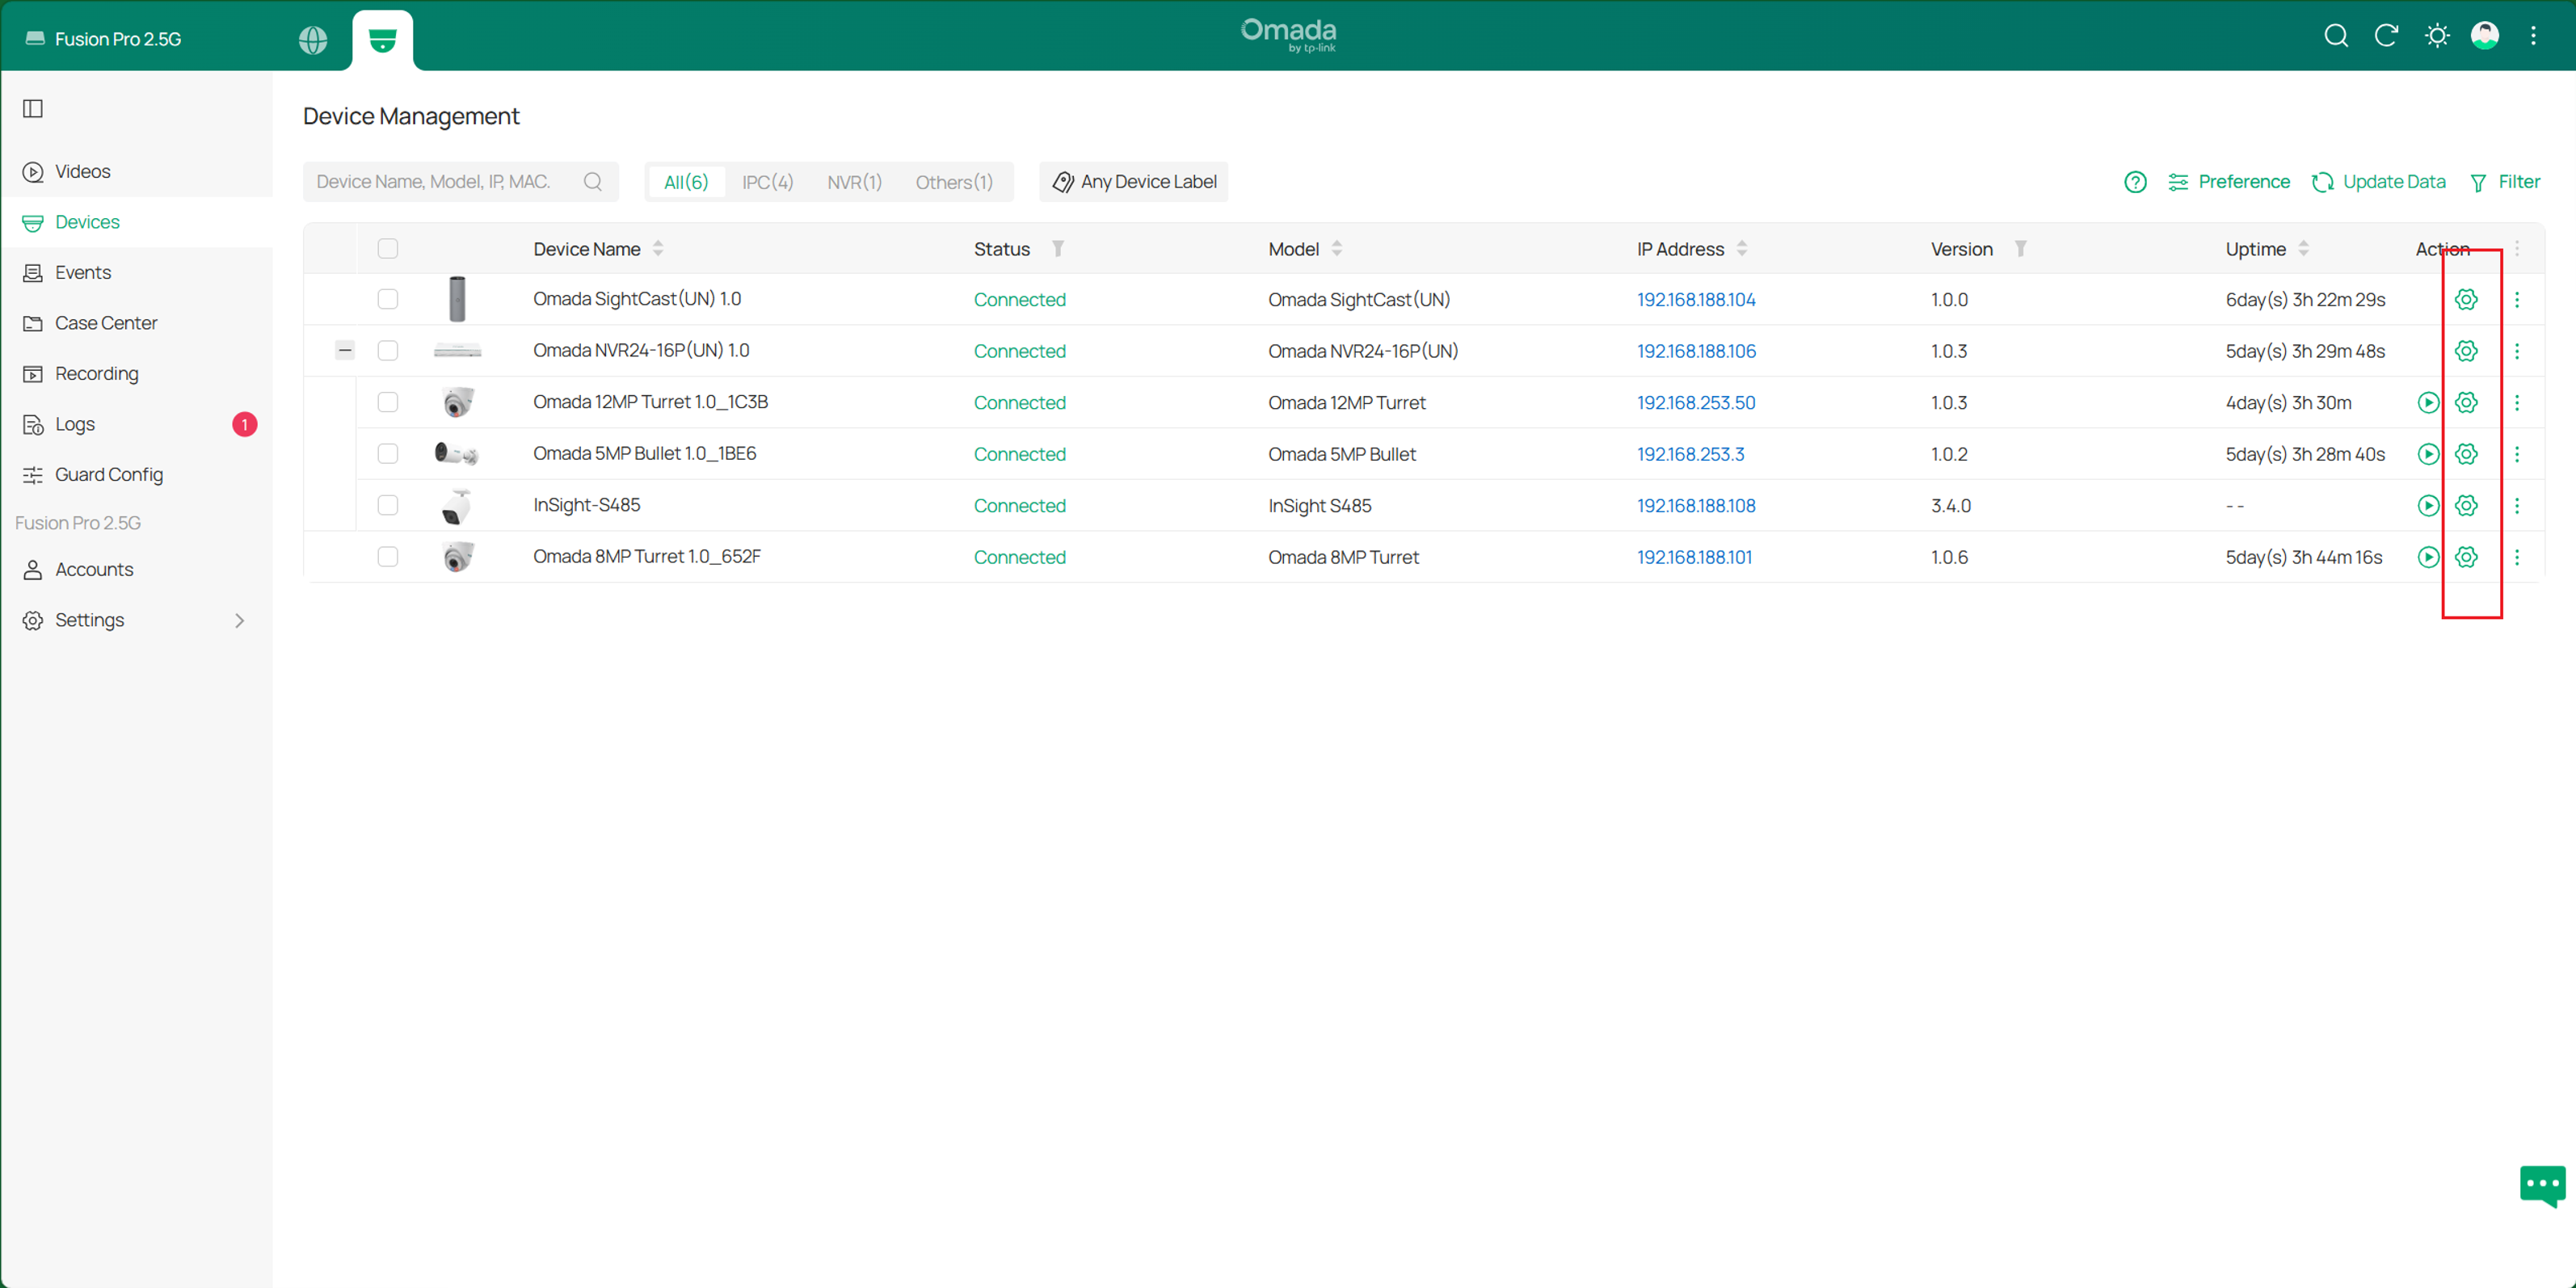
Enter the Omada Guard page and navigate to Device page. Click the Action button of the NVR and go to Storage > Recording Schedule.
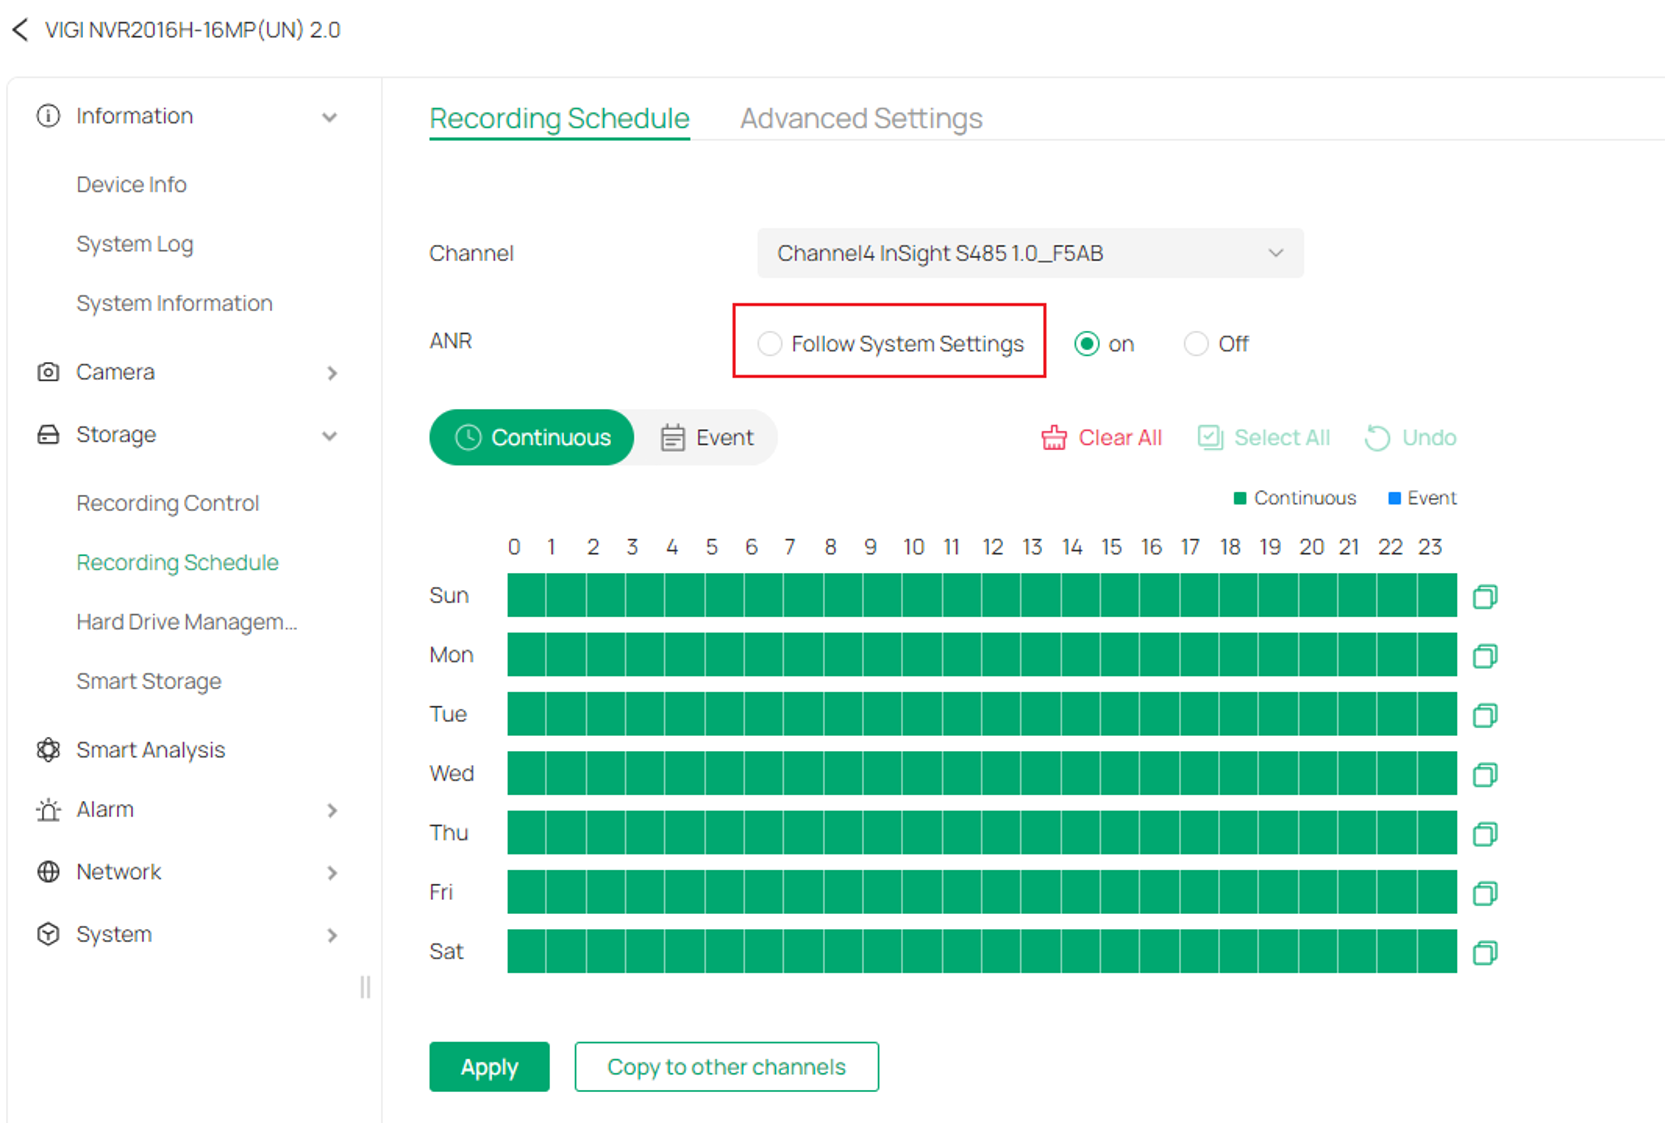
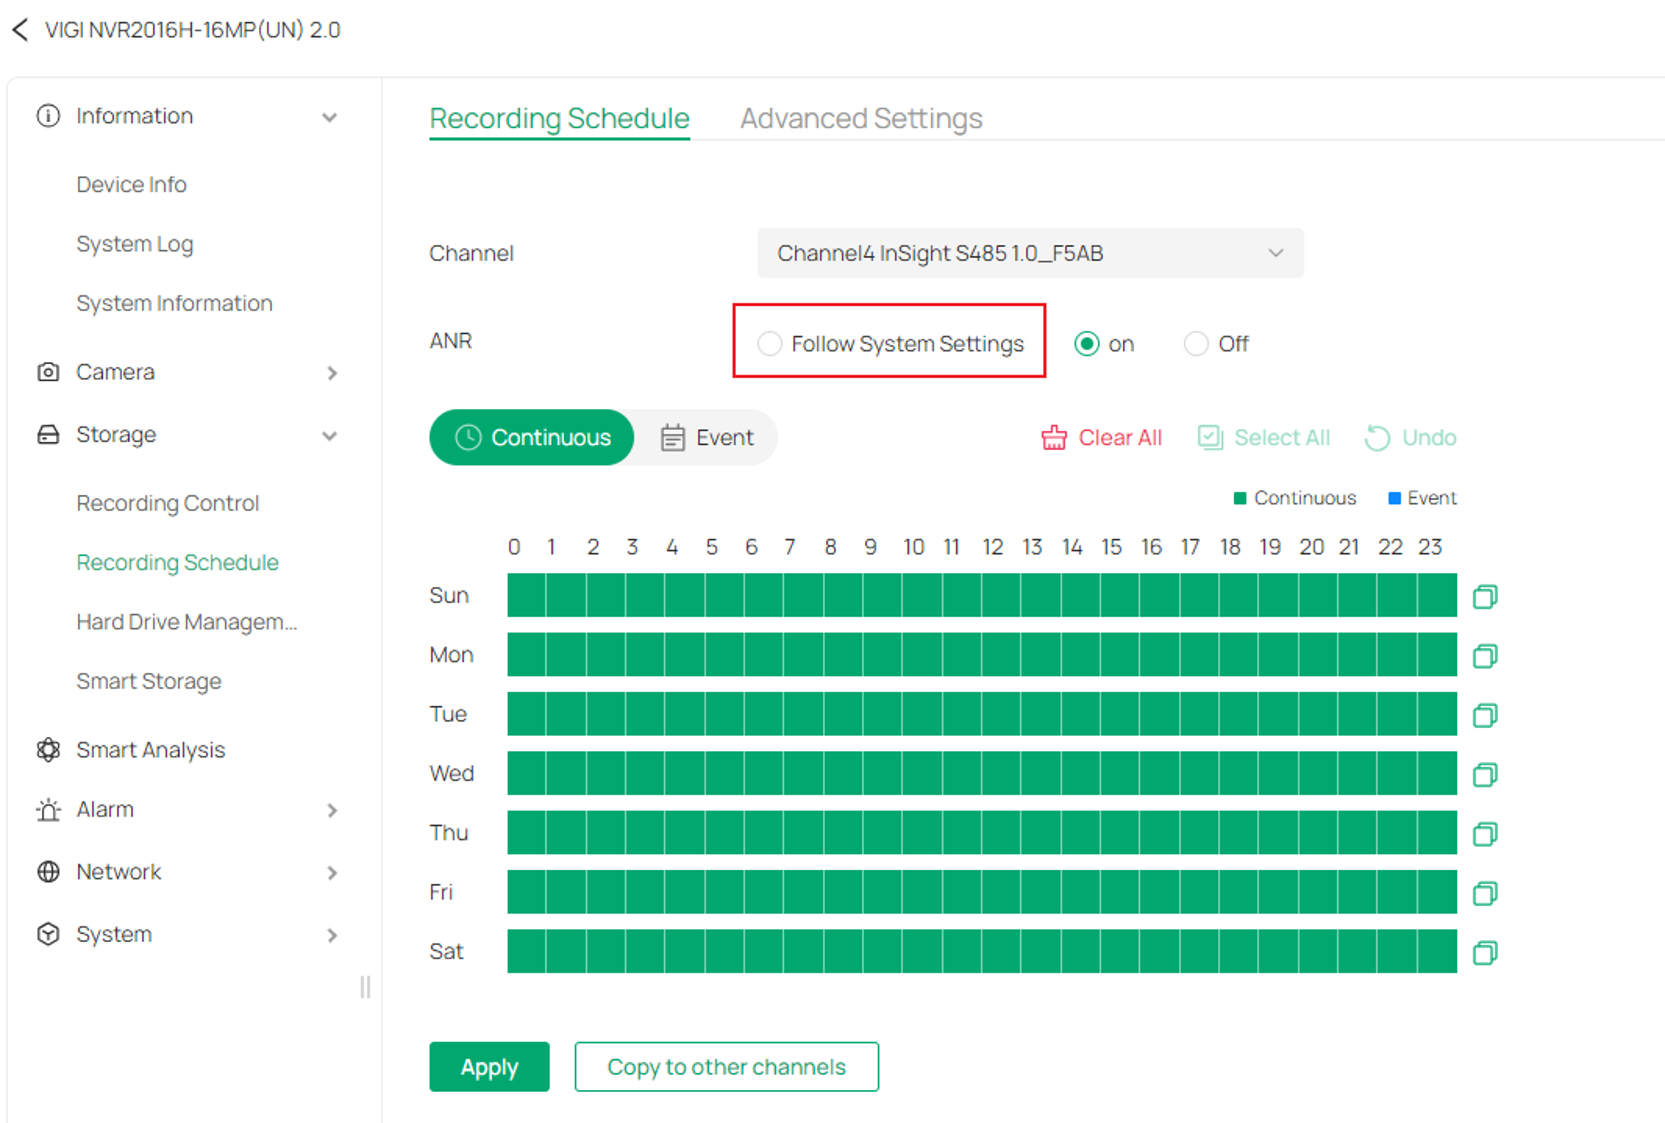
Here, select Follow System Settings to follow Fusion Pro’s ANR setting, or just turn On for ANR configuration.
Check recording schedules
To ensure that ANR functions properly, pay close attention to the Alignment of Recording Schedules on Fusion Pro/NVR and SD card.
The camera's recording schedule configured for Fusion Pro (SSD) or NVR (HDD) must fully cover the recording schedule configured for the camera's Edge Storage (SD card). ANR works by detecting missing recordings within the Fusion Pro recording schedule and then retrieving the corresponding footage from the camera's local storage.
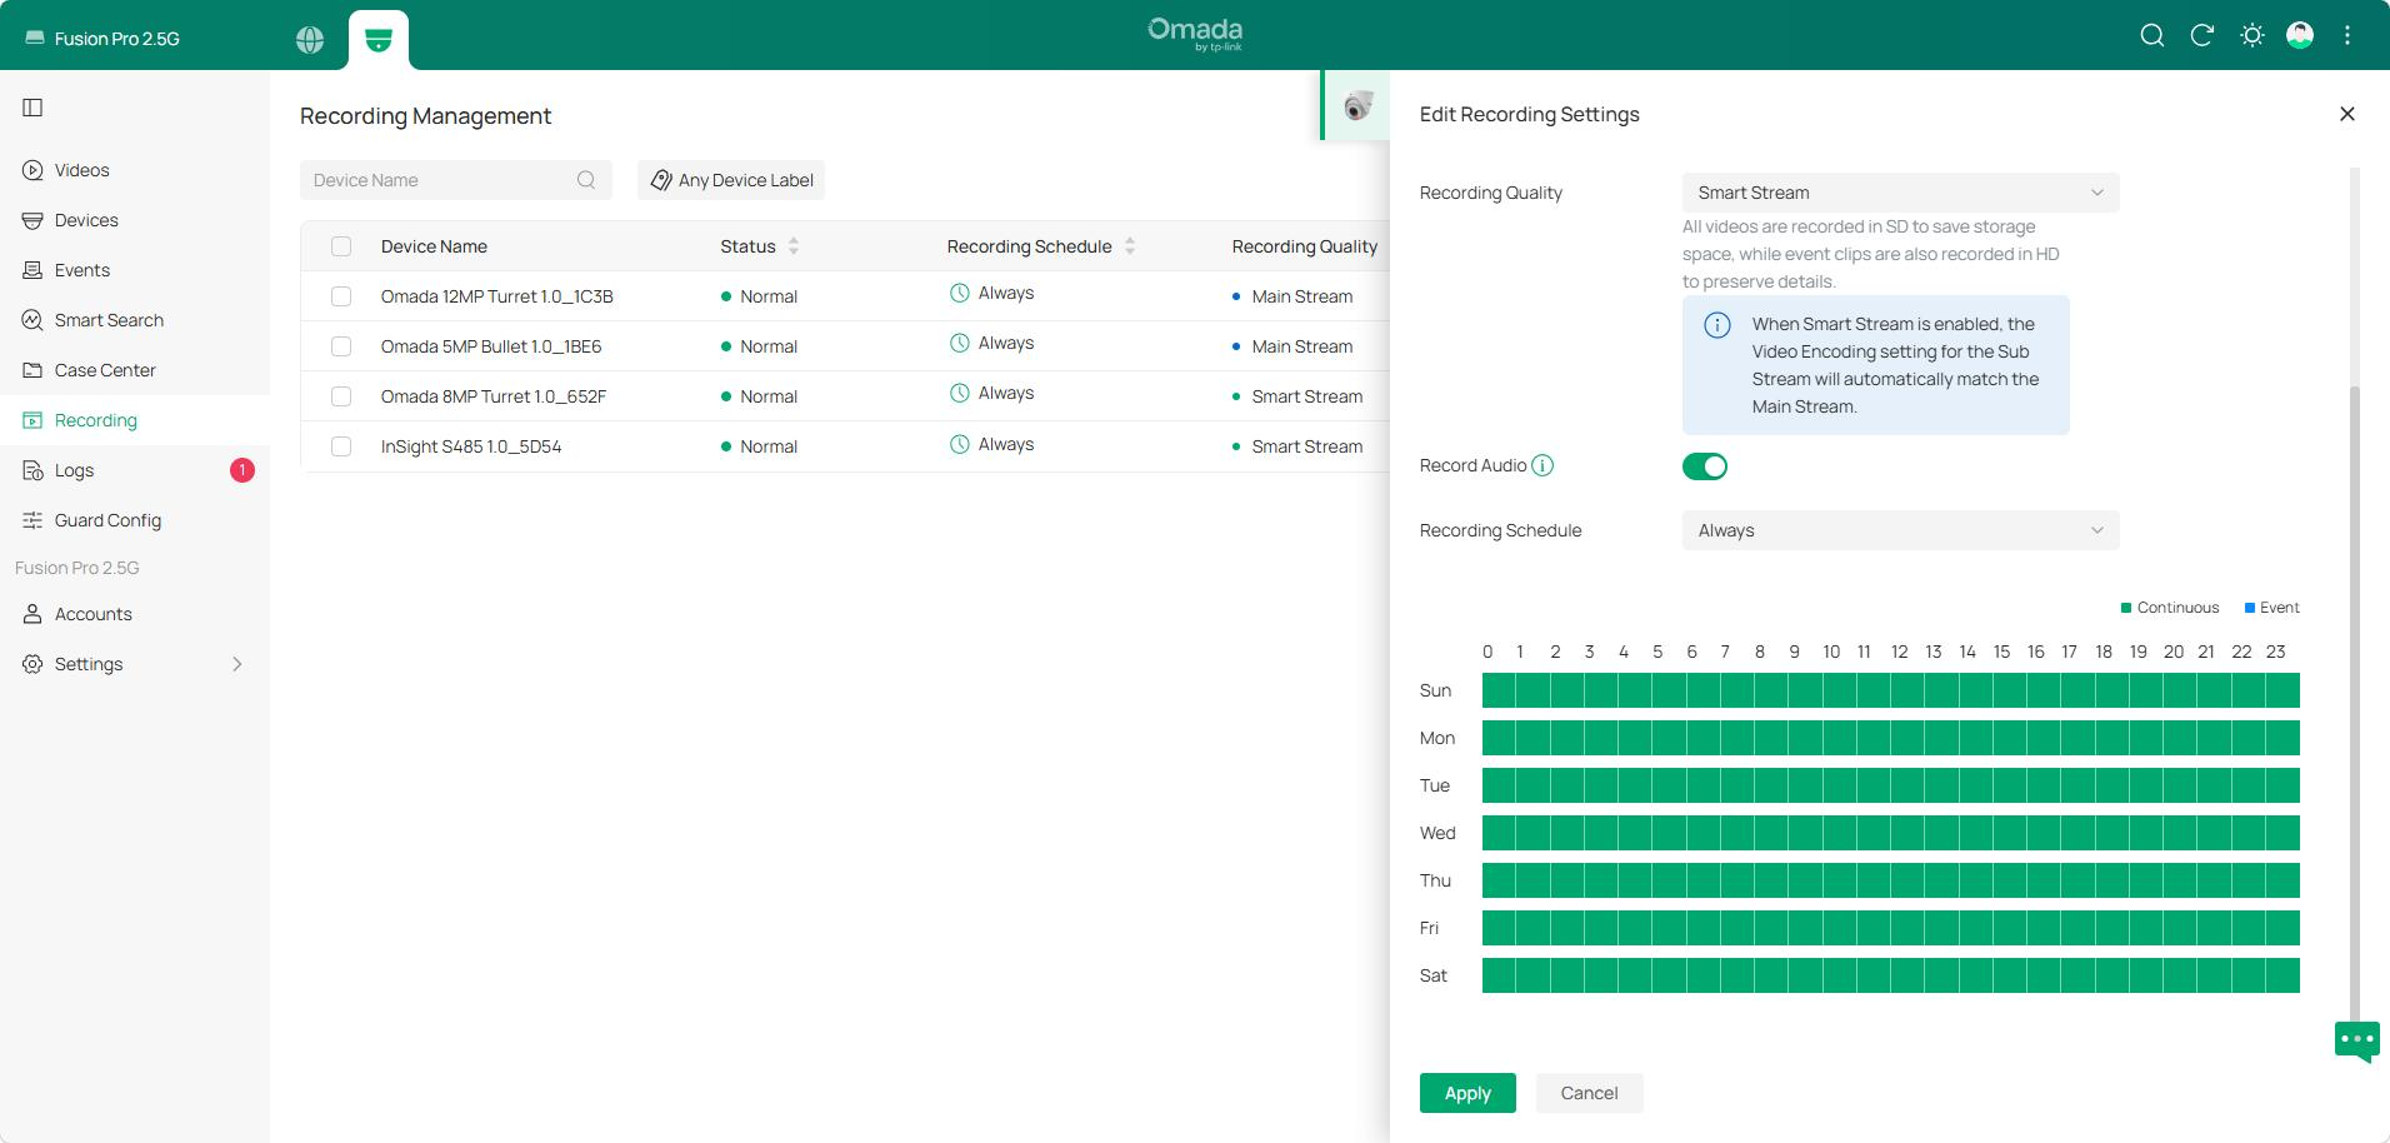
Step 1. Verify the Fusion Pro recording schedule
Navigate to Recording > Action > Edit Recording Settings. Verify that the recording schedule is configured as required.
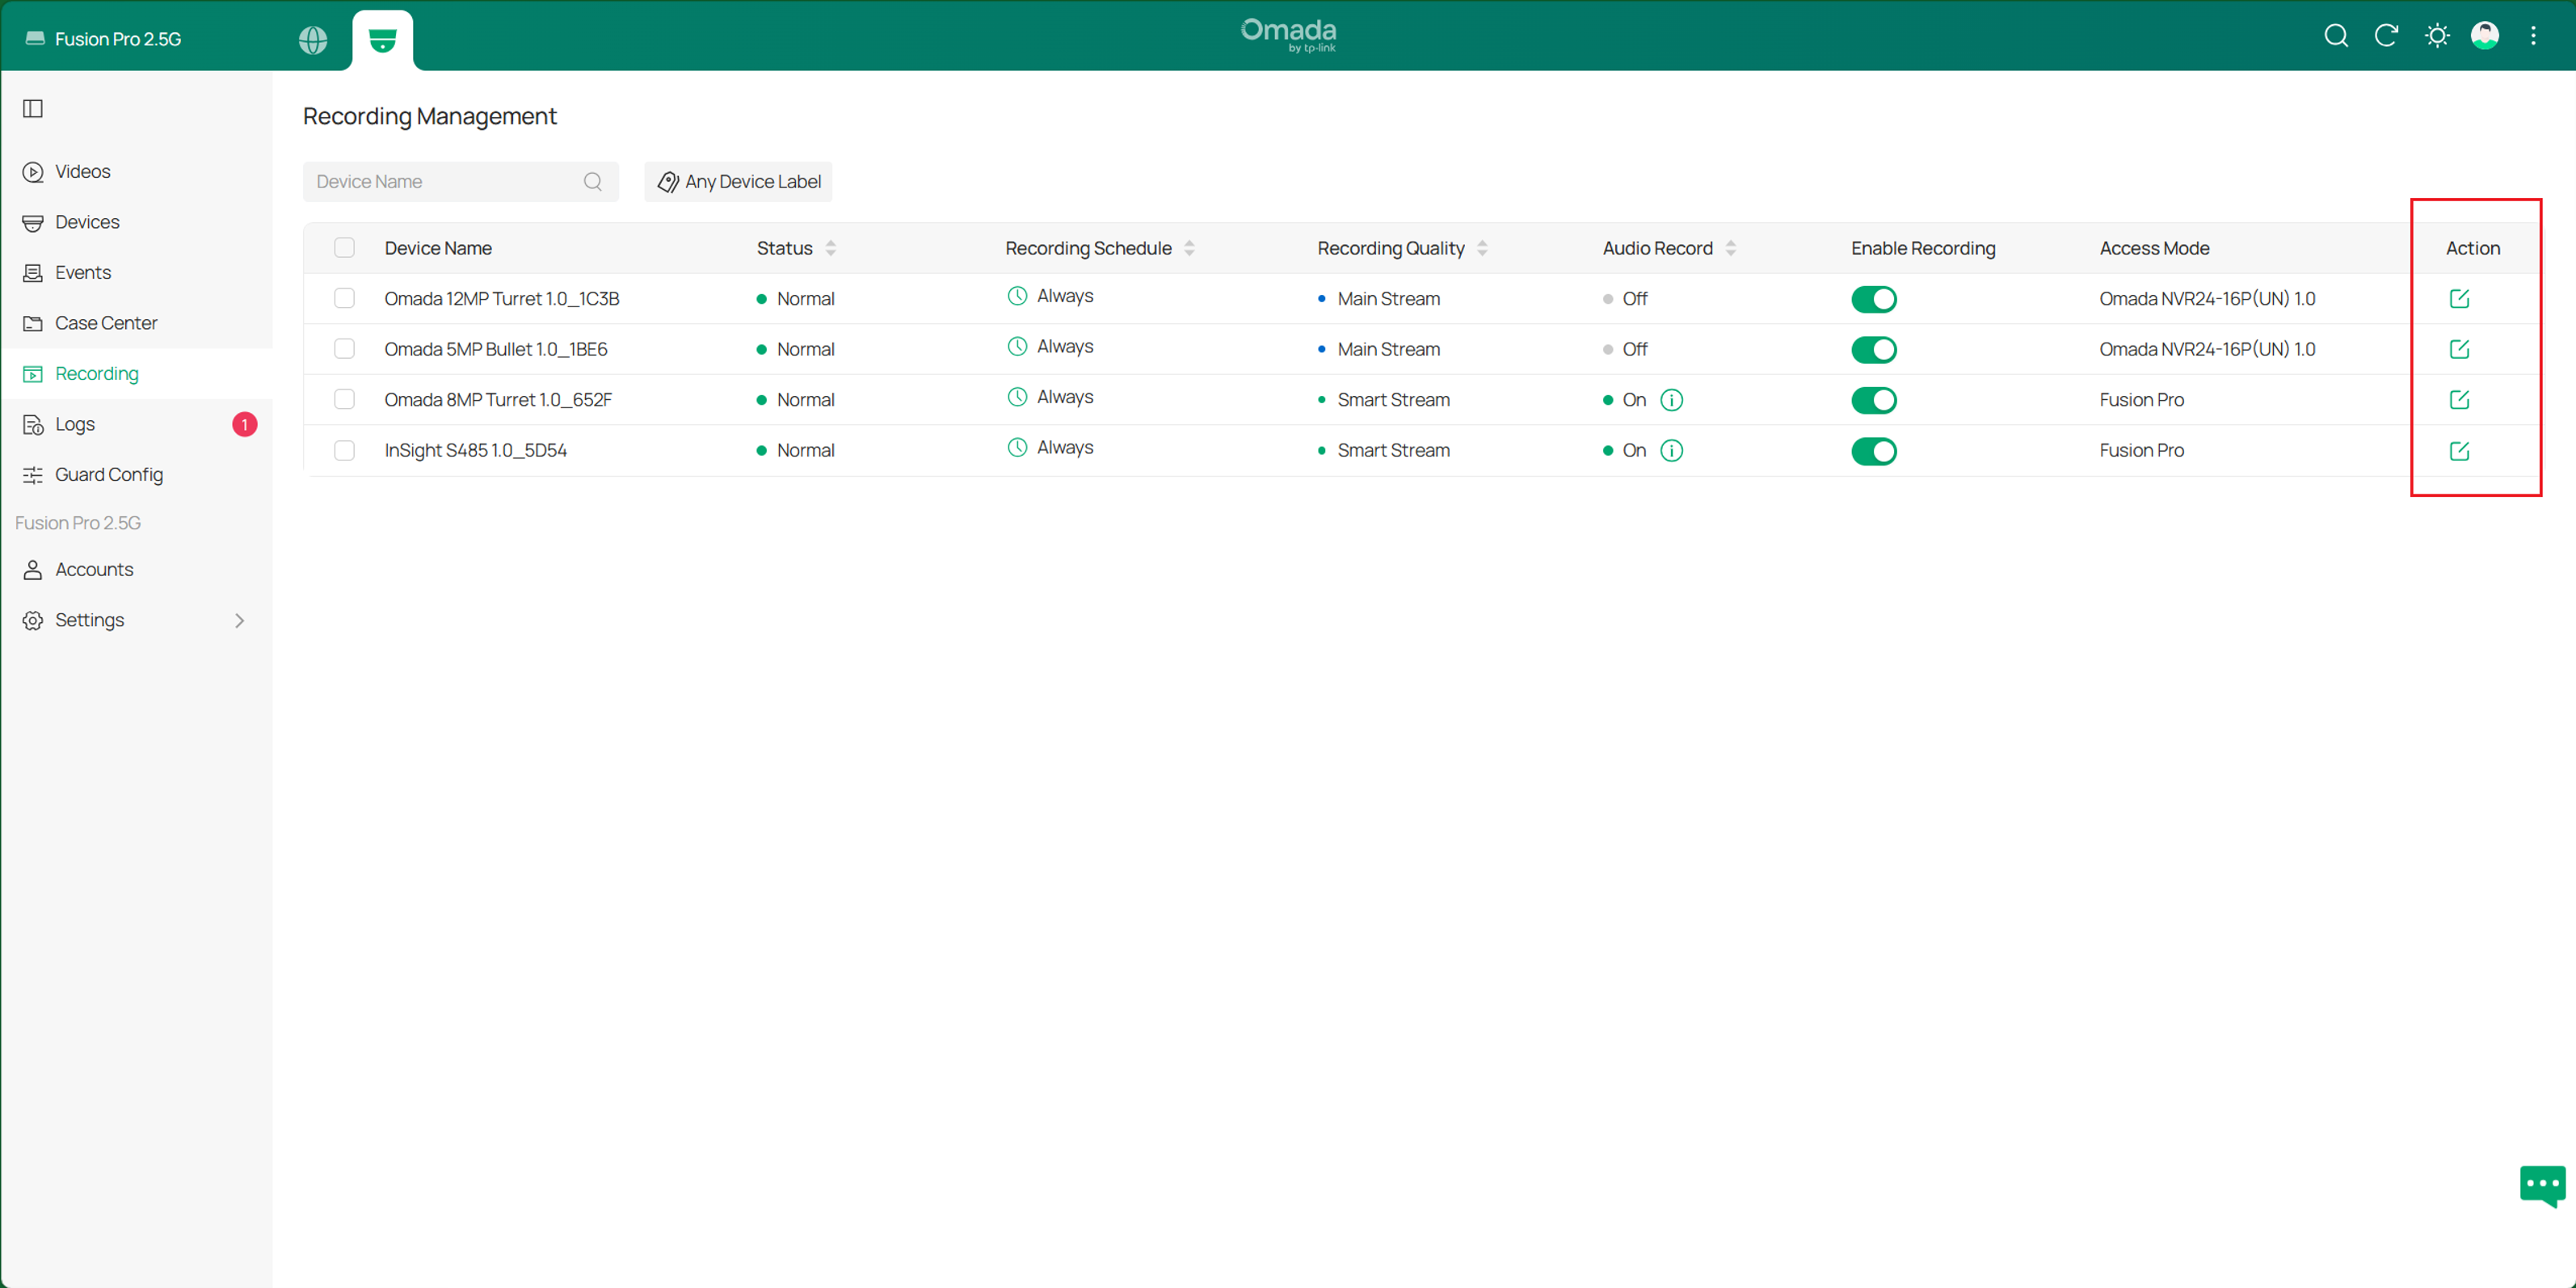
Step 2. Verify NVR recording schedule
Navigate to Device > NVR Action > Storage > Recording Schedule. Verify that the recording schedule is configured as required.
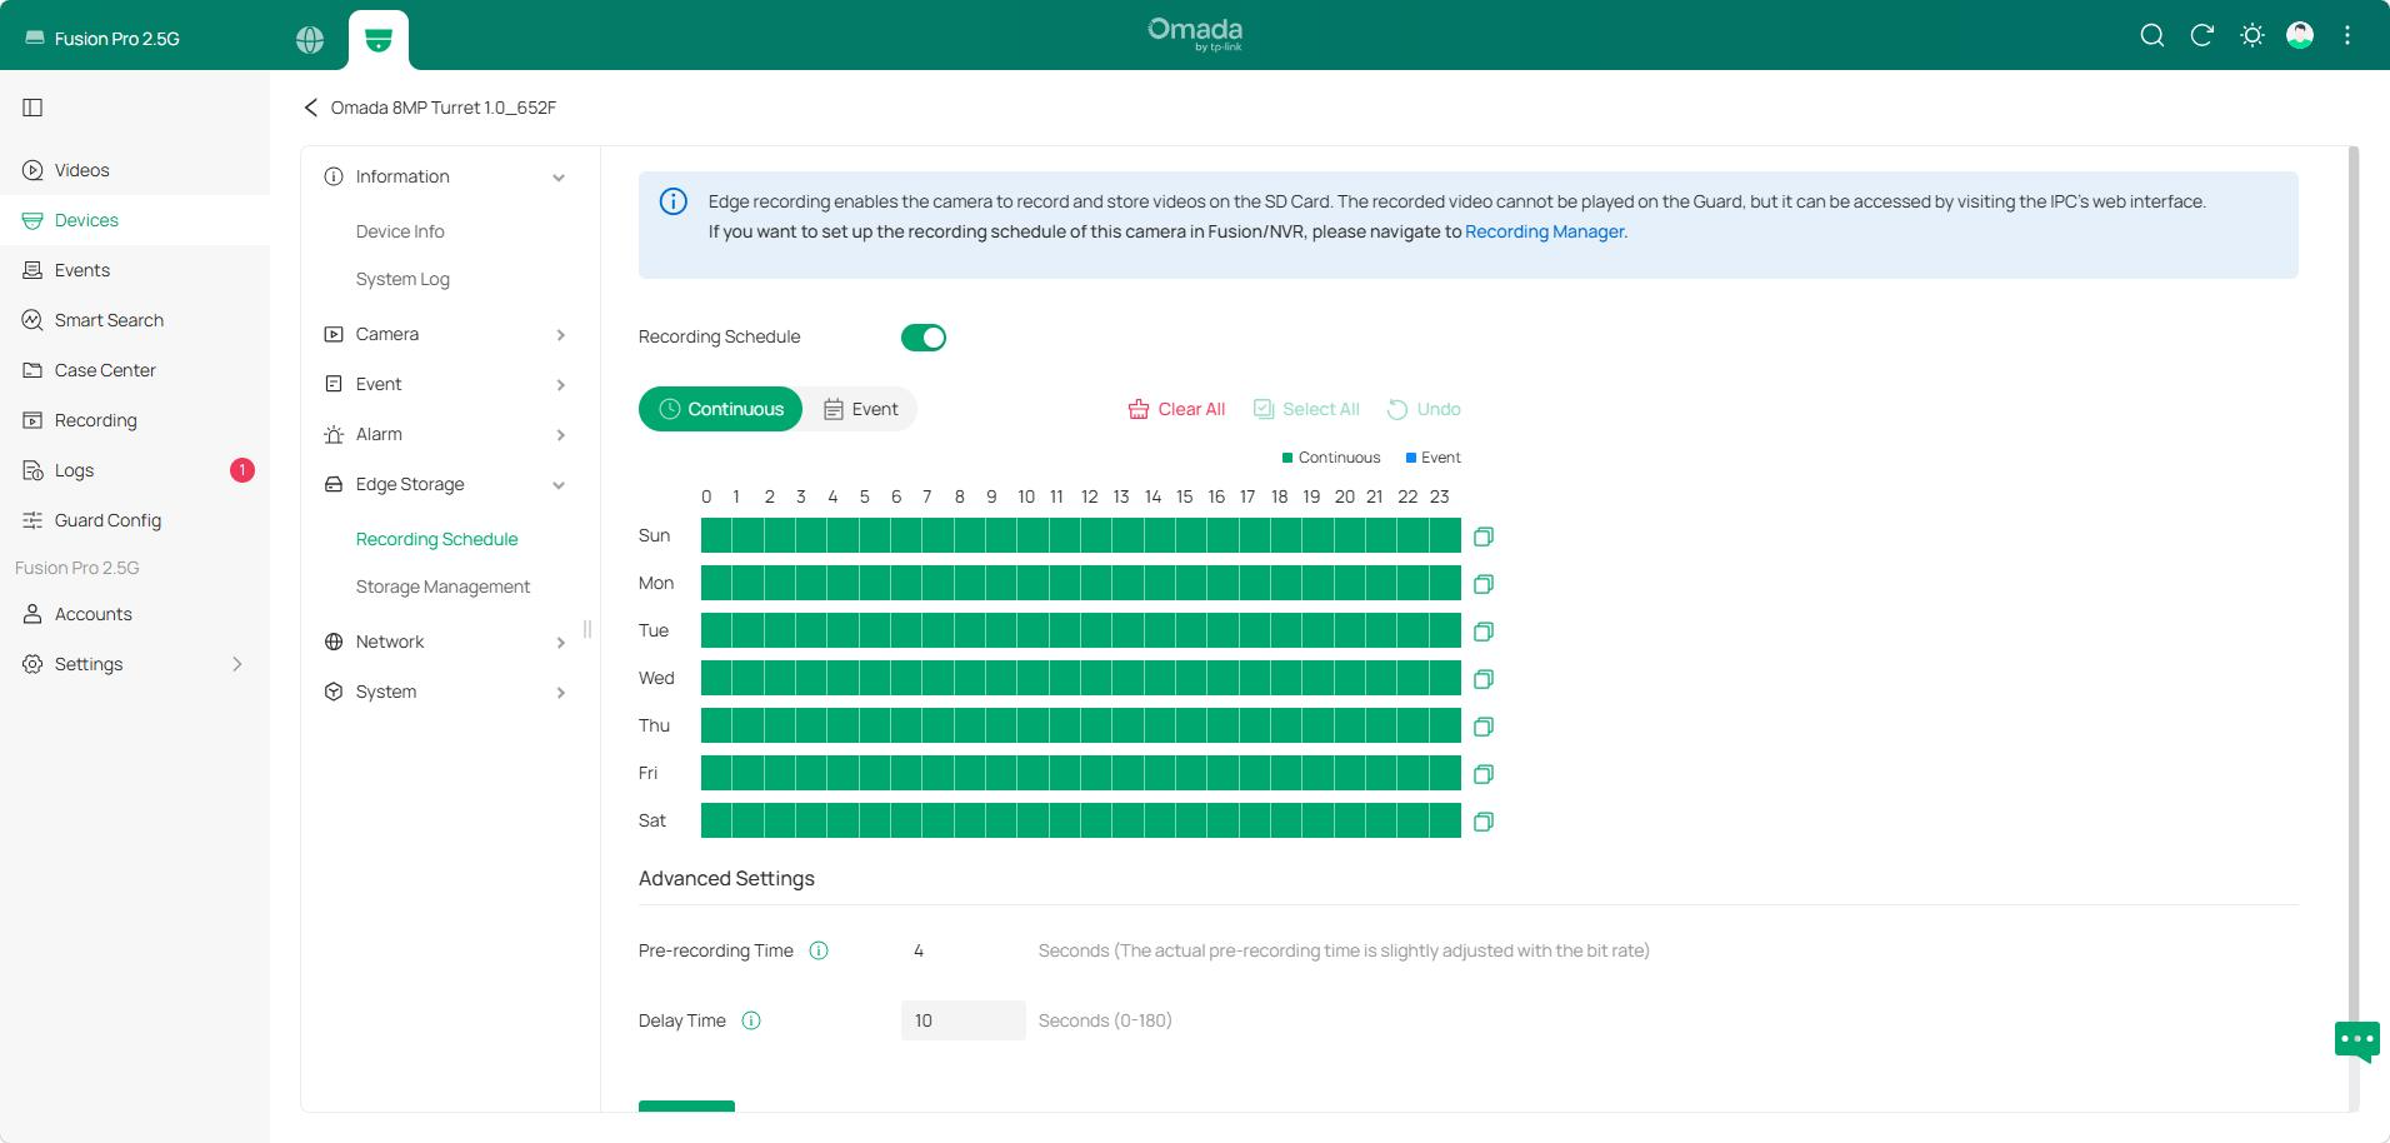
Step 3. Verify camera recording schedule
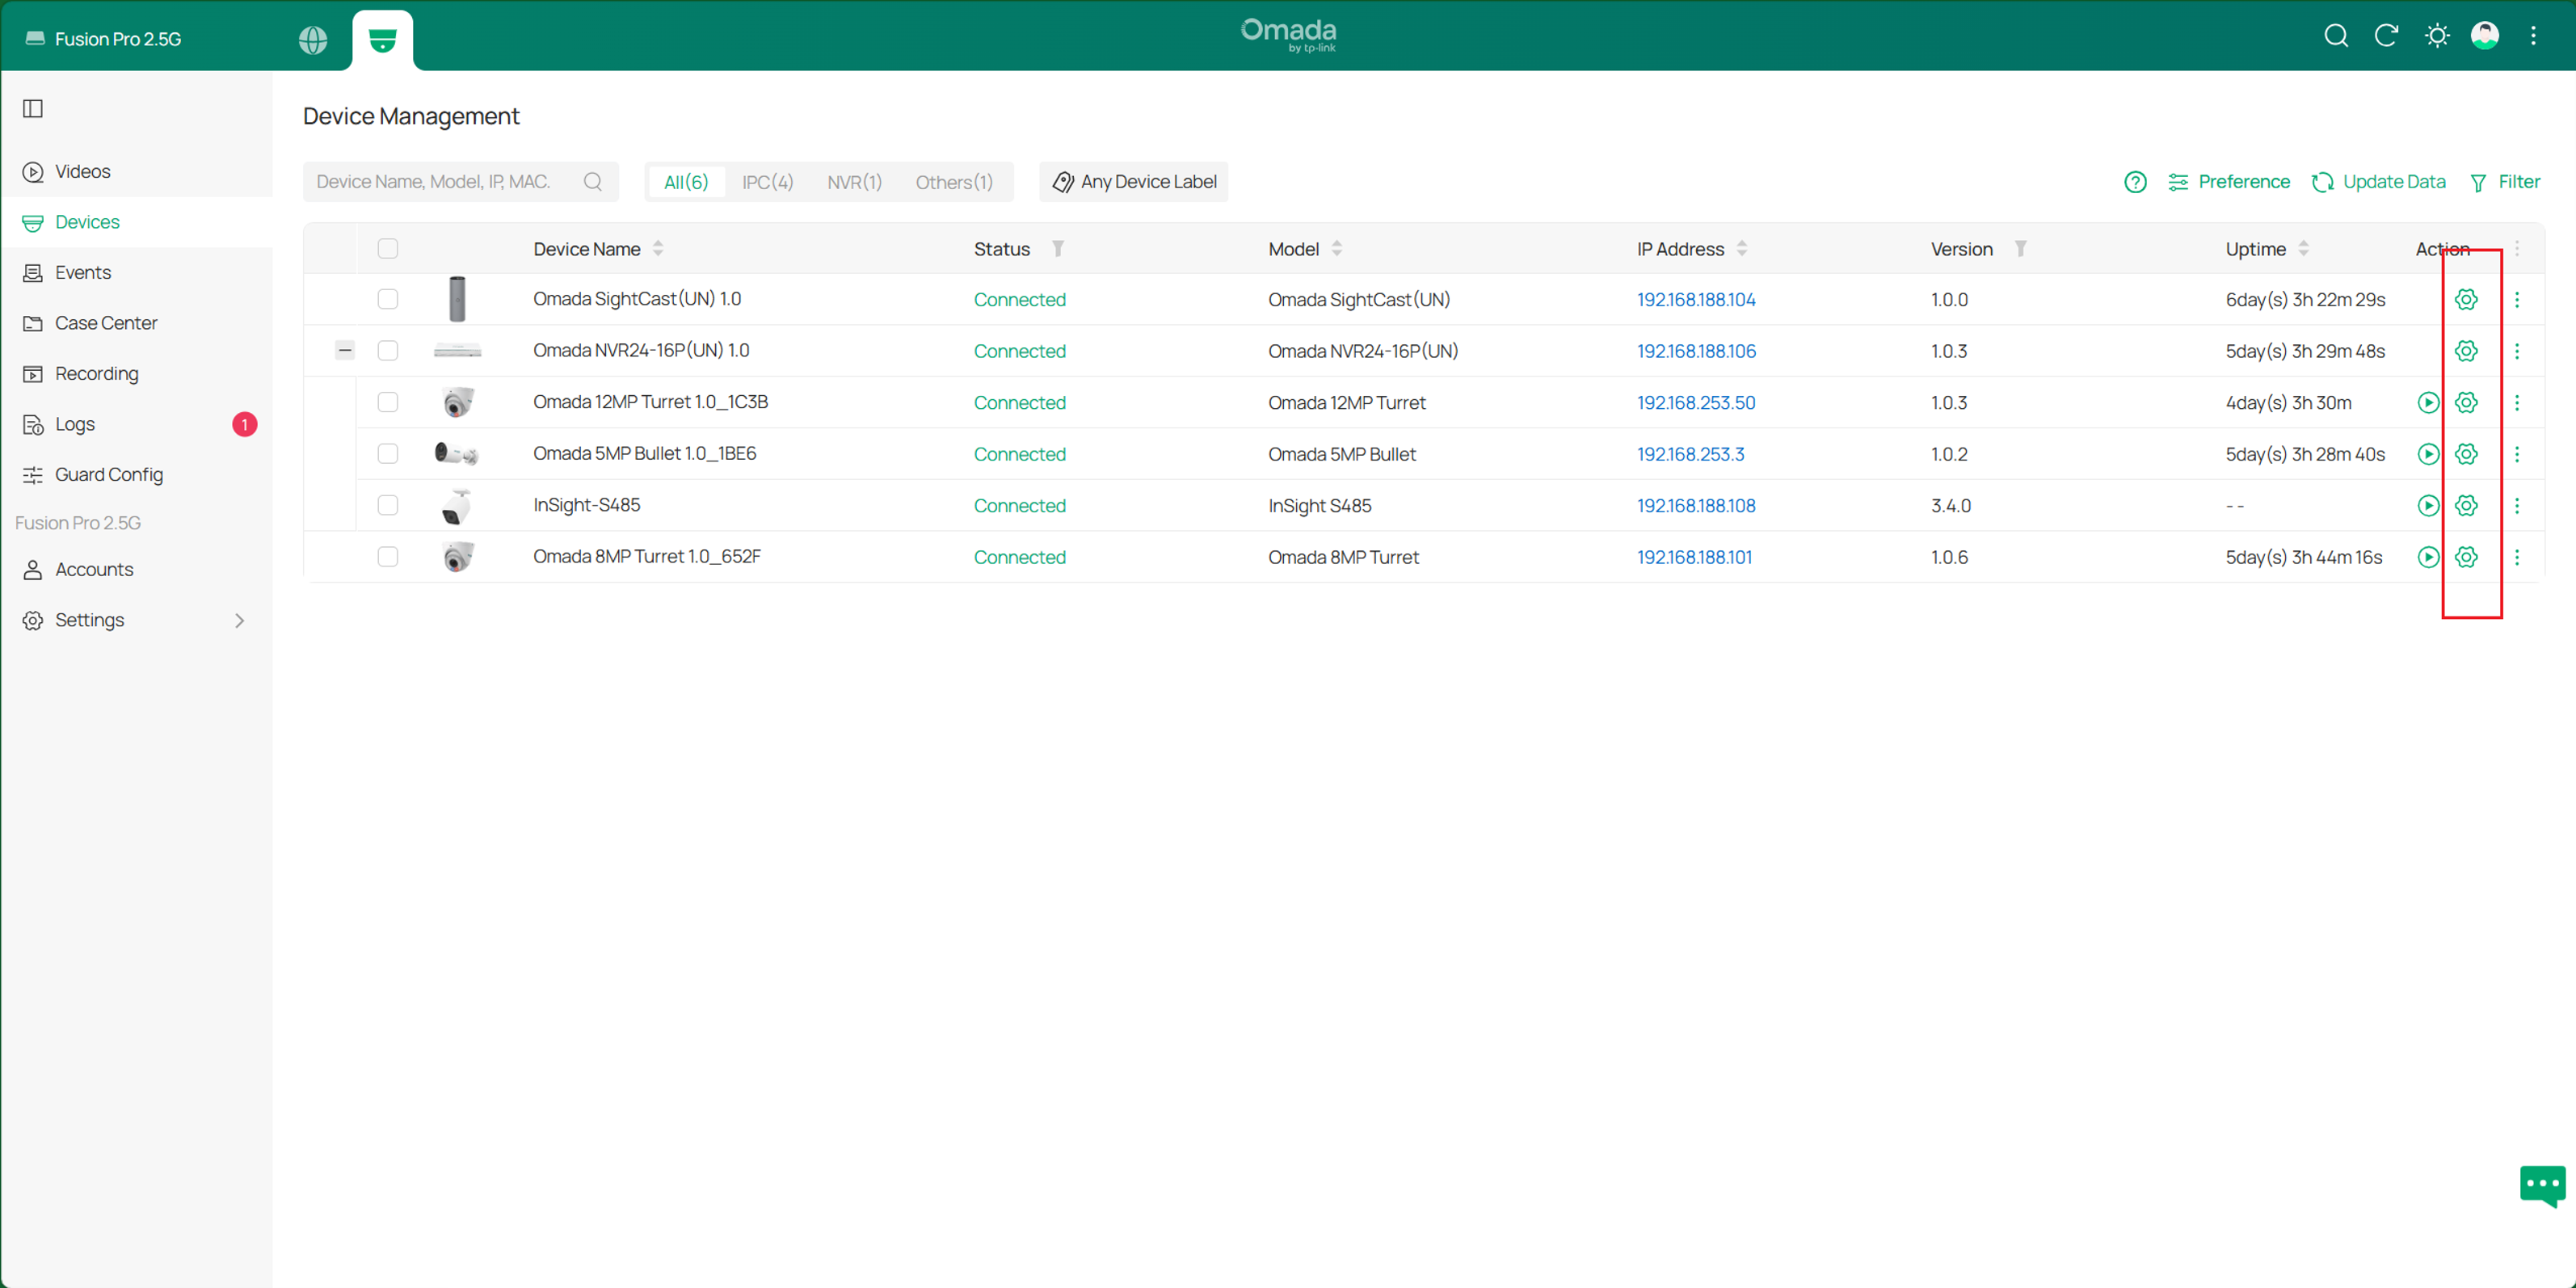
Navigate to Device > Camera Action > Edge Storage > Recording Schedule. Verify that the recording schedule is configured as required and is fully covered by the corresponding Fusion Pro or NVR recording schedule.
Camera recording schedule can be modified from web interface as well. Please refer to How to Configure Recording Schedule on VIGI IPC
Note: Recordings on the SD card that occur outside the Fusion Pro recording schedule will not be synchronized through ANR.
Verification
After configuration is complete, verify that Fusion Pro and the camera are recording as expected. If recording is functioning properly, ANR will automatically recover missing footage when network connectivity is restored after an interruption.
Step 1. Check Fusion Pro Recordings
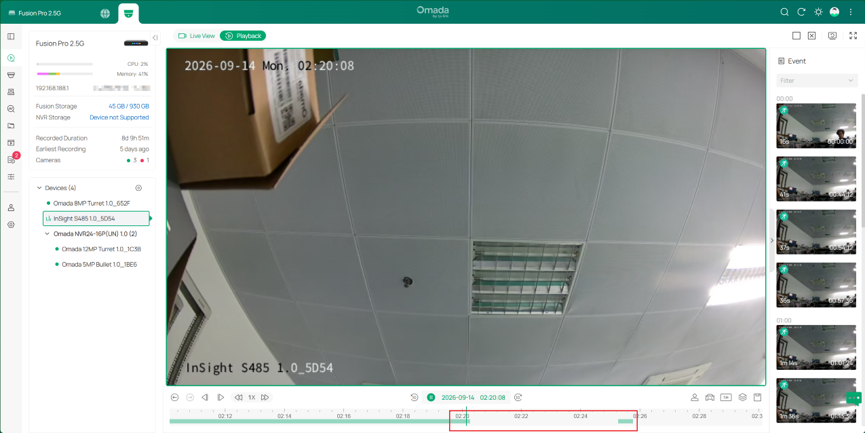
Navigate to Videos > Recording in Fusion Pro. Select the target camera and review the recording timeline. Verify that recordings are available during the configured recording periods.
Step 2. Check camera recordings
To verify recordings stored on the camera's SD card, log in to the camera's web interface and navigate to Playback. Confirm that recordings are available during the configured recording periods.
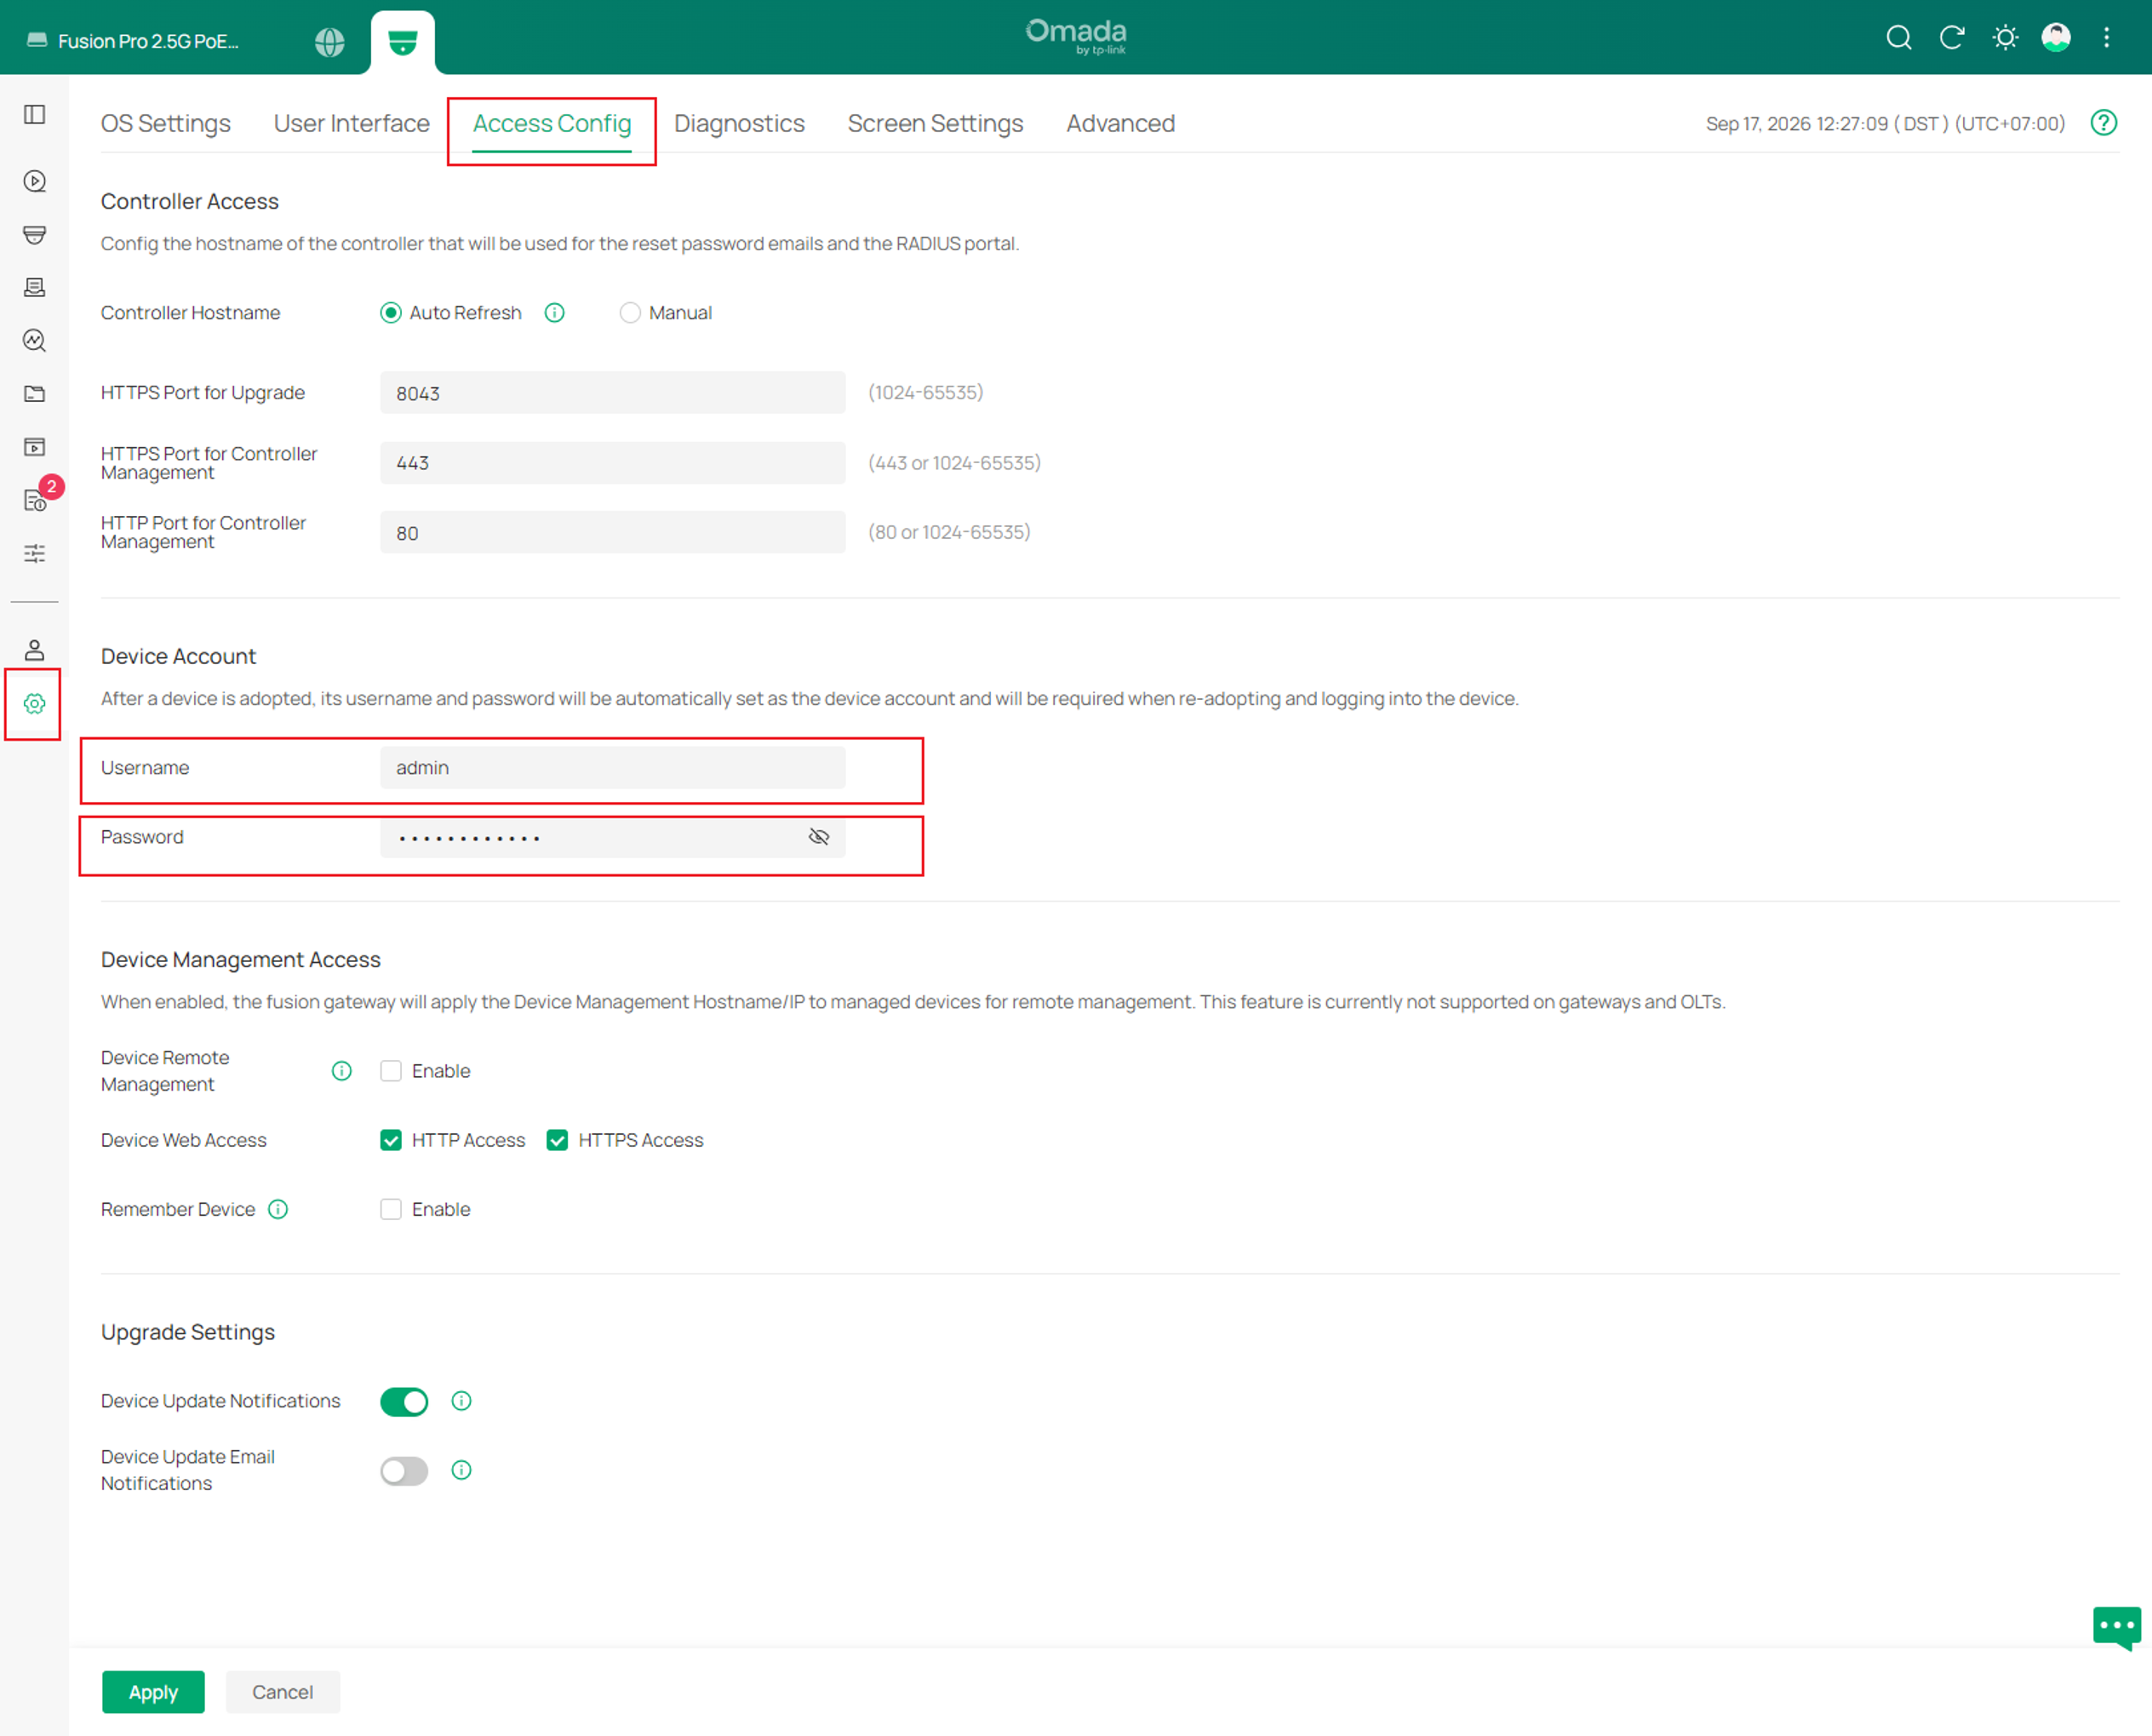
Note: To access the camera's web interface, enter the camera's IP address into a web browser. After the camera is added to Fusion Pro, its login credentials can be viewed under Guard > Settings > System Settings > Access Config.
Conclusion
ANR provides an effective safeguard against recording loss caused by temporary network interruptions. By storing footage on the camera's SD card during an outage and automatically synchronizing the missing recordings back to Fusion Pro when connectivity is restored, ANR helps maintain a complete recording history and improves the reliability of your surveillance system.
To learn more about each function and configuration, please visit Support Home to download or check the manual for your product.
QA
Q1: Can I use ANR with Omada/VIGI NVR, with Cameras managed by the NVR?
A1: Yes. If the camera is managed by NVR, enable ANR on NVR and recordings will be synchronized to the NVR. If the camera is managed by Fusion Pro directly, enable ANR on Fusion Pro and recordings will be synchronized to the Fusion Pro storage.
Q2: What should I do if recordings are not recovered through ANR during verification?
A2: Verify the following:
- The camera model supports ANR.
- A microSD card is installed and functioning properly.
- ANR is enabled in Fusion Pro.
- Recording schedules are configured correctly on both Fusion Pro and the camera.
- The camera has successfully reconnected to Fusion Pro.
If ANR synchronization has recently started, allow the recovery process to complete before refreshing the playback page and checking the recordings again.
Q3: What are the differences between ANR-synchronized recordings and continuous recordings?
A3: The following differences should be noted:
- Recordings synchronized from a camera's SD card to Fusion Pro or an NVR through ANR do not include event data generated during the recovered recording period.
- On the recording timeline, ANR-synchronized recordings do not display thumbnail previews.
