


How to Access and Use Open API in Omada Controller


Contents
Authenticate Open API Requests
Introduction
Omada Open API provides RESTful interfaces that allow third-party applications to programmatically monitor and manage networks through Omada Controller. It supports integration with external systems and automation tools for retrieving network statistics, managing configurations, and configuring firmware management settings. These capabilities help streamline network operations and improve management efficiency across large-scale and multi-site deployments.
Omada Open API supports standard HTTP methods, including GET, POST, PUT, PATCH, and DELETE, and returns responses in JSON format.
Organization-Level Open API provides access to resources and APIs within a specific Omada Controller. It supports three authentication methods: API Key, OAuth 2.0 Client Credentials, and Authorization Code, accommodating integration scenarios such as scheduled tasks, server-to-server communication, and applications requiring user authorization.
Requirements
- Omada Hardware Controller, Omada Software Controller, Omada Cloud-Based Controller or ER7212PC running Controller version 6.4 or later.
Configuration
Create Open API Credentials
Omada Controller supports creating Open API credentials in both Global View and MSP Mode.
Create Credentials in Global View
Step 1. Log in to the Omada Controller, enter Global View, and navigate to Settings > Platform Integration > Open API.
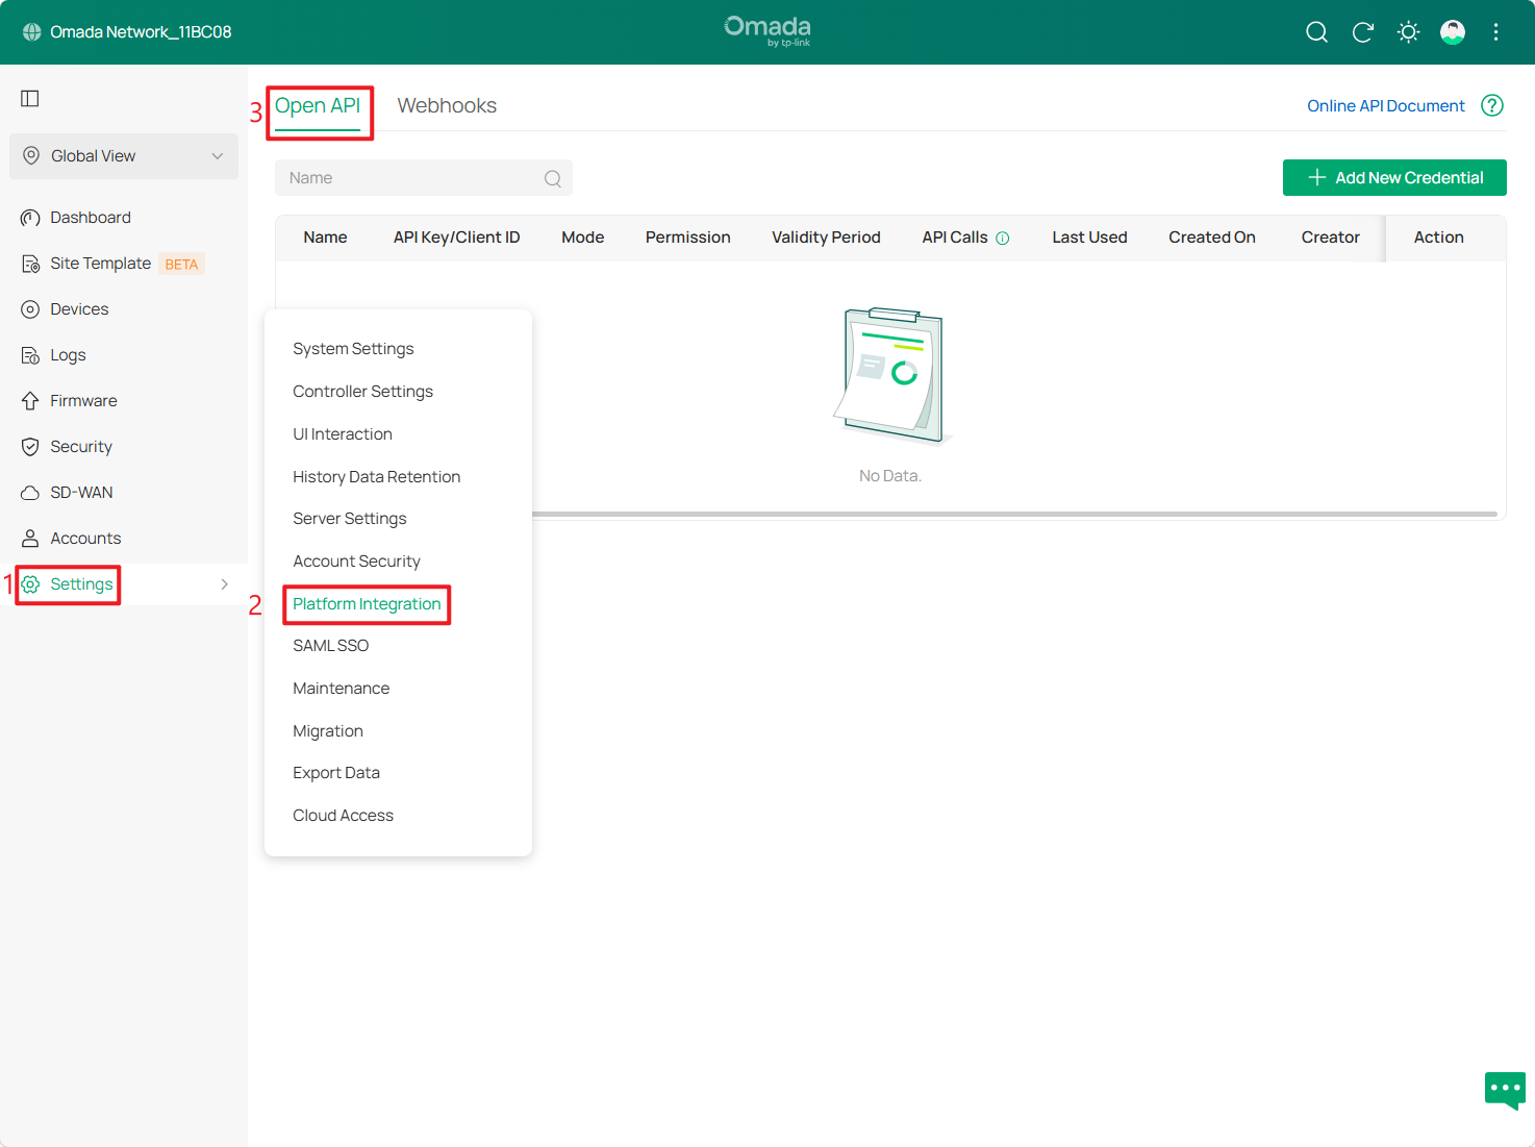
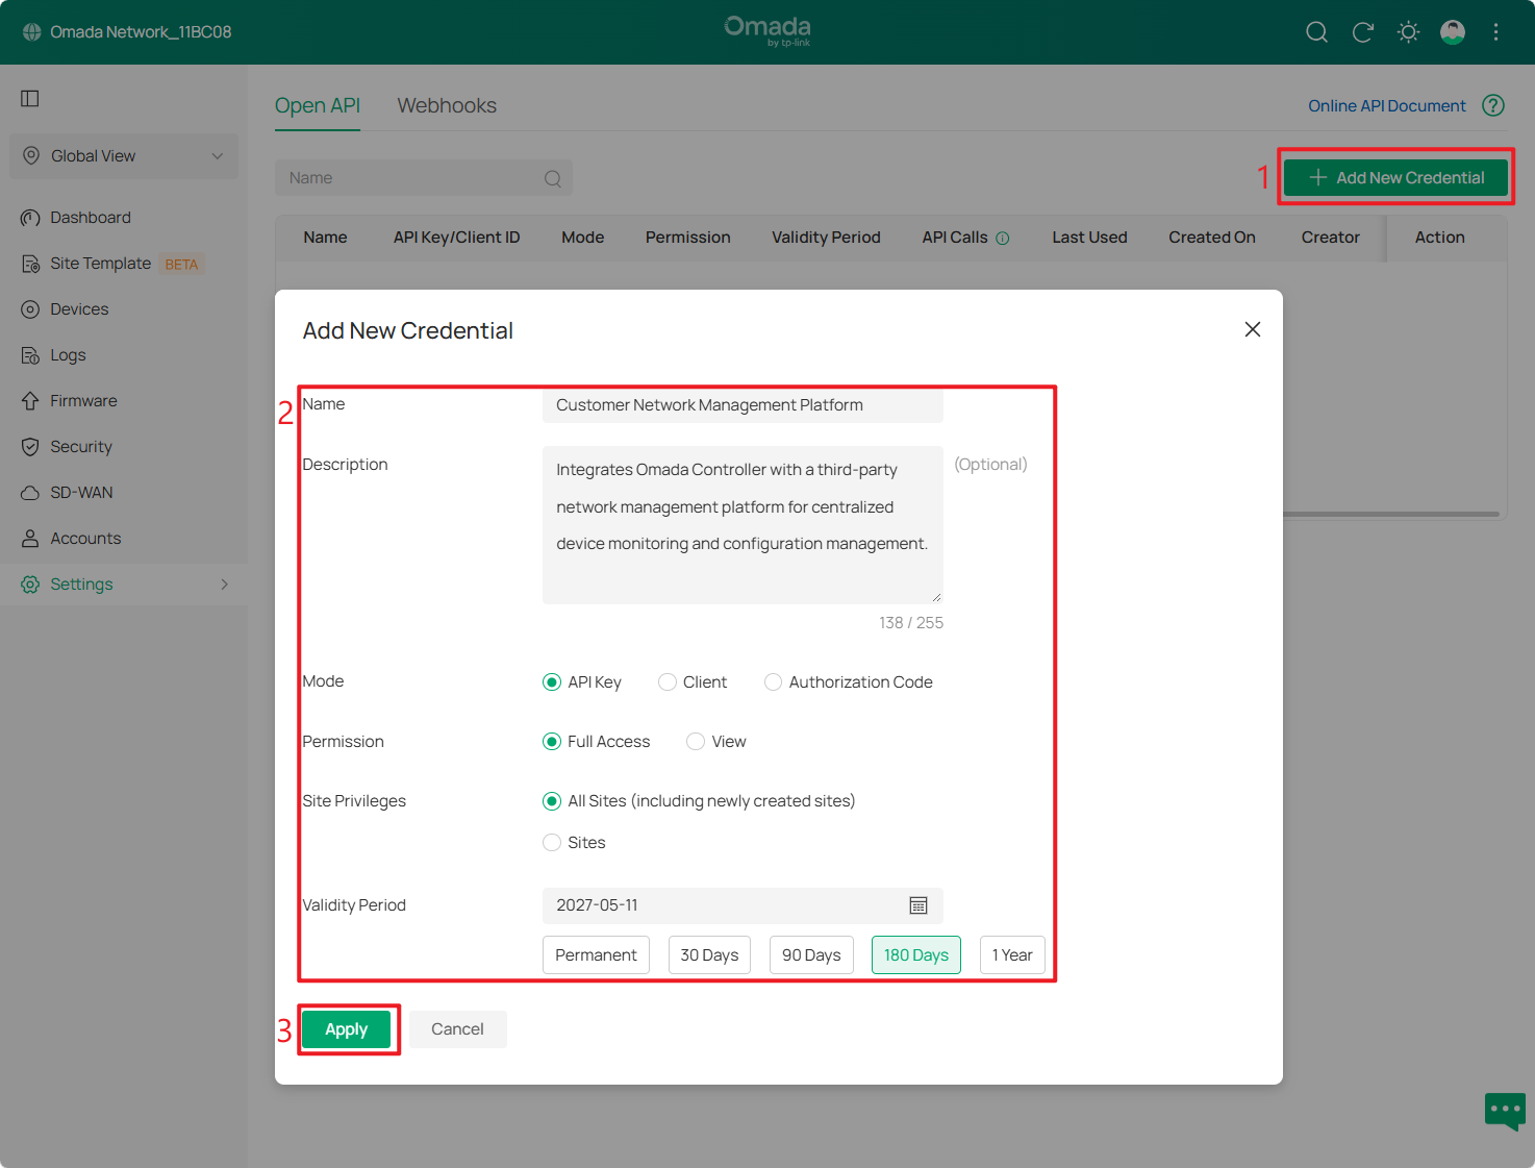
Step 2. Click Add New Credential and configure the following settings:
- Name: Enter a name to identify the credential.
- Description (Optional): Describe the purpose of the credential.
- Mode: Select an authentication method based on the application's authentication requirements:
- API Key:
- Permission: Select View for read-only access or Full Access to allow both reading and modifying configurations.
- Site Privileges: Select All Sites (including newly created sites) or Sites to define the accessible sites.
-
- Client:
- Role: Select a role to define the application's access permissions.
- Site Privileges: Select All Sites (including newly created sites) or Sites to define the accessible sites.
-
- Authorization Code:
- Redirect URL (Optional): Specify the URL where the authorization code will be sent after successful user authorization. If left blank, the authorization code can be obtained without redirection.
Note:
- In Authorization Code mode, API access follows the permissions of the Omada Controller user account used for authorization.
- To use a Redirect URL, contact TP-Link Technical Support to have the domain added to the Omada system's trusted list.
- Validity Period: Set the credential's expiration date or select Permanent.
After completing the configuration, click Apply.
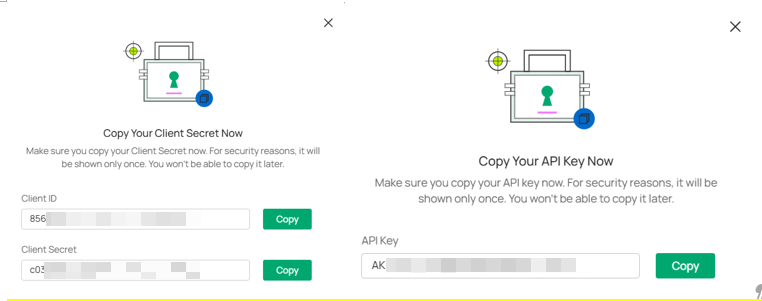
Step 3. After creating the credential, a pop-up window displays the API Key (API Key mode) or Client ID and Client Secret (Client and Authorization Code modes). Copy and securely store the API Key or Client Secret, as these values are displayed only once and cannot be retrieved later. The Client ID remains available in the credential details.
Create Credentials in MSP View
When MSP Mode is enabled, Open API credentials can also be created in MSP View to access MSP resources and resources across multiple authorized customers.
Step 1. Log in to the Omada Controller, enter MSP View, and navigate to Settings > Platform Integration > Open API.
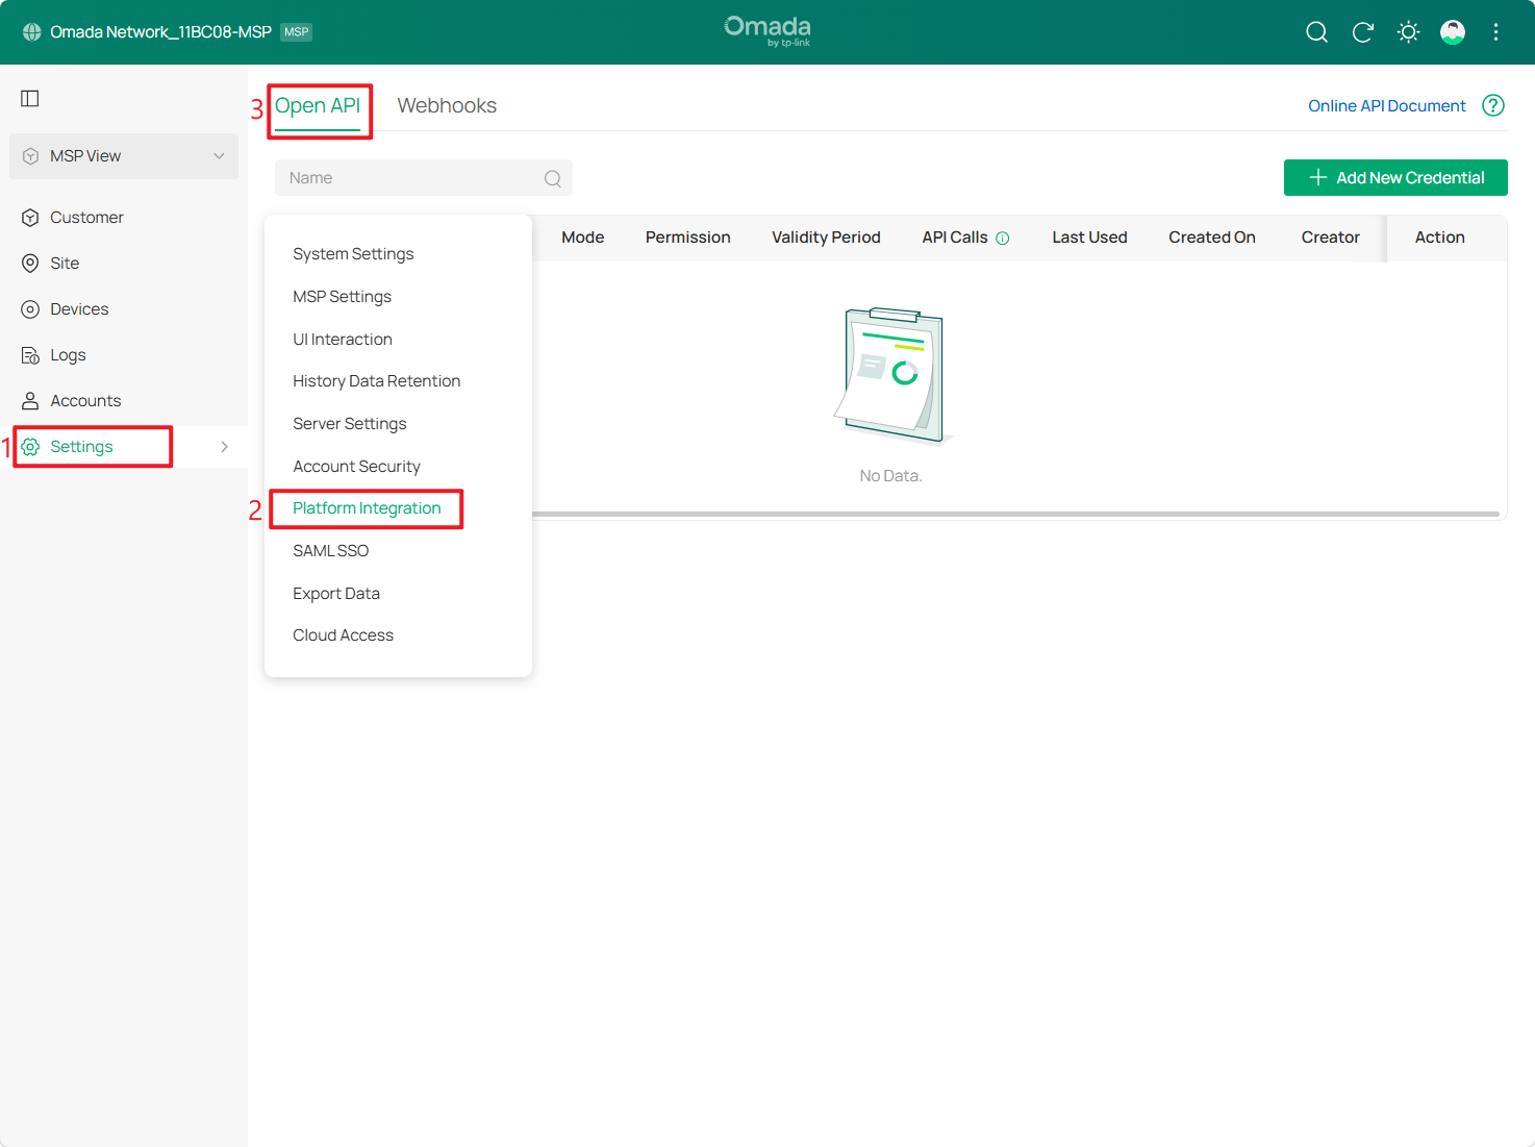
Step 2. Click Add New Credential. Configure Name, Description, Mode, and Validity Period as described in Global View. Configure the MSP-specific access permissions as follows:
API Key:
- Customer Privileges: Select All Customers (including newly created customers), Customer (select specific customers under Applicable Customer), or None to define the customer access scope.
Client:
- MSP Role: Select a role to define MSP-level permissions.
- Customer Privileges: Select All Customers (including newly created customers), Customer (select specific customers under Applicable Customer), or None.
- Customer Role: Select a role to define permissions for the authorized customers.
Authorization Code: The configuration is the same as in Global View.
After completing the configuration, click Apply.
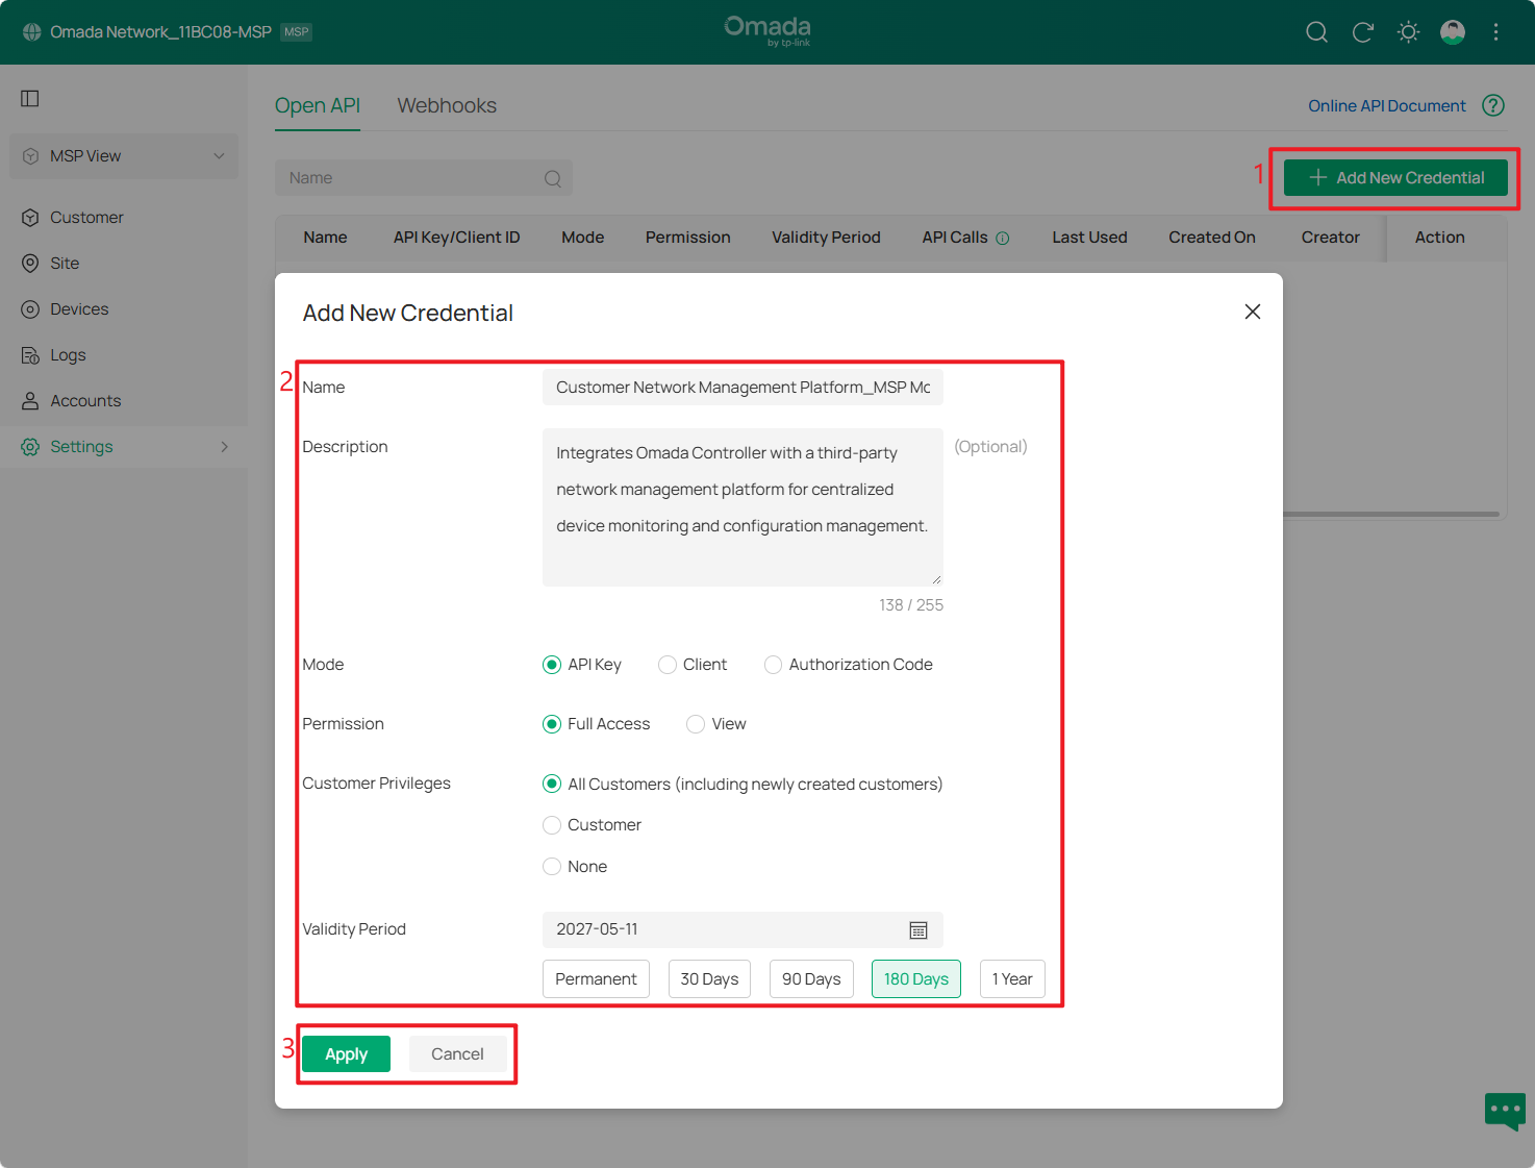
Step 3. After creating the credential, copy and securely store the API Key or Client Secret from the pop-up window.
Authenticate Open API Requests
After creating an Open API credential, use the corresponding authentication method to access the Omada Controller APIs. API Key mode supports direct authentication, while Client and Authorization Code modes require an Access Token.
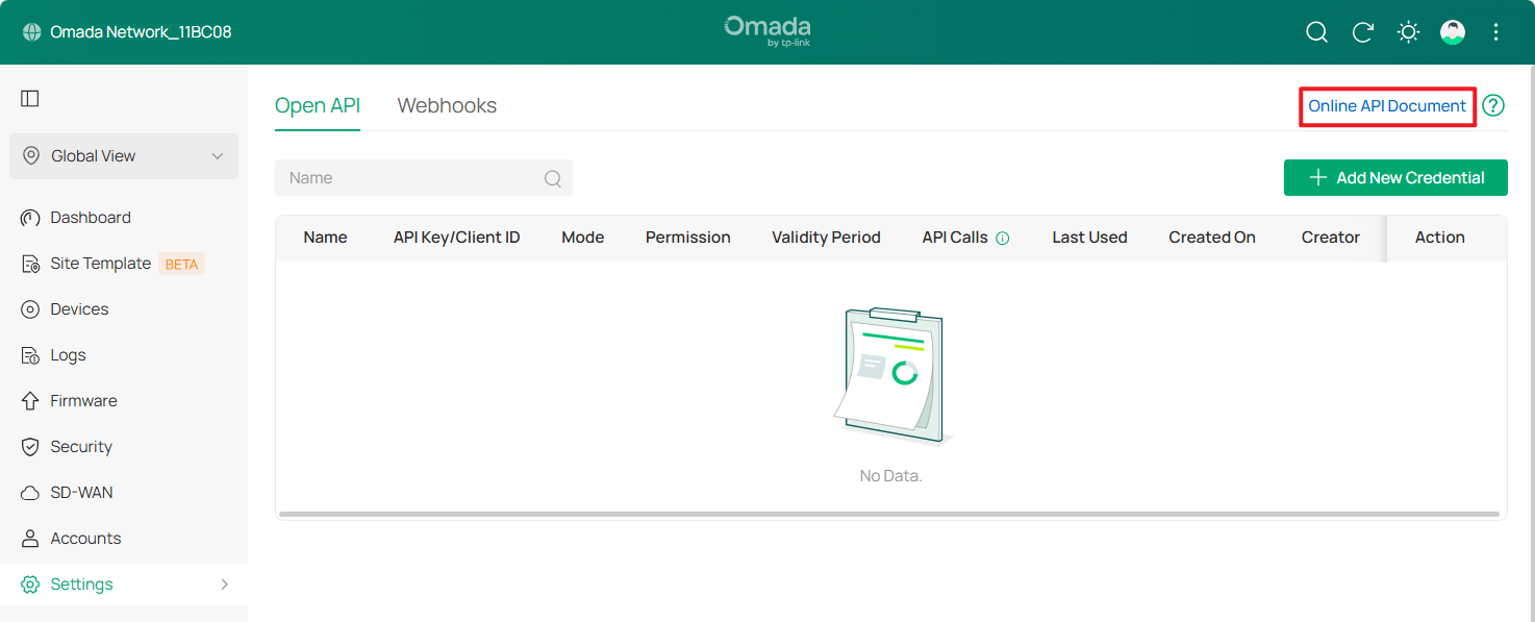
Note: For detailed authentication procedures, API endpoints, and request parameters, click Online API Document in the upper-right corner of the Open API page.
API Key Authentication
API Key mode does not require an Access Token. When calling an OpenAPI interface, include the API Key in the HTTP Authorization header using the following format:
|
Authorization: Bearer AK-xxxxxxxxxxxxxxxxxxxxxxxxxxxxxxxx |
Authorization Code Authentication
Authorization Code mode allows API access to be authorized using an Omada Controller user account.
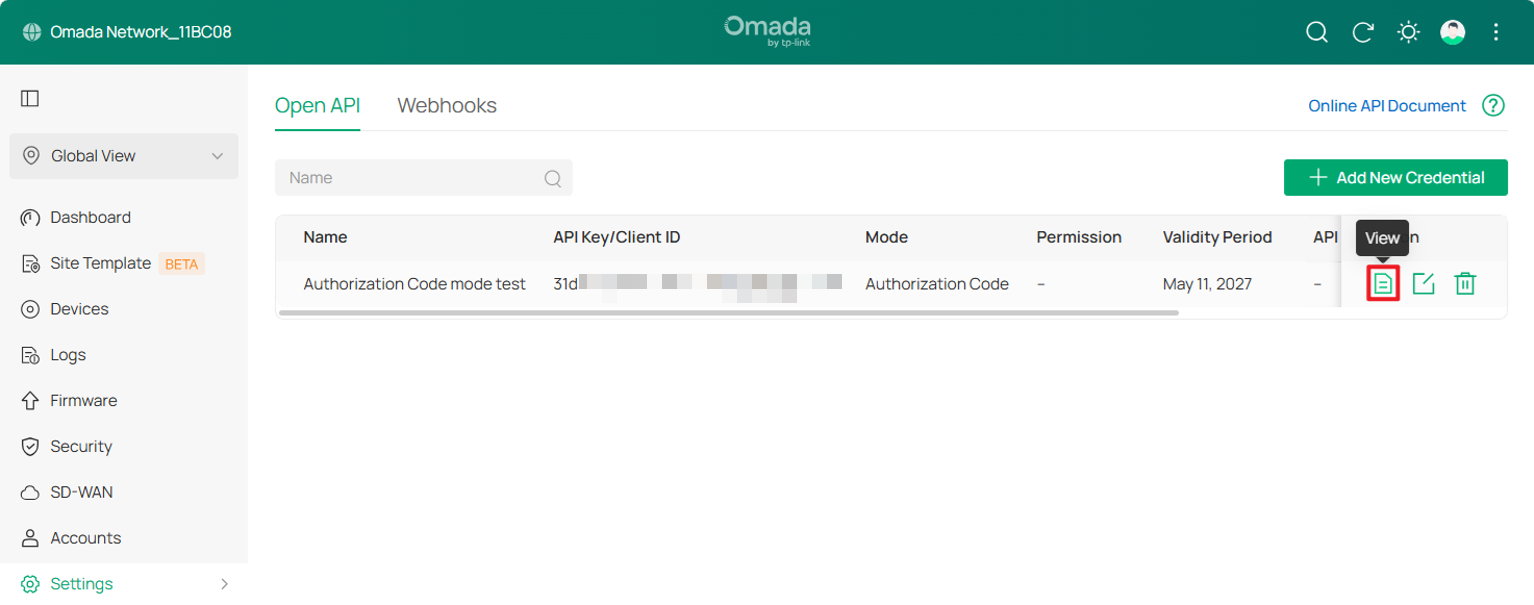
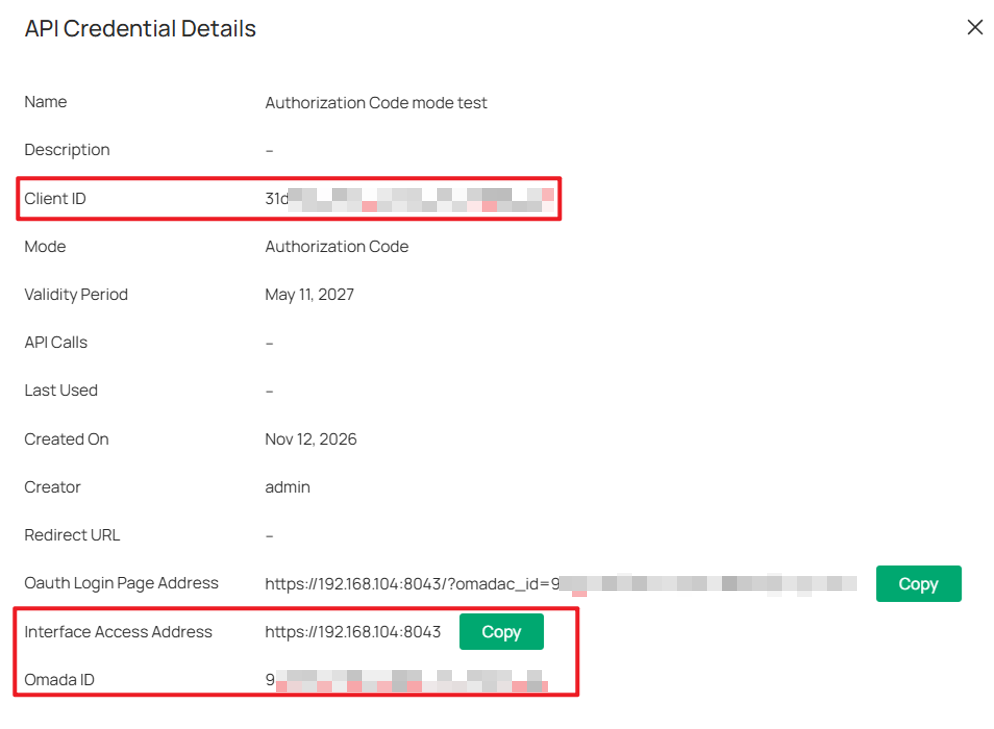
Step 1. On the Open API page, locate the Authorization Code credential and click View under Action. In the API Credential Details window, find the Client ID, Interface Access Address and Omada ID.
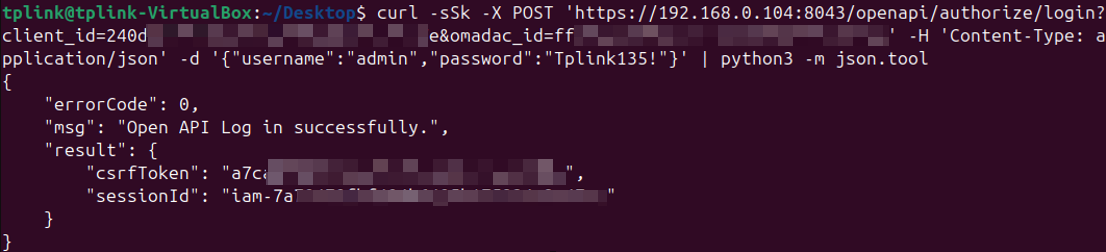
Step 2. Call the Login API to obtain the csrfToken and sessionId.
The following Linux curl example assumes that no Redirect URL is configured and Two-Factor Authentication (2FA) is disabled for the user account.
|
curl -sSk -X POST '<Interface Access Address>/openapi/authorize/login?client_id=<Client ID>&omadac_id=<Omada ID>' \ -H 'Content-Type: application/json' -d '{"username":"<Username>","password":"<Password>"}' \ | python3 -m json.tool |
Note:
- The python3 -m json.tool command formats the JSON response for easier reading without modifying its content.
- Save the returned csrfToken and sessionId for subsequent requests.
- If 2FA is enabled for the user account or enforced by the controller, the Login API returns a 2FA-related error code instead of the csrfToken and sessionId. Refer to Section 3.2.1.3, 2FA Login, in the Organization Level Open API Access Guide for further instructions.
Step 3. Call the Obtain Authorization Code interface using the csrfToken and sessionId returned in Step 2.
|
curl -sSk -X POST '<Interface Access Address>/openapi/authorize/code?client_id=<Client ID>&omadac_id=<Omada ID>&response_type=code' \ -H 'Content-Type: application/json' -H 'Csrf-Token: <csrfToken>' \ -H 'Cookie: TPOMADA_SESSIONID=<sessionId>' | python3 -m json.tool |

Note: The Authorization Code is valid for 2 minutes. If it expires, obtain a new Authorization Code.
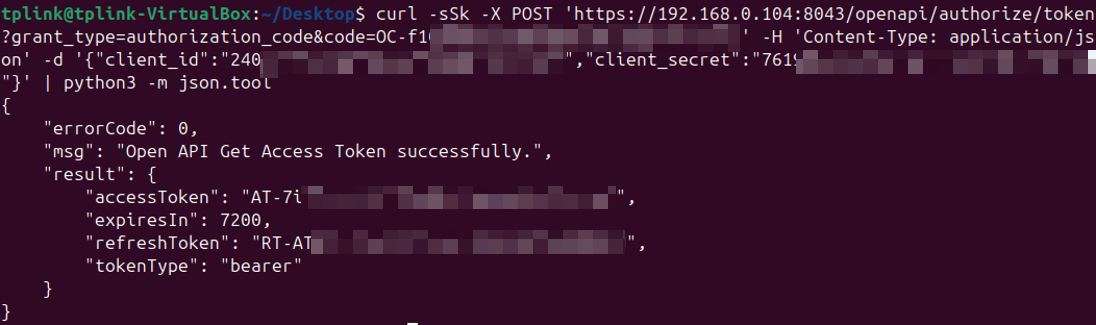
Step 4. Call the Obtain Access Token interface using the Authorization Code returned in Step 3, the Client ID, and the Client Secret saved during credential creation.
|
curl -sSk -X POST '<Interface Access Address>/openapi/authorize/token?grant_type=authorization_code&code=<Authorization Code>' \ -H 'Content-Type: application/json' \ -d '{"client_id":"<Client ID>","client_secret":"<Client Secret>"}' | python3 -m json.tool |
Client Credentials Authentication
Client mode allows applications to obtain an Access Token directly using their API credentials, without user interaction.
Step 1. On the Open API page, locate the Client credential and click View under Action to obtain the Client ID, Interface Access Address, and Omada ID, as shown in Step 1 of Authorization Code Authentication.
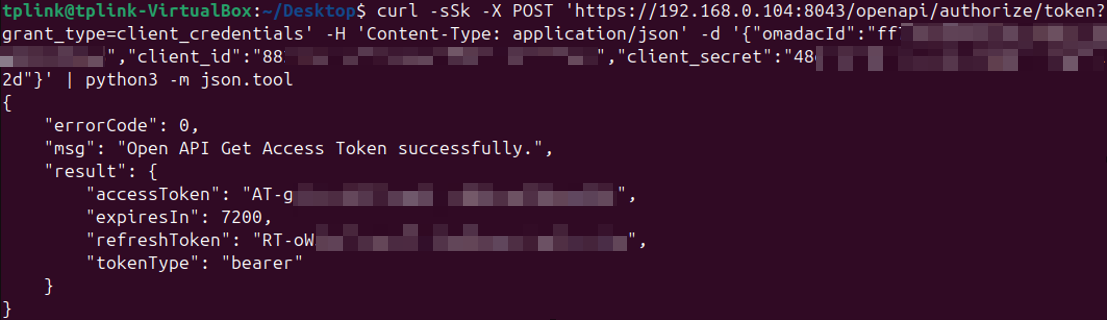
Step 2. Call the Obtain Access Token interface using the Client ID and the Client Secret saved during credential creation.
|
curl -sSk -X POST '<Interface Access Address>/openapi/authorize/token?grant_type=client_credentials' \ -H 'Content-Type: application/json' \ -d '{"omadacId":"<Omada ID>","client_id":"<Client ID>","client_secret":"<Client Secret>"}' | python3 -m json.tool |
Token Validity and Refresh
In both Client and Authorization Code modes, the Access Token is valid for 2 hours, and the Refresh Token is valid for 14 days.
Note: Existing tokens become invalid if sites are copied or imported, or if the credential's permission-related settings (such as roles, site privileges, or customer privileges) are changed in the controller. In such cases, authentication must be performed again.
Step 1. Call the Refresh Access Token interface using the refreshToken obtained previously.
|
curl -sSk -X POST '<Interface Access Address>/openapi/authorize/token?grant_type=refresh_token&refresh_token=<refreshToken>' \ -H 'Content-Type: application/json' \ -d '{"client_id":"<Client ID>","client_secret":"<Client Secret>"}' | python3 -m json.tool |
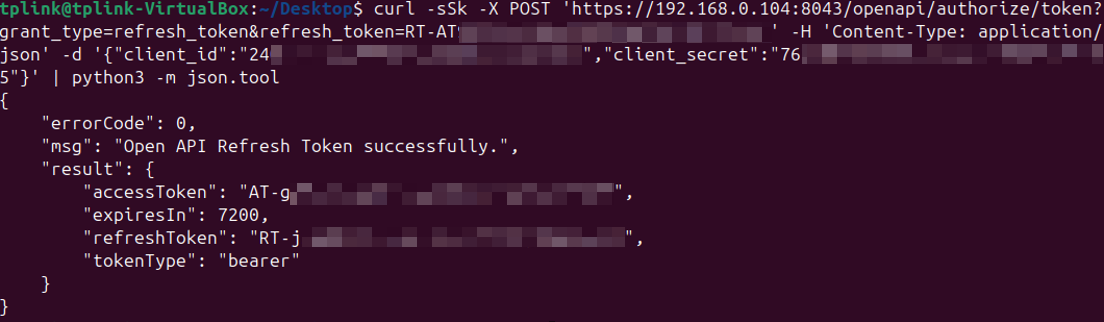
Step 2. After a successful refresh, use the returned Access Token for subsequent API requests and securely store the new Refresh Token for future refresh requests.
Call Open API Interfaces
The following examples demonstrate how to use five HTTP methods—PATCH, GET, PUT, DELETE, and POST—through Omada Open API. The selected interfaces illustrate practical operations involving device management, network monitoring, configuration changes, and firmware management. The PATCH examples also demonstrate how to authenticate API requests using either an Access Token or an API Key.
Modify try-beta channel info (PATCH)
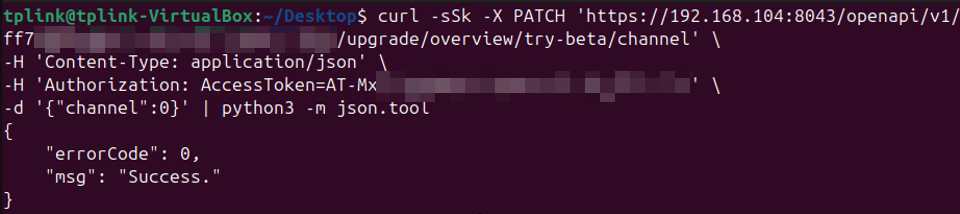
The following examples demonstrate how to call the Modify try-beta channel info interface using either an Access Token or an API Key for authentication.
The channel parameter supports three values: 0 for Stable, 1 for Release Candidate (RC), and 2 for Beta.
Example 1: Using an Access Token
|
curl -sSk -X PATCH '<Interface Access Address>/openapi/v1/<Omada ID>/upgrade/overview/try-beta/channel' \ -H 'Content-Type: application/json' \ -H 'Authorization: AccessToken=<accessToken>' \ -d '{"channel":0}' | python3 -m json.tool |
Example 2: Using an API Key
Note: This example performs a write operation, so ensure that Permission is set to Full Access for this API Key credential.
|
curl -sSk -X PATCH '<Interface Access Address>/openapi/v1/<Omada ID>/upgrade/overview/try-beta/channel' \ -H 'Content-Type: application/json' \ -H 'Authorization: Bearer <API Key>' \ -d '{"channel":1}' | python3 -m json.tool |
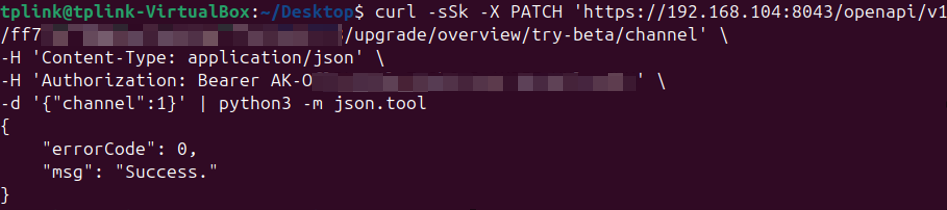
After successful execution, the API returns errorCode: 0, indicating that the request was processed successfully.
Get Wi-Fi Summary (GET)
Call the Get wifi summary interface to retrieve Wi-Fi statistics for a specified site and time range.
|
curl -sSk -X GET '<Interface Access Address>/openapi/v1/<Omada ID>/sites/<Site ID>/dashboard/wifi-summary?start=<Start Timestamp>&end=<End Timestamp>' \ -H 'Authorization: AccessToken=<accessToken>' | python3 -m json.tool |
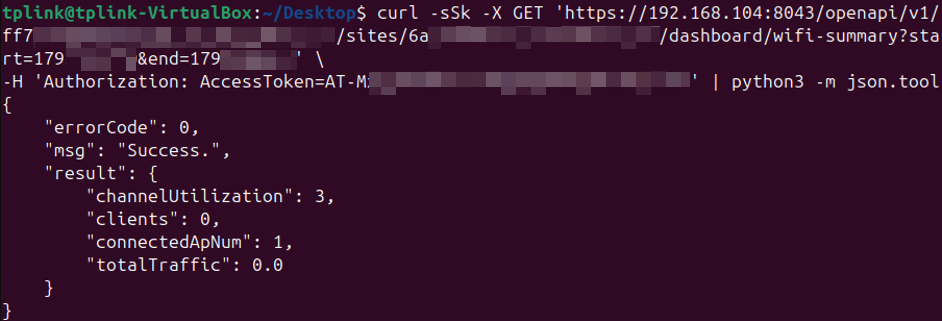
Note: The Site ID can be obtained through the Get Site List interface. The start and end parameters specify the query time range using Unix timestamps in seconds.
Modify Application Control General Settings (PUT)
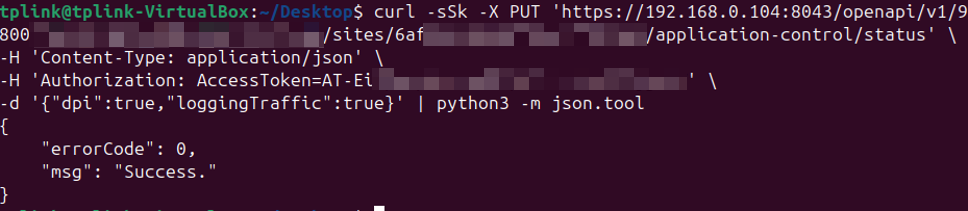
Call the Modify application control general settings interface to update application control settings.
|
curl -sSk -X PUT '<Interface Access Address>/openapi/v1/<Omada ID>/sites/<Site ID>/application-control/status' \ -H 'Content-Type: application/json' \ -H 'Authorization: AccessToken=<accessToken>' \ -d '{"dpi":true,"loggingTraffic":true}' | python3 -m json.tool |
Delete an IP-MAC Binding (DELETE)
Call the Delete IP-MAC binding interface to delete an existing IP-MAC binding entry.
|
curl -sSk -X DELETE '<Interface Access Address>/openapi/v1/<Omada ID>/sites/<Site ID>/ip-mac-binds/<Bind ID>' \ -H 'Authorization: AccessToken=<accessToken>' | python3 -m json.tool |

Note: The Bind ID can be obtained through the Get IP-MAC binding list interface.
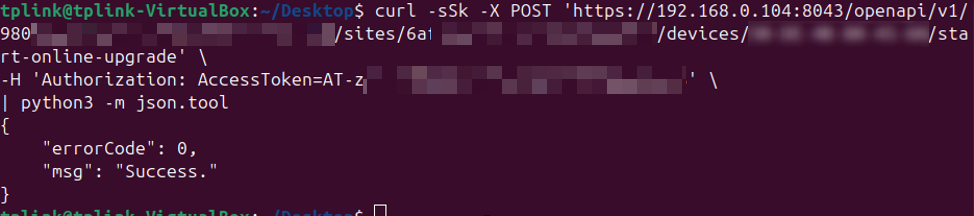
Start Online Upgrade (POST)
Call the Start online upgrade interface to initiate an online firmware upgrade for a specified device.
|
curl -sSk -X POST '<Interface Access Address>/openapi/v1/<Omada ID>/sites/<Site ID>/devices/AA-BB-CC-DD-EE-FF/start-online-upgrade' \ -H 'Authorization: AccessToken=<accessToken>' \ | python3 -m json.tool |
Conclusion
Omada Open API enables third-party applications to integrate network monitoring, configuration management, and firmware management into automated workflows. By selecting the appropriate authentication method—API Key, Client Credentials, or Authorization Code—applications can securely access Controller resources and perform supported operations through REST APIs. This helps reduce repetitive manual operations and improve management efficiency across large-scale and multi-site networks.
To learn more about each function and configuration, please visit Support Home to download or check the manual for your product.
QA
Q1: Can an API Key or Access Token from a Credential created in MSP View be used to call Customer-level (Global View) and Site-level APIs?
A1: Yes. They can be used to call MSP-level, Customer-level, and Site-level APIs. However, access to Customer-level and Site-level APIs requires permission to access the corresponding customers and sufficient permissions to view or modify the requested resources.
In API Key and Client modes, these permissions are defined in the Credential configuration. In Authorization Code mode, API access follows the permissions of the Omada Controller user account used for authorization.
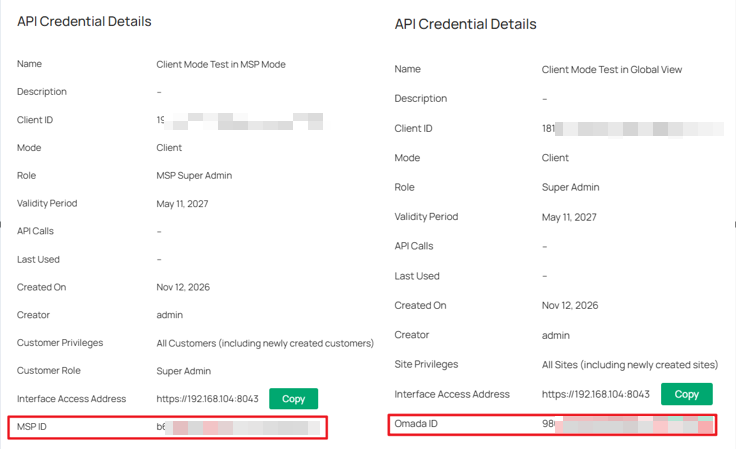
Q2: In MSP Mode, which IDs should be used in API request paths when using an API Key or Access Token from an MSP-level Credential?
A2: The IDs required in the request path depend on the API level, as shown in the table below.
|
API level |
Required Path Parameters |
Example request path |
|
MSP level |
MSP ID |
/openapi/v1/msp/{mspId}/general-setting |
|
Customer level |
Target customer's Omada ID |
/openapi/v1/{omadacId}/global/controller/setting/network/radius-server |
|
Site level |
Target customer's Omada ID and target site's Site ID |
/openapi/v1/{omadacId}/sites/{siteId}/wireless-network/ssids |
The MSP ID is shown in the Credential details in MSP View. The target customer's Omada ID is shown in the Credential details in that customer's Global View.
Q3: Do Access Tokens, Refresh Tokens, and API Keys have expiration times?
A3: In Client and Authorization Code modes, Access Tokens are valid for 2 hours, while Refresh Tokens are valid for 14 days. API Keys are long-lived static credentials without a fixed expiration time. However, all three authentication modes are subject to the Validity Period configured when the Credential is created.
Q4: How does Two-Factor Authentication (2FA) work with Open API authentication?
A4: In Authorization Code mode, if 2FA is enabled for the user account or enforced by the controller, the Login API returns a 2FA-related error code instead of the csrfToken and sessionId. The 2FA Login interface must then be used to complete authentication. Refer to Section 3.2.1.3, 2FA Login, in the Organization Level Open API Access Guide for details.
Q5: What is the difference between using an API Key and an Access Token when calling Open API interfaces?
A5: Both are included in the HTTP Authorization header, but they use different authentication prefixes:
- API Key: Authorization: Bearer <API Key>
- Access Token: Authorization: AccessToken=<accessToken>
Q6: How many Open API Credentials can be created in Omada Controller?
A6: Up to 20 Credentials can be created in each view (Global View and MSP View). If the limit is reached, an existing Credential must be deleted before a new one can be created.
Q7: Where can Open API interface updates and version compatibility information be found?
A7: The Online API Document provides API specifications, version requirements, and an API ChangeLog that records added, modified, deprecated, and removed interfaces. Refer to the API ChangeLog to check interface changes and compatibility with different Omada Controller versions.
Q8: How many API operations can be included in a batch request?
A8: A single batch request can include up to 20 API operations using the Batch Processing OpenAPIs or Batch Processing MSP OpenAPIs interfaces.
Q9: What happens when an Open API Credential expires or is deleted?
A9: When a Credential expires, its associated authentication credentials (API Key or Client ID and Client Secret) become invalid. The Credential can be reactivated by updating its Validity Period. Deleting a Credential permanently invalidates its associated authentication credentials.
Q10: Is there an API request rate limit for Omada Cloud-Based Controller?
A10: Yes. Each Omada organization has a limit of 10 API requests per second. This limit applies to the organization as a whole, rather than to individual Credentials.
