


How to Troubleshoot Wi‑Fi Connection Failures on Omada EAP


Contents
Troubleshooting Steps in Controller mode
Troubleshooting Steps in Standalone mode
Introduction
Wi-Fi connection failures on Omada EAP access points may prevent clients from joining or maintaining a stable wireless connection. These issues can be caused by SSID misconfiguration, authentication failures, DHCP or VLAN issues, incorrect security policies, or poor wireless signal conditions.
This guide provides a structured troubleshooting workflow for both Controller mode and Standalone mode to help quickly identify the root cause and restore normal wireless connectivity.
Requirements
- Omada EAP series
- Omada Controller (Software Controller / Hardware Controller / Cloud Based Controller, v6.0 and above)
- Client devices with Wi-Fi capability (e.g., smartphones, laptops, tablets)
Troubleshooting Steps
Troubleshooting Steps in Controller mode
Wi‑Fi connection failures can prevent clients from accessing the network or maintaining stable communication. To effectively diagnose and resolve such issues in an Omada environment, it is important to systematically check configuration settings, signal conditions, and client behavior.
Step 1. Verify SSID basic and advanced settings.
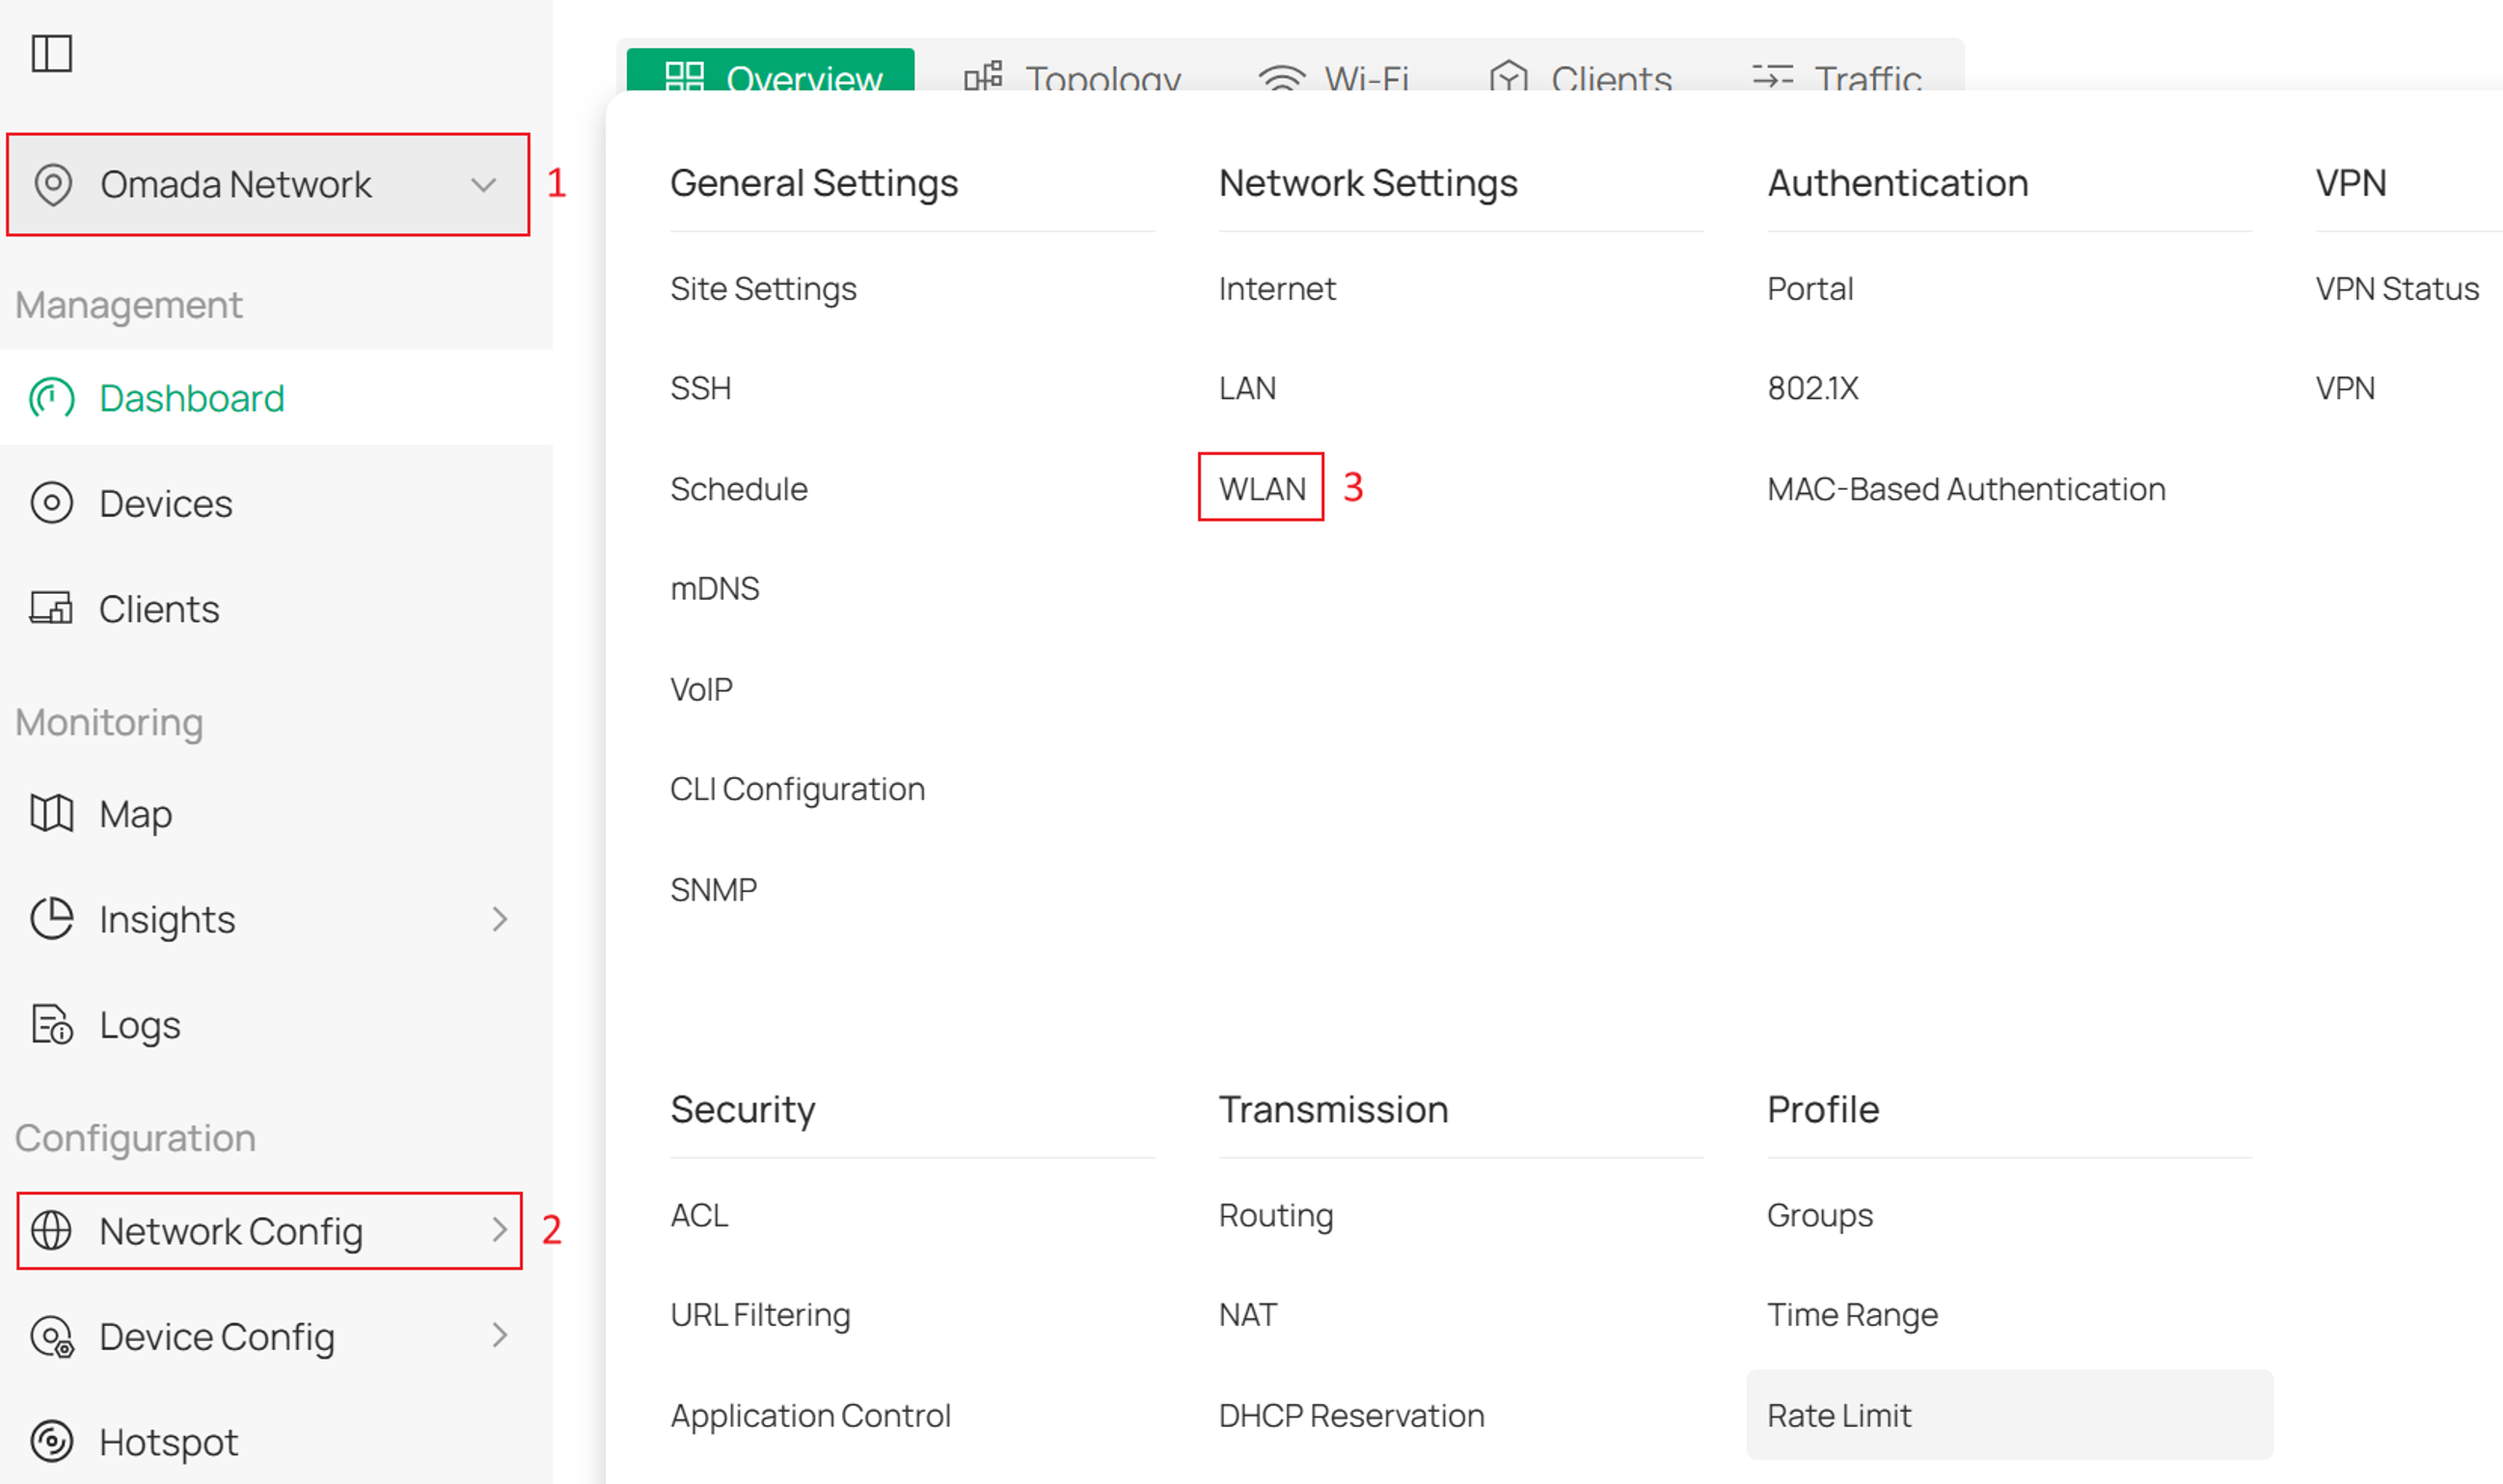
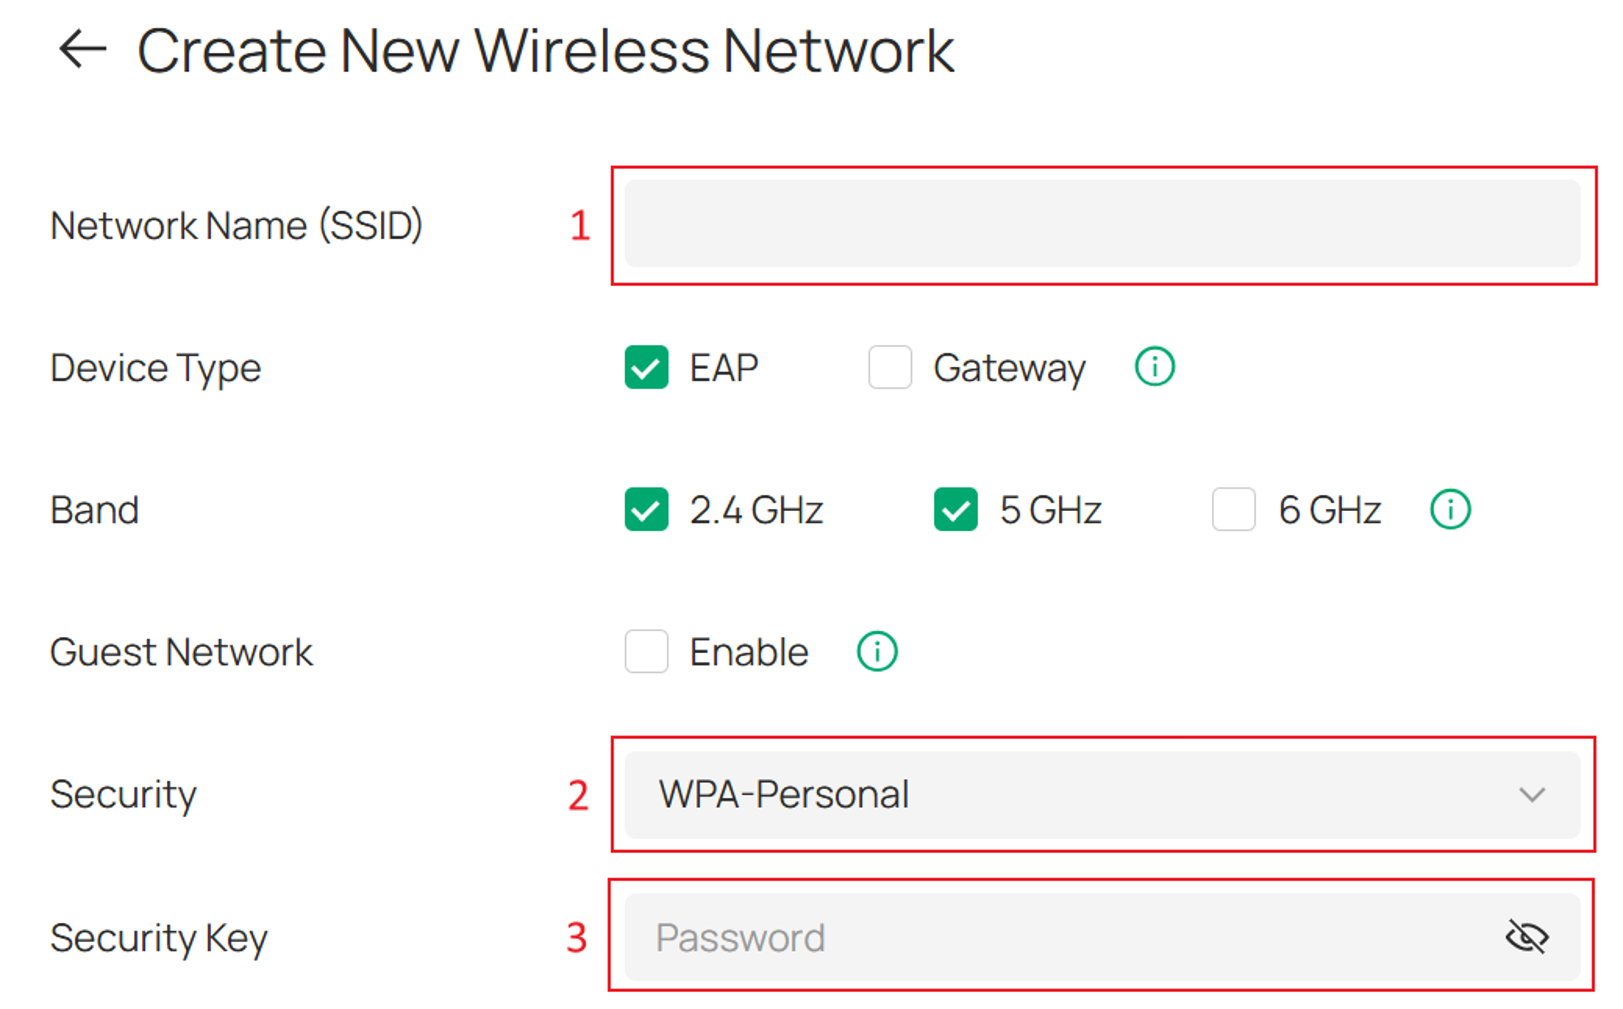
Go to Site > Network Config > Network Settings > WLAN, and verify the basic and advanced configuration for the SSID.
Basic settings
Ensure:
• SSID name is correctly configured
• Security mode matches network requirements
• Client credentials and encryption type are correct.
Note: For Enterprise or PPSK authentication, verify that assigned credentials or passphrases are correct.
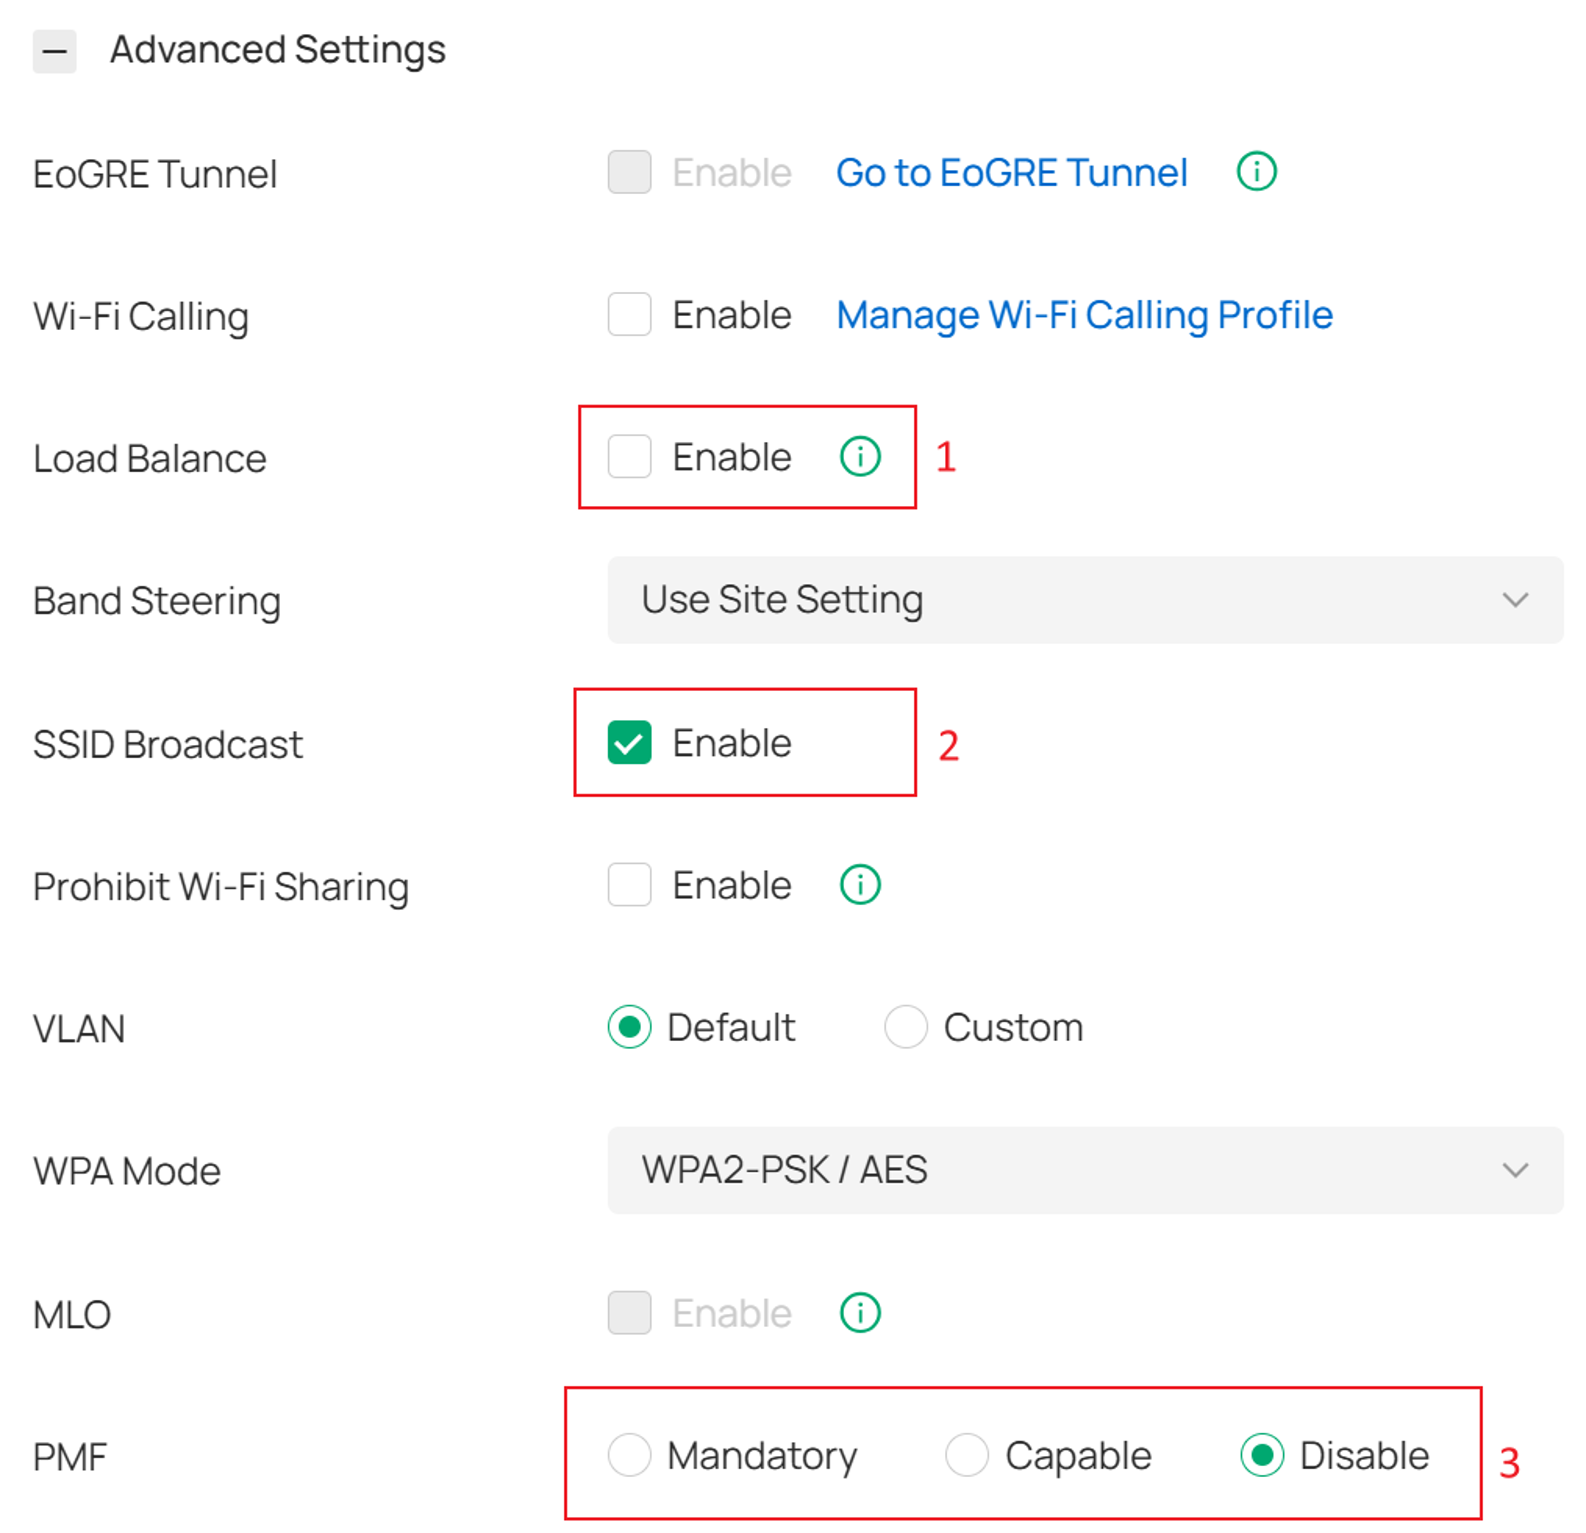
Advanced settings
Check:
• Load balancing is not blocking new clients
• SSID broadcast is enabled
• PMF settings are compatible with client devices
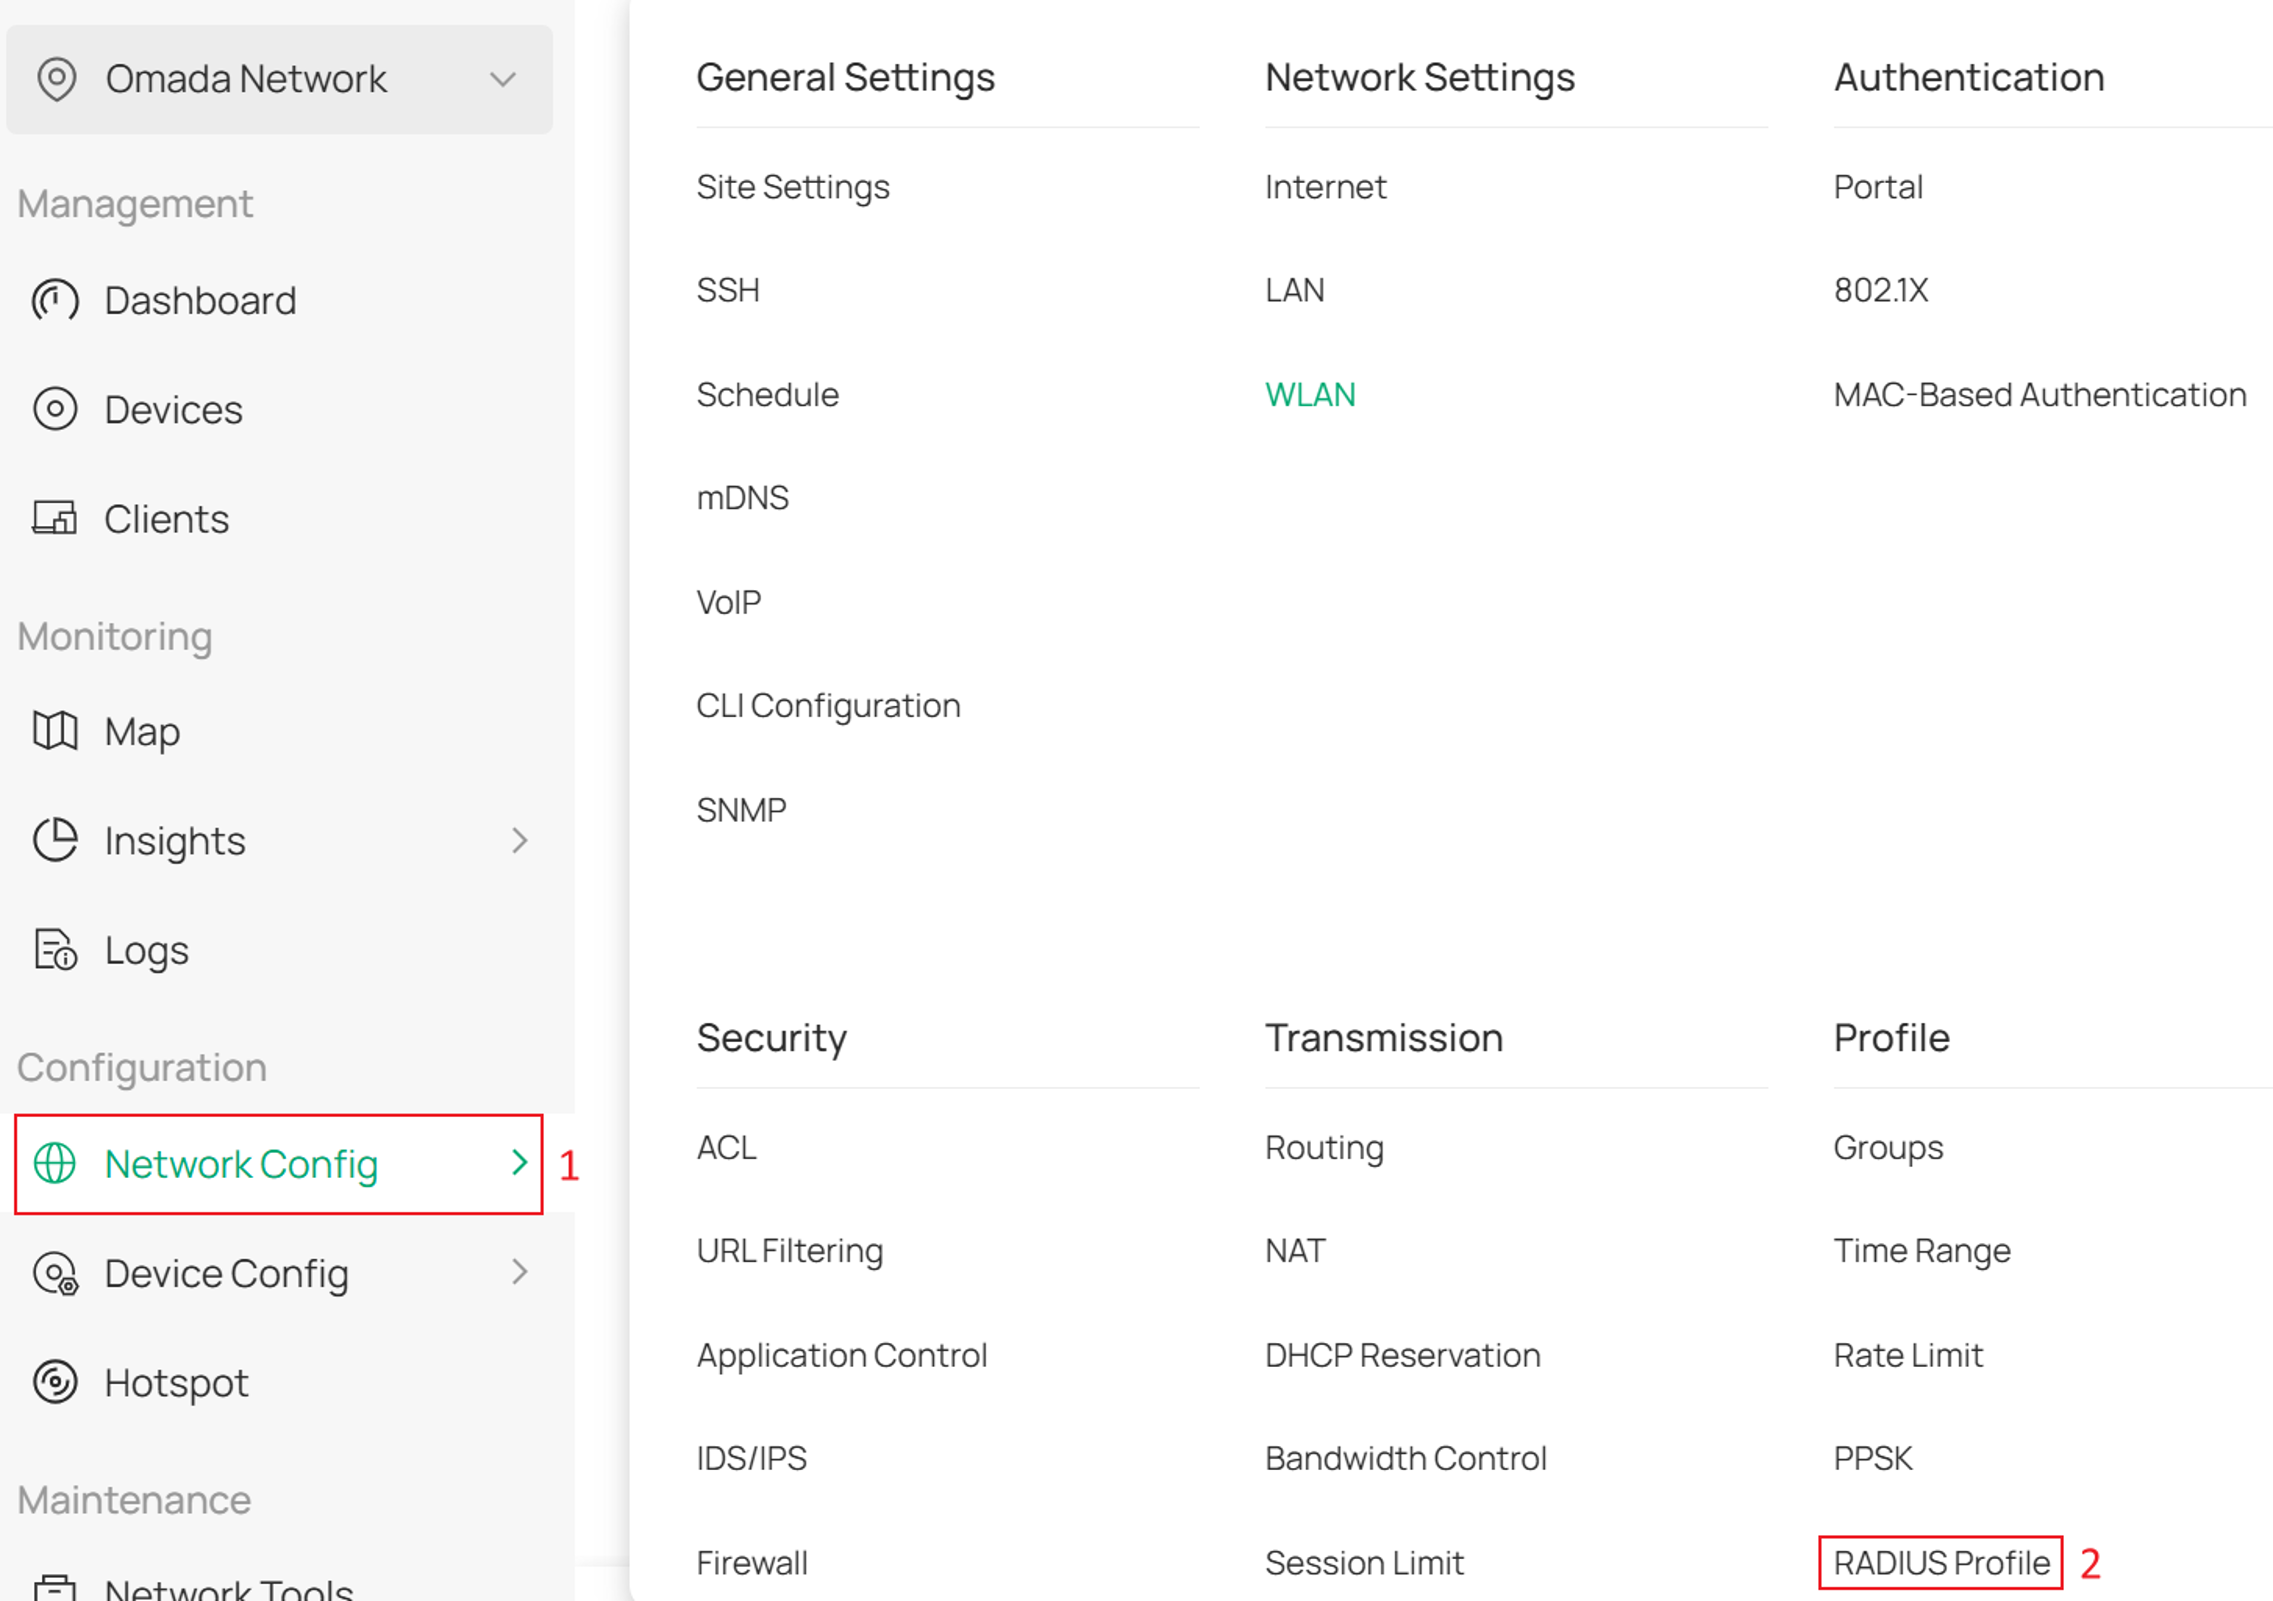
Step 2. Check the authentication configuration (if applicable).
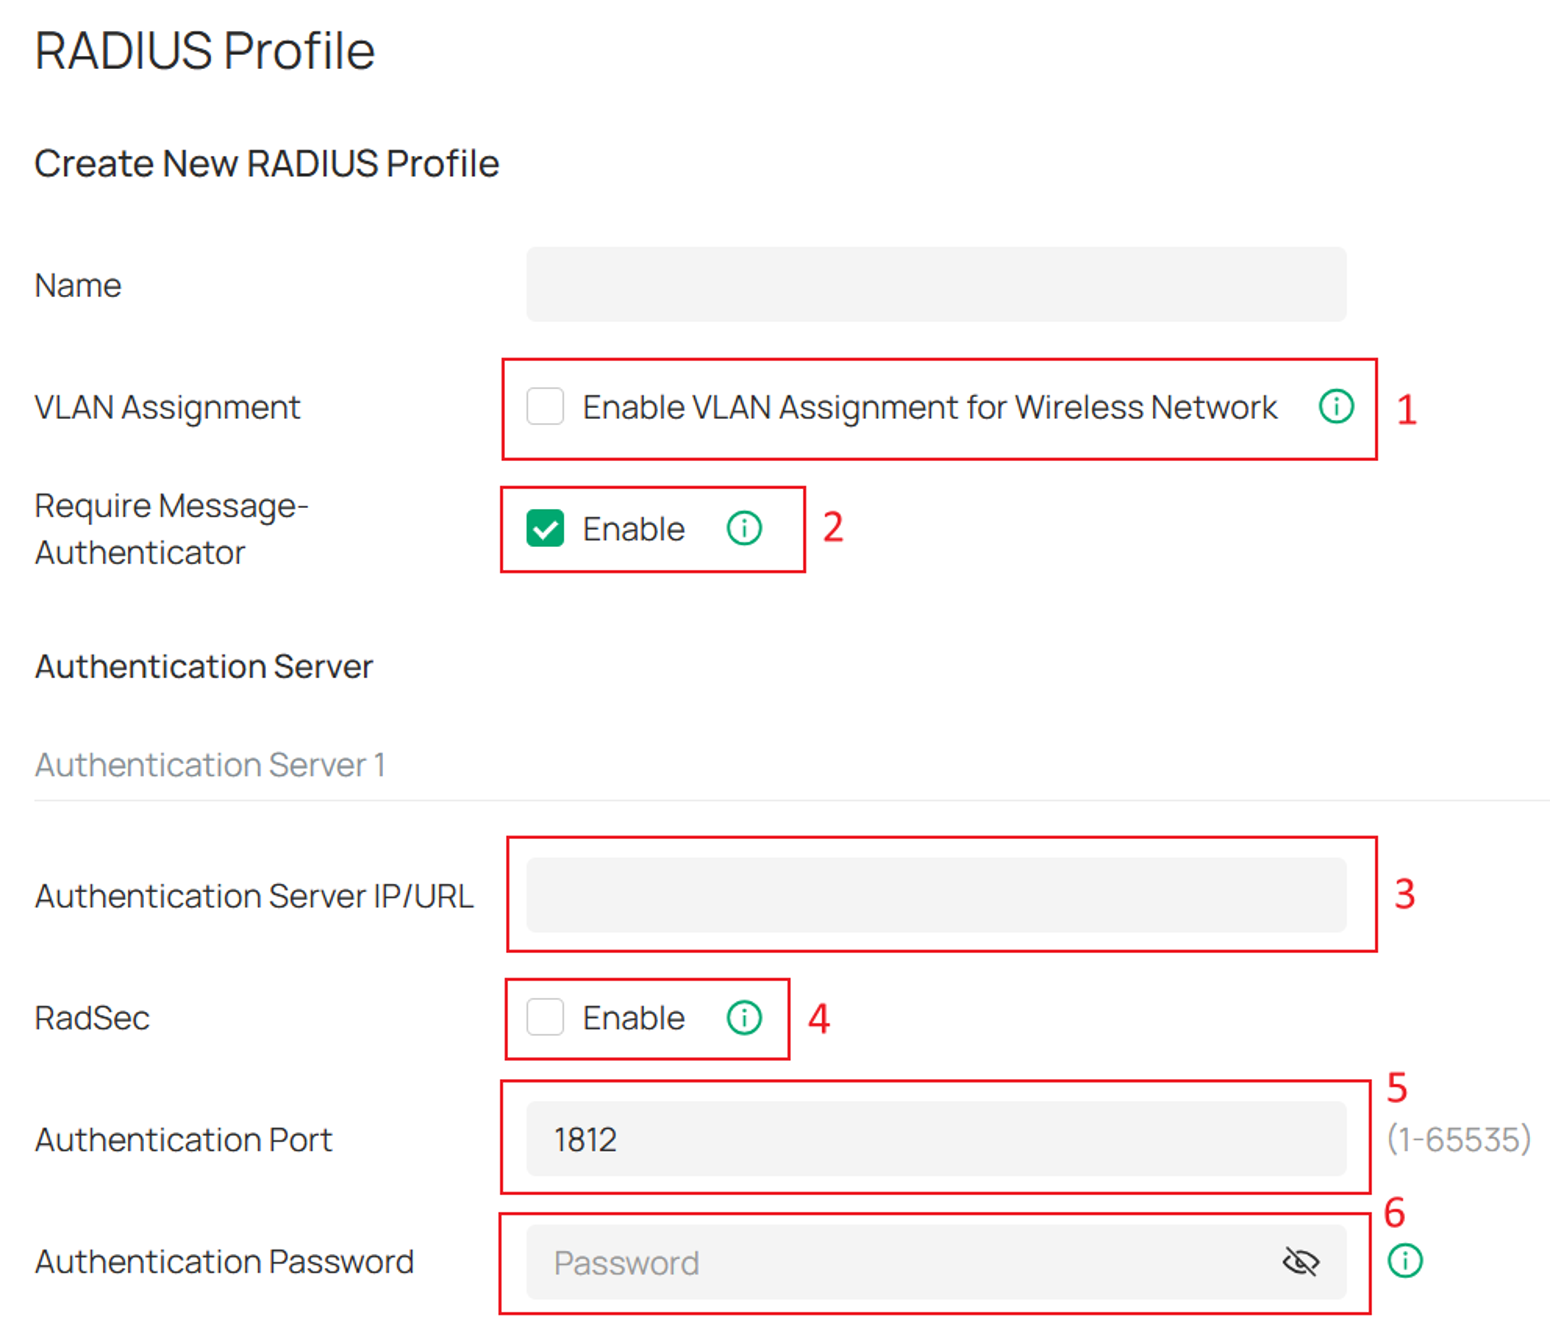
If WPA-Enterprise or PPSK with RADIUS is enabled, go to Network Config > Profile > RADIUS Profile.
Verify:
• VLAN Assignment configuration (if enabled)
• Require Message-Authenticator setting
• Correct RADIUS server IP address
• RadSec configuration (if enabled)
• Authentication port (default: 1812)
• Matching shared secret
• RADIUS server availability and connectivity.
Important checks:
• If VLAN Assignment is disabled, VLAN attributes returned by the RADIUS server may not be applied, which can cause clients to be assigned to an unexpected VLAN and experience DHCP or connectivity issues.
• If Require Message-Authenticator is enabled, verify that the RADIUS server includes the Message-Authenticator attribute in its Access-Accept packets. Responses without this attribute may be ignored by the AP, resulting in authentication failures.
• If RadSec is enabled, verify that the configured certificates are valid and correctly installed on both the AP and the RADIUS server. Certificate issues may prevent successful authentication.
Step 3. Check network connectivity and DHCP service.
Verify DHCP server configuration and ensure that clients can obtain a valid IP address. Then Verify Management VLAN settings and ensure that the EAP, gateway, and DHCP server are in the correct VLAN.
Note: Omada EAP does not provide DHCP server.
Step 4. Check security policies and access restrictions.
Review whether the following features are blocking client access:
• MAC filtering / blacklist
• WIPS policies
• ACL rules
• Portal authentication
• RSSI Threshold settings
• Lock to AP settings
Ensure the client is not restricted by any access control policies.
Note: RSSI Threshold may reject clients with weak signal strength, while Lock to AP may prevent clients from roaming or associating with other APs, potentially resulting in client connection failures.
Step 5. Check wireless signal strength and radio settings.
Ensure:
• RSSI is stronger than -70 dBm
• No excessive distance, obstruction, or interference
• Channel utilization is not too high
• Correct frequency band (2.4 GHz / 5 GHz) is used
• Basic rate and radio settings are properly configured
Step 6. Check the client connection logs.
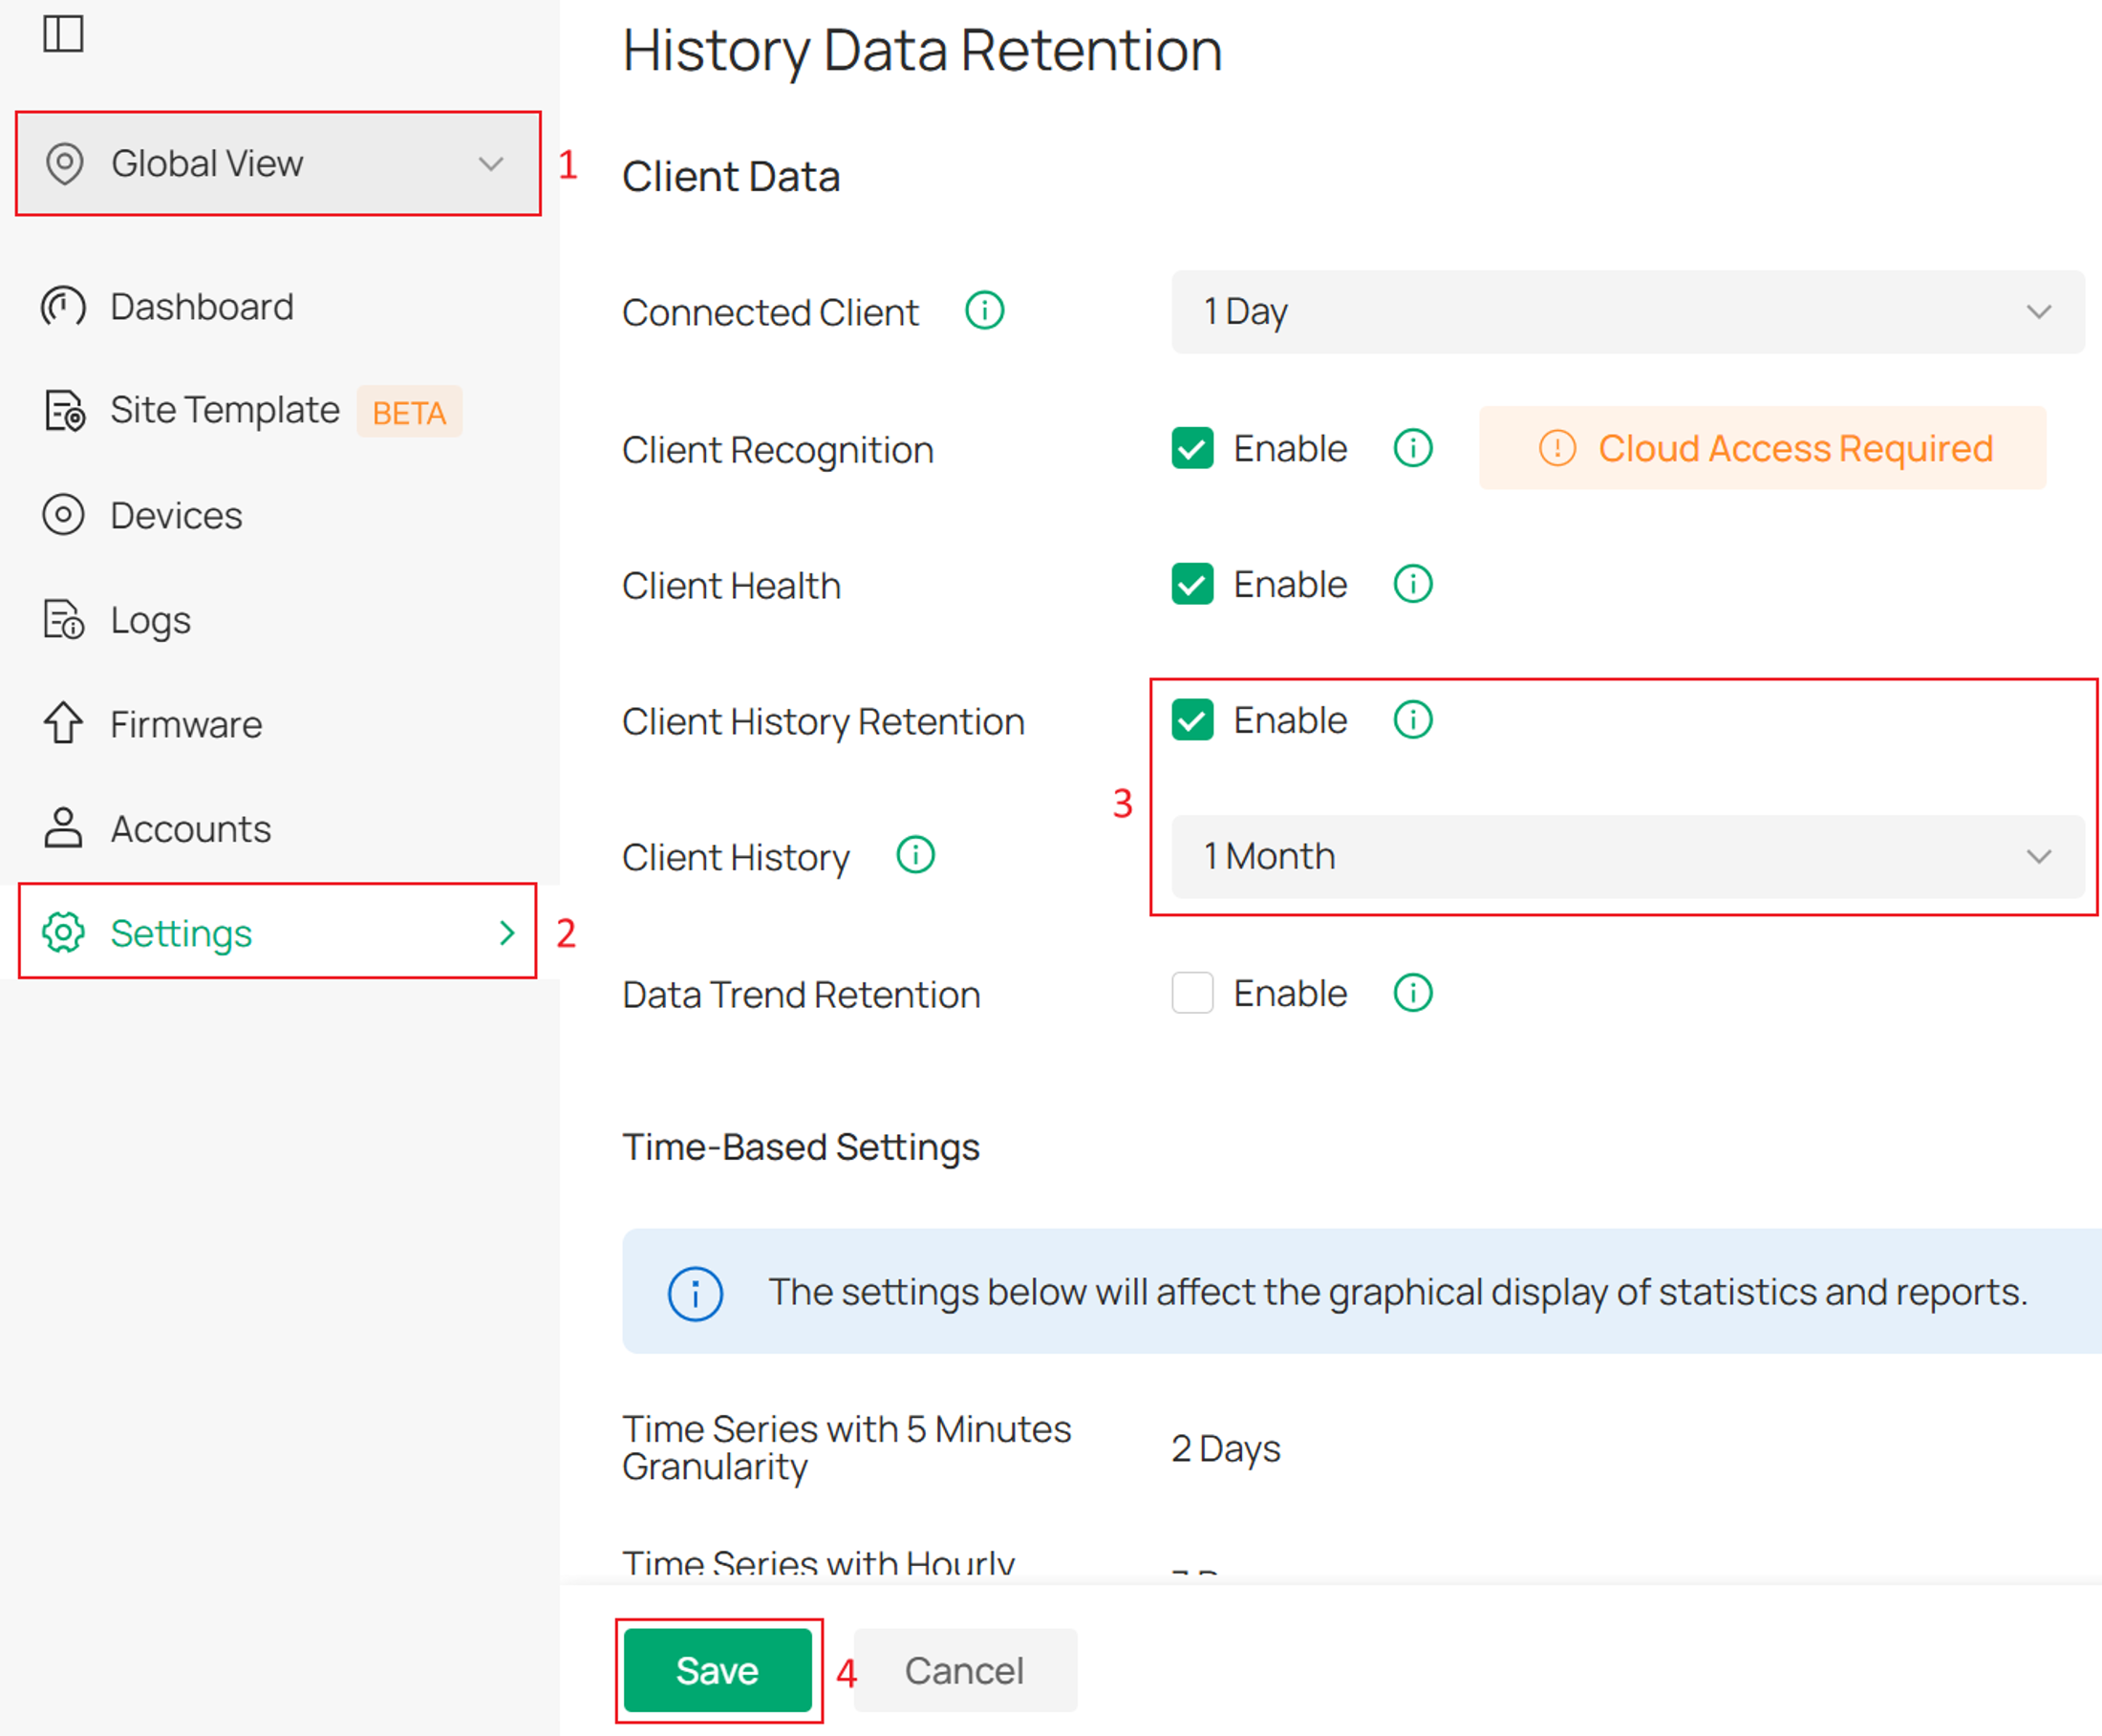
Go to Global View > Settings > History Data Retention, enable Client History Retention option and select a preferred Client History expiry time (default 1 month), then click Save.
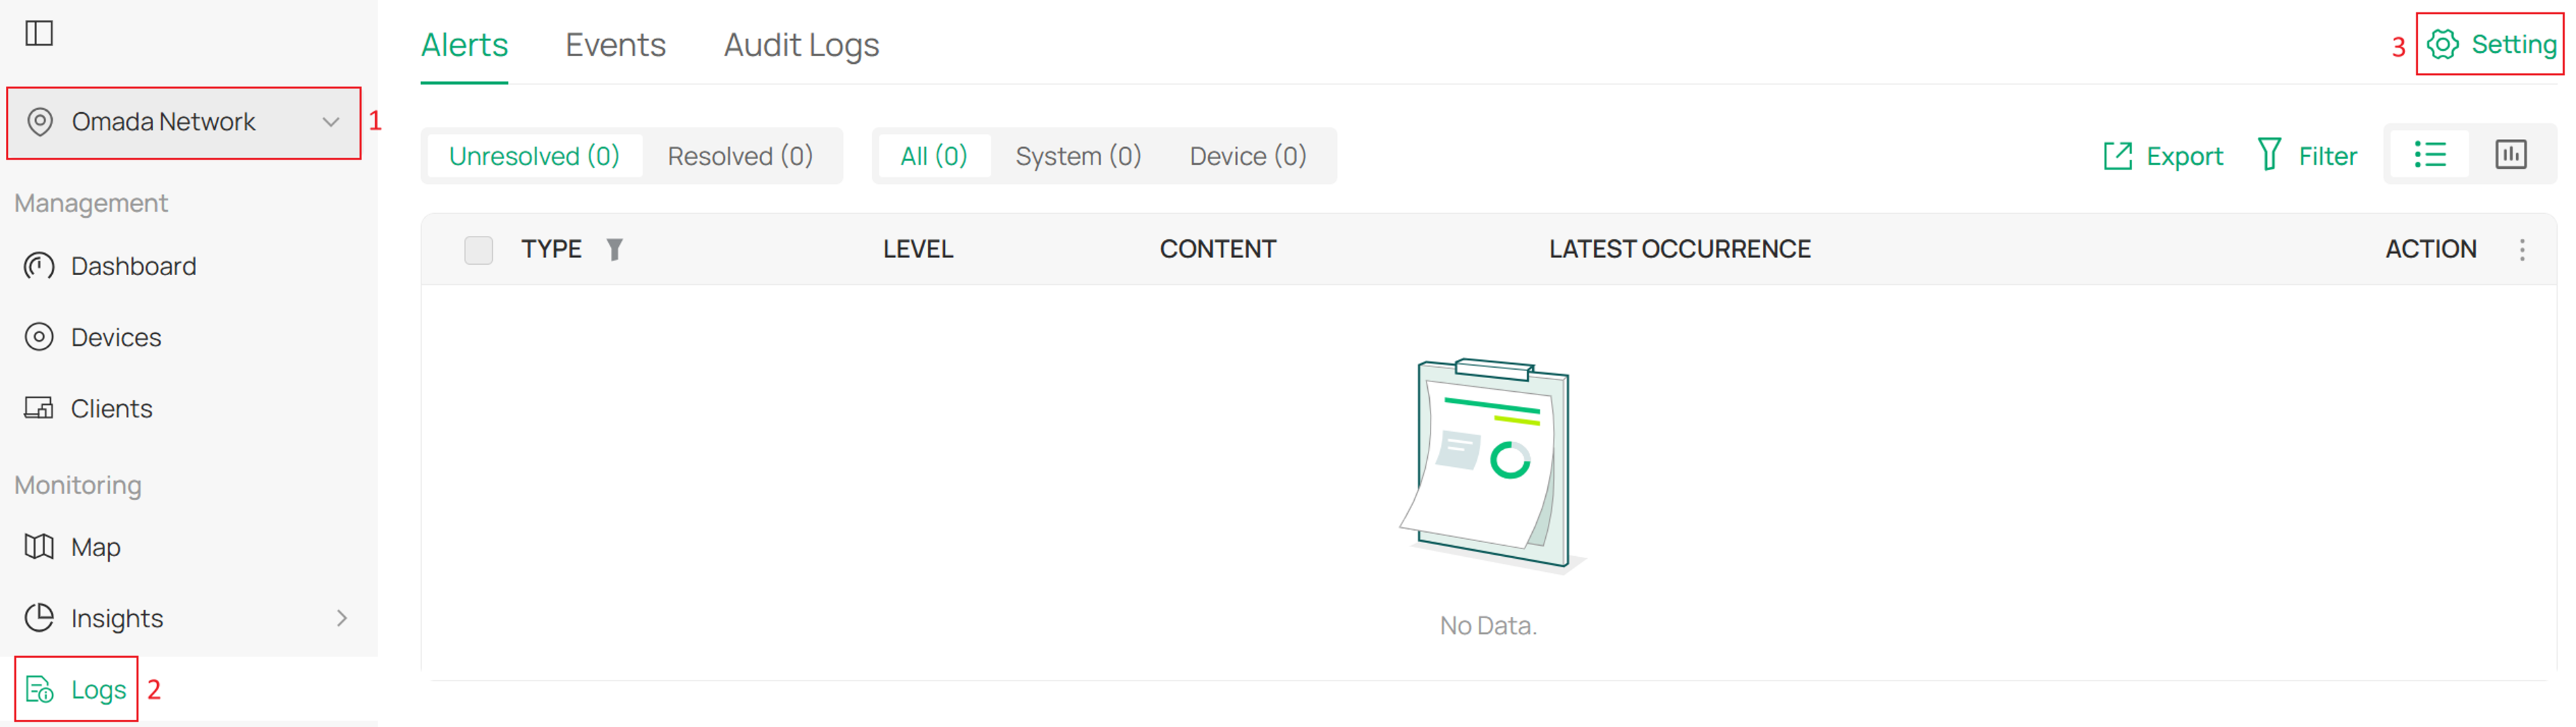
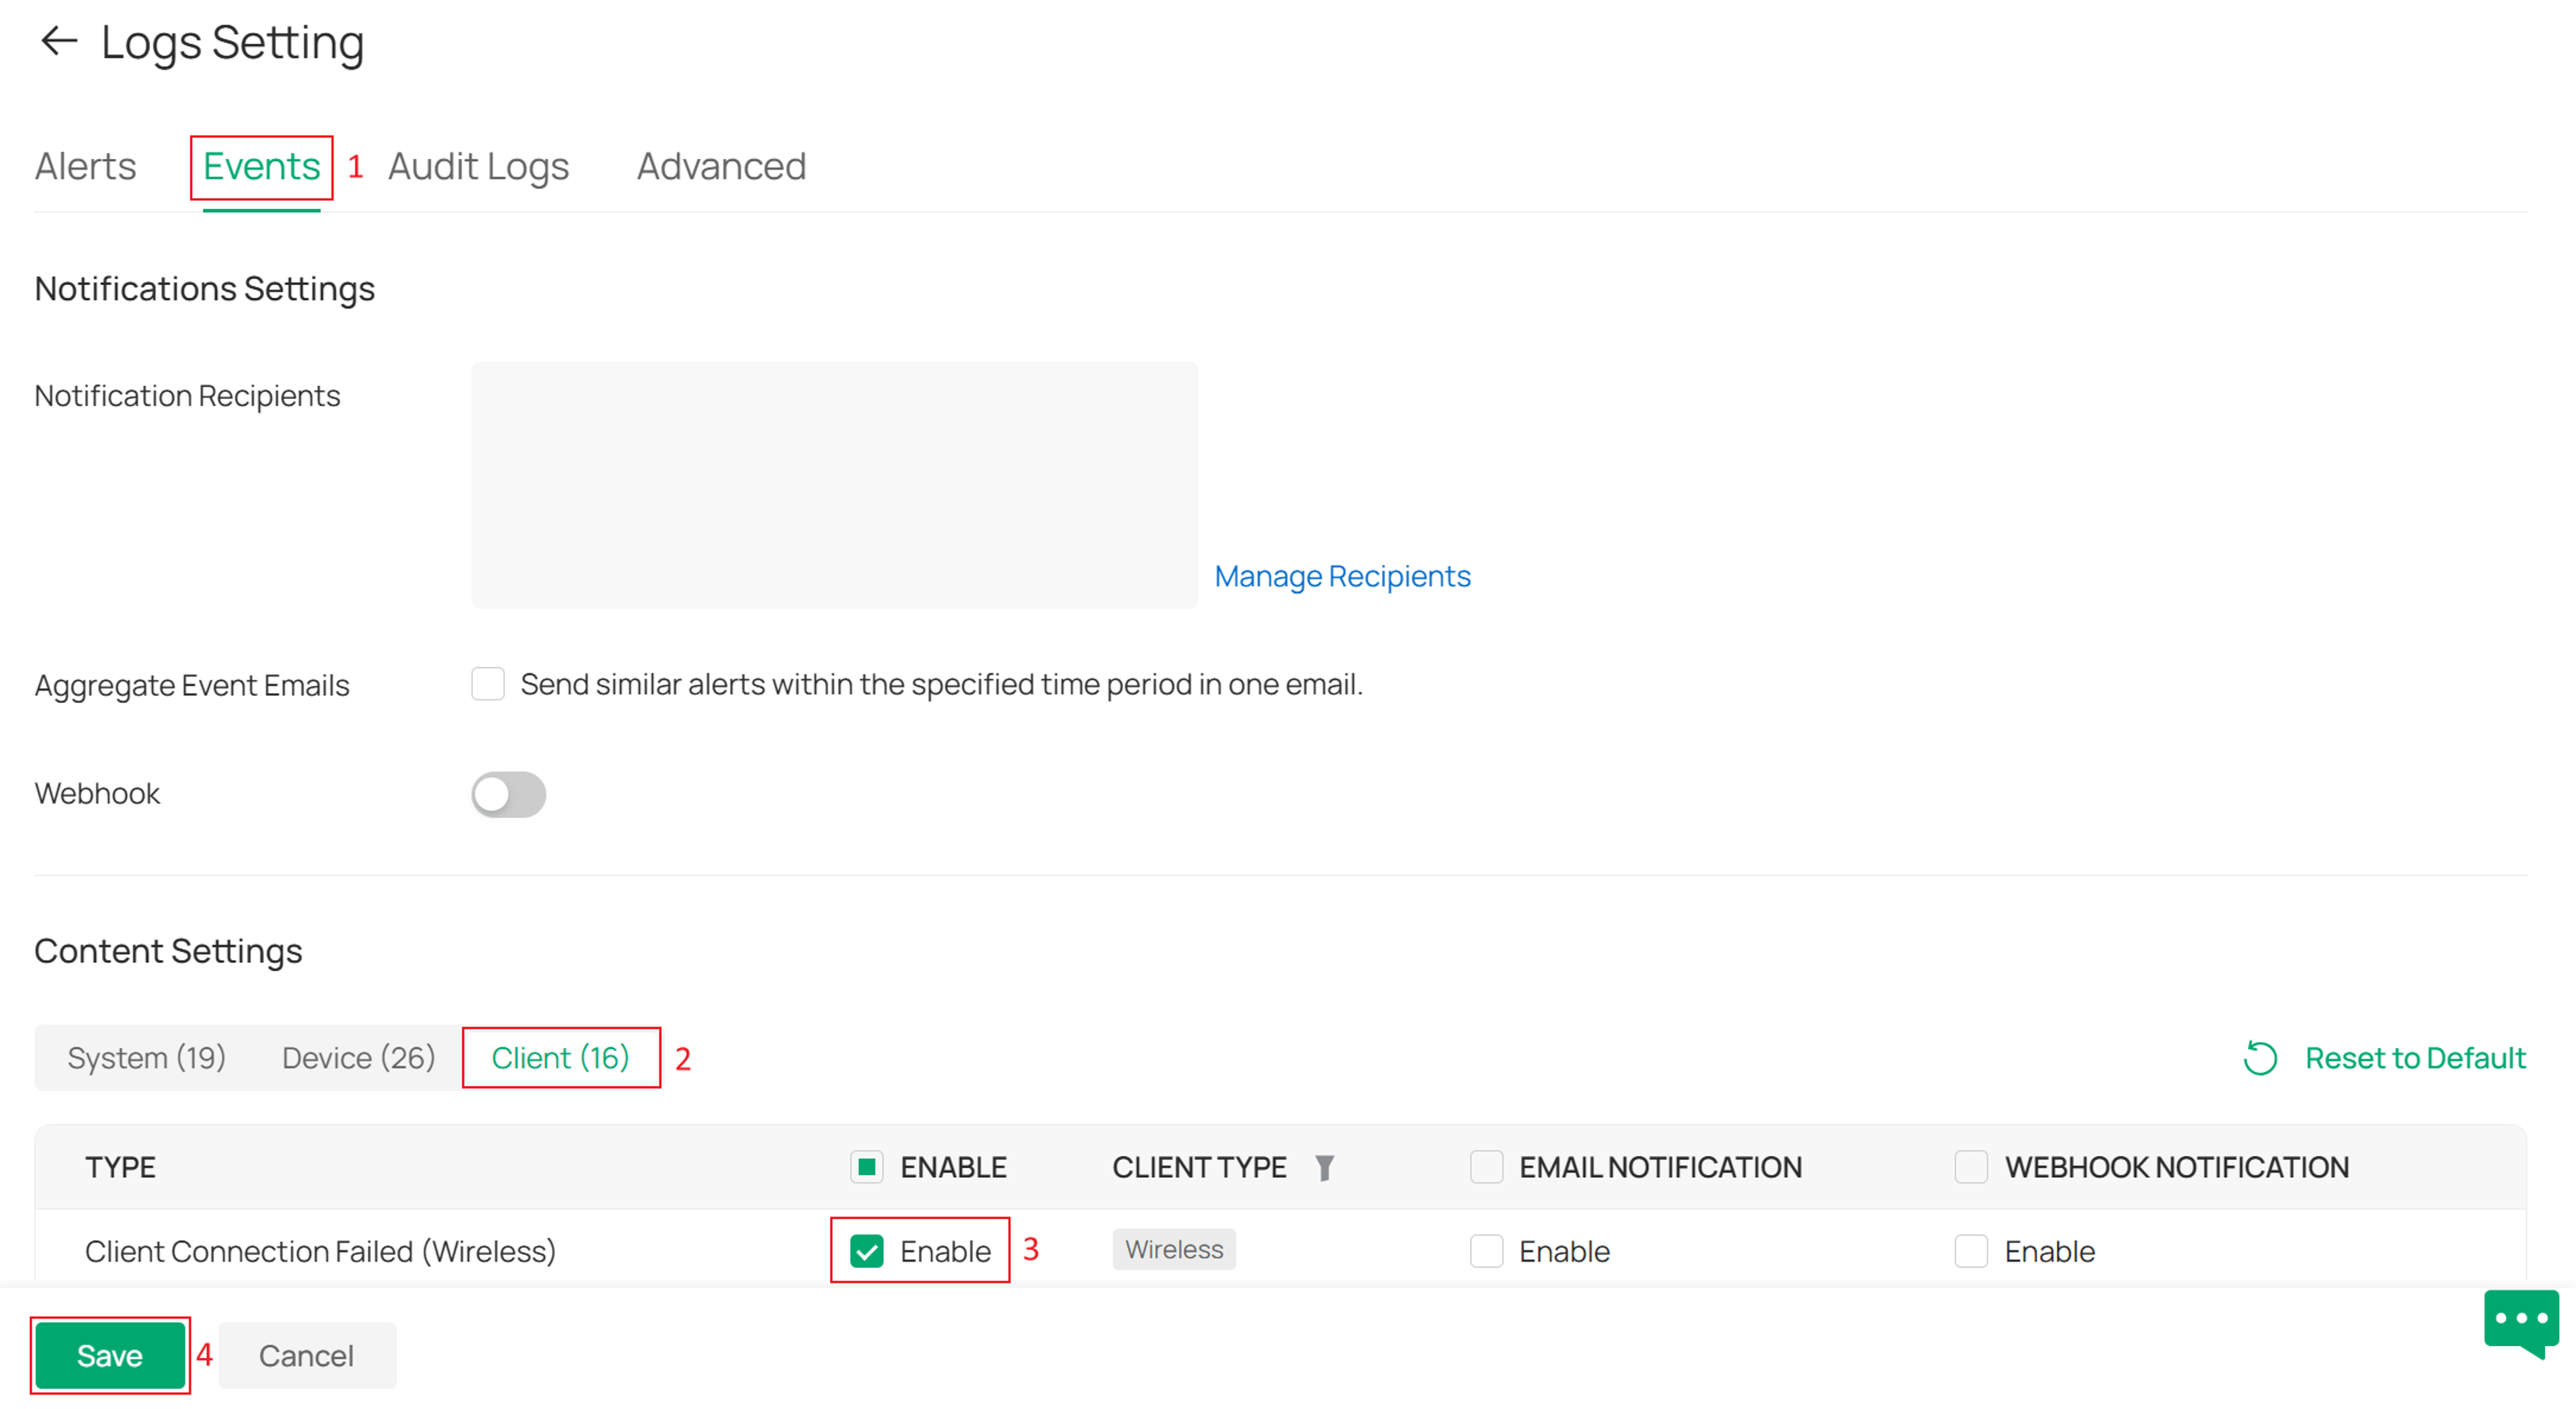
Go to Site > Logs > Setting > Events > Client, enable Client Connection Failed (Wireless) option and click Save.
Then you can review the failed connection records to further identify the cause of the issue. Pay attention to indicators such as authentication failures, connection timeouts, and access rejections, as these logs can provide valuable insights into the root cause of the failure.
Step 7. Upgrade firmware and client software.
Ensure that both the EAP firmware and client device OS or drivers are up to date. Outdated versions on either side may result in compatibility issues or unexpected connection problems.
Step 8. Create a test SSID for comparison.
Create a new SSID using default settings, with advanced features such as PMF and 802.11r disabled. Then test client connectivity with this SSID. This helps determine whether the issue is related to configuration complexity or compatibility issues.
Step 9. Verify AP power status.
Check whether the AP is receiving sufficient power and is operating under the recommended power specifications. Insufficient power may cause unexpected reboots, disabled radio bands, or degraded wireless performance. Verify the power source and review any power-related alerts or logs.
Step 10. Check for abnormal disconnection behavior.
Check for abnormal deauthentication events and investigate potential sources of interference or external disruptions, as these factors may contribute to unstable connectivity.
Troubleshooting Steps in Standalone mode
This section describes the configuration steps. The steps in standalone mode are almost the same as those in controller mode. A brief introduction is provided below.
Step 1. Check SSID basic and advanced settings.
Go to Wireless > Wireless Settings, select the Wi-Fi band (for example, 2.4 GHz), click the edit icon, and verify the basic and advanced configuration for the SSID.
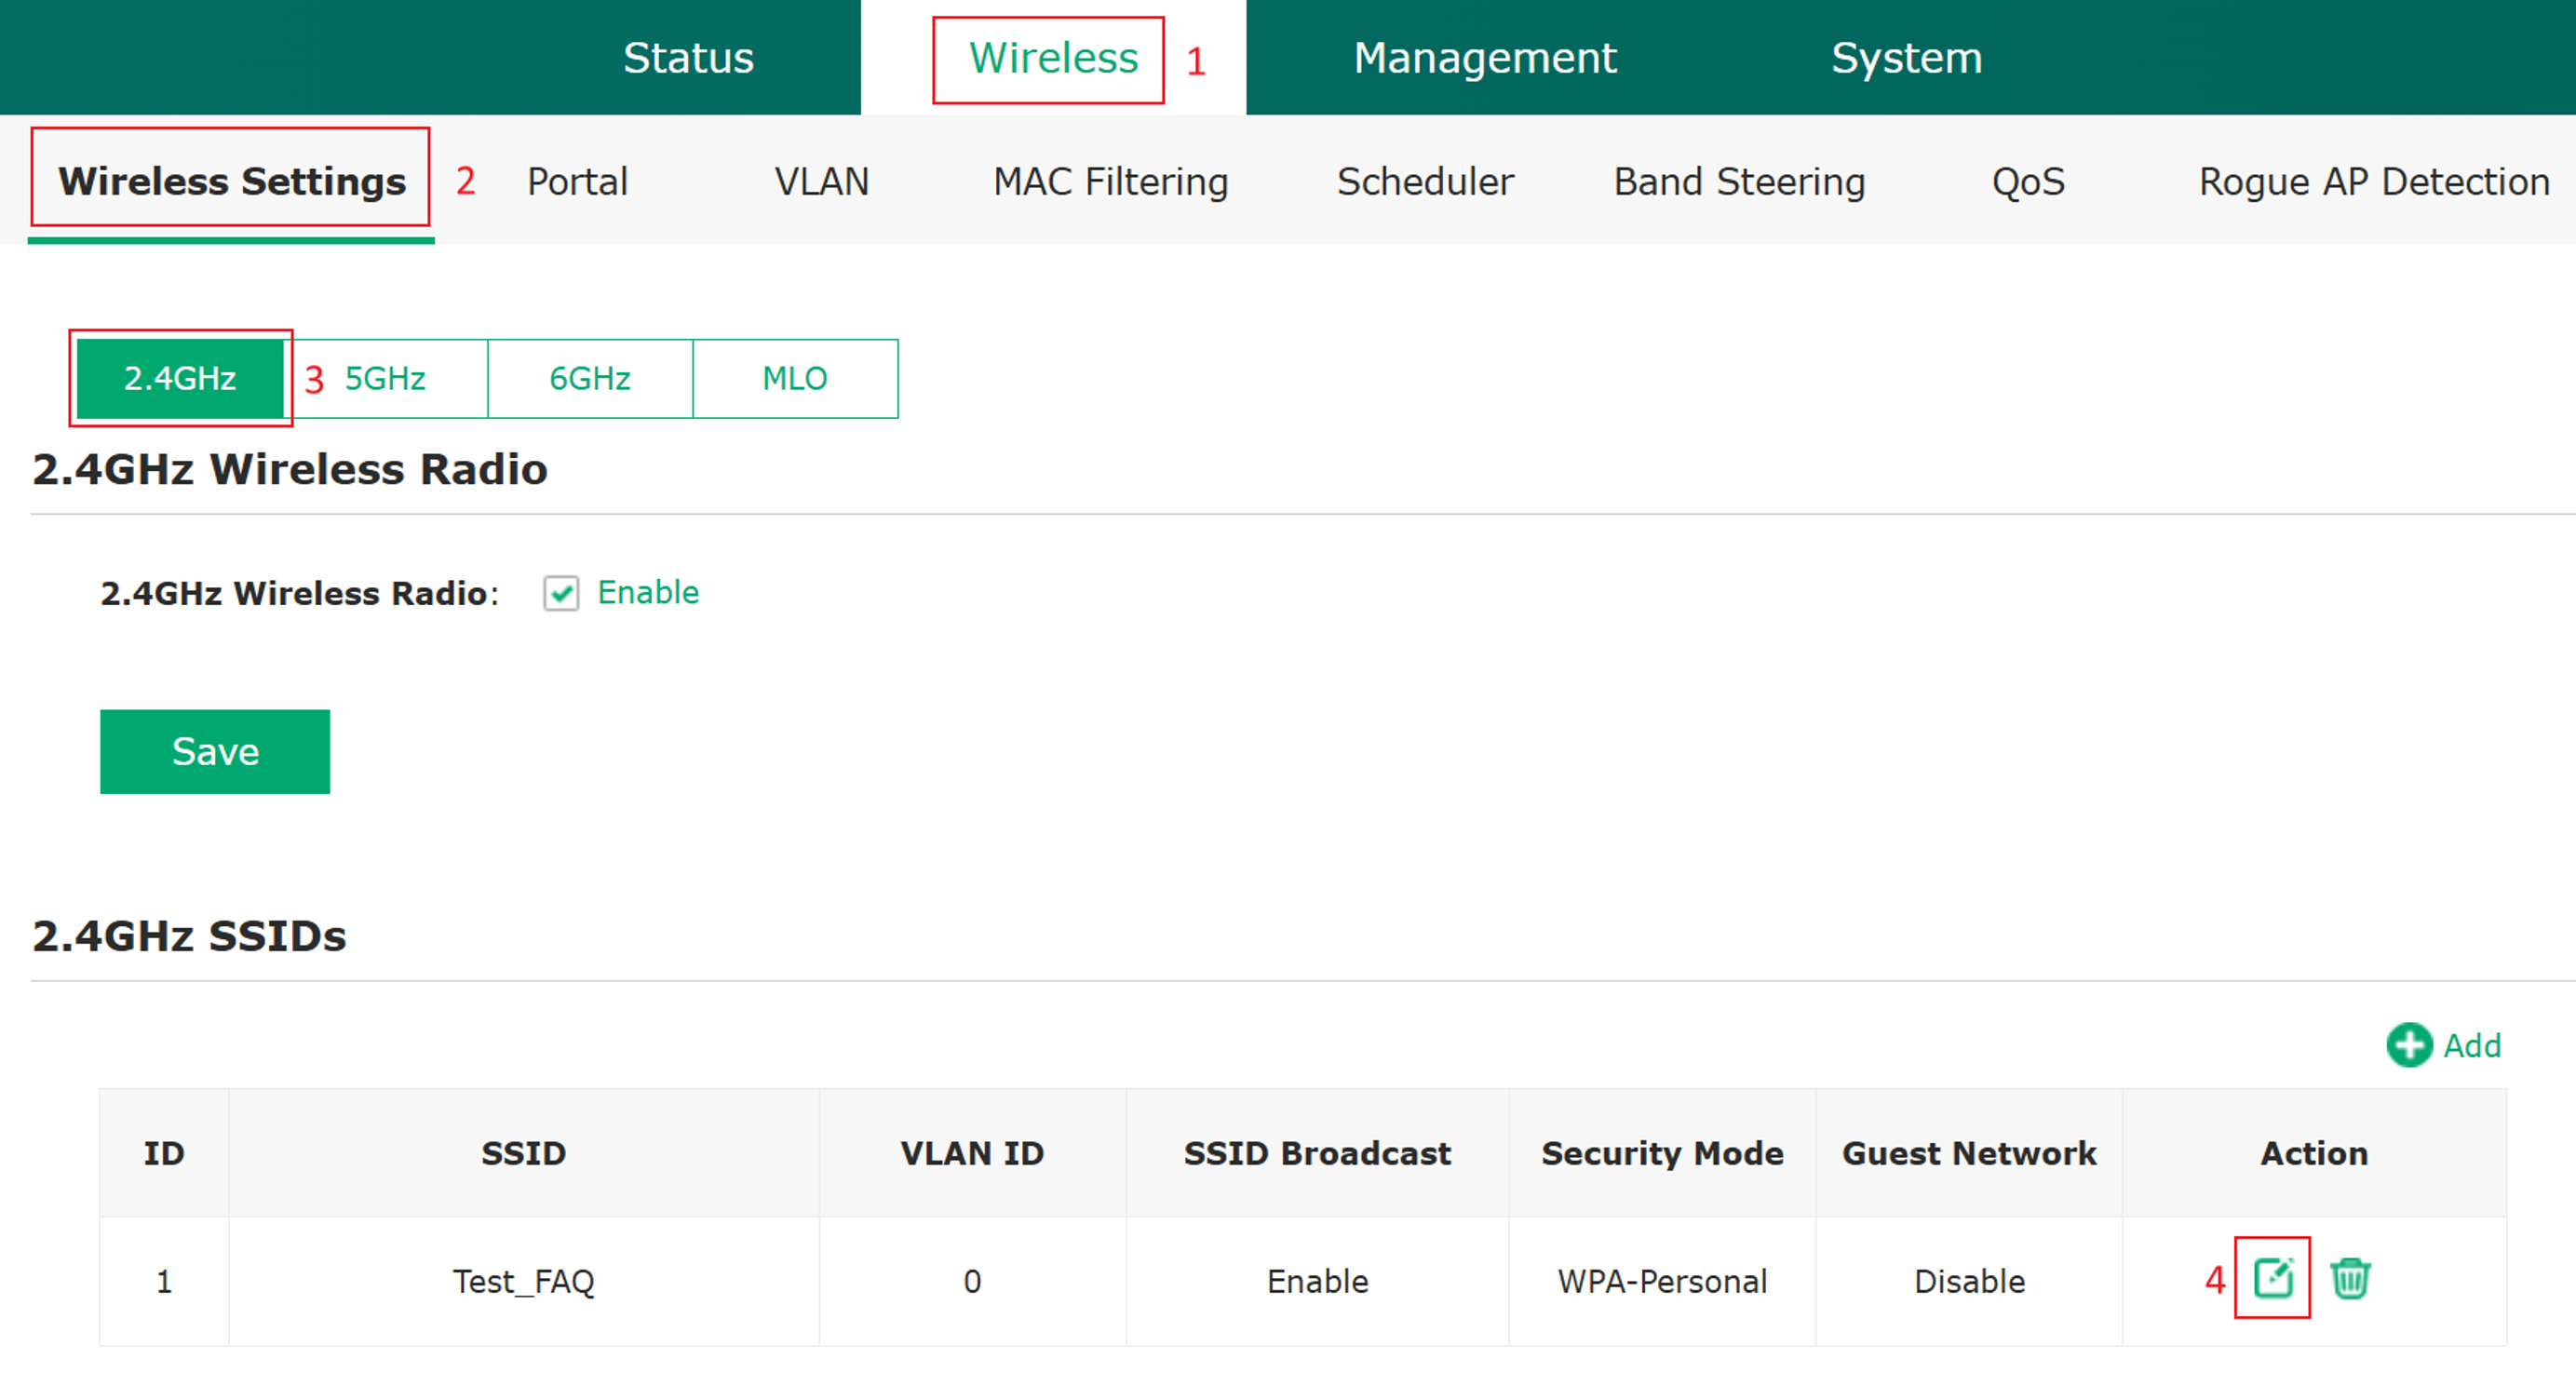
Basic settings
Ensure:
• SSID name is correctly configured
• SSID broadcast is enabled
• Security mode matches network requirements
Also verify:
• Client password is correct
• Client device supports the configured encryption method
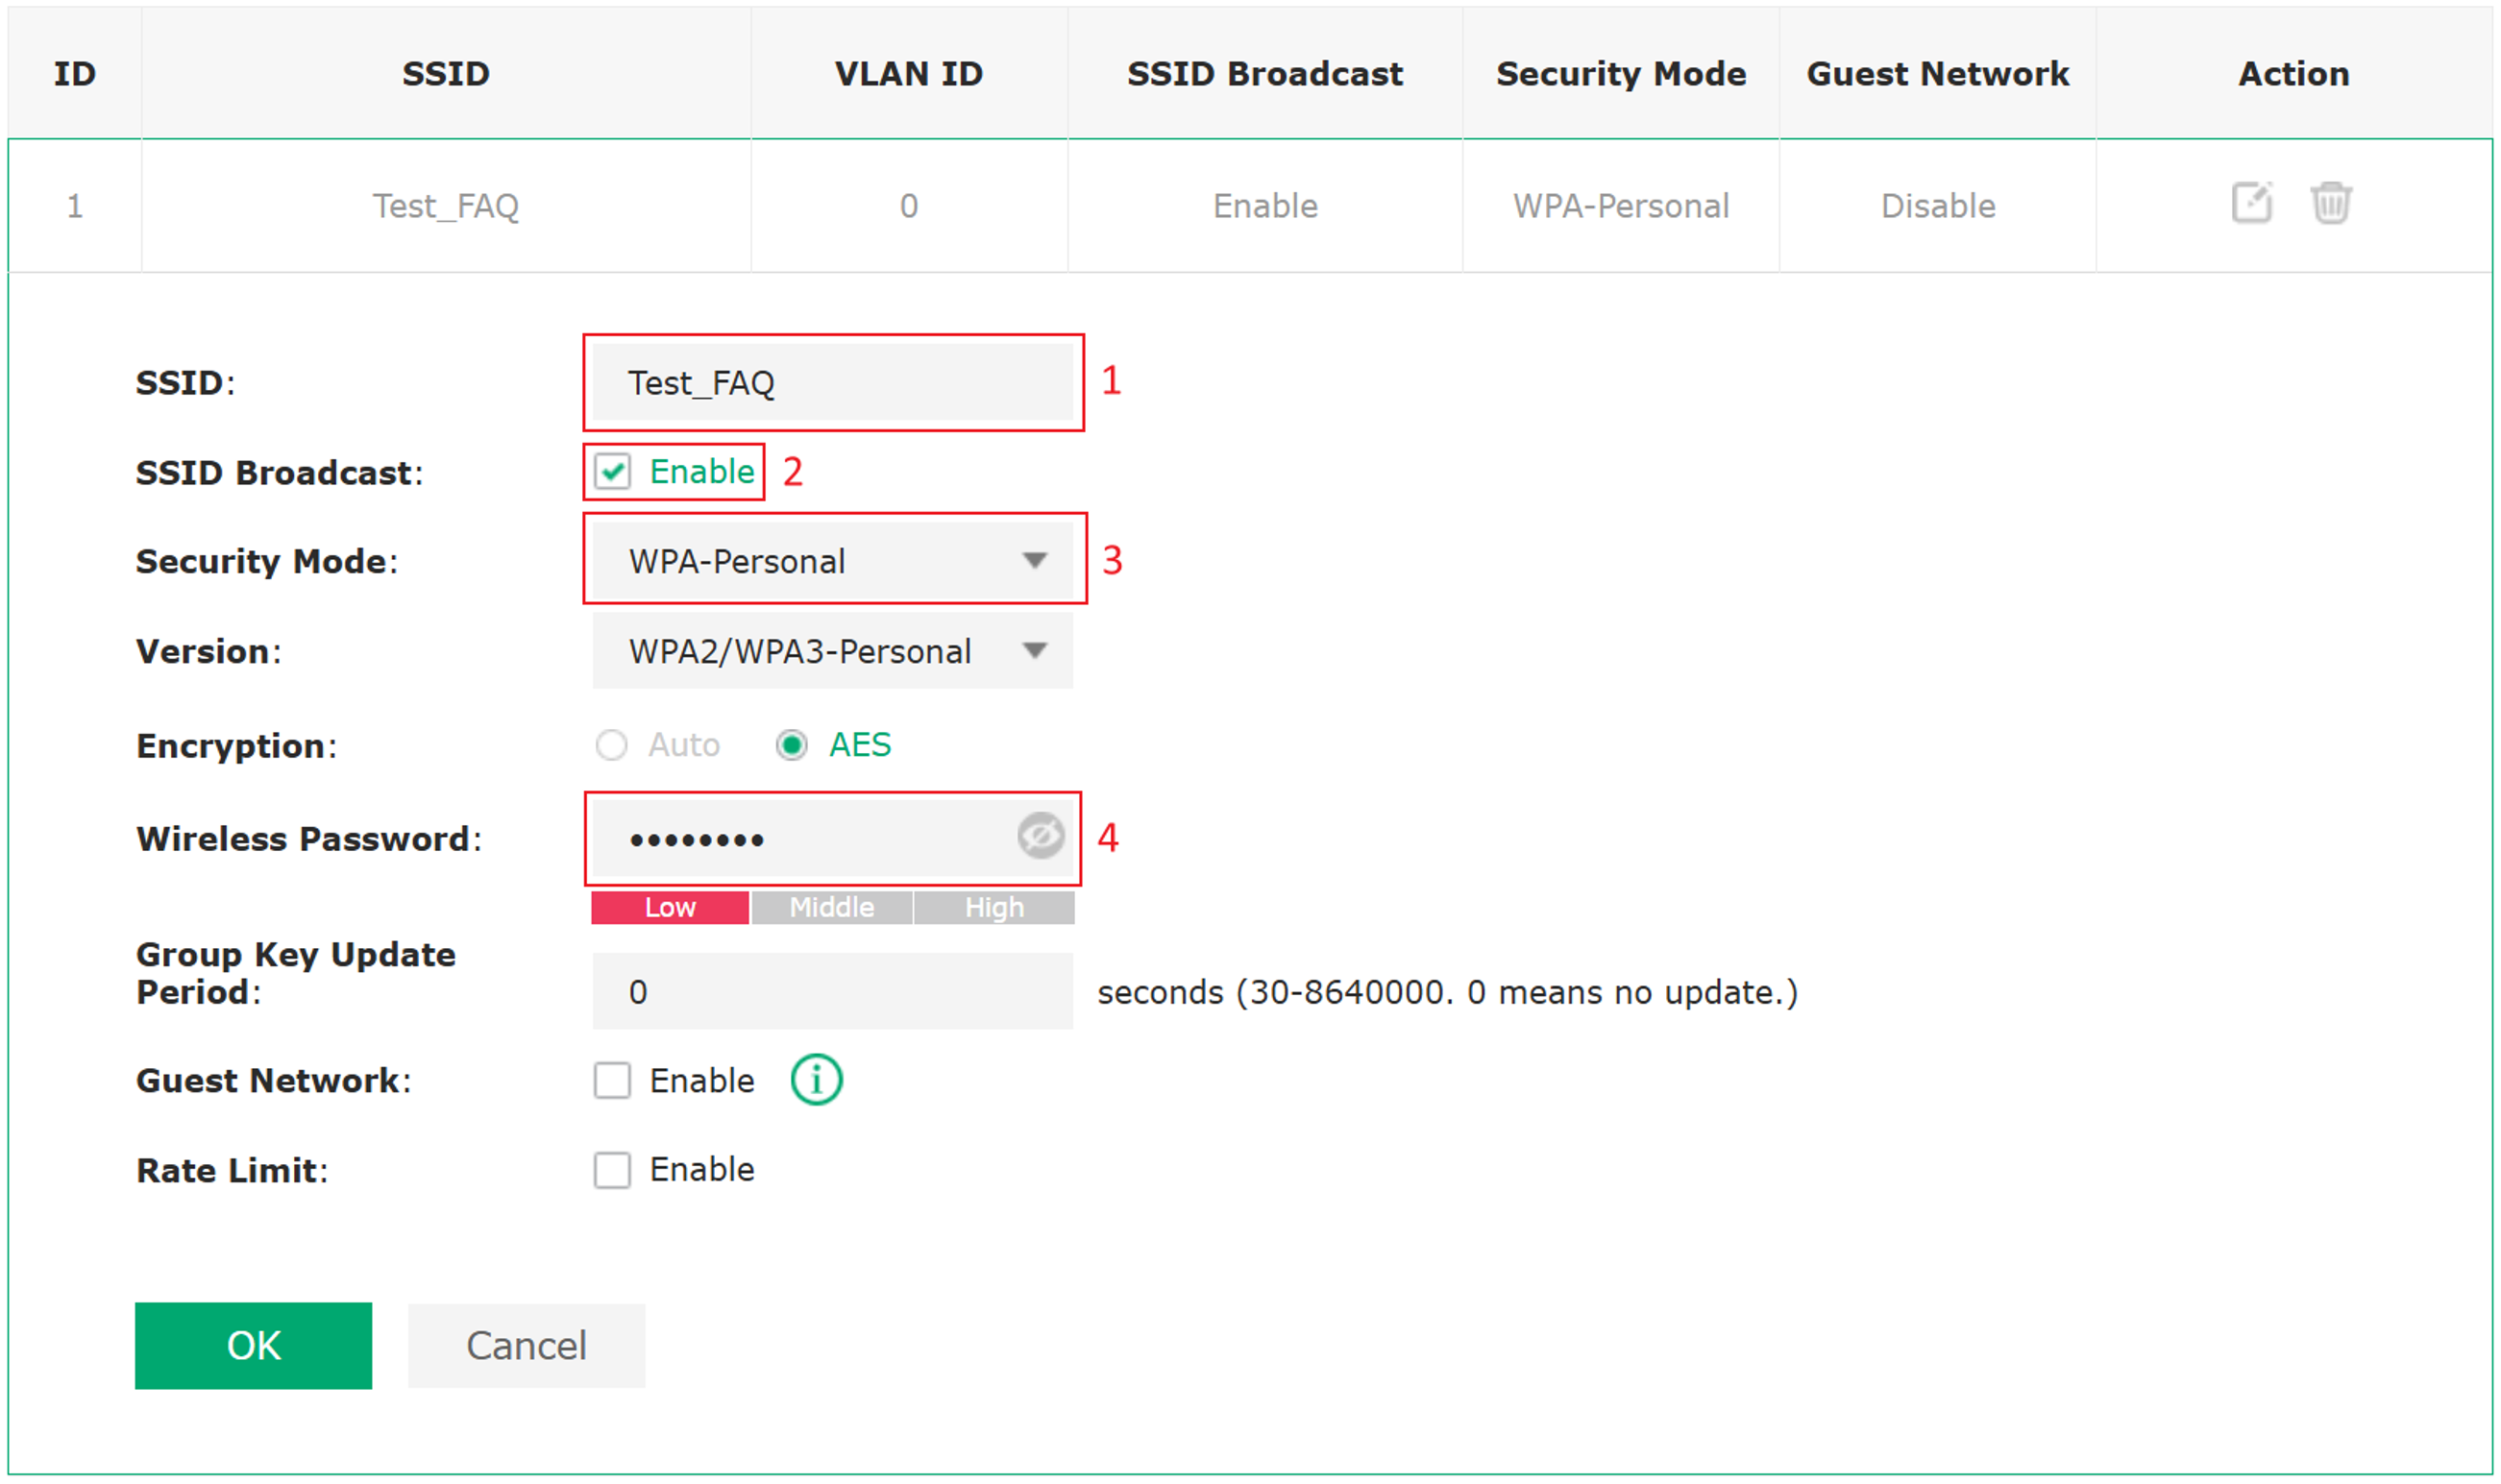
Advanced settings
Check that:
• Wireless radio settings are properly configured
• Load balancing is not blocking new client connections.
Note: Increasing TX power temporarily during testing is recommended to help identify the root cause.
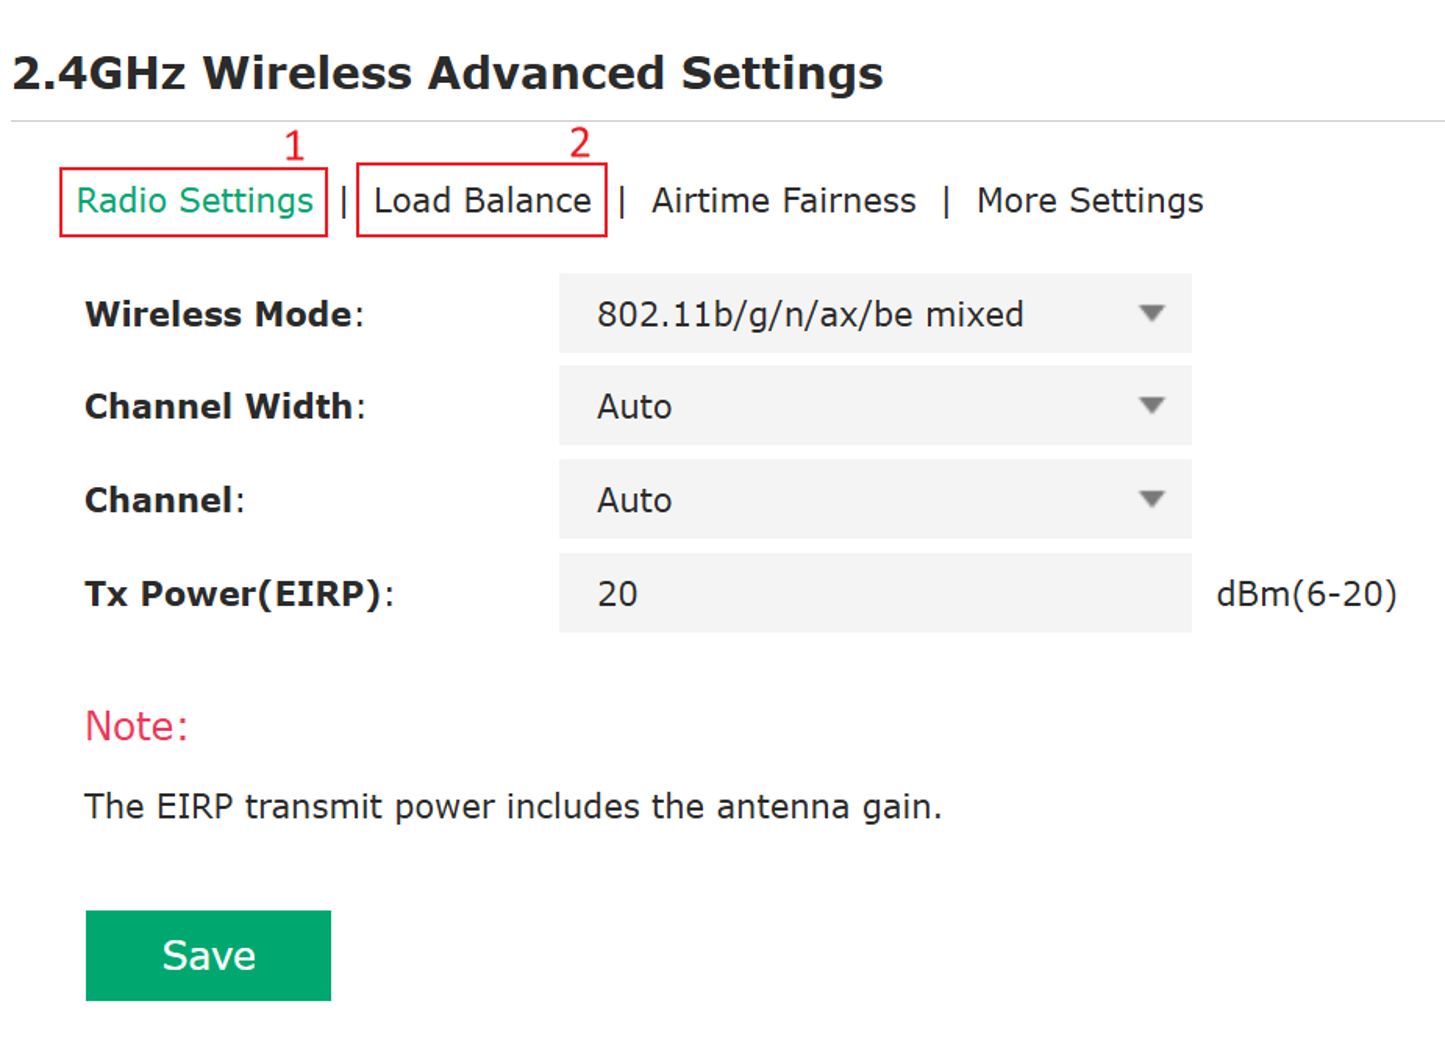
Step 2. Check network connectivity and DHCP service.
Verify DHCP server configuration and ensure that clients can obtain a valid IP address. Then Verify Management VLAN settings and ensure that the EAP, gateway, and DHCP server are in the correct VLAN.
Note: Omada EAP does not provide DHCP server.
Step 3. Check security policies and access restrictions.
Verify whether any security features may block client access, such as:
• MAC filtering
• Blacklist policies
• Portal authentication
• RSSI Threshold settings
• Lock to AP settings
Ensure the client is not restricted by any access control policies.
Note: RSSI Threshold may reject clients with weak signal strength, while Lock to AP may prevent clients from roaming or associating with other APs, potentially resulting in client connection failures.
Step 4. Check wireless signal strength and radio settings.
Ensure the client has sufficient signal strength, with recommended RSSI better than -70 dBm. Also check environmental factors such as distance, obstacles, and wireless interference.
In addition, verify:
• Channel utilization is not excessively high
• Basic rate settings are correctly configured
• Selected frequency bands (2.4 GHz / 5 GHz) are supported by the client device
Improper configuration or poor radio conditions may cause connection failures.
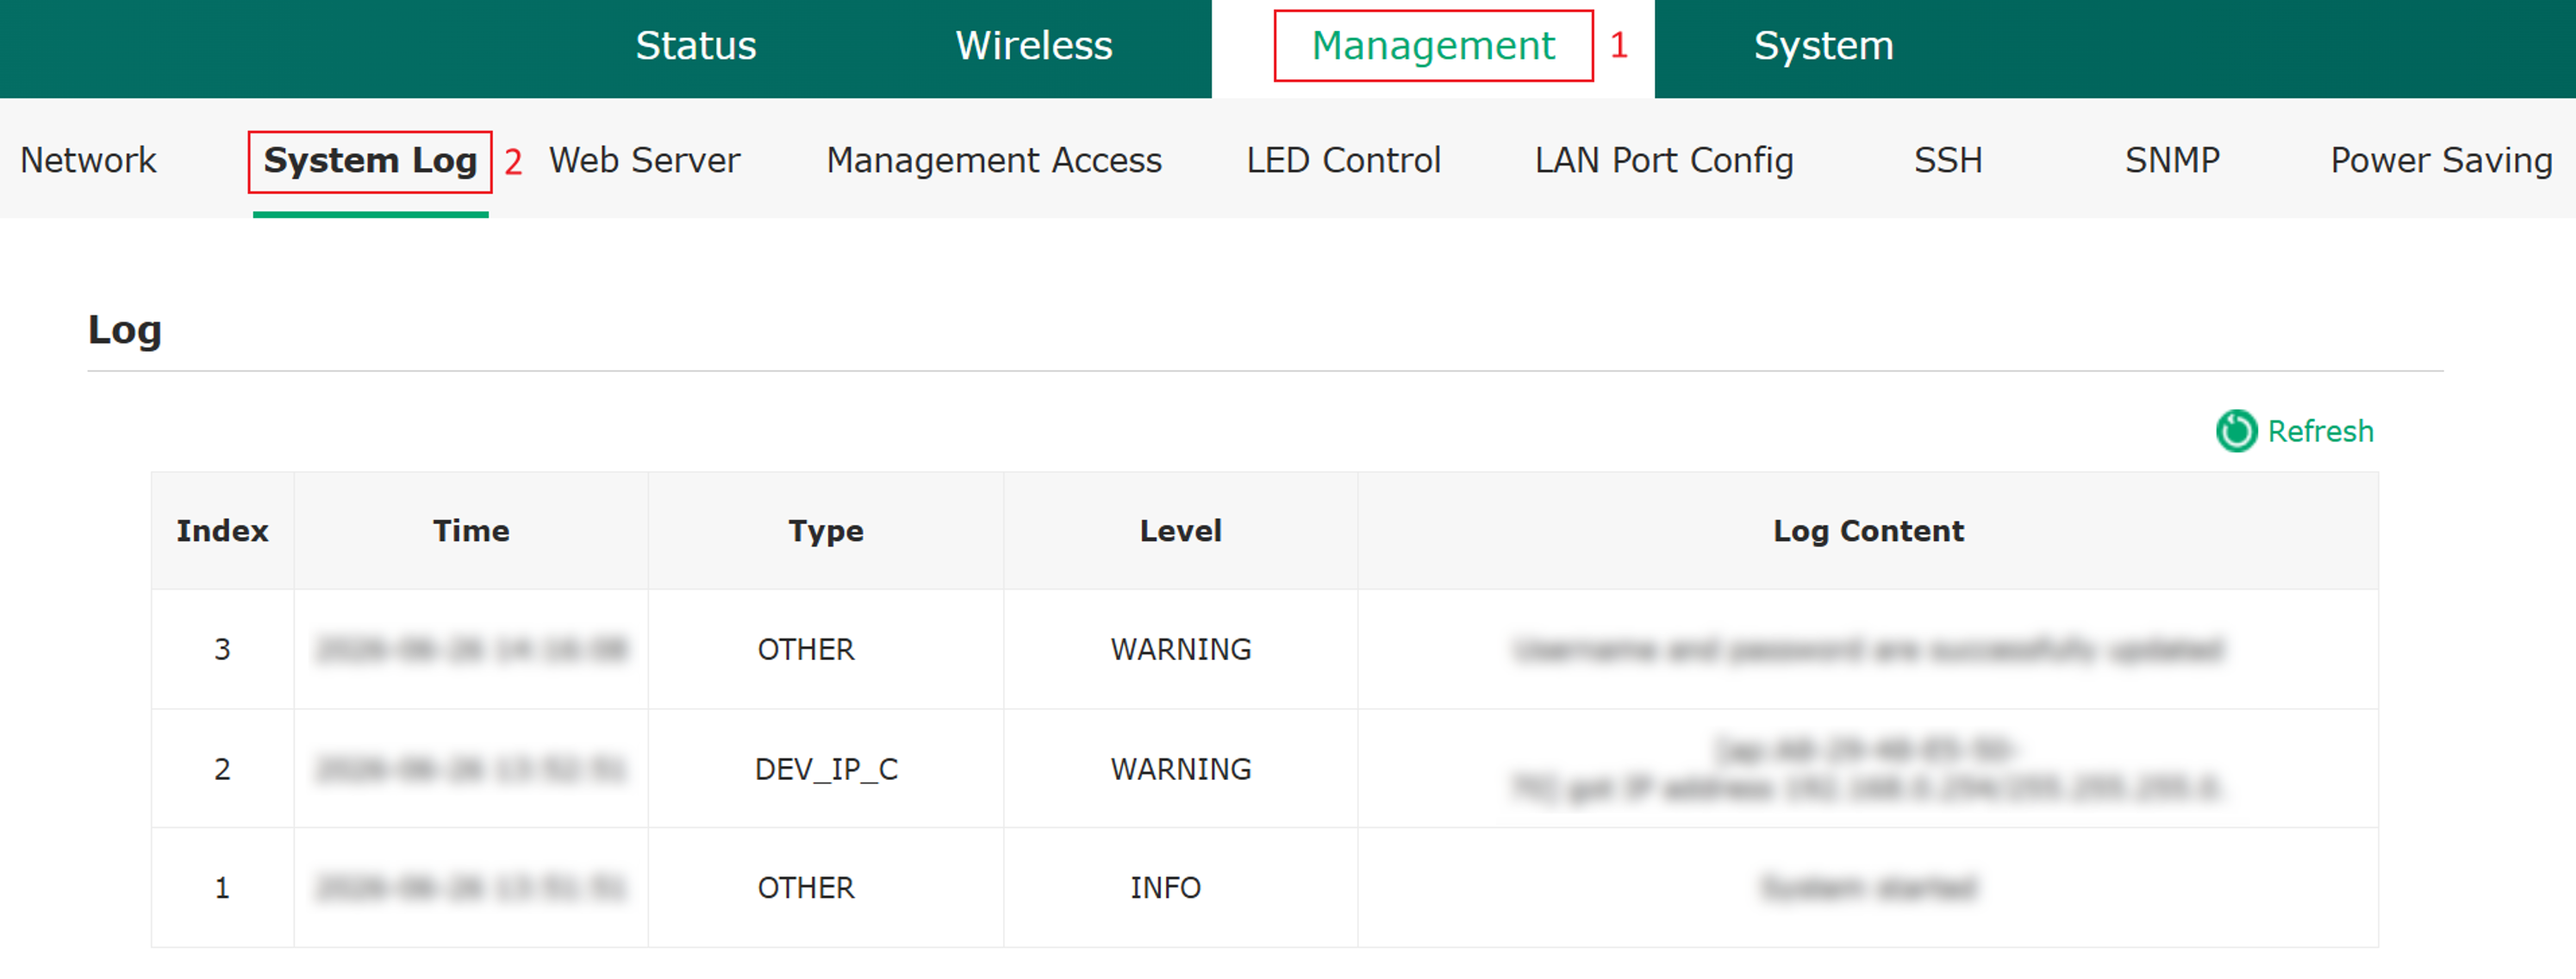
Step 5. Check the System Log.
Go to Management > System Log. Then you can review the failed connection records to further identify the cause of the issue. Pay attention to indicators such as authentication failures, connection timeouts, and access rejections, as these logs can provide valuable insights into the root cause of the failure.
Step 6. Upgrade firmware and client software.
Ensure that both the EAP firmware and client device OS or drivers are up to date. Outdated versions on either side may result in compatibility issues or unexpected connection problems.
Step 7. Create a test SSID for comparison.
Create a new SSID using default settings, with advanced features such as PMF and 802.11r disabled. Then test client connectivity with this SSID. This helps determine whether the issue is related to configuration complexity or compatibility issues.
Step 8. Verify AP power status.
Check whether the AP is receiving sufficient power and is operating under the recommended power specifications. Insufficient power may cause unexpected reboots, disabled radio bands, or degraded wireless performance. Verify the power source and review any power-related alerts or logs.
Step 9. Check for abnormal disconnection behavior.
Check for abnormal deauthentication events and investigate potential sources of interference or external disruptions, as these factors may contribute to unstable connectivity.
Conclusion
By following the step-by-step troubleshooting process in this article, most connection failures can be efficiently identified and resolved. For optimal performance, ensure correct SSID and security configuration, proper network setup (DHCP and VLAN), stable wireless conditions, and up-to-date firmware on both EAP devices and client endpoints.
To learn more about each function and configuration, please visit Support Home to download or check the manual for your product.
