


Contents
Configuration for standalone mode
Configuration for controller mode (method 1)
Configuration for controller mode (method 2)
Introduction
Storm control is mainly used to suppress or block specific messages. When a Layer 2 Ethernet interface receives broadcast, multicast, or unknown unicast messages, the switch will forward them to all other Layer 2 Ethernet interfaces in the same VLAN if it cannot specify the outgoing interface of the messages according to their destination MAC addresses. This could lead to broadcast storms, undermining the switch's forwarding performance.
By configuring traffic suppression and storm control, you can control the traffic of these three types of messages to prevent broadcast storms. Traffic suppression mainly limits traffic by configuring thresholds, while storm control blocks traffic by shutting down ports. Storm control is a port-based feature, so it has to be configured on the specific ports either directly or through a custom profile that can be applied to selected ports.
In standalone mode, you can log in to the switch’s management interface and configure storm control under the QoS menu in Bandwidth Control. This allows you to directly enable storm control on specific ports.
Two methods are available to configure storm control on the Omada Controller. Method 1 is to directly enable and configure storm control on specific devices and ports using Profile Overrides; Method 2 is to create a switch profile and apply it to the target ports.
You can choose based on the number of ports configured. If you want to enable Storm Control on only a few specific ports or want to do so without modifying the port profile, it is recommended to use Method 1. If there is a need to configure multiple ports in bulk, Method 2 is recommended.
Requirements
- Omada Controller (Software Controller / Hardware Controller / Cloud-Based Controller, v6.0 and above)
- Omada Access, Access Plus, Access Pro, Access Max, Aggregation, Campus Switch (Firmware should be fully compatible with controller v6.0)
Configuration
The following sections will respectively introduce the configuration steps for standalone mode and controller mode.
Configuration for standalone mode
This section describes the configuration steps for standalone mode.
Step 1. In standalone mode, Storm Control configuration begins by logging in to the switch’s web management interface. After accessing the interface, navigate to QoS > Bandwidth Control > Storm Control. This page allows you to view and configure bandwidth and storm control settings for each port, serving as the entry point for the overall configuration process.
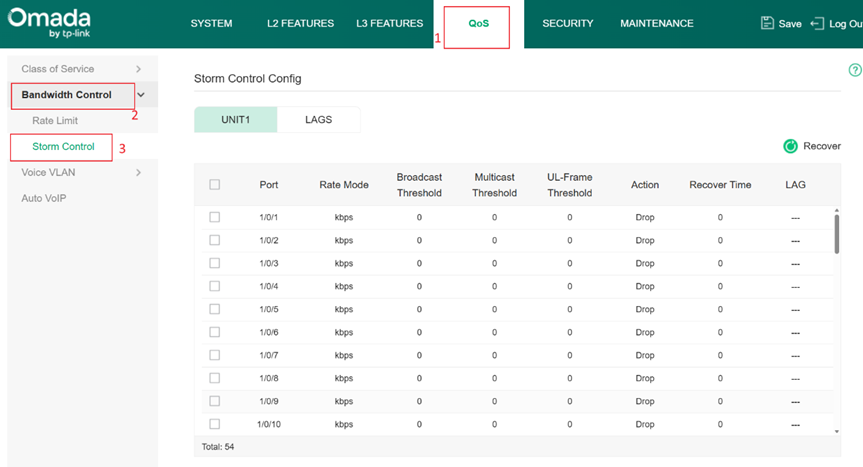
Step 2. Next, select the port on which you want to enable Storm Control. Each port can be configured independently, allowing you to monitor broadcast, multicast, and unknown unicast traffic. Depending on your network requirements, choose an appropriate rate mode—such as kbps or ratio—and set threshold values for the corresponding traffic types. When the incoming traffic rate exceeds the configured limits, the switch will take action accordingly.
Step 3. Finally, specify the action to be performed when traffic exceeds the threshold, as well as the recovery behavior. The available actions typically include Drop, which discards excess packets, and Shutdown, which disables the port. You can also configure a Recover Time to determine whether the port will automatically return to its normal state after protection is triggered. If the recovery time is set to 0, manual recovery is required. After completing all settings, click Apply to activate the Storm Control configuration in standalone mode.
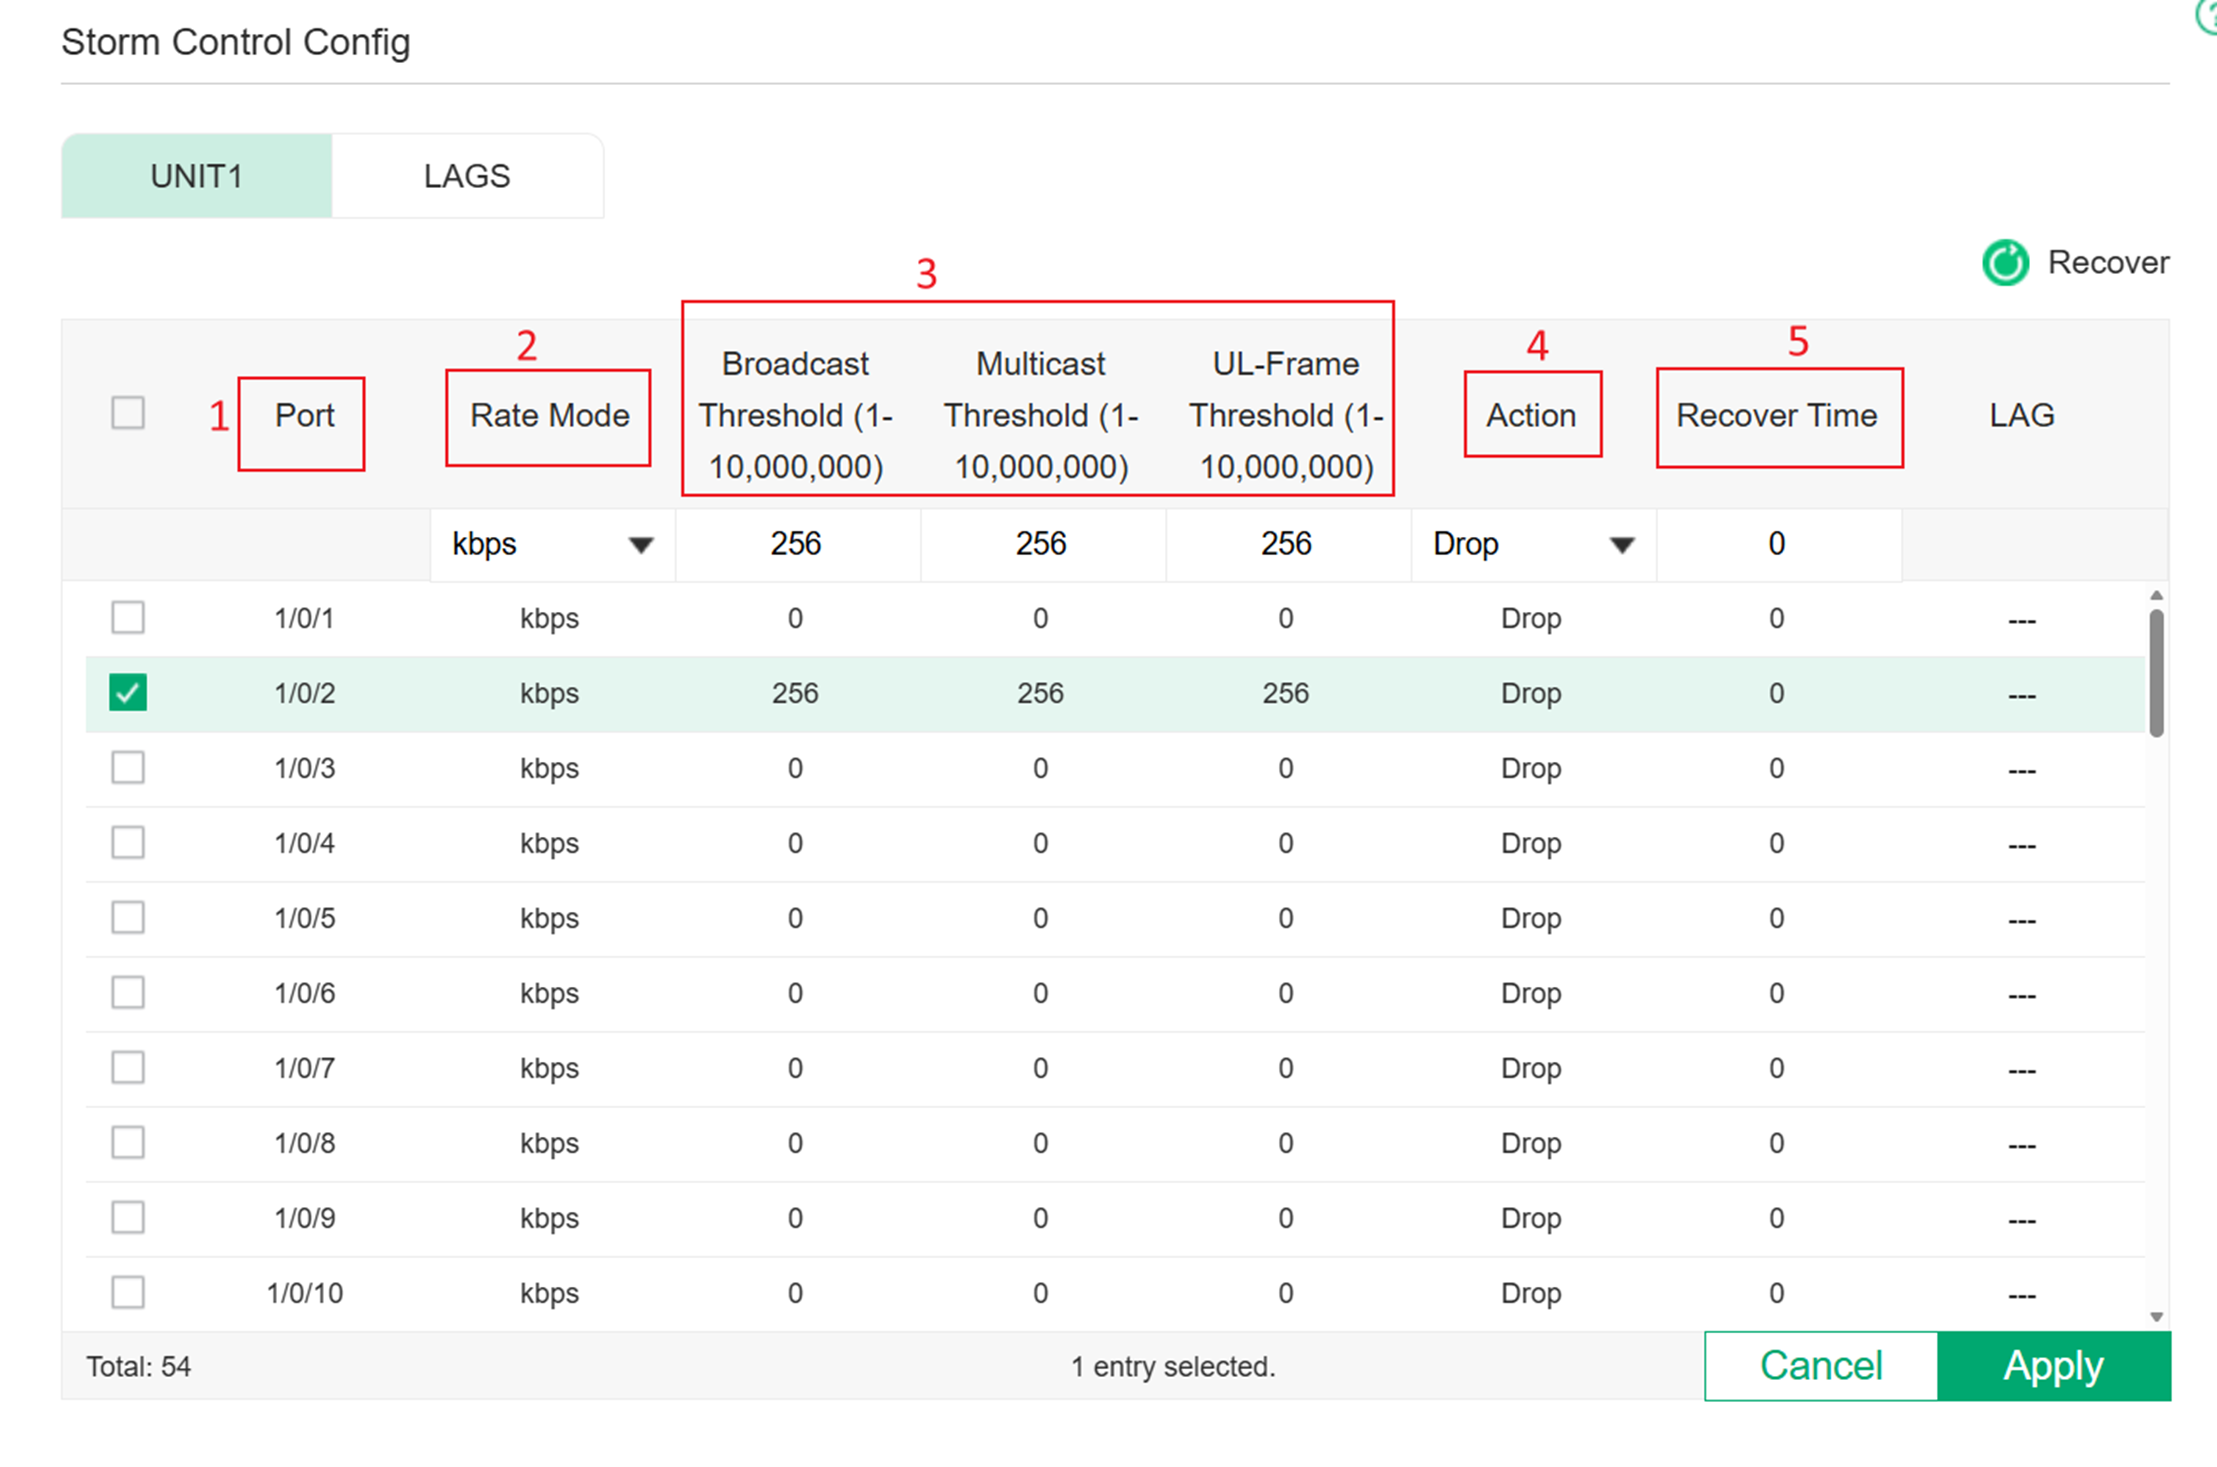
Note: The Threshold value is required to be a multiple of 64. If the input does not meet the requirement, the system will automatically modify the value to the closest multiple of 64 after the configuration is applied.
The thresholds should be decided based on the actual network. Generally, to enhance usability and reliability, it is recommended to set the threshold as 128 kbps or 256 kbps in the gigabit negotiation rate for broadcast and unknown unicast.
Whether to enable storm control for multicast depends on the actual demands. If there is a demand for multicast, avoid setting storm control for multicast messages. If not, the multicast threshold can be configured as 128 kbps or 256 kbps, or even as low as 64 kbps to minimize flooding in the network when all these types of messages are not required.
Configuration for controller mode (method 1)
In the first method, we use the Configuration Overrides feature, which allows storm control to be applied directly on the switch ports.
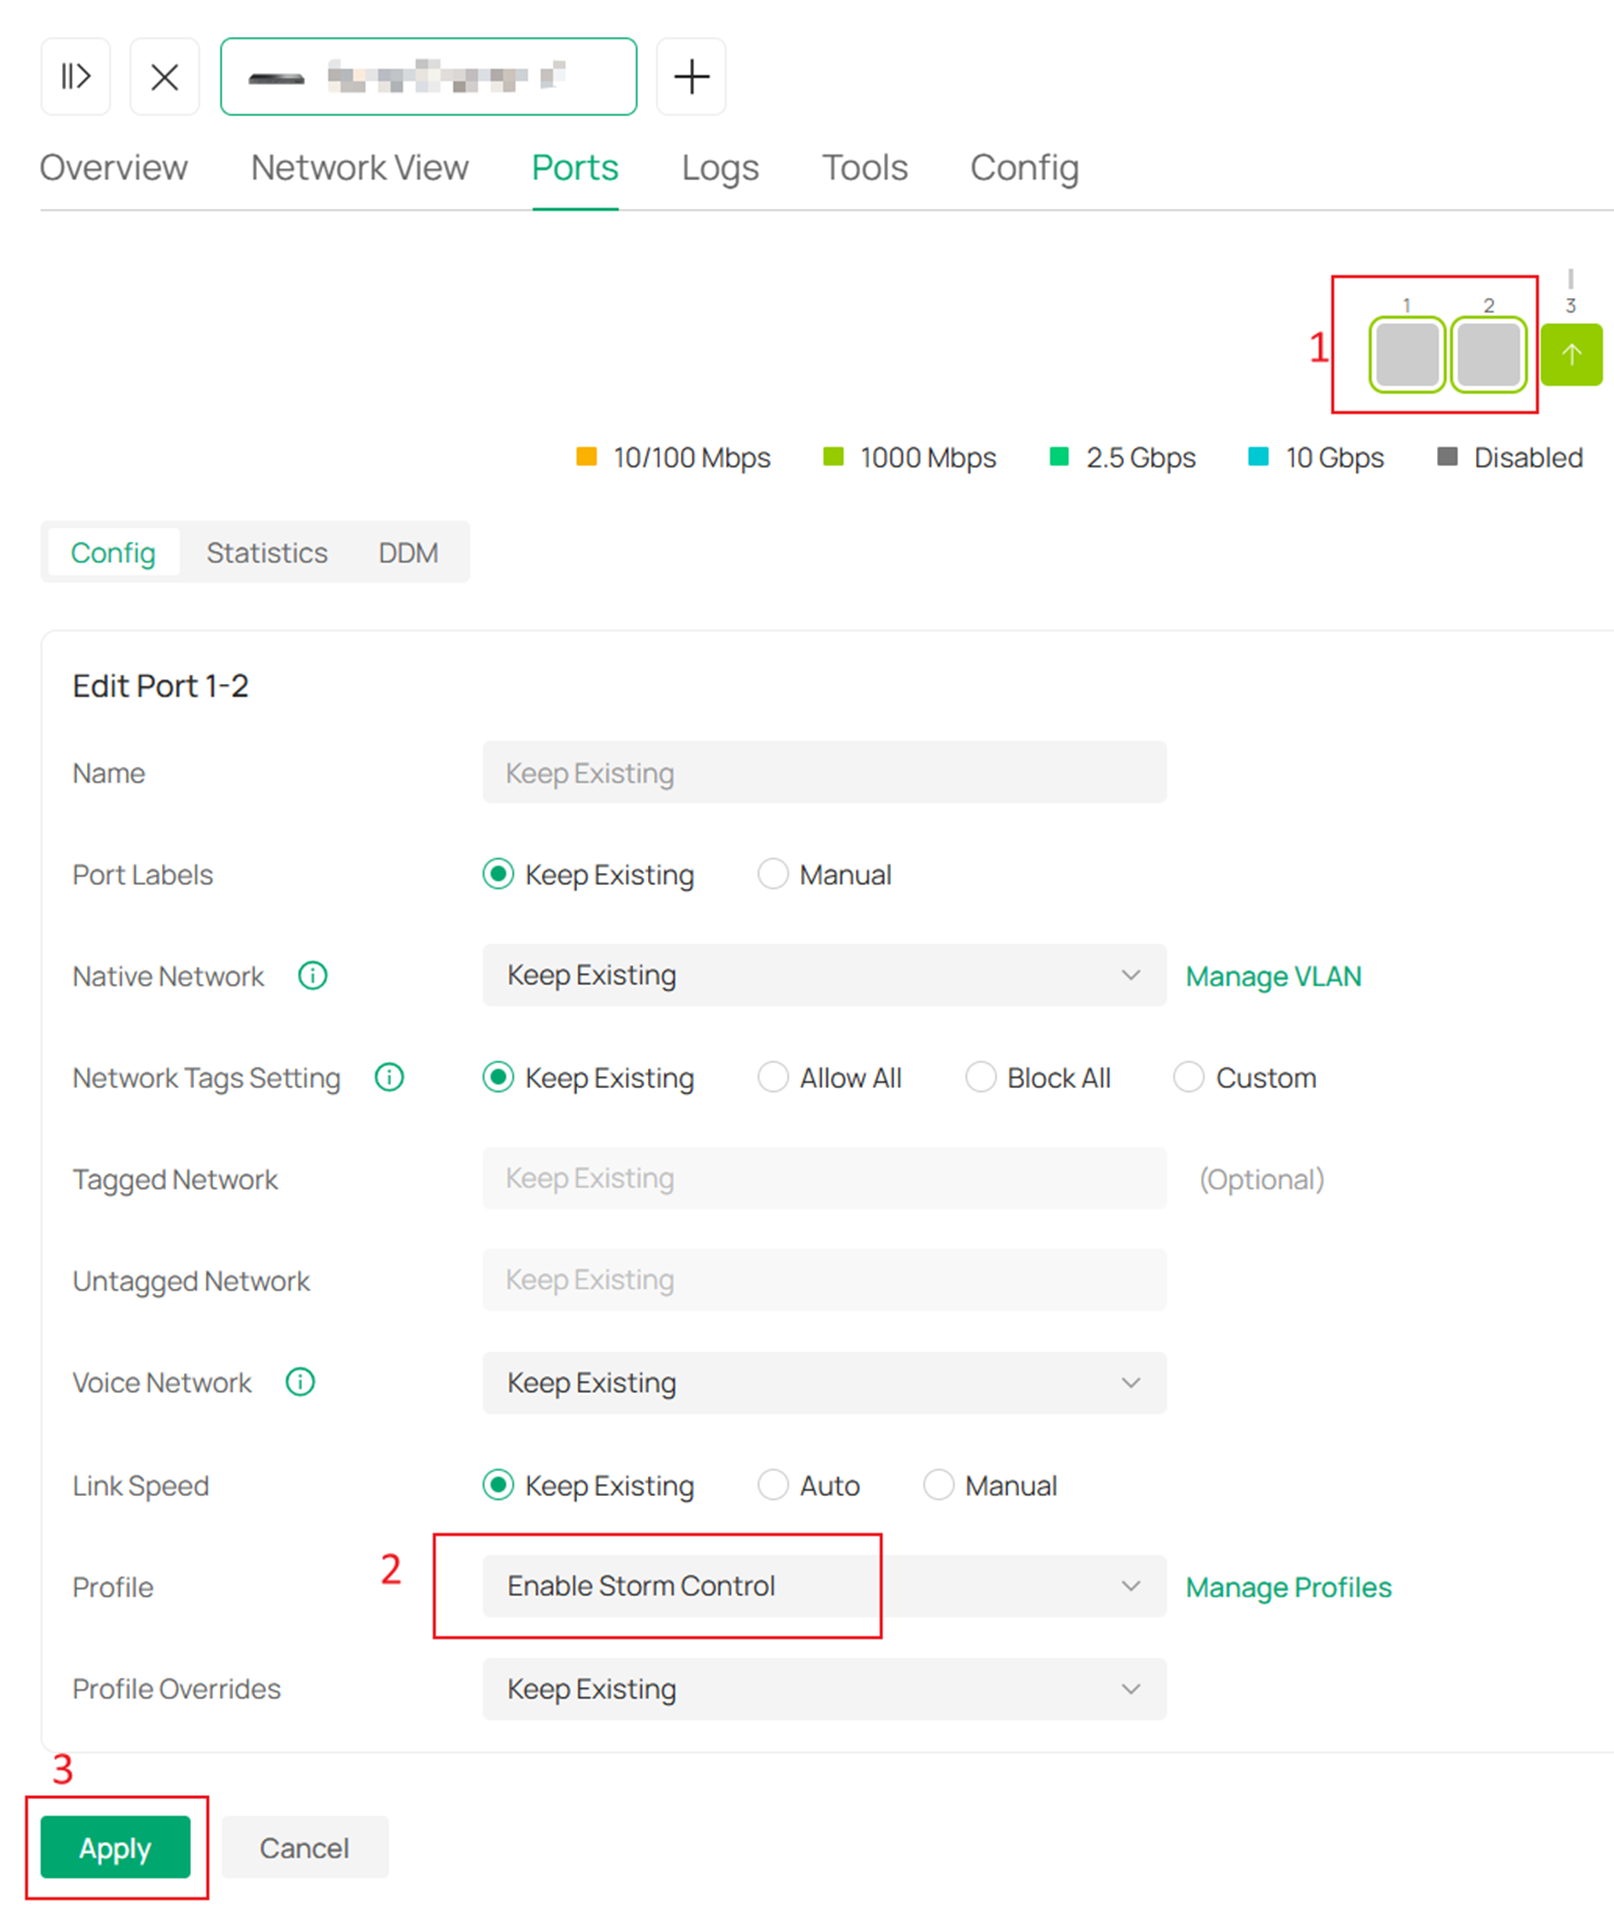
Step 1. Log in to the Omada Controller. Go to Devices > Target switch > Manage Device to open the properties window.
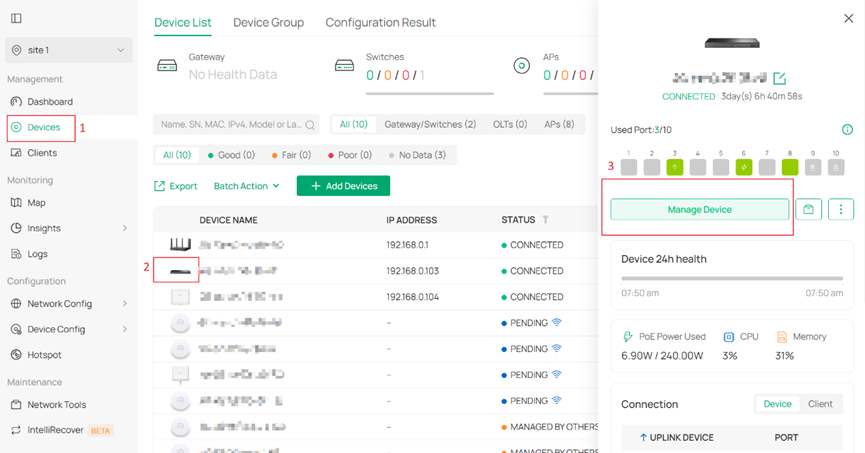
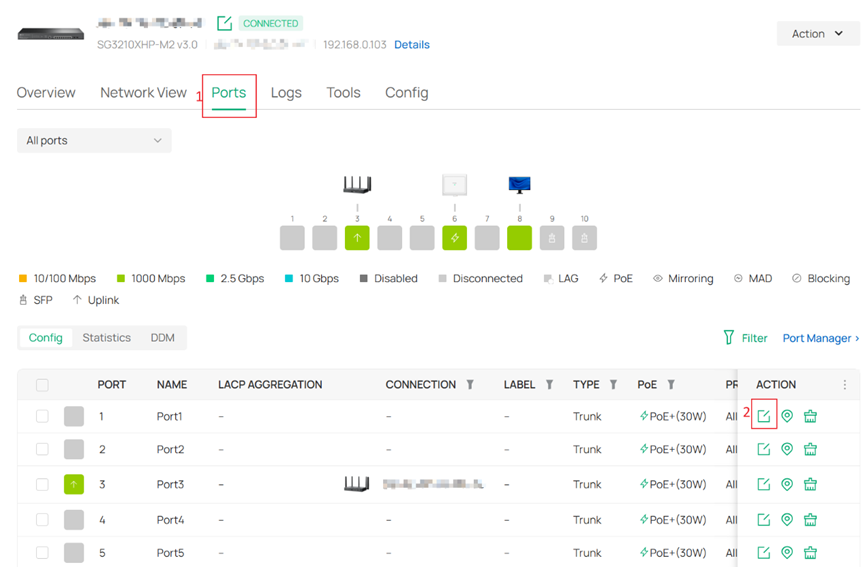
Step 2. Go to the Ports tab > click the Edit icon to configure the target port.
Step 3. Click the checkbox of Profile Overrides for further configuration. Then select Storm Control in the Bandwidth Control section.
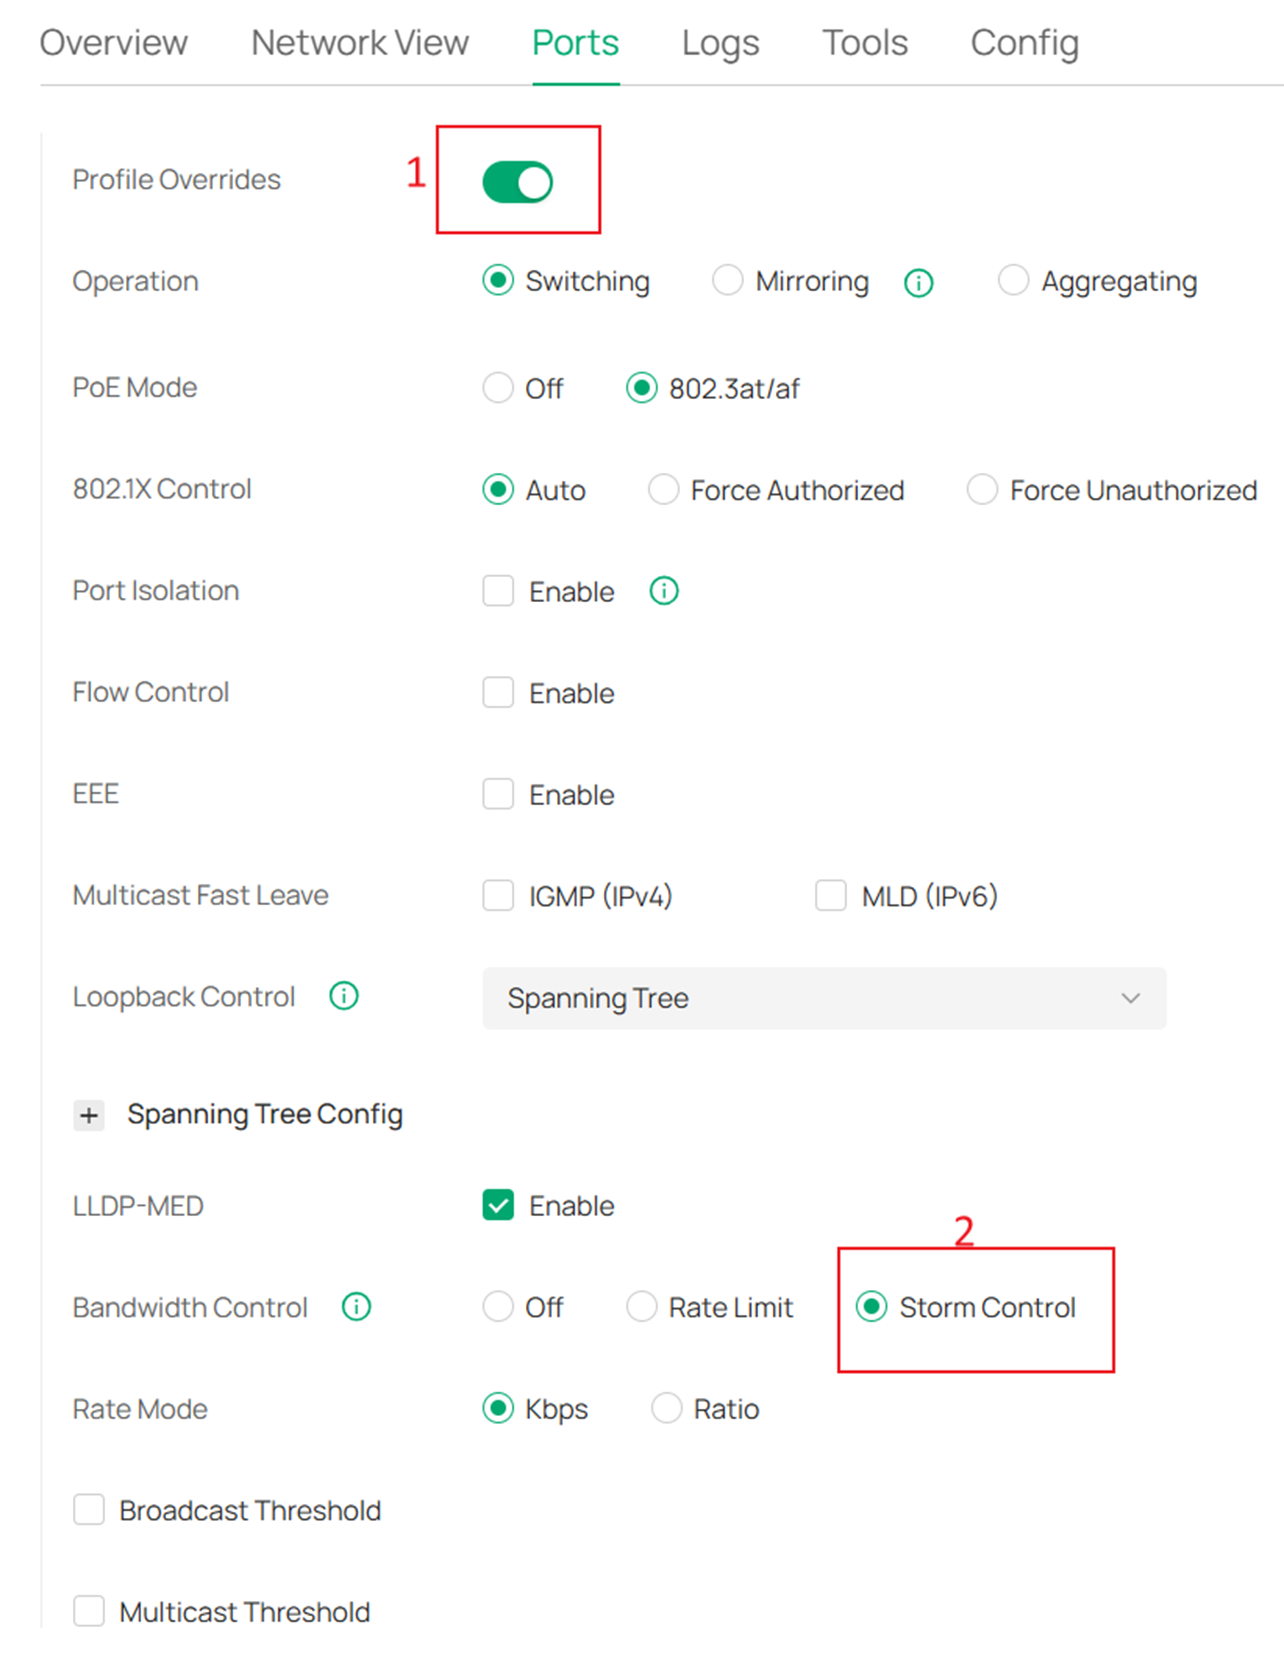
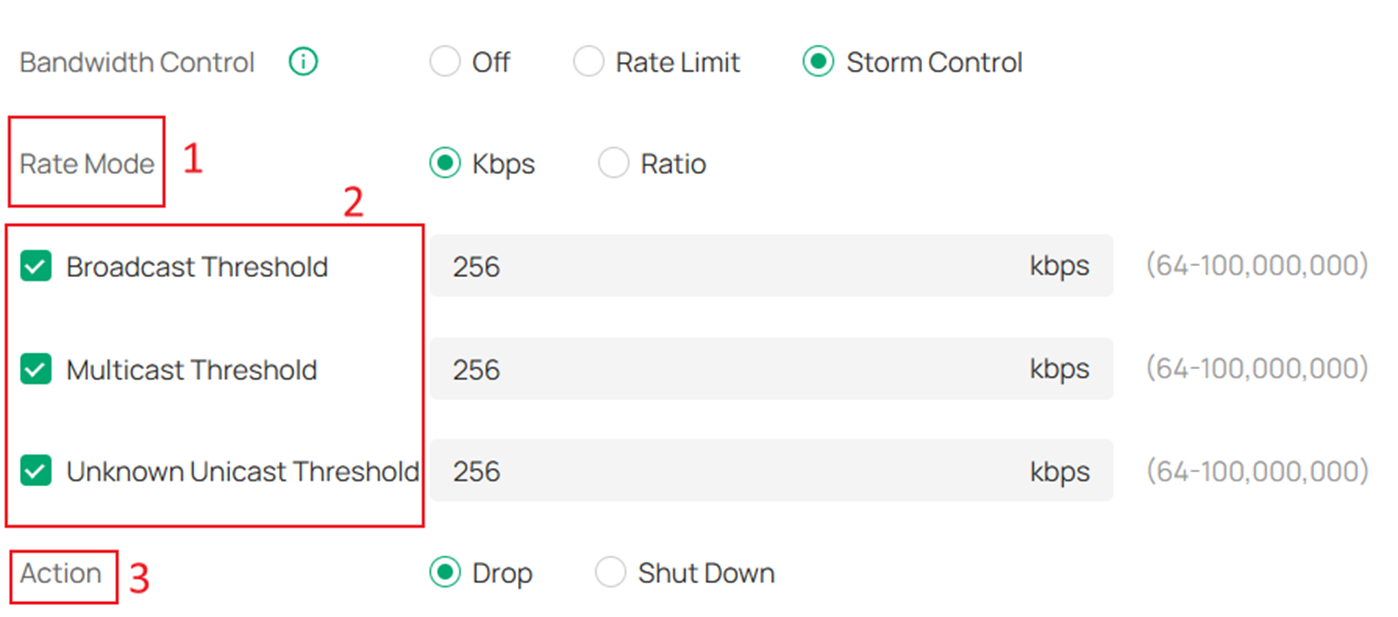
Step 4. Select the message types (Broadcast, Multicast, and Unknown Unicast) to be controlled based on your own needs, and specify the Threshold value (unit: kbps). Choose the Action to be taken when the traffic exceeds the threshold on the port. Drop refers to dropping the corresponding type of message that goes beyond the traffic limit after the threshold is exceeded. Shut Down indicates shutting down the port for 3,600 seconds (1 hour) when the threshold is exceeded. Click Apply to implement your configurations.
Configuration for controller mode (method 2)
Method 2 allows you to customize a switch configuration to implement storm control by applying this configuration file to the switch ports.
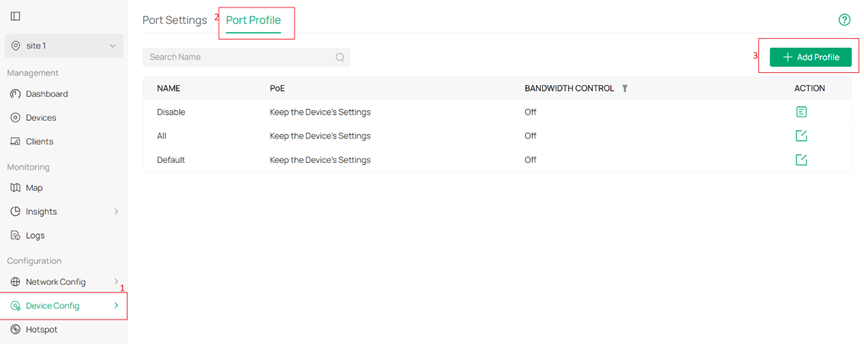
Step 1. Log in to the Omada Controller. Go to Device Config > Switch Ports > Port Profile > Add Profile.
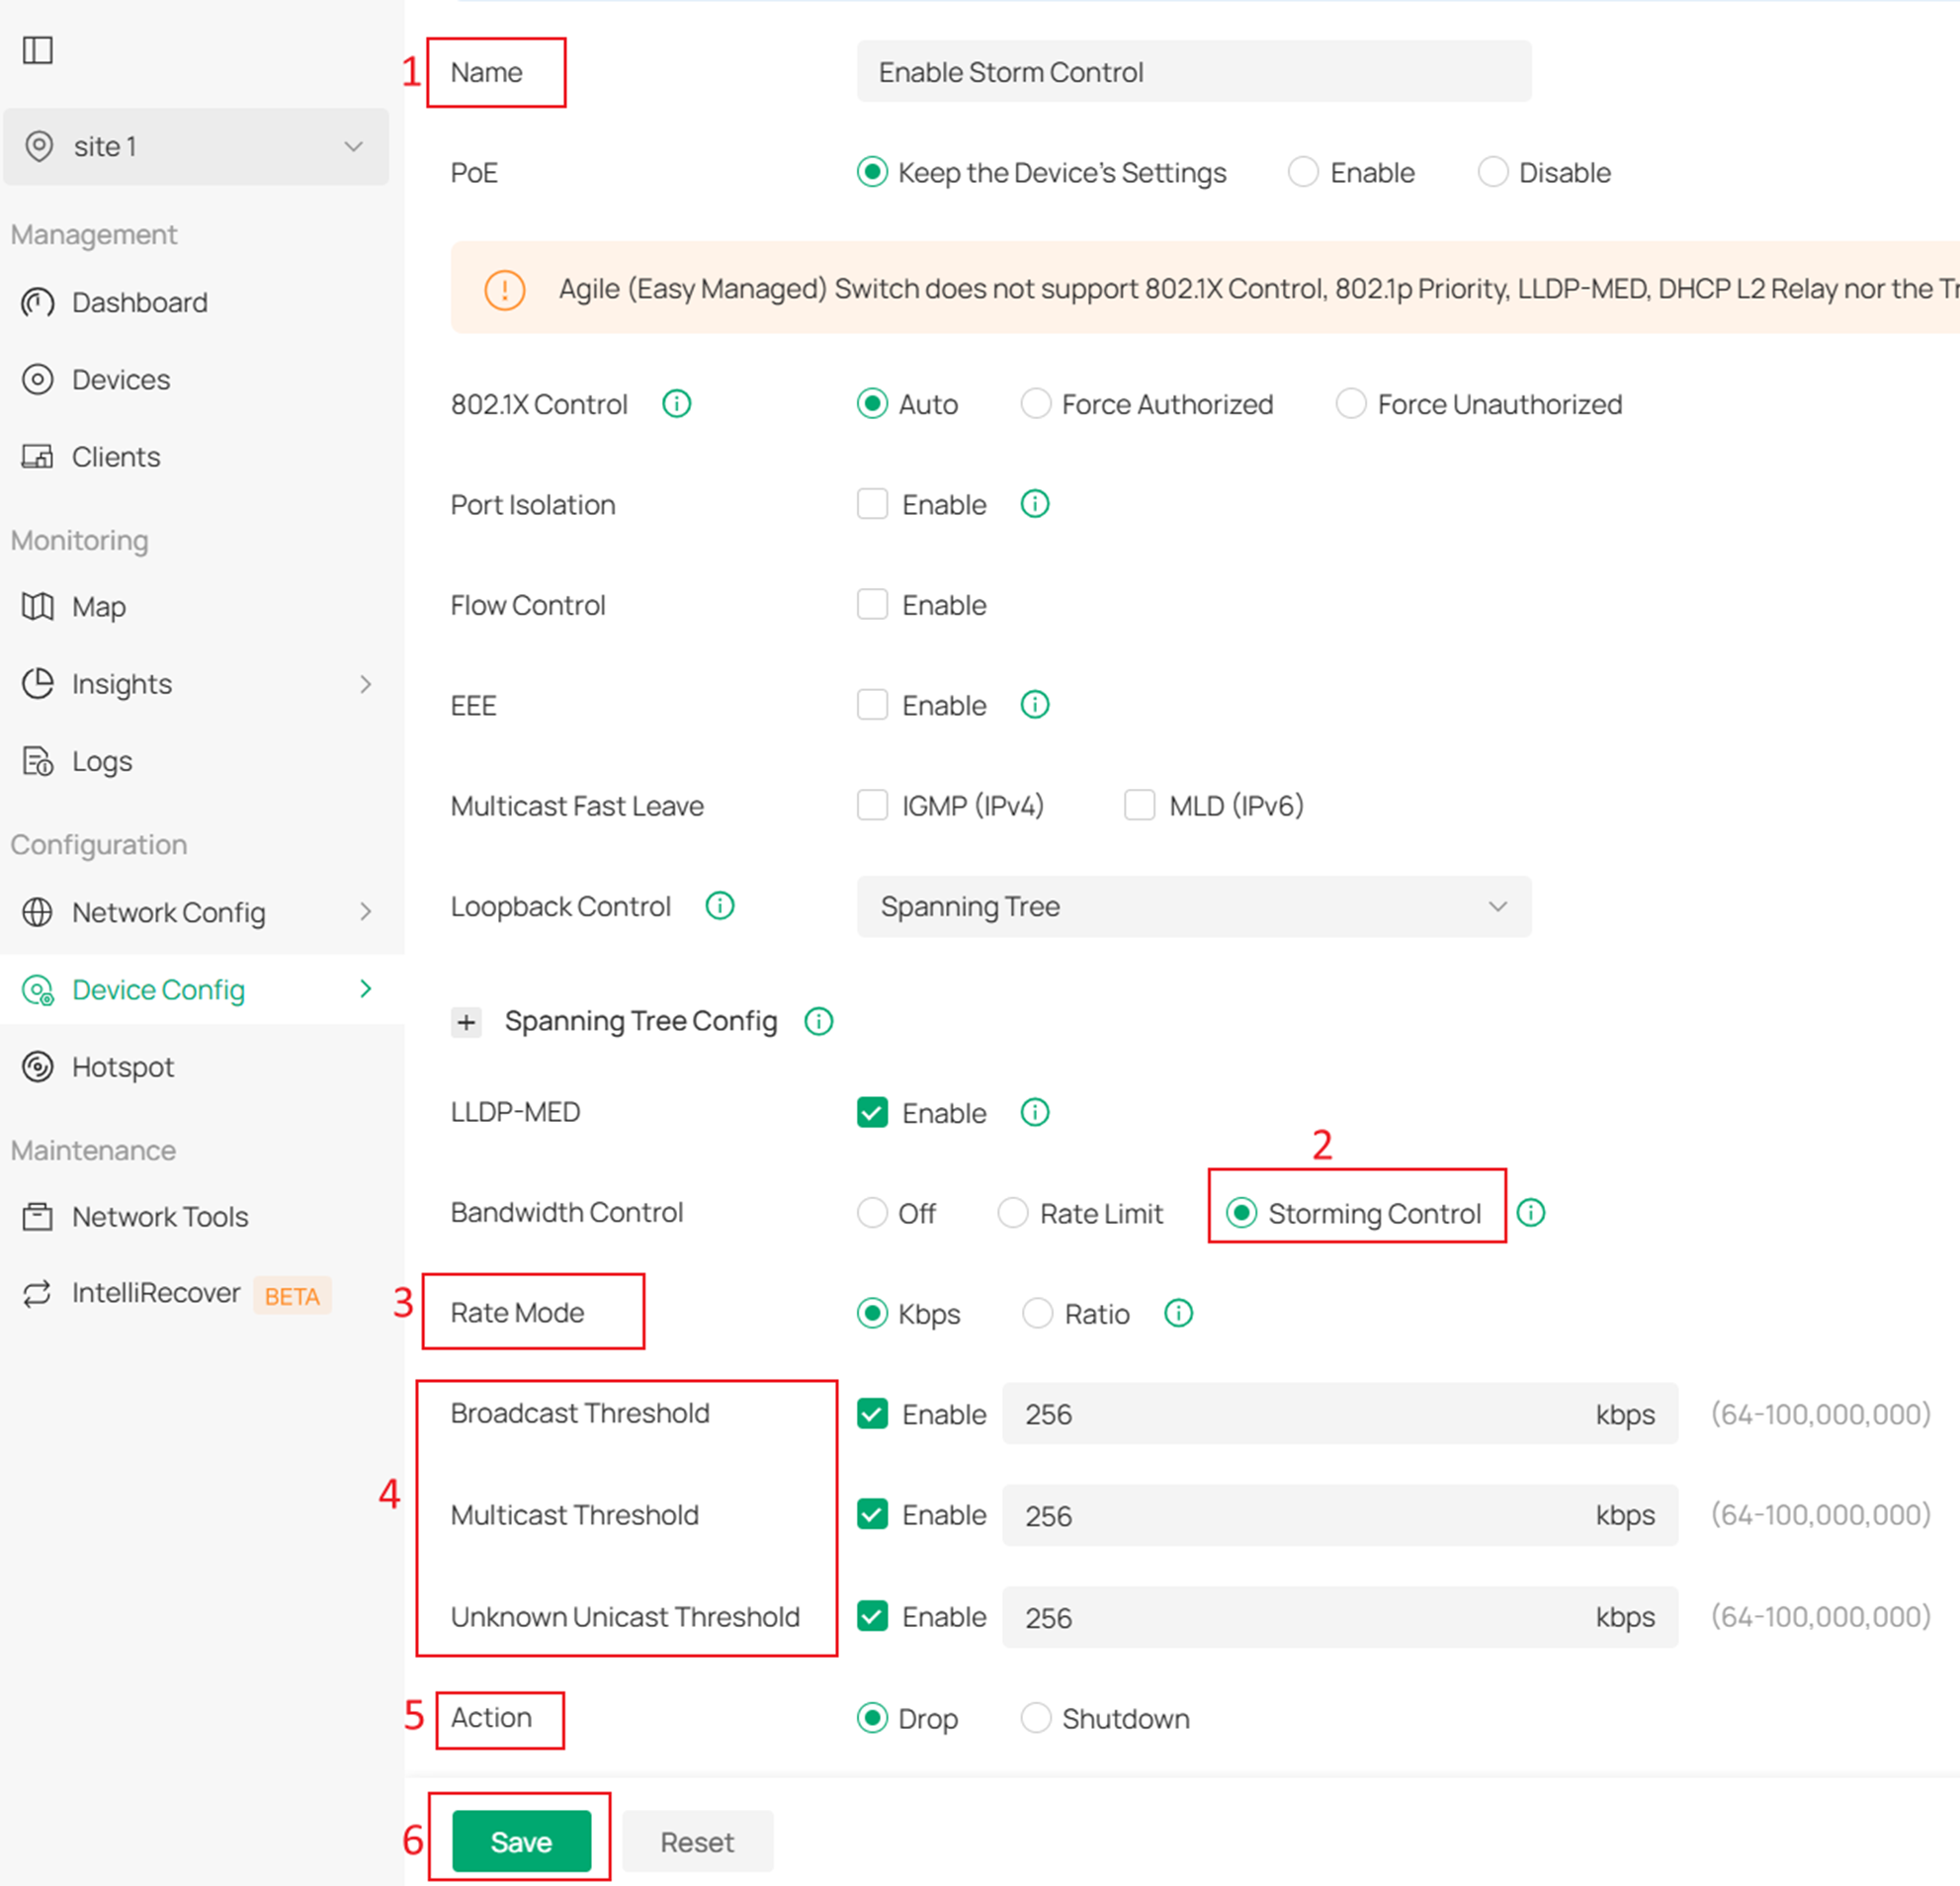
Step 2. When creating a new port profile, configure the VLAN according to your needs. Select Storming Control in the Bandwidth Control section. Then select the message types (Broadcast, Multicast, and Unknown Unicast) to be controlled based on your own needs, and specify the Threshold value (unit: kbps). Choose the Action to be taken when the traffic exceeds the threshold on the port. Drop refers to dropping the corresponding type of message that goes beyond the traffic limit after the threshold is exceeded. Shut Down indicates shutting down the port for 3,600 seconds (1 hour) when the threshold is exceeded. Click Save to implement your configurations.
Step 3. Apply the configuration created in Step 2 to the target ports. Go to Devices and click the corresponding switch to open its properties window. Navigate to the Ports tab, then click the Edit icon to configure the target ports.
Multiple ports can be selected simultaneously. In the Profile field, select the new profile created in the previous step, and then click Apply to deliver the configuration to all selected ports at once.
Conclusion
You have now successfully configured the storm control feature on the Omada switch.
Get to know more details of each function and configuration please go to Download Center to download the manual of your product.
