


목차
OAM 링크를 통해 Dying Gasp 메시지를 전송하기 위한 설정
Syslog 서버로 Dying Gasp 메시지를 전송하기 위한 설정
SNMP Trap을 통해 Dying Gasp 메시지를 전송하기 위한 설정
개요
네트워크 엣지에 위치한 디바이스는 최적의 전력 상태가 아닌 경우가 많기 때문에 예기치 않은 전력 손실이 발생하기 쉽습니다. Dying Gasp 메커니즘은 디바이스의 연결이 끊어지기 전에 예기치 않은 정전에 대해 모니터링 시스템에 경고를 보내는 방법을 제공합니다. 정전이 발생하면 하드웨어 커패시터가 기기의 종료를 잠시 지연시킵니다. 이 기간 동안 디바이스는 구성된 OAM 링크, syslog 서버 또는 SNMP 알림 수신자에게 Dying Gasp 메시지를 보냅니다.
요구 사항
- Omada 캠퍼스 스위치
설정
개요에서 언급했듯이 예기치 않은 정전이 발생하면 세 가지 방법을 통해 Dying Gasp 메시지를 보낼 수 있습니다:
1. 구성된 OAM 링크를 통해 Dying Gasp 알림을 보냅니다.
2. 구성된 syslog 서버로 로그를 보냅니다.
3. 구성된 SNMP 트랩 수신기로 SNMP 트랩 메시지를 보냅니다.
다음 섹션에서는 이 세 가지 방법을 통해 메시지를 전송하고 메시지 수신 결과를 표시하도록 Dying Gasp를 구성하는 방법에 대해 설명합니다.
OAM 링크를 통해 Dying Gasp 메시지를 전송하기 위한 설정
OAM 링크는 OAM을 지원하는 네트워크 장치 간에 모니터링 정보를 전송하기 위한 것입니다. 여기서는 다른 Omada 스위치를 피어 장치로 사용하겠습니다. OAM 링크를 통해 메시지를 보내도록 Dying Gasp를 구성하려면 OAM 링크용 VLAN을 만들고, 이 VLAN에 태그된 다른 스위치에 연결되는 포트를 추가한 다음, 이 포트에서 OAM을 사용하도록 설정해야 합니다. 피어 스위치에서도 동일한 절차를 수행해야 합니다. 마지막으로 Dying Gasp을 허용하고, 전송 방식을 OAM으로 설정하고, 생성한 OAM VLAN을 지정합니다.
1단계. OAM 링크에 대한 VLAN을 만듭니다. 예를 들어 OAM 사용을 위해 VLAN 2를 만들겠습니다. CLI에서 글로벌 설정 보기로 들어간 후 다음 명령을 사용합니다:
vlan 2
exit
그러면 VLAN 2가 생성되고 글로벌 구성 보기로 돌아갑니다.
2단계. 피어 OAM 장치에 연결되는 포트를 새로 생성된 VLAN에 추가하고 이 포트에서 OAM을 사용하도록 설정합니다. 예를 들어 방금 생성한 VLAN 2에 기가비트 포트인 포트 5를 추가한 다음 포트 5에서 OAM을 사용하도록 설정합니다. 명령은 다음과 같습니다:
interface gigabitEthernet 1/0/5
switchport general allowed vlan 2 tagged
ethernet-oam
exit
실제 포트 번호와 속도를 기준으로 명령을 입력하세요. 피어 OAM 장치에서 동일한 구성을 수행합니다.
3단계. 메시지 전송 방법으로 OAM 링크를 사용하여 Dying Gasp을 사용하도록 설정합니다. 명령어를 다음과 같이 입력합니다:
dying-gasp enable oam vlan 2
이것은 OAM을 통해 Dying Gasp 메시지를 보내도록 지정하며, VLAN ID는 2입니다.
여기서는 OAM을 통해 Dying Gasp를 전송하기 위한 구성을 완료했습니다. 결론적으로 명령은 다음과 같습니다:
interface gigabitEthernet 1/0/5
switchport general allowed vlan 2 tagged
ethernet-oam
exit
dying-gasp enable oam vlan 2
Syslog 서버로 Dying Gasp 메시지 전송을 위한 구성
시스로그 서버는 일반적으로 원격으로 로그를 수신하는 데 사용됩니다. 스위치에서 syslog 서버 주소를 구성한 후, Dying Gasp 메시지를 syslog 서버로 전송하고 원격으로 수신할 수 있습니다.
1단계. 스위치에 syslog 서버 주소를 설정하면 스위치에 Dying Gasp 메시지를 포함한 로그를 전송할 위치를 알려줍니다. 시스로그 서버의 주소는 스위치의 인터페이스에서 연결할 수 있어야 합니다. 로그 심각도의 경우, Dying Gasp의 메시지 수준은 1단계이므로 설정한 심각도 수준은 1보다 작아서는 안 됩니다. 예를 들어, syslog 서버 주소를 192.168.0.104로 설정하고 로그 심각도를 6으로 설정하겠습니다. 명령어를 다음과 같이 입력합니다:
logging host index 1 192.168.0.104 6
Omada 스위치에서는 "index" 뒤의 숫자로 표시된 대로 1에서 4까지 최대 4개의 syslog 서버를 동시에 구성할 수 있습니다. 실제 네트워크 설정과 필요에 따라 인덱스 번호, IP 주소, 로그 심각도를 구성하세요.
2단계. 전송 방법을 syslog 서버로 설정하여 Dying Gasp를 사용하도록 설정합니다. 명령어를 다음과 같이 입력합니다:
dying-gasp enable syslog
시스템 로그 서버를 통해 메시지를 보내도록 Dying Gasp의 구성을 완료했습니다. 결론적으로 다음과 같은 명령을 사용합니다:
logging host index 1 192.168.0.104 6
dying-gasp enable syslog
SNMP 트랩을 통해 Dying Gasp 메시지를 전송하기 위한 설정
SNMP 트랩은 일반적으로 중요한 알림을 수신하는 데 사용됩니다. SNMP 서비스를 활성화하고 SNMP 사용자 및 트랩 구성을 설정한 후 SNMP 트랩을 통해 죽어가는 헐떡임 메시지를 전송하고 SNMP 트랩 수신기 또는 이와 유사한 소프트웨어에 기록할 수도 있습니다.
1단계. SNMP 서버를 사용 설정하고, 사용자를 설정하고, 트랩을 구성합니다. 예를 들어, 여기서는 사용자 커뮤니티 이름을 "Omada"로 설정하고, SNMP 트랩 수신 소프트웨어를 실행하는 PC의 위치인 SNMP 트랩 대상을 192.168.0.4로 설정하면 기본적으로 SNMP 트랩 메시지는 포트 162로 전송되며 SNMP 트랩 수신 소프트웨어도 기본적으로 포트 162에서 수신 대기합니다. 명령어를 다음과 같이 입력합니다:
snmp-server
snmp-server community "Omada" read-only "viewDefault"
snmp-server host 192.168.0.104 162 "Omada" smode v2c slev noAuthNoPriv type trap
사용자 권한을 읽기 전용 또는 읽기-쓰기로 설정해도 Dying Gasp 메시지를 보내는 스위치에는 영향을 미치지 않습니다. 또한 트랩의 스모드는 v1 또는 v2c로 구성할 수 있습니다.
2단계. 전송 방법을 SNMP 트랩으로 설정하여 Dying Gasp를 사용하도록 설정합니다. 명령어를 다음과 같이 입력합니다:
dying-gasp enable snmp
SNMP 트랩을 통해 메시지를 보내기 위한 설정을 완료했습니다. 결론적으로 사용하는 명령어는 다음과 같습니다:
snmp-server
snmp-server community "Omada" read-only "viewDefault"
snmp-server host 192.168.0.104 162 "Omada" smode v2c slev noAuthNoPriv type trap
dying-gasp enable snmp
확인
스위치에서 구성을 완료한 후 이 세 가지 방법을 통해 Dying Gasp 메시지가 어떻게 전송되는지 확인해 보겠습니다.
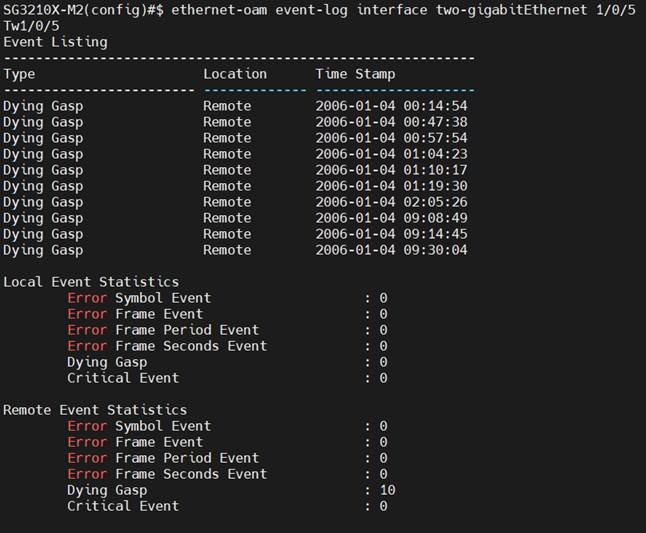
OAM 링크를 통해 전송하려면 OAM으로 구성된 피어 스위치로 이동하여 CLI에 들어가서 Dying Gasp 스위치의 전원을 분리하여 예기치 않은 정전을 에뮬레이션하면 화면에 "포트 xx에서 원격 Dying Gasp 감지"라는 로그가 인쇄되는 것을 볼 수 있으며, 이는 로깅 버퍼에도 기록되며 포트에서 OAM을 통해 수신 된 이벤트도 확인할 수 있으며 2.5G 포트 인 포트 5를 예로 들어 명령은 다음과 같습니다:
show ethernet-oam event-log interface two-gigabitEthernet 1/0/5

구성이 끝나면 일반적으로 syslog 서버를 실행하는 PC인 스위치에 syslog 서버 IP 주소가 설정됩니다. PC에서 syslog 서버를 시작합니다. 그런 다음 Dying Gasp 스위치의 전원을 분리하여 예기치 않은 정전 상황을 모방합니다. 서버에 기록된 로그를 볼 수 있어야 합니다.

구성이 끝나면 SNMP 트랩 수신기 소프트웨어의 IP 주소가 스위치(일반적으로 소프트웨어를 실행하는 PC)에 설정됩니다. PC에서 소프트웨어를 시작하면 자동으로 포트 162에서 수신이 시작됩니다. 예상치 못한 정전 상황을 모방하기 위해 Dying Gasp 스위치의 전원을 분리하면 트랩 메시지가 수신되는 것을 볼 수 있을 것입니다.

결론
지금까지 세 가지 방법을 통해 스위치에서 Dying Gasp를 구성하고 메시지를 보내는 방법에 대해 소개해 드렸습니다. 확인 섹션에서는 메시지의 예시도 제공합니다.
해당 제품의 설명서를 다운로드 센터에서 다운로드하여 각 기능 및 설정에 대한 자세한 내용을 확인할 수 있습니다.
QA
Q1: 동시에 여러 방법으로 메시지를 보내도록 Dying Gasp를 설정할 수 있나요?
A1: 예, 세 가지 Dying Gasp 메시지 전송 방법을 동시에 활성화할 수 있습니다. 활성화하면 해당 위치에서 메시지를 받게 됩니다.
이 문서에는 기계 번역이 적용되었으며, 정확한 내용을 확인하려면 원본 영문 문서를 참고하시기 바랍니다.
