


Contents
01. Cannot discover the Omada Fusion Gateway via the Omada APP
02. Cannot discover Omada Switches/APs
03. Omada Switches/APs discovered but cannot be adopted
04. Cannot establish an SD-WAN network
05. Cannot connect to the LightLink VPN server
06. Omada Switches/APs frequently disconnect
08. WAN port keeps going online and offline
11. Port forwarding cannot work
12. Clients cannot obtain IP addresses
13. DHCP Reservation cannot work
14. Policy Routing cannot work
15. Bandwidth Control cannot work
16. Content Filtering cannot work
17. ACL (Access Control List) cannot work
18. Clients within the same VLAN cannot communicate with each other
19. Portal interface cannot pop up automatically
20. Portal authentication failed
22. Unable to open the management page using the domain name
Introduction
When using an Omada Fusion Gateway, we may encounter various issues, such as being unable to discover the Omada Fusion Gateway via the Omada app or being unable to discover Omada Switches/APs. This article will introduce how to troubleshoot some common issues.
Requirements
- Omada Fusion Gateway
Troubleshooting
1. Cannot discover the Omada Fusion Gateway via the Omada APP
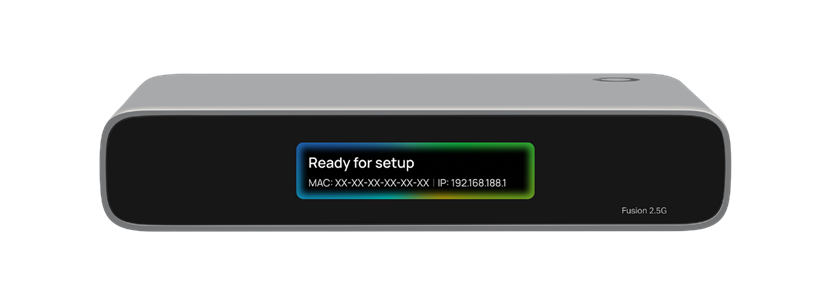
Step 1. Make sure the Omada Fusion Gateway has finished booting up and the screen displays “Ready for setup.”
Step 2. Make sure you have the Omada app in v5.2.0 or later.
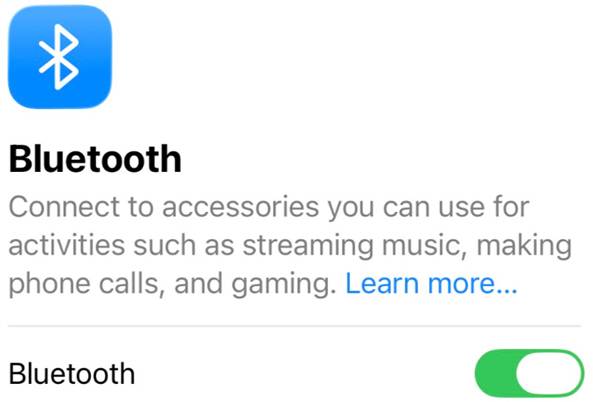
Step 3. Make sure Bluetooth is enabled on your phone and that you have granted the Omada app permission.
Step 4. Make sure your phone is close enough to the Omada Fusion Gateway (Recommended within 5 meters).
Step 5. Make sure no other phones are setting up the Omada Fusion Gateway at the same time.
Note: Once the Omada Fusion Gateway has finished its initial setup, Bluetooth will automatically disable, but you can still manage it via its IP address or the Omada Cloud Management Platform.
2. Cannot discover Omada Switches/APs
First of all, during the initial setup of the Omada Fusion Gateway, only Omada Switches/APs in the factory mode can be discovered. Devices that have already been configured or adopted by other controllers can be discovered and adopted after the initial setup of Omada Fusion Gateway is complete.
If the Omada Switches/APs are on the same network as the Omada Fusion Gateway, please ensure the connectivity between them, which can be tested using a ping tool.
If the Omada Switches/APs are on a different network from the Omada Fusion Gateway, you may need to verify that the Omada Switches/APs have the Inform URL configured correctly or are correctly obtaining Option 138 from the DHCP server.
If there is a NAT (Network Address Translation) device between the Omada Fusion Gateway and the Omada Switches/Aps, ensure that the security policy correctly permits the necessary ports.
Here are two related FAQs for your reference:
3. Omada Switches/APs discovered but cannot be adopted
Step 1. Similar to the issue above, we need to first ensure the two-way connectivity between the Omada Switches/APs and the Omada Fusion Gateway and make sure that the necessary ports are permitted by the security policy.
Step 2. Make sure to use the correct username and password when adopting them. By default, the Omada Fusion Gateway attempts to adopt devices using the username “admin” and the password “admin”. You can click the Retry button and enter the username and password manually. If the EAP worked in the standalone mode before, then the username and password will be the login account and password for the web management page.
Step 3. Make sure Omada Switches/APs are not in a special state, such as during an upgrade or boot process.
Here is a related FAQ for your reference:
What should I do when the Omada Controller (V6) fails to adopt the devices? | Omada Network Support
4. Cannot establish an SD-WAN network
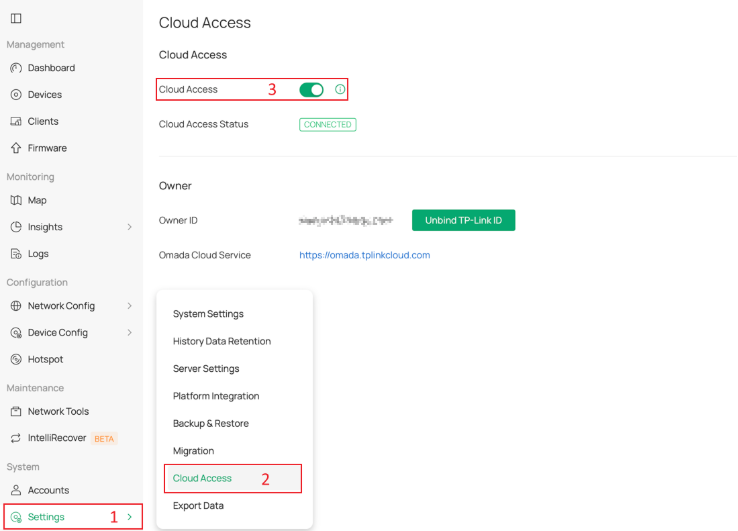
Step 1. Make sure all the Fusion Gateways have Cloud Access enabled, and the cloud access account has Superadmin or Owner privileges to access the SD-WAN feature for the bound Fusion Gateways.
Step 2. Make sure the network segments participating in the same SD-WAN group do not overlap across all sites.
Step 3. Make sure the target sites are not already part of any other SD-WAN groups.
Step 4. Check the NAT types of the failed sites. For sites where only NAT8 (Symmetric NAT) or NAT6 (Port-restricted cone NAT)- NAT8 is present, the NAT Traversal process may fail, resulting in connection establishment failure between some of the sites. In this situation, the traffic between these sites will be forwarded by other tunnels established successfully.
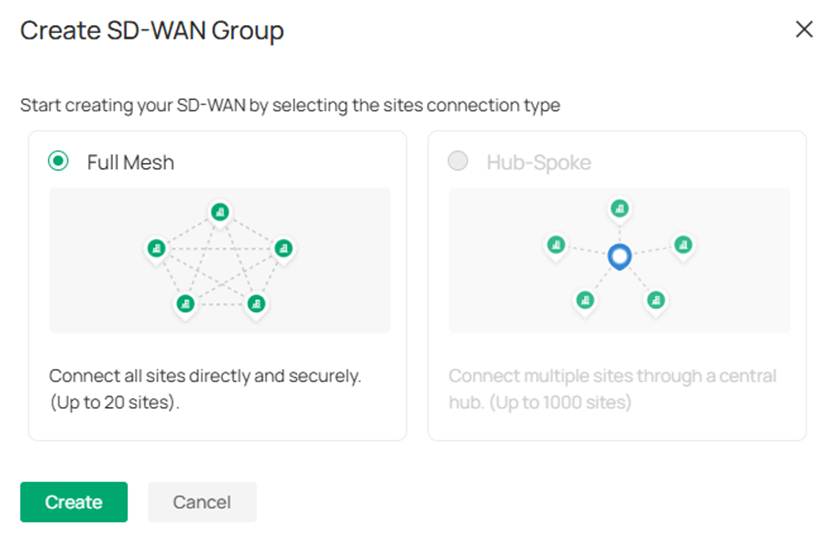
Note: Currently, the Hub-Spoke model is not yet supported on Fusion Gateway SD-WAN, it will be available in a future version.
5. Cannot connect to the LightLink VPN server
Step 1. Make sure the LightLink VPN Server is online, and the client's internet connection is working properly.
Step 2. Make sure the invitation link has not expired, an invitation link expires 24 hours after it is generated.
Step 3. Make sure the invitation link has not been used by any other users.
Note: LightLink VPN supports NAT traversal and works in most non-public IP environments. However, connectivity may depend on your network and ISP. In some cases, such as strict carrier restrictions or enterprise firewalls, connections may fail or be unstable.
6. Omada Switches/APs frequently disconnect
Step 1: Check whether the connection between the devices and the Omada Fusion Gateway is stable. If the devices are on the LAN side, there may be an IP conflict or network congestion. If the devices are on the WAN side, their internet connection may be unstable.
Step 2. Check the devices for issues such as high CPU or memory utilization and an unstable power supply.
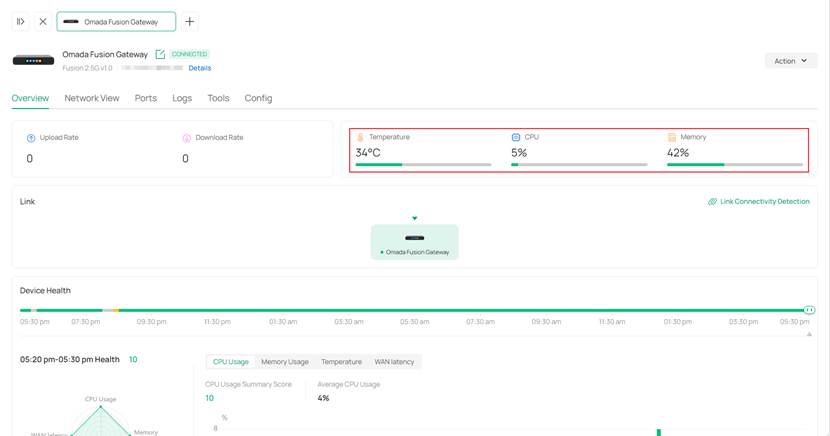
Step 3. Check for issues with the network cable's quality or whether the cable type is incompatible with the port's speed.
7. WAN port is offline
Step 1. Make sure the Ethernet cable is properly connected to the gateway's WAN port, and the indicator light is flashing normally.
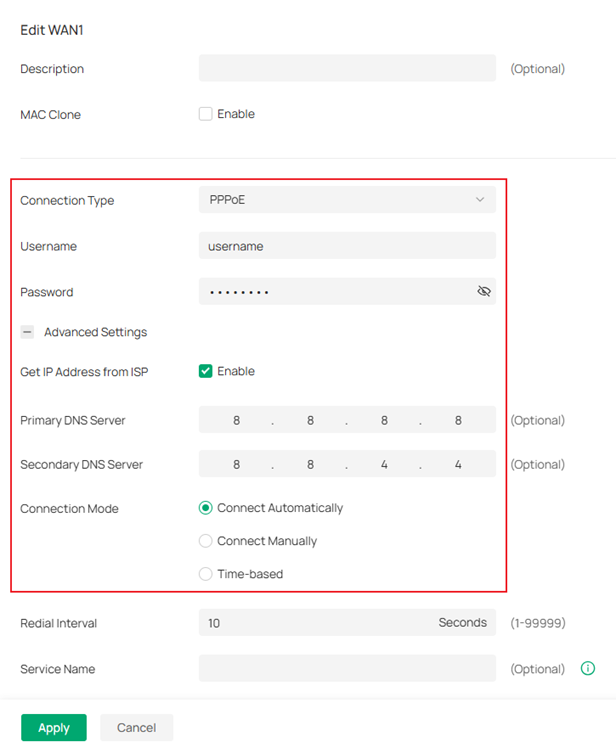
Step 2. Make the dial-up configuration meet the carrier's requirements, including the dial-up type, account, password, and DNS settings.
Step 3. Try using a different Ethernet cable.
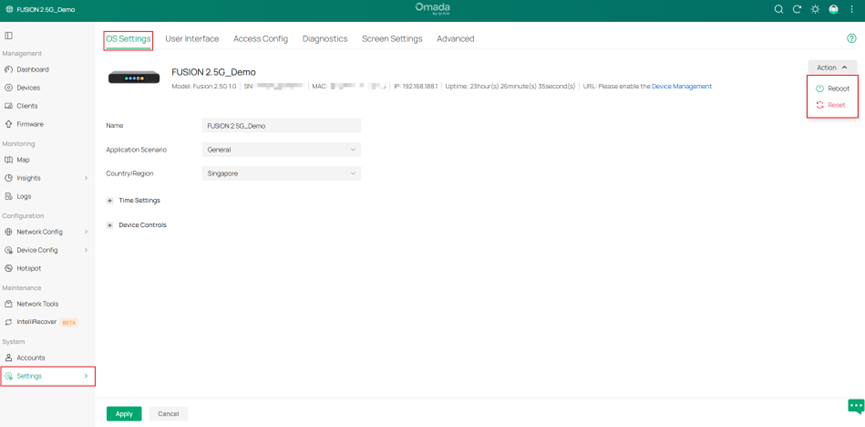
Step 4. Try rebooting the device or resetting it to factory settings and reconfiguring the WAN.
8. WAN port keeps going online and offline
Step 1. Try using a different Ethernet cable.
Step 2. Try other reliable DNS servers.
Step 3. Connect a PC directly to the ISP's modem to check if the ISP's network is stable.
9. Link Backup cannot work
Step 1. Check the physical connection of the WAN port to see if the Ethernet cable is loose and if the WAN port indicator light on the gateway is flashing.
Step 2. Disable the Link Backup feature and check whether all WAN ports are online. If not, the dial-up configuration may be incorrect.
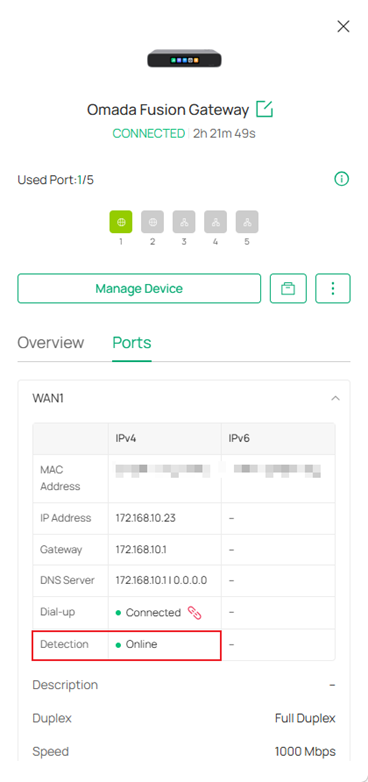
Step 3. Check whether multiple WAN interfaces have been selected for the Primary WAN and whether the Failover Mode is configured to “Enable backup link when all primary WANs fail,” but the condition “all primary WANs fail” is not currently met.
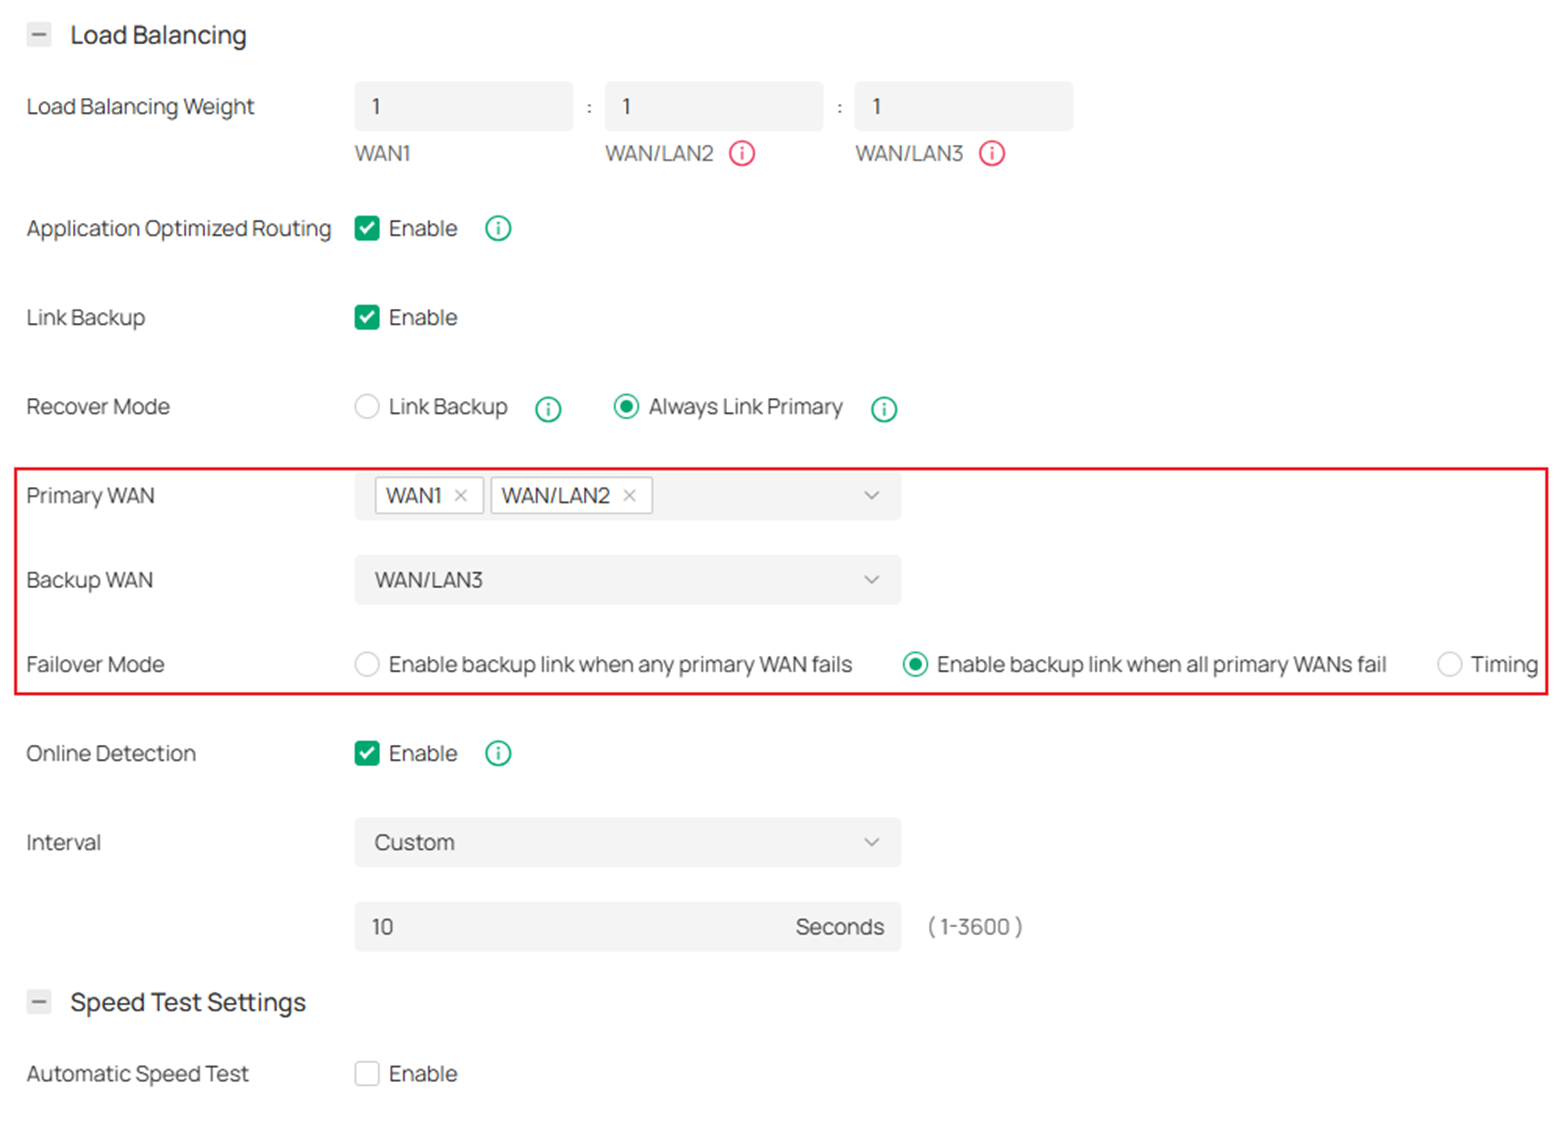
Note: The switchover from the primary WAN to the backup WAN typically takes 60–120 seconds.
10. Low network throughput
Step 1. Make sure the carrier provides sufficient bandwidth.
Step 2. Check whether the port's link speed is normal. If the port’s LED indicator is yellow, it means the link speed is not the maximum speed the port supports.
Step 3. Check whether the device's CPU usage is normal.
Step 4. Check whether the negotiated speeds for the WAN and LAN ports are inconsistent. If they are, it is recommended to enable flow control.
Step 5. Verify whether speed-limiting features such as QoS, Bandwidth Control, and Rate Limit have been configured, or whether advanced security features such as IPS/IDS and DPI have been enabled.
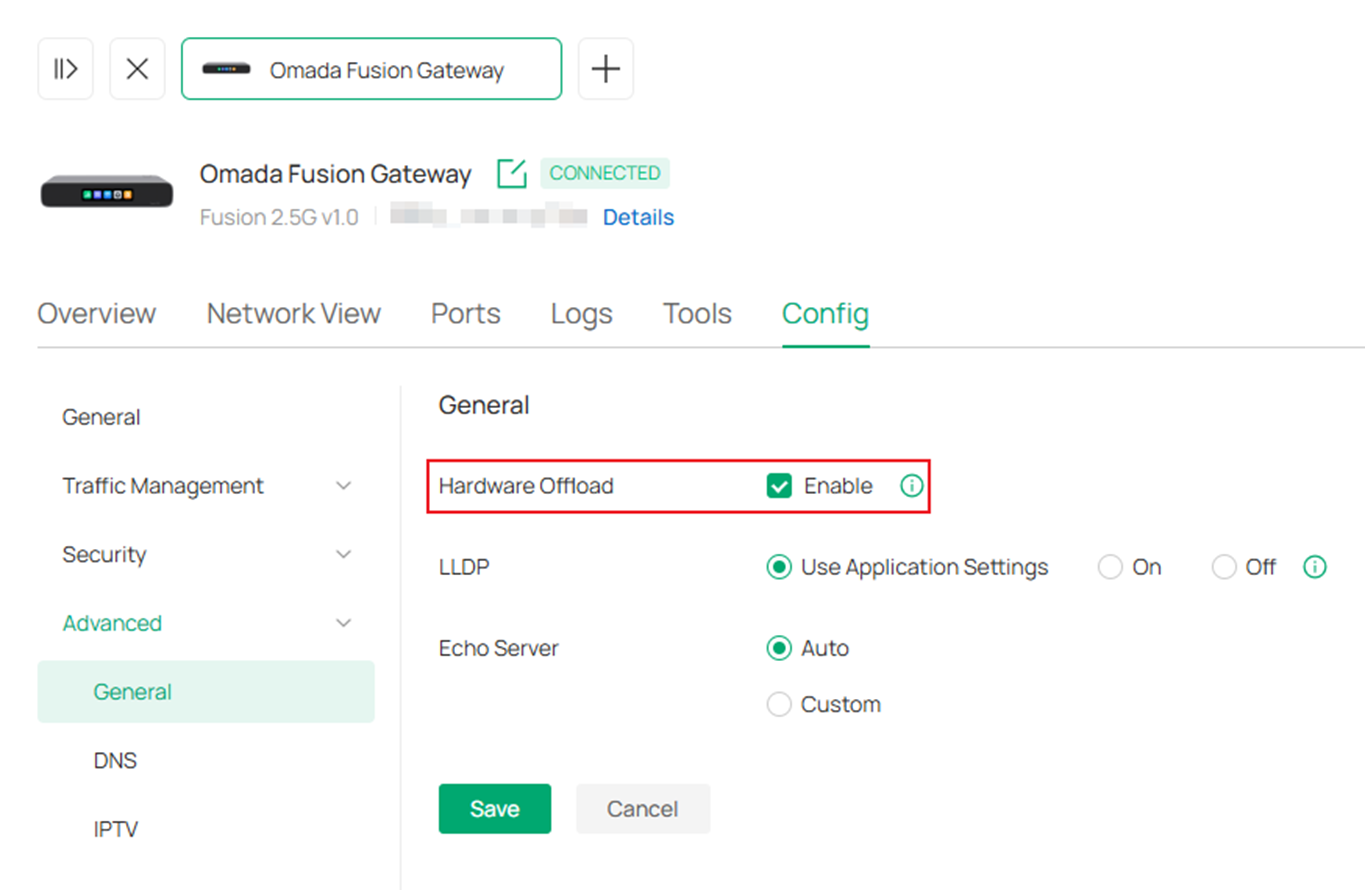
Step 6. Check whether Hardware Offload is enabled.
Step 7. Try using a more professional speed-testing tool, such as iPerf, and specify more than 10 connections.
11. Port forwarding cannot work
Step 1. Make sure the WAN interface, IP address, and protocol are all configured correctly.
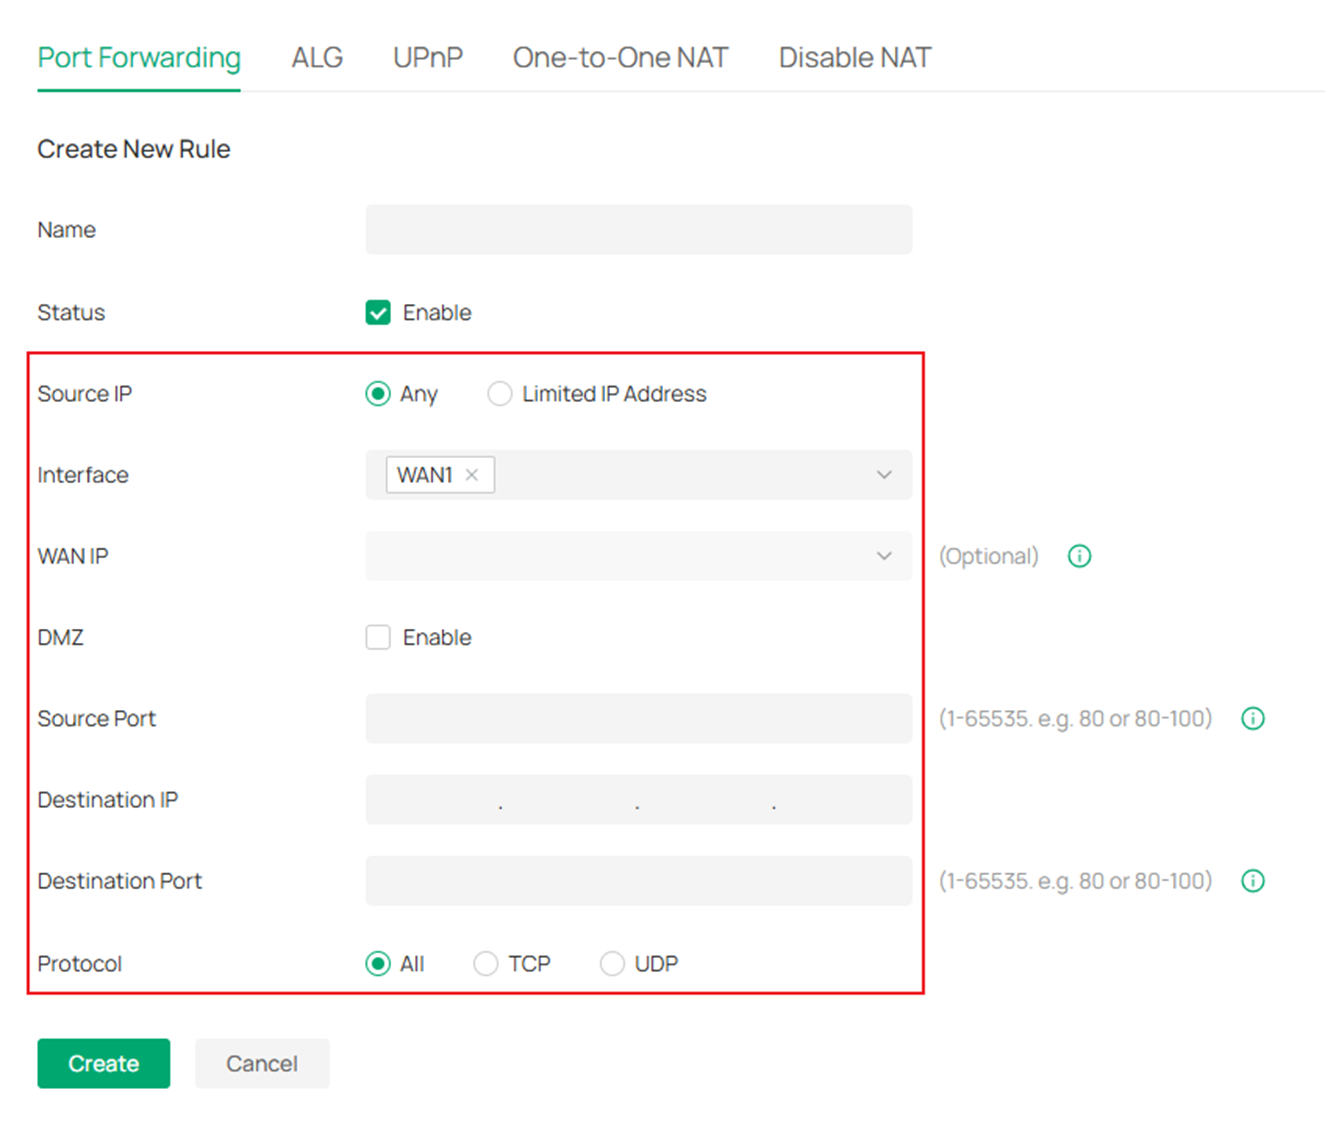
Step 2. Make sure the configured port does not conflict with ports used by other services.
12. Clients cannot obtain IP addresses
Step 1. Check that the physical connection is working properly and that there are no port link-down issues.
Step 2. Check whether the CPU utilization of the device is normal.
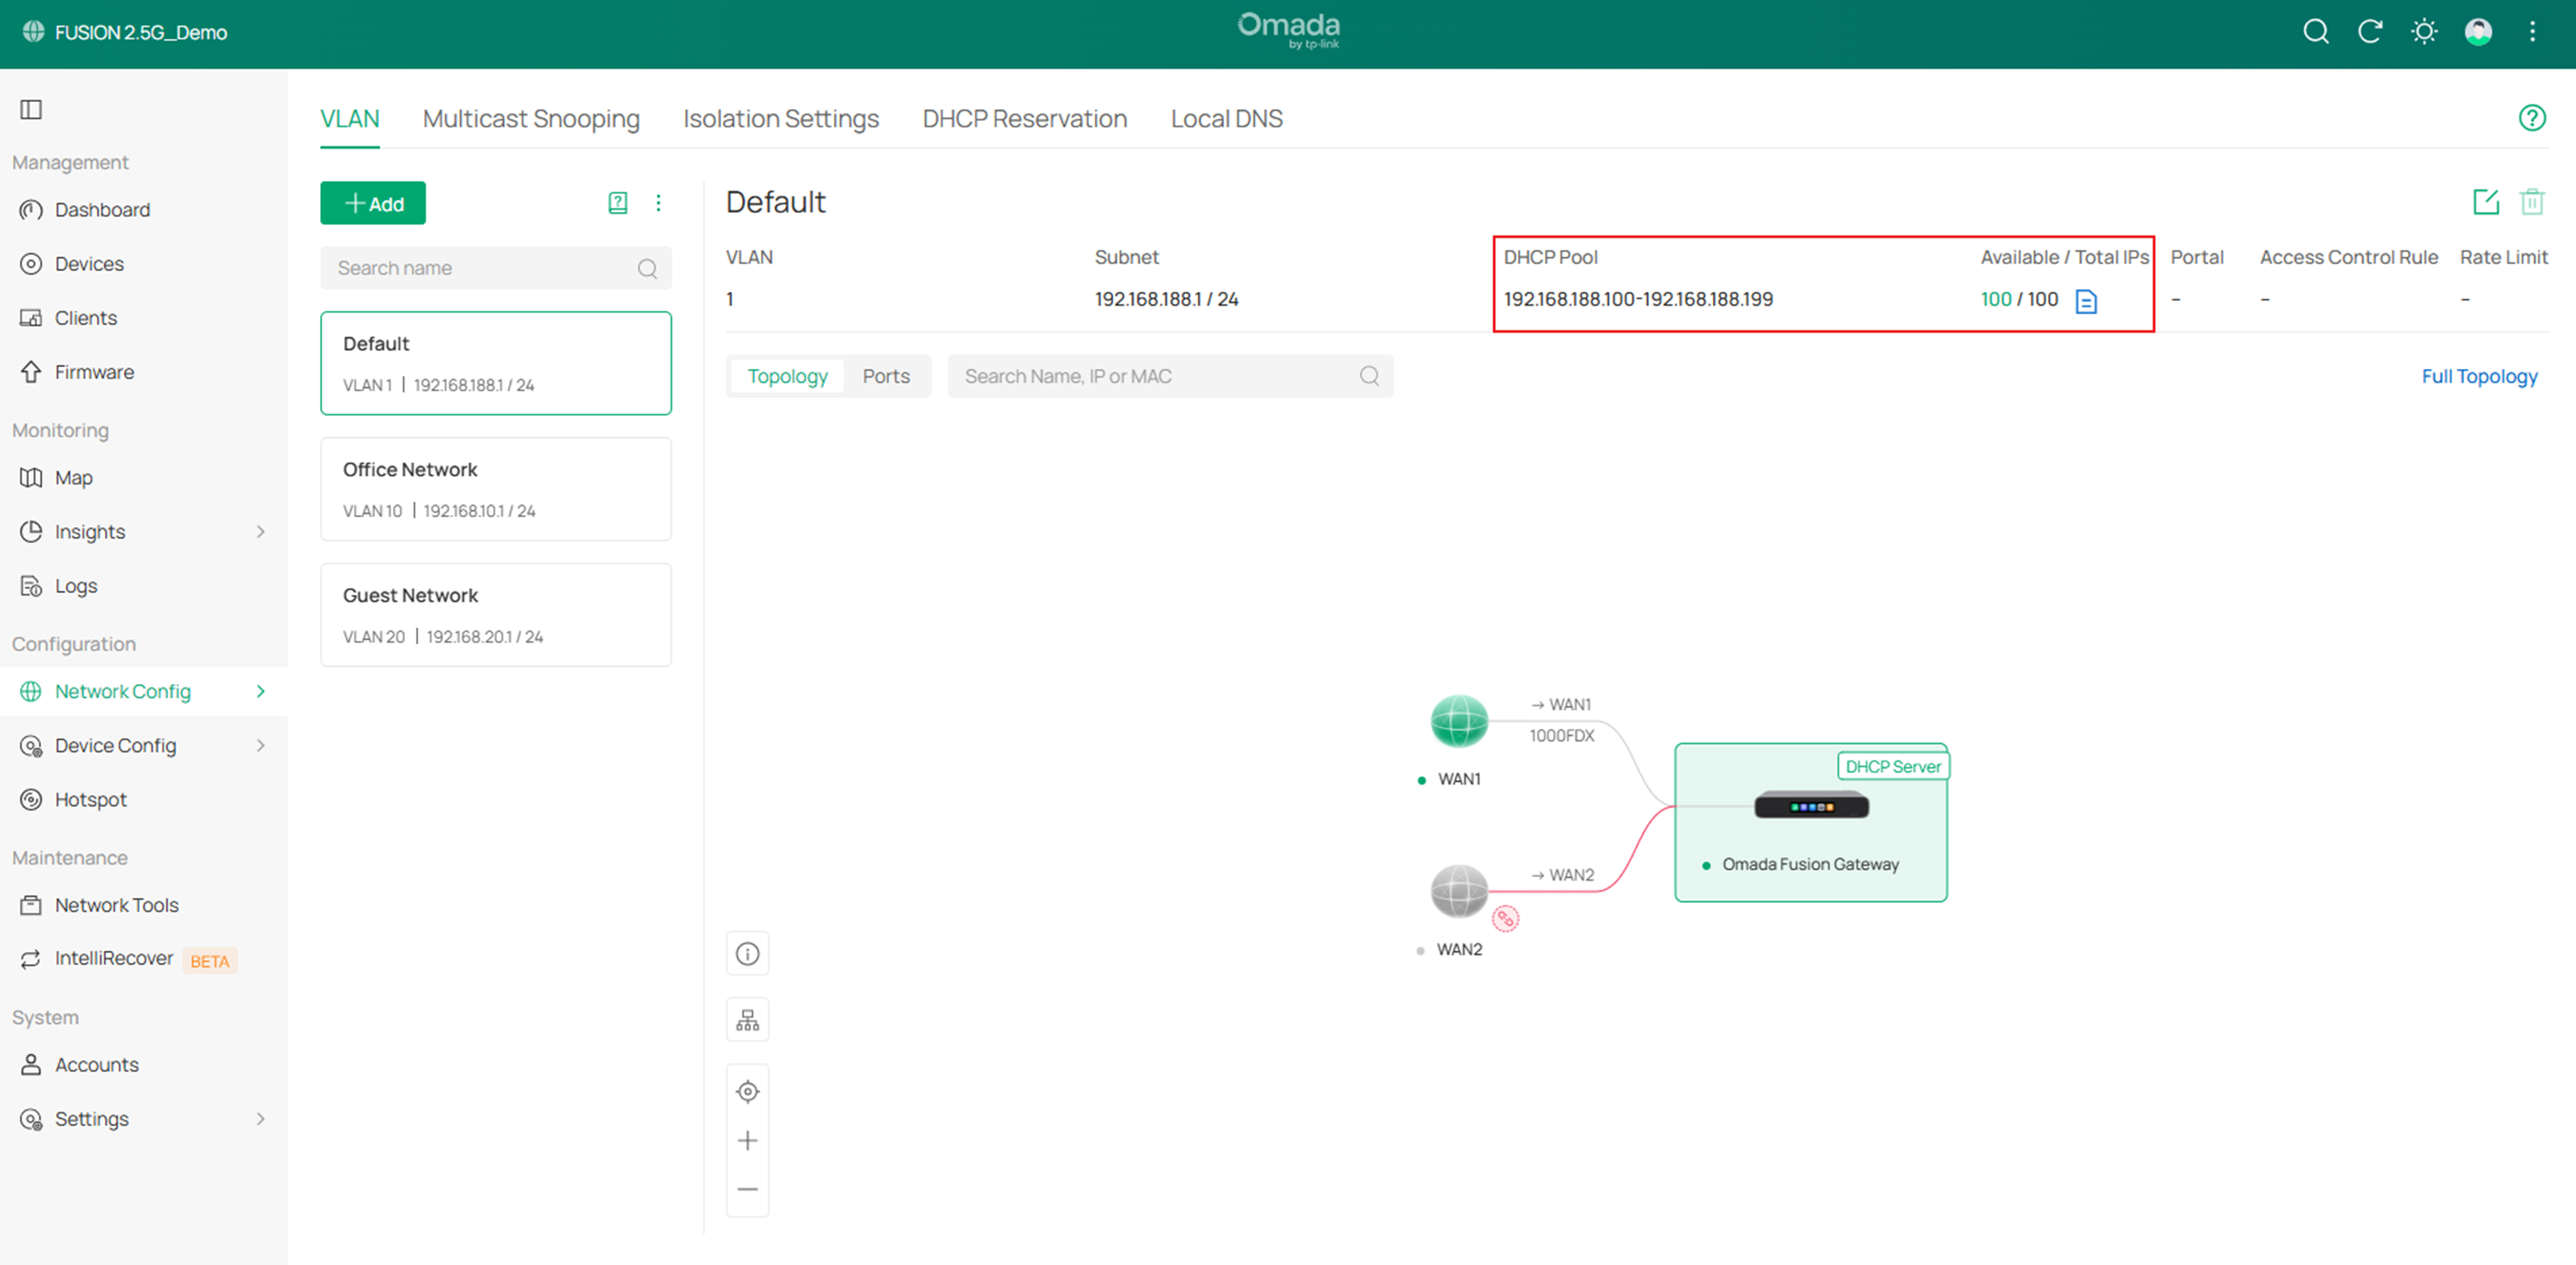
Step 3. Go to Network Config > Network Settings > LAN, and make sure the DHCP address pool is large enough and has not been exhausted.
Step 4. Check whether security policies, such as MAC filtering, have been configured.
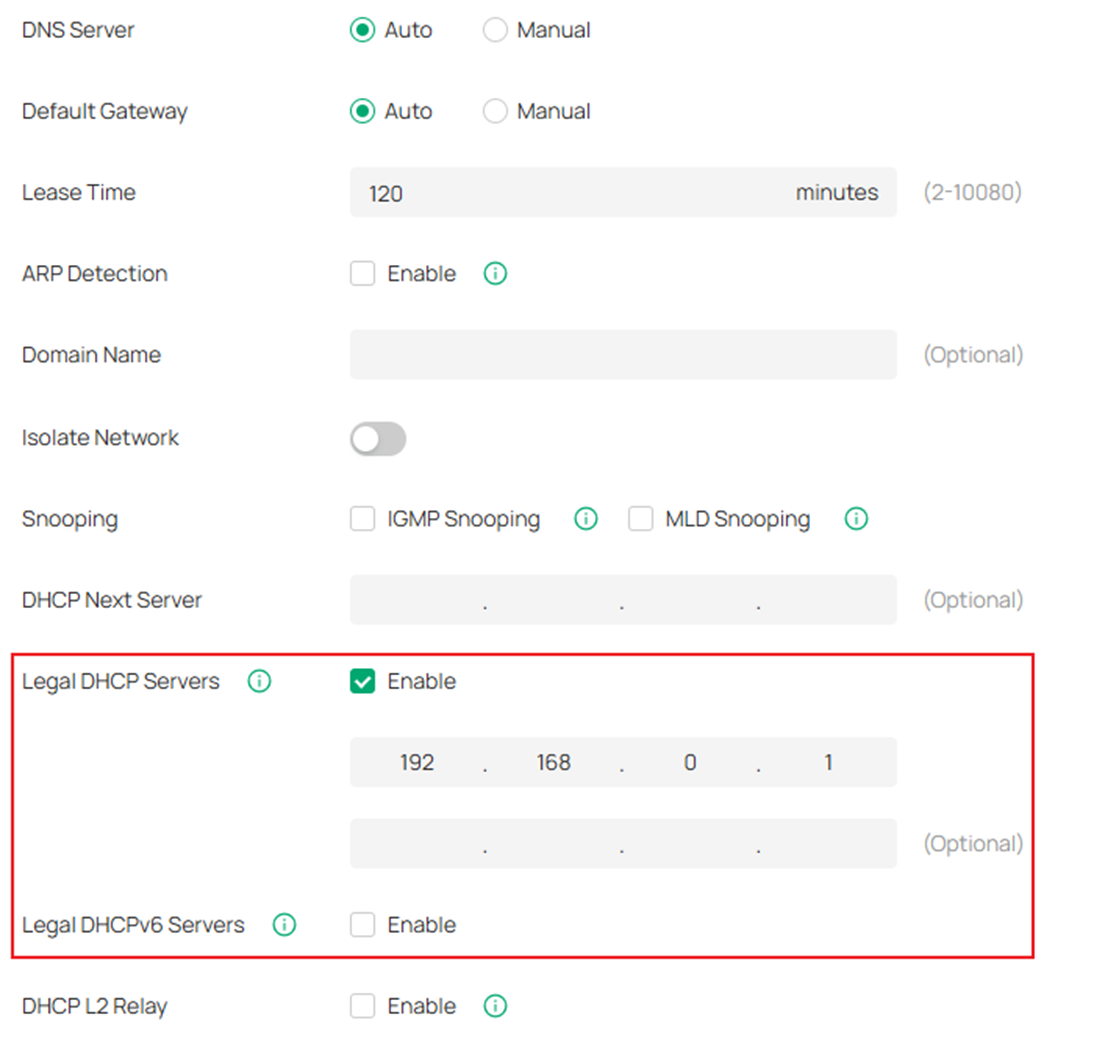
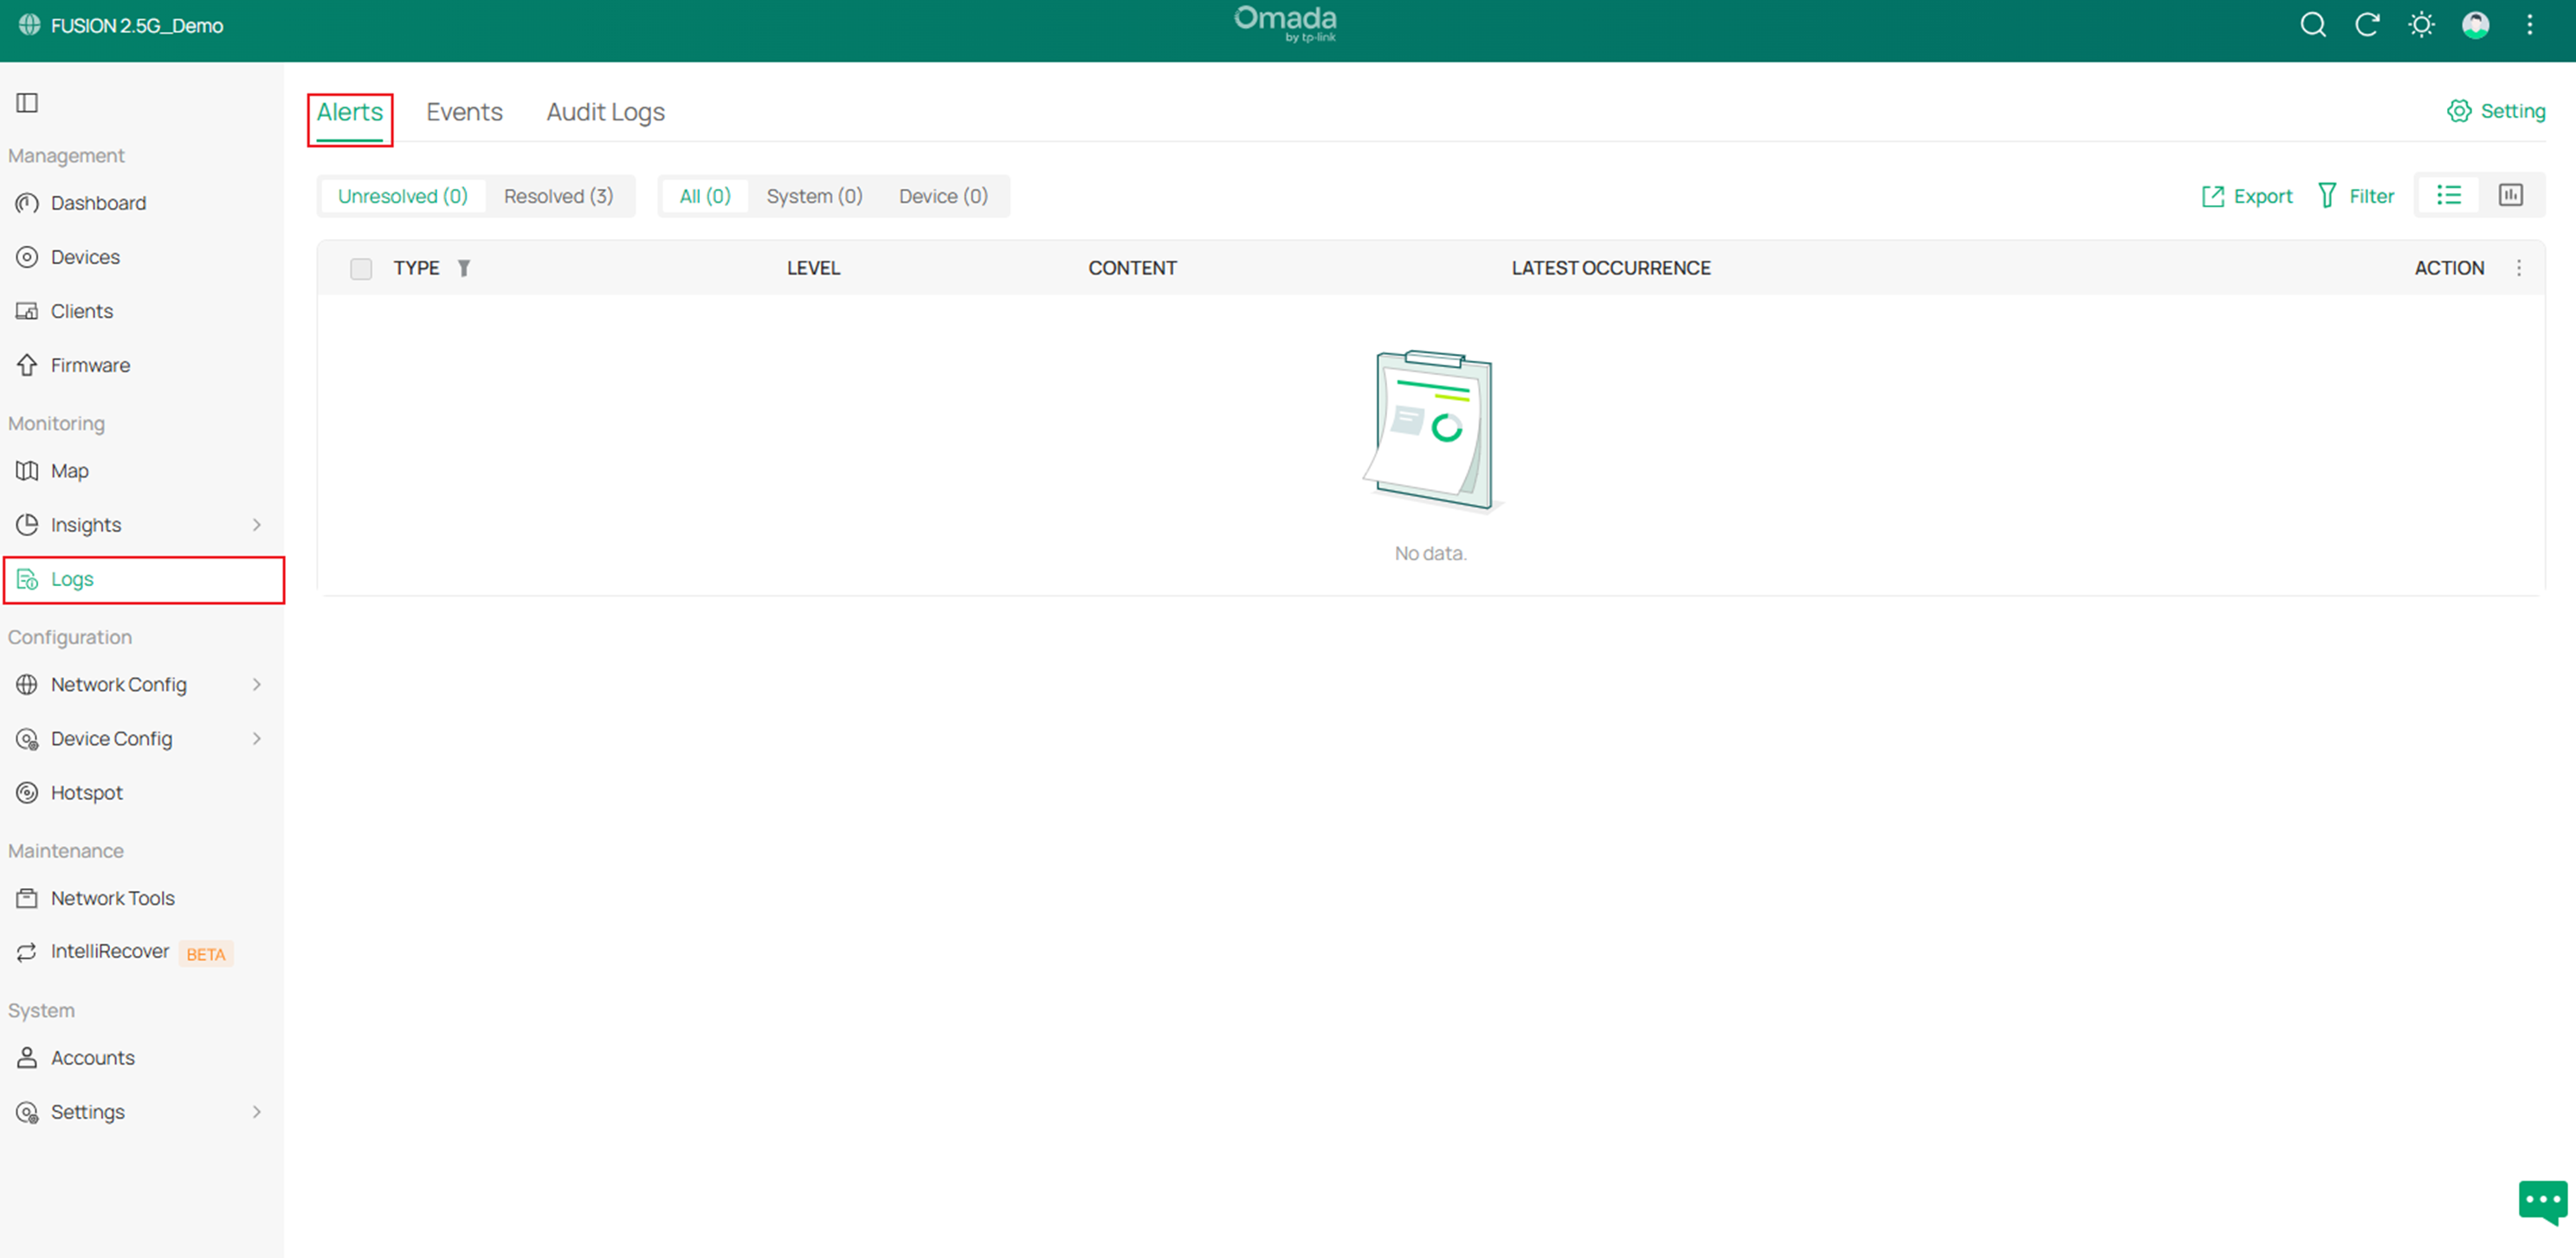
Step 5. Check for any other rogue DHCP servers on the network in Logs > Alerts.
Step 6. Check whether incorrect legal DHCP servers have been configured in the LAN settings.
13. DHCP Reservation cannot work
Step 1. Check whether the CPU utilization of the device is normal.
Step 2. Go to Logs and check for any related alerts.
Step 3. Make sure the MAC address entered in the DHCP reservation matches the MAC address of the target device.
Step 4. Check if any other devices on the network are using the target IP address statically.
Step 5. Check whether the client device is using a random MAC address.
14. Policy Routing cannot work
Step 1. Check if the configuration for the matching criteria is incorrect.
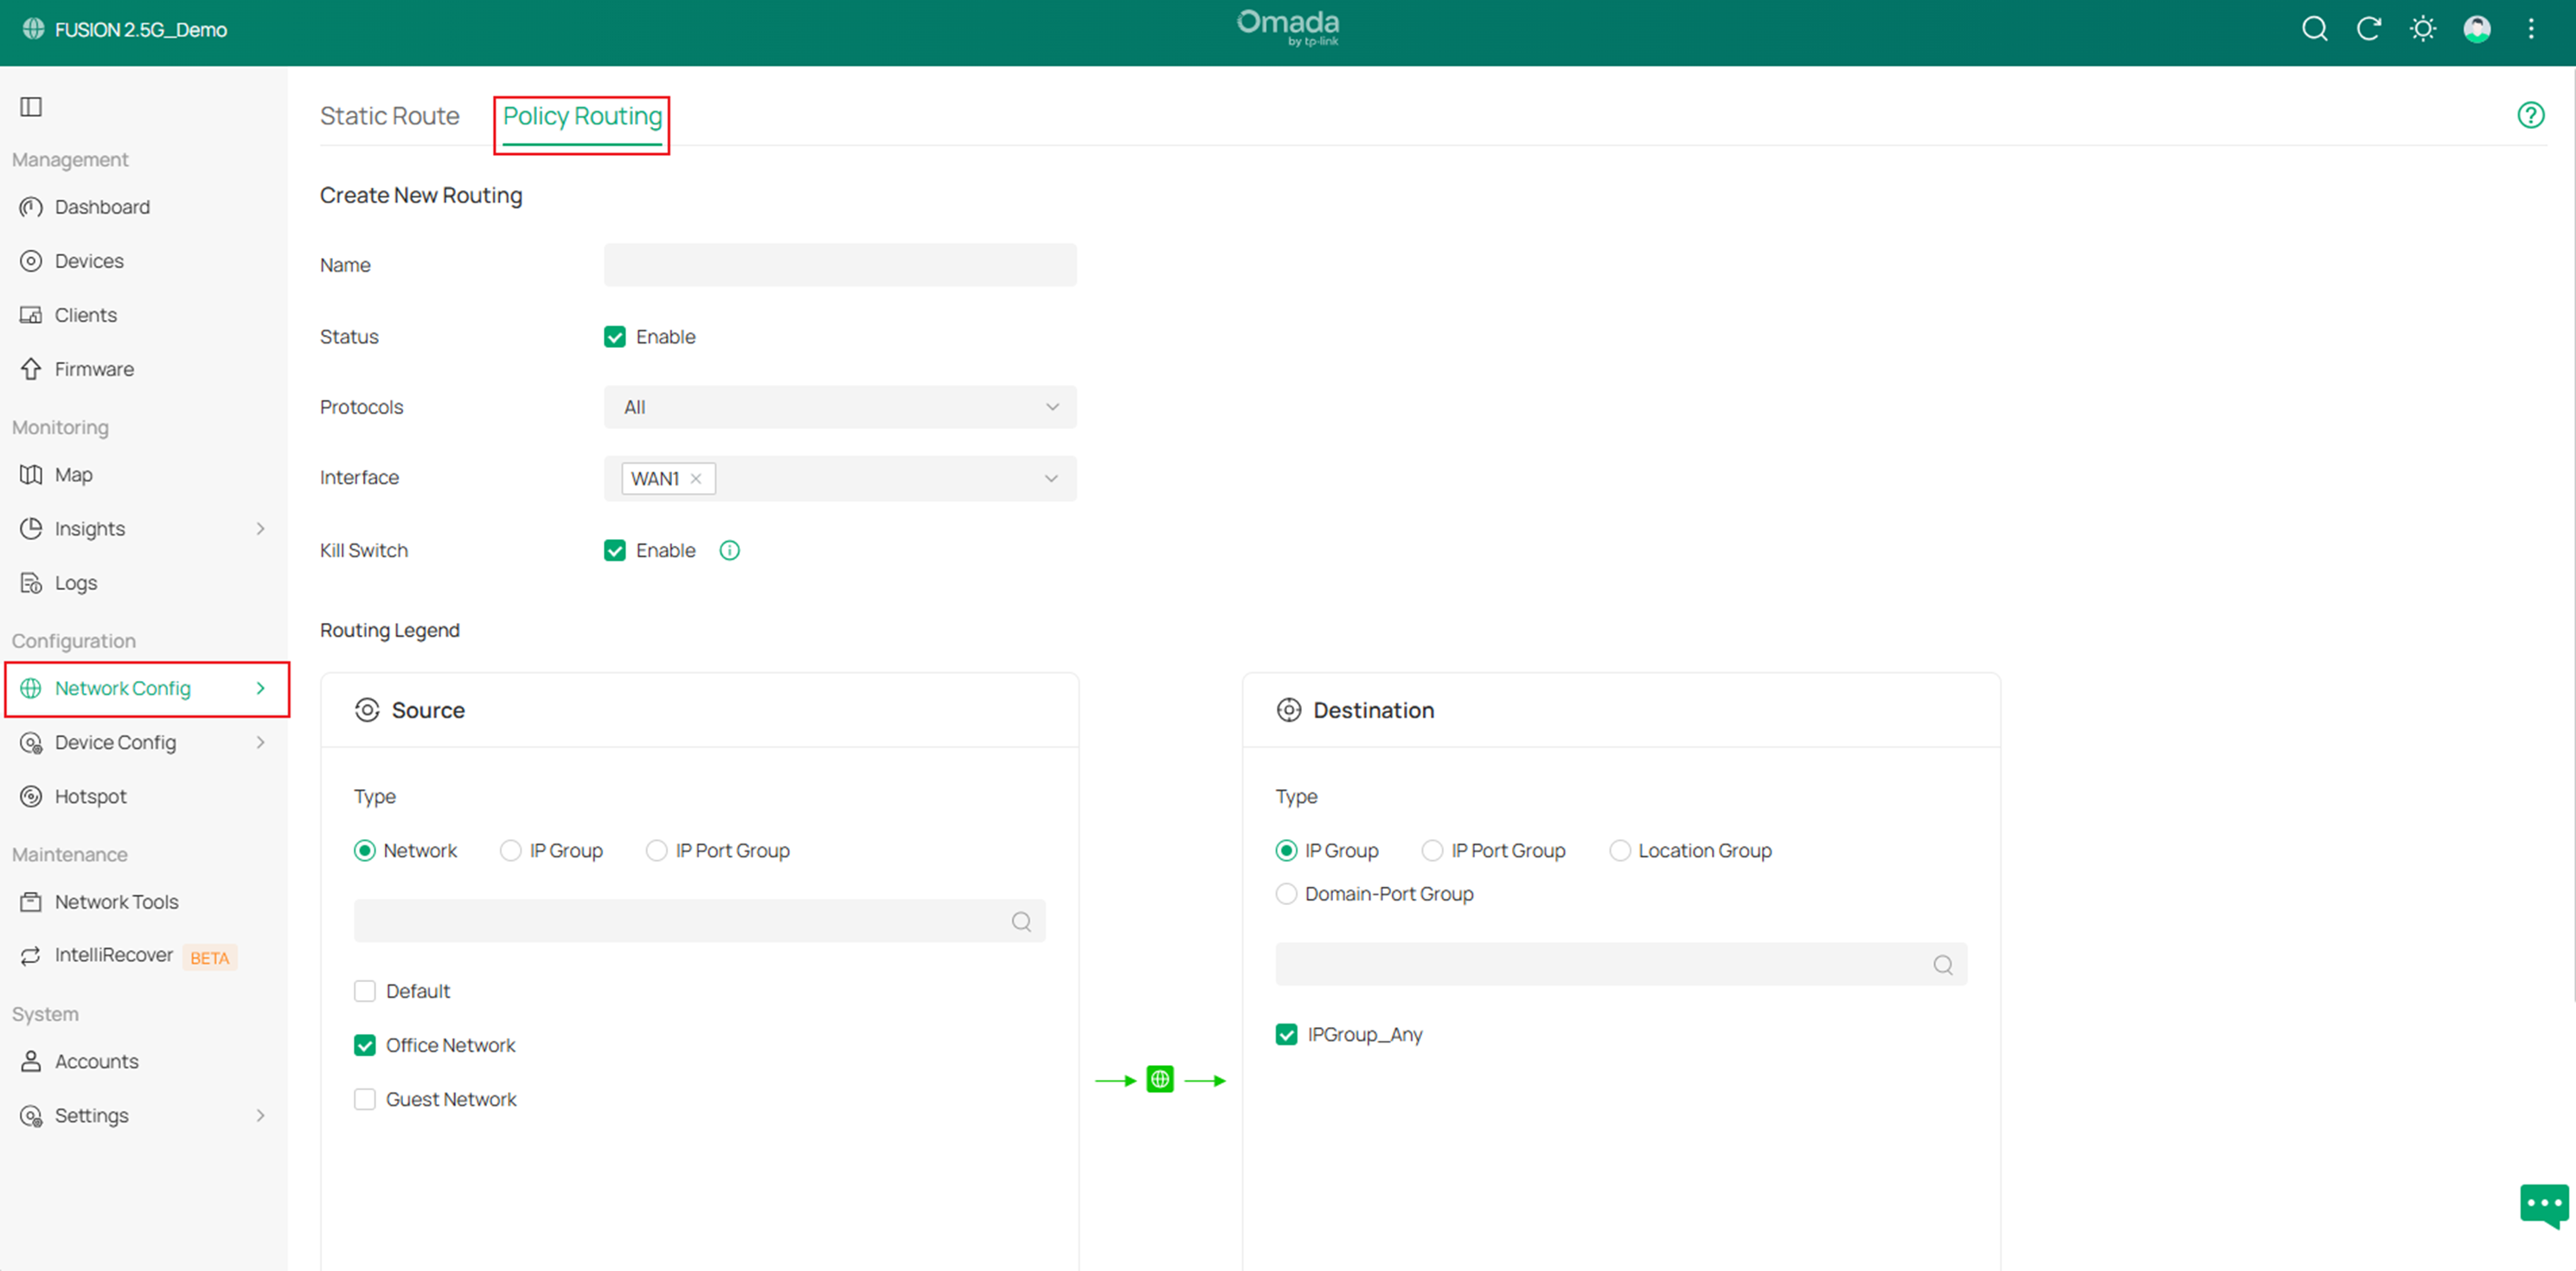
Step 2. Check whether the status of the configured interface is “Online”.
Step 3. Check whether VPNs have been configured, as VPN routes have a higher priority than policy routing.
Step 4. Check whether security policies such as ACLs have been configured, or whether features such as Disable NAT or IPTV are enabled.
15. Bandwidth Control cannot work
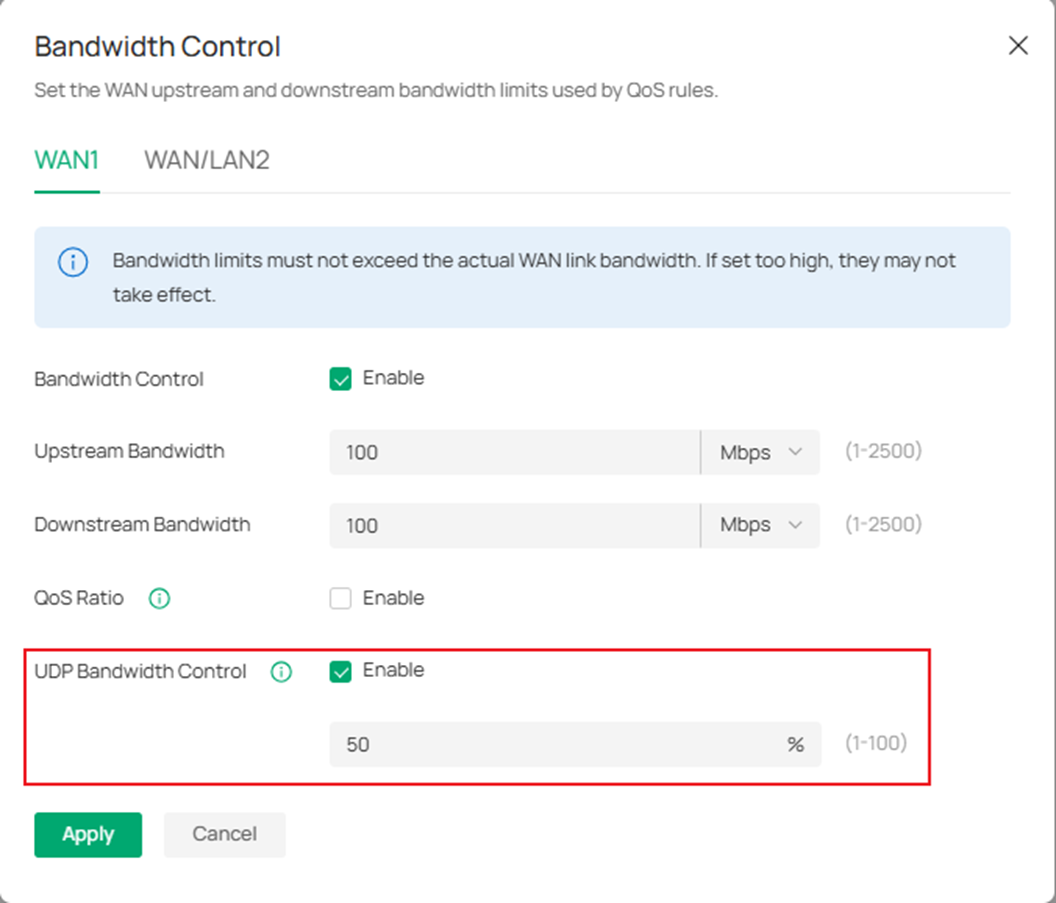
Step 1. Go to Network Config > Traffic Management > Gateway QoS and click Bandwidth Control to check if the bandwidth control for specific WAN interfaces is all configured correctly.
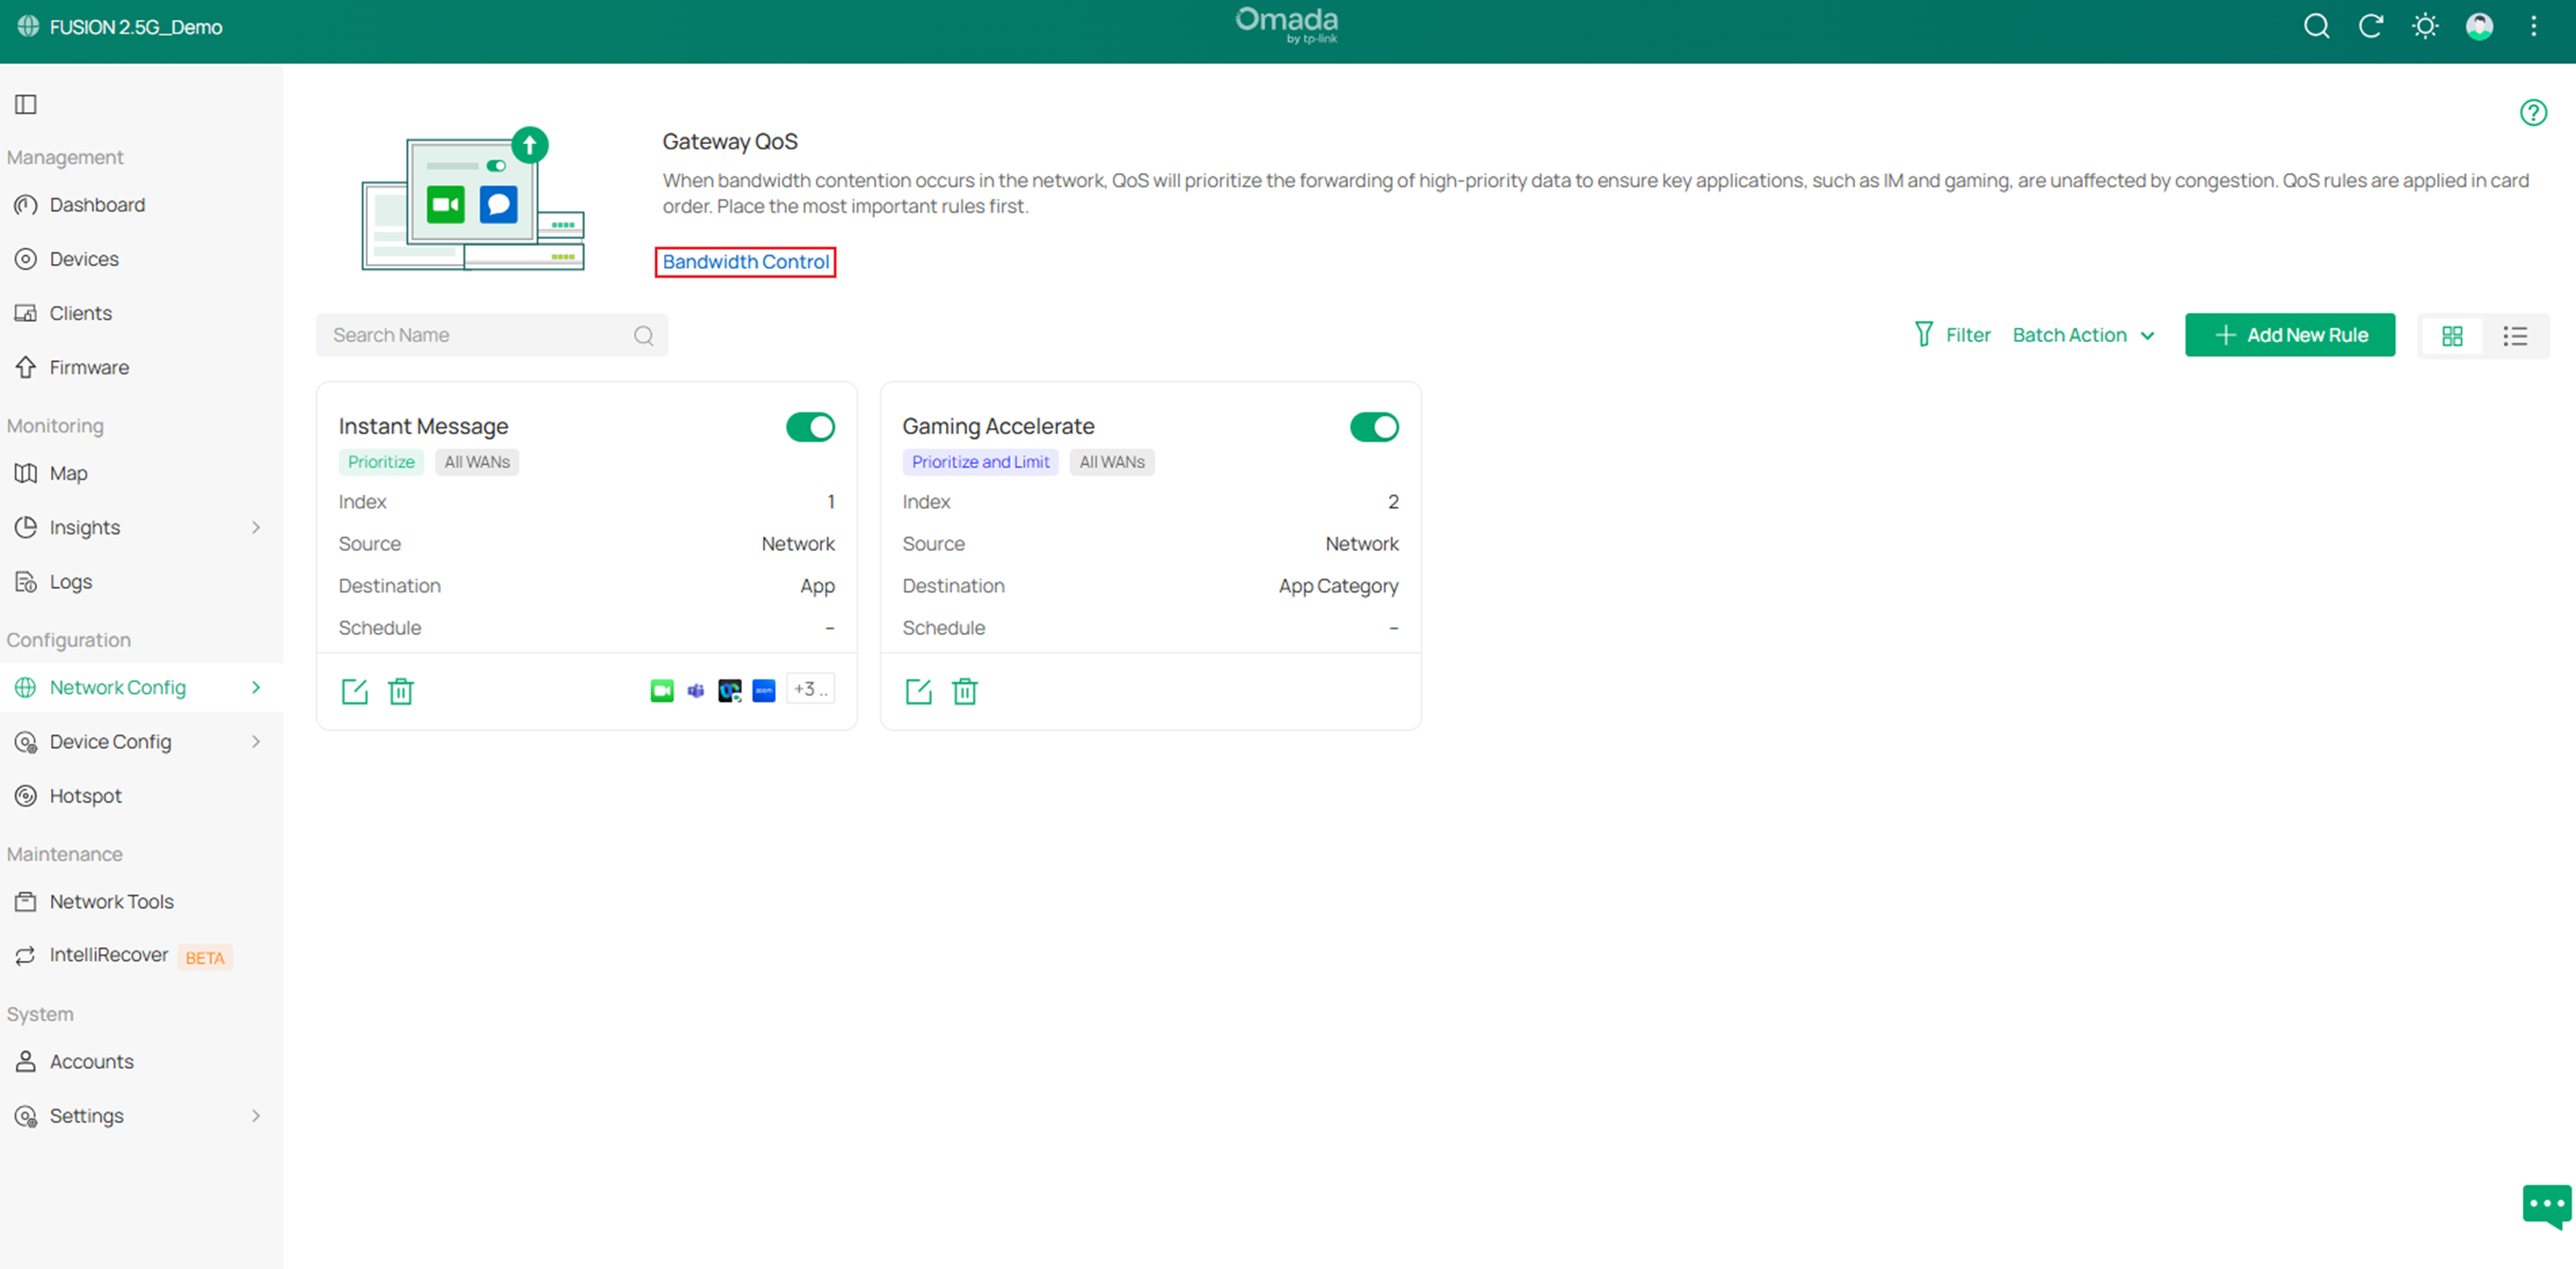
You can also assess actual requirements to determine whether dedicated bandwidth control for UDP packets is needed.
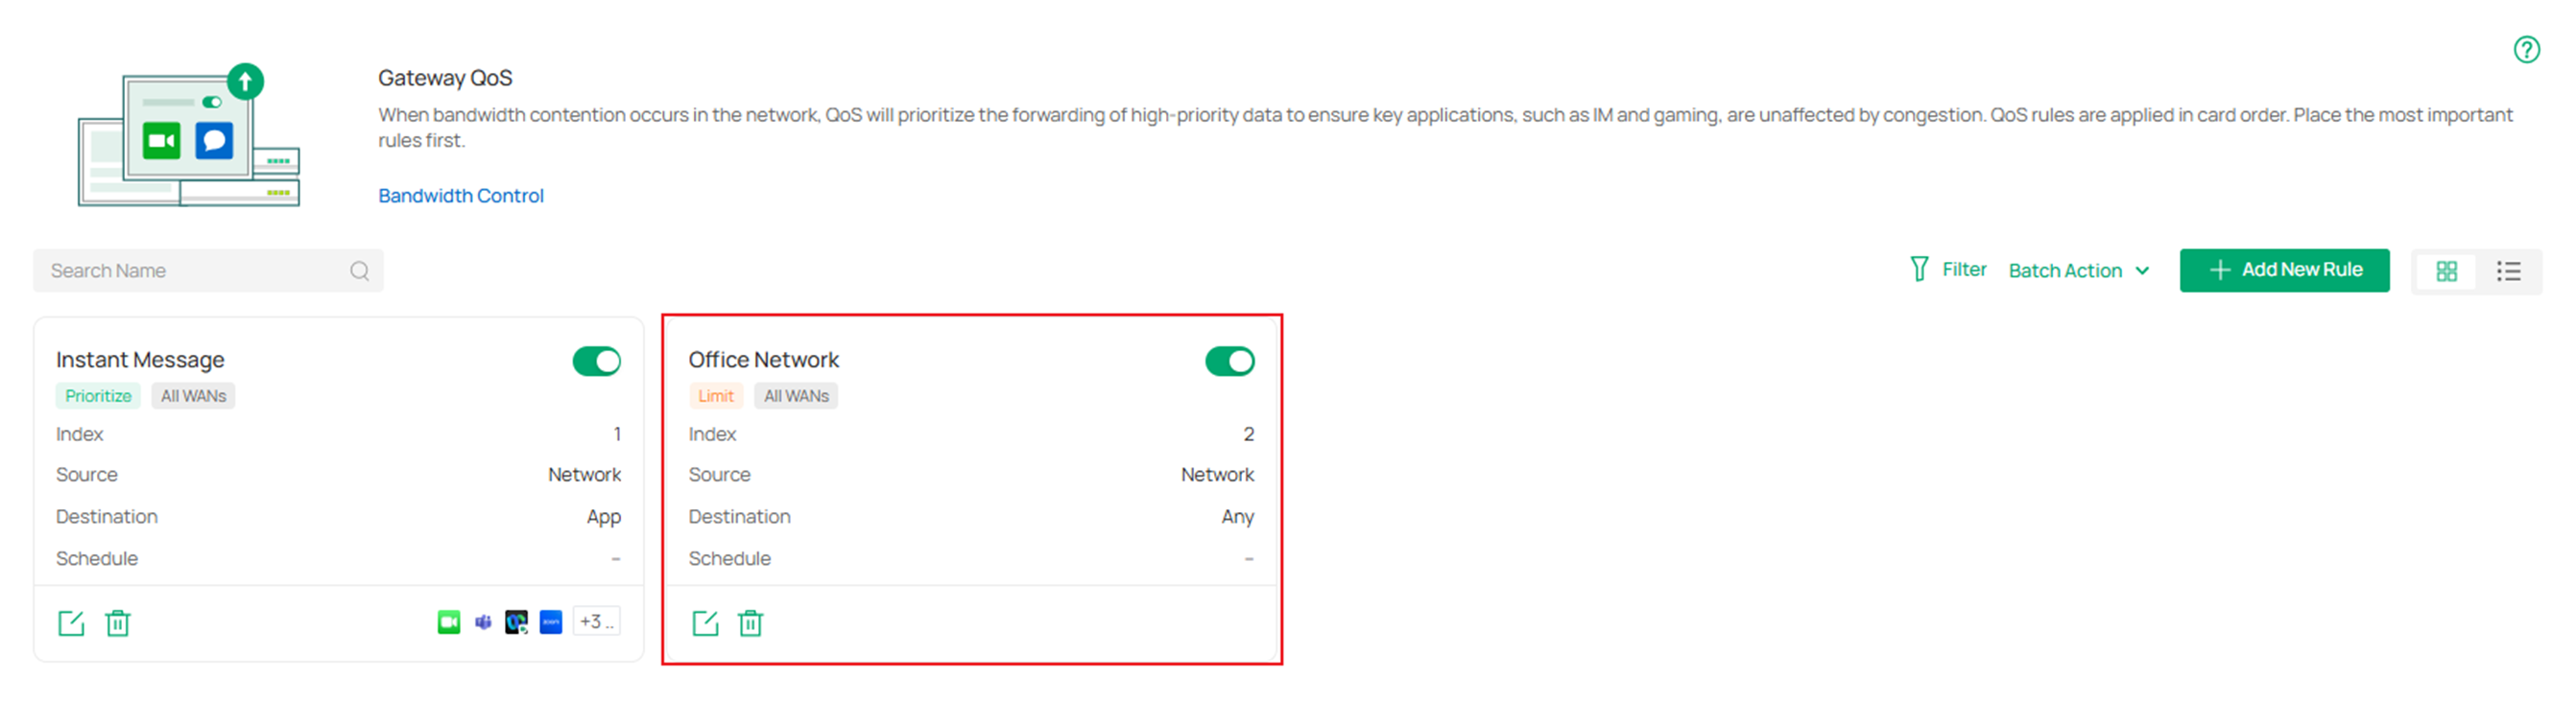
Step 2. Click the Edit button for the rules created to check if the bandwidth for specific traffic is configured correctly.
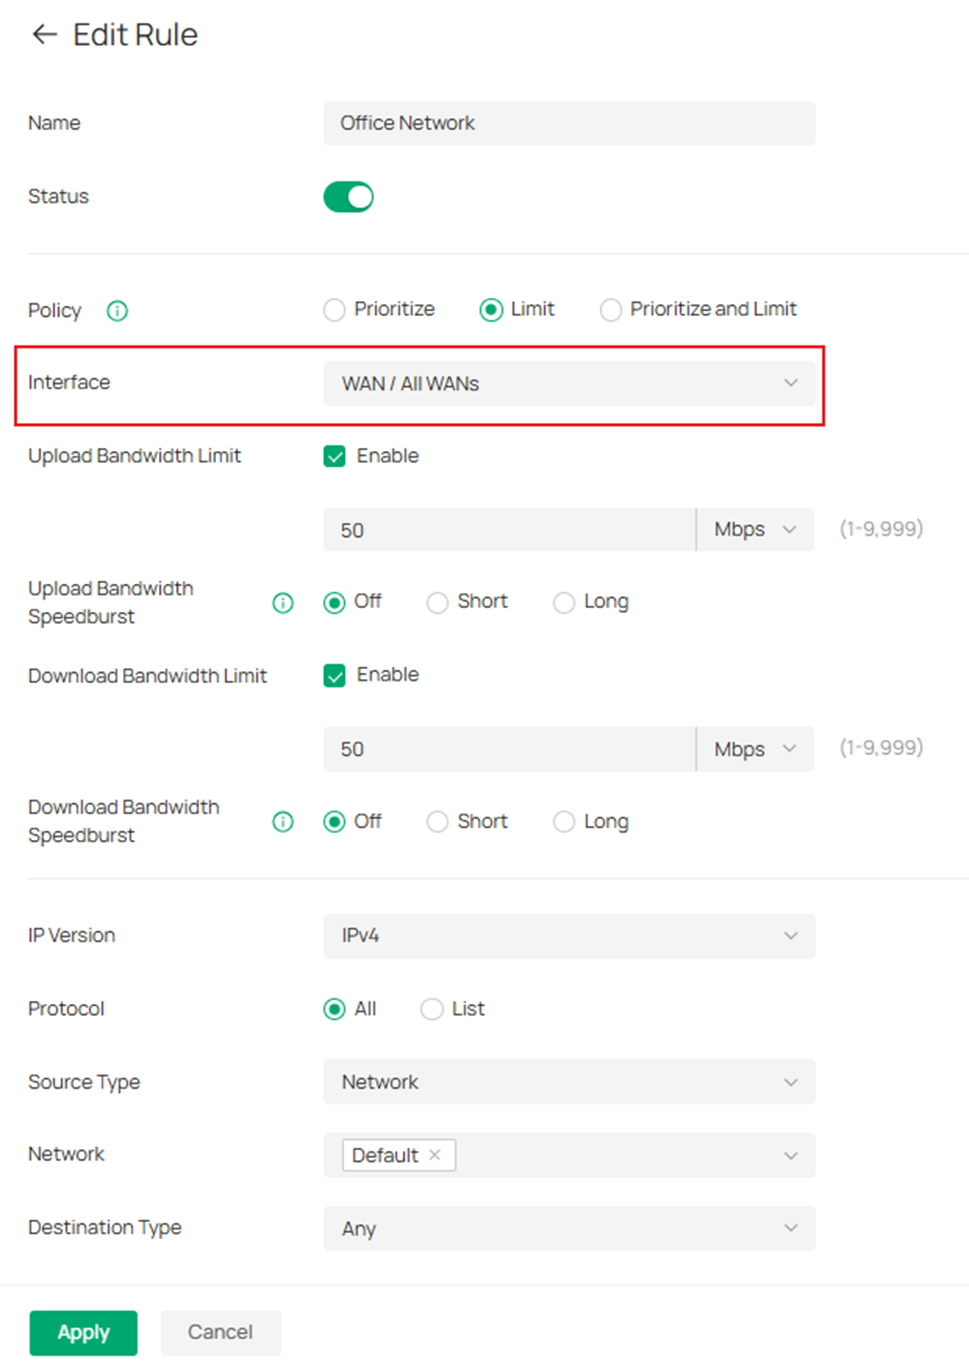
If multiple WAN interfaces are available, configure the interface to “All WANs” to prevent traffic from being forwarded through an unrestricted WAN interface due to load balancing.
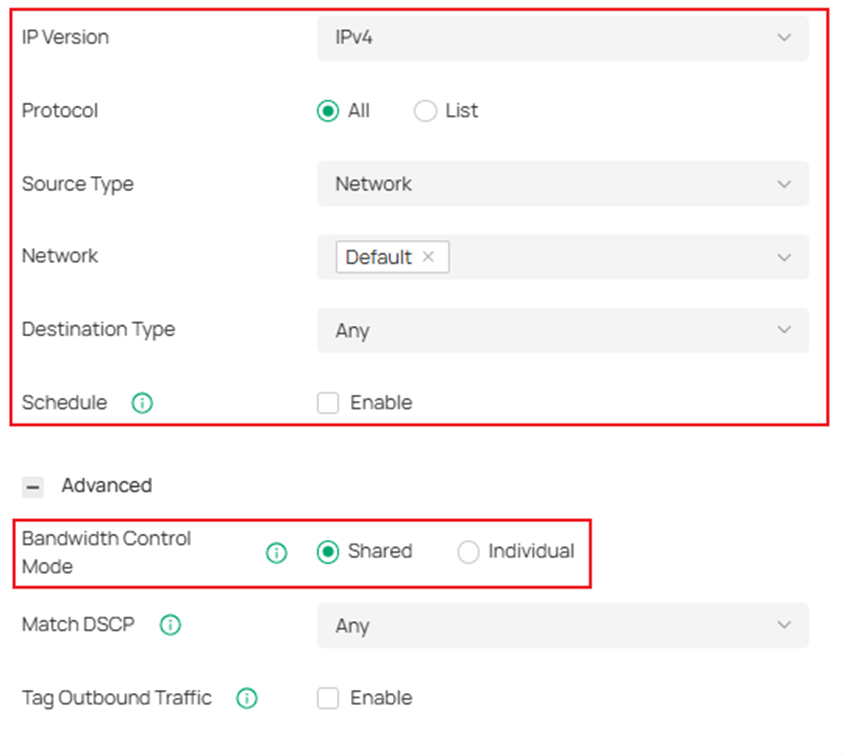
Make sure the matching criteria, schedule, and mode are all configured correctly. In the shared mode, the total bandwidth for all users is equal to the specified values. In the individual mode, the bandwidth of each user is equal to the specified values.
Note: The right testing method is also important, you might want to try different speed test providers to get a more objective result.
16. Content Filtering cannot work
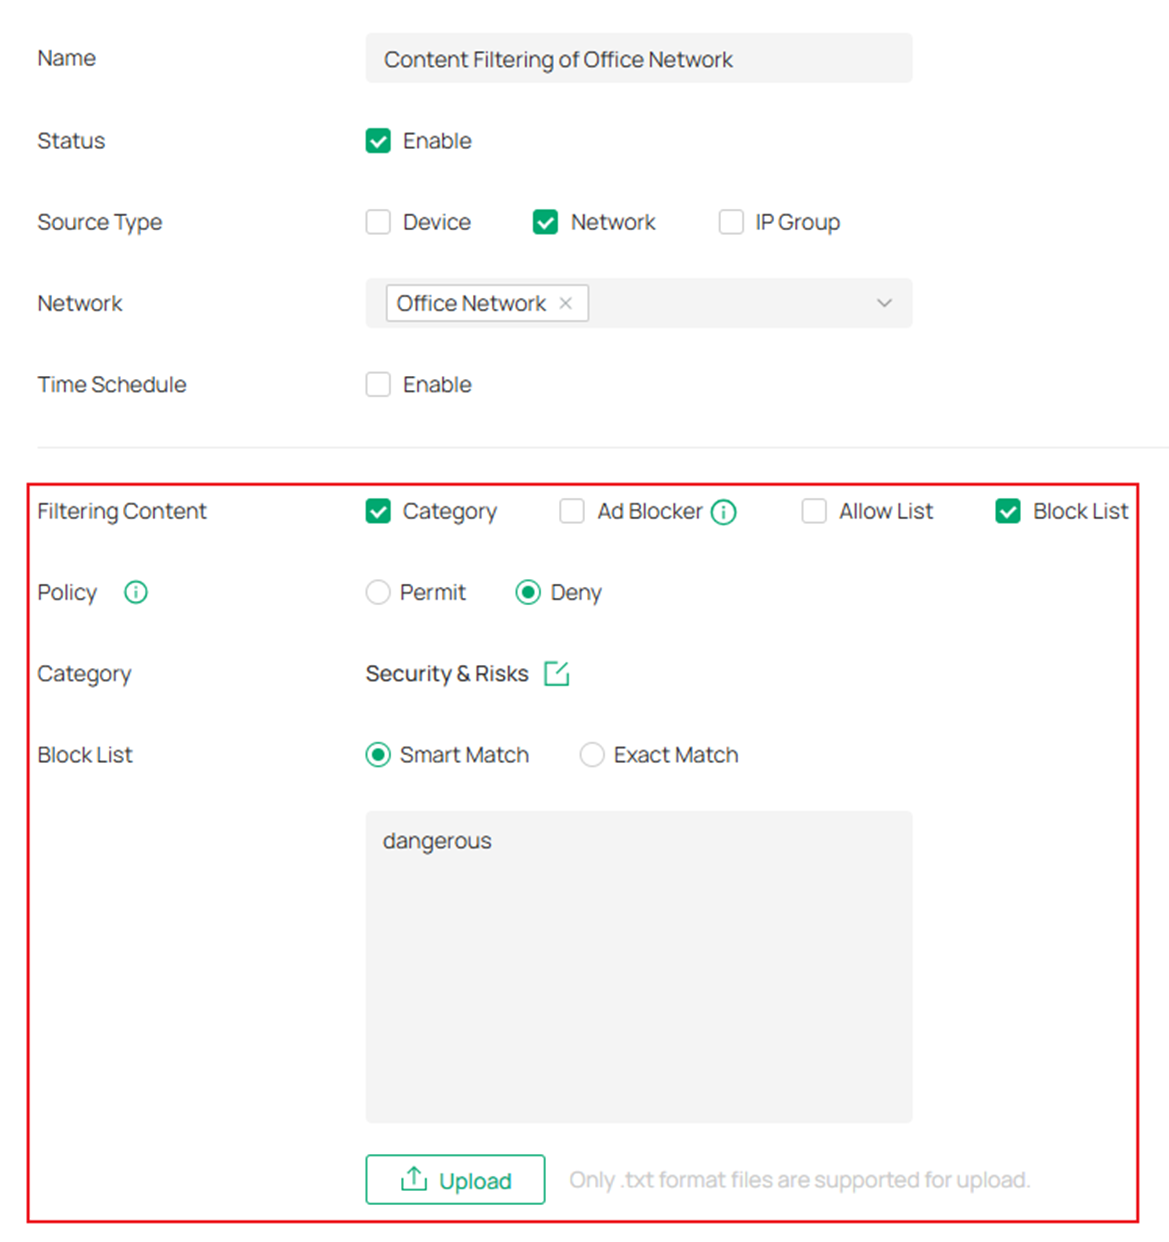
If the time schedule and filter policy of the rule are all configured correctly, but the website is still accessible, the domain may not be included in the current category database. In this case, we recommend using the Block List in conjunction with category filtering. Category filtering can cover most URLs within a category, while the Block List can be used to block specific websites that are not included in the category database. For example:
Note:
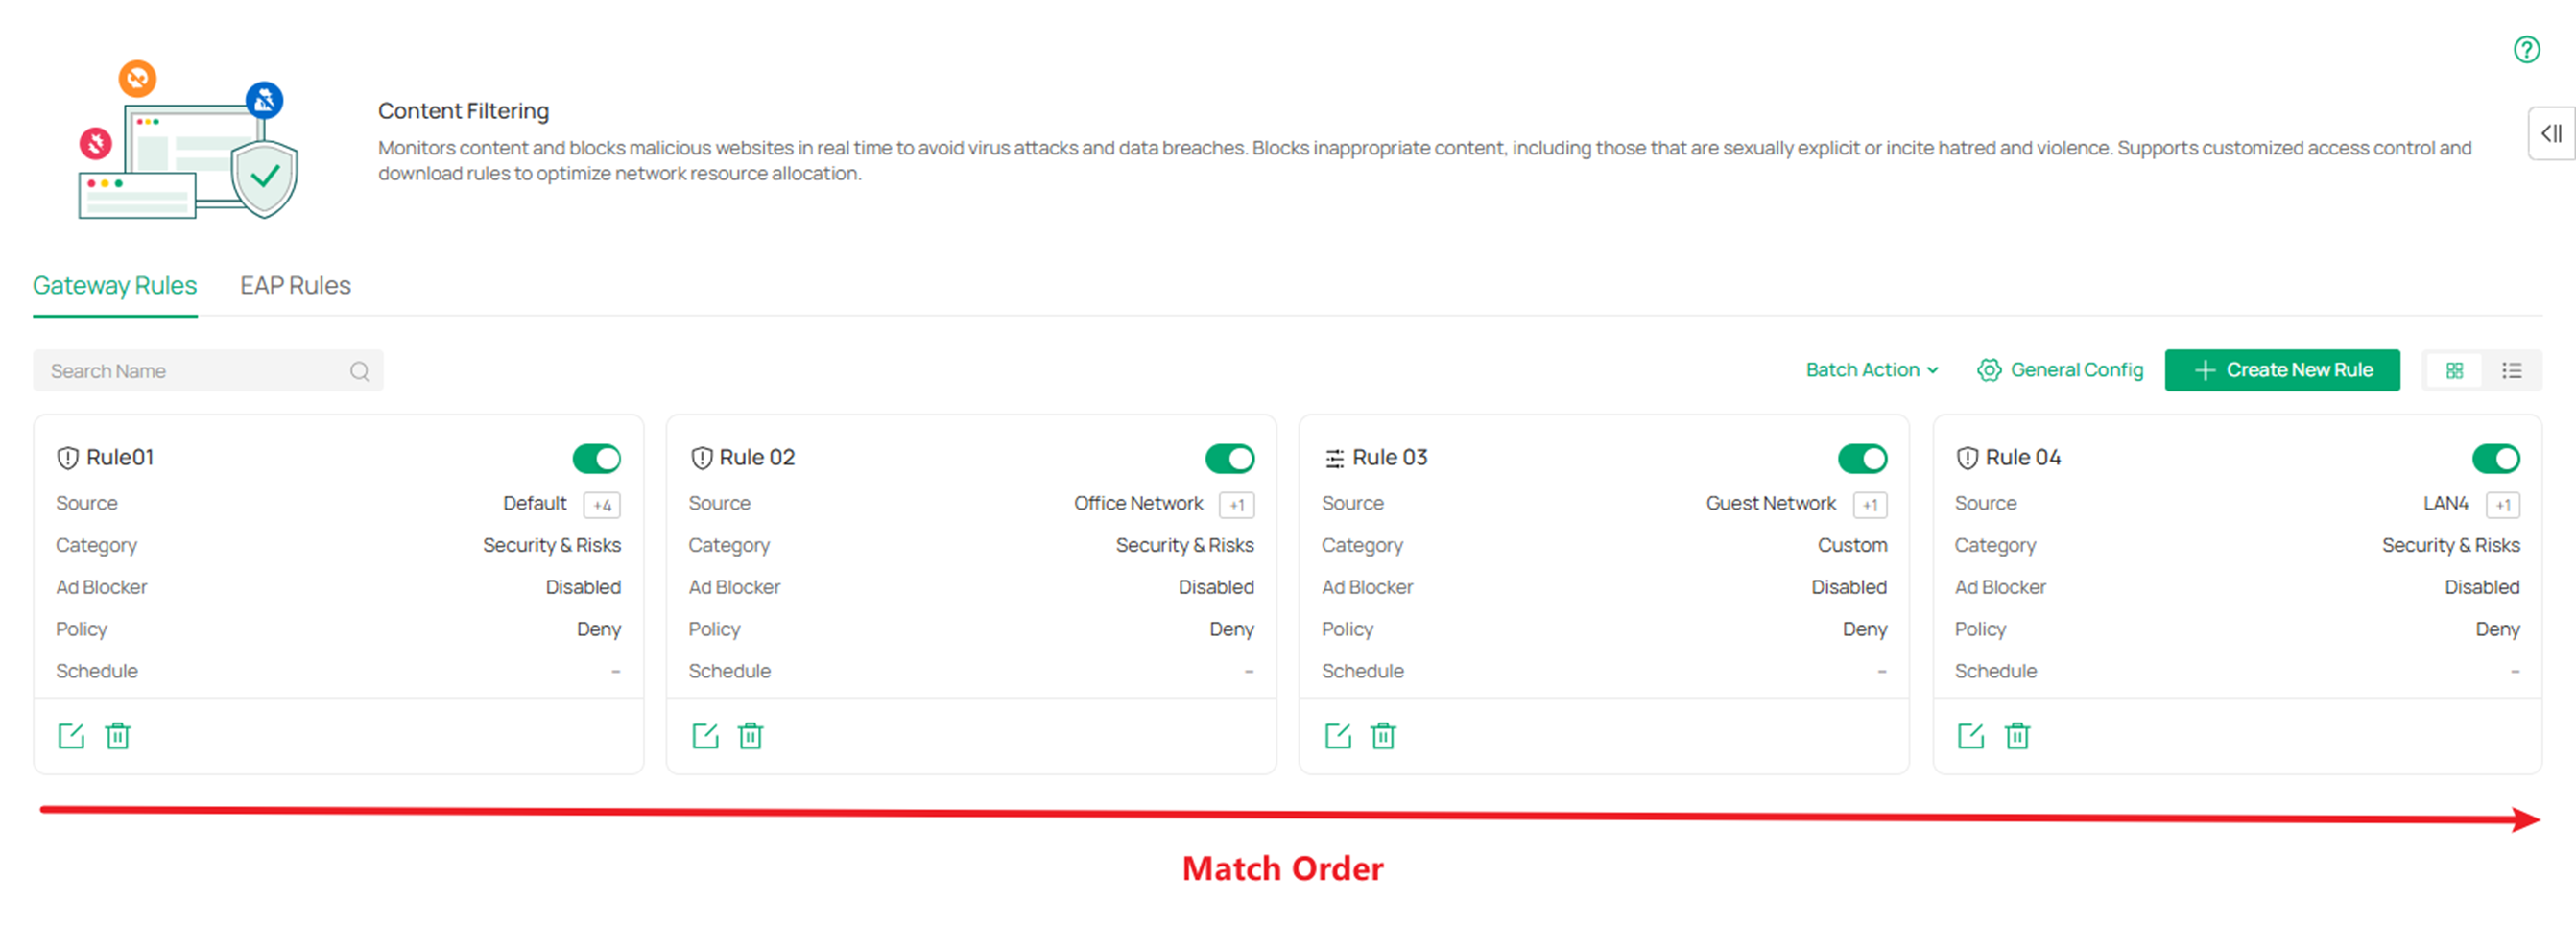
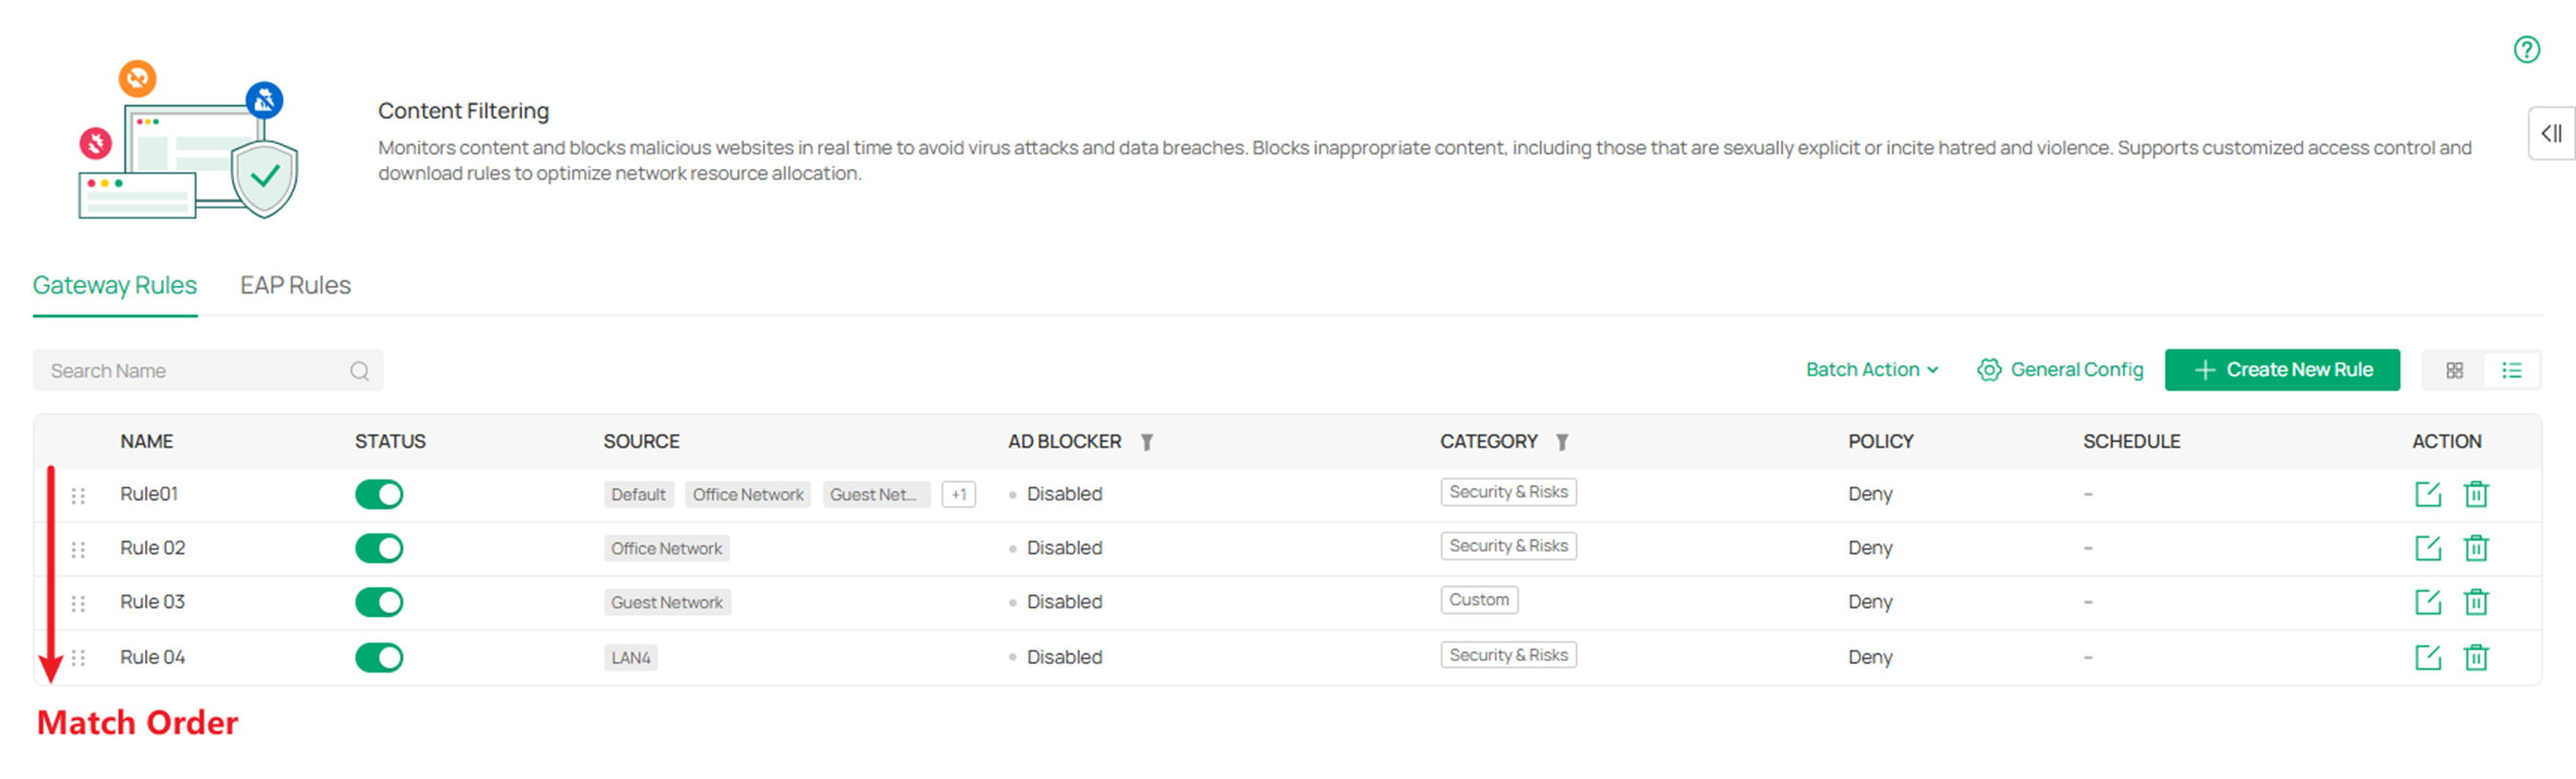
- Gateway Rules are applied based on the rule order. In Card View, rules are applied from left to right, then top to bottom. In List View, rules are applied from top to bottom. The rule order determines which rule takes effect. When a client matches multiple rules, the gateway applies the first matched rule, and subsequent rules are not evaluated.
- When multiple filtering methods are configured within the same rule, Allow List and Block List take precedence over Category. This means that specific domains on the Allow List will always be accessible, any domains on the Block List will be blocked, and all remaining traffic will then be subject to filtering based on the selected categories.
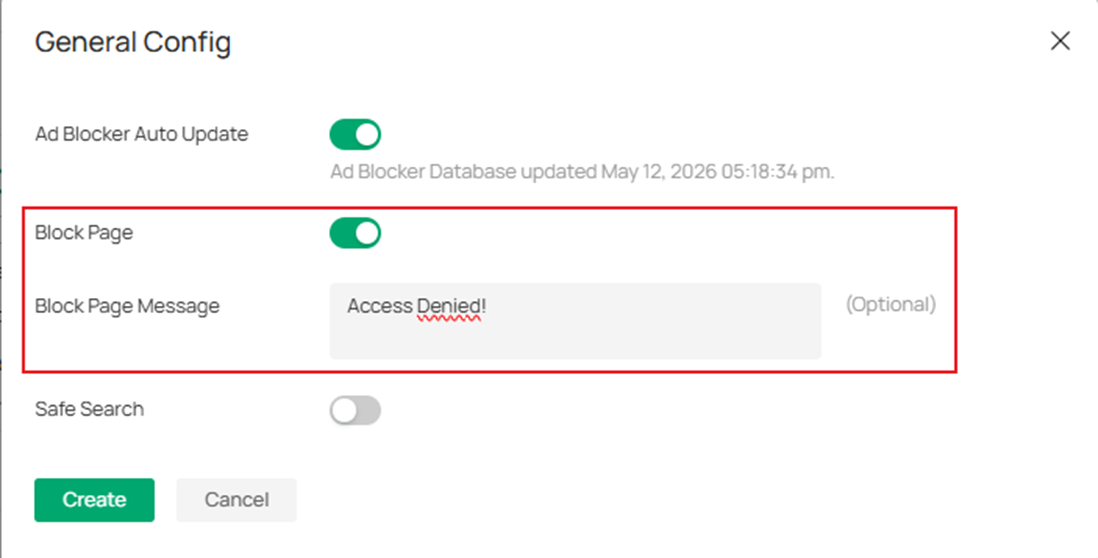
- When the client supports both IPv4 and IPv6, if a Block Page is configured for Content Filtering, the Omada Fusion Gateway may not be able to effectively intercept the client’s HTTP/3 traffic because HTTP/3 (QUIC over UDP) uses encrypted UDP transport and differs from traditional TCP-based HTTP/HTTPS mechanisms.
- Please clear your browser cache before taking the test.
17. ACL (Access Control List) cannot work
Step 1. Make sure the rule is enabled and the protocol, policy, source, destination, and ports in the ACL rules are all configured correctly.
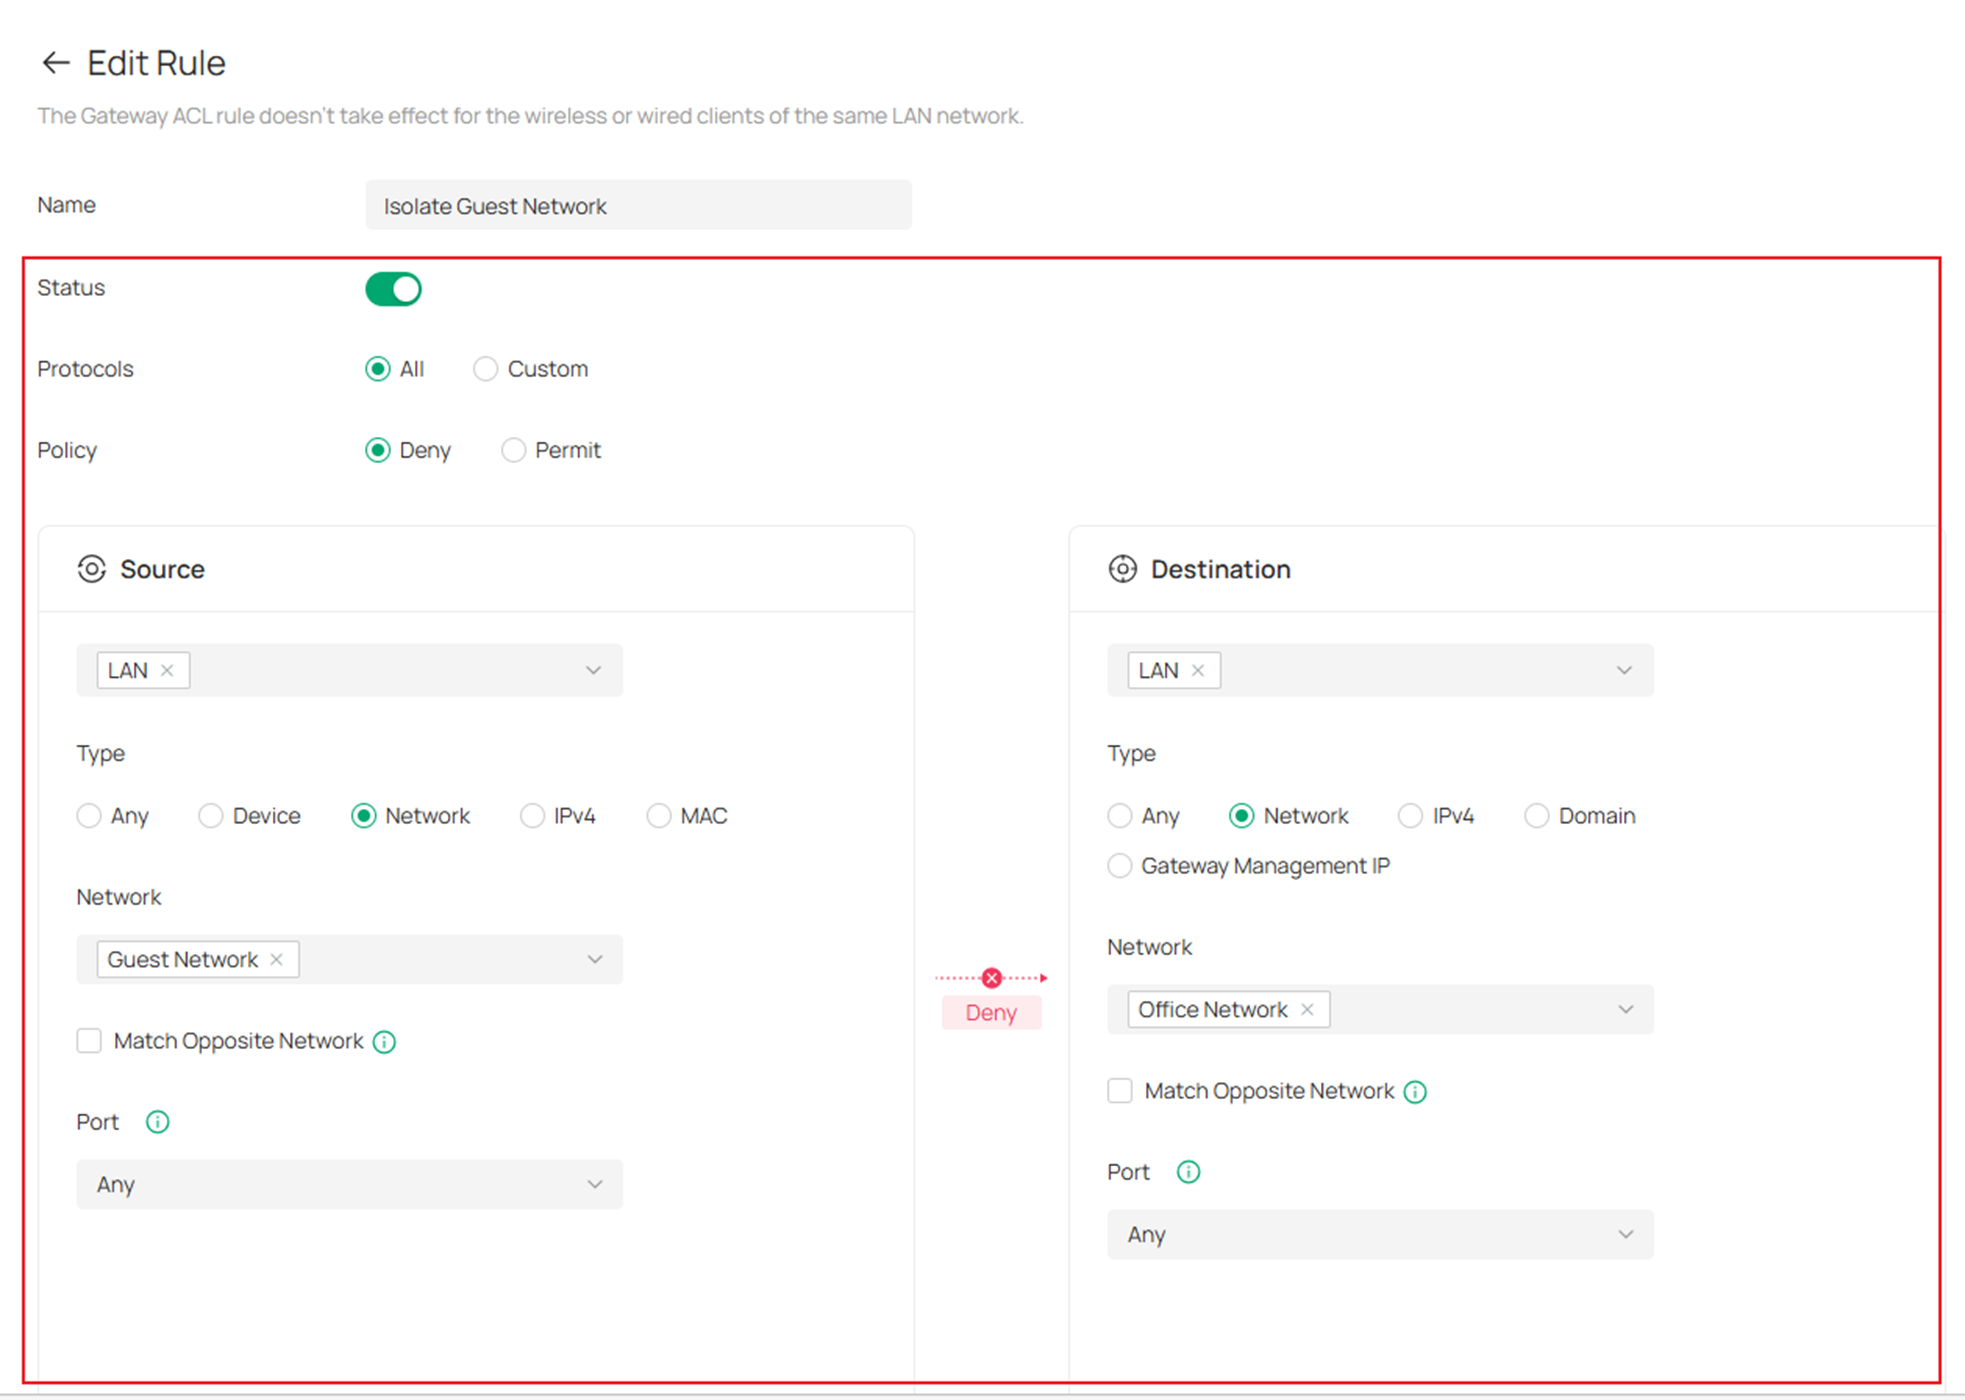
Step 2. Make sure the order of multiple ACL rules is correct, as ACL rules are matched in order.
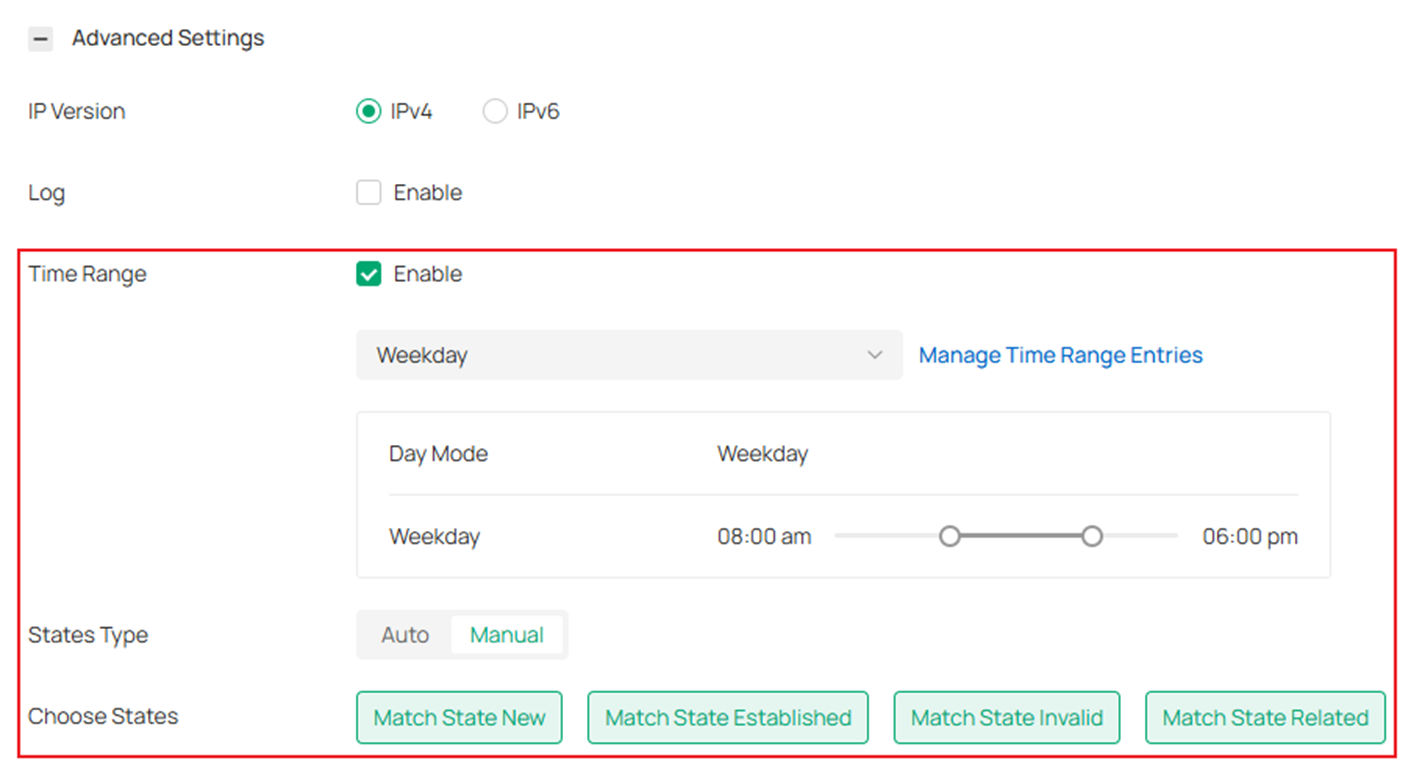
Step 3. Make sure the Time Range and States Type are configured correctly in Advanced Settings.
18. Clients within the same VLAN cannot communicate with each other
Step 1. Check that the physical connection is working properly and that there are no port link-down issues.
Step 2. Check whether the IP addresses of clients within the same VLAN are in the same subnet.
Step 3. Check whether security policies, such as Port Isolation and MAC filtering, have been configured.
Step 4. Check for anomalies such as broadcast storms and network congestion.
19. Portal interface cannot pop up automatically
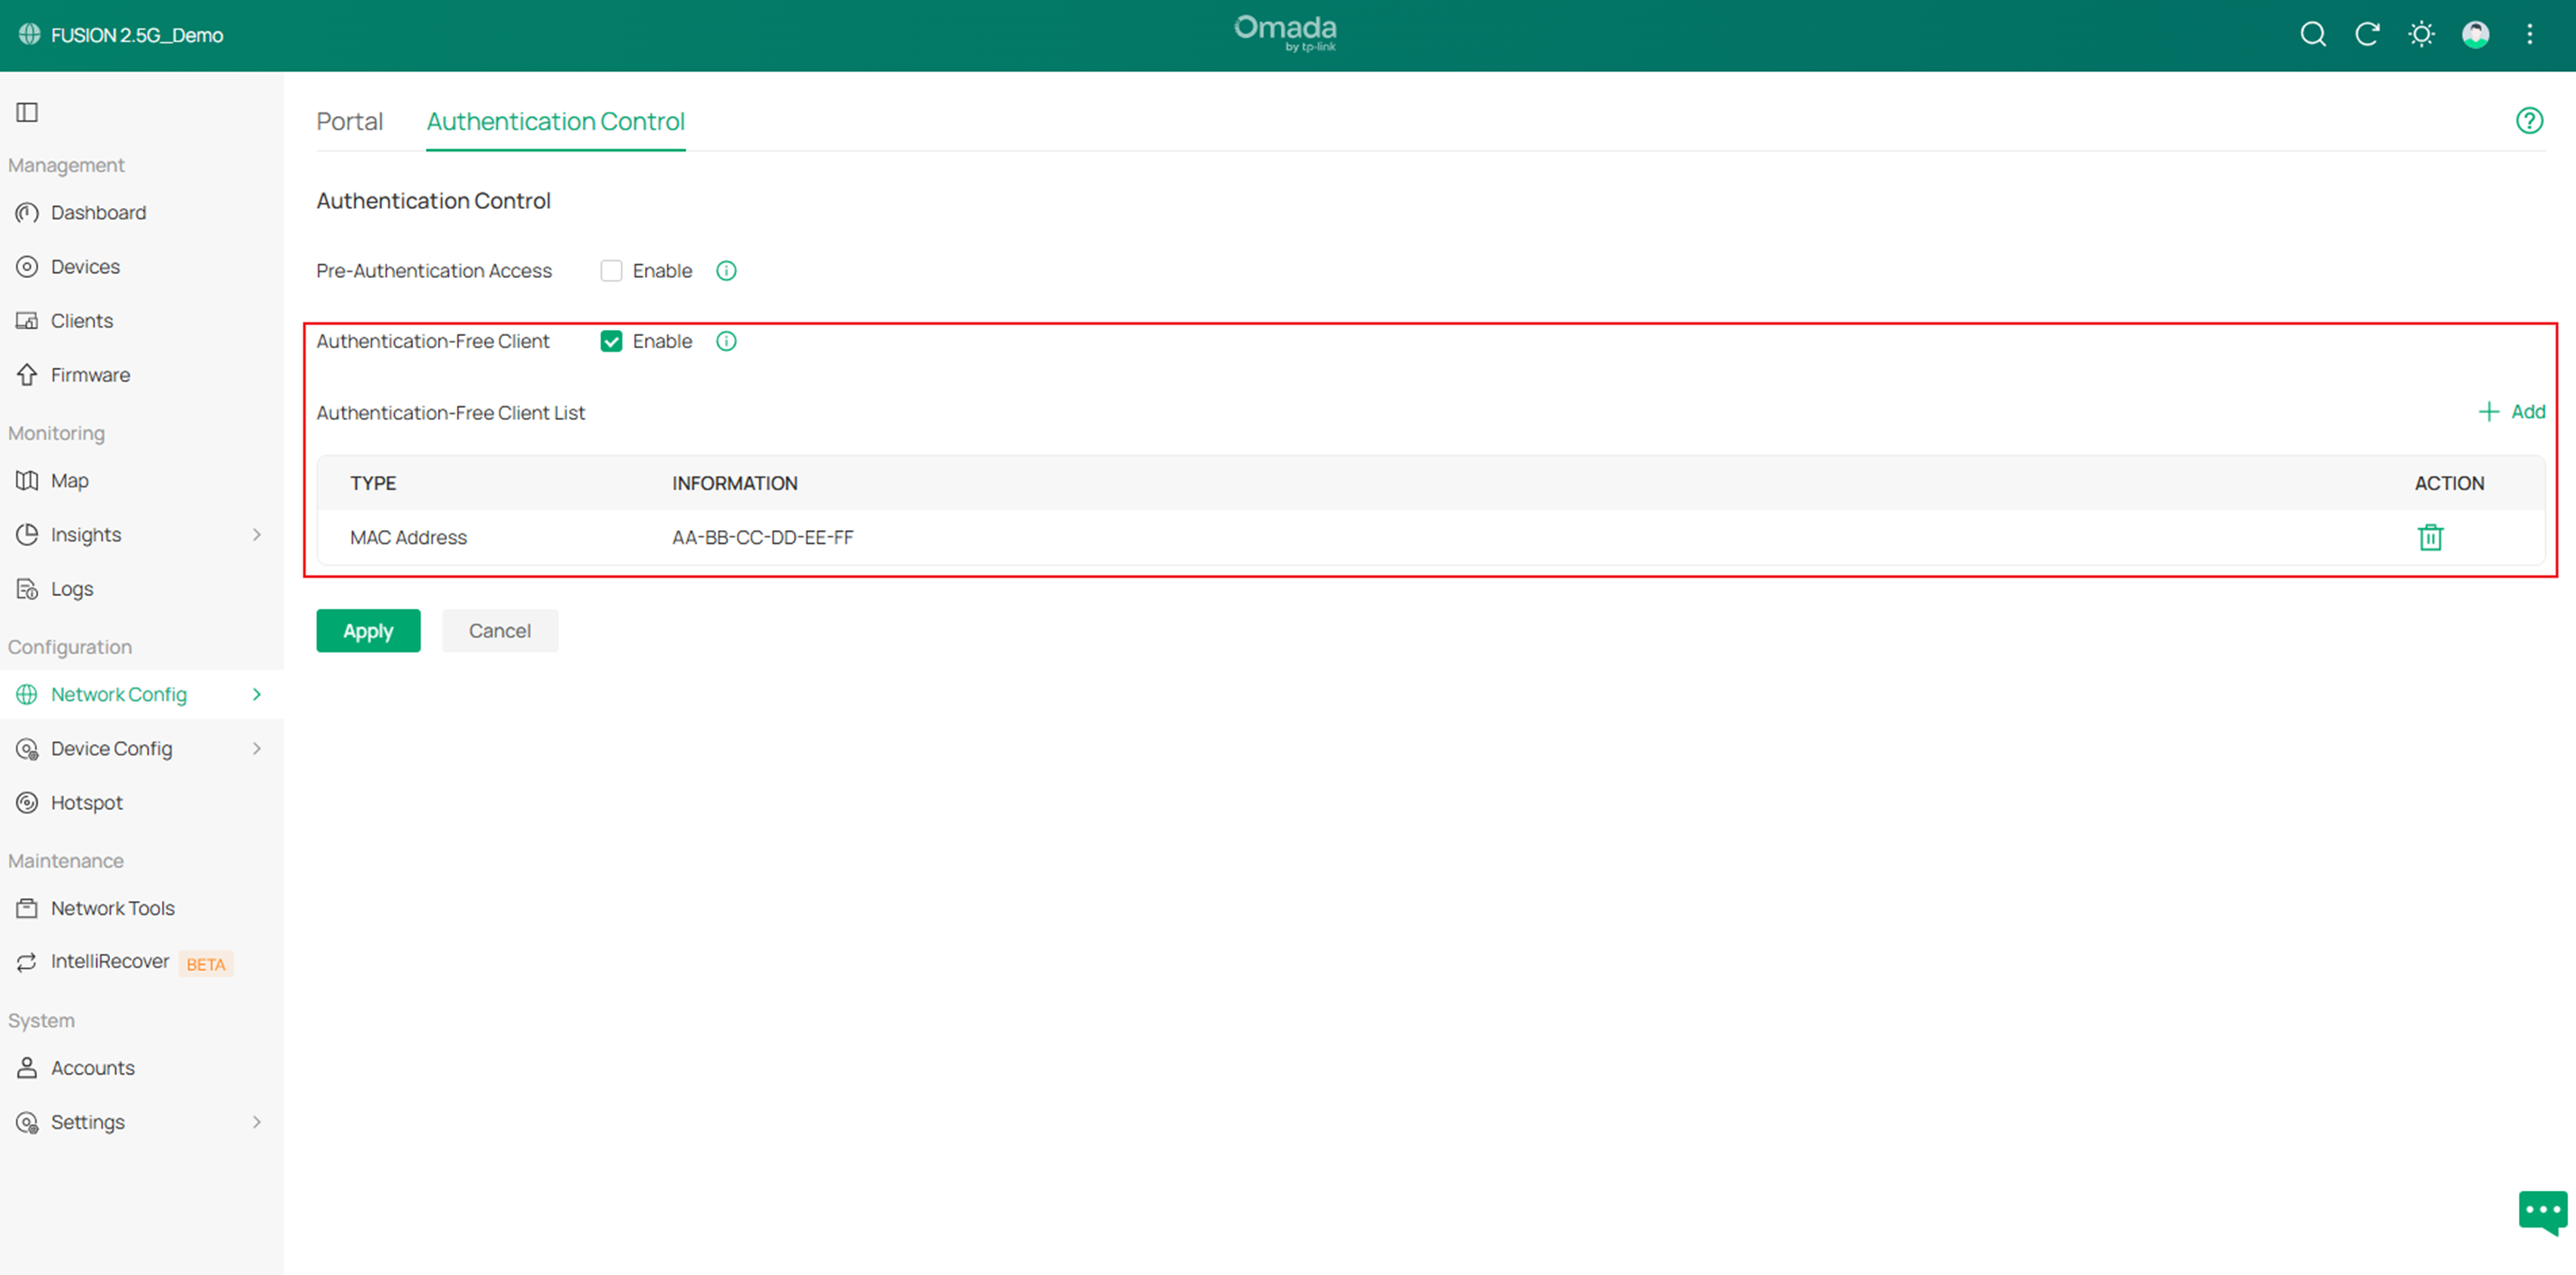
Some Android devices or older versions of Windows may not automatically display the Portal authentication page. Instead, users need to manually click something or open a browser and visit a website to access it. This behavior is determined by the client devices' system design.
In addition, we can check whether security policies such as ACLs or rules for authentication-free clients have been configured.
20. Portal authentication failed
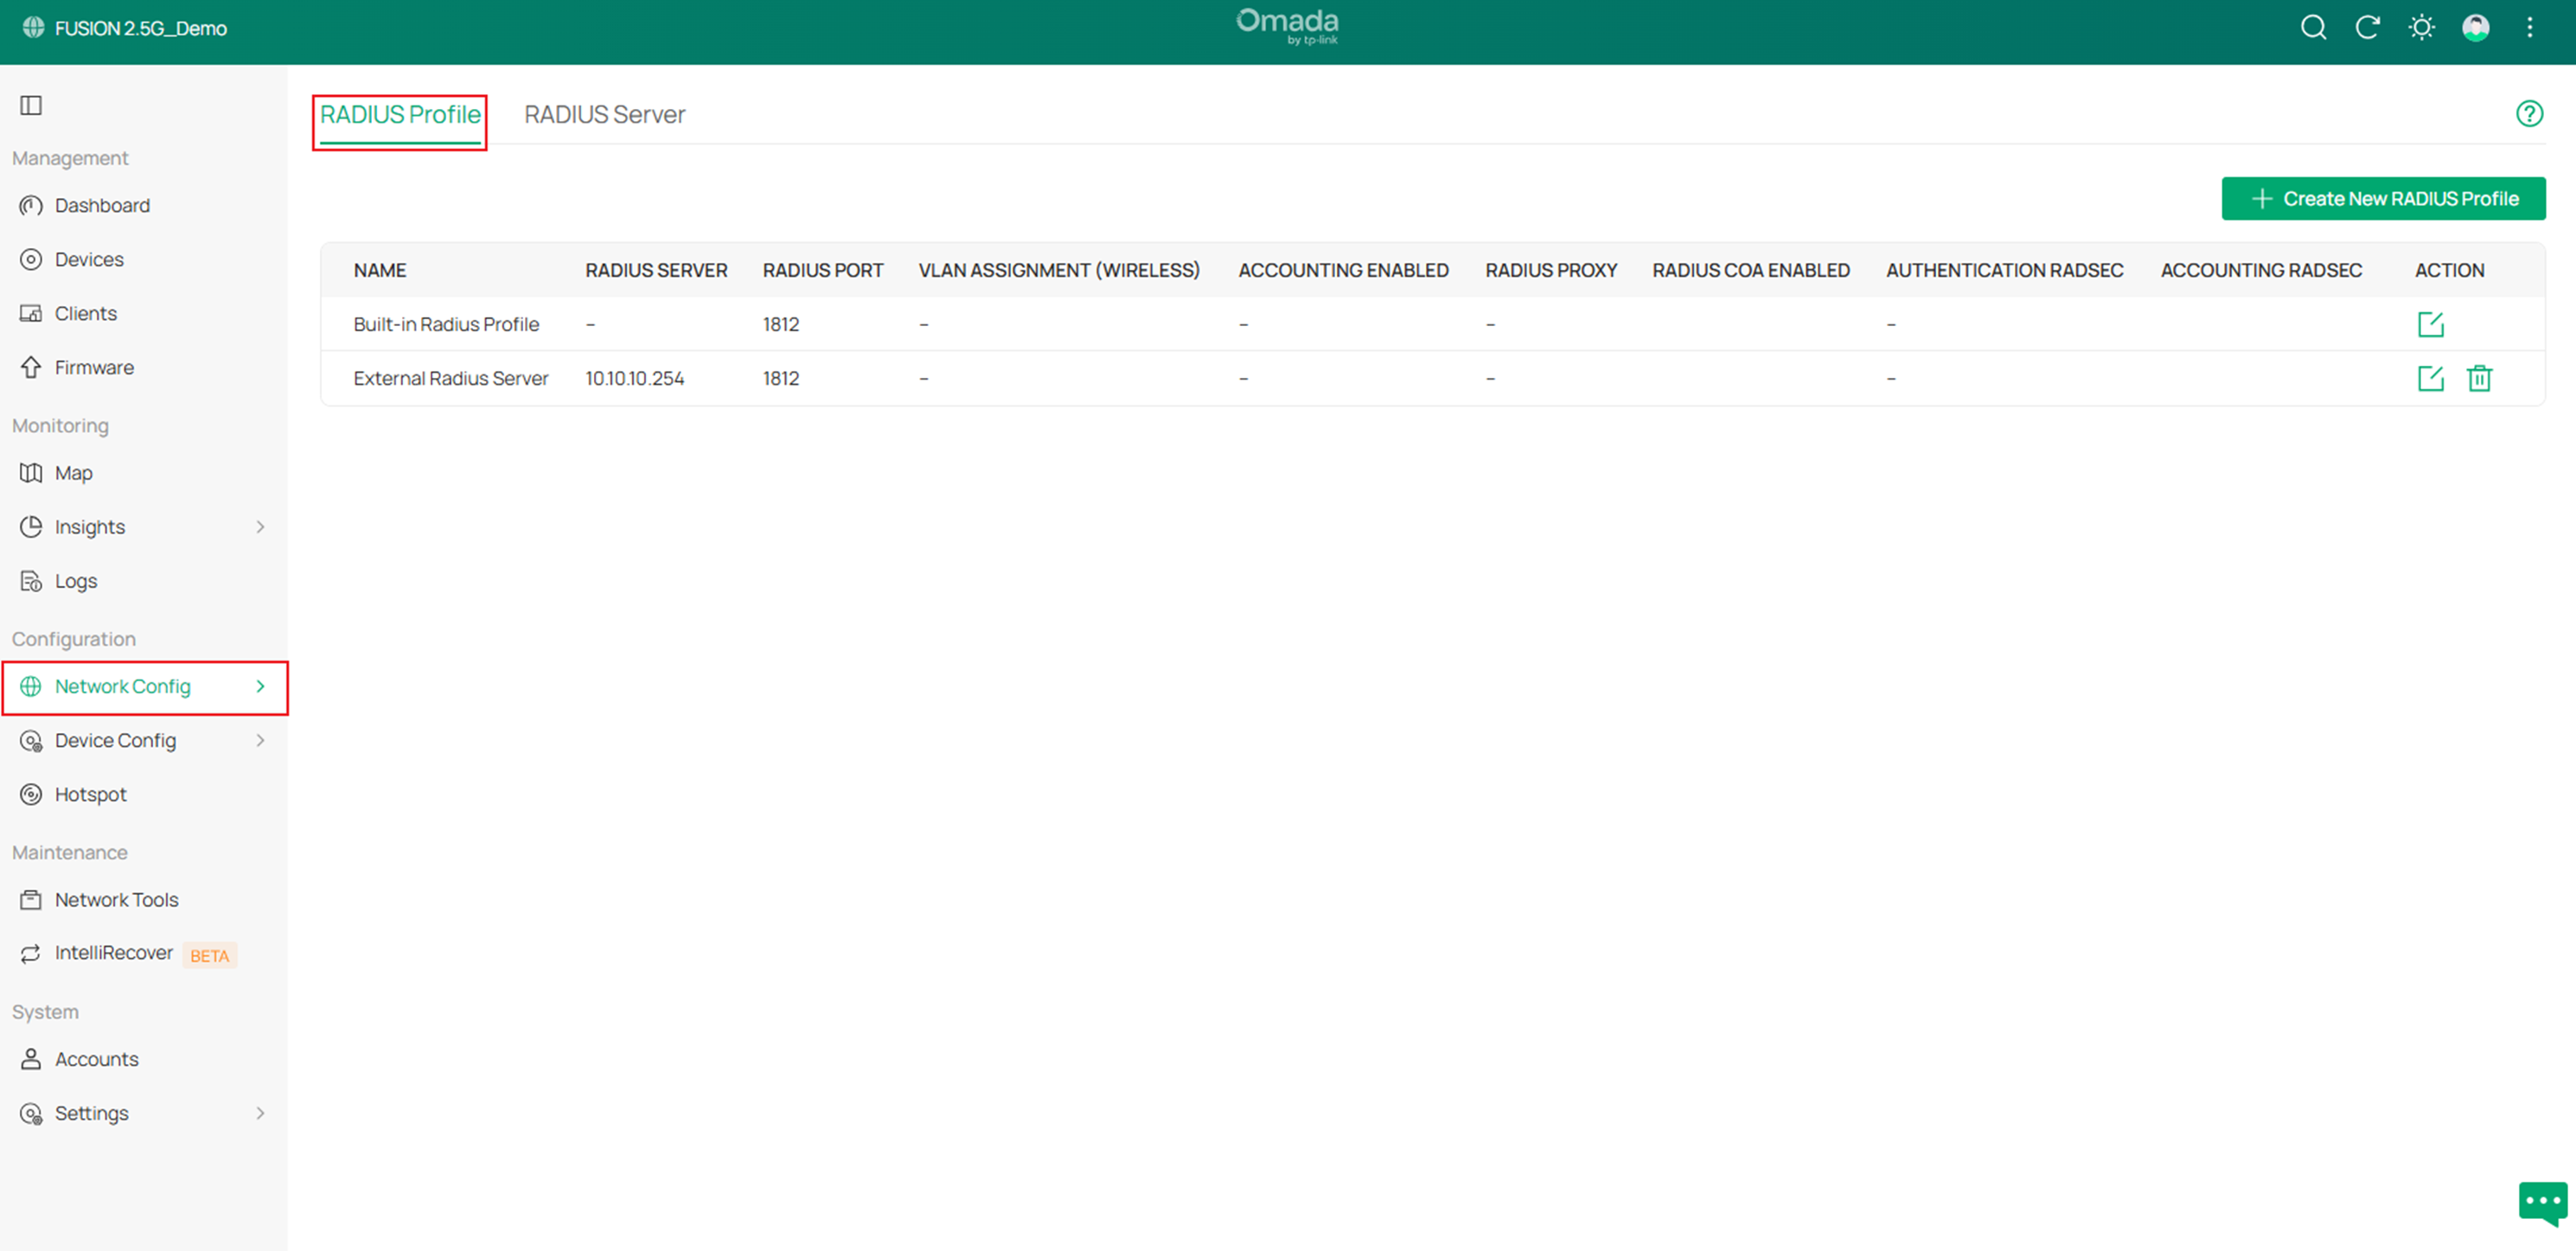
If you use an external RADIUS server as the authentication type, go to Network Config > Profile > RADIUS Profile and make sure the RADIUS profile is configured correctly.
Then make sure the connectivity between the device and the RADIUS server is working properly by performing a ping test from the device to the server.
At last, we can check the RADIUS server's system logs for more information.
21. High CPU usage
Step 1. Check for a network loop or excessive multicast/broadcast traffic on the network.
Step 2. Check for clients with unusually high traffic on the network.
Step 3. Check for an excessive number of clients.
Step 4. Check for high-frequency SNMP requests
Step 5. Check for network attacks such as SYN floods, UDP floods, and ICMP floods.
22. Unable to open the management page using the domain name
If you are unable to access the device's management page using omada.local or omadafusion.net, follow the troubleshooting steps below:
Step 1. Verify Your Network Connection.
Make sure your computer or mobile device is connected to the Fusion’s network. You can connect either by:
- (Recommand) Using an Ethernet cable to connect to one of the LAN ports on Fusion Gateway, or
- Connecting to the Wi-Fi broadcast by the Wi-Fi device within the Fusion's network.
Step 2. Clear Browser Cache and Cookies.
Clear your browser's cache and cookies, then close and reopen the browser before trying again. If the issue persists, try accessing the management page using a different web browser.
Step 3. Disconnect Other Network Connections.
Check whether your computer is connected to multiple networks at the same time, such as:
- A VPN connection
- A virtual network adapter
- A mobile hotspot
- Another Wi-Fi network
- An additional Ethernet connection
Disconnect any unnecessary network connections and keep only the connection to the target Fusion device before trying again.
Step 4. Disable Secure DNS in Your Browser.
Some web browsers support Secure DNS, which may interfere with local domain name resolution. Disable the Secure DNS feature in your browser settings, then try accessing omada.local or omadafusion.net again.
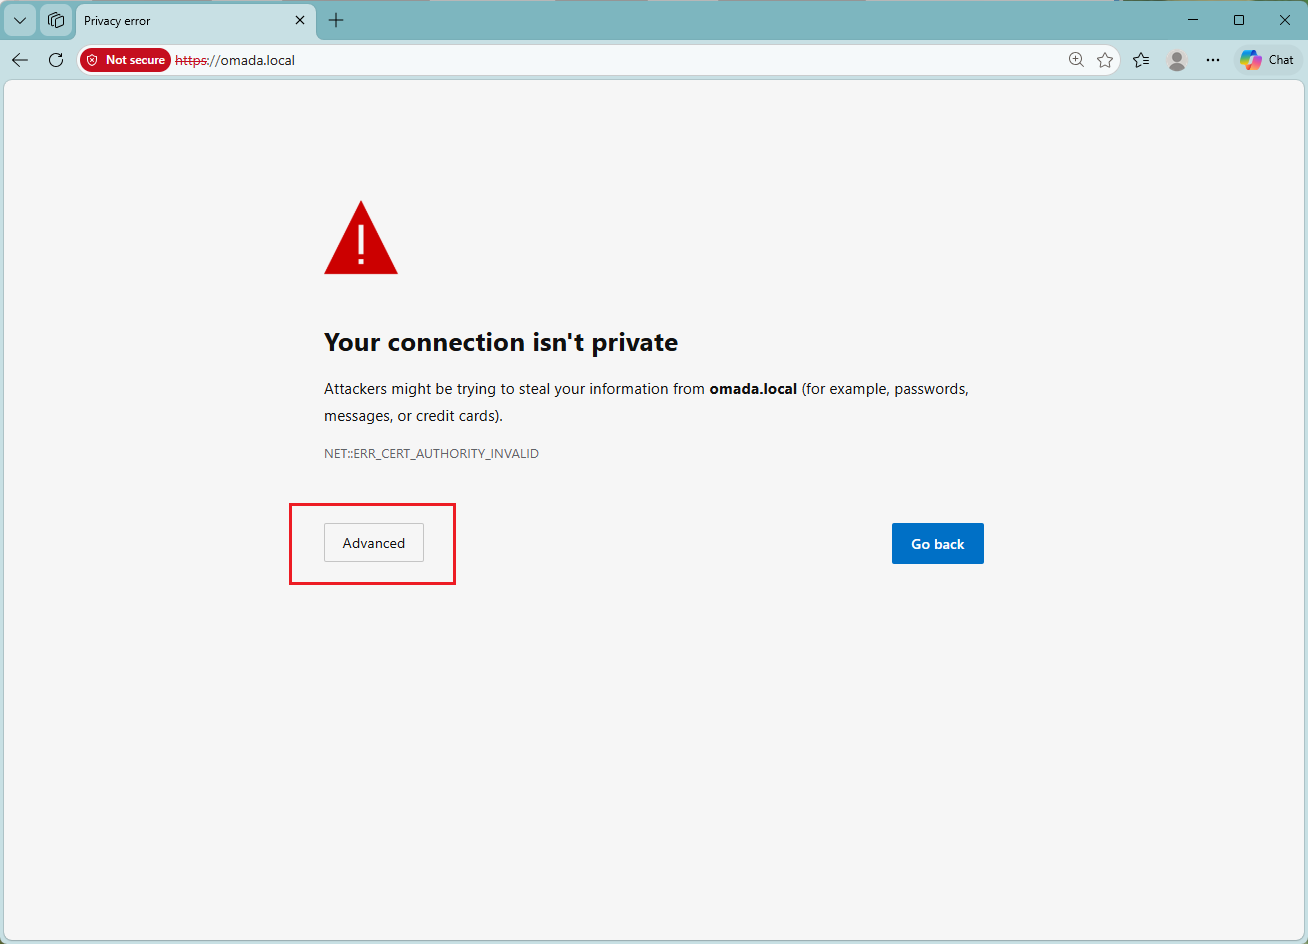
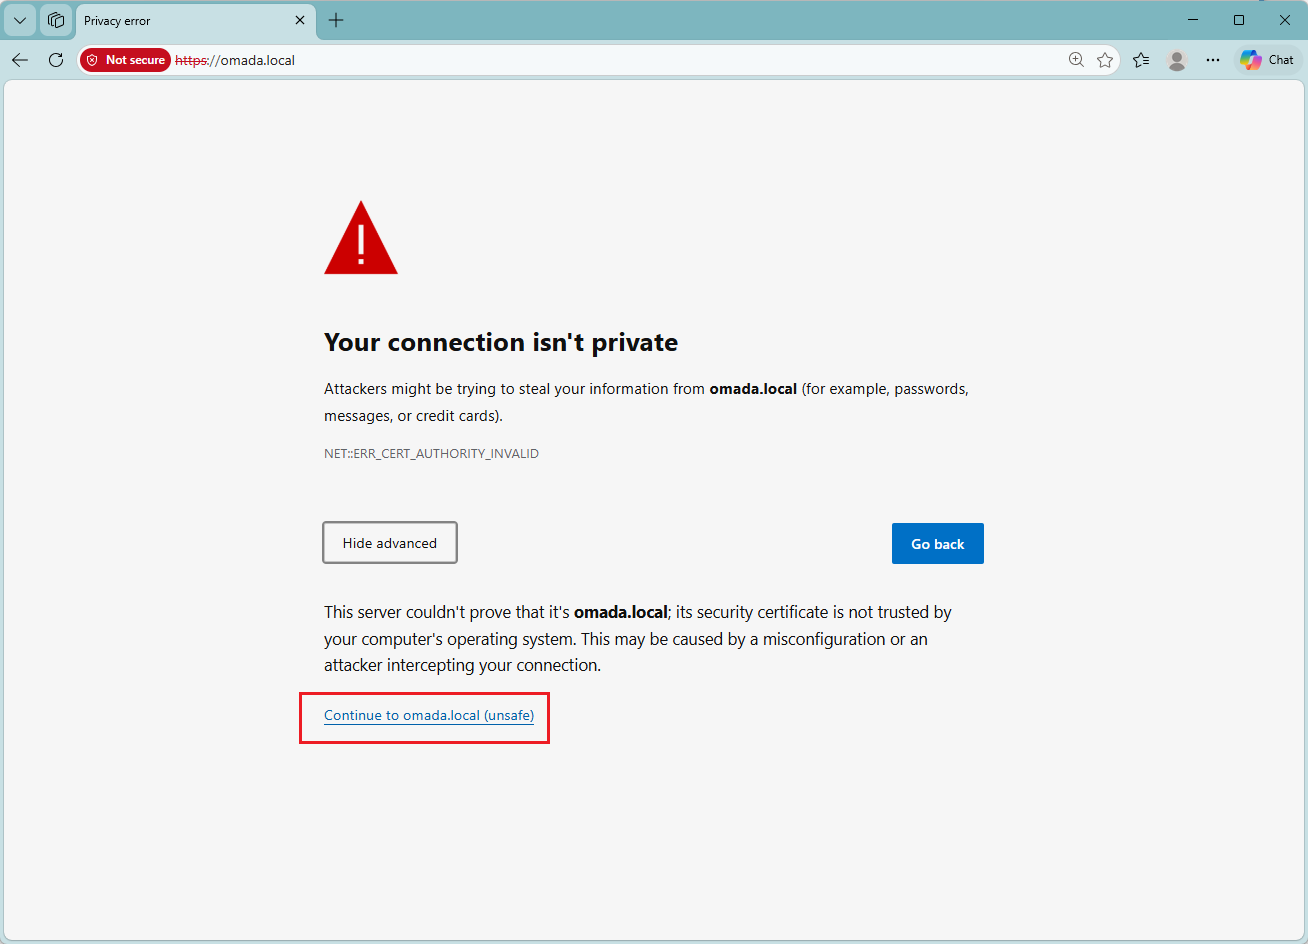
Step 5. Access the Device Using Its Default IP Address.
If the problem still persists, access the management page directly using the device's default management IP address. Enter the following address into your browser's address bar: http://192.168.188.1
Conclusion
This article provides a basic troubleshooting guide for common issues encountered when using an Omada Fusion Gateway. If you encounter any related issues, you can refer to this article first to troubleshoot them.
If this article does not help resolve the issue, please contact Omada technical support.
To learn more about each function and configuration, please visit Support Home to download or check the manual for your product.
