


Contents
IPv6 Limitations and Considerations
Introduction
This FAQ provides an overview of IPv6 and explains how to configure it within the Omada Controller. It covers key Omada limitations, Global Unicast Address (GUA) configuration, initial IPv6 connectivity with an internet service provider, and IPv6 deployment across VLANs.
IPv6 Limitations and Considerations
Currently, Omada SDN supports only Global Unicast Addresses (GUAs) for IPv6 configuration. A GUA is a publicly routable IPv6 address used for communication over the internet. GUAs are typically assigned by an internet service provider and fall within the 2000::/3 address range. Unlike link-local addresses, GUAs can communicate beyond the local network.
Omada SDN does not currently support Unique Local Addresses (ULAs).
Requirements
- Omada Gateway
- Omada Software Controller, Hardware Controller, or Cloud-Based Controller
Configuration
The IPv6 configuration process is divided into two sections: WAN and LAN. The WAN section covers the available IPv6 connection methods, including PPPoE, SLAAC, DHCPv6, static addressing, and ISP-specified configuration. The LAN section explains how to create an IPv6-enabled network and configure related settings, including VLAN assignment and IPv6 addressing for individual LAN segments.
IPv6 WAN Configuration
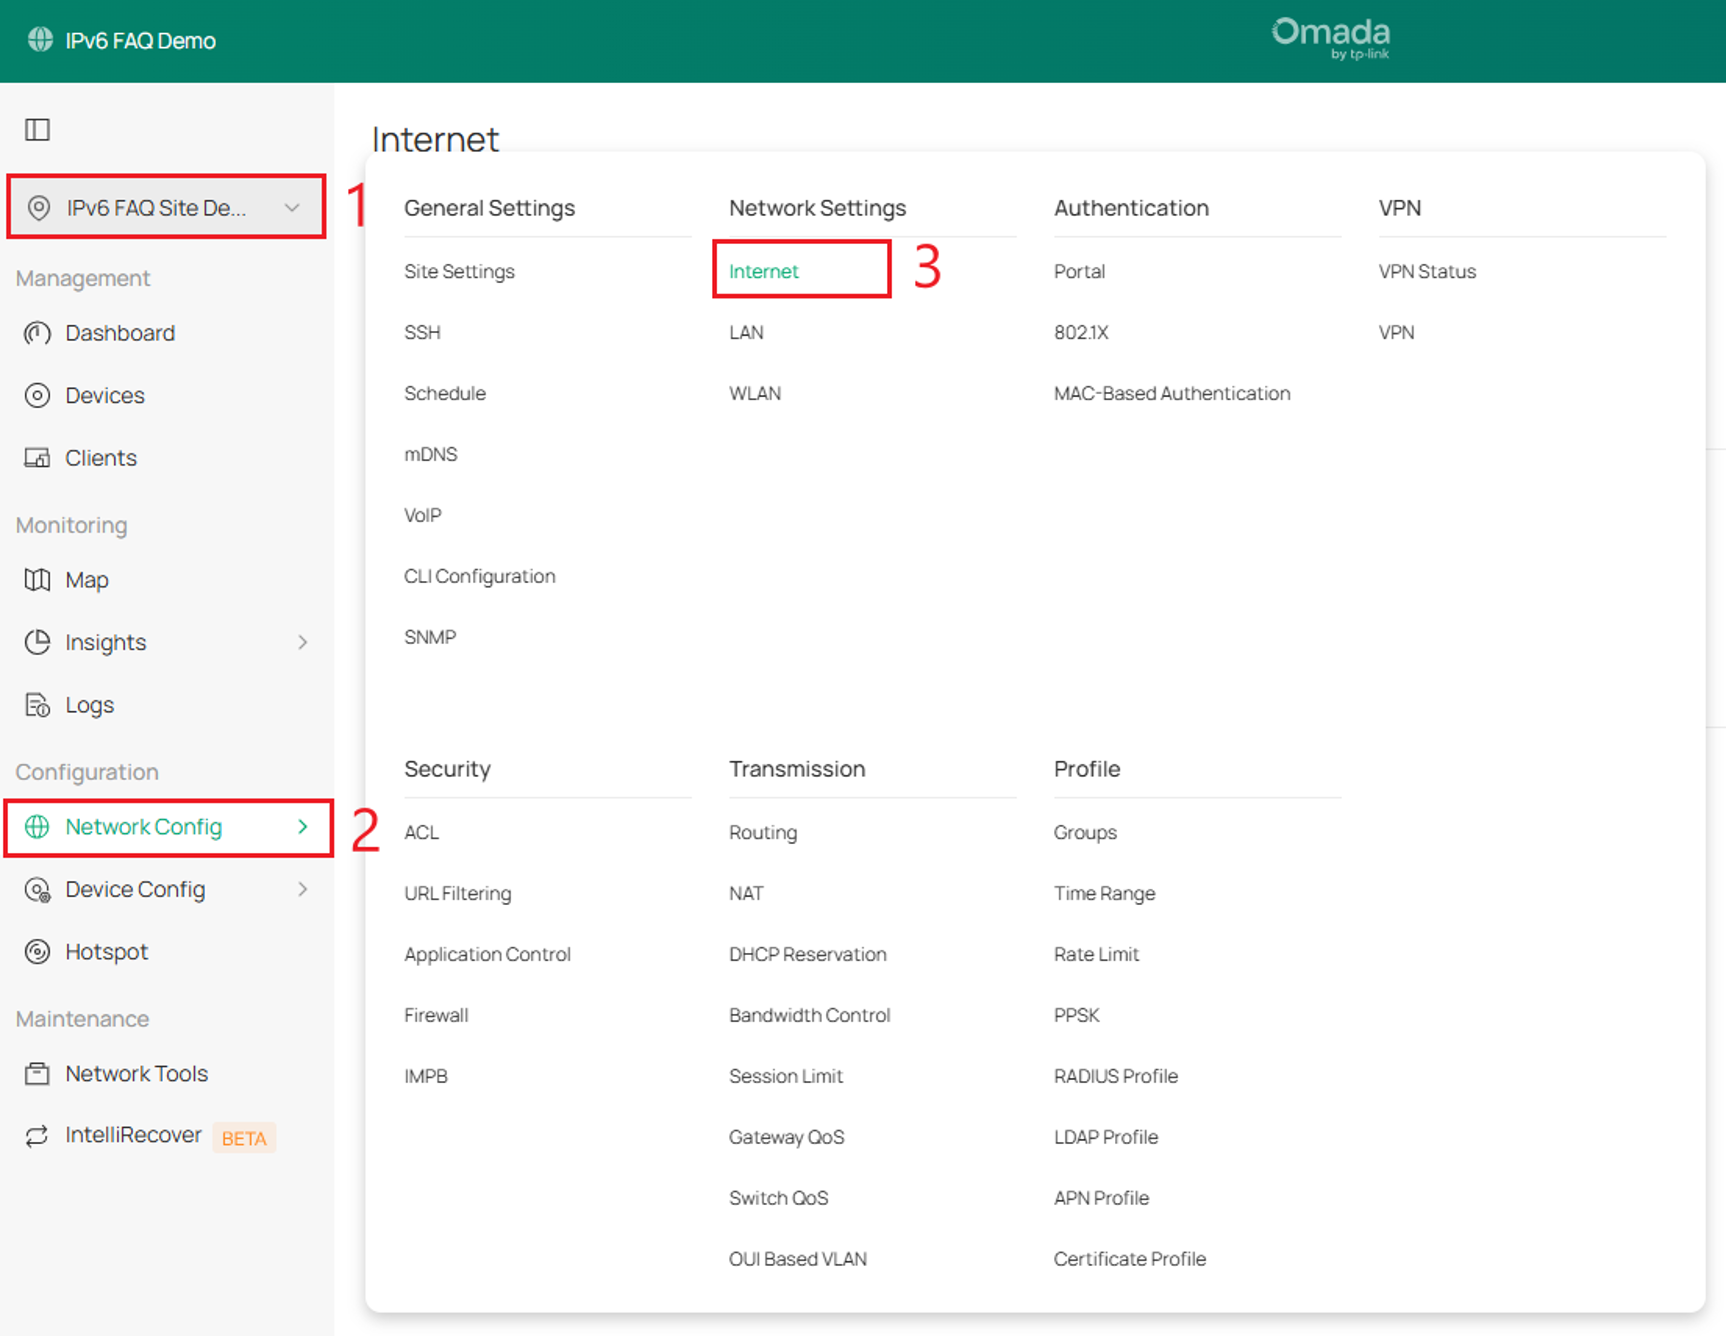
Step 1. Go to Site View > Network Config > Internet.
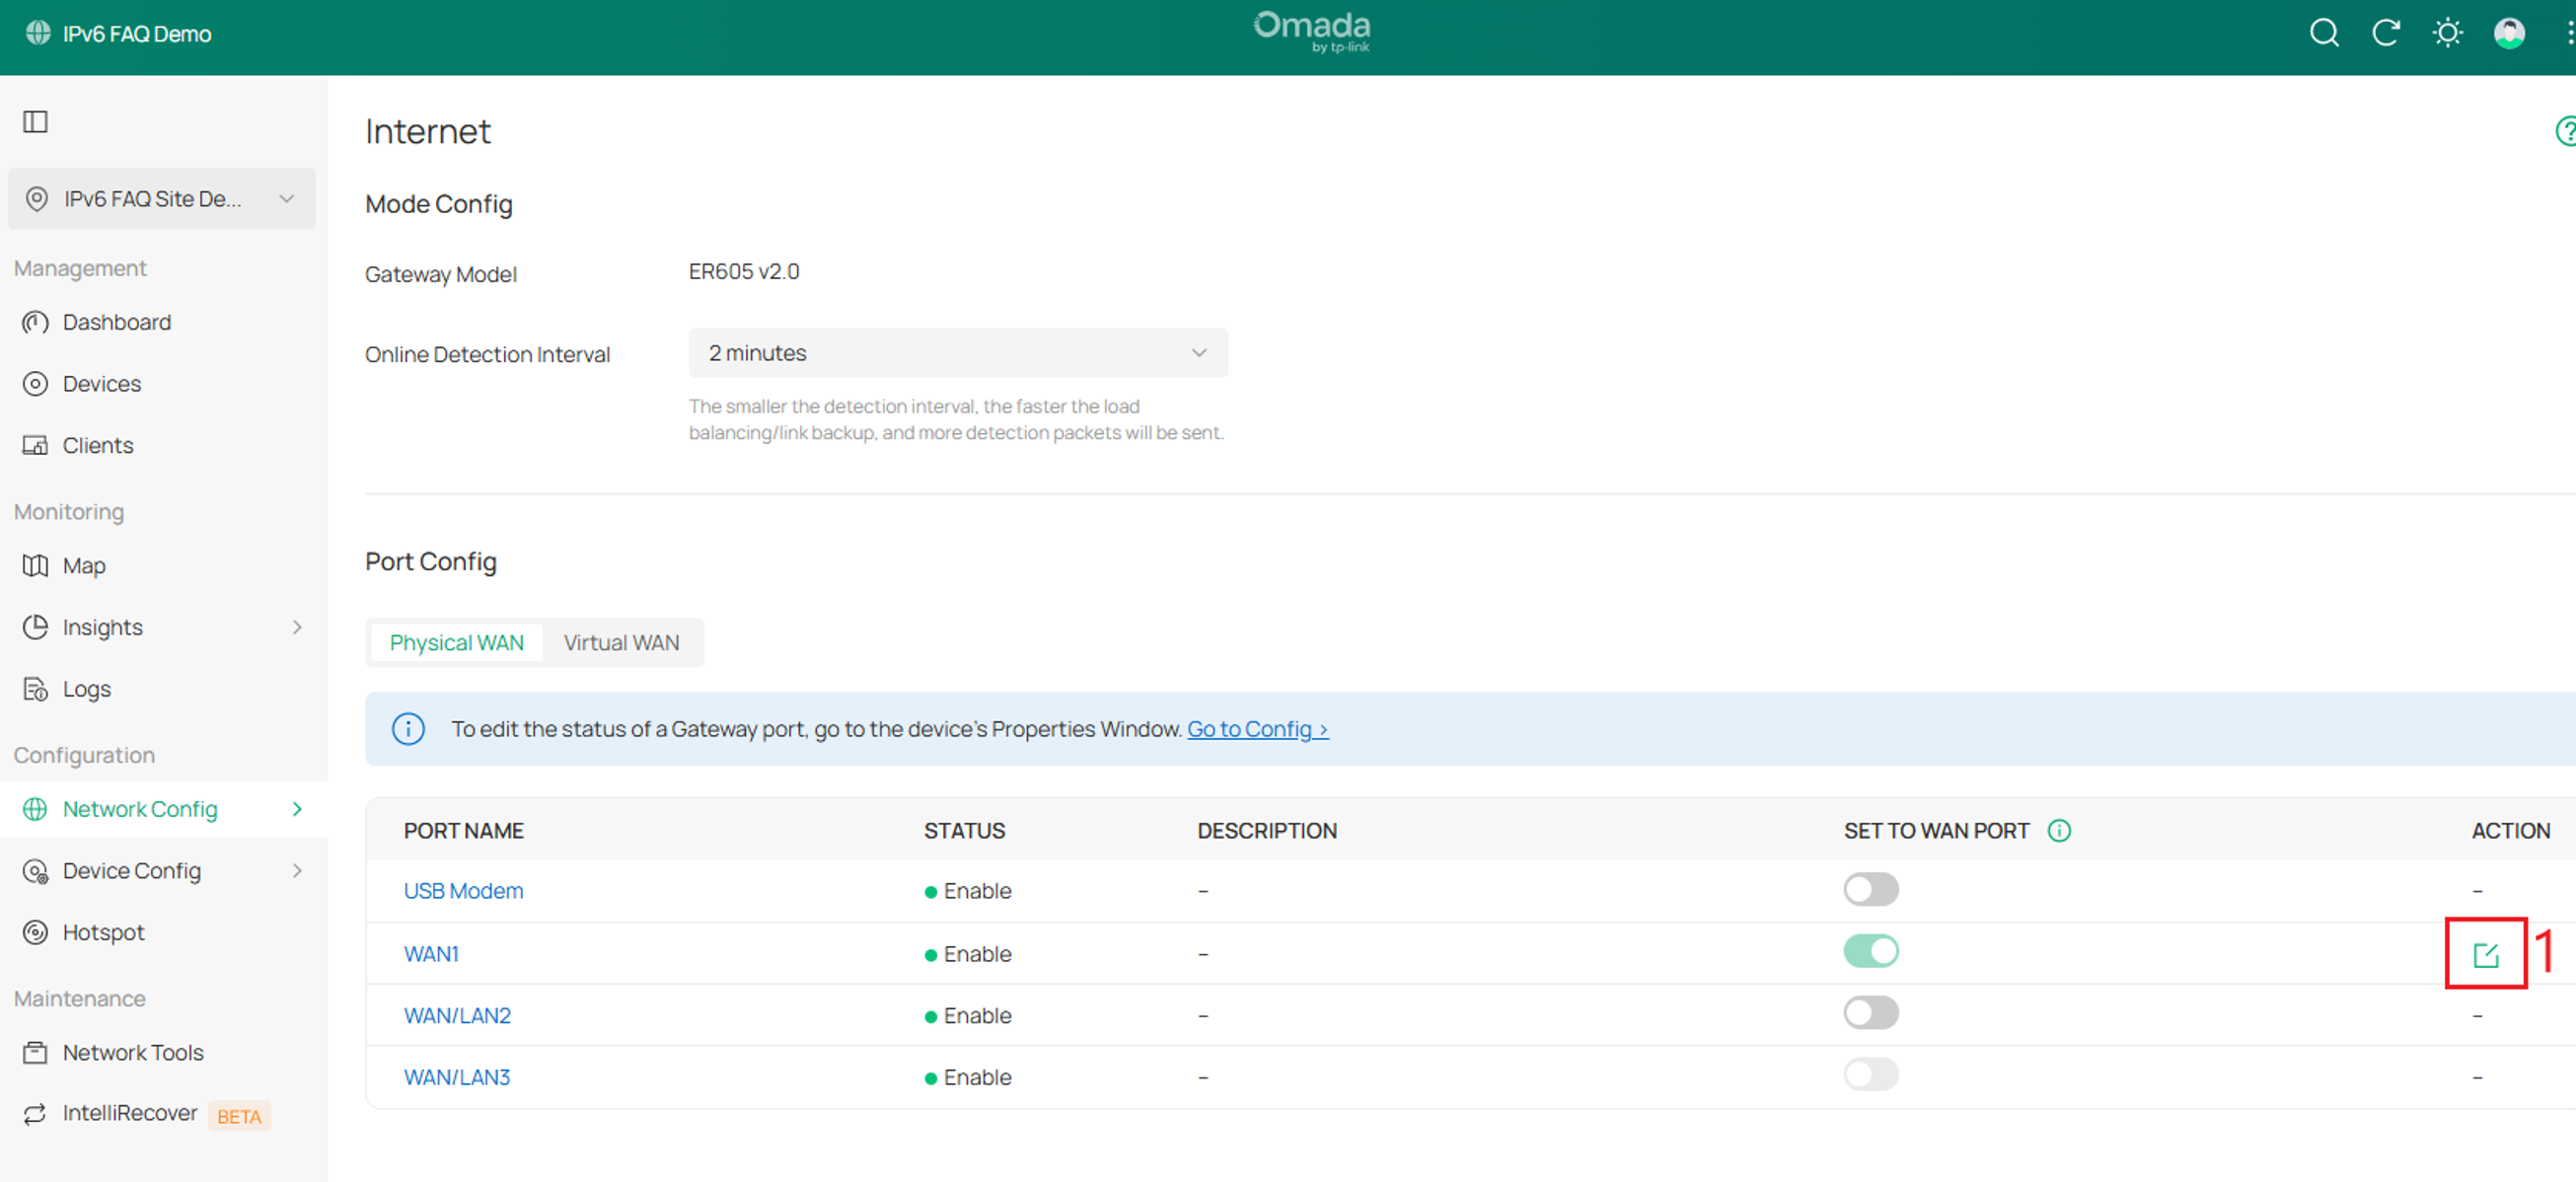
Step 2. Under Port Config, select Edit for the uplink WAN port connection.
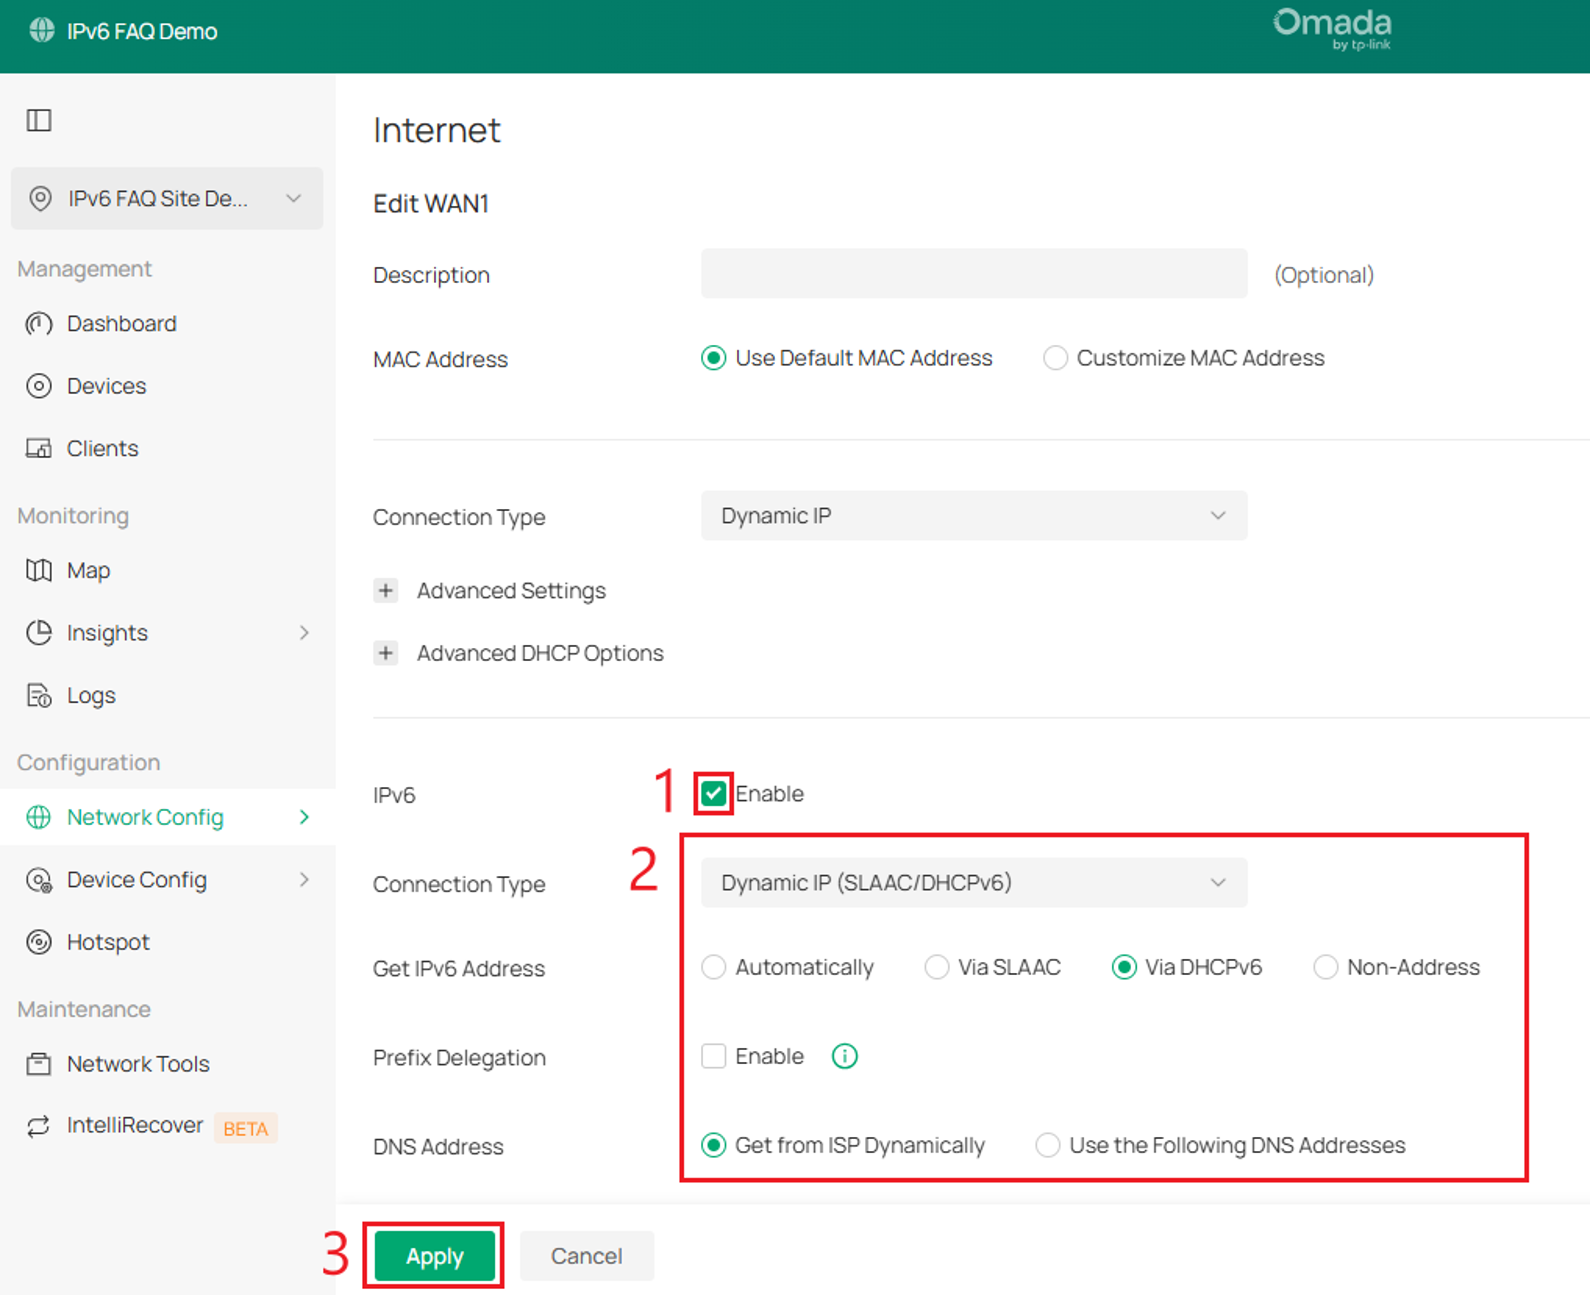
Step 3. Enable IPv6. Select the Connection Type and configure the corresponding settings. These options are explained below. In this example, Dynamic IP (SLAAC/DHCPv6) is used. Select Apply after completing the configuration. The IPv6 settings for the WAN port are now configured.
IPv6 WAN Configuration Options
When connecting to an ISP, use the configuration details provided by the ISP, typically included in its onboarding or service documentation. The options below provide a brief explanation of each available setting.
Connection Type: Dynamic IP (SLAAC/DHCPv6)
If your ISP uses Dynamic IPv6 address assignment, either DHCPv6 or SLAAC+Stateless DHCP, select Dynamic IP (SLAAC/DHCPv6).
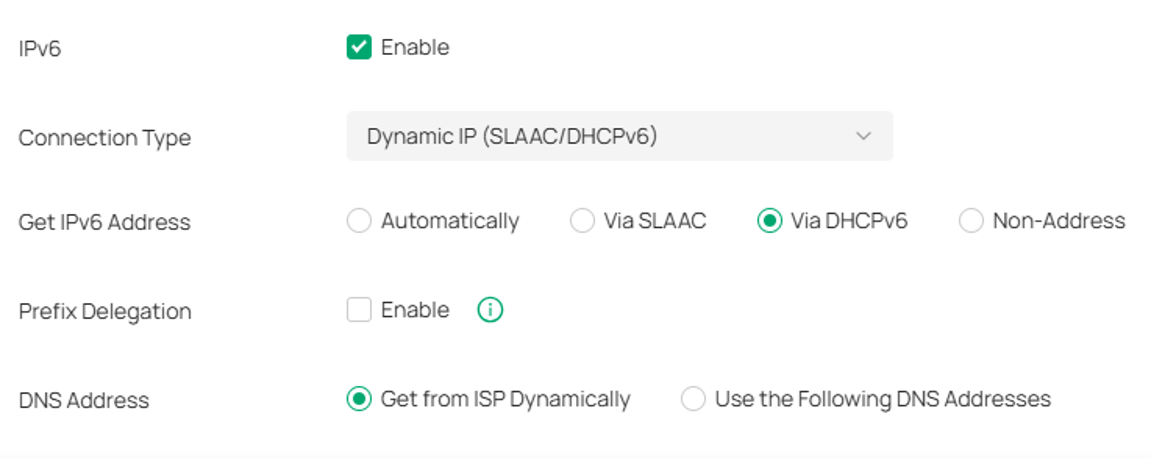
Get IPv6 Address: Select the method your ISP uses to assign an IPv6 address to your gateway.
Automatically: With this option selected, the gateway will automatically select SLAAC or DHCPv6 to get IPv6 addresses.
Via SLAAC: With SLAAC (Stateless Address Auto-Configuration) selected, your ISP assigns the IPv6 address prefix to the gateway and the gateway automatically generates its own IPv6 address. Also, your ISP assigns other parameters including the DNS server address to the gateway.
Via DHCPv6: With DHCPv6 selected, your ISP assigns an IPv6 address and other parameters including the DNS server address to the gateway using DHCPv6.
Non-Address: When selected, the WAN port will not configure a global IPv6 address.
Prefix Delegation: Select Enable to obtain an address prefix from your ISP through DHCPv6, or select Disable to manually configure a prefix for the LAN. LAN clients will receive IPv6 addresses from this prefix.
Prefix Delegation Size: With Prefix Delegation enabled, enter the Prefix Delegation Size to determine the length of the address prefix. If you are not sure about the value, you can ask your ISP.
DNS Address: Select whether to get the DNS address dynamically from your ISP or designate the DNS address manually.
Get from ISP Dynamically: The DNS address will be automatically assigned by the ISP.
Use the Following DNS Addresses: Enter the DNS address provided by the ISP.
Connection Type: Static IP
If your ISP provides you with a fixed IPv6 address, select Static IP.
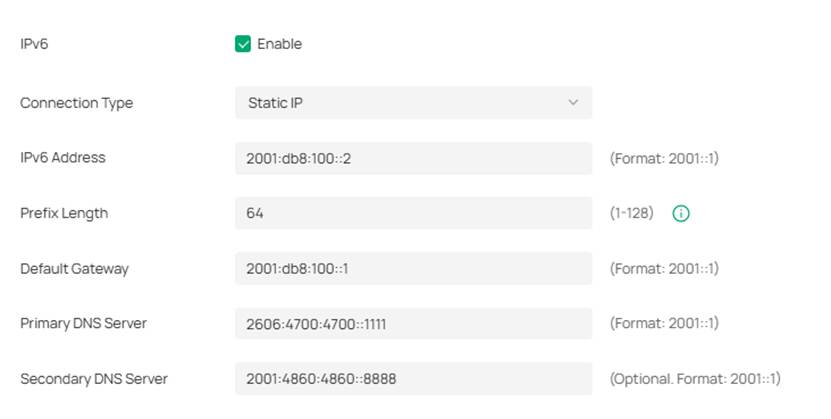
IPv6 Address: Enter the static IPv6 address information received from your ISP.
Prefix Length: Enter the prefix length of the IPv6 address received from your ISP.
Default Gateway: Enter the default gateway provided by your ISP.
Primary DNS Server: Enter the IP address of the primary DNS server provided by your ISP.
Secondary DNS Server: (Optional) Enter the IP address of the secondary DNS server, which provides redundancy in case the primary DNS server goes down.
Connection Type: PPPoE
If your ISP uses PPPoEv6 and provides a username and password, select PPPoE.
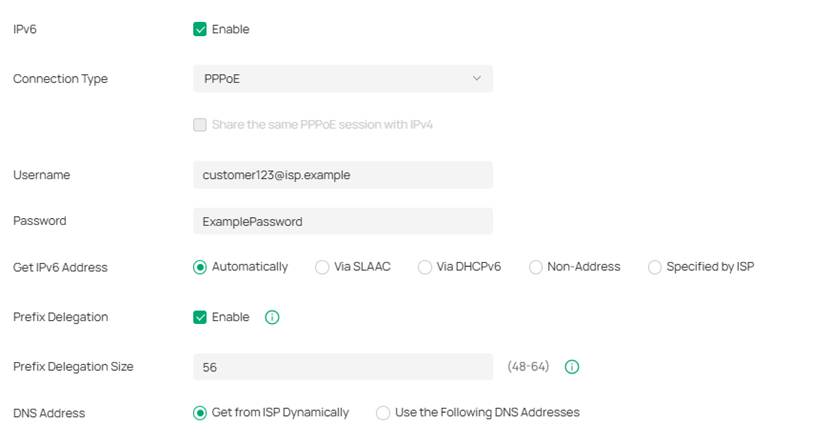
Share the same PPPoE session with IPv4: If your ISP provides one PPPoE account for both IPv4 and IPv6, and an IPv4 PPPoE connection is already established on this WAN port, select the checkbox to use the existing IPv4 PPPoE session. You do not need to enter the username and password again. If the ISP provides separate accounts, or the IPv4 connection does not use PPPoE, leave the checkbox cleared and enter the IPv6 PPPoE credentials manually.
Username: Enter the username of your PPPoE account provided by your ISP.
Password: Enter the password of your PPPoE account provided by your ISP.
Get IPv6 Address: Select the method your ISP uses to assign an IPv6 address to your gateway.
Automatically: With this option selected, the gateway will automatically select SLAAC or DHCPv6 to get IPv6 addresses.
Via SLAAC: With SLAAC (Stateless Address Auto-Configuration) selected, your ISP assigns the IPv6 address prefix to the gateway and the gateway automatically generates its own IPv6 address. Also, your ISP assigns other parameters including the DNS server address to the gateway.
Via DHCPv6: With DHCPv6 selected, your ISP assigns an IPv6 address and other parameters including the DNS server address to the gateway using DHCPv6.
Non-Address: When selected, the WAN port will not configure a global IPv6 address.
Specified by ISP: You should manually enter the IPv6 address provided by your ISP.
Prefix Delegation: Select Enable to obtain an address prefix from your ISP through DHCPv6, or select Disable to manually configure a prefix for the LAN. LAN clients will receive IPv6 addresses from this prefix.
Prefix Delegation Size: With Prefix Delegation enabled, enter the Prefix Delegation Size to determine the length of the address prefix. If you are not sure about the value, you can ask your ISP.
DNS Address: Select whether to get the DNS address dynamically from your ISP or designate the DNS address manually.
Get from ISP Dynamically: The DNS address will be automatically assigned by the ISP.
Use the Following DNS Addresses: Enter the DNS address provided by the ISP.
Connection Type: 6to4 Tunnel
If your ISP uses a 6to4 deployment to assign IPv6 addresses, select 6to4 Tunnel. 6to4 is an internet transition mechanism that allows IPv6 packets to be transmitted across an IPv4 network. IPv6 packets are encapsulated within IPv4 packets and forwarded to the IPv6 destination through the IPv4 network.
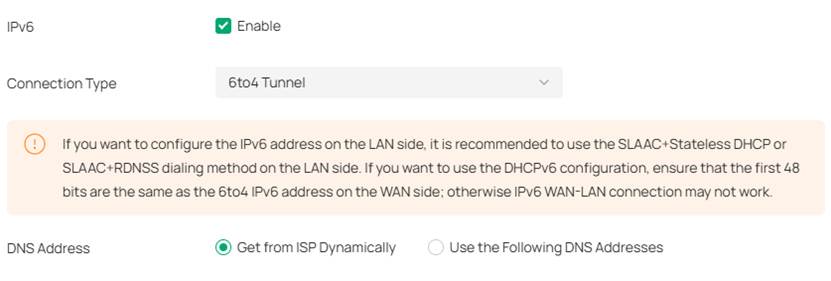
DNS Address: Select whether to get the DNS address dynamically from your ISP or designate the DNS address manually.
Get from ISP Dynamically: The DNS address will be automatically assigned by the ISP.
Use the Following DNS Addresses: Enter the DNS address provided by the ISP.
Connection Type: Pass-Through (Bridge)
In Pass-Through (Bridge) mode, the gateway works as a transparent bridge. The IPv6 packets received from the WAN port will be transparently forwarded to the LAN port and vice versa. No extra parameter is required.
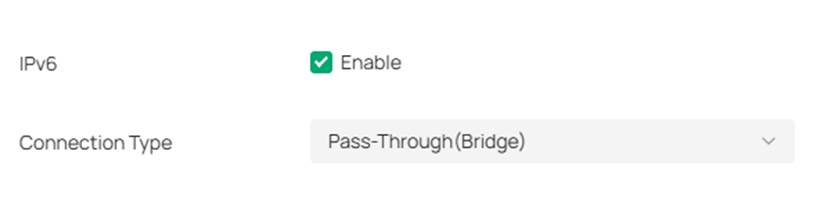
No configuration is required for this type of connection.
IPv6 LAN Configuration
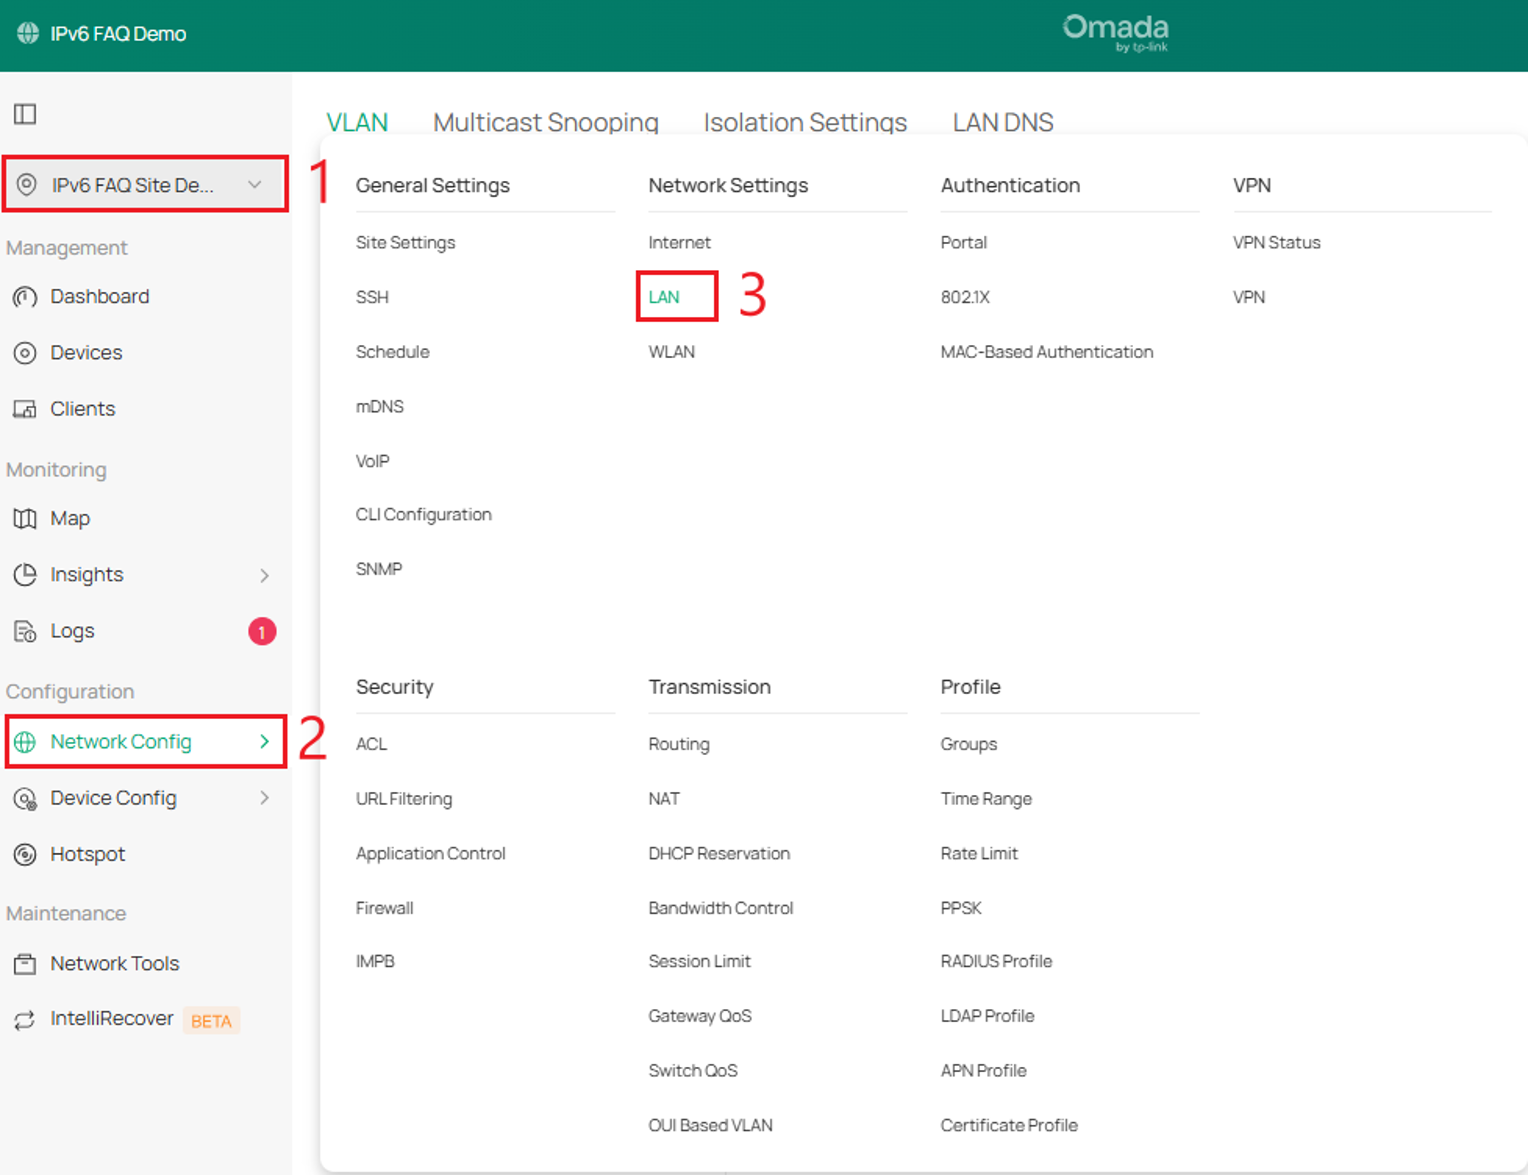
Step 1. In Site View, go to Network Config > LAN.
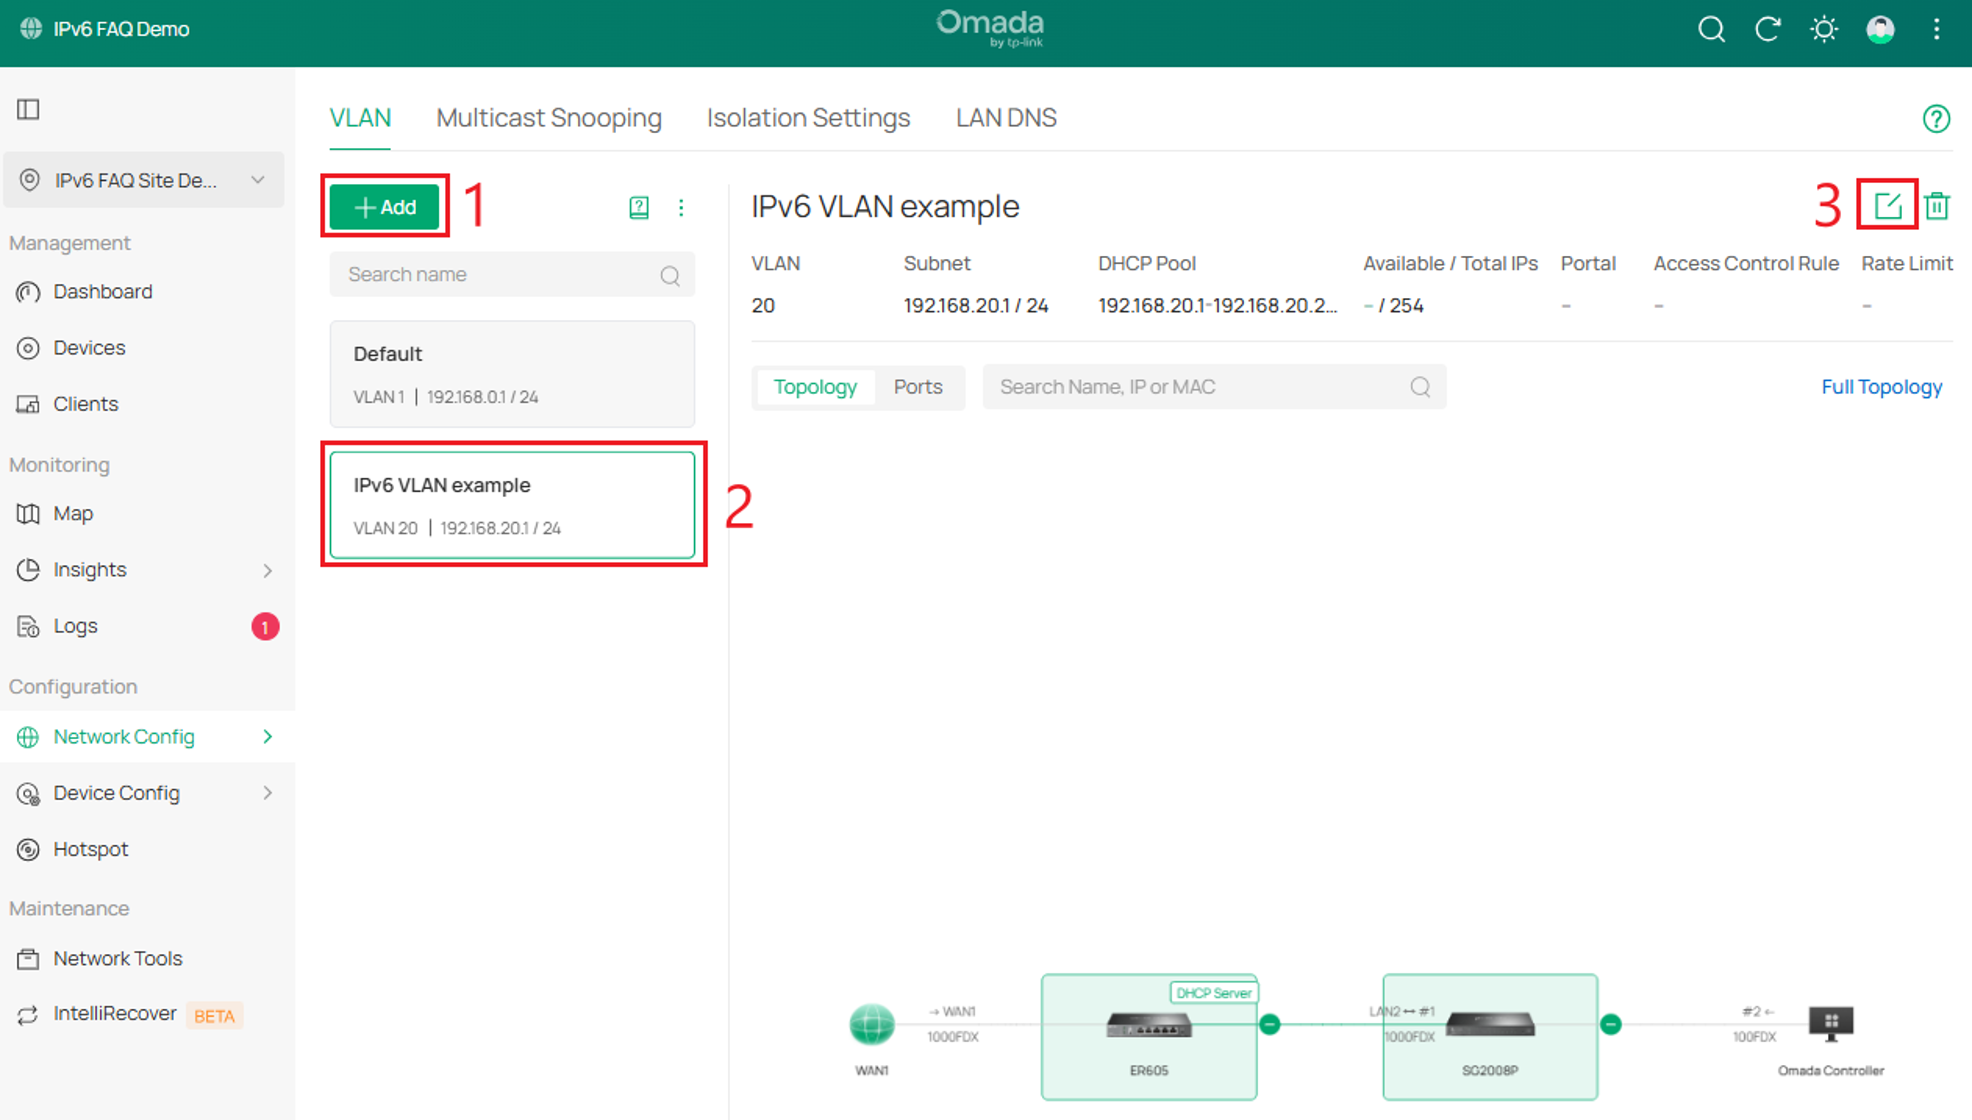
Step 2. You can add a new VLAN or edit an existing VLAN. Select Add, or select an existing VLAN and then select Edit.
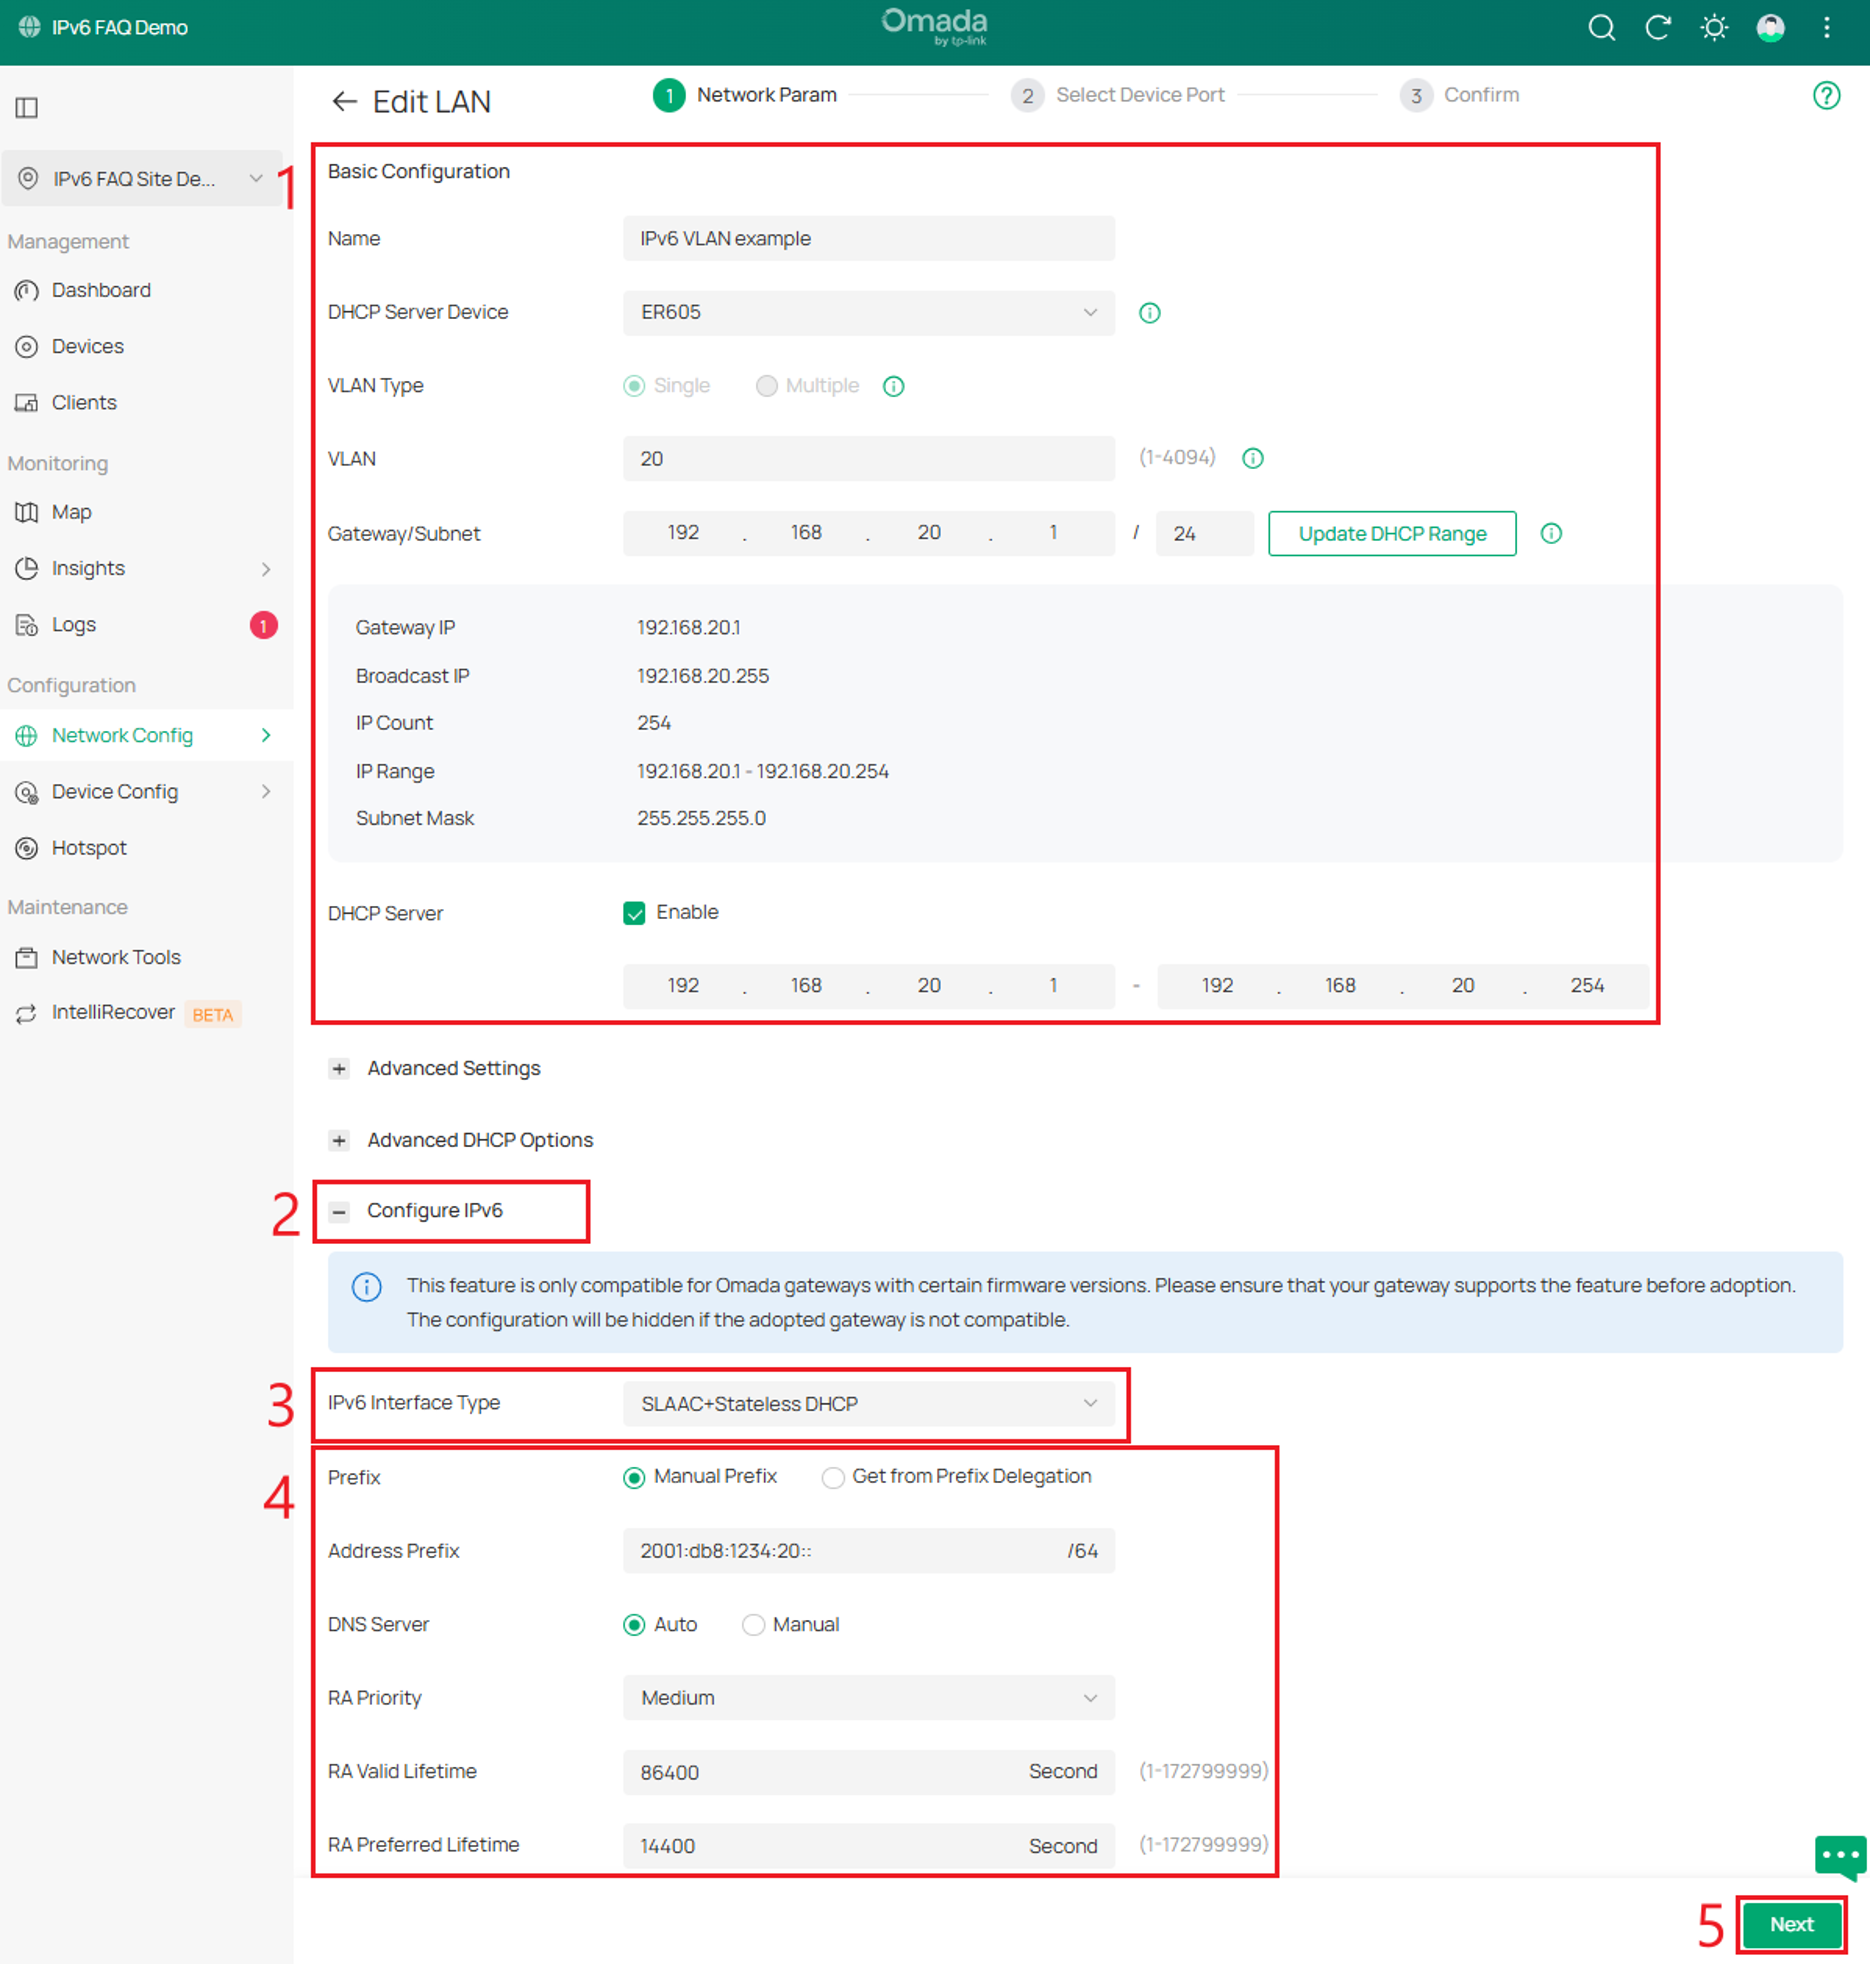
Step 3. First, configure a basic IPv4 VLAN. This example uses VLAN 20. Under Configure IPv6, select an IPv6 Interface Type, configure the additional IPv6 settings, and then select Next. A detailed explanation of these options can be found below.
Configure IPv6 LAN Configuration Options
This setting determines how the gateway assigns IPv6 addresses to clients on the local network. Some clients may support only certain connection types, so select an option that is compatible with the clients on the local network. The options below provide a brief explanation of each available setting.
IPv6 Interface Type
Select how IPv6 addresses are assigned to clients on the local network.
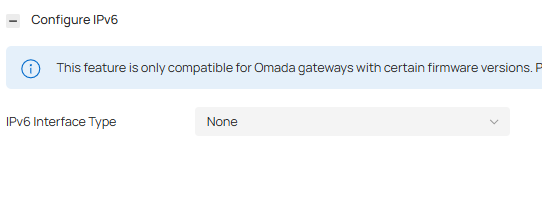
IPv6 Interface Type: None
IPv6 connection is not enabled for the clients in the local network.
IPv6 Interface Type: DHCPv6
The gateway assigns an IPv6 address and other parameters including the DNS server address to each client using DHCPv6.
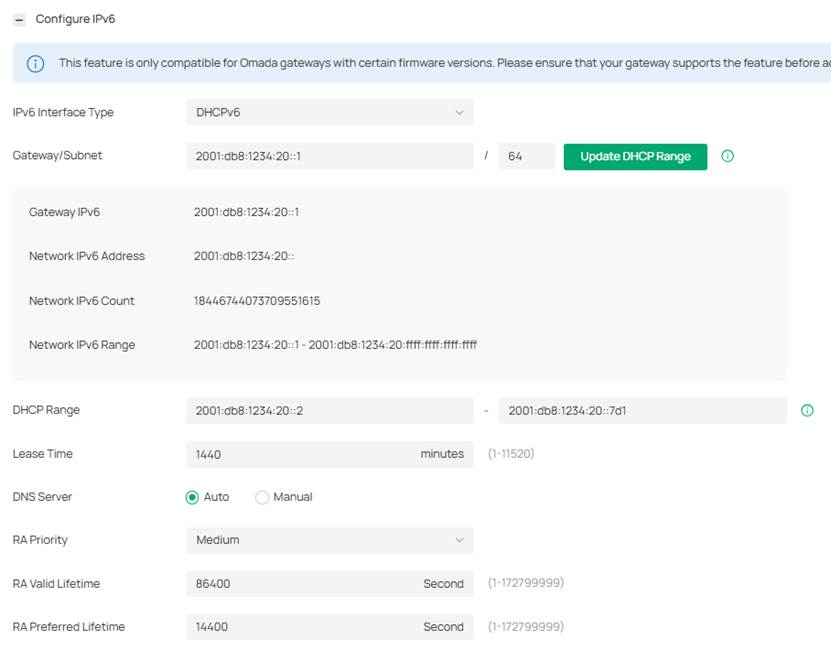
Gateway/Subnet: Enter the IPv6 gateway address and prefix length in CIDR notation. A summary of the network information entered appears below in real time.
DHCP Range: Enter the starting and ending IP addresses of the DHCP address pool in the fields provided. For quick operation, click the Update DHCP Range beside the Gateway/Subnet entry to populate the IP address range automatically, and edit the range according to your needs.
Lease Time: Determines how long the assigned IPv6 address remains valid. Either keep the default 1440 minutes or change it if required by your ISP.
DNS Server: Select a method to configure the DNS server for the network. With Auto selected, the DHCP server automatically assigns DNS server addresses to devices on the network. With Manual selected, enter the IP address of a server in each DNS server field.
RA Priority: Specify the router priority to help a host choose its default gateway. If a host receives RA messages from multiple routers, it will select the router with the highest RA priority as the default gateway. In the case of routers with the same priority, it will select the router whose RA message is received first as the default gateway.
RA Valid Lifetime: Specify the validity lifetime of the prefix. The addresses automatically generated with the prefix can be used normally during the valid lifetime. After the valid lifetime expires, the addresses become invalid and are removed.
RA Preferred Lifetime: Specify the preferred lifetime for stateless auto-configuration of addresses with the prefix. After the preferred lifetime expires, addresses automatically configured by hosts using this prefix will become deprecated. A deprecated address should not normally be used to establish a new connection, but it can continue to be used for existing connections. The RA Preferred Lifetime must be less than or equal to the RA Valid Lifetime.
IPv6 Interface Type: SLAAC+Stateless DHCP
The gateway assigns the IPv6 address prefix to each client and the client automatically generates its own IPv6 address. Also, the gateway assigns other parameters including the DNS server address to each client using DHCPv6.
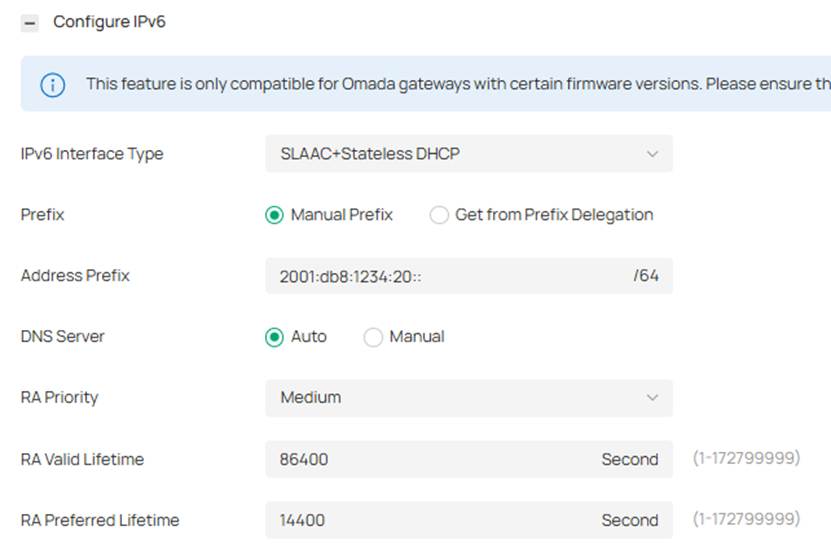
Prefix: Configure the IPv6 address prefix for each client in the local network.
With Manual Prefix selected, enter the prefix in the Address Prefix field. With Get from Prefix Delegation selected, select the WAN port with Prefix Delegation configured, and clients will receive the address prefix through Prefix Delegation.
IPv6 Prefix ID: With Get from Prefix Delegation selected, enter the Prefix ID, which will be added to the delegated prefix to create a /64 subnet. The range of IPv6 Prefix ID is determined by Prefix Delegation Size and Prefix Length. Go to Network Config > Network Settings > Internet to configure Prefix Delegation Size.
DNS Server: Select a method to configure the DNS server for the network. With Auto selected, the DHCP server automatically assigns DNS server addresses to devices on the network. With Manual selected, enter the IP address of a server in each DNS server field.
RA Priority: Specify the router priority to help a host choose its default gateway. If a host receives RA messages from multiple routers, it will select the router with the highest RA priority as the default gateway. In the case of routers with the same priority, it will select the router whose RA message is received first as the default gateway.
RA Valid Lifetime: Specify the validity lifetime of the prefix. The addresses automatically generated with the prefix can be used normally during the valid lifetime, and they will become invalid and be deleted after the valid lifetime expires.
RA Preferred Lifetime: Specify the preferred lifetime for stateless auto-configuration of addresses with the prefix. After the preferred lifetime expires, the addresses automatically configured by hosts using this prefix will become deprecated. A host cannot use a deprecated address to establish a new connection, but it can continue using the address for existing connections. The RA Preferred Lifetime must be less than or equal to the RA Valid Lifetime.
IPv6 Interface Type: SLAAC+RDNSS
The gateway assigns the IPv6 address prefix to each client and the client automatically generates its own IPv6 address. Also, the gateway assigns other parameters including the DNS server address to each client using the RDNSS option in RA (Router Advertisement).
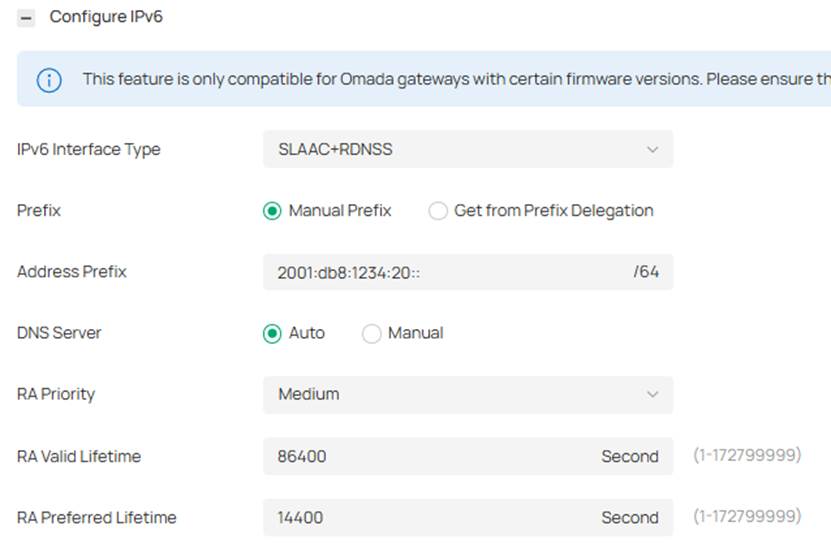
The explanation of configuration settings is the same as those mentioned above in IPv6 Interface Type: SLAAC+Stateless DHCP.
IPv6 Interface Type: Pass-Through
Allows upstream addressing and traffic to pass directly to devices on the LAN with minimal processing by the router.
IPv6 Passthrough WAN: Select the WAN port configured with the Pass-Through (Bridge) IPv6 connection type.
Note: To configure Pass-Through as the LAN IPv6 Interface Type, first configure a WAN port with IPv6 using the Pass-Through (Bridge) connection type.
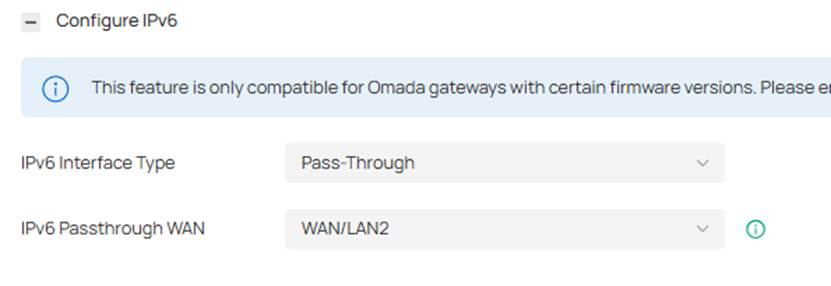
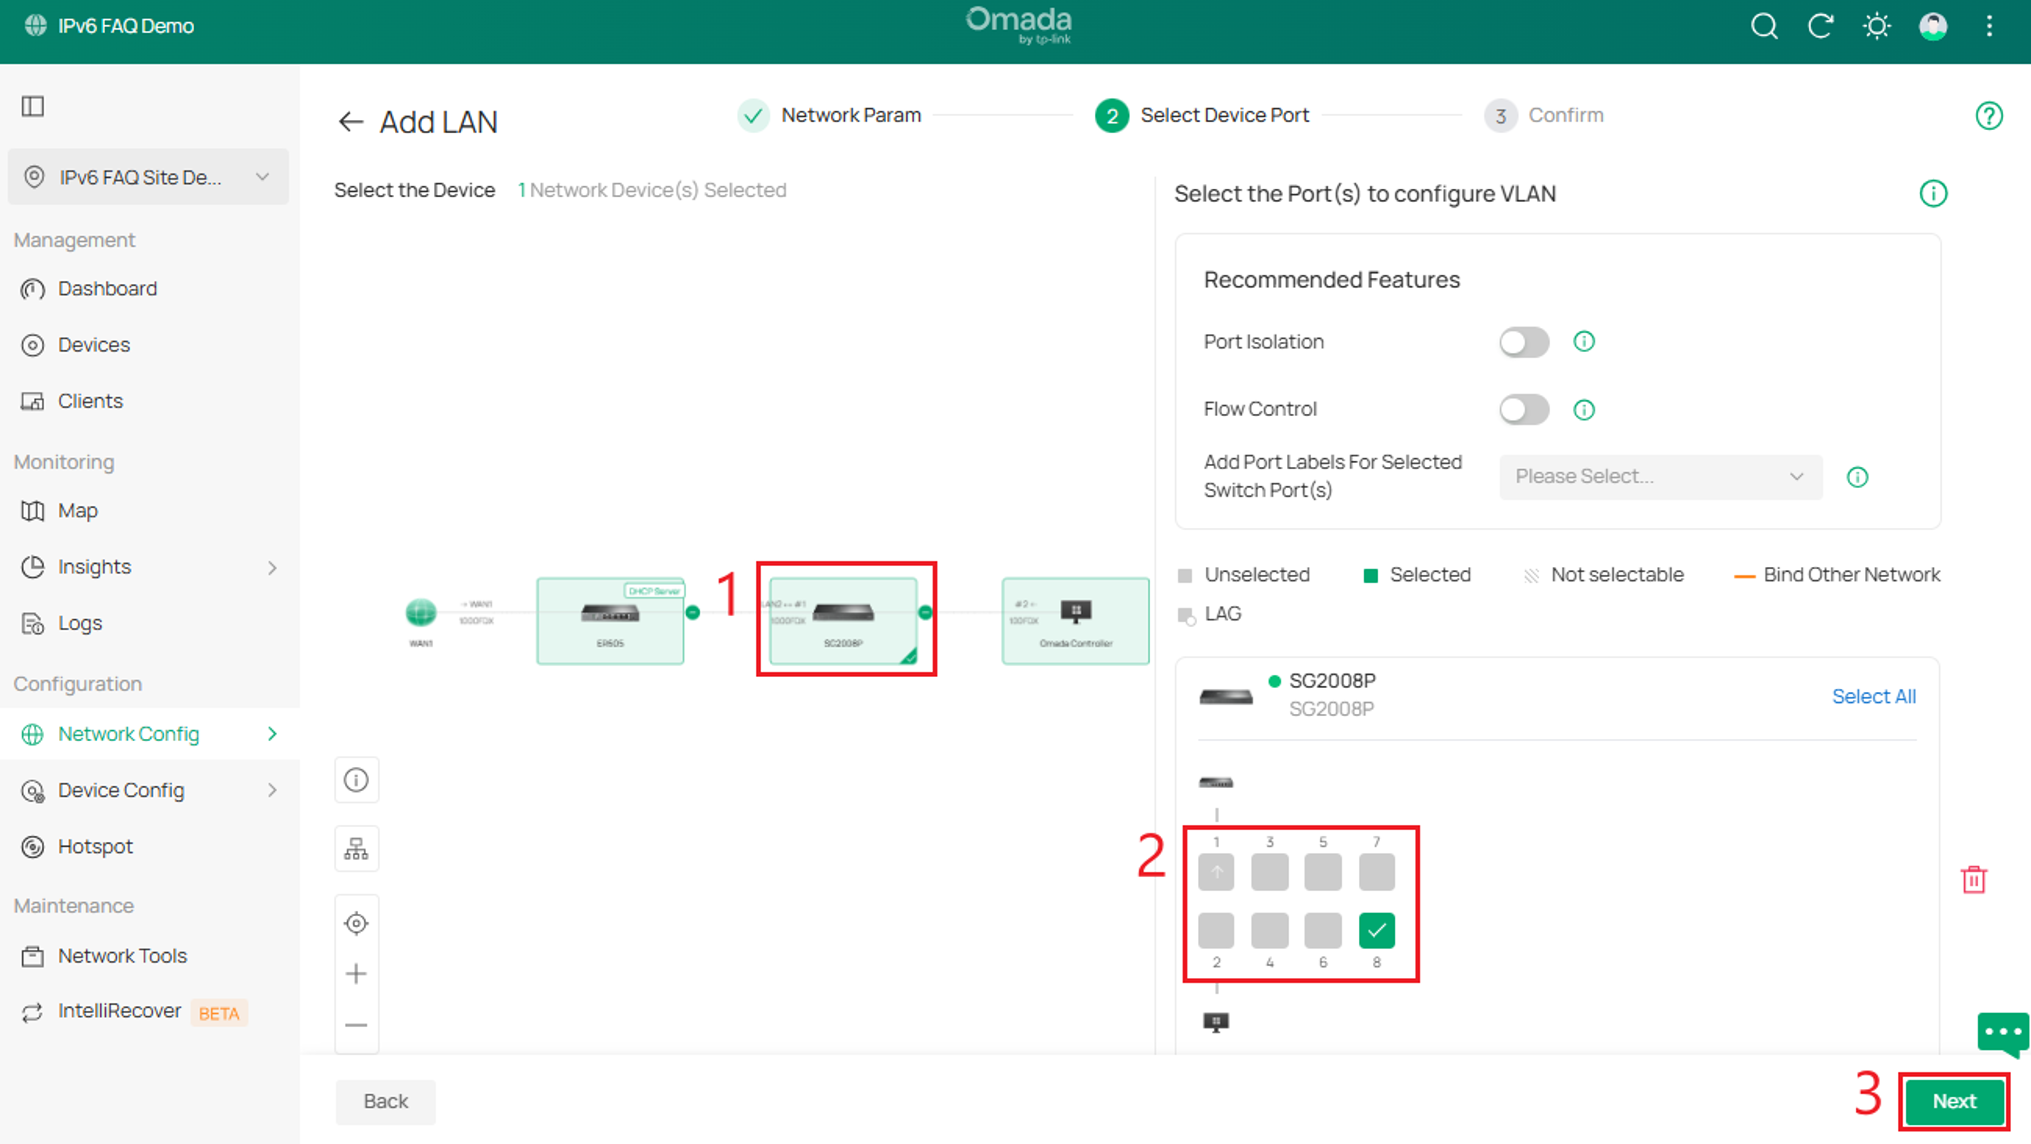
Step 4. Select the ports that will use the newly created or edited VLAN. Configure the devices and ports that will carry the VLAN. Select Device > Configure Ports > Next.
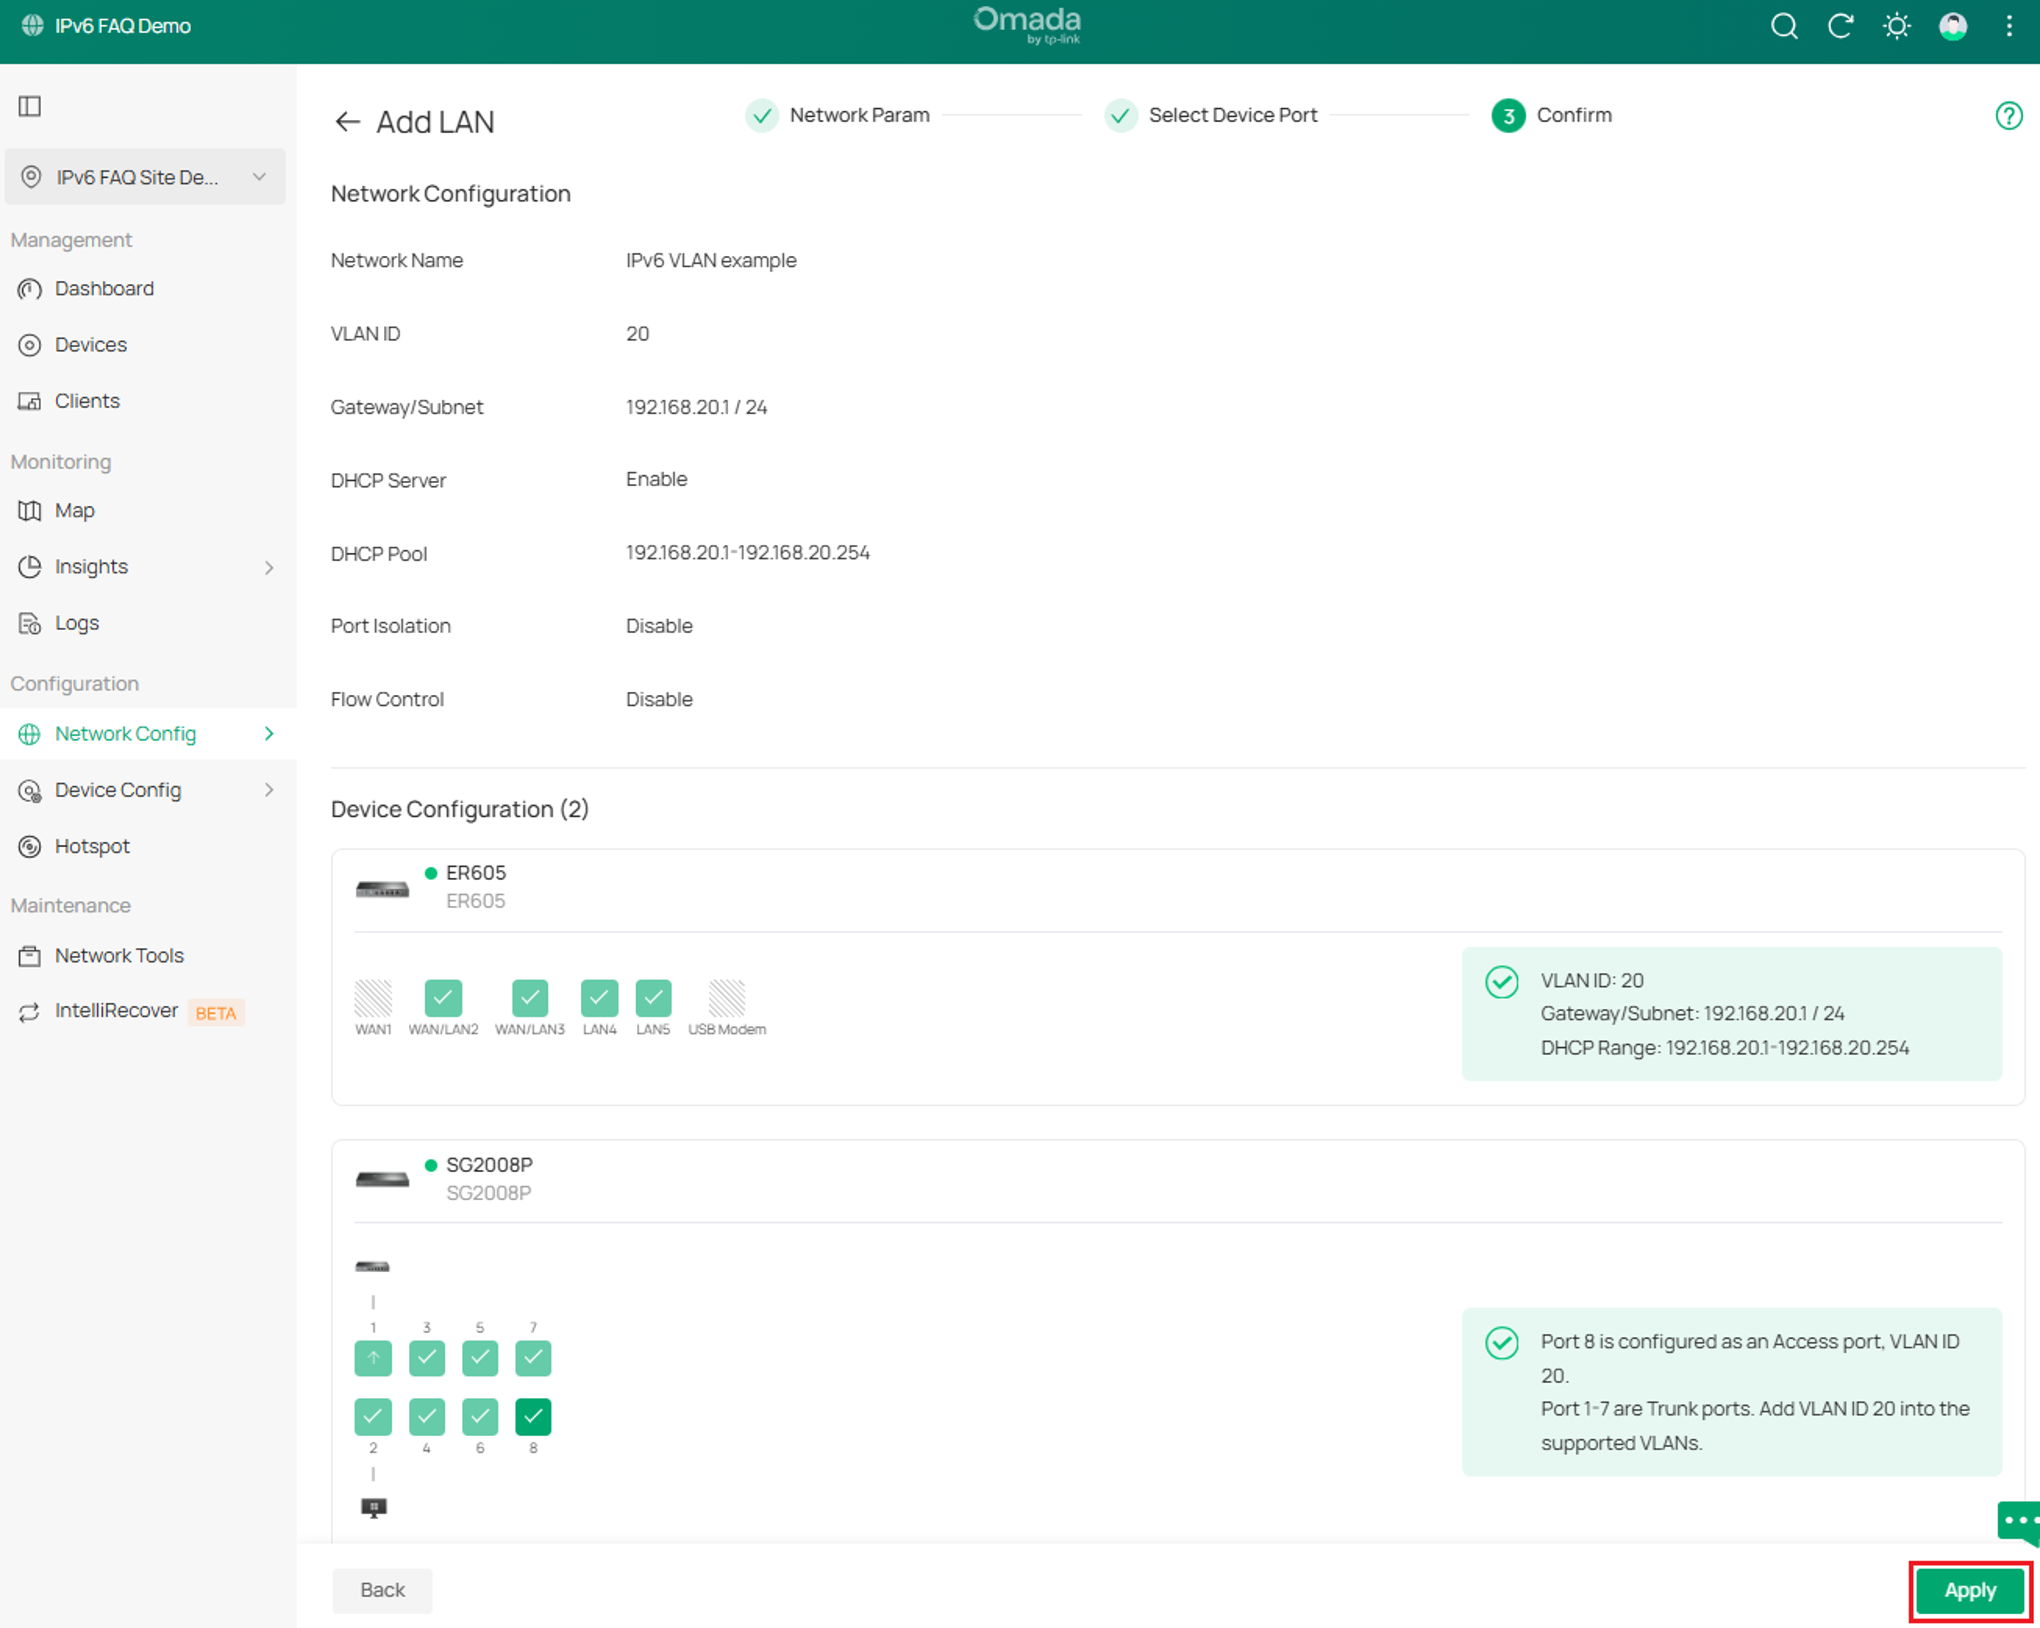
Step 5. This summary screen shows configuration before it is applied. Select Apply.
Verification
WAN Port Status
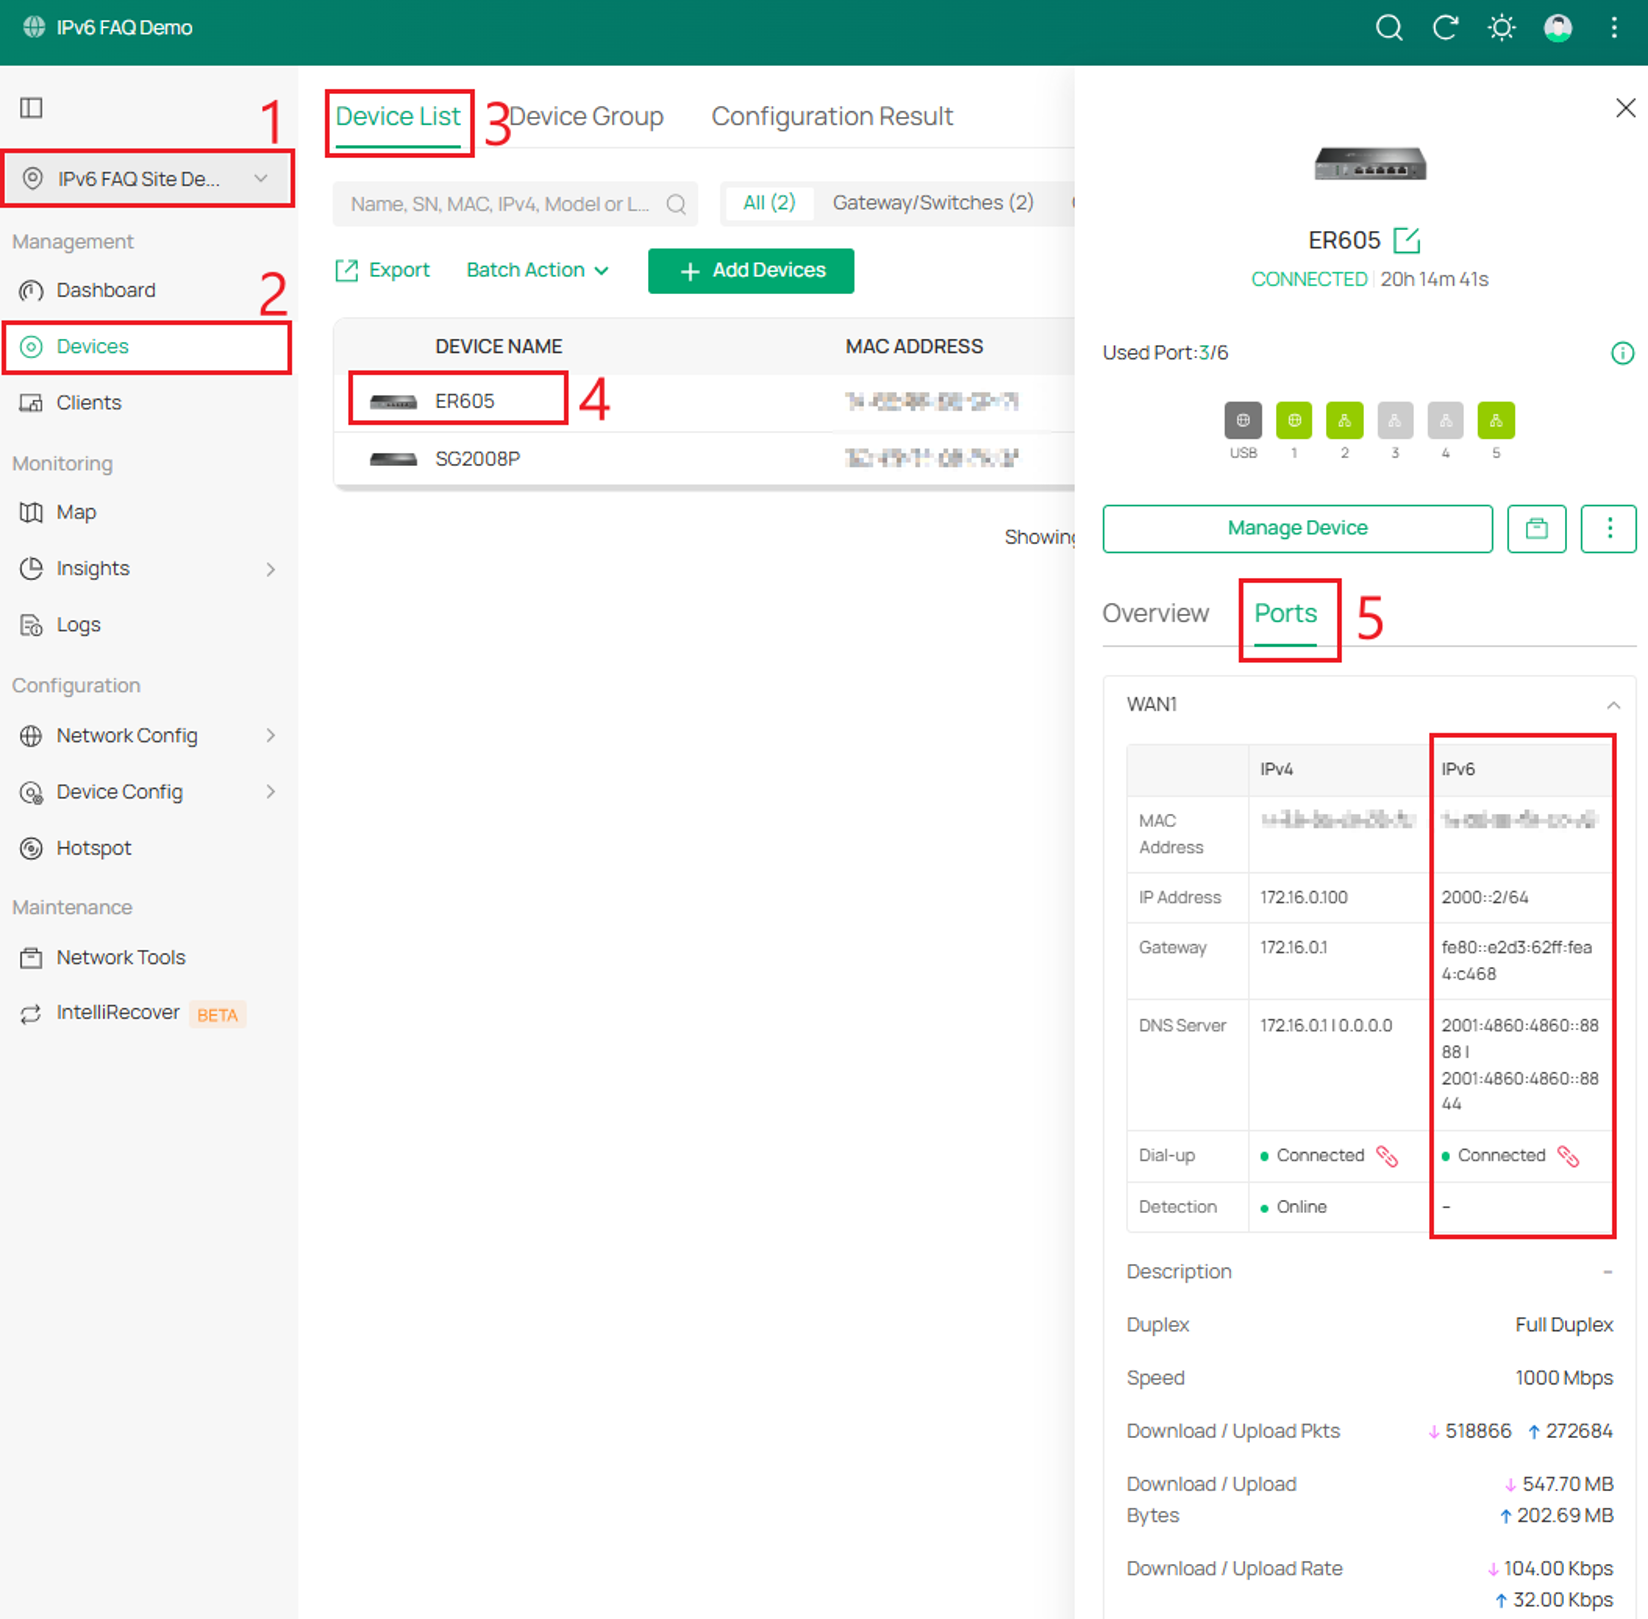
After configuring the WAN interface, go to Site View > Devices, select the gateway, and then select Ports. The assigned IPv6 address appears in the IPv6 column.
VLAN Status
In Command Prompt, run ipconfig /release6 followed by ipconfig /renew6. The PC connected to VLAN 20 has received IPv6 addresses from the configured 2001:db8:1234:20::/64 prefix.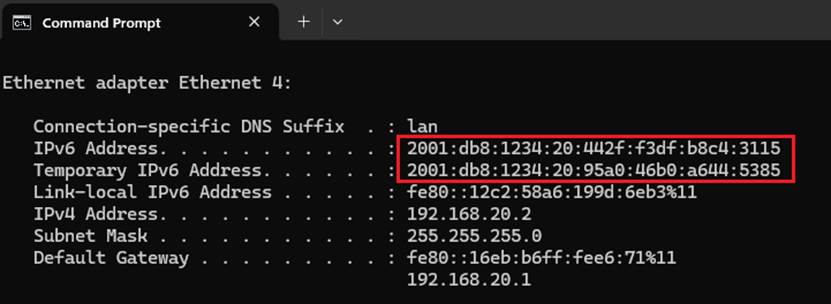
Conclusion
Omada Controller provides several options for deploying IPv6 across WAN and LAN networks, including SLAAC, DHCPv6, PPPoE, static addressing, and Pass-Through. Administrators should confirm the required connection type and prefix information with their ISP before configuration. After applying the settings, verify that the gateway and connected clients receive valid Global Unicast Addresses and can access IPv6 resources.
To learn more about each function and configuration, please visit Support Home to download or check the manual for your product.
QA
Q1: Why does the WAN port not receive an IPv6 address?
A1: Confirm that IPv6 is enabled and that the selected connection type matches the configuration used by your ISP. Contact your ISP to verify whether SLAAC, DHCPv6, PPPoE, static addressing, or another method is required.
Q2: Why does the gateway receive an IPv6 address while LAN clients do not?
A2: The WAN interface may have received an IPv6 address without receiving a delegated prefix for the LAN. Confirm that Prefix Delegation is enabled and that the ISP provides a suitable IPv6 prefix.
Q3: What Prefix Delegation Size should I configure?
A3: Use the prefix size supplied by your ISP. If the required value is unknown, contact the ISP before completing the configuration.
Q4: Can a Unique Local Address be configured through Omada Controller?
A4: No. Omada SDN currently supports Global Unicast Addresses for IPv6 configuration and does not support Unique Local Addresses.
Q5: Why is the Pass-Through option unavailable for the LAN?
A5: The selected WAN port must first be configured with IPv6 using the Pass-Through (Bridge) connection type.
Q6: Which LAN IPv6 Interface Type should I select?
A6: Select an option supported by the connected clients. DHCPv6 assigns addresses through the gateway, while SLAAC options allow clients to generate their own addresses from an advertised prefix.
Q7: Why can a client receive an IPv6 address but cannot access the internet?
A7: Verify the client’s default gateway, DNS server, prefix, and WAN IPv6 status. Also confirm that the assigned address is a valid Global Unicast Address and that the ISP provides working IPv6 connectivity.
Q8: How can I refresh the IPv6 address on a Windows client?
A8: Open Command Prompt and run ipconfig /release6 followed by ipconfig /renew6. Then run ipconfig to confirm that a new IPv6 address was assigned.
Q9: Why is the configured IPv6 address not shown on the gateway port?
A9: Confirm that the configuration was applied successfully, then check the gateway port status from Site View > Devices > Gateway > Ports. If no address appears, review the WAN settings and confirm the service details with the ISP.
