


Contents
Introduction
The Omada Controller API enables seamless integration between TP-Link Omada Controller and third-party applications, allowing developers to automate authentication, client access control, network monitoring, and management tasks.
This guide provides API specifications and code samples for integrating an External Portal Server with Omada Controller v6.2.10.
What's New in v6.2.10
Compared with Omada SDN Controller v5.x, the External Portal API introduces the following changes:
- Removal of legacy parameters.
- Addition of new optional parameters for enhanced flexibility and customization.
Note: Parameters shown in bold italics are automatically populated by the EAP or Gateway. Your External Portal Server must preserve and return these parameters when interacting with the Omada Controller. Parameter definitions are provided at their first occurrence in this guide.
For Omada Controller v5.0.15 to v6.2.0, please refer to FAQ3231
For Omada Controller v4.1.5 to v4.4.6, please refer to FAQ2907
For Omada Controller v2.6.0 to v3.2.17, please refer to FAQ2274
Requirements
- Omada Controller (Software or Hardware Controller, v6.2.10 or above)
Configuration
This section describes how to configure an External Portal Server and integrate it with Omada Controller v6.2.10. Before implementing the API, it is important to understand how authentication requests are exchanged between the client, Omada Controller, network devices (EAPs or Gateways), and the External Portal Server.
The following workflow illustrates the data flow during the External Portal authentication process.
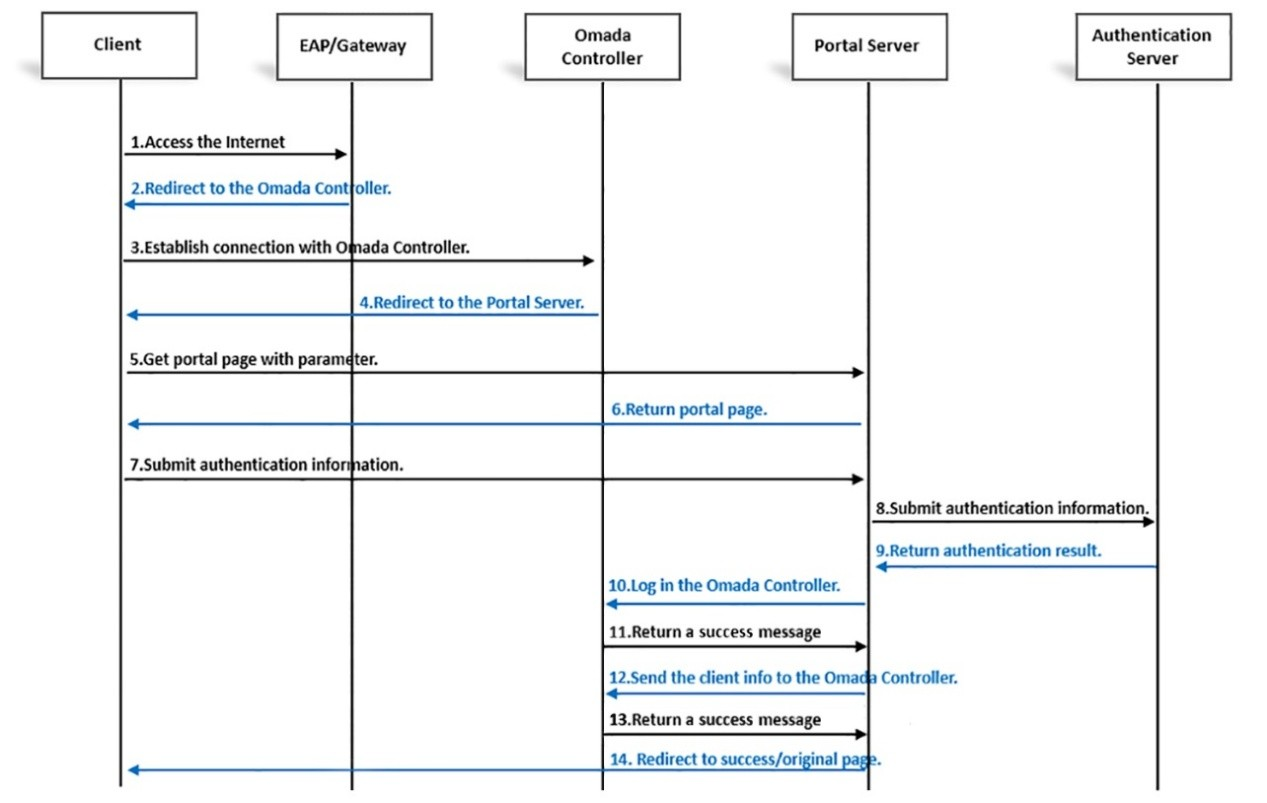
Steps 1 and 2. Client access and initial redirection
When a client connects to a wired or wireless network with Portal authentication enabled and attempts to access the Internet, the client's HTTP request is intercepted by the network device:
- For wireless clients, the request is intercepted by the EAP.
- For wired clients, the request is intercepted by the Gateway.
The EAP or Gateway then redirects the client to the Controller by appending the client's connection information as query parameters in the request URL.
Steps 3 and 4. Controller redirects client to the Portal
The client sends an HTTP GET request containing the connection information to the Controller.
The Controller responds with an HTTP 302 Redirect, directing the client to the configured External Portal Server. The redirect URL contains both the Portal address and the client connection information.
URL Format for EAP
http(s)://PORTAL?clientMac=CLIENT_MAC&clientIp=CLIENT_IP&apMac=AP_MAC&ssidName=SSID_NAME&t=TIME_SINCE_EPOCH&radioId=RADIO_ID&site=SITE_ID&redirectUrl=LANDING_PAGE.
URL Format for Gateway
http(s)://PORTAL?clientMac=CLIENT_MAC&gatewayMac=GATEWAY_MAC&vid=VLAN_ID&t=TIME_SINCE_EPOCH&site=SITE_ID&redirectUrl=LANDING_PAGE.
URL Parameter Reference
|
PORTAL |
The IP address or URL, and Port number (if necessary) of the External Portal Server. |
|
|
clientMac
|
CLIENT_MAC |
MAC address of the client. |
|
clientIp
|
CLIENT_IP |
IP address of the client |
|
apMac |
AP_MAC |
MAC address of the EAP to which the client is connected. |
|
gatewayMac
|
GATEWAY_MAC |
MAC address of the Gateway. |
|
vid |
VLAN_ID |
VLAN ID of the wired network to which the client is connected. |
|
ssidName |
SSID_NAME |
Name of the SSID to which the client is connected |
|
radioId |
RADIO_ID |
Radio ID of the band to which the client is connected, where 0 represents 2.4G and 1 represents 5G. |
|
site |
SITE_ID |
Site ID. |
|
redirectUrl |
LANDING_PAGE |
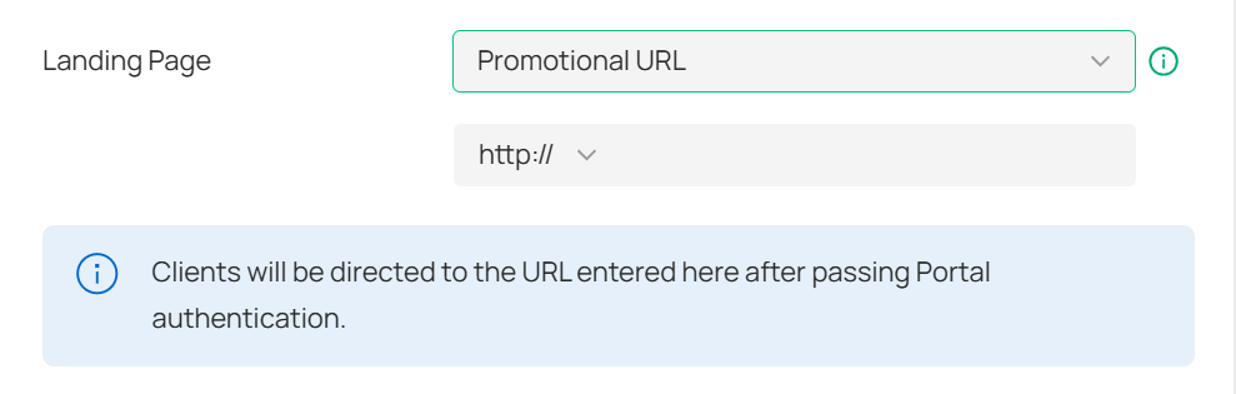
URL to visit after successful authentication, which can be set in the Landing Page. |
|
t |
TIME_SINCE_EPOCH |
Unit here is millisecond. The default value is current timestamp. |
The following example shows the Landing Page configuration page in Omada Controller v6.2.10.
Steps 5 and 6. Portal receives the client request
The client will send HTTP GET request to Portal with the URL above. Portal must be able to recognize and keep the connection information in the query string of the HTTP GET request and return the web page for authentication.
Steps 7, 8 and 9. Authenticate the client
The client submits its authentication credentials to the Portal.
The Portal forwards the credentials to the authentication server for verification. Once authentication is complete, the authentication server returns the authentication result to the Portal.
The authentication mechanism and the communication between the Portal and the authentication server are implementation-specific and are outside the scope of this document.
NOTE: The Portal and authentication server may be deployed on separate servers or on the same server. Regardless of the deployment model, the Portal must be able to obtain the client's authentication result.
Steps 10 and 11. Portal logs in to the Controller
If authentication succeeds, the Portal must first log in to the Controller before authorizing the client.
Send an HTTP POST request to:
For On Premise Controllers: https://CONTROLLER:PORT/CONTROLLER_ID/api/v2/hotspot/login
For Cloud-Based Controllers: https://CONTROLLER/CONTROLLER_ID/api/v2/hotspot/login
The request body must contain the hotspot operator credentials in JSON format:
{"name": "OPERATOR_USERNAME","password": "OPERATOR_PASSWORD"}.
Note: The credentials must belong to a Hotspot Operator account created in the Controller, not a Controller administrator account.
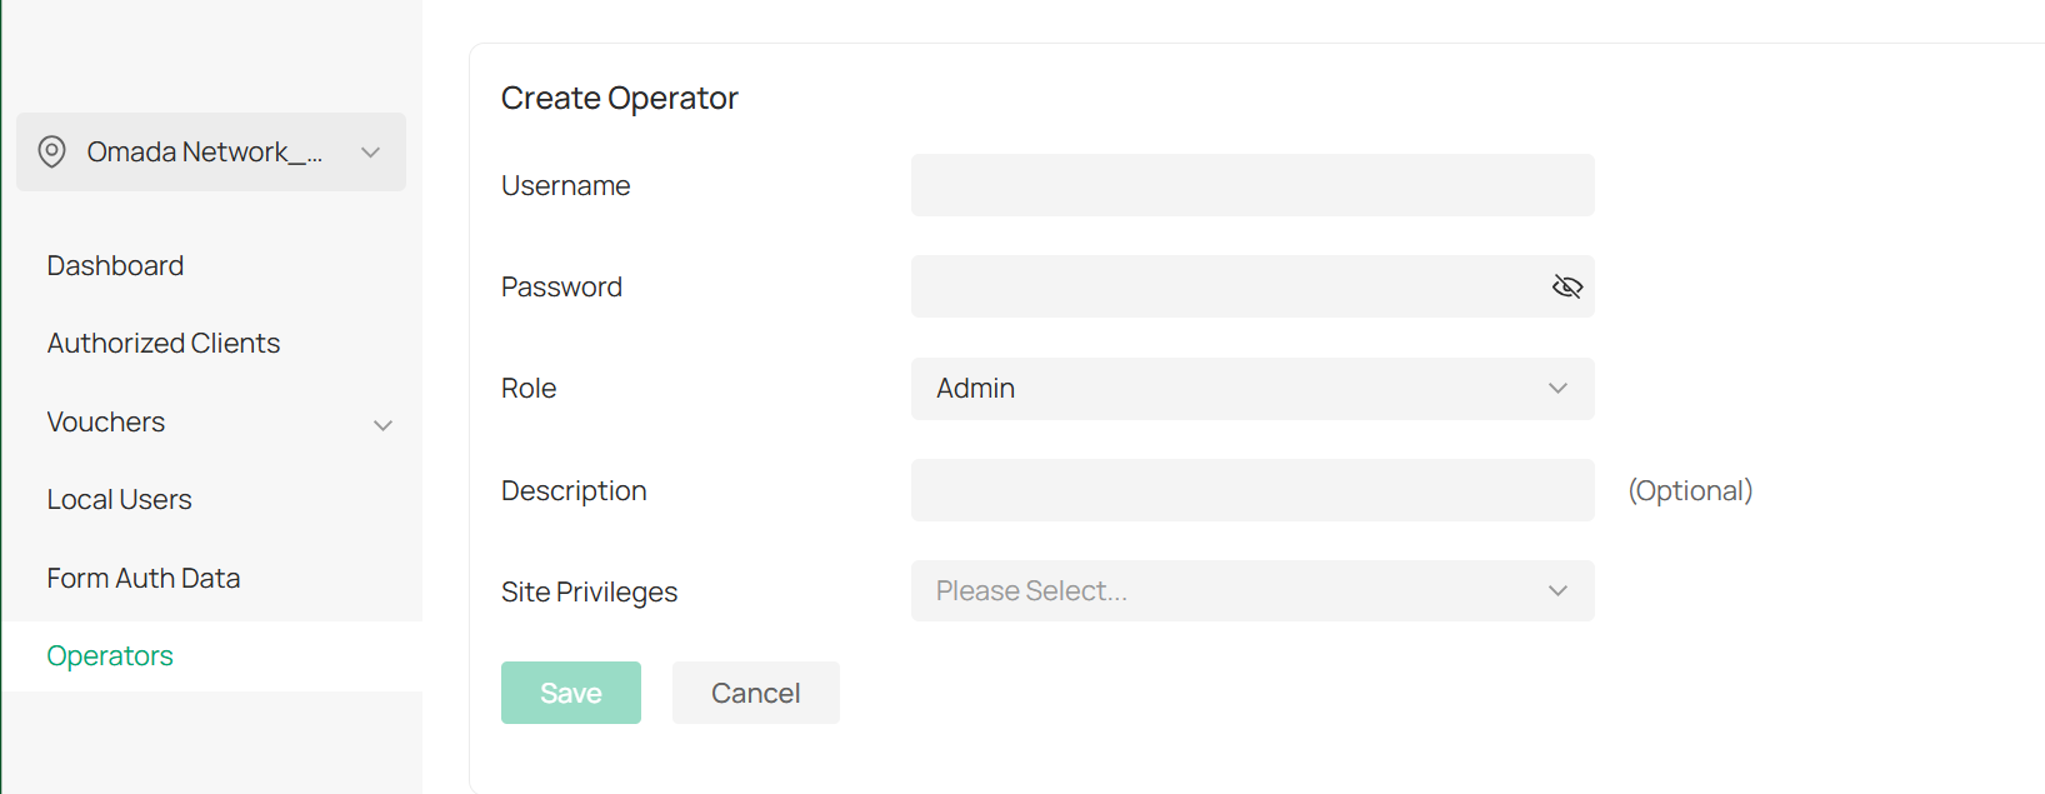
The parameters are described below.
|
CONTROLLER |
IP address or URL of Omada SDN Controller. |
|
PORT |
HTTPS Port for Controller Management of Omada SDN Controller (8043 for software, and 433 for OC by default, go to Settings --- Controller --- Access Config for modification). |
|
CONTROLLER_ID |
Identifier of the Omada SDN Controller. When you access the controller, the identifier will be automatically added to the URL, from which you will get the identifier. For example, if your controller URL is https://localhost:8043/abcdefghijklmnopqrstuvwxyzabcdef/, then the CONTROLLER_ID is abcdefghijklmnopqrstuvwxyzabcdef. |
|
OPERATOR_USERNAME |
Username of the hotspot operator. |
|
OPERATOR_PASSWORD |
Password of the hotspot operator. |
PHP Code Template:
public static function login()
{
$loginInfo = array(
"name" => OPERATOR_USER NAME,
"password" => OPERATOR_PASSWORD
);
$headers = array(
"Content-Type: application/json",
"Accept: application/json"
);
$ch = curl_init();
// post
curl_setopt($ch, CURLOPT_POST, TRUE);
// Set return to a value, not return to page
curl_setopt($ch, CURLOPT_RETURNTRANSFER, 1);
// Set up cookies. COOKIE_FILE_PATH defines where to save Cookie.
curl_setopt($ch, CURLOPT_COOKIEJAR, COOKIE_FILE_PATH);
curl_setopt($ch, CURLOPT_COOKIEFILE, COOKIE_FILE_PATH);
// Allow Self Signed Certs
curl_setopt($ch, CURLOPT_SSL_VERIFYPEER, FALSE);
curl_setopt($ch, CURLOPT_SSL_VERIFYHOST, FALSE);
// API Call
curl_setopt($ch, CURLOPT_URL, "https://" . CONTROLLER . ":" . PORT . "/" . CONTROLLER_ID . "/api/v2/hotspot/extPortal/auth");
curl_setopt($ch, CURLOPT_HTTPHEADER, $headers);
curl_setopt($ch, CURLOPT_POSTFIELDS, json_encode($loginInfo));
$res = curl_exec($ch);
$resObj = json_decode($res);
//Prevent CSRF. TOKEN_FILE_PATH defines where to save Token.
if ($resObj->errorCode == 0) {
// login successfully
self::setCSRFToken($resObj->result->token);
}
curl_close($ch);
}
private static function setCSRFToken($token)
{
$myfile = fopen(TOKEN_FILE_PATH, "w") or die("Unable to open file!");
fwrite($myfile, $token);
fclose($myfile);
return $token;
}
If the login authentication passes, the Controller will reply with the following JSON in the HTTP body. Note that the token inside result is the CSRF-Token, which should be added to the HTTP Header of the following steps.
{
"errorCode": 0,
"msg": "Hotspot log in successfully.",
"result": {
"token": "xxxxxxxxxxxxxxxxxxxxxxxxxxxxxxxx"
}
}
Steps 12 and 13. Authorize the client
After successful login, Portal can send the client authentication result to https://CONTROLLER:PORT/CONTROLLER_ID/api/v2/hotspot/extPortal/auth with HTTP POST method.
The client information should be encapsulated in JSON format in the HTTP message body, and must contain the following parameters.
For EAP: {"clientMac":"CLIENT_MAC","clientIp":"CLIENT_IP","apMac":"AP_MAC","ssidName":"SSID_NAME","radioId":"RADIO_ID","time":"EXPIRE_TIME","authType":"4","originUrl":"",
"totalTrafficLimitBytes":"TOTAL_TRAFFIC_LIMIT_BYTES","downloadRateLimitKbps":"DOWNLOAD_RATE_LIMIT_KBPS","uploadRateLimitKbps":"UPLOAD_RATE_LIMIT_KBPS"}
For Gateway: {"clientMac":"CLIENT_MAC","clientIp":"CLIENT_IP","gatewayMac":"GATEWAY_MAC","vid":"VLAN_ID","time":"EXPIRE_TIME","authType":"4",
"totalTrafficLimitBytes":"TOTAL_TRAFFIC_LIMIT_BYTES","downloadRateLimitKbps":"DOWNLOAD_RATE_LIMIT_KBPS","uploadRateLimitKbps":"UPLOAD_RATE_LIMIT_KBPS"}
|
time |
EXPIRE_TIME |
Authentication Expiration time. Unit here is millisecond. |
|
totalTrafficLimitBytes |
TOTAL_TRAFFIC_LIMIT_BYTES |
Total traffic (Upload + Download) limit. Unit here is Bytes. |
|
downloadRateLimitKbps |
DOWNLOAD_RATE_LIMIT_KBPS |
Download rate limit. Unit here is Kbps. |
|
uploadRateLimitKbps |
UPLOAD_RATE_LIMIT_KBPS |
Upload rate limit. Unit here is Kbps. |
PHP Code Template for EAP:
public static function authorize($clientMac, $apMac, $ssidName, $radioId, $milliseconds)
{
// Send user to authorize and the time allowed
$authInfo = array(
'clientMac' => $clientMac,
'apMac' => $apMac,
'ssidName' => $ssidName,
'radioId' => $radioId,
'time' => $milliseconds,
'authType' => 4
);
$csrfToken = self::getCSRFToken();
$headers = array(
'Content-Type: application/json',
'Accept: application/json',
'Csrf-Token: ' . $csrfToken
);
$ch = curl_init();
// post
curl_setopt($ch, CURLOPT_POST, TRUE);
// Set return to a value, not return to page
curl_setopt($ch, CURLOPT_RETURNTRANSFER, 1);
// Set up cookies.
curl_setopt($ch, CURLOPT_COOKIEJAR, COOKIE_FILE_PATH);
curl_setopt($ch, CURLOPT_COOKIEFILE, COOKIE_FILE_PATH);
// Allow Self Signed Certs
curl_setopt($ch, CURLOPT_SSL_VERIFYPEER, FALSE);
curl_setopt($ch, CURLOPT_SSL_VERIFYHOST, FALSE);
// API Call
curl_setopt($ch, CURLOPT_URL, "https://" . CONTROLLER . ":" . PORT . "/" . CONTROLLER_ID . "/api/v2/hotspot/login");
curl_setopt($ch, CURLOPT_POSTFIELDS, json_encode($authInfo));
curl_setopt($ch, CURLOPT_HTTPHEADER, $headers);
$res = curl_exec($ch);
echo $res;
$resObj = json_decode($res);
if ($resObj->errorCode == 0) {
// authorized successfully
}
curl_close($ch);
}
public static function getCSRFToken()
{
$myfile = fopen(TOKEN_FILE_PATH, "r") or die("Unable to open file!");
$token = fgets($myfile);
fclose($myfile);
return $token;
}
If the authentication request is accepted, the Controller will reply with the following JSON:
{
"errorCode": 0
}
Portal Requirements
The Portal implementation must satisfy the following requirements:
- Support self-signed HTTPS certificates, or install a trusted HTTPS certificate on the Controller.
- Store the session cookie returned by the Controller and include it in subsequent authentication requests.
- For Controller versions earlier than v5.11, the cookie name is TPEAP_SESSIONID.
- For v5.11 and later, the cookie name is TPOMADA_SESSIONID.
Conclusion
This guide provides API and Code Sample for External Portal Server (Omada Controller 6.2.10). If you need more information about Omada Controller OpenAPI, please contact TP-Link Technical Support for further assistance.
To learn more about each function and configuration, please visit Support Home to download or check the manual for your product.
